- Available 24/7 for inquiries from customers all over the world and respond with accurate, standardized information tailored to those customer queries.
- Handle high volumes of customer inquiries, which lessens wait times for customers who choose to call and reduces the number of live customer interactions. These factors allow your personnel to resolve more complex customer issues, which in turn, helps shorten the timeframe to complete purchase transactions or obtain the information your organization provides.
Agent configuration overview
Agent Studio is hosted on Lucidworks Platform and is easily configured and implemented. You create an agent by choosing from a library of prebuilt agents, and then select from a list of generative AI models, industry options, and datasources, all hosted in the cloud. Then, you complete the implementation by placing a small script and HTML markup on your site, based on when you want the virtual agent to load.Agent Studio does not support custom large language model (LLM) training.
Library of available agents
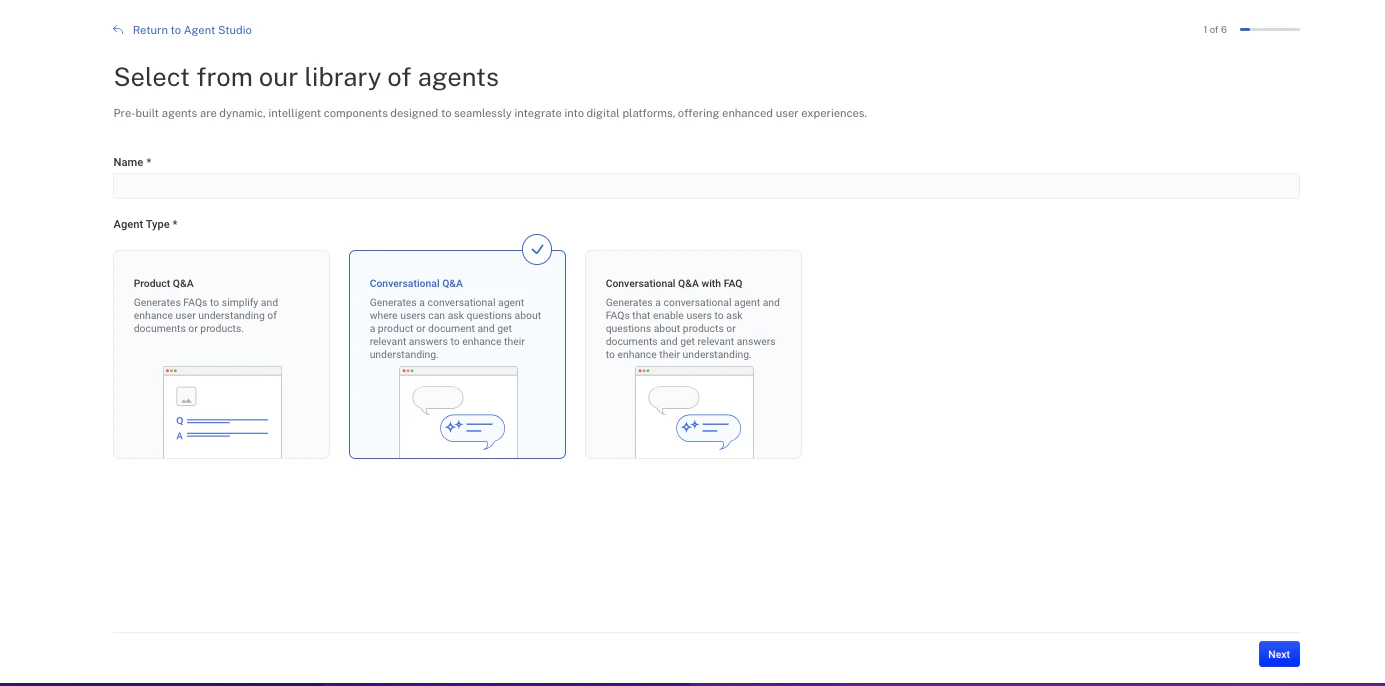
The following is a list of available agent types you can select to create custom virtual agents.- Product Q&A: Generates frequently asked questions to simplify and enhance user understanding of documents or products.
- Conversational Q&A: Assesses natural language user queries for a product and generates accurate, real-time answers grounded in that product’s own documentation, such as datasheets, manuals, specifications, and other supporting PDF technical content.
- Conversational Q&A FAQ: Provides the same functions as the conversational Q&A agent, but also generates a series of frequently asked questions.
Agent use cases and configuration
This section provides detailed information about each agent type. For a video walkthrough of the setup steps for a new agent, click Get Started below.Product Q&A agent
Based on your industry, the Agent Studio Product Q&A agent generates an interactive question and answer solution that provides information from your website about products you offer or information your organization provides.Use case examples
Use case examples
The following examples describe how you can use an Agent Studio Product Q&A agent.
- B2B
- B2C
If you are a B2B organization that provides industrial technology components and a computer server manufacturer queries about fiber optic connectors, the agent displays questions that a customer may have about a specific fiber optic connector on its product detail page, based on the information ingested about that product in the datasource from documents such as instruction manuals and specification files. These questions could relate to bandwidth capabilities, equipment compatibility, and warranty terms. The customer can then select the question to view the answer without reading multiple documents to find the answer.
Set up the agent datasource
Set up the agent datasource
To implement an agent, you must first set up a datasource for the agent.Agent Studio ingests client datasource information stored in a datasource outside of Lucidworks Platform and uses that data in a specified model. You must enter the datasource details where your data is stored when you create an agent.Agent Studio requires Google Cloud Storage (GCS) buckets as a datasource.
If your organization has not created a GCS bucket to use as a datasource, you need to create one.
For detailed information, see Create a GCS bucket.Your data must be in JSONL and PDF format.In a JSONL file, each line is a complete JSON expression representing a single document, as in the example below:All fields are required. Each
product_id must be unique. JSONL lines are not separated by commas. Enter multiple PDF files as an array of strings. If a document does not have an associated PDF file, a blank PDF file is accepted.Create the agent
Create the agent
To create an Agent Studio agent:
-
From the Agent Studio screen, select Agents and click + Create New.

-
Enter a descriptive Name for the agent, select an agent type, and then click Next.

- From the Industry Domain list, select the industry that best matches your business.
- In the Tasks field, select the AI model to execute for that agent. The recommended model is selected by default because it is deemed to be the most relevant based on the industry selection, but you can select a different model. Click Next.
- On the Select a data connector screen, click the connector and then click Next. For example, select GCS Bucket.
-
On the Configure GCS bucket to import data screen, fill out all required fields.

- In the Name field, enter the name of your datasource as you want it to display in Lucidworks Platform.
- In the Processing Region field, select the region for Lucidworks to process your data. This is not necessarily the region you created your GCS bucket in. The default value is
us-southcarolina. - In the Bucket Name field, enter the name of your GCS bucket as it displays in GCS.
- In the Service Account JSON Key field, enter your Google Cloud Platform (GCP) key in JSON format to allow access to your GCS bucket.
- Click Verify Connection to verify the connection to the GCS bucket.
You can add multiple GCS buckets to the agent to expand the information the model uses for responses. To add another GCS bucket, click Add New on the Configure GCS bucket screen. If multiple GCS buckets exist and you want to remove a specific GCS bucket from your agent, select that bucket and click Remove.
-
When you’ve successfully created the agent, select Get Agent Code to implement the agent. Click Exit and verify the agent displays on the Agents screen of Agent Studio.

You can also click Preview Agent to test the agent after it is configured.
Conversational Q&A agent
The Agent Studio Conversational Q&A agent is an AI-powered chat agent that lives on your organization’s product detail pages. Customers can ask natural-language questions about a product, and the agent responds with accurate, real-time answers grounded in that product’s own documentation, such as datasheets, manuals, specifications, and other supporting PDF technical content.Use case examples
Use case examples
The following examples describe how you can use an Agent Studio Conversational Q&A agent.
- B2B
- B2C
- Knowledge management
If you are a B2B organization that provides computer components for enterprise organizations, your customers may ask questions about the specifications and compatibility documents for your products prior to purchase. The Conversational Q&A agent can interpret user questions, analyze the documentation, and quickly provide accurate, factually-based answers. Any follow-up questions are answered based on the information on your site.This saves your customers time-consuming and difficult research to obtain the information they need to help make a purchasing decision. This agent enhances customer satisfaction, increases the potential for conversions, and improves the long-term relationship between your customers and your organization.
Set up the agent datasource
Set up the agent datasource
To implement an agent, you must first set up a datasource for the agent.Agent Studio ingests client datasource information stored in a datasource outside of Lucidworks Platform and uses that data in a specified model. You must enter the datasource details where your data is stored when you create an agent.Agent Studio requires Google Cloud Storage (GCS) buckets as a datasource.
If your organization has not created a GCS bucket to use as a datasource, you need to create one.
For detailed information, see Create a GCS bucket.Your data must be in JSONL and PDF format.In a JSONL file, each line is a complete JSON expression representing a single document, as in the example below:All fields are required. Each
product_id must be unique. JSONL lines are not separated by commas. Enter multiple PDF files as an array of strings. If a document does not have an associated PDF file, a blank PDF file is accepted.Create the agent
Create the agent
To create an Agent Studio agent:
-
From the Agent Studio screen, select Agents and click + Create New.
-
Enter a descriptive Name for the agent, select an agent type, and then click Next.

- From the Industry Domain list, select the industry that best matches your business.
- In the Tasks field, select the AI model to execute for that agent. The recommended model is selected by default because it is deemed to be the most relevant based on the industry selection, but you can select a different model. Click Next.
- On the Select a data connector screen, click the connector and then click Next. For example, select GCS Bucket.
-
On the Configure GCS bucket to import data screen, fill out all required fields.
- In the Name field, enter the name of your datasource as you want it to display in Lucidworks Platform.
- In the Processing Region field, select the region for Lucidworks to process your data. This is not necessarily the region you created your GCS bucket in. The default value is
us-southcarolina. - In the Bucket Name field, enter the name of your GCS bucket as it displays in GCS.
- In the Service Account JSON Key field, enter your Google Cloud Platform (GCP) key in JSON format to allow access to your GCS bucket.
- Click Verify Connection to verify the connection to the GCS bucket.
You can add multiple GCS buckets to the agent to expand the information the model uses for responses. To add another GCS bucket, click Add New on the Configure GCS bucket screen. If multiple GCS buckets exist and you want to remove a specific GCS bucket from your agent, select that bucket and click Remove.
-
When you’ve successfully created the agent, select Get Agent Code to implement the agent. Click Exit and verify the agent displays on the Agents screen of Agent Studio.
You can also click Preview Agent to test the agent after it is configured.
Conversational Q&A FAQ agent
The Agent Studio Conversational Q&A FAQ agent provides the following information:- Answers to initial and follow-up user queries. The agent assesses user queries and then analyzes product information, specifications, and other documents on your site to generate standardized, accurate, content-based answers. If the user enters additional questions, the agent continues the conversation and responds based on your site’s information.
- Frequently asked questions. The agent generates a series of frequently asked questions that the current user is most likely to ask. This gives the user more information about their query, which can help minimize customer support calls and product returns.
Use case examples
Use case examples
The following examples describe how you can use an Agent Studio Conversational Q&A FAQ agent.
- B2B
- B2C
- Knowledge management
If you are a B2B organization that provides computer components for enterprise organizations, your customers may ask questions about the specifications and compatibility documents for your products prior to purchase. The Conversational Q&A FAQ agent can interpret user questions, analyze the documentation, and quickly provide accurate, factually-based answers. The agent responds to any follow-up queries to continue the conversation, providing standardized answers based on your site’s documentation.In addition, the agent predicts and surfaces several relevant questions based on the product content itself, which may provide information the current user might not have thought to ask. This gives the user more information to understand the product, and helps minimize customer support calls and product returns.This agent saves your customers time-consuming and difficult research to obtain the information they need to help make a purchasing decision. This agent enhances customer satisfaction, increases the potential for conversions, and improves the long-term relationship between your customers and your organization.
Set up the agent datasource
Set up the agent datasource
To implement an agent, you must first set up a datasource for the agent.Agent Studio ingests client datasource information stored in a datasource outside of Lucidworks Platform and uses that data in a specified model. You must enter the datasource details where your data is stored when you create an agent.Agent Studio requires Google Cloud Storage (GCS) buckets as a datasource.
If your organization has not created a GCS bucket to use as a datasource, you need to create one.
For detailed information, see Create a GCS bucket.Your data must be in JSONL and PDF format.In a JSONL file, each line is a complete JSON expression representing a single document, as in the example below:All fields are required. Each
product_id must be unique. JSONL lines are not separated by commas. Enter multiple PDF files as an array of strings. If a document does not have an associated PDF file, a blank PDF file is accepted.Create the agent
Create the agent
To create an Agent Studio agent:
-
From the Agent Studio screen, select Agents and click + Create New.

-
Enter a descriptive Name for the agent, select an agent type, and then click Next.

-
From the Industry Domain list, select the industry that best matches your business.

-
In the Tasks field, select the AI model to execute for the Q&A Generation (FAQ) feature of the agent. The recommended model is selected by default because it is deemed to be the most relevant based on the industry selection, but you can select a different model.

- In the Tasks field, select the AI model to execute for the Conversation Generation (conversational Q&A) feature of the agent. The recommended model is selected by default because it is deemed to be the most relevant based on the industry selection, but you can select a different model. Click Next.
- On the Select a data connector screen, click the connector and then click Next. For example, select GCS Bucket.
-
On the Configure GCS bucket to import data screen, fill out all required fields.
- In the Name field, enter the name of your datasource as you want it to display in Lucidworks Platform.
- In the Processing Region field, select the region for Lucidworks to process your data. This is not necessarily the region you created your GCS bucket in. The default value is
us-southcarolina. - In the Bucket Name field, enter the name of your GCS bucket as it displays in GCS.
- In the Service Account JSON Key field, enter your Google Cloud Platform (GCP) key in JSON format to allow access to your GCS bucket.
- Click Verify Connection to verify the connection to the GCS bucket.
You can add multiple GCS buckets to the agent to expand the information the model uses for responses. To add another GCS bucket, click Add New on the Configure GCS bucket screen. If multiple GCS buckets exist and you want to remove a specific GCS bucket from your agent, select that bucket and click Remove.
-
When you’ve successfully created the agent, select Get Agent Code to implement the agent. Click Exit and verify the agent displays on the Agents screen of Agent Studio.
You can also click Preview Agent to test the agent after it is configured.
Agent Studio agent implementation
The script, component markup, and CSS code for customization may be different based on the agent type you create. Please copy the information in the Agent Details section for each specific agent you create.
- Where you place the script and HTML snippet that enables the option to display the virtual agent
- How the virtual agent obtains the product ID so it provides accurate information
Options to obtain the script
Options to obtain the script
To implement the agent on your site, obtain the script and HTML snippet from Lucidworks Platform.To add the script to your website, complete the following steps:You may also place the script in the No matter where you place the script, the
-
Navigate to Agent Studio, click Agents, and then click the agent you want to implement.

-
In the Agent Details section, scroll to the Agent Code section, and in the Add the Script Tag area, click Copy.

-
Paste the script into the
<head>or<body>section of your website’s HTML code.
<head> or <body> of your HTML. The location of the script determines when it will load. For best performance, place the script in the <head> of your website’s HTML. If you place the script in the <head> of your website’s HTML, the script loads before your entire HTML page body loads, along with any other scripts your <head> may contain. The agent still only displays on the individual pages where you have also placed the HTML markup snippet in the <body>.The following example shows how to include the script in the <head>. It includes one option for the HTML snippet to obtain the product ID, which is described in options to obtain the product ID:<body> of your website’s HTML. If you place the script in the <body> of specific pages, the script loads only on the pages that contain the script, but the script loads after all the other scripts in your <head>. Even in this case, the agent only displays if you have also placed the HTML markup snippet on that page’s <body>. However, the order that you place the script and HTML markup snippet relative to other items on your page can affect the order in which other page elements load. For this reason, this placement is not the recommended one.The following example shows how to include the script in the <body>. It includes one option for the HTML snippet to obtain the product ID, which is described in options to obtain the product ID:<lw-template> HTML snippet must be present in the <body> of a page in order for the agent to display.To use the Signals beacon on the same page as your agent, you need additional script configuration.
See Configure the beacon with Agent Studio or UI Studio.
Options to obtain the product ID
Options to obtain the product ID
The Product Q&A, Conversational Q&A, and Conversational Q&A FAQ agents let your customers ask questions about a specific product. The agents know the exact product by obtaining the product’s unique ID. The product ID is included in the HTML snippet that you add to the
<body> of your webpage. There are three ways the agents obtain the product ID.Implement agent using Automatic Extraction through a URL query parameter
Implement agent using Automatic Extraction through a URL query parameter
This method is suitable when the product ID is consistently found in the page URL as a query parameter, or when you want to avoid manually injecting it into an HTML snippet.Use this method in combination with the option you chose to obtain the script.After you place the script in either the
<head> or <body> section:- Scroll to the Add Component Markup section and the in Automatic Extraction area, click Copy to copy the HTML snippet.
- Paste the
<lw-template>HTML snippet in the<body>of every page where you want the virtual agent to display. - In the Specify the Product ID section, enter the URL Query Parameters value for the
product-id. For example, if your URL ishttps://www.example.com/sale?q=solvents&product=1234and your product ID is 1234, enterproduct. - Verify the agent displays on the appropriate pages of your website.
- Test the agent again by entering various queries to determine if the agent returns appropriate responses.
Implement agent using Automatic Extraction through a CSS selector
Implement agent using Automatic Extraction through a CSS selector
You would use this method if, for example, the product ID is not in the URL, or at least not in the query parameter. Or if you do not want to inject the product ID into an HTML snippet. You might also use this method if the product ID is already built into the page through CSS selectors and you know how to isolate it.Use this method in combination with the option you chose to obtain the script.After you place the script in either the
You must be able to extract the exact product ID through CSS selectors. For example, if the product ID is 1234, then you must be able to extract
1234 from your CSS selectors without any additional text, such as product-id: 1234.<head> or <body> section:- Scroll to the Add Component Markup section and the in Automatic Extraction area, click Copy to copy the HTML snippet.
-
Paste the
<lw-template>HTML snippet in the<body>of every page where you want the virtual agent to display. -
In the Specify the Product ID section, enter the CSS Selector elements of the CSS rule that contains the
product_id. The following example uses.product .product-name @data-valuethat extracts a product ID of 1234. - Verify the agent displays on the appropriate pages of your website.
- Test the agent again by entering various queries to determine if the agent returns appropriate responses.
Implement agent using Markup Attribute
Implement agent using Markup Attribute
This option is primarily used if the product ID exists in the product detail page but is not made available in either the HTML or as a query parameter. Even when the agent cannot easily retrieve the product ID, it can be injected dynamically via markup.Use this method in combination with the option you chose to obtain the script.After you place the script in either the
<head> or <body> section:- Scroll to the Add Component Markup section and the Markup Attribute area, click Copy to copy the HTML snippet.
-
Paste the
<lw-template>HTML snippet in the<body>of every page where you want the virtual agent to display. The example code sample useshttps://www.example.com/sale/1234andproduct-idin the snippet. If yourproduct-idattribute name is different than what is copied in the snippet, manually change the name of your attribute. - Verify the agent displays on the appropriate pages of your website.
- Test the agent again by entering various queries to determine if the agent returns appropriate responses.
CSS for layout customization
CSS for layout customization
The agent details screen also contains a code block for CSS customization. You can use this code block to customize the appearance of the agent so it matches your website’s existing layout.The following code sample displays some custom styling options for the agent. Based on the agent type, the styling options may vary.
All agent customizations must be contained within the
.lw-template properties.Additional agent management tasks
Preview and test an agent
Preview and test an agent
This option lets you preview and test an agent to determine if its responses accurately reflect the information from your website and datasource before you implement it.Navigate to Agent Studio, click the Agents tab, and then select the agent you want to preview or test.
- Agent Information such as name, type, and model for the agent.
- Agent Preview to test the agent to determine if the responses accurately reflect the information on your website.
- Agent Code to embed the agent into your web page.
Edit an agent
Edit an agent
To make changes to the agent:
- Navigate to Agent Studio, click Agents, hold the pointer over the agent you want to change, and click the pencil icon.
- Enter the changes to each of the screens, clicking Next to advance to the next screen, and then click Exit at the final screen to save the changes.
- Verify the changes by testing the agent using the steps in the Agent Preview section. If necessary, you can refine the agent until you determine that the returned responses are accurate and optimized.
Delete an agent
Delete an agent
If you no longer want to use an agent, you can delete it. To delete an agent:
- Navigate to Agent Studio, click Agents, hold the pointer over the agent you want to change, and then click the trash can icon.
- Confirm the deletion and then review the Agents screen and verify that the agent no longer displays.