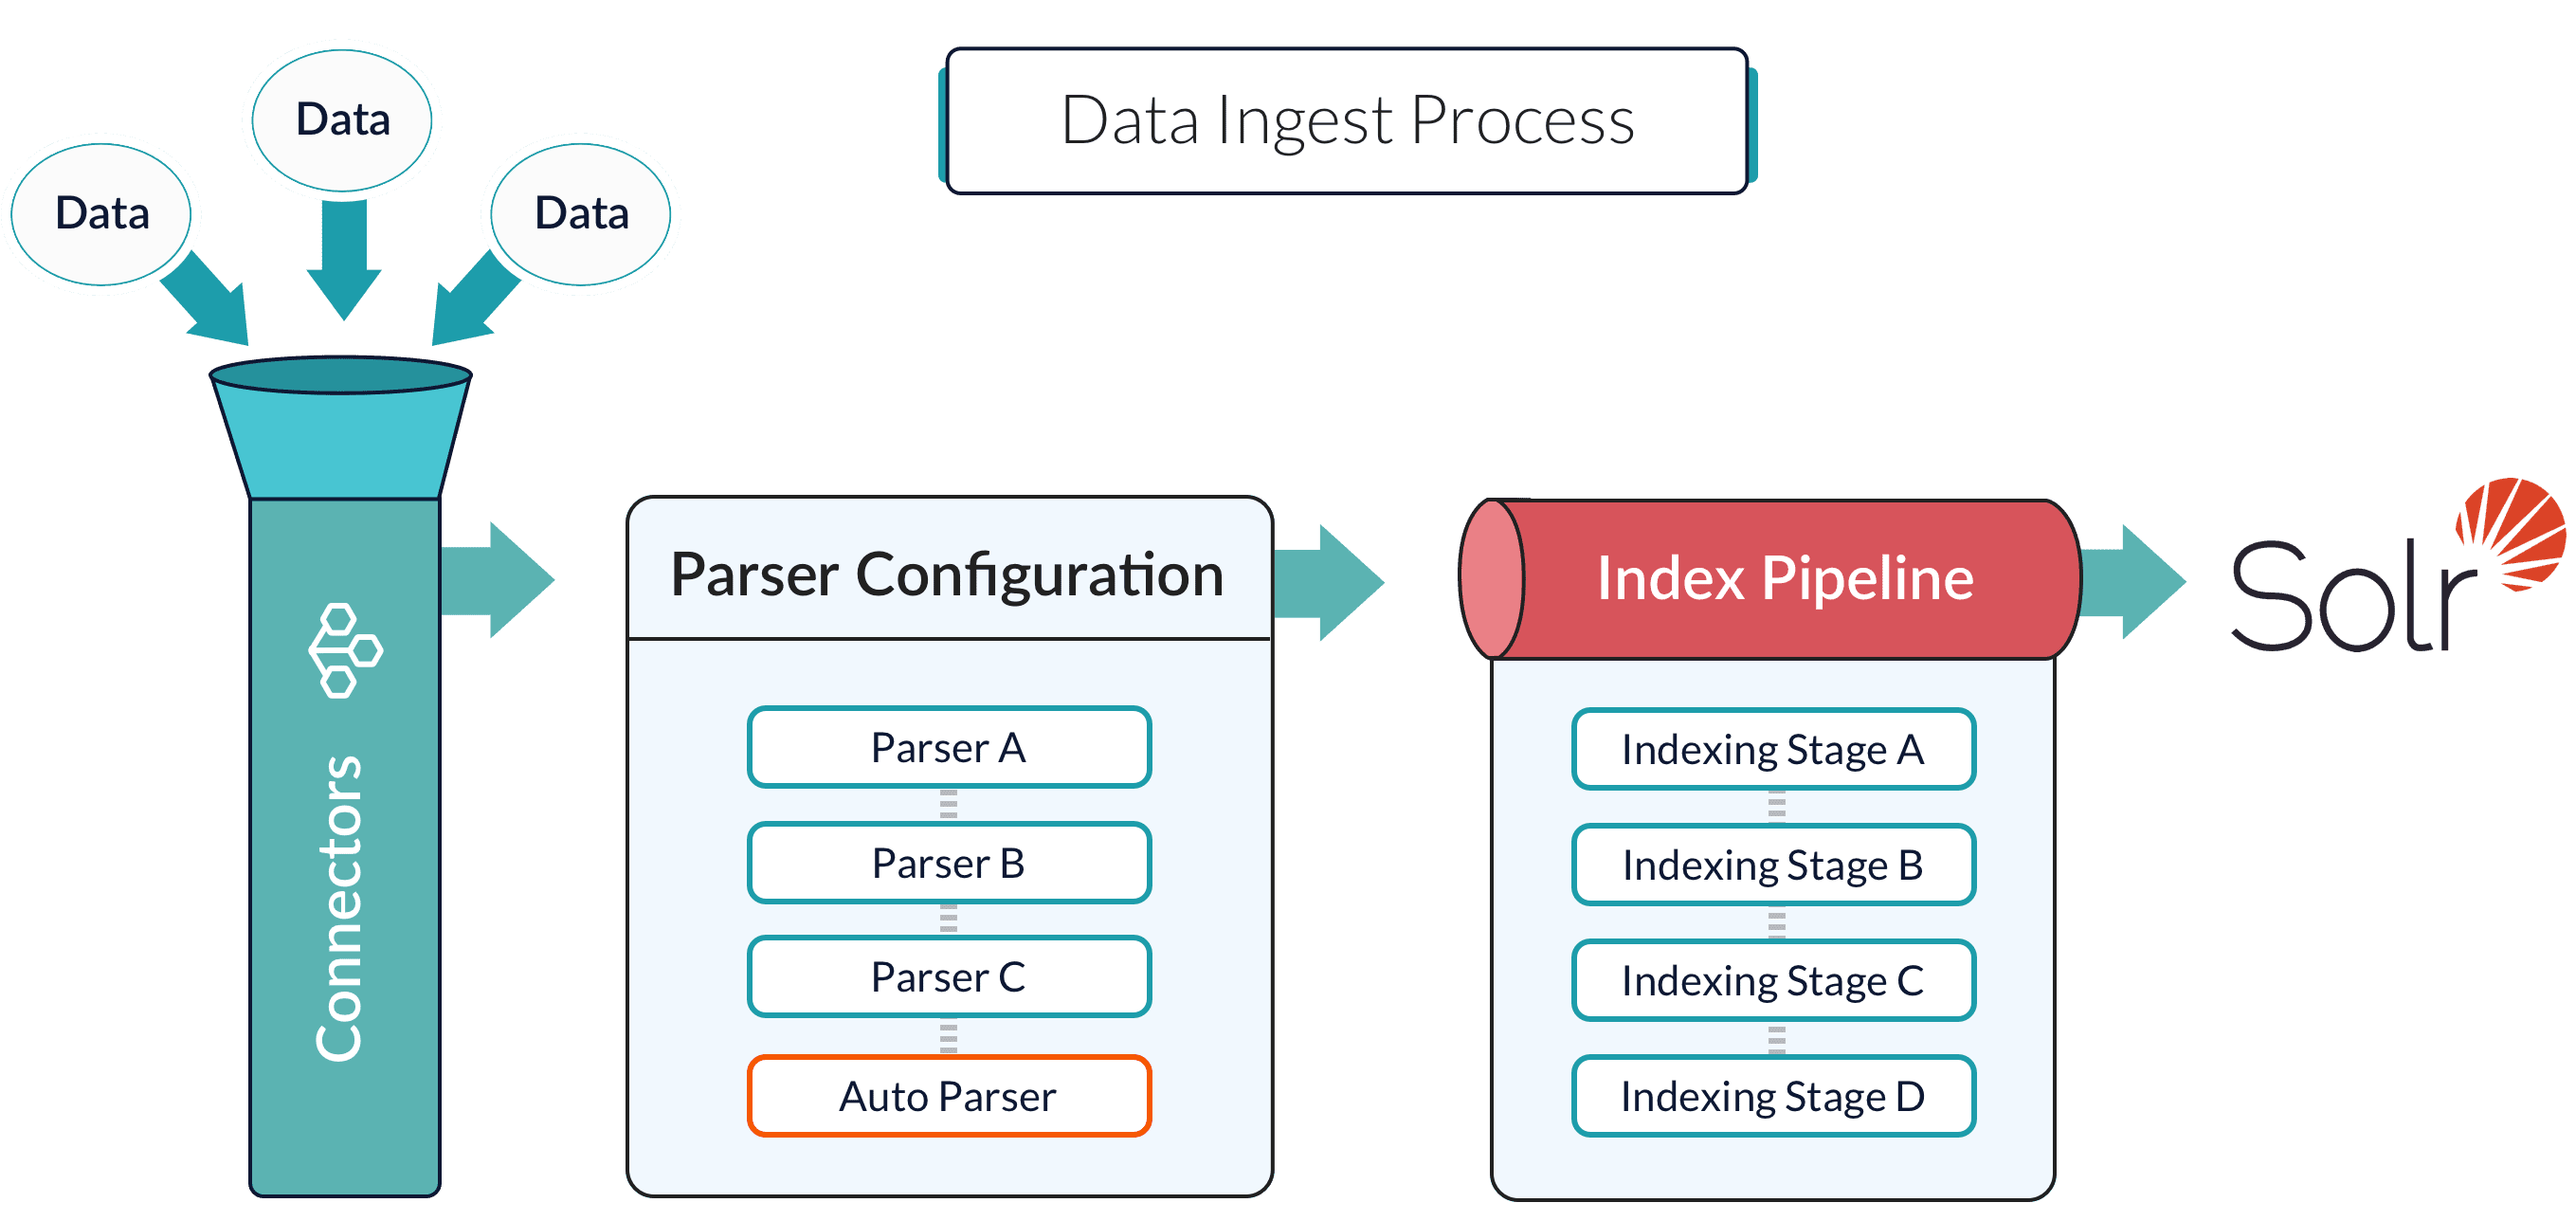
A datasource is a complete data ingest configuration that consists of the following components:Documentation Index
Fetch the complete documentation index at: https://doc.lucidworks.com/llms.txt
Use this file to discover all available pages before exploring further.
- Connector. Connectors are out-of-the-box components for pulling your data into Fusion. Lucidworks provides a wide variety of connectors, each specialized for a particular data type. For a list of connectors, see Fusion Connectors.
- Parser. Parsers provide fine-grained configuration for inbound data.
-
Index pipeline. Index pipelines transform incoming data for indexing by Fusion.
- For Fusion 5.x, see Index Pipelines for more information.
- For Fusion 4.x, see Index Pipelines for more information.
Install or update a connector - Fusion 5
Install or update a connector - Fusion 5
When you create a new datasource that requires an uninstalled connector, Fusion 5 automatically downloads and installs the connector using the Datasources dropdown. You can also update the connector using the Blob Store UI or via the Connector API.
Install a connector using the Datasources dropdown
- In your Fusion app, navigate to Indexing > Datasources.
- Click Add.
- In the list of connectors, scroll down to the connectors marked Not Installed and select the one you want to install.
Fusion automatically downloads it and moves it to the list of installed connectors.
Install or update a connector using the Blob Store UI
- Download the connector zip file from Download V2 connectors.
Do not expand the archive; Fusion consumes it as-is.
- In your Fusion app, navigate to System > Blobs.
- Click Add.
- Select Connector Plugin.

- Click Choose File and select the downloaded zip file from your file system.
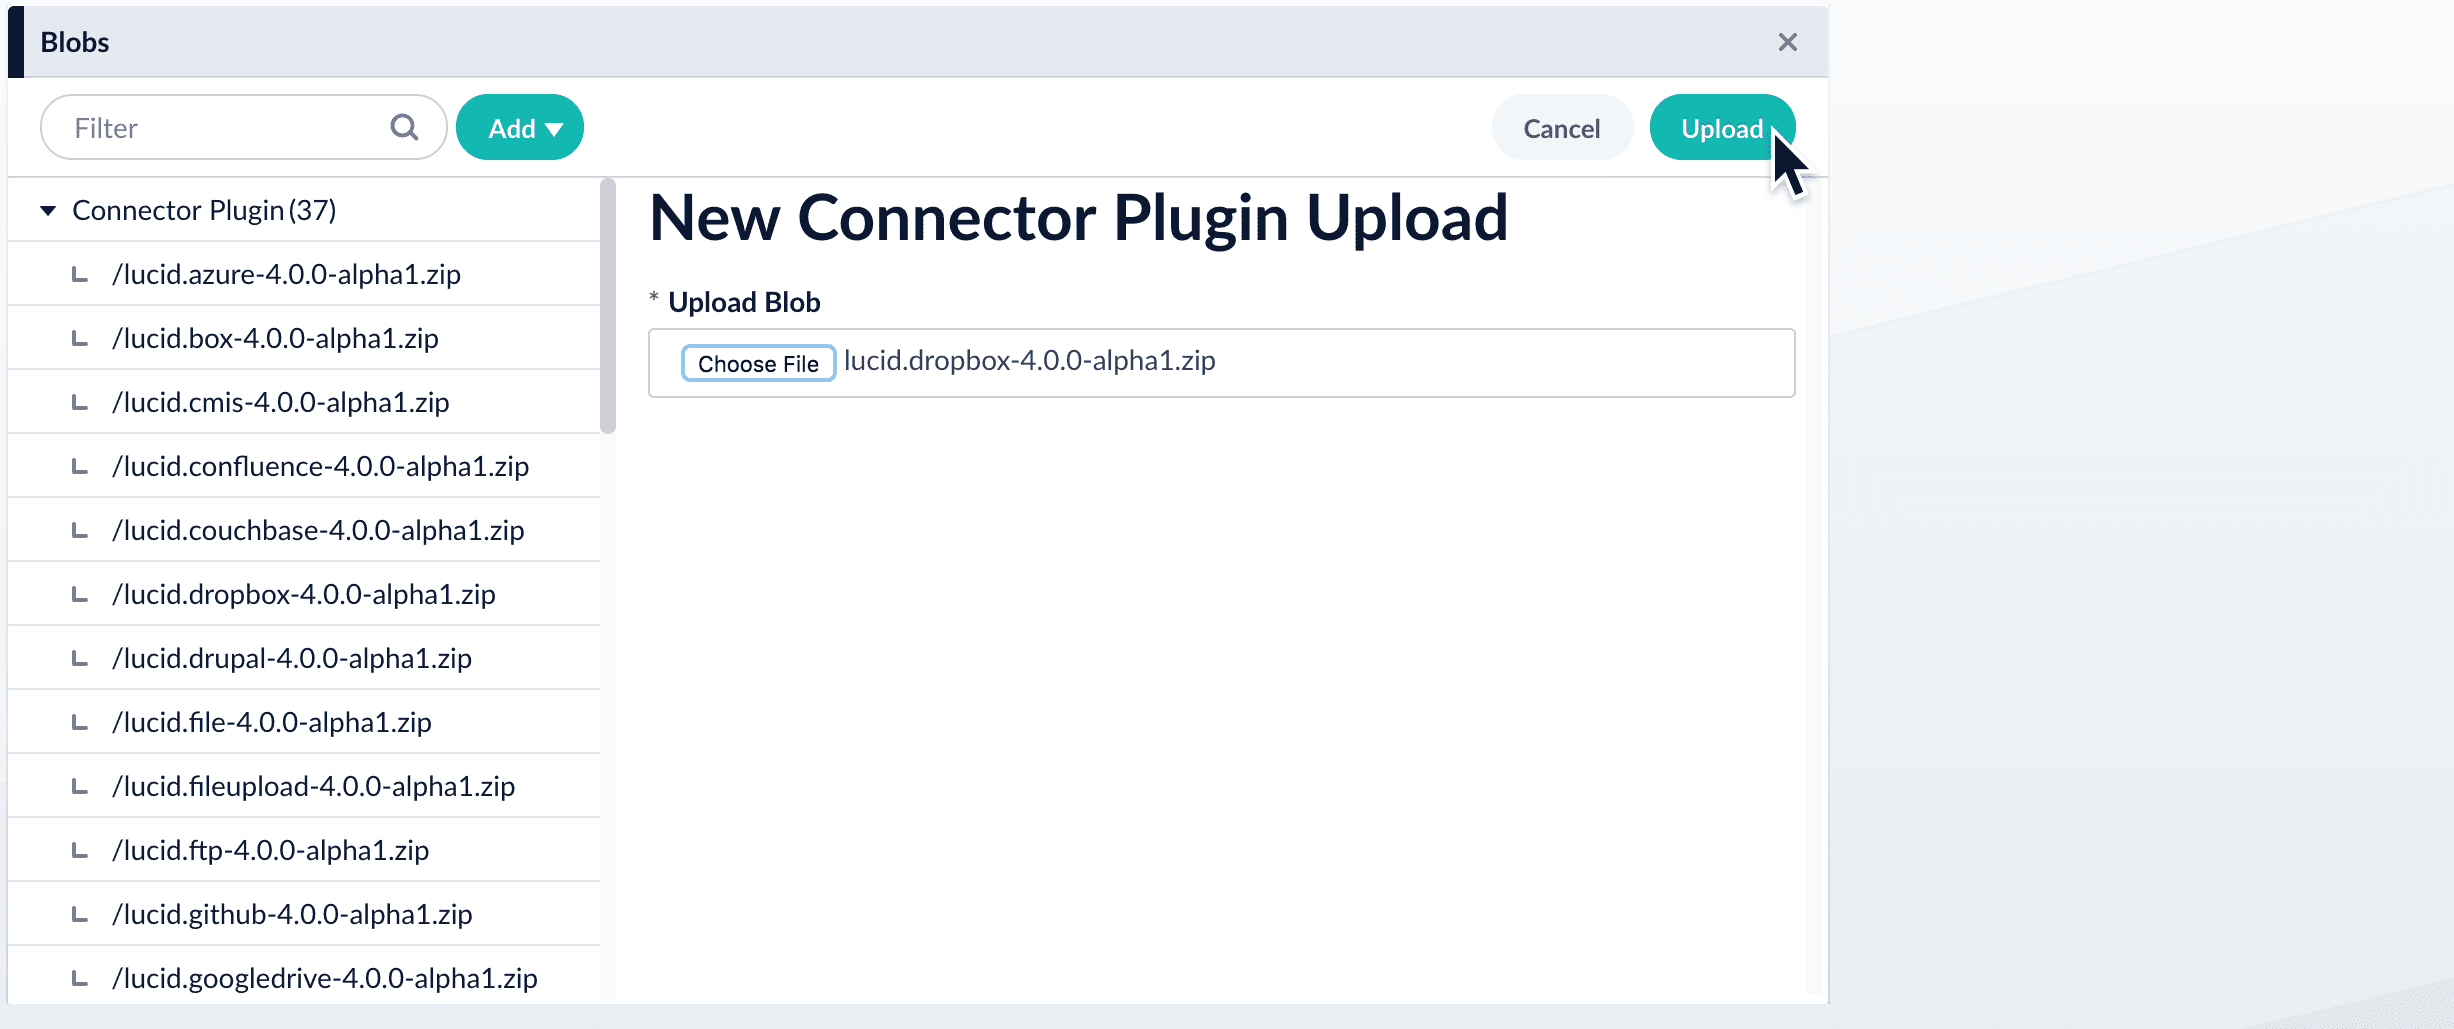
- Click Upload.
The new connector’s blob manifest appears.

Install or update a connector using the Connector API
-
Download the connector zip file from Download V2 connectors.
Do not expand the archive; Fusion consumes it as-is.
-
Upload the connector zip file to Fusion’s plugins.
Specify a
pluginIdas in this example:Fusion automatically publishes the event to the cluster, and the listeners perform the connector installation process on each node. -
Look in
https://FUSION_HOST:FUSION_PORT/apps/connectors/plugins/to verify the new connector is installed.
Reinstall a connector
To reinstall a connector for any reason, first delete the connector then use the preceding steps to install it again. This may take a few minutes to complete depending on how quickly the pods are deleted and recreated.Install a Connector - Fusion 4.2
Install a Connector - Fusion 4.2
In Fusion 4.2, connectors are installed by uploading them to the blob store. You can use any of these methods to install a connector:After you install a connector, you can Configure A New Datasource.
- By installing connectors as “bootstrap plugins”, that is, by putting them in the
bootstrap-pluginsdirectory during initial installation or an upgrade - By using the Blob Store UI after installation or an upgrade
- By using the Blob Store API after installation or an upgrade.
During upgrades, the migrator handles some aspects of installing connectors. Depending on the target version and the presence or absence of an Internet connection, there might be manual steps. Installing connectors during upgrades is explained where needed in the upgrade procedures.
Install a connector as a bootstrap plugin
Fusion can install connectors as “bootstrap plugins.” All this means is that you put the connectorzip files in a specific directory named bootstrap-plugins, and Fusion installs the connectors the first time it starts during initial installation or an upgrade.- Download the connector zip file from Fusion 4.x Connector Downloads.
Do not expand the archive; Fusion consumes it as-is. Also, do not start Fusion until instructed to do so by the installation or upgrade instructions. - Under the version-numbered Fusion directory, place the connector in the directory
apps/connectors/bootstrap-plugins/(on Unix) or\apps\connectors\bootstrap-plugins\(on Windows). - Start Fusion when instructed to do so in the installation or upgrade procedure.
Install or update a connector using the Blob Store UI
-
Download the connector zip file from Fusion 4.x Connector Downloads.
Do not expand the archive; Fusion consumes it as-is.
- In the Fusion workspace, navigate to System > Blobs.
- Click Add.
-
Select Connector Plugin.
-
Click Choose File and select the downloaded zip file from your file system.
-
Click Upload.
The new connector’s blob manifest appears.
Install or update a connector using the Blob Store API
-
Download the connector zip file from Fusion 4.x Connector Downloads.
Do not expand the archive; Fusion consumes it as-is.
-
Upload the connector zip file to Fusion’s blob store.
Specify an arbitrary blob ID, and aresourceTypevalue ofplugin:connector, as in this example:Fusion automatically publishes the event to the cluster, and the listeners perform the connector installation process on each node. -
Look in
https://FUSION_HOST:FUSION_PORT/apps/connectors/plugins/to verify the new connector is installed.
Reinstall a connector
To reinstall a connector for any reason, first delete the connector then use the preceding steps to install it again. This may take a few minutes to complete depending on how quickly the pods are deleted and recreated.Configure a New Datasource
Configure a New Datasource
- In your Fusion app, navigate to Indexing > Datasources.
- Click Add.
- Select your connector. The connector configuration panel appears. The specific configuration options vary depending on the connector.
- Configure your connector’s options:
- Enter a useful name for your datasource in the Datasource ID field.
- You can leave the Pipeline ID and Parser fields as-is to start with the defaults, or select different ones if you have them.
- Configure the connector-specific options. Select your specific release and connector detail from the configuration reference topic.
- Click Save.
- Test your datasource configuration:
- Navigate to the Index Workbench at Indexing > Index Workbench.
- Click Load….
- Select the datasource ID you specified when you created the datasource.
Now you can see your datasource configuration and a simulation of the results you can expect when you run this datasource job to index your data. - Adjust the configurations of your datasource, parsers, and index pipeline until the simulated results are satisfactory.
- Click Save.
- Index your data:
- In the Index Workbench, click Start Job.
- When the job status is Finished, navigate to the Query Workbench at Querying > Query Workbench to view the indexed documents and configure your query pipeline.