

- Latest version: v2.2.3
- Compatible with Fusion version: 5.9.0 and later
startLinks), following links up to a configurable depth, and indexing the fetched pages.
The connector uses the absolute URL of each crawled page as the document id, and uses that id on recrawls to update changed pages and remove pages that no longer exist.
If your index pipeline changes the id, such as replacing it with a relative URL, the connector can no longer match pages to their indexed documents, and outdated pages remain in search results.
To store a different version of the URL, copy it to a separate field when indexing.
For Web V2 v2.1.0 through v2.2.2, up to three Web V2 connectors can run simultaneously in a single cluster. This prevents reaching a max concurrency limit per Web V2 connector, which affects how much data can be sent to Selenium Grid at one time.
For Web V2 v2.2.3 and later, multiple Web V2 datasources with JavaScript evaluation enabled can run concurrently while sharing one Selenium Grid instance. If you run multiple JavaScript-enabled datasources simultaneously, scale your Selenium Grid to handle the increased load.
Starting with Fusion 5.9.11, users of the Web V2 connector must upgrade to version 2.0.0 or later. Previous versions are incompatible due to changes introduced by the upgraded JDK in Fusion 5.9.11.
If crawls fail with a corrupted CrawlDB error, reinstall the connector.
Prerequisites
Perform these prerequisites to ensure the connector can reliably access, crawl, and index your data. Proper setup helps avoid configuration or permission errors, so use the following guidelines to keep your content available for discovery and search in Fusion. Confirm network and security configurations:- Egress must allow HTTP/2 traffic from your on-prem host into the Fusion gRPC endpoint.
- You need a Fusion user account with the
remote-connectorsoradminrole to authenticate the connector. - If the standalone host doesn’t trust Fusion’s TLS cert, point to your truststore file path.
Authentication
Setting up the correct authentication according to your organization’s data governance policies helps keep sensitive data secure while allowing authorized indexing. The Web V2 connector supports many crawl-time authentication methods, including OAuth token retrieval. You configure these under Crawl Authentication Properties in your datasource. The supported authentication schemes include the following:- Basic HTTP Authentication: Provide host, port, realm (if any), username, and password.
- Digest HTTP Authentication: Same parameters as Basic, but using the Digest challenge/response scheme.
- NTLM Authentication For Windows-style authentication: Provide domain, workstation, host, port, realm (if any), username, and password.
- Form Authentication: Post to a login form URL with whatever name/value pairs the site expects, plus a TTL for the session.
- SAML/Smart Form Authentication: For multi-step or SAML-backed form logins, submit a sequence of forms until you’re authenticated.
- OAuth 2.0: Fetch a bearer token using client-credentials before crawling. You supply the token-endpoint URL and parameter names/values (for example,
client_id,client_secret,scope, orgrant_type) in the Access Token section of Crawl Authentication Properties.
Authentication resources
Configure Web Site Authentication
Configure Web Site Authentication
The Web V2 connector retrieves data from a Web site using HTTP and starting from a specified URL.The Web connector supports Basic, Digest, Form, and NTLM authentication to websites.The credentials for a crawl are stored in a credentials file in To figure out what parameters you need to specify, turn off JavaScript in your browser and go through the login work flow.
Though you normally see only a single login form on your screen, you might find many more forms you need to submit before you get logged in when JavaScript is not available to perform those form submissions automatically.
Each form in that login chain needs to be represented in the list of
https://FUSION_HOST:FUSION_PORT/data/connectors/container/lucid.web/datasourceName, where datasourceName is the name of the datasource.
After you create a datasource, Fusion creates this directory for you. The file should be a JSON formatted file, ending with the .json file extension.
When defining the datasource, use the name of the file in the Authentication credentials filename field in the UI (or for the f.credentialsFile property if using the REST API).All authentication types require the credentials file to include a property called type that defines the type of authentication to use. The other required properties vary depending on the type of authentication chosen.Basic form-based Authentication
To use basic form-based authentication, useform for the type. The other properties are:- ttl. The “time to live” for the session created after authentication. After the specified time, the crawler logs in again to keep the crawl activity from failing due to an expired session. This value is defined in seconds.
- action. The action to take to log in. That is, the URL for the login form.
- params. The parameters for the form, likely the username and password, but could be other required properties. In the example below, we pass two parameters,
os_usernameandos_password, which are expected by the system we crawl.
Complex Form-based Authentication
Some websites do not manage their own authentication, but rather trust a third-party authority to authenticate the user. An example of this is websites that use SAML to log in a user via a central single-signon authority. To configure fusion to log in to a website like this, usesmartForm for the type. The other properties are:- ttl. The “time to live” for the session created after authentication. After the specified time, the crawler logs in again to keep the crawl activity from failing due to an expired session. This value is defined in seconds.
- loginUrl. The URL on which the first page that initializes the login chain is located
- params. A list of parameters to use for the form logins, likely the username and password, but could be other required properties. In the example below, we pass two parameters,
os_usernameandos_password, which are expected by the system we crawl. Additionally we expect that once that login has happened, a new form is presented to the user which then posts back to where we came from. No data need to be entered in this form, which is why we include an empty{ }in the params list.
params. If no user input is required, simply include an empty { }.Basic and Digest Authentication
Basic and Digest authentication are simple HTTP authentication methods still in use in some places. To use either of these types, in the credentials file, for thetype property use “basic” or “digest”. The other properties are:- host. The host of the site.
- port. The port, if any.
- userName. The username to use for authentication.
- password. The password for the userName.
- realm. The security realm for the site, if any.
NTLM Authentication
To use NTLM authentication, in the credentials file, for thetype property, use ntlm. The other properties available are:- host. The host of the site.
- port. The port, if any.
- userName. The username to use for authentication.
- password. The password for the userName.
- realm. The security realm for the site, if any.
- domain. The domain.
- workstation. The workstation, as needed.
Web V2 connector OAuth access token configuration
Web V2 connector OAuth access token configuration
The Web V2 connector v1.4.0 added the ability to authenticate using OAuth.
Example with PingFederate
This example uses Client Credentials Grant Type and a basic configuration.- Create new app in PingIdentity.
-
Edit the app configuration:
- Check Client Credentials Grant Type.
- Set Token Endpoint Authentication Method to
Client Secret Post.
- Enable the app by clicking on the toggle button to the right of the app name.
-
Go to the Configuration tab and click Get Access Token. At this point it will probably show an error about scope. Fix it by adding a scope, such as
testScope. - Click the Get Access Token button again under the Configuration tab. It should generate and display your access token.
- Go to the Configuration tab and click URLs. Copy the Token Endpoint URL for further use.
-
You can view a sample of Client Credentials Grant Type access token request in the PingIdentity documentation. In this example the access token request is:
-
In Fusion, go to CRAWL AUTHENTICATION PROPERTIES in the datasource configuration and fill in the ACCESS TOKEN section by adding the URL and parameters of the request. Replace CLIENT_ID with your own client ID.
- ACCESS TOKEN REQUEST URL:
https://auth.pingone.com/ENV_ID/as/token - PARAMETER NAME | PARAMETER VALUE:
grant_type|client_credentials - PARAMETER NAME | PARAMETER VALUE:
client_id| CLIENT_ID - PARAMETER NAME | PARAMETER VALUE:
scope|testScope
- ACCESS TOKEN REQUEST URL:
Example with Microsoft Azure AD
- In Microsoft Entra ID, go to App Registrations and register a new app.
- Go to your app and click Certificates & secrets and add a client secret.
- Copy the client secret Value for further use.
-
View the Microsoft documentation for a request to get access token. In this example, we use the client credentials grant type:
-
Copy the endpoint URL and the parameters to the CRAWL AUTHENTICATION PROPERTIES > ACCESS TOKEN section in the datasource configuration in Fusion. Replace CLIENT_ID with your own client ID.
- ACCESS TOKEN REQUEST URL:
https://login.microsoftonline.com/TENANT_ID/oauth2/v2.0/token - PARAMETER NAME | PARAMETER VALUE:
grant_type|client_credentials - PARAMETER NAME | PARAMETER VALUE:
client_id| CLIENT_ID - PARAMETER NAME | PARAMETER VALUE:
scope|https://graph.microsoft.com/.default
- ACCESS TOKEN REQUEST URL:
Remote connectors
V2 connectors support running remotely in Fusion versions 5.7.1 and later. For more information, see Configure remote V2 connectors. Below is an example configuration showing how to specify the file system to index under theconnector-plugins entry in your values.yaml file:
Selenium Grid setup
If you are using Web V2 v2.1.0 or later, you must also use Selenium Grid as part of your Web V2 connector setup. For hosted connectors, Selenium Grid support is available through Kubernetes. For remote connectors, Selenium Grid support is avialable through Docker Compose. See the Web V2 remote support repository for full setup instructions and YAML files. Before you set up Selenium Grid, install the connector standalone plugin file for the version of Fusion that you are using and the most recent version of the Web V2 connector. Verify that you have the correct files at the Lucidworks plugins site.The Selenium services require an x86 architecture to run properly. Running the Selenium services on an ARM-based system such as Apple Silicon is not supported.
Set up Selenium Grid in Kubernetes
If you are using a hosted connector, use Kubernetes to set up Selenium Grid. These steps explain how to deploy the Selenium Hub component and the two Chrome browser nodes that connect to Selenium Hub. The referenced YAML files are available in thek8s directory of the Web V2 remote support repository.
To set up Selenium Grid:
-
In a terminal, apply the Kubernetes YAML configurations:
-
Verify that the deployments are successful. Replace
NAMESPACEwith your namespace. -
Adjust the network policy to allow port 4444. Enter the following command in a terminal:
-
Add the following snippet to the file:
- Save the file.
Set up Selenium Grid in Docker Compose
If you are using a remote connector, use Docker Compose to set up Selenium Grid. The referenced YAML files are available in the Web V2 remote support repository. Before setting up Selenium Grid in Docker Compose, you must know what version of JDK your Fusion connectors are using. If you are using Fusion 5.9.10 or earlier, you are using JDK 11. If you are using Fusion 5.9.11 or later, you are using JDK 17. To set up Selenium Grid in Docker Compose:- Visit the the Web V2 remote support repository and select the folder corresponding to your JDK version. Download the contents of that folder.
-
Edit the
bin/conf/connector-config.yamlfile to configure the Kafka bridge settings, the proxy settings, and the plugin path. The following snippet shows an example configuration. Quotation marks are required around the password. - Save the configuration file.
http://localhost:4444/ui. Verify that the Selenium Hub is running and the Chrome nodes are connected.
The Lucidworks connector is available on port 8764. Run docker-compose logs lucidworks-connector in a terminal to verify that the service is up.
To check the container status, run docker-compose ps in a terminal and verify that all containers are up.
Press Ctrl-C to stop the services when viewing logs in real-time.
To stop all services, run docker-compose down in a terminal. If you want to remove all volumes when stopping all services, run docker-compose down -v.
Scale Selenium Grid for concurrent JavaScript-evaluation datasources
Starting with Web V2 v2.2.3, multiple datasources with JavaScript evaluation enabled can run simultaneously and share one Selenium Grid instance. The default Selenium Grid configuration targets light-to-moderate JavaScript workloads and provides only two concurrent browser slots. If you run more than one JavaScript-enabled datasource at a time, you may need to scale your Selenium Grid to avoid slot exhaustion. If you are using this connector with Lucidworks Search, contact Lucidworks Support.Shipped defaults
The Helm chart ships with the following conservative defaults:
These default values give Selenium Grid two total slots: two replicas and one session.
The total Selenium Grid capacity is calculated as:
Scaling strategies
You can increase Selenium Grid capacity in two ways: horizontal scaling or vertical scaling. Start with horizontal scaling. Use vertical scaling only when cluster scheduling constraints make adding more pods impractical.Horizontal scaling
You can increasereplicas on the selenium-node-chrome deployment to add more Chrome node pods.
Each new pod runs independently with its own memory and CPU allocation, providing fault isolation between sessions. This is the recommended method.
Vertical scaling
Alternately, you can create more sessions per node. To do this, increaseSE_NODE_MAX_SESSIONS to run multiple concurrent browser sessions within a single Chrome node pod.
This requires proportionally more pod memory, CPU, and /dev/shm, and sessions on the same pod compete for resources.
SE_NODE_OVERRIDE_MAX_SESSIONS=true must be set when SE_NODE_MAX_SESSIONS is greater than 1.
Without it, Selenium silently caps the session count at its auto-detected value, regardless of what SE_NODE_MAX_SESSIONS is set to.
To verify the setting is present:Pod memory sizing
Each concurrent Chrome session requires memory for the browser process, renderer processes, and the JavaScript heap. Use the following per-session budgets as a starting point based on your target sites:
Use this formula to calculate the pod memory limit:
pod_memory_limit to 6Gi.
/dev/shm sizing
Chrome uses /dev/shm (POSIX shared memory) for communication between the browser process and its renderer processes.
When /dev/shm runs out, the kernel ends Chrome renderer processes, which causes tab crashes.
Because the pod stays healthy, the crashes appear random. Crawls succeed on some pages and fail on others with no clear pattern.
Use these per-session budgets:
The
dshm volume in the Chrome node Deployment controls this limit:
dshm_sizeLimit = sessions * per_session_shm_budget
For four sessions on typical pages: 4 * 512 MB = 2 Gi.
Session timeouts
Two environment variables control how long an idle session holds its resources:
Always set both to the same value.
If they differ, the component with the shorter timeout releases its resources first while the other holds on, either silently blocking a slot or leaving Chrome processes running after a connector failure.
The default of 60 seconds provides fast crash recovery.
If you crawl websites where page load and JavaScript execution routinely take longer than 60 seconds (large enterprise portals, sites with heavy client-side rendering), raise both timeouts together:
Validate your configuration
After scaling, confirm your configuration supports concurrent load matching your production workload.- Start multiple JavaScript-enabled datasource crawls simultaneously.
- Confirm all of the following:
- All crawls start without
SELENIUM_HUB_UNAVAILABLEorSELENIUM_CHROME_NODES_UNAVAILABLEerrors. - Crawls complete without renderer crashes (
Tab crashed,Aw, Snap!) or podOOMKilledevents. - Pod memory stays under the limit throughout the crawl cycle (
kubectl top pod). - Documents from all crawls are indexed successfully.
- All crawls start without
replicas, raise pod memory, or reduce SE_NODE_MAX_SESSIONS per node.
Control the web connector’s crawl depth
The Max Crawling Depth setting controls how many levels the Web V2 connector follows from your starting URL. You can think of these crawl levels as link hops or navigation levels from a starting URL. Setting the crawl depth ensures you are crawling the appropriate pages for your search experience. As you increase the Max Crawling Depth value, the Web V2 connector may crawl exponentially more pages. For example, if the start link contains links to ten pages, and each of those pages links to ten different pages, then a crawl depth of2 can grow to 100 pages. As the number of pages crawled increases, the time to complete the crawl also increases.
Deeper crawl depths consume more memory, use more HTTP requests and bandwidth, and may cause your website to limit the number of pages the web connector can crawl or time out before completing the crawl. Without strict limits, it’s possible for the Web V2 connector to crawl extremely large websites indefinitely if the website contains dynamic content or circular links.
Use a start link
A start link can be a page of your website or a webpage with a list of HTML links. The Web V2 connector starts the crawl from this page and crawls the page to the specified depth. You may specify multiple start URLs in the Bulk Start Links field. A simple example is starting a crawl from a company’s home page with the following layout:
If you set the max crawling depth to
0, the web connector crawls only your start page if you are using a start URL. This setting is recommended for testing basic connectivity or troubleshooting.
A max crawling depth of 2 or 3 is sufficient for most business needs, especially when combined with URL filters and page limits. Very large websites may need a max crawling depth of 4. If you need comprehensive coverage, set the max crawling depth to -1.
If you set the max crawling depth to
-1, set strict document limits and URL filters so your crawls complete successfully.Use a sitemap file
The Web V2 connector supports XML sitemap files. These files must be in XML format and are typically namedsitemap.xml or similar. To use a sitemap instead of a start link, select Link Discovery, enter a sitemap URL in the Sitemap URLs field, and click Add. You may add multiple sitemap URLs.
Unlike using a start link, setting the max crawling depth to 0 when using a sitemap crawls the URLs listed in the sitemap. Setting the max crawling depth to 1 crawls the URLs listed in the sitemap and the links included in those pages.
Configure the timeout
The connector timeout can be configured as infinite to handle large files. Configure the timeout by enabling Crawl performance properties and setting the Connection timeout (ms).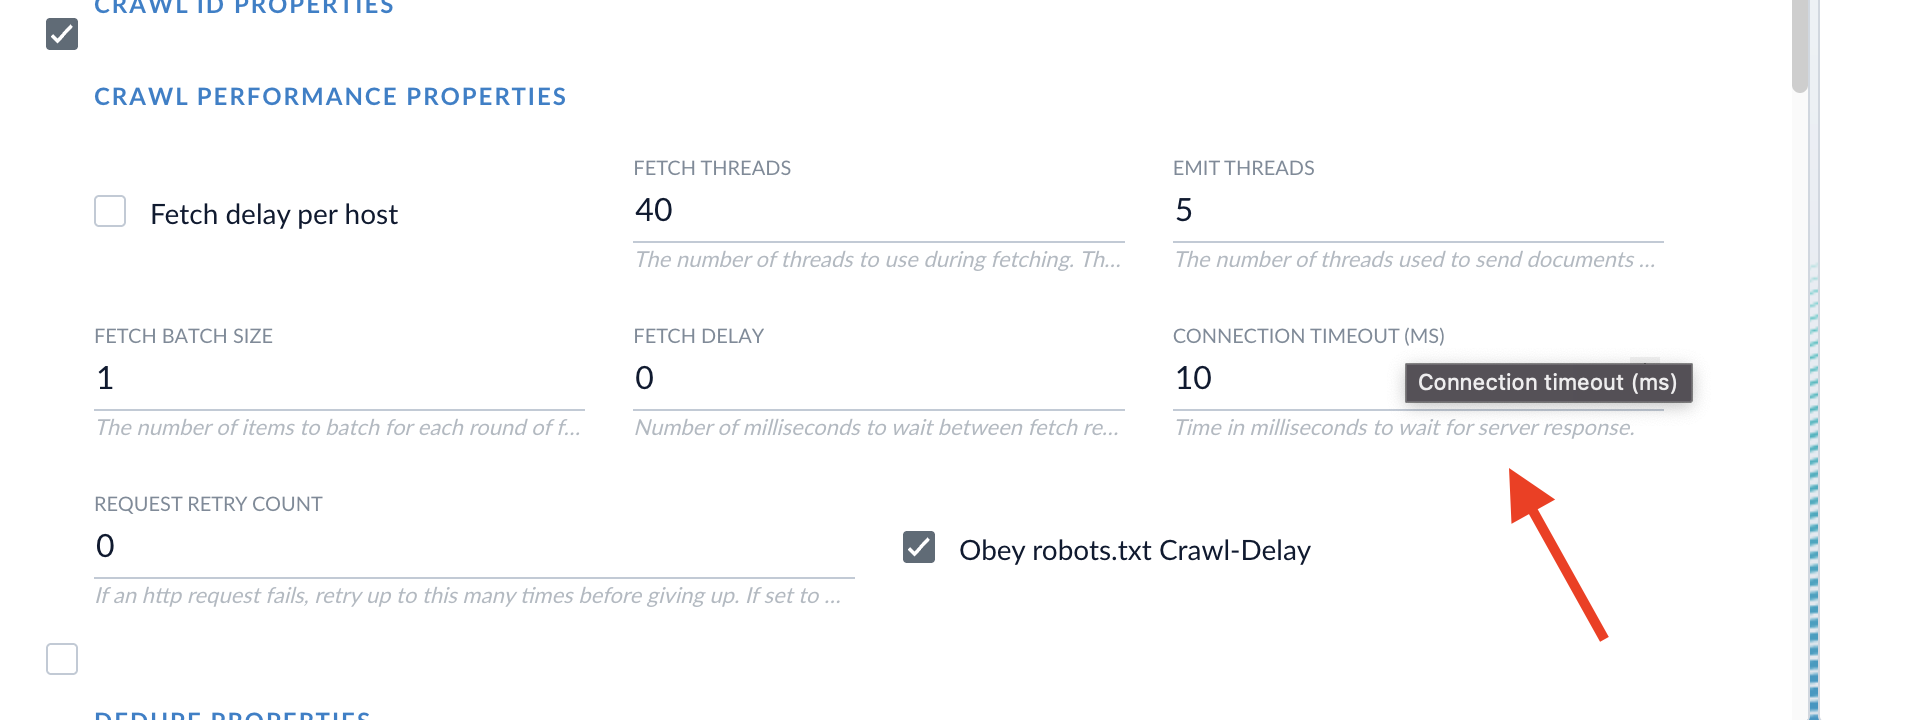
- To enable an infinite timeout for large file downloads, set the timeout configuration to
0. - For standard timeout behavior, use any positive value. For example, a timeout of
30000gives a 30-second timeout with clean connection termination.
Enable Javascript Evaluation in Fusion
JavaScript evaluation allows the Web V2 connector to extract content from a website that is only available after JavaScript has rendered the document. It is available for Web V2 v2.1.0 and later on hosted and remote connectors. To enable JavaScript evaluation in the Web V2 connector:- Navigate to your Web V2 datasource in Fusion.
- Select Javascript Evaluation Properties. A variety of settings displays. In this section you can customize your JavaScript evaluation settings.
- Select Evaluate JavaScript. This is required for using JavaScript evaluation.
- If you specified a SmartForms or SAML element in the Crawl Authentication Properties area, select Evaluate JavaScript during SmartForms/SAML Login.
- Headless browser mode is selected by default, which runs the browser performing the website crawl in the background without being visible. If your website renders pages on the server side, the Headless browser field must be unchecked for the crawl to work correctly and retrieve links. If your website renders pages on the client side, the Headless browser field should be checked.
- Click Apply.
javascriptEvaluationConfig under Properties in the configuration specifications.