Install or update a connector
Install or update a connector
Install a connector using the Datasources dropdown
- In your Fusion app, navigate to Indexing > Datasources.
- Click Add.
- In the list of connectors, scroll down to the connectors marked Not Installed and select the one you want to install.
Fusion automatically downloads it and moves it to the list of installed connectors.
Install or update a connector using the Blob Store UI
- Download the connector zip file from Download V2 connectors.
Do not expand the archive; Fusion consumes it as-is.
- In your Fusion app, navigate to System > Blobs.
- Click Add.
- Select Connector Plugin.

- Click Choose File and select the downloaded zip file from your file system.
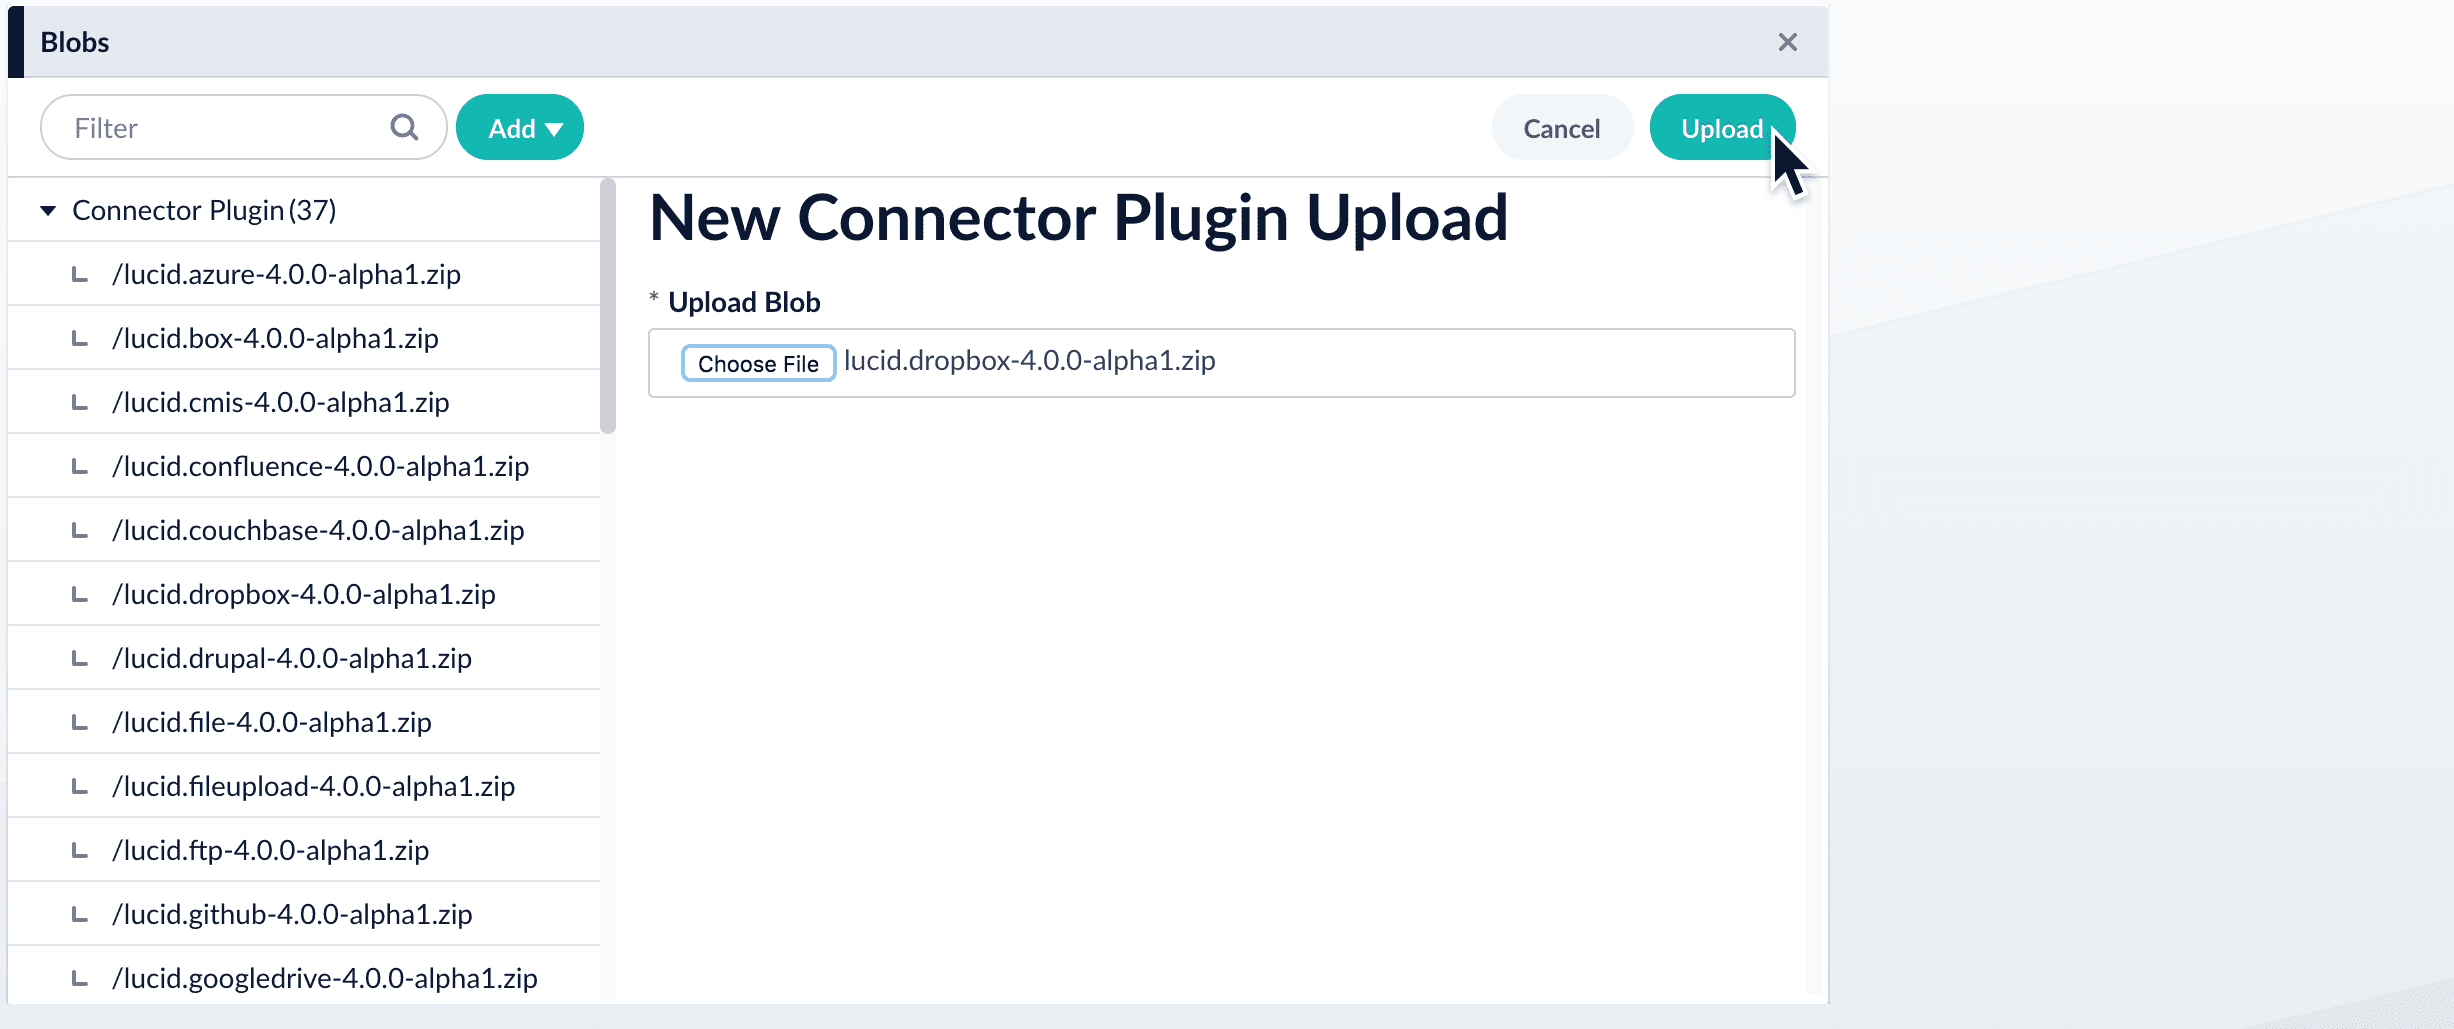
- Click Upload.
The new connector’s blob manifest appears.

Install or update a connector using the Connector API
-
Download the connector zip file from Download V2 connectors.
Do not expand the archive; Fusion consumes it as-is.
-
Upload the connector zip file to Fusion’s plugins.
Specify a
pluginIdas in this example:Fusion automatically publishes the event to the cluster, and the listeners perform the connector installation process on each node. -
Look in
https://FUSION_HOST:FUSION_PORT/apps/connectors/plugins/to verify the new connector is installed.
Reinstall a connector
To reinstall a connector for any reason, first delete the connector then use the preceding steps to install it again. This may take a few minutes to complete depending on how quickly the pods are deleted and recreated.Latest connector downloads
AEM V2
AEM V2
v1.3.0
- SDK version: 4.2.0
- Release date: July 31, 2024
AWS S3 Pro
AWS S3 Pro
v2.0.0
- SDK version: 4.2.0
- Release date: July 7, 2026
Box.com V2
Box.com V2
v2.2.0
- SDK version: 4.2.0
- Release date: July 17, 2024
Couchbase V2
Couchbase V2
v3.1.0
- SDK version: 4.0.0
- Release date: April 22, 2021
File Upload Pro
File Upload Pro
v1.1.0
- SDK version: 4.2.0
- Release date: April 15, 2026
FTP Pro
FTP Pro
v1.0.0
- SDK version: 4.2.0
- Release date: May 7, 2026
Local Filesystem V2
Local Filesystem V2
v3.1.0
- SDK version: 4.0.0
- Release date: April 22, 2021
Google Cloud Storage (GCS) V2
Google Cloud Storage (GCS) V2
v2.1.0
- SDK version: 4.0.0
- Release date: April 22, 2021
JDBC V2
JDBC V2
v2.8.0
- SDK version: 4.2.0
- Release date: July 7, 2026
Kaltura V2
Kaltura V2
v1.4.1
- SDK version: 4.2.0
- Release date: September 23, 2025
LDAP ACLs V2
LDAP ACLs V2
v2.1.1
- SDK version: 4.2.0
- Release date: December 20, 2024
OneDrive V2
OneDrive V2
v3.1.0
- SDK version: 4.0.0
- Release date: April 22, 2021
REST V2
REST V2
v1.1.0
- SDK version: 4.2.0
- Release date: January 30, 2025
Sitecore V2
Sitecore V2
v3.1.0
- SDK version: 4.0.0
- Release date: April 22, 2021
Slack V2
Slack V2
v1.0.0
- SDK version: 4.0.0
- Release date: May 3, 2021
Solr Pro
Solr Pro
v1.0.1
- SDK version: 4.2.0
- Release date: April 15, 2026
Web V2
Web V2
v2.2.3
- SDK version: 4.2.0
- Release date: July 10, 2026
Connector plugin standalone JARs
These are standalone JAR files that contain the Fusion connector runtime, allowing you to run connectors remotely. Each JAR version corresponds to a specific Fusion release version and must match your deployed Fusion instance for compatibility.Fusion 5.18
Fusion 5.18.x JAR file downloads
Fusion 5.18.x JAR file downloads
5.18.0
Fusion 5.17
Fusion 5.17.x JAR file downloads
Fusion 5.17.x JAR file downloads
5.17.2
5.17.1
5.17.0
Fusion 5.9
Fusion 5.9.x JAR file downloads
Fusion 5.9.x JAR file downloads
5.9.16
5.9.15
5.9.14
5.9.13
5.9.12
5.9.11
5.9.10
5.9.9
5.9.8
5.9.7
5.9.6
5.9.5
5.9.4
5.9.3
5.9.2
5.9.1
5.9.0
Other versions
Fusion 5.12.x JAR file downloads
Fusion 5.12.x JAR file downloads
5.12.0
Fusion 5.11.x JAR file downloads
Fusion 5.11.x JAR file downloads
5.11.0
Fusion 5.10.x JAR file downloads
Fusion 5.10.x JAR file downloads
5.10.0
Fusion 5.8.x JAR file downloads
Fusion 5.8.x JAR file downloads
5.8.1
5.8.0
Fusion 5.7.x JAR file downloads
Fusion 5.7.x JAR file downloads
5.7.1
5.7.0
Fusion 5.6.x JAR file downloads
Fusion 5.6.x JAR file downloads
5.6.2
5.6.1
Fusion 5.5.x JAR file downloads
Fusion 5.5.x JAR file downloads
5.5.2
5.5.1
5.5.1-3
5.5.1-2
5.5.0
Fusion 5.4.x JAR file downloads
Fusion 5.4.x JAR file downloads
5.4.4
5.4.0
Fusion 5.3.x JAR file downloads
Fusion 5.3.x JAR file downloads
5.3.3
5.3.2
5.3.1
5.3.0
Previous plugin releases
The connector downloads that follow represent the most recent versions available that are compatible with the specified SDK version.AEM V2
AEM V2
v1.3.0
- SDK version: 4.2.0.
- Plugin version: 0.1.3
- Release date: July 31, 2024
v1.2.0
- SDK version: 4.0.0.
- Plugin version: 0.1.2
- Release date: May 15, 2024
AWS S3 V2
AWS S3 V2
v2.0.0
- SDK version: 4.2.0.
- Plugin version: 2.0.0
- Release date: July 7, 2026
v1.5.0
- SDK version: 4.0.0.
- Plugin version: 1.5.0
- Release date: July 29, 2025
v1.0.0
- SDK version: 3.0.0.
- Plugin version: 1.0.0
- Release date: November 11, 2020
Box.com V2
Box.com V2
v2.2.0
- SDK version: 4.2.0.
- Plugin version: 0.2.2
- Release date: July 17, 2024
v2.1.0
- SDK version: 4.0.0.
- Plugin version: 0.2.1
- Release date: April 22, 2021
v2.0.0
- SDK version: 3.0.0.
- Plugin version: 0.2.0
- Release date: November 13, 2020
v1.1.0
- SDK version: 2.0.3.
- Plugin version: 0.1.1
- Release date: September 11, 2020
v1.0.0
- SDK version: 2.0.2.
- Plugin version: 0.1.0
- Release date: August 14, 2020
Couchbase V2
Couchbase V2
v3.1.0
- SDK version: 4.0.0.
- Plugin version: 3.1.0
- Release date: April 22, 2021
v3.0.0
- SDK version: 3.0.0.
- Plugin version: 3.0.0
- Release date: November 11, 2020
v2.0.1
- SDK version: 2.0.2.
- Plugin version: 2.0.1
- Release date: July 28, 2020
File Upload V2
File Upload V2
v1.0.0
- SDK version: 4.2.0.
- Plugin version: 0.0.1
- Release date: July 24, 2024
Local Filesystem V2
Local Filesystem V2
v3.1.0
- SDK version: 4.0.0.
- Plugin version: 3.1.0
- Release date: April 22, 2021
v3.0.0
- SDK version: 3.0.0.
- Plugin version: 3.0.0
- Release date: November 11, 2020
v2.0.2
- SDK version: 2.0.2.
- Plugin version: 2.0.2
- Release date: July 27, 2020
Google Cloud Storage (GCS) V2
Google Cloud Storage (GCS) V2
v2.1.0
- SDK version: 4.0.0.
- Plugin version: 2.1.0
- Release date: April 22, 2021
v2.0.0
- SDK version: 3.0.0.
- Plugin version: 2.0.0
- Release date: November 11, 2020
v1.0.0
- SDK version: 2.0.1.
- Plugin version: 1.0.0
- Release date: July 15, 2020
JDBC V2
JDBC V2
v2.8.0
- SDK version: 4.2.0.
- Plugin version: 2.8.0
- Release date: July 7, 2026
v2.7.0
- SDK version: 4.2.0.
- Plugin version: 2.7.0
- Release date: December 5, 2025
v2.6.3
- SDK version: 4.1.3.
- Plugin version: 2.6.3
- Release date: September 23, 2025
v2.0.0
- SDK version: 4.0.0.
- Plugin version: 2.0.0
- Release date: April 22, 2021
v1.0.0
- SDK version: 3.0.0.
- Plugin version: 1.0.0
- Release date: November 13, 2020
Kaltura V2
Kaltura V2
v1.4.1
- SDK version: 4.2.0.
- Plugin version: 1.4.1
- Release date: September 23, 2025
v1.3.0
- SDK version: 4.1.3.
- Plugin version: 1.3.0
- Release date: November 29, 2023
LDAP ACLs V2
LDAP ACLs V2
v2.1.1
- SDK version: 4.2.0.
- Plugin version: 2.1.1
- Release date: December 20, 2024
v1.5.2
- SDK version: 4.1.3.
- Plugin version: 1.5.2
- Release date: July 17, 2024
v1.0.0
- SDK version: 4.0.0.
- Plugin version: 1.0.0
- Release date: August 16, 2022
OneDrive V2
OneDrive V2
v3.1.0
- SDK version: 4.0.0.
- Plugin version: 3.1.0
- Release date: April 22, 2021
v3.0.0
- SDK version: 3.0.0.
- Plugin version: 3.0.0
- Release date: November 11, 2020
v2.0.3
- SDK version: 2.0.2.
- Plugin version: 2.0.3
- Release date: July 27, 2020
REST V2
REST V2
v1.1.0
- SDK version: 4.2.0.
- Plugin version: 1.1.0
- Release date: January 30, 2025
Sitecore V2
Sitecore V2
v3.1.0
- SDK version: 4.0.0.
- Plugin version: 3.1.0
- Release date: April 22, 2021
v3.0.1
- SDK version: 3.0.0.
- Plugin version: 3.0.1
- Release date: January 26, 2021
v2.0.2
- SDK version: 2.0.2.
- Plugin version: 2.0.2
- Release date: August 6, 2020
Slack V2
Slack V2
v1.0.0
- SDK version: 4.0.0.
- Plugin version: 1.0.0
- Release date: May 3, 2021
Solr Pro
Solr Pro
v1.0.0
- SDK version: 4.2.0
- Plugin version: 1.0.0
- Release date: February 25, 2026
Web V2
Web V2
v2.2.3
- SDK version: 4.2.0.
- Plugin version: 2.2.3
- Release date: July 10, 2026
v2.2.2
- SDK version: 4.2.0.
- Plugin version: 2.2.2
- Release date: February 24, 2026
v2.2.1
- SDK version: 4.2.0.
- Plugin version: 2.2.1
- Release date: November 13, 2025
v1.4.0
- SDK version: 4.1.3.
- Plugin version: 0.0.4
- Release date: September 25, 2024
v1.0.0
- SDK version: 4.0.0.
- Plugin version: 0.0.1
- Release date: September 27, 2022