With Lucidworks Search, your data is indexed in a set of collections in Lucidworks Search’s Solr core. A primary collection holds your searchable content, such as your product catalog, knowledge base, blog articles, product reviews, and so on. A set of secondary collections are associated with your primary collection to hold related data that Lucidworks Search can use to enhance the relevancy of your search results. This topic shows you how different types of data flow through Lucidworks Search to be indexed in your primary and secondary collections.Documentation Index
Fetch the complete documentation index at: https://doc.lucidworks.com/llms.txt
Use this file to discover all available pages before exploring further.
1. Index your content
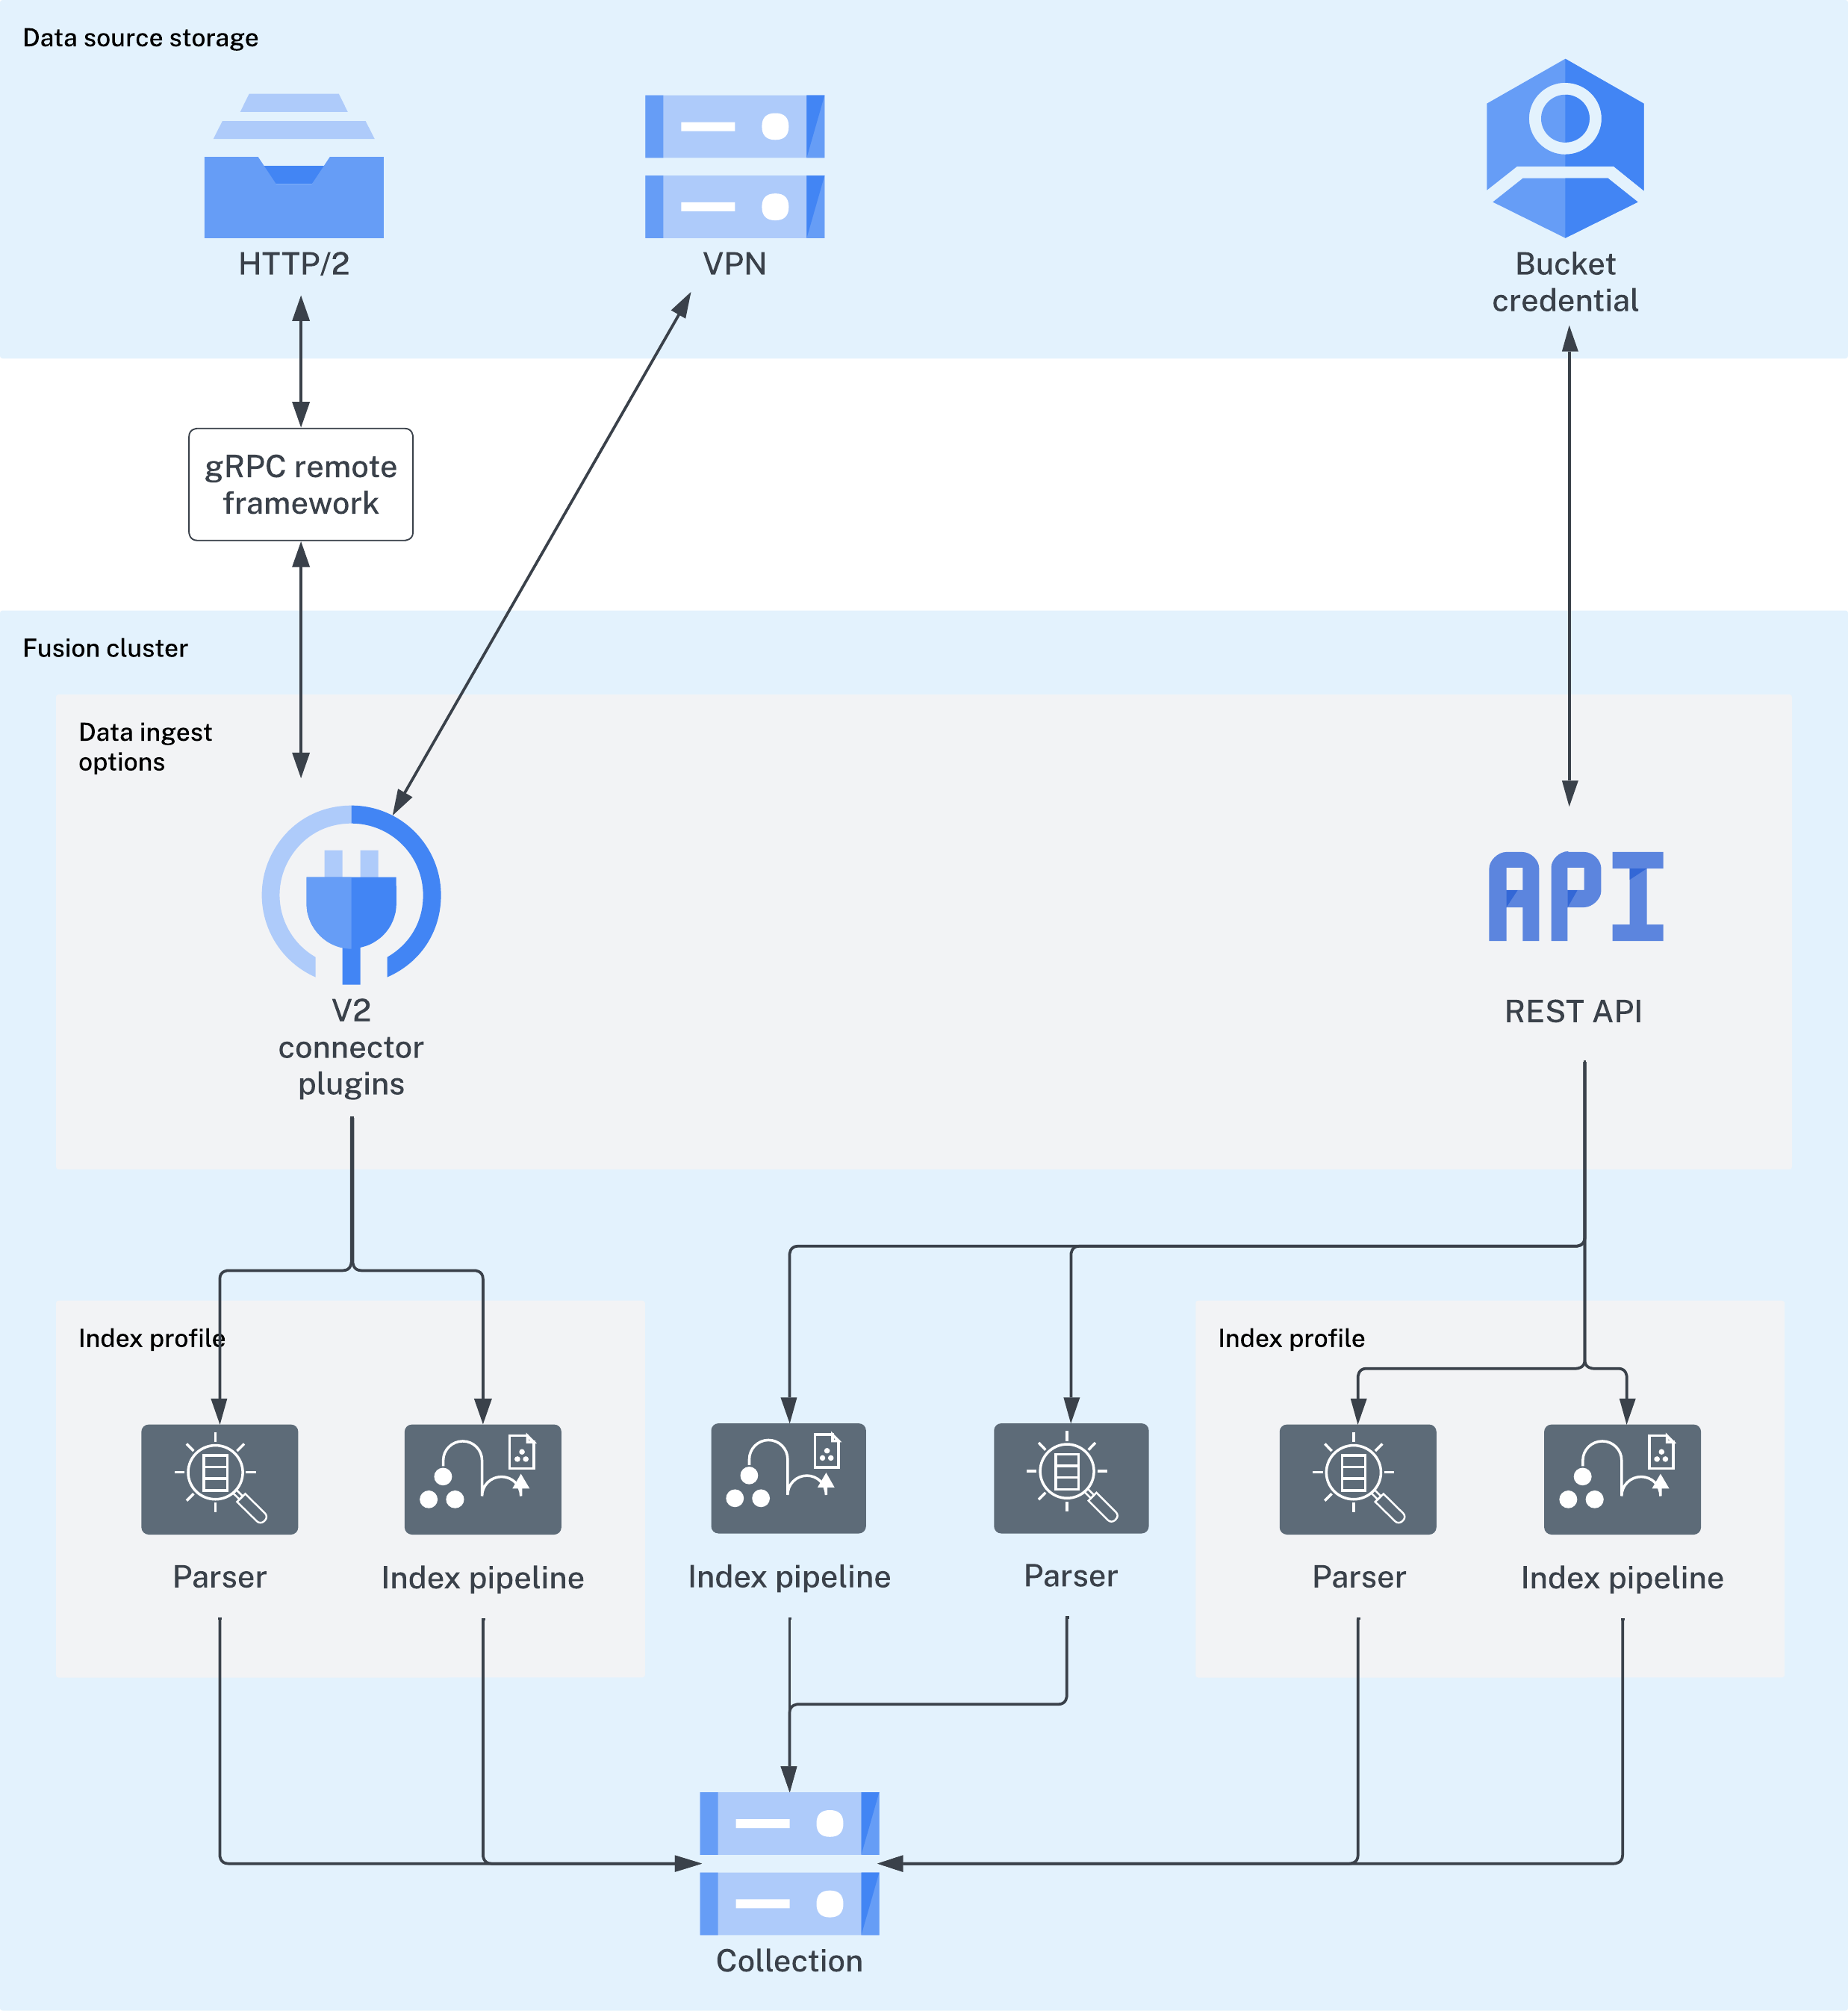
No matter where your content is located, Lucidworks Search can index it. The Lucidworks Search collection where your searchable content is indexed is called the primary collection. Secondary collections are automatically created to hold related data, such as signals, machine learning job output, and so on. There are a few ways to index your searchable content to the primary collection:-
Lucidworks Connectors
Lucidworks has a wide variety of connectors for many types of data sources.
Once the connector fetches your data, parsers read it before passing it to the index pipeline.- The gRpc remote framework is configured on the client side and only works with V2 type connectors.
- V1 classic connectors support ingesting data using IP white lists, VPN tunnels, and public channels.
-
The Parallel Bulk Loader (PBL)
The PBL can send your data to an index pipeline or directly to the primary collection, depending on whether the data requires transformation before indexing. It does not support parsers and is not recommended for production environments. -
Import Data with the REST API
Send your content to an index profile using the Lucidworks Search REST API. Index profiles are saved configurations of parsers and index pipelines.
Import Data with the REST API
Import Data with the REST API
It is often possible to get documents into Lucidworks Search by configuring a datasource with the appropriate connector: Connectors Configuration Reference.But if there are obstacles to using connectors, it can be simpler to index documents with a REST API call to an index profile or pipeline.These requests are sent as a POST request. The request header specifies the format of the contents of the request body. Create an index profile in the Lucidworks Search UI.To send a streaming list of JSON documents, you can send the JSON file that holds these objects to the API listed above with To prevent the terminal from displaying all the data and metadata it indexes—useful if you are indexing a large file—you can optionally append You can also create documents using the PipelineDocument JSON notation.
Push documents to Lucidworks Search using index profiles
Index profiles allow you to send documents to a consistent endpoint (the profile alias) and change the backend index pipeline as needed. The profile is also a simple way to use one pipeline for multiple collections without any one collection “owning” the pipeline. See Lucidworks Search Index Profiles.You can send documents directly to an index using the Index REST API. The request path is:application/json as the content type. If your JSON file is a list or array of many items, the endpoint operates in a streaming way and indexes the docs as necessary.Send data to an index profile that is part of an app
Accessing an index profile through an app lets a Lucidworks Search admin secure and manage all objects on a per-app basis. Security is then determined by whether a user can access an app. This is the recommended way to manage permissions in Lucidworks Search.The syntax for sending documents to an index profile that is part of an app is as follows:Spaces in an app name become underscores. Spaces in an index profile name become hyphens.
?echo=false to the URL.Be sure to set the content type header properly for the content being sent. Some frequently used content types are:- Text:
application/json,application/xml - PDF documents:
application/pdf - MS Office:
- DOCX:
application/vnd.openxmlformats-officedocument.wordprocessingml.document - XLSX:
application/vnd.openxmlformats-officedocument.spreadsheetml.sheet - PPTX:
application/vnd.vnd.openxmlformats-officedocument.presentationml.presentation - More types: http://filext.com/faq/office_mime_types.php
- DOCX:
Example: Send JSON data to an index profile under an app
In$FUSION_HOME/apps/solr-dist/example/exampledocs you can find a few sample documents. This example uses one of these, books.json.To push JSON data to an index profile under an app:- Create an index profile. In the Lucidworks Search UI, click Indexing > Index Profiles and follow the prompts.
-
From the directory containing
books.json, enter the following, substituting your values for username, password, and index profile name: -
Test that your data has made it into Lucidworks Search:
- Log into the Lucidworks Search UI.
- Navigate to the app where you sent your data.
- Navigate to the Query Workbench.
- Search for
\*:*. - Select relevant Display Fields, for example
authorandname.
Example: Send JSON data without defining an app
In most cases it is best to delegate permissions on a per-app basis. But if your use case requires it, you can push data to Lucidworks Search without defining an app.To send JSON data without app security, issue the following curl command:Example: Send XML data to an index profile with an app
To send XML data to an app, use the following:Send documents to an index pipeline
Although sending documents to an index profile is recommended, if your use case requires it, you can send documents directly to an index pipeline.Specify a parser
When you push data to a pipeline, you can specify the name of the parser by adding a parserId querystring parameter to the URL. For example:https://EXAMPLE_COMPANY.b.lucidworks.cloud/api/index-pipelines/INDEX_PIPELINE/collections/COLLECTION_NAME/index?parserId=PARSER.If you do not specify a parser, and you are indexing outside of an app (https://EXAMPLE_COMPANY.b.lucidworks.cloud/api/index-pipelines/...), then the _system parser is used.If you do not specify a parser, and you are indexing in an app context (https://EXAMPLE_COMPANY.b.lucidworks.cloud/api/apps/APP_NAME/index-pipelines/...), then the parser with the same name as the app is used.Indexing CSV Files
In the usual case, to index a CSV or TSV file, the file is split into records, one per row, and each row is indexed as a separate document.- Synchronous parsing
- Asynchronous parsing
When using the REST API for , you can send content directly to the Lucidworks Search indexing endpoint for Lucidworks Search to process. You can designate an index profile that consists of a parser, collection, and a pipeline. If you do not want to use an index profile, you can specify the parser, collection, and pipeline in the API call.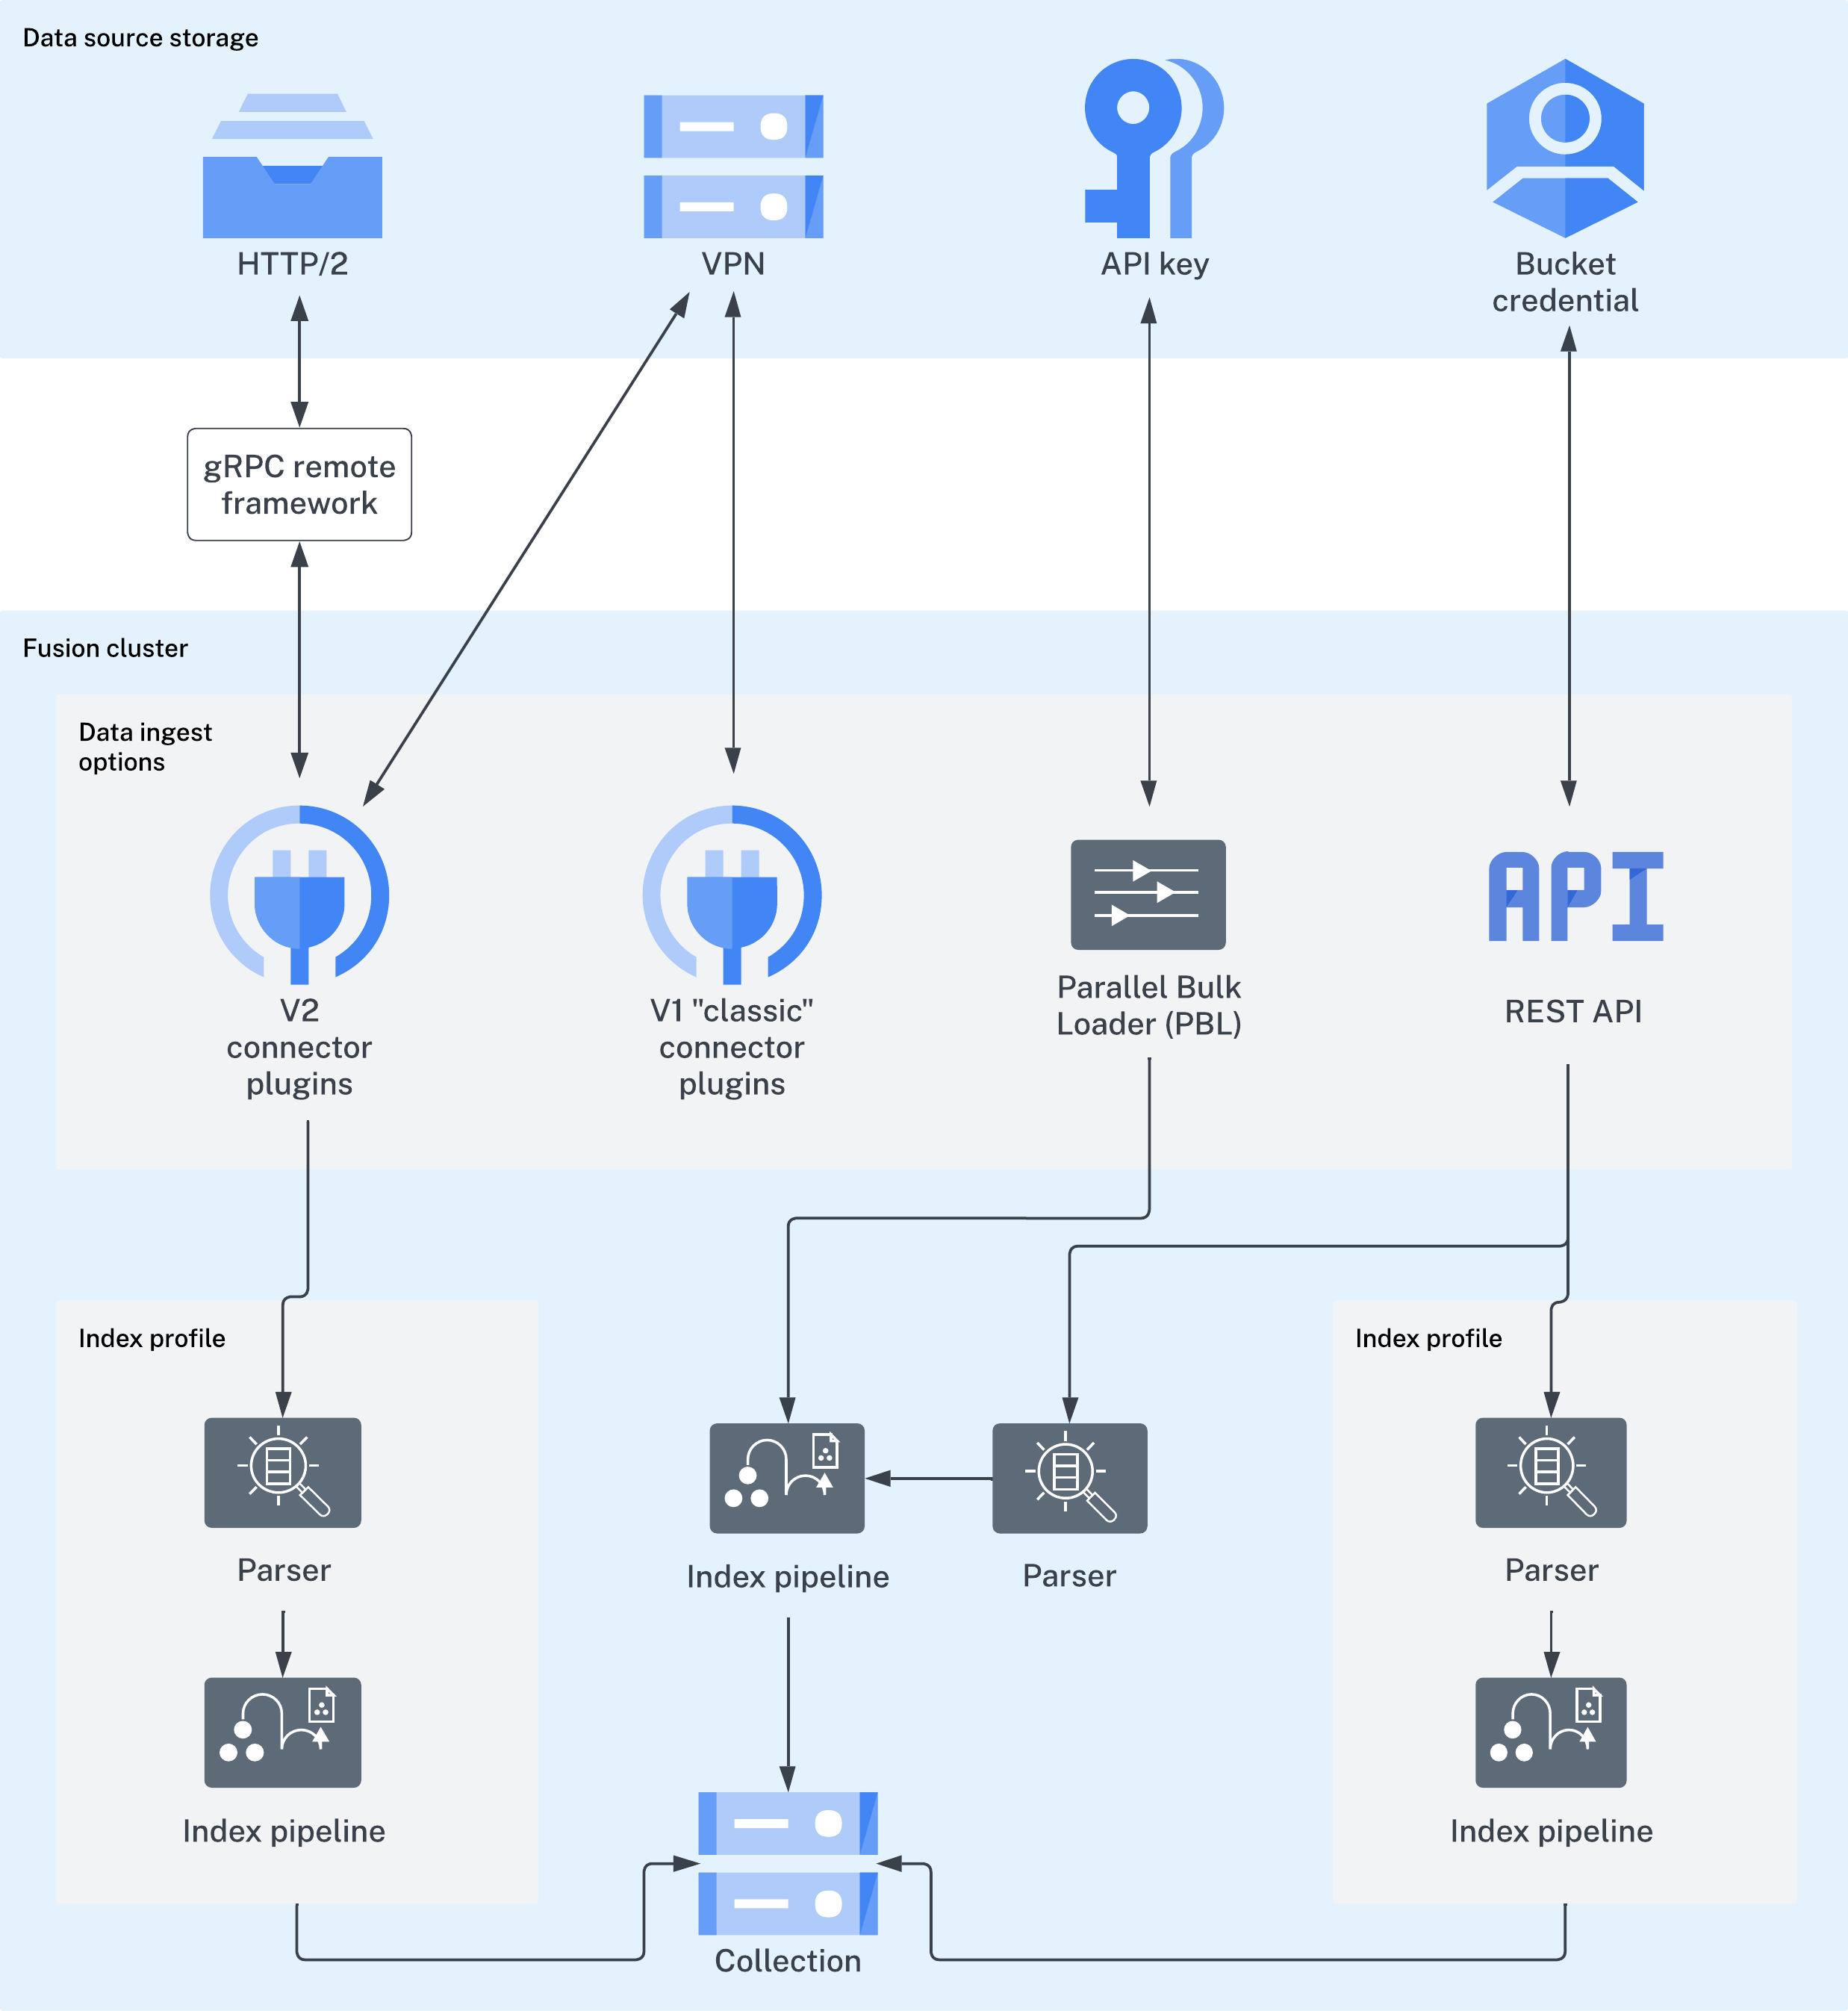
2. Index your signals
Signals are event records that provide historical data about user behavior, such as clicks, likes, purchases, and so on. You don’t need to index signals about query responses; Lucidworks Search indexes response signals automatically by default. If you are using App Studio or App Insights, then you need to index request signals. Learn more about signal types and required fields. To index your signals, you send them to Lucidworks Search using the Signals API, which points to the hidden index pipeline designed especially for signals.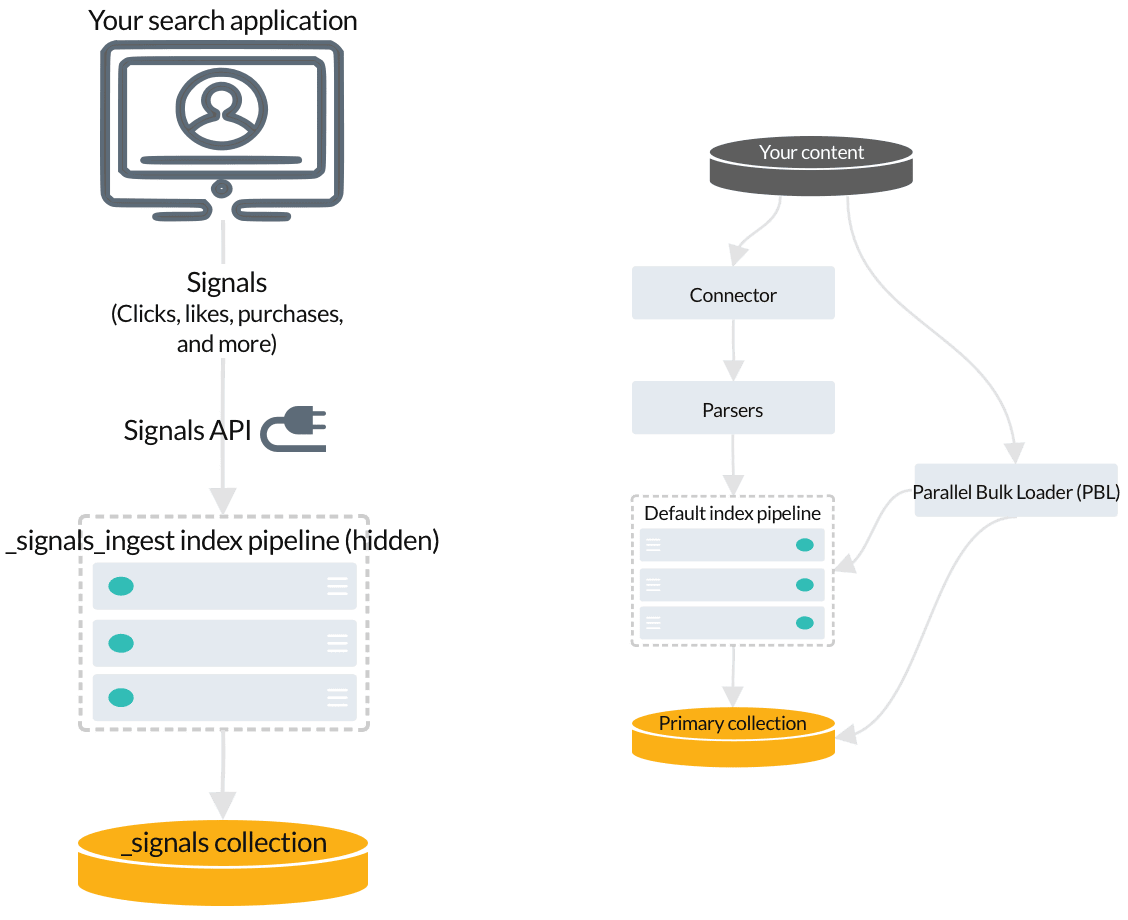
COLLECTION_NAME_signals. For example, if your primary collection is called Products, then the raw signals collection is Products_signals.
3. Lucidworks Search jobs that index signals-related data
When you Enable or disable signals, Lucidworks Search creates jobs and secondary collections for analyzing and aggregating your raw signals. Some of this data enables query rewriting and automatic boosting, while other data becomes useful when you enable recommendations.Enable or disable signals
Enable or disable signals
You can enable and disable signals using the Lucidworks Search UI or the REST API.Enable signals for a collectionDisable signals for a collection
Using the UI
When you create a collection using the Fusion UI, signals are enabled and a signals collection created by default. You can also enable and disable signals for existing collections using the Collections Manager.Enable signals for a collection- In the Fusion workspace, navigate to Collections > Collections Manager.
- Hover over the primary collection for which you want to enable signals.
-
Click
 Configure to open the drop-down menu.
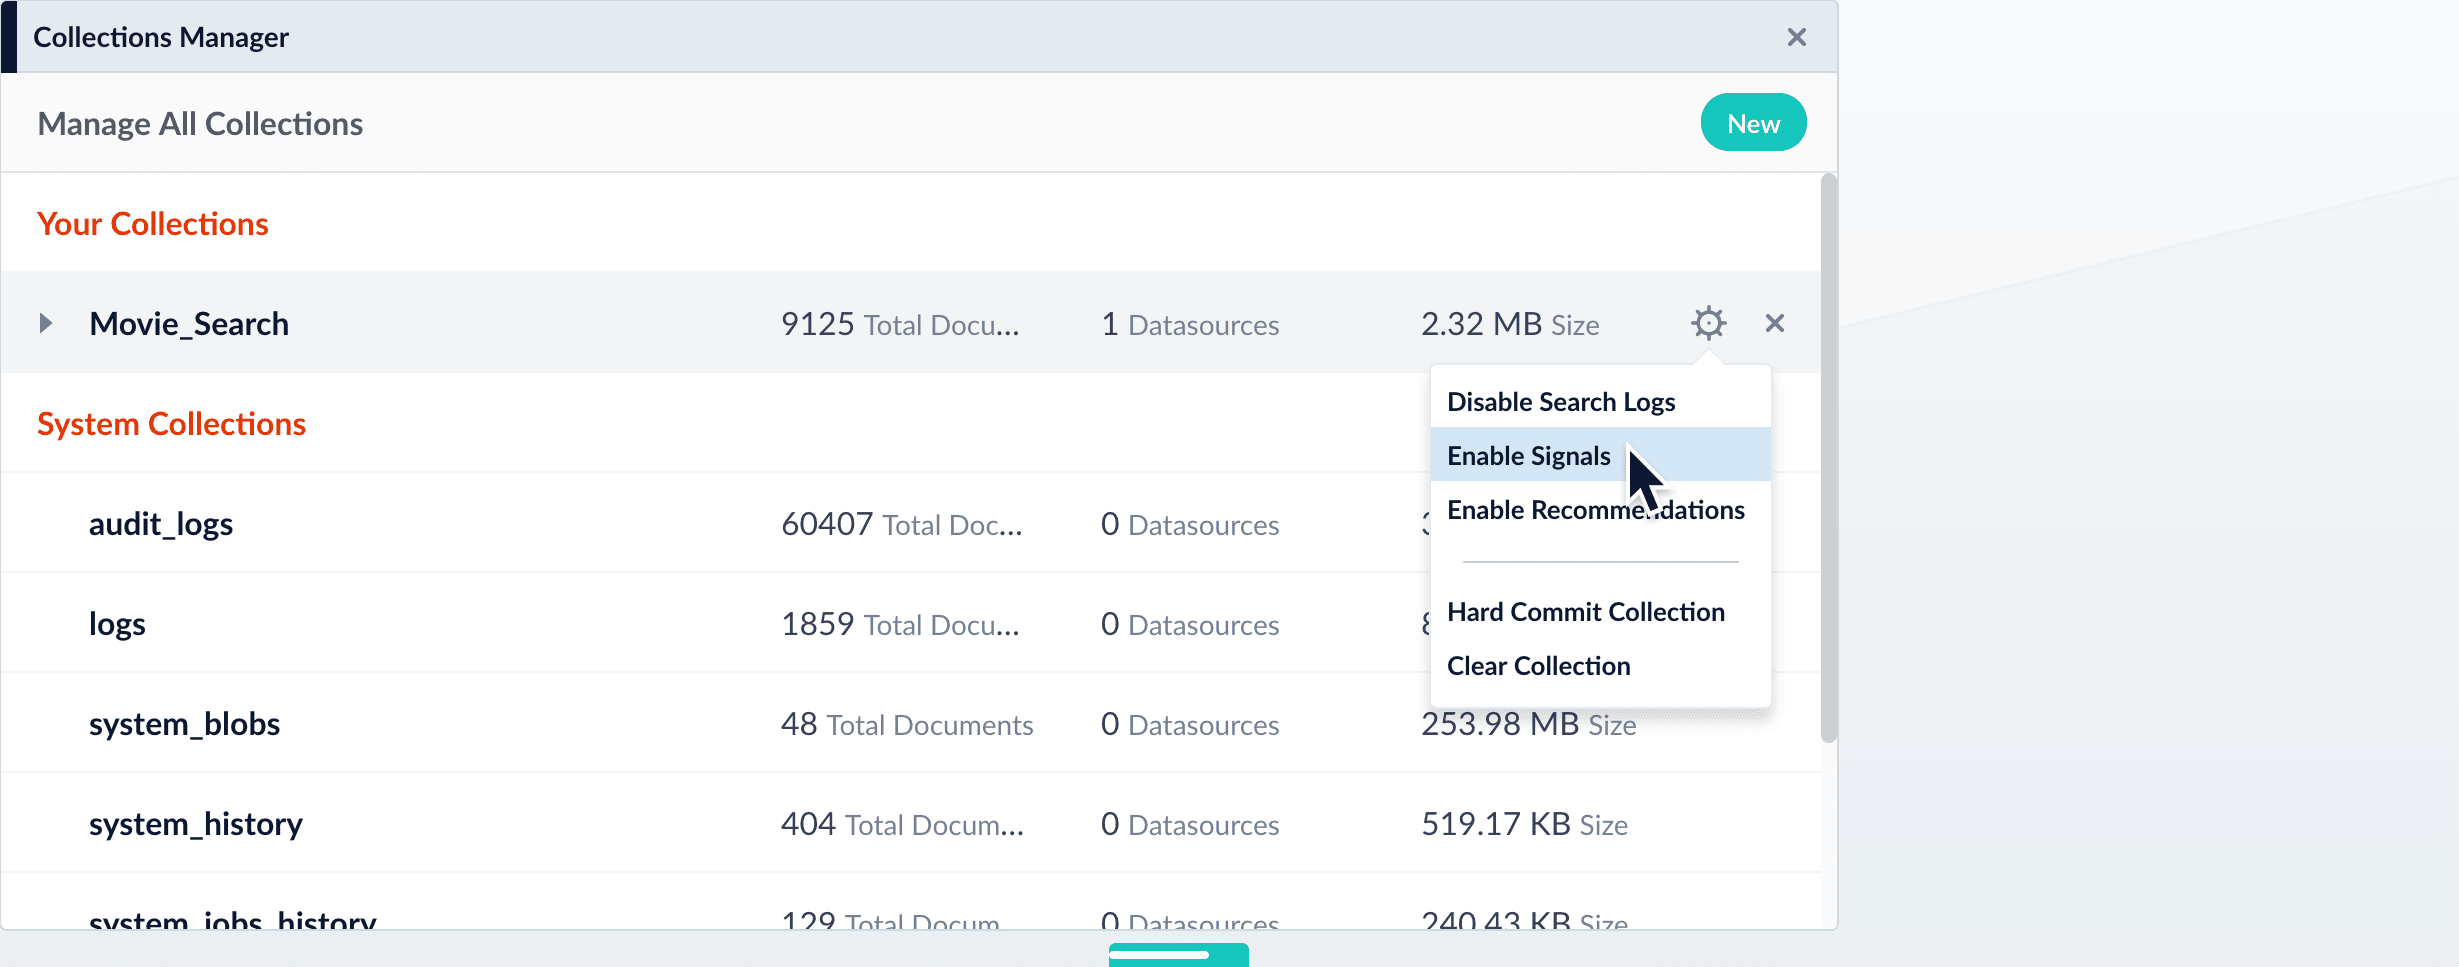
-
Click Enable Signals.
The Enable Signals window appears, with a list of collections and jobs that are created when you enable signals.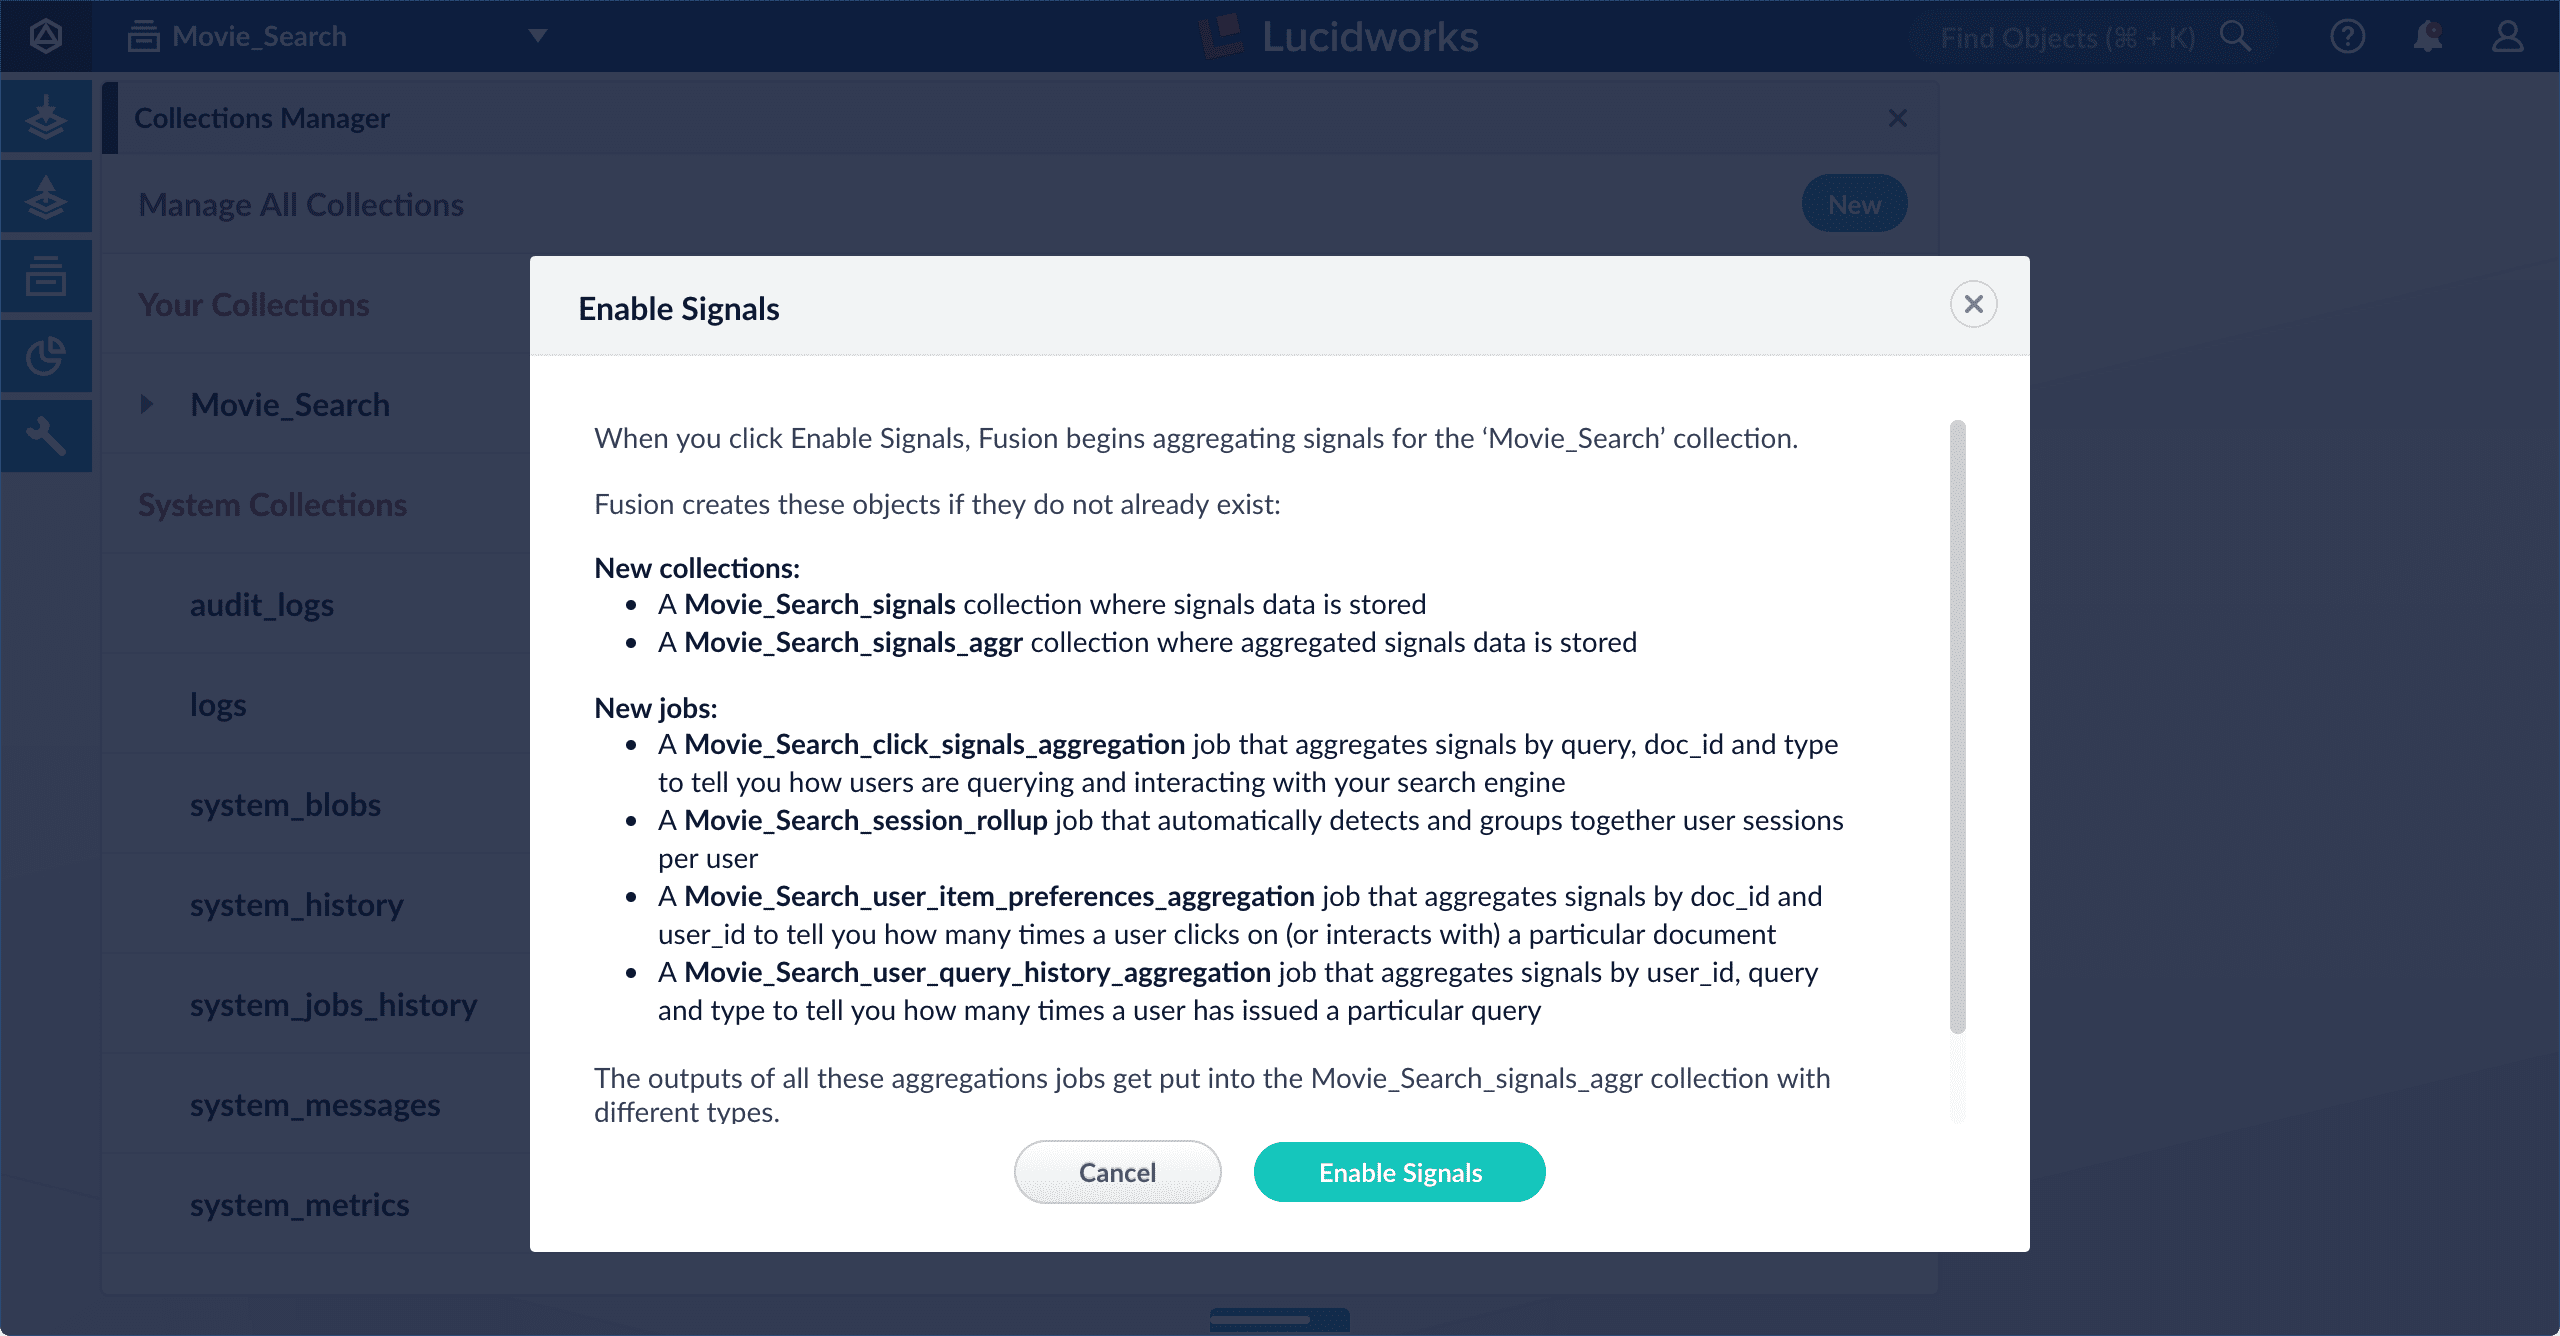
- Click Enable Signals.
- In the Fusion workspace, navigate to Collections > Collections Manager.
- Hover over the primary collection for which you want to disable signals.
- Click Configure to open the drop-down menu.
- Click Disable Signals.
The Disable Signals window appears, with a list of jobs that are created when you enable signals. - Click Disable Signals.
Your_signalsand_signals_aggrcollections remain intact so that you can access your legacy signals data.
Using the Collection Features API
Using the API, the/collections/{collection}/features/{feature} endpoint enables or disables signals for any collection:Check whether signals are enabled for a collection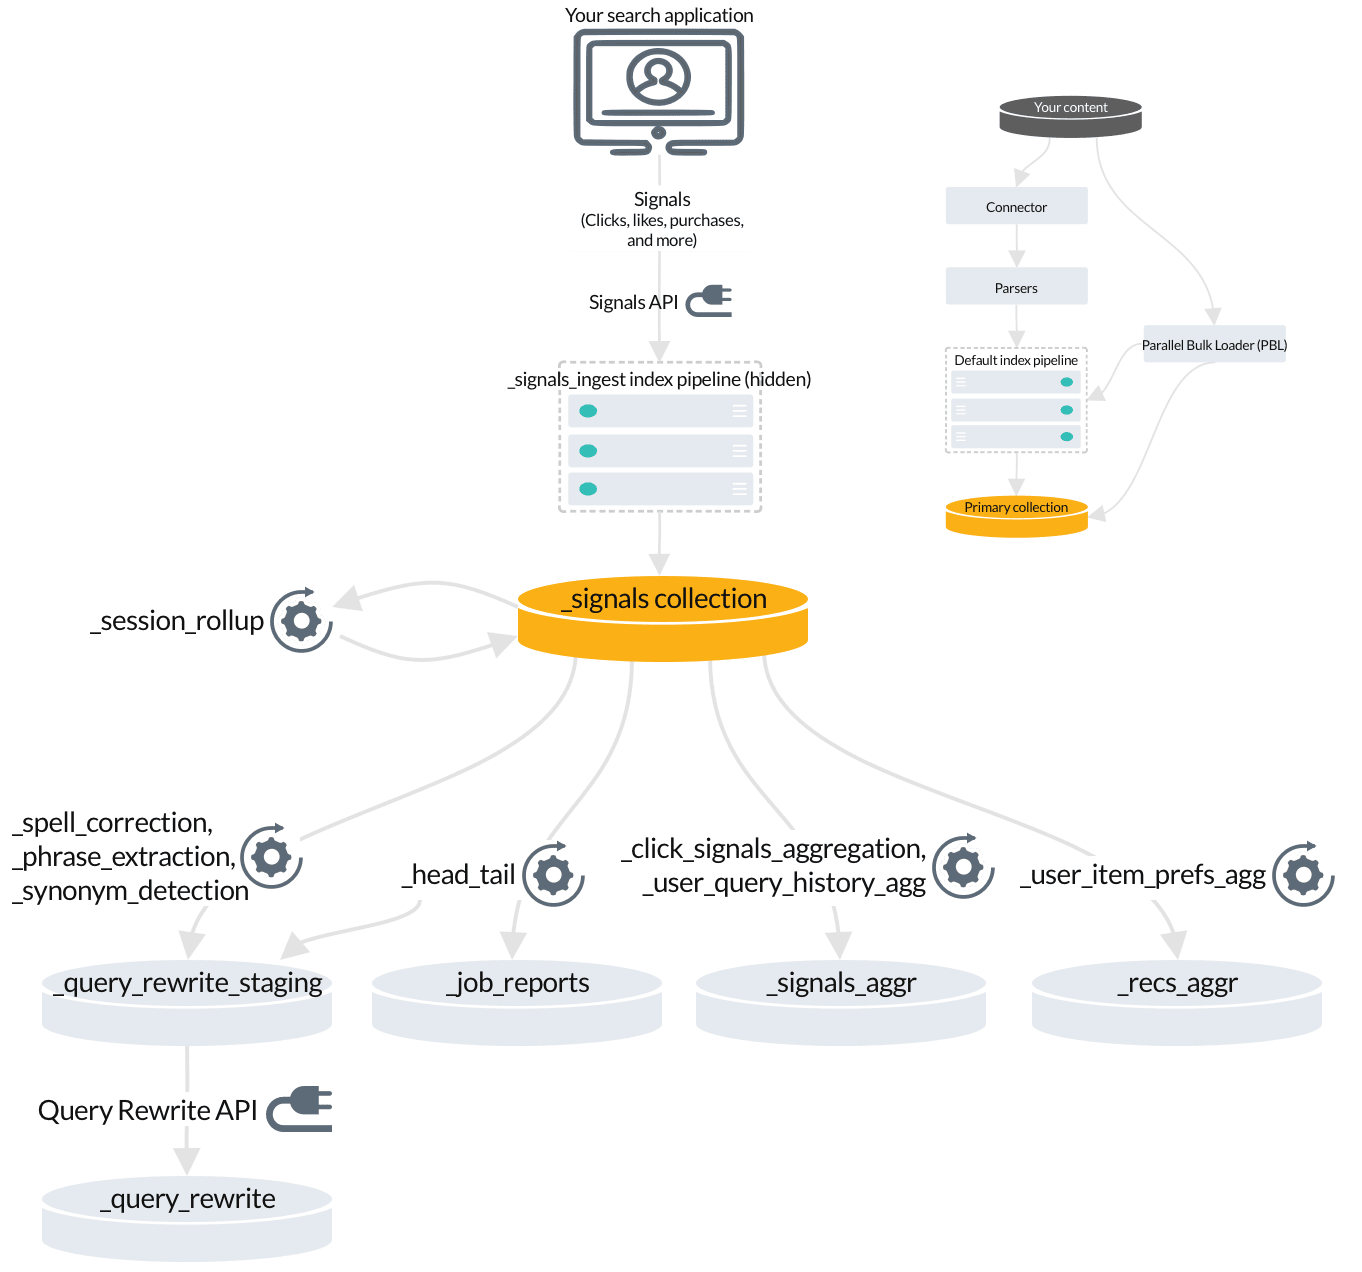
- The
_session_rollupjob creates session signals from your raw signals and adds them to the_signalscollection. - Automatic query rewrites are created by several jobs and indexed in the
_query_rewrite_stagingcollection for review before they are published to the_query_rewritecollection. - The
_head_tailjob sends rewrites for underperforming queries to the_query_rewrite_stagingcollection. It also sends analytics tables to the_job_reportscollection. - The
_signals_aggrcollection stores unique combinations of query, document ID, and filters found in your raw signals, each with a timestamp, weight, and count. These are generated by the_click_signals_aggregationjob and the_user_query_history_aggjob. - The
user_item_prefs_aggjob identifies unique pairs of document IDs and user IDs, assigns a timestamp, weight, and count to each pair, and indexes it in the_recs_aggrcollection.
4. Lucidworks Search jobs that index recommendations
When you enable recommendations, another set of jobs and secondary collections is created.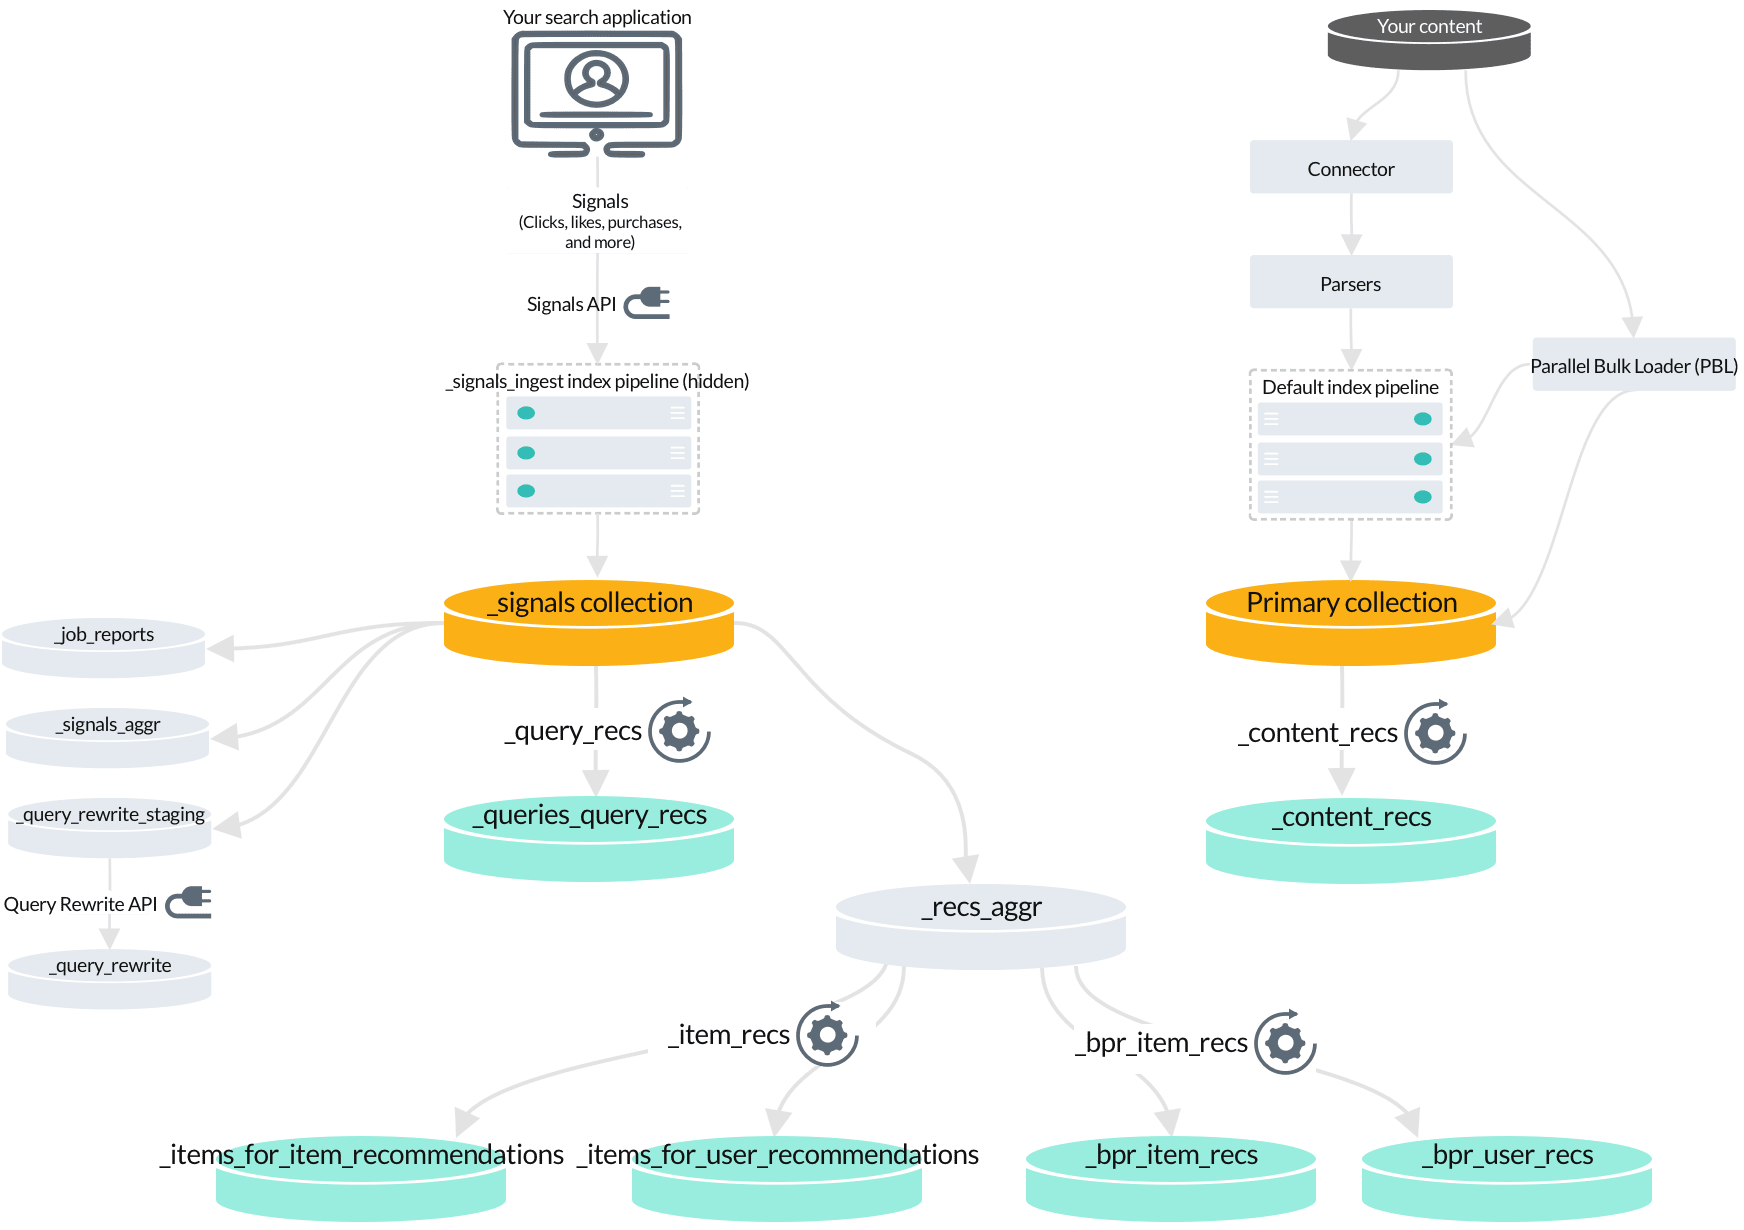
- Content-based recommendations are produced by the
_content_recsjob by analyzing your primary collection. - Queries-for-query recommendations are produced by the
_query_recsjob by analyzing your raw signals. - BPR-based items-for-item and items-for-user recommendations are produced by the
_bpr_item_recsjob by analyzing aggregated signals.
Identify trending items or queries
Identify trending items or queries
The Trending Recommender job analyzes signals to measure customer engagement over time. Use this job to identify spikes in popularity for specific items or queries, then display those items to your users or analyze the trends for business purposes. You can configure any time window, such as daily, weekly, or monthly.For complete details about the job’s configuration options, see Trending Recommender Jobs.How to identify trending items or queries
-
Navigate to Collections > Jobs > Add + > Trending Recommender.
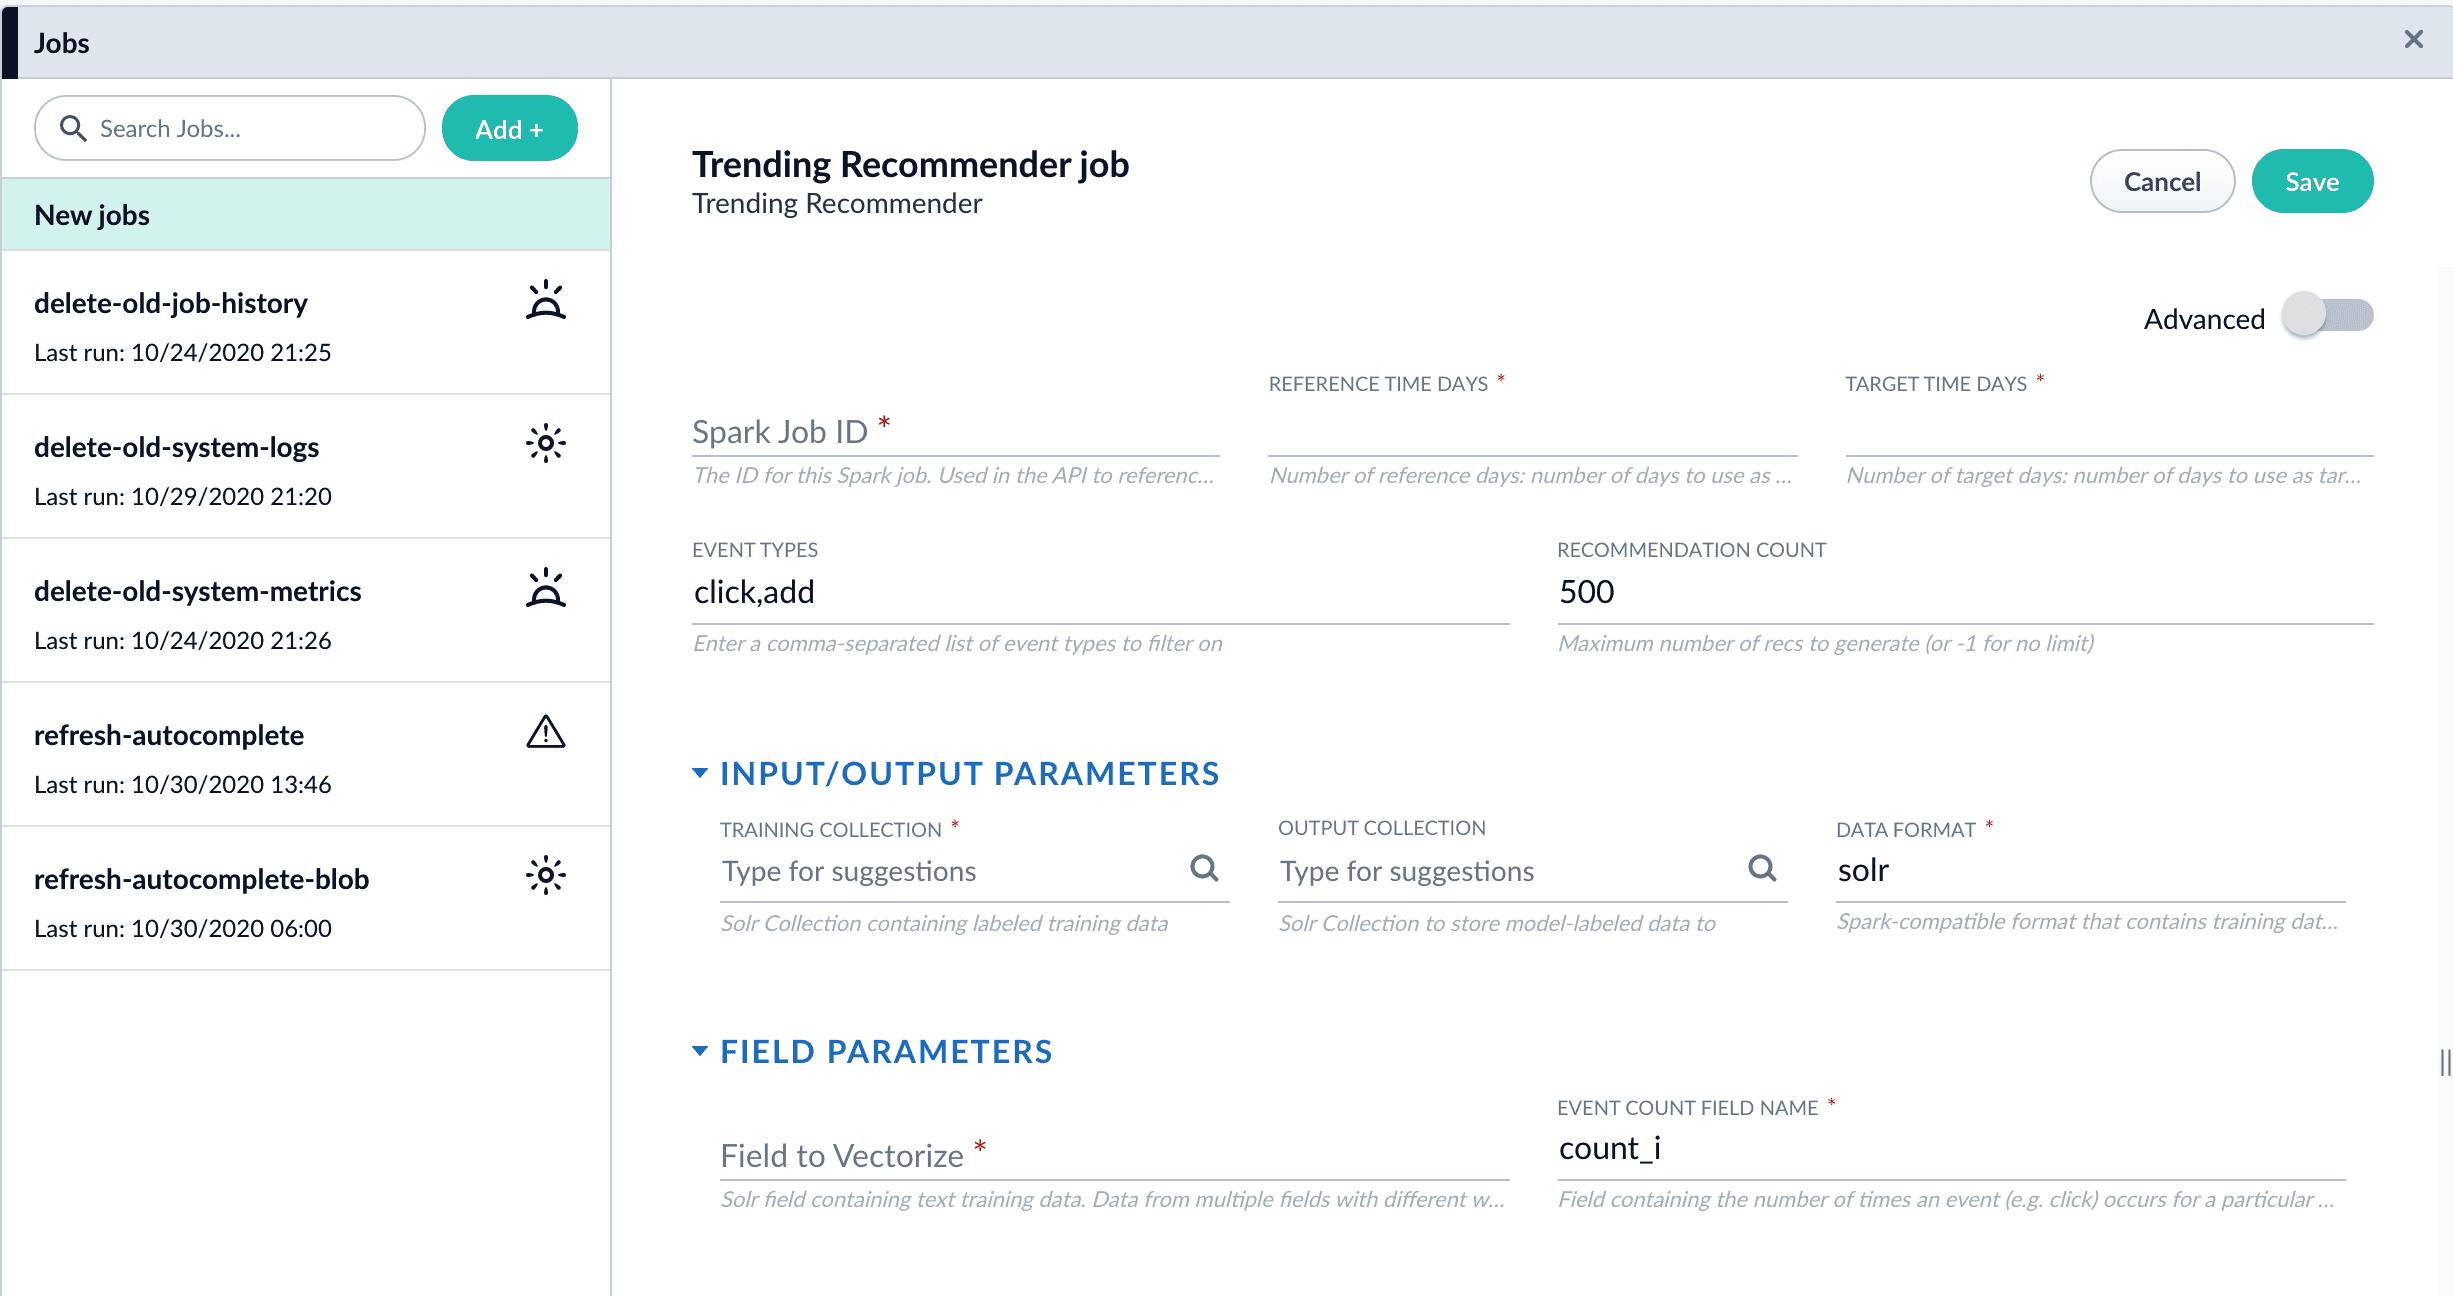
-
Configure the job:
- Enter an ID for this job.
- In the Reference Time Days field, enter the number of days to use as a baseline for identifying trends, starting from today.
For example, enter 21 days to analyze three weeks of signals data to use as a baseline. - In the Target Time Days field, enter the number of days to use as a target for identifying trends, starting from today.
For example, enter 7 days to get documents or products whose popularity has spiked in the past week. - If you want to identify trending queries instead of trending items, change the value of the Document ID Field from
doc_id_stoquery_s.This field must be present in your signals. See the required signals fields in the Trending Recommender Jobs reference topic. - In the Training Collection field, enter the Solr collection or cloud path where signals are stored (the
COLLECTION_NAME_signalscollection by default). - In the Output Collection field, enter the Solr collection or cloud path where trend analysis data will be stored.
- If you are using a format other than
solr, enter it in the Data Format field. - In the Solr Fields to Read field, enter one or more field names containing text training data.
- In the Event Count Field Name field, enter the name of the event count field in your training data, usually
count_i.
- Click Save.
- Click Run > Start to run the job. The job outputs documents similar to this example:
- Configure a query pipeline to retrieve trending items from the job’s output collection for display or further analysis. For more information about pipelines created when recommendations are enabled, see enable recommendations.
What’s next?
See Query data to learn about querying your content and recommendations.Indexing Menu Tour
The quick learning for Indexing Menu Tour focuses on the Indexing Menu features and functionality along with a brief description of each screen available in the menu.
Anatomy of Indexing
The quick learning for Anatomy of Indexing focuses on the Fusion objects that work together to index your data.
Ingesting Data
The course for Ingesting Data focuses on understanding connectors and how to configure datasources, parsers, and index pipelines.