Lucidworks Search Smart Answers brings the benefits of a versatile, scalable Semantic Search platform to provide cutting edge relevancy for your applications. This system makes use of advanced Deep Learning techniques to provide the power of Neural dense vectors search. Semantically rich models encode queries and documents into vectors in the same digital vector space in such way that query and the most relevant information are located near each other. It pushes search boundaries beyond classical token-based matching mechanisms by leveraging the contextual information and query understanding. Virtual assistants and Chatbots can incorporate Smart Answers to enable self-service for employees and customers and save cost on answering incoming queries. E-commerce can utilize Smart Answers to handle zero-result search queries and improve the overall relevancy by recommending products that are most likely of users interest. Training data can be explicitly provided as query/response pairs or constructed from the collected signals data. Even if you do not have an existing set of recorded interactions, you can rely on Smart Answers cold start solution. It uses various pre-trained models to get out-of-the-box (OOTB) semantic capabilities as well as provides a possibility to train unsupervised models for specific domains. These features bring traditional search relevancy development and Data Science together into an easy-to-use configuration framework that leverages Lucidworks Search’s indexing and querying pipelines.Documentation Index
Fetch the complete documentation index at: https://doc.lucidworks.com/llms.txt
Use this file to discover all available pages before exploring further.
Smart Answers
The course for Smart Answers focuses on how to utilize Smart Answers to go beyond classical token-based matching mechanisms by leveraging contextual information and query understanding.
Example business use cases
Call center or IT support- Embed this system as a self-help feature on your Help page or Contact Us page to reduce the call center load.
- Make it available to your customer support team to find the answers to already-solved problems.
Get started with Smart Answers
To get started, you need a trained machine learning model. There are two methods for building a model, depending on the kind of data you already have. Each method requires a slightly different model training procedure, but the model deployment procedure is the same for both. To implement Smart Answers, follow this workflow:- Train or install a machine learning model. This process differs depending on whether you use the Smart Answers supervised solution or the Smart Answers cold start solution.
- Use the supervised solution when you already have a collection of query/response pairs or if you can construct such a dataset from the signals data. The input is a dataset of query/response pairs. See Train a Smart Answers Supervised Model.
Train a Smart Answers Supervised Model
Train a Smart Answers Supervised Model
The Supervised solution for Smart Answers begins with training a model using your existing data and the Smart Answers Supervised Training job, as explained in this topic. The job includes an auto-tune feature that you can use instead of manually tuning the configuration.
Training job requirements
Storage150GB plus 2.5 times the total input data size.Processor and memoryThe memory requirements depend on whether you choose GPU or CPU processing:| GPU | CPU |
|---|---|
|
|
Prepare the input data
-
Format your input data as question/answer pairs, that is, a query and its corresponding response in each row.
You can do this in any format that Lucidworks Search supports.
If there are multiple possible answers for a unique question, then repeat the questions and put the pair into different rows to make sure each row has one question and one answer, as in the example JSON below:
-
Index the input data in Lucidworks Search.
If you wish to have the training data in Lucidworks Search, index it into a separate collection for training data such as
model_training_input. Otherwise you can use it directly from the cloud storage.
Configure the training job
- In Lucidworks Search, navigate to Collections > Jobs.
-
Select Add > Smart Answers Supervised Training:

-
In the Training Collection field, specify the input data collection that you created when you prepared the input data.
You can also configure this job to read from or write to cloud storage.
- Enter the names of the Question Field and the Answer Field in the training collection.
- Enter a Model Deployment Name. The new machine learning model will be saved in the blob store with this name. You will reference it later when you configure your pipelines.
-
Configure the Model base.
There are several pre-trained word and BPE embeddings for different languages, as well as a few pre-trained BERT models.
If you want to train custom embeddings, select
word_customorbpe_custom. This trains Word2vec on the provided data and specified fields. It might be useful in cases when your content includes unusual or domain-specific vocabulary. If you have content in addition to the query/response pairs that can be used to train the model, then specify it in the Texts Data Path. When you use the pre-trained embeddings, the log shows the percentage of processed vocabulary words. If this value is high, then try using custom embeddings. The job trains a few (configurable) RNN layers on top of word embeddings or fine-tunes a BERT model on the provided training data. The result model uses an attention mechanism to average word embeddings to obtain the final single dense vector for the content. - Optional: Check Perform auto hyperparameter tuning to use auto-tune. Although training module tries to select the most optimal default parameters based on the training data statistics, auto-tune can extend it by automatically finding even better training configuration through hyper-parameter search. Although this is a resource-intensive operation, it can be useful to identify the best possible RNN-based configuration. Transformer-based models like BERT are not used during auto hyperparameter tuning as they usually perform better yet they are much more expensive on both training and inference time.
-
Click Save.
 If using solr as the training data source ensure that the source collection contains the
random_*dynamic field defined in itsmanaged-schema.xml. This field is required for sampling the data. If it is not present, add the following entry to themanaged-schema.xmlalongside other dynamic fields<dynamicField name="random_*" type="random"/>and <fieldType class=“solr.RandomSortField” indexed=“true” name=“random”/> alongside other field types. - Click Run > Start.
Next steps
- See A Smart Answers Supervised Job’s Status and Output
- Configure The Smart Answers Pipelines
- Evaluate a Smart Answers Query Pipeline
- Use the cold start solution when you have no historical training data or fewer than 200 query/response pairs. Each method requires a slightly different model training procedure, but the model deployment procedure is the same for both.
- If you have a pre-trained cold start model, see Set Up a Pre-Trained Cold Start Model for Smart Answers, which deploys the existing model into Fusion.
- If you have a body of content that can be used for unsupervised training, see Train a Smart Answers Cold Start Model.
Set Up a Pre-Trained Cold Start Model for Smart Answers
Set Up a Pre-Trained Cold Start Model for Smart Answers
Lucidworks provides these pre-trained cold start models for Smart Answers:
qna-coldstart-large- this is a large model trained on variety of corpuses and tasks.qna-coldstart-multilingual- covers 16 languages. List of supported languages: Arabic, Chinese-simplified, Chinese-traditional, English, French, German, Italian, Japanese, Korean, Dutch, Polish, Portuguese, Spanish, Thai, Turkish, Russian.
Deploy a pre-trained cold-start model into Fusion
The pre-trained cold-start models are deployed using a Fusion job called Create Seldon Core Model Deployment. This job downloads the selected pre-trained model and installs it in Fusion.- Navigate to Collections > Jobs.
- Select Add > Create Seldon Core Model Deployment.
- Enter a Job ID, such as
deploy-qna-coldstart-multilingualordeploy-qna-coldstart-large. - Enter the Model Name, one of the following:
qna-coldstart-multilingualqna-coldstart-large
- In the Docker Repository field, enter
lucidworks. - In the Image Name field, enter one of the following:
qna-coldstart-multilingual:v1.1qna-coldstart-large:v1.1
- Leave the Kubernetes Secret Name for Model Repo field empty.
- In the Output Column Names for Model field, enter one of the following:
qna-coldstart-multilingual:[vector]qna-coldstart-large:[vector, compressed_vector]
- Click Save.
- Click Run > Start to start the deployment job.
Next steps
- Configure The Smart Answers Pipelines
- Evaluate a Smart Answers Query Pipeline
Train a Smart Answers cold start model
Train a Smart Answers cold start model
The Smart Answers Cold Start Training job is deprecated in Fusion 5.12.
Configure the training job
- In Fusion, navigate to Collections > Jobs.
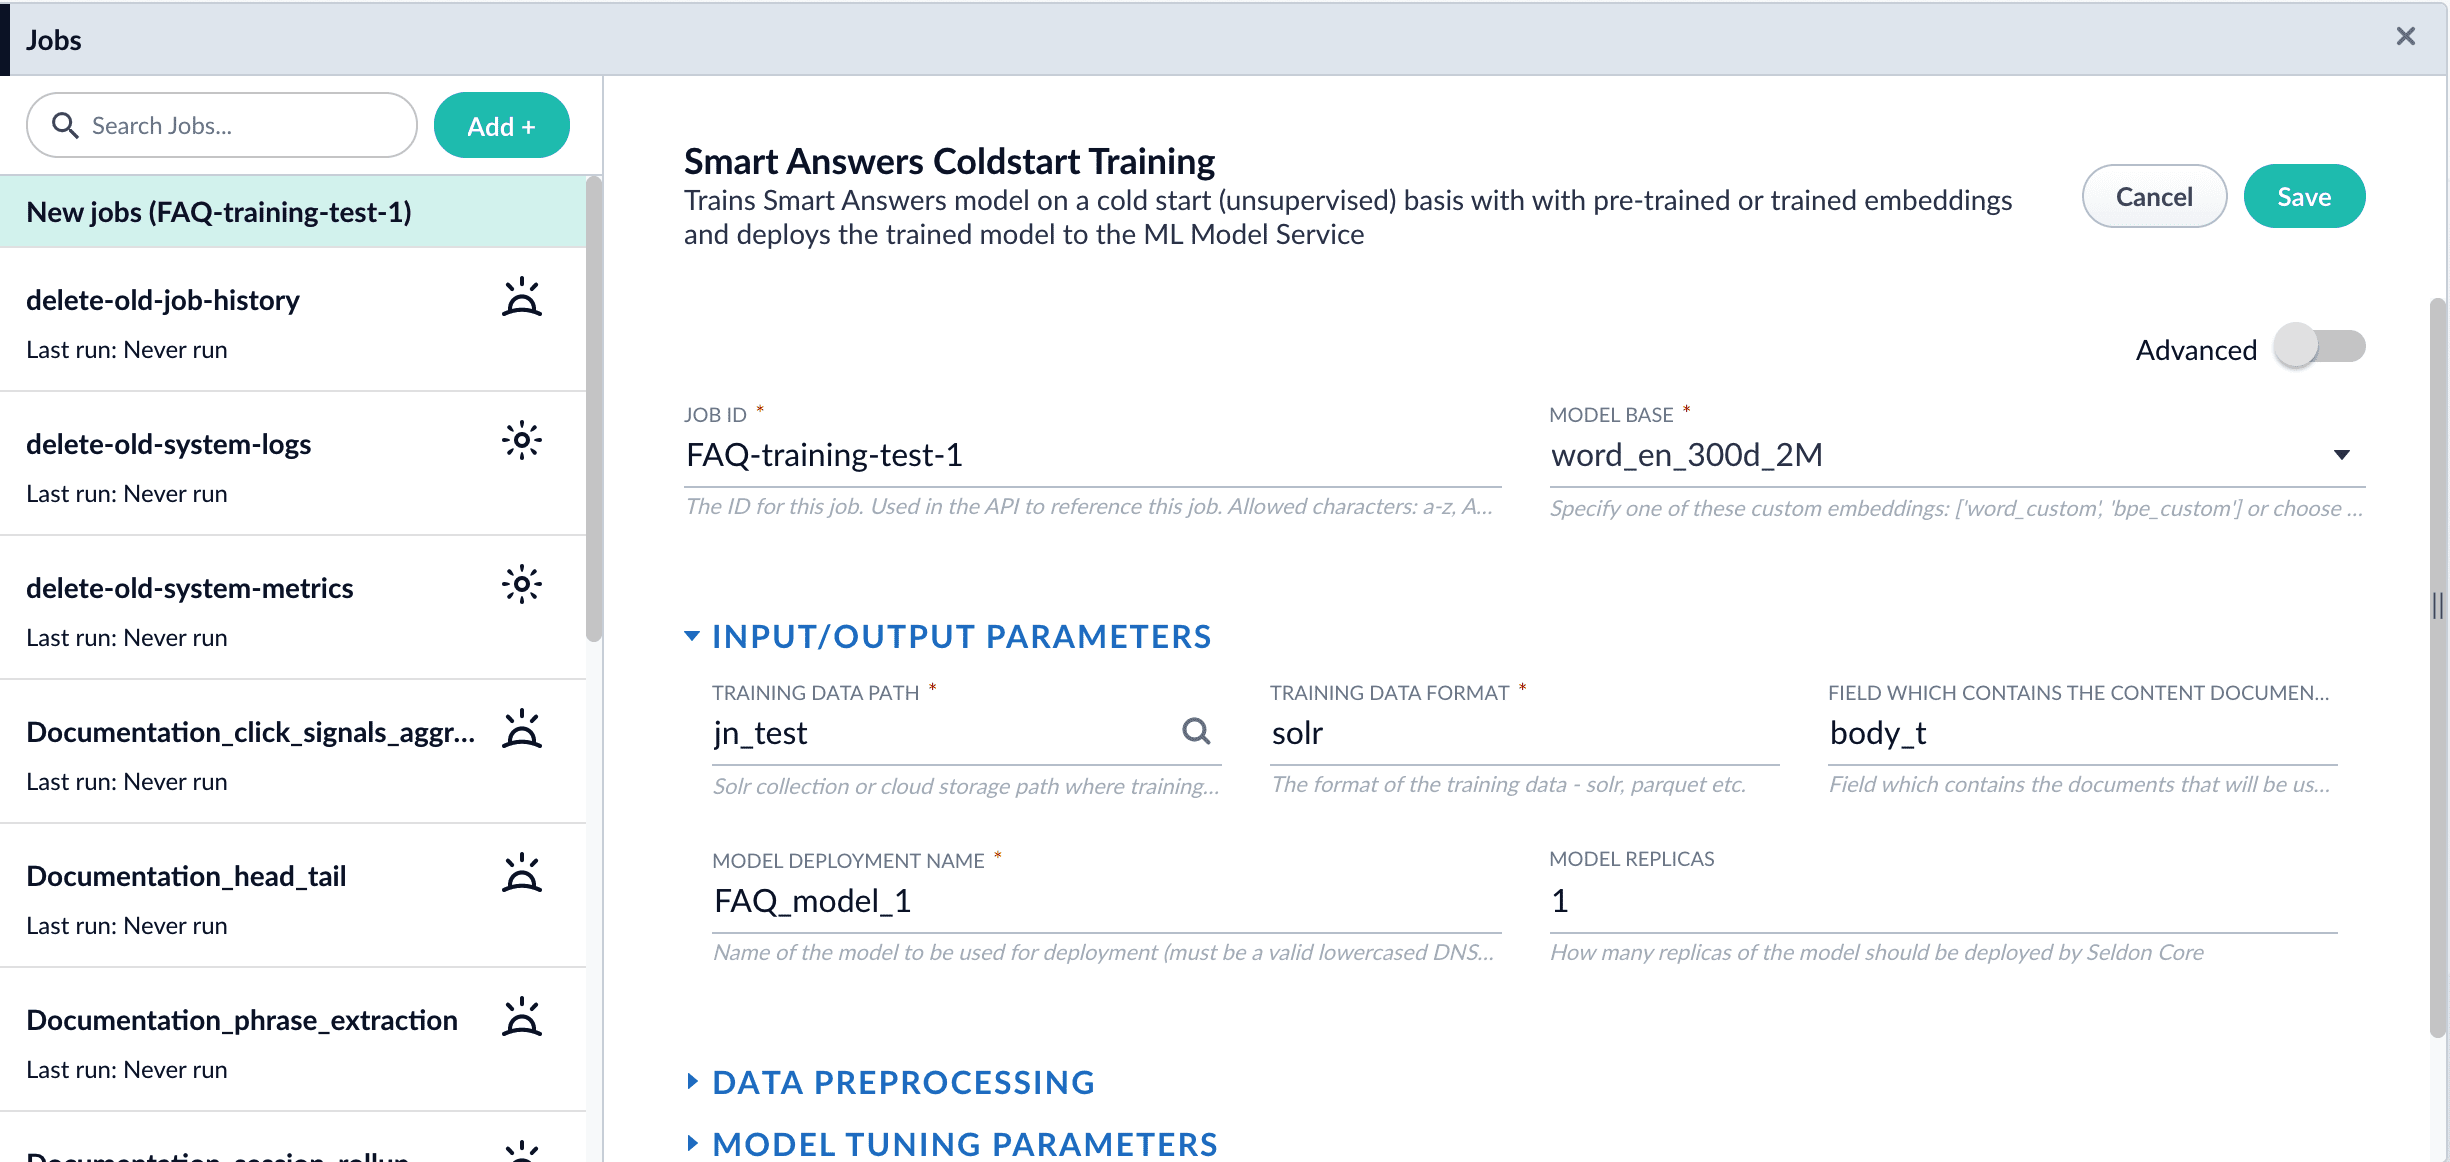
- Select Add > Smart Answer Coldstart Training.
- In the Training Collection field, specify the collection that contains the content that can be used to answer questions.
- Enter the name of the Field which contains the content documents.
- Enter a Model Deployment Name. The new machine learning model is saved in the blob store with this name. You will reference it later when you configure your pipelines.
-
Configure the Model base.
There are several pre-trained word and BPE embeddings for different languages, as well as a few pre-trained BERT models.
If you want to train custom embeddings, please select
word_customorbpe_custom. This trains Word2vec on the data and fields specified in Training collection and Field which contains the content documents. It might be useful in cases when your content includes unusual or domain-specific vocabulary. When you use the pre-trained embeddings, the log shows the percentage of processed vocabulary words. If this value is high, then try using custom embeddings. During the training job analyzes the content data to select weights for each of the words. The result model performs the weighted average of word embeddings to obtain final single dense vector for the content. -
Click Save.
 If using solr as the training data source ensure that the source collection contains the
random_*dynamic field defined in itsmanaged-schema.xml. This field is required for sampling the data. If it is not present, add the following entry to themanaged-schema.xmlalongside other dynamic fields<dynamicField name="random_*" type="random"/>and <fieldType class=“solr.RandomSortField” indexed=“true” name=“random”/> alongside other field types. - Click Run > Start.
Next steps
- Configure The Smart Answers Pipelines
- Evaluate a Smart Answers Query Pipeline
- Configure the index and query pipelines.
Fusion includes default pipelines to get you started. See Configure the Smart Answers Pipelines.
Configure the Smart Answers pipelines
Configure the Smart Answers pipelines
Before beginning this procedure, train a machine learning model using either the FAQ method or the cold start method.Regardless of how you set up your model, the deployment procedure is the same: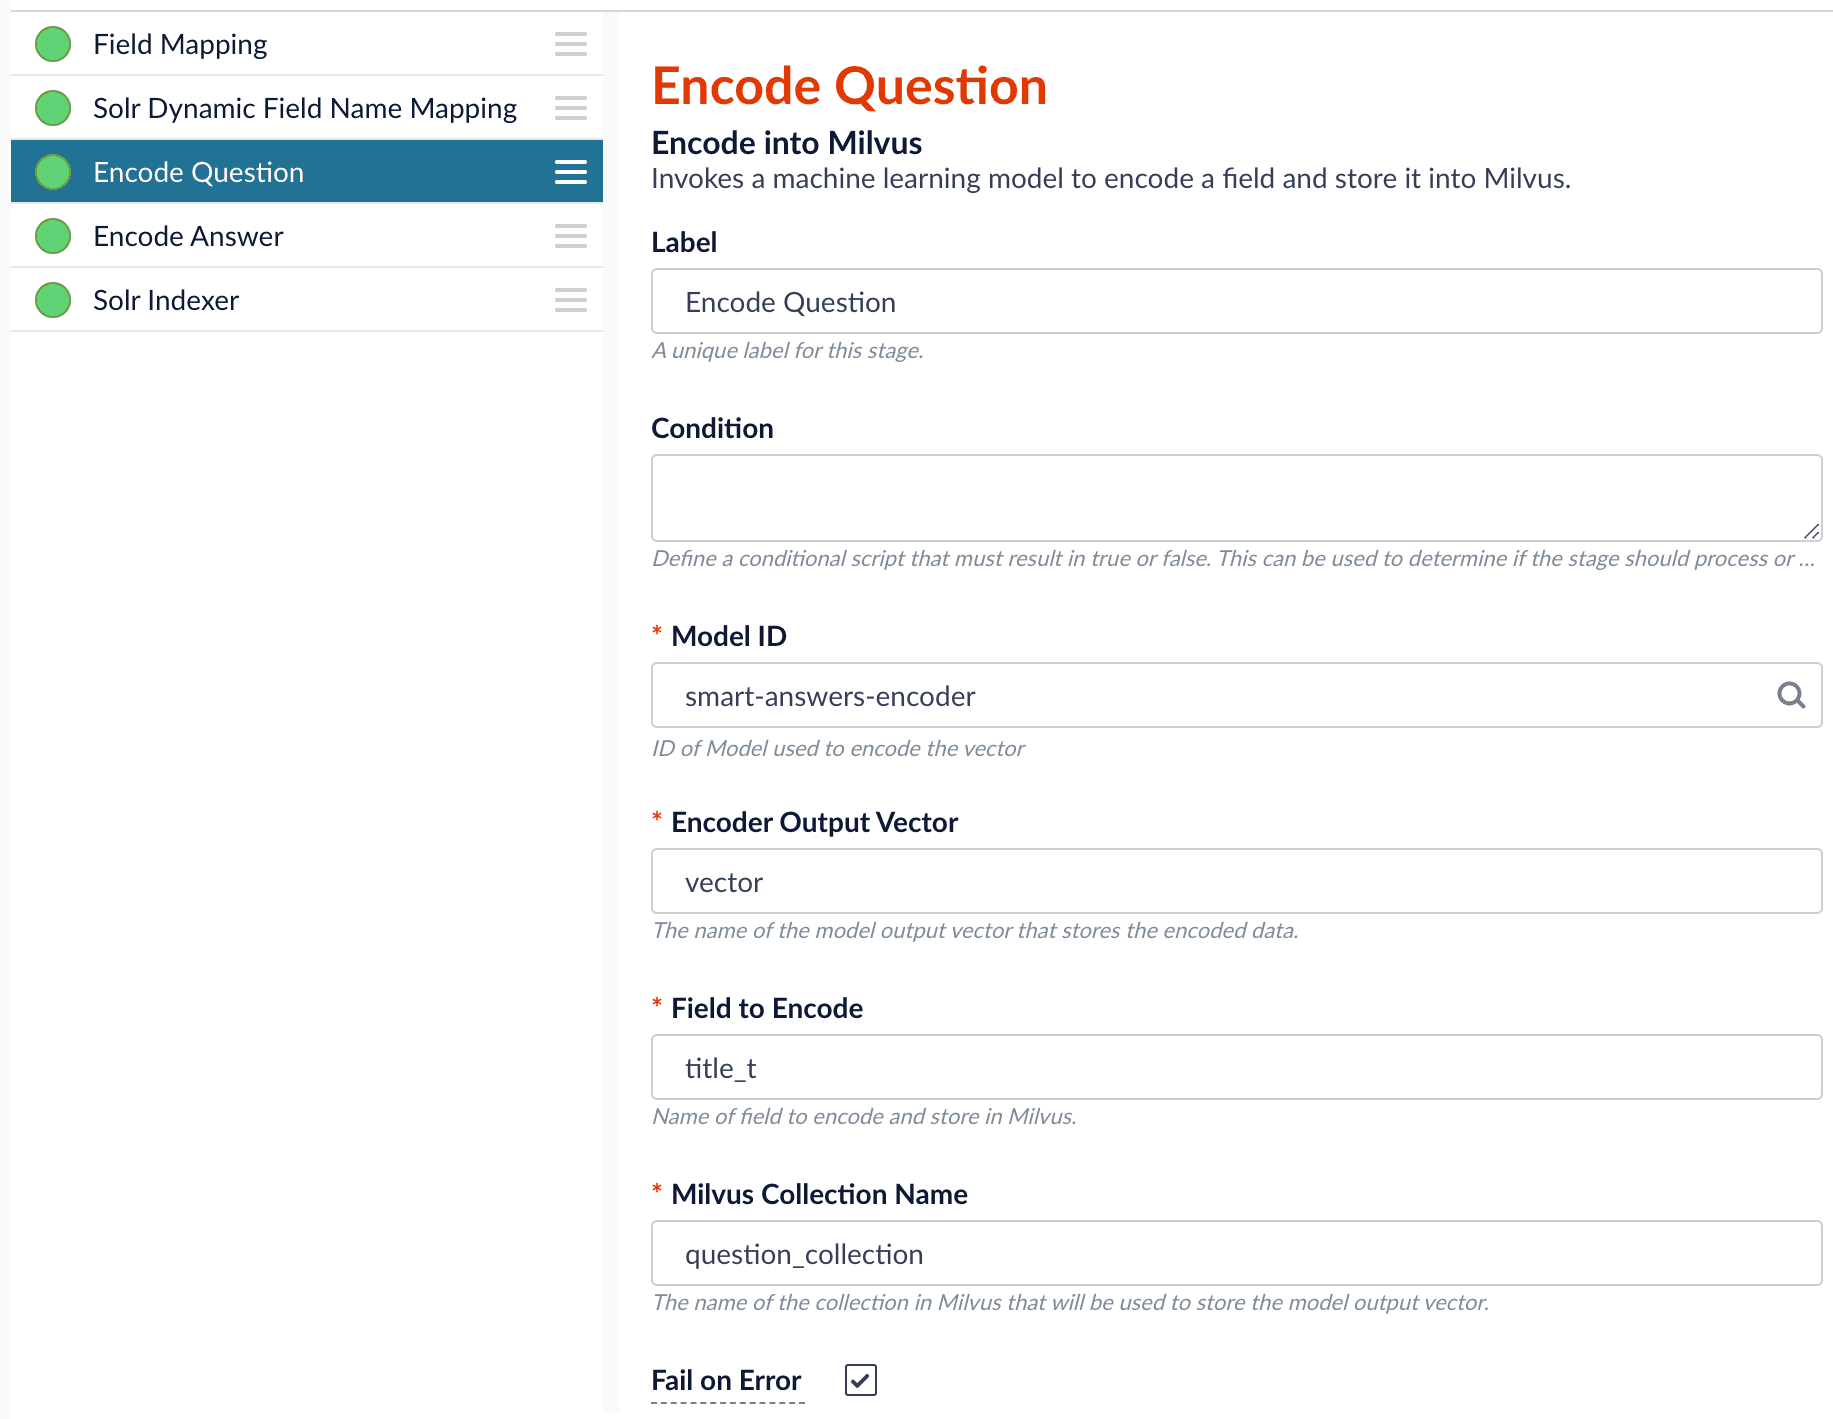
- Create the
Milvuscollection. - Configure the
smart-answersindex pipeline. - Configure the
smart-answersquery pipeline.
Create the Milvus collection
For complete details about job configuration options, see the Create Collections in Milvus job.- Navigate to Collections > Jobs > Add + and select Create Collections in Milvus.
-
Configure the job:
- Enter an ID for this job.
- Under Collections, click Add.
- Enter a collection name.
- In the Dimension field, enter the dimension size of vectors to store in this Milvus collection. The Dimension should match the size of the vectors returned by the encoding model. For example, the
Smart Answers Pre-trained Coldstartmodels outputs vectors of 512 dimension size. Dimensionality of encoders trained bySmart Answers Supervised Trainingjob depends on the provided parameters and printed in the training job logs.
-
Click Save.
The
Create Collections in Milvusjob can be used to create multiple collections at once. In this image, the first collection is used in the indexing and query steps. The other two collections are used in the pipeline setup example.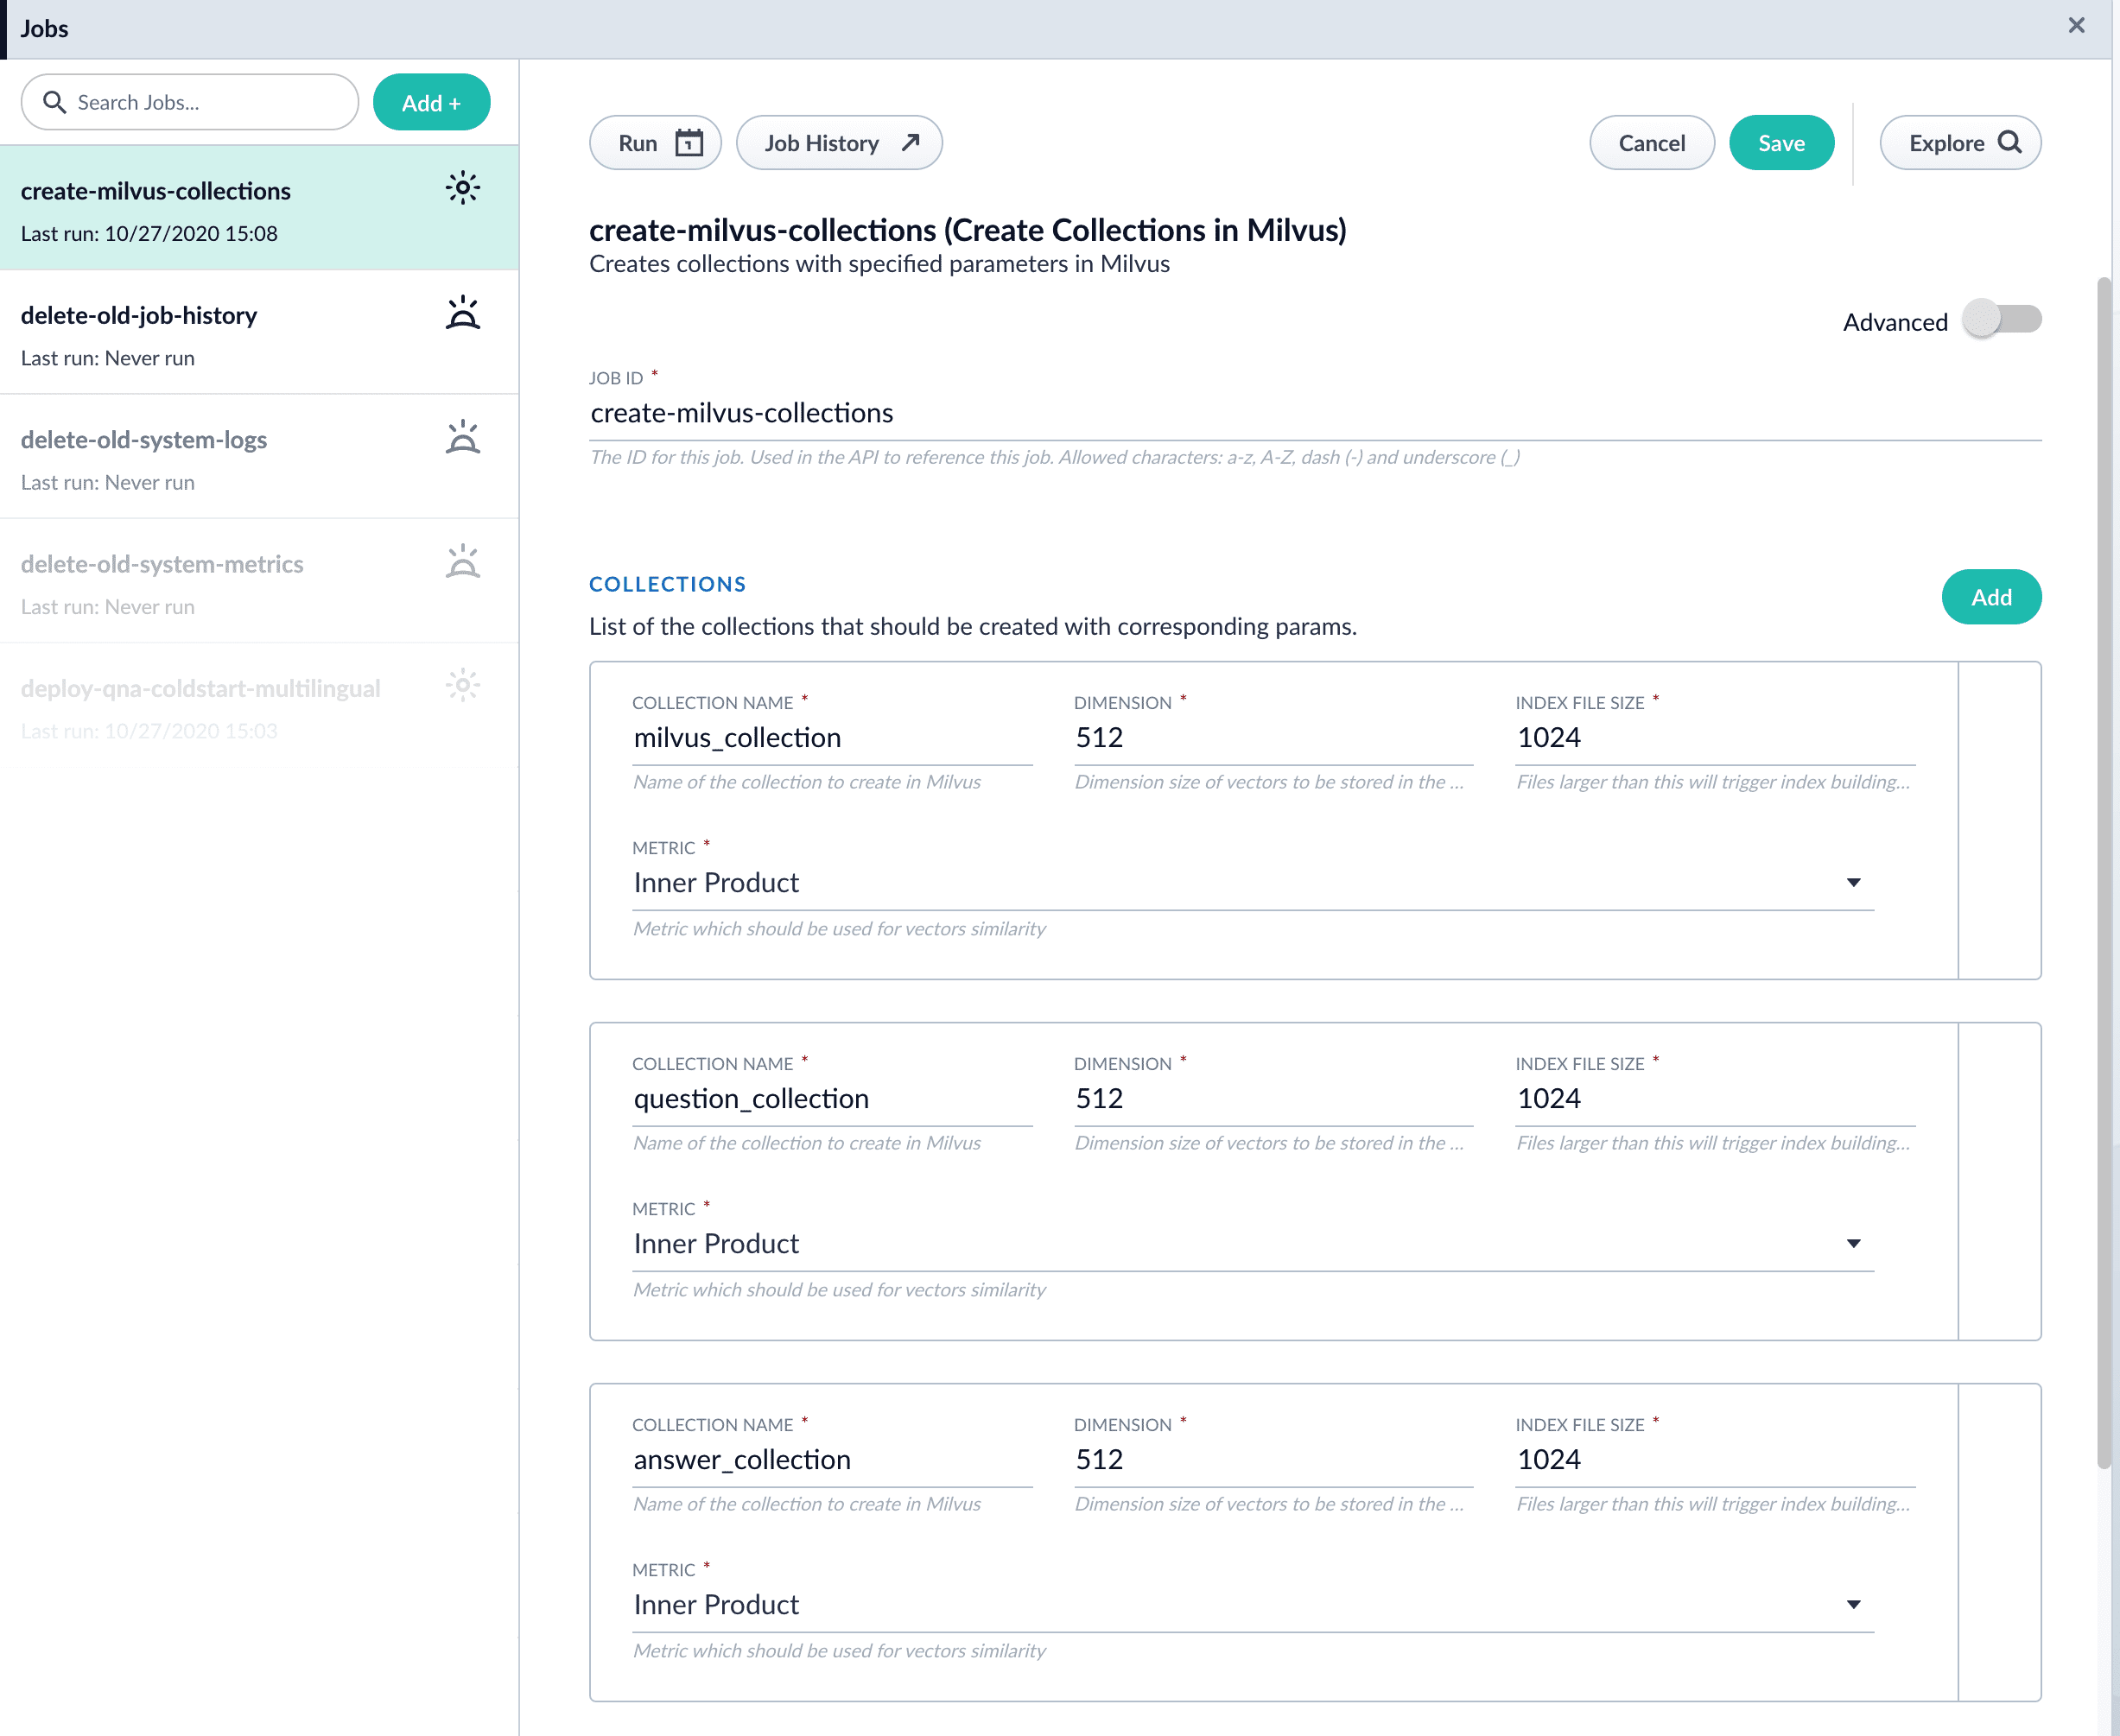
- Click Run > Start to run the job.
Configure the index pipeline
- Open the Index Workbench.
-
Load or create your datasource using the default smart-answers index pipeline.
-
Configure the
Encode into Milvus stage:
- change the value of Model ID to match the model deployment name you chose when you configured the model training job.
-
Change
Field to Encodeto the document field name to be processed and encoded into dense vectors. -
Ensure the
Encoder Output Vectormatches the output vector from the chosen model. -
Ensure the
Milvus Collection Namematches the collection name created via theCreate Milvus Collectionjob.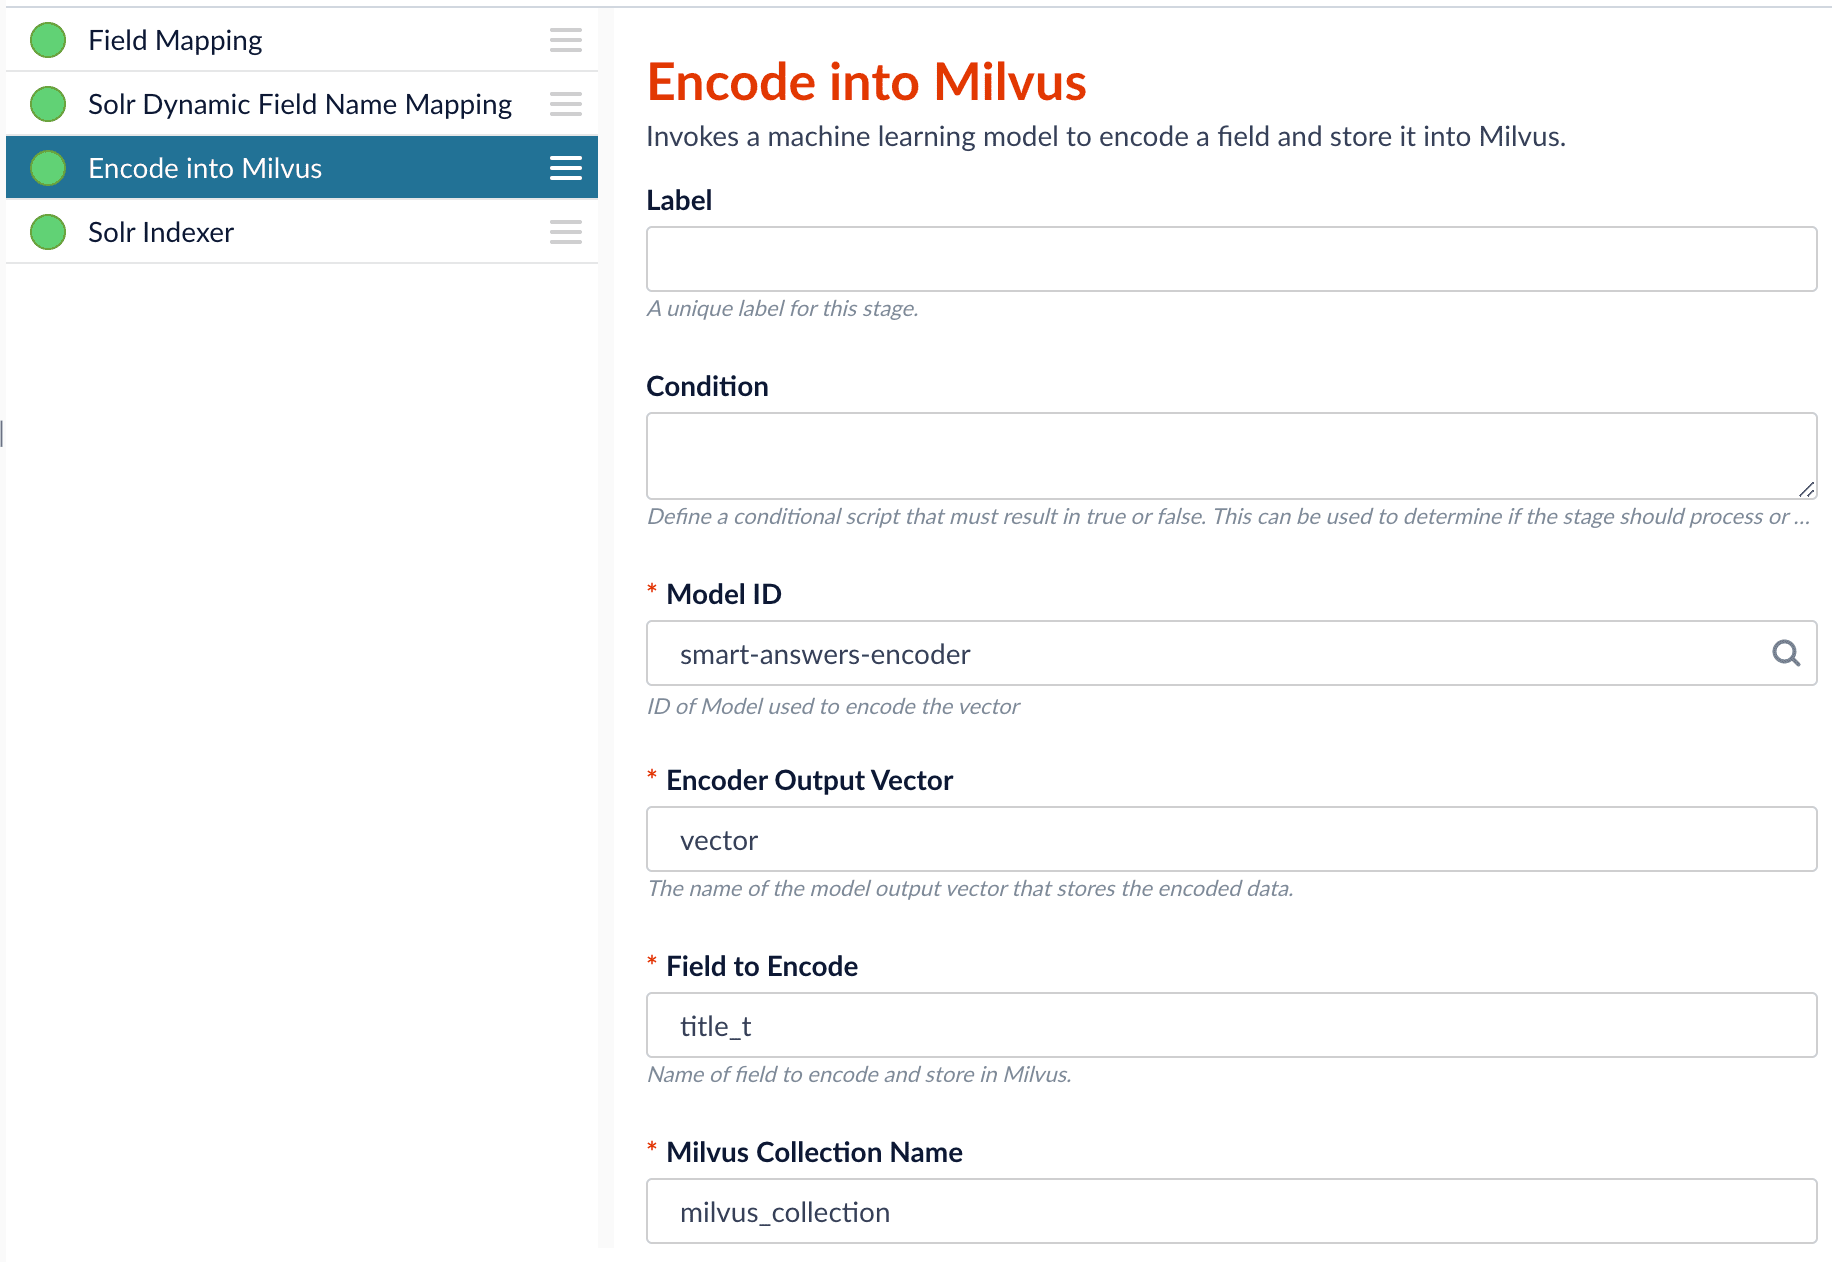
- Save the datasource.
- Index your data.
Configure the query pipeline
- Open the Query Workbench.
-
Load the default smart-answers query pipeline.
-
Configure the Milvus Query stage:
- Change the Model ID value to match the model deployment name you chose when you configured the model training job.
-
Ensure the
Encoder Output Vectormatches the output vector from the chosen model. -
Ensure the
Milvus Collection Namematches the collection name created via theCreate Milvus Collectionjob. -
Milvus Results Context Keycan be changed as needed. It will be used in the Milvus Ensemble Query Stage to calculate the query score.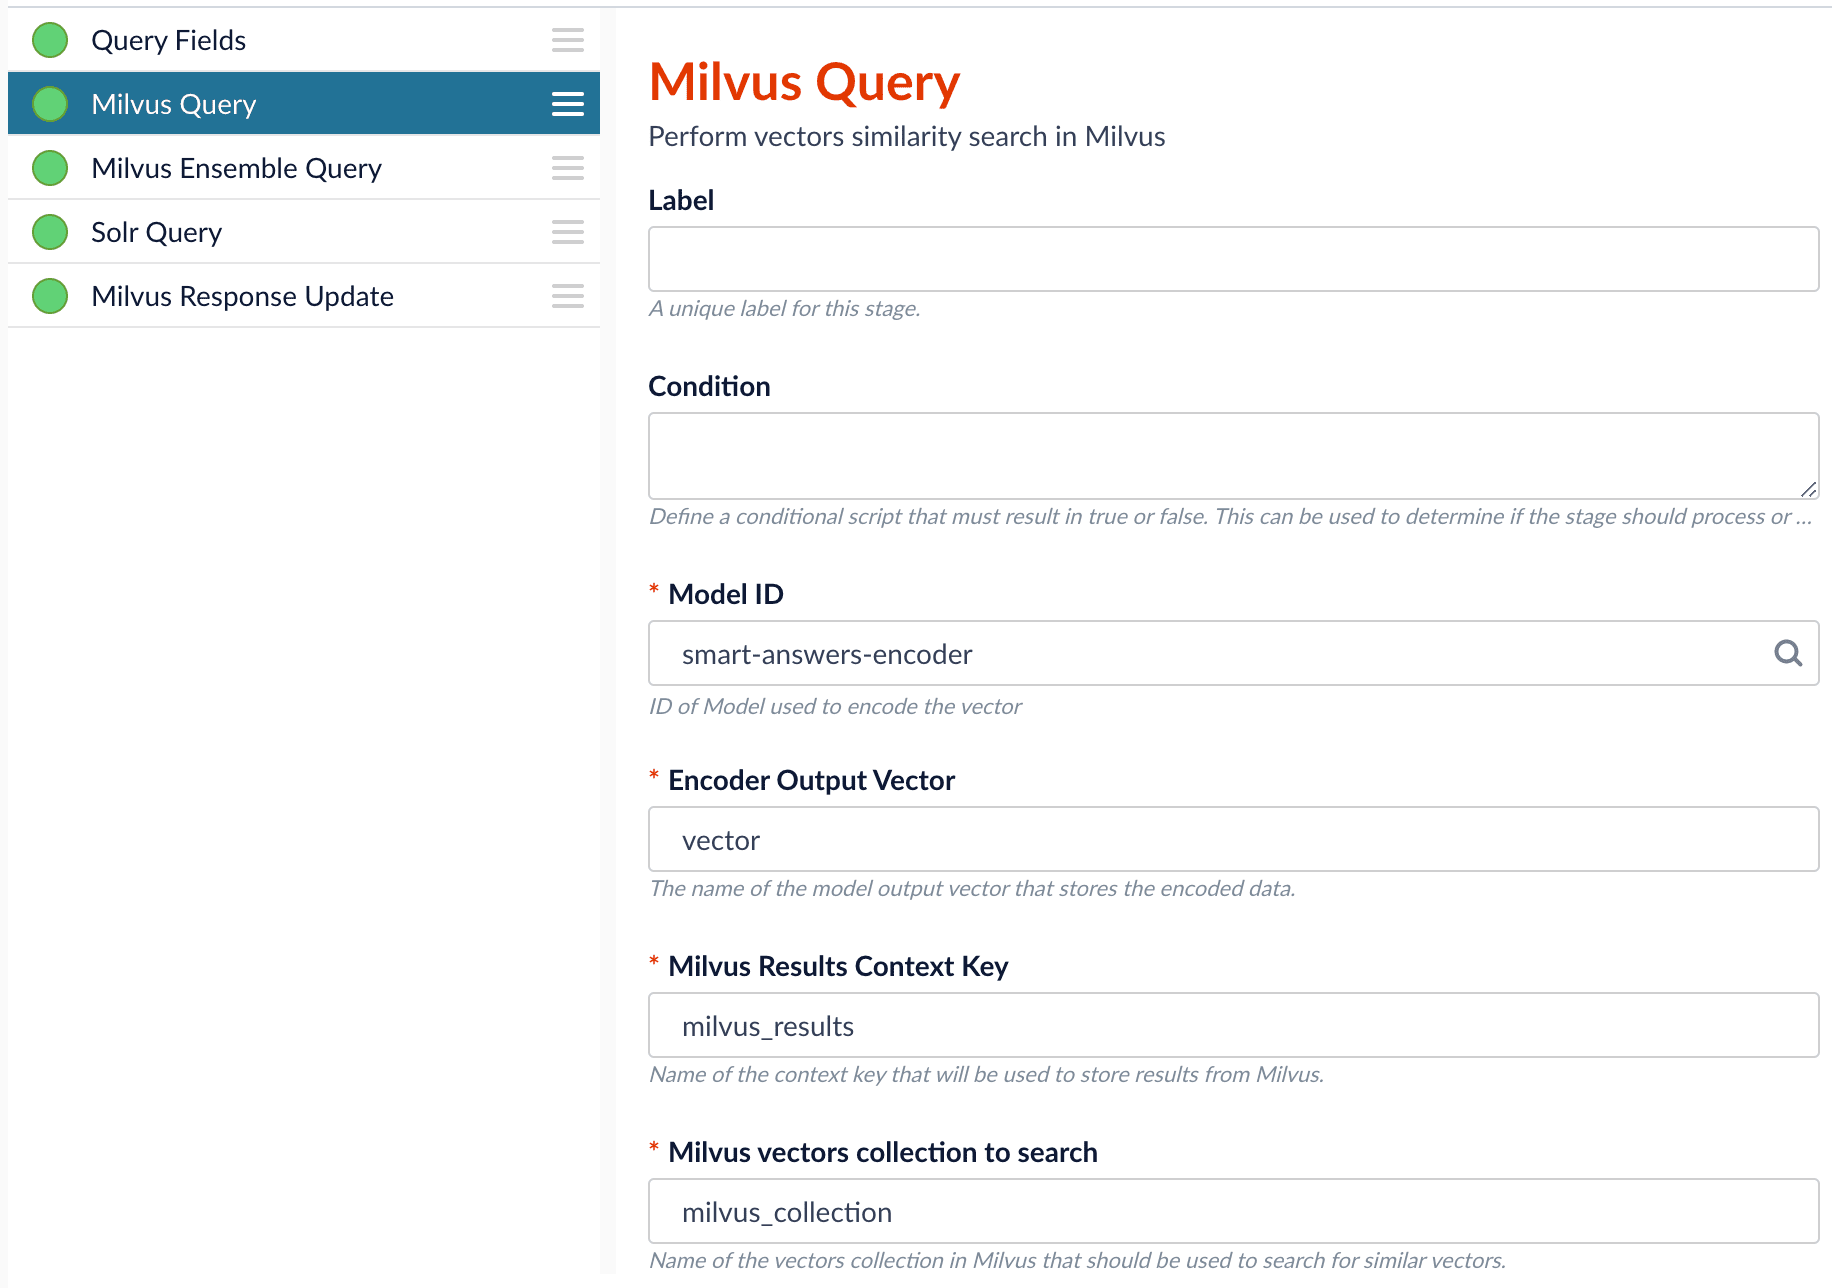
-
In the Milvus Ensemble Query stage, update the
Ensemble math expressionas needed based on your model and the name used in the prior stage for the storing the Milvus results. You can also set theThresholdso that the Milvus Ensemble Query Stage will only return items with a score greater than or equal to the configured value.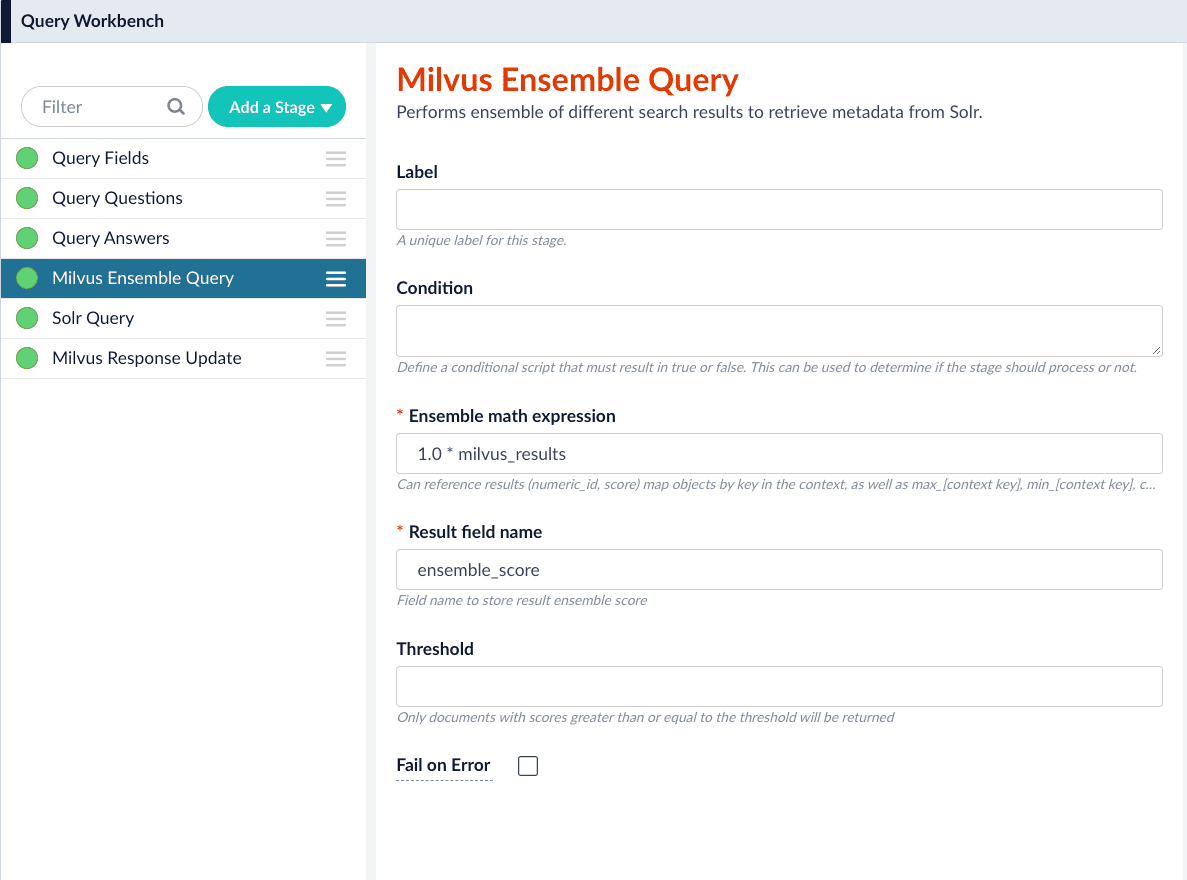
- Save the query pipeline.
Pipeline Setup Example
Index and retrieve the question and answer together
To show question and answer together in one document (that is, treat the question as the title and the answer as the description), you can index them together in the same document. You can still use the defaultsmart-answers index and query pipelines with a few additional changes.Prior to configuring the Smart Answers pipelines, use the Create Milvus Collection job to create two collections, question_collection and answer_collection, to store the encoded “questions” and the encoded “answers”, respectively.Index Pipeline
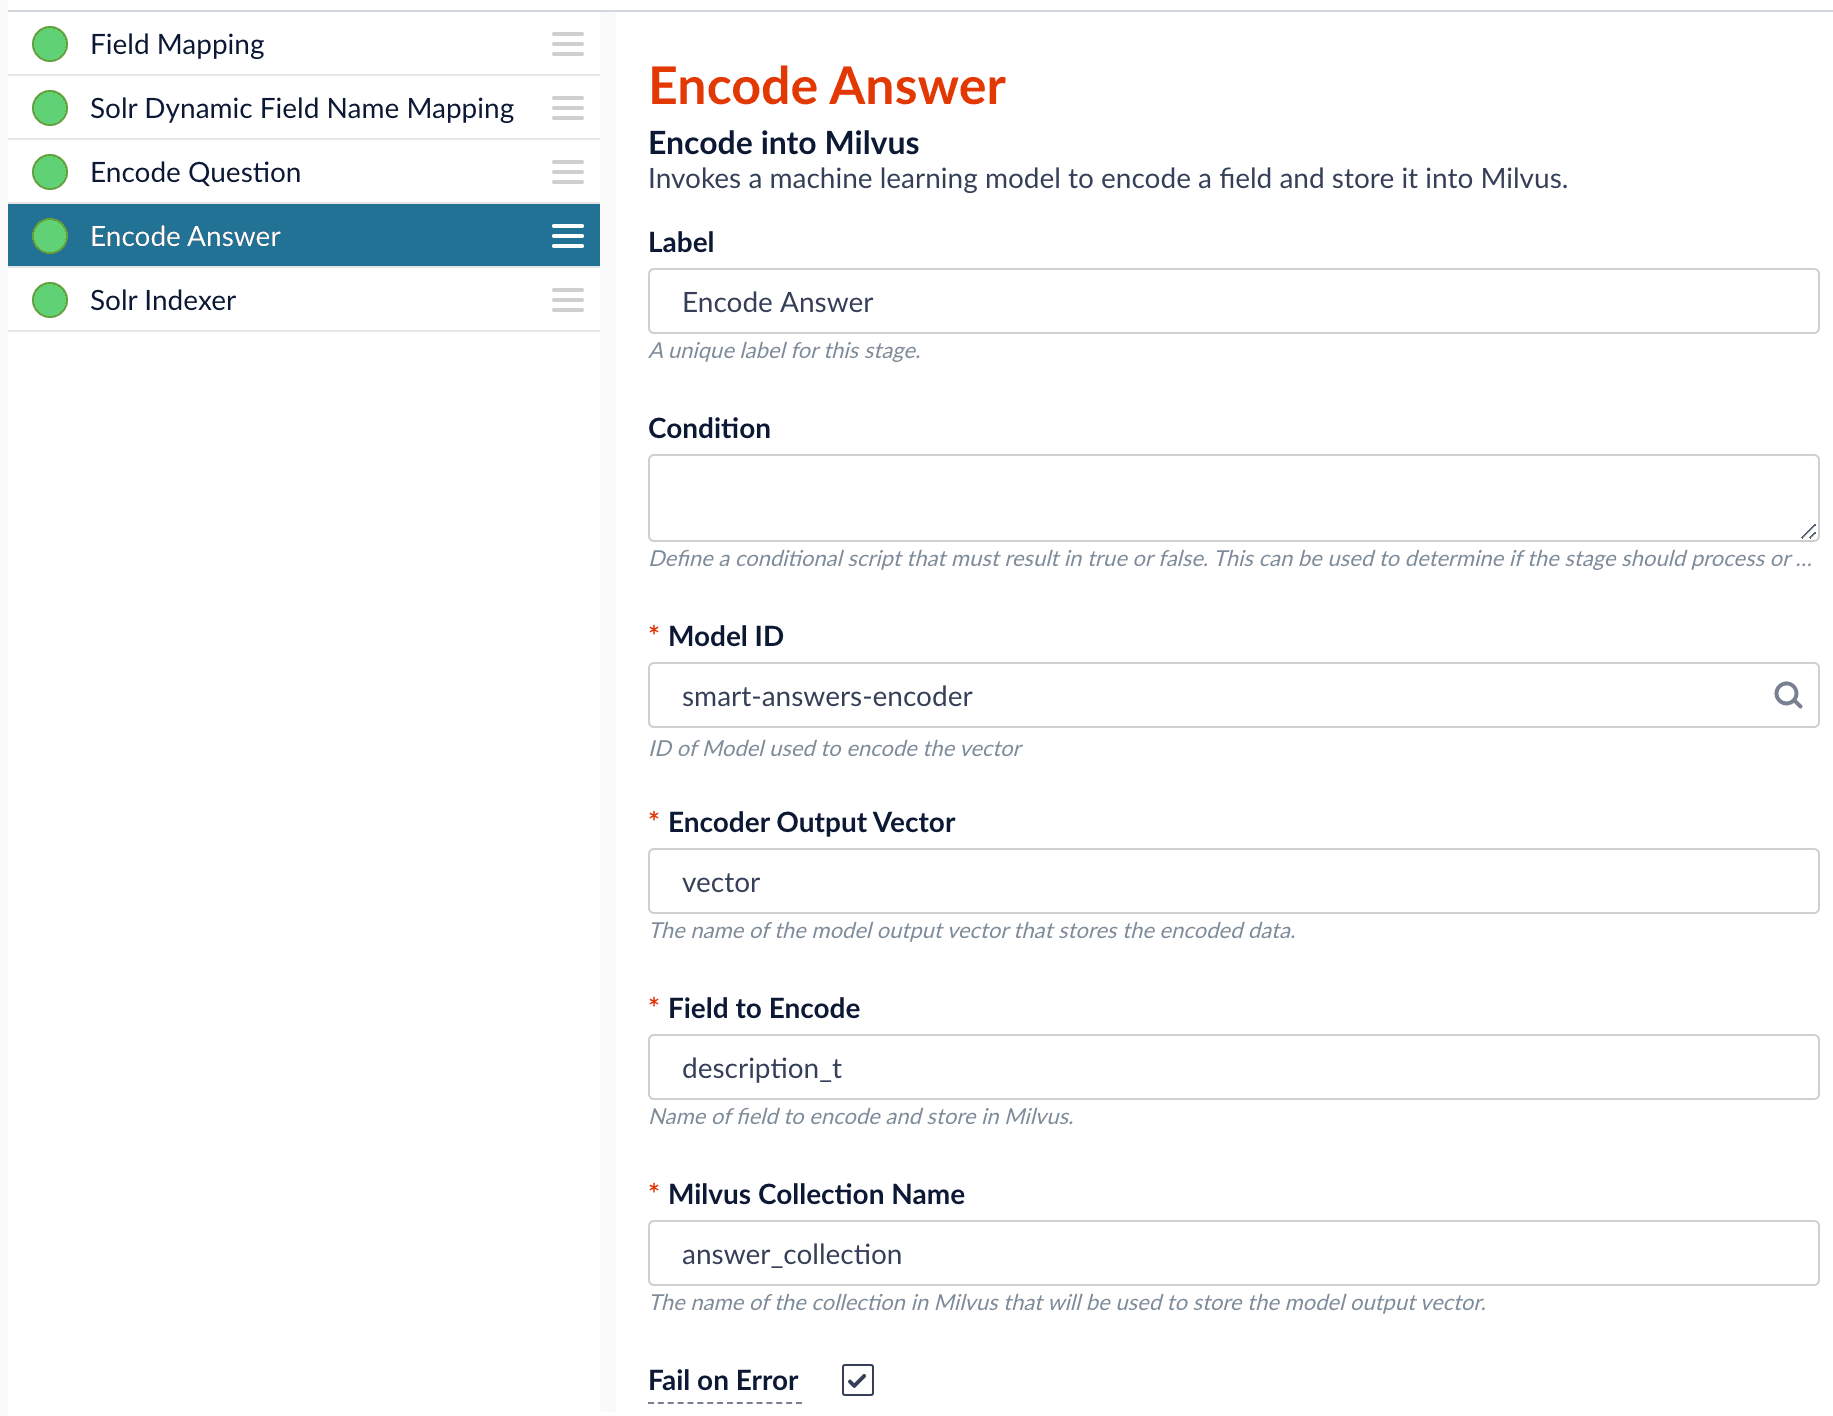
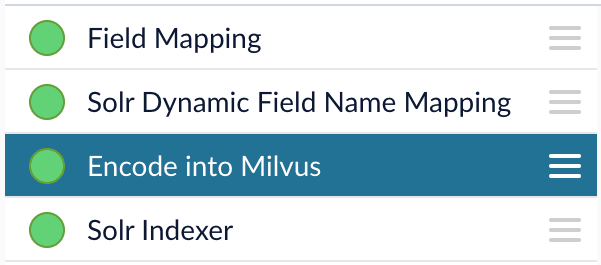
As shown in the pictures below, you will need two Encode into Milvus stages, named Encode Question and Encode Answer respectively.Encode Question (Encode Into Milvus) stageField to Encode to be title_t and change the Milvus Collection Name to match the new Milvus collection, question_collection.In the Encode Answer stage, specify Field to Encode to be description_t and change the Milvus Collection Name to match the new Milvus collection, answer_collection.Query Pipeline
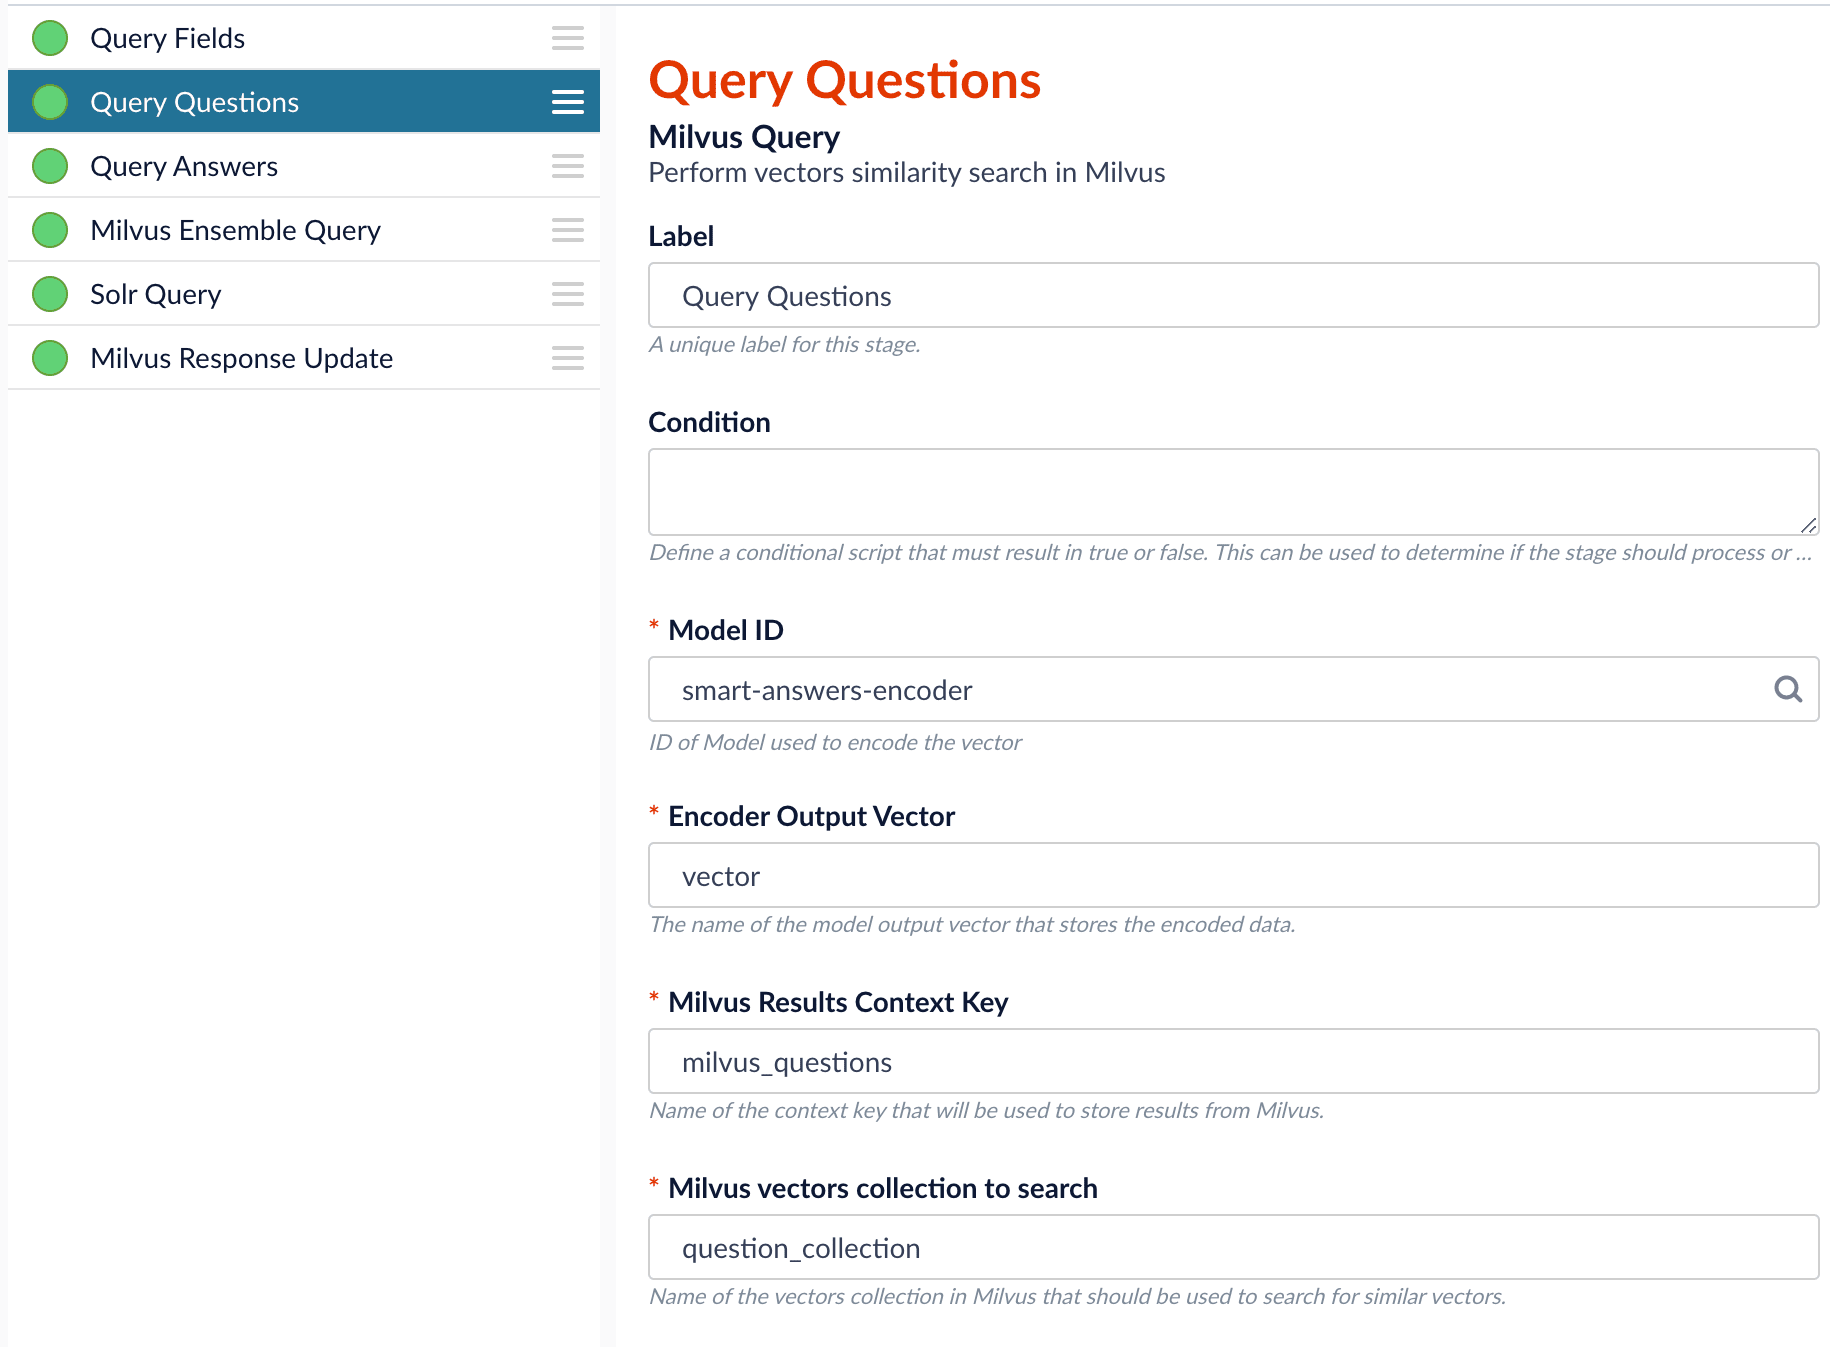
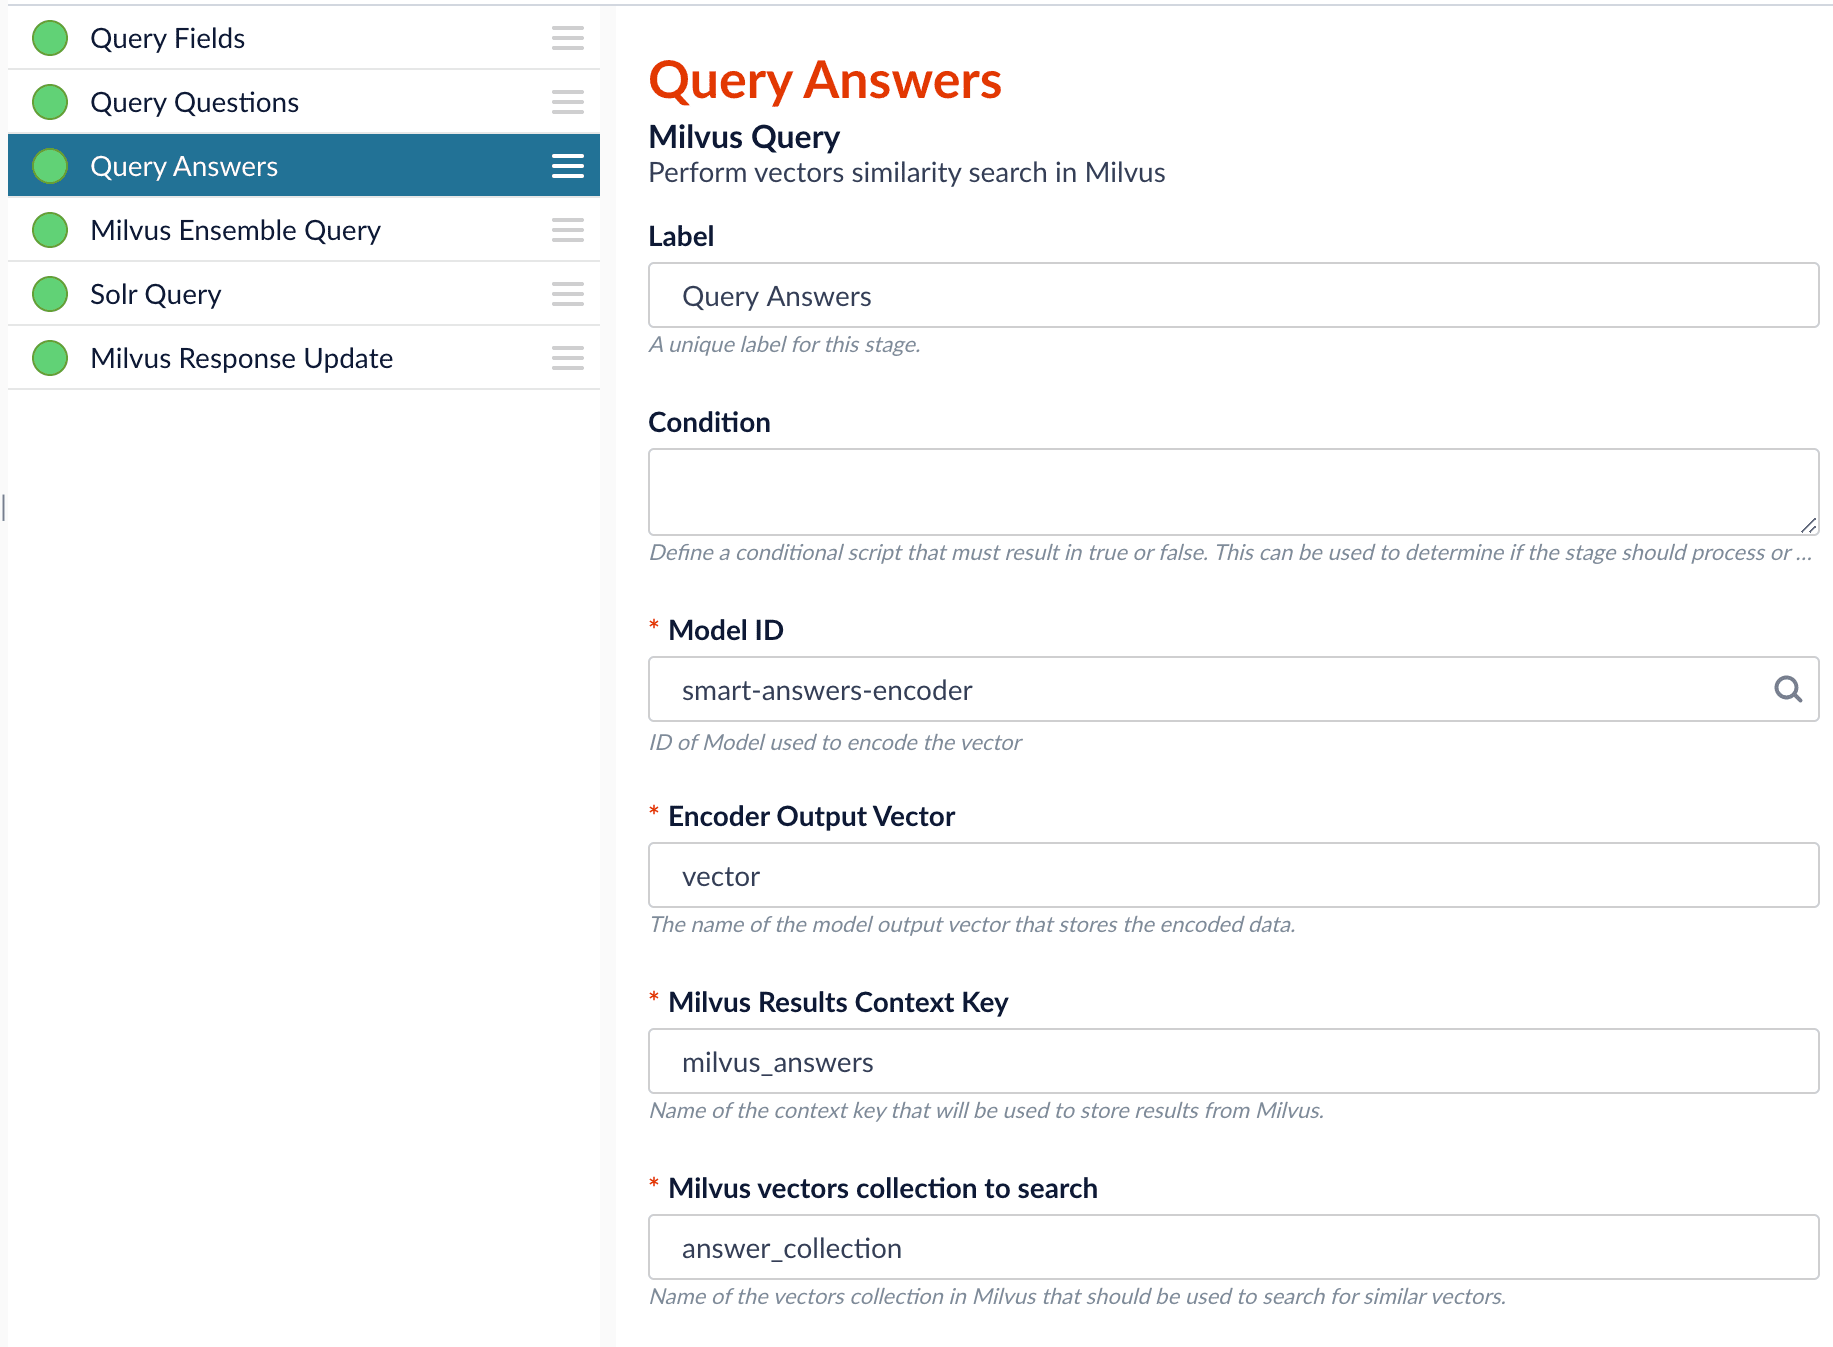
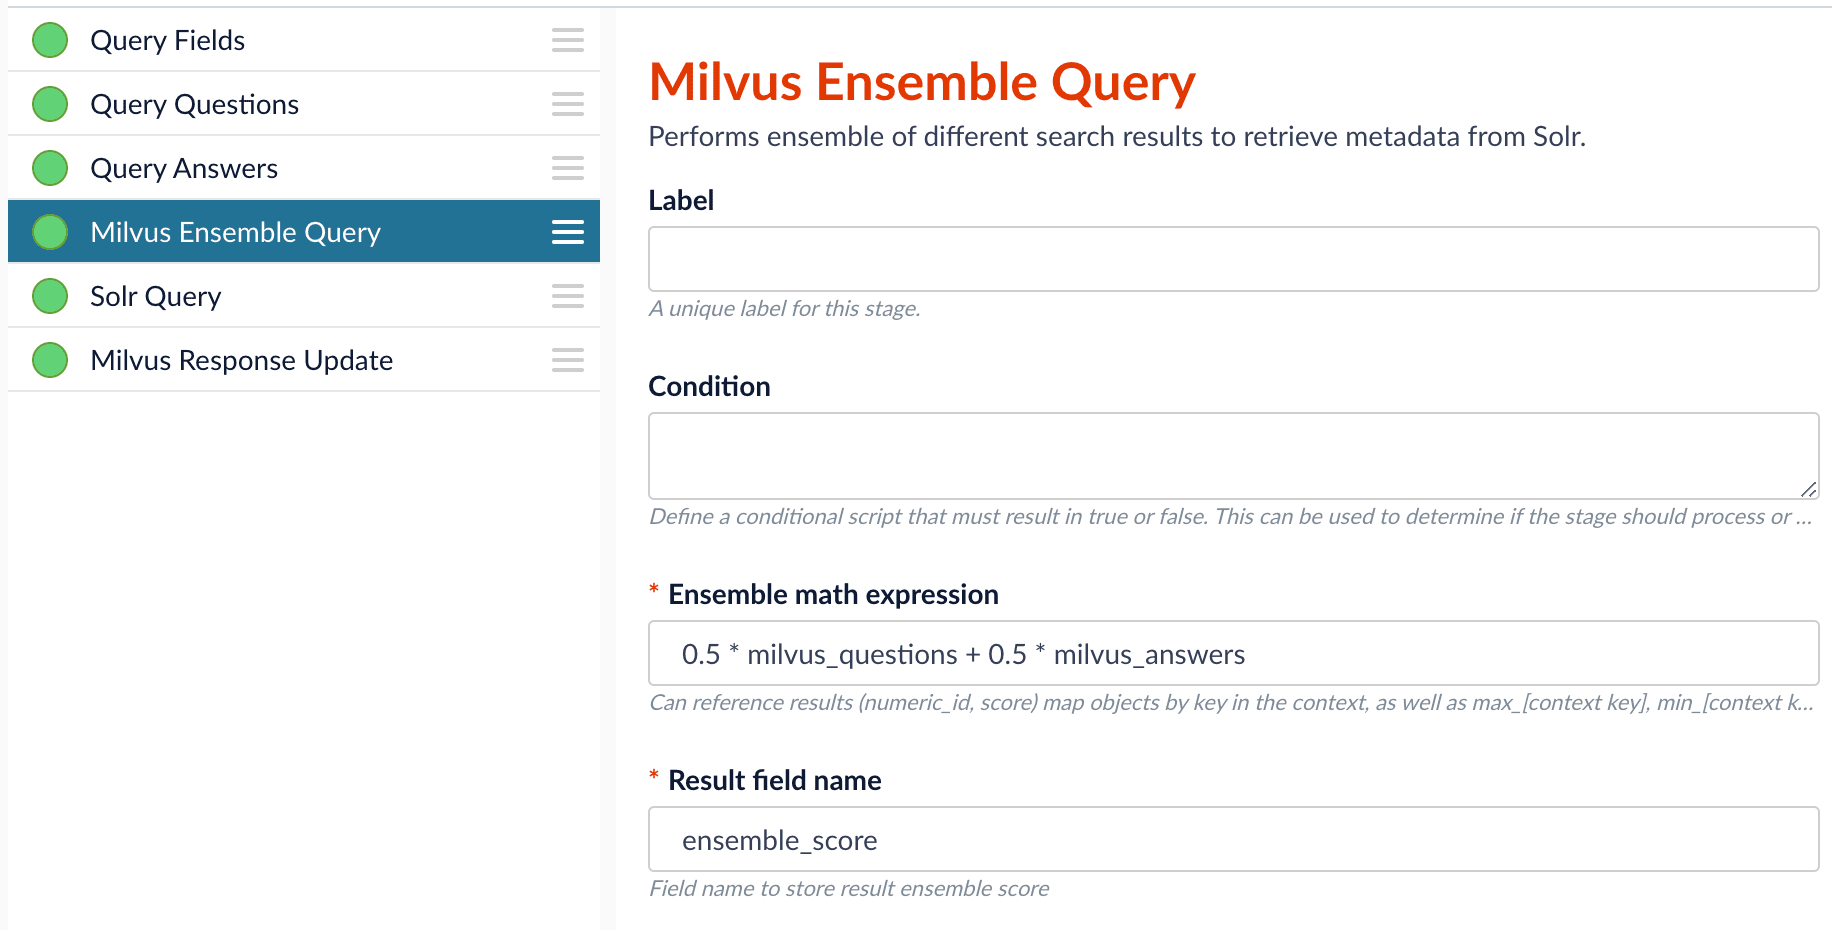
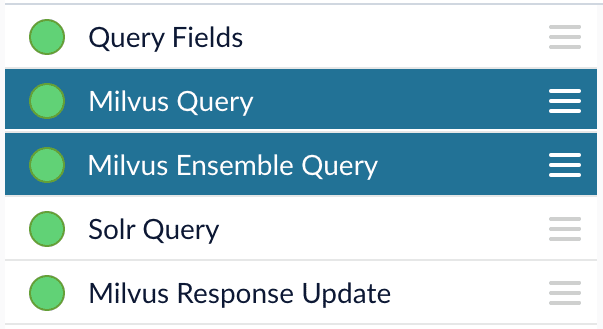
Since we have two dense vectors generated during indexing, at query time we need to compute both query to question distance and query to answer distance. This can be set up as the pictures shown below with two Milvus Query Stages, one for each of the two Milvus collections. To store those two distances separately, theMilvus Results Context Key needs to be different in each of these two stages.In the Query Questions stage, we set the Milvus Results Context Key to milvus_questions and the Milvus collection name to question_collection.Query Questions (Milvus Query) stage:Milvus Results Context Key to milvus_answers and the Milvus collection name to answer_collection.Query Answers (Milvus Query) stage:Ensemble math expression combining the results from the two query stages. If we want the question scores and answer scores weighted equally, we would use: 0.5 * milvus_questions + 0.5 * milvus_answers.
This is recommended especially when you have limited FAQ dataset and want to utilize both question and answer information.Milvus Ensemble Query stageEvaluate the query pipeline
The Evaluate QnA Pipeline job evaluates the rankings of results from any Smart Answers pipeline and finds the best set of weights in the ensemble score.Detailed pipeline setup
Typically, you can use the default pipelines included with Lucidworks Search. These pipelines now utilize Milvus to store encoded vectors and to calculate vector similarity. This topic provides information you can use to customize the Smart Answers pipelines. See also Configure The Smart Answers Pipelines.| ”smart-answers” index pipeline | | Encode into Milvus stage |
| ”smart-answers” query pipeline | |
Create the Milvus collection
Prior to indexing data, the Create Collections in Milvus job can be used to create the Milvus collection(s) used by the Smart Answers pipelines.Job ID. A unique identifier for the job.Collection Name. A name for the Milvus collection you are creating. This name is used in both the Smart Answer Index and the Smart Answer Query pipelines.Dimension. The dimension size of the vectors to store in this Milvus collection. The Dimension should match the size of the vectors returned by the encryption model. For example, if the model was created with either theSmart Answers Coldstart Trainingjob or theSmart Answers Supervised Trainingjob with the Model Baseword_en_300d_2M, then the dimension would be 300.Index file size. Files with more documents than this will cause Milvus to build an index on this collection.Metric. The type of metric used to calculate vector similarity scores.Inner Productis recommended. It produces values between 0 and 1, where a higher value means higher similarity.
Index pipeline setup
Stages in the default “smart-answers” index pipelineThe Encode into Milvus Index Stage
The Encode into Milvus index stage uses the specified model to encode theField to Encode and store it in Milvus in the given Milvus collection.
There are several required parameters:Model ID. The ID of the model.Encoder Output Vector. The name of the field that stores the compressed dense vectors output from the model. Default value:vector.Field to Encode. The text field to encode into a dense vector, such asanswer_torbody_t.Milvus Collection Name. The name of the collection you created via the Create Milvus Collection job, which will store the dense vectors. When creating the collection you specify the type of Metric to use to calculate vector similarity. This stage can be used multiple times to encode additional fields, each into a different Milvus collection. See how to index and retrieve the question and answer together.
Query pipeline setup
The Query Fields stage
The first stage is Query Fields. For more information see the Query Fields stage.The Milvus Query stage
The Milvus Query stage encodes the query into a vector using the specified model. It then performs a vector similarity search against the specified Milvus collection and returns a list of the best document matches.Model ID. The ID of the model used when configuring the model training job.Encoder Output Vector. The name of the output vector from the specified model, which will contain the query encoded as a vector. Defaults to vector.Milvus Collection Name. The name of the collection that you used in theEncode into Milvusindex stage to store the encoded vectors.Milvus Results Context Key. The name of the variable used to store the vector distances. It can be changed as needed. It will be used in the Milvus Ensemble Query Stage to calculate the query score for the document.Number of Results. The number of highest scoring results returned from Milvus. This stage would typically be used the same number of times that theEncode into Milvusindex stage is used, each with a different Milvus collection and a differentMilvus Results Context Key.
The Milvus Ensemble Query stage
The Milvus Ensemble Query takes the results of the Milvus Query stage(s) and calculates theensemble score, which is used to return the best matches.Ensemble math expression. The mathematical expression used to calculate theensemble score. It should reference the value(s) variable name specified in theMilvus Results Context Keyparameter in the Milvus Query stage.Result field name. The name of the field used to store theensemble score. It defaults toensemble_score.Threshold- A parameter that filters the stage results to remove items that fall below the configured score. Items with a score at, or above, the threshold will be returned.
The Milvus Response Update Query stage
The Milvus Response Update Query stage does not need to be configured and can be skipped if desired. It inserts the Milvus values, including theensemble_score, into each of the returned documents, which is particularly useful when there is more than one Milvus Query Stage. This stage needs to come after the Solr Query stage.Short answer extraction
By default, the question-answering query pipelines return complete documents that answer questions. Optionally, you can extract just a paragraph, a sentence, or a few words that answer the question.- Evaluate the query pipeline’s effectiveness.
Fine tune your query pipeline configuration by running a job that analyzes its effectiveness. See Evaluate a Smart Answers Query Pipeline.
Evaluate a Smart Answers Query Pipeline
Evaluate a Smart Answers Query Pipeline
The Smart Answers Evaluate Pipeline job evaluates the rankings of results from any Smart Answers pipeline and finds the best set of weights in the ensemble score. This topic explains how to set up the job.Before beginning this procedure, prepare a machine learning model using either the Supervised method or the Cold start method, or by selecting one of the pre-trained cold start models, then Configure your pipelines.The input for this job is a set of test queries and the text or ID of the correct responses. At least 100 entries are needed to obtain useful results. The job compares the test data with Lucidworks Search’s actual results and computes variety of the ranking metrics to provide insights of how well the pipeline works. It is also useful to use to compare with other setups or pipelines.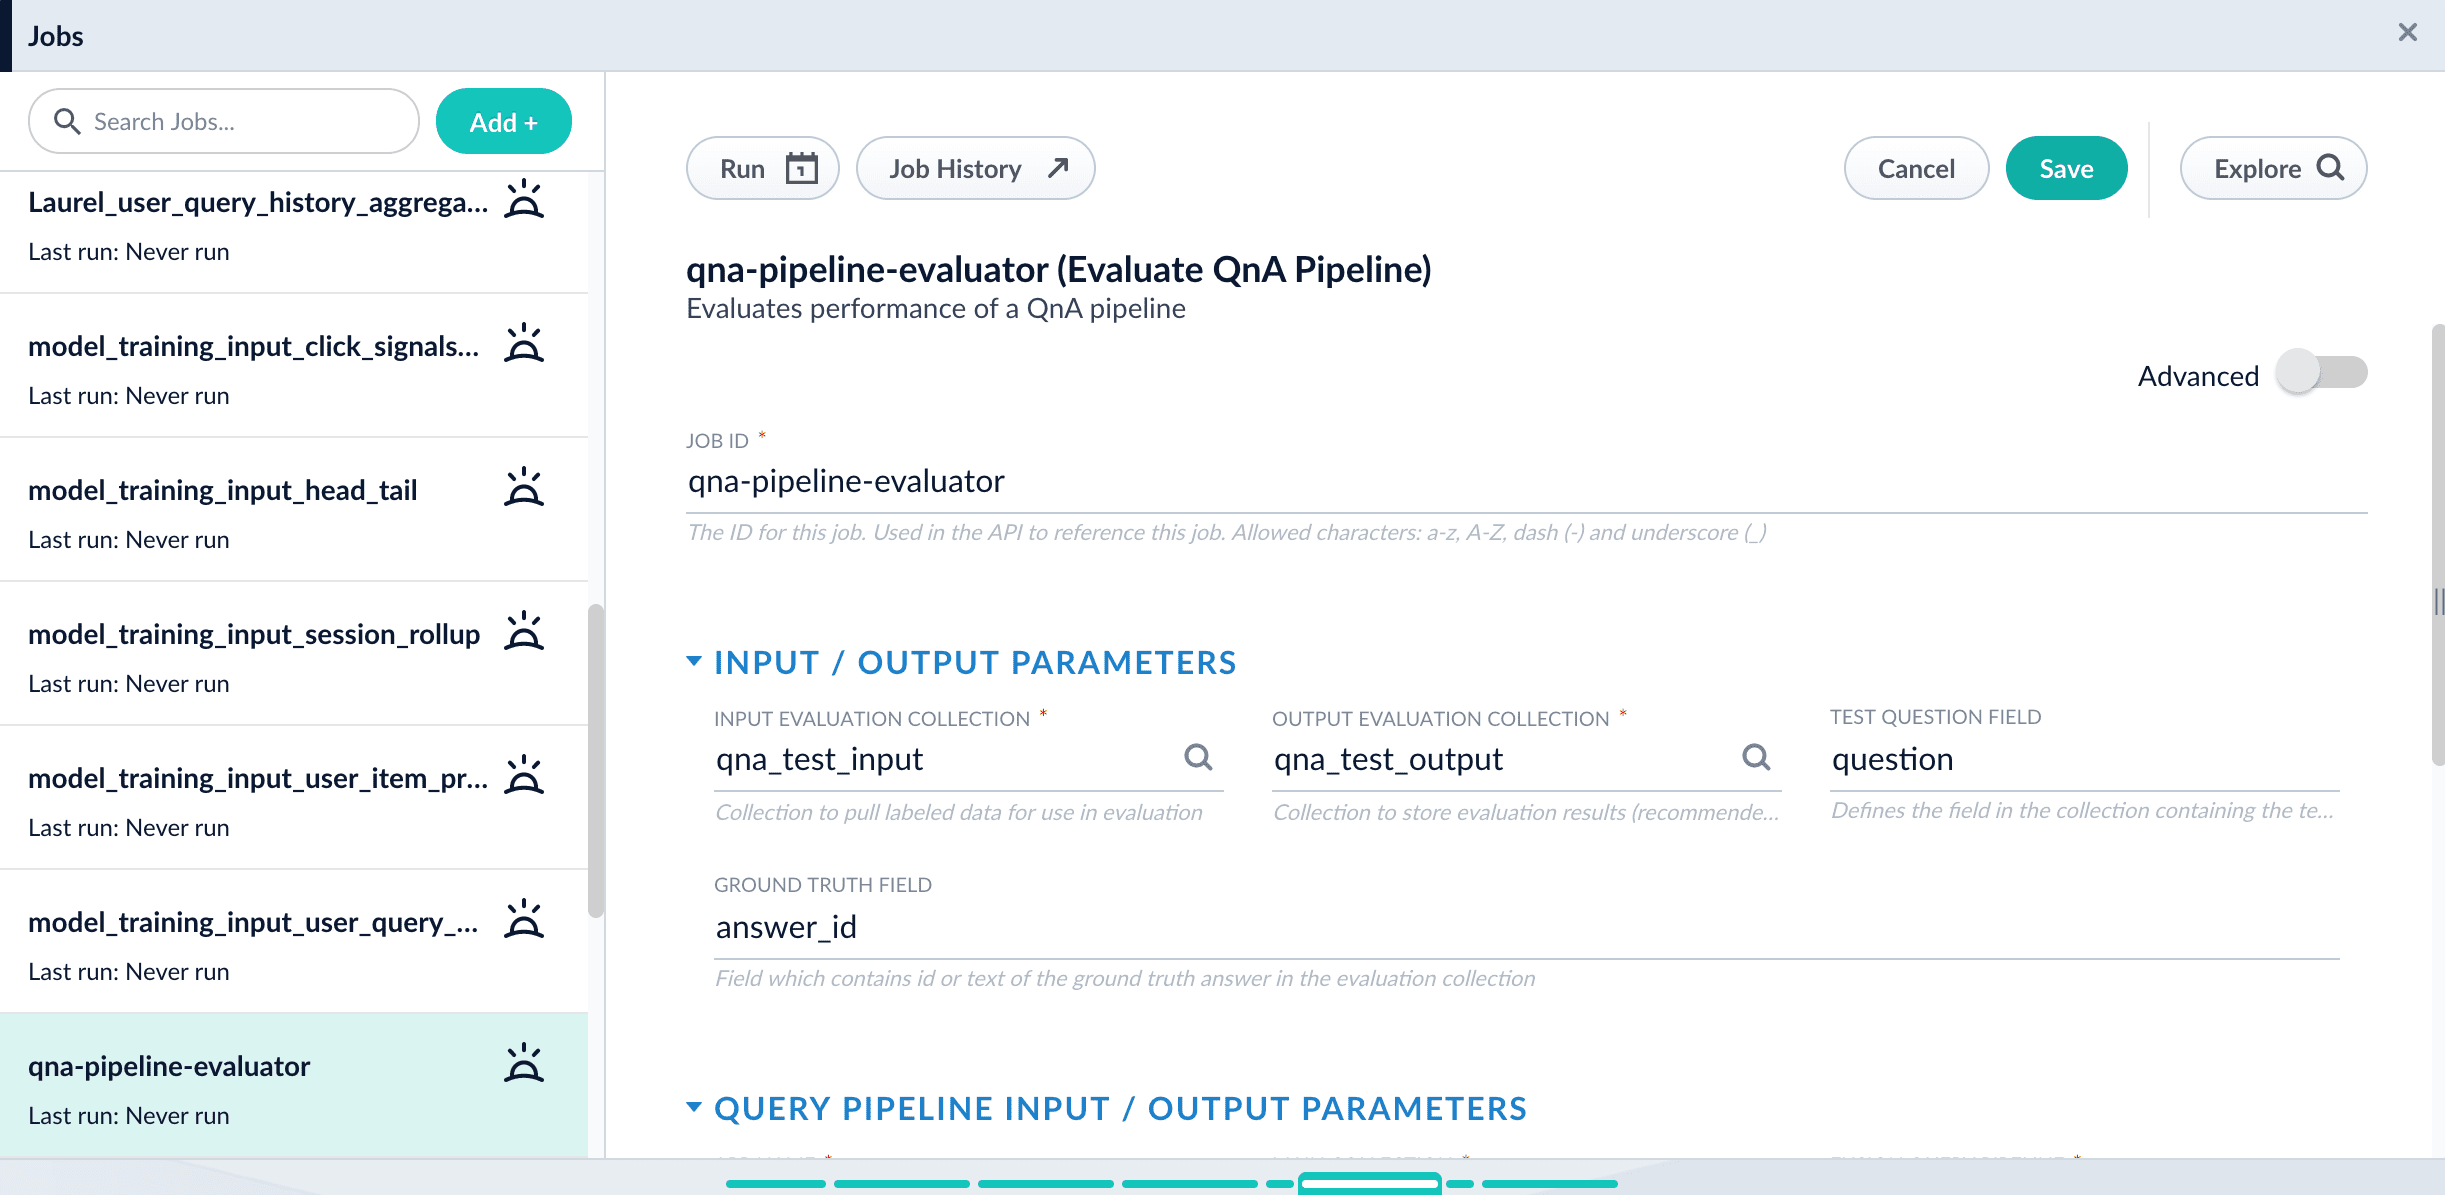
Prepare test data
-
Format your test data as query/response pairs, that is, a query and its corresponding answer in each row.
You can do this in any format that Lucidworks Search supports, but parquet file would be preferable to reduce the amount of possible encoding issues.
The response value can be either the document ID of the correct answer in your Lucidworks Search index (preferable), or the text of the correct answer.
If there are multiple possible answers for a unique question, then repeat the questions and put the pair into different rows to make sure each row has exactly one query and one response.If you use answer text instead of an ID, make sure that the answer text in the evaluation file is formatted identically to the answer text in Lucidworks Search.
-
If you wish to index test data into Lucidworks Search, create a collection for your test data, such as
sa_test_inputand index the test data into that collection.
Configure the evaluation job
-
If you wish to save the job output in Lucidworks Search, create a collection for your evaluation data such as
sa_test_output. - Navigate to Collections > Jobs.
- Select New > Smart Answers Evaluate Pipeline.
-
Enter a Job ID, such as
sa-pipeline-evaluator. -
Enter the name of your test data collection (such as
sa_test_input) in the Input Evaluation Collection field. -
Enter the name of your output collection (such as
sa_test_output) in the Output Evaluation Collection field. - Enter the name of the Test Question Field in the input collection.
- Enter the name of the answer field as the Ground Truth Field.
- Enter the App Name of the Lucidworks Search app where the main Smart Answers content is indexed.
- In the Main Collection field, enter the name of the Lucidworks Search collection that contains your Smart Answers content.
- In the Fusion Query Pipeline field, enter the name of the Smart Answers query pipeline you want to evaluate.
- In the Answer Or ID Field In Fusion field, enter the name of the field that Lucidworks Search will return containing the answer text or answer ID.
- Optionally, you can configure the Return Fields to pass from Smart Answers collection into the evaluation output.
- Configure the Metrics parameters:
-
Solr Scale Function
Specify the function used in the Compute Mathematical Expression stage of the query pipeline, one of the following:
maxlog10pow0.5
- List of Ranking Scores For Ensemble To find the best weights for different ranking scores, list the names of the ranking score fields, separated by commas. Different ranking scores might include Solr score, query-to-question distance, or query-to-answer distance from the Compute Mathematical Expression pipeline stage.
-
Target Metric To Use For Weight Selection
The target ranking metric to optimize during weights selection. The default is
mrr@3.
- Optionally, read about the advanced parameters and consider whether to configure them as well.
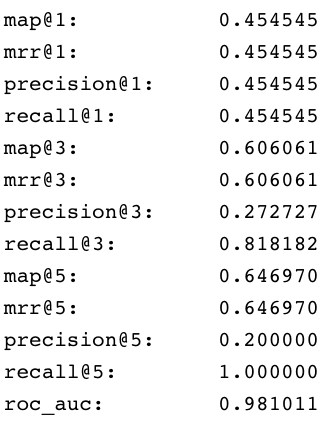
Examine the output
The job provides a variety of metrics (controlled by the Metrics list advanced parameter) at different positions (controlled by the Metrics@k list advanced parameter) for the chosen final ranking score (specified in Ranking score parameter).Example: Pipeline evaluation metrics- Check the job status and output. When your job has completed, you can check the job’s status through the ML Model service logs. See View a Smart Answers (QnA) Job’s Status and Output.
Smart Answers jobs
These jobs provide the machine learning features that drive Smart Answers:-
Machine learning model training:
- Smart Answers Supervised Training job. Lucidworks Search includes default pipelines to get you started. See Configure the Smart Answers pipelines.
- Smart Answers Coldstart Training job.
- Machine learning model deployment:
-
Smart Answers Evaluate Pipeline
This job analyzes your configured Smart Answers query pipeline to provide insights about its effectiveness so that you can fine-tune your configuration for the best possible results.
Smart Answers pipelines and stages
Once you have trained and deployed your model, you can use one of the default pipelines that are automatically created with your Lucidworks Search app. Both pipelines are calledAPP_NAME-smart-answers.
See Configure the Smart Answers pipelines for more information.
-
“-smart-answers” index pipeline
-
“-smart-answers” query pipeline
Short answer extraction
By default, the question-answering query pipelines return complete documents that answer questions. Optionally, you can extract just a paragraph, a sentence, or a few words that answer the question. See Extract short answers from longer documents.Extract short answers from longer documents
Extract short answers from longer documents
This topic explains how to deploy and configure the transformer-based deep learning model for short answer extraction with Smart Answers. This model is useful for analyzing long documents and extracting just a paragraph, a sentence, or a few words that answer the question.
The out-of-the-box (OOTB) model only supports English content.
Deploy the model in Fusion
- Navigate to Collections > Jobs.
- Select New > Create Seldon Core Model Deployment.
-
Configure the job as follows:
- Job ID. the ID for this job, such as
deploy-answer-extractor. - Model Name. model name of the Seldon Core deployment that will be referenced in the Machine Learning pipeline stage configurations, such as
answer-extractor. - Docker Repository.
lucidworks - Image Name.
answer-extractor:v1.1 - Kubernetes Secret Name for Model Repo. (empty)
- Output Column Names for Model.
[answer,score,start,end]
- Job ID. the ID for this job, such as
- Click Save.
- Click Run > Start.
Configure the Machine Learning query stage
This model provides the best results when used with one of the question-answering query pipelines. The default query pipeline is calledAPP_NAME-smart-answers.Starting with one of those pipelines, add a new Machine Learning stage to the end of the pipeline and configure it as described below.How to configure short answer extraction in the query pipeline- Make sure you have performed the basic configuration of your query pipeline.
- In the query pipeline, click Add a Stage > Machine Learning.
- In the Model ID field, enter the model name you configured above, such as answer-extractor.
-
In the Model input transformation script field, enter the following:
Configure the parameters in the script as follows:
-
question(Required). The name of the field containing the questions.Make sure that the question is provided as it was originally entered by user. If you have previous stages that augments question (like stopwords removing or synonyms expansion), it is better to copy original question and use it for the answer extraction without additional modifications. -
context(Required). A string or list of contexts; by default this is the firstnum_docs_to_extractdocuments in the output of the previous stage in the pipeline. If only one question is present with multiple contexts, that question will be applied to every context and vice versa for 1 context and multiple questions. If a list of questions and contexts is passed, a 1:1 mapping of questions and contexts will be created in the order in which they’re passed. -
topk. The number of answers to return (will be chosen by order of likelihood). Default: 1 -
handle_impossible_answer. Whether or not to deal with a question that has no answer in the context. If true, an empty string is returned. If false, the most probable (topk) answer(s) are returned regardless of how low the probability score is. Default: True
batch_size. How many samples to process at a time. Reducing this number will reduce memory usage but increase execution time, while increasing it will increase memory usage and decrease execution time to a certain extent. Default: 8max_context_len. If set to greater than 0, truncate contexts to this length in characters. Default: 5000max_answer_len. The maximum length of predicted answers (for example, only answers with a shorter length are considered). Default: 15max_question_len. The maximum length of the question after tokenization. It will be truncated if needed. Default: 64doc_stride. If the context is too long to fit with the question for the model, it will be split in several chunks with some overlap. This argument controls the size of that overlap. Default: 128max_seq_len. The maximum length of the total sentence (context + question) after tokenization. The context will be split in several chunks (using doc_stride) if needed. Default: 384
-
-
In the Model output transformation script field, enter the following:
- Save the pipeline.
Model output
The model adds the following fields to the query pipeline output:answer. The short answer extracted from the context. This may be blank ifhandle_impossible_answers=Trueandtopk=1.score. The score for the extracted answers.start. The start index of the extracted answer in the provided context.end. The end index of the extracted answer in the provided context.
Recreate a Milvus collection
If a Milvus collection is lost, you can recreate the collection. You can also use these steps to create a Milvus collection for a different field or a Milvus collection that uses a different encryption model. These steps assume that:- You used the Smart Answers pipeline to index data, which created the Milvus and Solr collections.
- The created Solr collection still exists, which is used as the Source Collection.
Recreate a Milvus collection
Recreate a Milvus collection
-
Create the Milvus collection. See Create Collections in Milvus for more information.
If the Milvus collection still exists and you want to overwrite it, select the Override Collections checkbox. This option deletes the current collection, allowing you to create a new collection.
-
Edit the Smart Answers Index Pipeline as follows:
- Disable the Solr Indexer stage.
-
If you are creating a Milvus collection for a different field, or one that uses a different encryption model, access the Encode into Milvus stage and:
- Specify the model, the Encoder Output Vector, and the Field to Encode.
- Verify the Milvus Collection Name refers to the new Milvus collection.
- Navigate to the Datasources panel.
-
Select Add a Solr connector and enter the following information:
- Pipeline ID. Smart Answers pipeline
- Solr Connection Type. SolrCloud
-
SolrCloud Zookeeper Host String. Execute the following curl command. The response displays the SolrCloud Zookeeper Host String value. In the following
RESPONSEexample, the value you would set for the SolrCloud Zookeeper Host String isns-zookeeper-0.ns-zookeeper-headless:2181.RESPONSE - Source Collection. Original collection from the initial Smart Answers pipeline indexing job
- Navigate to Index Workbench and load the new solr-index datasource.
- Select Start Job to run the Solr datasource through the updated Smart Answers pipeline.
- When the data is reindexed, edit the Smart Answers pipeline and re-enable the Solr Indexer stage.
Learn more
Configure Voice-Assisted Search
Configure Voice-Assisted Search
You can implement a voice chatbot using Smart Answers to integrate your search platform with a voice interface application. This procedure uses Google Dialogflow as an example, but you can use other voice interface platforms that support the following:
-
Speech-to-text translation
Translate the customer’s speech into a text-based query for Fusion. -
Workflow routing
Route queries to your Smart Answers query profile. -
Text-to speech translation
Translate Fusion’s text response into speech for the customer.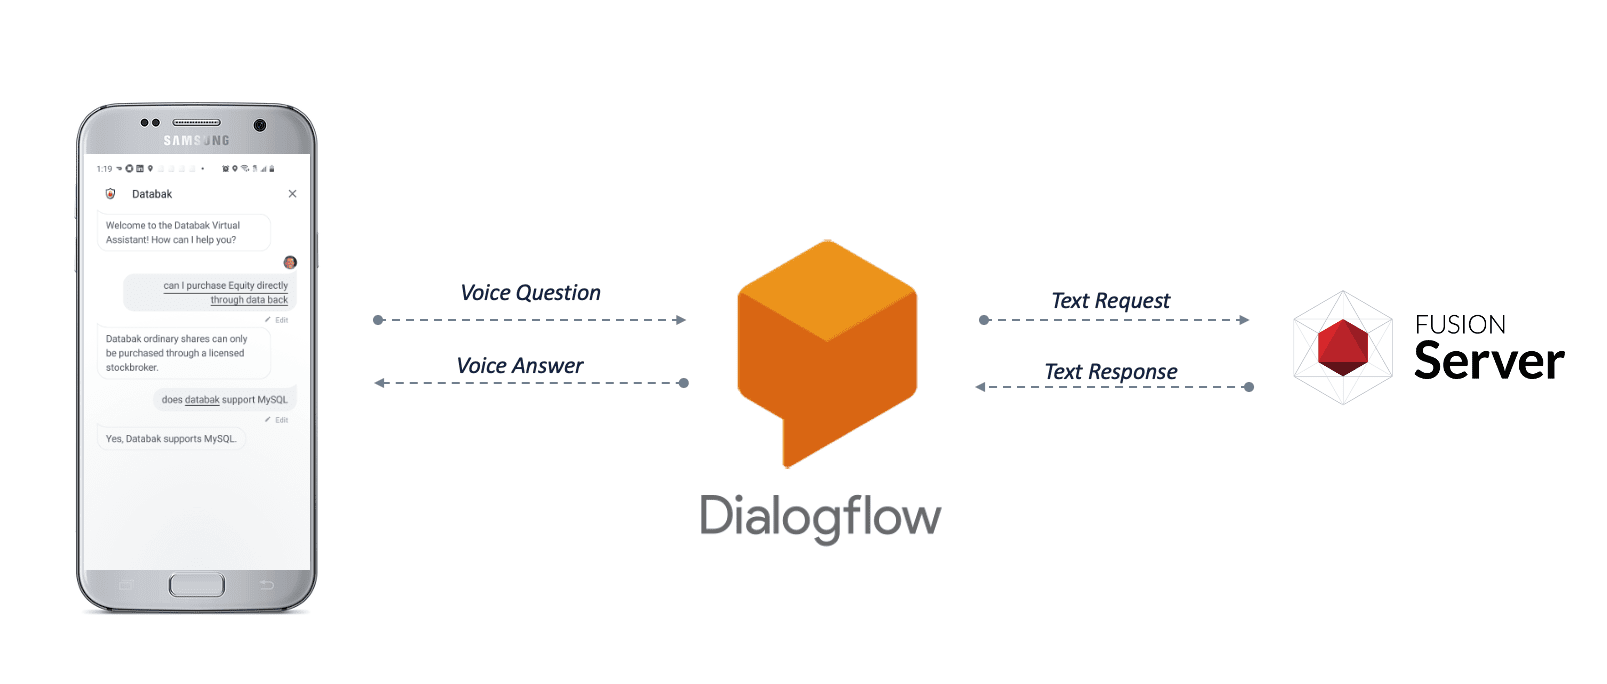
- Enable Smart Answers on your Fusion platform.
- Configure your voice interface application to perform speech-to-text on voice queries.
- Configure your voice interface application to route queries to the Fusion query profile associated with your Smart Answers query pipeline.
- Configure your voice interface application to perform text-to-speech on Fusion’s responses.
Enable Smart Answers
To enable Smart Answers, you need a trained machine learning model, a question-and-answer body of content, and a query pipeline configured to apply the machine learning model to the content.Perform speech-to-text on voice queries
In the case of Google Dialogflow, this functionality is enabled by default whenever you create a Dialogflow agent. See your voice interface platform’s documentation to find out how to enable speech-to-text for your application.Route voice queries to Fusion
The procedure below shows you how to configure a Google Dialogflow agent as an example to demonstrate one possible configuration for routing voice queries to Fusion. For other voice interface platforms, check your documentation.This example configures the agent so that all intents use a webhook. A code sample is provided.- Make sure you have created a billing account for Google Dialogflow, in order to enable all the required features.
- Download the
voice.js.zipfile, unzip it, and update the variables below to match your Fusion environment:If your Fusion response field is not calledanswer_t, then you also need to update the field name in this line of thevoice.jsfile: - In your Google Dialogflow agent interface, navigate to Intents.
A newly-created Google Dialogflow agent contains two default intents:- Default Fallback Intent
- Default Welcome Intent
Thevoice.jscode includes a handler for each of the default intents, plus “Try again” and “Yes” intents (which you will create below). If your application includes additional intents, you may need to add those to the code.
- Navigate to Intents > Default Fallback Intent and configure it as follows:
- Delete all of the items in the Context, Events, Training Phrases, Actions, and Response sections.
- Under Fulfillment, select Enable webhook call for this intent.\

- Click Save.
- Click Default Welcome Intent and configure it as follows:
- Delete all of the items in the Training Phrases and Responses sections.
- Under Fulfillment, select Enable webhook call for this intent.
- Click Save.
- Navigate to Intents > Create Intent, call the new intent “Try again” (case-sensitive), and configure it as follows:
- Delete all of the items in the Context, Events, Actions, and Response sections.
- Under Training Phrases, add “Try again” (case-sensitive).
- Under Fulfillment, select Enable webhook call for this intent.
- Click Save.
- Navigate to Intents > Create Intent, call the new intent “Yes” (case-sensitive), and configure it as follows:
- Delete all of the items in the Context, Events, Actions, and Response sections.
- Under Training Phrases, add the following phrases (case-sensitive):
- “Try again”
- “Yep”
- “Perfect”
- Under Fulfillment, select Enable webhook call for this intent.
- Click Save.
- Navigate to fulfillment and configure it as follows:
- Select Enable Inline Editor.
- Overwrite the default code with the
voice.jscode that you customized in step 2 above.\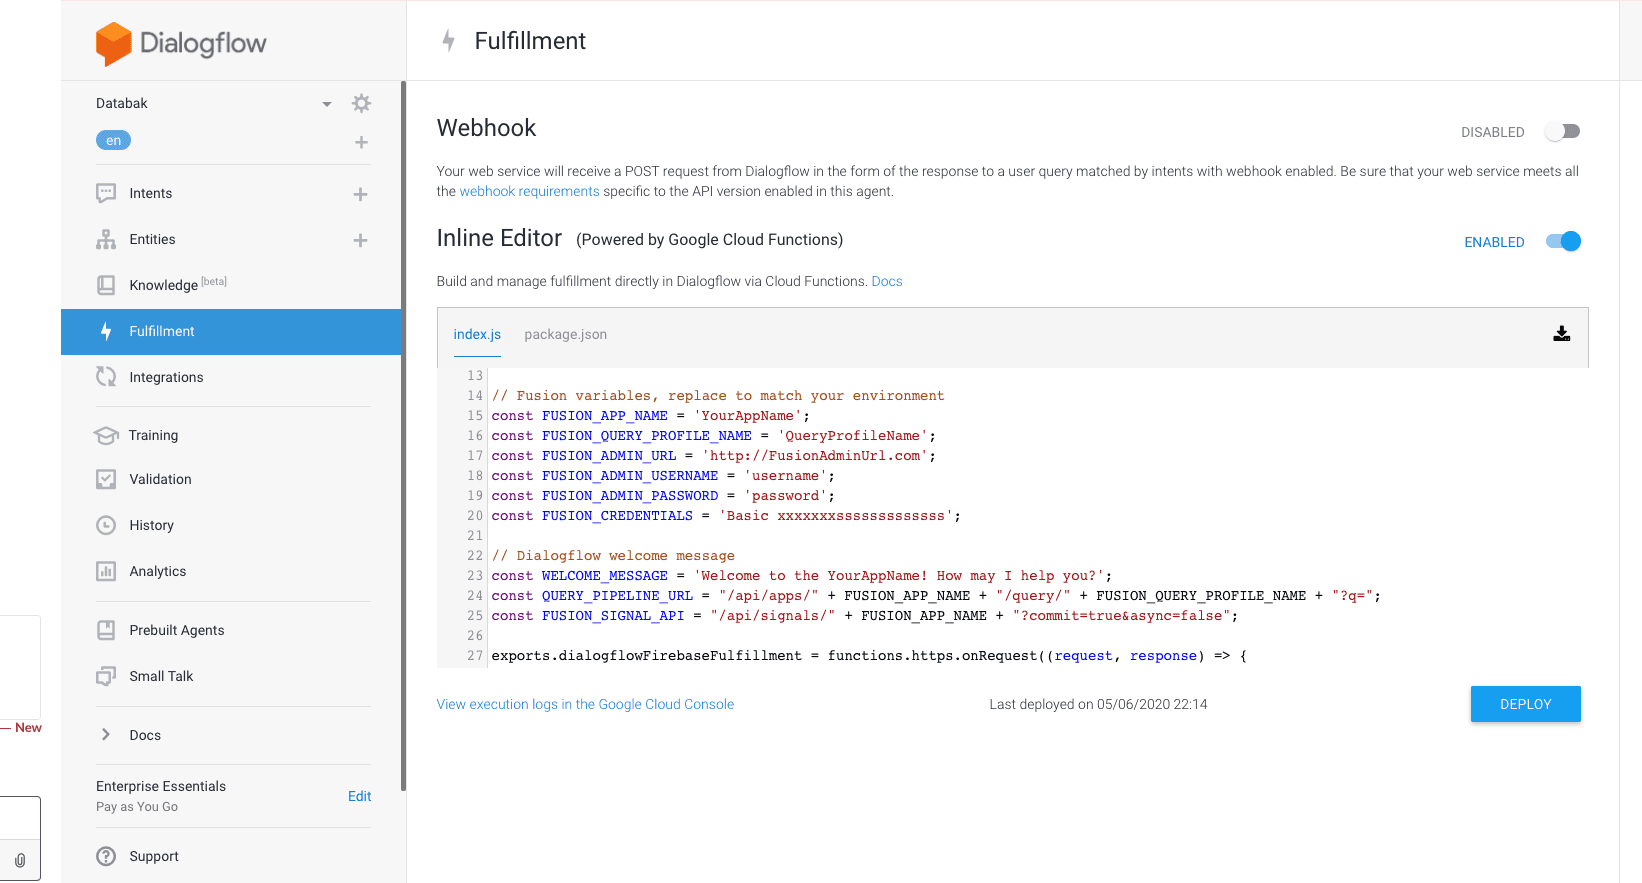
- Click Deploy.
In order to enable external API calls to Fusion, you must upgrade your Google Firebase billing account to the “Pay as you go” plan. Google Firebase is also where you can view the console logs for these API calls.
Perform text-to-speech on Fusion’s responses
- In your Google Dialogflow agent interface, click the gear icon next to your agent’s name.
- Under Automatic Spell Correction, enable Allow ML to correct spelling of query during request processing.
- Under Text to speech, select Enable Automatic Text to Speech.
- Click Save.
Test your configuration
- In your Google Dialogflow agent interface, click the Google Assistant link in the right-hand sidebar.\
- Click Talk to
<YOUR AGENT NAME>. - Click the microphone and ask a question.
If you do not receive a response that makes sense, check the logs in Google Firebase for information you can use to troubleshoot your configuration.
View a Smart Answers Job's Status and Output
View a Smart Answers Job's Status and Output
This topic explains how you can track the running steps of the following jobs:
- Smart Answers Supervised Training
- Smart Answers Coldstart Training
- Smart Answers Evaluate Pipeline
- Find the name of the ML Model service pod:
The pod name looks like
<namespace>-ml-model-service-ui-<hash>-<random>, as inf5-ml-model-service-ui-547dd78d6-p9d6q. - Set up port forwarding:
- In the Fusion UI, navigate to Collections > Jobs.
- Select your Smart Answers (QnA) model training job.
- Click Job History.
- Find the ML Model workflow ID.
- In the ML Model service UI, locate instances of the ID in the logs.