- Latest version: v2.1.0
- Compatible with Fusion version: 5.9.1 and later
Prerequisites
- Access to a Fusion instance with the appropriate permissions to configure a data source.
- Supported SharePoint deployment (2010, 2013, 2016, 2019, or Online).
- A service account with site collection administrator rights for on-premises SharePoint.
- An app registration with the
Sites.FullControl.Allpermission for SharePoint Online. - Azure Active Directory app registration with required permissions (for SharePoint Online).
Verify your connector versionThis connector depends on specific Fusion versions. See the following table for the required versions:
| Fusion version | Connector version | Notes |
|---|---|---|
| Fusion 5.9.1 and later | v2.0.0 and later | Supports LDAP ACLs integrations and security trimming. |
| Fusion 5.9.0 | v1.6.0 and later. Lucidworks recommends using the latest supported connector version. | Fusion 5.9.0 supports the v2.0.0 connector, but does not support LDAP ACLs integrations or security trimming. |
| Fusion 5.6.1 and later | v1.1.0 through v1.6.0 | - |
Business context
SharePoint is widely adopted for internal content collaboration, knowledge sharing, and structured document management. The SharePoint Optimized V2 connector supports use cases across knowledge management and business environments by making SharePoint content discoverable in Fusion.Knowledge management
Organizations use SharePoint as a central platform for storing and organizing internal knowledge, such as policies, training materials, and procedural documentation. With structured libraries, metadata tagging, and version control, teams can maintain accurate, searchable content. The connector brings this content into Fusion to support enterprise search, self-service portals, and role-based access to knowledge resources.B2B
In business-to-business contexts, SharePoint supports cross-functional collaboration, secure partner portals, and project documentation workflows. Companies use it to share content with clients, vendors, and internal stakeholders while maintaining strict access controls. The connector indexes this content for a unified search experience across departments or applications, enabling faster access to contracts, technical documents, or onboarding materials.B2C
SharePoint is not typically used for direct customer-facing experiences. However, B2C organizations often use it internally to support customer service, compliance, or product support operations. With the connector, teams can expose curated SharePoint content such as FAQs, internal product specifications, or support documentation through public or authenticated search interfaces managed in Fusion.How it works
The SharePoint Optimized V2 connector crawls and indexes structured content from SharePoint using its object model. SharePoint organizes data into a hierarchical structure that begins with a web application and includes site collections, sites, lists, folders, and list items. For an overview of this structure, see the SharePoint object model.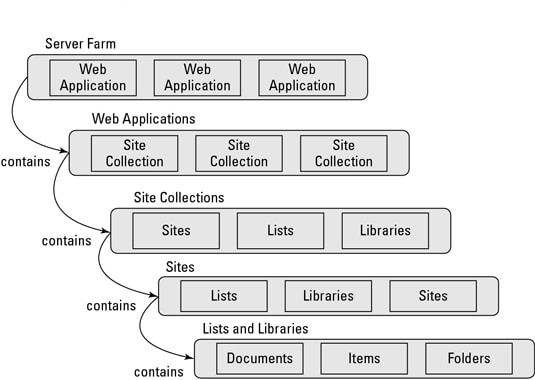
- A site collection can contain multiple subsites, each with its own permissions and content.
- A list can store structured data like announcements or documents, with fields such as title, status, and date.
- A list item or document may contain file content and metadata, such as the file type, size, author, and version.
Set up
To index SharePoint content with Fusion, you must configure both the SharePoint environment and the connector. SharePoint must be accessible and properly permissioned, and the connector must be configured to authenticate, crawl, and index the desired content.Required SharePoint permissions
The SharePoint Optimized V2 connector requires specific permissions to index content across SharePoint sites effectively. These permissions must be granted before the connector can perform operations such as reading site data, accessing files, or collecting audit logs. The following table lists the required permissions, along with detailed descriptions and use cases for each. Full indexing functionality, including support for all site collections and audit data, depends on granting the appropriate elevated permissions.| Permission | Description | Use case |
|---|---|---|
| Sites.Read.All | Grants read-only access to all SharePoint site collections and their content. | Used by applications that need to enumerate sites, retrieve metadata, list items, or download files across all sites. |
| Sites.Manage.All | Provides full control over all site collections, excluding permission management. | Enables applications to create, edit, and delete content such as list items and documents across all sites. |
| Files.Read.All | Allows read-only access to all files stored in SharePoint and OneDrive document libraries. | Used to access and download documents, attachments, and other file content across the organization. |
| AuditLog.Read.All | Enables access to SharePoint audit logs for monitoring user and system activities. | Used to analyze actions such as file edits, deletions, and permission changes for compliance and security auditing. |
| Sites.Selected | Allows access only to specific site collections explicitly granted by an administrator. | Used to restrict application access to approved SharePoint sites, providing fine-grained control over data exposure. |
| User.Read | Permits access to basic profile information of the signed-in user, including name and email. | Used to personalize the user experience or perform operations on behalf of the authenticated user. |
| Directory.Read.All | Grants read access to the full directory of users, groups, and other directory objects. | Used to look up user and group information for features like permissions mapping, people pickers, or organizational insights. |
FAQWhy are Full Control permissions required?Full Control allows the connector to discover all site collections and content in SharePoint. Without it, the connector can only access content where it already has permission and may miss sites or documents.Granting Full Control does not allow the SharePoint Optimized V2 connector to take destructive actions such as deleting or modifying content. The permission is used strictly for discovery and indexing.For environments with data transfer security concerns, the SharePoint Optimized V2 connector can be deployed as a remote connector. This enables Fusion to index content stored behind firewalls without opening firewall ports or exposing internal systems.
Prepare SharePoint
Before you configure the SharePoint Optimized V2 connector in Fusion, you must prepare your SharePoint environment. This section explains how to select an authentication method, assign the required permissions, and ensure access to the SharePoint content you intend to index.Configure the connector in Fusion
In Fusion, configure the SharePoint Optimized V2 connector to define the crawl scope, select an authentication method, and apply indexing settings. This setup enables Fusion to connect to SharePoint and index content securely and efficiently.This section applies to the latest version of the SharePoint Optimized V2 connector. If you are using an earlier version, some settings may have different names, appear in different sections, or may not be available.
Core configurations
Use the following parameters to configure what the connector crawls, how it authenticates, and how it handles content updates. Parameters are grouped by category for clarity. For full configuration options, see Configuration specifications.Scope
These settings define what SharePoint content the connector includes in the crawl. You can configure it to crawl all site collections or only specific sites, lists, folders, or items. To begin, specify the Web Application URL. This is the base URL of your SharePoint web application. All paths to site collections or items must be relative to this URL.
In earlier versions of the SharePoint Optimized V2 connector, you had to enable Fetch all site collections to crawl all site collections. This setting was removed in v2.0.0 and later. If you are using an older version and see this option in your configuration, enable it to ensure all site collections are crawled.
-
In the Site Collection List, provide a single site collection path.

- In Restrict to specific SharePoint items, enter one or more SharePoint URLs. You can copy these URLs directly from your browser.
Authentication
These settings define how the connector authenticates with SharePoint. For on-premises SharePoint, use NTLM authentication.
Crawl behavior
These settings control how the connector detects content changes and whether it performs incremental or full crawls. After the first successful full crawl, the connector uses incremental crawls by default. It relies on the SharePoint Changes API to detect and index added, updated, and deleted content. The connector tracks changes using a change token and removes deleted site collections. To support incremental crawling, required fields prefixed withlw must remain in the indexed documents.
To force a full crawl, enable the Force Full Crawl setting. This disables incremental crawling and reindexes all content from scratch. It also clears any previous crawl state. This option is useful when resetting the crawl due to major changes.
Incremental crawling requires Force Full Crawl to remain disabled.
Use cases
The SharePoint Optimized V2 connector supports a range of use cases for securely indexing and searching SharePoint content. This section highlights common deployment scenarios and configurations that help organizations meet security, compliance, and infrastructure requirements.Protect documents with security trimming
Security trimming ensures that users only see the content they are authorized to access when querying your SharePoint Optimized V2 datasource. It uses user roles and permissions to control document visibility. This feature requires the SharePoint Optimized V2 datasource to be used alongside an LDAP ACLs V2 datasource and a Graph Security Trimming query stage within the same app and collection. Benefits of using security trimming include:- Ensuring users only see documents they are authorized to access, maintaining data confidentiality.
- Reducing irrelevant search results by filtering content based on user permissions.
- Enhancing compliance with organizational security policies through integrated role-based access control.
Configure security trimming for SharePoint Optimized V2
Configure security trimming for SharePoint Optimized V2
You can configure the SharePoint Optimized V2 connector to use security trimming so that query results are filtered based on the roles and permissions assigned to the user.To configure security trimming, you’ll need to set up and run a SharePoint Optimized V2 datasource, an LDAP ACLs V2 datasource, and a Graph Security Trimming query stage in the same app and collection.When a crawl is run, the SharePoint Optimized V2 and LDAP ACLs V2 datasources must index the content documents and ACL documents to the same collection.
- ACL documents: Users, Groups, and their Role Assignments.
- Content documents: The SharePoint objects with metadata and content (Sites, Lists, Items). These documents have
_lw_acl_ssfields which determines who can see the docs when searching.
Set up the SharePoint datasource
- Navigate to Indexing > Datasources.
- Install the datasource connector if not already installed.
- Click Add and select SharePoint Optimized V2.
- Fill in all required fields.
- Configure only one authentication method. Enable NLTM Authentication Settings or SharePoint Online Authentication and configure the fields as explained below.
NTLM Authentication
This method connects to SharePoint on-premises server instances, such as SharePoint Server 2013, 2016, and 2019. When using this authentication method, the connector will indexcontentDocuments and the following aclDocuments: sharepointGroups, siteAdmins, roleDefinition, and roleAssignment.To use this authentication method, in your SharePoint Optimized V2 datasource, select the NTLM Authentication Settings checkbox and configure the following fields:- User
- Password
- Domain
- Workstation
SharePoint Online Authentication
These methods connect to SharePoint Online server instances. When using one of these methods, the connector will indexcontentDocuments and the following aclDocuments: sharepointGroups, siteAdmins, roleDefinition, roleAssignment and sharepointUsers in which loginName ends with onmicrosoft.com.Basic
To use this authentication method, in your SharePoint Optimized V2 datasource, select the SharePoint Online Authentication checkbox and configure the following fields:- SharePoint online account
- Password
App only (OAuth protocol)
To use this authentication method, in your SharePoint Optimized V2 datasource, select the SharePoint Online Authentication checkbox and configure the following fields:- Azure AD client ID
- Azure AD tenant
- Azure AD Client Secret
- Azure AD login endpoint (advanced)
- Azure AD Refresh Token (advanced)
App only with private key
To use this authentication method, in your SharePoint Optimized V2 datasource, select the SharePoint Online Authentication checkbox and configure the following fields:- Azure AD client ID
- Azure AD tenant
- Azure AD login endpoint
- Azure AD PKCS12 Base64 Keystore
- Azure AD PKCS12 Keystore Password
Set up the LDAP datasource
- Navigate to Indexing > Datasources.
- Install the datasource connector if not already installed.
- Click Add and select LDAP and Azure ACLs Connector (V2).
- Fill in all required fields.
- Configure authentication methods. Enter LDAP login credentials and/or enable Azure AD Properties and configure the fields as explained below.
LDAP Authentication
This method connects to an LDAP AD server. When using this method, the connector will index the followingaclDocuments: ldapUsers, and ldapGroups.To use this authentication method, in your LDAP and Azure ACLs Connector (V2) datasource, configure the following fields:- Login User Principal
- Login Password
Azure AD Authentication
This method connects to an Azure AD server. When using this method, the connector will index the followingaclDocuments: azureUsers, and azureGroupsTo use this authentication method, in your LDAP and Azure ACLs Connector (V2) datasource, select the Azure AD Properties checkbox and configure the following fields:- Azure AD Tenant ID
- Azure AD Client ID
- Azure AD Client Secret
Supported authentication methods for security trimming
| LDAP AD | Azure AD | |
|---|---|---|
| SharePoint On-Premises | NTLM Authentication and LDAP Authentication | NTLM Authentication and Azure AD Authentication |
| SharePoint Online | N/A | Any SharePoint Online authentication method and Azure AD Authentication |
Configure ACL collection
The SharePoint Optimized V2 and LDAP ACLs V2 datasources must index the content documents and ACL documents to the same collection. Ensure both datasources use the same value,contentCollection, for the field ACL Collection ID.If using SharePoint-Optimized and LDAP-ACLs < v2.0.0
Update the ACL Collection Id in the datasource configuration.The SharePoint-Optimized and LDAP-ACLs datasources must index theircontent_documents and acl_documents to the same collection. Make sure the property Security -> ACL Collection in both datasources have the same value. In both datasources, SharePoint-Optimized and LDAP-ACLs, check the property Security -> ACL Collection Id and make sure it points to the same content-collection.- Navigate to Indexing > Datasources.
- Open your SharePoint Optimized V2 or LDAP ACLs V2 datasource.
-
Under Security, update the configuration to use
contentCollectionas the ACL Collection ID.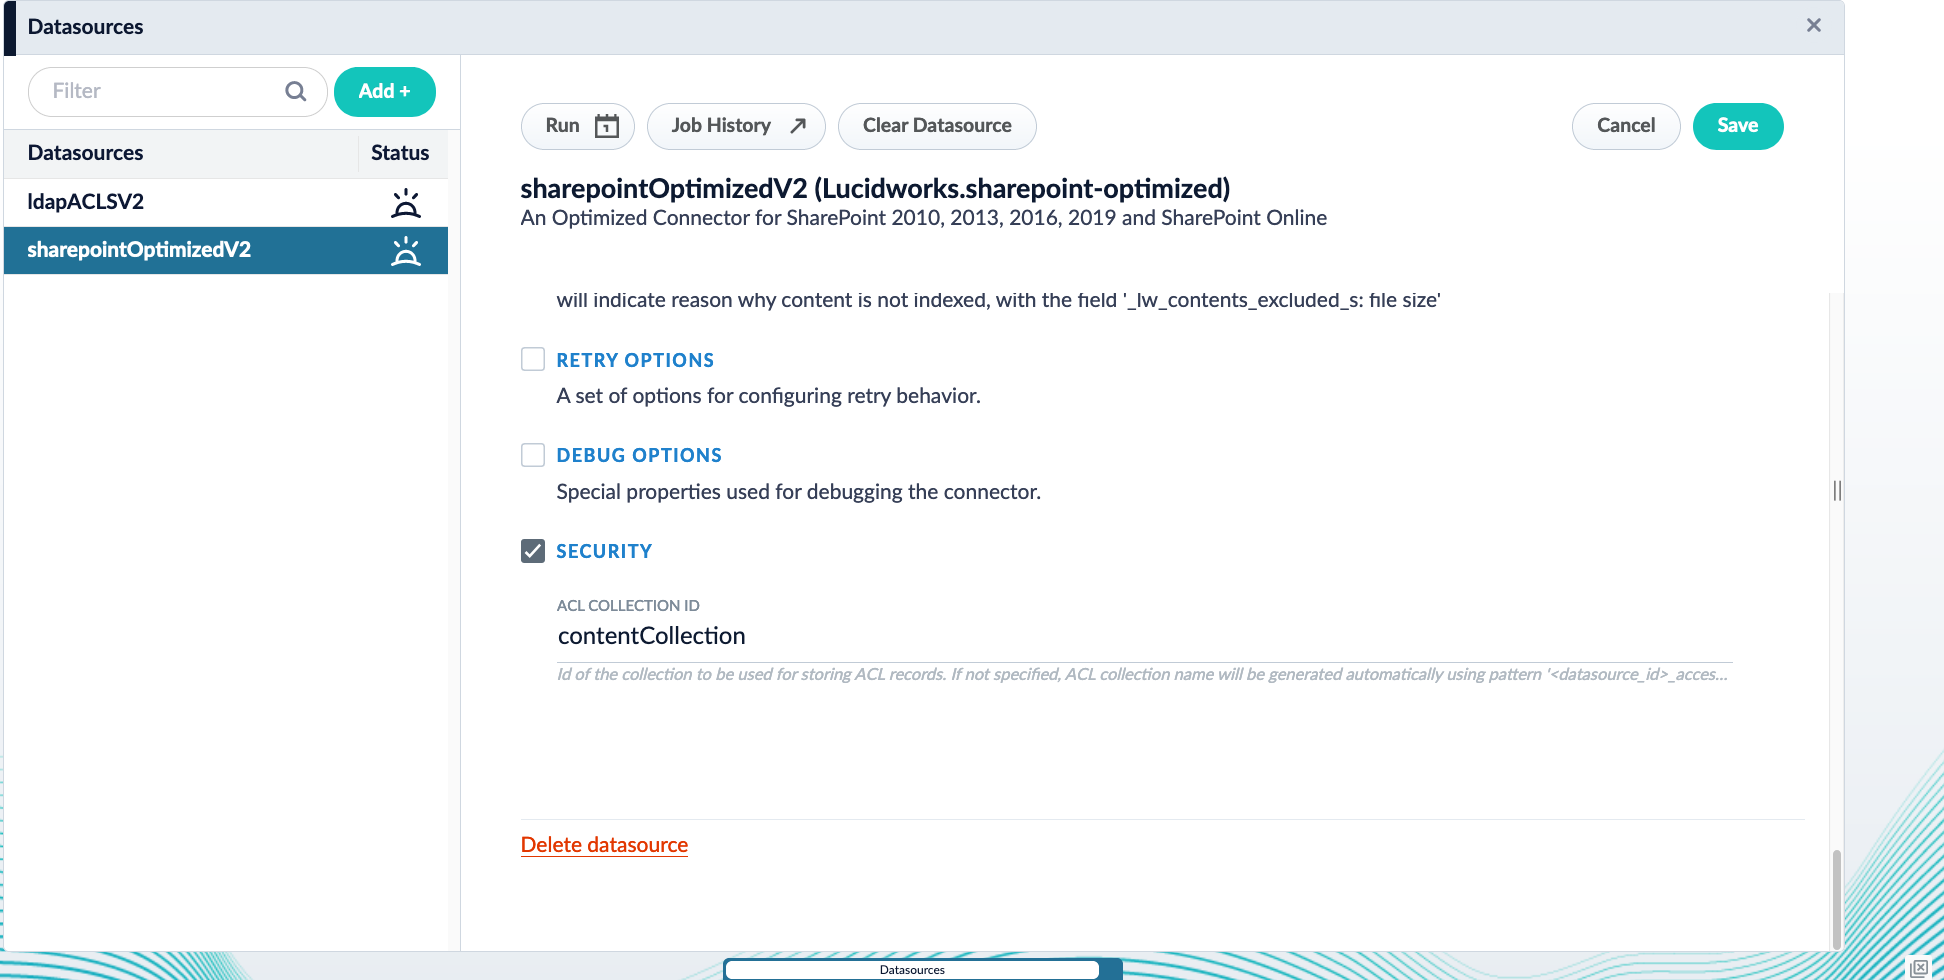
- Save the configuration.
If using SharePoint-Optimized and LDAP-ACLs >= v2.0.0
Recreate or update the datasources. If only updated, it is not possible to go back to the configuration of a previous plugin version.By default, the LDAP-ACLs and SharePoint-Optimized V2 datasources will index thecontent_documents and acl_documents to the same collection.- Navigate to Indexing > Datasources.
- Open your SharePoint Optimized V2 or LDAP ACLs V2 datasource.
- Under Graph Security Filtering Configuration, select Enable security trimming.
Set up Graph Security Trimming
A Graph Security Trimming stage is used to pull all nested groups for a user. Then the Solr join query takes those ACL IDs found in the graph query and filters out everything that does not match one of the ACLs.- Navigate to Querying > Query Pipelines.
- Open the query pipeline associated with your SharePoint Optimized V2 or LDAP ACLs V2 data.
- Click Add a new pipeline stage and select Graph Security Trimming.
-
Configure the stage with the following settings:
Field Value User ID source query_paramorheaderUser ID key The key that contains the User ID
Test the configuration
To confirm that security trimming works as configured, run the following test:- First, run the SharePoint Optimized V2 and LDAP ACLs V2 datasources.
- Run a series of queries to test user permissions are working as intended:
- Run a query using a User ID key with no permissions. You should see no search results.
- Run a query using a User ID key that has access to some documents. You should see some search results.
-
Run a query using a User ID key that has access to all documents. You should see all documents.
Facet by
_lw_document_type_s: contentDocumentto see only the SharePoint docs, otherwise aclDocuments will be also shown.
Index data behind firewalls
You can configure the SharePoint Optimized V2 Connector v2.0.0 and later to run remotely. This setup lets Fusion index content stored behind firewalls without exposing internal systems or opening firewall ports. It helps protect sensitive data, supports compliance, and enables unified search across cloud and on-premises sources. Fusion uses gRPC over HTTP/2 to connect on-premises remote connectors to Fusion clusters. For more information, see Remote V2 connectors.Configure remote V2 connectors
Configure remote V2 connectors
If you need to index data from behind a firewall, you can configure a V2 connector to run remotely on-premises using TLS-enabled gRPC.The gRPC connector backend is not supported in Fusion environments deployed on AWS.The
Prerequisites
Before you can set up an on-prem V2 connector, you must configure the egress from your network to allow HTTP/2 communication into the Fusion cloud. You can use a forward proxy server to act as an intermediary between the connector and Fusion.The following is required to run V2 connectors remotely:- The plugin zip file and the connector-plugin-standalone JAR.
- A configured connector backend gRPC endpoint.
- Username and password of a user with a
remote-connectorsoradminrole. - If the host where the remote connector is running is not configured to trust the server’s TLS certificate, you must configure the file path of the trust certificate collection.
If your version of Fusion doesn’t have the
remote-connectors role by default, you can create one. No API or UI permissions are required for the role.Connector compatibility
Only V2 connectors are able to run remotely on-premises. You also need the remote connector client JAR file that matches your Fusion version. You can download the latest files at V2 Connectors Downloads.Whenever you upgrade Fusion, you must also update your remote connectors to match the new version of Fusion.
System requirements
The following is required for the on-prem host of the remote connector:- (Fusion 5.9.0-5.9.10) JVM version 11
- (Fusion 5.9.11) JVM version 17
- Minimum of 2 CPUs
- 4GB Memory
Enable backend ingress
In yourvalues.yaml file, configure this section as needed:-
Set
enabledtotrueto enable the backend ingress. -
Set
pathtypetoPrefixorExact. -
Set
pathto the path where the backend will be available. -
Set
hostto the host where the backend will be available. -
In Fusion 5.9.6 only, you can set
ingressClassNameto one of the following:nginxfor Nginx Ingress Controlleralbfor AWS Application Load Balancer (ALB)
-
Configure TLS and certificates according to your CA’s procedures and policies.
TLS must be enabled in order to use AWS ALB for ingress.
Connector configuration example
Minimal example
Logback XML configuration file example
Run the remote connector
logging.config property is optional. If not set, logging messages are sent to the console.Test communication
You can run the connector in communication testing mode. This mode tests the communication with the backend without running the plugin, reports the result, and exits.Encryption
In a deployment, communication to the connector’s backend server is encrypted using TLS. You should only run this configuration without TLS in a testing scenario. To disable TLS, setplain-text to true.Egress and proxy server configuration
One of the methods you can use to allow outbound communication from behind a firewall is a proxy server. You can configure a proxy server to allow certain communication traffic while blocking unauthorized communication. If you use a proxy server at the site where the connector is running, you must configure the following properties:- Host. The hosts where the proxy server is running.
- Port. The port the proxy server is listening to for communication requests.
- Credentials. Optional proxy server user and password.
Password encryption
If you use a login name and password in your configuration, run the following utility to encrypt the password:- Enter a user name and password in the connector configuration YAML.
-
Run the standalone JAR with this property:
- Retrieve the encrypted passwords from the log that is created.
- Replace the clear password in the configuration YAML with the encrypted password.
Connector restart (5.7 and earlier)
The connector will shut down automatically whenever the connection to the server is disrupted, to prevent it from getting into a bad state. Communication disruption can happen, for example, when the server running in theconnectors-backend pod shuts down and is replaced by a new pod. Once the connector shuts down, connector configuration and job execution are disabled. To prevent that from happening, you should restart the connector as soon as possible.You can use Linux scripts and utilities to restart the connector automatically, such as Monit.Recoverable bridge (5.8 and later)
If communication to the remote connector is disrupted, the connector will try to recover communication and gRPC calls. By default, six attempts will be made to recover each gRPC call. The number of attempts can be configured with themax-grpc-retries bridge parameters.Job expiration duration (5.9.5 only)
The timeout value for irresponsive backend jobs can be configured with thejob-expiration-duration-seconds parameter. The default value is 120 seconds.Use the remote connector
Once the connector is running, it is available in the Datasources dropdown. If the standalone connector terminates, it disappears from the list of available connectors. Once it is re-run, it is available again and configured connector instances will not get lost.Enable asynchronous parsing (5.9 and later)
To separate document crawling from document parsing, enable Tika Asynchronous Parsing on remote V2 connectors.API operations
This section provides a simple example of how to use the Connectors API to list available connector plugins, demonstrating how to interact with the API to discover which datasources are supported. For more detailed examples, including full request and response payloads and the configuration specification used with the SharePoint Optimized V2 connector, see the Connector APIs documentation.Get all available connectors
RequestTroubleshooting
This section describes known limitations and configuration requirements for the SharePoint Optimized V2 Connector. Each issue includes the observed behavior, the expected behavior, and the impact to users.Connector runs on multiple pods
The SharePoint Optimized V2 Connector does not support running on more than one pod. If multiple instances run at the same time, they may try to index the same content, which can cause duplication, crawl errors, or inconsistent results. The connector is designed to run as a single instance. To ensure reliable indexing, deploy the connector on only one pod. This means you should only run one copy of the connector. Keeping it to one copy helps everything work correctly.Connector version compatibility
If you use the SharePoint Optimized V2 Connector with an ACL connector, make sure the versions are compatible. Incompatible versions can prevent document-level access controls from being applied correctly. This can result in users seeing content they shouldn’t or missing content they should be able to access. To avoid access issues, use only supported combinations of the SharePoint and ACL connectors. Check version compatibility in Prerequisites. For details about crawls and incremental crawls see Crawl using the SharePoint Optimized V2 connector.Avoid throttling and rate limiting in SharePoint Online
SharePoint Online enforces rate limits to protect its APIs. When that happens, it tells the connector to slow down by sending error messages. When the connector sends too many requests in parallel, SharePoint may respond with429 Too Many Requests or 503 Server Too Busy errors. These indicate that the service is temporarily rejecting traffic due to overload.
To avoid these errors, reduce the number of concurrent requests. In the connector configuration, go to Core Properties > Fetch Settings and lower the Fetch Threads value. Also consider reducing the number of connector jobs running at the same time.
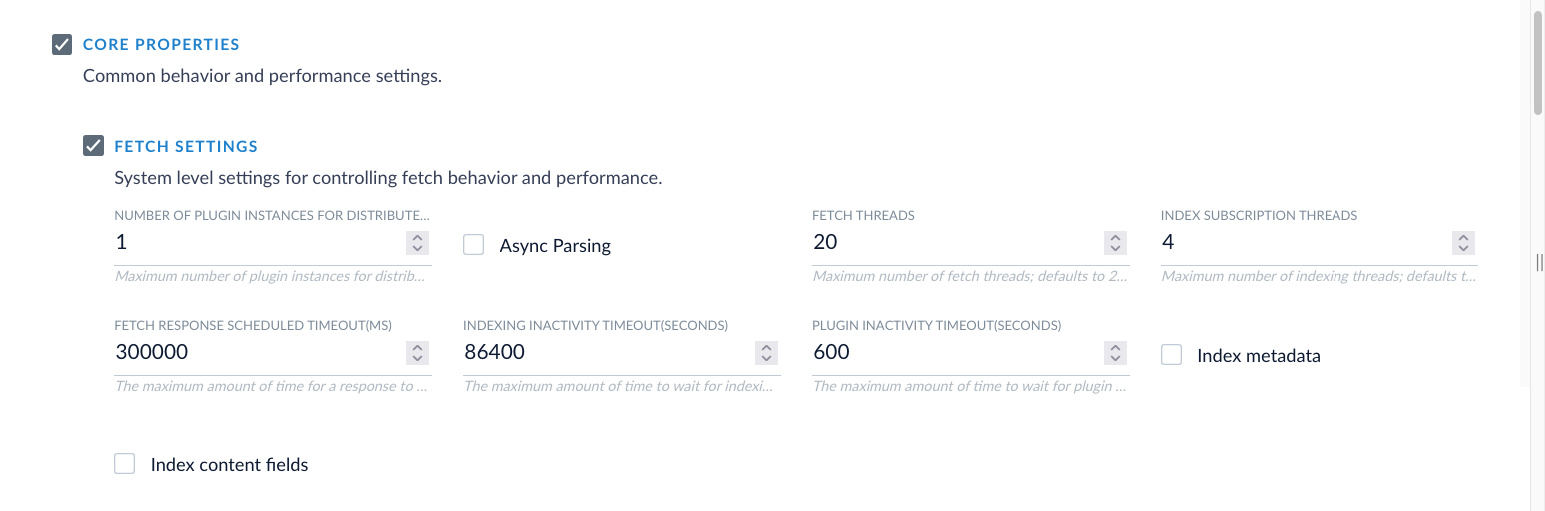
Retries help with occasional limits, but persistent
429 or 503 errors mean you’re sending too much traffic. Reduce request volume first. Only use retries to improve resilience, not to bypass throttling.More resources
For more information on how to plan, install, and configure the SharePoint Optimized V2 connector:- Overview of SharePoint and SharePoint Online connectors. Learn about the available SharePoint connectors and how they compare.
- Download Connectors. Get the latest version of the SharePoint Optimized V2 connector package.
- Install or update a connector. Follow step-by-step instructions to install a connector into Fusion.
- Crawl using the SharePoint Optimized V2 connector. Configure and run crawls using scoped collections, inclusion filters, and other crawl settings.
Install or update a connector
Install or update a connector
When you create a new datasource that requires an uninstalled connector, Fusion releases 5.2 and later automatically download and install the connector using the Datasources dropdown. You can also update the connector using the Blob Store UI or via the Connector API.
Install a connector using the Datasources dropdown
- In your Fusion app, navigate to Indexing > Datasources.
- Click Add.
- In the list of connectors, scroll down to the connectors marked Not Installed and select the one you want to install.
Fusion automatically downloads it and moves it to the list of installed connectors.
Install or update a connector using the Blob Store UI
- Download the connector zip file from Download V2 connectors.
Do not expand the archive; Fusion consumes it as-is.
- In your Fusion app, navigate to System > Blobs.
- Click Add.
- Select Connector Plugin.

- Click Choose File and select the downloaded zip file from your file system.
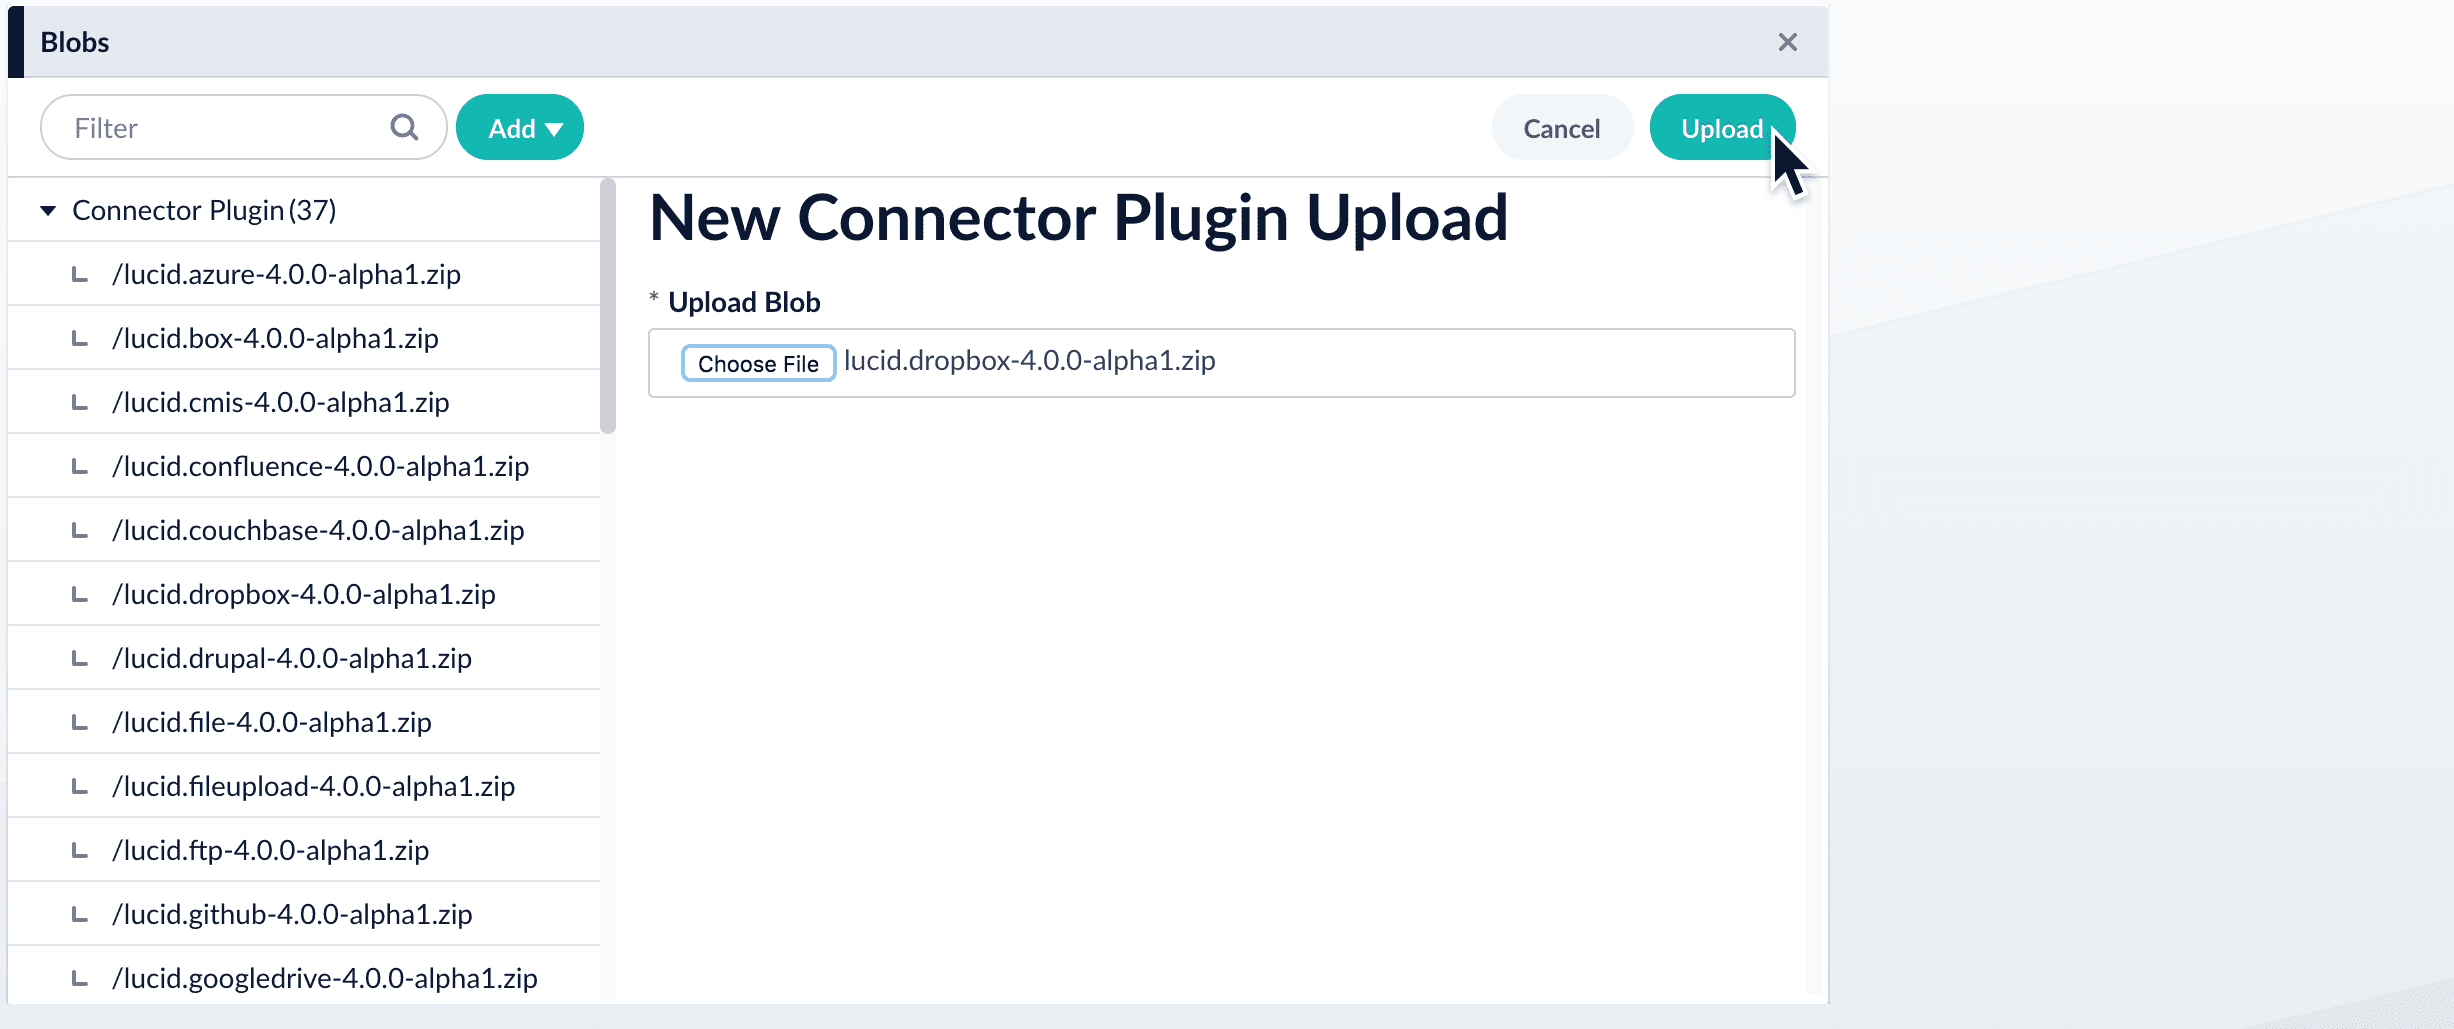
- Click Upload.
The new connector’s blob manifest appears.

Install or update a connector using the Connector API
-
Download the connector zip file from Download V2 connectors.
Do not expand the archive; Fusion consumes it as-is.
-
Upload the connector zip file to Fusion’s plugins.
Specify a
pluginIdas in this example:Fusion automatically publishes the event to the cluster, and the listeners perform the connector installation process on each node. -
Look in
https://FUSION_HOST:FUSION_PORT/apps/connectors/plugins/to verify the new connector is installed.
Reinstall a connector
To reinstall a connector for any reason, first delete the connector then use the preceding steps to install it again. This may take a few minutes to complete depending on how quickly the pods are deleted and recreated.Crawl using the SharePoint Optimized V2 connector
Crawl using the SharePoint Optimized V2 connector
Decide what you need to crawl
First understand the different types of objects in SharePoint.Get a quick overview of the SharePoint object modelYou have to choose what you want to crawl.Crawl all site collections
This option is only available if you crawl with administrative permissions as listing all site collections in the web application requires administrative access.
Crawl a subset of site collections
Do not check the Fetch all site collections checkbox and list each site collection you wish to crawl.Specify each site collection relative to the Web Application URL.Crawl a subset of sites, lists, or list items (URLs)
You can also limit your crawl to only crawl specific sites, lists, folders, files, or list items.You will specify a single site collection in the Site Collection List as in the previous example.Then you can Restrict to specific SharePoint items. Copy and paste the URL of the resource from the browser into this list of items.When crawling, the connector will convert the URLs specified into inclusive regular expressions.Decide how you would like to authenticate
With SharePoint, there are multiple options when it comes to authenticating.On-premise - NTLM
Specify using the NTLM Authentication Settings in the Fusion UI.SharePoint Online authentication options
When using the SharePoint Online connector, several options exist for authenticating.SharePoint Site Collection Administrator
You can create and promote a user to Site Collection Administrator for a specific site. Promoting a user to Site Collection Administrator grants all necessary permissions for a crawl, without granting broader administrative control over the entirety of the SharePoint environment. Administrators can be monitored and have their access revoked through the SharePoint Admin Center, mitigating potential security risks.For more information on SharePoint site administration, see the SharePoint documentation.App-only authentication - Azure AD with private key
This method of authentication is the most commonly used. It requires giving the application key Full Control permission, otherwise you get security authorization errors while crawling.The
username field is mandatory. If using app-only authentication, you can use a fake value in this field, for example xxx@lucidworks.com.- Client ID
- PFX key (in base 64 format)
- PFX key password
- Tenant
App-only authentication - Azure AD with OAuth
This method of authentication is also commonly used. It requires giving the application key Full Control permission, otherwise you get security authorization errors while crawling.The
username field is mandatory. If using app-only authentication, you can use a fake value in this field, for example xxx@lucidworks.com.- Client ID
- Client Secret
- Tenant
Understanding incremental crawls
After you have performed your first successful full crawl (no blocking errors), all subsequent crawls are incremental crawls.Incremental crawls use SharePoint’s Changes API to do the following:- For each site collection, use the change token (timestamp) to get all changes since the full crawl was started:
- Additions
- Updates
- Deletions
During incremental crawl, all fields with the lw prefix must remain in the content documents. Failure to do so results in incremental crawls not working as expected. If you are going to filter on fields, leave the lw fields as-is.
Force full crawl
To perform incremental crawls, the Force Full Crawl property must be disabled, which it is by defaultIf a crawl starts, and Force Full Crawl is enabled, incremental crawl behavior is skipped and instead a full crawl is performed:- MapDb tables are recreated and previously persisted data is deleted.
- The plugin performs the requests of all SharePoint objects just like the first crawl.
- All sharepoint-items are reindexed.
- Given incremental crawl is skipped, changes with
deleteare not detected and documents deleted from the SharePoint server are not removed from the index, resulting in orphaned documents.
- After a first crawl, MapDb information is persisted in PVC if configured, otherwise it is saved in the
/tmppath. - If PVC is configured in the environment and you need to perform full-crawls from scratch:
- Clear the datasource as it also removes MapDb.
- If PVC is not configured and it is needed to perform full crawls from scratch:
- Clearing the datasource does not remove the MapDb saved in the
/tmppath from a previous crawl. - Enable the Force Full Crawl property, as this forces MapDb files to be removed.
- Clearing the datasource does not remove the MapDb saved in the
- Clear the datasource and enable the full-crawl property.
- It does not matter if PVC is configured or not, as MapDb information is not persisted by the plugin.
Crawl or incremental crawl and MapDb
At crawl time, MapDb is used to persist:- SharePoint objects metadata (sites, lists, items, and attachments). The plugin reads the metadata saved and builds the documents to send to the connector server.
- siteCollections checkpoints.
- Permissions inheritance (list of all SharePoint objects and permissions associated).
- Site-collection taxonomy terms (if property is enabled).
- List of siteCollections.
- Folders fetched.
Since SharePoint Optimized V2 connector v1.5.0, SharePoint objects metadata is not persisted as the metadata is removed when the crawl finishes.
- siteCollections checkpoints to know where to start a subsequent crawl (incremental crawl).
- Information related to permissions inheritance to know which permissions and documents to update.
- Information related to the list of siteCollections to perform siteCollection deletion.
- Information related to the list of folders to update folders/nested folders.
- Taxonomy terms to perform incremental crawl of this feature.
Since SharePoint Optimized V2 connector v2.0.0, the plugin does not need to persist the information mentioned above: site collection checkpoints, list of site collections, folders, or permissions. Only taxonomy terms requires mapDb usage and is needed only at crawl time.
Connectors 101
The microlearning for Connectors 101 focuses on Learn how connectors work to get data into Fusion.
Configuration
To change the number of items to retrieve per page, set the value ofapiQueryRowLimit. The default value is 5000.
To change the number of change events to retrieve per page, set the value of changeApiQueryRowLimit. The default value is 2000.