- Latest version: v2.1.1
- Compatible with Fusion version: 5.9.1 and later
Verify your connector versionThis connector depends on specific Fusion versions. See the following table for the required versions:
For connector downloads, see Download Connectors.
| Fusion version | Connector version |
|---|---|
| Fusion 5.6.1 and later | v1.0.0 and later |
| Fusion 5.9.0 and later | v1.5.0 and later |
| Fusion 5.9.1 and later | v2.0.0 and later |
Prerequisites
Perform these prerequisites to ensure the connector can reliably access, crawl, and index your data. Proper setup helps avoid configuration or permission errors, so use the following guidelines to keep your content available for discovery and search in Fusion. The LDAP server must use a supported authentication method:- Simple bind with a username and password.
- (Optional) Anonymous bind for open LDAP servers, but this is discouraged in production environments for security reasons.
- For users: Have access for
uid,cn,sAMAccountName, or an equivalent for the unique user ID. - For groups: Have access for
cnor equivalent for group ID, plusmember, oruniqueMemberfor users or subgroups assigned to that group.
User.Read.Allto read profile properties and group memberships.GroupMember.Read.Allto read memberships and basic group properties.
Remote mode prerequisites (optional)
If running in remote mode, there are additional considerations:- Ensure your network allows outbound HTTP/2 traffic from the remote host to the Fusion gRPC endpoint.
- You need a Fusion user account with the
remote-connectorsoradminrole to authenticate the connector. - If the standalone host doesn’t trust Fusion’s TLS cert, point it to your truststore file path.
Authentication
Setting up the correct authentication according to your organization’s data governance policies helps keep sensitive data secure while allowing authorized indexing. You will need to enter the following in Fusion:- LDAP host and port.
- Bind DN username for the Login User Principal field in Fusion.
- Bind password for the Login Password in Fusion.
- Base DN, such as
dc=example,dc=com. - User and group filters are prepopulated and you can adjust these as needed.
- If crawling Azure AD, enter the Azure credentials in the Azure AD Properties section.
- Bind to the LDAP server.
- Search users and groups.
- Fetch ACL data for security trimming.
Full recrawls
Starting in Fusion 5.7, subsequent crawls work differently with the LDAP ACLs V2 connector than other connectors. Crawls follow this process:- Every time the connector crawl runs, all documents are indexed.
- Each document is assigned a new field,
_lw_job_id_s. - The connector job assigns the
jobIDvalue to this field. - When the crawl finishes, the job deletes documents that do not have the latest
jobIDvalue.
Remote connectors
You can configure the LDAP ACLs V2 connector (v2.0.0 and later) to running remotely in Fusion versions 5.9.1 and later.Configure Remote V2 Connectors
Configure Remote V2 Connectors
If you need to index data from behind a firewall, you can configure a V2 connector to run remotely on-premises using TLS-enabled gRPC.The gRPC connector backend is not supported in Fusion environments deployed on AWS.The
Prerequisites
Before you can set up an on-prem V2 connector, you must configure the egress from your network to allow HTTP/2 communication into the Fusion cloud. You can use a forward proxy server to act as an intermediary between the connector and Fusion.The following is required to run V2 connectors remotely:- The plugin zip file and the connector-plugin-standalone JAR.
- A configured connector backend gRPC endpoint.
- Username and password of a user with a
remote-connectorsoradminrole. - If the host where the remote connector is running is not configured to trust the server’s TLS certificate, you must configure the file path of the trust certificate collection.
If your version of Fusion doesn’t have the
remote-connectors role by default, you can create one. No API or UI permissions are required for the role.Connector compatibility
Only V2 connectors are able to run remotely on-premises. You also need the remote connector client JAR file that matches your Fusion version. You can download the latest files at V2 Connectors Downloads.Whenever you upgrade Fusion, you must also update your remote connectors to match the new version of Fusion.
System requirements
The following is required for the on-prem host of the remote connector:- (Fusion 5.9.0-5.9.10) JVM version 11
- (Fusion 5.9.11) JVM version 17
- Minimum of 2 CPUs
- 4GB Memory
Enable backend ingress
In yourvalues.yaml file, configure this section as needed:-
Set
enabledtotrueto enable the backend ingress. -
Set
pathtypetoPrefixorExact. -
Set
pathto the path where the backend will be available. -
Set
hostto the host where the backend will be available. -
In Fusion 5.9.6 only, you can set
ingressClassNameto one of the following:nginxfor Nginx Ingress Controlleralbfor AWS Application Load Balancer (ALB)
-
Configure TLS and certificates according to your CA’s procedures and policies.
TLS must be enabled in order to use AWS ALB for ingress.
Connector configuration example
Minimal example
Logback XML configuration file example
Run the remote connector
logging.config property is optional. If not set, logging messages are sent to the console.Test communication
You can run the connector in communication testing mode. This mode tests the communication with the backend without running the plugin, reports the result, and exits.Encryption
In a deployment, communication to the connector’s backend server is encrypted using TLS. You should only run this configuration without TLS in a testing scenario. To disable TLS, setplain-text to true.Egress and proxy server configuration
One of the methods you can use to allow outbound communication from behind a firewall is a proxy server. You can configure a proxy server to allow certain communication traffic while blocking unauthorized communication. If you use a proxy server at the site where the connector is running, you must configure the following properties:- Host. The hosts where the proxy server is running.
- Port. The port the proxy server is listening to for communication requests.
- Credentials. Optional proxy server user and password.
Password encryption
If you use a login name and password in your configuration, run the following utility to encrypt the password:- Enter a user name and password in the connector configuration YAML.
-
Run the standalone JAR with this property:
- Retrieve the encrypted passwords from the log that is created.
- Replace the clear password in the configuration YAML with the encrypted password.
Connector restart (5.7 and earlier)
The connector will shut down automatically whenever the connection to the server is disrupted, to prevent it from getting into a bad state. Communication disruption can happen, for example, when the server running in theconnectors-backend pod shuts down and is replaced by a new pod. Once the connector shuts down, connector configuration and job execution are disabled. To prevent that from happening, you should restart the connector as soon as possible.You can use Linux scripts and utilities to restart the connector automatically, such as Monit.Recoverable bridge (5.8 and later)
If communication to the remote connector is disrupted, the connector will try to recover communication and gRPC calls. By default, six attempts will be made to recover each gRPC call. The number of attempts can be configured with themax-grpc-retries bridge parameters.Job expiration duration (5.9.5 only)
The timeout value for irresponsive backend jobs can be configured with thejob-expiration-duration-seconds parameter. The default value is 120 seconds.Use the remote connector
Once the connector is running, it is available in the Datasources dropdown. If the standalone connector terminates, it disappears from the list of available connectors. Once it is re-run, it is available again and configured connector instances will not get lost.Enable asynchronous parsing (5.9 and later)
To separate document crawling from document parsing, enable Tika Asynchronous Parsing on remote V2 connectors.Security trimming
Starting in Fusion 5.9, you can configure the LDAP ACLs V2 connector with the SharePoint Optimized V2 connector to support security trimming.Configure Security Trimming for SharePoint Optimized V2
Configure Security Trimming for SharePoint Optimized V2
You can configure the SharePoint Optimized V2 connector to use security trimming so that query results are filtered based on the roles and permissions assigned to the user.To configure security trimming, you’ll need to set up and run a SharePoint Optimized V2 datasource, an LDAP ACLs V2 datasource, and a Graph Security Trimming query stage in the same app and collection.When a crawl is run, the SharePoint Optimized V2 and LDAP ACLs V2 datasources must index the content documents and ACL documents to the same collection.
- ACL documents: Users, Groups, and their Role Assignments.
- Content documents: The SharePoint objects with metadata and content (Sites, Lists, Items). These documents have
_lw_acl_ssfields which determines who can see the docs when searching.
Set up the SharePoint datasource
- Navigate to Indexing > Datasources.
- Install the datasource connector if not already installed.
- Click Add and select SharePoint Optimized V2.
- Fill in all required fields.
- Configure only one authentication method. Enable NLTM Authentication Settings or SharePoint Online Authentication and configure the fields as explained below.
NTLM Authentication
This method connects to SharePoint on-premises server instances, such as SharePoint Server 2013, 2016, and 2019. When using this authentication method, the connector will indexcontentDocuments and the following aclDocuments: sharepointGroups, siteAdmins, roleDefinition, and roleAssignment.To use this authentication method, in your SharePoint Optimized V2 datasource, select the NTLM Authentication Settings checkbox and configure the following fields:- User
- Password
- Domain
- Workstation
SharePoint Online Authentication
These methods connect to SharePoint Online server instances. When using one of these methods, the connector will indexcontentDocuments and the following aclDocuments: sharepointGroups, siteAdmins, roleDefinition, roleAssignment and sharepointUsers in which loginName ends with onmicrosoft.com.Basic
To use this authentication method, in your SharePoint Optimized V2 datasource, select the SharePoint Online Authentication checkbox and configure the following fields:- SharePoint online account
- Password
App only (OAuth protocol)
To use this authentication method, in your SharePoint Optimized V2 datasource, select the SharePoint Online Authentication checkbox and configure the following fields:- Azure AD client ID
- Azure AD tenant
- Azure AD Client Secret
- Azure AD login endpoint (advanced)
- Azure AD Refresh Token (advanced)
App only with private key
To use this authentication method, in your SharePoint Optimized V2 datasource, select the SharePoint Online Authentication checkbox and configure the following fields:- Azure AD client ID
- Azure AD tenant
- Azure AD login endpoint
- Azure AD PKCS12 Base64 Keystore
- Azure AD PKCS12 Keystore Password
Set up the LDAP datasource
- Navigate to Indexing > Datasources.
- Install the datasource connector if not already installed.
- Click Add and select LDAP and Azure ACLs Connector (V2).
- Fill in all required fields.
- Configure authentication methods. Enter LDAP login credentials and/or enable Azure AD Properties and configure the fields as explained below.
LDAP Authentication
This method connects to an LDAP AD server. When using this method, the connector will index the followingaclDocuments: ldapUsers, and ldapGroups.To use this authentication method, in your LDAP and Azure ACLs Connector (V2) datasource, configure the following fields:- Login User Principal
- Login Password
Azure AD Authentication
This method connects to an Azure AD server. When using this method, the connector will index the followingaclDocuments: azureUsers, and azureGroupsTo use this authentication method, in your LDAP and Azure ACLs Connector (V2) datasource, select the Azure AD Properties checkbox and configure the following fields:- Azure AD Tenant ID
- Azure AD Client ID
- Azure AD Client Secret
Supported authentication methods for security trimming
| LDAP AD | Azure AD | |
|---|---|---|
| SharePoint On-Premises | NTLM Authentication and LDAP Authentication | NTLM Authentication and Azure AD Authentication |
| SharePoint Online | N/A | Any SharePoint Online authentication method and Azure AD Authentication |
Configure ACL collection
The SharePoint Optimized V2 and LDAP ACLs V2 datasources must index the content documents and ACL documents to the same collection. Ensure both datasources use the same value,contentCollection, for the field ACL Collection ID.If using SharePoint-Optimized and LDAP-ACLs < v2.0.0
Update the ACL Collection Id in the datasource configuration.The SharePoint-Optimized and LDAP-ACLs datasources must index theircontent_documents and acl_documents to the same collection. Make sure the property Security -> ACL Collection in both datasources have the same value. In both datasources, SharePoint-Optimized and LDAP-ACLs, check the property Security -> ACL Collection Id and make sure it points to the same content-collection.- Navigate to Indexing > Datasources.
- Open your SharePoint Optimized V2 or LDAP ACLs V2 datasource.
-
Under Security, update the configuration to use
contentCollectionas the ACL Collection ID.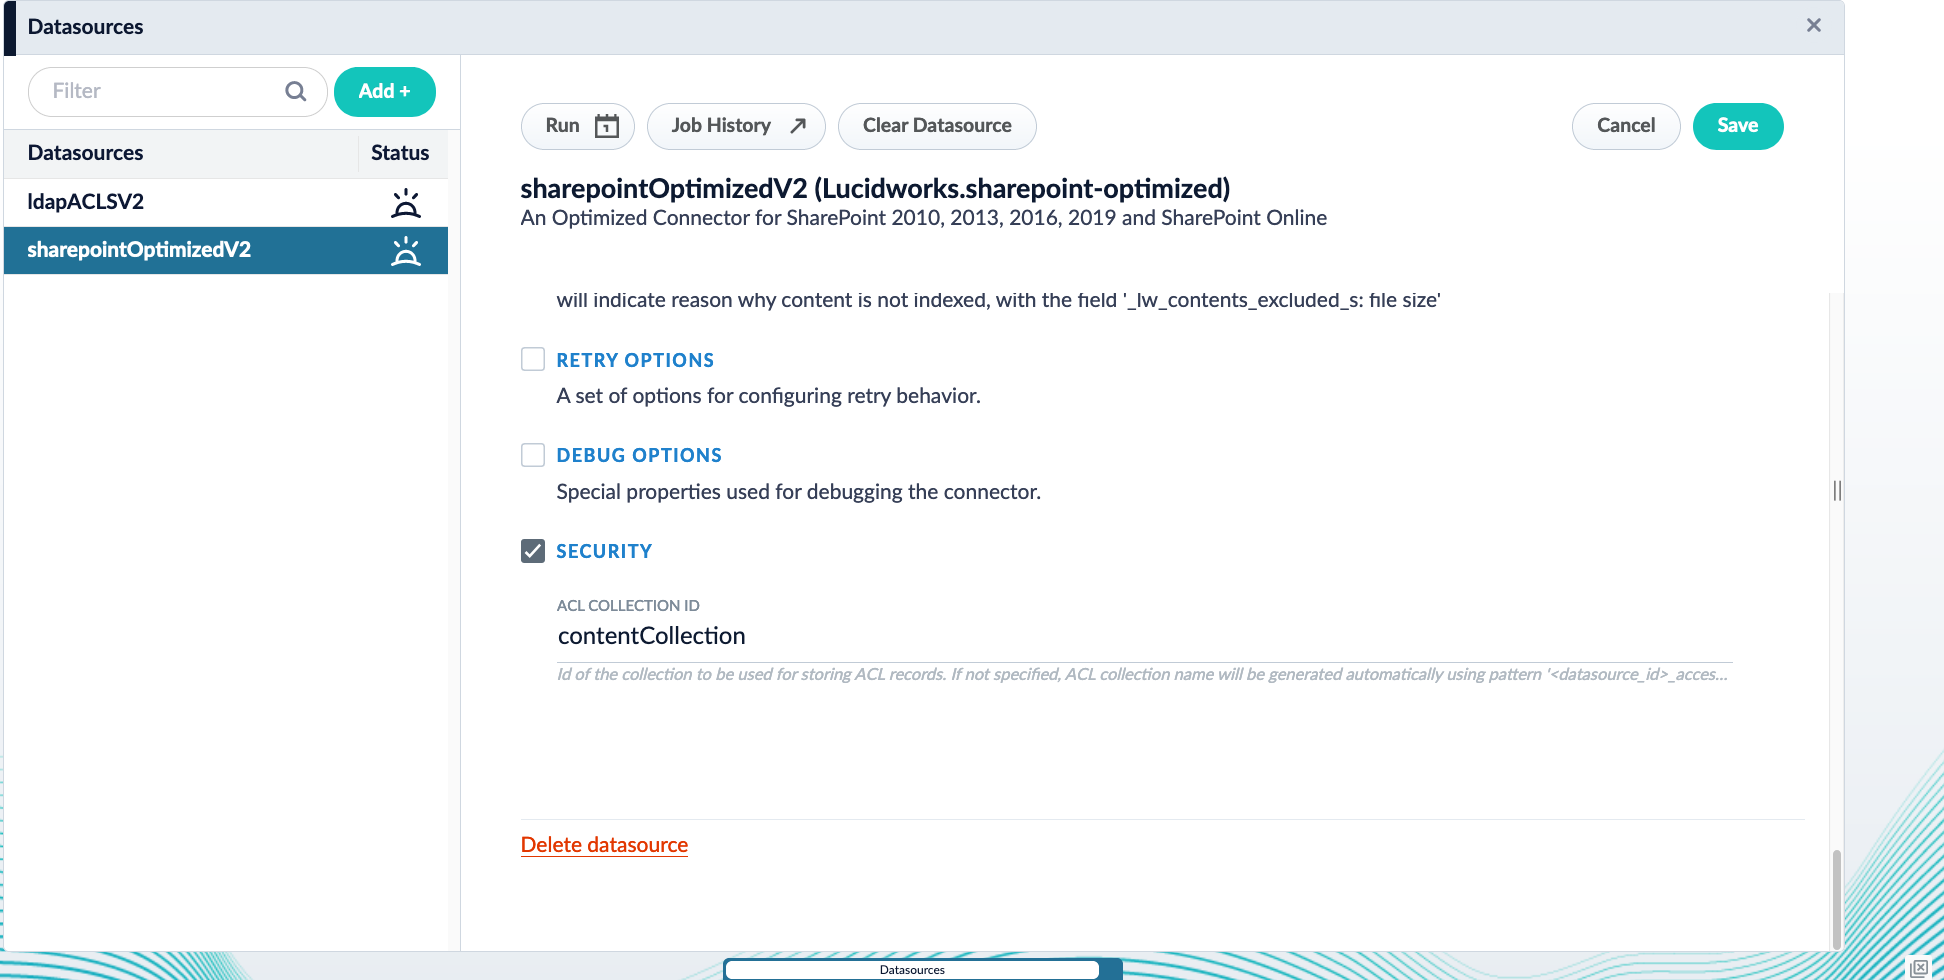
- Save the configuration.
If using SharePoint-Optimized and LDAP-ACLs >= v2.0.0
Recreate or update the datasources. If only updated, it is not possible to go back to the configuration of a previous plugin version.By default, the LDAP-ACLs and SharePoint-Optimized V2 datasources will index thecontent_documents and acl_documents to the same collection.- Navigate to Indexing > Datasources.
- Open your SharePoint Optimized V2 or LDAP ACLs V2 datasource.
- Under Graph Security Filtering Configuration, select Enable security trimming.
Set up Graph Security Trimming
A Graph Security Trimming stage is used to pull all nested groups for a user. Then the Solr join query takes those ACL IDs found in the graph query and filters out everything that does not match one of the ACLs.- Navigate to Querying > Query Pipelines.
- Open the query pipeline associated with your SharePoint Optimized V2 or LDAP ACLs V2 data.
- Click Add a new pipeline stage and select Graph Security Trimming.
-
Configure the stage with the following settings:
Field Value User ID source query_paramorheaderUser ID key The key that contains the User ID
Test the configuration
To confirm that security trimming works as configured, run the following test:- First, run the SharePoint Optimized V2 and LDAP ACLs V2 datasources.
- Run a series of queries to test user permissions are working as intended:
- Run a query using a User ID key with no permissions. You should see no search results.
- Run a query using a User ID key that has access to some documents. You should see some search results.
-
Run a query using a User ID key that has access to all documents. You should see all documents.
Facet by
_lw_document_type_s: contentDocumentto see only the SharePoint docs, otherwise aclDocuments will be also shown.
Learn more
Fetch Azure Groups with the AD Connector for ACLs
Fetch Azure Groups with the AD Connector for ACLs
The Active Directory Connectors for ACLs has the ability to fetch Azure groups and index them into the ACL collection. The connector utilizes the Microsoft Graph API’s group-list service.The resulting ACL document contains IDs that are GUID strings, such as
45b7d2e7-b882-4a80-ba97-10b7a63b8fa4, and they have inbound_ss relationship to the ldapGroup-sid record’s SID identifier.Configuration parameters
In order to crawl Azure groups from the AD Connector for ACLs, you will need the values for the following parameters:- Azure AD Tenant ID
- Azure AD Client ID
- Azure AD Client Secret
Find your Tenant ID and Client ID
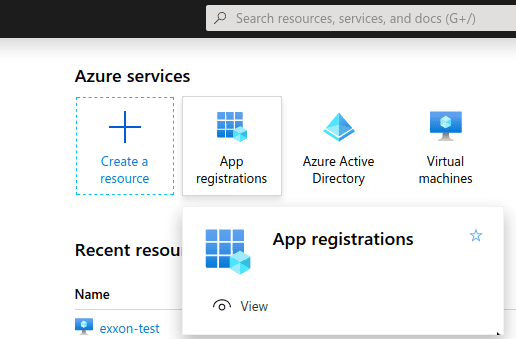
Begin by registering your application:- Visit the Azure portal.
-
Click App registrations.
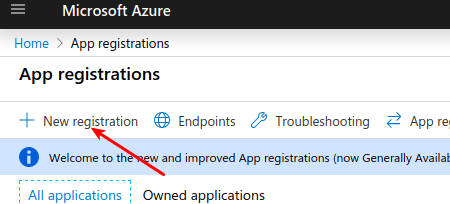
-
Click New registration.
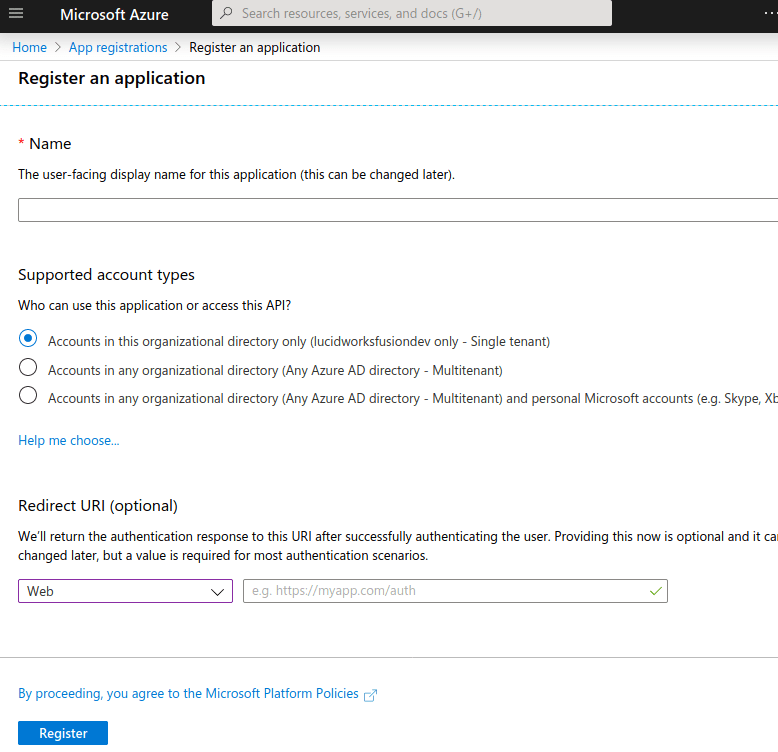
- Enter a name for the application.
- Choose the Single Tenant supported account type.
- Leave the Redirect URI value blank.
- Click Register.
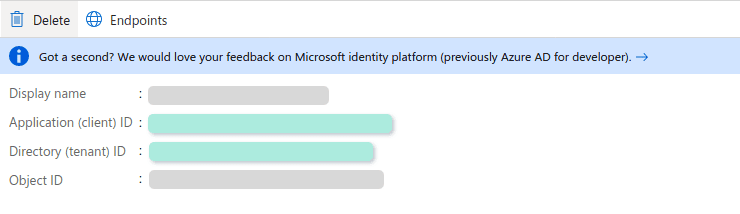
- Azure AD Tentant ID. Listed as “Directory (tenant) ID”
-
Azure AD Client ID. Listed as “Application (client) ID”
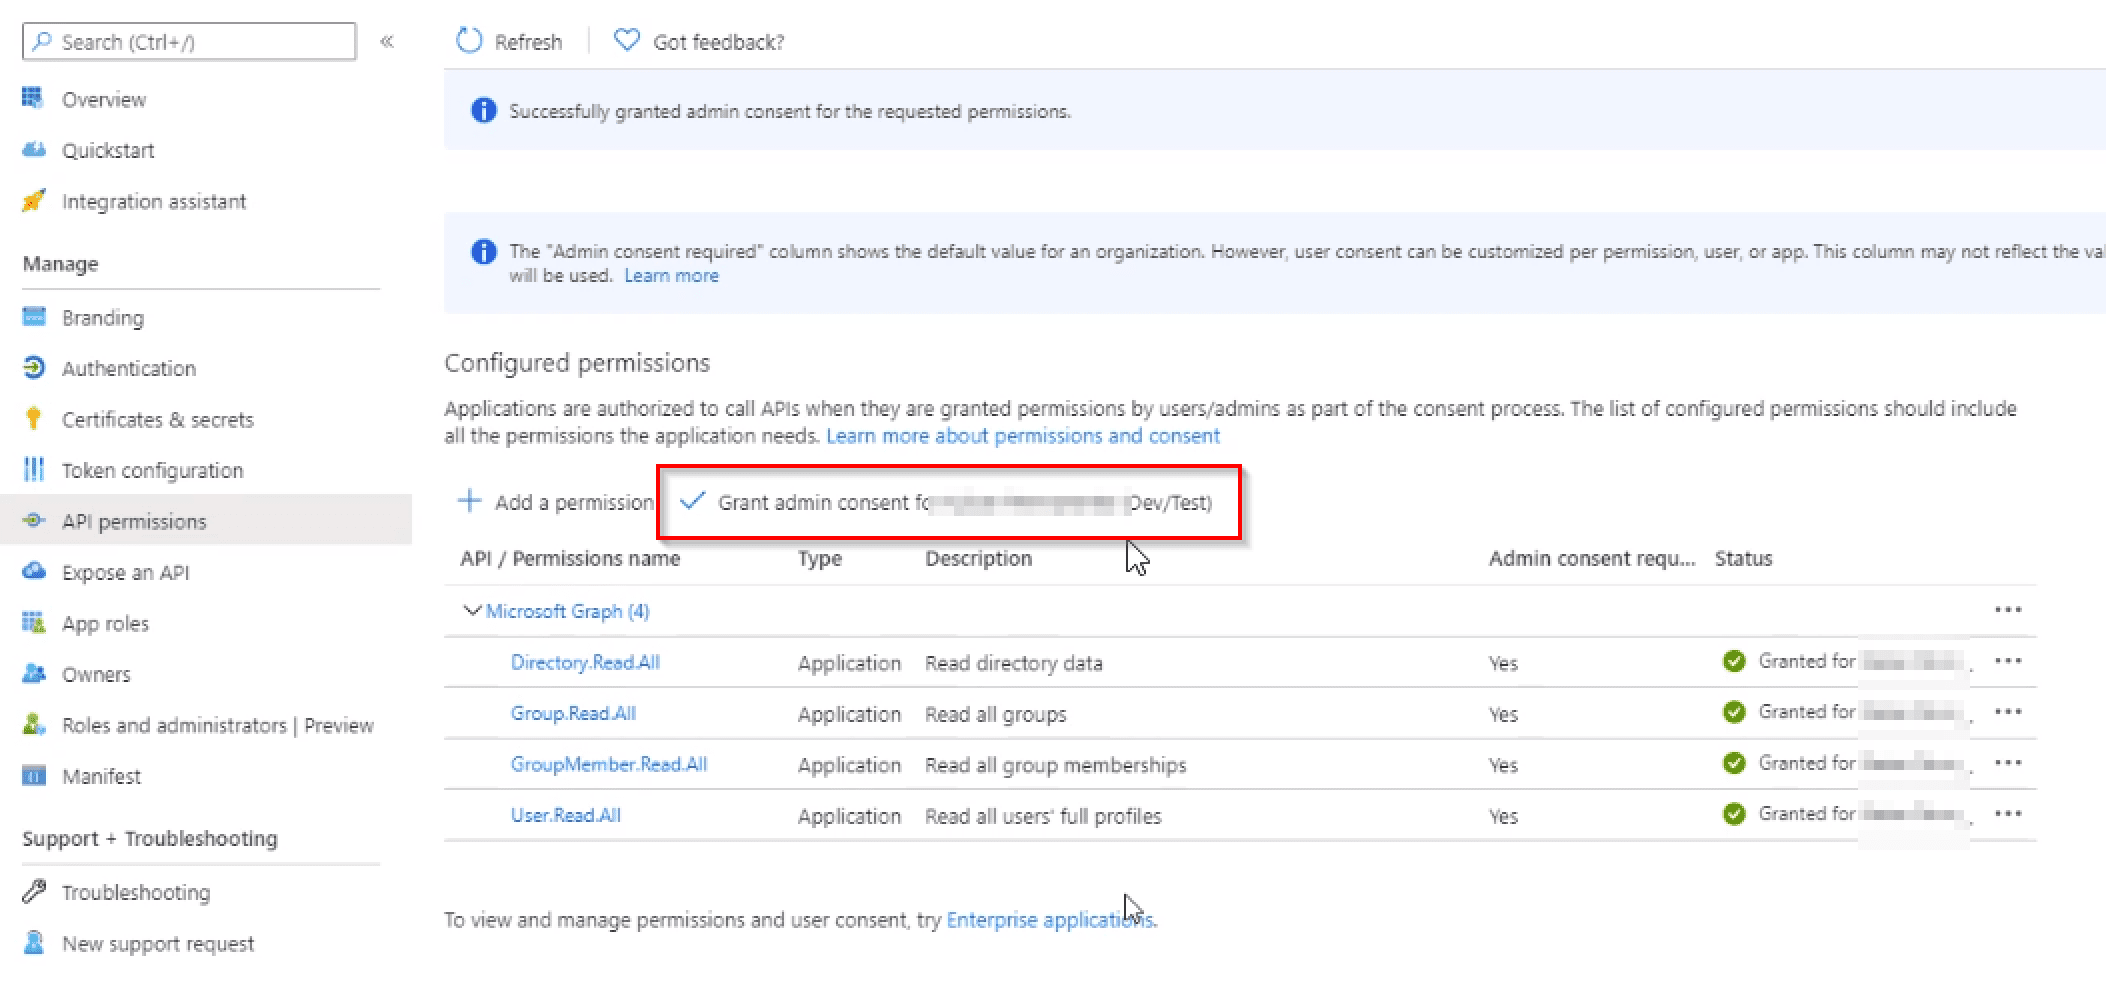
Configure your application permissions
-
Click View API permissions.

-
Add the following as Application permissions under Microsoft Graph.
-
GroupMember.Read.AllAllows the application to read general information about associated groups, such as the list of members and basic group properties. See Microsoft Graph Group Application permissions for more information. -
User.Read.AllAllows the application to read all user profile information, such as properties and group membership. See Microsoft Graph User Application permissions for more information.
-
-
Select Grant admin consent.
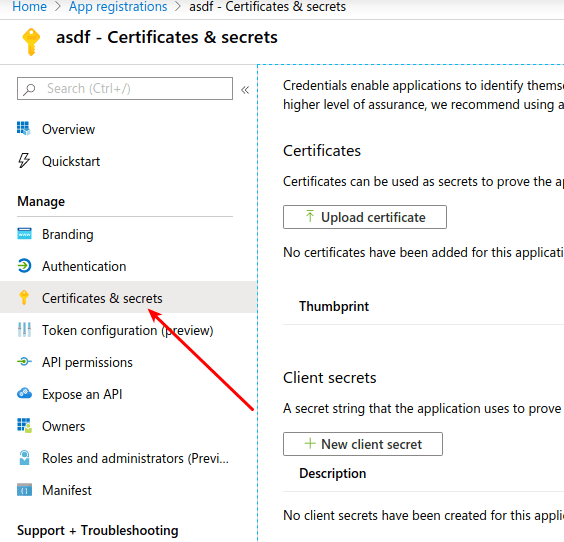
Find your Client Secret
- Click Clients & Secrets.
-
Create a New client secret.