

Compatible with Fusion version: 4.0.0 through 5.12.0
href attributes and sitemaps up to your configured depth, then indexes those pages.
If you migrate to the Web V2 connector instead of the Web V1 connector, you’ll get better Java SDK-based performance, distributed fetching, upgrades to the plugin as new versions are released, and built-in OAuth token support.
Fusion 5.x uses the Open Graph Protocol metadata such as og:title and og:description as the default configuration for fields. Deviation from that standard configuration may exclude information from indexing during the crawl.
Prerequisites
Perform these prerequisites to ensure the connector can reliably access, crawl, and index your data. Proper setup helps avoid configuration or permission errors, so use the following guidelines to keep your content available for discovery and search in Fusion. Network connectivity requires that your Fusion server or remote connector host be able to reach the target site over HTTP/HTTPS on the required ports.Authentication
Setting up the correct authentication according to your organization’s data governance policies helps keep sensitive data secure while allowing authorized indexing. The Web V1 connector supports many HTTP-level authentication methods. You configure these under Crawl Authentication Properties in your datasource. The supported authentication schemes include the following:- Basic HTTP Authentication: Provide host, port, realm (if any), username, and password.
- Digest HTTP Authentication: Same parameters as Basic, but using the Digest challenge/response scheme.
- Form Authentication: Post to a login form URL with whatever name/value pairs the site expects, plus a TTL for the session.
- SAML/Smart Form Authentication: For multi-step or SAML-backed form logins, submit a sequence of forms until you’re authenticated.
- NTLM Authentication for Windows-style authentication: Provide domain, workstation, host, port, realm (if any), username, and password.
Crawl options
- If you’re crawling a website protected by a login or SmartForm, see Crawl an Authenticated Website with the Web Connector.
- If you’re crawling a CMS or ecommerce site, you may want to Deduplicate Web Content using Canonical Tags.
- To prevent unbounded crawls or to only crawl a portion of your website, see Limit the Crawl Scope for Web Sites.
Configure Web Site Authentication
Configure Web Site Authentication
The Web V1 connector retrieves data from a Web site using HTTP and starting from a specified URL.The Web connector supports Basic, Digest, Form, and NTLM authentication to websites.The credentials for a crawl are stored in a credentials file in To figure out what parameters you need to specify, turn off JavaScript in your browser and go through the login work flow.
Though you normally see only a single login form on your screen, you might find many more forms you need to submit before you get logged in when JavaScript is not available to perform those form submissions automatically.
Each form in that login chain needs to be represented in the list of The Fusion Web connector can optionally use Kerberos with SAML/Smart Form authentication.To crawl Kerberos-protected Web sites, first create the necessary configuration files, then configure Fusion to use them.Note that the first request is a 401 status code for the negotiate request followed by a second request, which is a status of 200.The format of the login.conf is described on
the Oracle Web site.The format of the Resolution:First test your keytab as described in test the keytab above.If your keytab passes validation, another possibility is that the You must restart Resolution:Your keytab’s principal name doesn’t match the value on the ticket server. Check the principal name for your user.
https://FUSION_HOST:FUSION_PORT/data/connectors/container/lucid.web/datasourceName, where datasourceName is the name of the datasource.
After you create a datasource, Fusion creates this directory for you. The file should be a JSON formatted file, ending with the .json file extension.
When defining the datasource, use the name of the file in the Authentication credentials filename field in the UI (or for the f.credentialsFile property if using the REST API).All authentication types require the credentials file to include a property called type that defines the type of authentication to use. The other required properties vary depending on the type of authentication chosen.Basic form-based Authentication
To use basic form-based authentication, useform for the type. The other properties are:- ttl. The “time to live” for the session created after authentication. After the specified time, the crawler logs in again to keep the crawl activity from failing due to an expired session. This value is defined in seconds.
- action. The action to take to log in. That is, the URL for the login form.
- params. The parameters for the form, likely the username and password, but could be other required properties. In the example below, we pass two parameters,
os_usernameandos_password, which are expected by the system we crawl.
Complex Form-based Authentication
Some websites do not manage their own authentication, but rather trust a third-party authority to authenticate the user. An example of this is websites that use SAML to log in a user via a central single-signon authority. To configure fusion to log in to a website like this, usesmartForm for the type. The other properties are:- ttl. The “time to live” for the session created after authentication. After the specified time, the crawler logs in again to keep the crawl activity from failing due to an expired session. This value is defined in seconds.
- loginUrl. The URL on which the first page that initializes the login chain is located
- params. A list of parameters to use for the form logins, likely the username and password, but could be other required properties. In the example below, we pass two parameters,
os_usernameandos_password, which are expected by the system we crawl. Additionally we expect that once that login has happened, a new form is presented to the user which then posts back to where we came from. No data need to be entered in this form, which is why we include an empty{ }in the params list.
params. If no user input is required, simply include an empty { }.Basic and Digest Authentication
Basic and Digest authentication are simple HTTP authentication methods still in use in some places. To use either of these types, in the credentials file, for thetype property use “basic” or “digest”. The other properties are:- host. The host of the site.
- port. The port, if any.
- userName. The username to use for authentication.
- password. The password for the userName.
- realm. The security realm for the site, if any.
NTLM Authentication
To use NTLM authentication, in the credentials file, for thetype property, use ntlm. The other properties available are:- host. The host of the site.
- port. The port, if any.
- userName. The username to use for authentication.
- password. The password for the userName.
- realm. The security realm for the site, if any.
- domain. The domain.
- workstation. The workstation, as needed.
Crawl a Web site protected by Kerberos
In Fusion 4.1 and later, the Web connector can crawl Web sites protected by Kerberos using SPNEGO. This is a way to access Web sites without requiring a user’s login credentials.Kerberos support requires Fusion 5.9.5.
Create standard Java configuration files to connect to Kerberos
Fusion uses the JDK standard JAAS Kerberos implementation, which is based on three system properties that reference three separate files.The files are as follows:- On the Kerberos-protected server, a keytab file, named
kerberuser.keytabin our examples. - On the Fusion system, a configuration file named
login.conf. - On the Fusion system, an initialization file named
krb5.ini.
Create a Kerberos keytab
Create and validate the keytab file for the Kerberos client principal you want to use to authenticate to the website.If you do not specify thekerberosPrincipalName and kerberosKeytabFilePath or kerberosKeytabBase64 when creating the Fusion datasource, Fusion uses the default login principal and ticket cache.
You can see the default values by logging into the Fusion server as the user who runs Fusion and running klist.If you do not want to use the default account and credentials, specify these configuration properties when creating a keytab as well as in the Web datasource setup.
Use the Kerberos user principal name (UPN), not the service principal name (SPN, which is used with the Kerberos security realm).
In some cases the UPN can be a service.In our examples, the Fusion Web crawler authenticates to the Web sites using the user kerbuser@win.lab.lucidworks.com.
We create a keytab file kerbuser.keytab for the user principal kerbuser@WIN.LAB.LUCIDWORKS.COM.Create a Kerberos keytab on Windows
Example:The following weak encryption types are not supported by Fusion:
- DES-CBC-CRC * DES_CBC_MD5
- Microsoft Windows 2000 RC4-HMAC
Create a Kerberos keytab on Ubuntu Linux
Prerequisite: Install thekrb5-user package: sudo apt-get install krb5-userExample:Test the keytab
Once you create a keytab, verify that it works.Prerequisite: You need a version of curl installed that allows SPNEGO. To test whether your version of curl does this, runcurl --version and make sure SPNEGO is in the output.Run the following curl command (replace the keytab path and site):Create a login.conf and krb5.ini
On the Fusion server, createlogin.conf and krb5.ini files as follows.Create a login.conf on Windows
For hosted connectors, Selenium Grid support is available through Kubernetes. For remote connectors, Selenium Grid support is available through Docker Compose. See the Web V2 remote support repository for full setup instructions and YAML files.In this example, the keytab is stored atC:\\kerb\\kerbuser.keytabCreate a login.conf on Linux
In this example, the keytab is stored at/home/lucidworks/kb.keytabCreate a krb5.ini
When you install krb5 on Linux, you can find a Kerberos configuration file in/etc/krb5.conf. You can optionally create a custom one instead.Creating a krb5.conf is the same for Linux and Windows. On Windows the file is krb5.ini.In this example the domain is WIN.LAB.LUCIDWORKS.COM, the Kerberos kdc host is my.kdc-dns.com, and the Kerberos admin server is my-admin-server-dns.com.Example:krb5.ini file is described in the MIT Kerberos documentation.
You can change the encryption algorithms by changing the properties default_tkt_enctypes, default_tgs_enctypes, and permitted_enctypes as needed. For example:Configure Fusion to use Kerberos
Once you have the keytab,login.conf, and krb5.ini files, configure Fusion to use Kerberos. You must set a property in a Fusion configuration file in addition to defining the datasource in the Fusion UI.At the command line on every machine in your Fusion cluster:- In
$FUSION_HOME/conf/fusion.cors(fusion.propertiesin Fusion 4.x), add the following property to theconnectors-classic.jvmOptionssetting:-Djavax.security.auth.useSubjectCredsOnly=false - Restart the
connectors-classicservice using./bin/connectors-classic restarton Linux orbin\connectors-classic.cmd restarton Windows.
- Click Indexing > Datasources.
- Click Add+, then Web.
- Enter a datasource ID and a start link.
- Click Crawl authorization.
- At the bottom of the section, check Enable SPNEGO/Kerberos Authentication.
- You can either use the default principal name or specify a principal name to use.
- If you do not specify the principal name, then Fusion uses the default login principal and ticket cache. You can see those default values by logging into the Fusion server as the user who runs Fusion and running
klist.
- If you do not specify the principal name, then Fusion uses the default login principal and ticket cache. You can see those default values by logging into the Fusion server as the user who runs Fusion and running
- If you specify a principal name, you must provide a keytab, either in Base64 or as a file path.
- If you specify a keytab file path, the file must be on the machine running the Fusion connector, for each connector’s node in the cluster.
- The Base64 option lets you supply the keytab in one place, in the UI.
- Fill in any remaining options to configure the datasource.
- Click Save.
Troubleshoot Kerberos authentication
javax.security.auth.login.LoginException: No key to store
Problem: When trying to crawl a Kerberos-authenticated Web site, you get an error like this:/tmp/krb* cache file got corrupted or is not compatible after you went through other troubleshooting steps.
To rule that out, remove the /tmp/krb* cache file on all hosts, restart your connectors-classic, and try the crawl again. That is, on each host:401 error
Problem: Crawling using the Web connector with Kerberos results in a 401 error, but curl with Kerberos works fine.Resolution:Make sure you have this system property set inconnectors-classic jvmOptions on all nodes:connectors-classic after making that change.If that doesn’t work, make sure the user you are authenticating with from Curl matches the user you are trying to authenticate with from the Web connector.
To see your Kerberos principal user name, run klist.Error: “Pre-authentication information was invalid - Identifier doesn’t match expected value”
Problem: When crawling using the Web connector with Kerberos enabled, you get an error like this:Crawl an Authenticated Website with the Web Connector
Crawl an Authenticated Website with the Web Connector
This article explains how to use the Web V1 connector to crawl a website that is protected by SSO, SAML, or OAuth.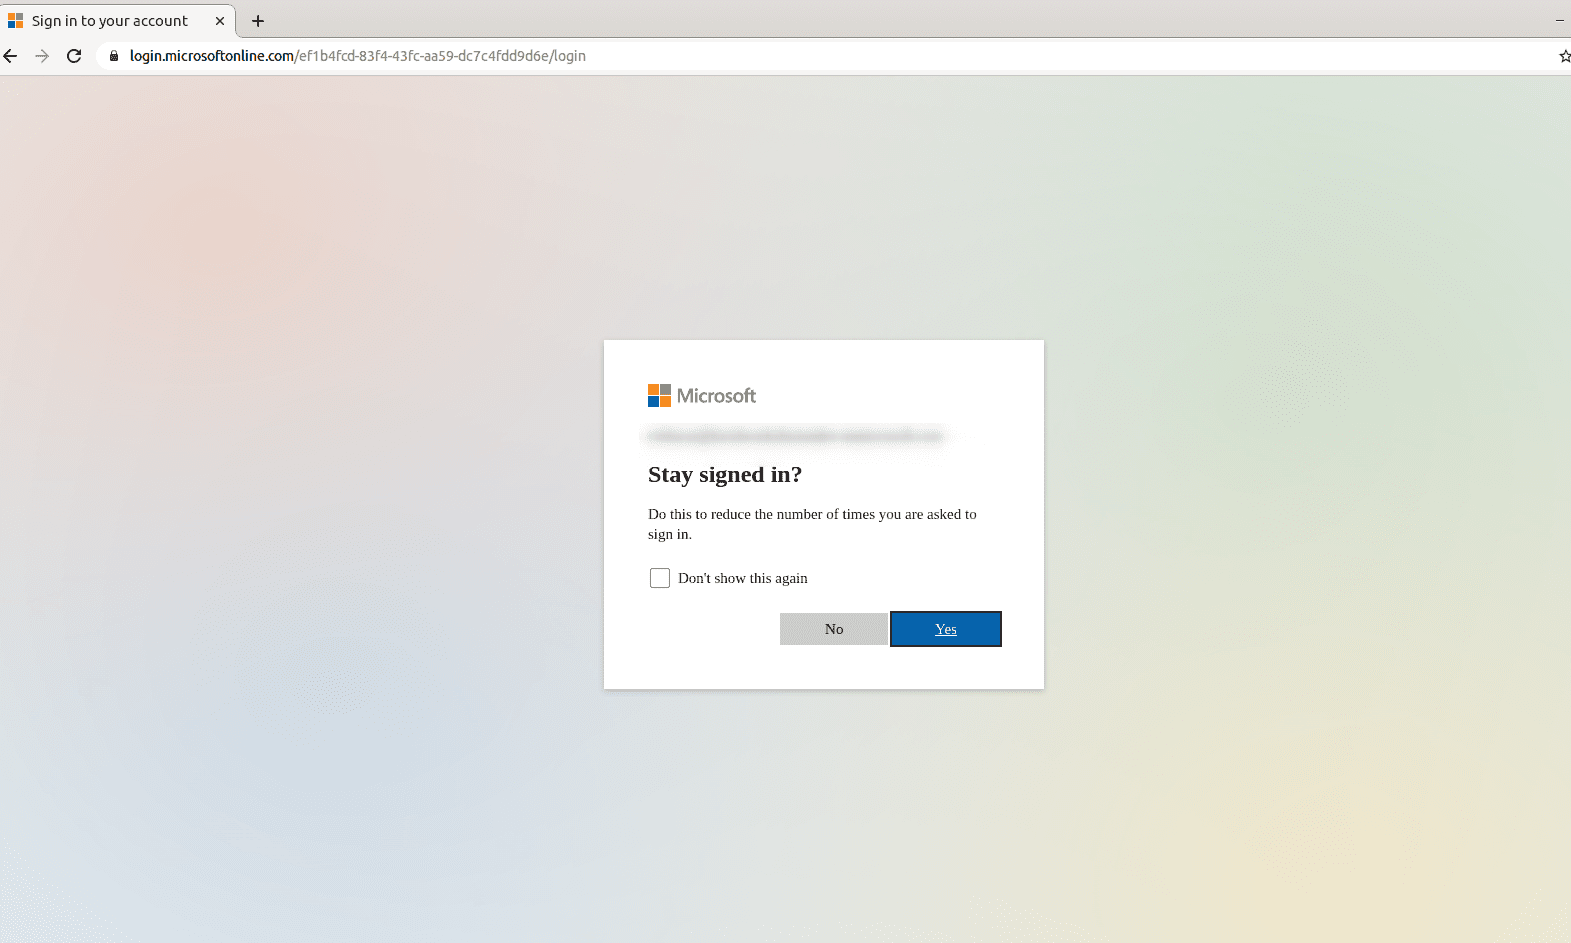
Overview
This example uses SharePoint Online, a website that uses the Microsoft identity platform.To crawl a website behind a login, configure the Web connector to authenticate with valid login credentials. In this example, there is also a final prompt to stay signed in. Configure the connector to use the SAML/Smart Form authentication method.Prerequisites
Before you can configure the Web connector, you must locate and copy the login parameters from the website you’re trying to crawl.- Open a private or incognito window in your internet browser. This example uses Google Chrome.
- Navigate to the site that you want to crawl with authentication.
-
Identify the URL for the login page.
For example, from
http://some-website-with-auth.com, navigate to the page that displays the login form, then copy the page URL, such ashttp://some-website-with-auth.com/sso/login. Use this URL as the value of theloginUrlparameter (URL in the Fusion UI). -
On the login page, identify the fields used for inputting the username and password.
You can do this by right-clicking on the form fields and selecting Inspect element to open the developer tools, where the corresponding HTML element is highlighted.
In most cases it is an
<input>element that has anameattribute and you can specify the field as this name value. For example: -
Add the username field as a parameter to the authentication section of the Web connector. The Property Name is
loginand the Property Value is the username the connector will use to log in. -
Add the password field name as the
passwordParamName(Password Parameter in the Fusion UI). -
On the site login page, right-click Submit (or equivalent) and select Inspect element.
- If the button is an
<input type="submit"/>, then the SmartForm login picks it up automatically. - If the button is another element (such as
<button>,<a>,<div>, and so on) then you must add a parameter with the special prefix::submitButtonXPath::, then add an XPath expression that points to the submit button. For example:::submitButtonXPath:://button[@name='loginButton']
- If the button is an
-
If there is no
nameattribute on the<input>elements, then you must specify a parameter to tell the Web connector how to find the input element. You can use any of these special selector formats for the parameter name:
What is the name of your first dog?In this case add another special parameter:Configure Web connector
Configure the connector to use login credentials and JavaScript to successfully authenticate through your website.- In Fusion, navigate to Indexing > Datasources.
- Click Add, then select Web (v1) (in Fusion 5.12, select Web (Deprecated)) from the dropdown.
- Configure the datasource and fill in required fields.
-
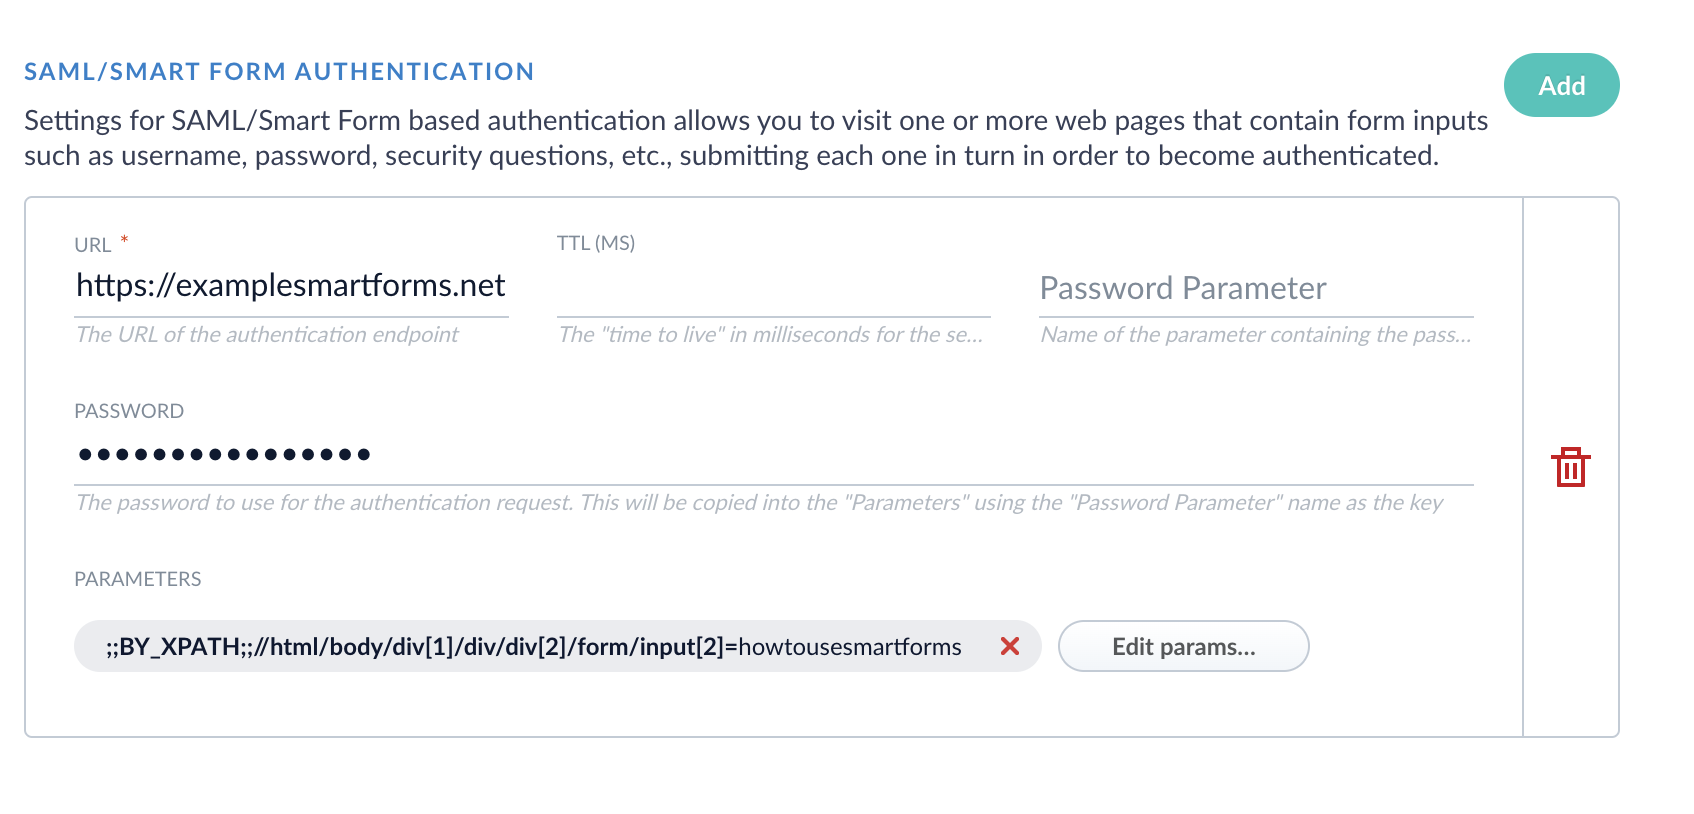
Expand Crawl Authorization, scroll down to SAML/Smart Form Authentication, then click Add.
- Enter the URL of the website that requires authentication.
- Enter the password to use for the authentication request.
- Set the TTL (ms) so there is enough time to load the form pieces on the page before Fusion attempts to run the Smart Form step.
-
Add Parameters as needed. For example, if the login page requires you to enter your name in addition to a password, add a parameter, specifying the Property Name and Property Value. Add a parameter for every required field on the login page.
- If applicable, create a SAML/Smart Form Authentication for every subsequent login page. These steps trigger from top to bottom.
-
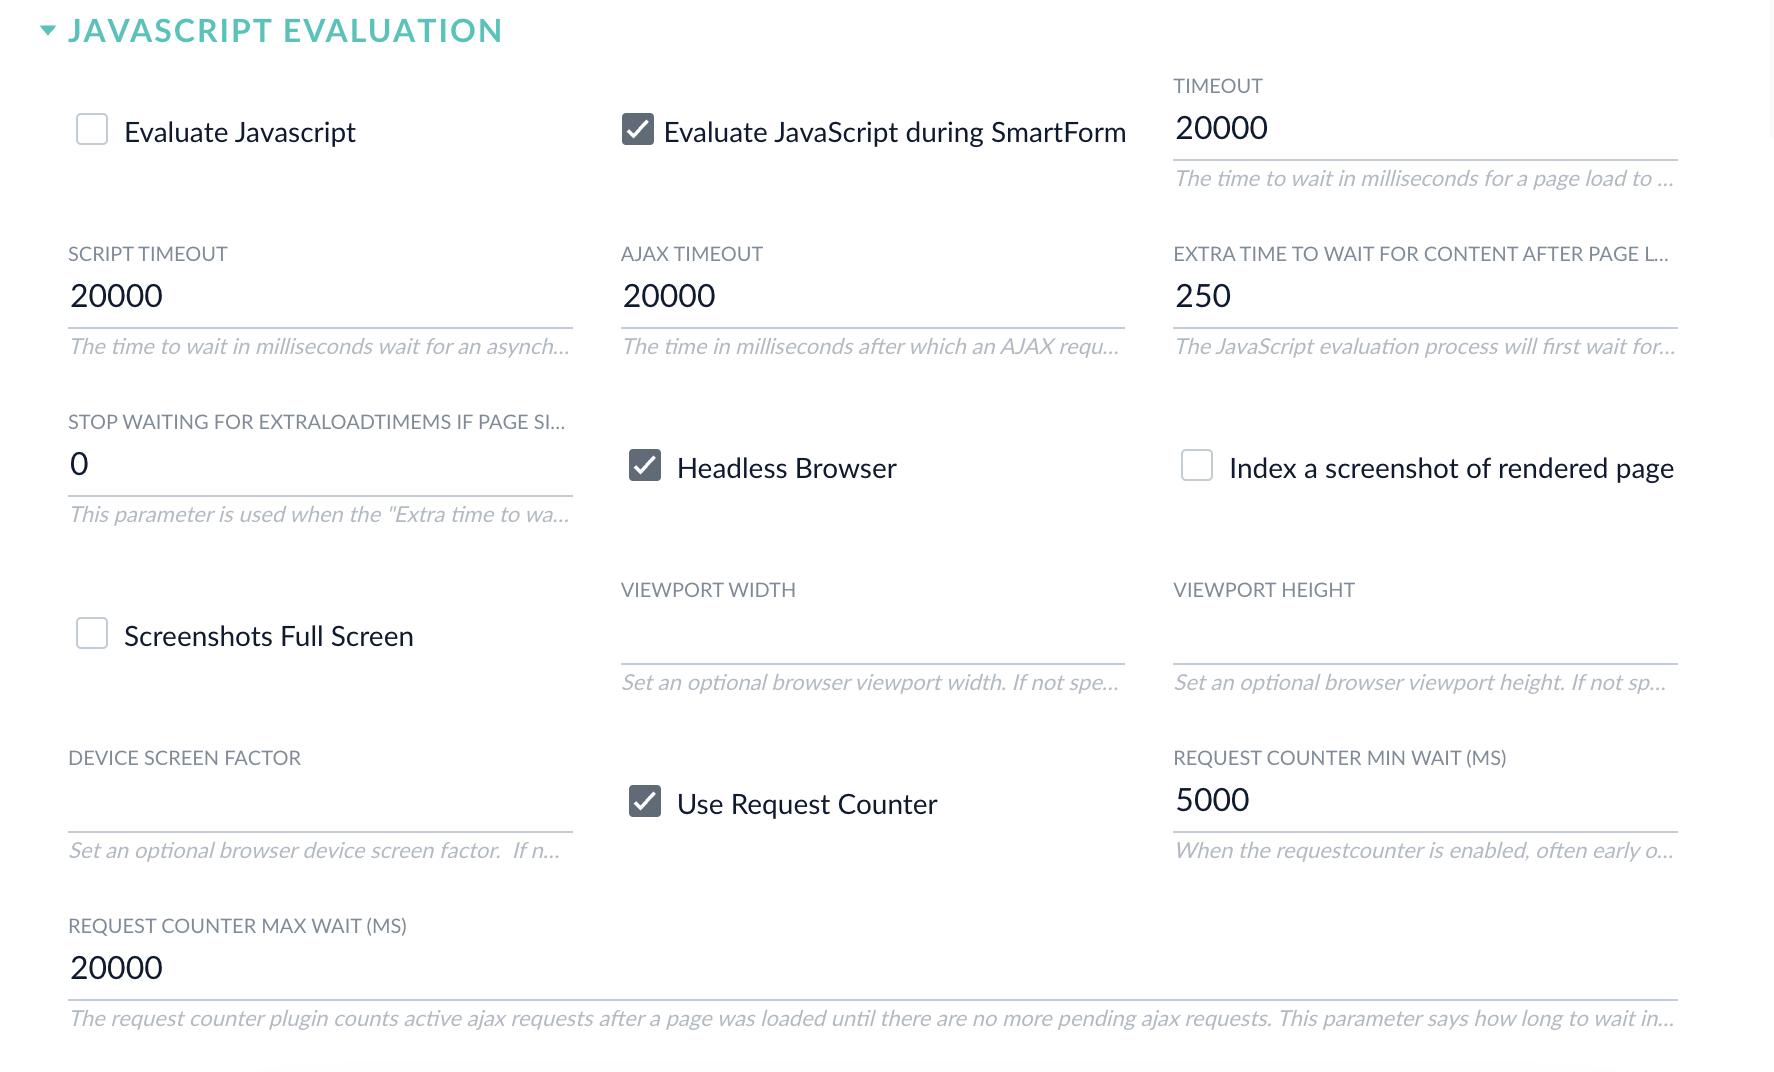
Expand the JavaScript Evaluation section and enable Evaluate JavaScript during SmartForm Authentication. Enable Evaluate Javascript if you would like to use a JavaScript evaluation engine for all requests, not just the authentication.
Install Chromium dependencies (Fusion 4.x only)
This section only applies to 4.x.x releases. For 5.x.x releases, Chrome dependencies are already installed in the Docker container.
f.crawlJS/“Evaluate JavaScript” and f.useHighPerfJsEval/“High Performance Mode” to “true”.Enable high-performance mode with Chromium-
Install the dependencies, using one of the scripts packaged with Fusion:
- Windows:
https://FUSION_HOST:FUSION_PORT/bin/install-high-perf-web-deps.ps1 - Linux and OSX:
https://FUSION_HOST:FUSION_PORT/bin/install-high-perf-web-deps.sh
- Windows:
-
In the Fusion UI, configure your Web data source:
- Set Evaluate Javascript to “true”.
- Set High Performance Mode to “true”.
f.headlessBrowserparameter can be set to “false” to display the browser windows during processing. It is “true” by default. Non-headless mode is available only using the “High-performance” mode. - Save the datasource configuration.
If Fusion is running on Docker, you must either mount an
shm directory using the argument -v /dev/shm:/dev/shm or use the flag --shm-size=2g to use the host’s shared memory. The default shm size 64m will result in failing crawls with logs showing error messages like org.openqa.selenium.WebDriverException: Failed to decode response from marionette. See Geckodriver issue 1193 for more details.Test the configuration
- In Fusion, navigate to Indexing > Datasources.
- Click on the web connector you configured.
- Set your Fetch Threads and Emit Threads. It simplifies testing when only one thread is trying to authenticate at a time.
- Expand Crawl Performance.
- Set Fetch Threads and Emit Threads to
1.
- Enable Diagnostic logging. Diagnostic mode will allow the HTML contents to print out in the logs for each step of the log on process, so you can use that to see what the browser doing. This can be useful because you can see where the browser was when/if you got into a bad state.
- Toggle Advanced to view advanced settings.
- Enable Diagnostic mode.
- Headless mode (Fusion 4.x only). If you are on a Windows Server or have the ability to install Fusion somewhere an active desktop environment is available, such as Mac or Linux with Desktop, you can use
headless mode = falseto test with an actual web browser.- Expand JavaScript Evaluation.
- Disable Headless Browser.
- When you run the crawl, a browser window opens and performs the log in process.
- Click Run to start the datasource job. Review results in the Query Workbench.
Limit the Crawl Scope for Web Sites
Limit the Crawl Scope for Web Sites
The Web V1 connector retrieves data from a Web site using HTTP and starting from a specified URL.The connector works by going to the seed page (the
startURIs specified in the configuration form), collecting the content for indexing, and extracting any links to other pages.
It then follows those links to collect content on other pages, extracting links to those pages, and so on.When creating a Web data source, pay attention to the Max crawl depth and Restrict To Tree parameters (c.depth and c.restrictToTree in the REST API).
These properties limit the scope of your crawl to prevent an unbounded crawl that could continue for a long time,
particularly if you are crawling a site with links to many pages outside the main site. An unbounded crawl can also cause memory errors in your system.The connector keeps track of URIs it has seen, and many of the properties relate to managing the resulting database of entries.
If the connector finds a standard redirect, it tracks that the redirected URI has an alias, and does not re-evaluate the URI on its next runs until the alias expiration has passed.
If deduplication is enabled, documents that were found to be duplicates are also added to the alias list and are not re-evaluated until the alias expiration has passed.Regular expressions can be used to restrict the crawl either by defining URI patterns that should be followed or URI patterns that should not be followed.Additionally, specific patterns of the URI can be defined to define URIs that should not be followed.sitemap_incremental_crawling configuration parameter processes and crawls URLs found in the sitemap. Set to true to remove documents from the index when they can no longer be accessed as unique documents. For example, if the page is removed from the sitemap and cannot be accessed. In addition, if the page is not in the sitemap, the connector classifies the missing page as unbounded and removes the page from the index.
Learn more
Add Custom Headers to HTTP Requests
Add Custom Headers to HTTP Requests
The Web V1 connector retrieves data from a Web site using HTTP and starting from a specified URL.You can optionally add custom headers to all http
get requests from the Web connector.
For example, you might want to add a header that includes Connection: keep-alive to prevent the connector from timing out while crawling your Web site.To add a custom header, use the configuration parameter f.addedHeaders. To send multiple headers, use the following format:- Click Indexing > Datasources.
- Click Add+, then Web.
- Enter a datasource ID and a start link.
- Click Link discovery.
- Fill in the Headers to add to HTTP requests field.
- Add each header in the format
HeaderName: HeaderValue. - To add multiple headers to all HTTP requests, put each header on a new line.
- Add each header in the format
- Fill in any remaining options to configure the datasource.
- Click Save.
Crawl JavaScript Web Sites
Crawl JavaScript Web Sites
JavaScript-enabled web sites require a different crawling configuration than plain HTML web sites do.Here is an example of three different parameters where your site might ask one of three questions randomly:
Enable JavaScript evaluation
To enable JavaScript evaluation, set thef.crawlJS/“Evaluate Javascript” parameter to “true”. When this option is enabled, the connector crawls links rendered from JavaScript evaluation, using a headless browser by default (see below).JavaScript evaluation is fastest when using High Performance JavaScript Evaluation mode, which uses the Chromium browser with the Web connector. There is also a High Performance Mode parameter, which uses the Chromium web browser to crawl web sites.How is “High performance JavaScript evaluation” different than the non-high performance mode? In high performance mode, the following are true:- JavaScript evaluation is faster.
- JavaScript evaluated content is more accurate.
- You can run in “non-headless” mode to watch the browser crawl your content on a desktop, for debugging purposes.
- You can save screenshots of pages and index them as base64 along with your other web page content.
- The process uses more RAM.
- The process uses more CPU.
Dependencies for High Performance JavaScript Evaluation
IMPORTANT: This section only applies to 4.x.x releases. For 5.x.x releases, Chrome dependencies are already installed in the Docker container.To enable high-performance JavaScript evaluation, you must install some dependencies, then setf.crawlJS/“Evaluate JavaScript” and f.useHighPerfJsEval/“High Performance Mode” to “true”.Enable high-performance mode with Chromium-
Install the dependencies, using one of the scripts packaged with Fusion:
- Windows:
https://FUSION_HOST:FUSION_PORT/bin/install-high-perf-web-deps.ps1 - Linux and OSX:
https://FUSION_HOST:FUSION_PORT/bin/install-high-perf-web-deps.sh
- Windows:
-
In the Fusion UI, configure your Web data source:
- Set Evaluate Javascript to “true”.
- Set High Performance Mode to “true”.
f.headlessBrowserparameter can be set to “false” to display the browser windows during processing. It is “true” by default. Non-headless mode is available only using the “High-performance” mode. - Save the datasource configuration.
If Fusion is running on Docker, you must either mount an
shm directory using the argument -v /dev/shm:/dev/shm or use the flag --shm-size=2g to use the host’s shared memory. The default shm size 64m will result in failing crawls with logs showing error messages like org.openqa.selenium.WebDriverException: Failed to decode response from marionette. See Geckodriver issue 1193 for more details.Screenshots with High Performance Mode
To enable screenshots, configure these parameters:f.takeScreenshot- Enable screenshots. Default: false.f.screenshotFullscreen- Take full-screen screenshots. Default: false.
f.viewportWidth- View port width in pixels. Default: 800.f.viewportHeight- View port height in pixels. Default: 600.f.deviceScreenFactor- Device screen factor. Default: 1 (no scaling). See the Android Screen compatibility overview for a description about device displays.f.simulateMobile- (advanced property) Tell the browser to “emulate” a mobile browser. Default: false.f.mobileScreenWidth- (advanced property) Only applicable withf.simulateMobile. Sets the screen width in pixels.f.mobileScreenHeight- (advanced property) Only applicable withf.simulateMobile. Sets the screen height in pixels.
Authentication with JavaScript Evaluation
To use authentication when JavaScript evaluation is enabled, use the SmartForm (SAML) option because it can log in to a web site like a typical browser user.SmartForm login functionality is more powerful when JavaScript evaluation is enabled:- You can perform login on forms that might be JavaScript rendered.
-
You can use a variety of HTML selectors to find the elements to enter as login information.
By contrast, when JavaScript evaluation is disabled, you can only provide inputs using the
nameattribute of<input>elements.
- Open a private or incognito window in your internet browser. This example uses Google Chrome.
- Navigate to the site that you want to crawl with authentication.
-
Identify the URL for the login page.
For example, from
http://some-website-with-auth.com, navigate to the page that displays the login form, then copy the page URL, such ashttp://some-website-with-auth.com/sso/login. Use this URL as the value of theloginUrlparameter (URL in the Fusion UI). -
On the login page, identify the fields used for inputting the username and password.
You can do this by right-clicking on the form fields and selecting Inspect element to open the developer tools, where the corresponding HTML element is highlighted.
In most cases it is an
<input>element that has anameattribute and you can specify the field as this name value. For example: -
Add the username field as a parameter to the authentication section of the Web connector. The Property Name is
loginand the Property Value is the username the connector will use to log in. -
Add the password field name as the
passwordParamName(Password Parameter in the Fusion UI). -
On the site login page, right-click Submit (or equivalent) and select Inspect element.
- If the button is an
<input type="submit"/>, then the SmartForm login picks it up automatically. - If the button is another element (such as
<button>,<a>,<div>, and so on) then you must add a parameter with the special prefix::submitButtonXPath::, then add an XPath expression that points to the submit button. For example:::submitButtonXPath:://button[@name='loginButton']
- If the button is an
-
If there is no
nameattribute on the<input>elements, then you must specify a parameter to tell the Web connector how to find the input element. You can use any of these special selector formats for the parameter name:
What is the name of your first dog?In this case add another special parameter:Debug the JavaScript Evaluation Stage using Non-headless Chromium
When testing the Web connector with Chromium, it helps to access Fusion through a GUI-enabled browser. Configure a Web data source with your website, enable advanced mode, set the Crawl Performance > Fetch Threads to1, and uncheck Javascript Evaluation > Headless Browser.This results in the Web fetcher using a single instance of Chromium in a window where you can see the fetch documents.
This is helpful if you are getting an unexpected result from the Chromium evaluation stage.Extract Content from Web Pages
Extract Content from Web Pages
The Web V1 connector retrieves data from a Web site using HTTP and starting from a specified URL.The connector supports several approaches to extracting and filtering content from pages. When analyzing the HTML of a page, the connector can specifically include or exclude elements based on the HTML tag, the tag ID, or the tag class (such as a
div tag, or the #content tag ID).Specific tags can be selected to become fields of the document if needed. For example, all content from <h1> tags can be pulled into an h1 field, and with field mapping be transformed into document titles.For other advanced capabilities, you can use jsoup selectors to find elements in the content to include or exclude from the content.While field mapping is generally a function of the index pipeline, you can define some initial mappings to occur during the crawl.
The “initial mappings” property for each web datasource is predefined with three mappings: to move fetchedDates to a fetchedDates_dts field, to move lastModified to a lastModified_dt field, and to move length to a length_l field.Finally, the crawler can deduplicate crawled content. You can define a specific field to use for this deduplication (such as title, or another field), or you can use the full raw content as the default.
In the Fusion UI, when you are defining your datasource, toggle Advanced to access the Dedupe settings.Process sitemaps on websites
Process sitemaps on websites
The Web V1 connector retrieves data from a Web site using HTTP and starting from a specified URL.Crawling sitemaps is supported. Simply add the URL(s) of the sitemap to the
f.sitemapURLs property (Sitemap URLs in the UI) and all of the URLs found in a sitemap are added to the list of URLs to crawl.
Sitemap indexes (that is, a sitemap that points to other sitemaps) are also supported. The URLs found through each sitemap are added to the list of URLs to crawl.To configure your datasource to crawl only the sitemap file, add the sitemap URL to both the startLinks property (because that is a required property for a datasource) and also to the f.sitemapsURL property so it is properly treated as a sitemap by the connector when it starts.Incremental crawls and deleted documents
Crawling a website with asitemap.xml adds the links in the sitemap to crawlDB.To remove deleted documents during reindexing, you must remove the links from the sitemap.xml.The Datasources API contains information on how to work with crawlDB and removing items.Diagnostic logging
Diagnostic logging allows the HTML contents to print out in the logs for each step of the crawl, so you can use that to see what the browser is doing. This can be useful because you can see the browser’s state if any part of a crawl fails.To enable diagnostic logging:- Open the Web connector.
- Toggle Advanced. You should now see new fields become active next to Cookie Spec.
- Select Diagnostic mode.
Crawl REST APIs using the Web connector
Crawl REST APIs using the Web connector
This article describes how to crawl REST API endpoints associated with Web connectors using Fusion.Before crawling a REST API endpoint, the following prerequisites must be met:To crawl the API endpoints using the sitemap:
- All endpoints are available using bulk start links or a sitemap
- The response data is in a parseable format (JSON, XML, etc.)
Options
Using bulk start links
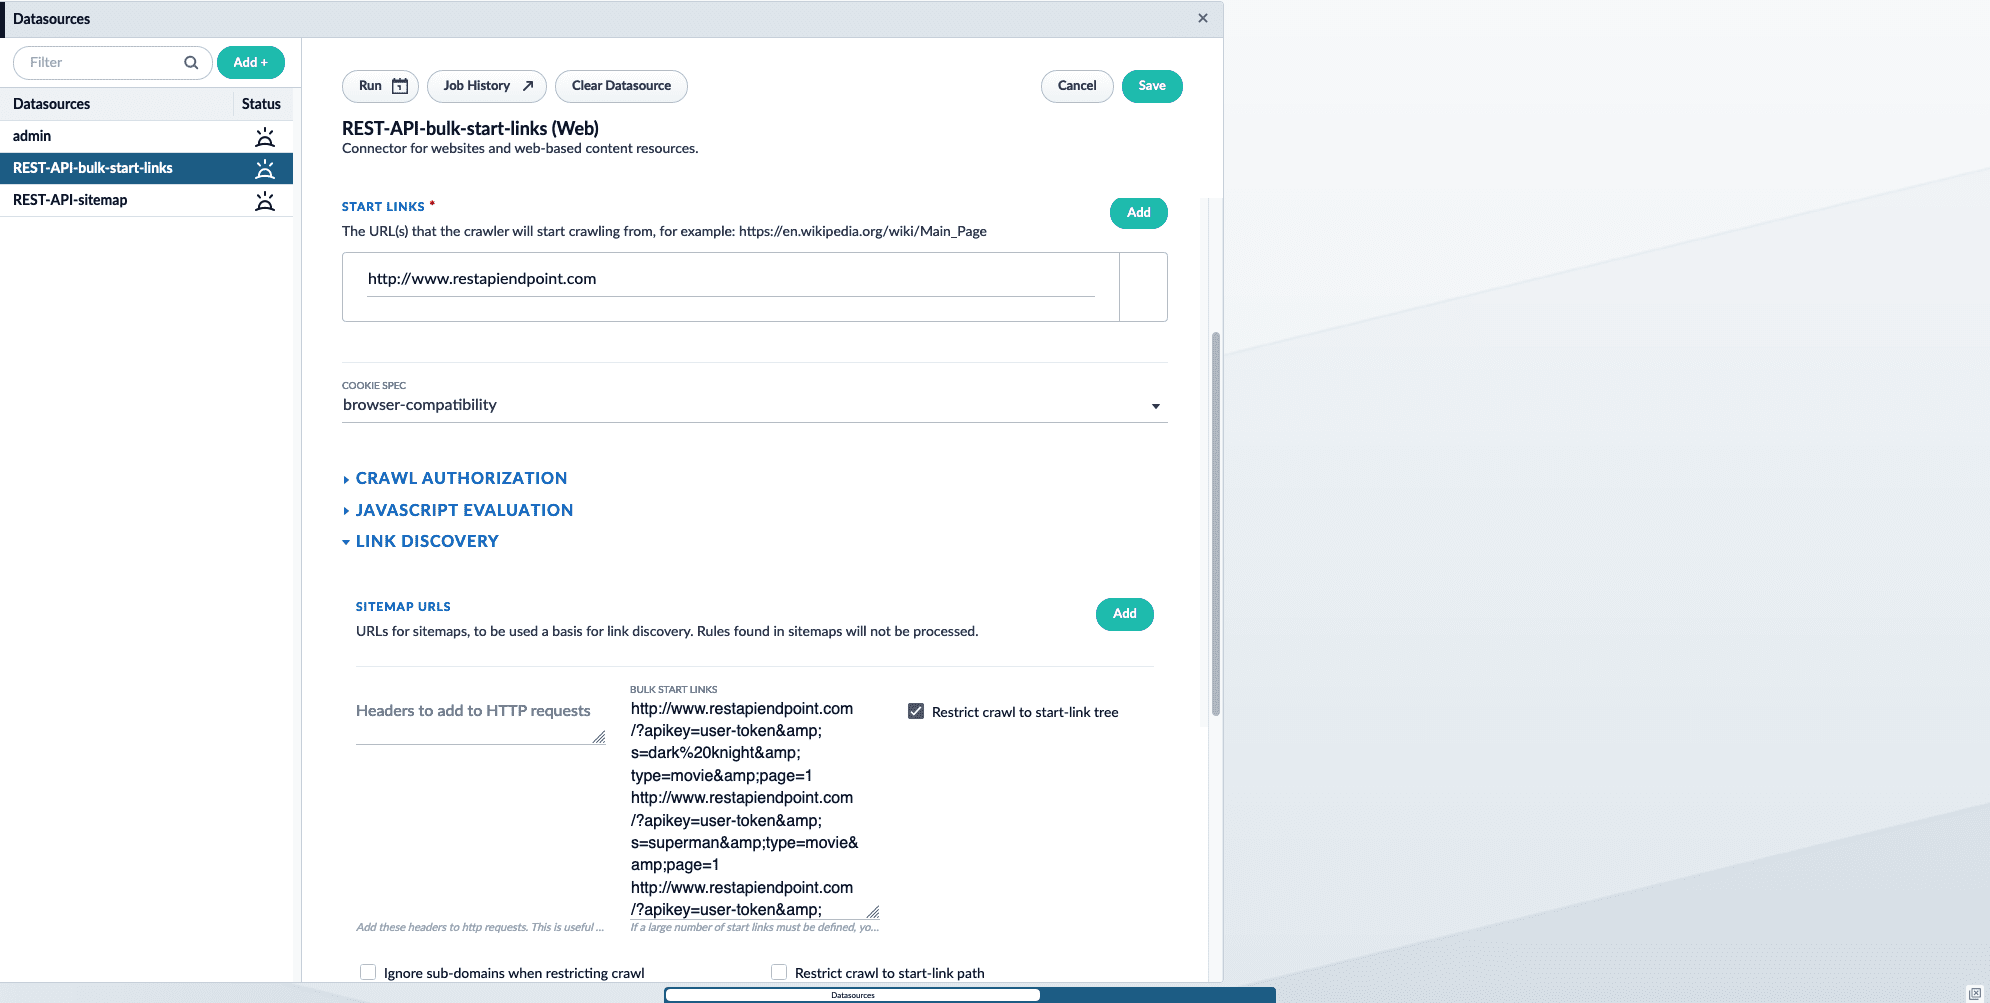
If you have a small number of endpoints you want to crawl, enter each endpoint as a bulk start link.To crawl the API endpoints using bulk start links:- Add a new Web connector datasource. To learn how to configure a new datasource, see Configure a New Datasource.
-
Under Start links, enter the main domain that contains the sitemap. For example,
http://www.restapiendpoint.com. -
In the Link discovery section under Bulk Start Links, enter the URLs you want to crawl. Separate links with a new line. For example:
- Save and run the job.
-
Once complete, check the results in the Index Workbench.
Using a sitemap
If you have a large number of endpoints you want to crawl, use a sitemap containing the API endpoint locations. This is also helpful if someone without access to Fusion maintains the list of endpoint URLs. An example sitemap:- Add a new Web connector datasource. To learn how to configure a new datasource, see Configure a New Datasource.
-
Under Start links, enter the main domain that contains the sitemap. For example,
http://www.restapiendpoint.com. - In the Link discovery section under Sitemap URLs, click the Add button.
-
Enter the URL of the sitemap. For example,
http://www.restapiendpoint.com/sitemap.xml. - Save and run the job.
-
Once complete, check the results in the Index Workbench.
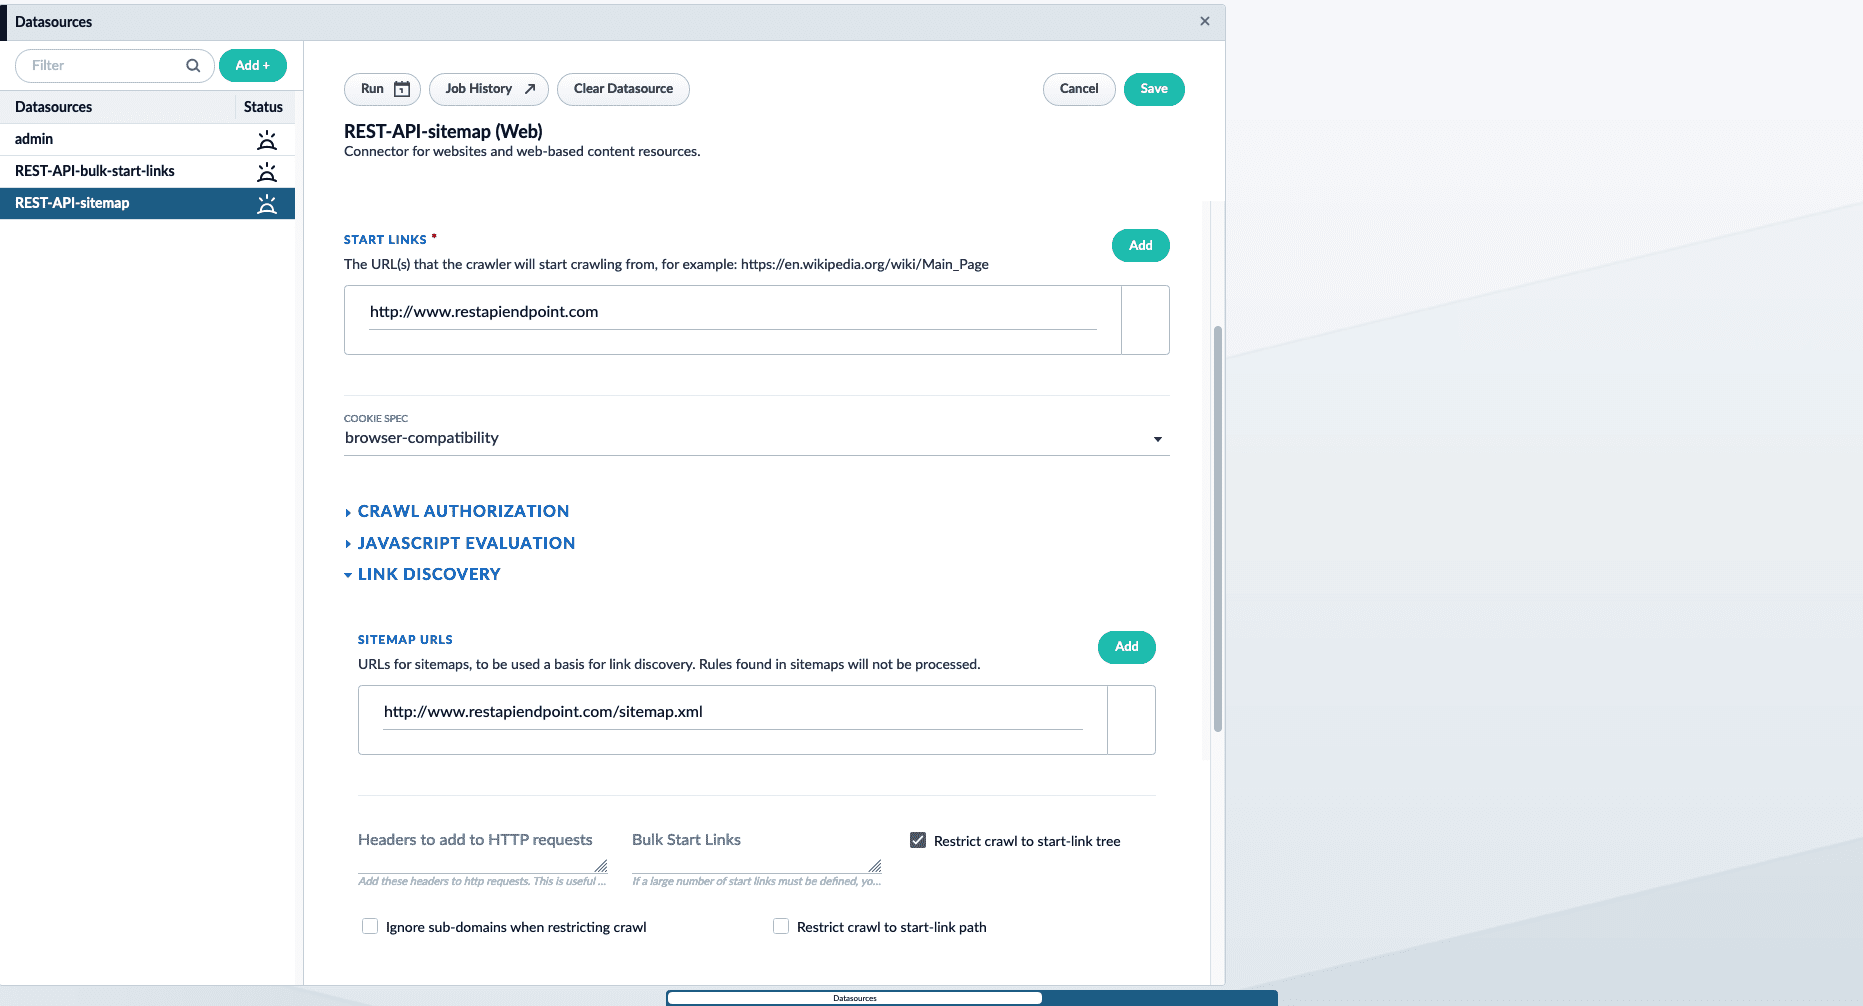
Results
Both options above achieve the same result. Fusion indexes the JSON response provided at the endpoints. If an array of JSON objects is available, Fusion indexes each object and an individual document.For example, Fusion creates three documents from the JSON response below:Troubleshoot Chrome Binary for Web Connector
Troubleshoot Chrome Binary for Web Connector
chromeBinaryPath values
If Google Chrome was installed via package installation manager, specify the Chrome binary in the chromeBinaryPath. Example locations are /usr/bin/google-chrome or /path/to/customlocation/of/google-chrome.For RHEL builds, run:which google-chrome to find where it installs and use that in the chromeBinaryPath.Troubleshooting Chrome binary errors
Steps to verify:- Make sure Chrome is installed properly on the system and
google-chrome --versionreturns successfully. - If a custom Chrome binary path is set in the datasource configuration, make sure is it valid.
- If bundled Chromium is used, where is it located? The Chrome install script puts it inside
var/connectors/connectors-classic/chrome-linux, but Fusion looks for it insidevar/connectors/connectors-classic/chrome-linux64. - Ensure proper permissions are set for the Fusion user.
- If running Fusion locally, try unchecking the Headless Browser option. This allows Chrome to open to the page the crawler is indexing and lets you know that Chrome is being reached by Fusion.
Configuration
If you experience CrawlDB errors such as “File is already opened and is locked”, then raise the Alias Expiration setting.