Navigating the Fusion UI
The course for Navigating the Fusion UI focuses on navigating through the Fusion application.
Logging in
To log in to Lucidworks Search, visit your Lucidworks Search URL athttps://EXAMPLE_COMPANY.b.lucidworks.cloud.
Replace
EXAMPLE_COMPANY with the name provided by your Lucidworks representative.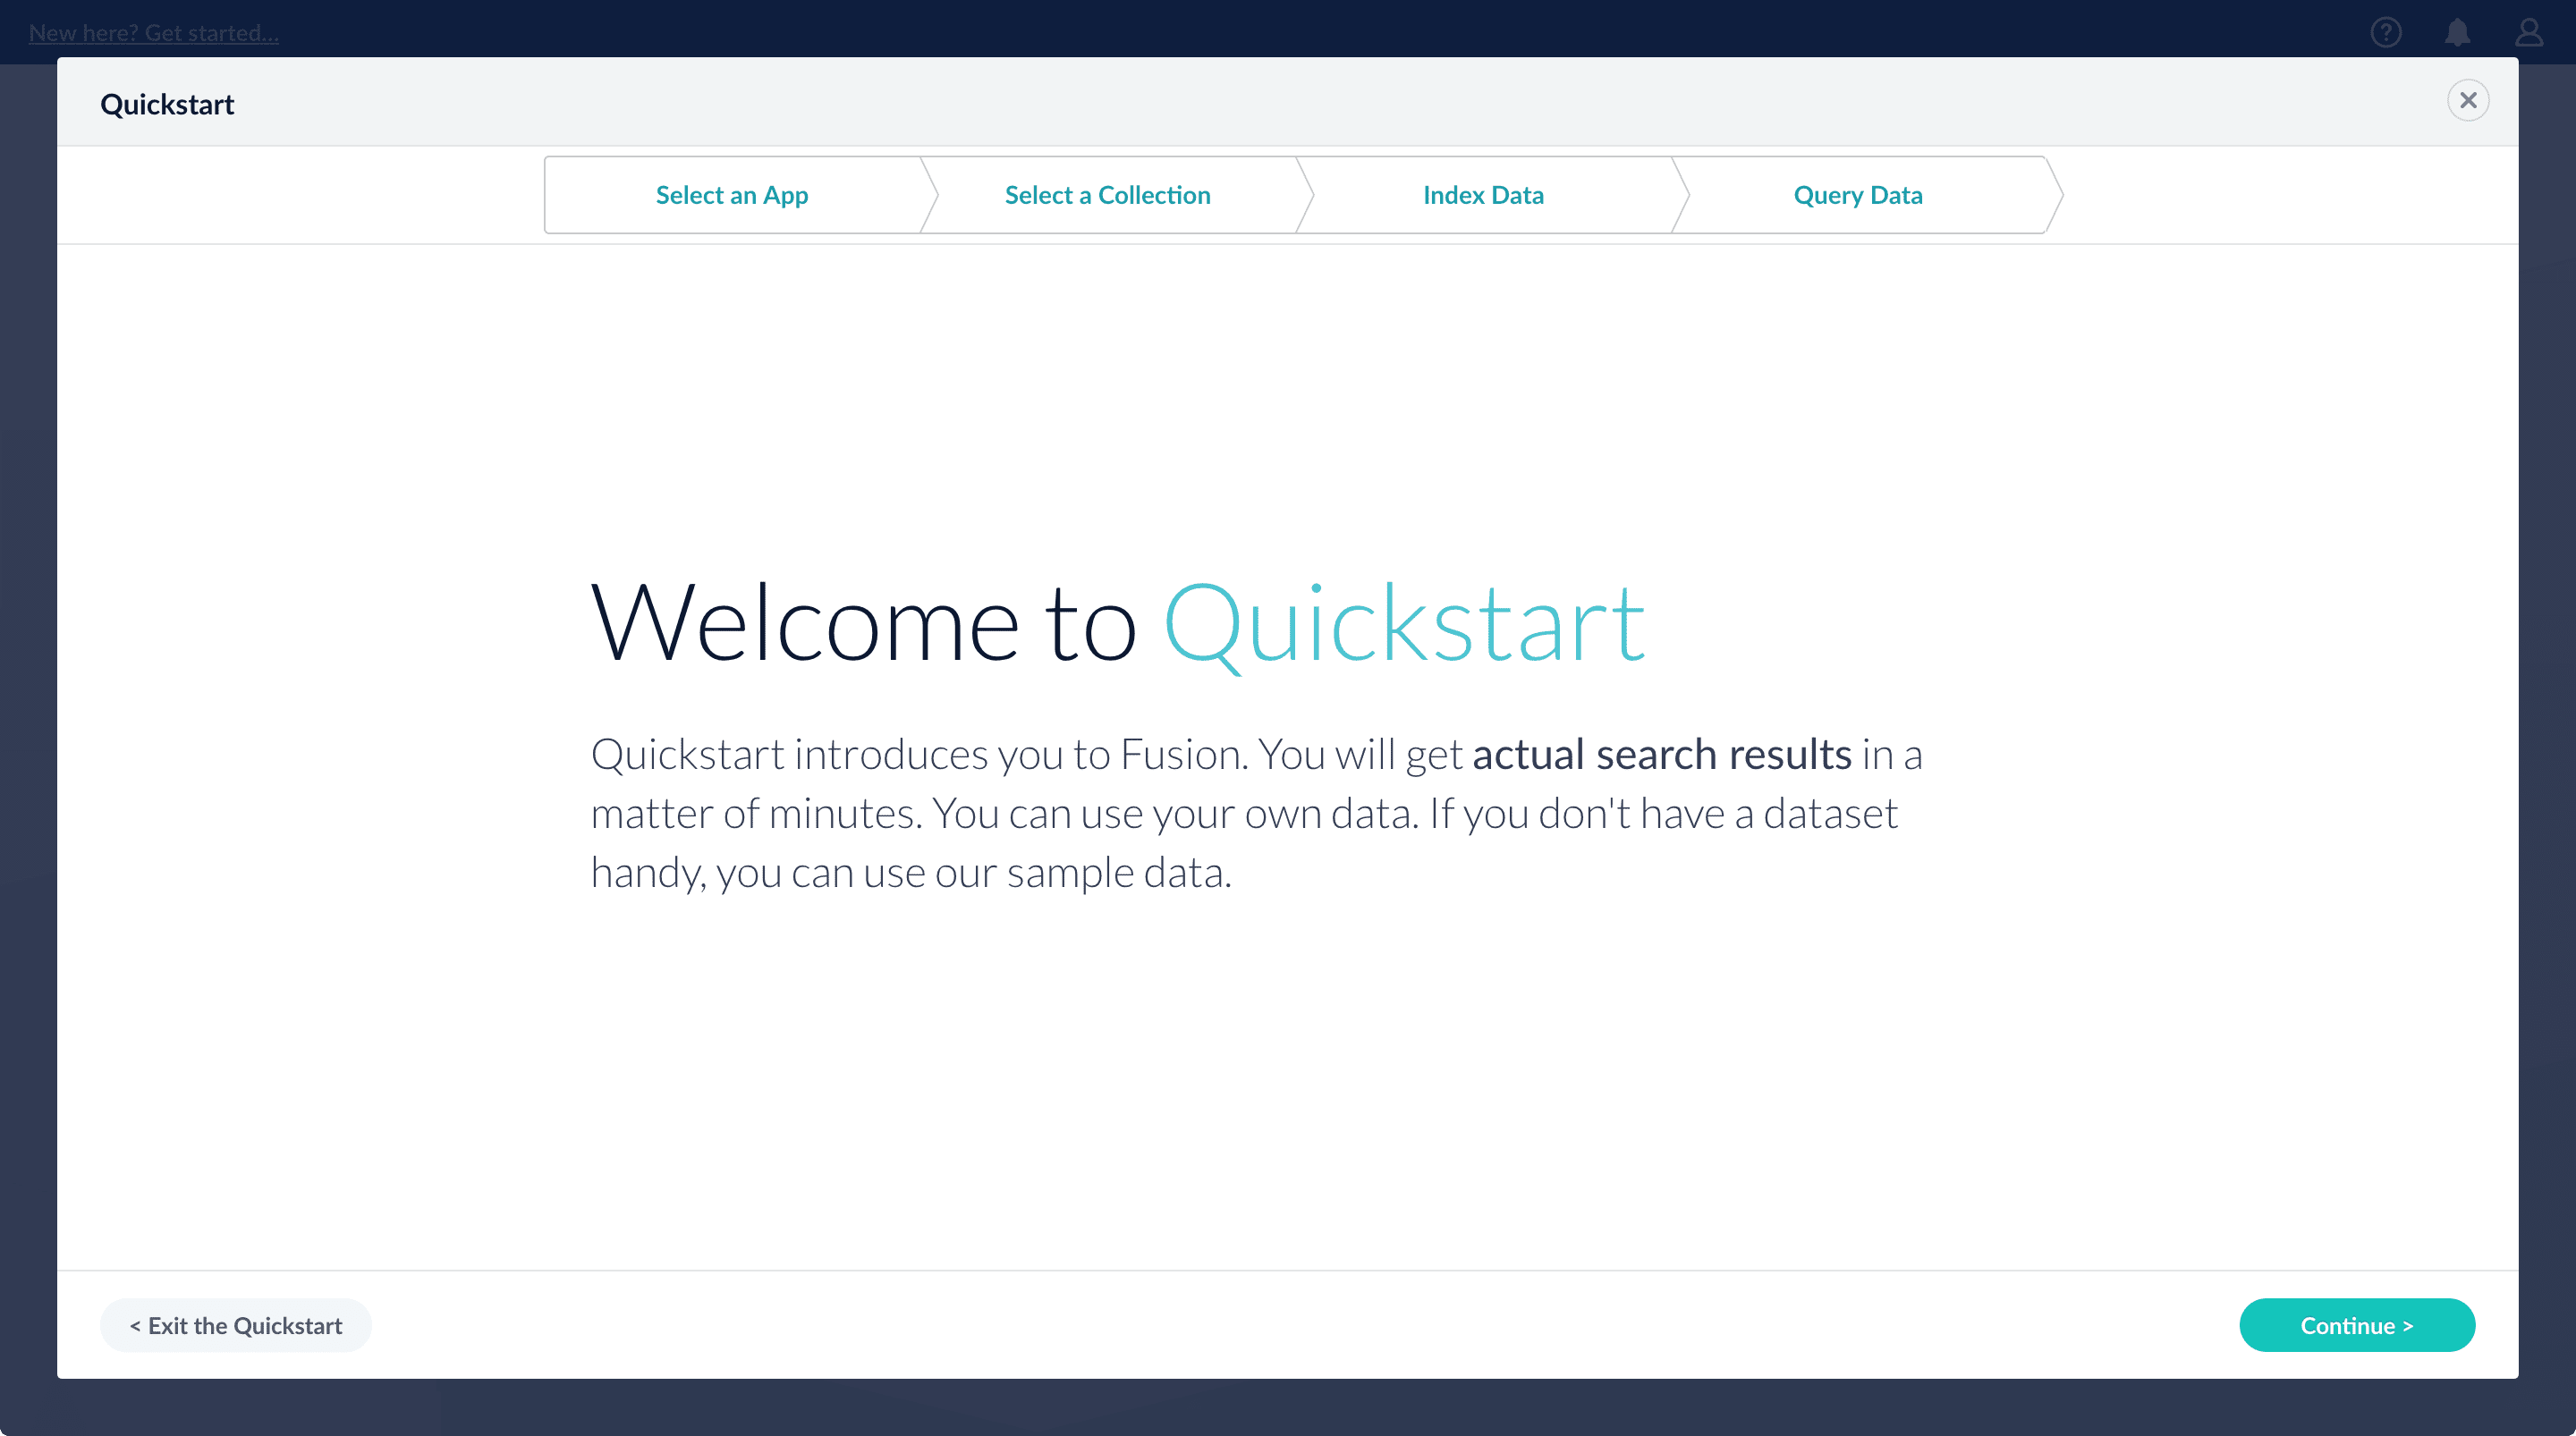
Quickstart
Quickstart
The Quickstart is a wizard that lets you explore some of Lucidworks Search’s core capabilities:
- Creating or selecting an app
- Selecting a collection (where data is stored)
- Indexing data
- Searching
Using The Quickstart Wizard
The course for Using The Quickstart Wizard focuses on using the wizard to practice using the key functions of Fusion.
Step through the Quickstart wizard
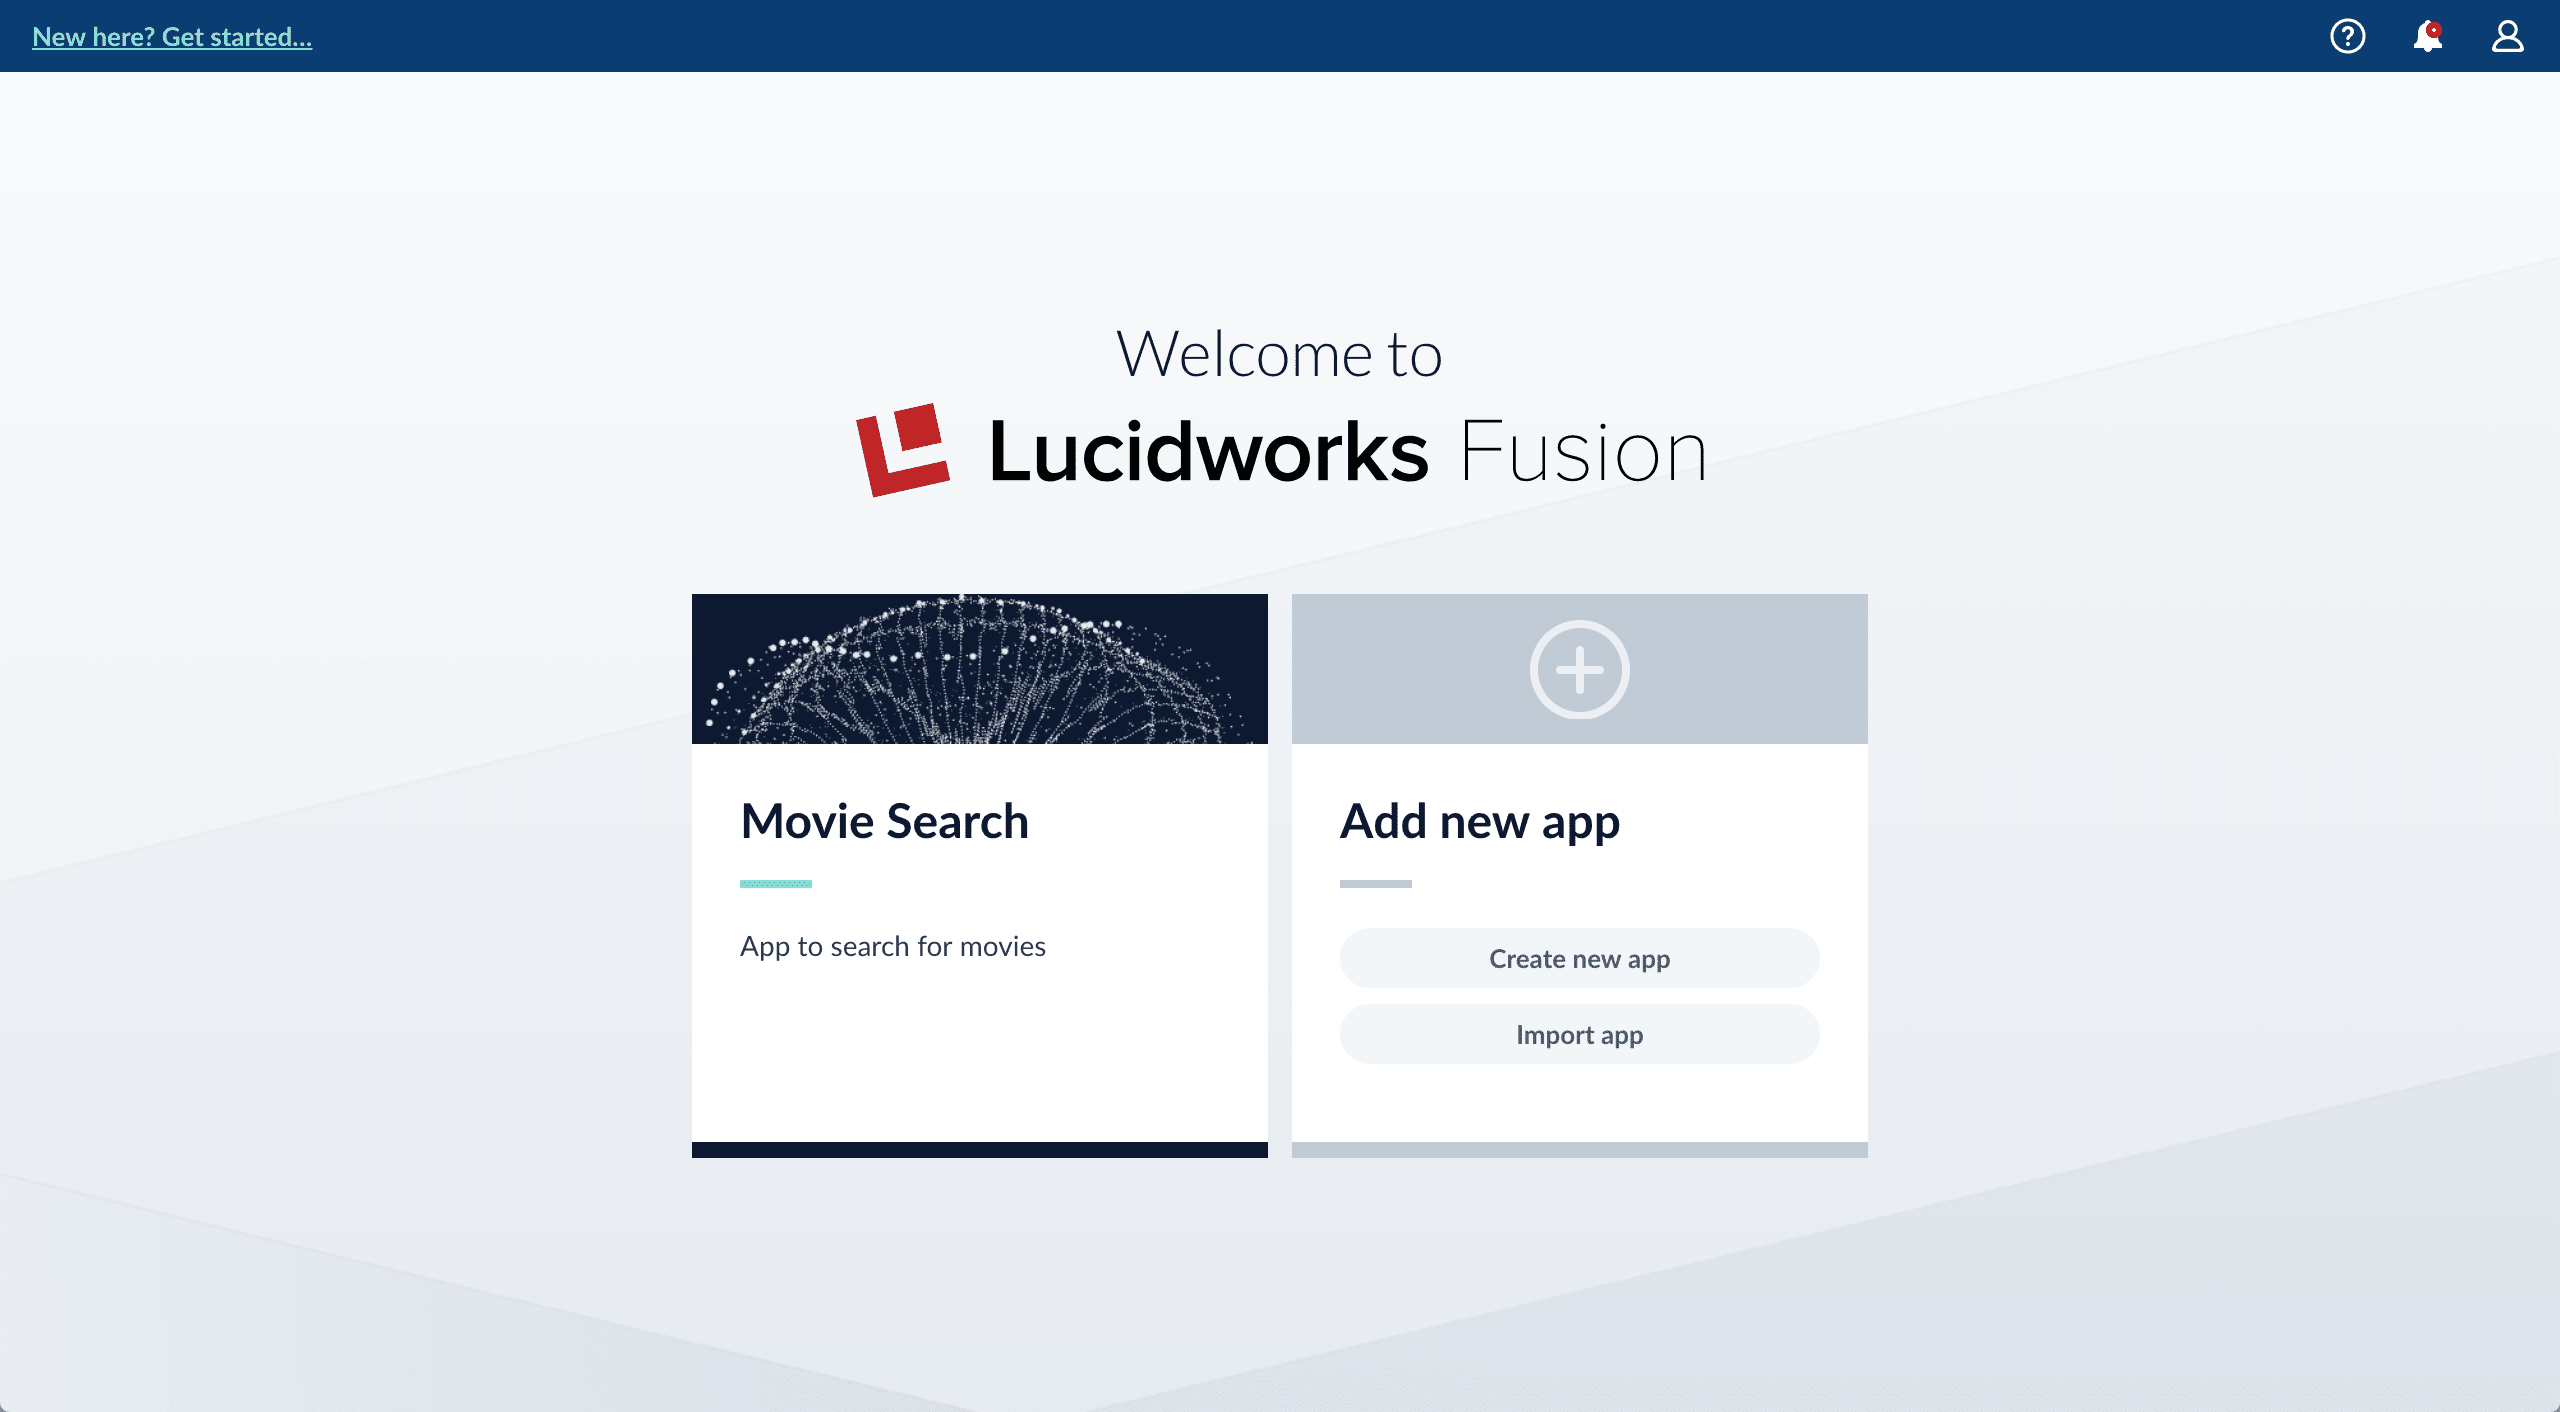
If it is not already open, open the Quickstart wizard. In the Lucidworks Search launcher, click New here? Get started….-
Click Continue.
On the Select an App screen, you can select or create an app for your quickstart data.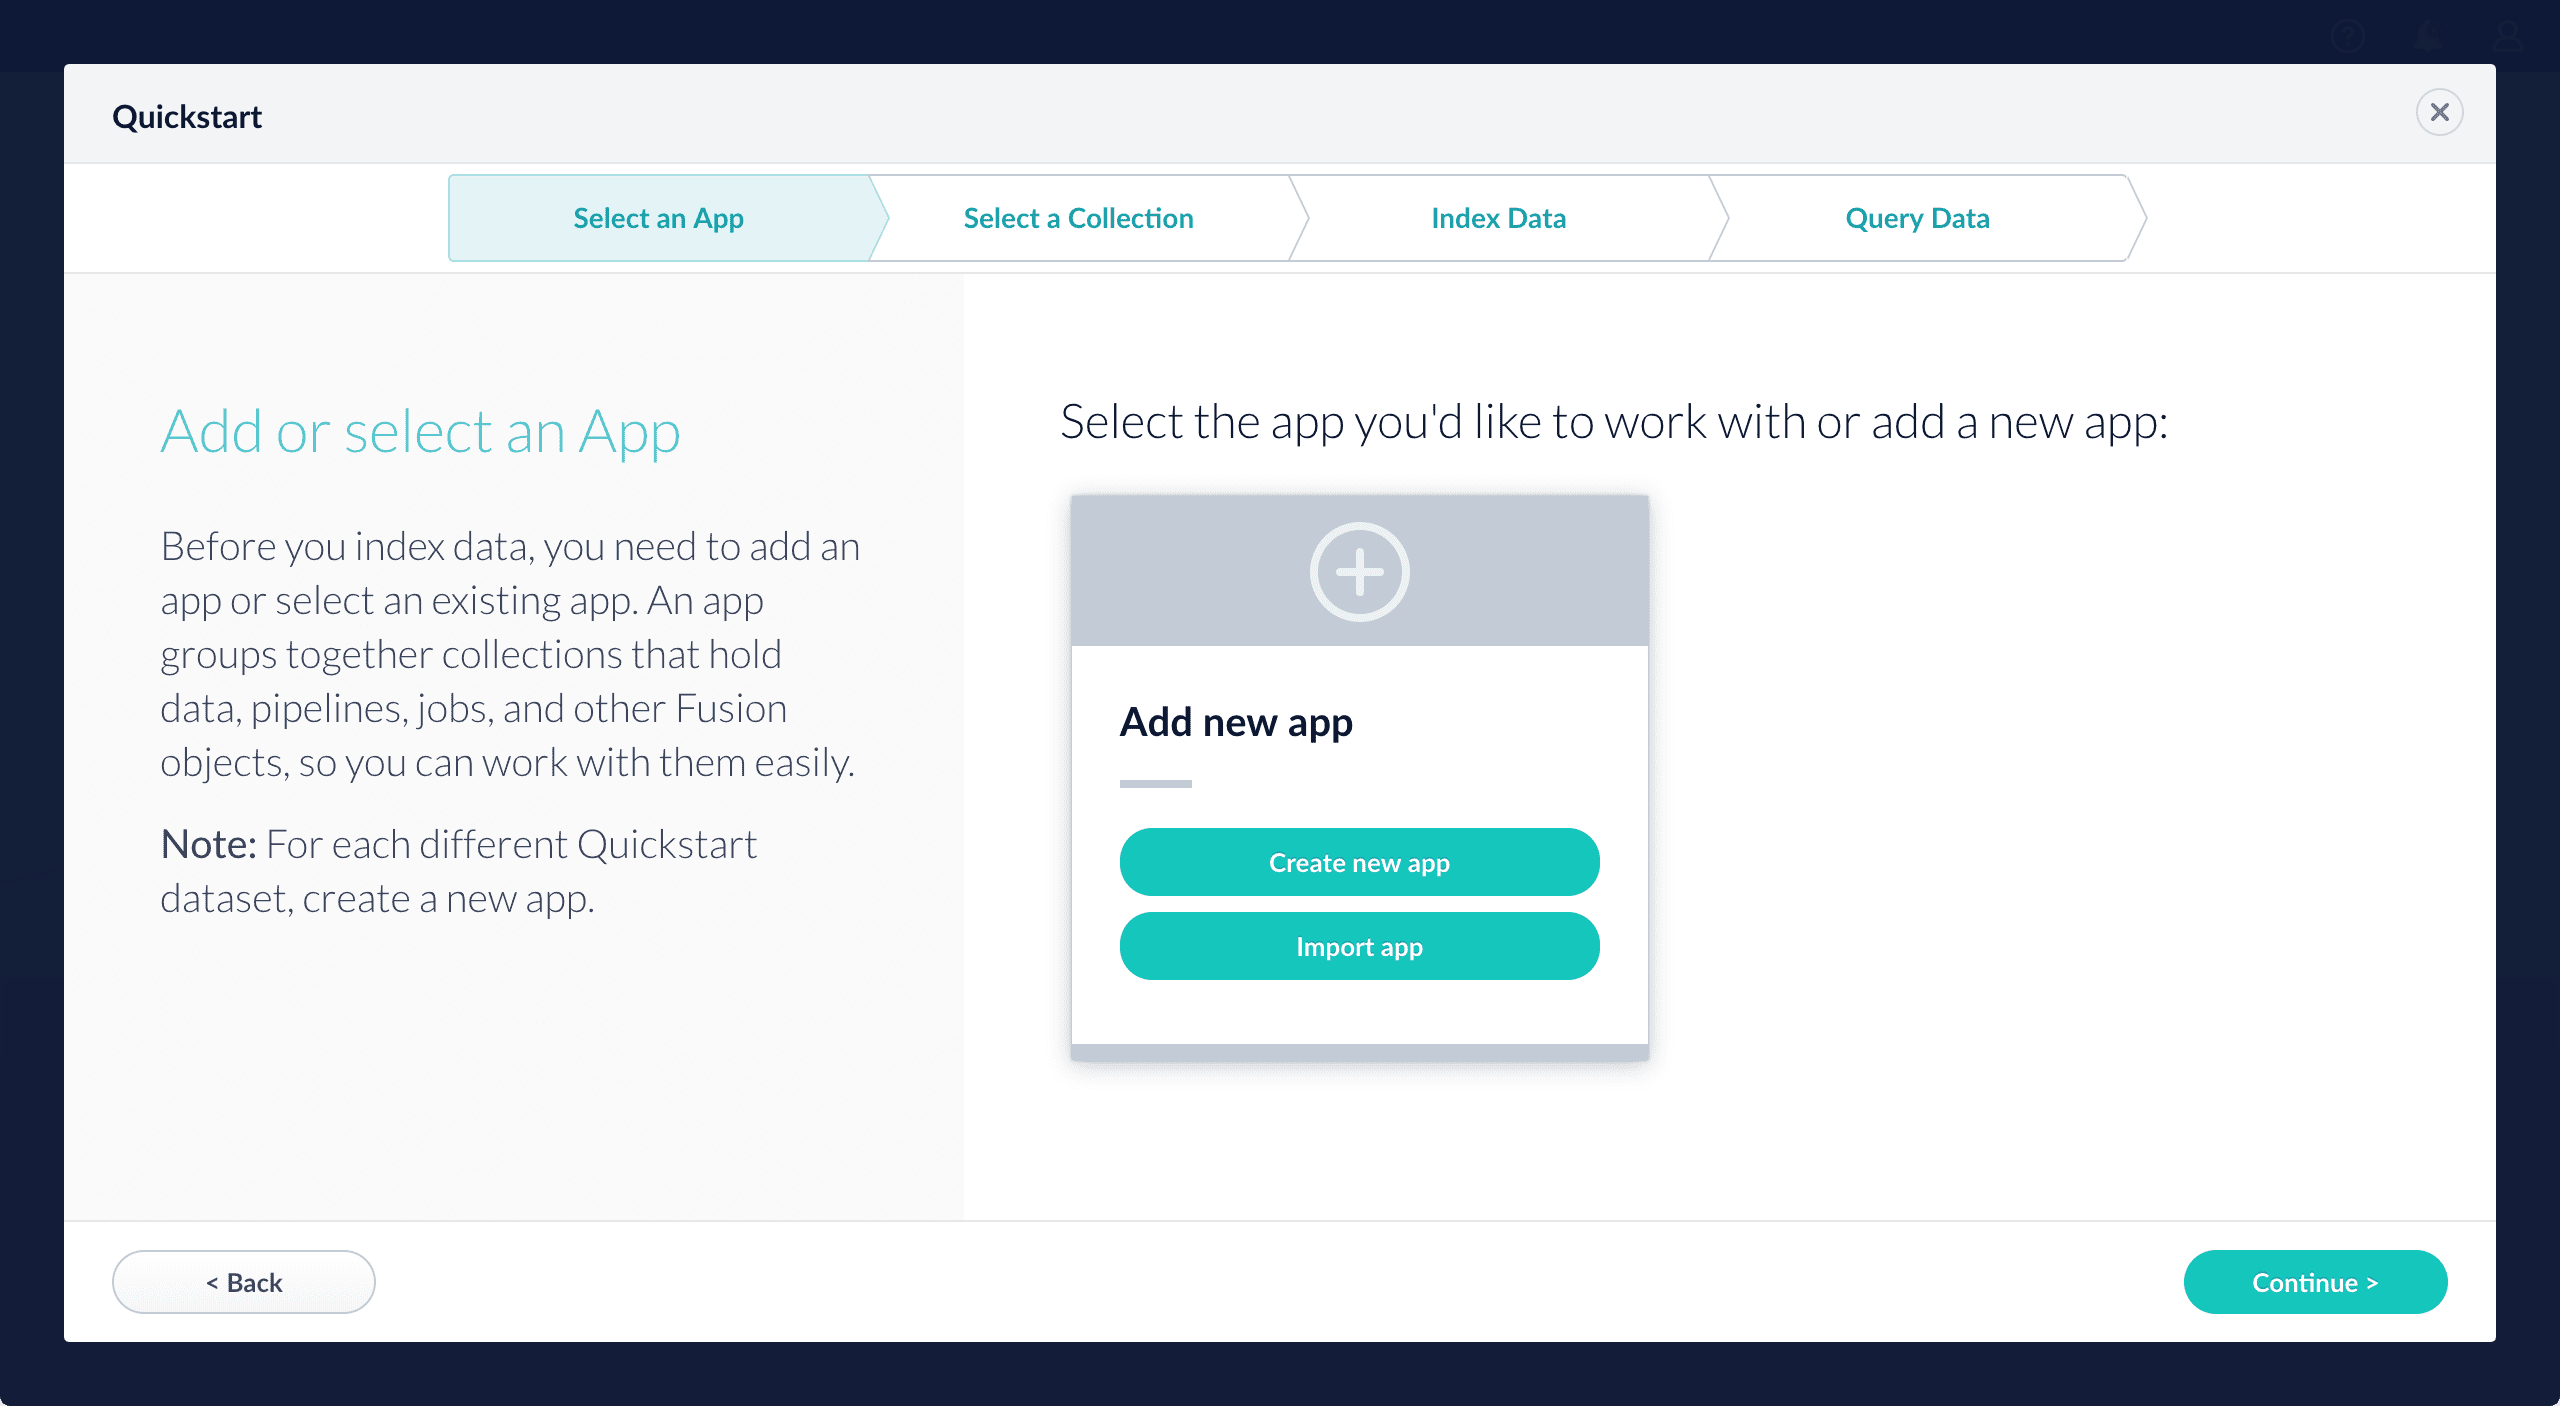
-
After selecting an app, click Continue.
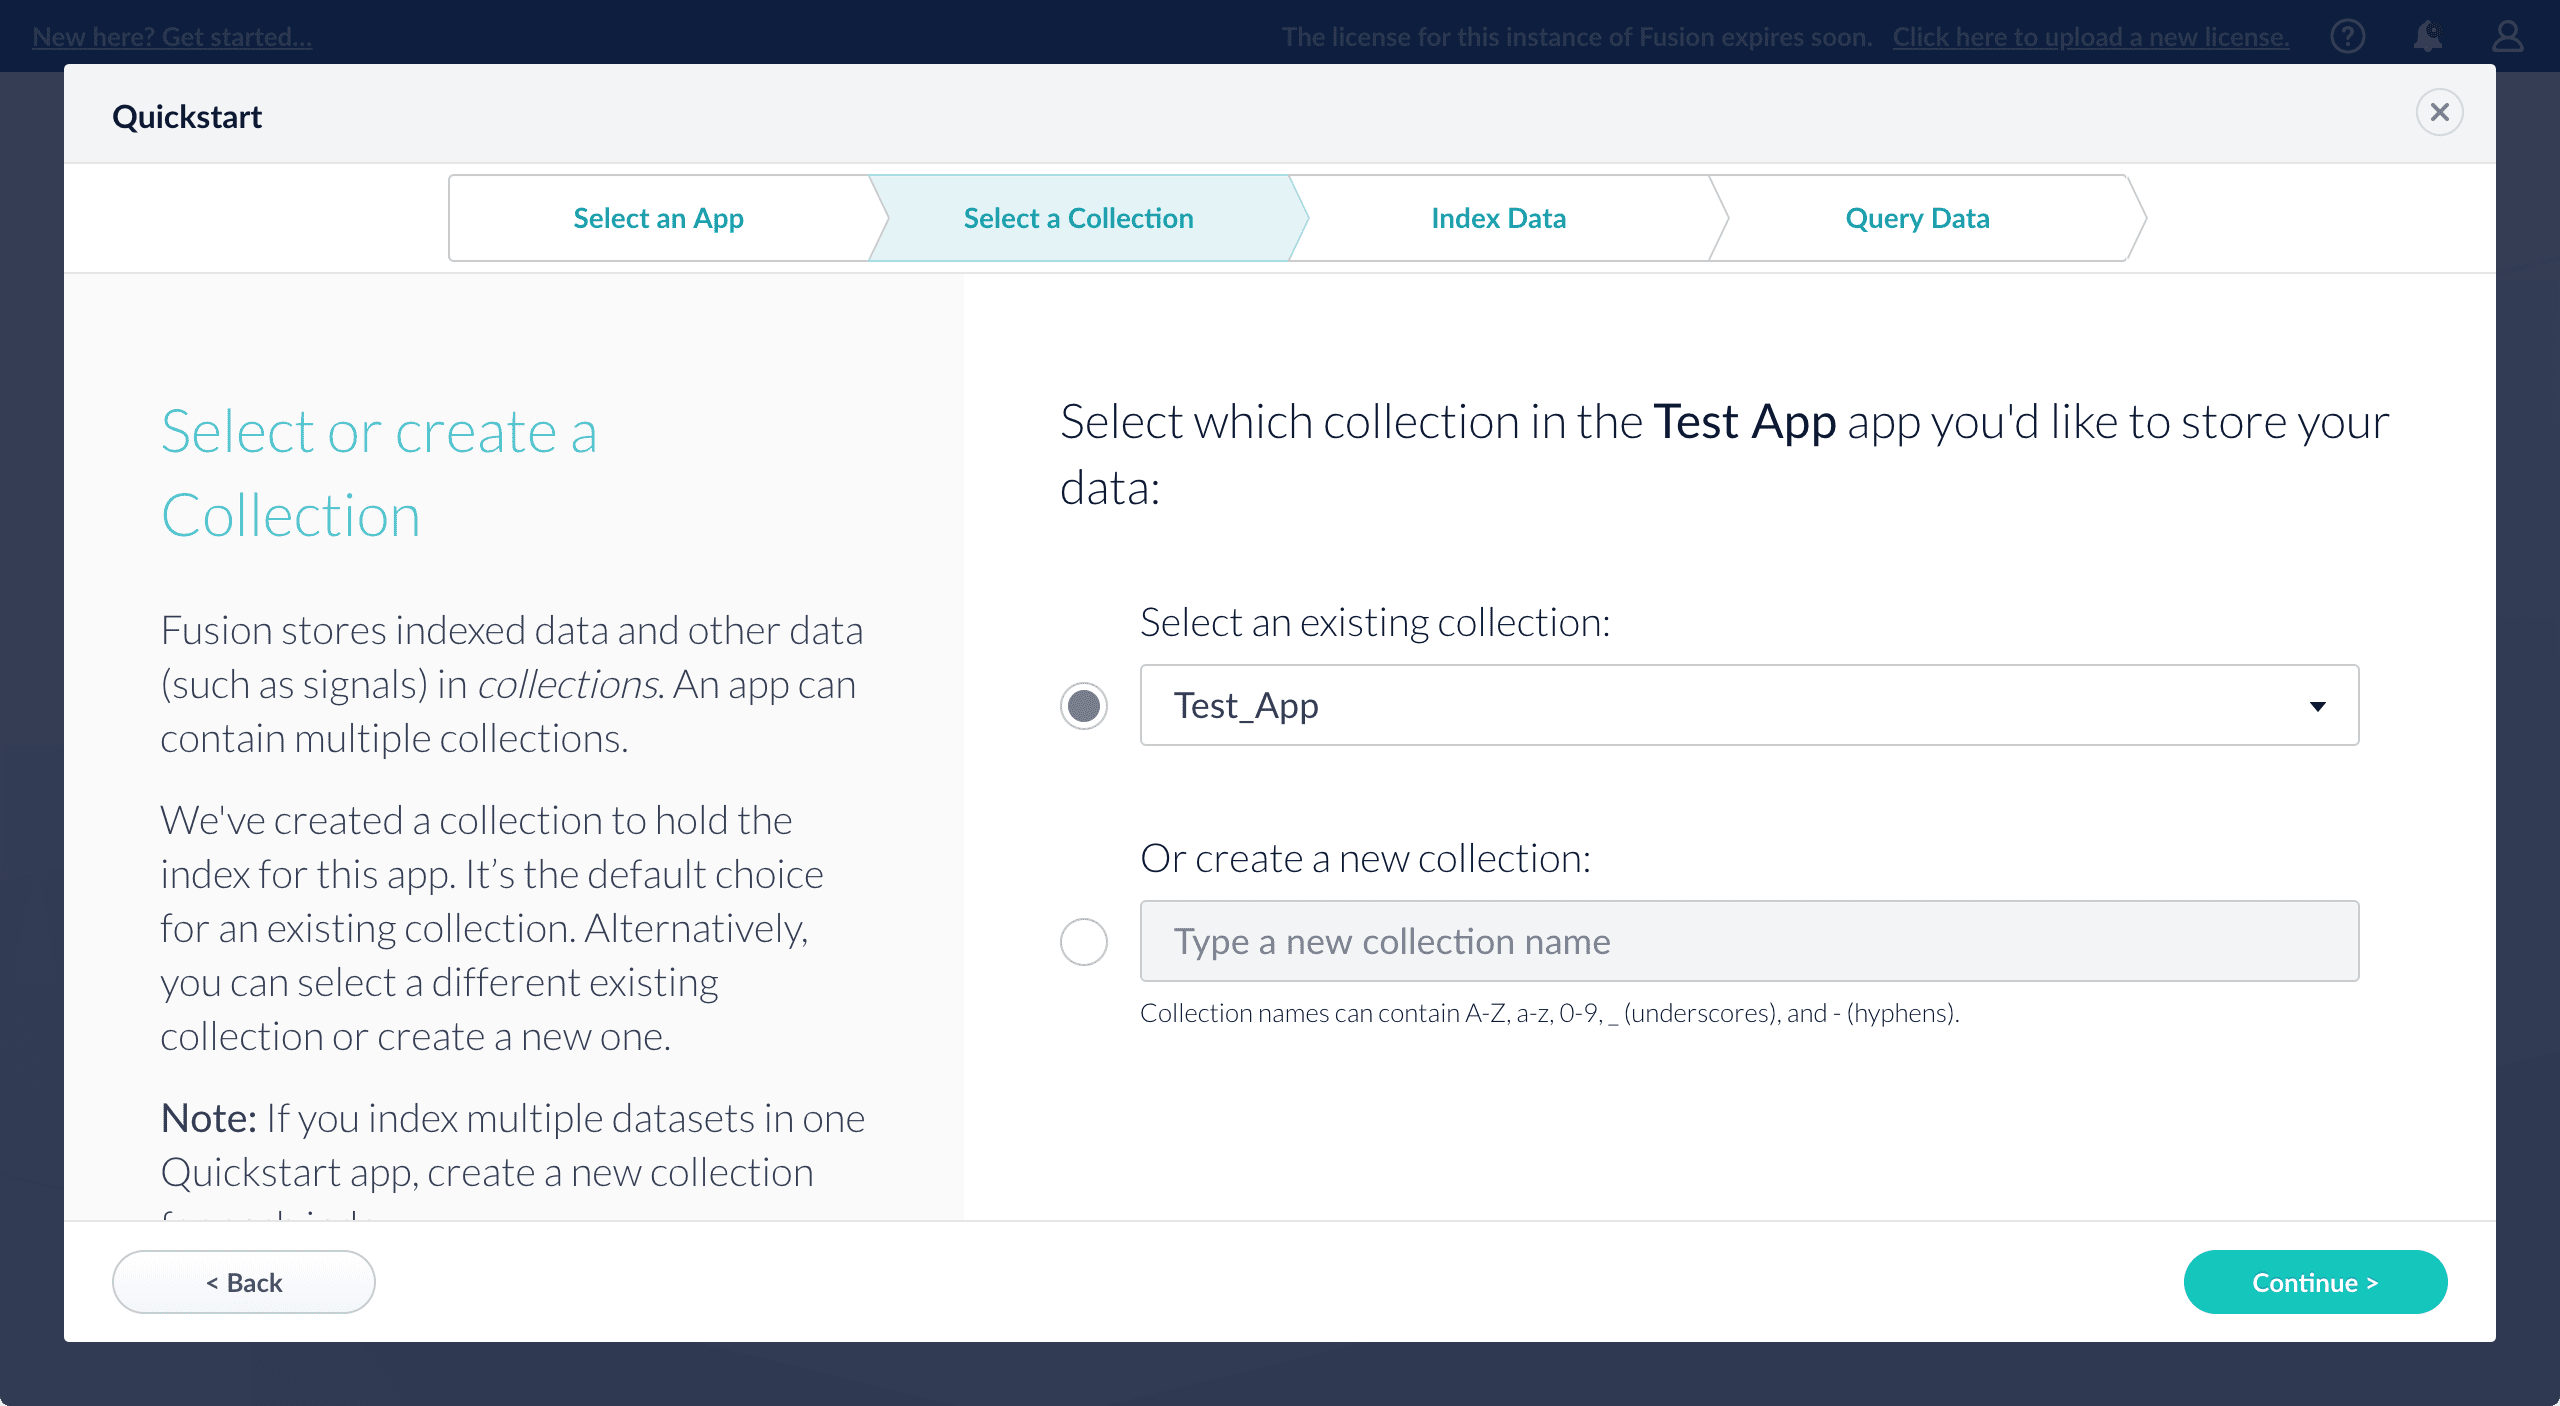
On the Select a Collection screen, you can select or create a collection for your quickstart data. A collection with the same name as your app is created automatically:
-
Click Continue.
On the Index Data screen, you can either select one of the built-in sample datasets or click Use my data to upload your own: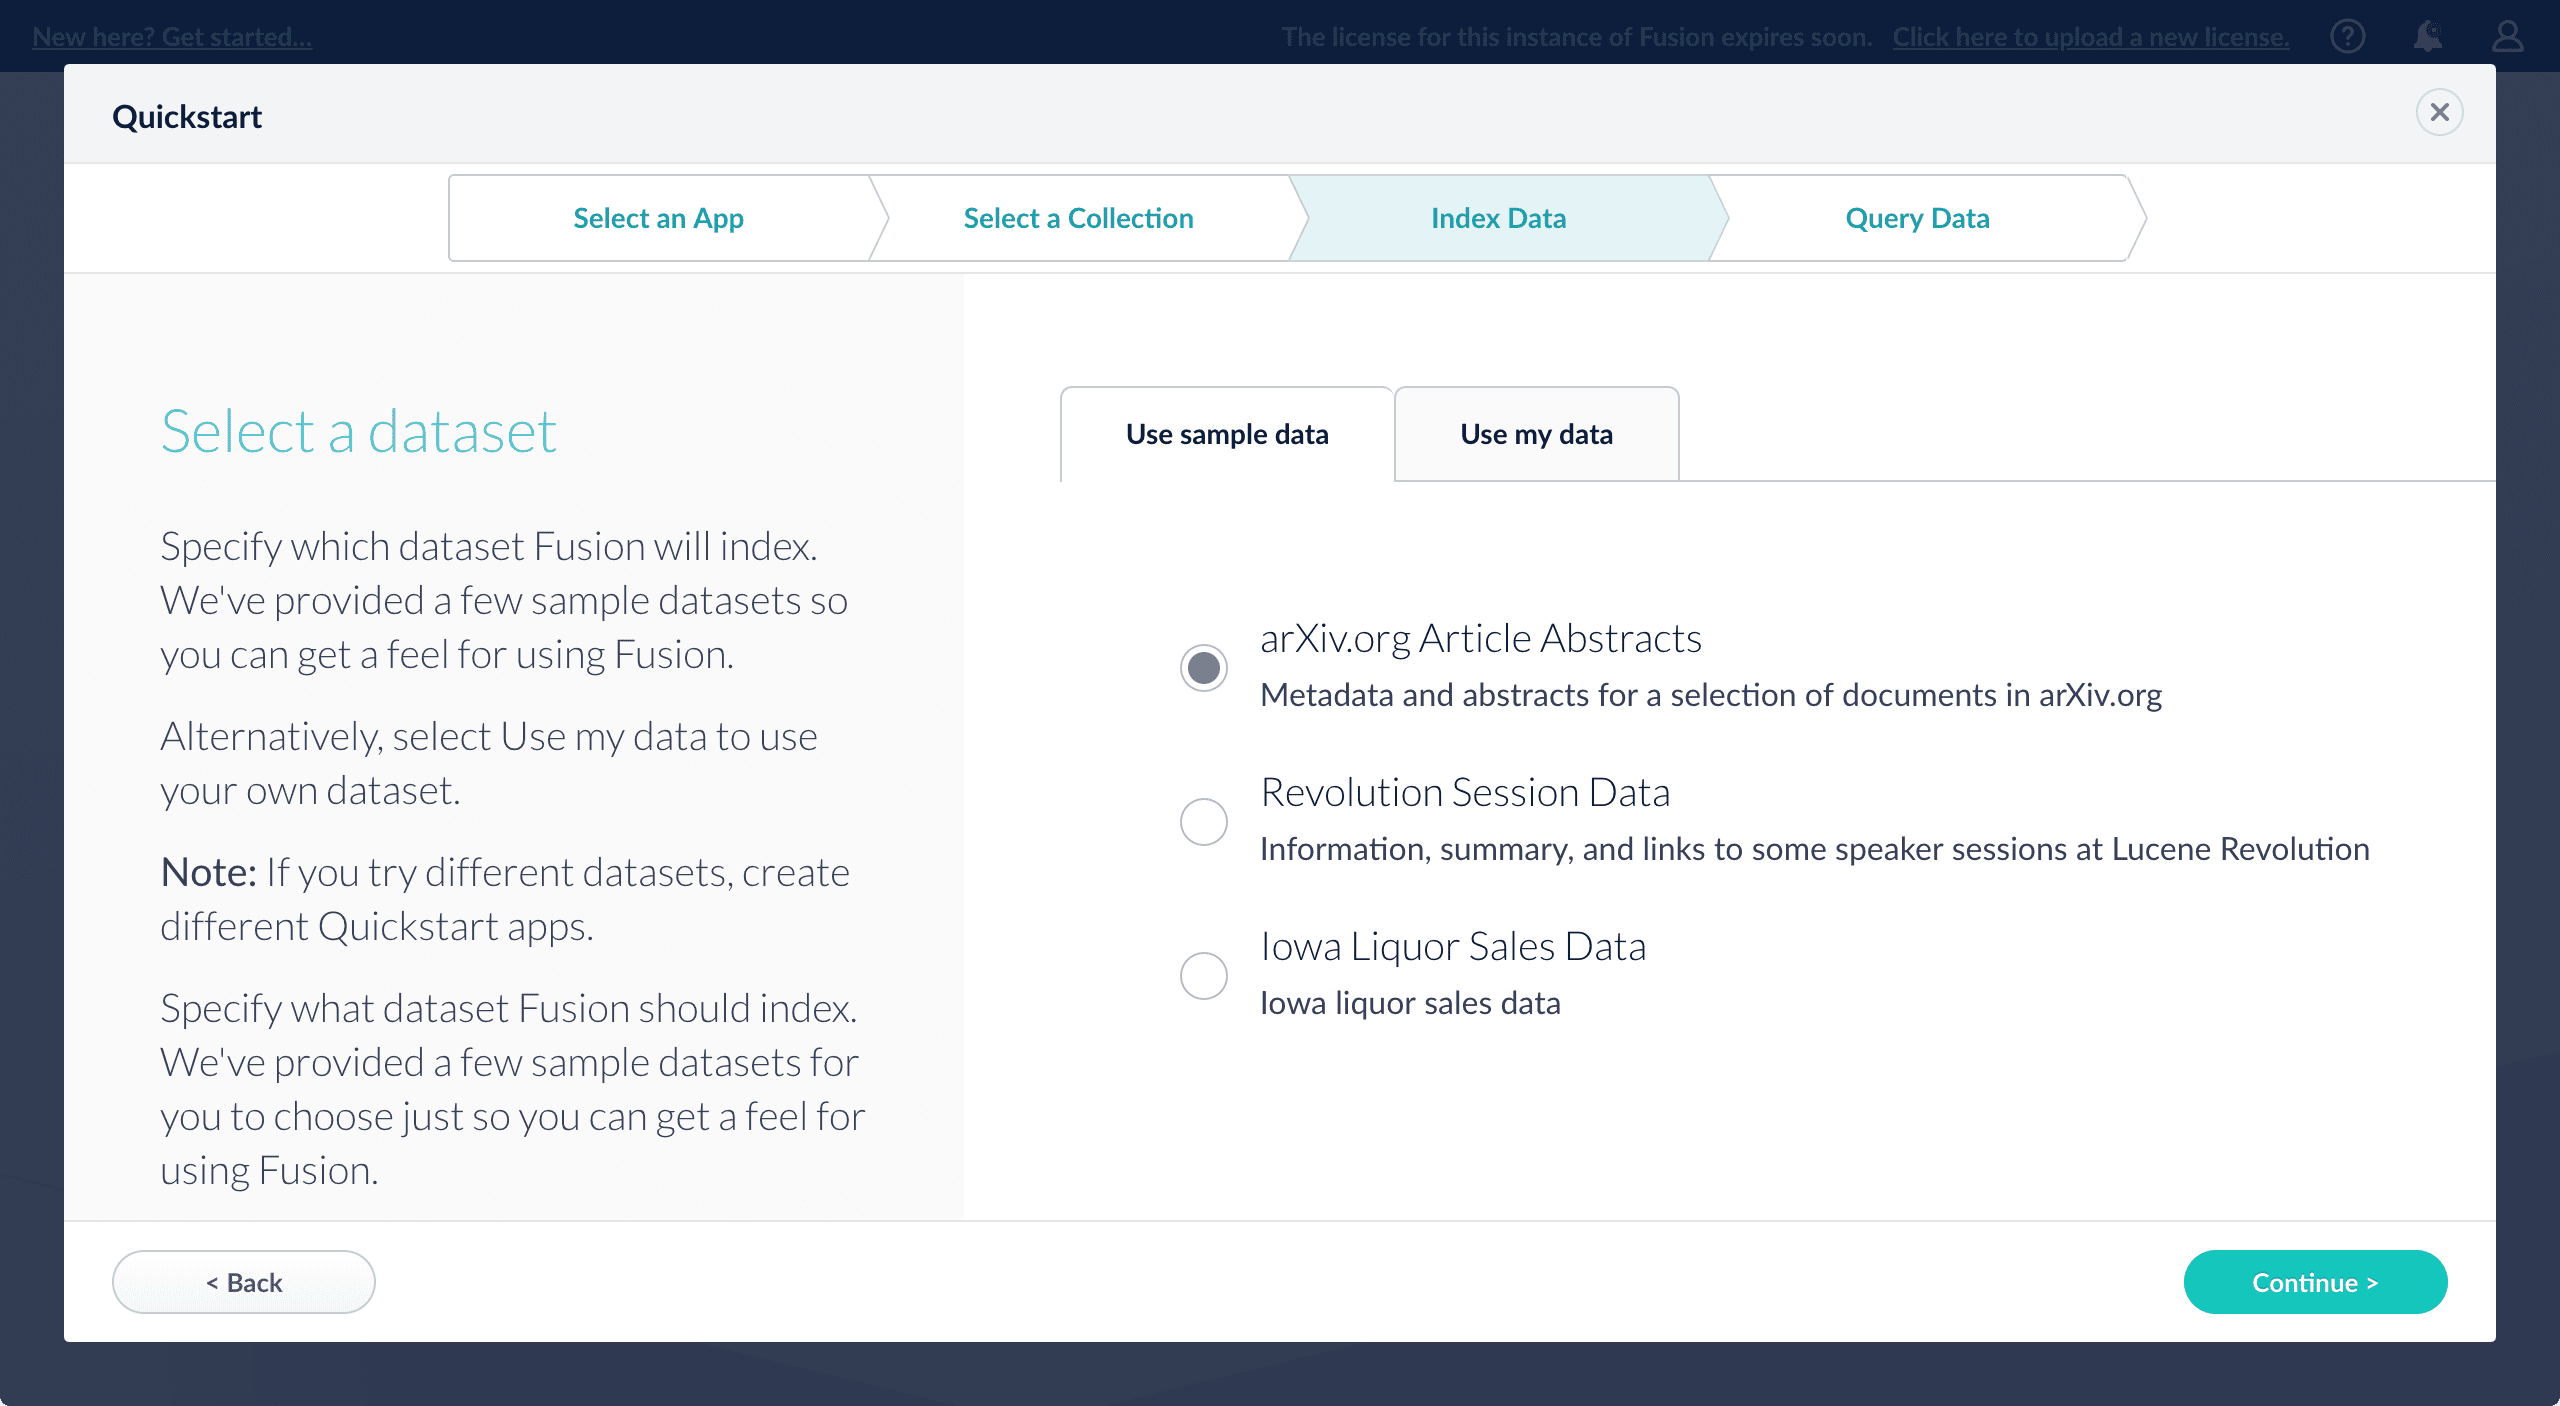
-
Click Continue.
On the Query Data screen, you can see all search results and enter your own search queries to test the indexed dataset. You can also select the display fields or view the parsed documents: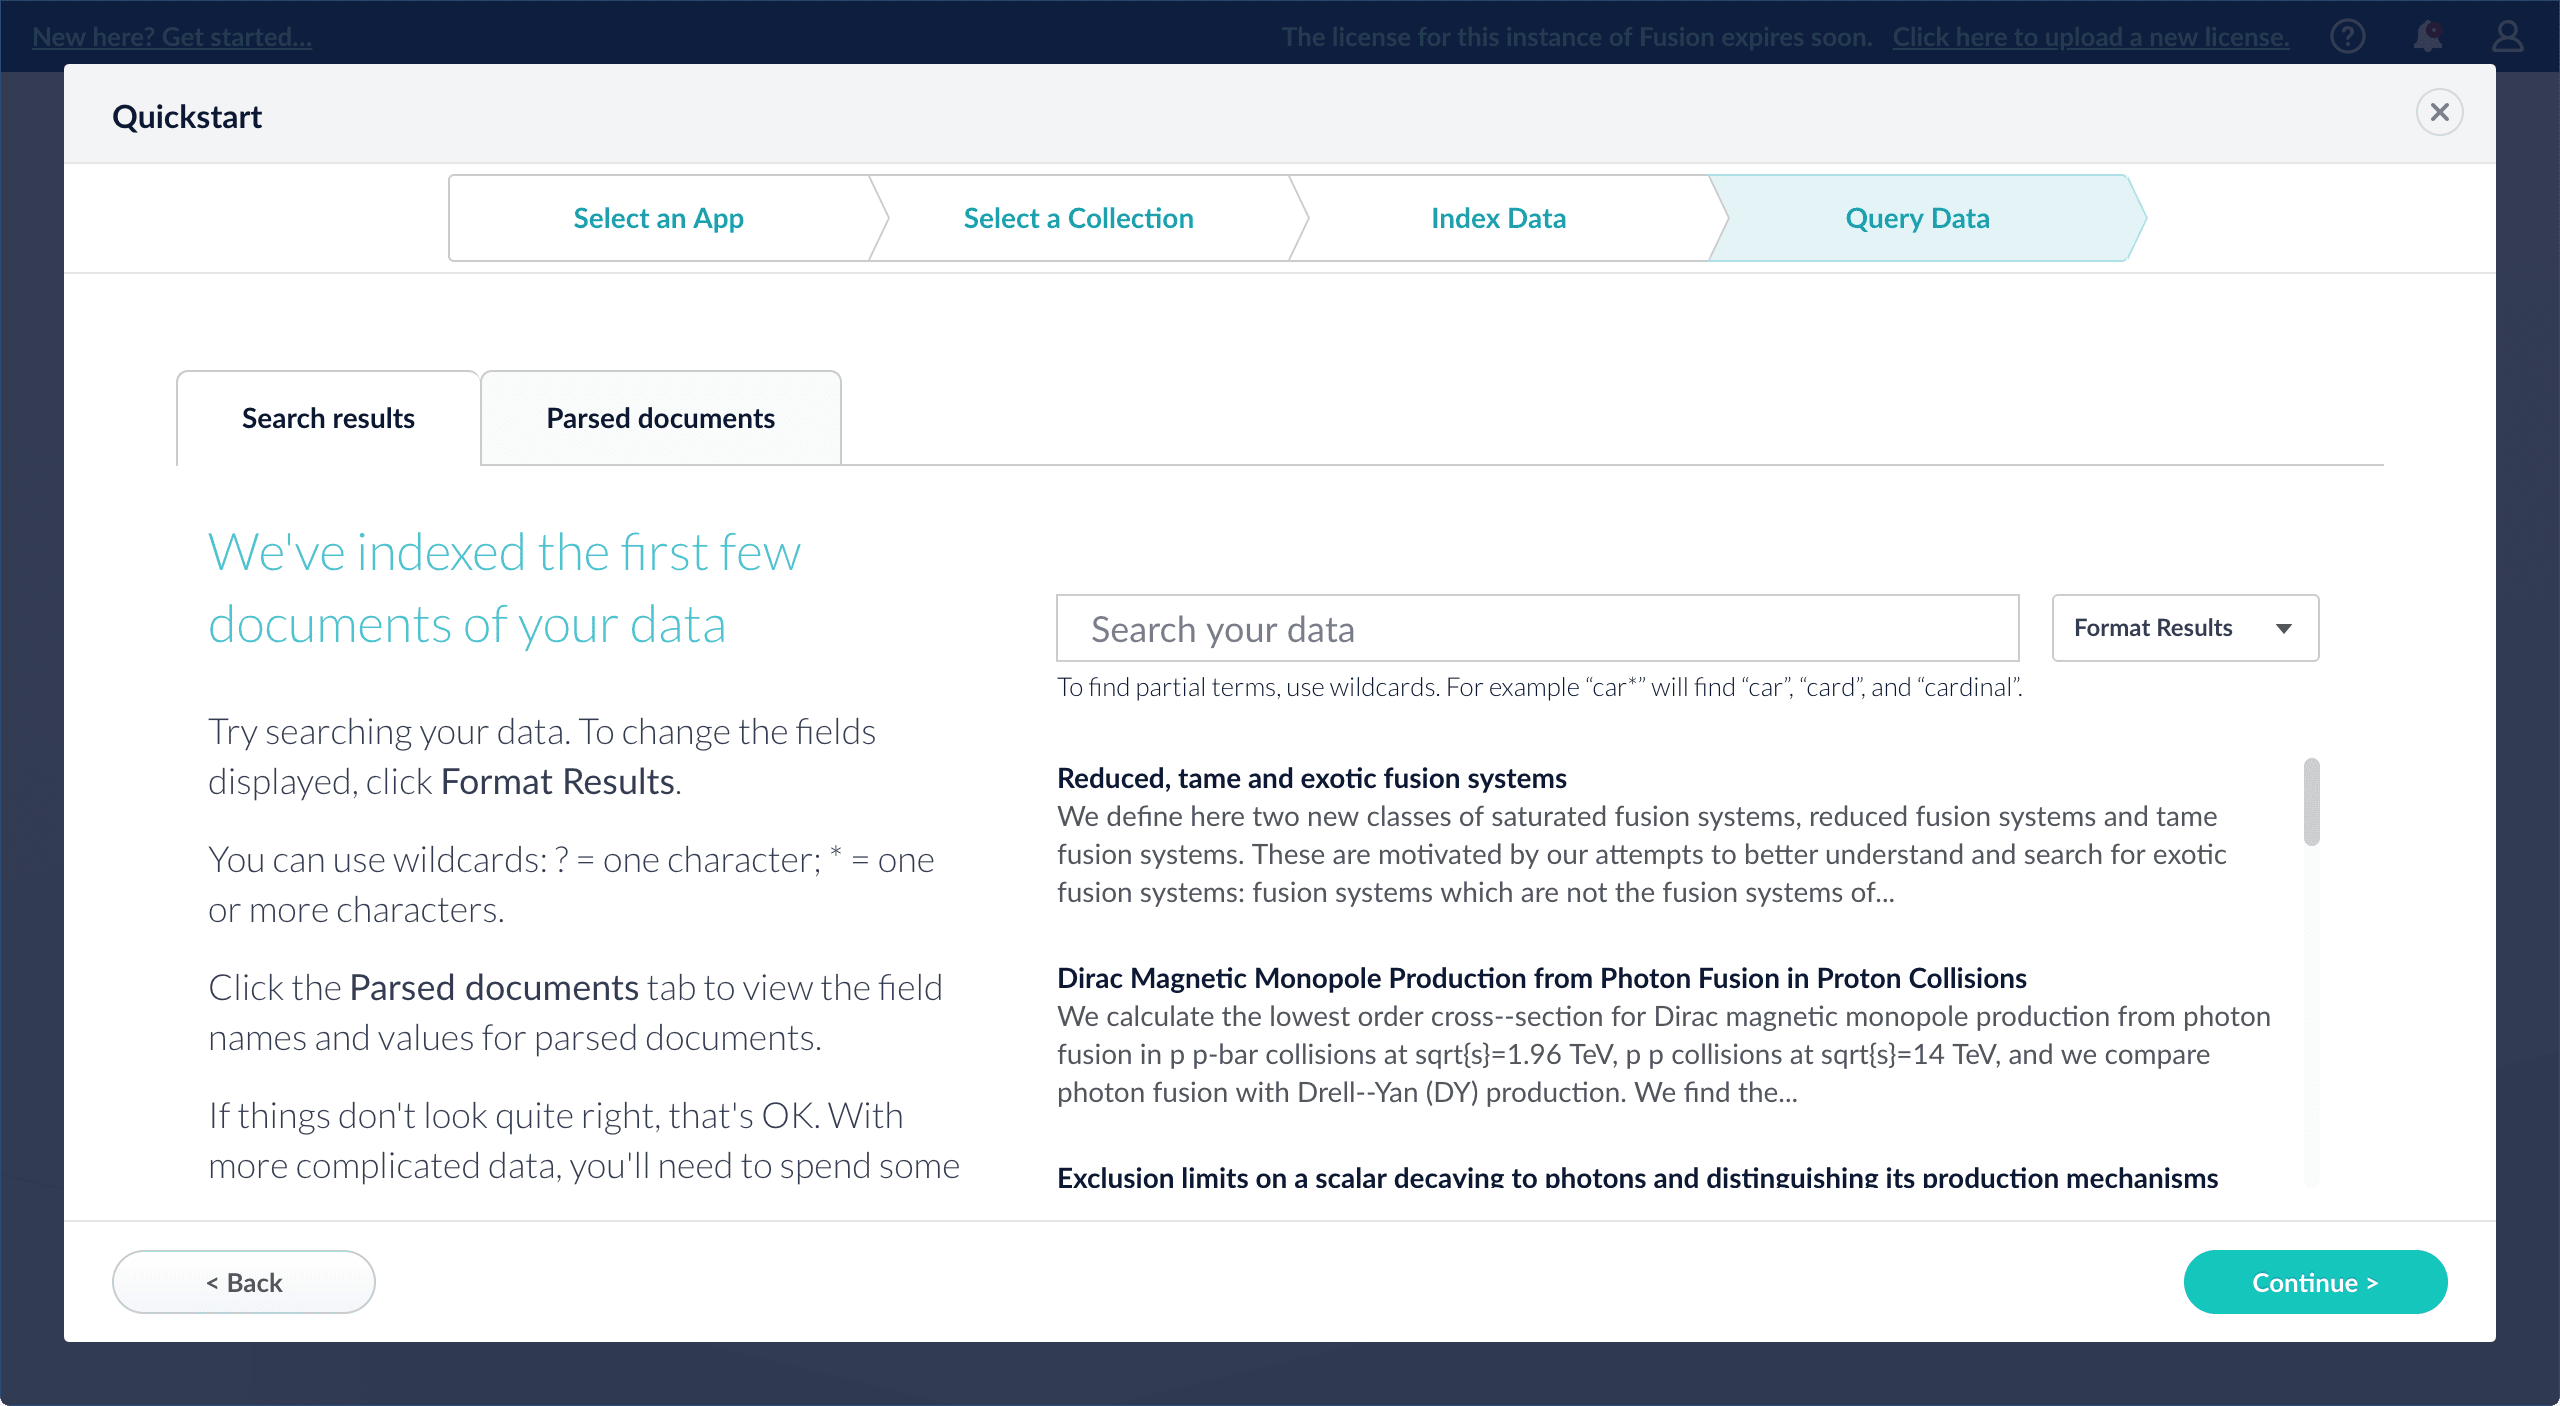
-
Click Continue.

- Open the Index Workbench to change the index pipeline.
- Open the Query Workbench to change the query pipeline.
Create a Lucidworks Search application
Create a Lucidworks Search application
Create a new application
An application (also referred to as app) is a set of objects that performs a specific searching task, such as searching for movies.- Sign in to Lucidworks Search.
For more information about the Lucidworks Search user interface, see UI Tour.
- In the Add new app section, click Create new app.
- In the App Name field, enter
Movie Search. - In the App Description field, enter
App to search for movies. - Click Create App.

Index Data
Index Data
This topic details how to configure a datasource using Index Workbench.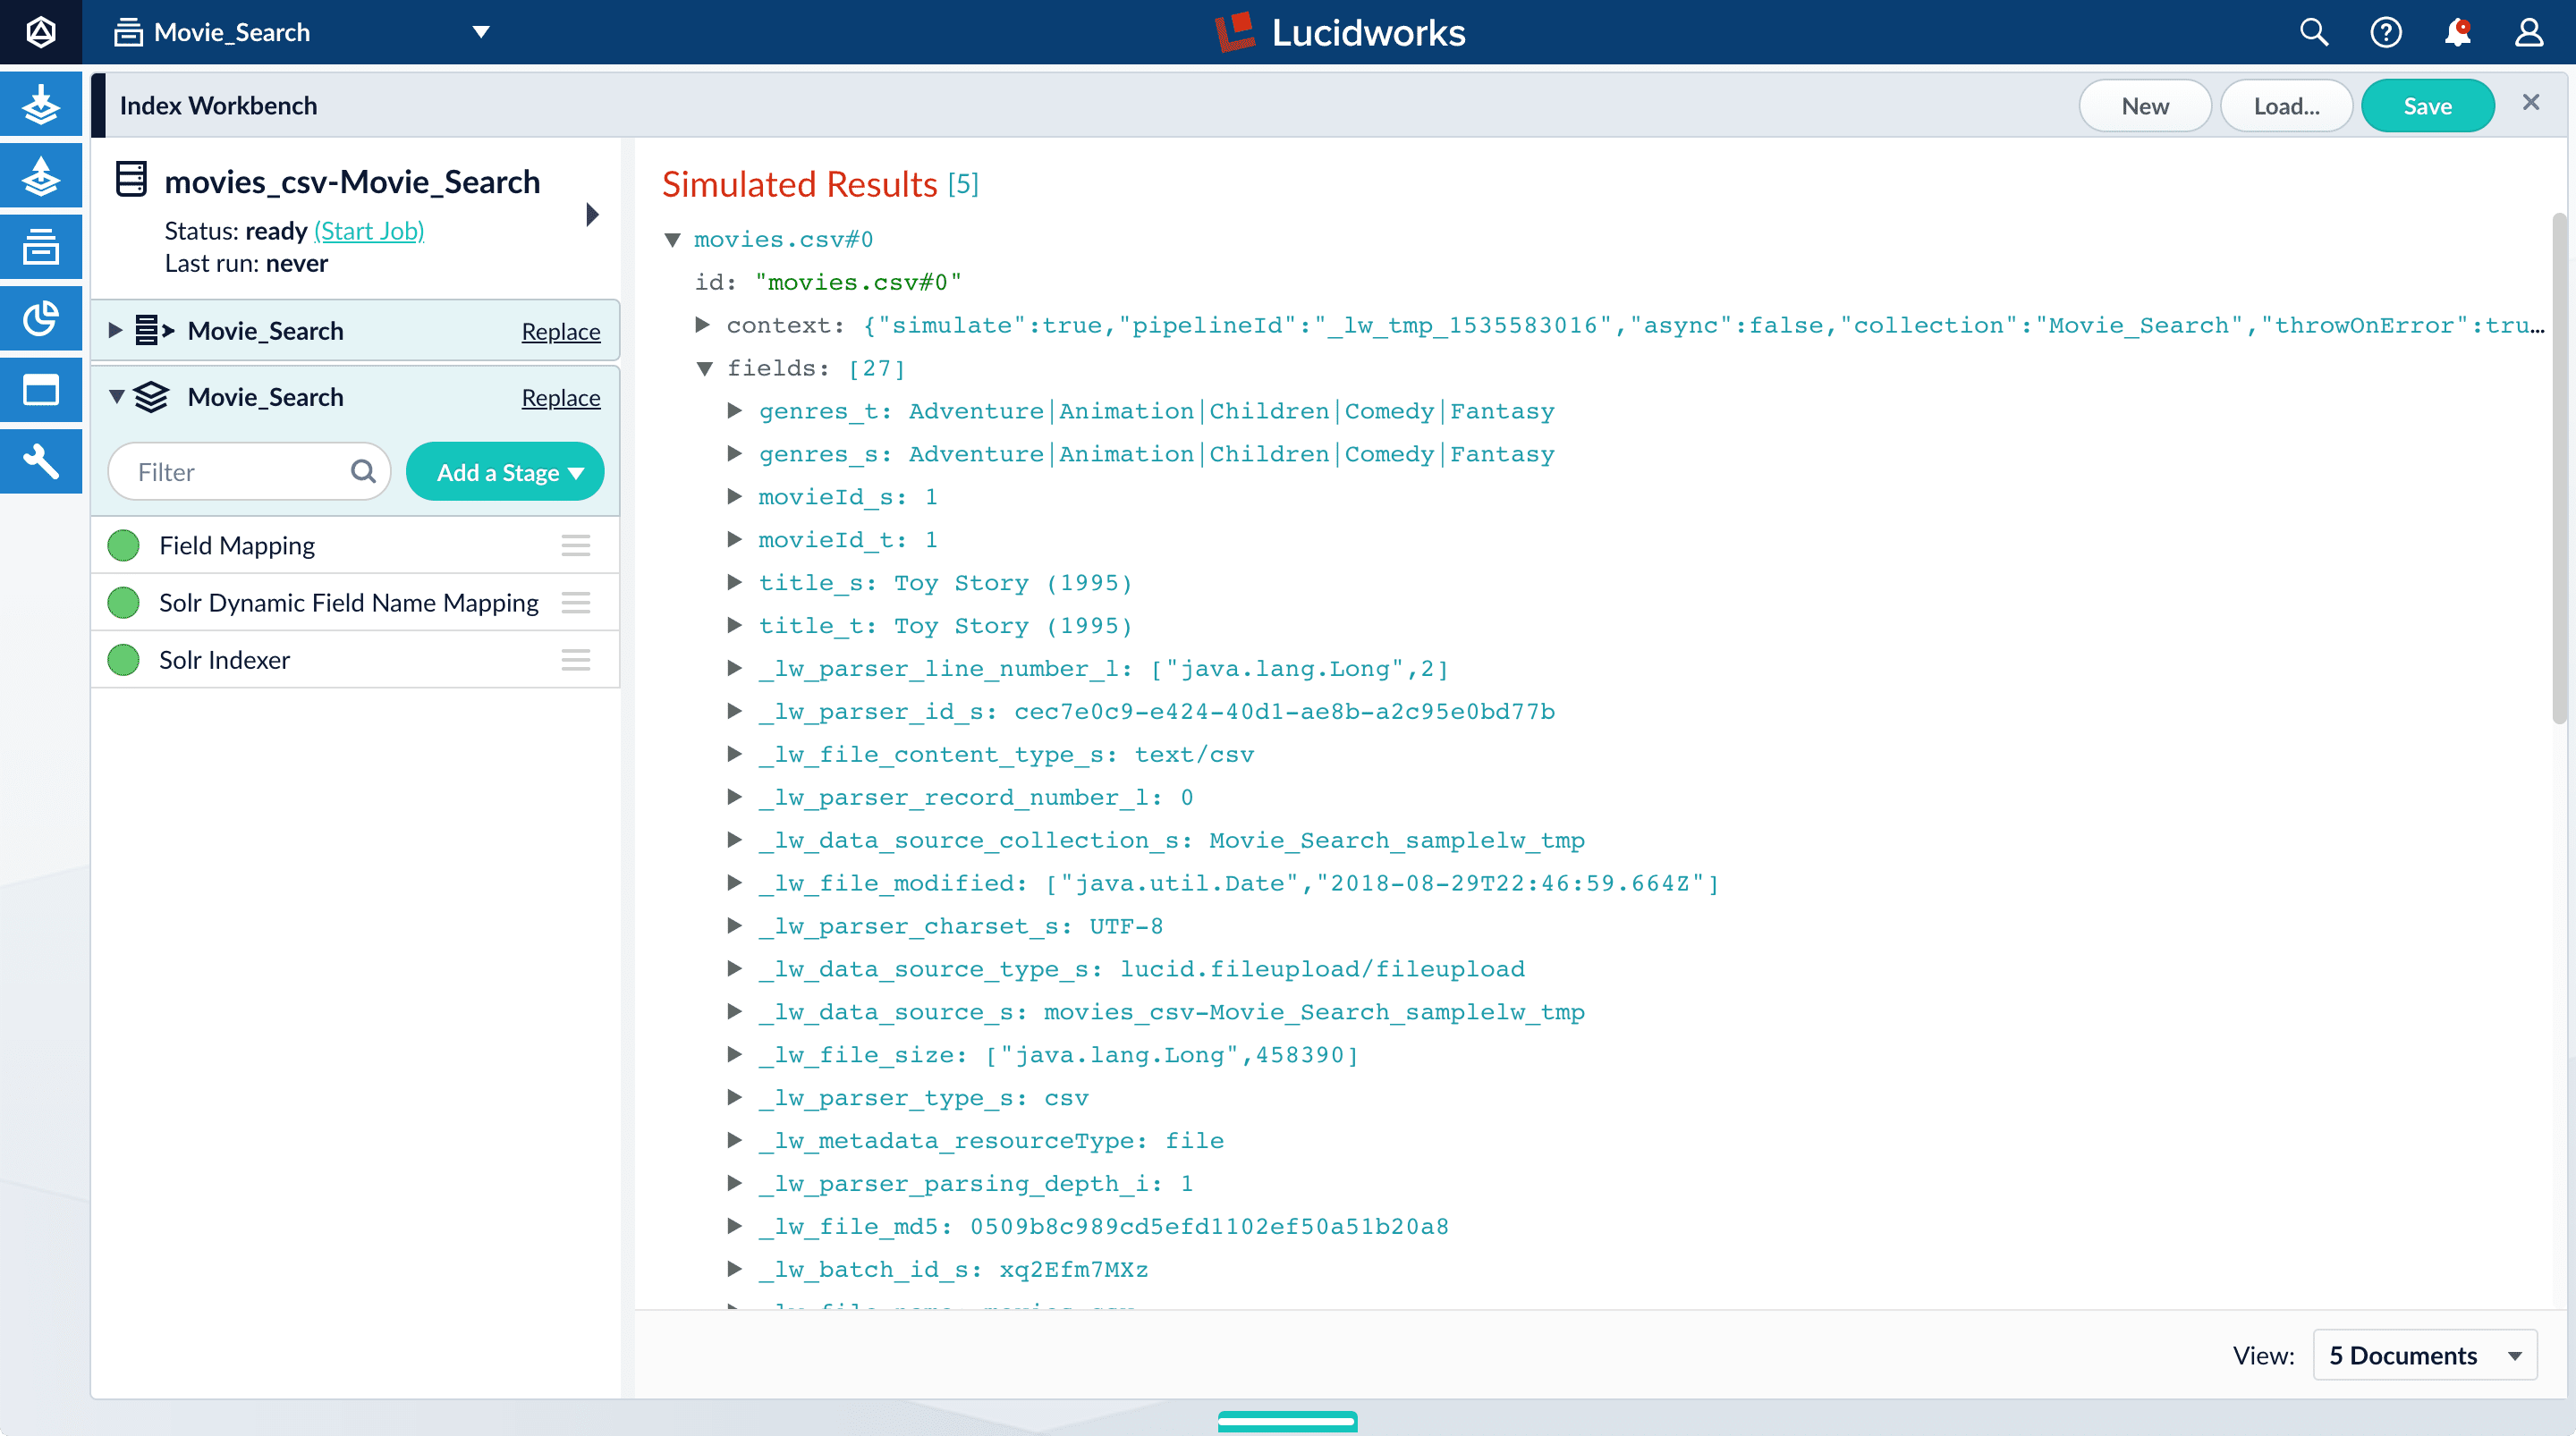
 to close all of the open panels.
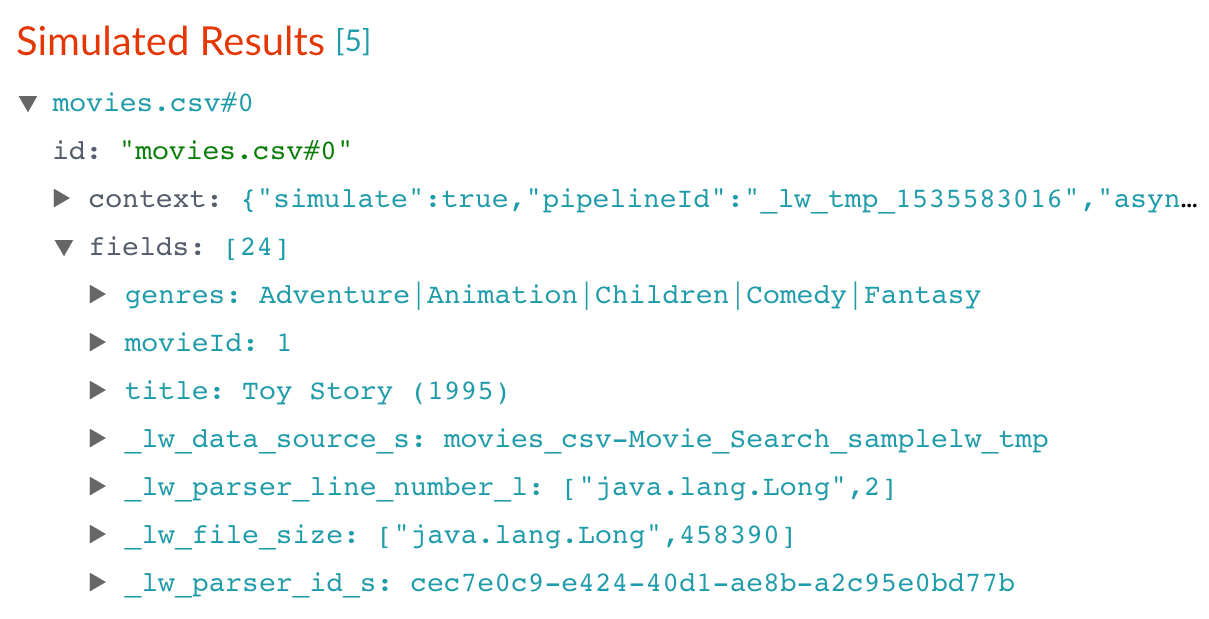

General information
Lucidworks Search’s Index Workbench provides the tools to configure datasources, parsers, and index pipelines. It lets you preview the results of indexing before you load your data into the actual index.When you enter the necessary data extraction configuration in Index Workbench, it retrieves a small number of documents as sample data.Since this processing is simulated, and actual data is not yet ingested, you can preview the sample documents to test and refine the index pipeline before all of the data is loaded into the actual index.When you complete and save the configuration, it is saved in Index Workbench as a Lucidworks Search datasource. To load your data into Lucidworks Search, use the Datasource tool to run the resulting configuration.Before you begin
Download the MovieLens dataset
- Download the dataset. This is a MovieLens dataset created by the Grouplens research lab.
- Unpack the
ml-latest-small.zipfile. Lucidworks Search can parse.zipfiles, but in this tutorial, we will index just one file from the archive (movies.csv). Themovies.csvfile contains a list of 9,125 movie titles, plus a header row. Here is a truncated listing:
Open the Movie Search app
- Sign in to Lucidworks Search if it is not currently open.
- In the Lucidworks Search launcher, click the Movie Search app.
- To verify the Movie Search app is selected to display in the workspace:
- Hover over Apps
 . Movie Search is the currently selected app.
 - Review the collection picker selection at the top of the screen.
Movie_Searchis selected as the default collection for the Movie Search app, and is where Lucidworks Search will place index data.
- Hover over Apps
Configure the datasource
A collection includes one or more datasources. A datasource is a configuration that manages the import, parsing, and indexing of data into a collection.- Click Indexing
 > Index Workbench.
 - Click New.
- In the Add A New Datasource section, click Or, upload a file.
- Click Choose File.
- Navigate to the
movies.csvfile on your computer, select it, and click Open. The file name displays on the screen.
- Click Add New Datasource.
The Datasource (File Upload) configuration panel displays the default datasource ID
movies_csv-Movie_Searchand the default file IDmovies.csv. You do not have to change these values. - Enter the Description
Movies CSV file.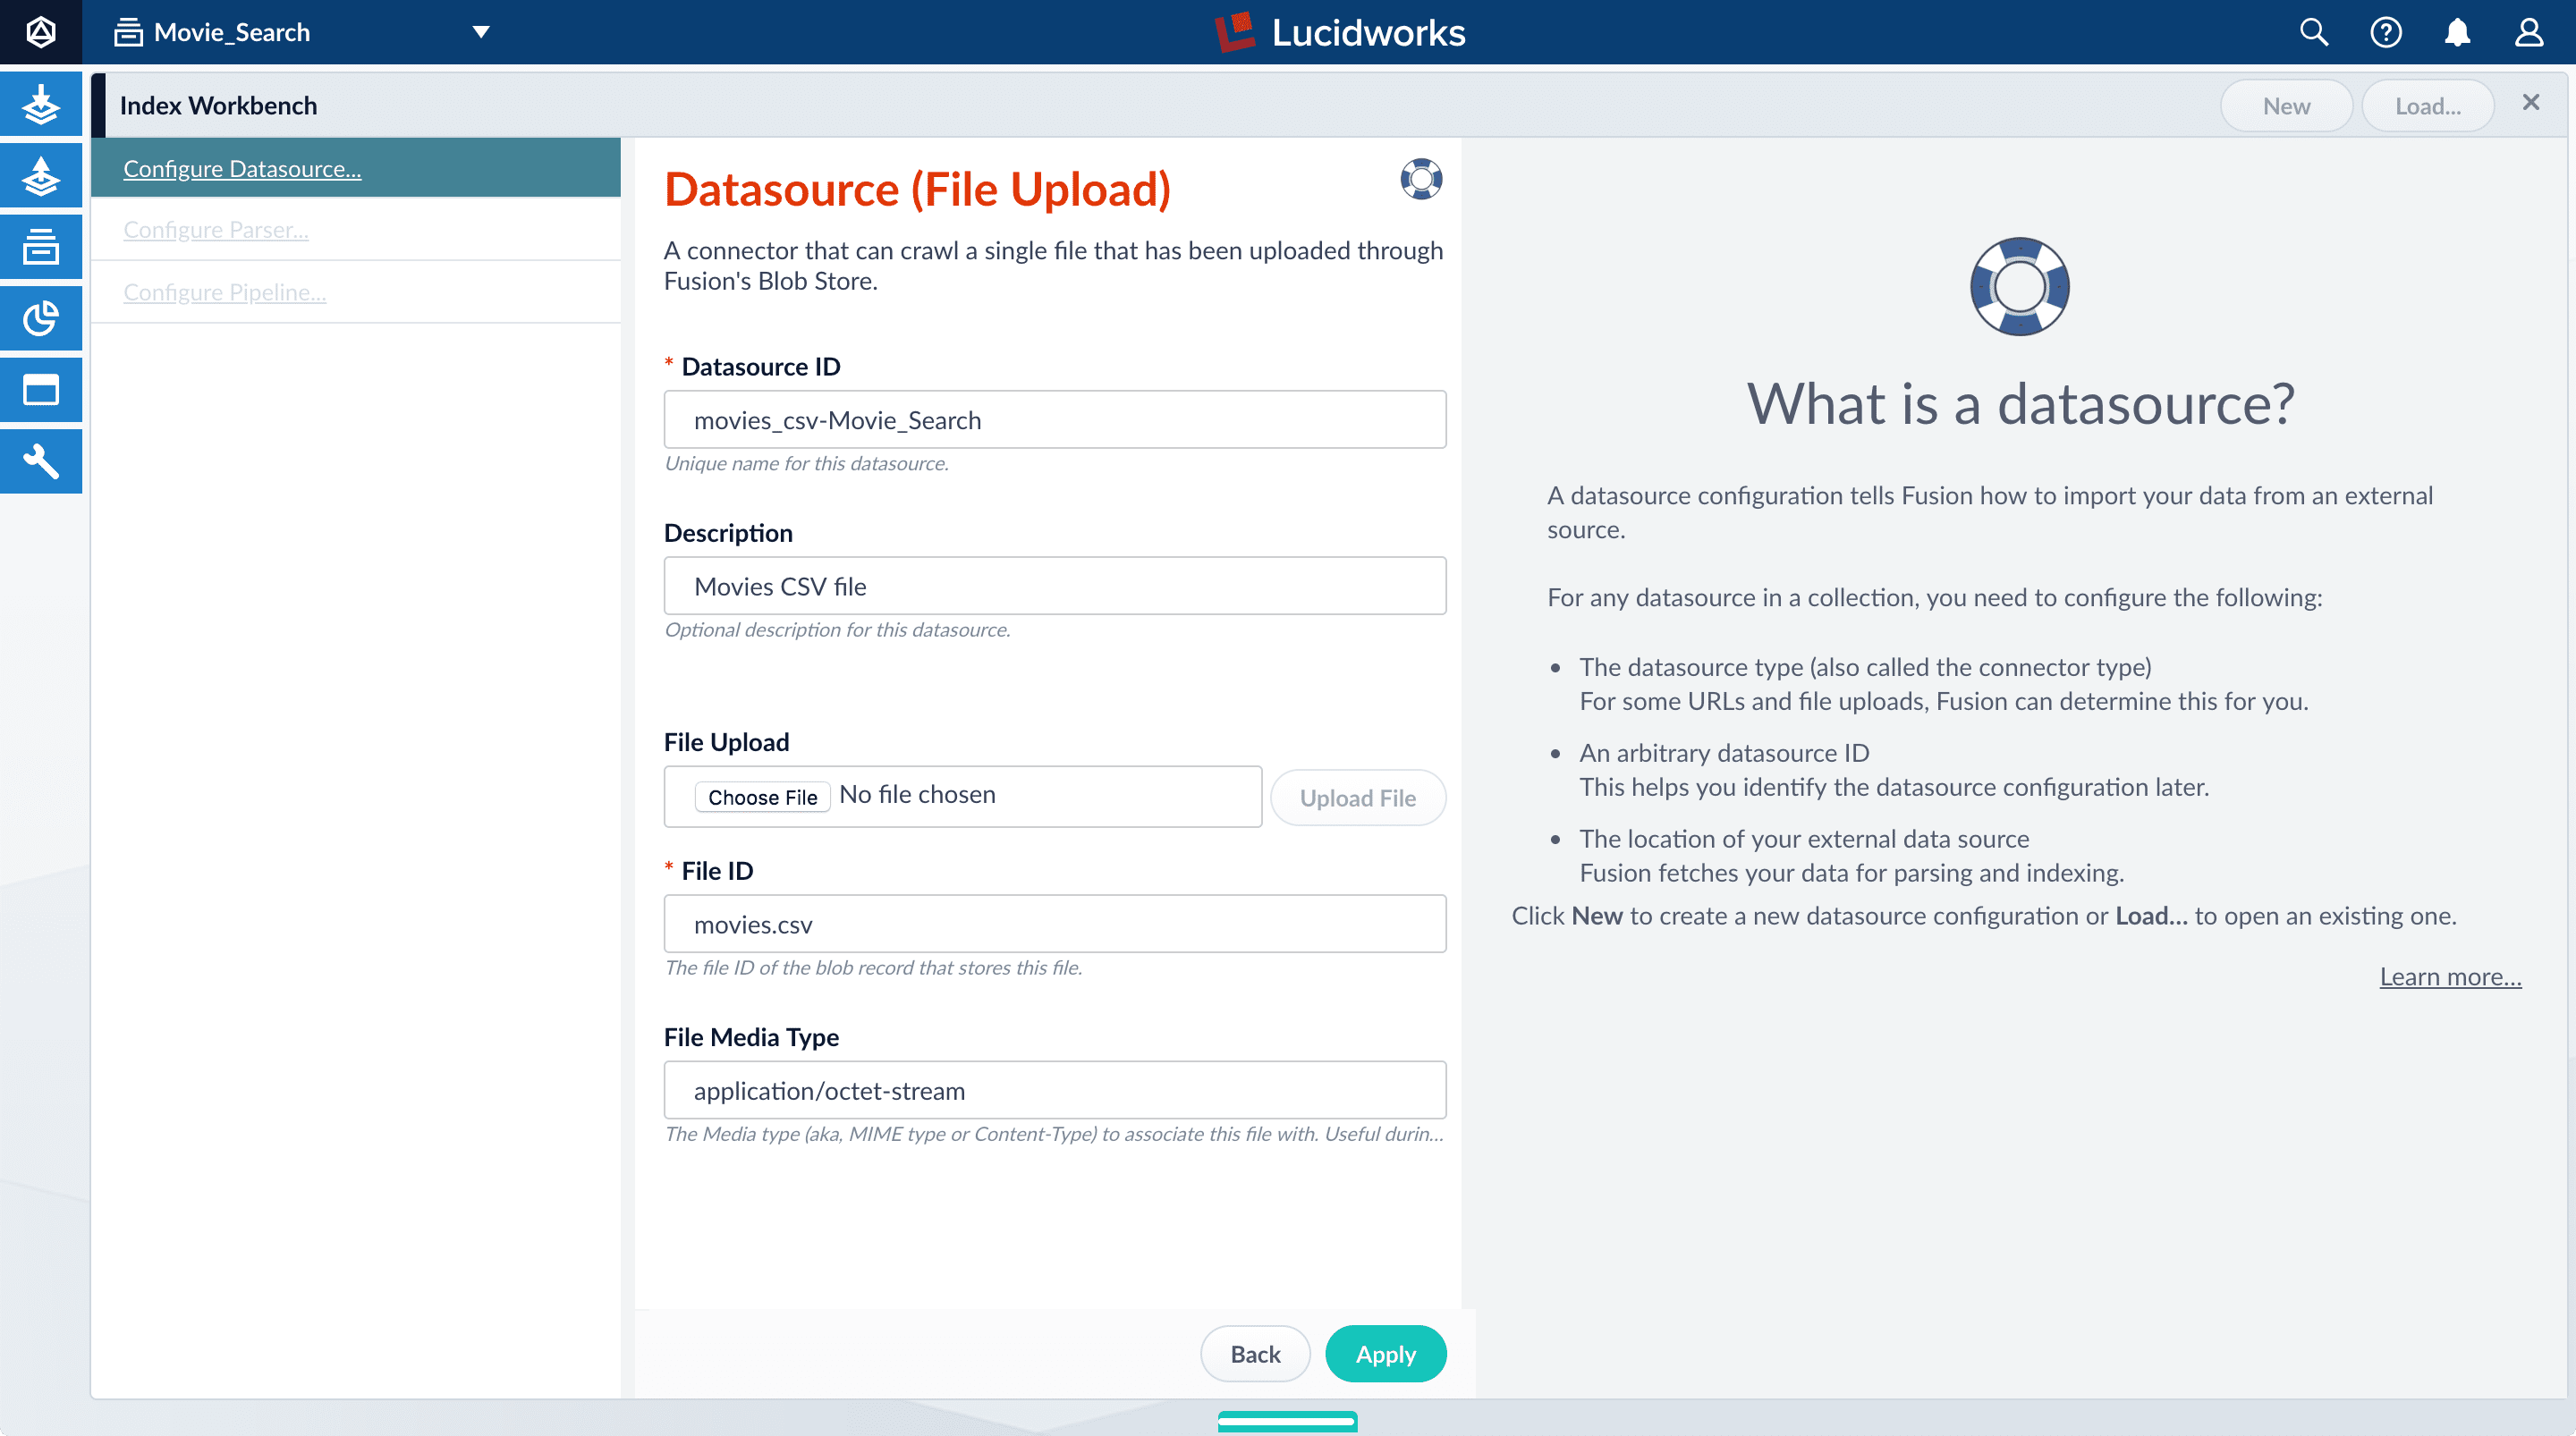
- Click Apply.
Index Workbench reads up to 20 documents into memory from the
movies.csvfile, and then displays a preview of how they would be indexed based on current parameter and field settings.
Analyze the default output
- Review the preview to inspect how Lucidworks Search interpreted the original fields:
genresbecamegenres_t(thetext_generalfield type) andgenres_s(thestringfield type). String fields are useful for faceting and sorting, while text fields are for full-text search. At this point, Lucidworks Search cannot determine whether you intend to use this field for faceting and sorting, for full-text search, or for both.- Similarly,
titlebecametitle_tandtitle_sbecause Lucidworks Search cannot determine whether you intend to use this field for faceting and sorting, for full-text search, or for both. - Like the other fields,
movieIdbecamemovieId_tandmovieId_sbecause Lucidworks Search cannot determine whether you intend to use this field for faceting and sorting, for full-text search, or for both. This might seem odd, because the original field contains numbers. But, at this stage, Lucidworks Search createstext_generalandstringfields. To use the contents of this field as an integer, you would map the field to an integer field. - Fields that begin with
_lwfields contain data that Lucidworks Search creates for its own housekeeping. You can disregard these entries.
genres, movieId, and title.Configure the index pipeline
In this section, you will:- Configure the field mappings in the index pipeline so each field has the correct data type.
- Query Data.
- Create a new field from part of an existing one.
- Trim a field’s value.
Configure field mappings
Field mappings control the data types of documents. Lucidworks Search uses field name suffixes to determine field types. If the field name:- Contains a suffix, precise analysis and search occurs.
- Does not contain a suffix, Lucidworks Search stores the data as a string field and treats it as an unanalyzed whole.
- In the list of index pipeline stages, click Field Mapping to open the Field Mapping stage configuration panel.
- In Field Translations, click Add
 to create a new field mapping rule.
 - In the Source Field, enter
genres. - In the Target Field, enter
genres_ss. The field suffix_ssmeans that this field is a multi-valued string field.Lucidworks Search currently interprets this field as having a single value. The field actually contains a pipe-delimited array of values. When you finish configuring field mappings, subsequent steps will guide you to change the value type. - In Operation, select m*ove.
The move operation means that the resulting document contains
genres_ssinstead ofgenres.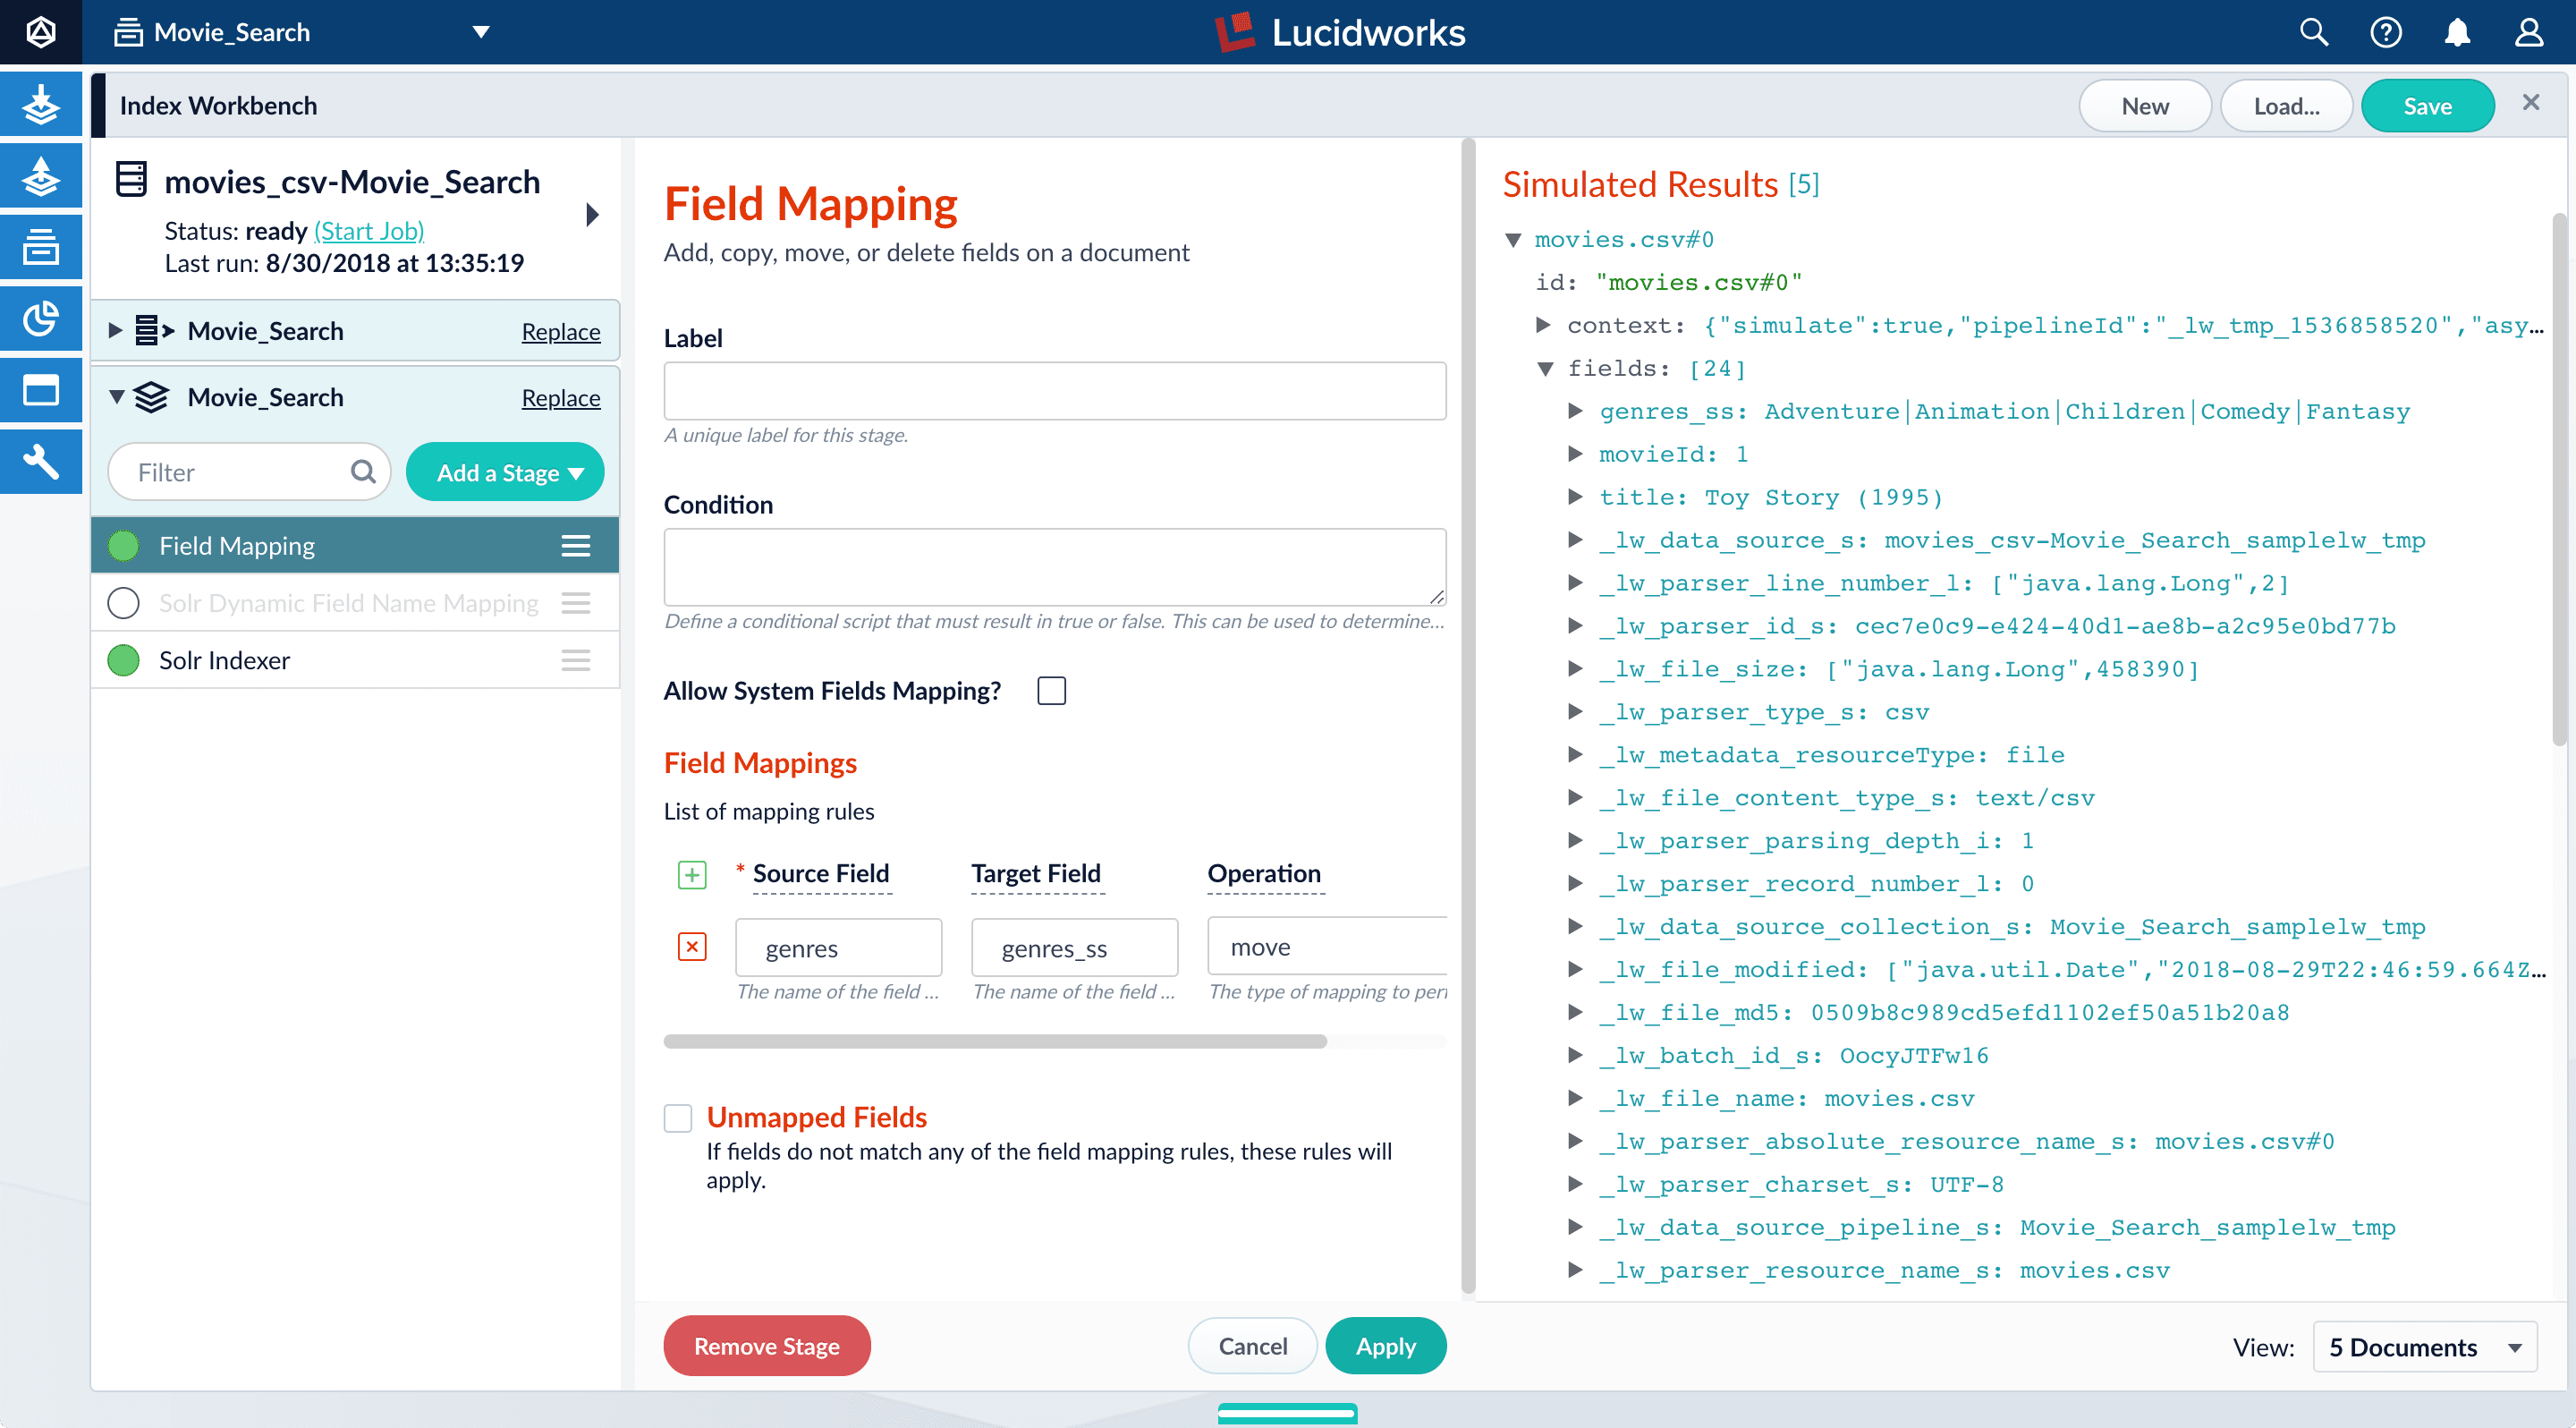
- Click Apply. The new configuration runs the simulation again and updates the preview panel contents, changing the field name to
genres_ss. Before: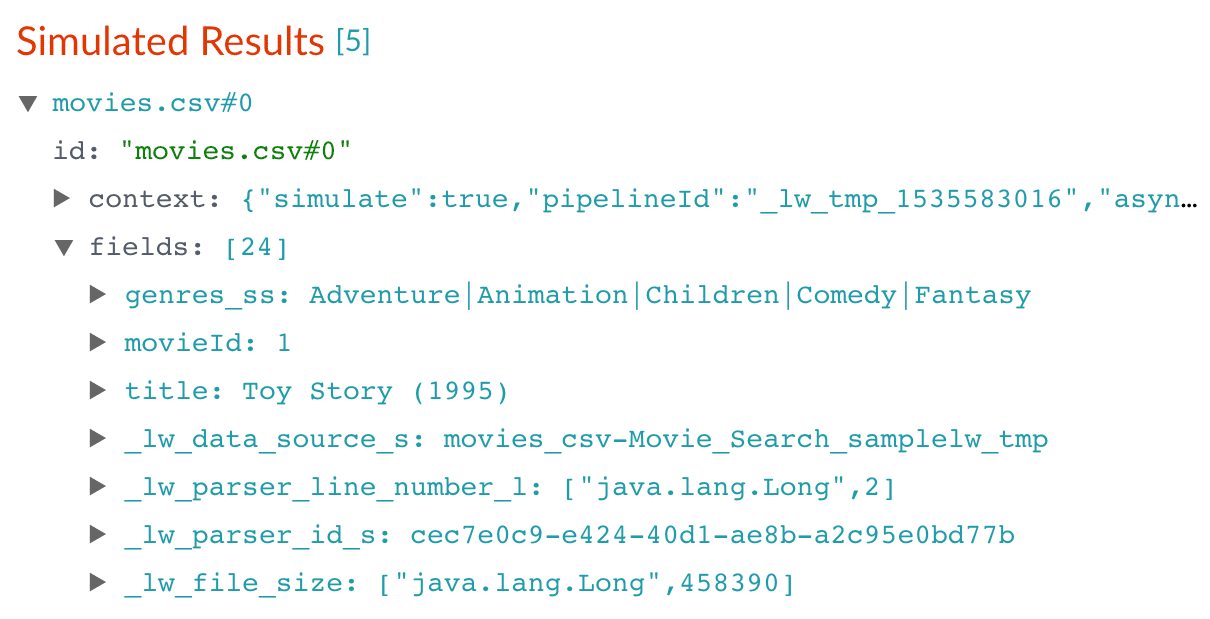
- Click Add to add more field mapping rules as follows:
- The
movieIdfield is a unique document identifier. Select to copy it into the document’sidfield. - The
titleshould be searchable as a text field, so select to move it to thetitle_txtfield. The field mappings display as: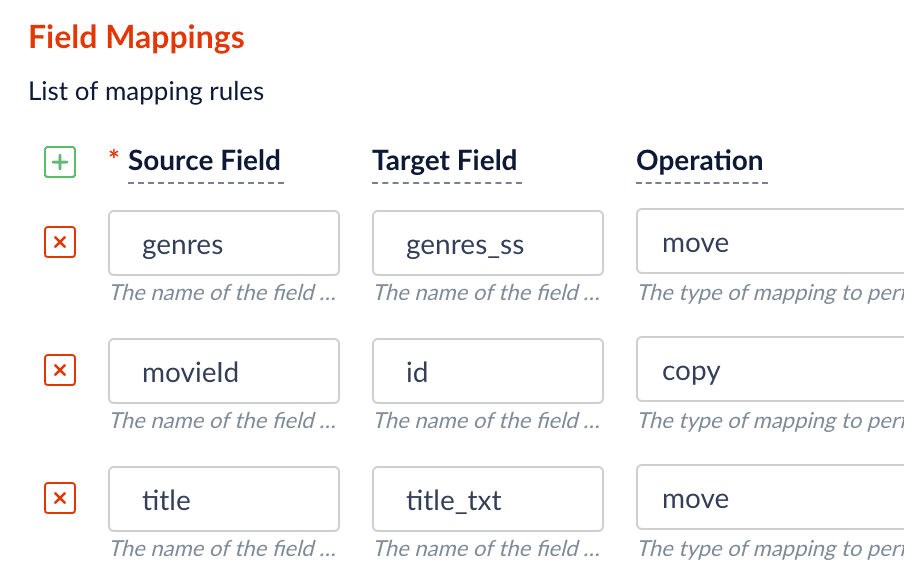
- The
- Click Apply. The results using those field mappings display in the preview panel.
Before:
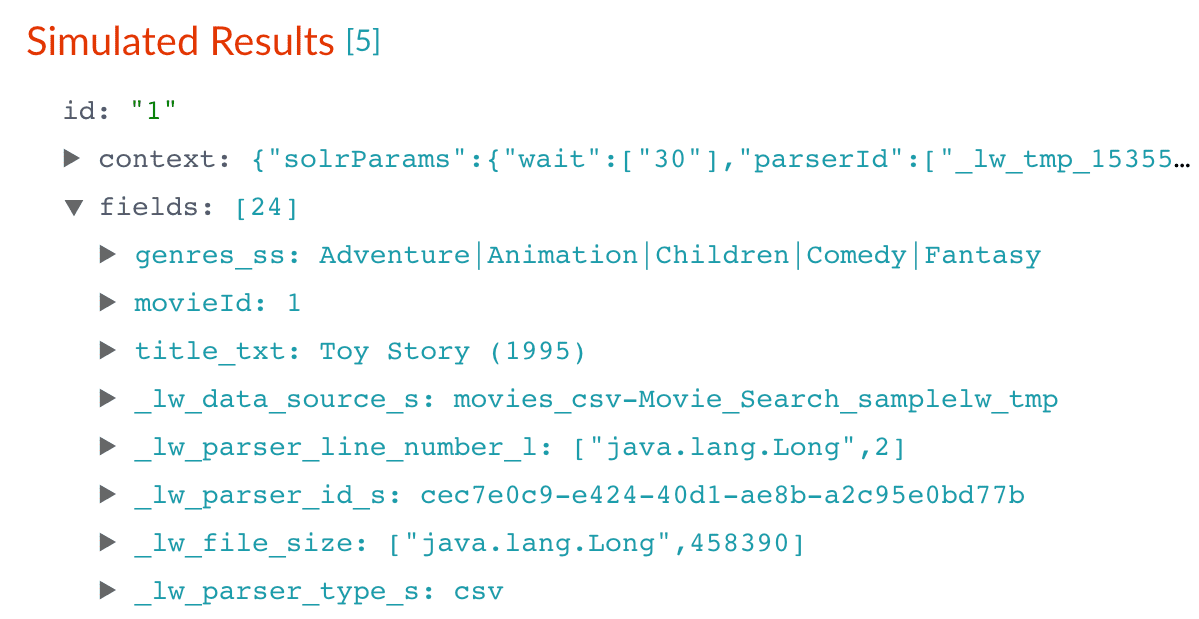
- In the upper right, click Save. The changes to the index pipeline make the document ID more useful and the full text of the movie titles searchable.
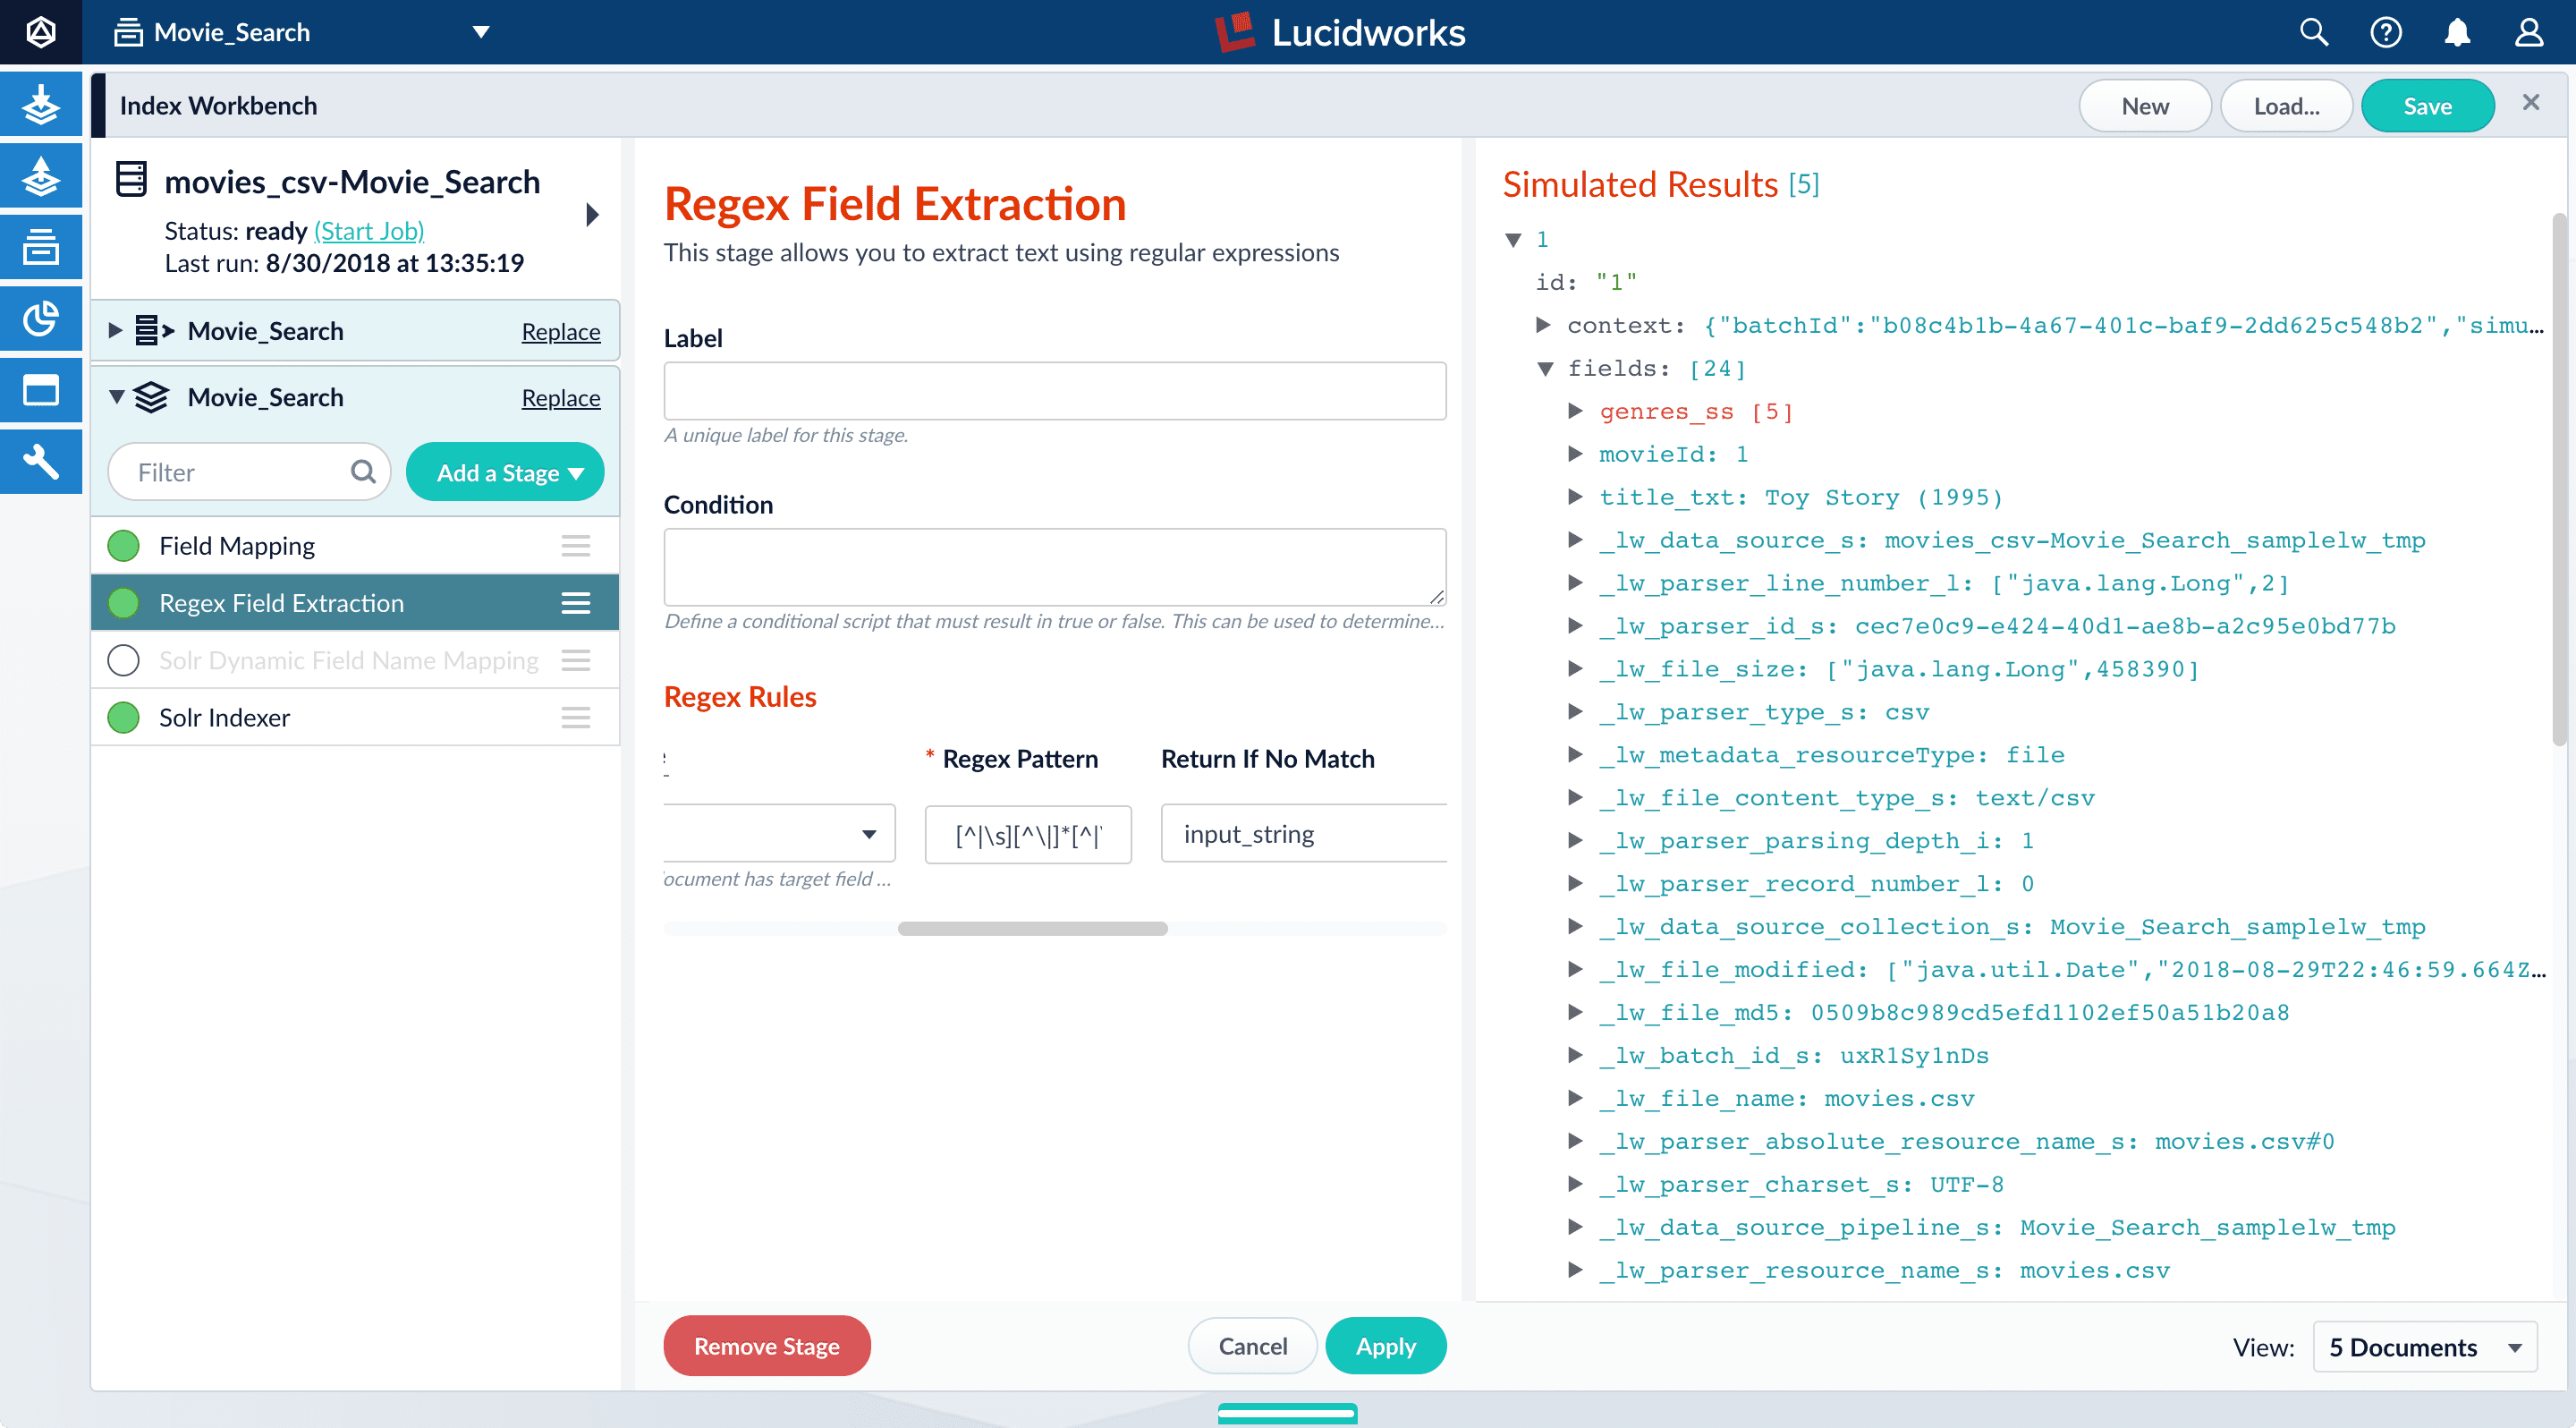
Split a multivalue field
Thegenres_ss field has been parsed as a single value field, but it is really a pipe-delimited array of values. To split this field into its constituent values, add a Regex Field Extraction stage to your index pipeline. This stage uses regular expressions to extract data from specific fields. It can append or overwrite existing fields with the extracted data, or use the data to populate new fields.- Click Add a stage.
- Scroll down to Field Transformation and select Regex Field Extraction.
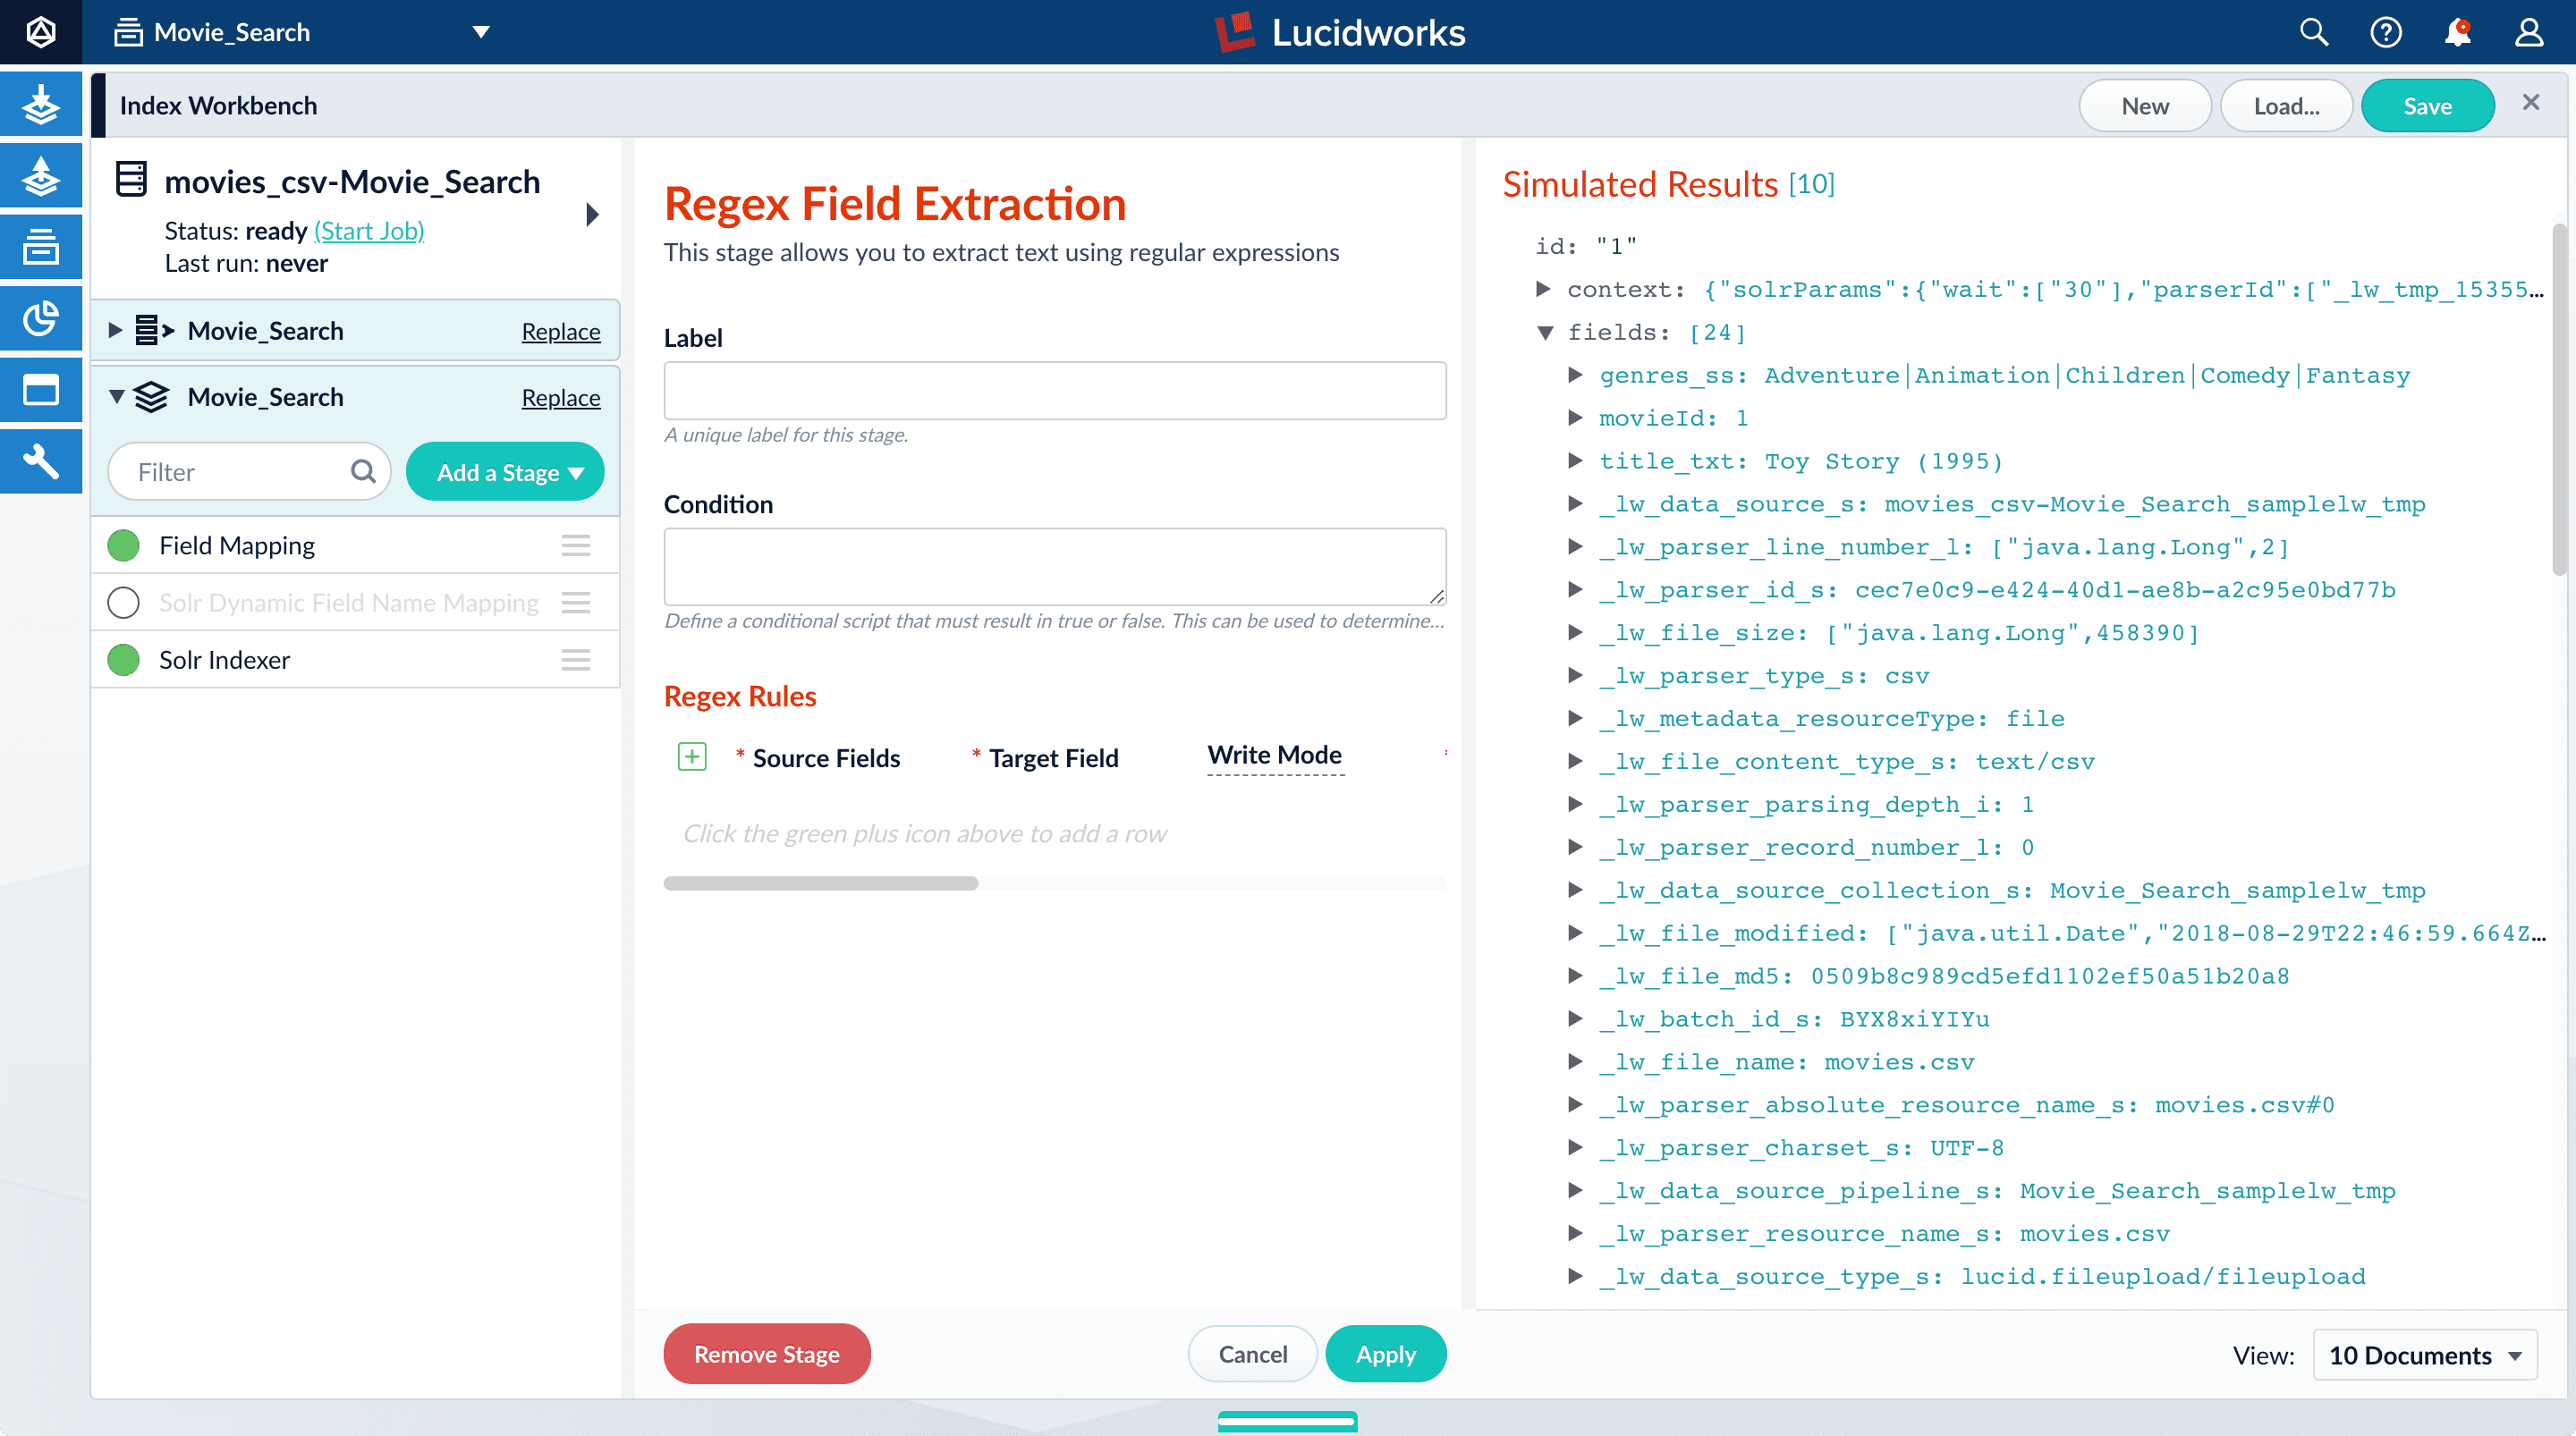
- In Regex Rules, click Add .
- On the new line, hover over the
<img className="inline-image" alt="...]under Source Fields, and click Edit [Edit, 30px” src=“/assets/images/4.0/icons/edit-icon.png”/>. - In the Source Fields screen, click Add .
- Enter
genres_ssand click Apply. - In Target Field, enter
genres_ss. - In the Write Mode field, select overwrite.
- In the Regex Pattern field, paste this expression:
The first bracketed term in the regex matches any character that is not a vertical bar or a space. The second term matches any character that is not a vertical bar, zero or more times. The last term matches any character that is not a vertical bar, zero or more times.
- In Return If No Match, select
input_string. - Click Apply. Initially, your data does not change.
- In the list of index pipeline stages, click and drag the Regex Field Extraction stage so it processes after the Field Mapping stage:
genres_ssfield: Before: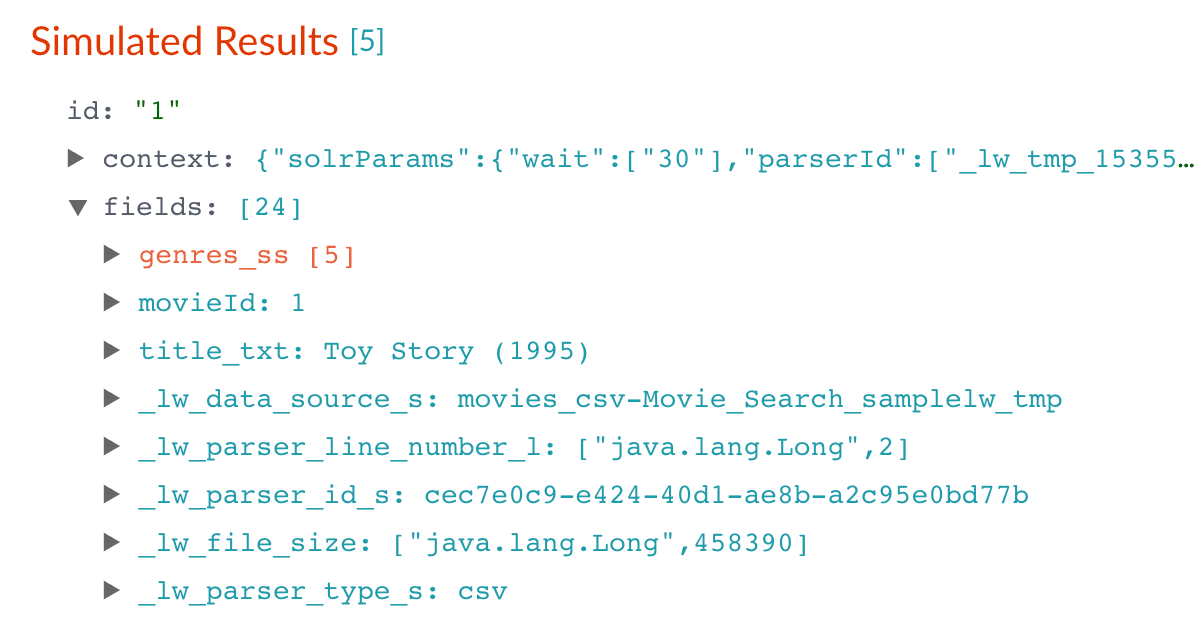
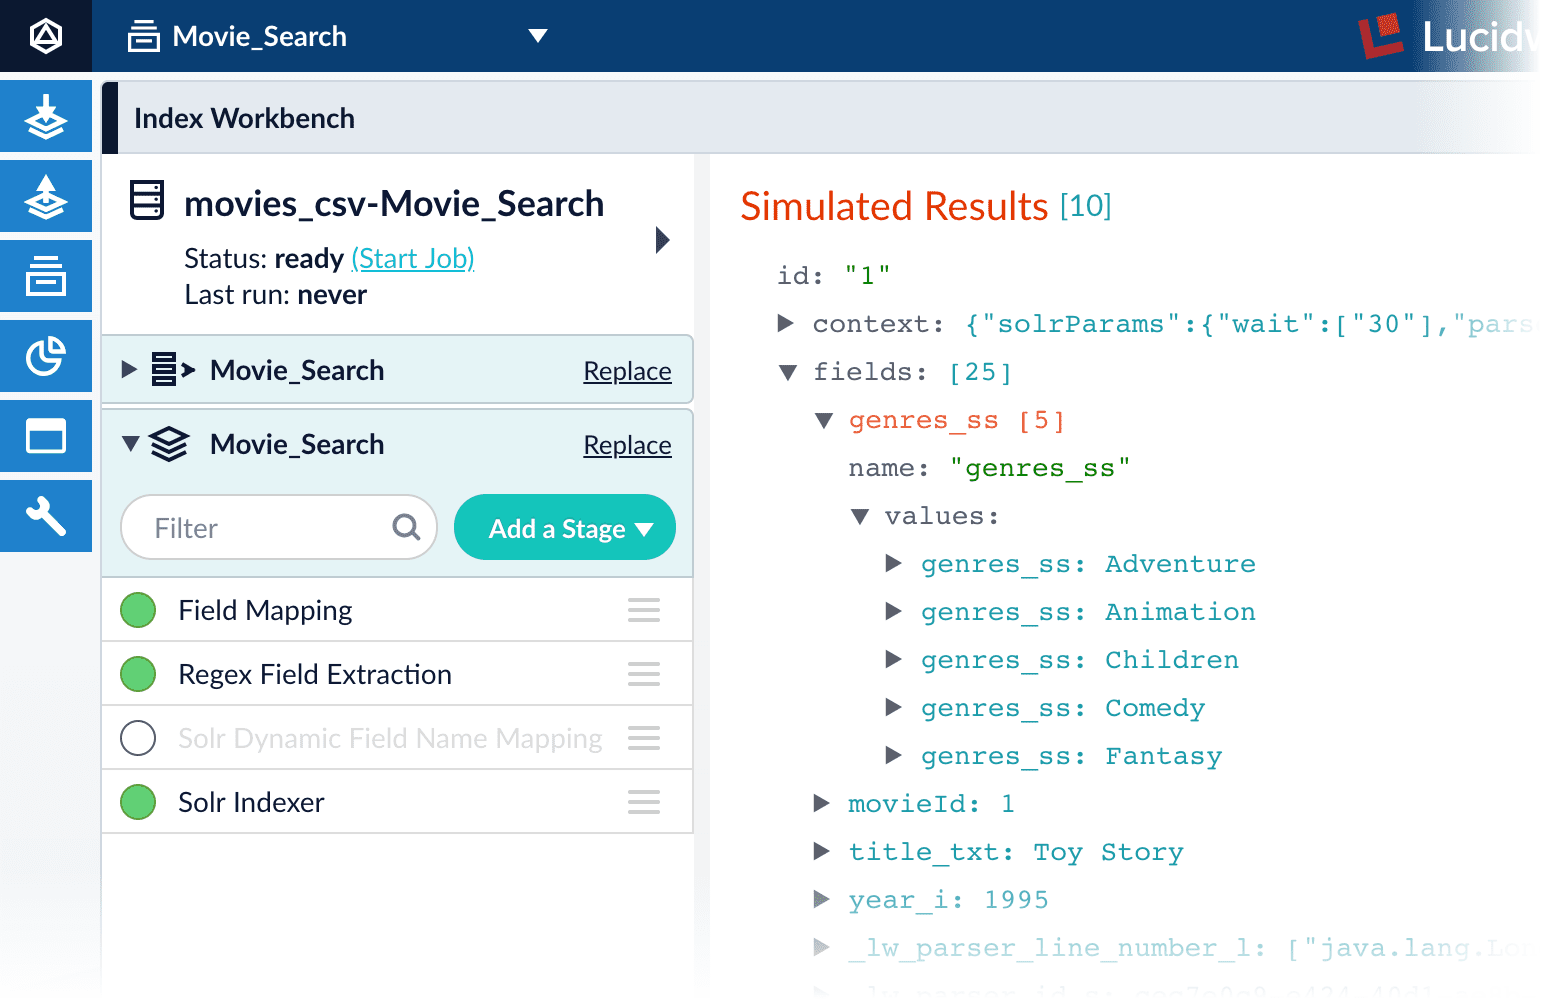
- To view the values of the
genres_ssfield, click the right triangle to expand it and
 valuesunder it: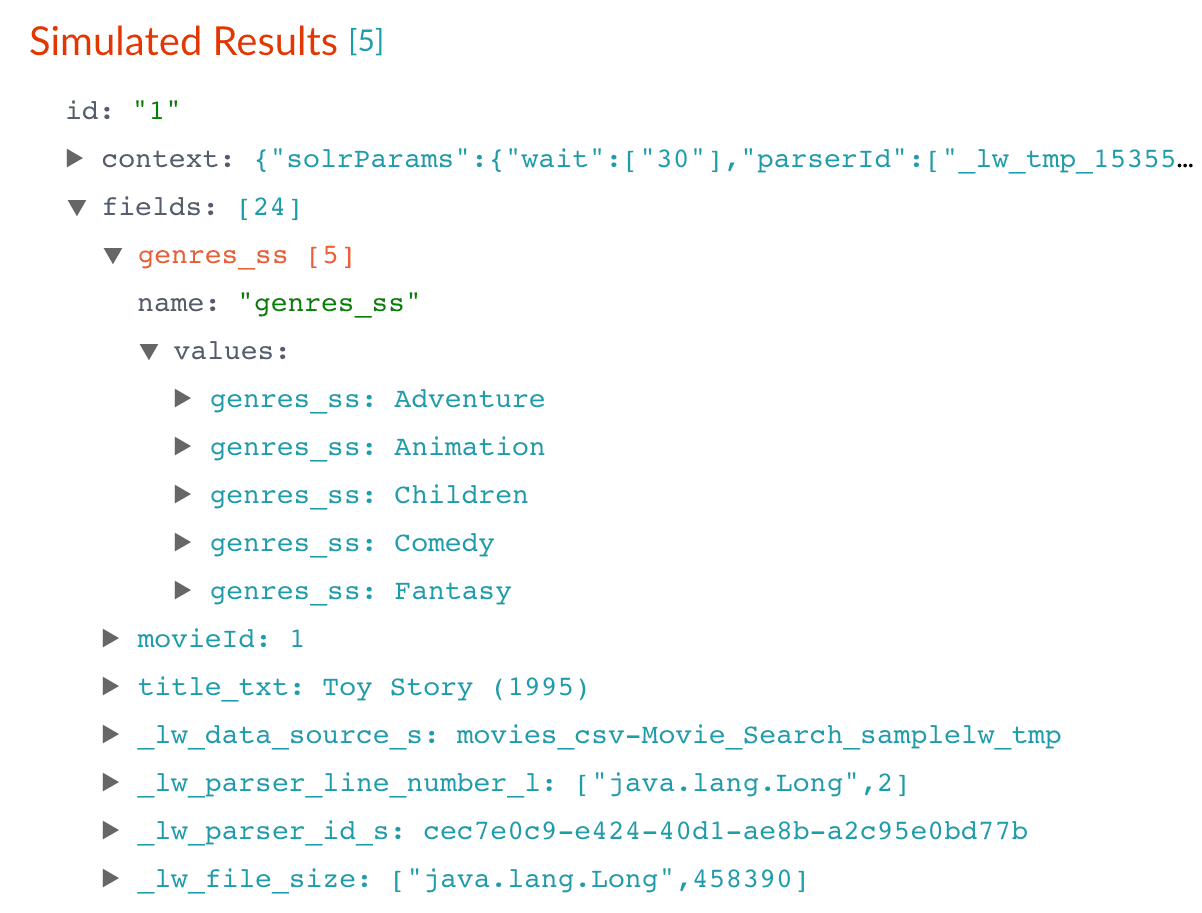
- In the upper right, click Save to save the changes to the index pipeline.
Create a new field from part of an existing one
Currently, thetitle_txt field also contains the year in which the movie was released. To make the field more useful for faceting, the year needs to be a separate field. The Regex Field Extraction stage will separate the data.- In the list of index pipeline stages, click Regex Field Extraction.
- In the Regex Field Extraction configuration panel, under Regex Rules, click Add .
- On the new line, hover over the
<img className="inline-image" alt="...]under Source Fields, and then click Edit [Edit, 30px” src=“/assets/images/4.0/icons/edit-icon.png”/>. - In the Source Fields screen, click Add .
- Enter
title_txtand click Apply. - In Target Field, enter
year_i. The_isuffix indicates an integer point field (specifically, that the field is a dynamic field with a point integer,pint, field type). Lucidworks Search creates this new field when the regular expression matches the contents of the source field. - In the Regex Pattern field, paste this expression to match the digits inside the parentheses at the end of the
title_txtvalue: - In the Regex Capture Group field, enter
1. This lets the index pipeline stage transfer the year into theyear_ifield. - Click Apply.
Now the preview includes the new
year_ifield: Before: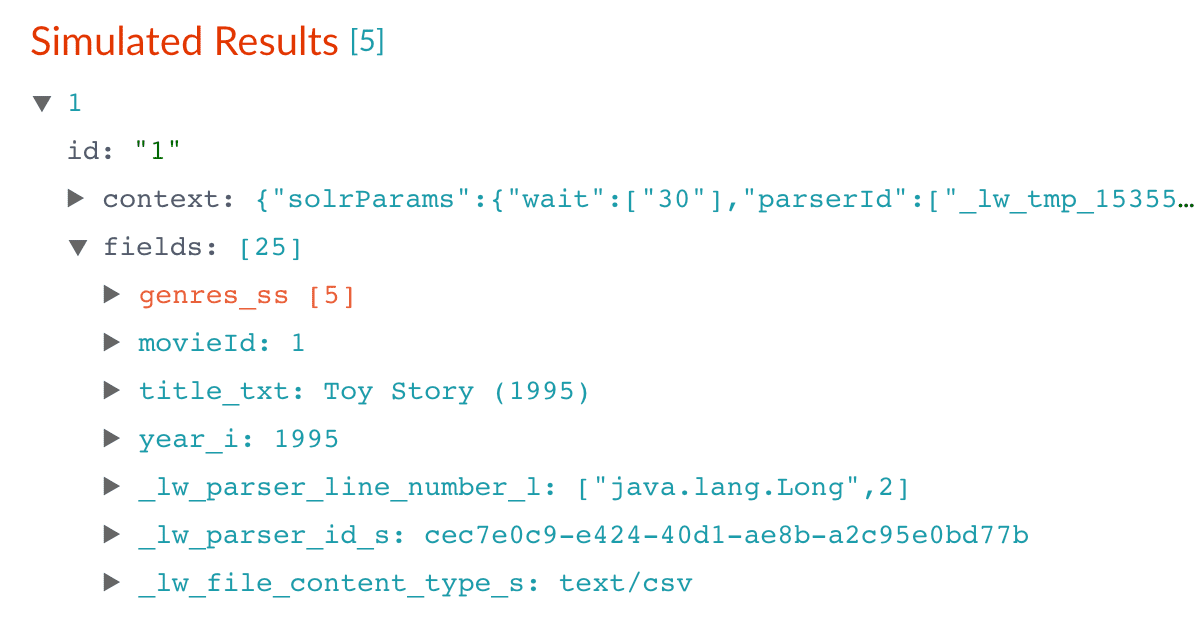
- In the upper right, click Save to save the changes to the index pipeline.
Trim a field’s value
Thetitle_txt field still includes the year of the film’s release, which you have extracted into its own field, year_i. To refine the field for faceting, trim year_i from the title_txt values so only the title text remains.- In the list of index pipeline stages, click Regex Field Extraction.
- In the Regex Field Extraction configuration panel, under Regex Rules, click Add .
- On the new line, hover over Source Fields and click Edit
 .
. - In the Source Fields screen, click Add .
- Enter
title_txtand click Apply. - In Target Field, enter
title_txt. - In the Write Mode field, select
overwrite. - In the Regex Pattern field, paste this expression to match the digits inside the parentheses at the end of the
title_txtvalue: - In the Regex Capture Group field, enter
1. - Click Apply.
The preview pane displays the
title_txtfield with only the title string: Before:

- In the upper right, click Save to save the changes to the index pipeline.
Run the datasource job
In the upper left, click Start job to index the data using the configured index pipeline.movies.csv file using the configuration you just saved.Your datasource job is finished when the Index Workbench displays Status: success in the upper left. If the status does not change, click to return to the launcher and relaunch your app to refresh the status.Close panels you no longer need open
If you do not manually close each panel, Lucidworks Search opens panels beside already open panels. Click CloseReindex the datasource
Documents are associated with a collection through the name of the datasource, which is stored as a value in the_lw_data_source_s field.For various reasons, you may wish to remove all documents associated with a datasource from a collection before using CrawlDB to add relevant documents back to the collection. This process is known as reindexing.- Navigate to Indexing > Datasources.
- Select the datasource name.
- Click Clear Datasource. This removes all documents with the selected datasource name in the
_lw_data_source_sfield. - When the documents are removed, repeat the steps in Configure the index pipeline to reindex the data.
Summary
The parts of this tutorial so far have guided you to:- Move 9,125 movie listings from the MovieLens database into Lucidworks Search
- Customize the data type for each field
- Split multivalued fields to treat its values individually
- Create a new field that contains partial contents of a different field
- Trimmed the content of the original multivalue field
Query Data
Query Data
This topic details how to use Query Workbench to configure search results, including faceting. Facets are categories or features offered as filters within a search results page.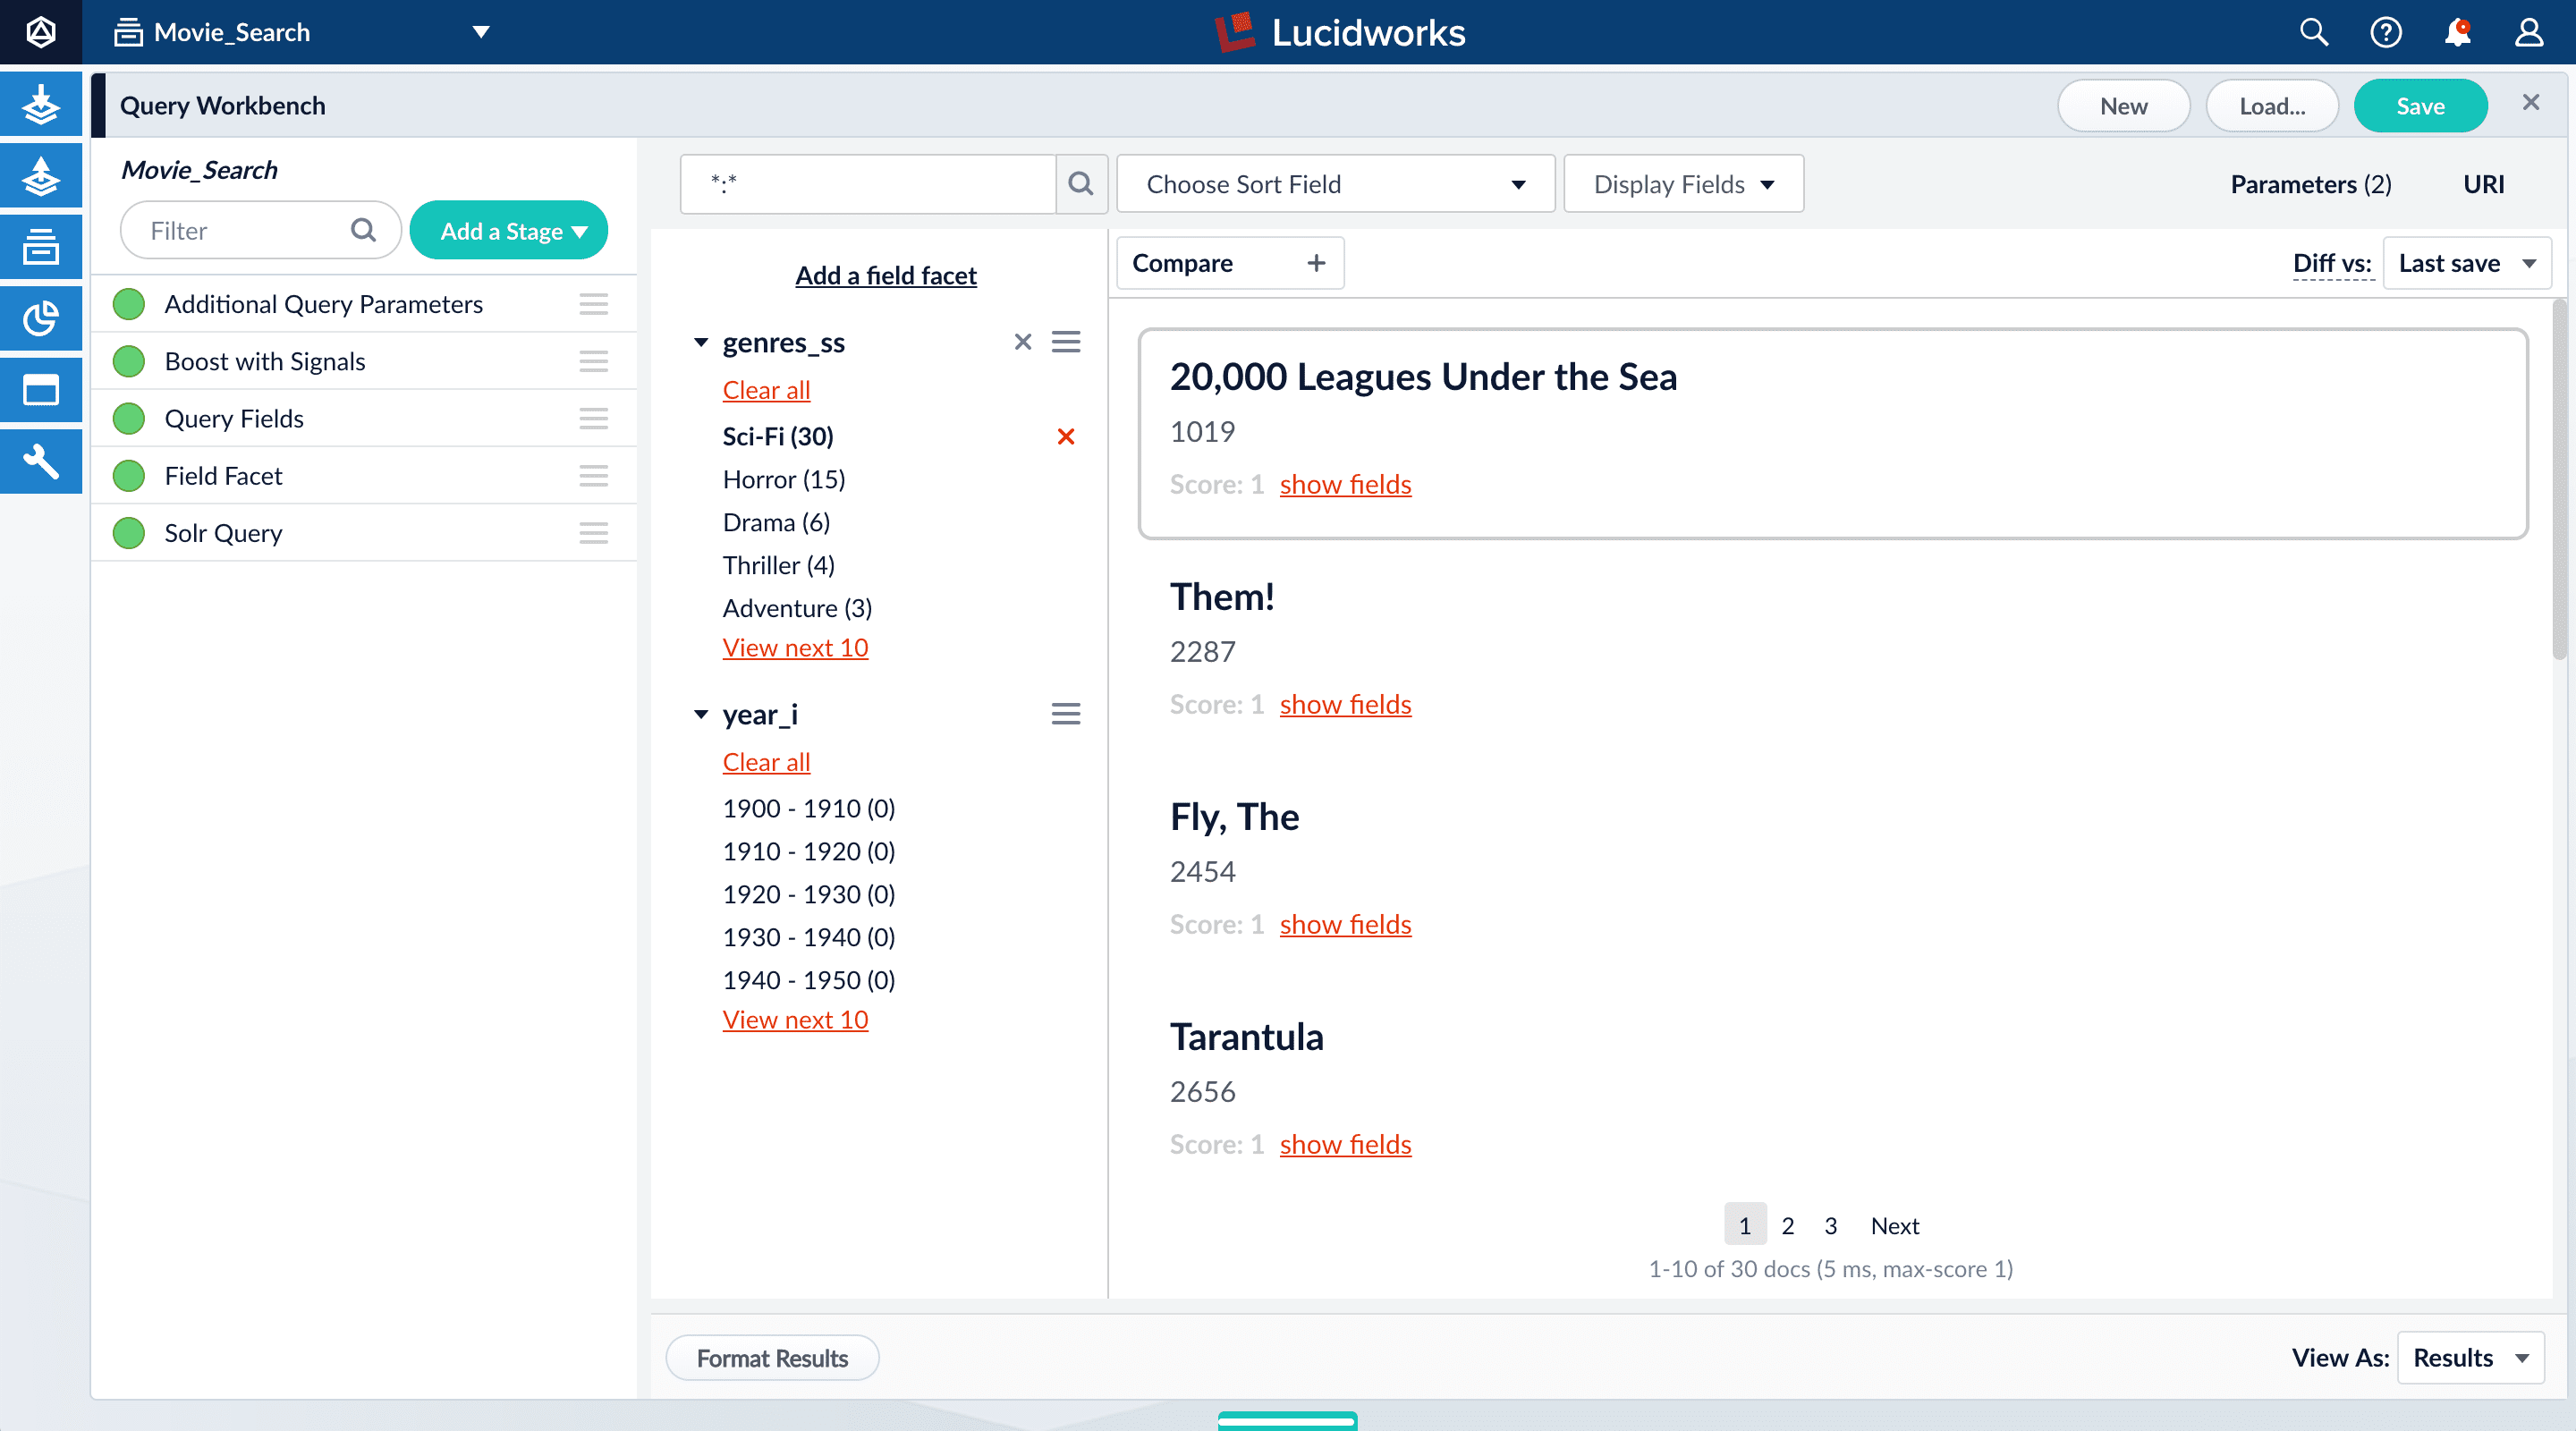
Before you begin
To perform the steps in this part of the tutorial, you must first complete Part 2 - Index Data.The dataset created in the previous sections of the tutorial has three fields that users of your search application might find relevant:genres_ss. A list of one or more genre labels.title_txt. The name of the movie.year_i. The movie’s year of release.
- Fields with the suffix
_ss(multivalued string fields) contain one or more string values. String fields require an exact match between the query string and the string value stored in that field. - Fields with the suffix
_txt(text fields) contain text. Text fields allow for free text search of the field contents. For example, because the movie titles are stored in a text field, a search on the word “Star” will match movies titled “Star”, “A Star is Born”, all movies in the Star Wars and Star Trek franchises, as well as “Dark Star”, “Lone Star”, and “Star Kid”. - Fields with the suffix
_i(point integer fields) contain integer values. Numeric fields allow range matches as well as exact matches, and point integer fields allow efficient comparisons between the field’s values and the search criteria.
Explore search results
Query Workbench lets you configure a query pipeline and preview the search results it produces. A query pipeline converts a free text query submitted to your search application into a structured query for Solr.- Sign in to Lucidworks Search if it is not currently open.
- In the Lucidworks Search launcher, click the Movie Search app.
- Click Querying
 > Query Workbench.
Perform a search
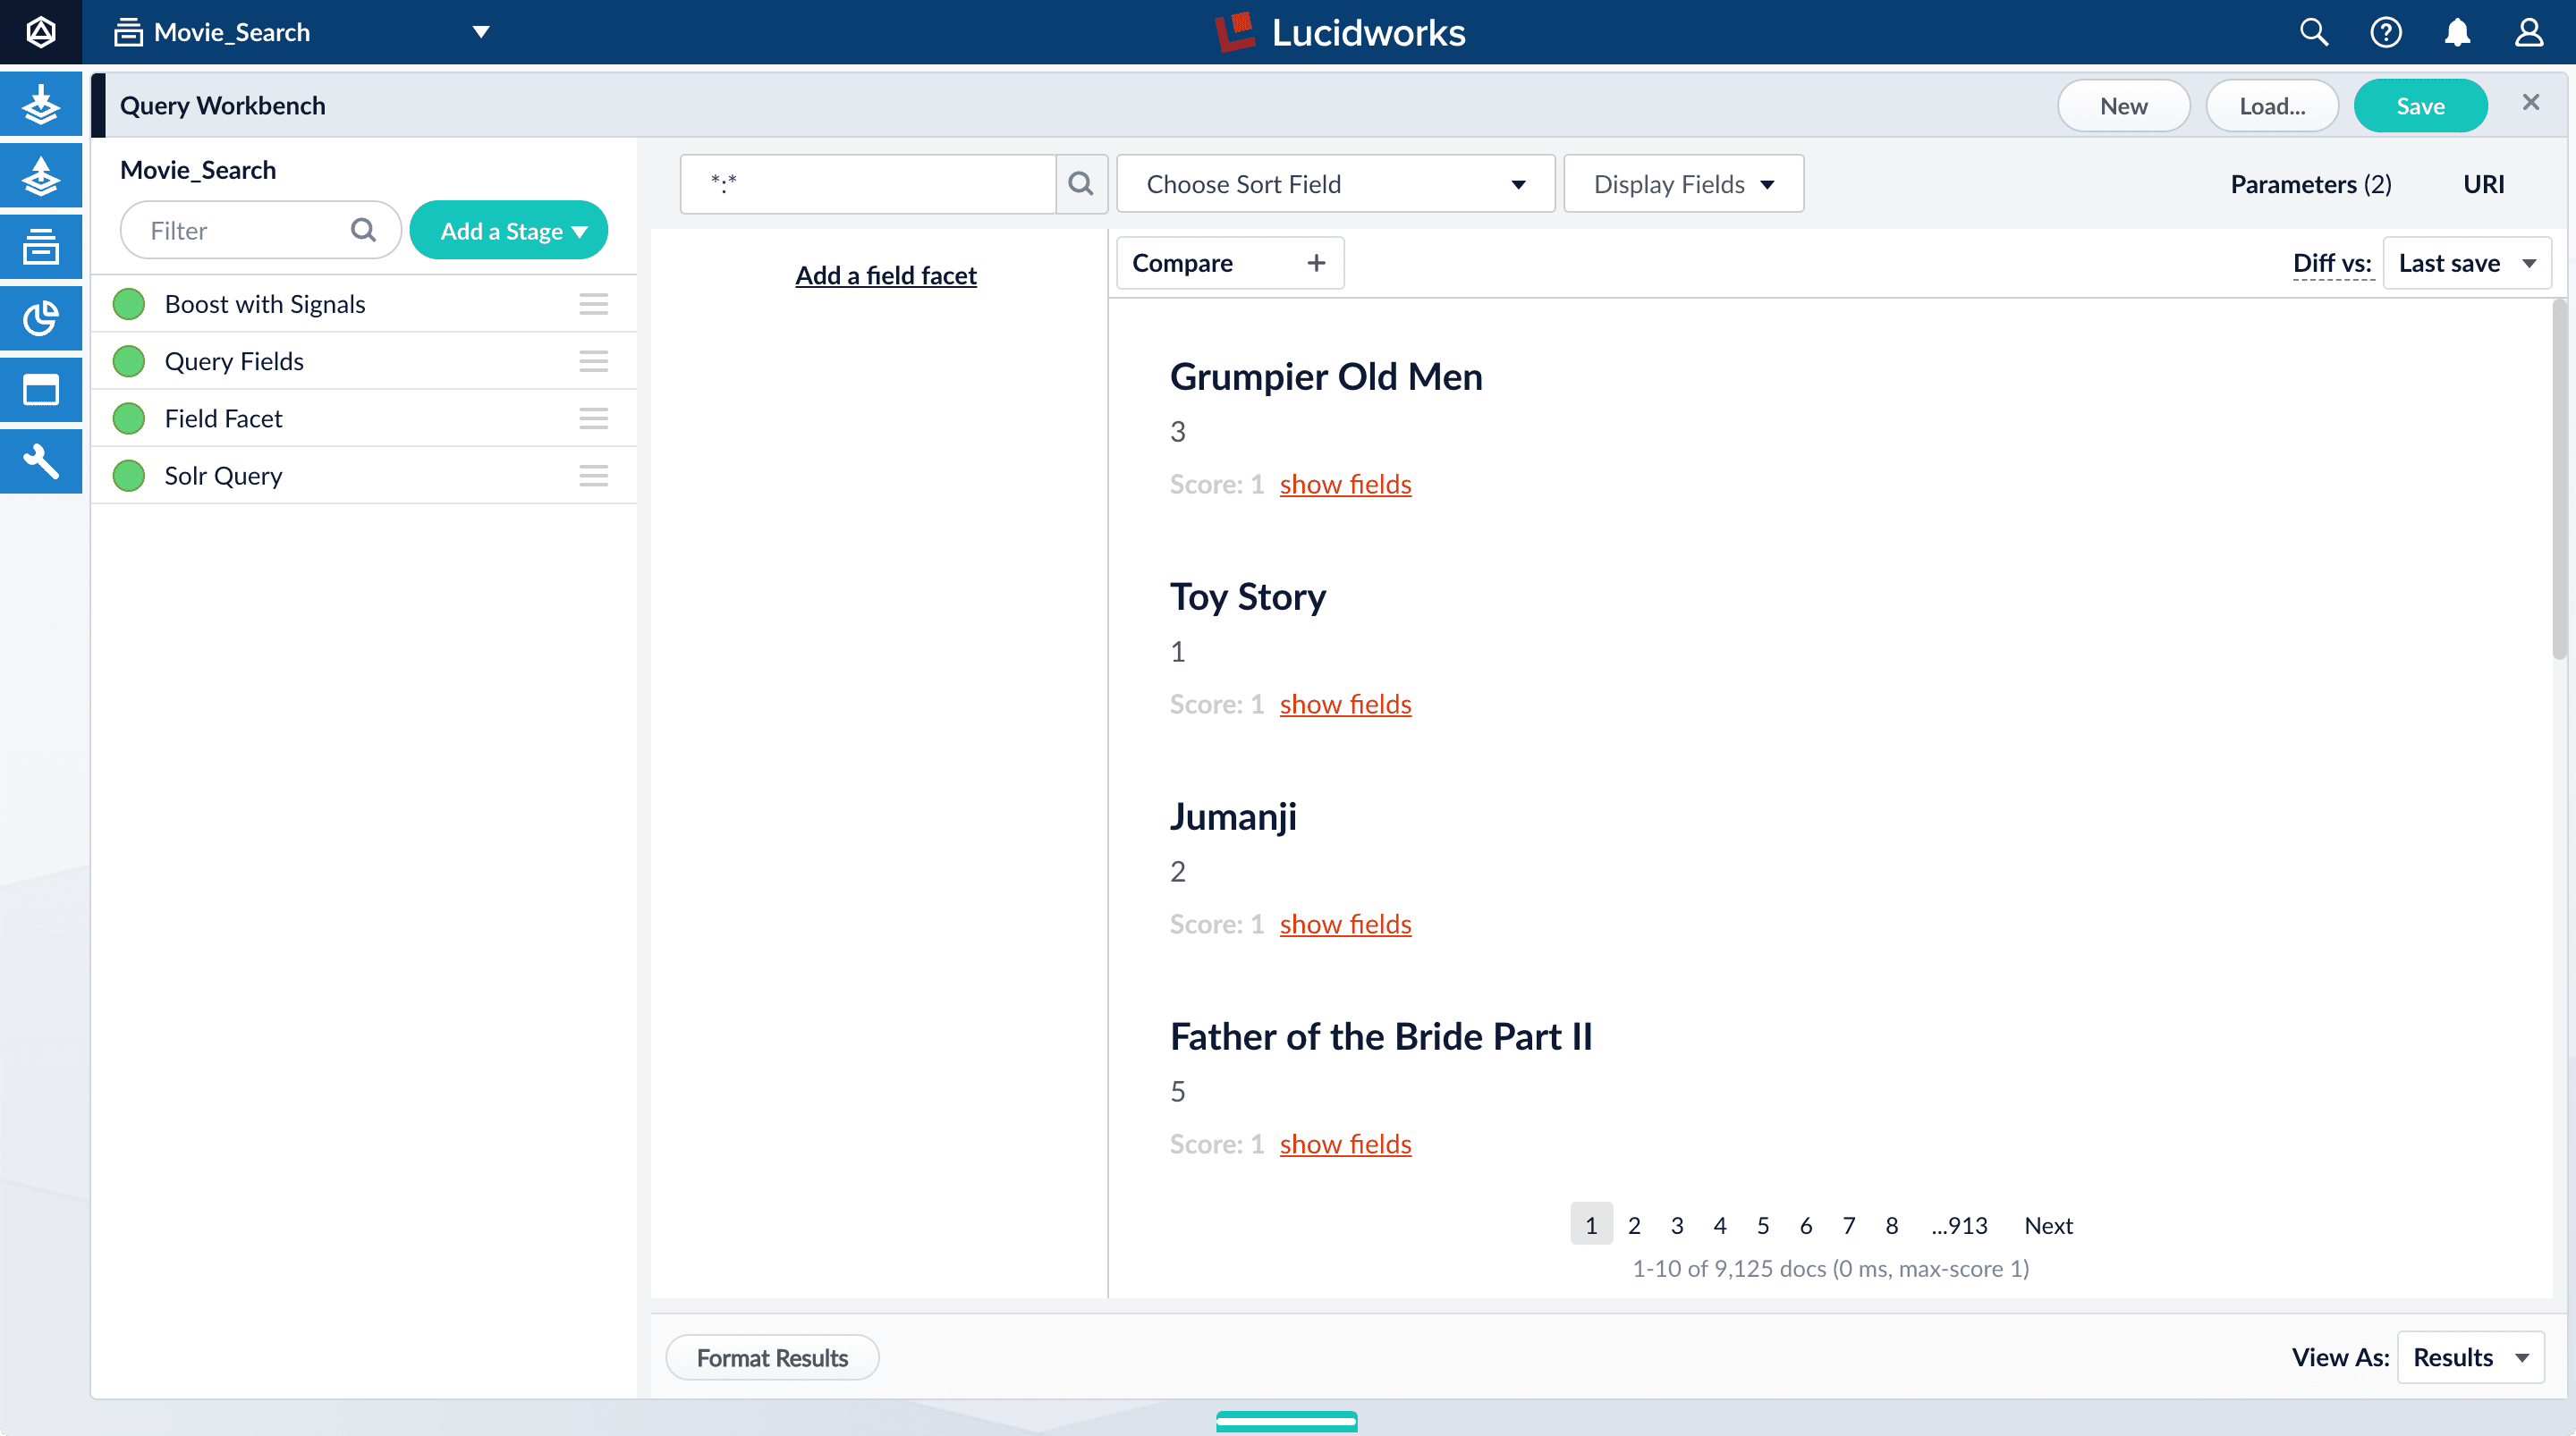
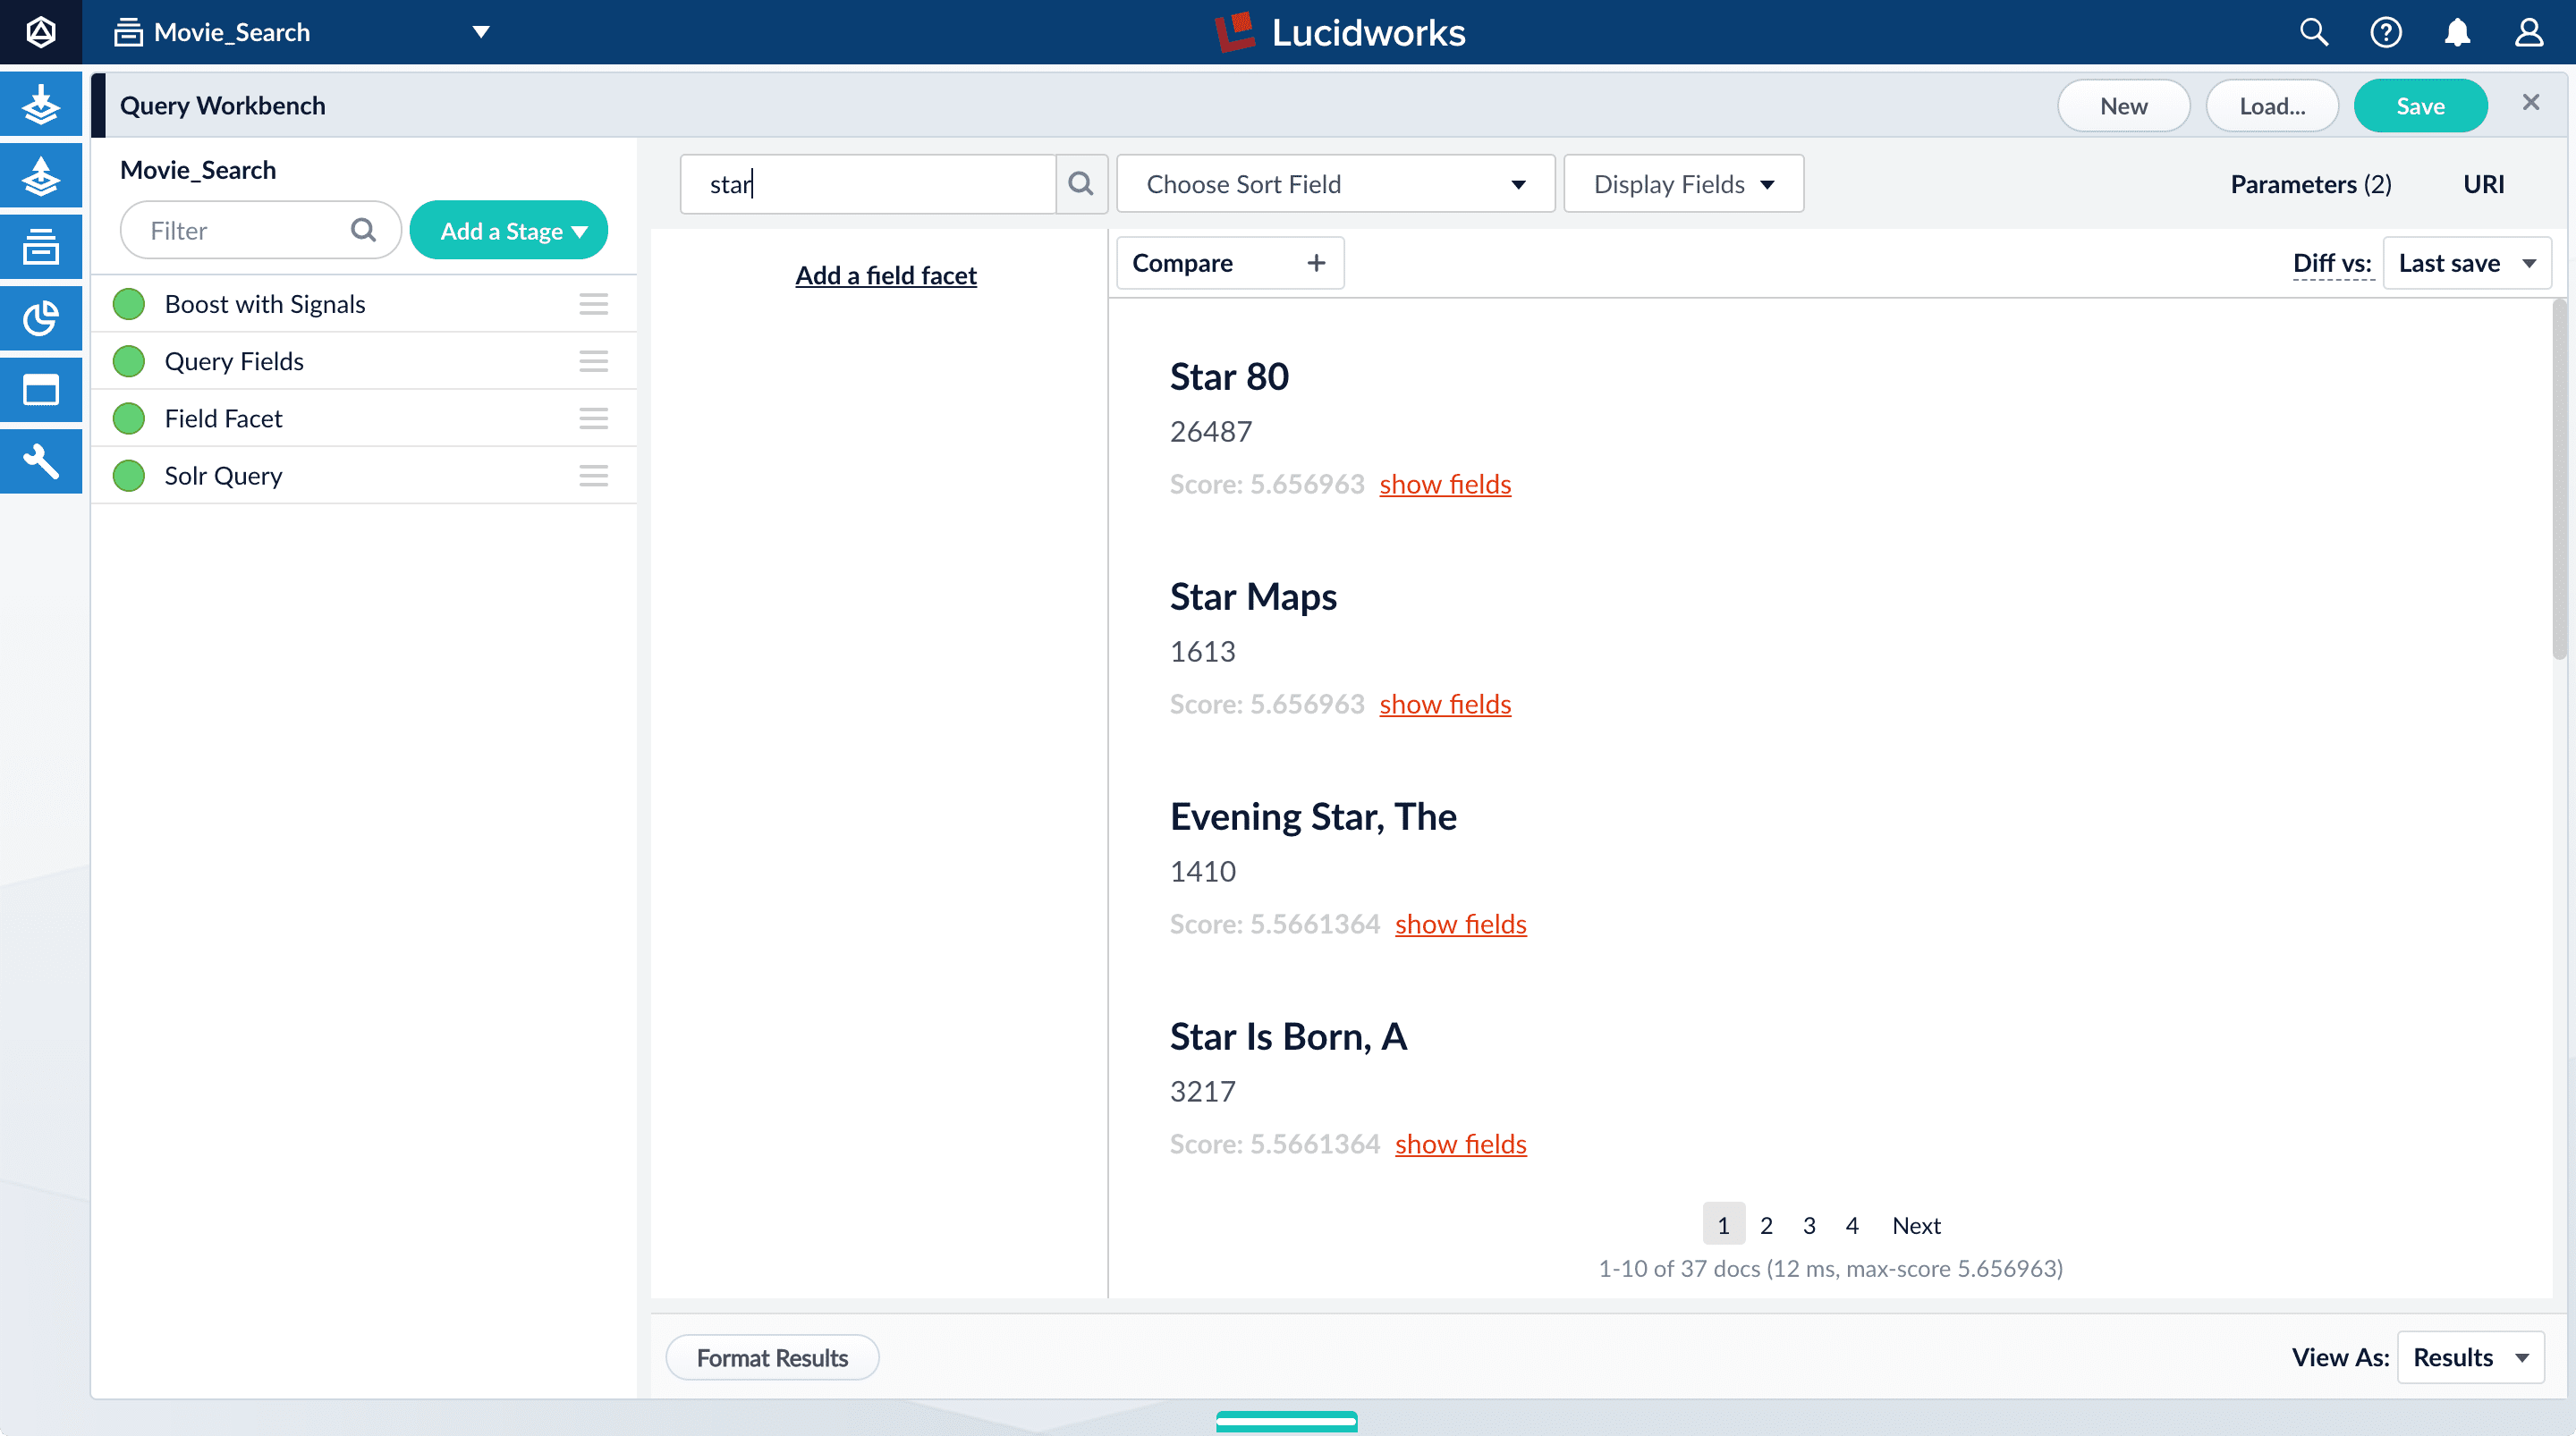
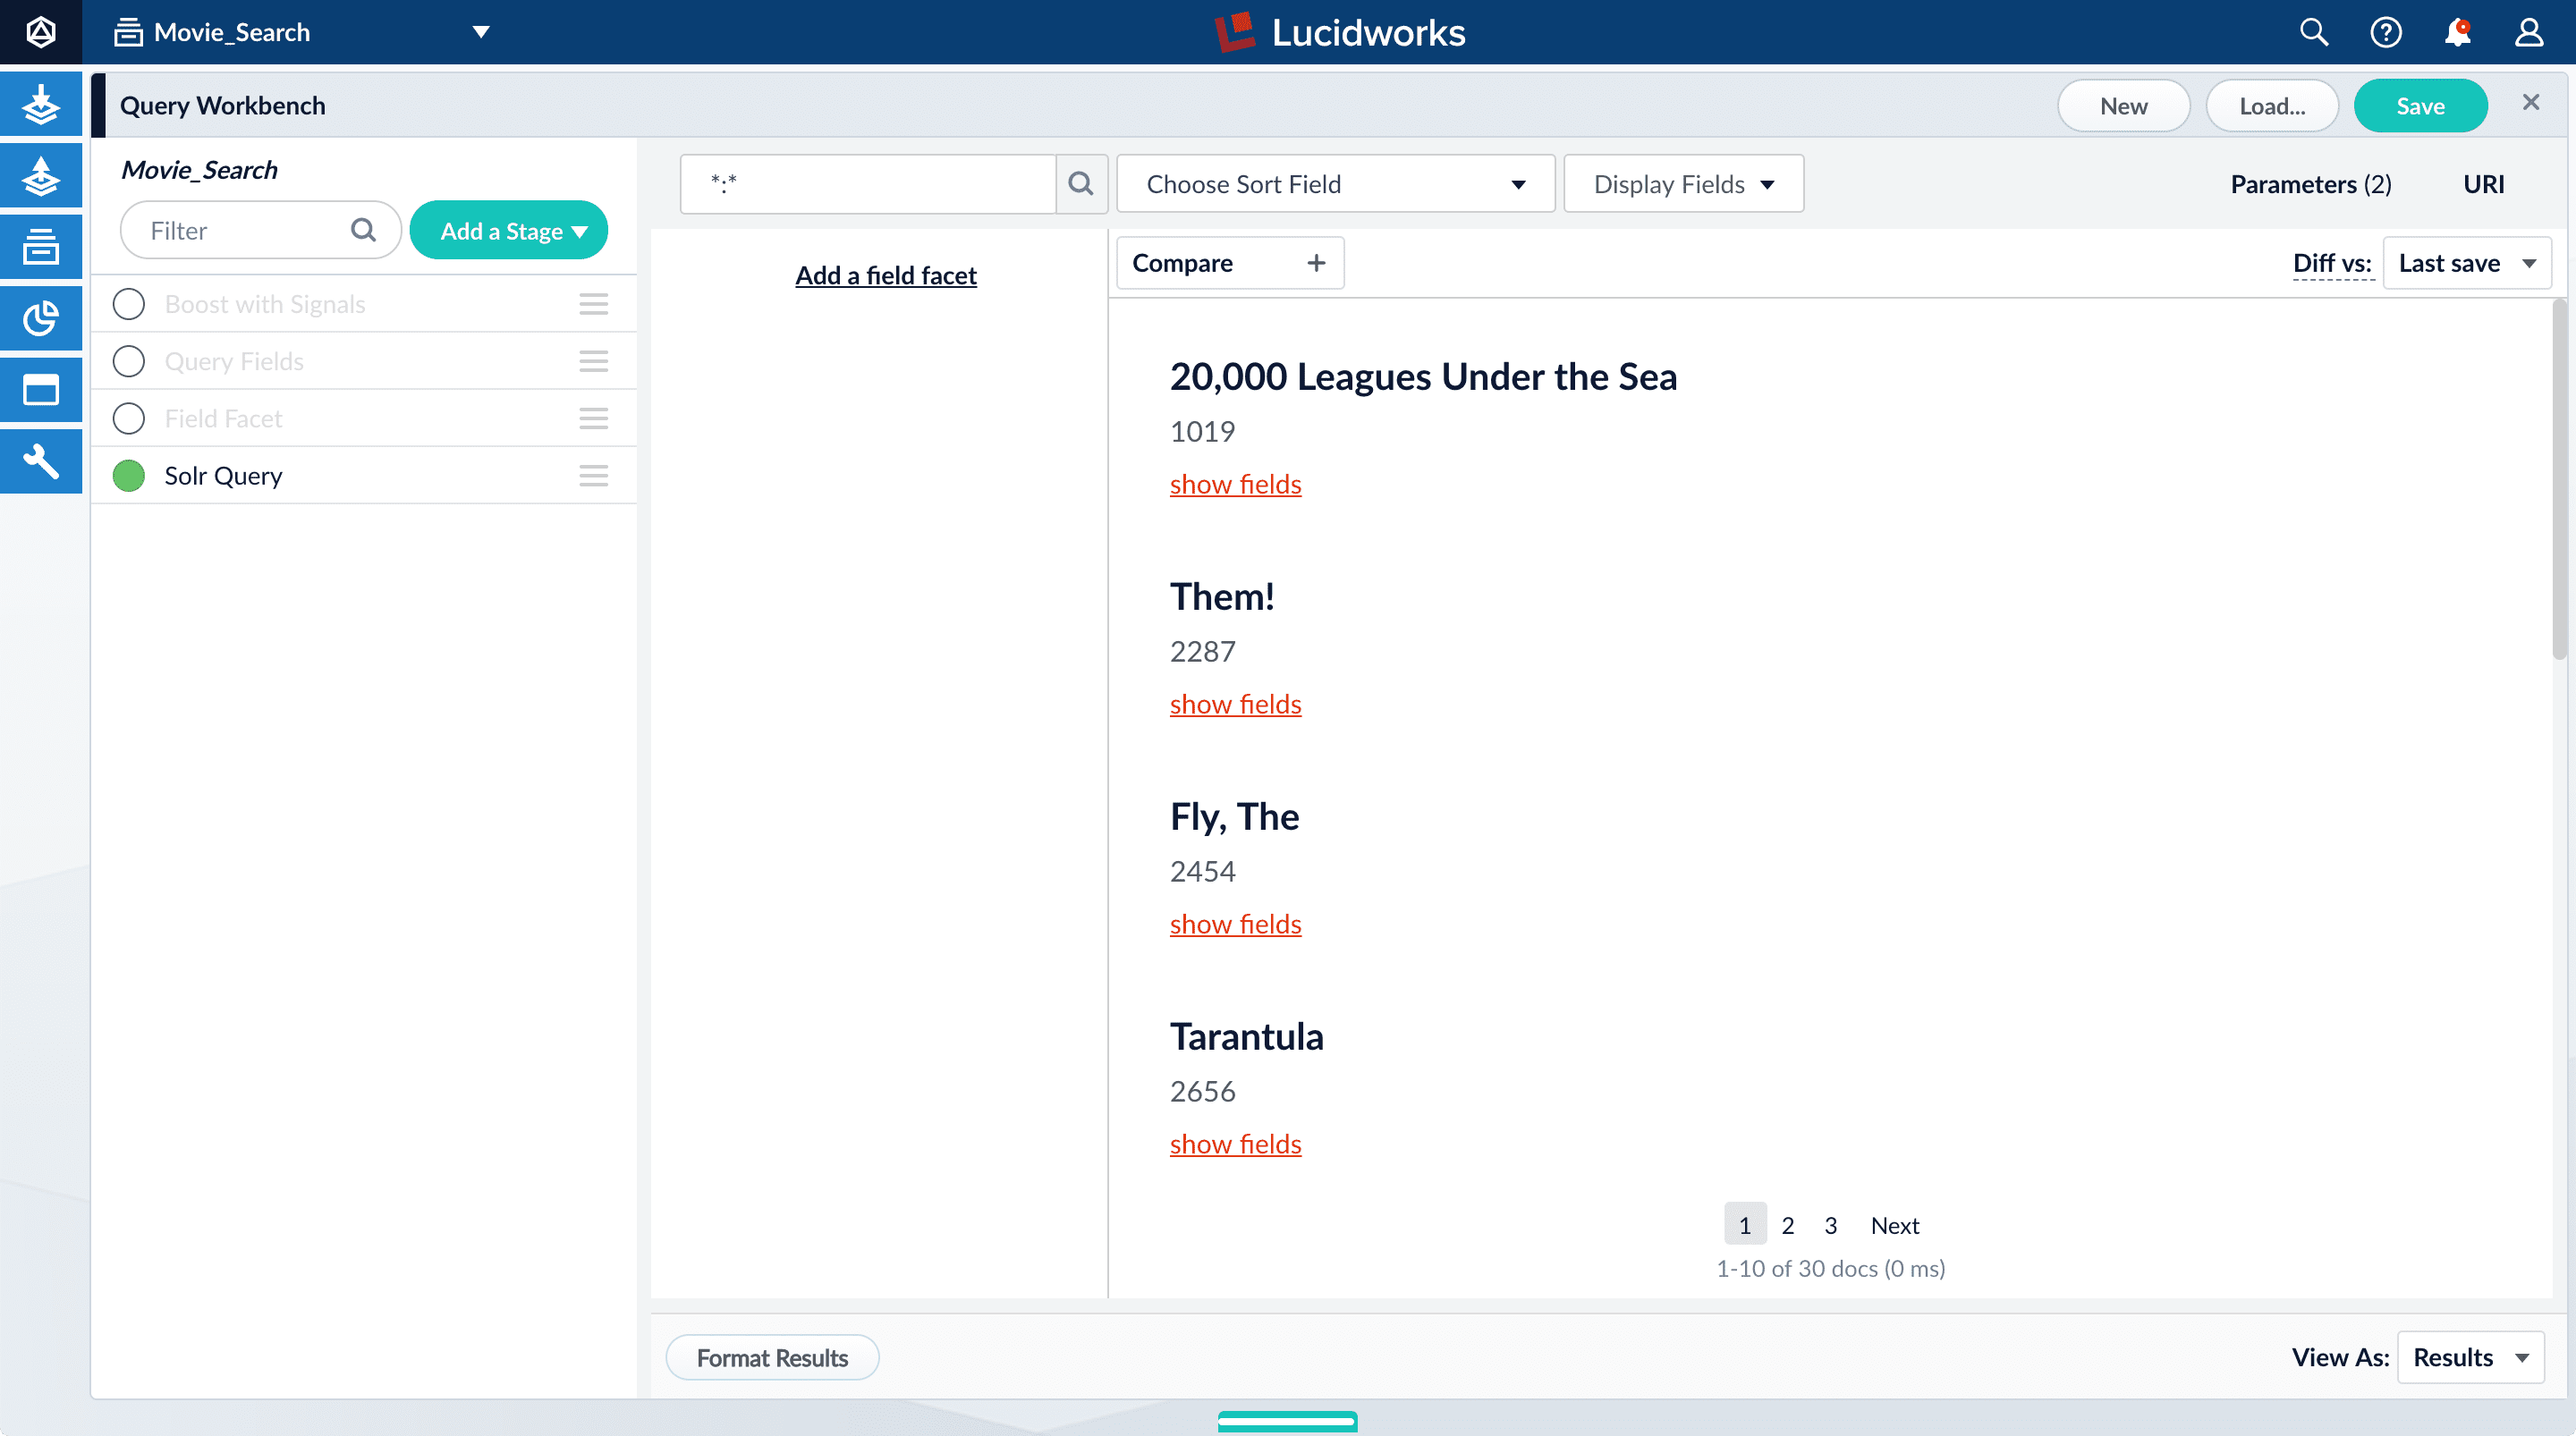
The default search is the wildcard search (*:*), which returns all documents in the collection.For information about other search entries for facets, see search entry options.- In the search box, enter the query string
star, and press Enter or click Search .
This search returns all movies that have the word “star” in the title.
.
This search returns all movies that have the word “star” in the title.
movie-search. To view more of the default output, you can perform other searches. - In the search box, enter the query string
*:*to return all documents, and press Enter or click Search.
Explore the role of query pipeline stages
A default query pipeline includes the following stages:- Boost with Signals. Use signals data to boost relevant documents. For more information, see collaborative filtering.
- Query Fields. Specify the set of fields over which to search.
- Field Facet. Specify the fields to use for faceting.
- Text Tagger. Search for information such as known phrases, synonyms, and misspellings that can be used to improve the query with query rewriting.
- Apply Rules. Modify the query using business rules, if any are triggered.
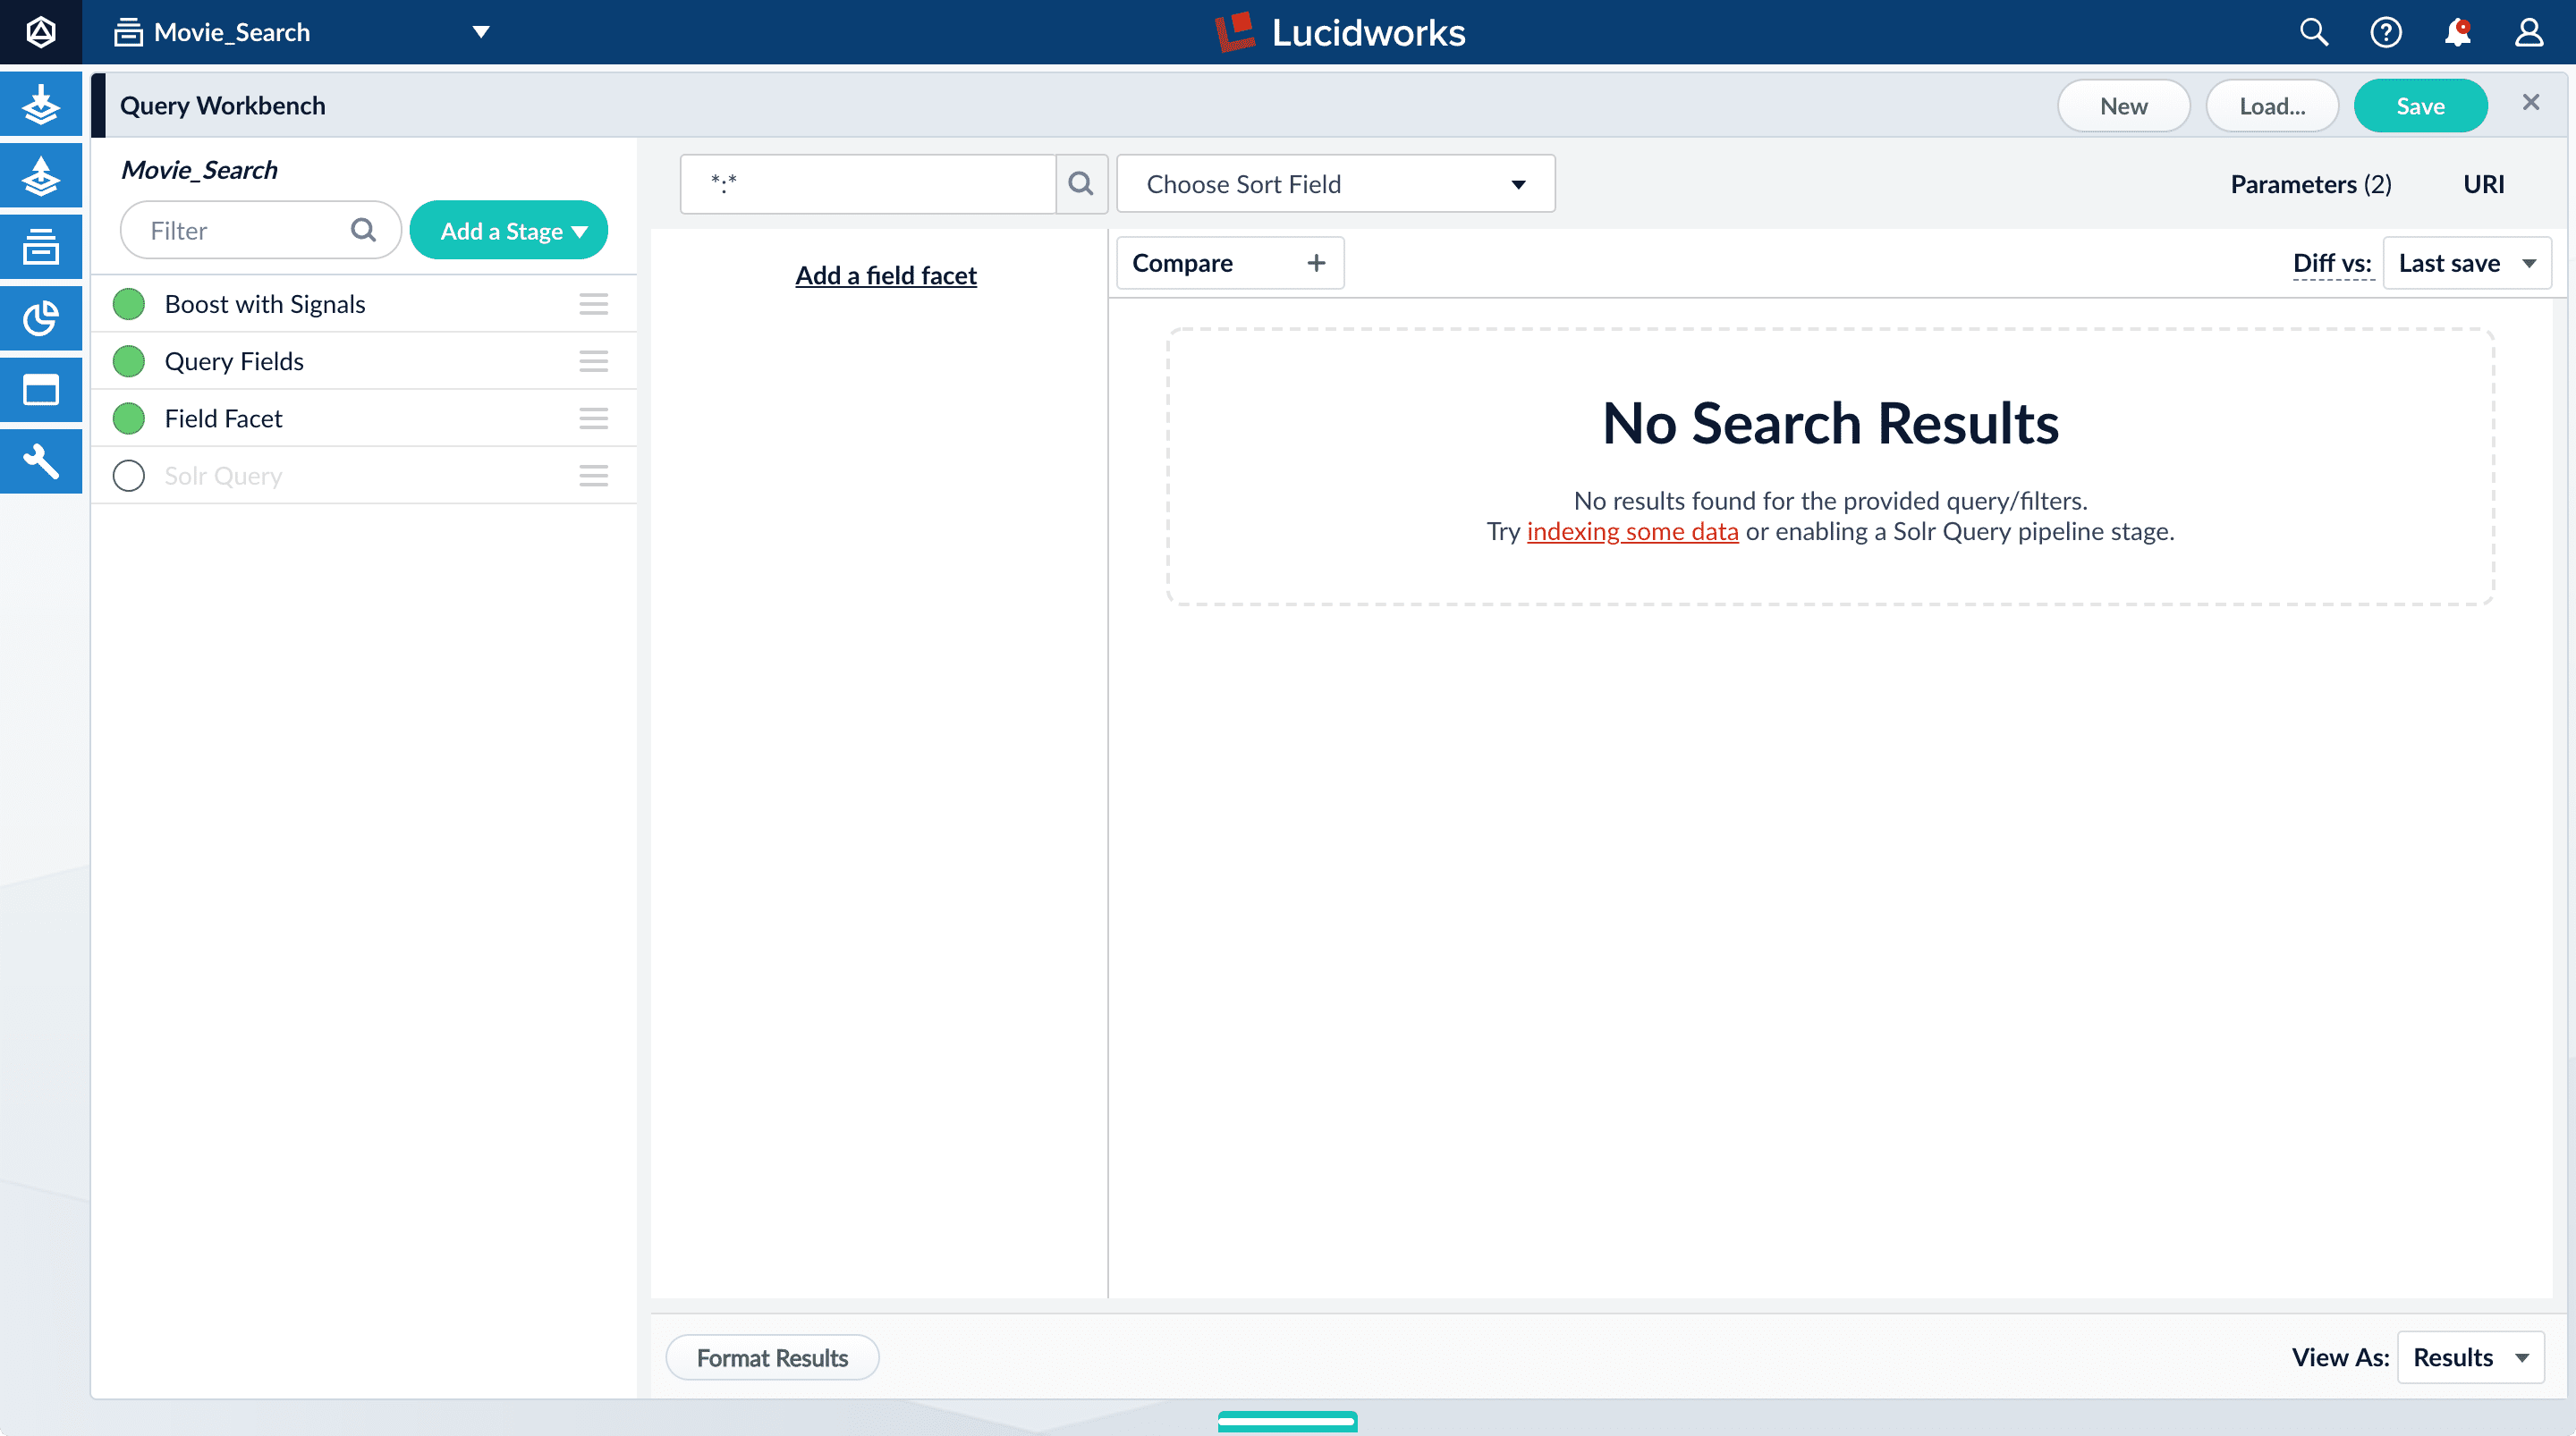
- Solr Query. Perform the query and return the results. This is the only stage that is always required to perform a query and receive results.
- Modify Response with Rules. Modify Solr’s response using business rules, if any are triggered.
- Click the green circle next to the Solr Query stage to turn off the stage.
- Turn on the Solr Query stage and turn all other stages off.
- Turn all stages on.
Configure faceting
Facets:- Are categories or features offered as filters within a search results page.
- Provide a simple way for users to explore and filter their search results without having to construct complicated queries.
- Can be configured when you also configure a query pipeline.
genres_ss and year_i. For example, a user could search for science fiction of the 1950s in just a few clicks.Configure basic faceting for genres
- Click Add a field facet and select the
genres_ssfield.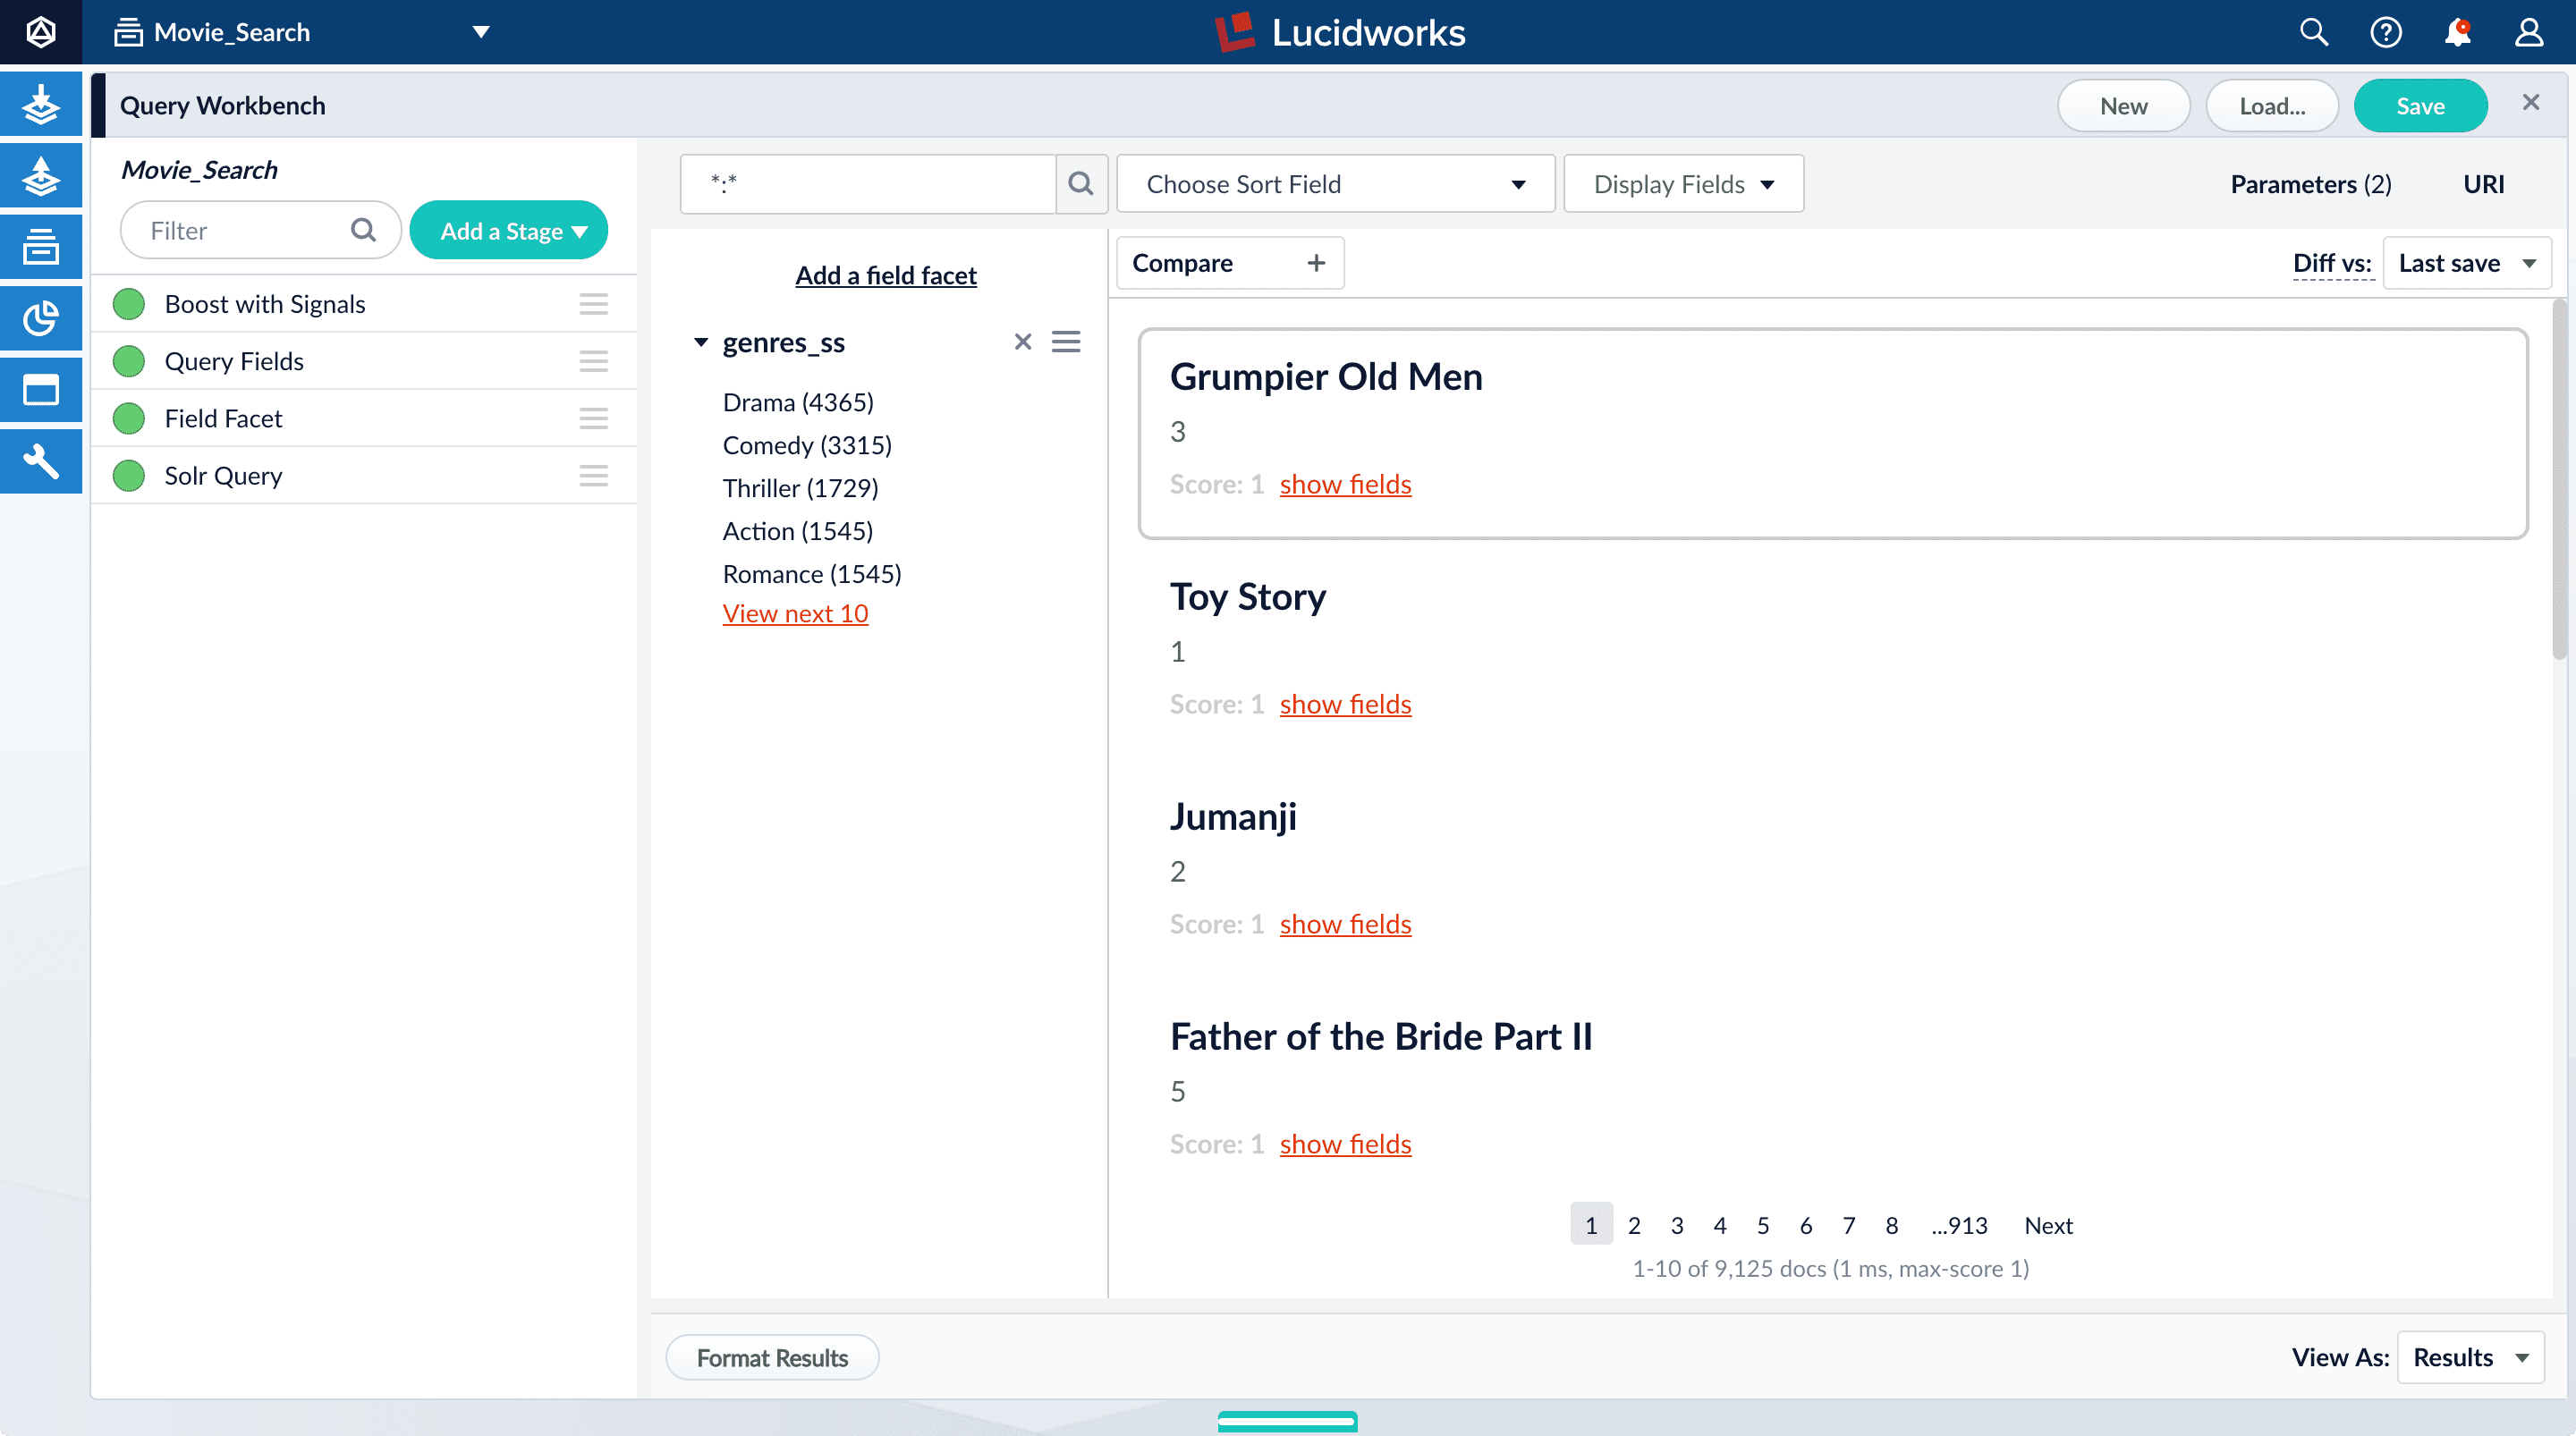
- Click Sci-Fi to select movies that have the value
Sci-Fiforgenres_ss:
- Under the field facet genres_ss, click Clear all.
Configure range faceting for years
If you configure faceting for theyear_i field as you did above for the genres_ss field, you would get one facet per year, which is not very useful.The year_i field will be more usable if you configure range faceting. Range faceting is a way of grouping values together so that the user can select a value range instead of one specific value. For example, range facets are commonly used with pricing (100) or ratings (4 stars or higher). In this example, you will group years by decade.Range faceting requires sending an additional query parameter to Lucidworks Search’s Solr core. You can configure this with the Solr’s range facet query parameters.Use the Additional Query Parameters stage to configure range faceting for the year_i field:- Click Add a stage.
- Scroll down, and in Advanced, select Additional Query Parameters.
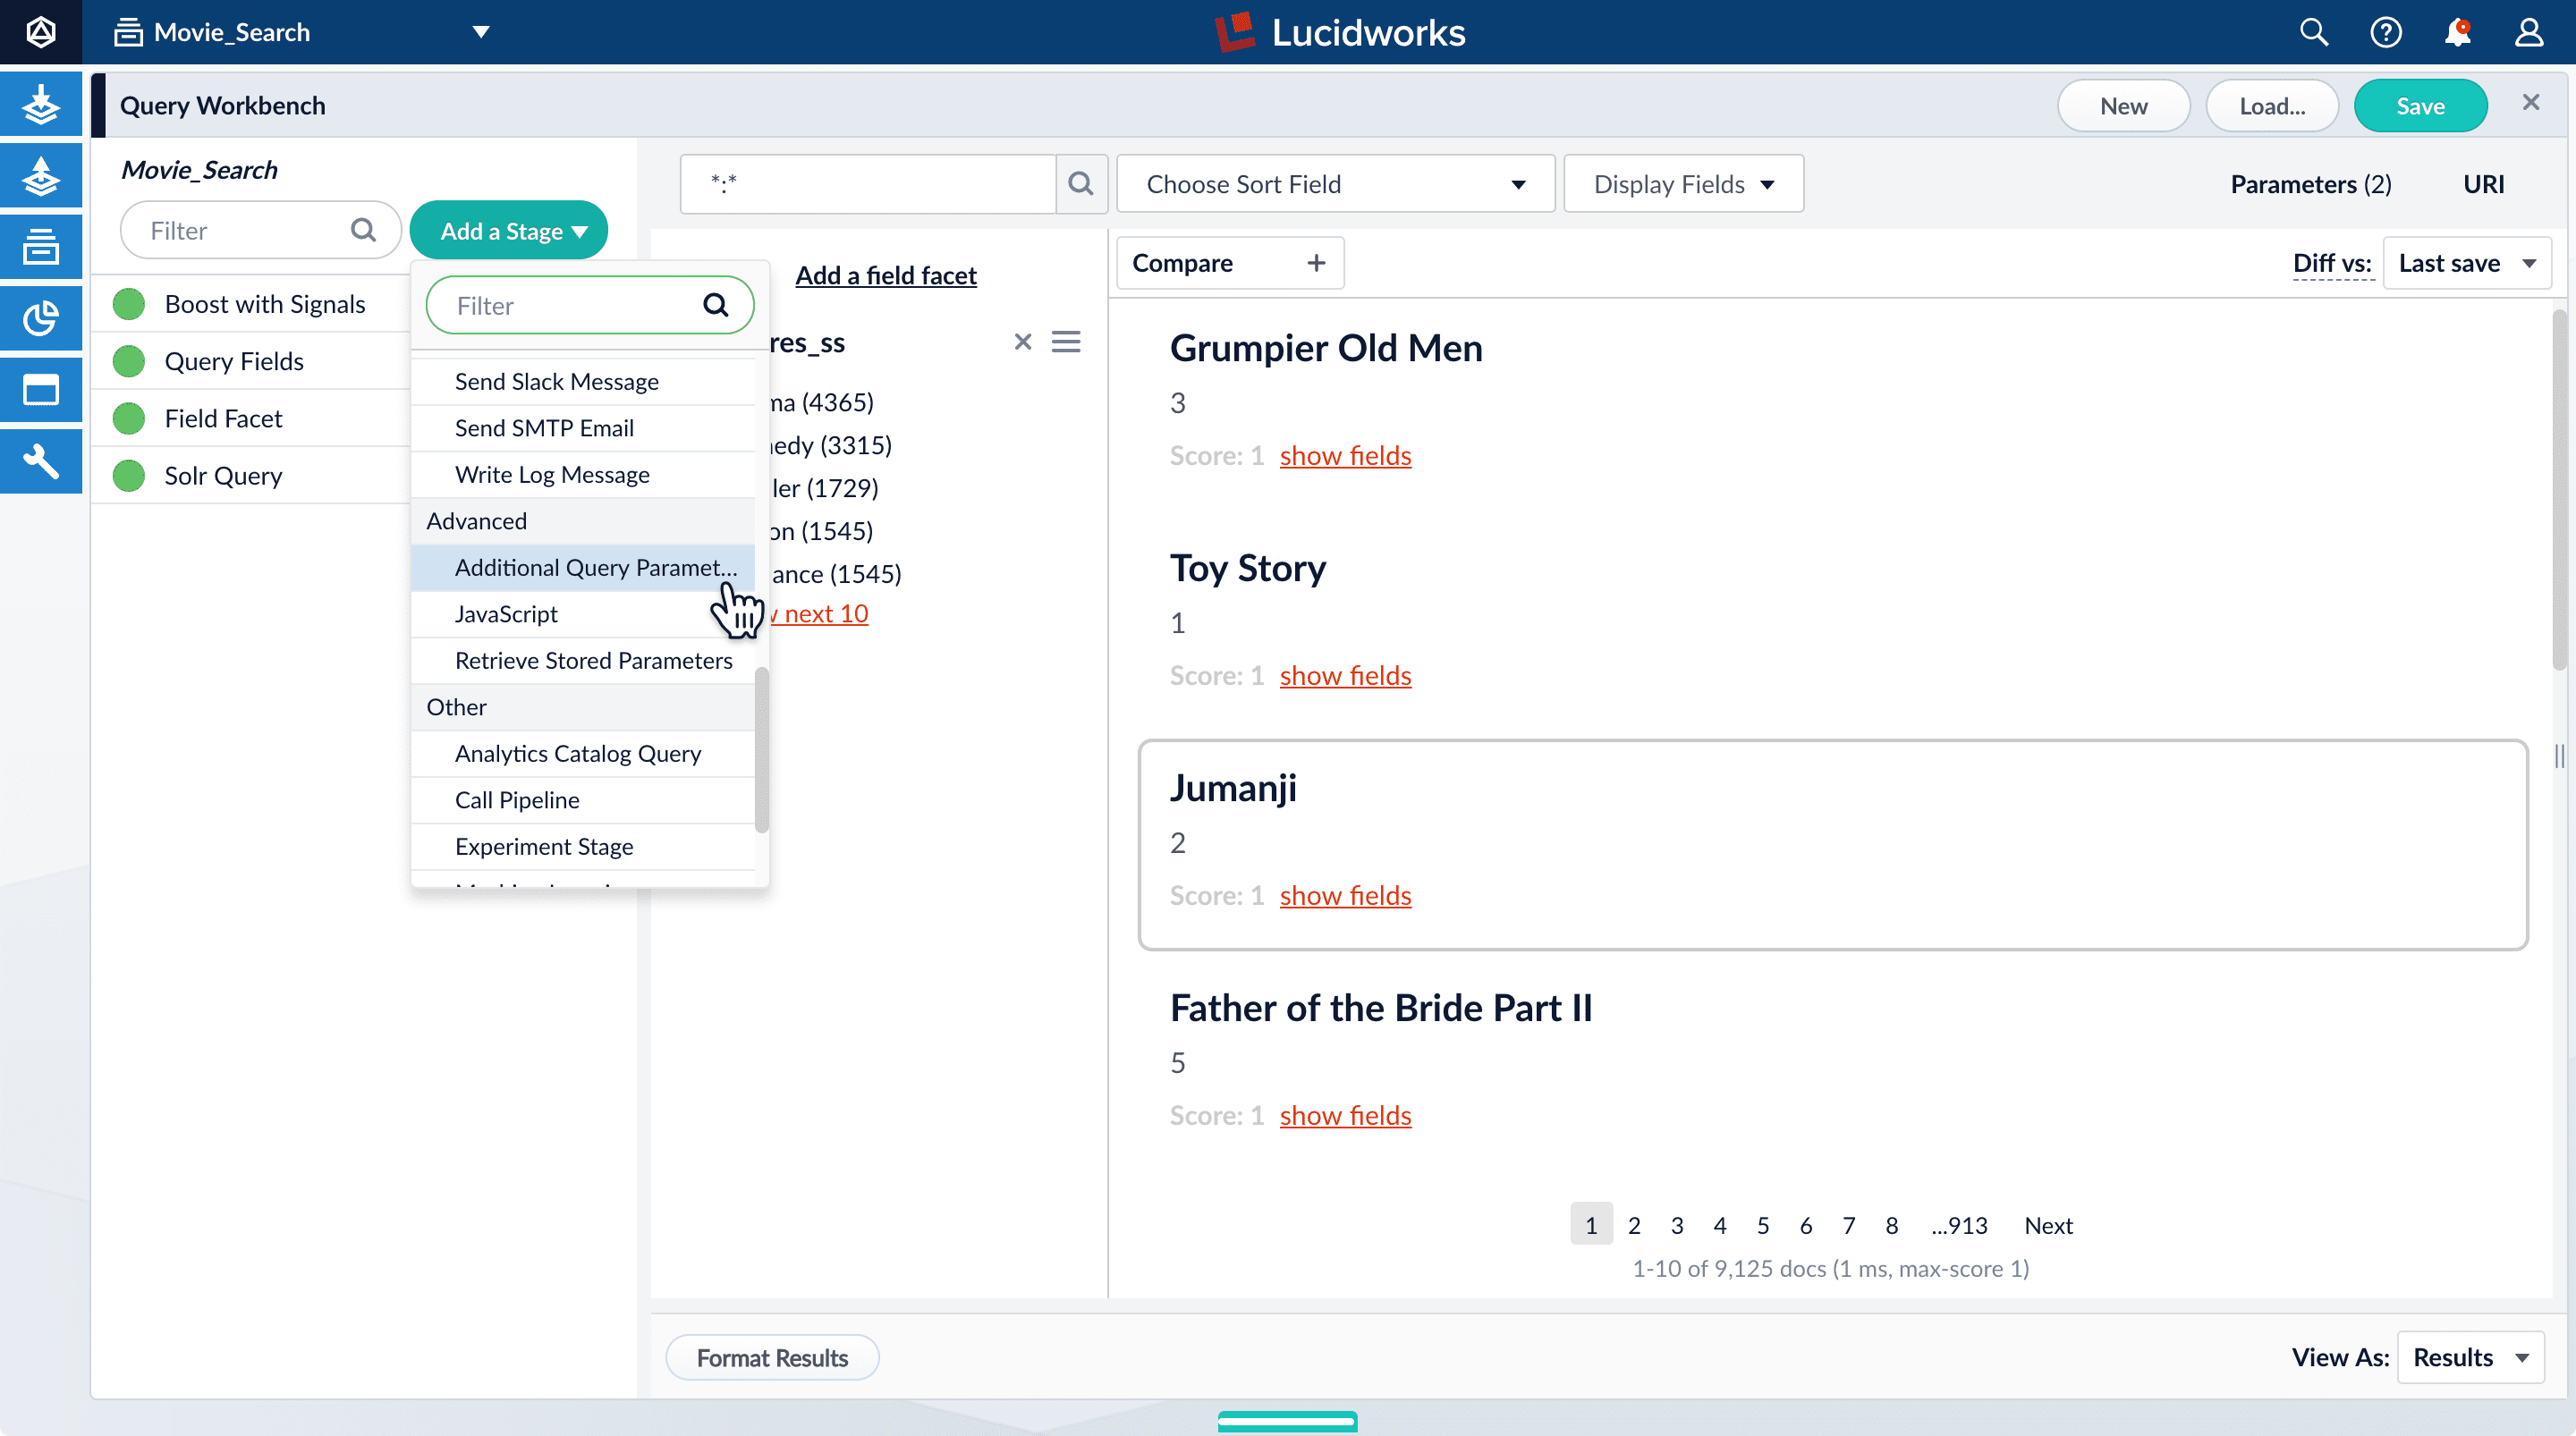
- Under Parameters and Values, add the following parameter names and values:
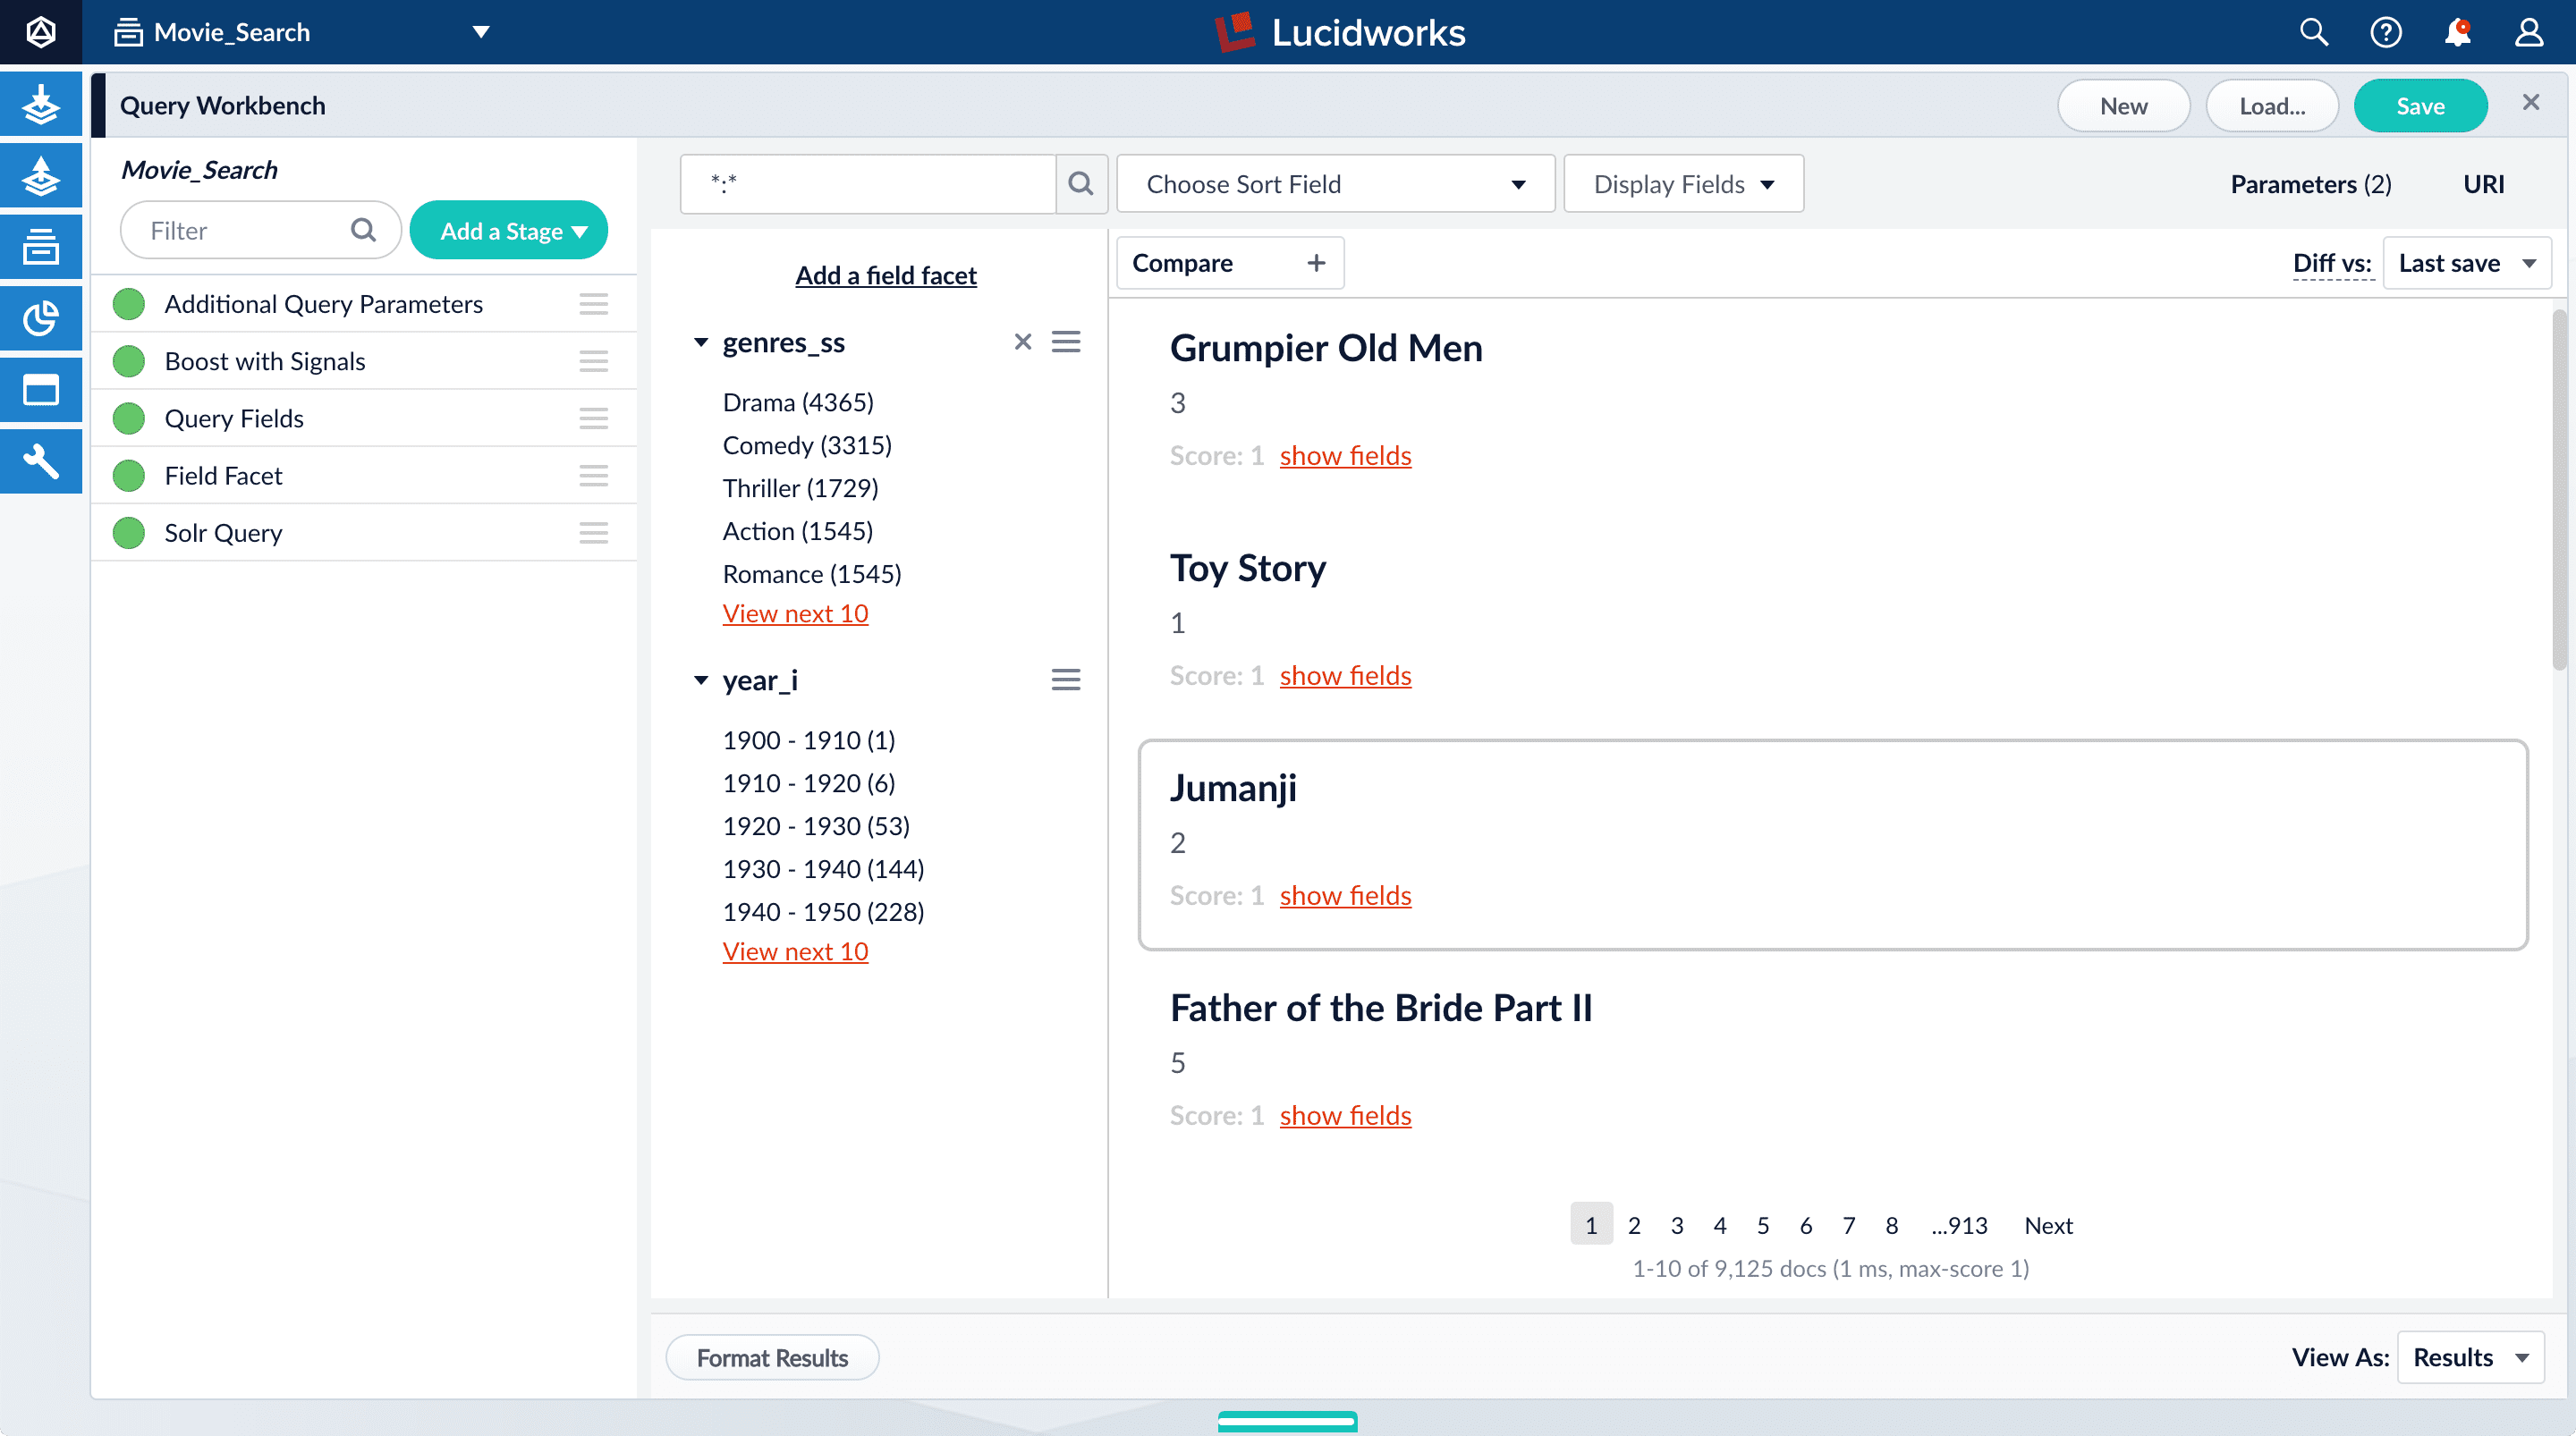
facet.range:year_ifacet.range.start:1900facet.range.end:2020facet.range.gap:10facet.range.include:outerIn this case, you do not need to modify the Update Policy field. The default value ofappenddoes not affect these results.
- Click Apply, and then click Cancel to close the configuration panel for the Additional Query Parameters stage.
The year facets are now grouped by decade:
Configure query fields
To specify fields to match a particular query:- Search for “2001”.
The results are not what an end user might expect because “2001: A Space Odyssey” is not the top search result.
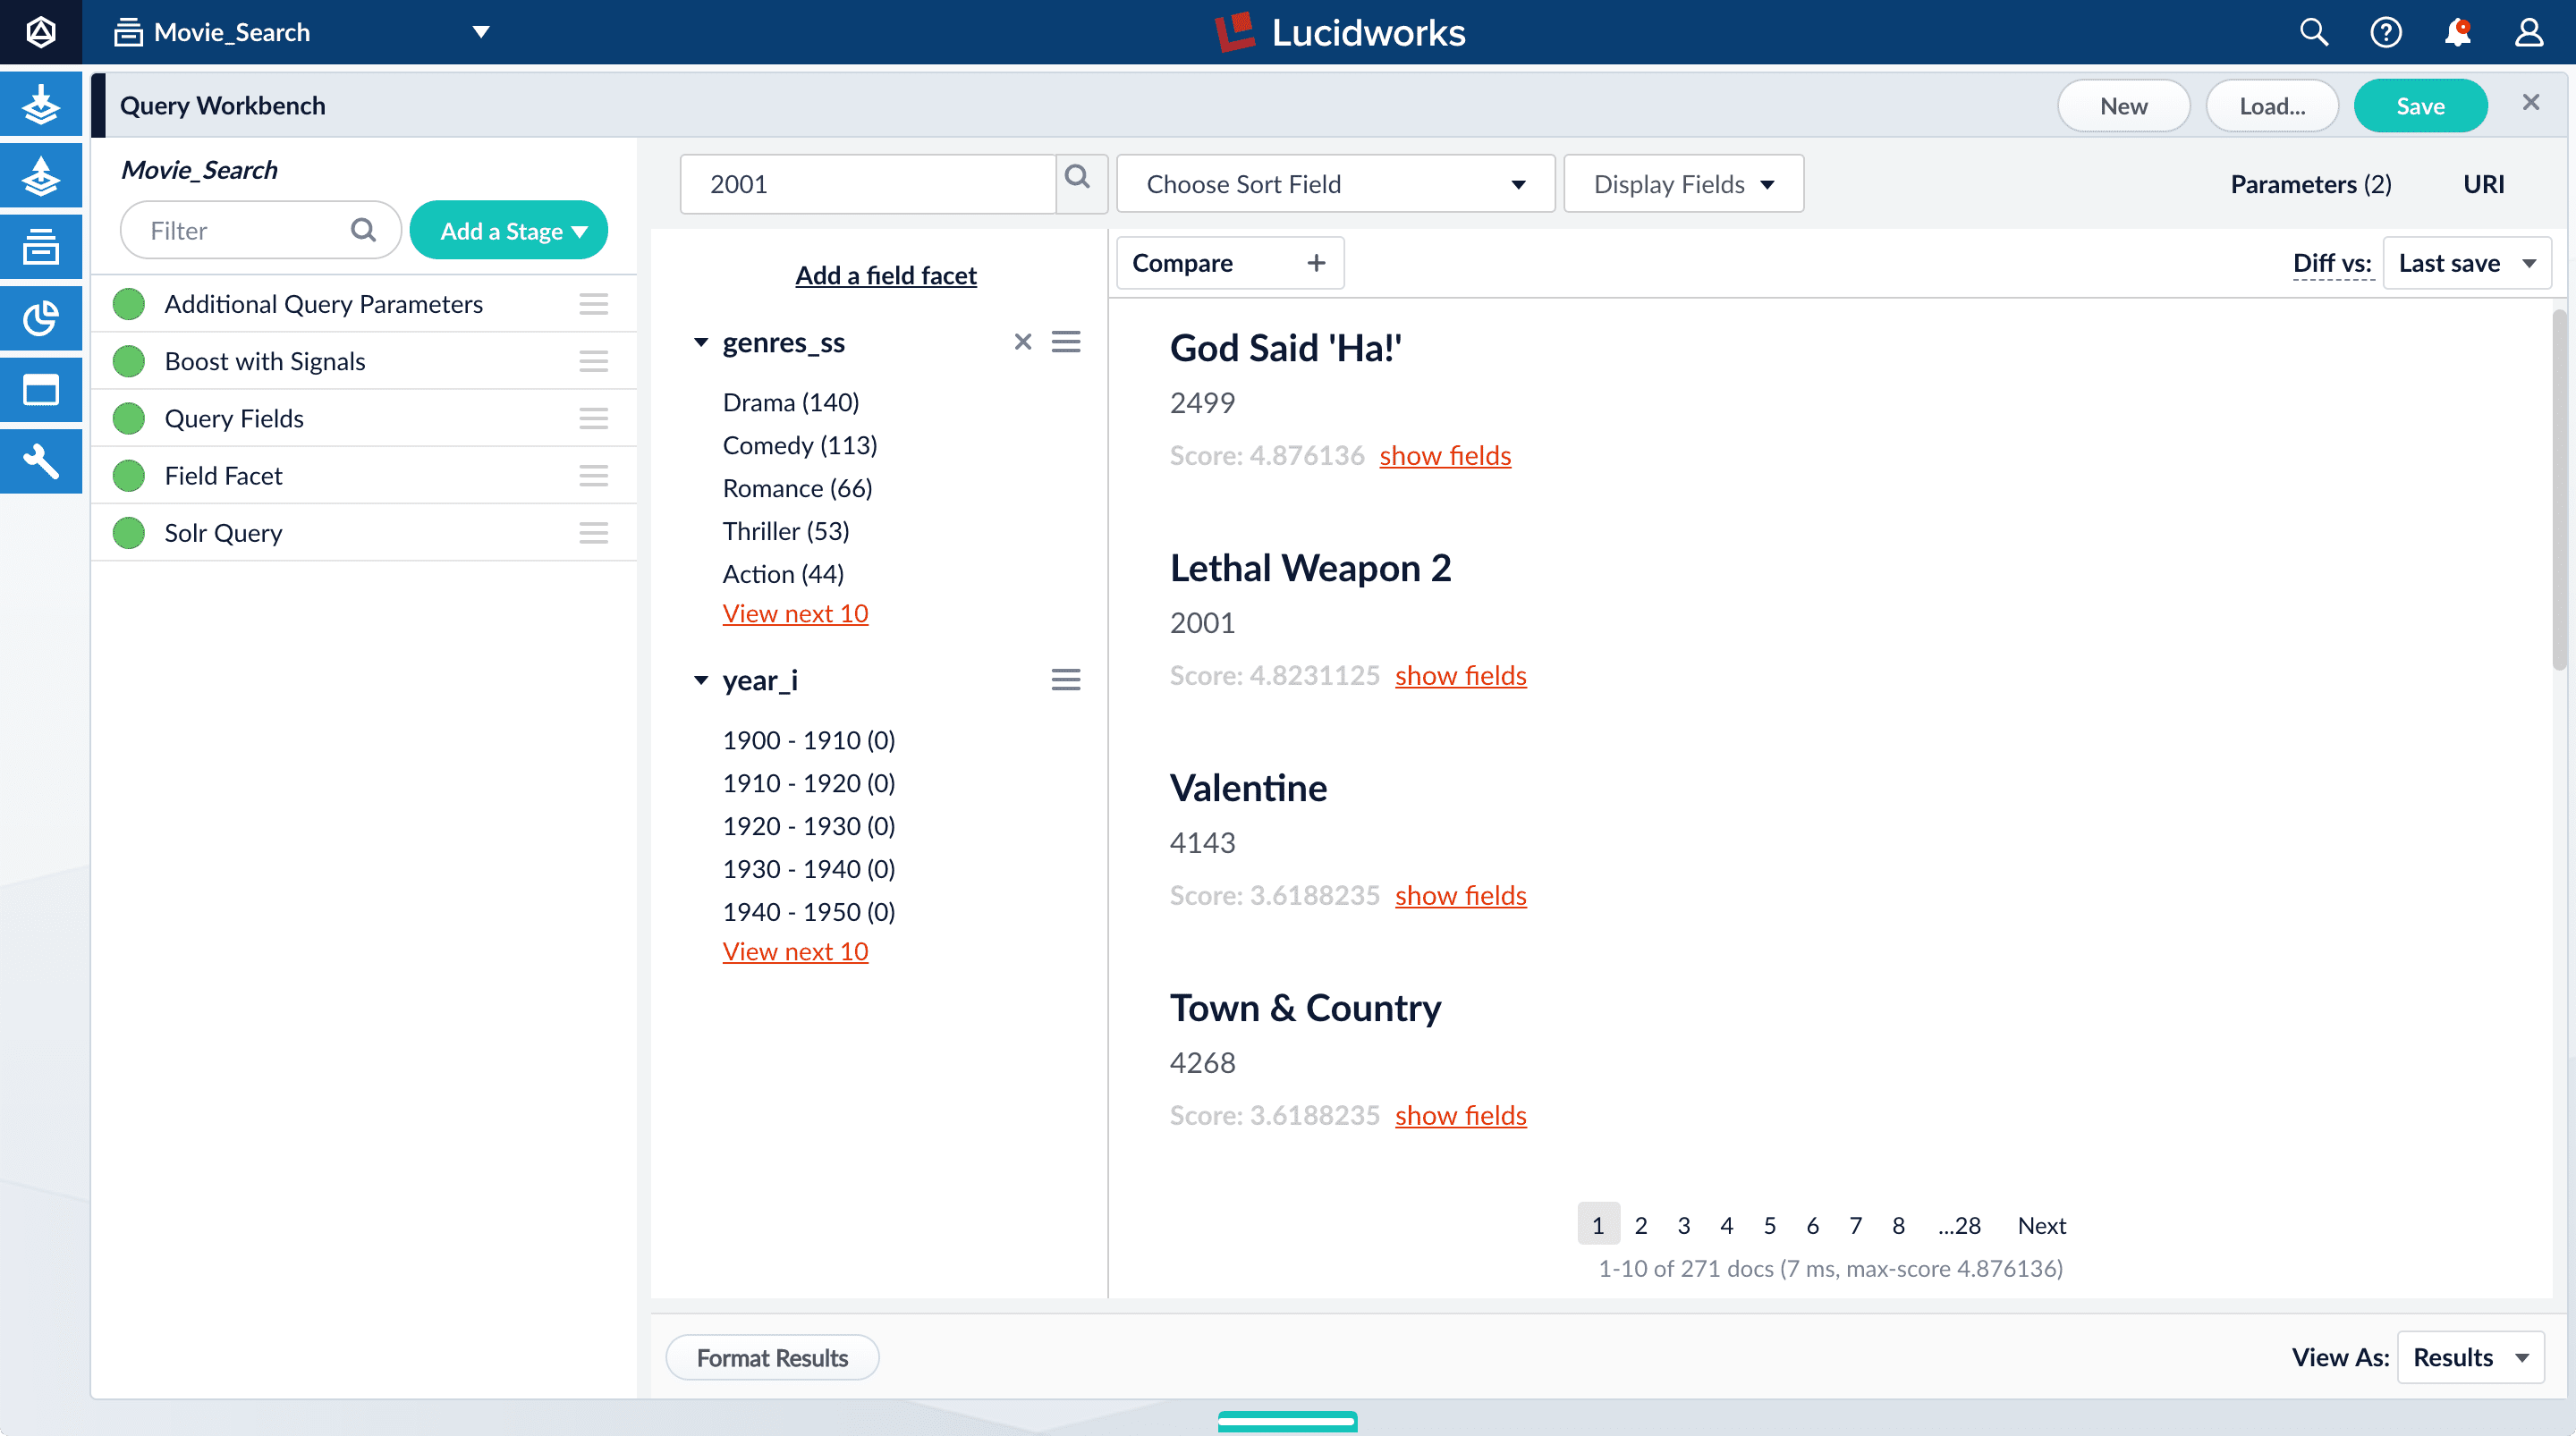
- Under one of the movies listed, click show fields.
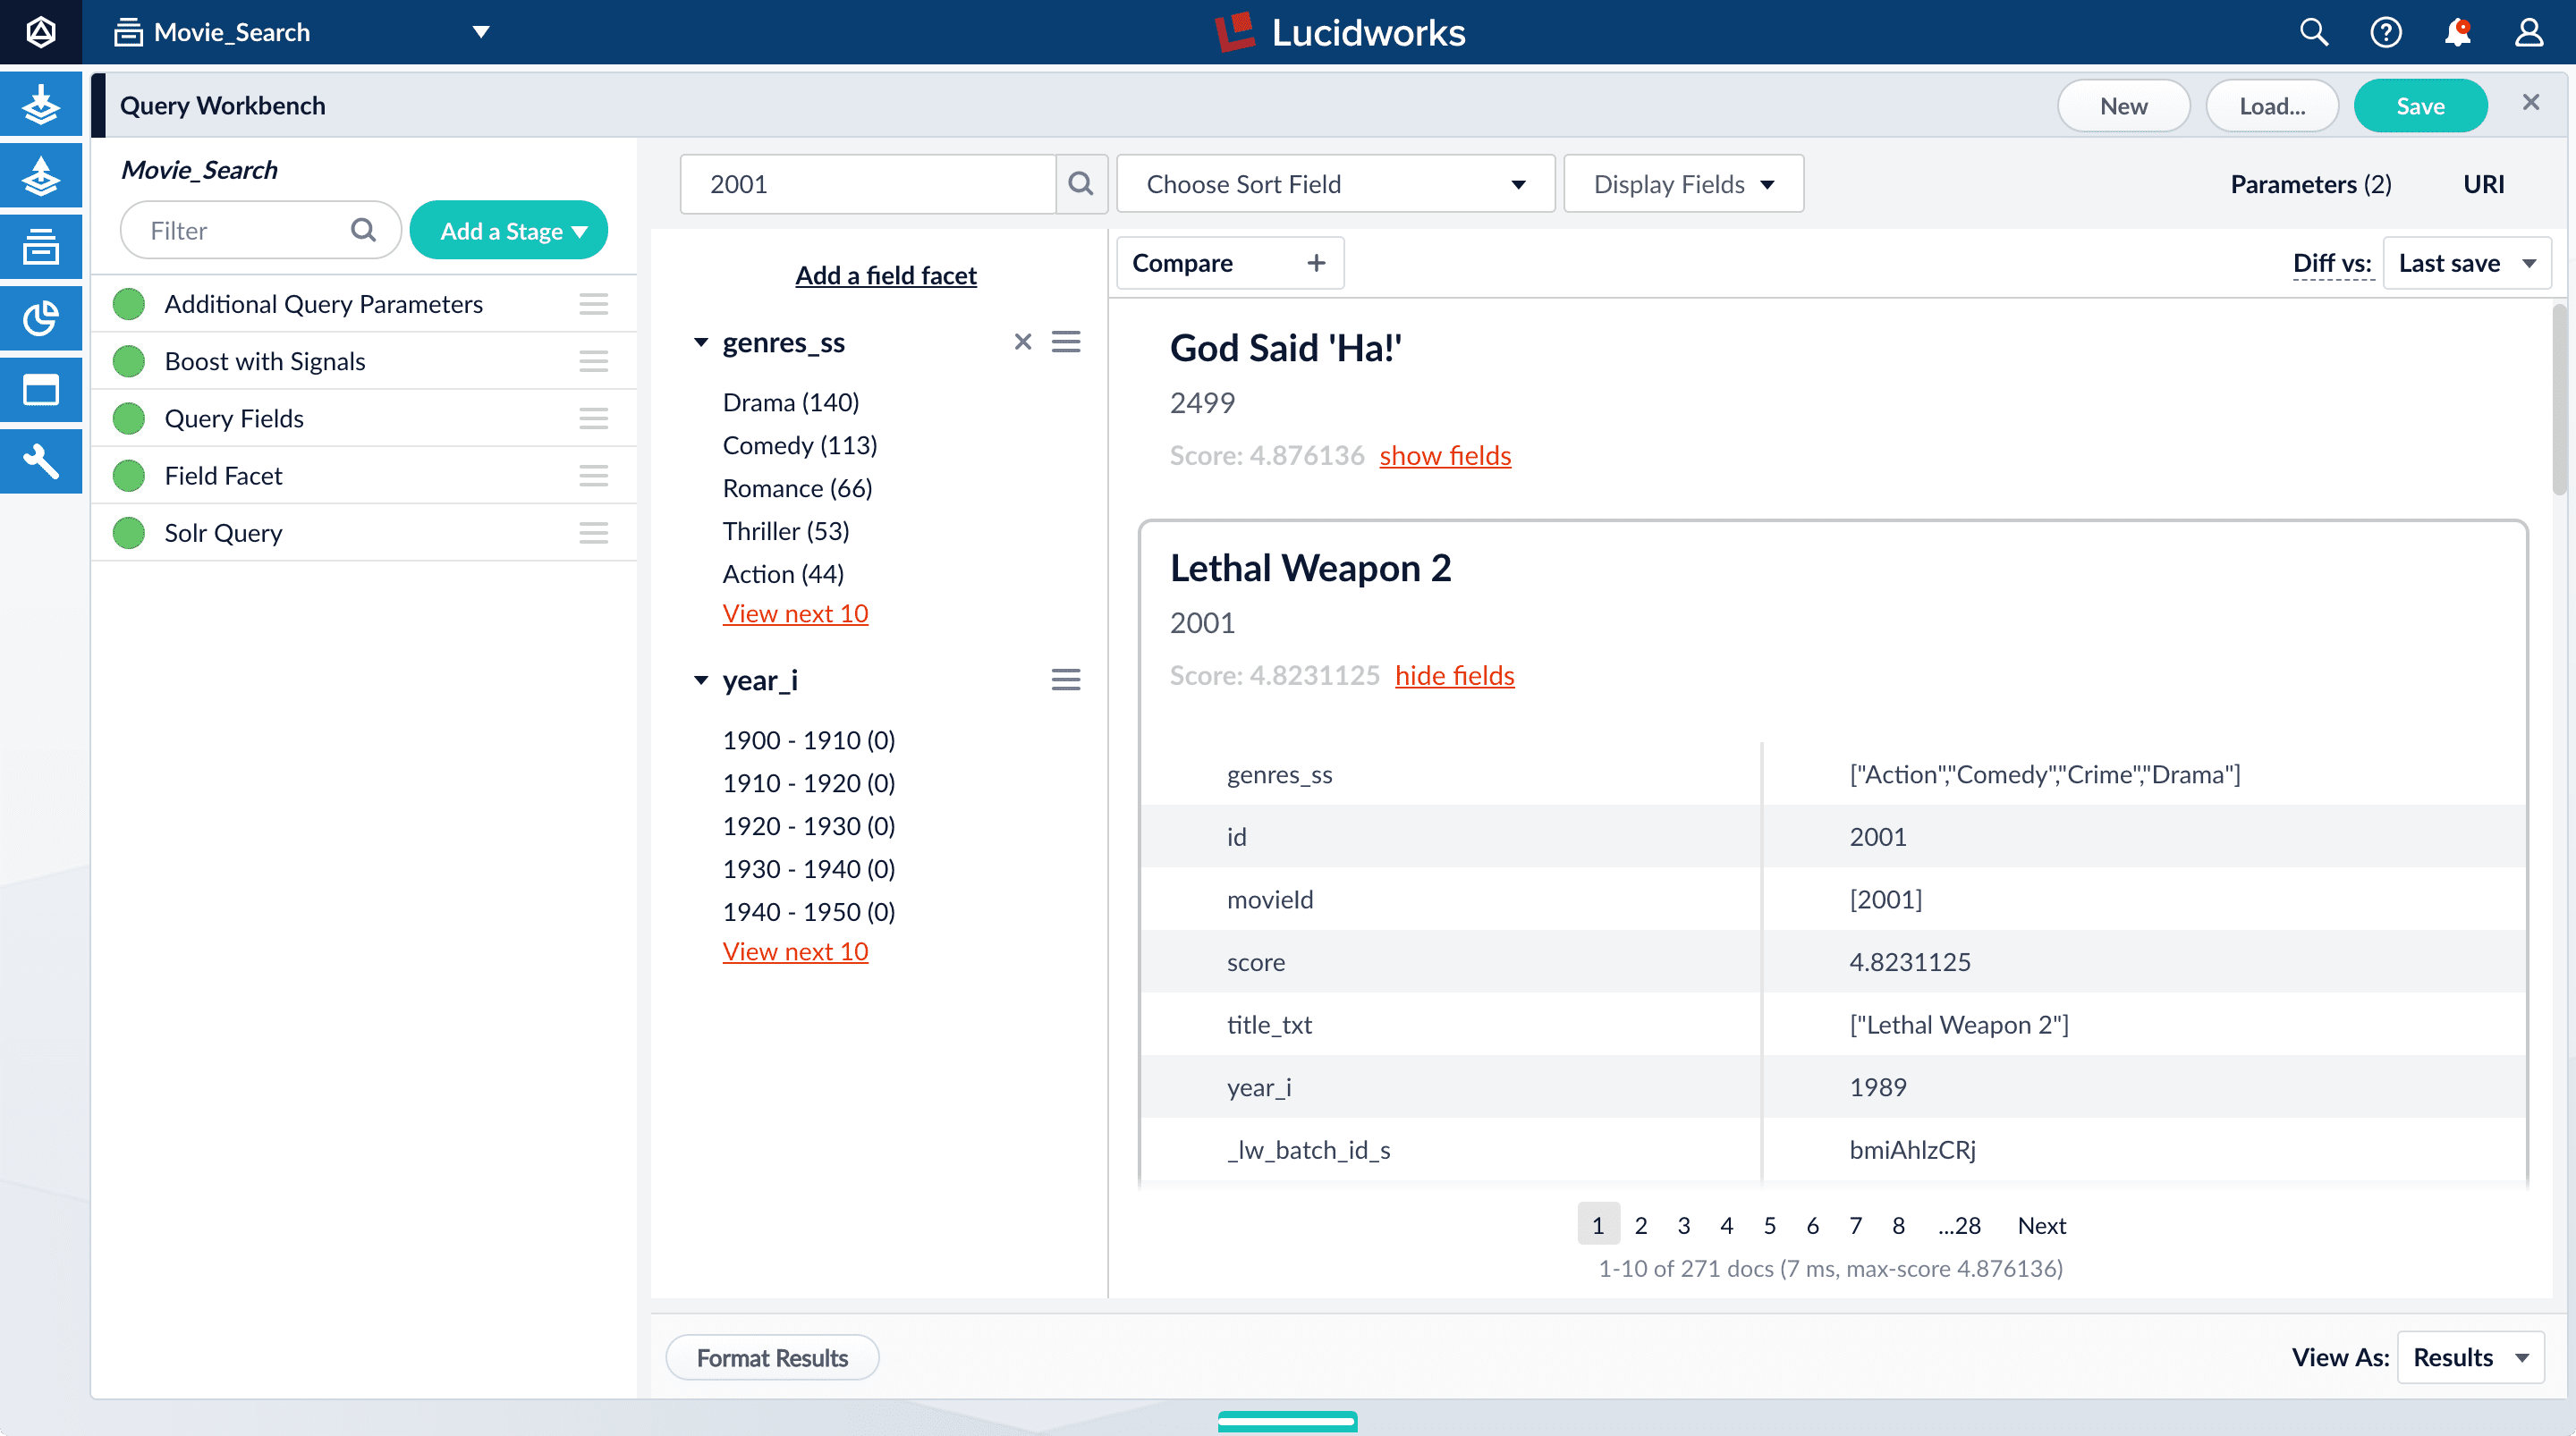
idfield. This field may not be useful to your users. Use the Query Fields stage to specify the fields that may be a higher priority for users. - Below the name for the movie you selected, click hide fields.
- Click the Query Fields stage of the query pipeline. The Query Fields configuration panel displays.
- Under Search Fields, click Add .
- Enter
title_txt. - Click Add again.
- Enter
year_i. - Click Apply, and then click Cancel to close the configuration panel for the Query Fields stage.
Now movies with ‘2001’ in their title rise to the top of your search results, followed by films made in the year 2001:
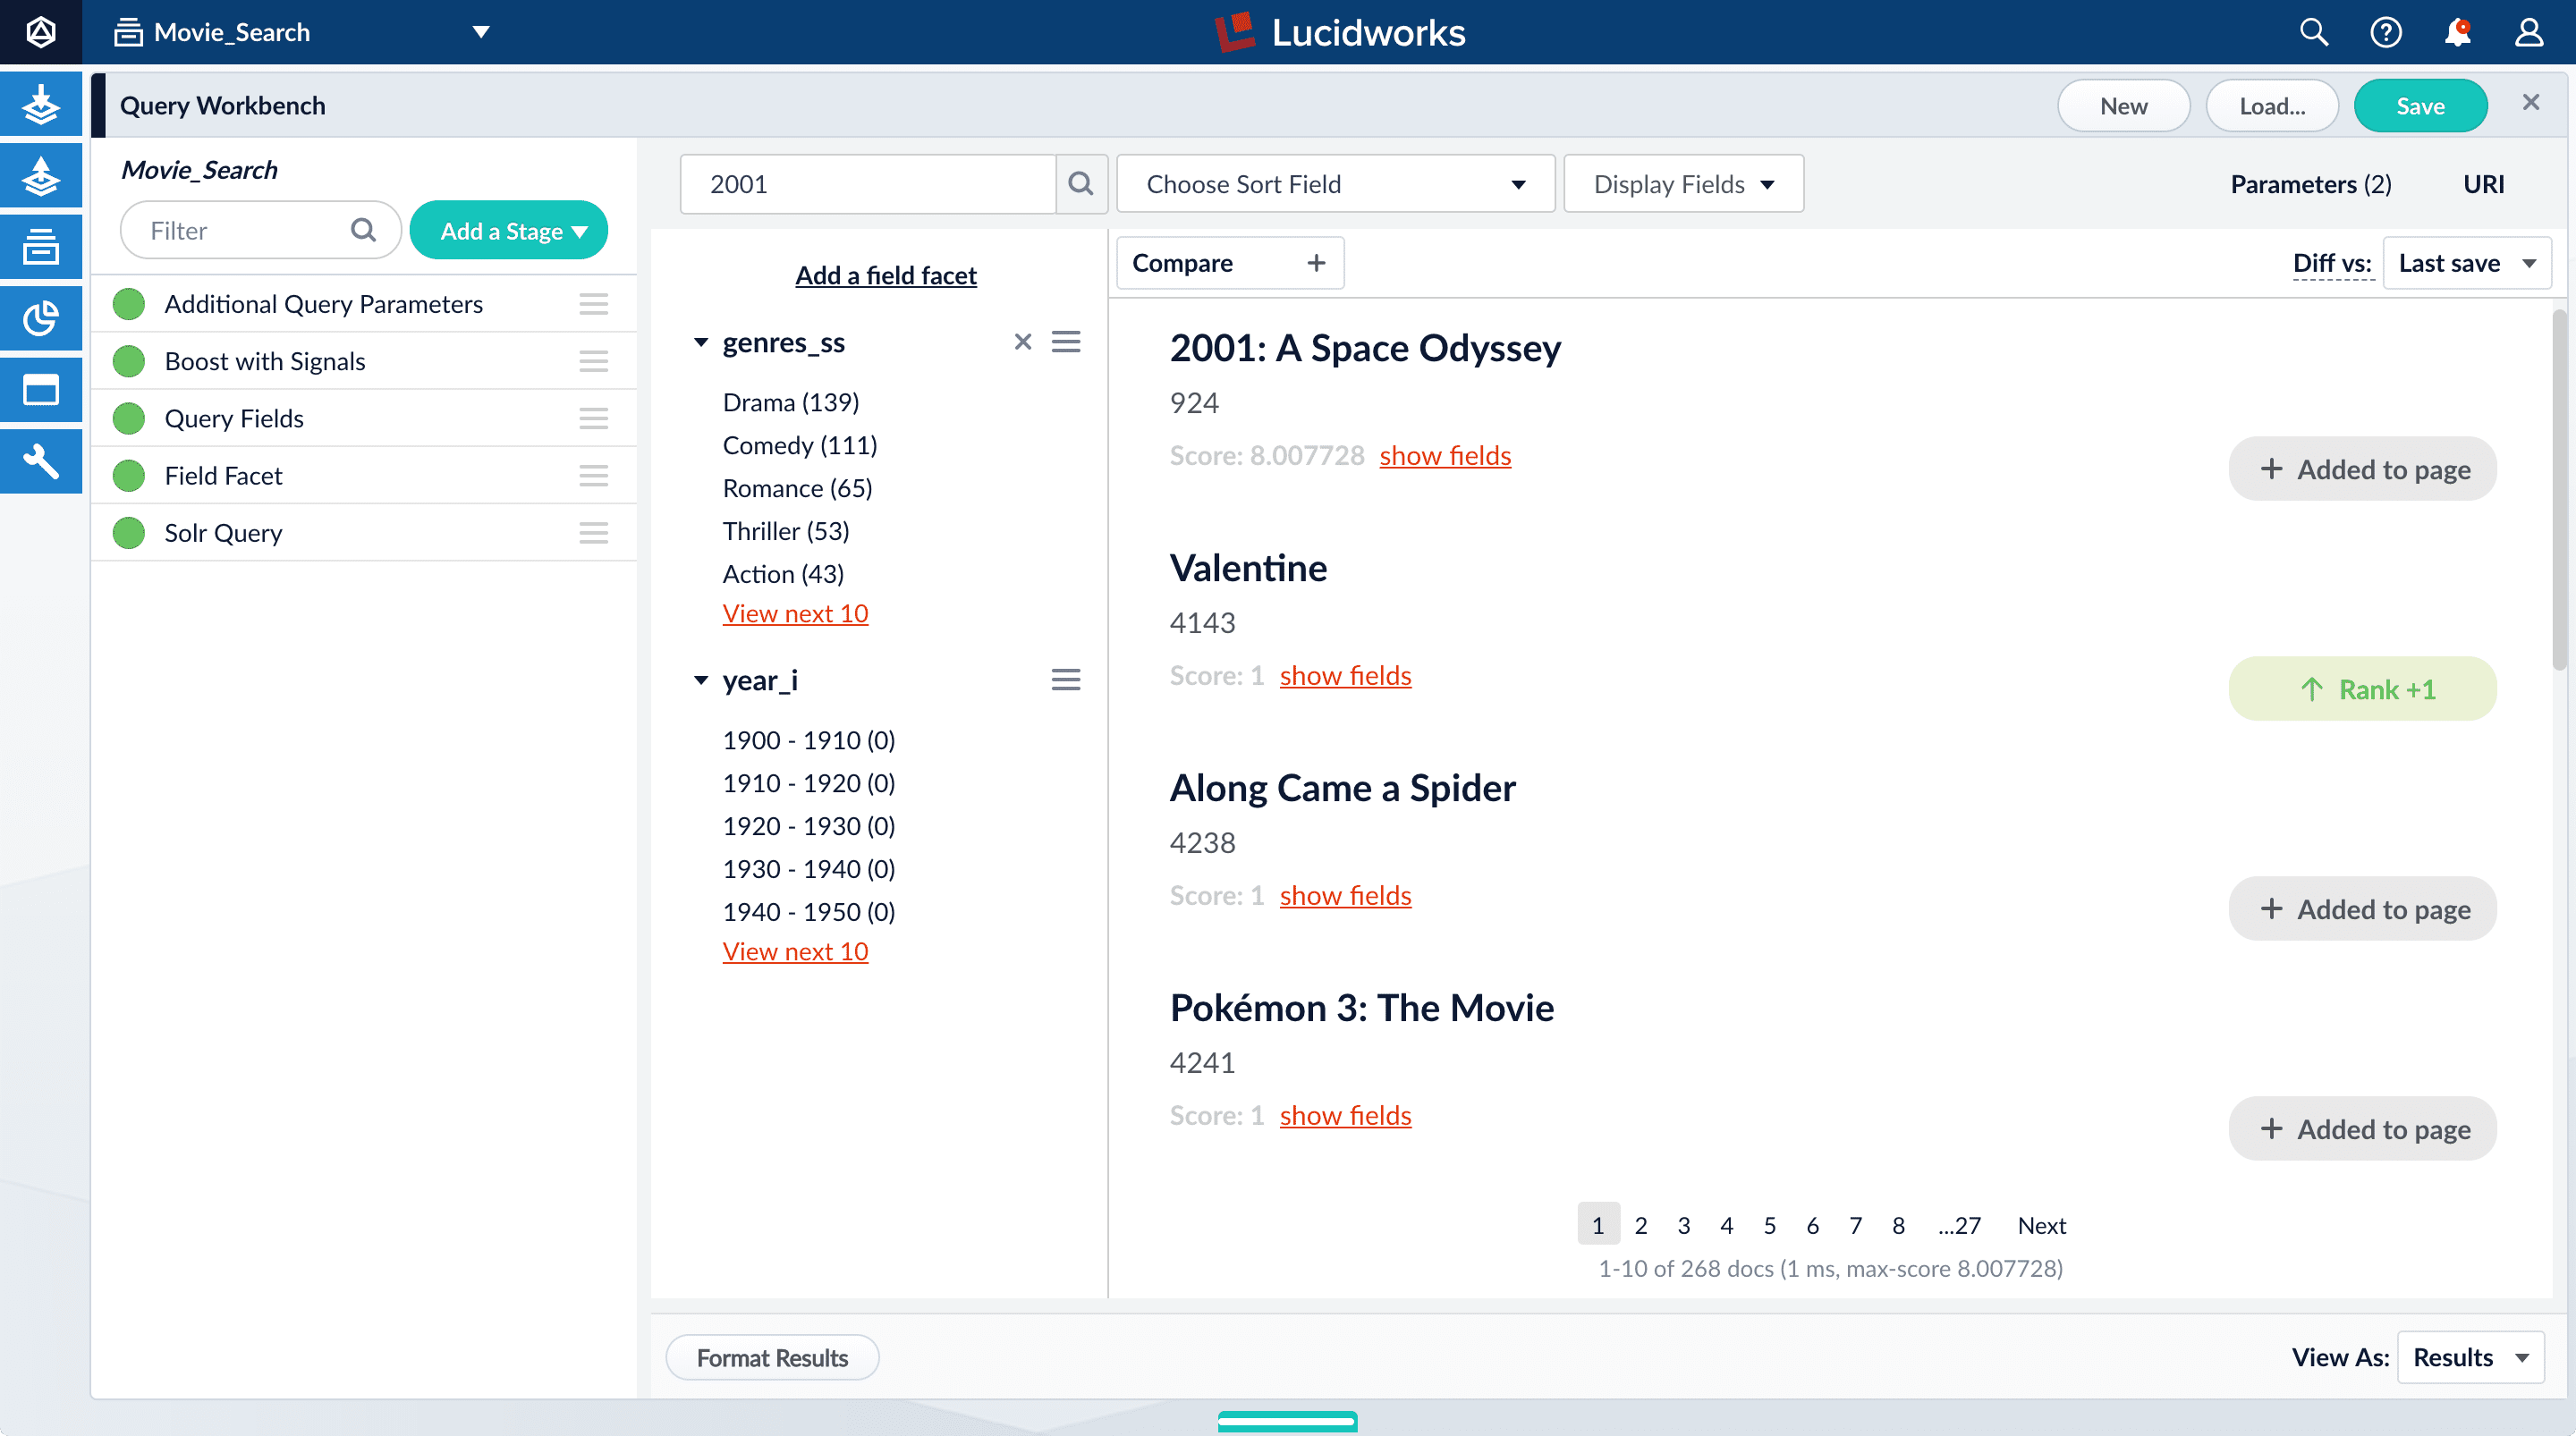
- In the upper right, click Save to save the changes to the query pipeline.
Improve Relevancy
Improve Relevancy
Signals are events that can be aggregated and used for automatic boosting or recommendations, which are methods to make search results more relevant.As an example of boosting, the most popular search results for certain queries can be boosted so they display first (or at least nearer the top) when other users make similar queries.Similarly for recommendations, click events or purchase events can be collected as signals and used to display “Customers who viewed this also viewed” or “Best-selling holiday items”.In a production environment, users’ actions generate signals. For the purposes of this tutorial, you will use Query Workbench to generate click signals.
Before you begin
To perform the steps in this part of the tutorial, you must first complete Part 3 - Query Data, which give you an indexed dataset that is configured for faceted search.Format display fields
- Sign in to Lucidworks Search if it is not currently open.
- In the Lucidworks Search launcher, click the Movie Search app.
- Click Querying > Query Workbench.
- At the top right, select Display Fields.
- In the Name field, click the row to display a dropdown of possible values.
- Select
title_txt. You can filter the list of possible values. - In the Description field, select
id. - Click Display Fields to close the Display Fields panel.
Enable synthetic signals
To complete this part of the tutorial, you must generate more signals because not enough signals were created in Part 3 - Query Data. Since this example is a prototype app, users are not generating signals. To create more signals, you must enable synthetic signals in Query Workbench.- At the bottom of the Query Workbench page, click Format Results.
- Select Show signal generators and Send click signals.
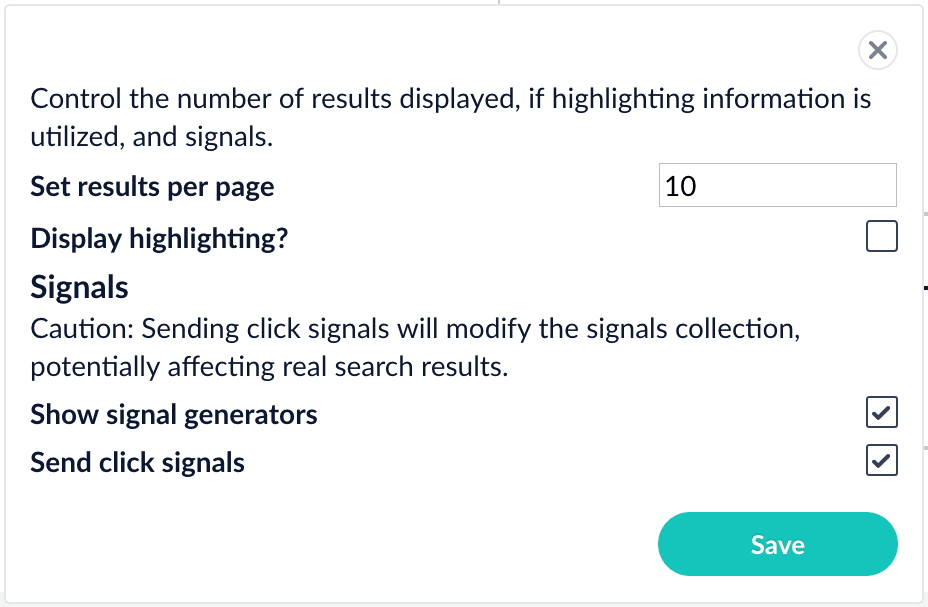
- Click Save.
- Hover over one of the search results. Query Workbench displays controls that include a Simulate button next to a field that lets you specify the number of signals to simulate:

Generate signals
With synthetic signals enabled, you will generate a simple set of signal data that you can use to generate meaningful recommendations.For this tutorial, you will generate signals you can use to boost your favorite sci-fi titles so that they display first.- Search for
star wars. The top results are not your favorite titles: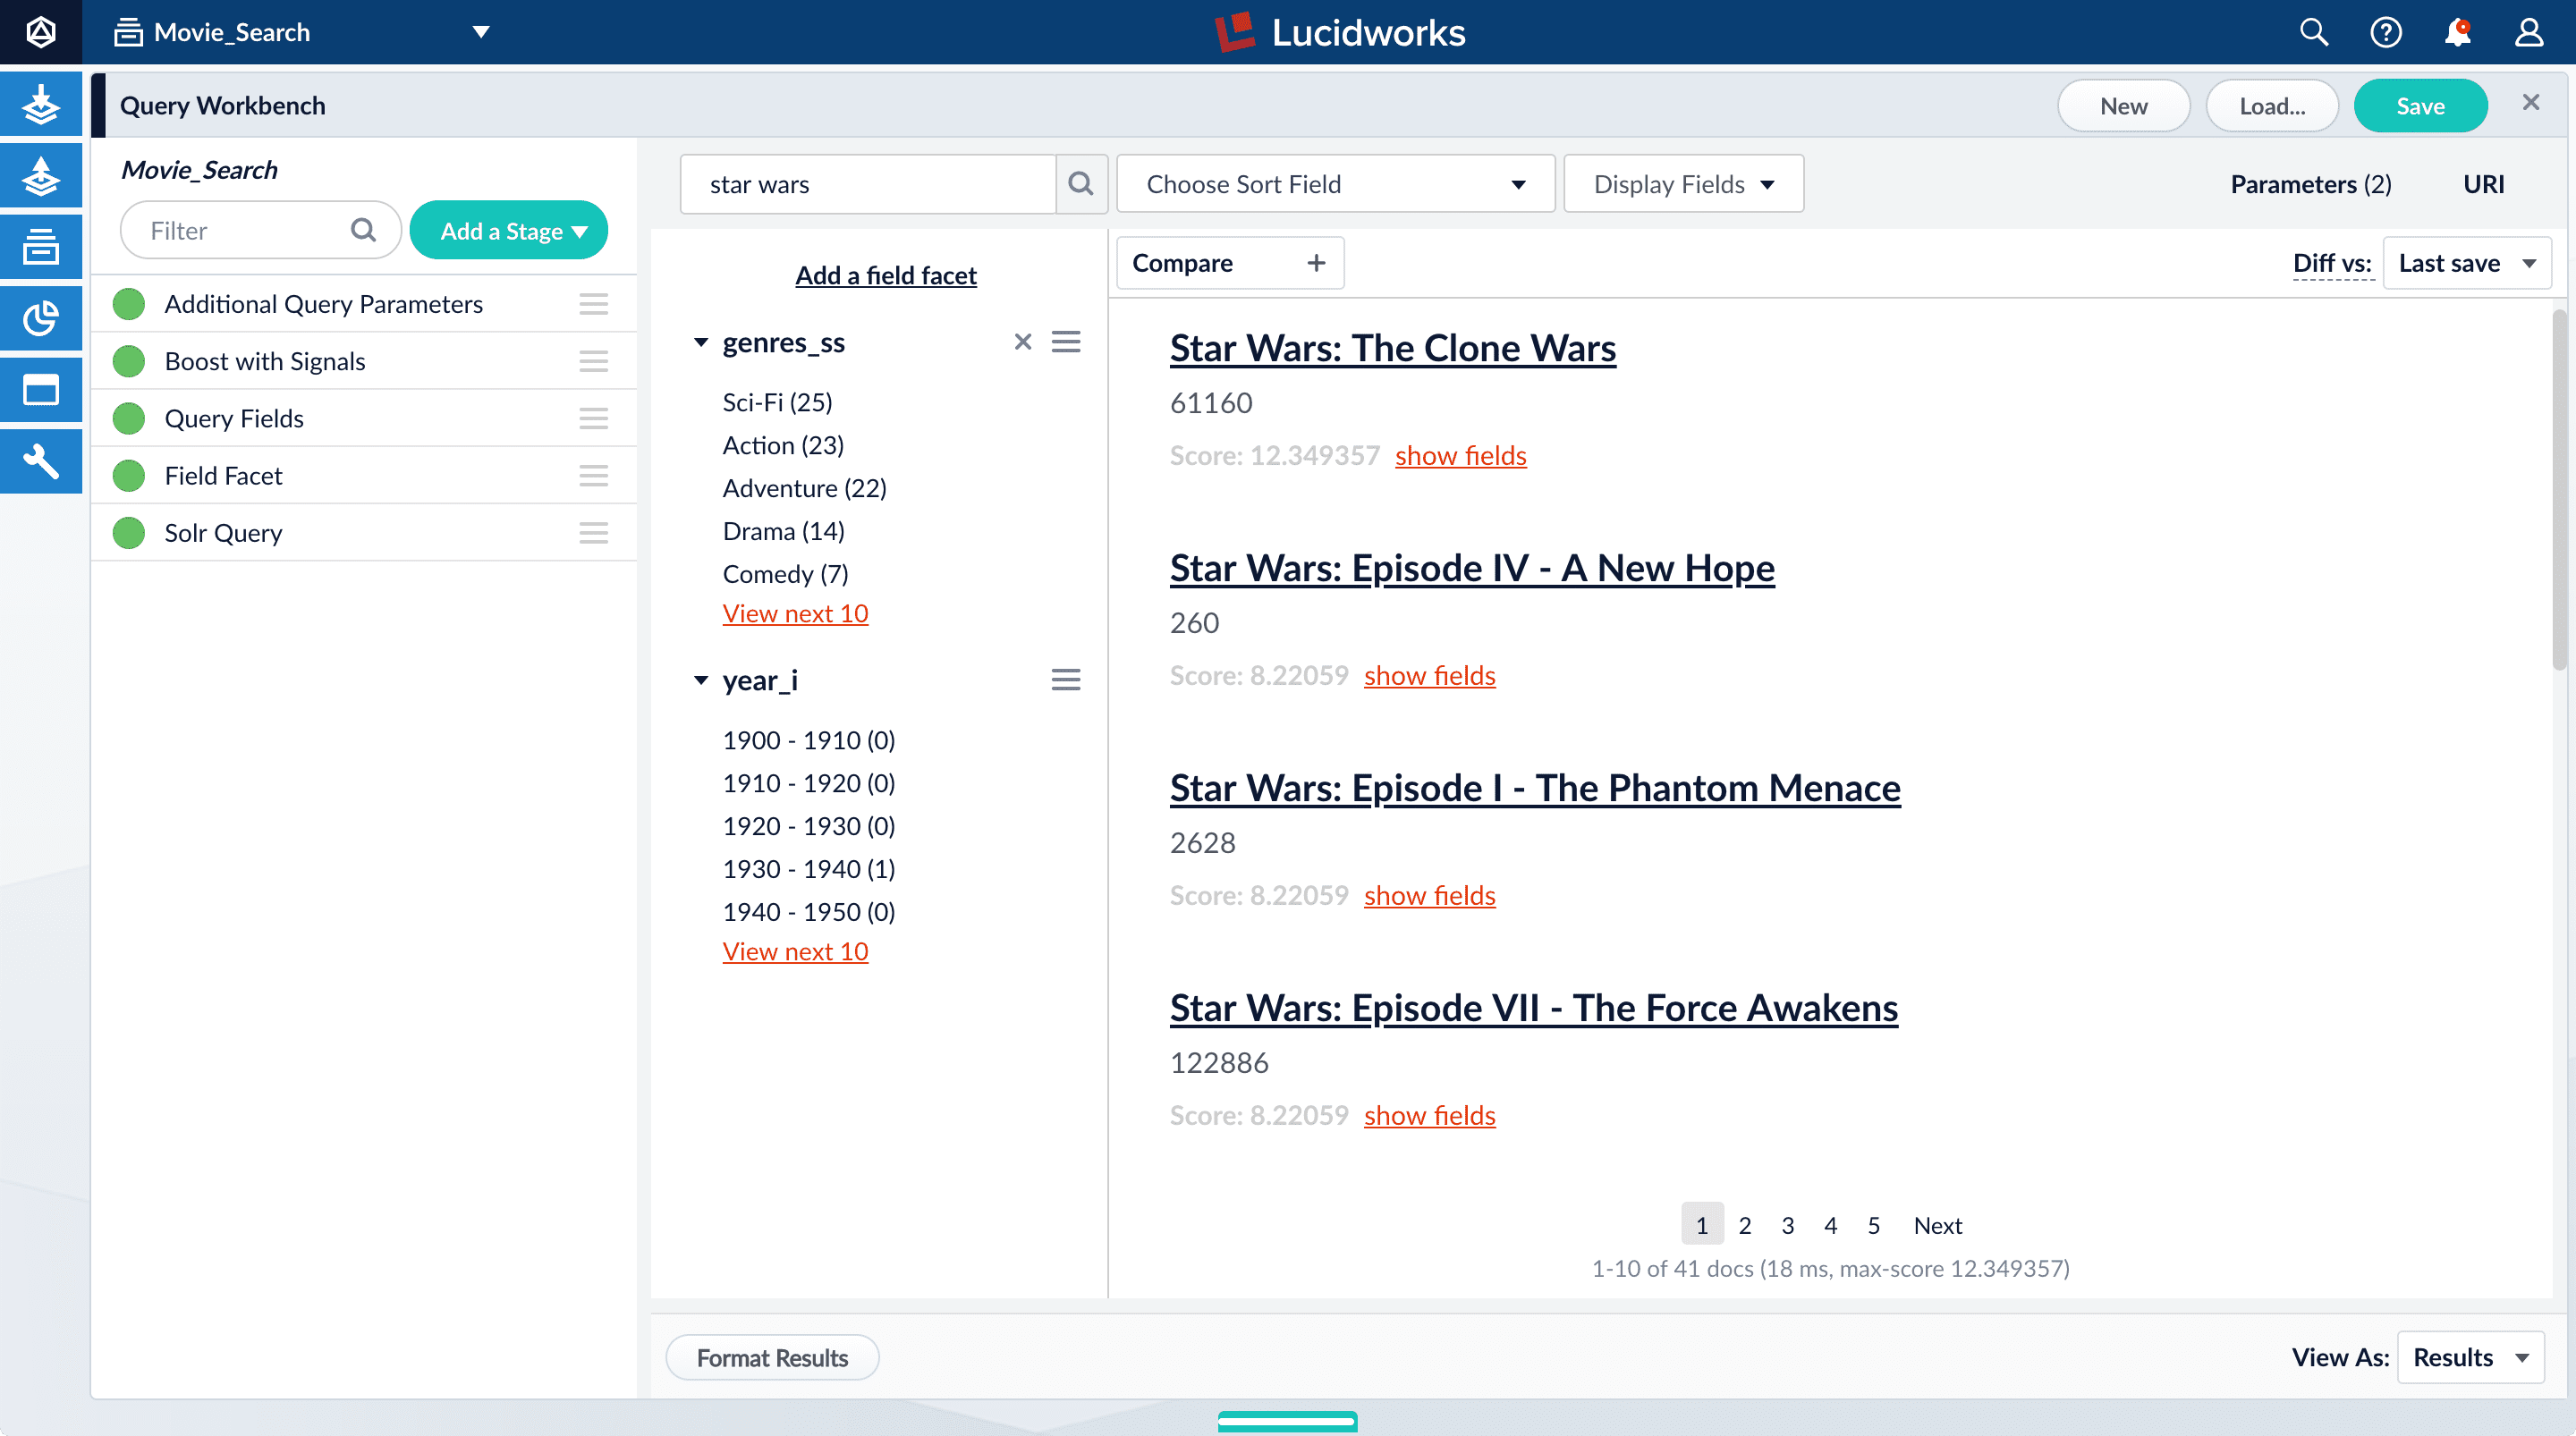
- In Format Results, Set results per page to 20. This should allow you to scroll for this next part instead of explicitly searching for the titles.
Next you will generate signals you can use to boost certain titles. Signals are tied to the search query, so your boosted titles will display first in the search results only when users search for
star wars. - Hover over “Star Wars: Episode IV - A New Hope”.
- Set the number of signals to 4000 and click Simulate.
- Hover over “Star Wars: Episode V - The Empire Strikes Back”.
- Set the number of signals to 3000 and click Simulate.
- Hover over “Star Wars: Episode VI - Return of the Jedi”.
- Set the number of signals to 2000 and click Simulate.
- In the upper right, click Save. The Save Pipeline window displays. By default, you will overwrite the existing query pipeline for the selected collection (in this case,
Movie_Search_signals). - Click Save pipeline.
Explore the raw signals
When you create a collection, two corresponding collections are also created automatically:COLLECTION_NAME_signalsfor raw signals. For example,Movie_Search_signals.COLLECTION_NAME_signals_aggrfor aggregated signals. For example,Movie_Search_signals_aggr.
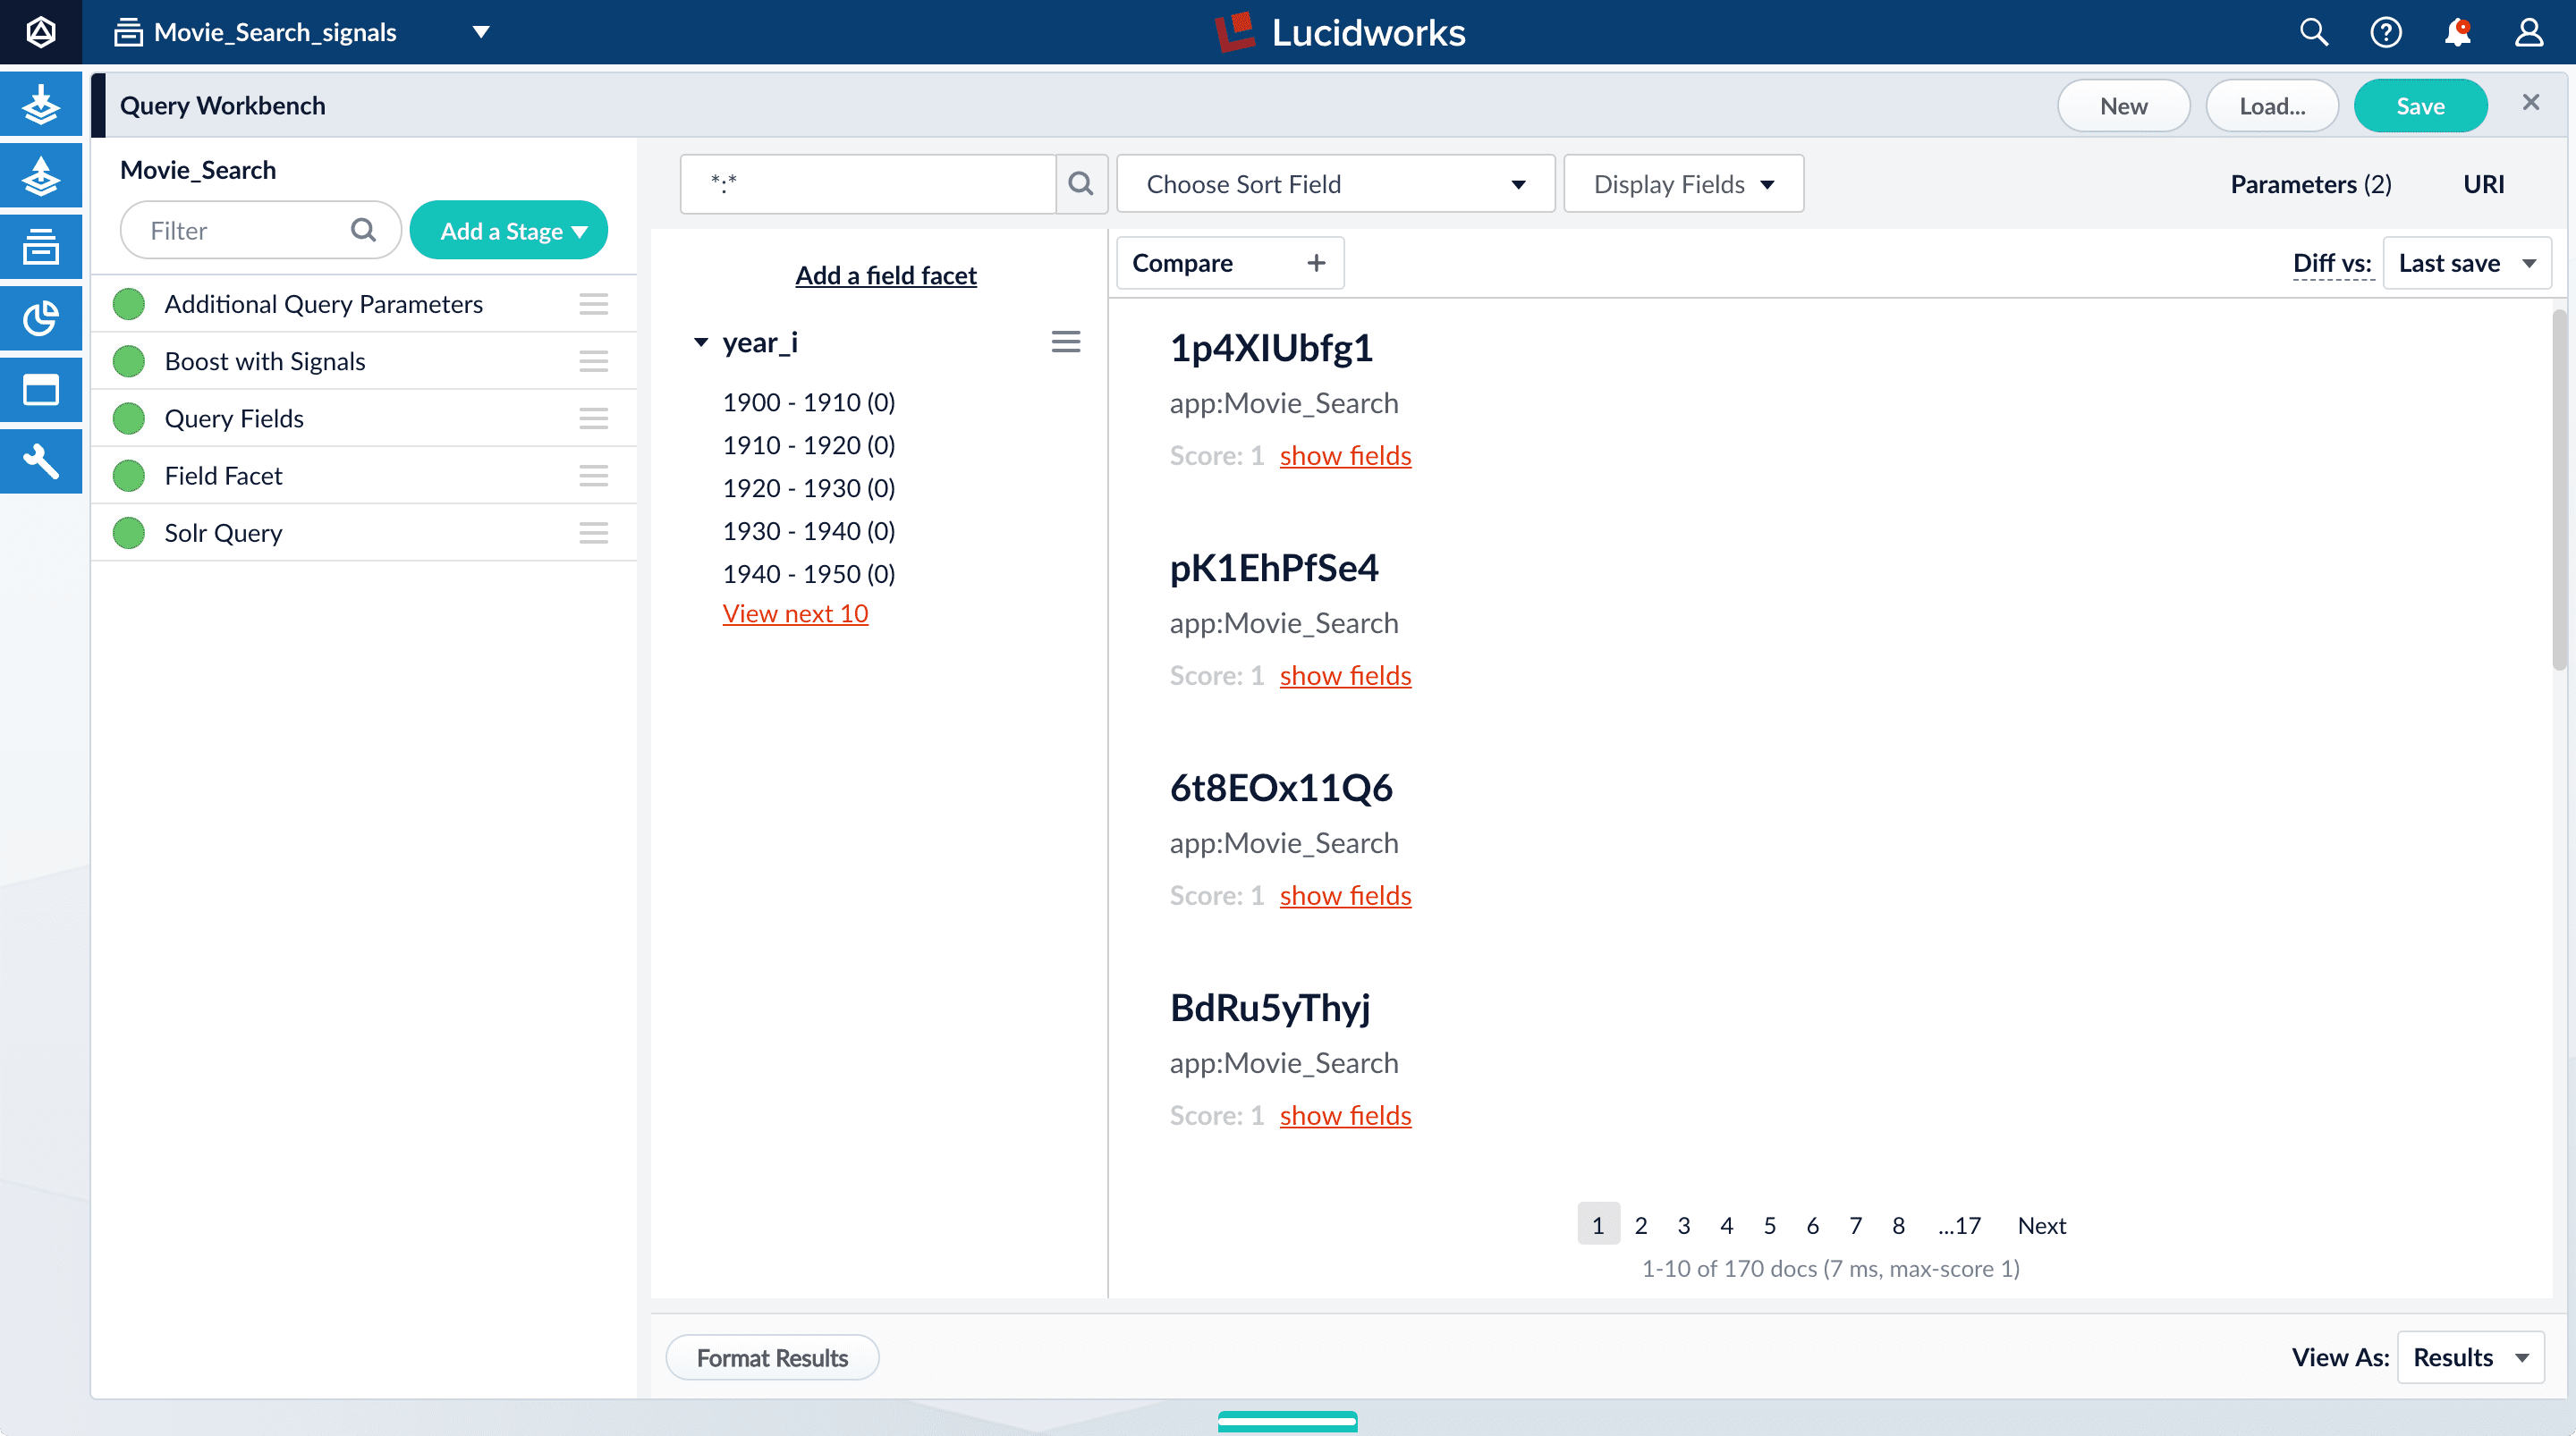
_signals collection.- In the collection picker in the upper left, select Movie_Search_signals.
- Click Querying > Query Workbench. The signals data displays.
- To display click signals, enter
type:clickand click Search. - For any of the results, click show fields.
The
count_ifield displays the number of click signals you generated for this event. For example, given the correspondingdoc_idfor Star Wars: Episode IV - A New Hope, thecount_iequals 4000.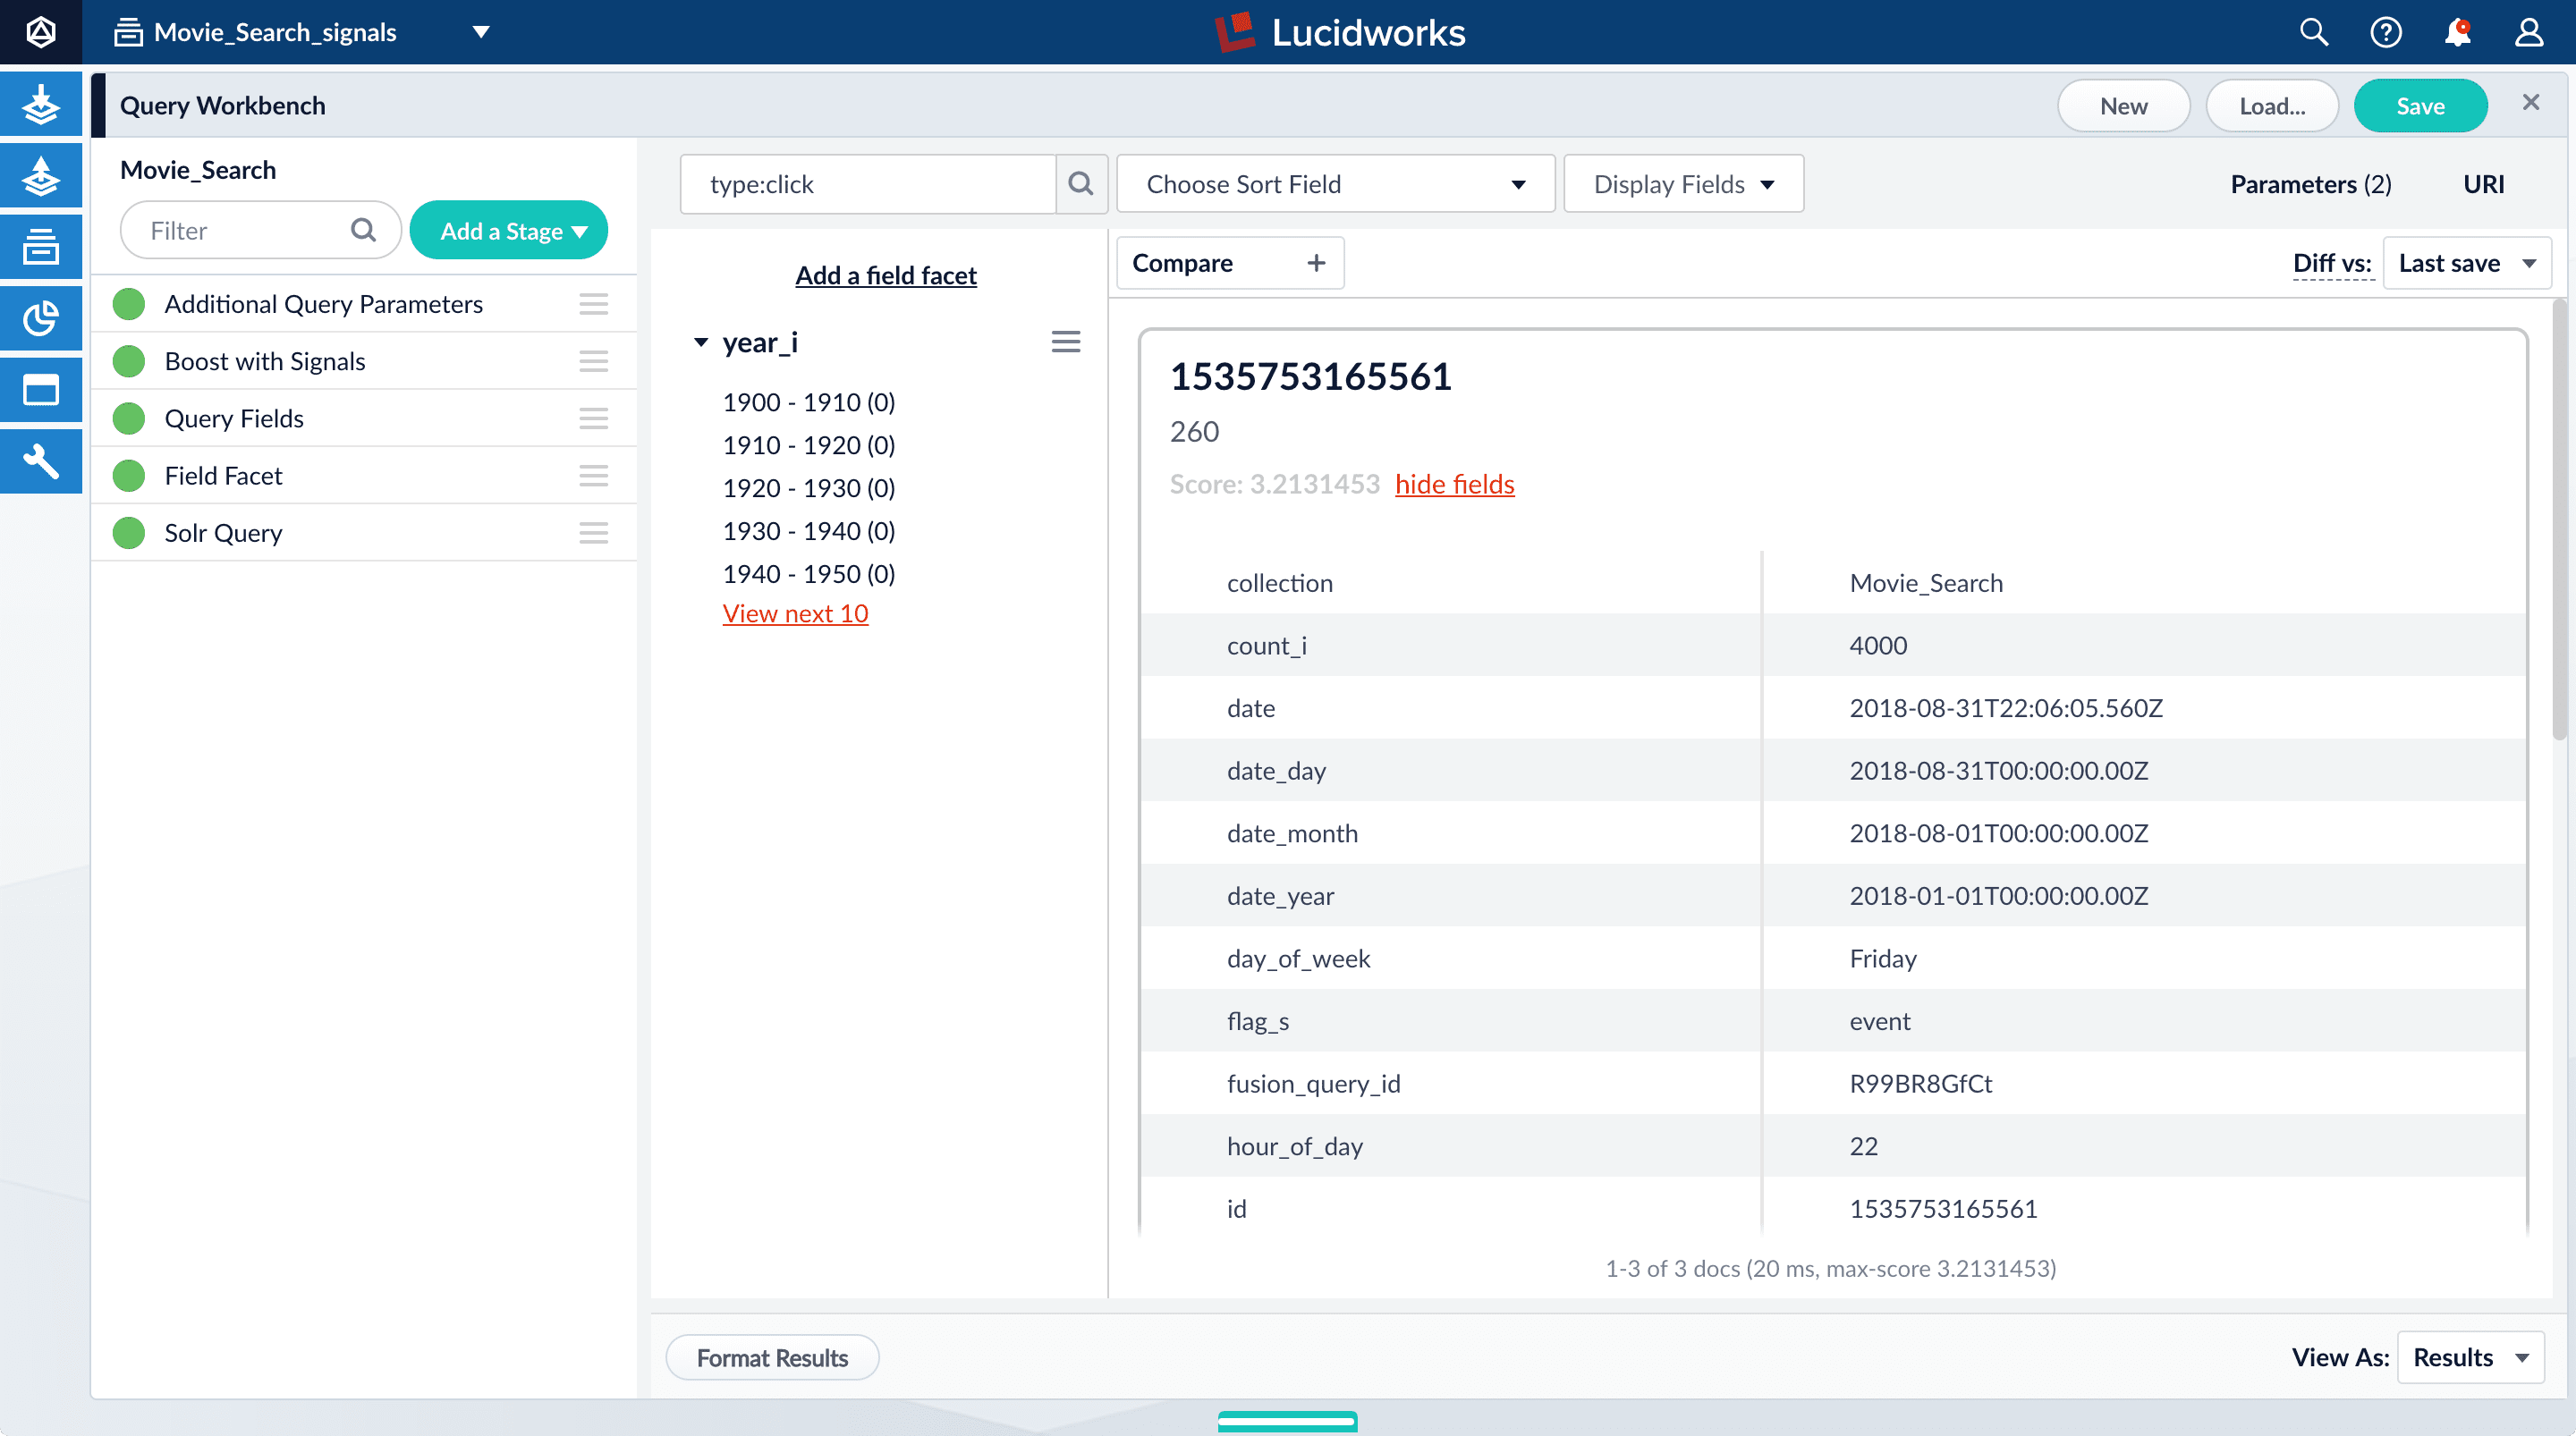
- Click hide fields.
Optional: Format signals fields
You can configure your search view to display fields that are meaningful for your investigation. For example, you can display the document ID and the number of click signals.- Click Display Fields.
-
For the Name field, select
doc_id. -
For the Description field, select
count_i.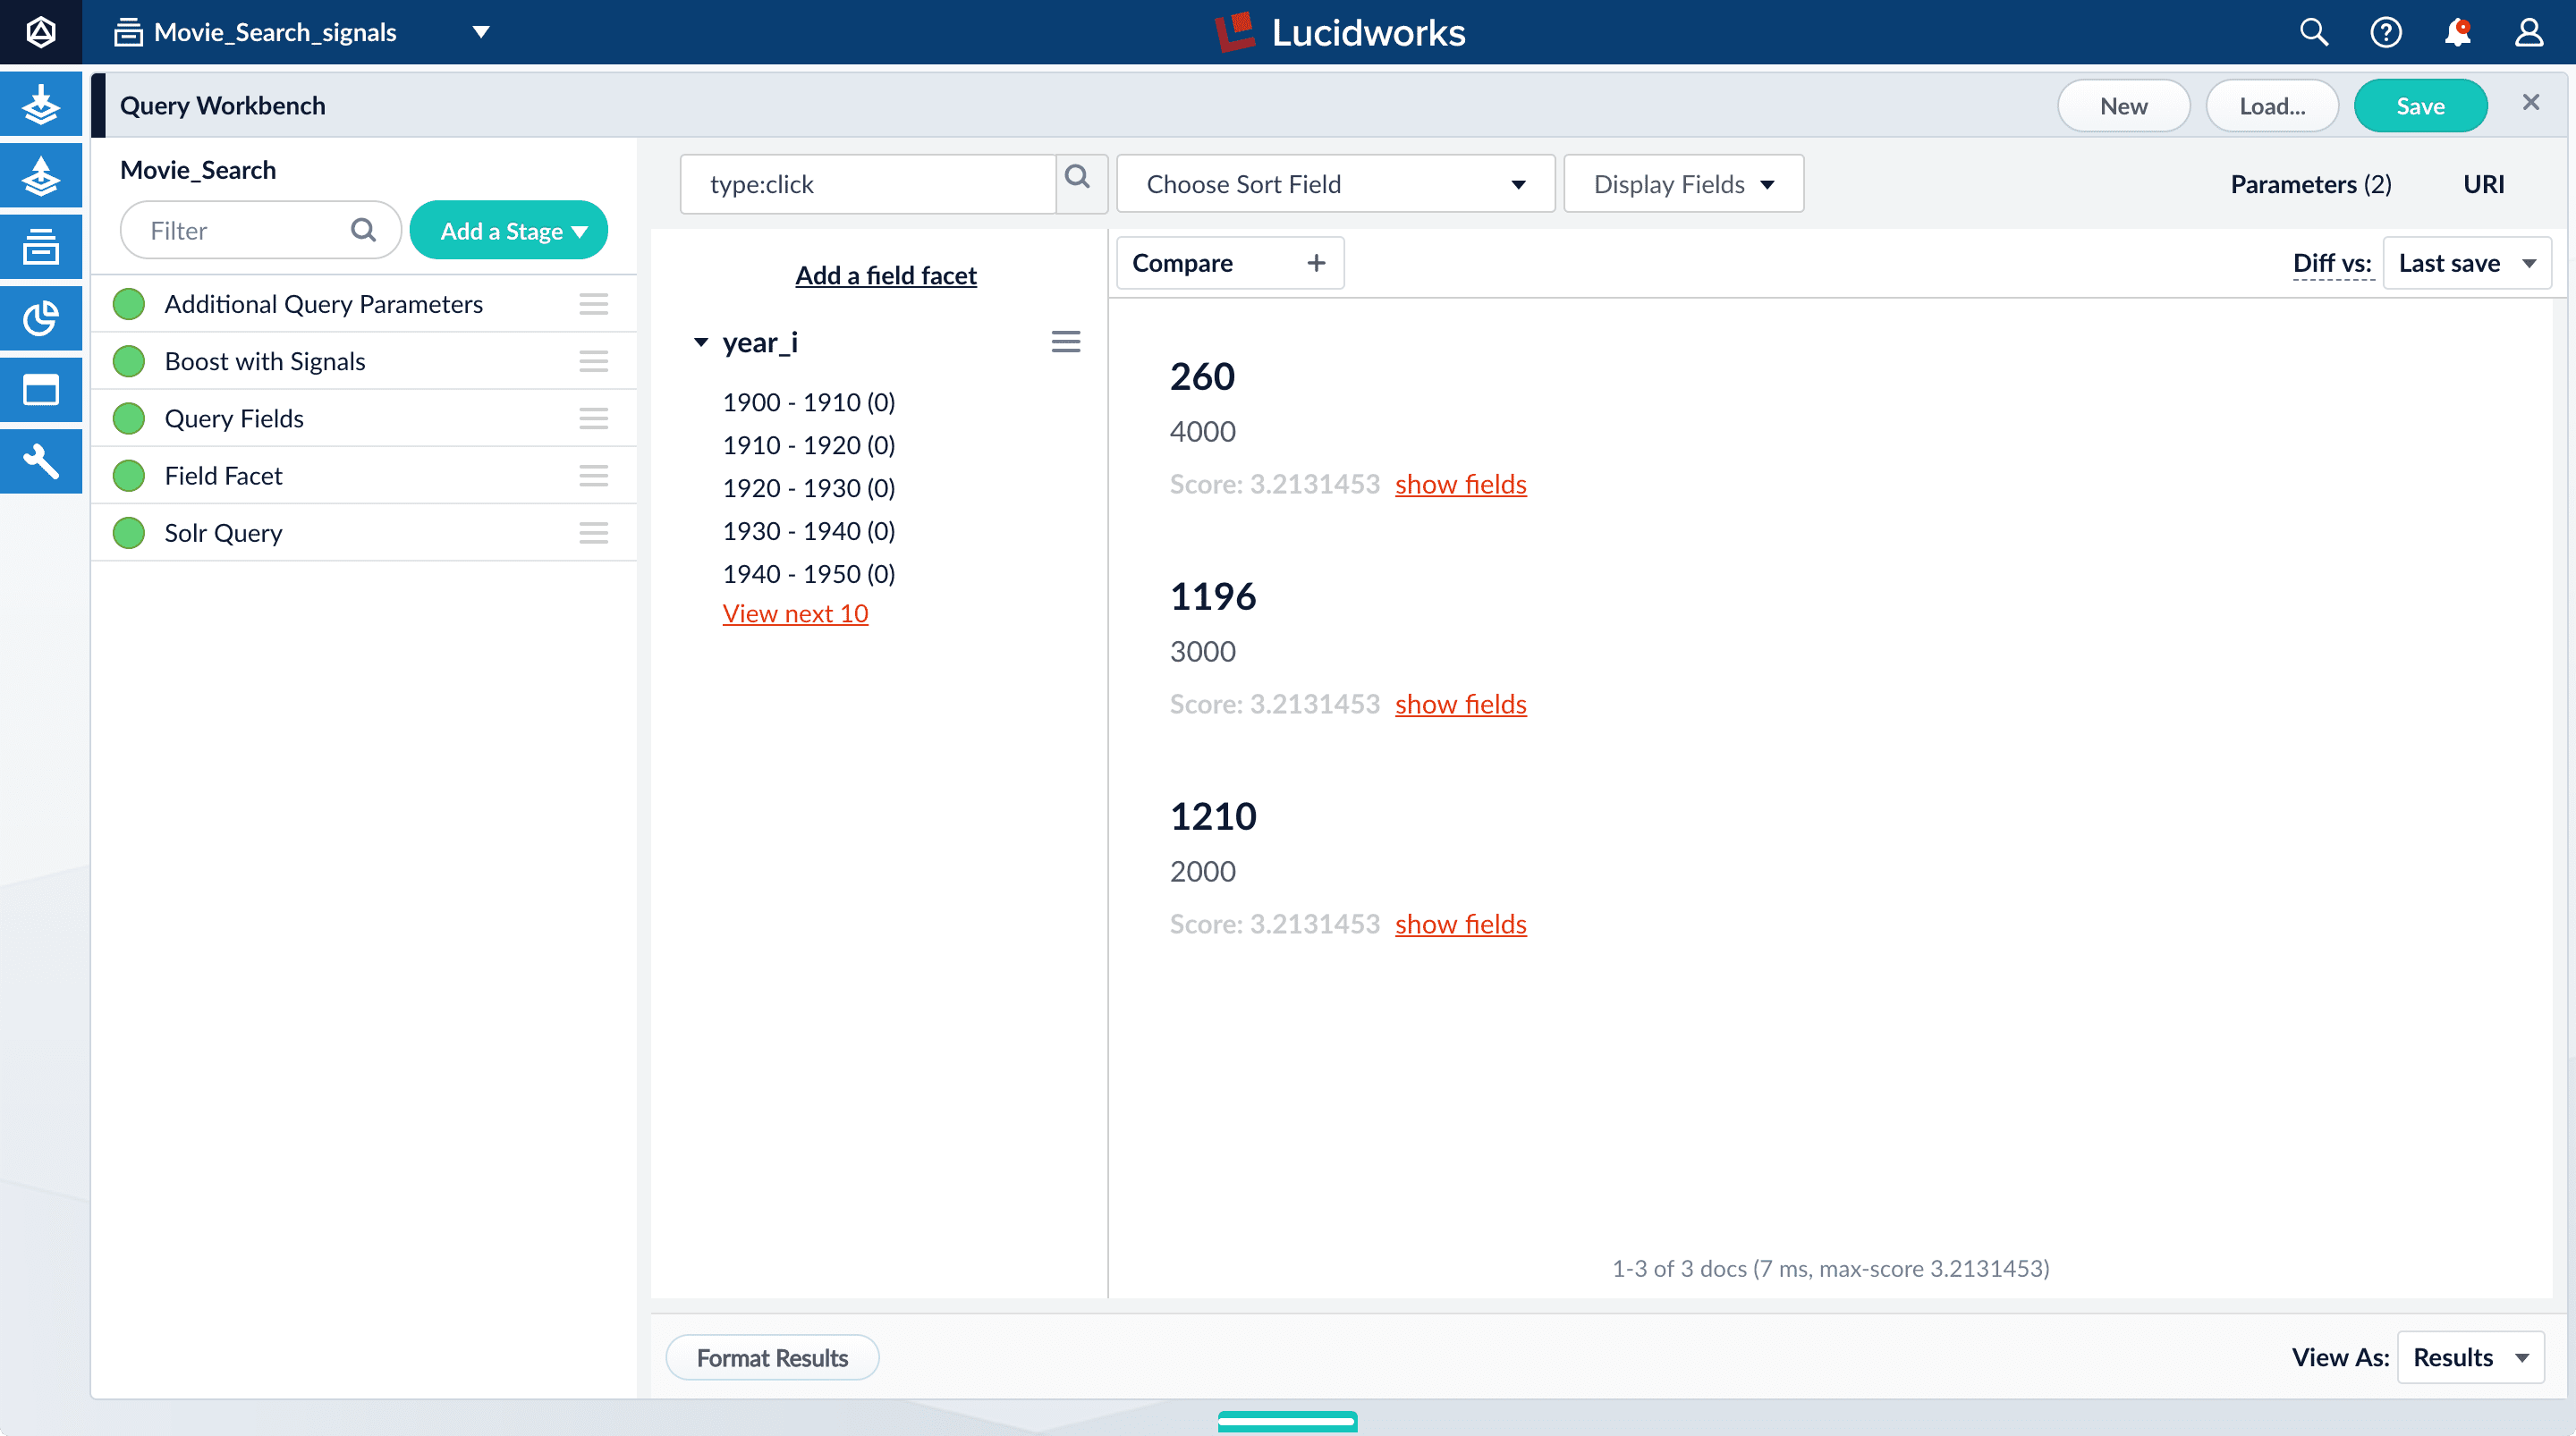
Explore the aggregated signal data
Aggregation jobs are created automatically when you create an app. However, you need to run the aggregation job manually:- Navigate to Collections
 > Jobs.
 - In the job list, select
Movie_Search_click_signals_aggregation. - Click Run.
- Click Start. The job may take a few minutes to complete.
- When the success message displays, in the collections picker in the upper left, select Movie_Search_signals_aggr.
- Click Querying > Query Workbench.
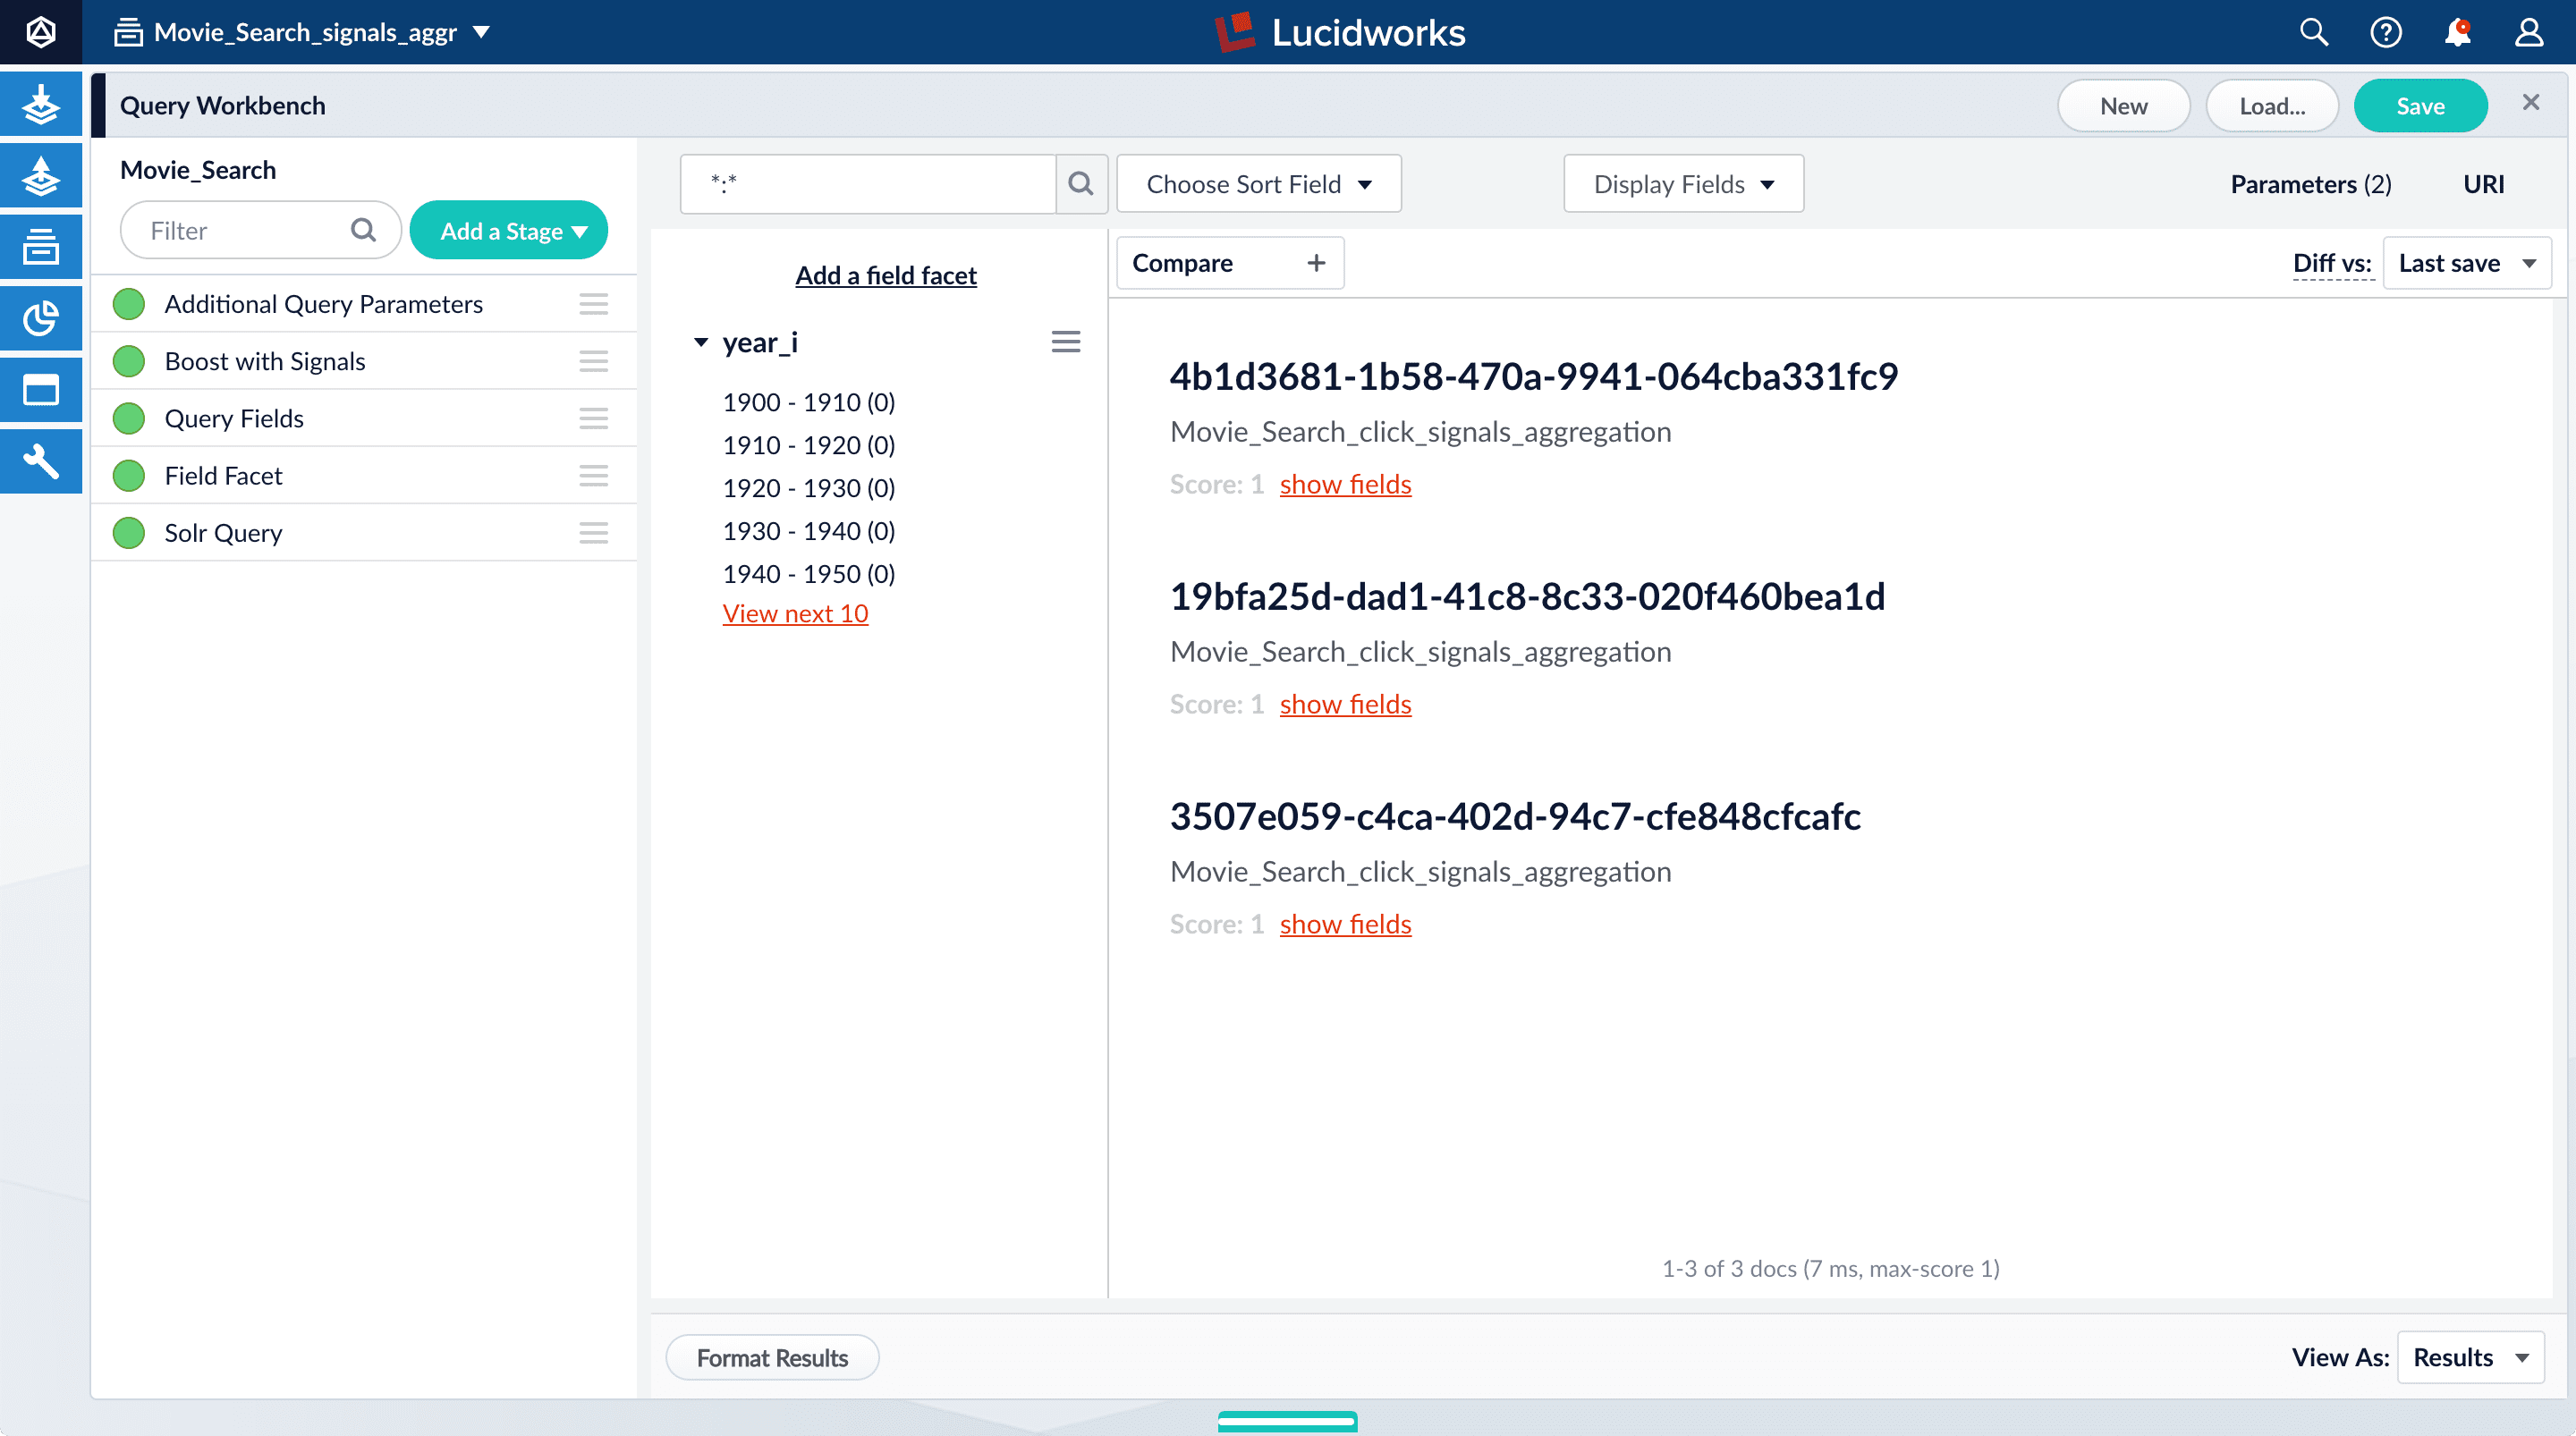
The aggregated signals data displays. If the aggregated signals data does not display, wait a minute and then reload your browser, or click Search in Query Workbench.
- Click Display Fields.
- In the Name field, select
doc_id. - In the Description field, select
aggr_count_i. - For the result named
1210, click show fields.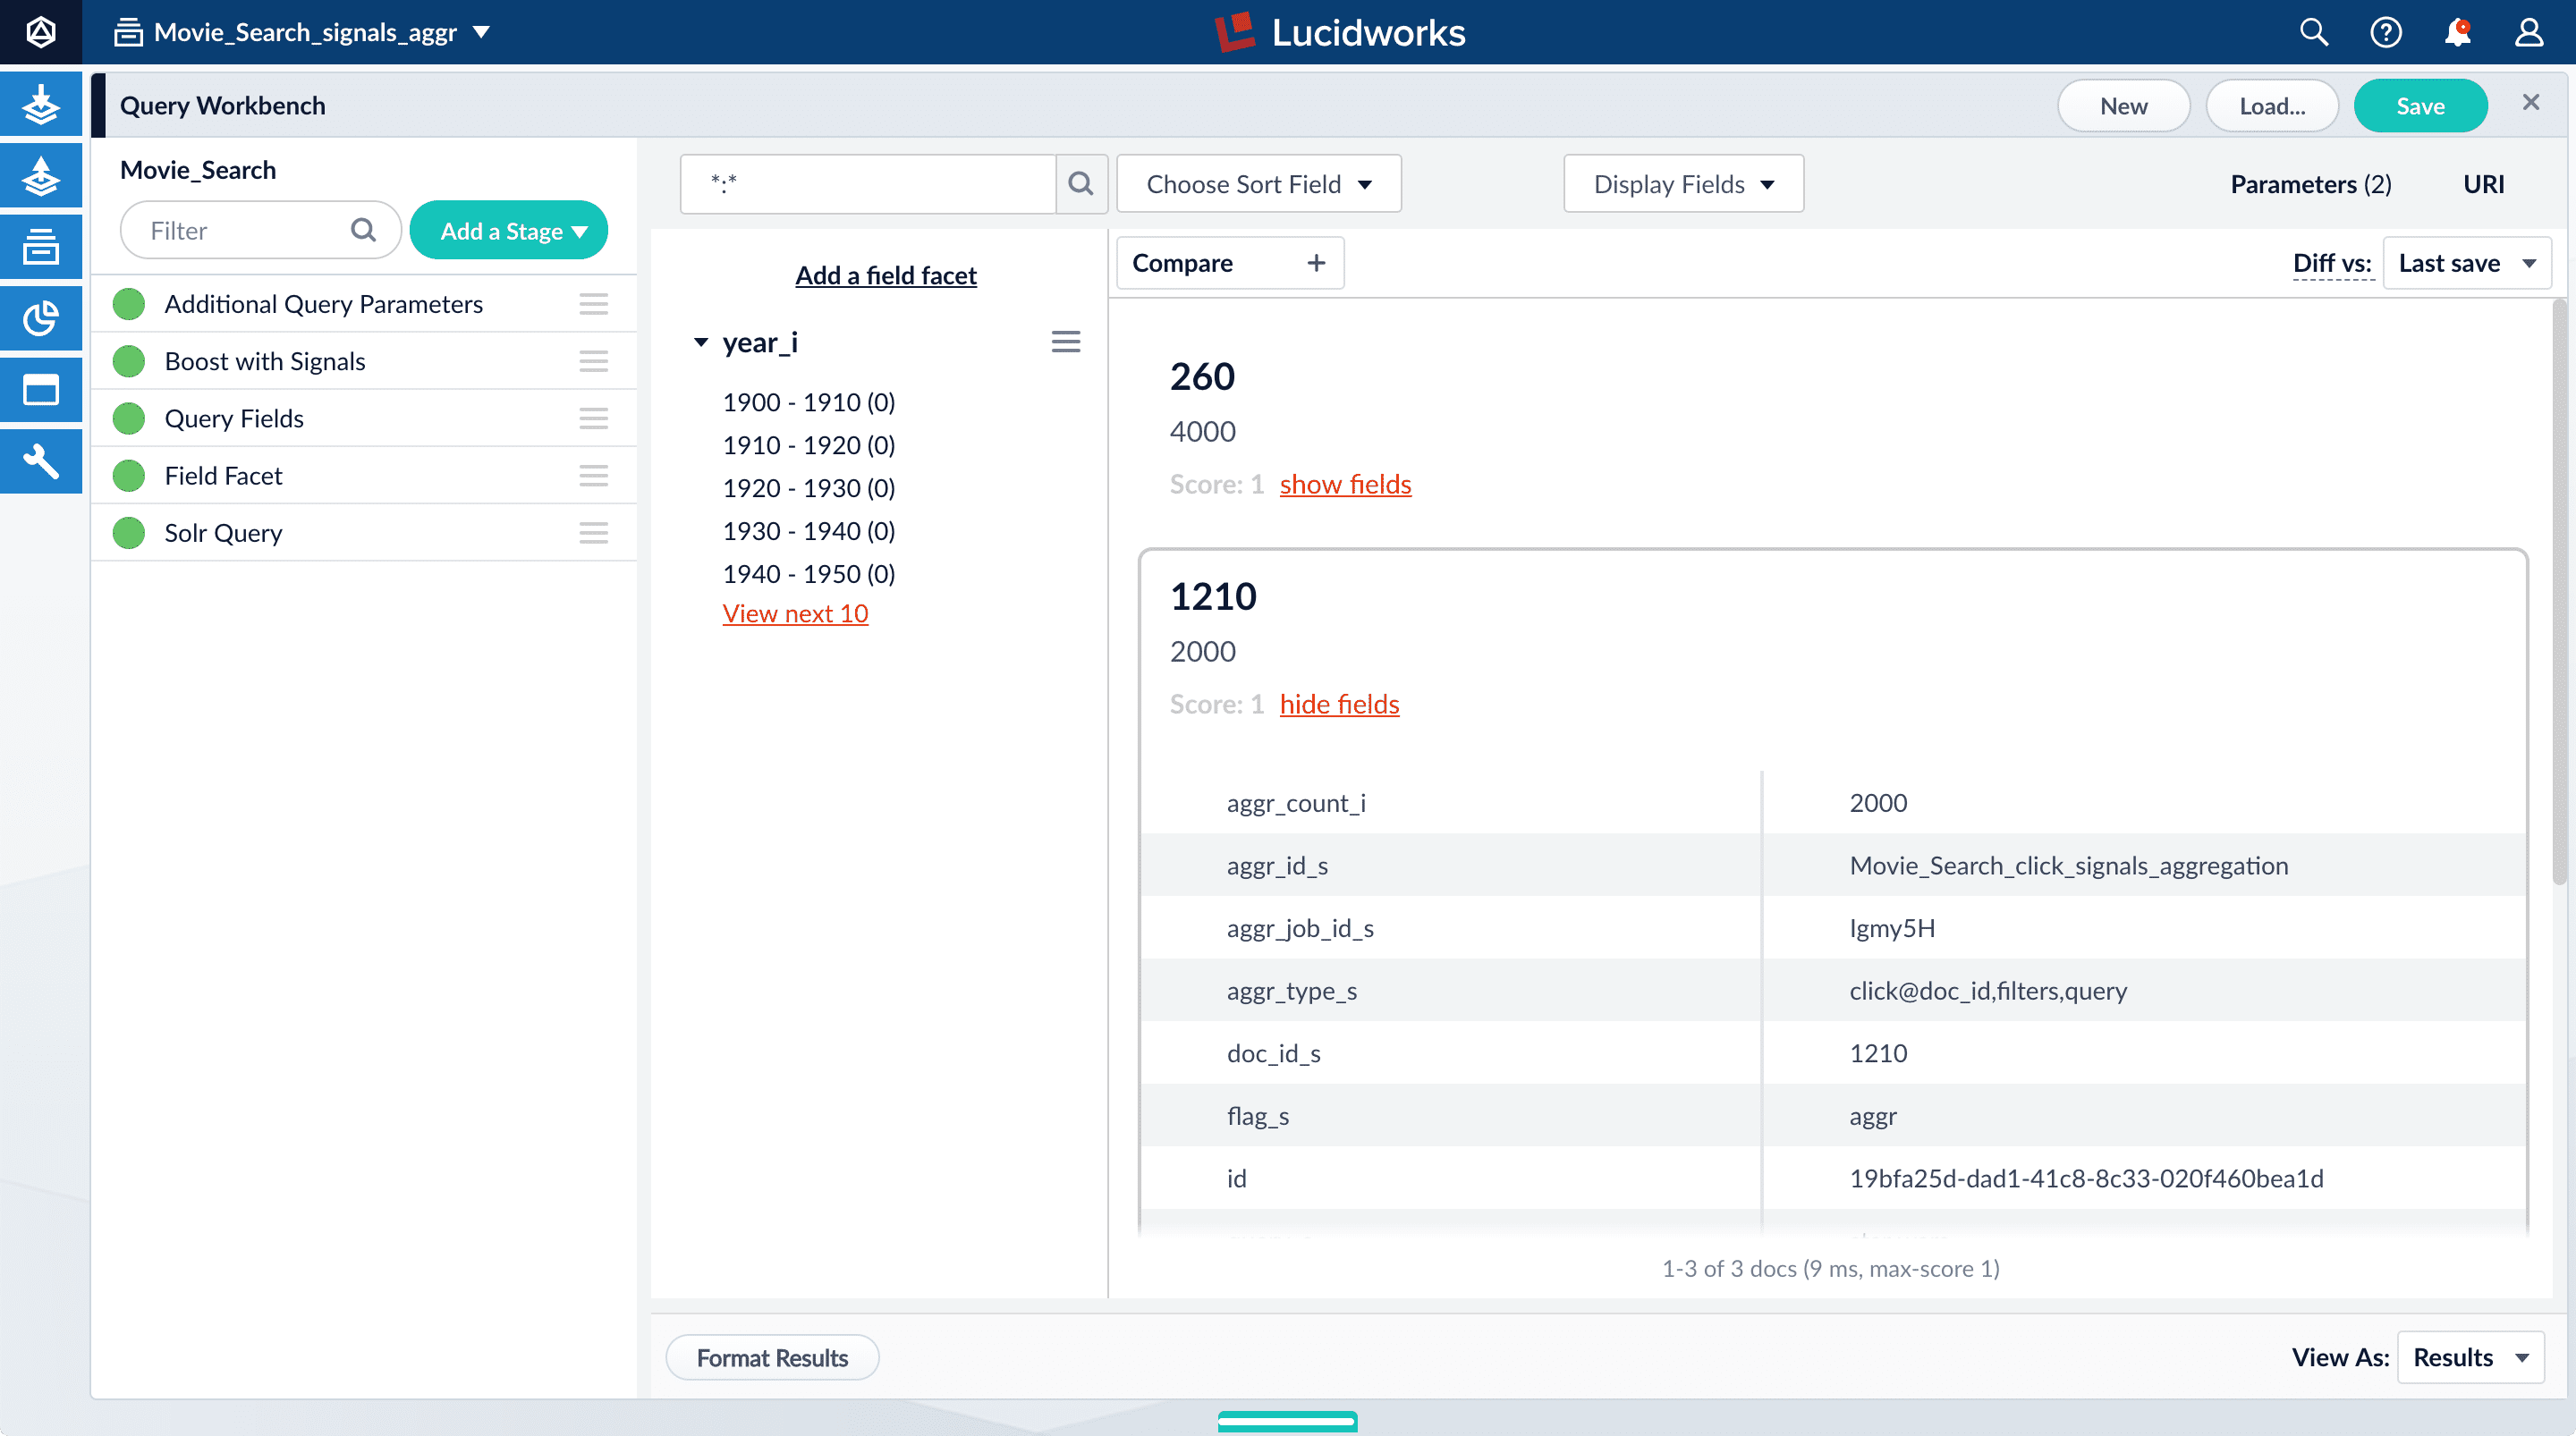
aggr_count_i. Number of signals that have been aggregated. For example, 3000.aggr_id_s. Name of the aggregation job.aggr_job_id_s. Job ID.aggr_type_s. Aggregation type.
- In the upper right, click Save.
The Save Pipeline screen displays. By default, you will overwrite the existing query pipeline for the selected collection. For example,
Movie_Search. - Click Save pipeline.
View the search results with and without default boosting
- In the collections picker in the upper left, select Movie_Search.
- Open Query Workbench. Navigate to Querying > Query Workbench.
- Search for
star wars. “Star Wars: Episode IV - A New Hope” is the first search result, followed by Episode V and then VI. These search results are automatically boosted by the default configuration of the Boost with Signals query pipeline stage, which boosts on theidfield.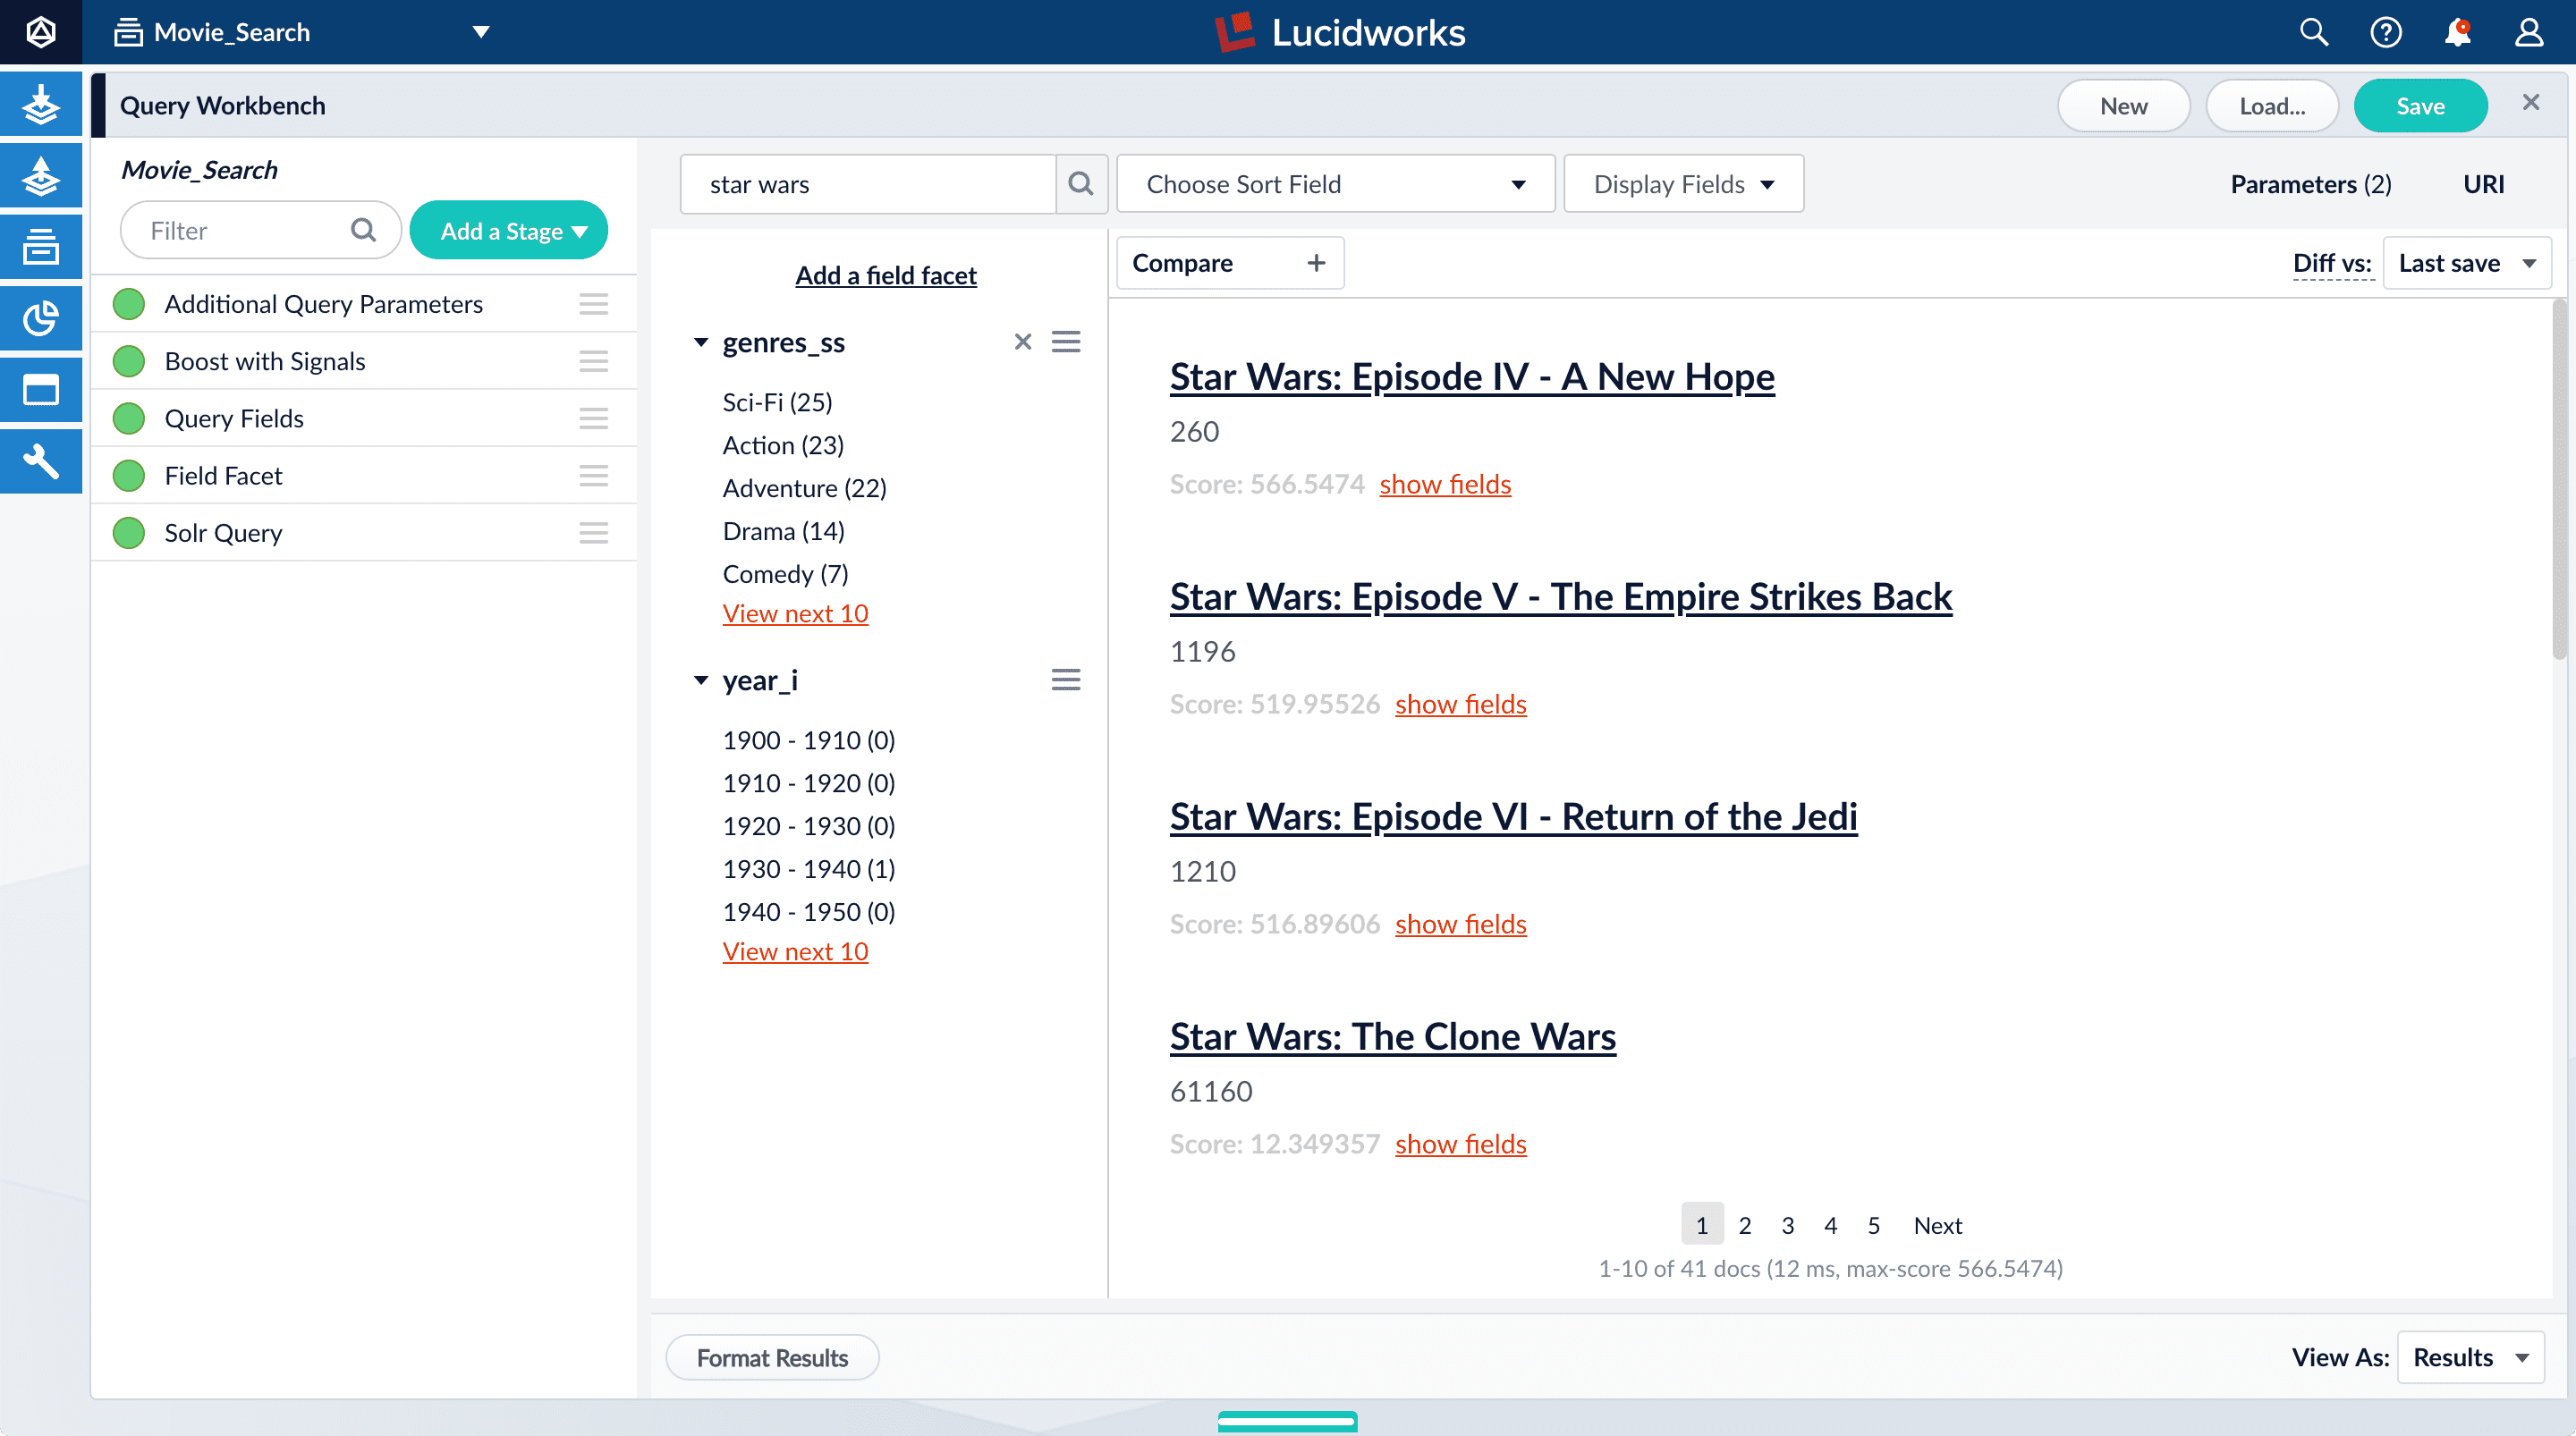
- Click Compare. Another preview panel opens. Now the working pipeline is on the right and a static snapshot of that same pipeline is on the left.
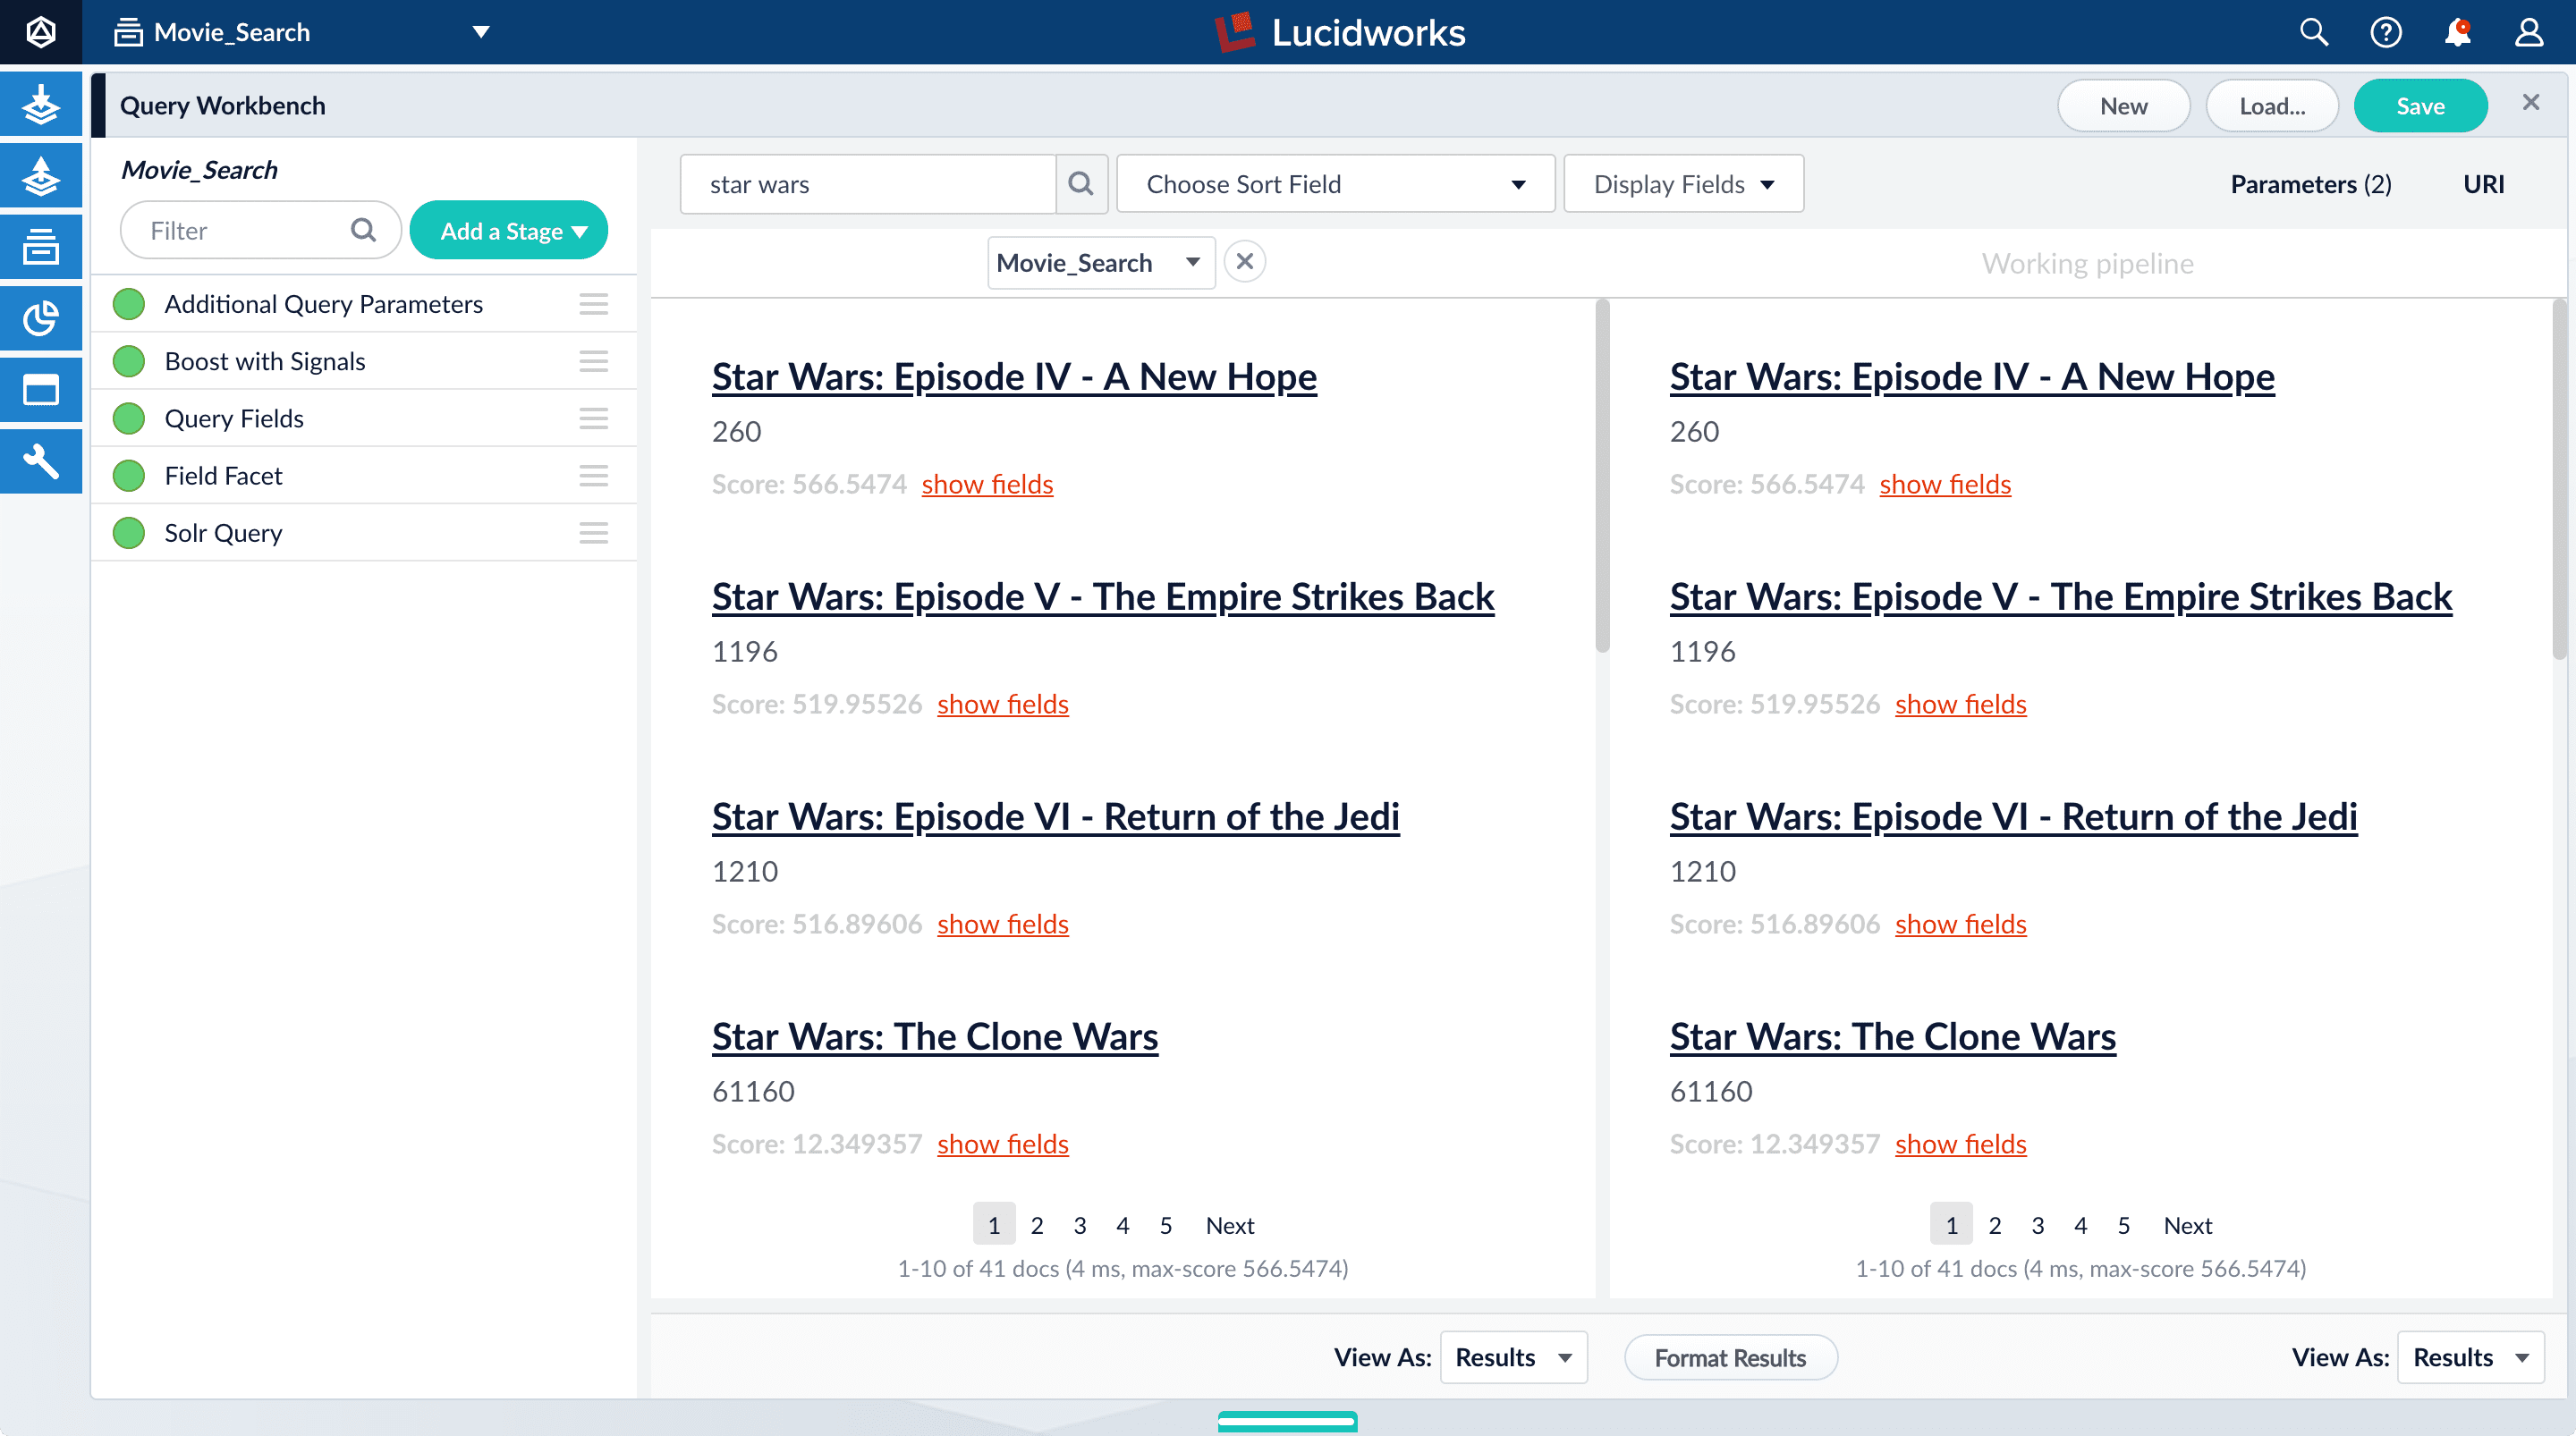
Movie_Search) with and without the Boost with Signals stage enabled. - Turn off the Boost with Signals stage.\
- Turn on the Boost with Signals stage again to restore the boosted results.
- To close the comparison preview panel, click Close
 .
.
A brief tour
- The launcher is where you can view all apps in your Lucidworks Search environment and create new ones.
- The Lucidworks Search workspace is where you configure how an app ingests, indexes, queries, and analyzes data.
The Lucidworks Search launcher
When you log in to Lucidworks Search, the first page is the Lucidworks Search launcher. This is where you create and launch apps: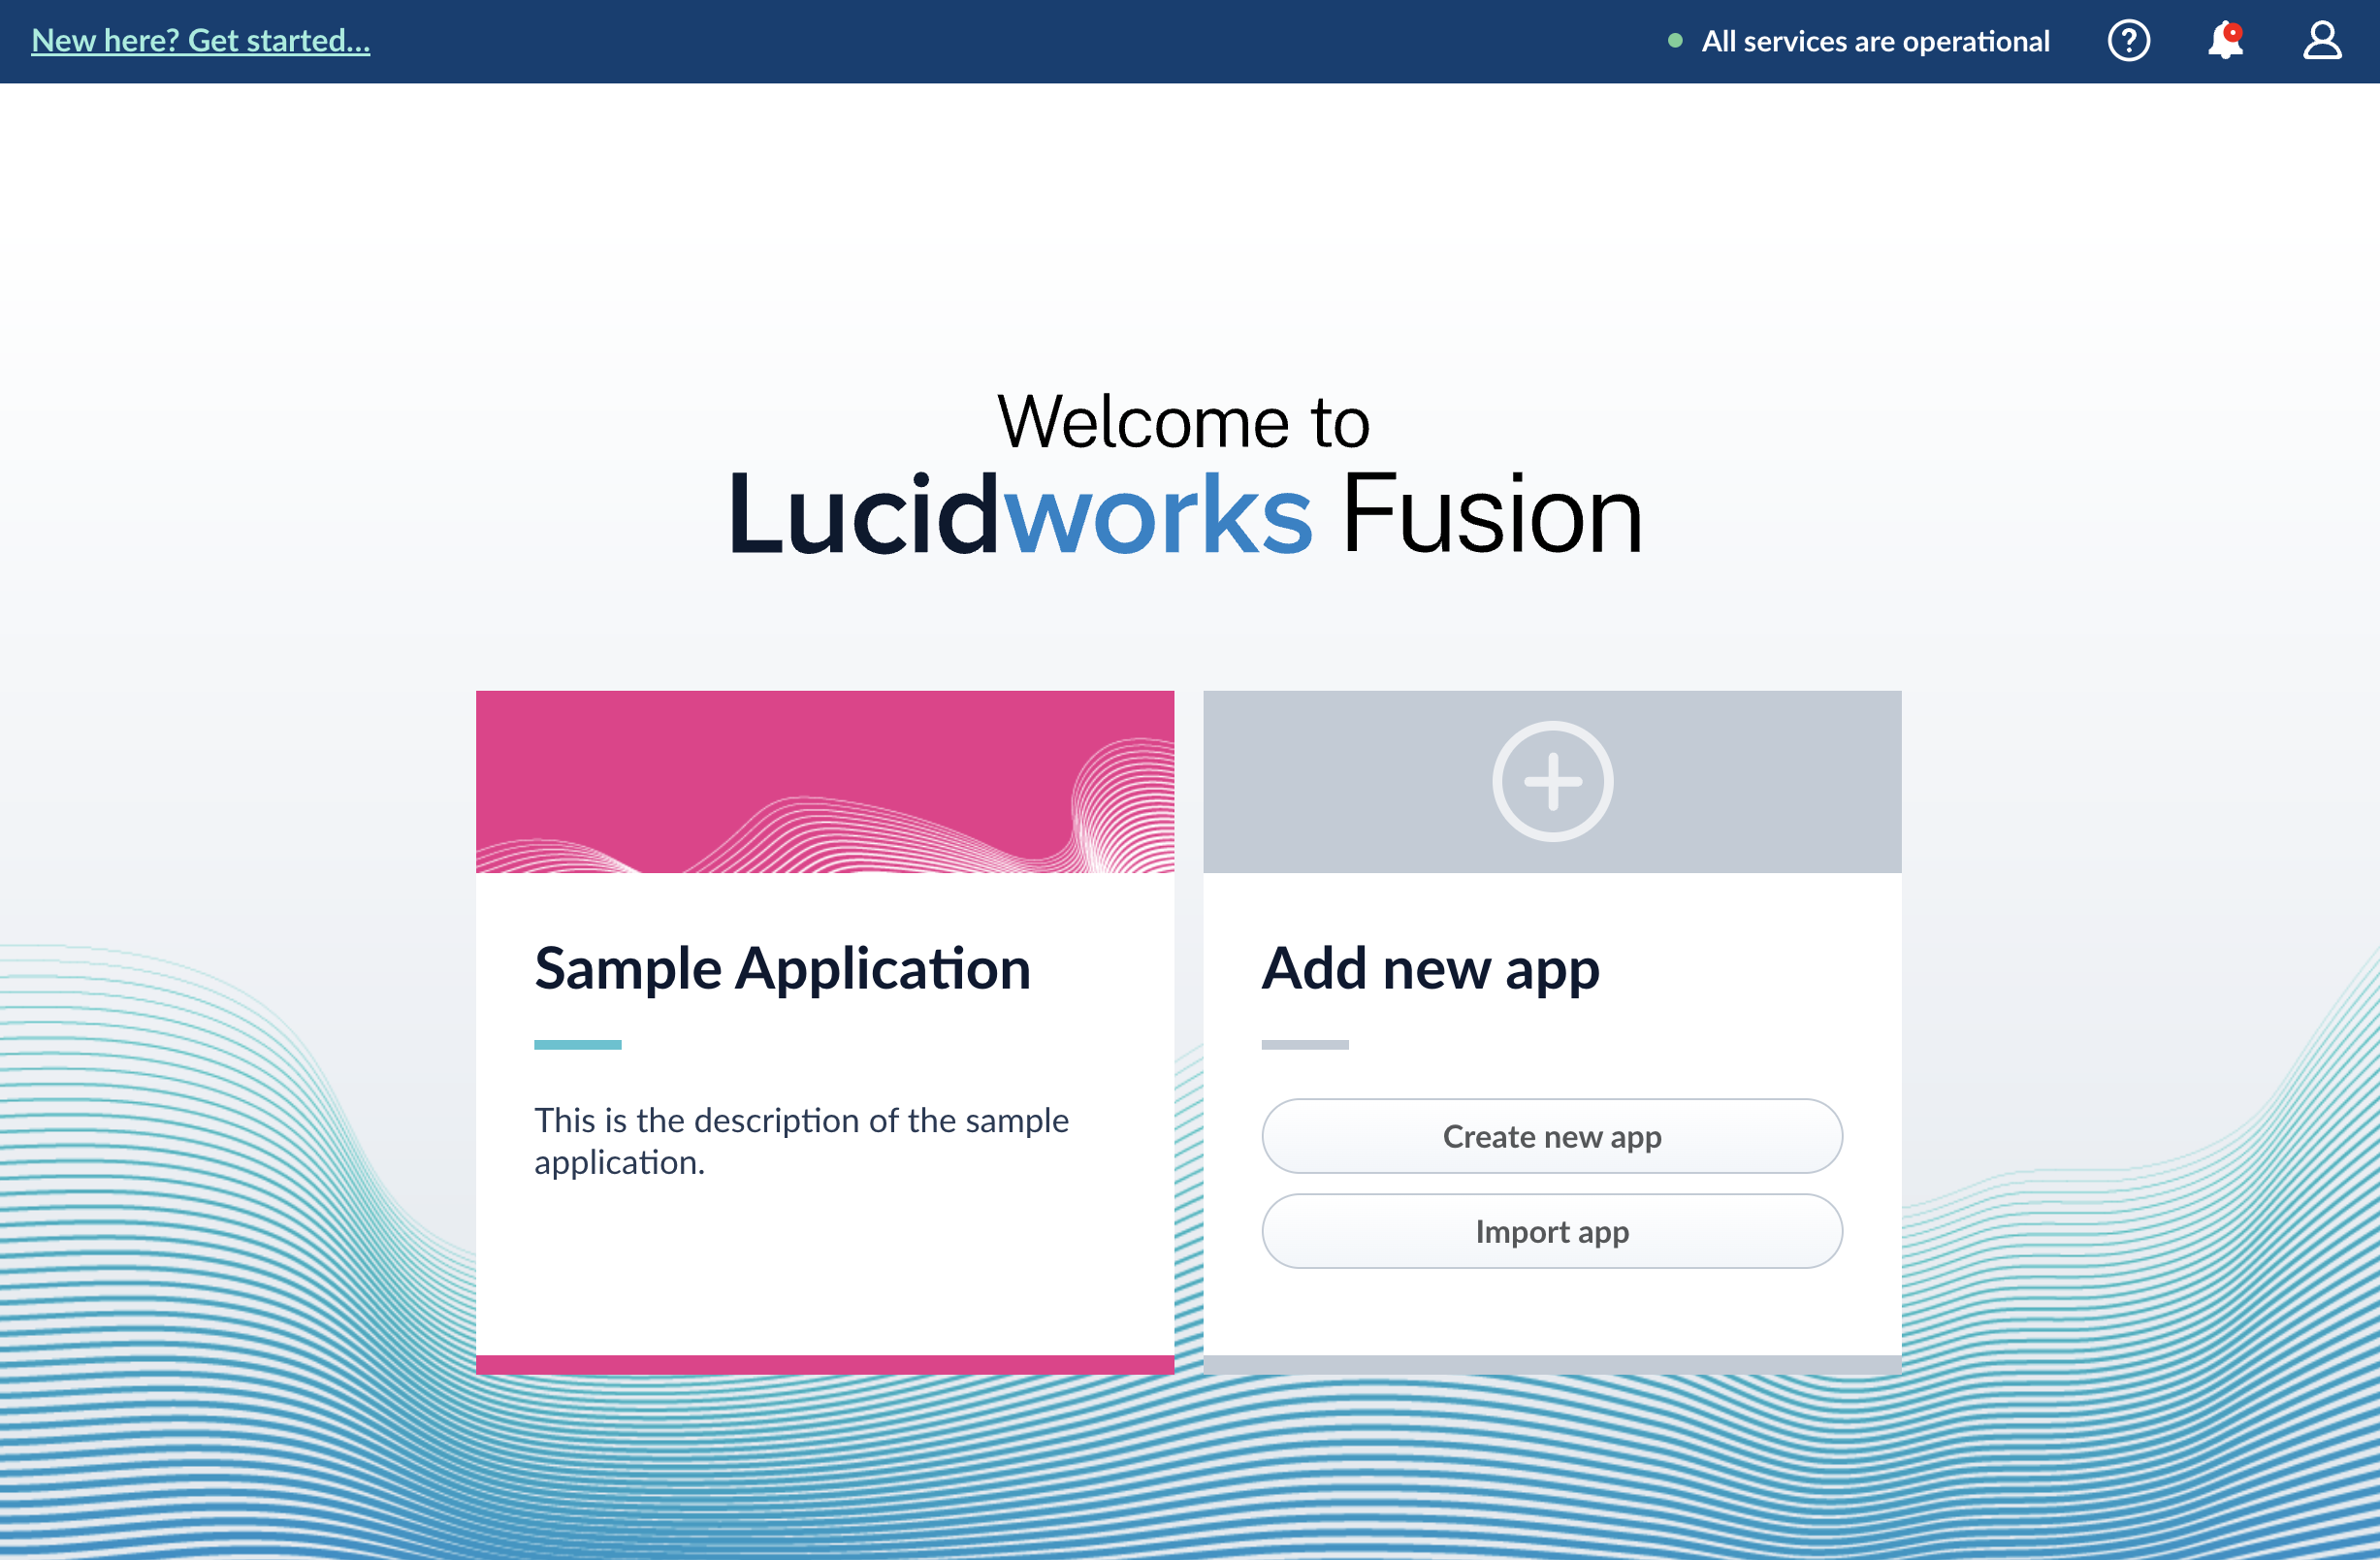
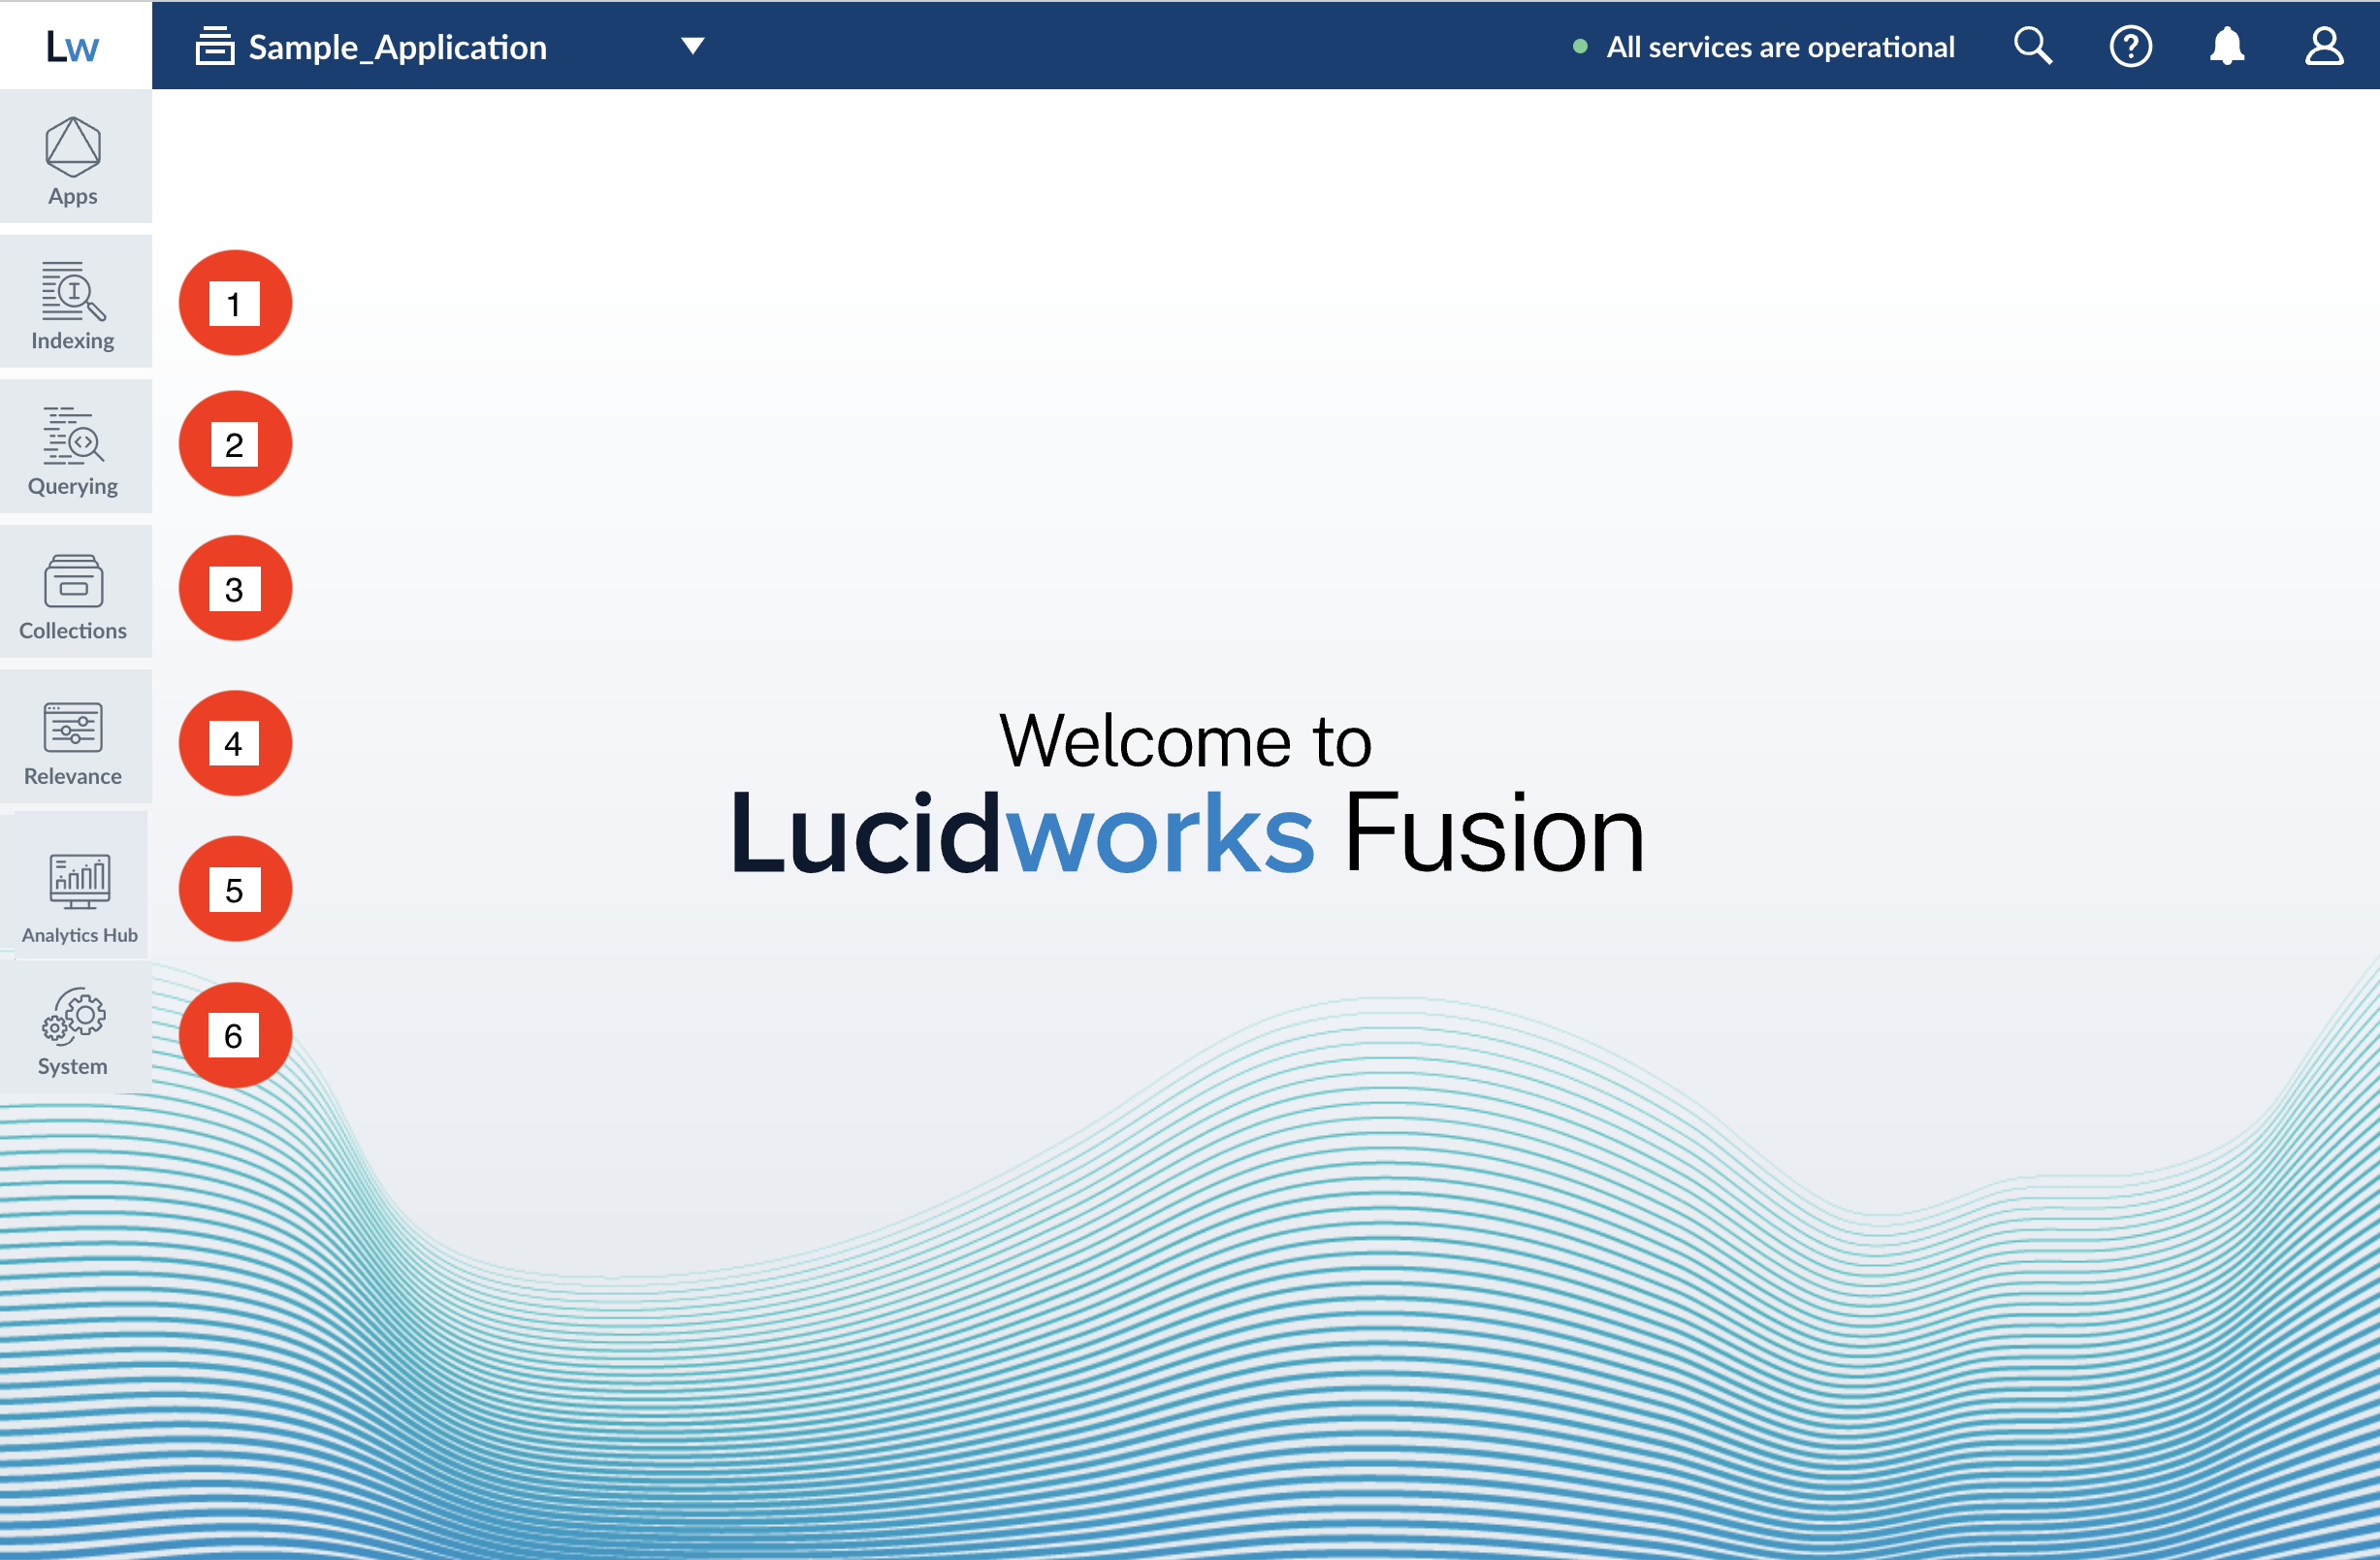
The Lucidworks Search workspace
You can reach the Lucidworks Search workspace by clicking on any app in the launcher. When you enter the Lucidworks Search workspace, you find all the tools you need to configure the selected app:- On the left side are the app tool menus, where you can find tools for working with your app.
- System-wide tools are at the top of the UI. With the exception of the Collections tool, which allows you to switch between collections for your app, these tools do not concern your app specifically.
App tool menus
- Indexing (getting data in)
The Index Workbench is the primary tool for getting data into your app through the Lucidworks Search UI. It provides an all-in-one view of the components of a datasource. You can also access those components individually through this menu. - Querying (getting data out)
For getting data out, the Query Workbench is the main tool. It shows you a live preview of search results while you configure and fine tune your query pipelines.
See also Query data. - Collections
Manage your data collections and configure their features.
See also Collection Management. - Relevance
Add or edit rules, recommendations, and signals. - Analytics Hub
View App Insights, run Experiments, or view your Dashboard. - System
Manage your system, including access control and logs.
System-wide
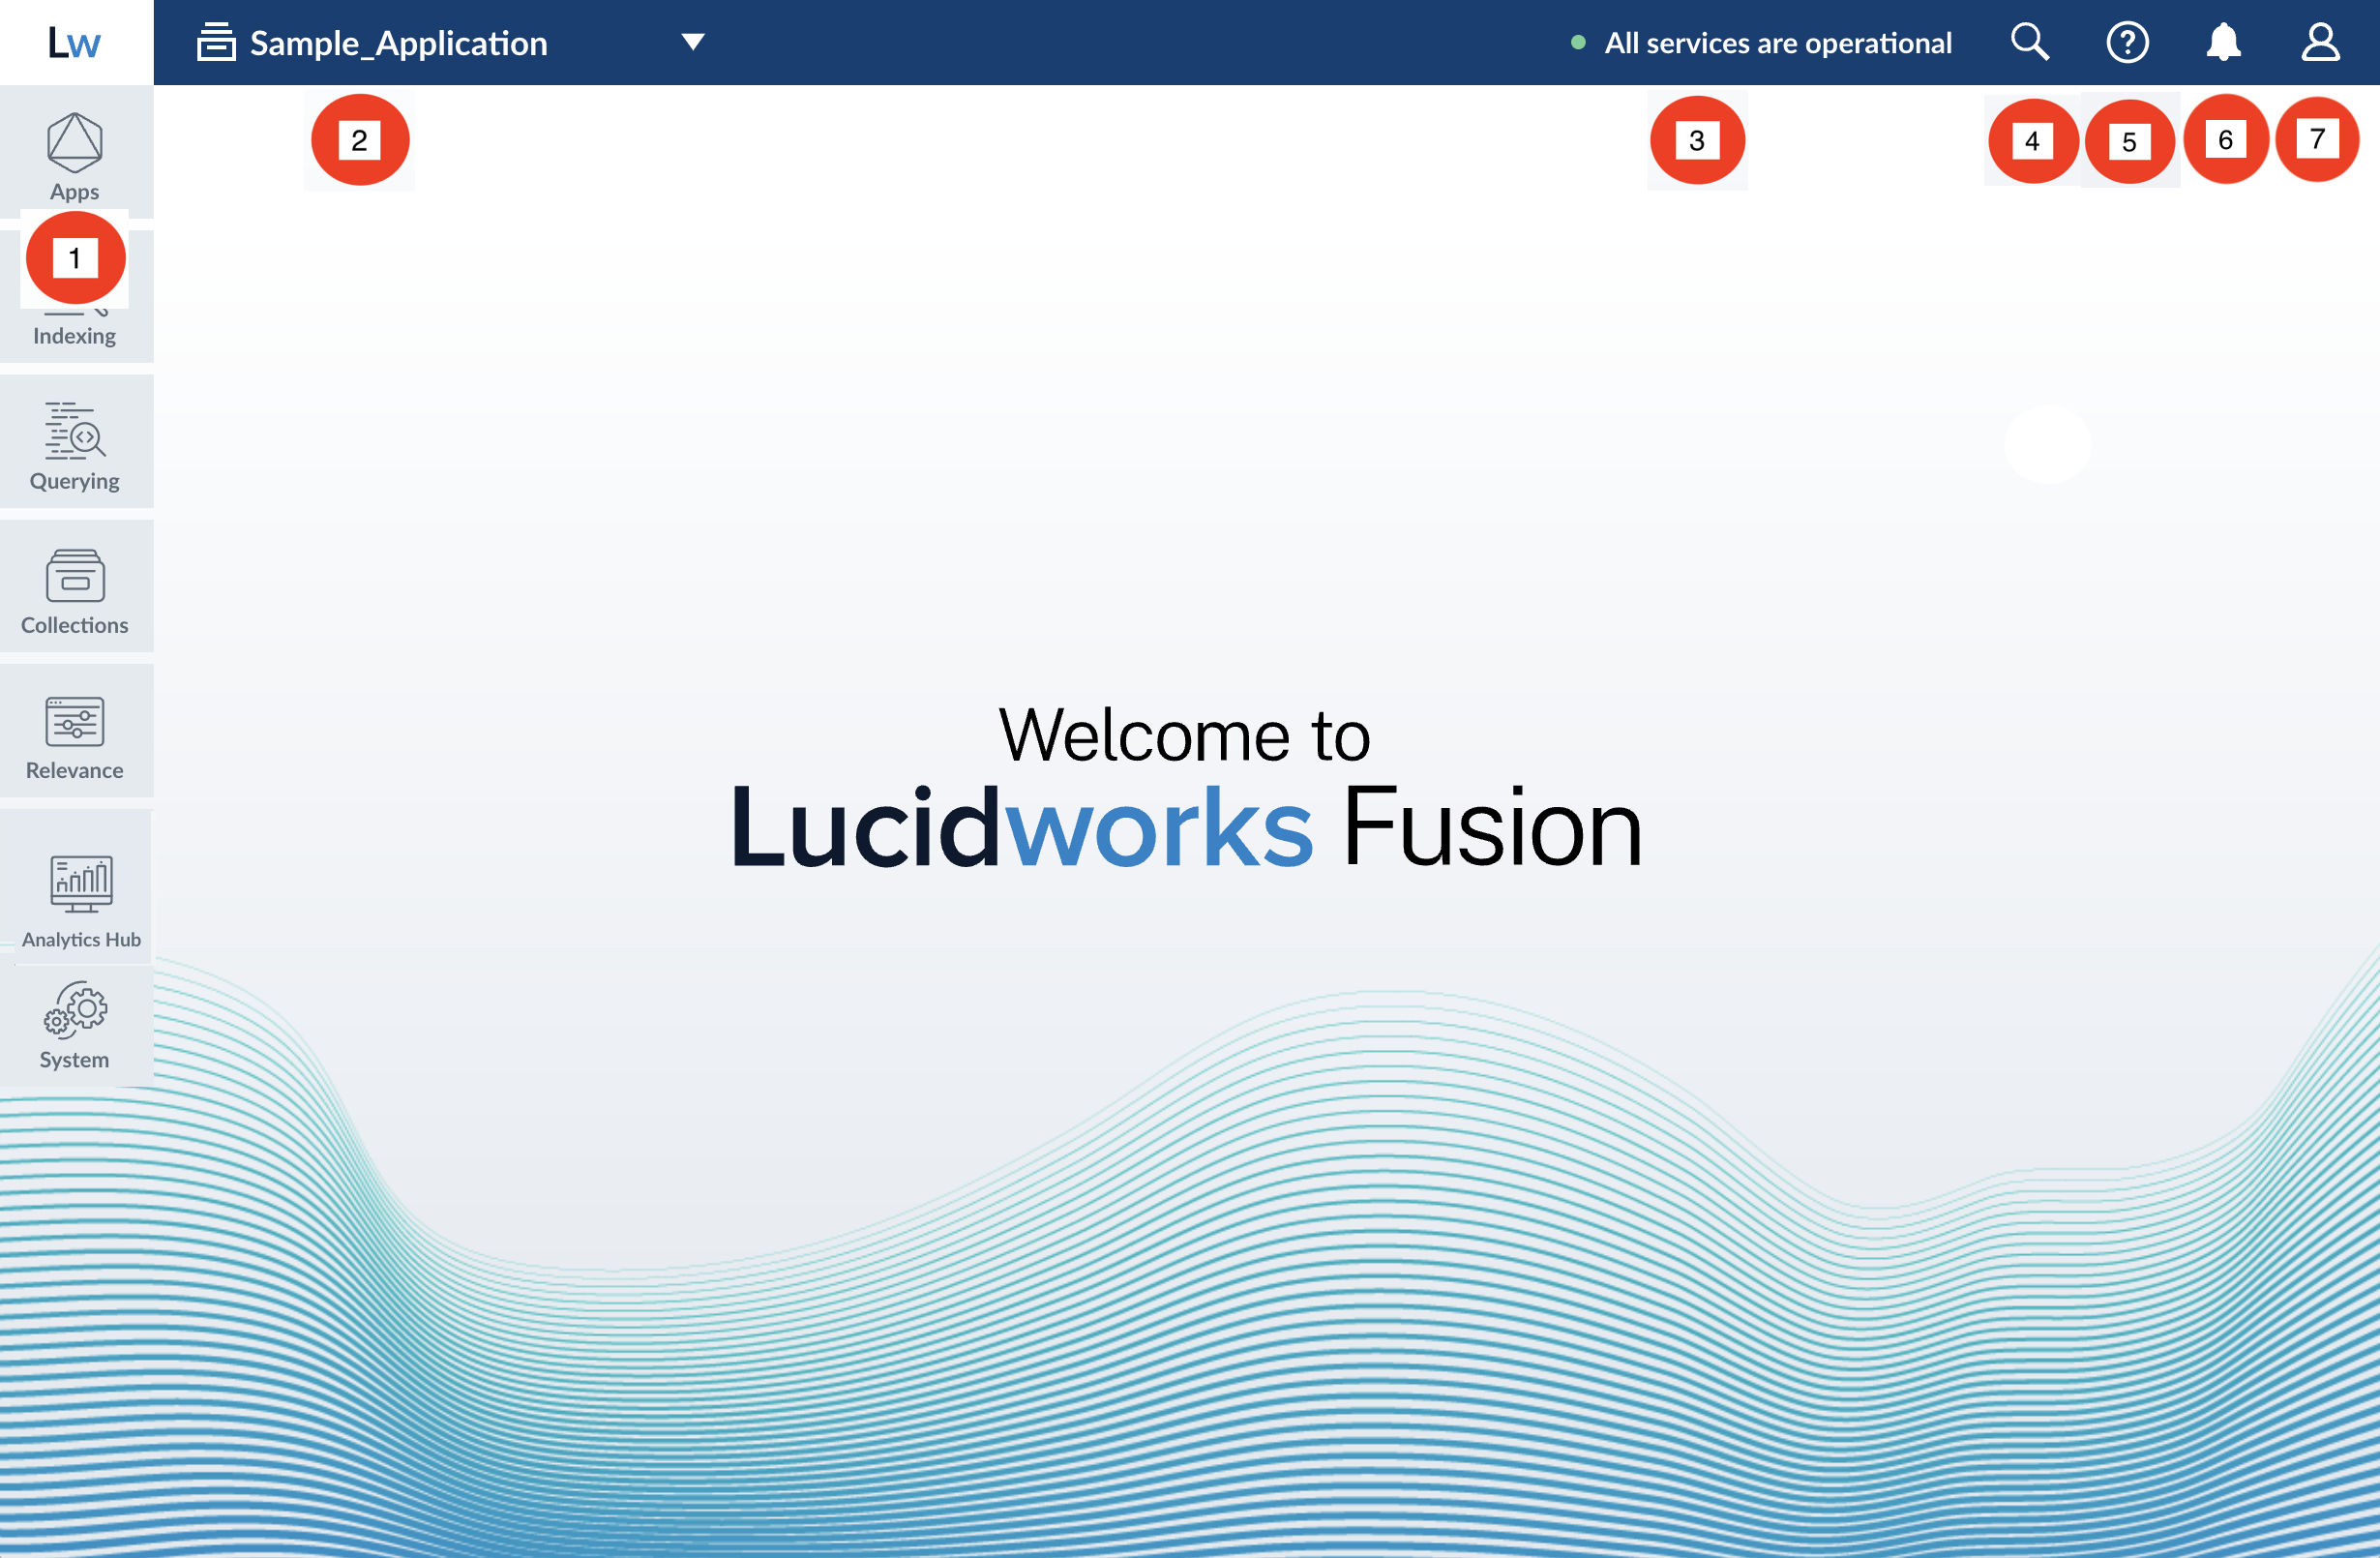
- Apps
Switch between apps or return to the app launcher. - Collections
View and navigate to other collections. - Microservices
View the status of all Lucidworks Search microservices. - Search
Click the search icon and enter a query to find areas of the Lucidworks Search UI, objects, and related documentation. Clicking an object opens the Object Explorer. - Help
Access the documentation. - Alerts
New alerts are briefly displayed in the foreground. Open this menu to see past alerts, or to clear the alert history. - Account Settings
Edit your profile, log out, or manage your Lucidworks Search license.
Learn more
Getting Started with Lucidworks Search
Getting Started with Lucidworks Search
Create a new application
An application (also referred to as app) is a set of objects that performs a specific searching task, such as searching for movies.- Sign in to Lucidworks Search.
- In the Add new app section, click Create new app.
-
In the App Name field, enter
Movie Search. -
In the App Description field, enter
App to search for movies. -
Click Create App.
Getting Started with Lucidworks Search
Getting Started with Lucidworks Search
This topic details how to configure a datasource using Index Workbench.
General information
Lucidworks Search’s Index Workbench provides the tools to configure datasources, parsers, and index pipelines. It lets you preview the results of indexing before you load your data into the actual index.When you enter the necessary data extraction configuration in Index Workbench, it retrieves a small number of documents as sample data.Since this processing is simulated, and actual data is not yet ingested, you can preview the sample documents to test and refine the index pipeline before all of the data is loaded into the actual index.When you complete and save the configuration, it is saved in Index Workbench as a Lucidworks Search datasource. To load your data into Lucidworks Search, use the Datasource tool to run the resulting configuration.Before you begin
Throughout these tutorials, it is important to save your work regularly. The steps include instructions to save, but you can save your work more frequently if needed. When you configure datasources, pipelines, and other settings on your own site, saving your changes regularly is essential.
Download the MovieLens dataset
- Download the dataset. This is a MovieLens dataset created by the Grouplens research lab.
-
Unpack the
ml-latest-small.zipfile. Lucidworks Search can parse.zipfiles, but in this tutorial, we will index just one file from the archive (movies.csv). Themovies.csvfile contains a list of 9,125 movie titles, plus a header row. Here is a truncated listing:
Open the Movie Search app
- Sign in to Lucidworks Search if it is not currently open.
- In the Lucidworks Search launcher, click the Movie Search app.
- To verify the Movie Search app is selected to display in the workspace:
-
Hover over Apps . Movie Search is the currently selected app.
-
Review the collection picker selection at the top of the screen.
Movie_Searchis selected as the default collection for the Movie Search app, and is where Lucidworks Search will place index data.
-
Hover over Apps
Configure the datasource
A collection includes one or more datasources. A datasource is a configuration that manages the import, parsing, and indexing of data into a collection.-
Click Indexing > Index Workbench.
- Click New.
- In the Add A New Datasource section, click Or, upload a file.
- Click Choose File.
-
Navigate to the
movies.csvfile on your computer, select it, and click Open. The file name displays on the screen. -
Click Add New Datasource.
The Datasource (File Upload) configuration panel displays the default datasource ID
movies_csv-Movie_Searchand the default file IDmovies.csv. You do not have to change these values. -
Enter the Description
Movies CSV file. -
Click Apply.
Index Workbench reads up to 20 documents into memory from the
movies.csvfile, and then displays a preview of how they would be indexed based on current parameter and field settings. You have finished configuring the datasource. At the bottom of the page, click Cancel.
Analyze the default output
-
Review the preview to inspect how Lucidworks Search interpreted the original fields:
-
genresbecamegenres_t(thetext_generalfield type) andgenres_s(thestringfield type). String fields are useful for faceting and sorting, while text fields are for full-text search. At this point, Lucidworks Search cannot determine whether you intend to use this field for faceting and sorting, for full-text search, or for both. -
Similarly,
titlebecametitle_tandtitle_sbecause Lucidworks Search cannot determine whether you intend to use this field for faceting and sorting, for full-text search, or for both. -
Like the other fields,
movieIdbecamemovieId_tandmovieId_sbecause Lucidworks Search cannot determine whether you intend to use this field for faceting and sorting, for full-text search, or for both. This might seem odd, because the original field contains numbers. But, at this stage, Lucidworks Search createstext_generalandstringfields. To use the contents of this field as an integer, you would map the field to an integer field. -
Fields that begin with
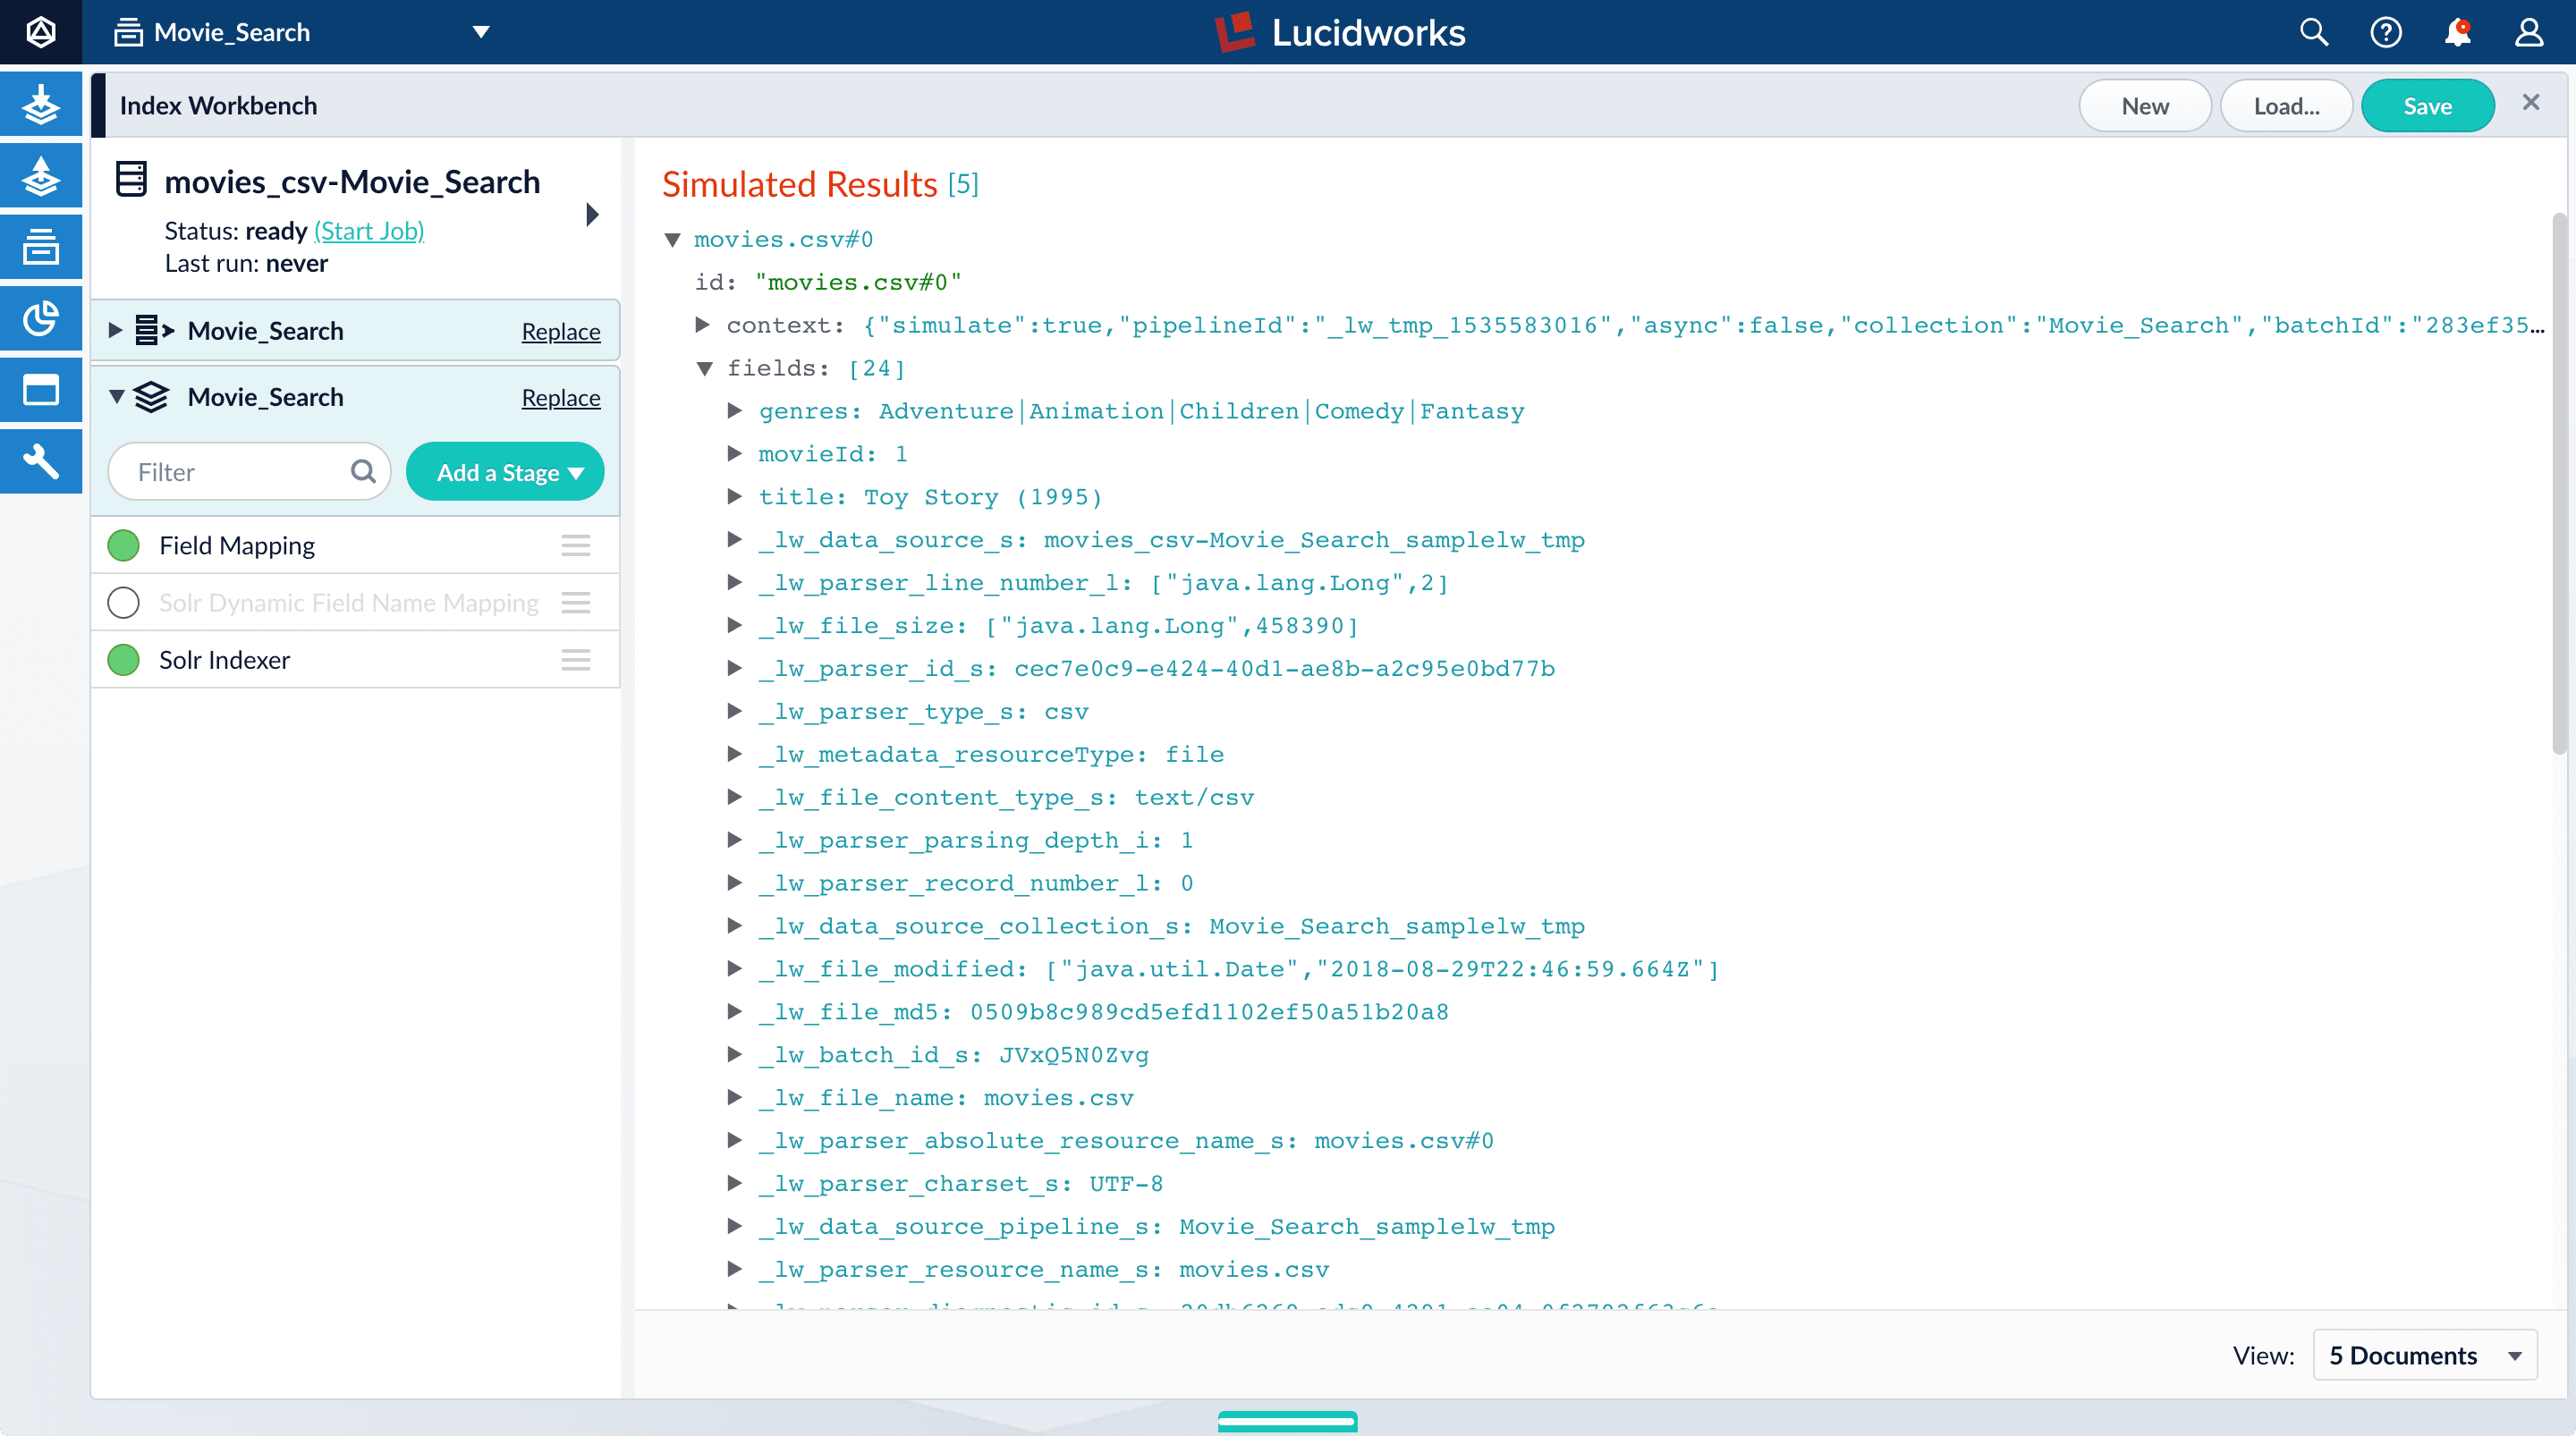
_lwfields contain data that Lucidworks Search creates for its own housekeeping. You can disregard these entries. These fields are created by the Solr Dynamic Field Name Mapping stage in the default index pipeline. This stage attempts to automatically detect field types, and renames fields accordingly. For this tutorial, you will manually configure the fields instead.
-
-
Click the green circle next to the Solr Dynamic Field Name Mapping stage to turn off the stage.
Your data’s original fields display:
genres,movieId, andtitle.
Configure the index pipeline
In this section, you will:- Configure the field mappings in the index pipeline so each field has the correct data type.
- Split the
genresfield into multiple values so each value can be used as a facet later. - Create a new field from part of an existing one.
- Trim a field’s value.
Configure field mappings
Field mappings control the data types of documents. Lucidworks Search uses field name suffixes to determine field types. If the field name:- Contains a suffix, precise analysis and search occurs.
- Does not contain a suffix, Lucidworks Search stores the data as a string field and treats it as an unanalyzed whole.
- In the list of index pipeline stages, click Field Mapping to open the Field Mapping stage configuration panel.
-
In Field Translations, click Add to create a new field mapping rule.
-
In the Source Field, enter
genres. -
In the Target Field, enter
genres_ss. The field suffix_ssmeans that this field is a multi-valued string field.Lucidworks Search currently interprets this field as having a single value. The field actually contains a pipe-delimited array of values. When you finish configuring field mappings, subsequent steps will guide you to change the value type. -
In Operation, select move.
The move operation means that the resulting document contains
genres_ssinstead ofgenres. -
Click Apply. The new configuration runs the simulation again and updates the preview panel contents, changing the field name to
genres_ss.Before After -
Click Add to add more field mapping rules as follows:
-
The
movieIdfield is a unique document identifier. Select to copy it into the document’sidfield. -
The
titleshould be searchable as a text field, so select to move it to thetitle_txtfield. The field mappings display as:
-
The
-
Click Apply. The results using those field mappings display in the preview panel.
Before After - In the upper right, click Save. The changes to the index pipeline make the document ID more useful and the full text of the movie titles searchable.
Split a multivalue field
Thegenres_ss field has been parsed as a single value field, but it is really a pipe-delimited array of values. To split this field into its constituent values, add a Regex Field Extraction stage to your index pipeline. This stage uses regular expressions to extract data from specific fields. It can append or overwrite existing fields with the extracted data, or use the data to populate new fields.- Click Add a stage.
-
Scroll down to Field Transformation and select Regex Field Extraction.
-
In Regex Rules, click Add .
-
On the new line, hover over the
[...]under Source Fields, and click Edit .
-
In the Source Fields screen, click Add .
-
Enter
genres_ssand click Apply. -
In Target Field, enter
genres_ss. - In the Write Mode field, select overwrite.
-
In the Regex Pattern field, paste this expression:
The first bracketed term in the regex matches any character that is not a vertical bar or a space. The second term matches any character that is not a vertical bar, zero or more times. The last term matches any character that is not a vertical bar, zero or more times.
-
In Return If No Match, select
input_string. - Click Apply. Initially, your data does not change.
-
In the list of index pipeline stages, click and drag the Regex Field Extraction stage so it processes after the Field Mapping stage:
genres_ssfield:Before After -
To view the values of the
genres_ssfield, click the right triangle to expand it and valuesunder it: - In the upper right, click Save to save the changes to the index pipeline.
Create a new field from part of an existing one
Currently, thetitle_txt field also contains the year in which the movie was released. To make the field more useful for faceting, the year needs to be a separate field. The Regex Field Extraction stage will separate the data.- In the list of index pipeline stages, click Regex Field Extraction.
-
In the Regex Field Extraction configuration panel, under Regex Rules, click Add .
-
On the new line, hover over the
[...]under Source Fields, and then click Edit .
-
In the Source Fields screen, click Add .
-
Enter
title_txtand click Apply. -
In Target Field, enter
year_i. The_isuffix indicates an integer point field (specifically, that the field is a dynamic field with a point integer,pint, field type). Lucidworks Search creates this new field when the regular expression matches the contents of the source field. -
In the Regex Pattern field, paste this expression to match the digits inside the parentheses at the end of the
title_txtvalue: -
In the Regex Capture Group field, enter
1. This lets the index pipeline stage transfer the year into theyear_ifield. -
Click Apply.
Now the preview includes the new
year_ifield:Before After - In the upper right, click Save to save the changes to the index pipeline.
Trim a field’s value
Thetitle_txt field still includes the year of the film’s release, which you have extracted into its own field, year_i. To refine the field for faceting, trim year_i from the title_txt values so only the title text remains.- In the list of index pipeline stages, click Regex Field Extraction.
-
In the Regex Field Extraction configuration panel, under Regex Rules, click Add .
-
On the new line, hover over Source Fields and click Edit .
-
In the Source Fields screen, click Add .
-
Enter
title_txtand click Apply. -
In Target Field, enter
title_txt. -
In the Write Mode field, select
overwrite. -
In the Regex Pattern field, paste this expression to match the digits inside the parentheses at the end of the
title_txtvalue: -
In the Regex Capture Group field, enter
1. -
Click Apply.
The preview pane displays the
title_txtfield with only the title string:Before After - In the upper right, click Save to save the changes to the index pipeline.
Run the datasource job
In the upper left, click Start job to index the data using the configured index pipeline.movies.csv file using the configuration you just saved.Your datasource job is finished when the Index Workbench displays Status: success in the upper left. If the status does not change, click to return to the launcher and relaunch your app to refresh the status.Close panels you no longer need open
If you do not manually close each panel, Lucidworks Search opens panels beside already open panels. Click CloseReindex the datasource
Documents are associated with a collection through the name of the datasource, which is stored as a value in the_lw_data_source_s field.For various reasons, you may wish to remove all documents associated with a datasource from a collection before using CrawlDB to add relevant documents back to the collection. This process is known as reindexing.- Navigate to Indexing > Datasources.
- Select the datasource name.
- Click Clear Datasource. This removes all documents with the selected datasource name in the
_lw_data_source_sfield. - When the documents are removed, repeat the steps in Configure the index pipeline to reindex the data.
Summary
The parts of this tutorial so far have guided you to:- Move 9,125 movie listings from the MovieLens database into Lucidworks Search
- Customize the data type for each field
- Split multivalued fields to treat its values individually
- Create a new field that contains partial contents of a different field
- Trimmed the content of the original multivalue field
| Before | After |
|---|---|
| |
Indexing Data
The course for Indexing Data focuses on how to ingest and store your data in a format that’s optimized for search.
Getting Started with Lucidworks Search
Getting Started with Lucidworks Search
This topic details how to use Query Workbench to configure search results, including faceting. Facets are categories or features offered as filters within a search results page.
Before you begin
The dataset created in the previous sections of the tutorial has three fields that users of your search application might find relevant:genres_ss. A list of one or more genre labels.title_txt. The name of the movie.year_i. The movie’s year of release.
-
Fields with the suffix
_ss(multivalued string fields) contain one or more string values. String fields require an exact match between the query string and the string value stored in that field. -
Fields with the suffix
_txt(text fields) contain text. Text fields allow for free text search of the field contents. For example, because the movie titles are stored in a text field, a search on the word “Star” will match movies titled “Star”, “A Star is Born”, all movies in the Star Wars and Star Trek franchises, as well as “Dark Star”, “Lone Star”, and “Star Kid”. -
Fields with the suffix
_i(point integer fields) contain integer values. Numeric fields allow range matches as well as exact matches, and point integer fields allow efficient comparisons between the field’s values and the search criteria.
Explore search results
Query Workbench lets you configure a query pipeline and preview the search results it produces. A query pipeline converts a free text query submitted to your search application into a structured query for Solr.- Sign in to Lucidworks Search if it is not currently open.
- In the Lucidworks Search launcher, click the Movie Search app.
-
Click Querying > Query Workbench.
Perform a search
The default search is the wildcard search (\*:*), which returns all documents in the collection.-
In the search box, enter the query string
star, and press Enter or click Search.
This search returns all movies that have the word “star” in the title.
movie-search.
To view more of the default output, you can perform other searches.- In the search box, enter the query string
\*:*to return all documents, and press Enter or click Search .
Explore the role of query pipeline stages
A default query pipeline includes the following stages:- Boost with Signals. Use signals data to boost relevant documents.
- Query Fields. Specify the set of fields over which to search.
- Field Facet. Specify the fields to use for faceting.
- Text Tagger. Search for information such as known phrases, synonyms, and misspellings that can be used to improve the query with query rewriting.
- Apply Rules. Modify the query using business rules, if any are triggered.
- Solr Query. Perform the query and return the results. This is the only stage that is always required to perform a query and receive results.
- Modify Response with Rules. Modify Solr’s response using business rules, if any are triggered.
-
Click the green circle next to the Solr Query stage to turn off the stage.
-
Turn on the Solr Query stage and turn all other stages off.
- Turn all stages on.
Configure faceting
Facets:- Are categories or features offered as filters within a search results page.
- Provide a simple way for users to explore and filter their search results without having to construct complicated queries.
- Can be configured when you also configure a query pipeline.
genres_ss and year_i. For example, a user could search for science fiction of the 1950s in just a few clicks.Configure basic faceting for genres
-
Click Add a field facet and select the
genres_ssfield. -
Click Sci-Fi to select movies that have the value
Sci-Fiforgenres_ss: - Under the field facet genres_ss, click Clear all.
Configure range faceting for years
If you configure faceting for theyear_i field as you did above for the genres_ss field, you would get one facet per year, which is not very useful.The year_i field will be more usable if you configure range faceting. Range faceting is a way of grouping values together so that the user can select a value range instead of one specific value. For example, range facets are commonly used with pricing (100) or ratings (4 stars or higher). In this example, you will group years by decade.Range faceting requires sending an additional query parameter to Lucidworks Search’s Solr core. You can configure this with the Additional Query Parameters stage. In this case, you will use several of Solr’s range facet query parameters.Use the Additional Query Parameters stage to configure range faceting for the year_i field:- Click Add a stage.
-
Scroll down, and in Advanced, select Additional Query Parameters.
-
Under Parameters and Values, add the following parameter names and values:
In this case, you do not need to modify the Update Policy field. The default value of
appenddoes not affect these results. -
Click Apply, and then click Cancel to close the configuration panel for the Additional Query Parameters stage.
The year facets are now grouped by decade:
Configure query fields
To specify fields to match a particular query:-
Search for “2001”.
The results are not what an end user might expect because “2001: A Space Odyssey” is not the top search result.
-
Under one of the movies listed, click show fields.
idfield. This field may not be useful to your users. Use the Query Fields stage to specify the fields that may be a higher priority for users. - Below the name for the movie you selected, click hide fields.
- Click the Query Fields stage of the query pipeline. The Query Fields configuration panel displays.
-
Under Search Fields, click Add .
-
Enter
title_txt. -
Click Add again.
-
Enter
year_i. -
Click Apply, and then click Cancel to close the configuration panel for the Query Fields stage.
Now movies with ‘2001’ in their title rise to the top of your search results, followed by films made in the year 2001:
- In the upper right, click Save to save the changes to the query pipeline.
Getting Started with Lucidworks Search
Getting Started with Lucidworks Search
Signals are events that can be aggregated and used for automatic boosting or recommendations, which are methods to make search results more relevant.As an example of boosting, the most popular search results for certain queries can be boosted so they display first (or at least nearer the top) when other users make similar queries.Similarly for recommendations, click events or purchase events can be collected as signals and used to display “Customers who viewed this also viewed” or “Best-selling holiday items”.In a production environment, users’ actions generate signals. For the purposes of this tutorial, you will use Query Workbench to generate click signals.
Refining Search Results
The learning path for Refining Search Results focuses on the Fusion features that help you maximize the relevancy of your search results.
Format display fields
- Sign in to Lucidworks Search if it is not currently open.
- In the Lucidworks Search launcher, click the Movie Search app.
- Click Querying > Query Workbench.
- At the top right, select Display Fields.
- In the Name field, click the row to display a dropdown of possible values.
- Select
title_txt. You can filter the list of possible values. - In the Description field, select
id. - Click Display Fields to close the Display Fields panel.
Enable synthetic signals
To complete this part of the tutorial, you must generate more signals because not enough signals were created in Part 3 - Query Data. Since this example is a prototype app, users are not generating signals. To create more signals, you must enable synthetic signals in Query Workbench.- At the bottom of the Query Workbench page, click Format Results.
-
Select Show signal generators and Send click signals.
- Click Save.
-
Hover over one of the search results. Query Workbench displays controls that include a Simulate button next to a field that lets you specify the number of signals to simulate:
Generate signals
With synthetic signals enabled, you will generate a simple set of signal data that you can use to generate meaningful recommendations.For this tutorial, you will generate signals you can use to boost your favorite sci-fi titles so that they display first.-
Search for
star wars. The top results are not your favorite titles: -
In Format Results, Set results per page to 20. This should allow you to scroll for this next part instead of explicitly searching for the titles.
Next you will generate signals you can use to boost certain titles. Signals are tied to the search query, so your boosted titles will display first in the search results only when users search for
star wars. - Hover over “Star Wars: Episode IV - A New Hope”.
- Set the number of signals to 4000 and click Simulate.
- Hover over “Star Wars: Episode V - The Empire Strikes Back”.
- Set the number of signals to 3000 and click Simulate.
- Hover over “Star Wars: Episode VI - Return of the Jedi”.
- Set the number of signals to 2000 and click Simulate.
-
In the upper right, click Save. The Save Pipeline window displays. By default, you will overwrite the existing query pipeline for the selected collection (in this case,
Movie_Search_signals). - Click Save pipeline.
Explore the raw signals
When you create a collection, two corresponding collections are also created automatically:COLLECTION_NAME_signalsfor raw signals. For example,Movie_Search_signals.COLLECTION_NAME_signals_aggrfor aggregated signals. For example,Movie_Search_signals_aggr.
_signals collection.- In the collection picker in the upper left, select Movie_Search_signals.
-
Click Querying > Query Workbench. The signals data displays.
-
To display click signals, enter
type:clickand click Search .
-
For any of the results, click show fields.
The
count_ifield displays the number of click signals you generated for this event. For example, given the correspondingdoc_idfor Star Wars: Episode IV - A New Hope, thecount_iequals 4000. - Click hide fields.
Optional: Format signals fields
You can configure your search view to display fields that are meaningful for your investigation. For example, you can display the document ID and the number of click signals.- Click Display Fields.
-
For the Name field, select
doc_id. -
For the Description field, select
count_i.
Explore the aggregated signal data
Aggregation jobs are created automatically when you create an app. However, you need to run the aggregation job manually:-
Navigate to Collections > Jobs.
-
In the job list, select
Movie_Search_click_signals_aggregation. - Click Run.
- Click Start. The job may take a few minutes to complete.
- When the success message displays, in the collections picker in the upper left, select Movie_Search_signals_aggr.
-
Click Querying > Query Workbench.
The aggregated signals data displays. If the aggregated signals data does not display, wait a minute and then reload your browser, or click Search in Query Workbench.
- Click Display Fields.
-
In the Name field, select
doc_id. -
In the Description field, select
aggr_count_i. -
For the result named
1210, click show fields.aggr_count_i. Number of signals that have been aggregated. For example, 3000.aggr_id_s. Name of the aggregation job.aggr_job_id_s. Job ID.aggr_type_s. Aggregation type.
-
In the upper right, click Save.
The Save Pipeline screen displays. By default, you will overwrite the existing query pipeline for the selected collection. For example,
Movie_Search. - Click Save pipeline.
View the search results with and without default boosting
- In the collections picker in the upper left, select Movie_Search.
-
Open Query Workbench. Navigate to Querying > Query Workbench.
-
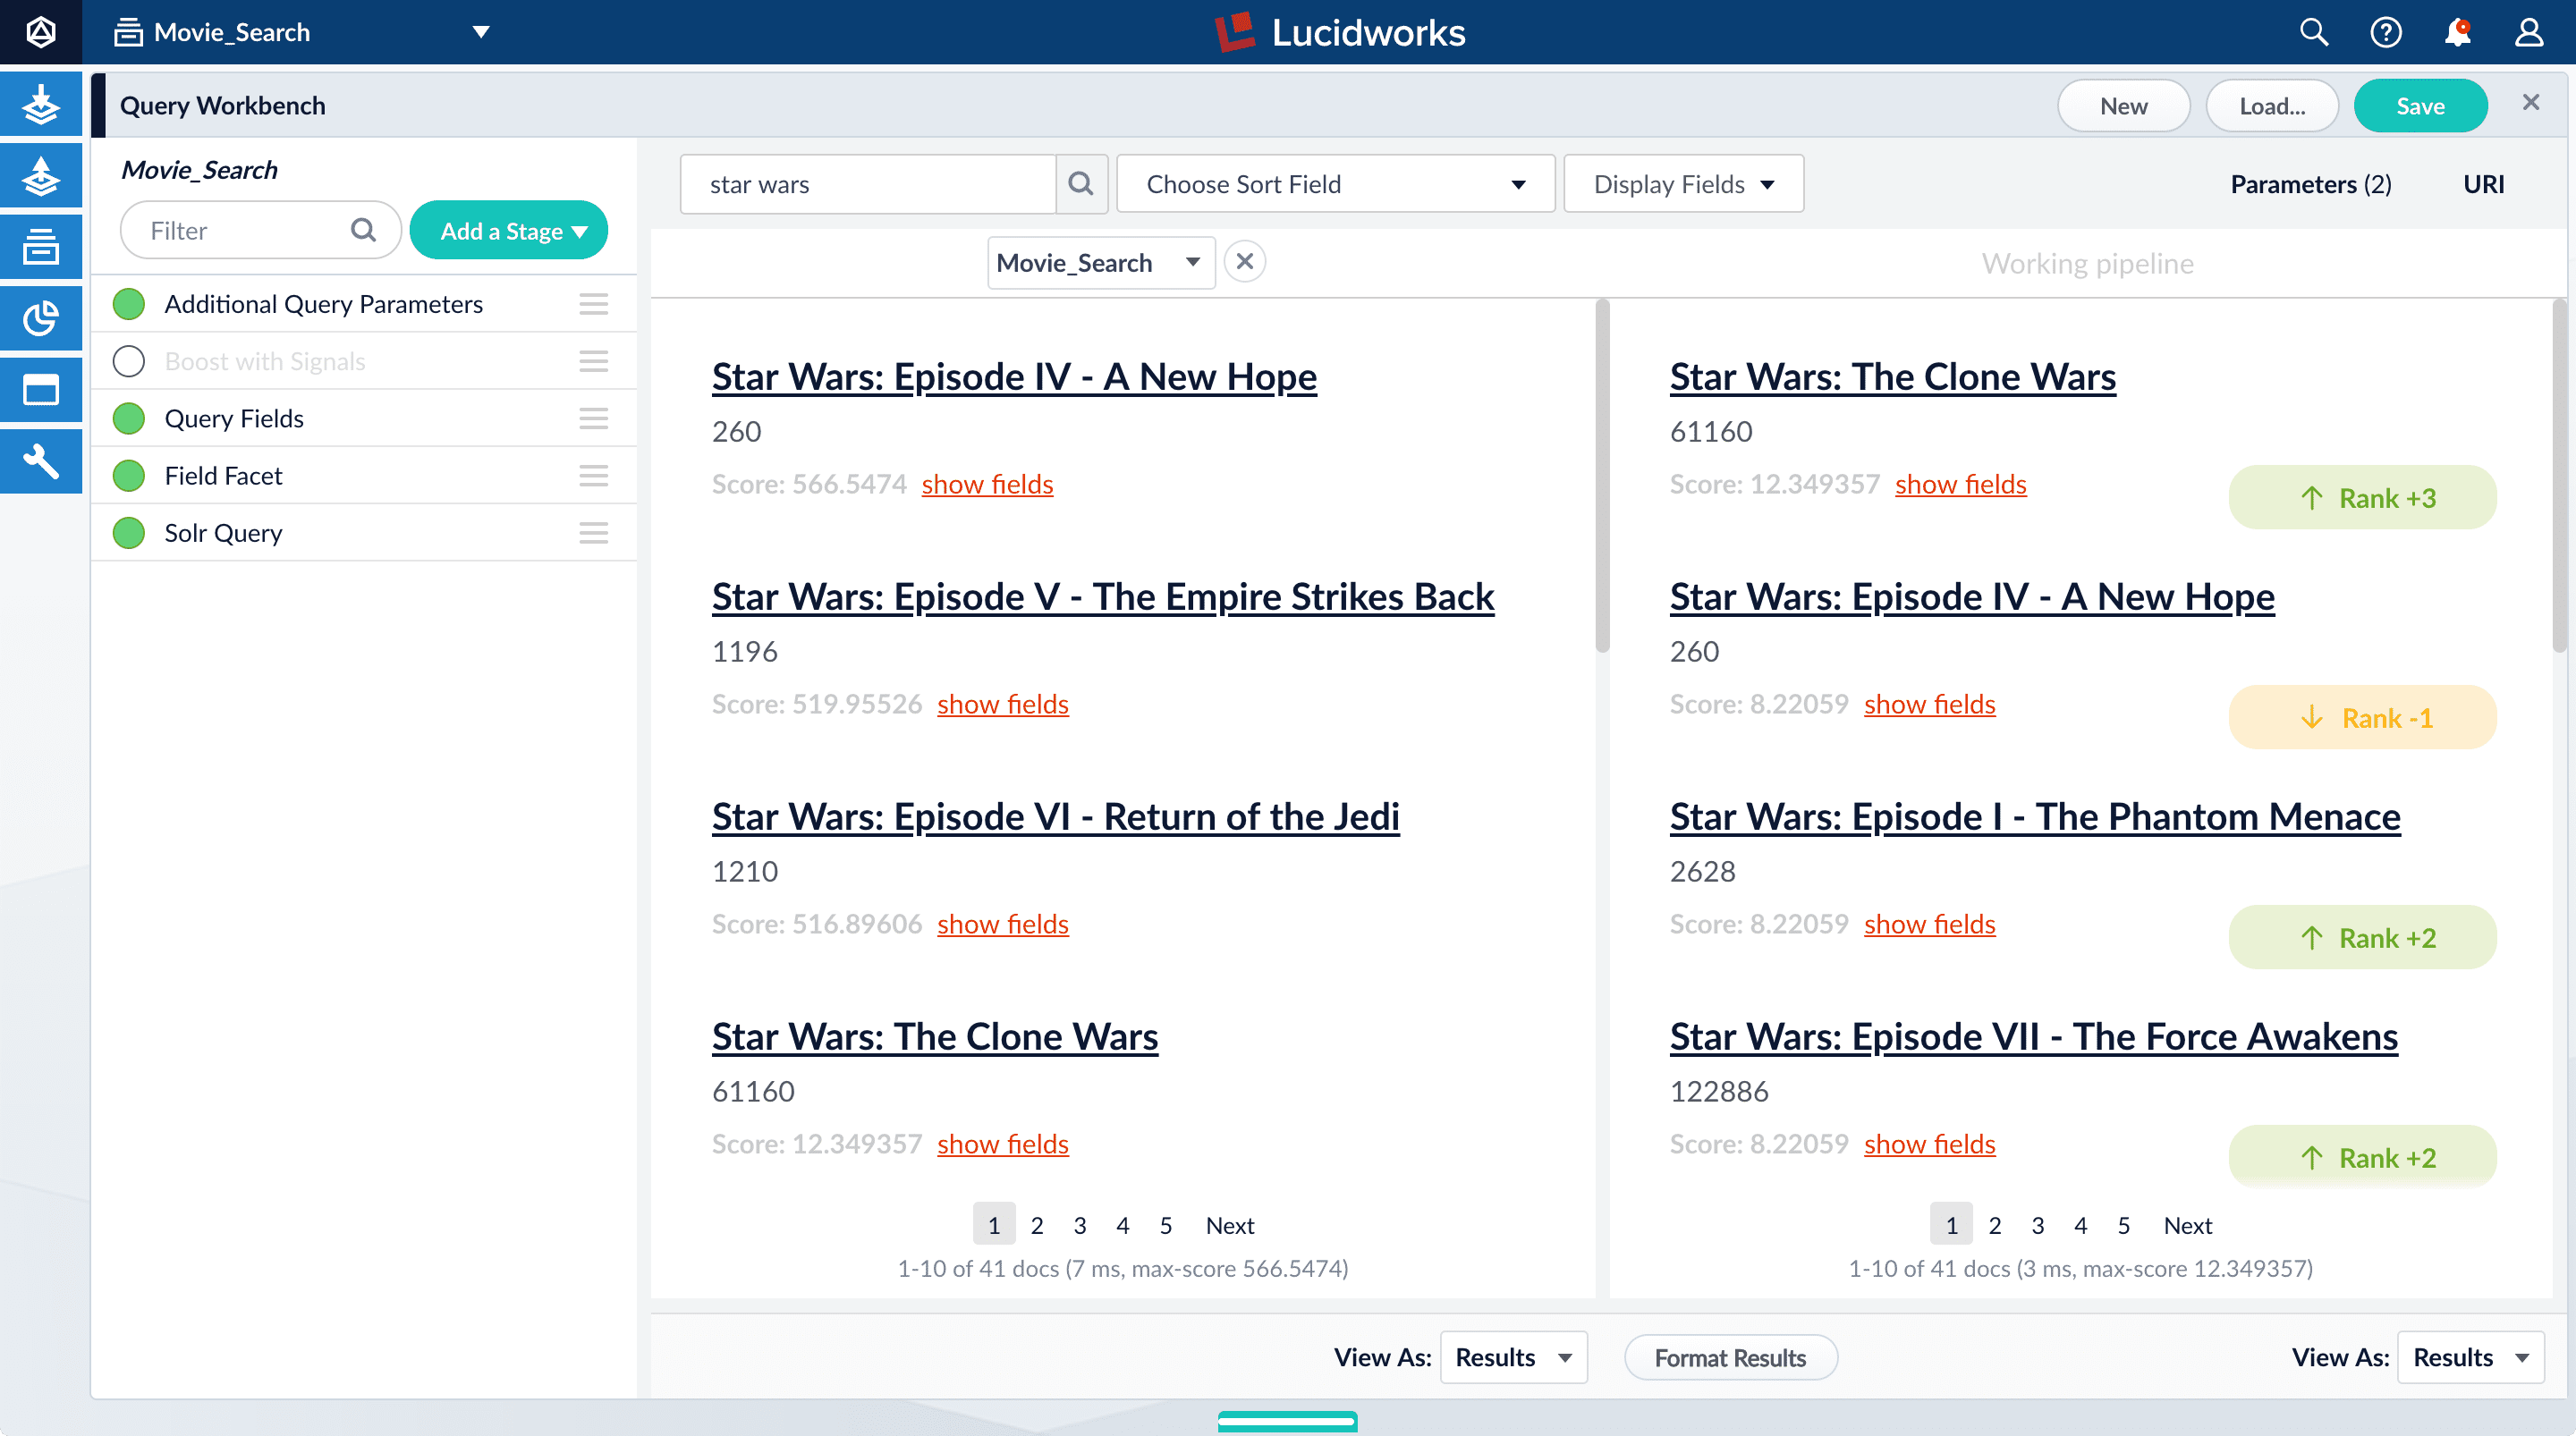
Search for
star wars. “Star Wars: Episode IV - A New Hope” is the first search result, followed by Episode V and then VI. These search results are automatically boosted by the default configuration of the Boost with Signals query pipeline stage, which boosts on theidfield. -
Click Compare. Another preview panel opens. Now the working pipeline is on the right and a static snapshot of that same pipeline is on the left.
Movie_Search) with and without the Boost with Signals stage enabled. -
Turn off the Boost with Signals stage.
- Turn on the Boost with Signals stage again to restore the boosted results.
-
To close the comparison preview panel, click Close .
Getting Started with Lucidworks Search
Getting Started with Lucidworks Search
This four-part tutorial details how to create a Lucidworks Search application and configure it to search data in the MovieLens dataset.
- Part 1: Create a Lucidworks Search application. Create an example Lucidworks Search application that searches a movie data source.
- Part 2: Index Data. Use the Index Workbench to configure an index pipeline, preview the results, and move data into the Movie Search app in a format that is useful for search.
- Part 3: Query Data. Use Query Workbench to move data out of the Movie Search app, explore the role of query pipeline stages, configure faceting, and preview search results.
- Part 4: Improve Relevancy. Use signals and boosting to make search results more relevant.