

- Number of shards
Documents are distributed across this number of partitions. - Document routing strategy
How documents are assigned to shards. - Replication factor
How many copies of each document in the collection. - Replica placement strategy
Where to place replicas in the cluster.
Install Fusion 4.x on a Single Node
Install Fusion 4.x on a Single Node
These instructions are for an initial installation of Fusion on a single node (computer). To install Fusion on multiple nodes (a Fusion cluster), see Install a Fusion Cluster. If you already have a version of Fusion installed and want to upgrade it, see the [Fusion upgrade instructions.
Ports
This table lists the default port numbers used by Fusion processes. Port settings are defined in the:fusion.properties file in https://FUSION_HOST:FUSION_PORT/conf/ (on Unix or macOS) or fusion\4.2.x\conf\ (on Windows).Additional ports might be required. See Port configuration for more information or to modify the default ports before starting Fusion.
Unix installation
Fusion for Unix is distributed as a gzipped tar file.How to install Fusion on Linux or Mac- Verify that the node on which you plan to install Fusion meets hardware and software requirements.
-
Download the Fusion tar/zip file for the latest version of Fusion and move it to where you would like it to reside in your filesystem (if you would like to use Upstart for process management, you must install Fusion in
/opt/lucidworks). -
Become the user that will run Fusion.
Do not run Fusion as the root user.
-
Change your working directory to the directory in which you placed the
fusion-version.x.tar.gzfile, for example:$ cd /opt/lucidworks -
Unpack the archive with
tar -xf(ortar -xvf), for example:$ tar -xf fusion-version.x.tar.gzThe resulting directory is namedhttps://FUSION_HOST:FUSION_PORT. You can rename this if you wish. This directory is considered your Fusion home directory. See Directories, Files, and Ports for the contents of thehttps://FUSION_HOST:FUSION_PORTdirectory.
Starting Fusion
All Fusion start scripts must be executed by a user who has permissions to read and write to the directories where Fusion is installed. These scripts do not need to be run as root (or sudo), nor should they be. Use a suitable user, or create a new one, and then ensure that it owns the directory where Fusion resides, (for example,C:\lucidworks).Give the commands that follow from the directory fusion/latest.x/bin.Start the required services that are defined in the group.default property.How to start all required services./fusion startFor information about starting groups of services or individual services, see Start and Stop Fusion.Running Fusion In The Foreground
To run Fusion or any of its services in the foreground, use therun command-line argument in place of start.Stopping Fusion
To stop Fusion or any of its services, use thestop command-line argument in place of start.Using systemd to manage processes
On Red Hat Enterprise Linux, CentOS 7 and newer, and Ubuntu 15.04 LTS and newer, we support using the operating system-providedsystemd for process management.For more information about using systemd, see Using systemd to manage processes.Using Ubuntu Upstart to manage processes
Under Ubuntu 12.04 LTS through Ubuntu 14.10, we support using Upstart for process management. This requires Fusion to be installed in the/opt/lucidworks/ directory.For more information about using Upstart, see Using Ubuntu Upstart to manage processes.Windows installation
Fusion for Windows is distributed as a compressed zip file. To unpack the Fusion zip file on Windows, you can use a native compression utility or the freely available 7zip file archiver. Visit the 7zip download page for the latest version.How to install Fusion on Windows- Verify that the node on which you plan to install Fusion meets hardware and software requirements.
- Download the zip file for the latest version of Fusion and move it to where you would like Fusion to reside in your filesystem. It will appear as a compressed folder.
- Unpack the archive. In most cases, you need only right-click and choose “Extract all…”. If you do not see this option, check that you have permissions to extract folders on your system.
The resulting directory is namedfusion\latest.x. This directory is considered your Fusion home directory. See Directories, Files, and Ports for the contents of thefusion\latest.xdirectory.
- Run
bin\install-services.cmd. - Enter the name of the windows user that is used to launch this service.
Remember the username isCOMPUTERNAME\usernameorDOMAIN\username(if your computer is part of a Windows domain). - Enter the user’s password.
- Enter the path to the directory containing the JDK to use for running the services.
Starting Fusion
All Fusion start scripts must be executed by a user who has permissions to read and write to the directories where Fusion is installed. Ensure that the user owns the directory where Fusion resides (for example,C:\lucidworks).Give the commands that follow from the directory fusion\latest.x\bin.How to start all required Fusion services as Java processesStopping Fusion
To stop Fusion or any of its services, use thestop command-line argument in place of start.Installation with an existing Solr instance or cluster
Before you install Fusion with an existing Solr instance or cluster, confirm that the Solr version is supported by Fusion.If installing Fusion to work with an existing Solr instance, either in SolrCloud mode or standalone, you should install Fusion as described above. You should start each of the services as described above.Once Fusion installation is complete, you can register your existing Solr installation with Fusion to be able to use the two systems together. For details on how to do that, see the section Integrate Fusion with an Existing Solr Deployment.Troubleshooting
For information about problems you might encounter when installing Fusion, and solutions, see Troubleshoot When Installing Fusion.Collection names are case-insensitive, but Fusion preserves case when displaying collection names.
Auxiliary Collections
Every primary collection is associated with a set of auxiliary collections that contain related data, such as signals, aggregations, and more. Some auxiliary collections are created for every primary collection. Others are created only for the app’s default collection, one per app. Auxiliary collections are described below:Do not create primary collections with names that end in the suffixes above; these are reserved for Fusion auxiliary collections, which are created and managed by Fusion directly.
Do not create primary collections named “logs” or beginning with “system_”.
These names are reserved for Fusion system collections.
- Datasources
- Pipelines
- Profiles
- Signals and aggregations
- Analytics dashboards
System Collections
Fusion automatically creates some collections that are used for internal purposes and shared across all apps:- system_autocomplete store the content that the Fusion UI displays when you use the search bar.
- system_blobs stores blobs in Solr. This is used to store model files for the NLP components and other binary files used by Fusion components.
- system_history keeps a record of configuration changes, start and stop times for services and experiments, and more.
- system_jobs_history keeps a record of Fusion jobs, including start/stop times and status.
- system_logs stores parsed Java logs from the REST API, connectors-classic component, and other parts of Fusion, like proxy, connectors-rpc, and appkit app insights.
It also includes http logs and optional gc logs (off by default in Fusion 4.1). Prior to Fusion version 4.1, Java logs were stored in thelogscollection and HTTP requests were stored in theaudit_logscollection. - system_messages is used by Fusion’s messaging services.
- system_monitor stores metrics about Fusion hosts and services. See System Metrics and the DevOps Center.
Collection Configuration Properties
Collections have three properties that you can configure only when you are creating a collection using the Collections API.
*Signals are events with timestamps that can be used to improve search results.
For more information about signals in Fusion, see Signals in the Fusion AI documentation.
**In schemaless mode, if a document contains a field not currently in the Solr schema, Solr processes the field value to determine what the field type should be defined as, and then adds a new field to the schema with the field name and field type.
This behavior can be convenient during preliminary application development, but it is rarely appropriate in a production environment.
Using profiles to associate collections with pipelines
Index pipelines and query pipelines are not connected to a specific collection by default. Index profiles and query profiles are configurations that create consistent endpoints for indexing and querying, each with a specific pipeline and collection.- Index Profiles work with index pipelines for getting content into the system.
- Query Profiles work with query pipelines for user queries.
Field Editor UI
The Fusion UI includes a space under Collections to edit Fields. Descriptions for these fields can be found in the Field Type Definitions section of the Solr Reference Guide associated with your Fusion release. Field options displayed in the UI include:- Dynamic checkbox (cannot change via UI)
- Field Name (cannot change via UI)
- Field Type (a preset value is shown that can be changed using edit mode)
- Checkboxes for Indexed, Stored, Multivalued, Required
- Text field to enter a Default Value
- Copy Fields uses the plus sign to add rows (static can copy to
raw_contentortext; dynamic can copy to anyraw_content/textor any other dynamic field) - Advanced toggles checkboxes for Doc Values, Omit Norms, Omit Positions, Omit term freq and positions, Term Vectors, Term Positions, Term Offsets
Learn more
Use Federated Search
Use Federated Search
Federated search lets you query across multiple collections in Fusion. This is useful if you keep separate data collections for security or compliance reasons or maintain different collections based on data type.
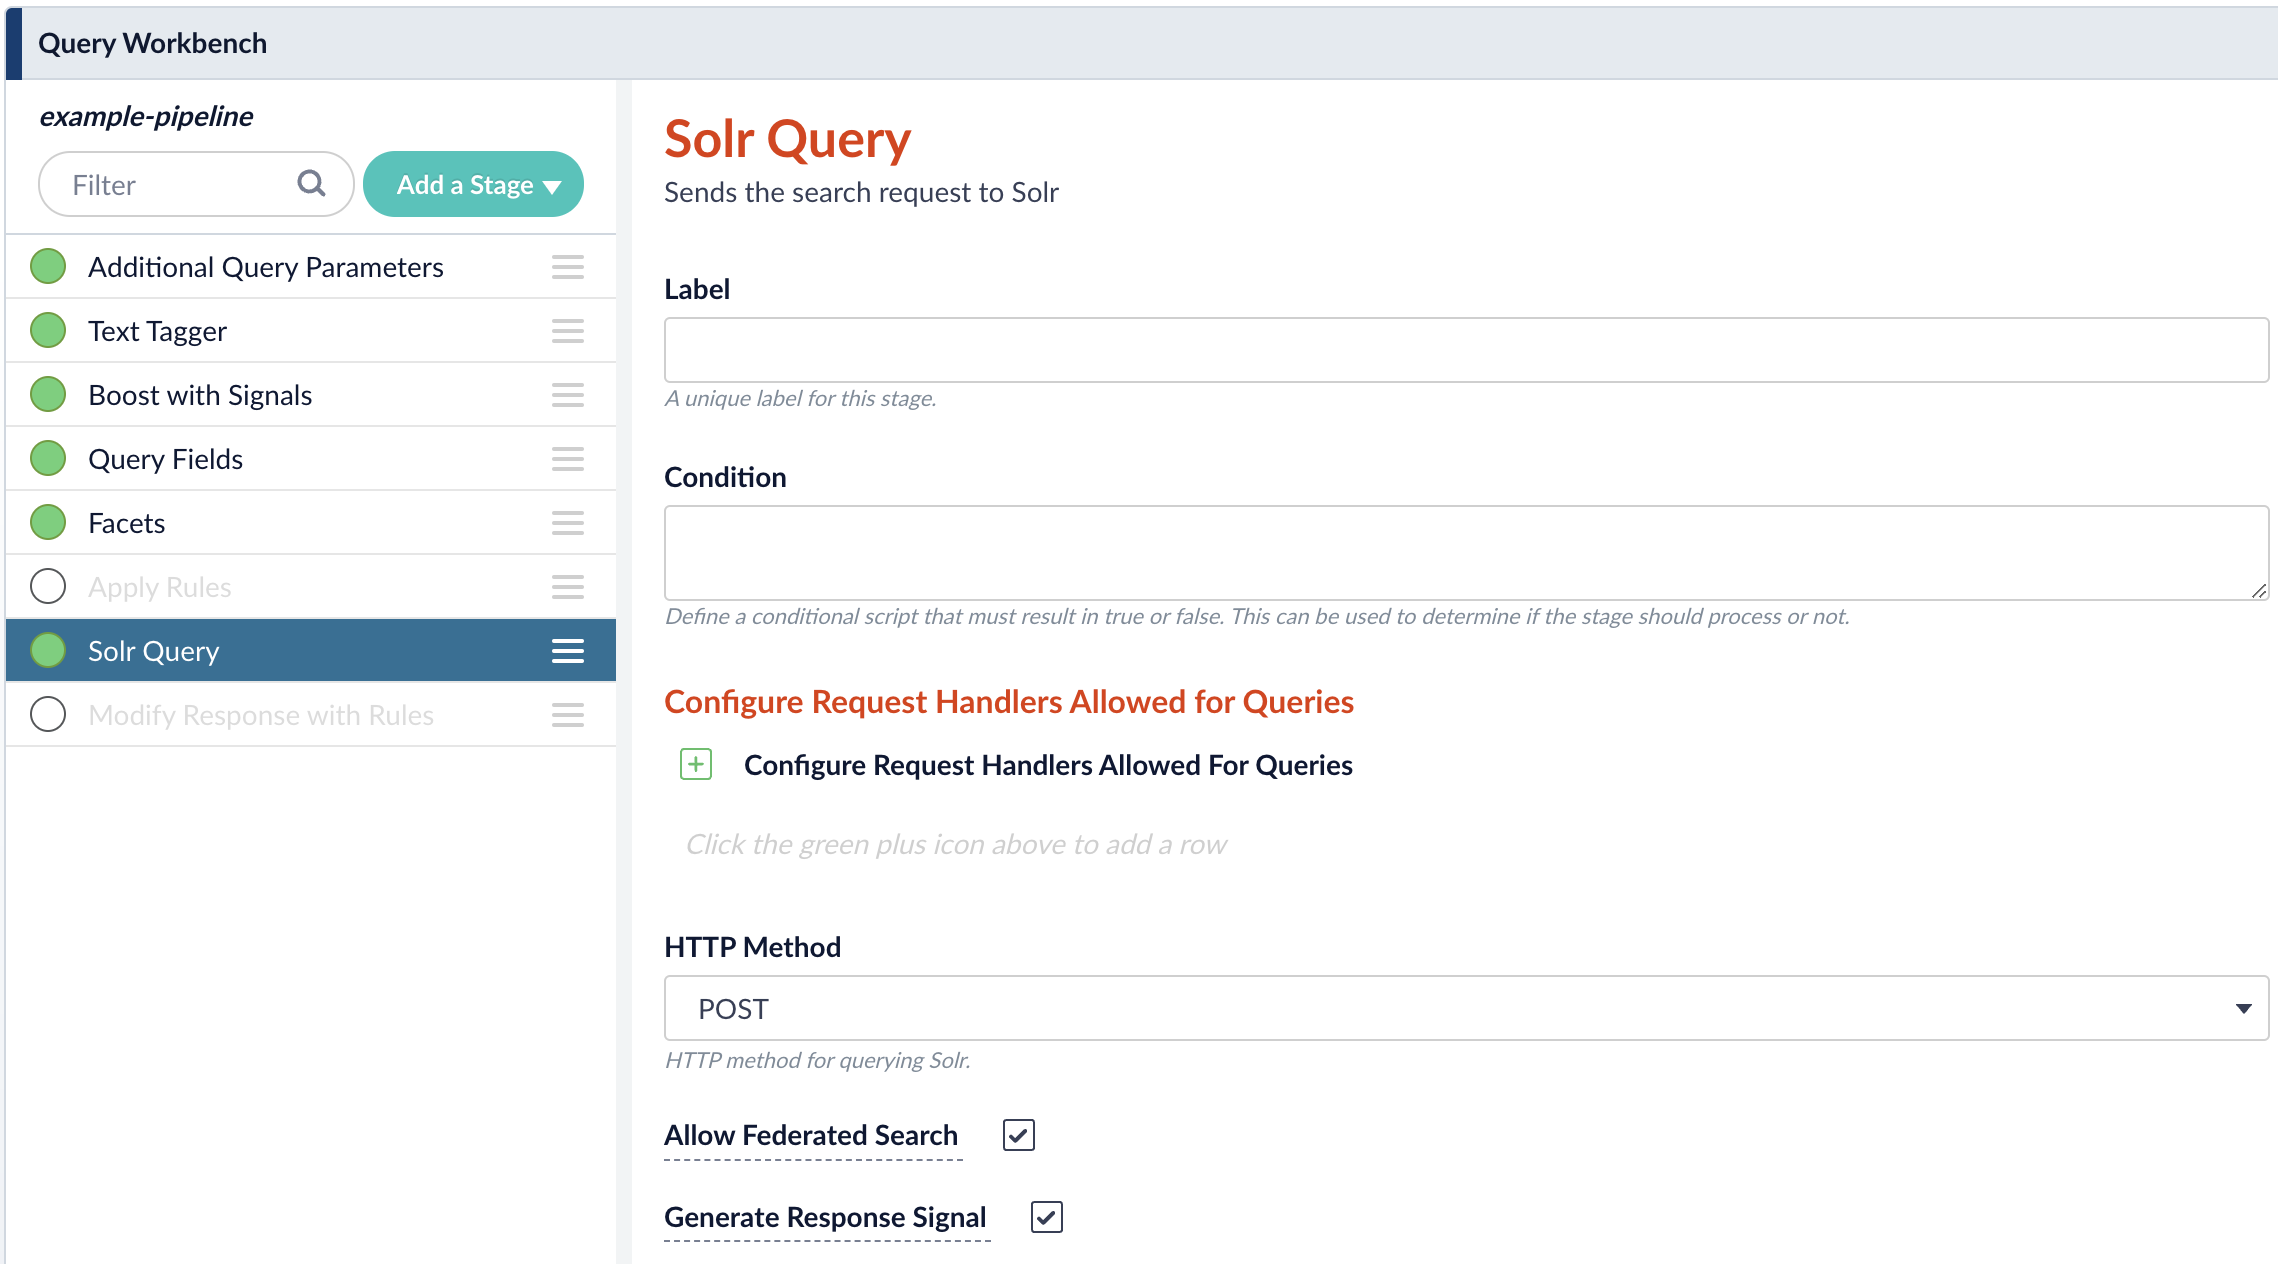
- In the Fusion workspace, navigate to Querying > Query Workbench.
- Click Solr Query to open the Solr Query panel.
-
Enable Allow Federated Search then click Apply.\
- In the workbench area, click Parameters then click Edit Parameters.
-
Click Add
 to add a parameter. For the Name, enter
 collectionand for the Parameter Value, enter a comma-separated list of collections you want to query. For example,movies-collection,books-collection,music-collection.\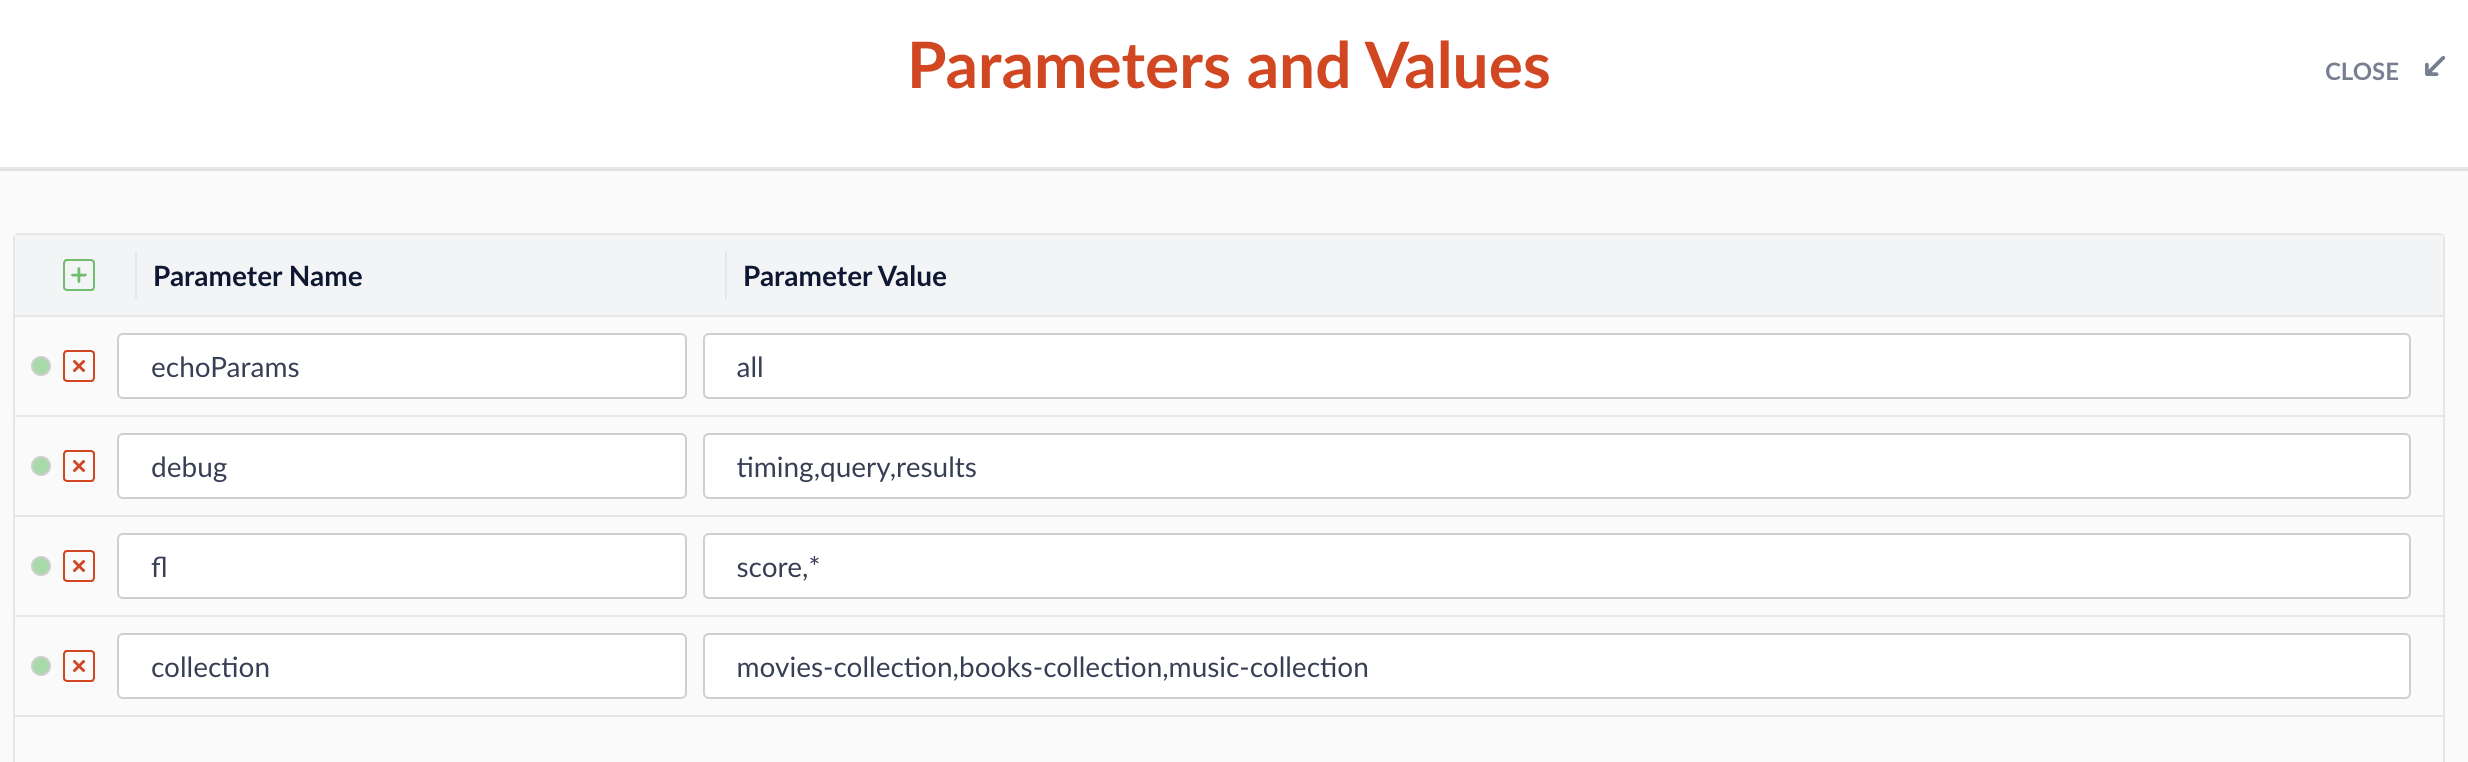
- Click Close.
-
Check that your pipeline is querying documents from all specified collections.\
