Compatible with Fusion version: 4.0.0 through 5.3.5
Deprecation and removal noticeThis connector is deprecated as of Fusion 5.3 and is removed or expected to be removed as of Fusion 5.5. Use the SharePoint Optimized V2 connector instead.For more information about deprecations and removals, including possible alternatives, see Deprecations and Removals.
Learn more
Configure a Non-Administrative Crawl Account in SharePoint Online
Configure a Non-Administrative Crawl Account in SharePoint Online
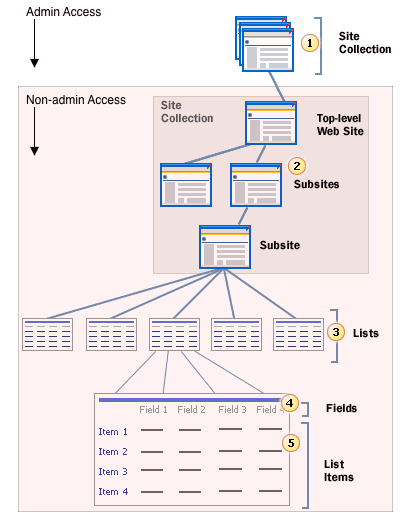
The SharePoint connector retrieves content and metadata from an on-premises SharePoint repository.The steps below describe how to configure a crawl account in SharePoint Online without giving the account administrative access.
Create a site collection administrator account
To create a site collection administrator account, you must have administrator permissions for the site you want to crawl.- Log in to the SharePoint Online admin center as a SharePoint administrator.
- Go to Sites > Active sites and select the site you want to crawl.
- Go to Membership > Site Admins and click Add site admin.
- Search for the user you want to designate as a site admin, then click Add.
The site collection administrator only has control over the selected site and its sub-sites.
Add a crawl permissions level
To create a new permission level, click the gear symbol and go to Site Settings > Site permissions. Select Permission Levels, and click Add a Permission Level. Name the new permission level “Lucidworks Fusion Service Permission”, and assign the following site permissions:| Name | Description |
|---|---|
| View Items | View items in lists and documents in document libraries. |
| Open Items | View the source of documents with server-side file handlers. |
| View Versions | View past versions of a list item or document. |
| View Application Pages | View forms, views, and application pages. Enumerate lists. |
| View Web Analytics Data | View reports on Web site usage. |
| Browse Directories | Enumerate files and folders in a Web site using SharePoint Designer and Web DAV interfaces. |
| View Pages | View pages in a Web site. |
| Enumerate Permissions | Enumerate permissions on the Web site, list, folder, document, or list item. |
| Browse User Information | View information about users of the Web site. |
| Use Remote Interfaces | Use SOAP, Web DAV, the Client Object Model or SharePoint Designer interfaces to access the Web site. |
| Open | Allows users to open a Web site, list, or folder in order to access items inside that container. |
| Edit Personal User Information | Allows a user to change his or her own user information, such as adding a picture. |
Create a Fusion crawl group
For each top-level site you want to be able to crawl, you must create a site permissions group and assign the permissions level you created previously. Go to Site Settings > Site permissions. Click the Create Group symbol and name the new group “Lucidworks Fusion Crawl Accounts”. Add the site collection administrator, and any other user that you wish to have crawl permissions, to this group.The site collection administrator should now be able to crawl without administrator rights.Limitations of a non-administrative crawl account in SharePoint Online
There are important limitations to crawling SharePoint Online with a non-administrative account. Only administrators are permitted to list site collections from SharePoint Online. To crawl multiple site collections from your SharePoint Online tenant, you must either:- List the site collections in the Start Links explicitly, or;
- Provide a SharePoint administrator account when crawling SharePoint Online
Although a non-administrator user can be allowed to list sub-sites in a site collection, the user cannot list the site collections of the tenant URL.
https://lucidworks.sharepoint.com/sites/sitecol, such as /sitecol/subsite1 and /sitecol/subsite2. However, only an administrator can list the site collections in https://lucidworks.sharepoint.com.Crawl SharePoint Online with Minimal Throttling
Crawl SharePoint Online with Minimal Throttling
These instructions are for how to design your crawl so Microsoft will not throttle you.
Use this if you are starting a new deployment or getting chronic throttling as a strategy to architect the crawl using multiple accounts, splitting datasources, and chaining the scheduler.Some key points:This “decorates” traffic uniquely so Microsoft will know exactly who API calls are coming from.
Do not use the default user agent string. It will not uniquely identify your company’s traffic.The crawling will begin with great speed. However, eventually errors are generated in the logs:The idea is to reduce rate limiting. Microsoft will see requests coming from five accounts rather than a single account. To prevent multiple SharePoint jobs from running concurrently, chain jobs.The key is to prevent Fusion from making too many SharePoint API requests to the SharePoint Online servers concurrently. If too aggressive, Microsoft will throttle.In the above case Job 2 (SPO_DS_2) is triggered when Job 1 (SPO_DS_1) completes and so on.For practical purposes one datasource crawling may be too slow. To increase the number of concurrent jobs use ‘MaxConcurrentSharePointJobs’.Example ‘MaxConcurrentSharePointJobs=3’:
- Identify traffic with a custom user agent tied to an Azure app.
- Divide and conquer by splitting sites across multiple datasources and multiple service accounts.
- Set very low threads per datasource, but spread the load horizontally across accounts and datasources.
- Shape concurrency at the job level by chaining jobs with the scheduler and controlling how many SharePoint jobs run at once.
Update the user agent string to link to an Azure app
Each SharePoint datasource requires your company name in the user agent string.Example:ISV|AcmeInc|Fusion/5.3
Divide and conquer with multiple service accounts
SharePoint Online rate limits are due to multiple threads accessing SharePoint APIs concurrently. SharePoint sees that sort of traffic and throttles it heavily.To reduce the traffic and throttling:- Split SharePoint site collections between datasources.
- Create multiple SharePoint Online service accounts and spread them across the datasources.
Start links:
https://tenant.sharepoint.com/sites/test1
https://tenant.sharepoint.com/sites/test2
https://tenant.sharepoint.com/sites/test3
https://tenant.sharepoint.com/sites/test4
https://tenant.sharepoint.com/sites/test5

Service account: service.account@tenant.onmicrosoft.com
Fetch Threads: 5
Number of prefetch threads: 10
User agent: ISV|YourCompanyName|Fusion/5.x.x
Error message: [429 TOO MANY REQUESTS]
Divide and conquer
- Create five service accounts, exactly like the first.
- Create five datasources. Give each datasource its very own service account and a subset of the SharePoint site collections that are to be crawled.
- Set the fetch threads to 1.
Configuration results
* SPO_DS_1:\
Start links: **<span>https://</span>tenant.sharepoint.com/sites/test1**\
Service account: **\service.account@tenant1.onmicrosoft.com**\
Fetch Threads: **1**\
Number of prefetch threads: **1**
* SPO_DS_2:\
Start links: **<span>https://</span>tenant.sharepoint.com/sites/test2**\
Service account: **\service.account@tenant2.onmicrosoft.com**\
Fetch Threads: **1**\
Number of prefetch threads: **1**
* SPO_DS_3:\
Start links: **<span>https://</span>tenant.sharepoint.com/sites/test3**\
Service account: **\service.account@tenant3.onmicrosoft.com**\
Fetch Threads: **1**\
Number of prefetch threads: **1**
* SPO_DS_4:\
Start links: **<span>https://</span>tenant.sharepoint.com/sites/test4**\
Service account: **\service.account@tenant4.onmicrosoft.com**\
Fetch Threads: **1**\
Number of prefetch threads: **1**
* SPO_DS_5:\
Start links: **<span>https://</span>tenant.sharepoint.com/sites/test5**\
Service account: **\service.account@tenant5.onmicrosoft.com**\
Fetch Threads: **1**\
Number of prefetch threads: **1**
Lucidworks job scheduler to limit concurrent datasources
In addition to limiting a single datasource from making to many connections as once, limit the number of SharePoint Online datasources running concurrently. To avoid too many concurrent datasources running, use the Lucidworks Job Scheduler to chain SharePoint datasources to run one at a time.See Schedule a JobUse the “Trigger job after another data source completes” feature.Example single datasource at a time:SPO_DS_1 Schedule: Every day at 06:00:00\
SPO_DS_2 Schedule: Trigger job upon completion of SPO_DS_1\
SPO_DS_3 Schedule: Trigger job upon completion of SPO_DS_2\
SPO_DS_4 Schedule: Trigger job upon completion of SPO_DS_3\
SPO_DS_5 Schedule: Trigger job upon completion of SPO_DS_4
SPO_DS_1 Schedule: Every day at 06:00:00\
SPO_DS_2 Schedule: Trigger job upon completion of SPO_DS_1\
SPO_DS_3 Schedule: Every day at 06:00:00\
SPO_DS_4 Schedule: Trigger job upon completion of SPO_DS_3\
SPO_DS_5 Schedule: Every day at 06:00:00\
SPO_DS_6 Schedule: Trigger job upon completion of SPO_DS_5
Set up App-Only Auth with Key for SharePoint Online
Set up App-Only Auth with Key for SharePoint Online
These steps are based on Microsoft’s Granting Access via Azure AD App-Only.At running the command, a password will be requested to protect the private key. YourFileName.pfx and YourFileName.cer files will be created.The .cer and .pfx need to be renewed. Follow these steps:
Create the .cer and .pfx file
- Connect a Windows system (any Windows machine is fine).
- Save this PowerShell script as Create-SelfSignedCertificate.ps1.
#Requires -RunAsAdministrator <# .SYNOPSIS Creates a Self Signed Certificate for use in server to server authentication .DESCRIPTION .EXAMPLE PS C:\> .\Create-SelfSignedCertificate.ps1 -CommonName "MyCert" -StartDate 2015-11-21 -EndDate 2017-11-21 This will create a new self signed certificate with the common name "CN=MyCert". During creation you will be asked to provide a password to protect the private key. .EXAMPLE PS C:\> .\Create-SelfSignedCertificate.ps1 -CommonName "MyCert" -StartDate 2015-11-21 -EndDate 2017-11-21 -Password (ConvertTo-SecureString -String "MyPassword" -AsPlainText -Force) This will create a new self signed certificate with the common name "CN=MyCert". The password as specified in the Password parameter will be used to protect the private key .EXAMPLE PS C:\> .\Create-SelfSignedCertificate.ps1 -CommonName "MyCert" -StartDate 2015-11-21 -EndDate 2017-11-21 -Force This will create a new self signed certificate with the common name "CN=MyCert". During creation you will be asked to provide a password to protect the private key. If there is already a certificate with the common name you specified, it will be removed first. #> Param( [Parameter(Mandatory=$true)] [string]$CommonName, [Parameter(Mandatory=$true)] [DateTime]$StartDate, [Parameter(Mandatory=$true)] [DateTime]$EndDate, [Parameter(Mandatory=$false, HelpMessage="Will overwrite existing certificates")] [Switch]$Force, [Parameter(Mandatory=$false)] [SecureString]$Password ) # DO NOT MODIFY BELOW function CreateSelfSignedCertificate(){ #Remove and existing certificates with the same common name from personal and root stores #Need to be very wary of this as could break something if($CommonName.ToLower().StartsWith("cn=")) { # Remove CN from common name $CommonName = $CommonName.Substring(3) } $certs = Get-ChildItem -Path Cert:\LocalMachine\my | Where-Object{$_.Subject -eq "CN=$CommonName"} if($certs -ne $null -and $certs.Length -gt 0) { if($Force) { foreach($c in $certs) { remove-item $c.PSPath } } else { Write-Host -ForegroundColor Red "One or more certificates with the same common name (CN=$CommonName) are already located in the local certificate store. Use -Force to remove them"; return $false } } $name = new-object -com "X509Enrollment.CX500DistinguishedName.1" $name.Encode("CN=$CommonName", 0) $key = new-object -com "X509Enrollment.CX509PrivateKey.1" $key.ProviderName = "Microsoft RSA SChannel Cryptographic Provider" $key.KeySpec = 1 $key.Length = 2048 $key.SecurityDescriptor = "D:PAI(A;;0xd01f01ff;;;SY)(A;;0xd01f01ff;;;BA)(A;;0x80120089;;;NS)" $key.MachineContext = 1 $key.ExportPolicy = 1 # This is required to allow the private key to be exported $key.Create() $serverauthoid = new-object -com "X509Enrollment.CObjectId.1" $serverauthoid.InitializeFromValue("1.3.6.1.5.5.7.3.1") # Server Authentication $ekuoids = new-object -com "X509Enrollment.CObjectIds.1" $ekuoids.add($serverauthoid) $ekuext = new-object -com "X509Enrollment.CX509ExtensionEnhancedKeyUsage.1" $ekuext.InitializeEncode($ekuoids) $cert = new-object -com "X509Enrollment.CX509CertificateRequestCertificate.1" $cert.InitializeFromPrivateKey(2, $key, "") $cert.Subject = $name $cert.Issuer = $cert.Subject $cert.NotBefore = $StartDate $cert.NotAfter = $EndDate $cert.X509Extensions.Add($ekuext) $cert.Encode() $enrollment = new-object -com "X509Enrollment.CX509Enrollment.1" $enrollment.InitializeFromRequest($cert) $certdata = $enrollment.CreateRequest(0) $enrollment.InstallResponse(2, $certdata, 0, "") return $true } function ExportPFXFile() { if($CommonName.ToLower().StartsWith("cn=")) { # Remove CN from common name $CommonName = $CommonName.Substring(3) } if($Password -eq $null) { $Password = Read-Host -Prompt "Enter Password to protect private key" -AsSecureString } $cert = Get-ChildItem -Path Cert:\LocalMachine\my | where-object{$_.Subject -eq "CN=$CommonName"} Export-PfxCertificate -Cert $cert -Password $Password -FilePath "$($CommonName).pfx" Export-Certificate -Cert $cert -Type CERT -FilePath "$CommonName.cer" } function RemoveCertsFromStore() { # Once the certificates have been exported we can safely remove them from the store if($CommonName.ToLower().StartsWith("cn=")) { # Remove CN from common name $CommonName = $CommonName.Substring(3) } $certs = Get-ChildItem -Path Cert:\LocalMachine\my | Where-Object{$_.Subject -eq "CN=$CommonName"} foreach($c in $certs) { remove-item $c.PSPath } } if(CreateSelfSignedCertificate) { ExportPFXFile RemoveCertsFromStore } - Open a Command prompt or PowerShell: Run as Administrator
- Run the below script to create the .pfx and .cer files needed for the next steps, where:
StartDate: Current DateEndDate: Current Date + 2 yearsCommonName: Name given to the .cer and .pfx files, such asYourFileName
\Create-SelfSignedCertificate.ps1 -CommonName "YourFileName" -StartDate YYYY-MM-DD -EndDate YYYY-MM-DD
Register a new App
- Go to the Azure Portal , select the Azure Active Directory section, and choose the option App registrations.
- Register a new application: App Registrations → New Registration https://portal.azure.com/#blade/Microsoft_AAD_IAM/ActiveDirectoryMenuBlade/RegisteredApps
Once the application has been created, copy the Application (client) ID as you’ll need to configure the datasource.
Grant permission to App
- From API permissions in the left menu bar, click on the Add a permission button. Choose the permissions that you will grant to this application.
- Choose Sharepoint permissions, and select the permissions needed (Application → Sites.FullControl.All)
- Click on the Grant admin consent for OrganizationName button and confirm the action by clicking on the Yes button that appears at the top.
- From Certificates & Secrets in the left menu, upload the Certificate file (YourFIleName.cer) created earlier:
Obtain the base64 code from the .pfx file
It can be obtained in two ways-
From Command Line (Linux)
- Convert the .pfx to .pc12
keytool -importkeystore -srckeystore YourFileName.pfx -srcstoretype pkcs12 -destkeystore yourcert.p12 -deststoretype pkcs12- Convert the .pc12 to base64
base64 -i yourcert.p12 > base64.txt- Open the .txt file and copy the value generated, you will need it to configure the datasource config
-
From PowerShell
- From PowerShell, run the following commands:
$fileContentBytes = get-content '.\YourFileName.pfx' -Encoding Byte [System.Convert]::ToBase64String($fileContentBytes) | Out-File 'pfx-encoded-bytes.txt'- Open the .txt file and copy the value generated, you will need it to configure the datasource config
Renew the Certificate
When the certificate expires, the crawl will fail with the following error:Client assertion contains an invalid signature. [Reason - The key used is expired
1AuthenticationException: {"error_description":"AADSTS700027: Client assertion contains an invalid signature. [Reason - The key used is expired., Thumbprint of key used by client:"...]}
- Execute the script from ” to get a new .cer and .pfx files
- Go to the Azure Portal, select the Azure Active Directory section, choose the option App registrations, and open the Application from where the certificate expired.
- From Certificates & Secrets’in the left menu bar, remove the older certificate, and upload the new one
- Obtain the base64 from the renewed .pfx file
Set up App-only Authentication With Private Key into Sharepoint v2 plugin
- Client ID, and Base64 from the .pfx file, and password for the private key, must be set into Azure AD Client ID, AZURE AD PKCS12 BASE64 KEYSTORE, and AZURE AD PKCS12 KEYSTORE PASSWORD properties respectively
- Set the appropriate tenant into Azure AD Tenant property, for example,
lucidworksfusion.onmicrosoft.com
Validate Your SharePoint Online Crawl Account Permissions Using PowerShell
Validate Your SharePoint Online Crawl Account Permissions Using PowerShell
Overview of procedure
How to set up and validate SharePoint Online crawl account permissions:- Authenticate to SharePoint Online.
- Get the FedAuth and rtFa cookie values.
- Add your information to the PowerShell script.
- Add your URL and DigestValue.
Authenticate to SharePoint Online
Authenticate to SharePoint Online as the service account user.Get the FedAuth and rtFa cookie values
Open up your Debugging Tools (such as DevTools from Chrome) and copy theFedAuth and rtFa cookies from session.Add your information to the PowerShell script
Enter your site and these two cookies into this PowerShell script:# change these 3 variables to match your environment
$sharepointUrl = "https://YourSharePointURL.com"
$fedAuthCookieValue = "EnterYourFedAuthCookieValueHere"
$rtFaValue = "EnterYourRtfaCookieValueHere"
$headers = New-Object "System.Collections.Generic.Dictionary[[String],[String]]"
$headers.Add("Content-Type", "text/xml")
$headers.Add("SOAPAction", "http://schemas.microsoft.com/sharepoint/soap/GetUpdatedFormDigestInformation")
$headers.Add("X-RequestForceAuthentication", "true")
$headers.Add("Cookie", "FedAuth=$fedAuthCookieValue;rtFa=$rtFaValue")
$body = "<?xml version=`"1.0`" encoding=`"utf-8`"?>`n<soap:Envelope xmlns:xsi=`"http://www.w3.org/2001/XMLSchema-instance`" xmlns:xsd=`"http://www.w3.org/2001/XMLSchema`" xmlns:soap=`"http://schemas.xmlsoap.org/soap/envelope/`">`n <soap:Body>`n <GetUpdatedFormDigestInformation xmlns=`"http://schemas.microsoft.com/sharepoint/soap/`" />`n </soap:Body>`n</soap:Envelope>"
$response = Invoke-RestMethod "$sharepointUrl/_vti_bin/sites.asmx" -Method 'POST' -Headers $headers -Body $body
Write-Host "$response"
<?xml version="1.0" encoding="utf-8"?>
<soap:Envelope xmlns:soap="http://schemas.xmlsoap.org/soap/envelope/" xmlns:xsi="http://www.w3.org/2001/XMLSchema-instance" xmlns:xsd="http://www.w3.org/2001/XMLSchema">
    <soap:Body>
        <GetUpdatedFormDigestInformationResponse xmlns="http://schemas.microsoft.com/sharepoint/soap/">
            <GetUpdatedFormDigestInformationResult>
                  **<DigestValue>YourDigestValueWithTimestamp</DigestValue>**
                  <TimeoutSeconds>1800</TimeoutSeconds>
                <WebFullUrl>https://lucidworksfusiondev.sharepoint.com/sites/ndd2</WebFullUrl>
                <LibraryVersion>16.0.19527.12083</LibraryVersion>
                <SupportedSchemaVersions>14.0.0.0,15.0.0.0</SupportedSchemaVersions>
            </GetUpdatedFormDigestInformationResult>
        </GetUpdatedFormDigestInformationResponse>
    </soap:Body>
</soap:Envelope>
Add your URL and DigestValue
Copy theDigestValue from this response into the PowerShell script below. Also change the SharePoint URL to match your environment.# change these 2 variables to match your environment
$sharepointUrl = "https://YourSharePointURL.com"
$digestValue = "YourDigestValueWithTimestamp"
$headers = New-Object "System.Collections.Generic.Dictionary[[String],[String]]"
$headers.Add("Content-Type", "text/xml")
$headers.Add("X-RequestForceAuthentication", "true")
$headers.Add("X-RequestDigest", "$digestValue")
$body = "<Request AddExpandoFieldTypeSuffix=`"true`" SchemaVersion=`"14.0.0.0`" LibraryVersion=`"16.0.0.0`" ApplicationName=`".NET Library`" xmlns=`"http://schemas.microsoft.com/sharepoint/clientquery/2009`"><Actions><ObjectPath Id=`"2`" ObjectPathId=`"1`"/><ObjectPath Id=`"4`" ObjectPathId=`"3`"/><Query Id=`"5`" ObjectPathId=`"3`"><Query SelectAllProperties=`"false`"><Properties><Property Name=`"Webs`" SelectAll=`"true`"><Query SelectAllProperties=`"false`"><Properties/></Query></Property><Property Name=`"Title`" ScalarProperty=`"true`"/><Property Name=`"ServerRelativeUrl`" ScalarProperty=`"true`"/><Property Name=`"RoleDefinitions`" SelectAll=`"true`"><Query SelectAllProperties=`"false`"><Properties/></Query></Property><Property Name=`"RoleAssignments`" SelectAll=`"true`"><Query SelectAllProperties=`"false`"><Properties/></Query></Property><Property Name=`"HasUniqueRoleAssignments`" ScalarProperty=`"true`"/><Property Name=`"Description`" ScalarProperty=`"true`"/><Property Name=`"Id`" ScalarProperty=`"true`"/><Property Name=`"LastItemModifiedDate`" ScalarProperty=`"true`"/></Properties></Query></Query></Actions><ObjectPaths><StaticProperty Id=`"1`" TypeId=`"{3747adcd-a3c3-41b9-bfab-4a64dd2f1e0a}`" Name=`"Current`"/><Property Id=`"3`" ParentId=`"1`" Name=`"Web`"/></ObjectPaths></Request>"
$response = Invoke-RestMethod "$sharepointUrl/_vti_bin/client.svc/ProcessQuery" -Method 'POST' -Headers $headers -Body $body
Write-Host "$response"
[
    {
        "SchemaVersion": "14.0.0.0",
        "LibraryVersion": "16.0.19527.12083",
        "ErrorInfo": {
            "ErrorMessage": "Access denied. You do not have permission to perform this action or access this resource.",
            "ErrorValue": null,
            "TraceCorrelationId": "640d309f-b0f7-b000-8100-49826f3674cb",
            "ErrorCode": -2147024891,
            "ErrorTypeName": "System.UnauthorizedAccessException"
        },
        "TraceCorrelationId": "640d309f-b0f7-b000-8100-49826f3674cb"
    }
]
[
    {
        "SchemaVersion": "14.0.0.0",
        "LibraryVersion": "16.0.19527.12083",
        "ErrorInfo": null,
        "TraceCorrelationId": "e70c309f-3097-b000-4931-8fe95320fdb0"
    },
    2,
    {
        "IsNull": false
    },
    4,
    {
        "IsNull": false
    },
    5,
    {
        "_ObjectType_": "SP.Web",
        "_ObjectIdentity_": "e70c309f-3097-b000-4931-8fe95320fdb0|740c6a0b-85e2-48a0-a494-e0f1759d4aa7:site:d714bad3-ef71-4f83-86b6-25405106b719:web:ab8c2f1e-c518-4b2a-a89f-c6404b97a85a",
        "Webs": {
            "_ObjectType_": "SP.WebCollection",
            "_Child_Items_": []
        },
        "Title": "NddTest",
        "ServerRelativeUrl": "/sites/ndd2",
        "RoleDefinitions": {
            "_ObjectType_": "SP.RoleDefinitionCollection",
            "_Child_Items_": [
                {
                    "_ObjectType_": "SP.RoleDefinition",
                    "_ObjectIdentity_": "e70c309f-3097-b000-4931-8fe95320fdb0|740c6a0b-85e2-48a0-a494-e0f1759d4aa7:site:d714bad3-ef71-4f83-86b6-25405106b719:web:ab8c2f1e-c518-4b2a-a89f-c6404b97a85a:rd:1073741829",
                    "BasePermissions": {
                        "_ObjectType_": "SP.BasePermissions",
                        "High": 2147483647,
                        "Low": 4294967295
                    },
                    "Description": "Has full control.",
                    "Hidden": false,
                    "Id": 1073741829,
                    "Name": "Full Control",
                    "Order": 1,
                    "RoleTypeKind": 5
                },
                {
                    "_ObjectType_": "SP.RoleDefinition",
                    "_ObjectIdentity_": "e70c309f-3097-b000-4931-8fe95320fdb0|740c6a0b-85e2-48a0-a494-e0f1759d4aa7:site:d714bad3-ef71-4f83-86b6-25405106b719:web:ab8c2f1e-c518-4b2a-a89f-c6404b97a85a:rd:1073741828",
                    "BasePermissions": {
                        "_ObjectType_": "SP.BasePermissions",
                        "High": 432,
                        "Low": 1012866047
                    },
                    "Description": "Can view, add, update, delete, approve, and customize.",
                    "Hidden": false,
                    "Id": 1073741828,
                    "Name": "Design",
                    "Order": 32,
                    "RoleTypeKind": 4
                },
                {
                    "_ObjectType_": "SP.RoleDefinition",
                    "_ObjectIdentity_": "e70c309f-3097-b000-4931-8fe95320fdb0|740c6a0b-85e2-48a0-a494-e0f1759d4aa7:site:d714bad3-ef71-4f83-86b6-25405106b719:web:ab8c2f1e-c518-4b2a-a89f-c6404b97a85a:rd:1073741830",
                    "BasePermissions": {
                        "_ObjectType_": "SP.BasePermissions",
                        "High": 432,
                        "Low": 1011030767
                    },
                    "Description": "Can add, edit and delete lists; can view, add, update and delete list items and documents.",
                    "Hidden": false,
                    "Id": 1073741830,
                    "Name": "Edit",
                    "Order": 48,
                    "RoleTypeKind": 6
                },
                {
                    "_ObjectType_": "SP.RoleDefinition",
                    "_ObjectIdentity_": "e70c309f-3097-b000-4931-8fe95320fdb0|740c6a0b-85e2-48a0-a494-e0f1759d4aa7:site:d714bad3-ef71-4f83-86b6-25405106b719:web:ab8c2f1e-c518-4b2a-a89f-c6404b97a85a:rd:1073741827",
                    "BasePermissions": {
                        "_ObjectType_": "SP.BasePermissions",
                        "High": 432,
                        "Low": 1011028719
                    },
                    "Description": "Can view, add, update, and delete list items and documents.",
                    "Hidden": false,
                    "Id": 1073741827,
                    "Name": "Contribute",
                    "Order": 64,
                    "RoleTypeKind": 3
                },
                {
                    "_ObjectType_": "SP.RoleDefinition",
                    "_ObjectIdentity_": "e70c309f-3097-b000-4931-8fe95320fdb0|740c6a0b-85e2-48a0-a494-e0f1759d4aa7:site:d714bad3-ef71-4f83-86b6-25405106b719:web:ab8c2f1e-c518-4b2a-a89f-c6404b97a85a:rd:1073741826",
                    "BasePermissions": {
                        "_ObjectType_": "SP.BasePermissions",
                        "High": 176,
                        "Low": 138612833
                    },
                    "Description": "Can view pages and list items and download documents.",
                    "Hidden": false,
                    "Id": 1073741826,
                    "Name": "Read",
                    "Order": 128,
                    "RoleTypeKind": 2
                },
                {
                    "_ObjectType_": "SP.RoleDefinition",
                    "_ObjectIdentity_": "e70c309f-3097-b000-4931-8fe95320fdb0|740c6a0b-85e2-48a0-a494-e0f1759d4aa7:site:d714bad3-ef71-4f83-86b6-25405106b719:web:ab8c2f1e-c518-4b2a-a89f-c6404b97a85a:rd:1073741825",
                    "BasePermissions": {
                        "_ObjectType_": "SP.BasePermissions",
                        "High": 48,
                        "Low": 134287360
                    },
                    "Description": "Can view specific lists, document libraries, list items, folders, or documents when given permissions.",
                    "Hidden": true,
                    "Id": 1073741825,
                    "Name": "Limited Access",
                    "Order": 160,
                    "RoleTypeKind": 1
                },
                {
                    "_ObjectType_": "SP.RoleDefinition",
                    "_ObjectIdentity_": "e70c309f-3097-b000-4931-8fe95320fdb0|740c6a0b-85e2-48a0-a494-e0f1759d4aa7:site:d714bad3-ef71-4f83-86b6-25405106b719:web:ab8c2f1e-c518-4b2a-a89f-c6404b97a85a:rd:1073741924",
                    "BasePermissions": {
                        "_ObjectType_": "SP.BasePermissions",
                        "High": 176,
                        "Low": 138612801
                    },
                    "Description": "Can view pages, list items, and documents. Document types with server-side file handlers can be viewed in the browser but not downloaded.",
                    "Hidden": false,
                    "Id": 1073741924,
                    "Name": "View Only",
                    "Order": 2147483647,
                    "RoleTypeKind": 0
                },
                {
                    "_ObjectType_": "SP.RoleDefinition",
                    "_ObjectIdentity_": "e70c309f-3097-b000-4931-8fe95320fdb0|740c6a0b-85e2-48a0-a494-e0f1759d4aa7:site:d714bad3-ef71-4f83-86b6-25405106b719:web:ab8c2f1e-c518-4b2a-a89f-c6404b97a85a:rd:1073741925",
                    "BasePermissions": {
                        "_ObjectType_": "SP.BasePermissions",
                        "High": 1073741856,
                        "Low": 203624545
                    },
                    "Description": "",
                    "Hidden": false,
                    "Id": 1073741925,
                    "Name": "LW Fusion",
                    "Order": 2147483647,
                    "RoleTypeKind": 0
                }
            ]
        },
        "RoleAssignments": {
            "_ObjectType_": "SP.RoleAssignmentCollection",
            "_Child_Items_": [
                {
                    "_ObjectType_": "SP.RoleAssignment",
                    "_ObjectIdentity_": "e70c309f-3097-b000-4931-8fe95320fdb0|740c6a0b-85e2-48a0-a494-e0f1759d4aa7:site:d714bad3-ef71-4f83-86b6-25405106b719:web:ab8c2f1e-c518-4b2a-a89f-c6404b97a85a:ra:3",
                    "PrincipalId": 3
                },
                {
                    "_ObjectType_": "SP.RoleAssignment",
                    "_ObjectIdentity_": "e70c309f-3097-b000-4931-8fe95320fdb0|740c6a0b-85e2-48a0-a494-e0f1759d4aa7:site:d714bad3-ef71-4f83-86b6-25405106b719:web:ab8c2f1e-c518-4b2a-a89f-c6404b97a85a:ra:6",
                    "PrincipalId": 6
                },
                {
                    "_ObjectType_": "SP.RoleAssignment",
                    "_ObjectIdentity_": "e70c309f-3097-b000-4931-8fe95320fdb0|740c6a0b-85e2-48a0-a494-e0f1759d4aa7:site:d714bad3-ef71-4f83-86b6-25405106b719:web:ab8c2f1e-c518-4b2a-a89f-c6404b97a85a:ra:7",
                    "PrincipalId": 7
                },
                {
                    "_ObjectType_": "SP.RoleAssignment",
                    "_ObjectIdentity_": "e70c309f-3097-b000-4931-8fe95320fdb0|740c6a0b-85e2-48a0-a494-e0f1759d4aa7:site:d714bad3-ef71-4f83-86b6-25405106b719:web:ab8c2f1e-c518-4b2a-a89f-c6404b97a85a:ra:8",
                    "PrincipalId": 8
                },
                {
                    "_ObjectType_": "SP.RoleAssignment",
                    "_ObjectIdentity_": "e70c309f-3097-b000-4931-8fe95320fdb0|740c6a0b-85e2-48a0-a494-e0f1759d4aa7:site:d714bad3-ef71-4f83-86b6-25405106b719:web:ab8c2f1e-c518-4b2a-a89f-c6404b97a85a:ra:14",
                    "PrincipalId": 14
                }
            ]
        },
        "HasUniqueRoleAssignments": true,
        "Description": "",
        "Id": "/Guid(ab8c2f1e-c518-4b2a-a89f-c6404b97a85a)/",
        "LastItemModifiedDate": "/Date(1580251756000)/"
    }
]
Configuration
When entering configuration values in the UI, use unescaped characters, such as
\t for the tab character. When entering configuration values in the API, use escaped characters, such as \\t for the tab character.