SQL aggregation jobs can also be set up using source files in Cloud Storage buckets.Documentation Index
Fetch the complete documentation index at: https://doc.lucidworks.com/llms.txt
Use this file to discover all available pages before exploring further.
Built-in SQL Aggregation Jobs Using Cloud Storage Buckets
Built-in SQL Aggregation Jobs Using Cloud Storage Buckets
Built-in SQL aggregation jobs can be set up to use source files in Cloud storage buckets.This process can be used with the following data types and Cloud storage systems:
- File formats such as
.parquetand.orcfiles - Cloud storage systems such as Google Cloud Storage (GCS), Amazon Web Services (AWS), and Azure Kubernetes Service (AKS).
Configure Parameters
The examples in this subsection use placeholder values:
<key name>: name of the Solr GCS service account key.<key file path>: path to the Solr GCS service account key.
Google Cloud Storage (GCS)
- Create a Kubernetes secret with the necessary credentials.
-
Create a secret containing the credentials JSON file:
For more information, see Creating and managing service account keys.
-
Create an extra config map in Kubernetes.
- Create a properties file:
- Create the config map:
-
Add the config map to
values.yaml: -
When the secret is successfully created, set the following parameters.
General parameters
SOURCE COLLECTIONExample value:gs://<path_to_data>/*.parquetURI path that contains the desired signal data files. This example returns all.parquetfiles in the specified directory using thegsscheme to access Google Cloud Storage (GCS).DATA FORMATExample value:parquetFile type of the input files. Valid values includeparquetandorc.Spark settings
spark.kubernetes.driver.secrets.{secret-name}Example value:/mnt/gcp-secretsThe{secret-name}obtained during configuration. Example:example-serviceaccount-key.spark.kubernetes.executor.secrets.{secret-name}Example value:/mnt/gcp-secretsThe{secret-name}obtained during configuration. Example:example-serviceaccount-key.spark.kubernetes.driverEnv.GOOGLE_APPLICATION_CREDENTIALSExample value:/mnt/gcp-secrets/{secret-name}.jsonPath to the.jsonfile used to create the{secret-name}. Example:example-serviceaccount-key.json.spark.executorEnv.GOOGLE_APPLICATION_CREDENTIALSExample value:/mnt/gcp-secrets/{secret-name}.jsonPath to the.jsonfile used to create the{secret-name}. Example:example-serviceaccount-key.json.spark.hadoop.google.cloud.auth.service.account.json.keyfileExample value:/mnt/gcp-secrets/{secret-name}.jsonPath to the.jsonfile used to create the{secret-name}. Example:example-serviceaccount-key.json.
Amazon Web Services (AWS)
-
Create a secret:
-
Create AWS properties:
-
Create the config map:
-
Add the config map to
values.yaml: -
When the secret is successfully created, set the following parameters.
General parameters
SOURCE COLLECTIONExample value:s3a://<path_to_data>/*.parquetURI path that contains the desired signal data files. This example returns all.parquetfiles in the specified directory using thes3ascheme to access AWS S3.DATA FORMATExample value:parquetFile type of the input files. Valid values includeparquetandorc.Spark settings
spark.kubernetes.driver.secretKeyRef.AWS_ACCESS_KEY_IDExample value:{aws-secret-key}Theaws-secret:keyobtained during configuration.spark.kubernetes.driver.secretKeyRef.AWS_SECRET_ACCESS_KEYExample value:{aws-secret-secret}Theaws-secret:secretobtained during configuration.spark.kubernetes.executor.secretKeyRef.AWS_ACCESS_KEY_IDExample value:{aws-secret-key}Theaws-secret:keyobtained during configuration.spark.kubernetes.executor.secretKeyRef.AWS_SECRET_ACCESS_KEYExample value:{aws-secret-secret}Theaws-secret:secretobtained during configuration.
Azure Data Lake
-
Manually upload the
core-site.xmlfile into thejob-launcherpod at/app/spark-dist/conf:At this time, only Data Lake Gen 1 is supported. -
When the secret is successfully created, set the following parameters.
General parameters
SOURCE COLLECTIONExample value:wasbs://<path_to_data>/*.parquetURI path that contains the desired signal data files. This example returns all Parquet files in the directory.wasbsis used for Azure data.DATA FORMATExample value:parquetFile type of the input files. Valid values includeparquetandorc.Spark settings
spark.hadoop.fs.wasbs.implExample value:org.apache.hadoop.fs.azure.NativeAzureFileSystemMakes the system file available inside the Spark job.spark.hadoop.fs.azure.account.key.{storage-account-name}.blob.core.windows.netExample value:{access-key-value}Obtain the values for{storage-account-name}and{access-key-value}from the Azure UI.
COLLECTION_NAME_signals and COLLECTION_NAME_signals_aggr collections, plus the aggregation jobs described below. You can view these jobs at collections > jobs.
| Job | Default input collection | Default output collection | Default schedule |
|---|---|---|---|
COLLECTION_NAME_click_signals_aggregation | COLLECTION_NAME_signals | COLLECTION_NAME_signals_aggr | Every 15 minutes |
COLLECTION_NAME_session_rollup | COLLECTION_NAME_signals | COLLECTION_NAME_signals | Every 15 minutes |
| Job | Default input collection | Default output collection | Default schedule |
|---|---|---|---|
COLLECTION_NAME_user_item_prefs_agg | COLLECTION_NAME_signals | COLLECTION_NAME_recs_aggr | Once per day |
COLLECTION_NAME_user_query_history_agg | COLLECTION_NAME_signals | COLLECTION_NAME_signals_aggr | Once per day |
COLLECTION_NAME_click_signals_aggregation
TheCOLLECTION_NAME_click_signals_aggregation job computes a time-decayed weight for each document, query, and filters group in the signals collection. Fusion computes the weight for each group using an exponential time-decay on signal count (30 day half-life) and a weighted sum based on the signal type. This approach gives more weight to a signal that represents a user purchasing an item than to a user just clicking on an item.
| query | count_i | type | timestamp_tdt | user_id | doc_id | session_id | fusion_query_id | |
|---|---|---|---|---|---|---|---|---|
| Required signals fields: | ✅ | ✅ | ✅ | ✅ | ✅ | See note below. |
signalTypeWeights SQL parameter in the Fusion Admin UI.
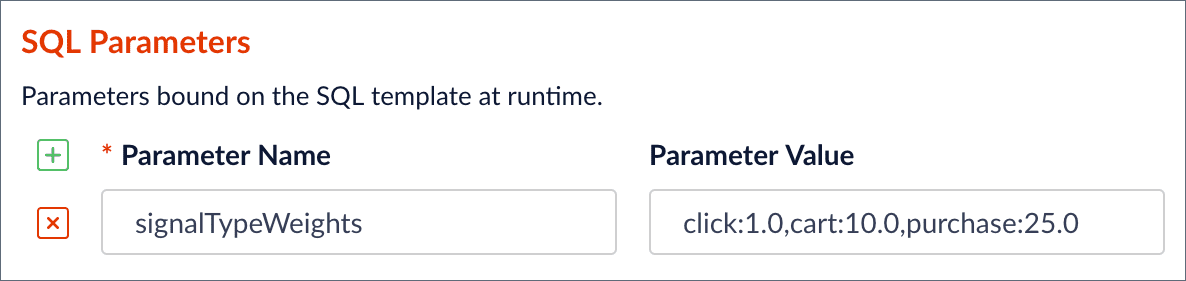
signalTypeWeights parameter into a WHERE IN clause to filter signals by the specified types (click, cart, purchase), and also passes the parameter into the weighted_sum SQL function. Notice that Fusion only displays the SQL parameters and not the actual SQL for this job. This is to simplify the configuration because, in most cases, you only need to change the parameters and not worry about the actual SQL. However, if you need to change the SQL for this job, you can edit it under the Advanced toggle on the form.
COLLECTION_NAME_session_rollup
TheCOLLECTION_NAME_session_rollup job aggregates related user activity into a session signal that contains activity count, duration, and keywords (based on user search terms).
The Fusion App Insights application uses this job to show reports about user sessions.
Use the elapsedSecsSinceLastActivity and elapsedSecsSinceSessionStart parameters to determine when a user session is considered to be complete. You can edit the SQL using the Advanced toggle.
The COLLECTION_NAME_session_rollup job uses signals as the input collection and output collection. Unlike other aggregation jobs that write aggregated documents to the COLLECTION_NAME_signals_aggr collection, the COLLECTION_NAME_session_rollup job creates session signals and saves them to the COLLECTION_NAME_signals collection.
COLLECTION_NAME_user_item_prefs_agg
TheCOLLECTION_NAME_user_item_preferences_aggregation job computes an aggregated weight for each user/item combination found in the signals collection. The weight for each group is computed using an exponential time-decay on signal count (30 day half-life) and a weighted sum based on the signal type.
| query | count_i | type | timestamp_tdt | user_id | doc_id | session_id | fusion_query_id | |
|---|---|---|---|---|---|---|---|---|
| Required signals fields: | ✅ | ✅ | ✅ | ✅ | ✅ |
This job is a prerequisite for the BPR Recommender job.
- In the job configuration panel, click Advanced to see all of the available options.
- When aggregating signals for the first time, uncheck the Aggregate and Merge with Existing checkbox. In production, once the jobs are running automatically then this box can be checked. Note that if you want to discard older signals then by unchecking this box those old signals will essentially be replaced completely by the new ones.
- If the original signal data has missing fields, edit the SQL query to fill in missing values for fields such as “count_i” (the number of times a user interacted with an item in a session).
- Sometimes the aggregation job can run faster by unchecking the Job Skip Check Enabled box. Do this when first loading the signals.
-
Use the
signalTypeWeightsSQL parameter to set the correct signal types and weights for your dataset. Its value is a comma-delimited list of signal types and their stakeholder-defined level of importance. Think of this numeric value as a weight that tells which type of signal is most important for determining a user’s interest in an item. An example of how to weight the signal types is shown below:Rank your signal types to determine which types should be added. Add only the signal types that are significant. Signal types that are not added to the list will not be included in the aggregation job, and for some signal types this is fine.
The weights should be within orders of magnitude of each other. The spread of values should not be wide. For instance,click:1.0, cart:100000.0is too wide of a spread. The values ofclick:1.0andcart:50.0would be a reasonable setting, indicating that the signal type ofcartis 50 times more important for measuring a user’s interest in an item. -
The Time Range field value is used in a weight decay function that reduces the importance of signals the older they are. This time range is in days and the default is 30 days. If you want to increase this time because the time duration of your signals is greater than 30 days, edit the SQL query to reflect the desired number of days. The SQL query is visible when you click Advanced in the job configuration panel. Modify the following line in the SQL query, changing “30 days” to your desired timeframe:
COLLECTION_NAME_item_recommendations and scheduled to run after this job completes. Consequently, you should only run this aggregation once or twice a day, because training a recommender model is a complex, long-running job that requires significant resources from your Fusion cluster.
COLLECTION_NAME_user_query_history_agg
TheCOLLECTION_NAME_user_query_history_aggregation job computes an aggregated weight for each user/query combination found in the signals collection. The weight for each group is computed using an exponential time-decay on signal count (30 day half-life) and a weighted sum based on the signal type. Use the signalTypeWeights parameter to set the correct signal types and weights for your dataset. You can use the results of this job to boost queries for a user based on their past query activity.
| query | count_i | type | timestamp_tdt | user_id | doc_id | session_id | fusion_query_id | |
|---|---|---|---|---|---|---|---|---|
| Required signals fields: | ✅ | ✅ | ✅ | ✅ | ✅ |