Query rewriting strategies
Fusion provides a variety of query rewriting strategies to improve relevancy:- Business rules
- Underperforming query rewriting
- Misspelling detection
- Phrase detection
- Synonym detection
- Remove Words
- Business rules - If a query triggers a business rule, then the business rule overrides any query rewriting strategies that conflict with it.
-
Query rewrites
- Underperforming query rewriting - If a query triggers an underperforming query rewrite, then this strategy overrides all subsequent query rewriting strategies.
- Remove words - To help increase the number of results returned, Remove Words query rewrites removes words from the users’ search.
- Synonym detection
- Misspelling detection and phrase detection - The query rewriting results from both of these strategies are applied together. To use only the strategy with the longest surface form, you can configure the Text Tagger query stage with Overlapping Tag Policy set to “LONGEST_DOMINANT_RIGHT”.
Business rules
Business rules are manually-created formulas for rewriting queries. This is the most versatile strategy for creating custom query rewrites. It supports a variety of conditions and actions to address a wide range of use cases. When you need a very specific query rewrite, this is the best strategy. Business rules are applied in the Apply Rules stage of the query pipeline. See Business Rules to learn how to create, edit, and publish business rules.Underperforming query rewriting
Head/tail analysis is:- Also known as the Underperforming Query Rewriting feature
- Uses signals data to identify underperforming queries
- Suggests improved queries that could produce better conversion rates
-
Suggested by the Head/Tail Analysis Spark job operating on your signals data
This job is deprecated in Fusion 5.9.15 and will be removed in a future release. Lucidworks recommends using Neural Hybrid Search, which achieves superior relevance compared to legacy machine learning methods.
- Created manually using the Rules Editor or underlying API
Misspelling detection
The Misspelling Detection feature maps misspellings to their corrected spellings. When Fusion receives a query containing a known misspelling, it rewrites the query using the corrected spelling in order to return relevant results instead of an empty or irrelevant results set.The Misspelling Detection job is deprecated in Fusion 5.9.15 and will be removed in a future release.
Lucidworks recommends using Neural Hybrid Search, which achieves superior relevance compared to legacy machine learning methods.
- Misspelling Detection for general information
- Use Misspelling Detection for information about how to review, edit, create, and publish spelling corrections
Use Misspelling Detection
Use Misspelling Detection
Query Analytics
The course for Query Analytics focuses on how Fusion provides query analytics to detect and improve underperforming queries.
Reviewing auto-generated spelling corrections
Spelling corrections that are automatically generated by the Token and Phrase Spell Correction job are assigned one of the following status values:-
Auto
There are three values for confidence level:
No action is required on these results, but you can edit them if you wish.
-
Pending
The confidence level is ambiguous, and the result must be reviewed by a user before it can be deployed. It will only be moved from the
_query_rewrite_stagingcollection to the_query_rewritecollection when its status has changed to “Approved” and it has been published.
- Navigate to Relevance > Rules > Rewrite.
- Select Misspelling tab. The application displays the Misspelling Detection screen.
- Click the icon next to the spelling correction.
- In the Status column, select either “Approved” or “Denied”. Optionally, you can also edit the spelling correction itself.
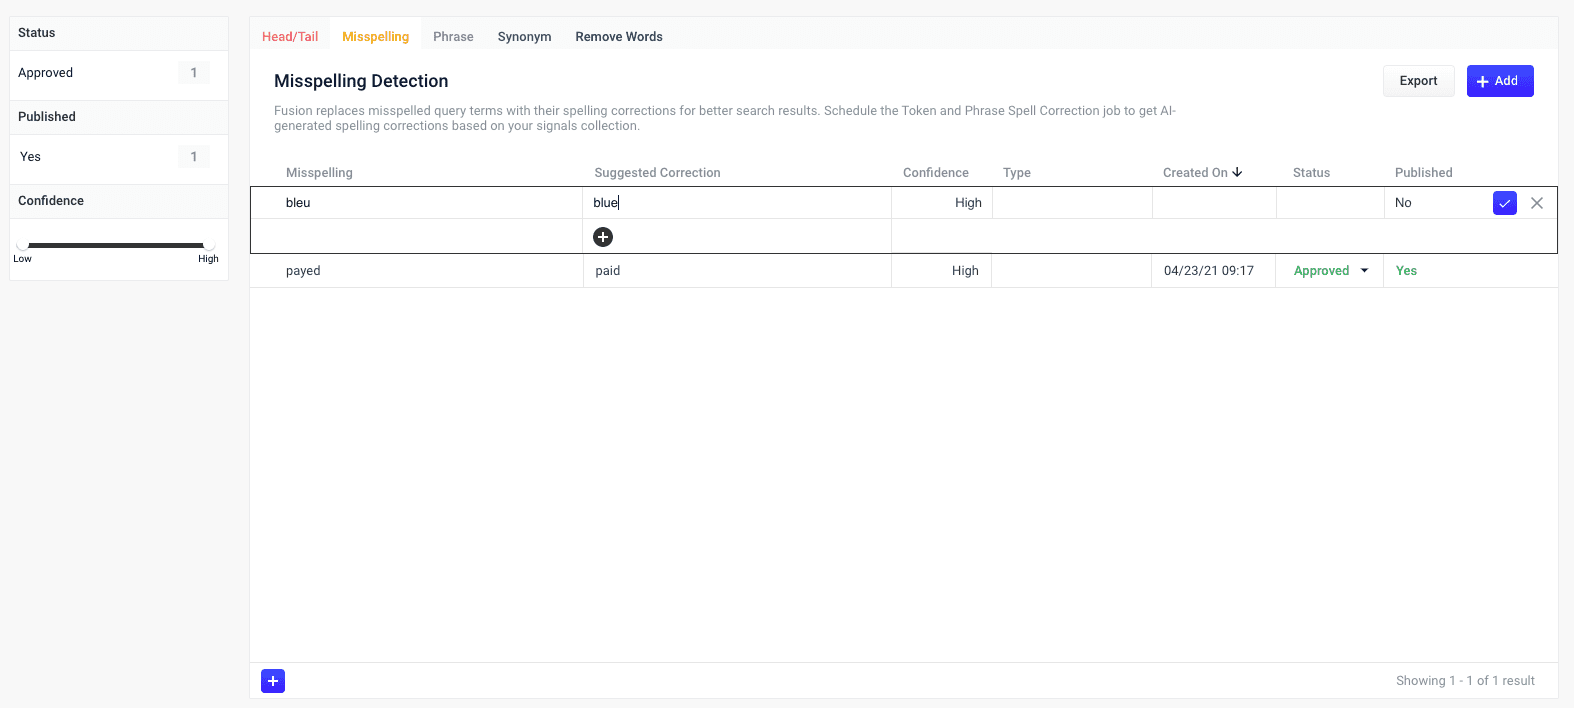
Adding new spelling corrections
You can manually add spelling corrections in addition to any generated by the Fusion 5.x.x Token and Phrase Spell Correction job release.- Navigate to Relevance > Rules > Rewrite.
- Select Misspelling tab. The application displays the Misspelling Detection screen.
-
At the bottom of the rules list, click the icon.
A new spelling correction appears at the top of the list:
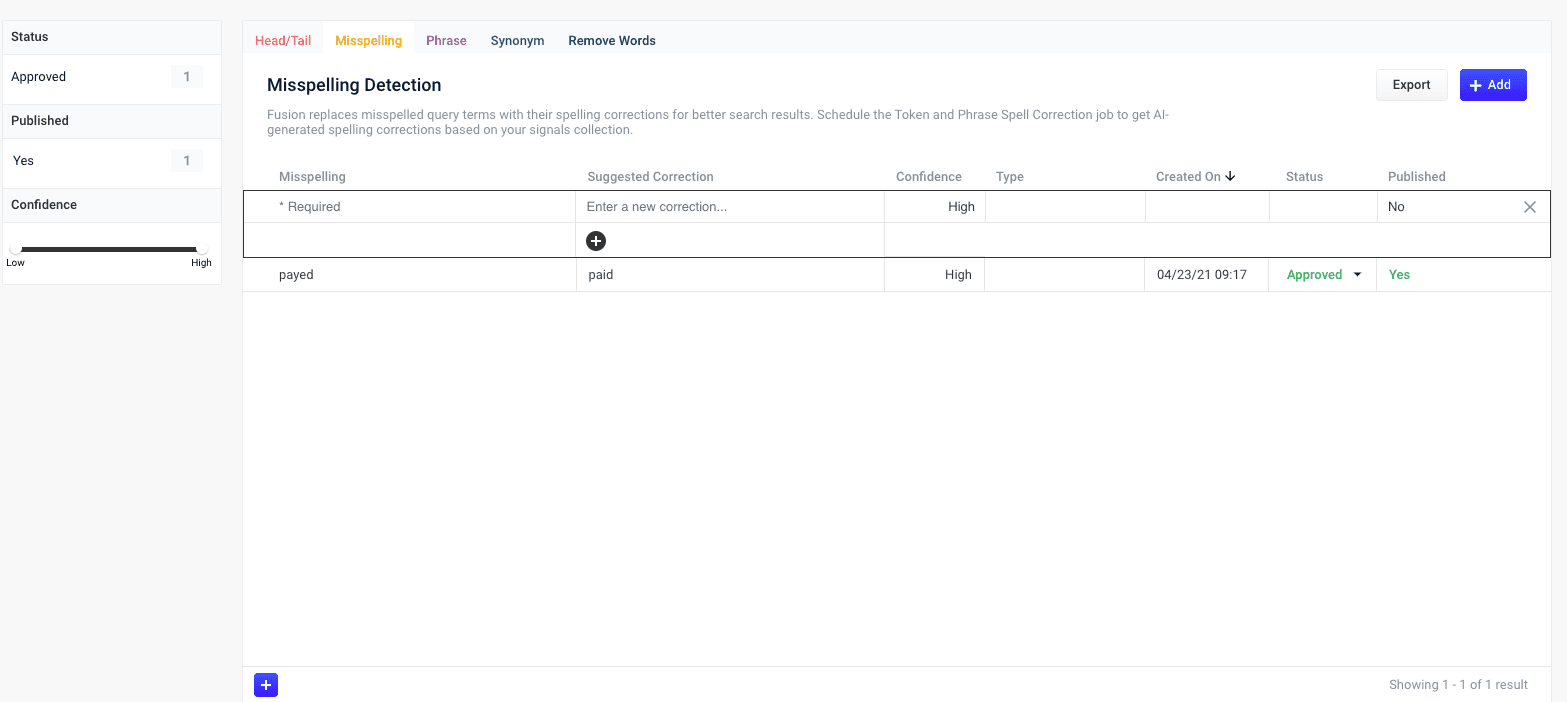
- Enter the misspelled word or phrase.
- Enter one or more spelling corrections.
- Select the spelling correction’s status, depending on whether you want to deploy it the next time you publish your changes (“Approved”) or save it for further review (“Pending”).
-
Click the check mark to save the new spelling correction:
Publishing your changes
How to publish updated spelling corrections- In the Misspelling Detection screen, click the PUBLISH button. Fusion prompts you to confirm that you want to publish your changes.
- Click PUBLISH.
Tuning the misspelling detection job
The default configuration for the Token and Phrase Spell Correction job, respectively, is designed for high accuracy and works well with most signal datasets, depending on the volume and quality of the signals. If you are seeing too few results, or too many inaccurate results, then you can try tuning the job to achieve better results.To modify job configurations, you must be a Fusion user with one of the following roles or permissions that include access to job configurations:Query rewrite jobs post-processing cleanup
To perform more extensive cleanup of query rewrites, complete the procedures in Query Rewrite Jobs Post-processing Cleanup.Phrase detection
Phrase detection identifies phrases in your signals so that results with matching phrases can be boosted. This helps compensate for queries where phrases are not distinguished with quotation marks. For example, the queryipad case is rewritten as “ipad case”~10^2, meaning if ipad and case appear within 10 terms (whitespace-delimited tokens) of each other, then boost the result by a factor of 2.
The Phrase Detection job is deprecated in Fusion 5.9.15 and will be removed in a future release.
Lucidworks recommends using Neural Hybrid Search, which achieves superior relevance compared to legacy machine learning methods.
- Phrase Detection for general information
- Use Phrase Detection for information about how to review, edit, create, and publish spelling corrections
Use Phrase Detection
Use Phrase Detection
The Phrase Extraction job automatically creates phrases based on your AI-generated data. When you navigate to Relevance > Rules > Rewrite and select the Phrase tab, the application displays the Phrase Detection screen.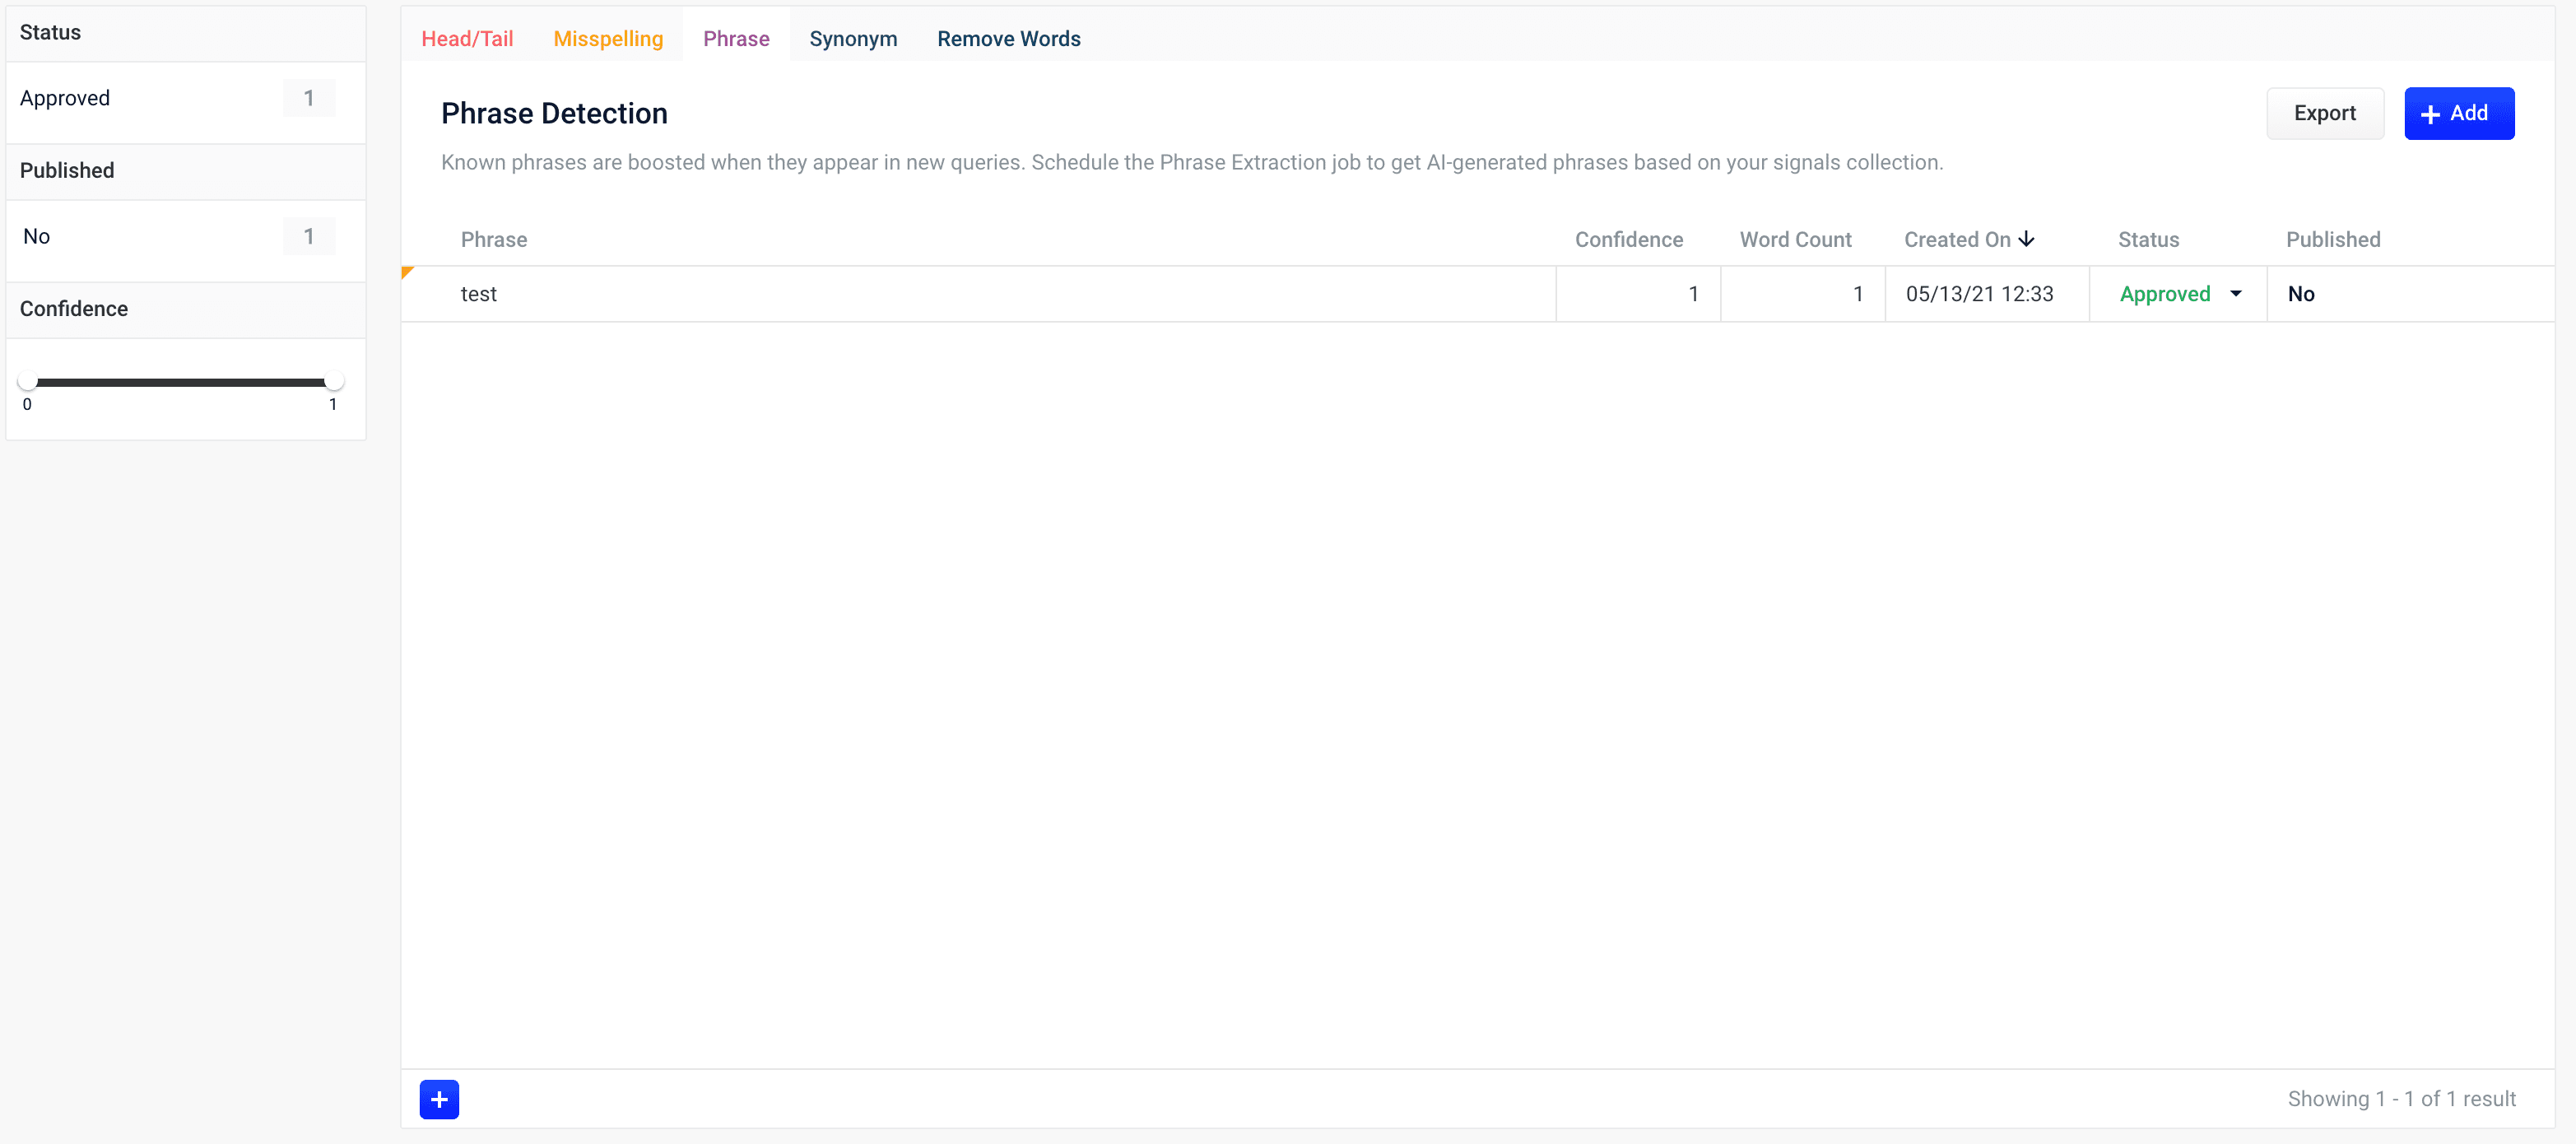
Query Analytics
The course for Query Analytics focuses on how Fusion provides query analytics to detect and improve underperforming queries.
Reviewing auto-generated phrases
Phrases that are automatically generated by the Phrase Extraction job are assigned one of the following status values:-
Auto
These results have a confidence level as a threshold to automatically deploy them to the
_query_rewritecollection. This threshold can be specified in the configuration parameter Minimum Likelihood Score (default value 0.1). No action is required on these results, but you can edit them if you wish. -
Pending
The confidence level is ambiguous, and the result must be reviewed by a user before it can be deployed. It will only be moved from the
_query_rewrite_stagingcollection to the_query_rewritecollection when its status has changed to “Approved” and it has been published.
How to review a pending phrase result
- Navigate to Relevance > Rules > Rewrite.
- Select Phrase tab. The application displays the Phrase Detection screen.
- Click the icon next to the phrase.
- In the Status column, select either “Approved” or “Denied”. Optionally, you can also edit the phrase itself.
-
Click the Close icon next to the updated phrase:
Approving a phrase does not automatically deploy it to the
_query_rewrite collection. When you have finished your review, you must click Publish to deploy your changes.Adding new phrases
You can manually add phrases in addition to any generated by the Phrase Extraction job.How to add a phrase
- Navigate to Relevance > Rules > Rewrite.
- Select Phrase tab. The application displays the Phrase Detection screen.
- At the bottom of the rules list, click the icon. A new phrase appears at the top of the list.
- Enter the phrase.
- Select the phrase’s status, depending on whether you want to deploy it the next time you publish your changes (“Approved”) or save it for further review (“Pending”).
- Click the check mark to save the new phrase.
Publishing your changes
How to publish updated phrases
- In the Phrase Detection screen, click the PUBLISH button. Fusion prompts you to confirm that you want to publish your changes.
- Click PUBLISH.
Synonym detection
The Synonym Detection feature generates pairs of synonyms and pairs of similar queries. Two words are considered potential synonyms when they are used in a similar context in similar queries. A query that contains a matching term is expanded to include all of its synonyms, with the original term boosted by a factor of two. Synonyms are applied in the Text Tagger stage of the query pipeline.The Synonym Detection job is deprecated in Fusion 5.9.15 and will be removed in a future release.
Lucidworks recommends using Neural Hybrid Search, which achieves superior relevance compared to legacy machine learning methods.
- Synonym Detection for general information
- Use Synonym Detection for information about how to review, edit, create, and publish synonym corrections
Use Synonym Detection
Use Synonym Detection
Based on the release, synonyms are automatically created based on your AI-generated data. When you navigate to Relevance > Rules > Rewrite and select the Synonym tab, the application displays the Synonym Detection screen. For more information, see: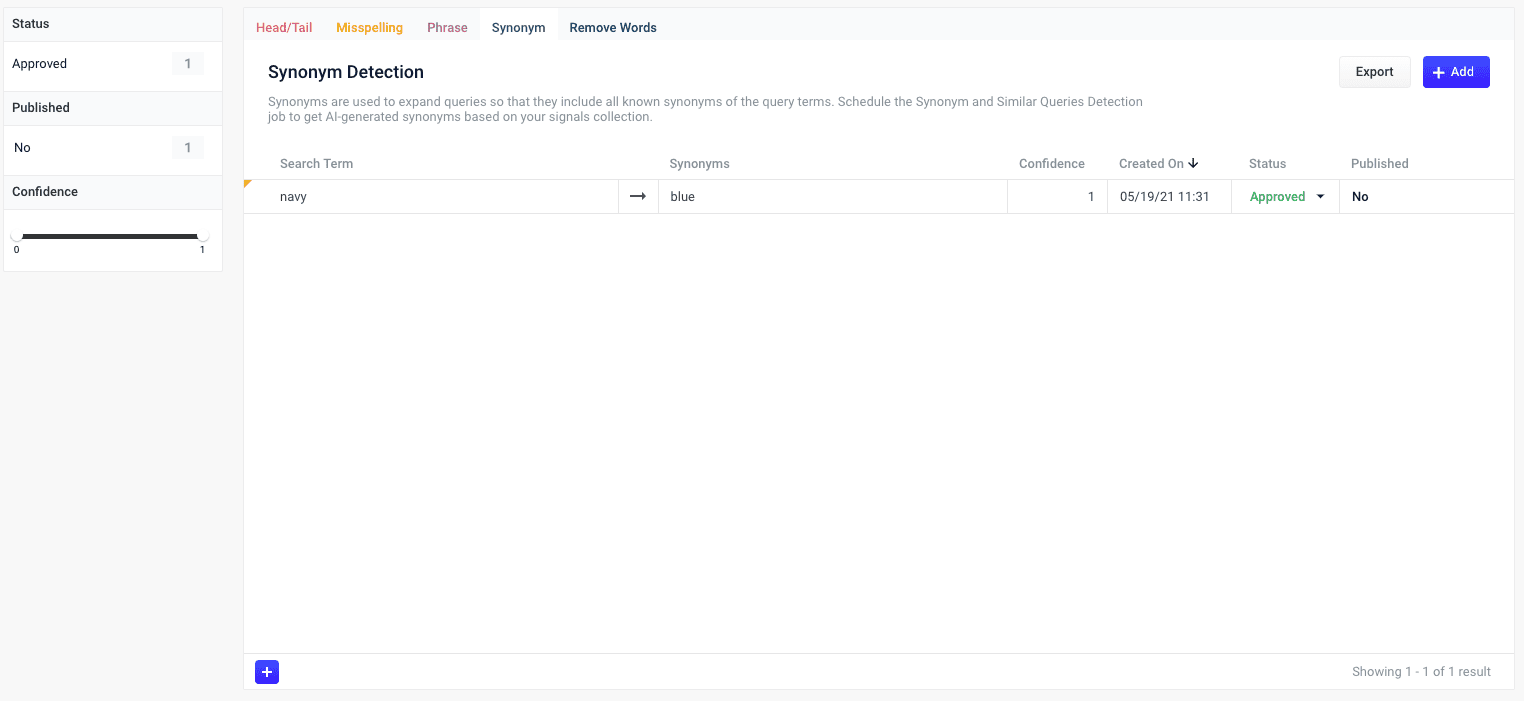
Query Analytics
The course for Query Analytics focuses on how Fusion provides query analytics to detect and improve underperforming queries.
Reviewing auto-generated synonym pairs
Synonyms that are automatically generated by the Fusion 5.2.x and later Synonym Detection job are assigned the following status value:-
Pending
The confidence level is ambiguous, and the result must be reviewed by a user before it can be deployed. It will only be moved from the
_query_rewrite_stagingcollection to the_query_rewritecollection when its status has changed to “Approved” and it has been published.By default, all results from a synonym job are set to “Pending”, since there are usually a limited number of synonyms, and synonym expansion can have high impact on relevancy.
How to review a pending synonym pair result
- Navigate to Relevance > Rules > Rewrite.
- Select Synonym tab. The application displays the Synonym Detection screen.
- Click the icon next to the synonym pair.
- In the Status column, select either “Approved” or “Denied”. Where alternative synonyms were detected, you can click Suggestions to view and select them as replacements for the displayed synonym pair.
-
Click the Close icon next to the updated synonym pair:
Approving a synonym pair does not automatically deploy it to the
_query_rewrite collection. When you have finished your review, you must click Publish to deploy your changes.Adding new synonym pairs
You can manually add synonym pairs in addition to any generated by your Fusion release:How to add a synonym pair
- Navigate to Relevance > Rules > Rewrite.
- Select Synonym tab. The application displays the Synonym Detection screen.
- At the bottom of the rules list, click the icon. A new synonym pair appears at the top of the list.
- Enter the query term.
- Select the synonym pair’s status, depending on whether you want to deploy it the next time you publish your changes (“Approved”) or save it for further review (“Pending”).
- Click the check mark to save the new synonym pair.
Publishing your changes
How to publish updated synonym pairs
- In the Synonym Detection screen, click the PUBLISH button. Fusion prompts you to confirm that you want to publish your changes.
- Click PUBLISH.
Remove words
Use a Remove Words query rewrite to remove particular phrases from queries. Unlike other rewrites, Remove Words rules are entered manually and aren’t generated by a job. You can create a Remove Words query rewrite to remove words from a query. This query rewrite is helpful when a word in the search query does not add value to the search results. For example, you can rewrite a search query forcase study examples to remove examples and then display results for case study.
See Remove Words to learn how to remove words from your users’ searches.
Rules Editor
The Rules Editor allows you to view, edit, create, approve, enable, and publish rules powered by Fusion. Access the Rules Editor from the Fusion UI by navigating to Relevance > Rules:
Query rewrite collections
For detailed information about query rewriting, see:
- Manage Collections in the Fusion UI
- Collections
Manage Collections in the Fusion UI
Manage Collections in the Fusion UI
Collections can be created or removed using the Fusion UI or the REST API.For information about using the REST API to manage collections, see Collections API in the REST API Reference:You can map a Fusion collection to multiple Solr collections, known here as partitions, where each partition contains data from a specific time range.To configure time-based partitioning, under Time Series Partitioning click Enable.See Time-Based Partitioning for more information.To stop a datasource immediately, choose Abort instead of Stop.There is also a REST API for datasources.
Creating a Collection
When you create an app, by default Fusion Server creates a collection and associated objects.To create a new collection in the Fusion UI:- From within an app, click Collections > Collections Manager.
- At the upper right of the panel, click New.
- Enter a Collection name. This name cannot be changed later.
- To create the collection in the default Solr cluster and with other default settings, click Save Collection.
Creating a Collection with Advanced Options
To access advanced options for creating a collection in the Fusion UI:- From within an app, click Collections > Collections Manager.
- At the upper right of the panel, click New.
- Enter a Collection name. This name cannot be changed later.
- Click Advanced.
- Configure advanced options. The options are described below.
- Click Save Collection.
Solr Cluster
By default, a new collection is associated with the Solr instance that is associated with thedefault Solr cluster.If Fusion has multiple Solr clusters, choose from the list which cluster you want to associate your collection with.
The cluster must exist first.Solr Cluster Layout
The next section lets you define a Replication Factor and Number of Shards. Define these options only if you are creating a new collection in the Solr cluster. If you are linking Fusion to an existing Solr collection, you can skip these settings.Solr Collection Import
Import a Solr collection to associate the new Fusion collection with an existing Solr collection. Enter a Solr Collection Name to associate the collection with an existing Solr collection. Then, enter a Solr Config Set to tell ZooKeeper to use the configurations from an existing collection in Solr when creating this collection.Time Series Partitioning
Available in 4.x only.
Configuring Collections
The Collections menu lets you configure your existing collection, including datasources, fields, jobs, stopwords, and synonyms.In the Fusion UI, from any app, the Collections icon displays on the left side of the screen.Some tasks related to managing a collection are available in other menus:- Configure a profile in Indexing > Indexing Profiles or Querying > Query Profiles.
- View reports about your collection’s activity in Analytics > Dashboards.
Collections Manager
The Collections Manager page displays details about the collection, such as how many datasources are configured, how many documents are in the index, and how much disk space the index consumes.This page also lets you create a new collection, disable search logs or signals, enable recommendations, issue a commit command to Solr, or clear a collection.Disable search logs
When you first create a collection, the search logs are created by default. The search logs populate the panels in Analytics > Dashboards.- Hover over your collection name until the gear icon appears at the end of the line.
- Click the gear icon.
- Click Disable Search Logs.
- On the confirmation screen, click Disable Search Logs.
- Fusion 5.x. Dashboards
- Fusion 4.x. Dashboards
Disable signals
When you first create a collection, the signals and aggregated signals collections are created by default.- Hover over your collection name until the gear icon appears at the end of the line.
- Click the gear icon.
- Click Disable Signals.
- On the confirmation screen, click Disable Signals.
Hard commit a collection
- Hover over your collection name until the gear icon appears at the end of the line.
- Click the gear icon.
- Click Hard Commit Collection.
- On the confirmation screen, click Hard Commit Collection.
Datasources
To access the Datasources page, click Indexing > Datasources. By default, there are no datasources configured right after installation.To add a new datasource, click New at the upper right of the panel.See the Connectors and Datasources Reference for details on how to configure a datasource. Options vary depending on the repository you would like to index.After you configure a datasource, it appears in a list on this screen. Click the name of a datasource to edit its properties. Click Start to start the datasource. Click Stop to stop the datasource before it completes. To the right, view information on the last completed job, including the date and time started and stopped, and the number of documents found as new, skipped, or failed.When you stop a datasource, Fusion attempts to safely close connector threads, finishing processing documents through the pipeline and indexing documents to Solr. Some connectors take longer to complete these processes than others, so might stay in a “stopping” state for several minutes.
Stopwords
The Stopwords page lets you edit a stopwords list for your collection.To add or delete stop words:- Click the name of the text file you wish to edit.
- Add a new word on a new line.
- When you are done with your changes, click Save.
- Click System > Import Fusion Objects.
- Choose the file to upload.
- Click Import >>.
Synonyms
Fusion has the same synonym functionality that Solr supports. This includes a list of words that are synonyms (where the synonym list expands on the terms entered by the user), as well as a full mapping of words, where a word is substituted for what the user has entered (that is, the term the user has entered is replaced by a term in the synonym list).See more about synonyms:You can edit the synonyms list for your collection.To access the Synonyms page in the Fusion UI, in any app, click Collections > Synonyms.Filter the list of synonym definitions by typing in the Filter… box.To import a synonyms list:- From the Synonyms page, click Import and Save. A dialog box opens.
- Choose the file to import.
- Enter new synonym definitions one per line.
- To enter a string of terms that expand on the terms the user entered, enter the terms separated by commas, like
Television, TV. - To enter a term that should be mapped to another term, enter the terms separated by an equal sign then a right angle bracket,
=>, likei-pod=>ipod.
- To enter a string of terms that expand on the terms the user entered, enter the terms separated by commas, like
- Remove a line by clicking the x at the end of the line.
- Once you are finished with edits, click Save.
Profiles
Profiles allow you to create an alias for an index or query pipeline. This allows you to send documents or queries to a consistent endpoint and change the underlying pipeline or collection as needed.Read about profiles in Index Profiles and Query Profiles:- Fusion 5.x.
- Fusion 4.x.
Learn more
Collections Menu Tour
The quick learning for Collections Menu Tour focuses on the Collections Menu features and functionality along with a brief description of each screen available in the menu.
COLLECTION_NAME_query_rewrite_staging
Certain Spark jobs send their output to this collection. Rules are also written to this collection initially
Some of the content in this collection requires manual review before it can be migrated to theCOLLECTION_NAME_query_rewrite, where query pipelines can read it. See below for details.COLLECTION_NAME_query_rewriteThis collection is optimized for high-volume traffic. Query pipelines can read from this collection to find rules, synonyms, spelling corrections, and more with which to rewrite queries and responses.
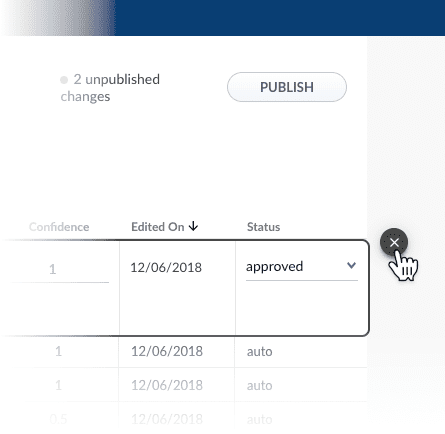
COLLECTION_NAME_query_rewrite_staging to the COLLECTION_NAME_query_rewrite collection only when they are approved (either automatically on the basis of their confidence scores or manually by a human reviewer) and a Fusion user clicks Publish. The review field value indicates whether a document will be published when the user clicks Publish:
You can review and approve or deny documents using the query rewriting UI. You can also change a document’s status to “pending” to save it for later review.
Rules Simulator query profile
The Rules Simulator allows product owners to experiment with rules and other query rewrites in theCOLLECTION_NAME_query_rewrite_staging collection before deploying them to the COLLECTION_NAME_query_rewrite collection.
Each app has a COLLECTION_NAME_rules_simulator query profile, configured to use the COLLECTION_NAME_query_rewrite_staging collection for query rewrites instead of the COLLECTION_NAME_query_rewrite collection. This profile is created automatically whenever a new app is created.
See Configure the Rules Simulator Query Profile for more information about configuration.
Configure the Rules Simulator Query Profile
Configure the Rules Simulator Query Profile
Each app has a
_rules_simulator query profile, configured to use the _query_rewrite_staging collection for query rewrites instead of the _query_rewrite collection. This profile is created automatically whenever a new app is created.By default, this query profile points to your default query pipeline and collection. You can configure it to point to any pipeline or collection, for example when testing a new pipeline before it has been deployed.How to change the query pipeline, collection, and query parameters used by the _rules_simulator query profile- Open the Fusion UI.
- Navigate to Querying > Query Profiles.
-
Select the
_rules_simulatorquery profile for your app. For example, if your app is called “Demo” then the name of the query profile isDemo_rules_simulator.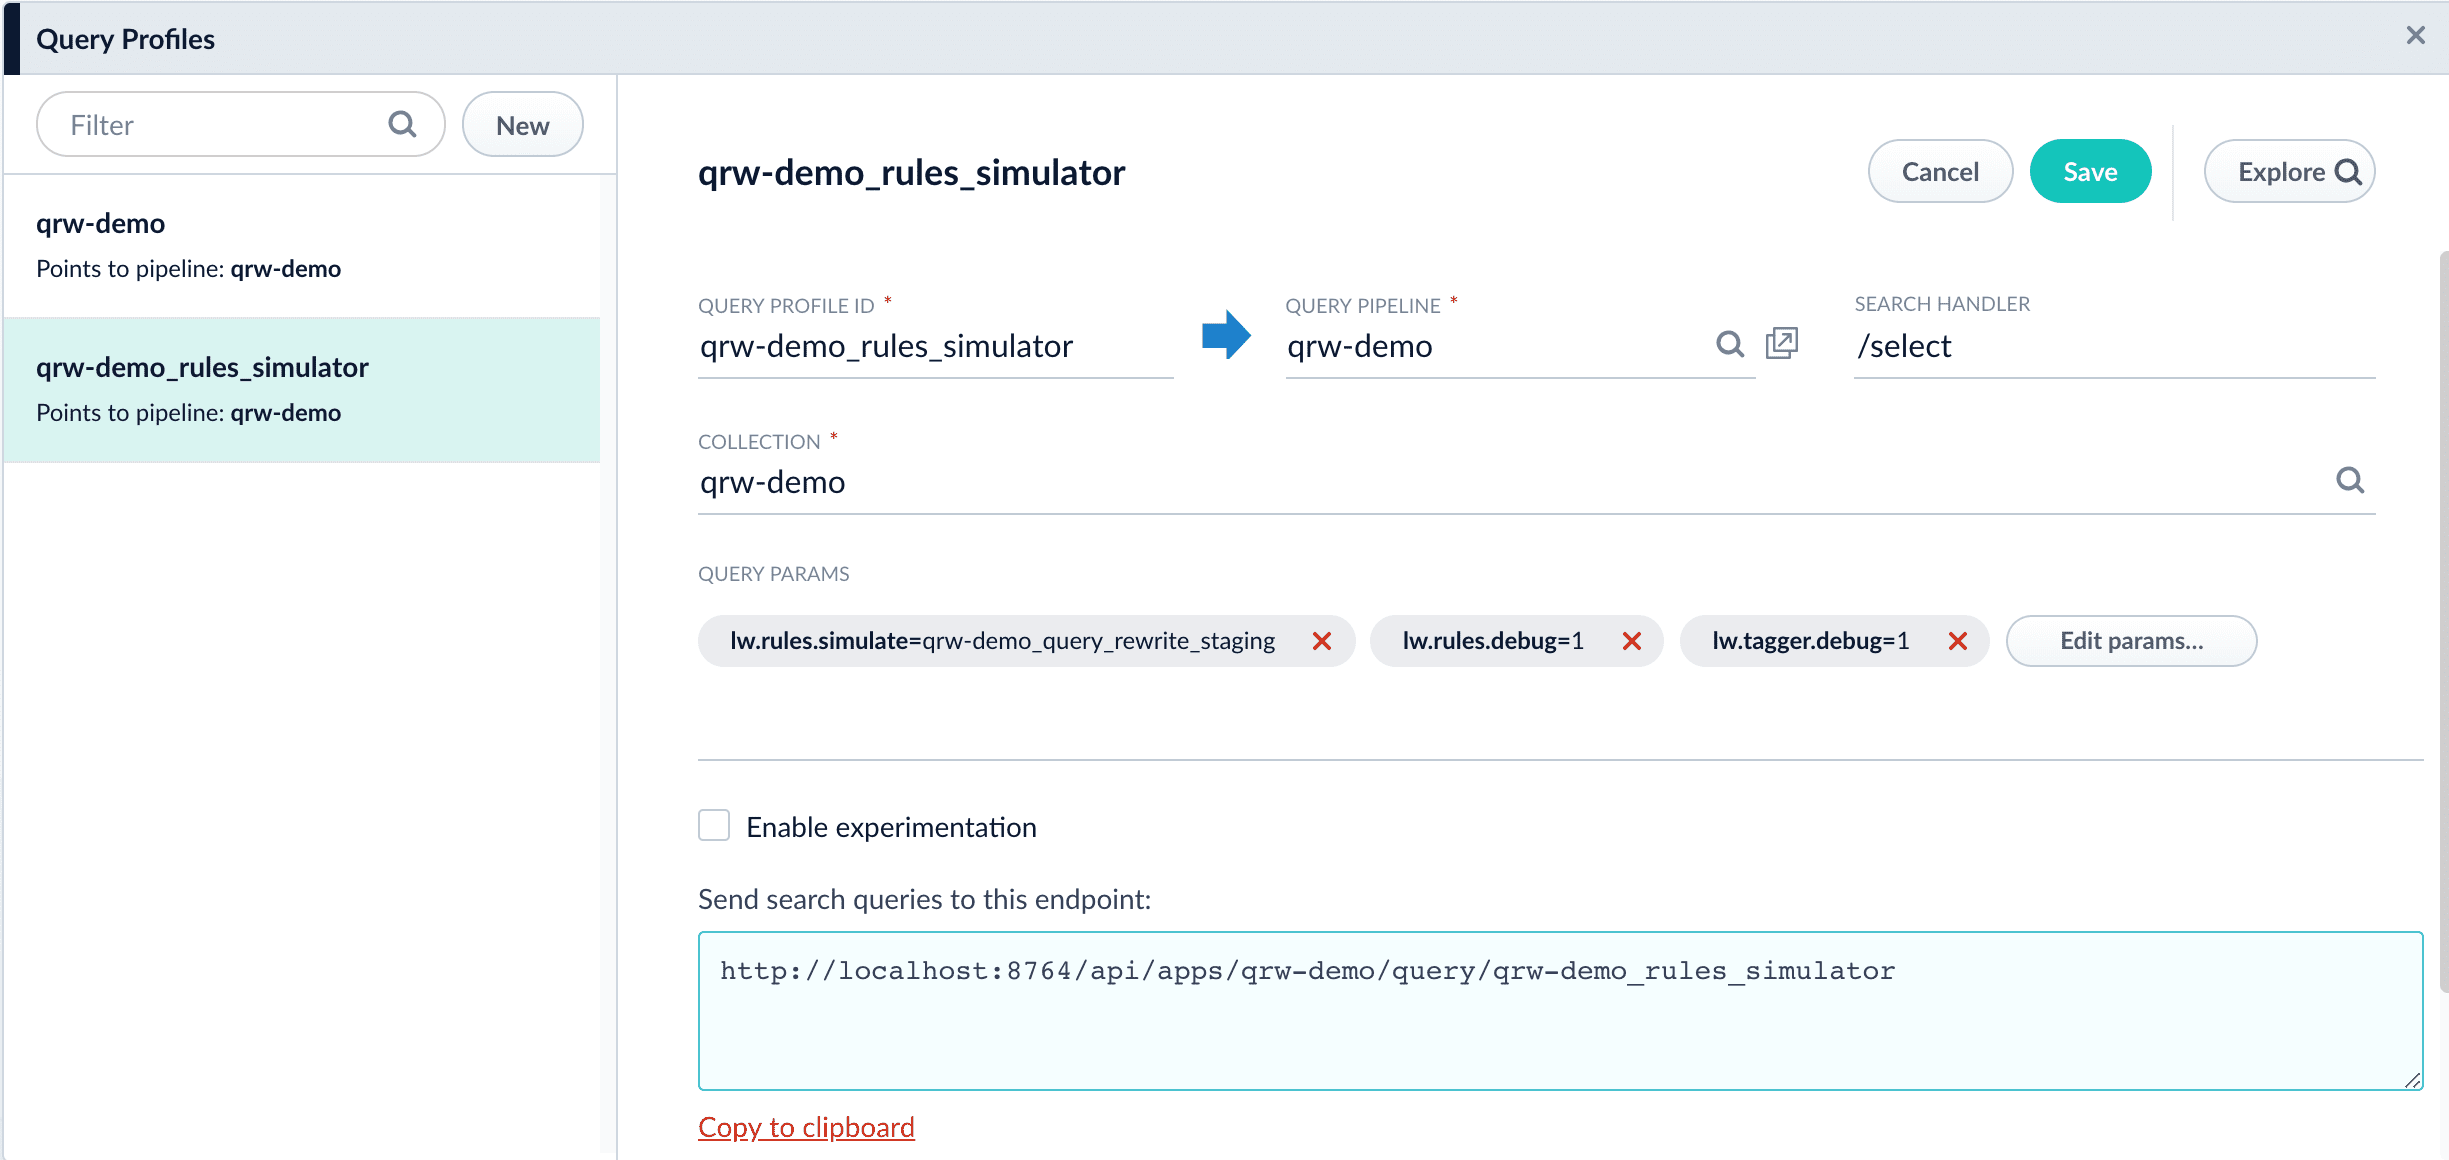
- Modify the configuration as desired.
- Click Save.
Query pipeline stages for query rewriting
These query rewriting stages are part of any default query pipeline:- Apply Rules query stage
This stage looks up rules that have been deployed to theCOLLECTION_NAME_query_rewritecollection and matches them against the query. Matching rules that perform query rewriting are applied at this stage, while matching rules that perform response rewriting are applied by the Modify Response with Rules stage later in the pipeline.
To trigger a rule that contains a tag, specify the tagname in the request URL of the user search app. See Easily define triggers in tags for more information.
-
Text Tagger query pipeline stage
This stage uses the SolrTextTagger handler to identify known entities in the query by searching the
COLLECTION_NAME_query_rewritecollection.The purpose of the search is to perform query rewriting using matches from the following items:For Fusion 5.x.x organizations that do not have a Predictive Merchandiser license, the Solr Text Tagger handler also searches theCOLLECTION_NAME_query_rewrite_stagingcollection in the case of the Fusion query rewriting Simulator).
Spark jobs for query rewriting
This section describes how Spark jobs support query rewriting. These jobs read from the signals collection and write their output to theCOLLECTION_NAME_query_rewrite_staging collection. High-confidence results are automatically migrated from there to the COLLECTION_NAME_query_rewrite collection, while ambiguous results remain in the staging collection until they are reviewed and approved. You can review job results in the Query Rewriting UI.
- Daily query rewriting jobs are created and scheduled automatically when you create a new app.
- Additional query rewriting jobs can be created manually.
Daily query rewriting jobs
When a new app is created, the jobs below are also created and scheduled to run daily, beginning 15 minutes after app creation, in the following order:- Token and Phrase Spell Correction job
Detect misspellings in queries or documents using the numbers of occurrences of words and phrases. - Phrase Extraction job
Identify multi-word phrases in signals. - Synonym Detection
Use this job to generate pairs of synonyms and pairs of similar queries. Two words are considered potential synonyms when they are used in a similar context in similar queries.
Process flow
The first and second jobs can provide input to improve the Synonym job’s output:- Token and Phrase Spell Correction job results can be used to avoid finding mainly misspellings, or mixing synonyms with misspellings.
- Phrase Extraction job results can be used to find pairs of synonyms with multiple tokens, such as “lithium ion”/“ion battery”.
Additional query rewriting jobs
These jobs also produce results that are used for query rewriting, but must be created manually:- Head/Tail Analysis job
Perform head/tail analysis of queries from collections of raw or aggregated signals, to identify underperforming queries and the reasons. This information is valuable for improving overall conversions, Solr configurations, auto-suggest, product catalogs, and SEO/SEM strategies, in order to improve conversion rates. - Ground Truth job
Ground truth or gold standard datasets are used in the ground truth jobs and query relevance metrics to define a specific set of documents.
Basic parameters
To enter advanced parameters in the UI, click Advanced. Those parameters are described in the advanced parameters section.
- Spark job ID. The unique ID for the Spark job that references this job in the API. This is the
idfield in the configuration file. Required field. - Input/Output Parameters. This section includes the Signals collection field, which is the Solr collection that contains click signals and its associated search log identifier. This is the
signalsCollectionfield in the configuration file. Required field.
Advanced parameters
If you click the Advanced toggle, the following optional fields are displayed in the UI.-
Spark Settings. This section lets you enter
parameter name:parameter valueoptions to use in this job. This is thesparkConfigfield in the configuration file. -
Additional Options. This section includes the following options:
- Search logs pipeline. The pipeline ID associated with search log entries. This is the
searchLogsPipelinefield in the configuration file. - Join key (query signals). The common key that joins the query signals in the signals collection. This is the
joinKeySignalsfield in the configuration file. - Join key (click signals). The common key that joins the click signals in the signals collection. This is the
joinKeySignalsfield in the configuration file. - Search logs and options. This section lets you enter
property name:property valueoptions to when loading the search logs collection. This is thesearchLogsAddOptsfield in the configuration file. - Additional signals options. This section lets you enter
property name:property valueoptions when loading the signals collection. This is thesignalsAddOptsfield in the configuration file. - Filter queries. The
array[string]filter query to apply when selecting top queries from the query signals in the signals collection. This is thefilterQueriesfield in the configuration file. - Top queries limit. The total number of queries to select for ground truth calculations when this job is run. This is the
topQueriesLimitfield in the configuration file.
- Search logs pipeline. The pipeline ID associated with search log entries. This is the
”rules” role for query rewriting users
The “rules” role provides permissions to access query rewriting features for all Fusion apps. A Fusion admin can create a user account with this role to give a business user access to the Query Rewriting UI.Query rewrite jobs post-processing cleanup
To perform more extensive cleanup of query rewrites, complete the procedures in Query Rewrite Jobs Post-processing Cleanup.Query Rewrite Jobs Post-processing Cleanup
Query Rewrite Jobs Post-processing Cleanup
The Synonym Detection job uses the output of the Misspelling Detection job and Phrase Extraction job. Therefore, post processing must occur in the order specified in this topic for the Synonym detection job cleanup, Phrase extraction job cleanup, and Misspelling detection job cleanup procedures. The Head-Tail Analysis job cleanup can occur in any order.
Synonym detection job cleanup
Use this job to remove low confidence synonyms.Prerequisites
Complete this:- AFTER the Misspelling Detection and Phrase Extraction jobs have successfully completed.
- BEFORE removing low confidence synonym suggestions generated in the post processing phrase extraction cleanup and misspelling detection cleanup procedures detailed later in this topic.
Remove low confidence synonym suggestions
Use either a Synonym cleanup method 1 - API call or the Synonym cleanup method 2 - Fusion Admin UI to remove low confidence synonym suggestions.Synonym cleanup method 1 - API call
-
Open the
delete_lowConf_synonyms.jsonfile.REQUEST ENTITY specifies the threshold for low confidence synonyms. Edit the upper range from 0.0005 to increase or decrease the threshold based on your data. -
Enter
<your query_rewrite_staging collection name/update>in the uri field. An example URI value for an app calledDC_Largewould beDC_Large_query_rewrite_staging/update. -
Change the
idfield if applicable. -
Specify the upper confidence level in the entity field.
The entity field specifies the threshold for low confidence synonyms. Edit the upper range to increase or decrease the threshold based on your data.
Synonym cleanup method 2 - Fusion Admin UI
- Log in to Fusion and select Collections > Jobs.
- Select Add+ > Custom and Other Jobs > REST Call.
- Enter delete-low-confidence-synonyms in the ID field.
-
Enter
<your query_rewrite_staging collection name/update>in the ENDPOINT URI field. An example URI value for an app calledDC_Largewould beDC_Large_query_rewrite_staging/update. - Enter POST in the CALL METHOD field.
- In the QUERY PARAMETERS section, select + to add a property.
- Enter wt in the Property Name field.
- Enter json in the Property Value field.
- In the REQUEST PROTOCOL HEADERS section, select + to add a property.
-
Enter the following as a REQUEST ENTITY (AS STRING)
<root><delete><query>type:synonym AND confidence: [0 TO 0.0005]</query></delete><commit/></root>REQUEST ENTITY specifies the threshold for low confidence synonyms. Edit the upper range from 0.0005 to increase or decrease the threshold based on your data.
Delete all synonym suggestions
To delete all of the synonym suggestions, enter the following in the REQUEST ENTITY section:<root><delete><query>type:synonym</query></delete><commit/></root>This entry may be helpful when tuning the synonym detection job and testing different configuration parameters.
Phrase extraction job cleanup
Use this job to remove low confidence phrase suggestions.Prerequisites
Complete this:- AFTER you complete Synonym detection job cleanup
Remove low confidence phrase suggestions
Use either a Phrase cleanup method 1 - API call or the Phrase cleanup method 2 - Fusion Admin UI to remove low confidence phrase suggestions.Phrase cleanup method 1 - API call
-
Open the
delete_lowConf_phrases.jsonfile. -
Enter
<your query_rewrite_staging collection name/update>in the uri field. An example URI value for an app calledDC_Largewould beDC_Large_query_rewrite_staging/update. - Change the id field if applicable.
-
Specify the upper confidence level in the entity field.
The entity field specifies the threshold for low confidence phrases. Edit the upper range to increase or decrease the threshold based on your data.
Phrase cleanup method 2 - Fusion Admin UI
- Log in to Fusion and select Collections > Jobs.
- Select Add+ > Custom and Other Jobs > REST Call.
- Enter remove-low-confidence-phrases in the ID field.
-
Enter
<your query_rewrite_staging collection name/update>in the ENDPOINT URI field. An example URI value for an app calledDC_Largewould beDC_Large_query_rewrite_staging/update. - Enter POST in the CALL METHOD field.
- In the QUERY PARAMETERS section, select + to add a property.
- Enter wt in the Property Name field.
- Enter json in the Property Value field.
- In the REQUEST PROTOCOL HEADERS section, select + to add a property.
-
Enter the following as a REQUEST ENTITY (AS STRING)
<root><delete><query>type:phrase AND confidence: [0 TO <insert value>]</query></delete><commit/></root>REQUEST ENTITY specifies the threshold for low confidence phrases. Edit the upper range to increase or decrease the threshold based on your data.
Delete all phrase suggestions
To delete all of the phrase suggestions, enter the following in the REQUEST ENTITY section:<root><delete><query>type:phrase</query></delete><commit/></root>This entry may be helpful when tuning the phrase extraction job and testing different configuration parameters.
Misspelling detection job cleanup
Use this job to remove low confidence spellings (also referred to as misspellings).Prerequisites
Complete this:- AFTER you complete Synonym detection job cleanup and Phrase extraction job cleanup
Remove misspelling suggestions
Use either a Misspelling cleanup method 1 - API call or the Misspelling cleanup method 2 - Fusion Admin UI to remove misspelling suggestions.Misspelling cleanup method 1 - API call
-
Open the
delete_lowConf_misspellings.jsonfile. -
Enter
<your query_rewrite_staging collection name/update>in the uri field. An example URI value for an app calledDC_Largewould beDC_Large_query_rewrite_staging/update. - Change the id field if applicable.
-
Specify the upper confidence level in the entity field.
The entity field specifies the threshold for low confidence spellings. Edit the upper range to increase or decrease the threshold based on your data.
Misspelling cleanup method 2 - Fusion Admin UI
- Log in to Fusion and select Collections > Jobs.
- Select Add+ > Custom and Other Jobs > REST Call.
- Enter remove-low-confidence-spellings in the ID field.
-
Enter
<your query_rewrite_staging collection name/update>in the ENDPOINT URI field. An example URI value for an app calledDC_Largewould beDC_Large_query_rewrite_staging/update. - Enter POST in the CALL METHOD field.
- In the QUERY PARAMETERS section, select + to add a property.
- Enter wt in the Property Name field.
- Enter json in the Property Value field.
- In the REQUEST PROTOCOL HEADERS section, select + to add a property.
-
Enter the following as a REQUEST ENTITY (AS STRING)
<root><delete><query>type:spell AND confidence: [0 TO 0.5]</query></delete><commit/></root>REQUEST ENTITY specifies the threshold for low confidence spellings. Edit the upper range from 0.5 to increase or decrease the threshold based on your data.
Delete all misspelling suggestions
To delete all of the misspelling suggestions, enter the following in the REQUEST ENTITY section:<root><delete><query>type:spell</query></delete><commit/></root>This entry may be helpful when tuning the misspelling detection job and testing different configuration parameters.
Head-tail analysis job cleanup
The head-tail analysis job puts tail queries into one of multiple reason categories. For example, a tail query that includes a number might be assigned to the ‘numbers’ reason category. If the output in a particular category is not useful, you can remove it from the results. The examples in this section remove the numbers category.Prerequisites
The head-tail analysis job cleanup does not have to occur in a specific order.Remove head-tail analysis query suggestions
Use either a Head-tail analysis cleanup method 1 - API call or the Head-tail analysis cleanup method 2 - Fusion Admin UI to remove query category suggestions.Head-tail analysis cleanup method 1 - API call
- Open the
delete_lowConf_headTail.jsonfile. - Enter
<your query_rewrite_staging collection name/update>in the uri field. An example URI value for an app calledDC_Largewould beDC_Large_query_rewrite_staging/update. - Change the id field if applicable.
Head-tail analysis cleanup method 2 - Fusion Admin UI
- Log in to Fusion and select Collections > Jobs.
- Select Add+ > Custom and Other Jobs > REST Call.
- Enter remove-low-confidence-head-tail in the ID field.
- Enter
<your query_rewrite_staging collection name/update>in the ENDPOINT URI field. An example URI value for an app calledDC_Largewould beDC_Large_query_rewrite_staging/update. - Enter POST in the CALL METHOD field.
- In the QUERY PARAMETERS section, select + to add a property.
- Enter wt in the Property Name field.
- Enter json in the Property Value field.
- In the REQUEST PROTOCOL HEADERS section, select + to add a property.
- Enter the following as a REQUEST ENTITY (AS STRING)
Delete all head-tail suggestions
To delete all of the head-tail suggestions, enter the following in the REQUEST ENTITY section:<root><delete><query>type:tail</query></delete><commit/></root>This entry may be helpful when tuning the head-tail job and testing different configuration parameters.
Learn more
Edit, Enable, or Disable a Rule
Edit, Enable, or Disable a Rule
- In the Fusion UI, navigate to Relevance > Query Rewriting.
- Under Business Rules, click View.
- Hover over the rule you want to edit.
- Click the
 icon next to the rule.
Publishing your changes
How to publish updated business rules- In the Business Rules screen, click the PUBLISH button. Fusion prompts you to confirm that you want to publish your changes.
- Click PUBLISH.
Use the UI to Create Custom Rules
Use the UI to Create Custom Rules
For My Custom Rules to show in the UI, you must first create a
custom_rule_type via the Query Rewrite API.- Navigate to Relevance > Query Rewriting.
- Under Business Rules, click View.
-
Click the
 icon.
The New Rule window appears.
icon.
The New Rule window appears.
- Enter the general parameters and conditions for this custom rule.
- Under Action, select My Custom Rule.
- Select the query pipeline to use when this rule is triggered.
- Enter a name for this custom rule type.
-
Optionally, you can click Add under Return Parameter Policy Override to override the value of a parameter returned from the specified pipeline:
- Enter the name of the parameter.
- Enter the desired value.
-
Select one of the following policies:
- Replace the returned value with the specified value.
- Append the specified value to the returned value.
- Remove the specified parameter from the set of returned parameters.
- Default
- Enter a value for From Custom Rule.
Enable and Disabling Query Rewriting Strategies
Enable and Disabling Query Rewriting Strategies
By default, all query rewriting strategies are enabled, and all of the data in the
_query_rewrite_staging collection is applied in the Simulator. To see how relevancy is affected by individual strategies, you can selectively enable or disable strategies in the query rewriting dashboard.How to enable or disable query rewriting strategies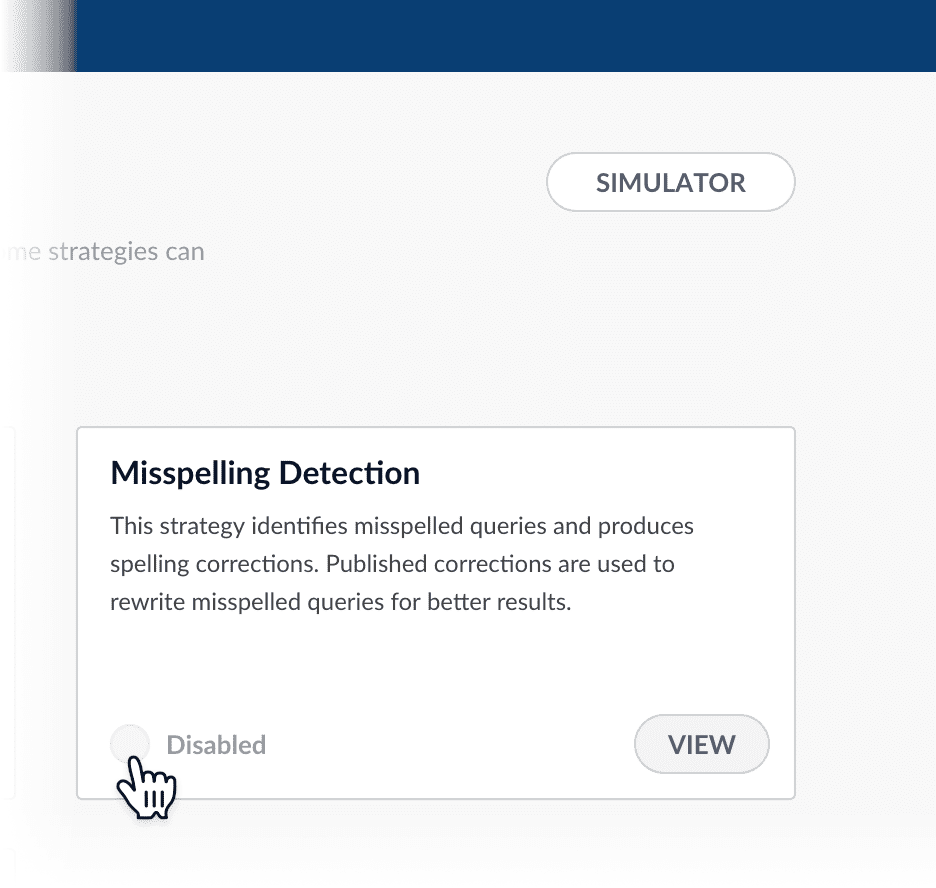 From the Simulator, click Query Rewriting Dashboard.
The query rewriting dashboard appears: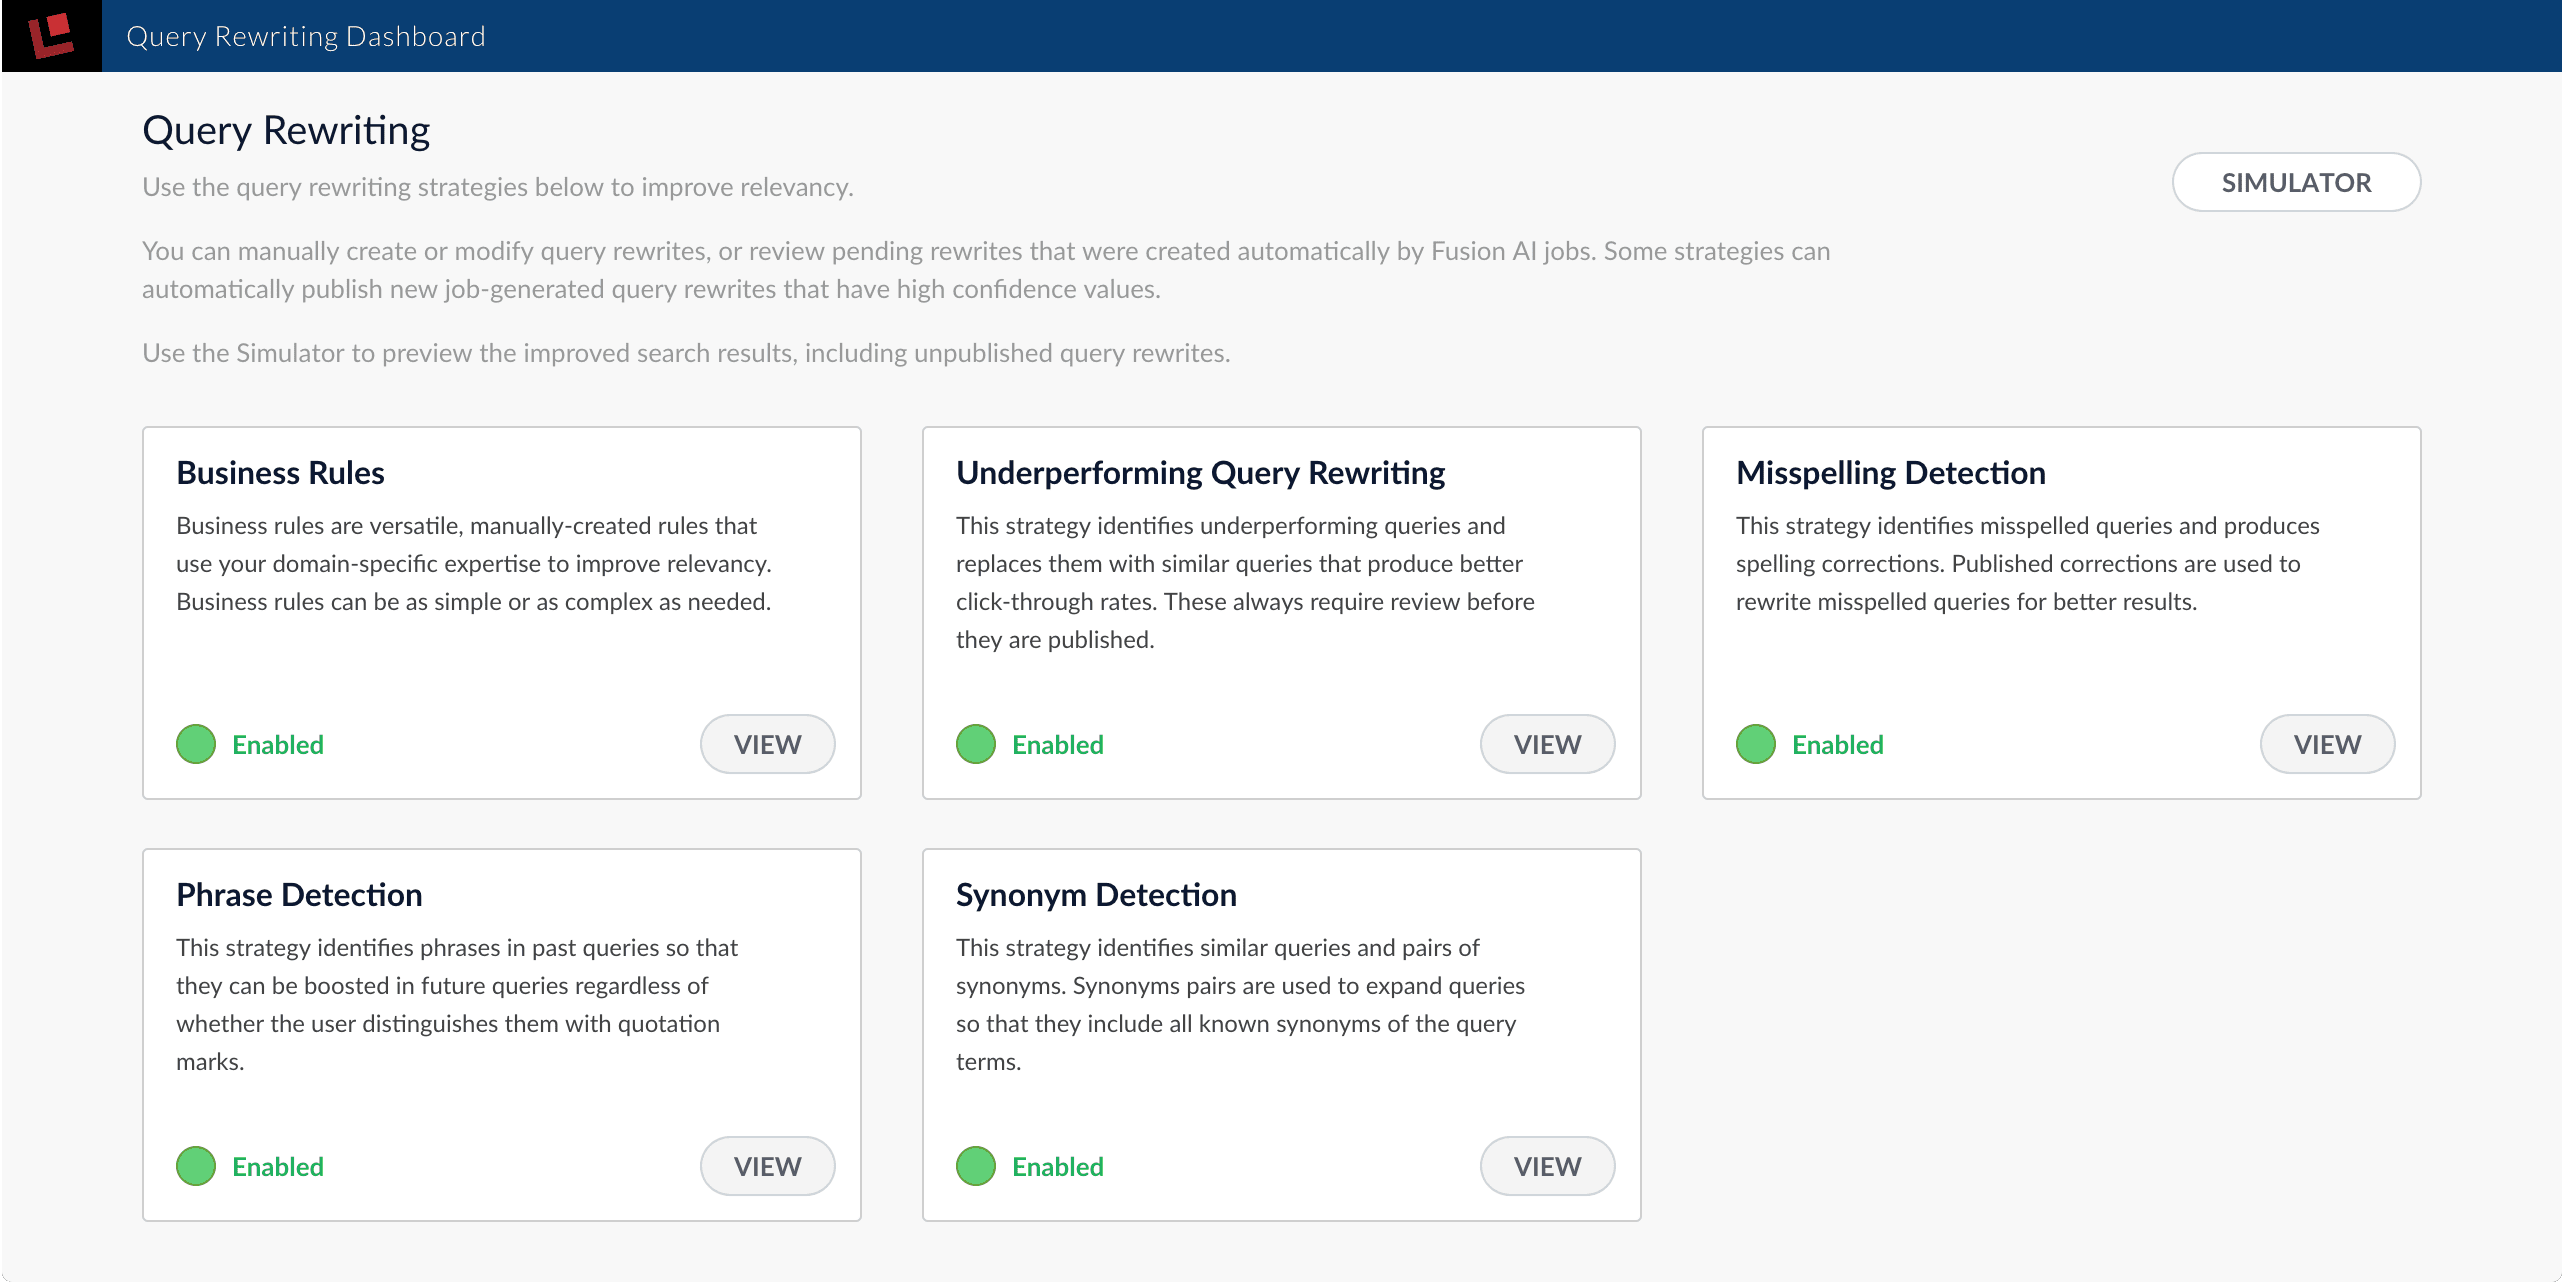
- Click Enabled to disable an active strategy, or click Disabled to enable an inactive strategy.
- Click Simulator to return to the Simulator and see how your changes affect search results.