To learn how to configure SAML based authentication, see the SAML Configuration.
SAML Configuration
SAML Configuration
As SAML is a flexible standard supporting varied security ‘architectures’, it is necessary to have a clear understanding of the authentication setup against which the Appkit application will be using. This said the SAML module is highly flexible, supporting a range of configurations.In this example, we assume a fairly straightforward configuration of authentication against an IdP providing the SSO login form. The Appkit application acts as an SP that authenticates against this IdP (requiring configuration of the IdP to accept login requests for this application).It is also assumed that the entire Appkit application is secured by the SSO and the desired behavior is to redirect the user to the IdP’s login form if they are not authenticated. However it is very simple to modify the application to allow anonymous access where login is only required for extra features.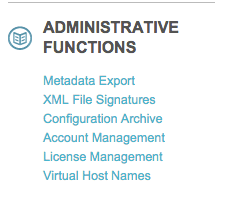

1. Change the application’s security provider to SAML
Simply modify the security provider type tosaml in security.conf:2. Use the SAML security module
Add this dependency to the application’spom.xml file. If an existing security provider is configured (an artifactId starting with twigkit.security.provider), replace the existing dependency with this dependency:3. Add a SAML security configuration file
-
Create a SAML configuration file at:
src/main/resources/conf/security/saml.conf. Add this content: -
Change the properties to relevant values as described here:
sso-url: Configure application’s login failure redirect endpoint (SSO URL).slo-url: Configure application’s logout success redirect URL (SLO URL). Typically this is the URL at the IdP which triggers ‘Single Logout’ (SLO), logging out the user from the IdP system entirely.entity-id: Define the SP (partner) entity ID for this application (as configured in the IdP backend). If not already defined, choose a unique identifier to use to refer to this SP and provide this to the IdP.
4. Add the IdP metadata to the application
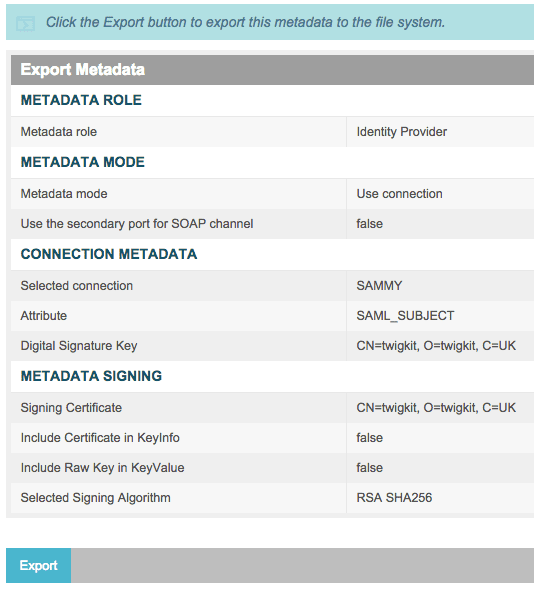
This simply requires an export of the IdP’s metadata from the IdP itself. This file should then be saved as ‘idp-metadata.xml’ under thesrc/main/resources directory. You can if necessary also configure a custom metadata XML file location using:idp-metadata-file: path of the IdP metadata file relative to src/main/resources (defaults to ‘idp-metadata.xml’).The majority of IdPs provide this metadata export functionality. In this case, we are using PingFederate (see the screenshots below).In the PingFederate admin UI, choose Administrative functions > Metadata Export.5. Add the IdP security certificates
Depending on the security certificates used, different configurations are required. Often the IdP metadata XML file supplies the correct certificate - in which case, you do not need any extra configuration.However in many cases you must import the public key for the certificate used by the IdP (for SSL encryption and to sign SAML messages) to the keystore used by the application. By default, this keystore is configured to be located atsrc/main/resources/samlKeystore.jks.In the case of SP initiated SSO, you will also must upload the keys used by the SP to sign SAML requests to the IdP system’s trusted certificate store.6. Ensure the IdP is configured for integration with the SP (the Appkit application)
In some integration scenarios, the IdP will have already set these properties and might require you to configure the Appkit application accordingly. However, the application’s SSO consumer and SLO service URLs should be defined by the SP and provided to the IdP for them to configure within the IdP system.It is possible to export the SP metadata as XML from a running application, however, because IdP implementations can vary, we recommend that this is configured in the IdP system manually using these settings:SP (partner) entity ID: As configured insaml.conf.
Protocol: SAML 2.0
Browser SSO: true
IdP initiated SSO & SLO: true
Assertion consumer service endpoint URL: (POST or Artifact) http://your-twigkit-host/your-twigkit-app/saml/SSO
SLO service URL: (POST) http://your-twigkit-host/your-twigkit-app/logout/
Artifact resolver location: http://your-twigkit-host/your-twigkit-app/saml/SSO/Testing the SAML provided SSO
-
Run the Appkit application and navigate to the root of the application context (for example,
http://localhost:8080/). You should be presented with the IdP’s login form; see the example below: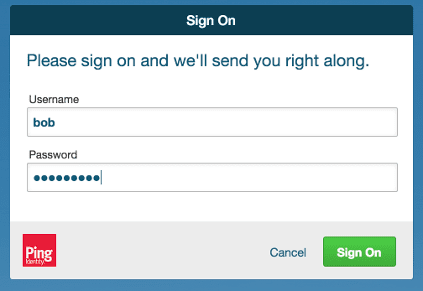
-
Enter valid credentials for a user in the IdP’s set of users.
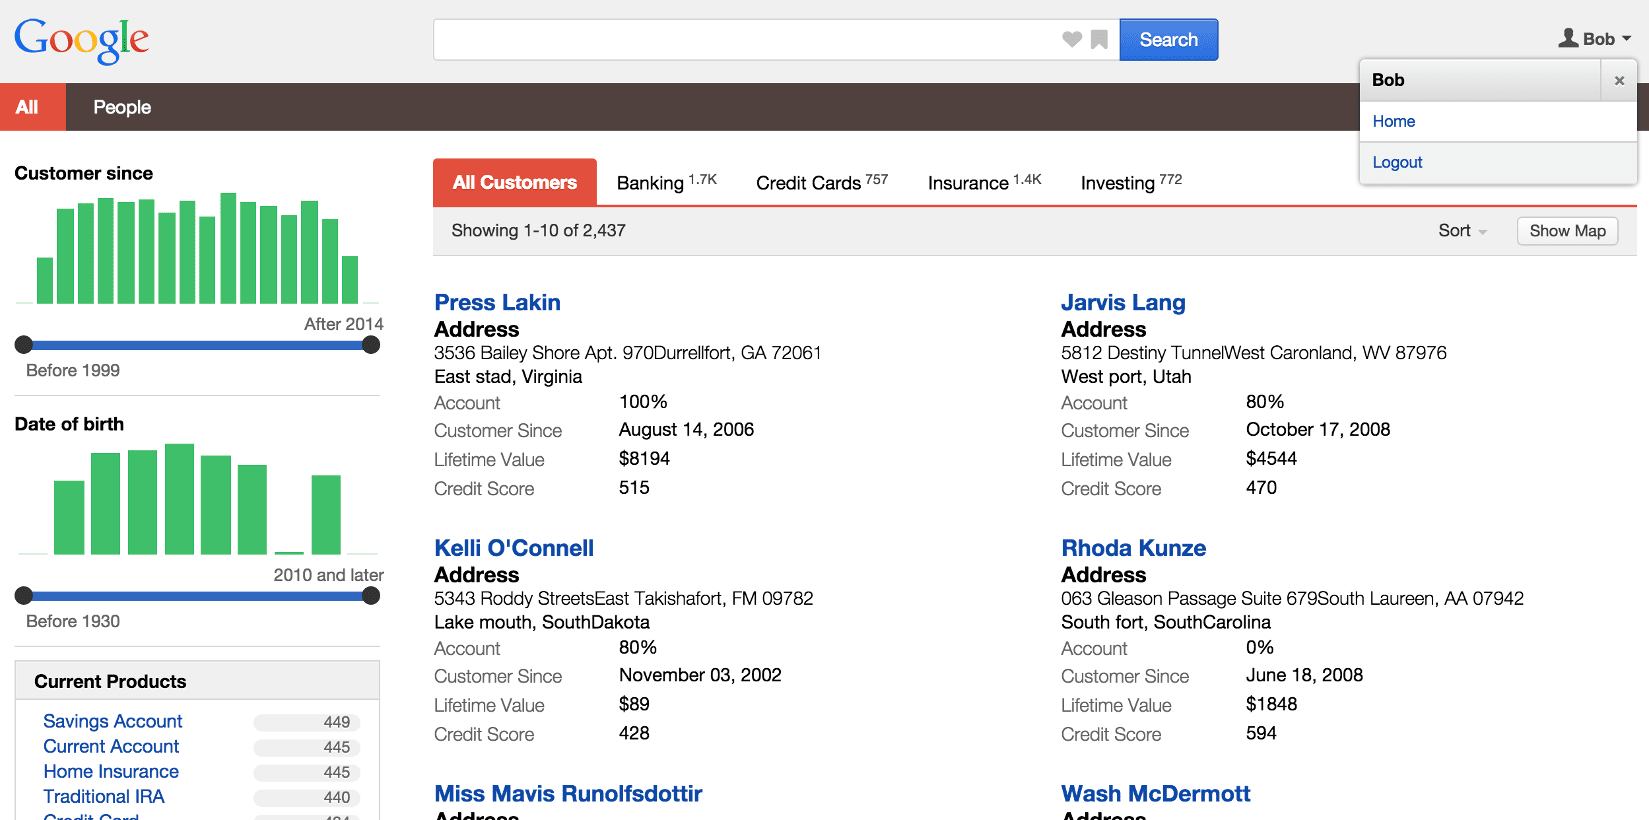
You will be logged into Appkit and should see the main applications search page, including the user’s details:
Removing SAML form-based authentication
If the IdP does not use form based authentication as a fallback mechanism, remove thedefaultFailureUrl property from the unauthenticatedRedirectHandler bean.Additional configuration
If additional customizations to the configuration are needed, download the default spring-security.xml file for SAML. This adds all the required filters for the SAML extension to function, but it will need customising for the security configuration the application is to authenticate against.Additional parameters
Some additional parameters can be used insaml.conf to change the behavior of the SAML module:
-
metadata-display: set to ‘metadataDisplayFilter’ and you will be able to download an SP metadata XML file athttp://your-twigkit-host/your-twigkit-app/saml/metadata. This is useful for debugging, but should be removed for production deployments because it exposes information about the authentication protocol. -
saml-keystore-file: location of the keystore file to use for checking trust and identity of the IdP and SP security certificates -
key-alias: the alias of a key in the keystore to use as the default SP security key -
key-password: password for the keystore and the key defined under using ‘key-alias’ (must match) -
max-authentication-age: a TTL for the authentication in seconds, useful if the authentication expires at the IdP end prior to the default which is 7200 seconds. -
response-skew: a time window in seconds to accept initial SAML responses from the IdP. This is useful if the IdP server and application server are on different timezones.
Default: 60 seconds
Configure for a load balancer
When using a load balancer or reverse-proxy in front of an App Studio web app, you must download a modified spring-security.xml file. You can then add these additional attributes tosaml.conf with the respective connection values for your load balancer:
-
server-scheme: The load balancer’s communication protocol (for example, http) -
server-name: The load balancer’s host name (for example, search.twigkit.com) -
server-port: The load balancer’s port number -
entity-base-url: A full URL for the load balancer (for example, http://search.twigkit.com)