Configure Activity Tracking
Configure Activity Tracking
App Studio will send information on user clicks that trigger URL requests as well as when a user creates an annotation, for example, a bookmark or comment.A signal event of type
click will include, amongst other things, information about the URL that was clicked as well as the number of times that URL was clicked.A signal event of type annotation will include, amongst other things, information about the annotation target, the collection, and the creator.For a full list of properties that are stored, refer to the signals collection associated with your application.Authorization
Activity tracking requires authorization. Both service account impersonation and the Sessions API can be used for this purpose.Service account impersonation requires credentials for the service account and these are stored in the Fusion platform configuration. These credentials can be accessed by setting the name of the Fusion platform configuration via theplatform-config parameter in the Fusion activity tracking configuration.If the credentials for a service account are not provided or cannot be found, a check will be made to see if a Fusion session cookie is available. Typically, this will be present when the user is known to the Fusion server and the Session API has been set up accordingly.Persist Social Data
Persist Social Data
Protect Against CSRF Attacks
Protect Against CSRF Attacks
To help protect against Cross-Site Request Forgery (CSRF) attacks on social web services, App Studio can ensure that all requests are tokenized. That is, each request is provided with a randomized Appkit request token.To enable protection against CSRF in your application:
- If it does not already exist, create a new file named
csrf.confand place it insrc/main/resources/conf/security. - In that file, set the property
enabledtotrue. This tokenizes the requests. - By default, the time-to-live of the Appkit request token is 60 minutes. You can change this by setting the property
durationto some other value; for example,duration: 30. Responses received without a request token or with a request token has expired are rejected.
Incorporate Fusion Signals into Appkit Applications
Incorporate Fusion Signals into Appkit Applications
1 Add the Fusion Signals dependency
Signals tracking in Fusion requires the Fusion Signals module. To enable this module, insert this within thedependencies tag of your pom.xml:2 Add fusion.conf to activity tracking resources
To access this module when Appkit starts up, create afusion.conf file in resources/conf/activity/tracking/. In that file, configure the signals-endpoint. This is the REST-API endpoint that will ingest signal data into a signals collection. For example:image_catalog is the name of a primary collection that will be used to generate an auxiliary collection consisting of activity tracking data.When accessing Fusion using a service account, the parameter platform-config is required. This is the name of the Fusion platform configuration that includes the necessary parameters required for basic authentication. For example, if the configuration file for the Fusion platform, fusion.conf is stored in resources/conf/platforms/fusion/ then the platform-config parameter would be set as shown above. If, however, the configuration file for the Fusion platform was named myFusion.conf and again stored in resources/conf/platforms/fusion/, then the platform-config parameter would be platforms.fusion.myFusion. For quick reference, the platform configuration should contain these parameters to enable basic authentication:signals-index-pipeline, can be used to define an index pipeline that will to be used to convert the raw JSON signal data into a set of Solr documents. If no pipeline is defined, then the preconfigured _signals_ingest pipeline will be used. Both the remaining two parameters, commit and async, are booleans. If commit is set to true, a Solr commit will occur at the end of indexing allowing a persistent record of the activity to be kept. If async is set to true, signals will be indexed in asynchronous mode. In this mode, an autoCommit is issued with each signal and failures are not reported. The default is false.Set Up Persisting Alerts
Set Up Persisting Alerts
By default, the alerting module produces “in-memory” alerts, meaning that any alerts registered will only be sent for the duration of the application lifecycle.For static configuration based alerts this is not an issue as they are registered again on application startup. However for alerts configured by a user with the ‘saved query alert form’ all alerts will be lost when the application is shut down or redeployed. Therefore on a production system, it makes sense to configure persistence of alerts using a database. This is simple to configure with these steps.Replace the variables in curly braces on the right with their respective values from your
1: Configure your alerting module database
- Add this dependency to your
pom.xml: - Remove any existing reference to
twigkit.socialmodules. Currently the in-memory database and MySQL are supported (twigkit.alert.db.mysql).
2: Add alerting module ORM mapping to your persistence configuration
Assuming you have configured your social datastore in apersistence.xml file, add this entry right after the existing mapping-file XML element:3: Tell the Quartz scheduler how to connect to the database
Add aquartz.properties file to the root of your class path (typically, in src/main/resources when building a Maven project form source) that contains the database configuration for the Quartz scheduler.This is a sample quartz.properties file with placeholder values for the database-specific parameters you must fill in. For example:persistence.xml file.Set Up Email Alerts
Set Up Email Alerts
Email alerts can be configured statically in
conf files to be sent at regular intervals throughout the lifecycle of an application. Use these steps to get up and running with the Alerting module:- Add this dependency to your
pom.xmlfile: - Set up
conf/alert/email/smtp.conf; see below for an example configuration: - Set up
conf/alert/email/alerts/alerts.conf; see below for an example configuration: - Add the alert
.conffiles toconf/alert/email/alerts/my-alert-name-here.conf; see below for an example:Here, thecron-expressiondefines how often to send the alert as described in this Quartz tutorial. - Create a JSP, in this case configured as above, on a standard Appkit application would be in
src/main/webapp/WEB-INF/pages/email.jspand the content would include:
Set Up Static Alerts
Set Up Static Alerts
Email alerts can be configured statically in
conf files to be sent at regular intervals throughout the lifecycle of an application. Use these steps to get up and running with the Alerting module:- Add this dependency to your
pom.xmlfile: - Set up
conf/alert/email/smtp.conf; see below for an example configuration: - Set up
conf/alert/email/alerts/alerts.conf; see below for an example configuration: - Add the alert
.conffiles toconf/alert/email/alerts/my-alert-name-here.conf; see below for an example:Here, thecron-expressiondefines how often to send the alert as described in this Quartz tutorial. - Create a JSP, in this case configured as above, on a standard Appkit application would be in
src/main/webapp/WEB-INF/pages/email.jspand the content would include:
Subscribing to Events
Subscribing to Events
For communication between separate system components, Appkit uses an event bus architecture. The event bus handles local events, within the same virtual machine. The event model is quite flexible and allows for any POJO to be transmitted on the event bus. Our current implementation uses Google Guava as the event bus provider.Next, you must register the subscriber on the event bus, so that events of the given type are routed correctly. This is typically done in your application module or controller.
Sending event notifications
To post an event notification onto the event bus, you must obtain a copy of the global event bus and submit an instance of the class that describes the event. In this example, we assume that a Java class namedMyEvent captures the event details.Subscribing to events
To subscribe for an event of a particular type, you create a new subscriber class (or use an anonymous class) that has a single-argument method annotated with the@Subscribe annotation.Standard event types
This types of event are built into the AppKit core framework. You can register your own subscriber to receive notifications of each. See details in our JavaDocs on which attributes are available in each case.twigkit.security.event.LoginEvent: User logs into the system.twigkit.event.ResponseEvent: A search response was retrieved from a data provider.
twigkit.event.QueryEvent: A search query was formulated and submitted to a data provider.twigkit.event.ClickEvent: User clicked a link on a page, possibly linked to a search query.
Set Up User-specified Alerts
Set Up User-specified Alerts
You can set up Appkit to provide user-specified email alerts in an app.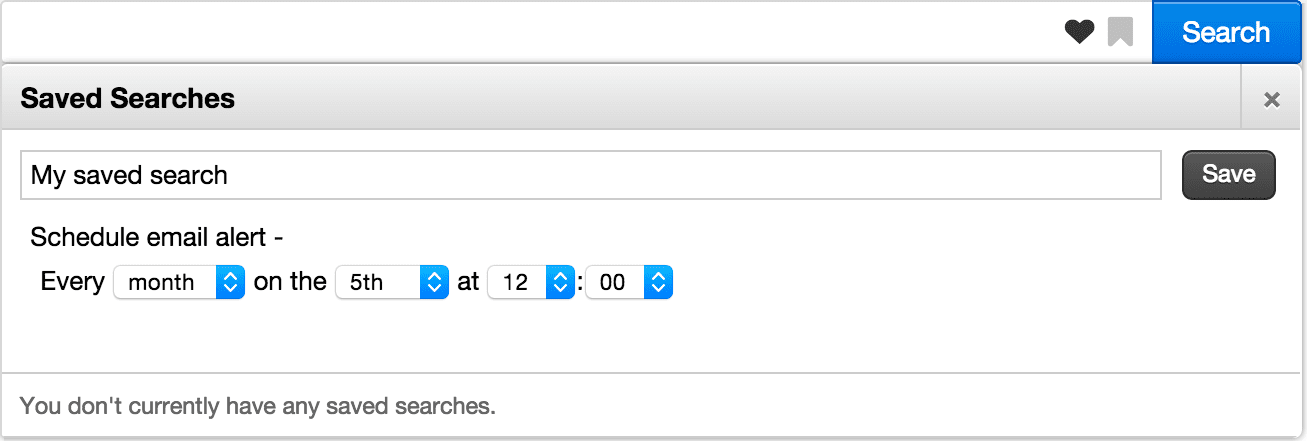
The Query object to be registered for alerting.
Default title of a saved query (if no query supplied).
Text to display above schedule component.
The email address to which the alert should be sent. If not supplied (left empty), the user will be presented with a field to specify this (default behavior).
Placeholder text for ‘to’ email address field which is displayed if toAddress attribute is blank
Label text for ‘to’ email address field which is displayed if toAddress attribute is blank
Text for label above scheduling component
Setup
To set up user-specified alerts:- Add this dependency to your
pom.xml. Remove any previous reference totwigkit.socialmodules. - Add a configuration file in
conf/alert/email/smtp.conf; see below for an example configuration: - Add another configuration file for the email template in
conf/alert/email/alerts/alerts.conf; see below for an example configuration: - Add the saved query alert scheduling form to the search header (header.tag):
- Create the email template JSP, in
src/main/webapp/WEB-INF/pages/email.jsp. For example:
- The ‘alert seen’ functionality is reliant on a field in the data specifying the date the document was last updated, in this case named
updated - The ‘to address’ of the email alert will either be chosen by the user via the form (default) or can be set by using the
toAddressattribute on the saved query alert form tag. - Appkit includes full user impersonation, so any security trimming is applied automatically.
Saved Query Alert Form tag attributes
**query (twigkit.model.Query)**The Query object to be registered for alerting.
**defaultTitle (java.lang.String)**Default title of a saved query (if no query supplied).
**scheduleAlertText (java.lang.String)**Text to display above schedule component.
**toAddress (java.lang.String)**The email address to which the alert should be sent. If not supplied (left empty), the user will be presented with a field to specify this (default behavior).
**toAddressPlaceholderText (java.lang.String)**Placeholder text for ‘to’ email address field which is displayed if toAddress attribute is blank
**toAddressLabelText (java.lang.String)**Label text for ‘to’ email address field which is displayed if toAddress attribute is blank
**deliveryFrequencyLabelText (java.lang.String)**Text for label above scheduling component
Use a Configured Platform
Use a Configured Platform
The ConfiguredPlatformProvider is a Java class that lets you gain access to an instance of a platform configured via the ‘conf’ files specified in an Appkit project. This is useful when writing custom code which you would like to have access to a platform already defined in an Appkit application, for example indexing or storing documents in a platform.To use this, simply inject the ConfiguredPlatformProvider into the class in which you want to gain access to the platform’s programmatic API:For example, if you have a platform configured in Most platforms support these general methods that you might want to use within the custom code that interfaces with the platform:A You can enter a fully qualified Java class per line for each managed service you want to deploy.An alternative is to use the AppkitApplication class to get an instance of the ConfiguredPlatformProvider:This creates code that is more tightly coupled, so is generally less desirable, but still completely functional.
src/main/resources/conf/platforms/gsa/gsa.conf, in your code you would have:PlatformOperationNotSupportedException will be thrown if the method is not supported by the underlying platform. See the Javadoc for the twigkit.model.Platform interface for more information.Deploying your service
Appkit uses Guice to inject dependencies into Java classes. The easiest way to let Guice know about your new Java class (service) so that it can inject the ConfiguredPlatformProvider is to define your class as a managed Appkit service. This is done by adding a configuration file with the fully qualified name of the Java class under:Use Git with Appkit
Use Git with Appkit
At Lucidworks, we use GitHub for hosting and Git for version control of our code and customers’ code. There are several good guides on the web to using Git detailed below, along with some high level instructions for getting started.Here, username is your GitHub username and projectname is the specific name of the project (GitHub provides you the URL to copy and paste for ease).Git will copy down the repository, both contents and commit history, to your system. Git will also add a Git remote named Of course, you’d want to replace the URL after Then either pull the latest changes in - these commands pull (fetch and merge) the most recent changes from the upstream repository, and pushes them back to your repository:Or explicitly fetch and merge the most recent changes from the upstream repository:For example, suppose you are working on ISSUE-1234. Then before doing any code changes, make sure you create a new feature branch like so:See https://help.github.com/articles/pushing-to-a-remote/ and https://git-scm.com/book/en/v2/Git-Basics-Working-with-Remotes.Other useful commands are
Getting access to the project
To gain access to a project, you must sign up for a free GitHub account. After you are signed up, contact Lucidworks Support and tell us who you are, your GitHub username, and which project you work on, and we can add you to the right project.Using the Fork-and-Branch Git workflow
When working with multiple developers on a single codebase, we use a Fork-and-Branch model. This lets you create a copy of a repository, make your changes and then submit them back to the original repository for review by the owner before they are merged in.GitHub Desktop App (Windows and Mac)
If you use the GitHub desktop application (details and install guide) there is a good Github guide on how forking with the GitHub desktop app works.Command Line (Windows and Mac)
If you use the command-line git tools then the “fork and branch” workflow process is documented well in this blog post:The article above covers it really well, but at a high level the process is as follows:- Fork a GitHub repository.
- Clone the forked repository to your local system.
- Add a Git remote for the original repository.
- Create a feature branch in which to place your changes.
- Make your changes to the new branch.
- Commit the changes to the branch.
- Push the branch to GitHub.
- Open a pull request from the new branch to the original repo.
- Keeping Your Fork in Sync.
Forking a GitHub Repository
Forking a repository is really straightforward:Make sure you’re logged into GitHub with your account. Find the GitHub repository with which you’d like to work.Click the Fork button on the upper right-hand side of the repository’s page. That’s it — you now have a copy of the original repository in your GitHub account.Making a local clone
Even though you have a copy of the original repository in your GitHub account, you must copy it (clone it) locally so you can work on it. Navigate to the forked repository on github.com (this is the copy of the original repository residing in your GitHub account) and look on the right-hand side of the web page. You should see an area that is labeled “HTTPS clone URL”. Simple copy the URL there and use as follows:origin that points back to the forked repository in your GitHub account.Adding a Git Remote
Git already added a Git remote namedorigin to the clone of the Git repository on your system, and this will let you push changes back up to the forked repository in your GitHub account using git commit (to add commits locally) and git push.To use the “fork and branch” workflow, you’ll must add a Git remote pointing back to the original repository (the one you forked on GitHub).You’d want to add a Git remote that points back to the original repository, like this:git remote add upstream with the appropriate clone URL for the original project repository.Keeping Your Fork in Sync
Your forked repository does not stay in sync automatically - you must take care of this yourself - it is good practice to do this before you start work to pull in changes from other developers. To ensure your code has the latest upstream code changes, first make sure you are on your local master branch:Working with feature branches
The master branch is the master copy of the code. When working on individual features, it is better to work in branches. Using branches, you can switch between different development tasks easily mid-flow.Create a new branch
Commit changes
- See what files you have changed and what is queued up to commit:
- Add some changes you have made to commit:
- Make your changes and then commit the changes to the branch:
Push changes back to your repository
When you’re ready to commit your changes, push those changes up to the corresponding feature branch on your remote fork. This does not push the changes back to Appkit - just to your forked copy:git branch (lists what branches you have created) and git remote -v (lists what remote repositories you are linked to).Sending changes back to the master repository - opening a Pull Request
When your feature branch is ready to have its changes brought into the master branch, you must go to your GitHub fork and issue a new pull request from that feature branch. If the branch does not already exist in GitHub, a pull request will automatically be created when you push the new branch up to your repository - GitHub will prompt you to create a pull request when you view the repo online (I’m assuming you’re using your browser and not the GitHub native apps). The maintainers of the original project can use this pull request to pull your changes across to their repository and, if they approve of the changes, merge them into the main repository. See this guide on how to create a pull request in GitHub for more details.It is good practice to ensure the pull request has a clear description of what it entails, and it should refer back to the issue that is being resolved in either the title or the description.Code review
After you have created the pull request, you should assign it to a colleague for peer review. If any issues are identified during the review, the reviewer can add code comments, and assign the pull request back to you to fix. After the pull request has passed its code review, the reviewer can assign the pull request to a dedicated merge master who can do the final merge.Milestones and releases
GitHub lets you tag your work and keep track of which tasks should be completed by specific milestones or releases. You might also want to consider following this practice to ensure development work on your codebase is sufficiently prioritized.- great Git resources
Writing a Custom Authorization
Writing a Custom Authorization