| Solr 7.5 | ZooKeeper 3.4.13 | Spark 2.3.1 | Jetty 9.4.11.v20180605 | Ignite 2.3.0 |
New features
-
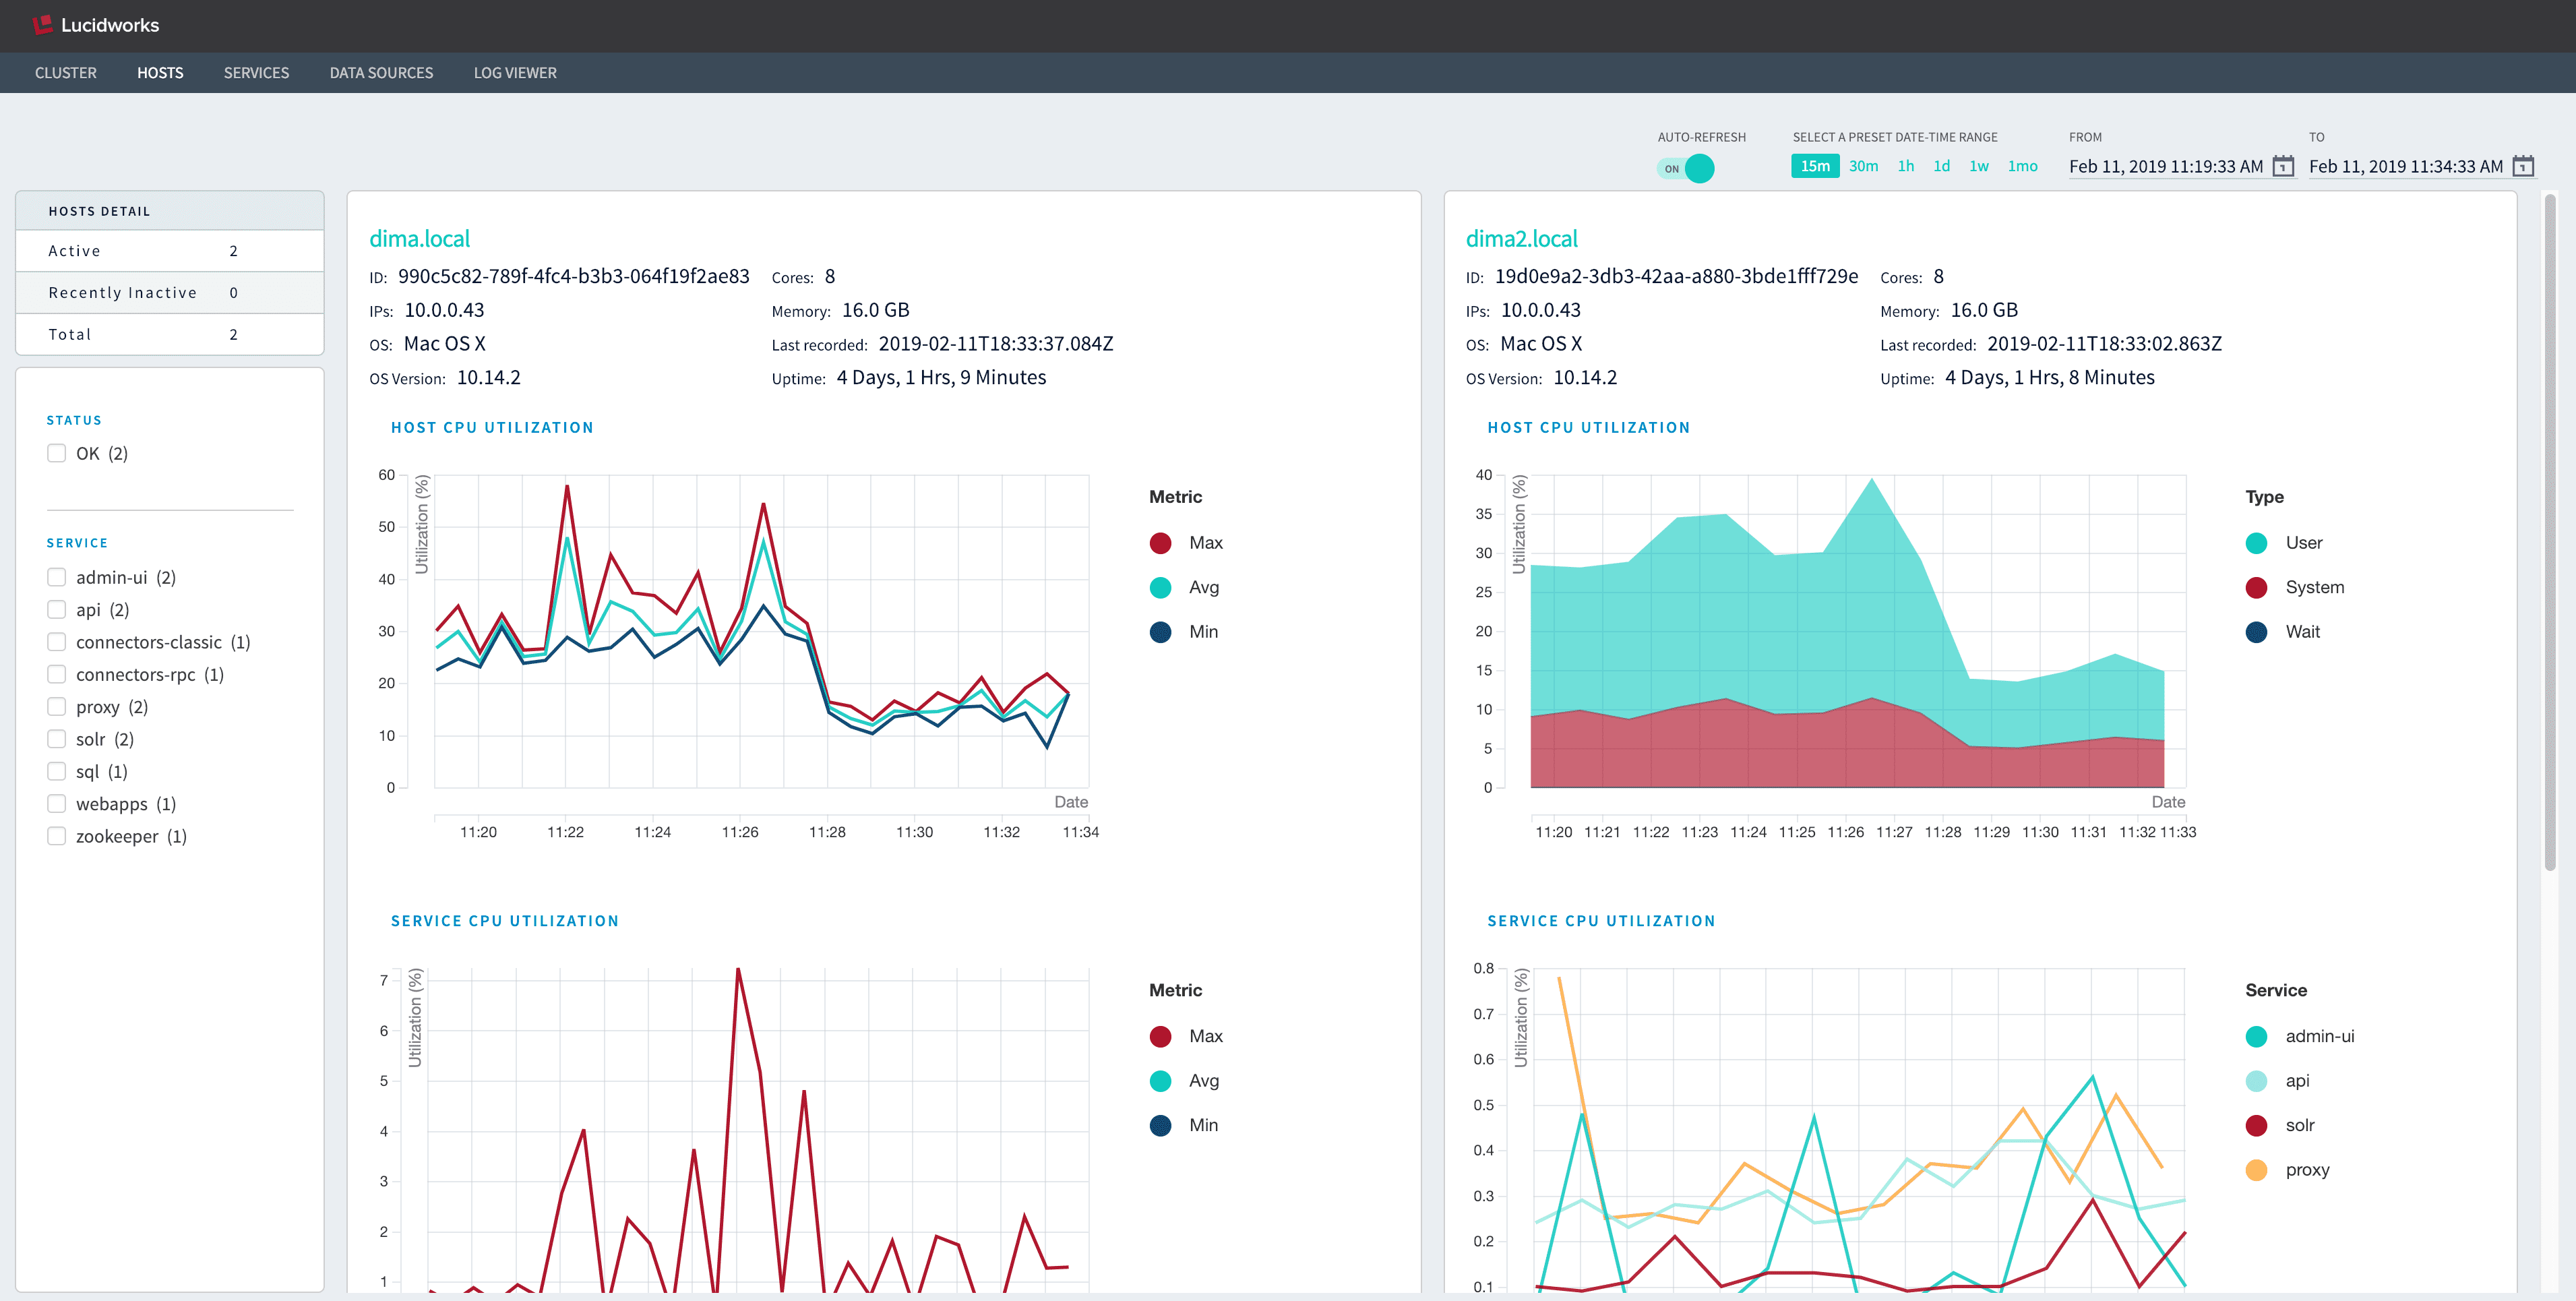
Dynamic, real-time system visualizations with the new DevOps Center](/docs/4.2/fusion-server/concepts/system/devops-center)
The DevOps Center generates real-time dashboards for visualizing metrics throughout your Fusion system, plus a log viewer where you can explore events and focus on specific event types. You can also export metrics and events for any timeframe, in CSV format, for external analysis.
-
Faster query pipeline performance with asynchronous stage processing
Query pipelines can now be forked for parallel processing so that faster stages can proceed while requests to external resources wait for their responses.
In this release, you can enable asynchronous execution in the following query stages:- Active Directory Security Trimming
- Apply Rules
- Boost with Signals
- JDBC Lookup
- Security Trimming
- Solr Subquery
For complete instructions, see Query Pipelines. - Sitecore support The new Sitecore connector provides full crawl and incremental crawl support for versions 8.x and 9.x of the popular Sitecore CMS, indexing both document content and metadata.
- A new Dropbox connector supports the latest Dropbox API.
- New Solr Update XML parser This is a simple parser for Solr’s various update formats (XML, CSV, JSON, and javaBin).
-
New query pipeline stages
These new query pipeline stages support new Fusion AI 4.2.0 features as well as the asynchronous pipeline processing described above.
- Query rewriting stages:
- Response rewriting stages:
-
Merge Async Results stage for asynchronous processing (see above).
The default query pipeline now includes the new Text Tagger, Apply Rules, and Modify Response with Rules stages.
-
New collections
-
query_rewrite_stagingRules and certain Spark job results are written to this collection temporarily. See Query Rewriting for details. -
query_rewriteQuery pipelines read rules and job results from this collection in order to perform query rewriting. Docs are migrated to this collection from thequery_rewrite_stagingcollection. -
job_reportsJob histories are now written to this collection. -
_user_prefsThis collection stores App Studio social data, such as user tags, bookmarks, and so on. -
system_monitorThe new system metrics used for the DevOps Center are written to this collection. These new metrics replace the metrics previously written to thesystem_metricscollection.
-
-
New REST APIs and endpoints
- New Custom Rules API
- New Query Rewrite API
- New Webapps Admin API
- New Webapps Appkit API
The Webapps API is deprecated in favor of the new Webapps Appkit API./index-pipelines/{id}/collections/{collection}/indexMultiplesubmits a set of documents to an index pipeline./spark/reports/{job}gets the job results from a specific job./webapps/{id}/war/manifestgets the.warfile manifest for specified Web app.
Improvements
-
Broader access to the Object Explorer
A new Explore button appears in configuration panels for Fusion objects that can be viewed in the Object Explorer. Click the button to see the object’s relationships to other Fusion objects.

-
Use external management tools to control Fusion configurations
Many of the values in
conf/fusion.propertiescan now be set using environment variables, enabling you to set them usingsystemd, Docker, Kubernetes, and so on. Default values are also provided. For example, inapi.port = ${API_PORT:-8765}, the default value is 8765 unlessAPI_PORTis defined.
Note thatZOOKEEPER_PORTcannot not be used, and value ofzookeeper.portinfusion.propertiesmust be the same as the value ofclientPortinconf/zookeeper/zoo.cfg. -
Improved connectors functionality
- Improved incremental crawl performance across all connectors with MapDB upgrade.
- Kerberos support in the Jive connector.
- javascript evaluation.
- Web connector now supports website authentication credentials files in container path.
- javascript evaluation. for crawling websites.
- SharePoint V1 connector now have bulk start link URL list import.
- Confluence connector now supports API token based authentication.
- The SMB2/3 Connector has improved support for crawling distributed file systems.
- The SMB2/3 Connector now saves the original file path and redirected file paths when crawling distributed file systems.
- JDBC V1 connector has improved settings for managing index commits during crawls.
- The OneDrive connector can now crawl user-specific drives.
-
Some connectors now give you the option to index metadata about documents that were discarded because they were too large or too small using the new
f.index_items_discarded/Index discarded document metadata parameter. A new field,_lw_skipped_reason_s, indicates the reason that the document was skipped during indexing. The new key is available for these connectors:- Web: default = false
- SharePoint: default = true
- SharePoint Online: default = true
- SMB2: default = false
- Box: default = false
- Google Drive: default = false
- Dropbox: default = false
- Local Filesystem: default = false
-
Several connectors have a new Enable Plugin Parsing/
pluginParsingparameter. When it is enabled, the connector parses raw content before streaming it to the index pipeline. The following connectors support this parameter:- Local Filesystem
- OneDrive
- Sitecore
- Windows Share (SMB 2/3)
- The dashboards framework has been upgraded to Banana 1.6.23. See the Banana release notes.
-
For tighter security, CORS is now disallowed by default. You can enable it, if needed, by editing the
proxy.corsAllowOriginproperty inconf/fusion.properties.
Other changes
- The Synonyms UI is no longer available. See the new Synonym Detection feature, available with a Fusion AI license.
-
The
synonymscollection has been replaced with the newquery_rewritecollection. - The Recommendations API is deprecated and will be removed in a future release.
Known issues
-
When under load, the Fusion proxy service can occasionally become stuck, causing user authentication to fail. This is the result of the proxy
InputStreamfailing to close properly.
An upgrade to Fusion 4.2.4 is required to fix this issue. See Upgrade Fusion Server 4.2.x to 4.2.y.Upgrade Fusion Server 4.2.x to 4.2.y
Introduction
This article describes how to perform the following upgrade:- From version: Fusion
4.2.x - To version: Fusion
4.2.y
For more information, see Fusion 4.x.Only specific version-to-version upgrade sequences are supported. Some upgrades require multiple steps.
For Fusion 3.1 and later releases, a migrator is available for upgrading Fusion.
During the upgrade process, the migrator uses a properties file. After downloading and installing the migrator, the properties files is in the/opt/lucidworks/fusion/4.2.x/var/upgradedirectory (on Unix or MacOS) or theC:\lucidworks\fusion\4.2.*x\var\upgrade\directory (on Windows). The file names reference the versions you are upgrading from and to. For example:- To upgrade
4.2.3to4.2.5, the migrator uses the4.2.x-4.2.x.propertiesfile.
Download the latest migrator immediately before upgrading. This helps ensure that the upgrade goes smoothly.The newer Fusion instance must be newly untarred and never started.About the upgrade
This section describes how connectors, object migrations, and signals are migrated during an upgrade.Connectors
In Fusion 3.1.0 and later, only a subset of connectors are included by default.The migrator detects which connectors were used in the older version of Fusion, and installs them automatically in Fusion4.0.y. This step requires an Internet connection. If no connection is available, then download the connectors from Fusion 4.x Connector Downloads and install them as bootstrap plugins.If a connector to be upgraded was not available during the upgrade, then a message in/opt/lucidworks/fusion/3.1.x/var/upgrade/tmp/migrator.log(on Unix) orC:\lucidworks\fusion\3.1.*x\var\upgrade\tmp\migrator.log(on Windows) indicates this.Only datasources for connectors that are supported in the new Fusion version are upgraded. Datasources for custom connectors are not upgraded.If no Internet connection is available
If no Internet connection is available during an upgrade, the migrator cannot automatically download the connectors it needs. Using the Fusion UI or API later to install the connectors also might not be an option.
In this case, download the connectors from Fusion 4.x Connector Downloads for all existing connectors and place them inapps/connectors/bootstrap-pluginsfor the new deployment (on all Fusion nodes). Do so at the time indicated in the procedures that follow.Adding connectors during an upgrade
You can add connectors during an upgrade (that is, add connectors that are not in the old deployment).
Download the connectors from Fusion 4.x Connector Downloads and place them inapps/connectors/bootstrap-pluginsfor the new version (on all Fusion nodes).Object migrations and transformations
The migrator automatically migrates these Fusion 4.2 object types, transforming them as needed:- Collections
- Index pipelines
- Query pipelines
- Search cluster configurations
- Datasources
- Parsing configurations
- Object groups
- Links
- Tasks
- Jobs
- Spark objects
- Apps
- Appkit apps
- Index profiles
- Query profiles
- Blobs
In Fusion Server 4.0 and later, most objects exist in the context of apps. When you upgrade from Fusion Server 4.2.x to 4.2.y, the migrator upgrades app objects, all objects in or linked to objects in apps, and objects that are not linked to apps. You can explore the objects in Object Explorer.Access control migration
The migrator upgrades all access control configurations:- Security realms
- Roles
- Users
Review known issues
Before upgrading, review the known issues to see whether any of them apply to the circumstances of your upgrade. Some known issues might require actions before upgrading.
That article also contains instructions regarding what to do if an upgrade step fails.Upgrade on Unix
Use this procedure to upgrade Fusion on a single Unix node or on multiple Unix nodes.
Perform the steps in this procedure on the indicated nodes on which Fusion is running (“Fusion nodes”). To perform an upgrade, Fusion nodes must have at least these services running:- API service (
api) - Proxy service (
proxy)
For every step on multiple nodes, ensure that the step completes on all Fusion nodes before going to the next step. There is the notion of a “main node” during the migration process. This node will be used for certain centralized migration activities that do not need to be done on every node, such as downloading connectors that are then uploaded to blob storage that is shared by all, etc. Just pick one of your Fusion nodes to be the “main node”; there is no special requirement as to which one you pick.Ensure that your current version of Fusion has a valid license
Ensure that your current version of Fusion has a valid permanent Fusion license before proceeding with the upgrade. Place a validlicense.propertiesfile in the/opt/lucidworks/fusion/4.2.x/confdirectory.Download and install the newer version of Fusion
Perform these tasks on all Fusion nodes:- Select the Fusion release to which you are upgrading from Fusion Server 4.x File Download Links.
- Extract the newer version of Fusion:
For example, if Fusion is currently installed in
/opt/lucidworks/fusion/4.2.x, then change your working directory to/opt/lucidworks/and extract the file there. do not run the new version of Fusion yet. - Ensure that the new version of Fusion has a valid permanent Fusion license before proceeding with the upgrade. Place a valid
license.propertiesfile in the/opt/lucidworks/fusion/4.2.y/confdirectory. - (If there are custom
jarfiles) If your deployment has customjarfiles, add them to the new Fusion deployment. - (If you are performing an upgrade without Internet access) Without Internet access, the migrator cannot download new versions of connectors automatically. Download the new versions of connector zip files for your current connectors from Fusion 4.x Connector Downloads and place them in
apps/connectors/bootstrap-pluginsfor the new deployment. - (If you are adding new connectors) If you want your new deployment to use connectors that are not in the current deployment, you can add them now. Download the connector zip files from Fusion 4.x Connector Downloads and place them in
apps/connectors/bootstrap-pluginsfor the new deployment. - Verify that there is sufficient disk space for a second copy of the Solr index directory,
fusion/4.2.x/data/solr. If there is not sufficient disk space, free up space before proceeding.
Download and install the Fusion migrator
Perform these tasks on all Fusion nodes:- Download the latest migrator zip file for Unix. (Do this now, even if you have downloaded the migrator before, to ensure that you have the latest version.)
- Create
FUSION_OLDandFUSION_NEWenvironment variables that point to the old and new Fusion installation directories respectively (using the full path).For example, when upgrading from Fusion 4.2.0 to 4.2.6: - Create this directory:
- Install the migrator:
Run the migrator
Perform these tasks on the indicated nodes:- (On all Fusion nodes) Start all Fusion services for the old version of Fusion:
- (Only on the main Fusion node) Run the migrator to export the configuration data from the old version of Fusion:
This message indicates that the step finished successfully:
- (On all Fusion nodes) Stop the old versions of Fusion services and Solr; but not ZooKeeper:
If Spark services are running, also stop those:
- (Only on secondary Fusion nodes) Prepare secondary nodes:
This message indicates that the step finished successfully:
- (On all Fusion nodes) Stop ZooKeeper for the old version of Fusion (unless you are using an external ZooKeeper instance, in which case you can ignore this step):
- (Only on the main Fusion node) Transform configuration data on the main Fusion node:
This message indicates that the step finished successfully:Depending on the size of your Solr index, this step can take a long time (for example, multiple tens of minutes).
- (On all Fusion nodes) Start ZooKeeper for the new version of Fusion (unless you are using an external ZooKeeper instance, in which case you can ignore this step):
- (Only on the main Fusion node) Import the first part of configuration data into the new version of Fusion:
This message indicates that the step finished successfully:
- (On all Fusion nodes) Start all Fusion services for the new version of Fusion:
- (Only on the main Fusion node) Import the second part of configuration data into the new version of Fusion:
This message indicates that the step finished successfully:
Validate the new version of Fusion
How to validate the new version of Fusion- (Only on the main Fusion node) Restart the new version of Fusion (all services defined in
fusion.properties): - Log into the Fusion UI (your
adminpassword is the same as for the old installation), and confirm the release number of the new version of Fusion:- Clear your browser’s cache. Otherwise, you might inadvertently access a cached version of the old Fusion UI and see inconsistent behavior.
- In a browser, open the Fusion UI at
http://localhost:8764/(replacelocalhostwith your server name or IP address if necessary). - Log in.
- Navigate to Admin > About Fusion. The About Fusion panel should display the newer Fusion release number.
- Ensure that all connectors were installed automatically during the upgrade.
- For Fusion 4.x from the Fusion launcher, click the tile for a migrated app. Click System > Blobs. If any connectors are missing from the list, click Add > Connector Plugin and install them manually.
- For Fusion 3.x from the Fusion launcher, click Devops > Home
 > Blobs.
If any connectors are missing from the list, click Add > Connector Plugin and install them manually.
> Blobs.
If any connectors are missing from the list, click Add > Connector Plugin and install them manually.
- Ensure that all customizations you made in the former version of Fusion are present in the new one.
- When you are satisfied with the migration and you have backed up the
fusion/4.2.x/directory, you canrm -fr fusion/4.2.*x/to remove the older version of Fusion (on all Fusion nodes).
Add support for business rules to existing apps
Fusion AI 4.2 introduces functionality for using business rules, that is, manually created formulas for rewriting queries and responses.
You can add support for business rules to apps that were created in versions of Fusion AI prior to version 4.2. To do so, perform the steps in this section.
Theadd-rule-objects-xyz.zipfile (wherexyzis a version number) specifies the objects to add to an app. It is supplied in the Fusion migrator zip file at the top level. After installing the migrator, the location is$FUSION_OLD/var/upgrade/import-files.You have a choice. You can update each app using the Fusion UI or the Fusion API.Adding support for business rules has a costs. Additional collections and objects are created. Only add support for business rules to apps in which you plan to use them.Fusion UI
For each app in which you plan to use business rules, import the objects in theadd-rule-objects-xyz.zipfile into the app.How to import business rule objects- In the Fusion launcher, click the app into which you want to import objects. The Fusion workspace appears.
-
In the upper left, click System
 > Import Fusion Objects.
The Import Fusion Objects window opens.
> Import Fusion Objects.
The Import Fusion Objects window opens.
-
For the data file, select
add-rule-objects-xyz.zipfrom your local filesystem. The location in the extracted migrator files is$FUSION_OLD/var/upgrade/import-files. - Click Import.
-
Edit the
Application IDparameter value to use the app name. If the app name contains spaces, replace those with underscore characters. For example,Lucene Revolutionwould becomeLucene_Revolution. - Click Import.
- If there are conflicts, Fusion prompts you to specify an import policy. Click Merge to skip all conflicting objects and import only the non-conflicting objects. Fusion confirms that the import was successful.
- Click Close to close the Import Fusion Objects window.
Fusion API
For each app in which you plan to use business rules, import the objects in theadd-rule-objects-xyz.zipfile into the app.How to import business rule objects- Create an
app-name.txtfile with the following content:For example, for the appLucene Revolution:Here, we assume that you create the files in your home directory, for which the$HOMEenvironment variable is defined. - Import the business rule objects:
For example:
Upgrade on Windows
Use this procedure to upgrade Fusion on a single Windows node or multiple Windows nodes.
Perform the steps in this procedure on the indicated nodes on which Fusion is running (“Fusion nodes”). To perform an upgrade, Fusion nodes must have at least these services running:- API service (
api) - Proxy service (
proxy)
If you are upgrading Fusion on multiple nodes, then, for every step on multiple nodes, ensure that the step completes on all Fusion nodes before going to the next step. There is the notion of a “main node” during the migration process. This node will be used for certain centralized migration activities that do not need to be done on every node, such as downloading connectors that are then uploaded to blob storage that is shared by all, etc. Just pick one of your Fusion nodes to be the “main node”; there is no special requirement as to which one you pick.Ensure that your current version of Fusion has a valid license
Ensure that your current version of Fusion has a valid permanent Fusion license before proceeding with the upgrade. Place a validlicense.propertiesfile in theC:\lucidworks\fusion\4.2.x\confdirectory.Download and install the newer version of Fusion
Perform these tasks on all Fusion nodes:- Select the Fusion release to which you are upgrading from Fusion Server 4.x File Download Links.
-
Move the
fusion-4.2.y.zipfile to the directory that contains thefusion\directory. For example, if Fusion is installed inC:\lucidworks\fusion\4.2.x, then move the file toC:\lucidworks. -
Unzip the
fusion-4.2.y.zipfile. do not run the new version of Fusion yet. -
For Fusion 4.x, ensure that the new version of Fusion has a valid permanent Fusion license before proceeding with the upgrade. Place a valid
license.propertiesfile in theC:\lucidworks\fusion\4.2.y\confdirectory. -
(If there are custom
jarfiles) If your deployment has customjarfiles, add them to the new Fusion deployment. -
(If you are performing an upgrade without Internet access) Without Internet access, the migrator cannot download new versions of connectors automatically. Download the new versions of connector zip files for your current connectors from Fusion 4.x Connector Downloads and place them in
apps\connectors\bootstrap-pluginsfor the new deployment. -
(If you are adding new connectors) If you want your new deployment to use connectors that are not in the current deployment, you can add them now. Download the connector zip files from Fusion 4.x Connector Downloads and place them in
apps\connectors\bootstrap-pluginsfor the new deployment. -
Verify that there is sufficient disk space for a second copy of the Solr index directory,
fusion\4.2.x\data\solr. If there is not sufficient disk space, free up space before proceeding.
Download and install the Fusion migrator
Perform these tasks on all Fusion nodes:- Download the latest migrator zip file for Windows. (Do this now, even if you have downloaded the migrator before, to ensure that you have the latest version.)
- Open a Command Prompt window and create
FUSION_OLDandFUSION_NEWenvironment variables that point to the old and new Fusion installation directories respectively. For example: - Create a
fusion\4.2.x\var\upgradedirectory. - Unzip the migrator zip file, and move the contents of the extracted folder to
+fusion\+4.2.x\var\upgrade.
Run the migrator
Perform these tasks on the indicated nodes:-
(On all Fusion nodes) Start all Fusion services for the old version of Fusion:
-
(Only on the main Fusion node) Run the migrator to export the configuration data from the old version of Fusion:
This message indicates that the step finished successfully:
-
(On all Fusion nodes) Stop the old versions of Fusion services and Solr; but not ZooKeeper:
If Spark and SQL services are running, also stop those:
-
(Only on secondary Fusion nodes) Prepare secondary nodes:
This message indicates that the step finished successfully:
-
(On all Fusion nodes) Stop ZooKeeper for the old version of Fusion (unless you are using an external ZooKeeper instance, in which case you can ignore this step):
-
(Only on the main Fusion node) Transform configuration data on the main Fusion node:
This message indicates that the step finished successfully:Depending on the size of your Solr index, this step can take a long time (for example, multiple tens of minutes).
-
(On all Fusion nodes) Start ZooKeeper for the new version of Fusion (unless you are only using an external ZooKeeper instance, in which case you can ignore this step):
-
(Only on the main Fusion node) Import the first part of configuration data into the new version of Fusion:
This message indicates that the step finished successfully:
-
(On all Fusion nodes) Start Solr for the new Fusion version:
-
(Only on the main Fusion node) Run a script to remove all old plugins from the blob store. Replace
solr-addressandsolr-portas appropriate (as shown in the example):For example:This message indicates that plugins were deleted successfully: -
(On all Fusion nodes) Start all Fusion services for the new version of Fusion:
-
(Only on the main Fusion node) Import the second part of configuration data into the new version of Fusion:
This message indicates that the step finished successfully:
Validate the new version of Fusion
How to validate the new version of Fusion- (On all Fusion nodes) Restart all Fusion services for the new version of Fusion:
- Log into the Fusion UI (your
adminpassword is the same as for the old installation), and confirm the release number of the new version of Fusion:- Clear your browser’s cache. Otherwise, you might inadvertently access a cached version of the old Fusion UI and see inconsistent behavior.
- In a browser, open the Fusion UI at
http://localhost:8764/(replacelocalhostwith your server name or IP address if necessary). - Log in.
- Navigate to Admin > About Fusion. The About Fusion panel should display the newer Fusion release number.
- Ensure that all connectors were installed automatically during the upgrade.
- For Fusion 4.x from the Fusion launcher, click the tile for a migrated app. Click System > Blobs. If any connectors are missing from the list, click Add > Connector Plugin and install them manually.
- For Fusion 3.x from the Fusion launcher, click Devops > Home > Blobs.
If any connectors are missing from the list, click Add > Connector Plugin and install them manually.
- Ensure that all customizations you made in the former version of Fusion are present in the new one.
- When you are satisfied with the migration and you have backed up the
+fusion\+4.2.xdirectory, you can remove the older version of Fusion by removing that directory (on all Fusion nodes).
Add support for business rules to existing apps
Fusion AI 4.2 introduces functionality for using business rules, that is, manually created formulas for rewriting queries and responses.
You can add support for business rules to apps that were created in versions of Fusion AI prior to version 4.2. To do so, perform the steps in this section.
Theadd-rule-objects-xyz.zipfile (wherexyzis a version number) specifies the objects to add to an app. It is supplied in the Fusion migrator zip file at the top level. After installing the migrator, the location is%FUSION_OLD%\var\upgrade\import-files\.
You have a choice. You can update each app using the Fusion UI or the Fusion API.Fusion UI
For each app in which you plan to use business rules, import the objects in theadd-rule-objects-xyz.zipfile into the app.How to import business rule objects- In the Fusion launcher, click the app into which you want to import objects. The Fusion workspace appears.
- In the upper left, click System > Import Fusion Objects.
The Import Fusion Objects window opens.
- For the data file, select
add-rule-objects-xyz.zipfrom your local filesystem. The location in the extracted migrator files is%FUSION_OLD%\var\upgrade\import-files\. - Click Import.
- Edit the
Application IDparameter value to use the app name. If the app name contains spaces, replace those with underscore characters. For example,Lucene Revolutionwould becomeLucene_Revolution. - Click Import.
- If there are conflicts, Fusion prompts you to specify an import policy. Click Merge to skip all conflicting objects and import only the non-conflicting objects. Fusion confirms that the import was successful.
- Click Close to close the Import Fusion Objects window.
Fusion API
For each app in which you plan to use business rules, import the objects in theadd-rule-objects-xyz.zipfile into the app.How to import business rule objects- Create an
app-name.txtfile with the following content:For example, for the appLucene Revolution:Here, we assume that you create the files in your home directory, for which the%HOMEPATH%environment variable is defined. - Import the business rule objects:
For example:
- From version: Fusion
-
Connectors
- Repeatedly stopping a V2 datasource job and clearing the datasource may result in an out-of-memory condition. To recover from this state, restart the
connectors-rpcprocess:
- In a cluster environment, after installing a V2 connector (OneDrive connectors) where multiple connectors-rpc nodes are running, the connector may only install and run on one node instead of propagating to all nodes. If this happens, restart all nodes and then re-install the connector.
- Although the Web V1 connector’s default value for
crawlDBType/Crawl database type is “in-memory”, this can cause an out-of-memory condition when crawling large sites. Change the value to “on-disk”. - If new items are not picked up when recrawling a Box.com folder, delete the records in the
system_box_distributed_crawlcollection, like this:
Then run the datasource job again.- The Local Filesystem connector may slow down while crawling an empty folder.
- With the SMB2/3 connector, if multiple start links point to some of the same data, then the data is indexed multiple times. Remove redundant start links and use only the “parent” link.
- FS (V2) connector does not save Item metadata in Crawldb. recrawls do not work as expected (some items will be missing or not be evaluated on the next crawl).
- When re-installing connector using same plugin id but different file name a deadlock condition may occur resulting in a timeout error.
- Repeatedly stopping a V2 datasource job and clearing the datasource may result in an out-of-memory condition. To recover from this state, restart the
-
Fusion UI
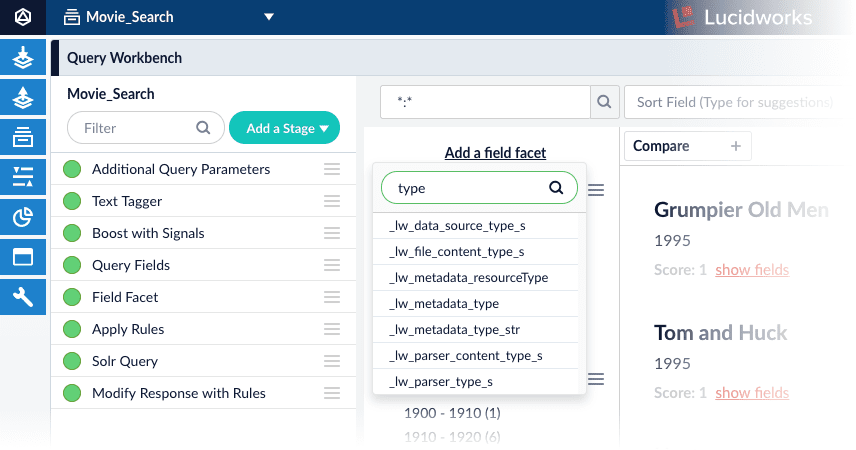
- In the Query Workbench, some document fields may not appear in the dropdown list of fields for faceting. To work around this, enter the name of the field in the text box and press Return. If the field exists in the dataset, it will be added as a facet even though it does not appear in the list.
- When using Compare mode in the Query Workbench, configuring the list of display fields may change the display in both panels instead of only the working panel.
- After logging out using Chrome version 73.0.3683.75, the login page may not automatically appear. To work around this, do a hard refresh (by holding down the CTRL key while clicking the Reload button).
- In the Query Rewriting UI, creating a query rewrite with the same name as an existing query rewrite deletes the existing one. Be sure to create new query rewrites using unique names.
- Jobs may display incorrect information about their current status or the time at which they last ran. To work around this, use the Jobs API to verify a job’s status and history.
- After you upload a
.warfile to the App Studio interface, the View Published UI button disappears from the App Studio configuration panel. To restore this button, click Edit, then click Return to Fusion. - New index pipelines may not appear in the Index Workbench until you do a hard refresh (by holding down the CTRL key while clicking the Reload button).
- In the Query Rewriting UI, after selecting multiple business rules where some rules have tags, adding more tags to the selected rules deletes their existing tags. To work around this, add tags to individual rules instead of adding them in bulk.
- In the Query Workbench, some document fields may not appear in the dropdown list of fields for faceting. To work around this, enter the name of the field in the text box and press Return. If the field exists in the dataset, it will be added as a facet even though it does not appear in the list.