On-premises deployment
Architecture and requirements
- Review system requirements. Start here to learn about required software and hardware.
- Review deployment types. Learn about deployment types for demos, trials, development, and production.
- Start or Stop Fusion Start and stop everything or individual services.
- Learn about directories, files, and ports.
- Review licensing information.
Start or Stop Fusion
Start or Stop Fusion
This topic explains how to start and stop Fusion Server and its services using the scripts in the
With the exception of the Even if only using RPC connectors, the In Fusion 4.0.x.Edit the In Fusion 4.0.x.For example, define this group property to start and stop services for Spark together:Define this group property to start and stop services for classic and RPC connectors together:To start any of Fusion’s services using Bash’s orShell mode is particularly useful in containerized environments, which generally assume that only one process runs per container and that process is “process 0”, that is, the initial process invoked within the container, not a separate spawned process.Log files for Fusion services are found in directories under If this complains with and similarly use How to start all required Fusion services as Windows services
bin directory below the Fusion home directory:/opt/fusion/latest.***__x__***/bin(Unix)C:\lucidworks\fusion{backslash}latest.***__x__***{backslash}bin(Windows)
Command summary
You can control all Fusion services at once under the management of the Fusion agent, or you can control services individually.How to control all services using the Fusion agent:- Unix.
/opt/fusion/latest.***__x__***/bin/fusion <command> - Windows.
C:\lucidworks\fusion{backslash}latest.***__x__***{backslash}bin{backslash}fusion.cmd <command>
-
Unix.
/opt/fusion/latest.***__x__***/bin/<servicename> <command>For example:/opt/fusion/latest.***__x__***/bin/proxy restart -
Windows.
C:\lucidworks\fusion{backslash}latest.***__x__***{backslash}bin{backslash}<servicename>.cmd <command>For example:C:\lucidworks\fusion{backslash}latest.***__x__***{backslash}bin{backslash}proxy.cmd restart
fusion/fusion.cmd script to issue the command to all services in the correct sequence, or they can be issued to an individual service.start | Start one or all Fusion services. |
status | Display the status of one or all Fusion services. |
restart | Restart one or all Fusion services. |
stop | Stop one or all Fusion services. |
run | Start one or all Fusion services in the foreground. |
run-in-shell (Unix only) (Fusion 4.2+ only.) | Start an individual service using Bash’s exec function, which allows the service to assume the shell process’s PID. See Run Fusion in shell mode below. |
Define groups of services
Thefusion.cors (fusion.properties in Fusion 4.x) file includes the property definition group.default. This property defines the Fusion services to start and stop by default (if no property is named in the start or stop command).The default list of services out-of-the-box is also the minimum set of services, with the exception of the log-shipper service, which you can remove if you do not use it.Here is the group.default definition in fusion.cors (fusion.properties in Fusion 4.x):In Fusion 4.1+.log-shipper service, these are all required services. Even if only using RPC connectors, the connectors-classic service is required. The log-shipper service is required to use the Log Shipper.In Fusion 4.0.x.connectors-classic service is required.How to modify the default list of services
In Fusion 4.1+.Edit thegroup.default property, for example, to include Spark and SQL related services:group.default property, for example, to include Spark related services:How to define other lists of services (Unix)
You can define other lists of services by defining othergroup properties.In Fusion 4.1+.For example, define this group property to start and stop services for Spark and SQL together:Unix
Start and stop Fusion on Unix.Start Fusion
All Fusion start scripts must be executed by a user who has permissions to read and write to the directories where Fusion is installed. These scripts do not need to be run as root (or sudo), nor should they be. Use a suitable user, or create a new one, and then ensure that it owns the directory where Fusion resides, (for example,C:\lucidworks).Give the commands that follow from the directory fusion/latest.***__x__***/bin.Start required services
Start the required services that are defined in thegroup.default property.How to start all required services./fusion startStart a group of services
You can start a group of services together. Reference the property infusion.cors (fusion.properties in Fusion 4.x) that defines the group.Examples of when this is useful are:-
Spark and SQL. The
spark-master,spark-worker, andsqlservices are interdependent and should be started and stopped together. -
Classic and RPC connectors. RPC connectors require both the
connectors-classicandconnectors-rpcservices to be running.
Start services individually
You can start services individually.How to start services individually-
Fusion UI service:
./admin-ui start -
API services:
./api start -
Classic Connectors services:
./connectors-classic start -
RPC Connectors services:
./connectors-rpc start -
Log shipper service (Fusion 4.1+ only):
./log-shipper start -
Proxy:
./proxy start -
Solr:
./solr start -
Spark Master:
./spark-master start -
Spark Worker:
./spark-worker start -
SQL service:
./sql start -
Web Apps:
./webapps start -
ZooKeeper:
./zookeeper start
Run Fusion in the foreground
To run Fusion or any of its services in the foreground, use therun command-line argument in place of start.Run Fusion in shell mode
This section applies to Fusion 4.2+ only.
exec function, which allows the service to assume the shell process’s PID, use the run-in-shell command-line argument in place of start or run. The run-in-shell argument can only be used to start one service at a time.ExamplesStop Fusion
How to stop Fusion servicesTo stop Fusion or any of its services, use the command above with thestop command-line argument in place of start, for example:./solr stopUsing systemd to manage processes
On Red Hat Enterprise Linux, CentOS 7 and newer, and Ubuntu 15.04 LTS and newer, we support using the operating system-providedsystemd for process management.Launching Fusion at system start
You can configuresystemd to launch Fusion when your system starts.How to launch Fusion at system start:-
Change your working directory to Fusion’s
systemddirectory, for example: -
Edit
fusion.serviceto provide correct values for theFUSION_HOMEandJAVA_HOMEenvironment variables. -
Stop Fusion if it is already running:
-
Create the
systemdmanagement file, which launches Fusion undersystemdmanagement:
Starting and stopping Fusion
You can use thesystemctl command to start and stop Fusion:https://FUSION_HOST:FUSION_PORT/var/log.Using Ubuntu Upstart to manage processes
Under Ubuntu 12.04 LTS through Ubuntu 14.10, we support using Upstart for process management. This requires Fusion to be installed in the/opt/lucidworks/ directory.To configure upstart, run the following commands:no JAVA_HOME set, replace sudo with sudo -E. Then you can use the service command to control the server:stop and status.Log files for Fusion services are found in directories under https://FUSION_HOST:FUSION_PORT/var/log.Windows
Start and stop Fusion on Windows.Start Fusion
All Fusion start scripts must be executed by a user who has permissions to read and write to the directories where Fusion is installed. Ensure that the user owns the directory where Fusion resides (for example,C:\lucidworks).Give the commands that follow from the directory fusion\latest.***__x__***\bin.Start required services
How to start all required Fusion services as Java processesStart services individually
How to start specific services as Java processes-
UI service:
admin-ui.cmd start -
API services:
api.cmd start -
Classic Connectors services:
connectors-classic.cmd start -
RPC Connectors services:
connectors-rpc.cmd start -
Log shipper service (Fusion 4.1+ only):
log-shipper.cmd start -
Proxy:
proxy.cmd start -
Solr:
solr.cmd start -
Spark Master:
spark-master.cmd start -
Spark Worker:
spark-worker.cmd start -
SQL service:
sql.cmd start -
Web Apps:
webapps.cmd start -
ZooKeeper:
zookeeper.cmd start
Run Fusion in the foreground
To run Fusion or any of its services in the foreground, use therun command-line argument in place of start, for example:connectors.cmd runStop Fusion
How to stop all Fusion servicesfusion.cmd stop(Stop all Fusion services, if they are running as Java processes)stop-services.cmd(Stop all Fusion services, if they are running as Windows services)
stop command-line argument in place of start, for example:connectors.cmd stopRun Fusion with a service account
This example assumes the following:| Field | Value |
|---|---|
| Account | FUSION_SVC |
| Domain | qe |
| Installation directory | C:\fusion<version> |
| Server | EC2AMAZ-79FD9JL |
-
As an administrator, create the service account, and install it to the server you want to use for Fusion:
-
Run
install-services.cmdas a local administrator: -
Grant the service account full access to Fusion:
-
Modify the Lucidworks Fusion service to use the service account.
- Open Administrative Tools > Services on your Windows server.
- Select the Lucidworks Fusion service.
- Open the Properties > Log On dialog.
-
Change the service user account to the
FUSION_SVCuser account.Only the account name is required. The password is managed by Windows.
Access Fusion after startup
After Fusion services have started, you can open the Fusion UI in a web browser athttp://localhost:8764/ (replace localhost with your server name or IP address if necessary).The first time you access Fusion, you must set the password for the user admin and agree to the Fusion Licensing Agreement (which contains terms of service). This is followed by an optional registration step. After this, Fusion displays the Fusion launcher (the page from which you can open apps).Deploy Fusion Server on-prem
- Install Fusion 4.x on a Single Node Install Fusion Server on a single Unix node. This is an easy way to try Fusion Server. Out-of-the-box, Fusion Server uses bundled instances of Solr, ZooKeeper, and Spark.
- Install Fusion 4.x on a Single Node Install Fusion Server on a single Unix node. This is an easy way to try Fusion Server. Out-of-the-box, Fusion Server uses bundled instances of Solr, ZooKeeper, and Spark.
- Install a Fusion 4.x Cluster You can cluster Fusion Server, Solr, and ZooKeeper nodes in a number of ways.
- Install a Fusion 4.x Cluster (Unix) Install multiple instances of Fusion Server, and of Solr and ZooKeeper, in a cluster.
- Install a Fusion 4.x Cluster (Windows) Install multiple instances of Fusion Server, and of Solr and ZooKeeper, in a cluster.
- Integrate Fusion 4.x with an Existing Solr Deployment If you have an existing Solr deployment, you can integrate Fusion Server with that deployment (if it meets Fusion Server’s version requirement for Solr).
- Troubleshoot When Installing Fusion 4.x Troubleshoot difficulties that you might encounter when installing Fusion Server.
Install Fusion 4.x on a Single Node
Install Fusion 4.x on a Single Node
These instructions are for an initial installation of Fusion on a single node (computer). To install Fusion on multiple nodes (a Fusion cluster), see Install a Fusion Cluster. If you already have a version of Fusion installed and want to upgrade it, see the [Fusion upgrade instructions.
Ports
This table lists the default port numbers used by Fusion processes. Port settings are defined in the:fusion.properties file in https://FUSION_HOST:FUSION_PORT/conf/ (on Unix or macOS) or fusion\4.2.x\conf\ (on Windows).| Port | Service |
|---|---|
| 8091 | Fusion agent |
| 8763 | Fusion UI service (use port 8764 to access the Fusion UI) |
| 8764 | Fusion proxy This service includes the Fusion Authorization Proxy. |
| 8765 | Fusion API Services |
| 8766 | Spark Master |
| 8769 | Spark Worker |
| 8771 | Connectors RPC Service This service can distribute connector jobs to as many Fusion nodes as you want. It uses HTTP/2 and has an SDK that you can use to build your own connectors. |
| 8780 | Web Apps This service delivers the UIs of Fusion apps. |
| 8781 | Log shipper Monitoring port that agent uses to check the health of the log shipper process. This port does not need to be accessible from other nodes. |
| 8983 | Solr This is the embedded Solr instance included in the Fusion distribution. |
| 8984 | Connectors Classic Service This service runs nondistributed connector jobs. It uses HTTP/1.1 and has no SDK. |
| 9983 | ZooKeeper The embedded ZooKeeper used by Fusion services. IMPORTANT: The ZooKeeper port is also defined in the configuration file for the embedded ZooKeeper, https://FUSION_HOST:FUSION_PORT/conf/zookeeper/zoo.cfg (on Unix or macOS) or fusion\4.2.x\conf\zookeeper\zoo.cfg (on Windows). Look for clientPort. If you run Fusion with the embedded ZooKeeper, remember to change the port number in both places. |
| 47100-48099 | Apache Ignite TCP communication port range (used by the API, Connectors Classic, Connectors RPC, and Proxy services) |
| 48100-48199 | Apache Ignite shared memory port range (used by the API, Connectors Classic, Connectors RPC, and Proxy services) |
| 49200-49299 | Apache Ignite discovery port range (used by API, Connectors Classic, Connectors RPC, and Proxy services) |
Unix installation
Fusion for Unix is distributed as a gzipped tar file.How to install Fusion on Linux or Mac- Verify that the node on which you plan to install Fusion meets hardware and software requirements.
-
Download the Fusion tar/zip file for the latest version of Fusion and move it to where you would like it to reside in your filesystem (if you would like to use Upstart for process management, you must install Fusion in
/opt/lucidworks). -
Become the user that will run Fusion.
Do not run Fusion as the root user.
-
Change your working directory to the directory in which you placed the
fusion-version.x.tar.gzfile, for example:$ cd /opt/lucidworks -
Unpack the archive with
tar -xf(ortar -xvf), for example:$ tar -xf fusion-version.x.tar.gzThe resulting directory is namedhttps://FUSION_HOST:FUSION_PORT. You can rename this if you wish. This directory is considered your Fusion home directory. See Directories, Files, and Ports for the contents of thehttps://FUSION_HOST:FUSION_PORTdirectory.
Starting Fusion
All Fusion start scripts must be executed by a user who has permissions to read and write to the directories where Fusion is installed. These scripts do not need to be run as root (or sudo), nor should they be. Use a suitable user, or create a new one, and then ensure that it owns the directory where Fusion resides, (for example,C:\lucidworks).Give the commands that follow from the directory fusion/latest.x/bin.Start the required services that are defined in the group.default property.How to start all required services./fusion startFor information about starting groups of services or individual services, see Start and Stop Fusion.Running Fusion In The Foreground
To run Fusion or any of its services in the foreground, use therun command-line argument in place of start.Stopping Fusion
To stop Fusion or any of its services, use thestop command-line argument in place of start.Using systemd to manage processes
On Red Hat Enterprise Linux, CentOS 7 and newer, and Ubuntu 15.04 LTS and newer, we support using the operating system-providedsystemd for process management.For more information about using systemd, see Using systemd to manage processes.Using Ubuntu Upstart to manage processes
Under Ubuntu 12.04 LTS through Ubuntu 14.10, we support using Upstart for process management. This requires Fusion to be installed in the/opt/lucidworks/ directory.For more information about using Upstart, see Using Ubuntu Upstart to manage processes.Windows installation
Fusion for Windows is distributed as a compressed zip file. To unpack the Fusion zip file on Windows, you can use a native compression utility or the freely available 7zip file archiver. Visit the 7zip download page for the latest version.How to install Fusion on Windows- Verify that the node on which you plan to install Fusion meets hardware and software requirements.
- Download the zip file for the latest version of Fusion and move it to where you would like Fusion to reside in your filesystem. It will appear as a compressed folder.
- Unpack the archive. In most cases, you need only right-click and choose “Extract all…”. If you do not see this option, check that you have permissions to extract folders on your system.
The resulting directory is namedfusion\latest.x. This directory is considered your Fusion home directory. See Directories, Files, and Ports for the contents of thefusion\latest.xdirectory.
- Run
bin\install-services.cmd. - Enter the name of the windows user that is used to launch this service.
Remember the username isCOMPUTERNAME\usernameorDOMAIN\username(if your computer is part of a Windows domain). - Enter the user’s password.
- Enter the path to the directory containing the JDK to use for running the services.
Starting Fusion
All Fusion start scripts must be executed by a user who has permissions to read and write to the directories where Fusion is installed. Ensure that the user owns the directory where Fusion resides (for example,C:\lucidworks).Give the commands that follow from the directory fusion\latest.x\bin.How to start all required Fusion services as Java processesStopping Fusion
To stop Fusion or any of its services, use thestop command-line argument in place of start.Installation with an existing Solr instance or cluster
Before you install Fusion with an existing Solr instance or cluster, confirm that the Solr version is supported by Fusion.If installing Fusion to work with an existing Solr instance, either in SolrCloud mode or standalone, you should install Fusion as described above. You should start each of the services as described above.Once Fusion installation is complete, you can register your existing Solr installation with Fusion to be able to use the two systems together. For details on how to do that, see the section Integrate Fusion with an Existing Solr Deployment.Troubleshooting
For information about problems you might encounter when installing Fusion, and solutions, see Troubleshoot When Installing Fusion.Install a Fusion 4.x Cluster
Install a Fusion 4.x Cluster
To support enterprise search applications at any scale, install Fusion on multiple nodes (a Fusion cluster). Deployed in this manner, Fusion can store large amounts of data and achieve high processing throughput.See also this video tutorial for building a multi-mode Fusion cluster:
Historically, “node” has also had a meaning at Lucidworks related to licensing and to the number of CPU cores. We do not mean that here. In the context of this documentation “node” is a computer, usually a physical server but also possibly a virtual machine (especially for test environments).
To install Fusion on a single node, see Install Fusion on a Single Node.
Install Fusion Server with Bundled Solr and ZooKeeper
When you install Fusion Server, the software includes bundled versions of Solr and ZooKeeper. Install Fusion Server on every node. Then, configure Fusion Server so that it does not start Solr and ZooKeeper on nodes where they are not needed.Supported Cluster Arrangements
To satisfy processing requirements, install Fusion Server, ZooKeeper, and Solr on specific nodes.Before proceeding, review the supported cluster arrangements.Hardware and software requirements
Verify that the nodes on which you plan to install Fusion meet hardware and software requirements.Next steps
Perform the installation steps in one of these articles:- Install a Fusion Cluster (Unix)
- Install a Fusion Cluster (Windows)
Install a Fusion 4.x Cluster (Unix)
Install a Fusion 4.x Cluster (Unix)
This article describes how to install a Fusion cluster on multiple Unix nodes. Instructions are given for each of the cluster arrangements described in Deployment Types.
In the steps below, the port numbers reflect default port numbers and one common choice (port 2181 for nodes in an external ZooKeeper cluster). Port numbers for your nodes might differ.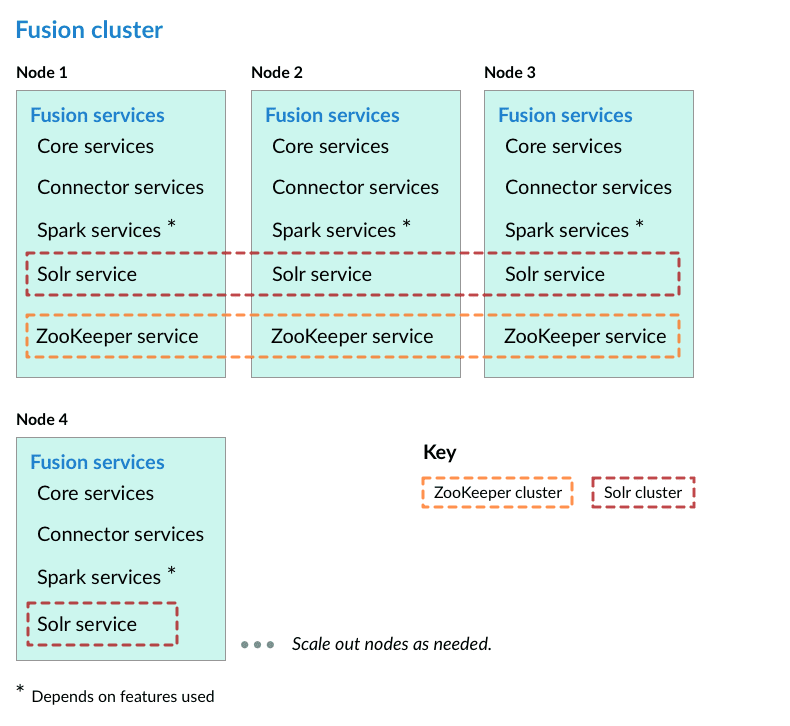
Preliminary steps
Before proceeding to one of the sections that follow, perform these steps:How to prepare for setting up a Fusion cluster- Prepare your firewall so that the Fusion nodes can communicate with each other. The default ports list contains a list of all ports used by Fusion. From this list, it is important that the ZooKeeper ports, Apache Ignite ports, and the Spark ports (if you are using Spark) are open between the different nodes for cross-cluster communication.
- Fusion for Unix is distributed as a compressed archive file (
.tar.gz). Move this file to each node that will run Fusion.To leverage the copies of Solr and/or ZooKeeper that are distributed with Fusion on nodes that will not run Fusion (as a simple means of obtaining compatible versions of the other software), also download the Fusion compressed archive file to each of those nodes. Below, you will edit configuration files so that Fusion does not run on those nodes. - On each node, change your working directory to the directory in which you placed the Fusion tar/zip file and unpack the archive, for example:
In the sections that follow, for every step on multiple nodes, complete the step on all nodes before going to the next step. It is especially important that you do not start Fusion on any node until the instructions say to do so.
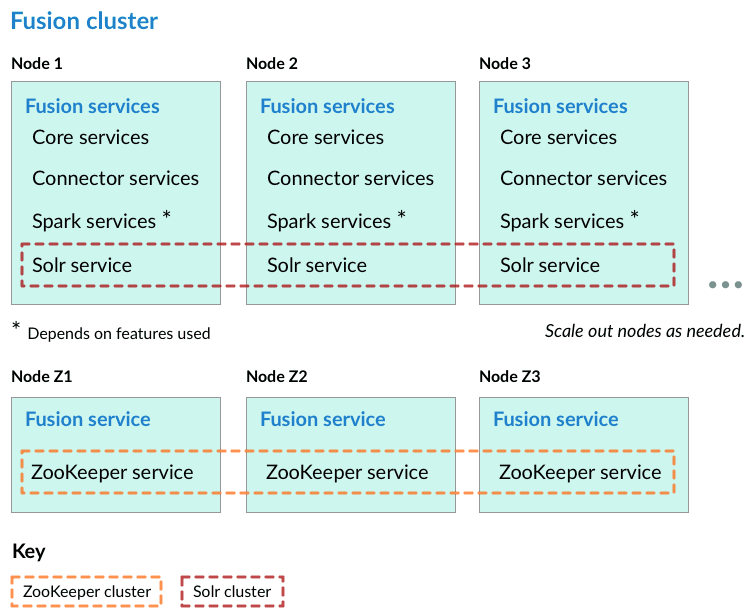
Nodes running core Fusion services and Solr also run ZooKeeper
In this cluster arrangement, a ZooKeeper cluster runs on the same nodes that run core Fusion services and Solr.- Assign a number to each Fusion node, starting at 1. We refer to the number we assign to each node as the ZooKeeper myid.
- On each Fusion node, create a
https://FUSION_HOST:FUSION_PORT/data/zookeeperdirectory, and a file calledmyidin that directory. Edit the file and save the ZooKeeper myid assigned for this node as the only contents. - On each Fusion node, open the
https://FUSION_HOST:FUSION_PORT/conf/zookeeper/zoo.cfgfile in a text editor and add the following after theclientPortline (change the hostnames or IP addresses to the correct ones for your servers):For example:Do not uselocalhostor127.0.0.1as the hostname/IP. Specify the hostname/IP that other nodes will use when communicating with the current node. - On each Fusion node, edit
default.zk.connectinhttps://FUSION_HOST:FUSION_PORT/conf/fusion.cors(fusion.propertiesin Fusion 4.x) to point to the ZooKeeper hosts: - On each node, start ZooKeeper with
bin/zookeeper start. Zookeeper should start without errors. If a ZooKeeper instance fails to start, check the log athttps://FUSION_HOST:FUSION_PORT/var/log/zookeeper/zookeeper.log. - On each node, start the rest of Fusion using
bin/fusion start. - Create an admin password and log in to Fusion at
http://FIRST_NODE_IP:8764, whereFIRST_NODE_IPis the IP address of your first Fusion node. - Verify the Solr cluster is healthy by looking at
http://ANY_NODE_IP:8983/solr/#/~cloud, whereANY_NODE_IPis the IP address of a Solr node. All of the nodes should appear green. - If necessary, prepare high availability by setting up a load balancer in front of Fusion so that it load balances between the Fusion UI URL’s at
http://NODE_IP:8764.
Consult your load balancer’s documentation for instructions.
Nodes running ZooKeeper are not running core Fusion services or Solr
In this cluster arrangement, the ZooKeeper cluster runs on nodes in the Fusion cluster on which core Fusion services and Solr are not running.Each node in the Fusion cluster has Fusion and Solr installed. ZooKeeper runs on Fusion cluster nodes on which neither Fusion nor Solr is running.- Assign a number to each Fusion node, starting at 1. We refer to the number we assign to each node as the ZooKeeper myid.
- On each Fusion node, create a
fusion\latest.x\data\zookeeperdirectory, and a file calledmyidin that directory. Edit the file and save the ZooKeeper myid assigned for this node as the only contents. - On each Fusion node, open the
fusion\latest.x\conf\zookeeper\zoo.cfgfile in a text editor and add the following after theclientPortline (change the hostnames or IP addresses to the correct ones for your servers):For example: - Edit
conf/fusion.cors(fusion.propertiesin Fusion 4.x) and removezookeeperfrom thegroup.defaultlist. This will make it so that ZooKeeper does not start when you start Fusion. - On each Fusion node, edit
default.zk.connectinhttps://FUSION_HOST:FUSION_PORT/conf/fusion.cors(fusion.propertiesin Fusion 4.x) to point to the ZooKeeper hosts: - On each node, start ZooKeeper with
bin/zookeeper start. Zookeeper should start without errors. If a ZooKeeper instance fails to start, check the log athttps://FUSION_HOST:FUSION_PORT/var/log/zookeeper/zookeeper.log. - On each node, start the rest of Fusion using
bin/fusion start. - Create an admin password and log in to Fusion at
http://FIRST_NODE_IP:8764, whereFIRST_NODE_IPis the IP address of your first Fusion node. - Verify the Solr cluster is healthy by looking at
http://ANY_NODE_IP:8983/solr/#/~cloud, whereANY_NODE_IPis the IP address of a Solr node. All of the nodes should appear green. - If necessary, prepare high availability by setting up a load balancer in front of Fusion so that it load balances between the Fusion UI URL’s at
http://NODE_IP:8764. Consult your load balancer’s documentation for instructions.
Known issues
Metrics collection failure
When the Java virtual machine (JVM) is started, the/tmp/.java_pid<pid> file is created and is the socket used:- To attach a debugger
- By the agent to connect to the service that collects Java Management Extension (JMX) metrics
/tmp/.java_pid<pid> is deleted after ten days on a standard Amazon Linux in EC2.When the JVM code the agent uses cannot locate the file, then it:- Sends a
-QUITmessage to the JVM - Triggers a thread dump to be printed to standard out
- Is logged to the agent log
- Generates the “No metrics can be gathered” exception
- Prints a complete thread dump
- Sends the thread dump to system logs
- Exclude the
agent.logfrom the logstash configuration. The logshipping is turned off for the file. The disadvantage to this option is that the metrics are missing. - Change the cron job in the Linux distribution that deletes the
/tmpfiles older than “x” days to exclude deleting the/tmp/.java_pid<pid>files. If your system is running the Linux Systemd software suite on EC2, the setting is typically located in theusr/lib/tmpfiles.d/tmp.conffile. For Dial On Demand (DOD), remove the call that configures the JMX Metrics requirement for the debugger attachment to the Java service.
Install a Fusion 4.x Cluster (Windows)
Install a Fusion 4.x Cluster (Windows)
This article describes how to install a Fusion cluster on multiple Windows nodes. Instructions are given for each of the cluster arrangements described in Deployment Types.In the steps below, the port numbers reflect default port numbers and one common choice (port 2181 for nodes in an external ZooKeeper cluster). Port numbers for your nodes might differ.
Preliminary steps
Before proceeding to one of the sections that follow, perform these steps:How to prepare for setting up a Fusion cluster- Prepare your firewall so that the Fusion nodes can communicate with each other. The default ports list contains a list of all ports used by Fusion. From this list, it is important that the ZooKeeper ports, Apache Ignite ports, and the Spark ports (if you are using Spark) are open between the different nodes for cross-cluster communication.
- Fusion for Windows is distributed as a compressed archive file (
.zip). Download the Fusion zip file for the latest version of Fusion to each node that will run Fusion, and move the file to where you would like Fusion to reside in your filesystem. It will appear as a compressed folder.To leverage the copies of Solr and/or ZooKeeper that are distributed with Fusion on nodes that will not run Fusion (as a simple means of obtaining compatible versions of the other software), also download the Fusion zip file to each of those nodes. Below, you will edit configuration files so that Fusion does not run on those nodes. - Unpack the archive. In most cases, you need only right-click and choose “Extract all…”. If you do not see this option, check that you have permissions to extract folders on your system.
The resulting directory is namedfusion\latest.x. This directory is considered your Fusion home directory. You can rename it if you wish. See Directories, Files, and Ports for the contents of the Fusion home directory.
In the sections that follow, for every step on multiple nodes, complete the step on all nodes before going to the next step. It is especially important that you do not start Fusion on any node until the instructions say to do so.
Nodes running core Fusion services and Solr also run ZooKeeper
In this cluster arrangement, a ZooKeeper cluster runs on the same nodes that run core Fusion services and Solr.- Assign a number to each Fusion node, starting at 1. We refer to the number we assign to each node as the ZooKeeper myid.
- On each Fusion node, create a
fusion\latest.x\data\zookeeperdirectory, and a file calledmyidin that directory. Edit the file and save the ZooKeeper myid assigned for this node as the only contents. - On each Fusion node, open the
fusion\latest.x\conf\zookeeper\zoo.cfgfile in a text editor and add the following after theclientPortline (change the hostnames or IP addresses to the correct ones for your servers):For example:
do not use
localhost or 127.0.0.1 as the hostname/IP. Specify the hostname/IP that other nodes will use when communicating with the current node.default.zk.connect in fusion\latest.x\conf\fusion.cors (fusion.properties in Fusion 4.x) to point to the ZooKeeper hosts:- On each node, start ZooKeeper with
bin\zookeeper start. Zookeeper should start without errors. If a ZooKeeper instance fails to start, check the log atfusion\latest.x\var\log\zookeeper\zookeeper.log. - On each node, start the rest of Fusion using
bin\fusion start. - Create an admin password and log in to Fusion at
http://FIRST_NODE_IP:8764, whereFIRST_NODE_IPis the IP address of your first Fusion node. - Verify the Solr cluster is healthy by looking at
http://ANY_NODE_IP:8983/solr/#/~cloud, whereANY_NODE_IPis the IP address of a Solr node. All of the nodes should appear green. - If necessary, prepare high availability by setting up a load balancer in front of Fusion so that it load balances between the Fusion UI URL’s at
http://NODE_IP:8764.
Consult your load balancer’s documentation for instructions.
Nodes running ZooKeeper are not running core Fusion services or Solr
In this cluster arrangement, the ZooKeeper cluster runs on nodes in the Fusion cluster on which core Fusion services and Solr are not running.Each node in the Fusion cluster has Fusion and Solr installed. ZooKeeper runs on Fusion cluster nodes on which neither Fusion nor Solr is running.- Assign a number to each Fusion node, starting at 1. We refer to the number we assign to each node as the ZooKeeper myid.
- On each Fusion node, create a
fusion\latest.x\data\zookeeperdirectory, and a file calledmyidin that directory. Edit the file and save the ZooKeeper myid assigned for this node as the only contents. - On each Fusion node, open the
fusion\latest.x\conf\zookeeper\zoo.cfgfile in a text editor and add the following after theclientPortline (change the hostnames or IP addresses to the correct ones for your servers):For example: - Edit
conf\fusion.cors(fusion.propertiesin Fusion 4.x) and removezookeeperfrom thegroup.defaultlist. This will make it so that ZooKeeper does not start when you start Fusion. - On each Fusion node, edit
default.zk.connectinfusion\latest.x\conf\fusion.cors(fusion.propertiesin Fusion 4.x) to point to the ZooKeeper hosts: - On each node, start ZooKeeper with
bin\zookeeper start. Zookeeper should start without errors. If a ZooKeeper instance fails to start, check the log atfusion\latest.x\var\log\zookeeper\zookeeper.log. - On each node, start the rest of Fusion using
bin\fusion start. - Create an admin password and log in to Fusion at
http://FIRST_NODE_IP:8764, whereFIRST_NODE_IPis the IP address of your first Fusion node. - Verify the Solr cluster is healthy by looking at
http://ANY_NODE_IP:8983/solr/#/~cloud, whereANY_NODE_IPis the IP address of a Solr node. All of the nodes should appear green. - If necessary, prepare high availability by setting up a load balancer in front of Fusion so that it load balances between the Fusion UI URL’s at
http://NODE_IP:8764. Consult your load balancer’s documentation for instructions.
Integrate Fusion 4.x with an Existing Solr Deployment
Integrate Fusion 4.x with an Existing Solr Deployment
If you have already implemented Solr as a standalone instance or as a SolrCloud cluster, you can add Fusion to your existing Solr deployment (if the Solr version is supported) and import your Solr collections into Fusion. Each Fusion collection can import one Solr collection.
- If your existing Solr instance is running in SolrCloud mode, you can use Fusion’s UI to modify configuration files (such as schema.xml or solrconfig.xml) and create Solr collections.
- If your existing Solr instance is running in standalone mode, you can still connect it to Fusion. Fusion can send documents to a standalone Solr instance and query the instance. But you will not be able to use Fusion’s UI to create Solr collections (Solr cores) or to modify Solr configuration files.
Prerequisites
- You have already installed Fusion.
- You have already installed Solr, which must meet these Solr requirements.
-
You have already installed ZooKeeper, which must meet these ZooKeeper requirements.
We recommend that you create an external ZooKeeper cluster (external to both Fusion and SolrCloud).
- Your Solr deployment must contain one or more collections (cores).
- In SolrCloud mode, Solr must be configured to use ZooKeeper.
Configure Fusion to use an existing Solr deployment
Use the Fusion UI to integrate Fusion with an existing Solr deployment.Use the Fusion UI
-
Create a Fusion search cluster:
- In the Fusion UI, navigate to System > Solr Clusters and click New Solr Cluster.
- Enter this information:
- A cluster ID of your choice
- Whether SolrCloud is enabled
- The connect string (to tell Fusion how to connect to the SolrCloud cluster or Solr instance)
- For SolrCloud, this is the ZooKeeper connect string.
- For a standalone Solr instance, this is the URL of the Solr instance.
- Verify that the connection is working by clicking Cores in the new cluster and inspecting the contents.
-
Create a Fusion collection that points to your Solr cluster and collection:
- In the UI, navigate to Collections and click Add a Collection.
- Enter a name for the new collection.
- Click Advanced.
- Select your SolrCloud cluster or Solr instance from the dropdown.
- Enter the name of the Solr collection to import.
Sending Documents to Solr through Fusion
You can use the Fusion connectors to crawl documents and index them to your existing Solr deployment.- Follow the steps above to create and configure a search cluster and a collection that points to Solr.
- Define an index pipeline that ends with a Solr Indexer stage that sends the documents to Solr.
- Use one of these methods to ingest your data:
- In the collection that points to your Solr collection, define a datasource using the connector of choice.
- Send prepared documents directly to the index pipeline for processing. See Importing Data with the REST API.
- It is also possible to use a different indexing process besides a connector, such as a script that sends documents through the index pipeline.
Querying Solr via Fusion requests
Indexed documents are stored in Solr indexes. You can query for these documents by using query pipelines. The query pipelines let you define your query parameters - such as how many records to return, the fields you would like, how to structure facets, and so on. You also have the ability to add JavaScript to the response processing, and define landing pages or specific boost levels depending on the user’s query. See Query Pipelines.If you prefer, you can also use the Solr API and SolrAdmin API to query Solr directly.Troubleshoot When Installing Fusion 4.x
Troubleshoot When Installing Fusion 4.x
This topic explains how to troubleshoot difficulties that occur when installing or upgrading Fusion.On Windows, the command is:Fusion scripts execute both the After stopping Fusion, you should make sure that no Fusion services are running.
When the Fusion scripts start a Fusion service, they record the process id in a The above output shows the set of
Fusion run script failures
Common problems that cause Fusion run scripts to fail:- Wrong Java version.
- Spaces in Windows install path.
- Users have insufficient privileges for the installation directory.
- Java
bindirectory not in thePATHenvironment variable. - Some Fusion services may already be running, or registered as running.
- Roaming IP address; try uncommenting this line in
https://FUSION_HOST:FUSION_PORT/conf/fusion.cors(fusion.propertiesin Fusion 4.x):
Check the Java version
Fusion runs on JDK 1.8. See System Requirements.Fusion scripts use the environment variableJAVA_HOME.
To check the setting of this variable, log in to the account used to run Fusion, and check that this variable is set to the proper value.
On a linux, Mac, or other Unix system, use the following command:java and javac commands.
To check the Java version invoked by these commands, run the following commands from a shell or terminal window:Clear browser cache
If a previous version of Fusion was accessed in the browser with the same URL as that of the newly installed version of Fusion, then there may be old pages and/or cookies in the browser cache. A hard page refresh will clear old pages from the browser cache. If clearing the page cache does not solve this problem, clear session cookies as well.Stop/Clean up/Start
If the scripthttps://FUSION_HOST:FUSION_PORT/bin/fusion start completes without reporting an error, but the
Fusion UI displays a message that it cannot find Collections or Datasources,
this may be due to Fusion services not being able to communicate properly (via ZooKeeper).
This can happen with developer deployments running on a laptop if the network connection
changes or is interrupted, especially when using the embedded ZooKeeper instance
that is bundled with Fusion.In this situation, you should stop Fusion, inspect the system processes
and if necessary, manually terminate running processes and cleanup .pid files
to bring the system back to a clean state, then start Fusion once again.Although the Fusion run script bin/fusion provides a restart option,
the restart option assumes a correctly functioning system and cannot
always recover from system failure.To stop Fusion:Run the script https://FUSION_HOST:FUSION_PORT/bin/fusion with the argument stop:.pid file in the directory https://FUSION_HOST:FUSION_PORT/var.
For a Fusion instance that is up and running, we see the following set of .pid files:.pid created by a single Fusion instance running with embedded ZooKeeper and Solr.But if no Fusion services are running, there should not be any .pid files.
In the case that all services have been stopped, but there are still some .pid files found,
these files should be deleted before starting Fusion.Inspect the log files
If none of the above help, inspect the Fusion log files in directoryhttps://FUSION_HOST:FUSION_PORT/var/log.If you experience unexpected termination when running Fusion, first look in the log files for clues.One setting you can look into is in $FUSION_HOME/conf/fusion.cors: default.supervision.pollingFailureCountThreshold.By default, pollingFailureCountThreshold is set to 1, so the Agent restarts all services the second time it fails to reach a service. Try a modest increase, for example set pollingFailureCountThreshold to 3.Log file names that start with “oom” indicate out-of-memory problems.
You might need to increase the amount of memory allotted to that service.
The amount of memory allotted to each kind of Fusion service is controlled by
environment variables that are set in the
fusion.cors (fusion.properties in Fusion 4.x) file.Troubleshoot a Windows Install
Check common Windows service install script mistakes:- Is the account trying run the install script a poweruser/administrator of the server?
- Is the DOMAIN\USERNAME correctly specified? Is the Domain correct?
- Is
javainstalled on the%PATH%? To use a different Java, specify it inbin/windows-service-wrapper.xml. - Are there any obvious issues in
var/log/windows-service-wrapper.log? - Does Fusion start from the normal
bin\fusion start? - Are there any other errors in the normal logs?
Increase memory
One other thing that can happen if you have not changed any of the default settings is for the services to run out of memory under heavy load, causing the program to crash.To find out if this happened, you can check for the presence of any files matching the pattern oom_killer-.log* in the log directory for the service that is being restarted, for example, $FUSION_HOME/var/log/connectors-classic if that is the one being restarted.If this is your issue, the first step is to increase the memory of the affected component by modifyingconf/fusion.cors (fusion.properties in Fusion 4.x). Go to the jvmOptions for the service in question and change the value of the -Xmx flag. By default you will see something like:-Xmx1g means this service will fail if it needs more than 1 gigabyte of memory to operate. Increase this memory, for example set the flag to Xmx4g for an additional 3 gigabytes. 1g can be very low for some workloads.More Help and Support
Upgrade and maintain Fusion Server
- Upgrade to Fusion 4.x Run a migrator to upgrade Fusion Server.
- Migrate Fusion Objects Migrate Fusion objects by hand. You might need to do this for objects that the migrator does not migrate automatically. You can also use this manual approach to migrate Fusion objects from development environments into testing and production environments, or to back up data and restore it after an incident of data loss.
- Scale a Fusion 4.x Cluster Add a new node to an existing Fusion cluster, or move Fusion from one node to another.
Upgrade to Fusion 4.x
Upgrade to Fusion 4.x
When you have a Fusion-based search application running, at some point it might be necessary to upgrade to a later version of Fusion. We provide a migrator tool to simplify the upgrade process.The migrator transfers over most of the objects that make up your search application, all configurations and customizations for your application, and all data in collections in the application.These upgrade sequences are supported.
In some cases, manual steps are required for objects that the migrator cannot handle automatically. We give you instructions and guidance about what might be required. You should also review the log of the upgrade in
/opt/fusion/x.y.z/var/upgrade/tmp/migrator.log (on Unix) or C:\lucidworks\var\fusion\x.y.z\upgrade\tmp\migrator.log (on Windows). The x.y.z directory is for the Fusion version that you are migrating from.Key points
Following are some key points about upgrading Fusion:- Migration involves down time. The upgrade process involves multiple starts and stops of Fusion services. Please plan accordingly, especially in terms of disabling external load balancers or monitors that might react adversely to the starts and stops.
- Current deployment is preserved. Upgrades preserve the current Fusion deployment, copying information over from the current deployment to the new one. This provides a rapid roll-back option if you encounter problems during the upgrade process.
- If the upgrade fails. If an upgrade fails, there is a procedure for dealing with that.
Supported upgrade sequences
Only specific version-to-version upgrade sequences are supported. Some upgrades require multiple steps.
Upgrades to the current version
- 3.1.x to 4.2.y. From any 3.1.x version to 4.2.6 SP1 (one step, using the migrator)
- 4.0.x to 4.2.y. From any 4.0.x version to 4.2.6 SP1 (one step, using the migrator)
- 4.1.x to 4.2.y. From any 4.1.x version to 4.2.6 SP1 (one step, using the migrator)
Upgrades to prior versions
Using the migrator:- 3.1.x to 4.0.y. From 3.1.5 directly to 4.0.2 (one step) For more information, see Upgrade Fusion 3.1.x to 4.0.y.
- 4.0.x to 4.0.y. From 4.0.0 or 4.0.1 to 4.0.2 (one step) For more information, see Upgrade Fusion Server 4.0.x to 4.0.y.
- 3.1.x to 4.1.y. From any 3.1.x version to 4.1.3 (one step, using the migrator) For more information, see Upgrade Fusion Server 3.1.x to 4.1.y.
- 4.0.x to 4.1.y. From 4.0.2 to 4.1.3 (one step, using the migrator) For more information, see Upgrade Fusion Server 4.0.x to 4.1.y.
- 4.1.x to 4.1.y. From 4.1.0 to 4.1.3 (one step, using the migrator) For more information, see Upgrade Fusion Server 4.1.x to 4.1.y.
Example
For example, to upgrade from Fusion 3.0.1 to Fusion Server 4.2.5, you would perform the following upgrades (both of them using the migrator):- Upgrade from Fusion 3.0.1 to Fusion 3.1.5
- Upgrade from Fusion 3.1.5 to Fusion Server 4.2.5
Per-version instruction sets
To upgrade to a later version of Fusion from an existing installation requires transferring over all configurations and data from your existing Fusion installation to the new version.How to upgrade from Fusion 3.1.x to Fusion Server 4.2.yPerform the steps in this article:Upgrade from Fusion Server 3.1.x to 4.2.y - Run a migrator to upgrade from Fusion Server 3.1.x to 4.2.y.How to upgrade from Fusion 4.0.x to Fusion Server 4.2.yPerform the steps in this article:Upgrade from Fusion Server 4.0.x to 4.2.y - Run a migrator to upgrade from Fusion Server 4.0.x to 4.2.y.How to upgrade from Fusion 4.1.x to Fusion Server 4.2.yPerform the steps in this article:Upgrade from Fusion Server 4.1.x to 4.2.y - Run a migrator to upgrade from Fusion Server 4.1.x to 4.2.y.How to upgrade from Fusion 4.2.x to Fusion Server 4.2.yPerform the steps in this article:Upgrade from Fusion Server 4.2.x to 4.2.y - Run a migrator to upgrade from Fusion Server 4.2.x to 4.2.y.Migrate Fusion Objects
Migrate Fusion Objects
You can use the Fusion UI and the Objects API to migrate collections and related objects, including your searchable data, configuration data, pipelines, aggregations, and other objects on which your collections depend. You can also migrate entire apps.You might need to migrate objects in the following circumstances:
For more information about using the Objects API to export and import objects, see Objects API.The remainder of this topic describes approaches in the Fusion UI.Use the parts of the Fusion UI indicated in the table to export and import apps and specific objects. Exporting creates a zip file. To import, you select a data file and possibly a variable file.The approach with Object Explorer differs. With Object Explorer, you can add objects from other apps (or that are not linked to any apps) to the currently open app.
When upgrading from one Fusion version to a later one, you must use the migrator to migrate objects. The migrator automates the process of translating relevant objects to the new version. Exporting an object from one Fusion version and importing it into a different Fusion version isn’t supported.
- When migrating data from development environments into testing and production environments
- To back up data, so you can restore it after an incident of data loss
- When the migrator script was not able to migrate an object automatically
Migration approaches
Several approaches are available for migrating Fusion objects. This table summarizes the approaches.| Export an app | Import an app | Export an object | Import an object | Add an object to an app | |
|---|---|---|---|---|---|
| Fusion UI | App configuration | Launcher (entire app) App configuration (combine apps) | - | - | Object Explorer |
| Objects API (endpoints) | GET from export endpoint | POST to import endpoint | GET from export endpoint | POST to import endpoint | - |
Export an app with the Fusion UI
How to export an app with the Fusion UI- Navigate to the launcher.
-
Hover over the app you want to export and click the Configure icon:
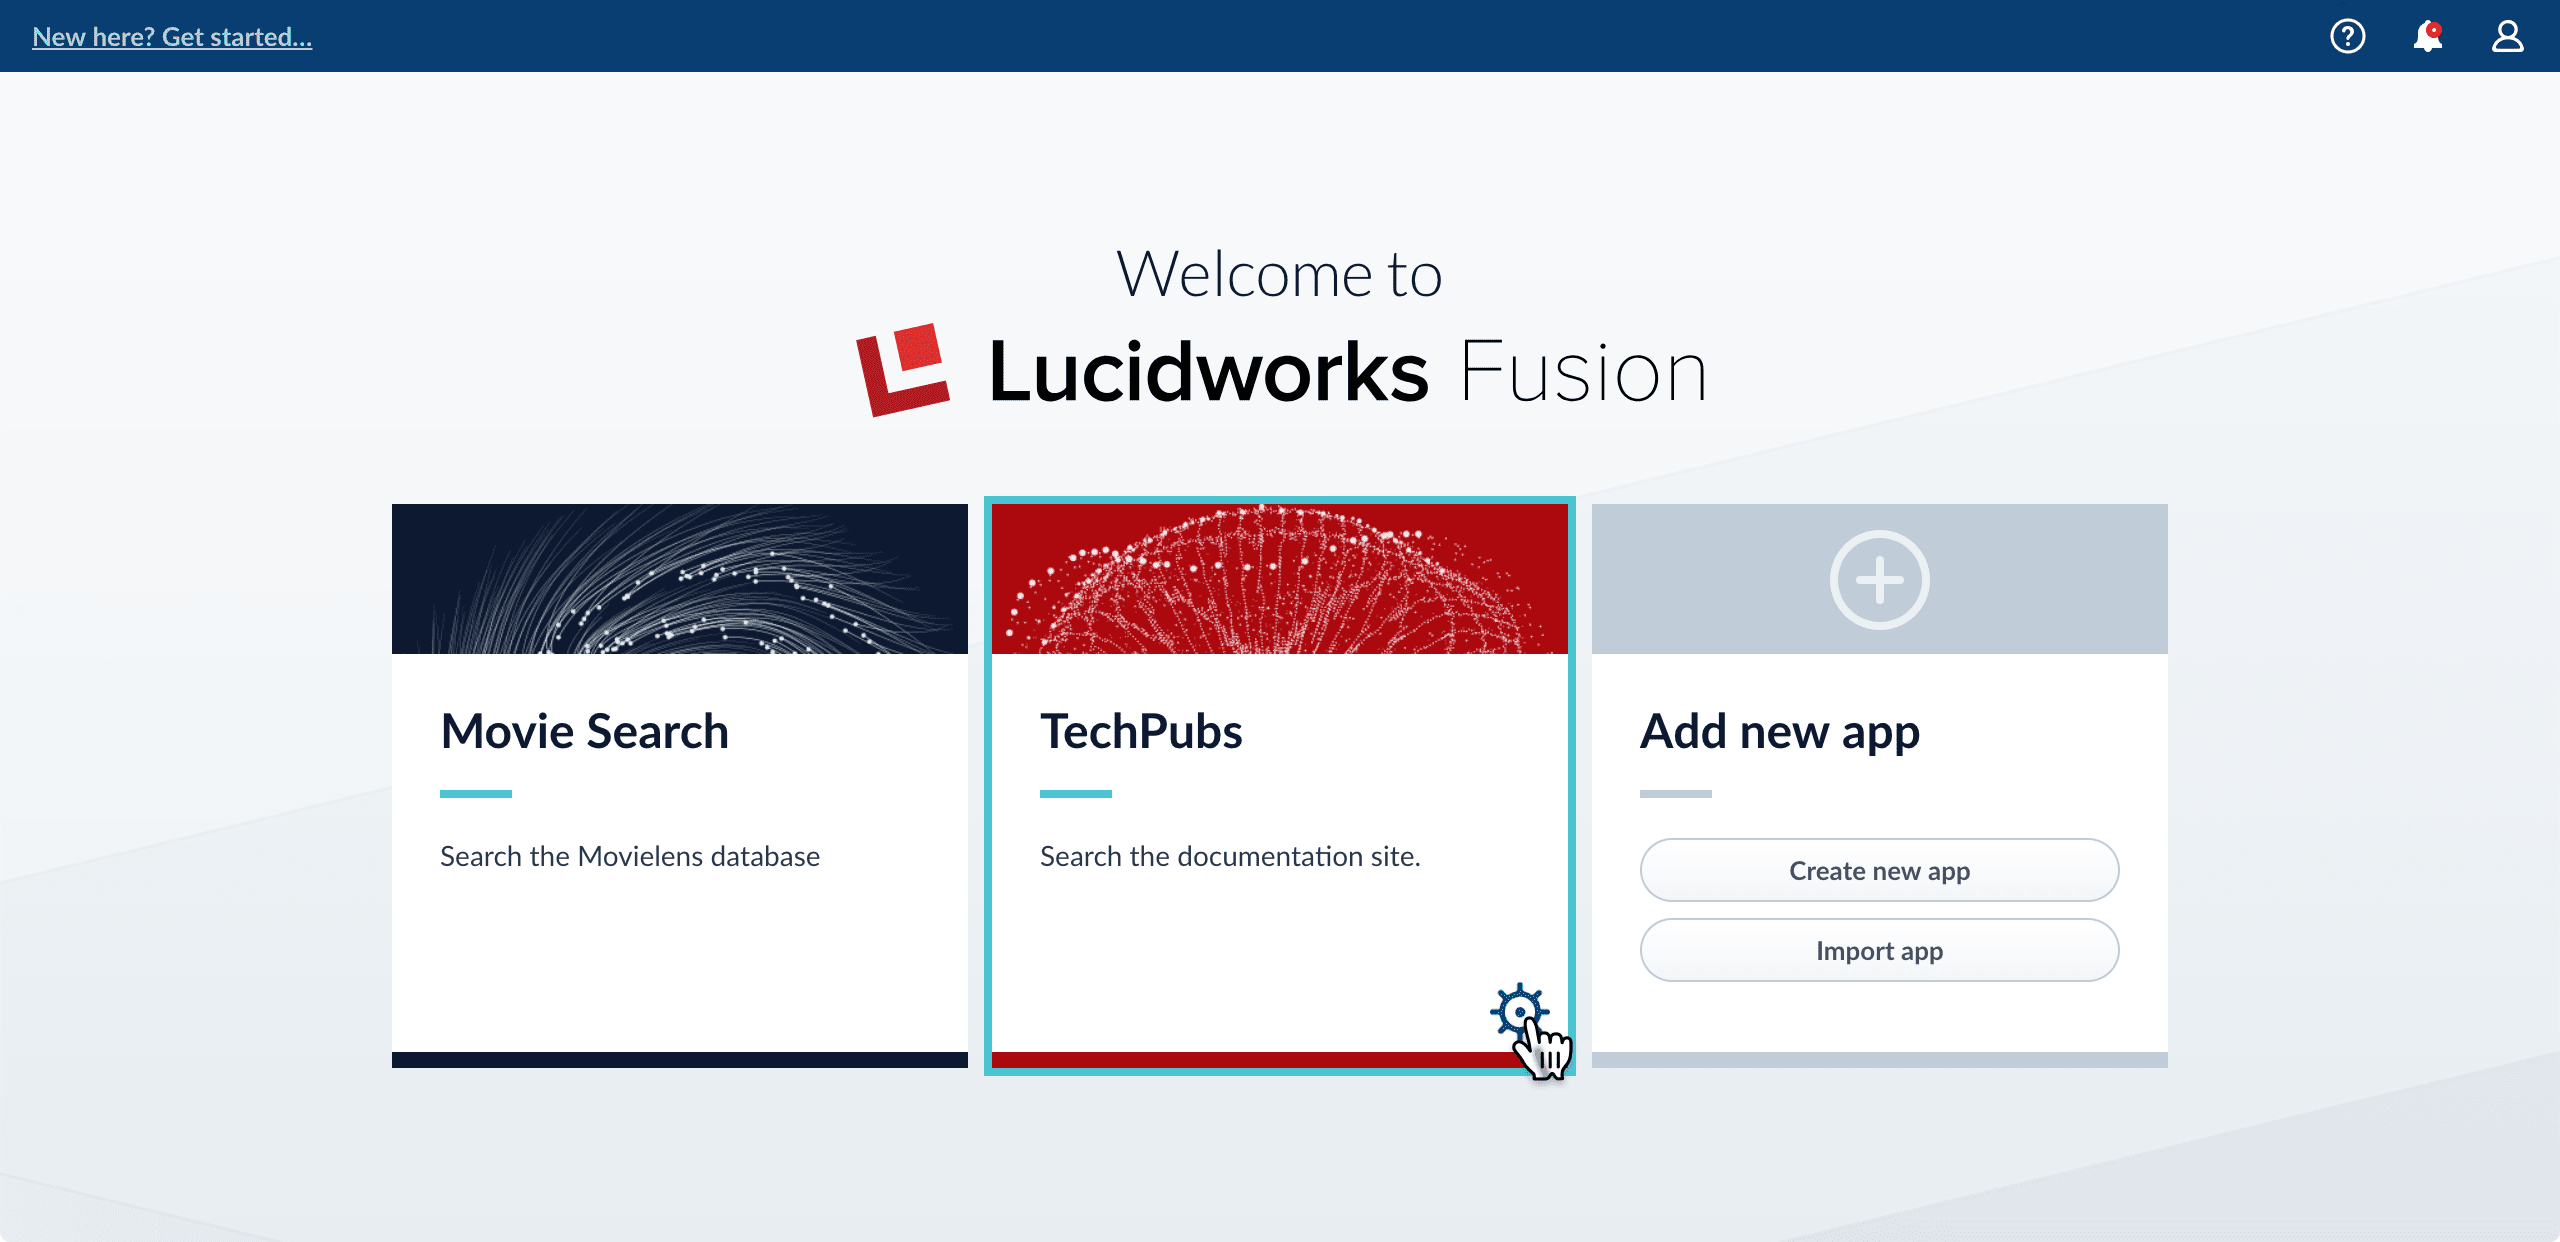
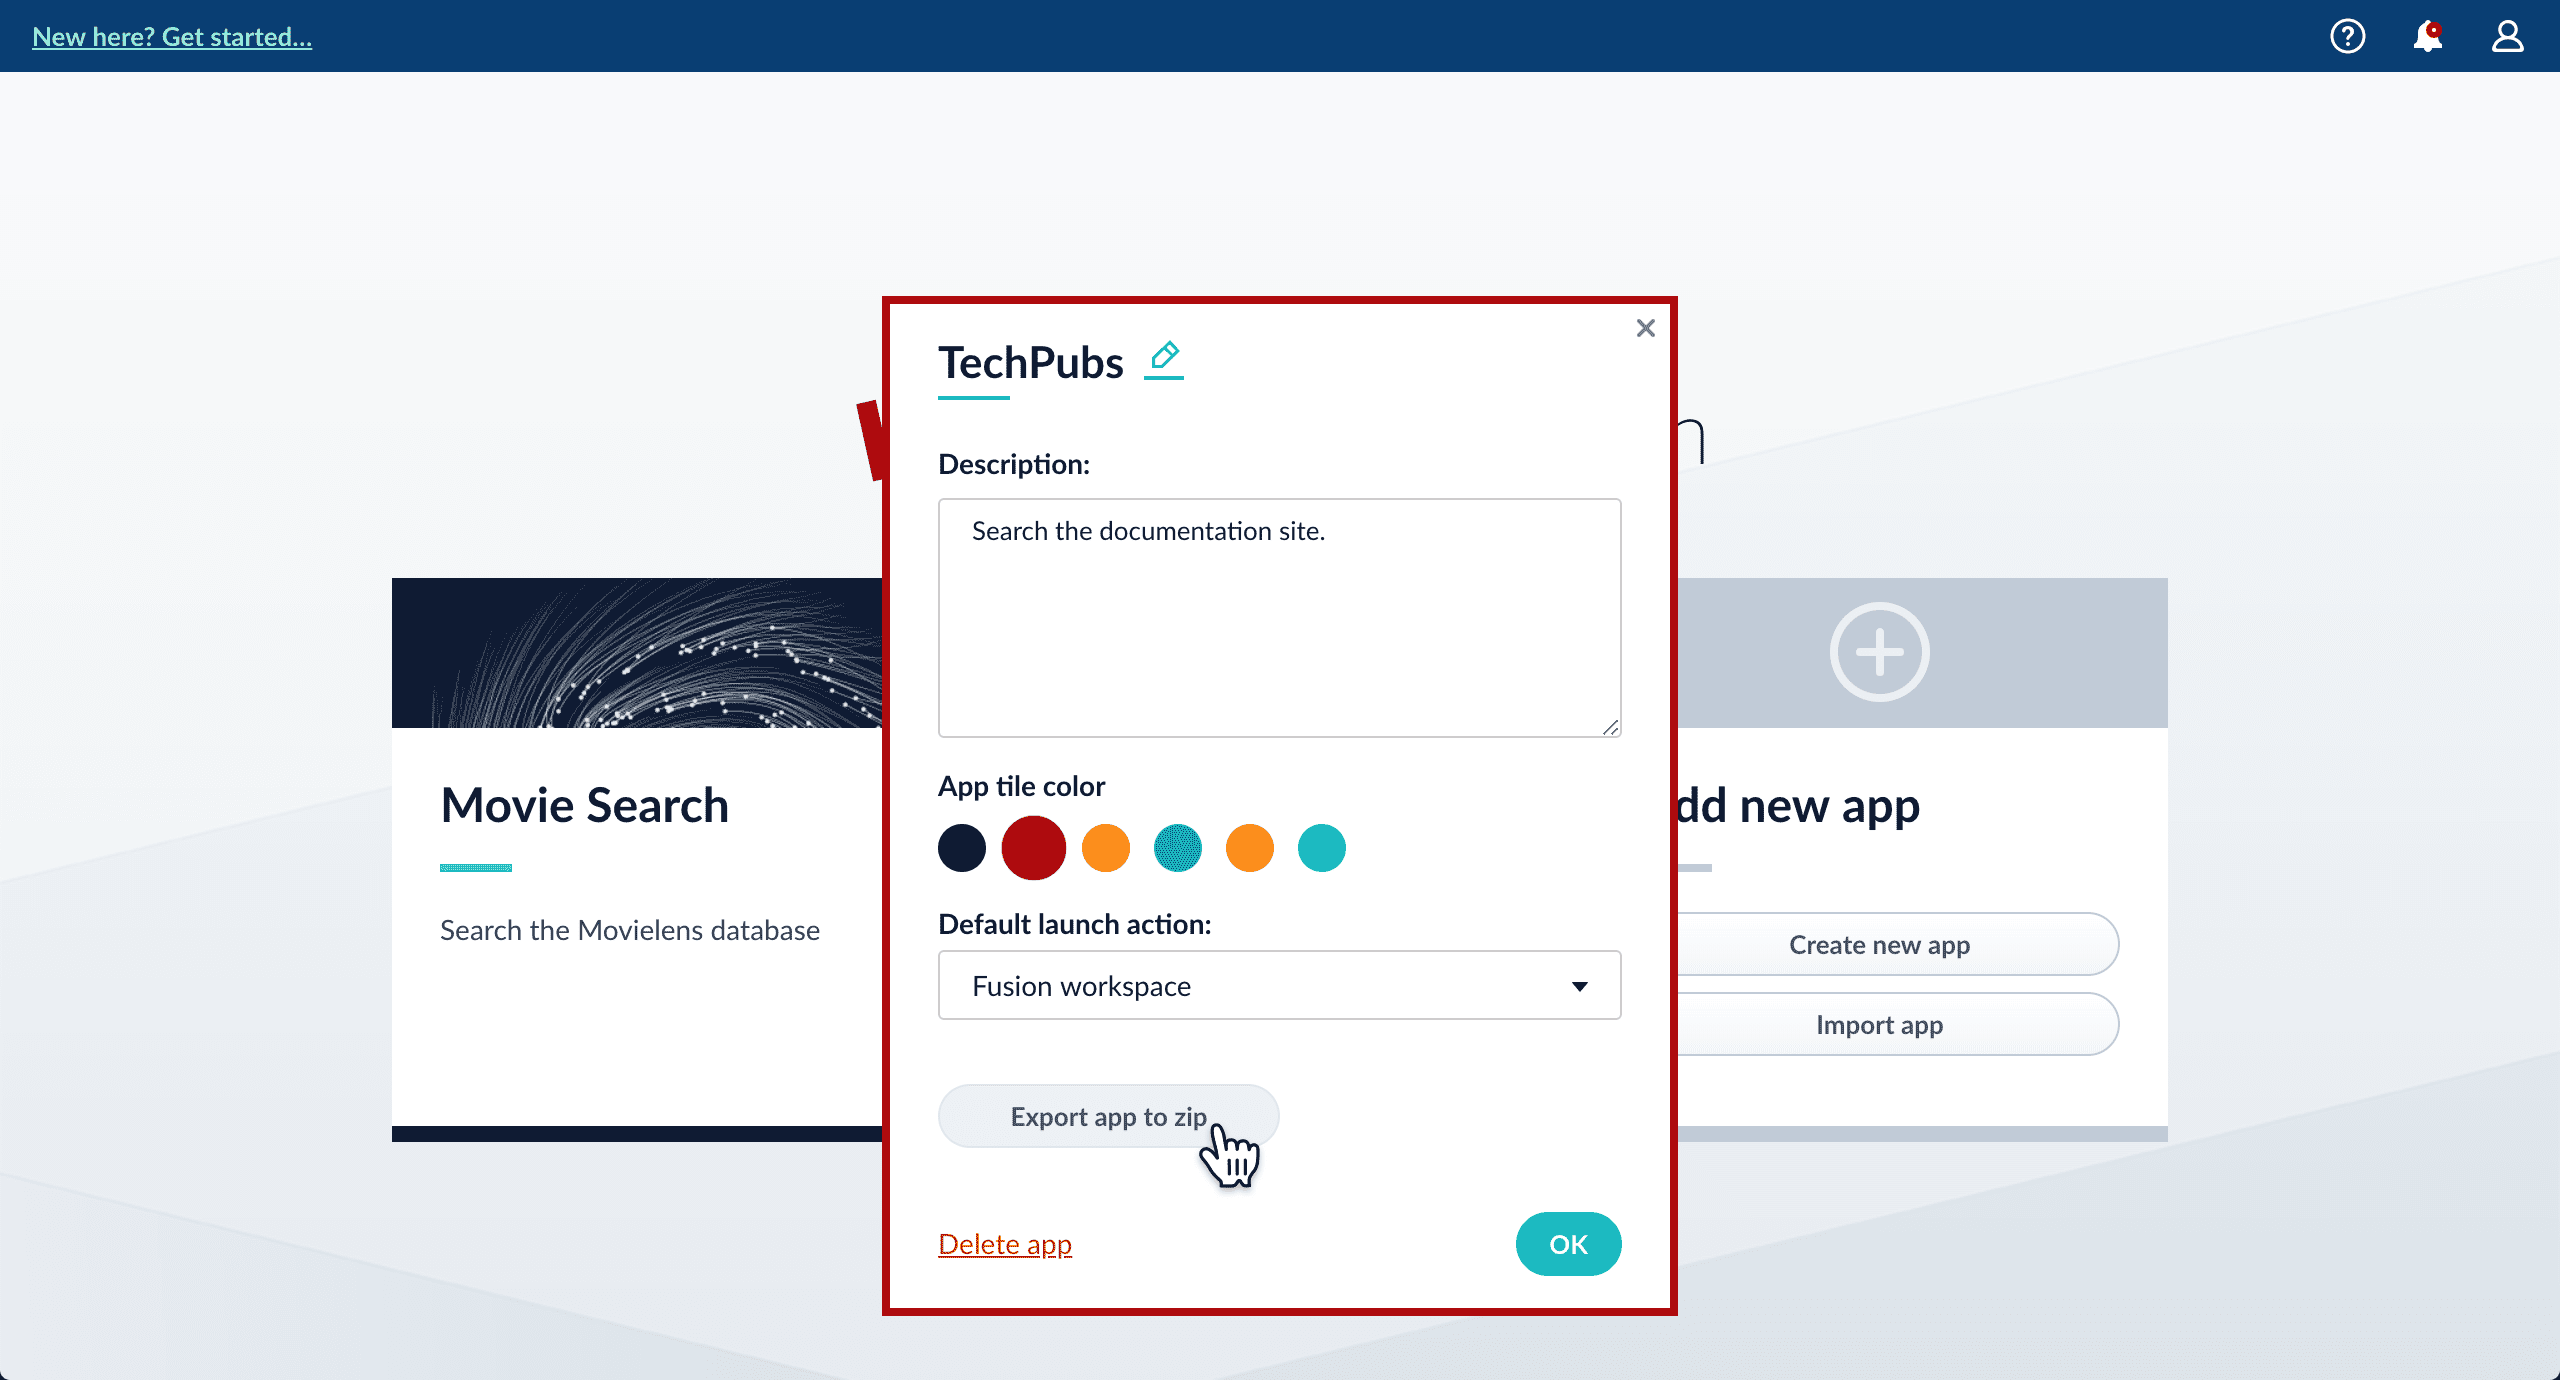
-
In the app config window, click Export app to zip:
Import an app with the Fusion UI
How to import an app with the Fusion UI- Navigate to the launcher.
-
Click Import app.
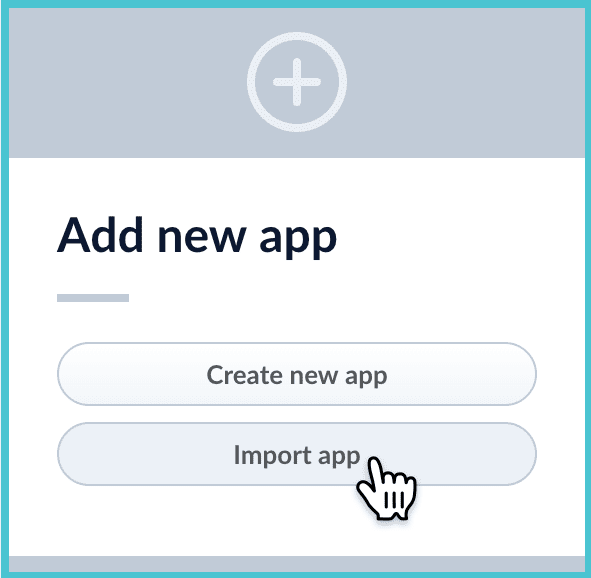
- Under Data File, click Choose File and select the zip file containing the app you want to import.
-
If your app has usernames and passwords in a separate file, select it under Variables File.
If the Variables File is needed, it must be a separate file that is not in a .zip file. It is a .json map of variables to values. The following is an example:
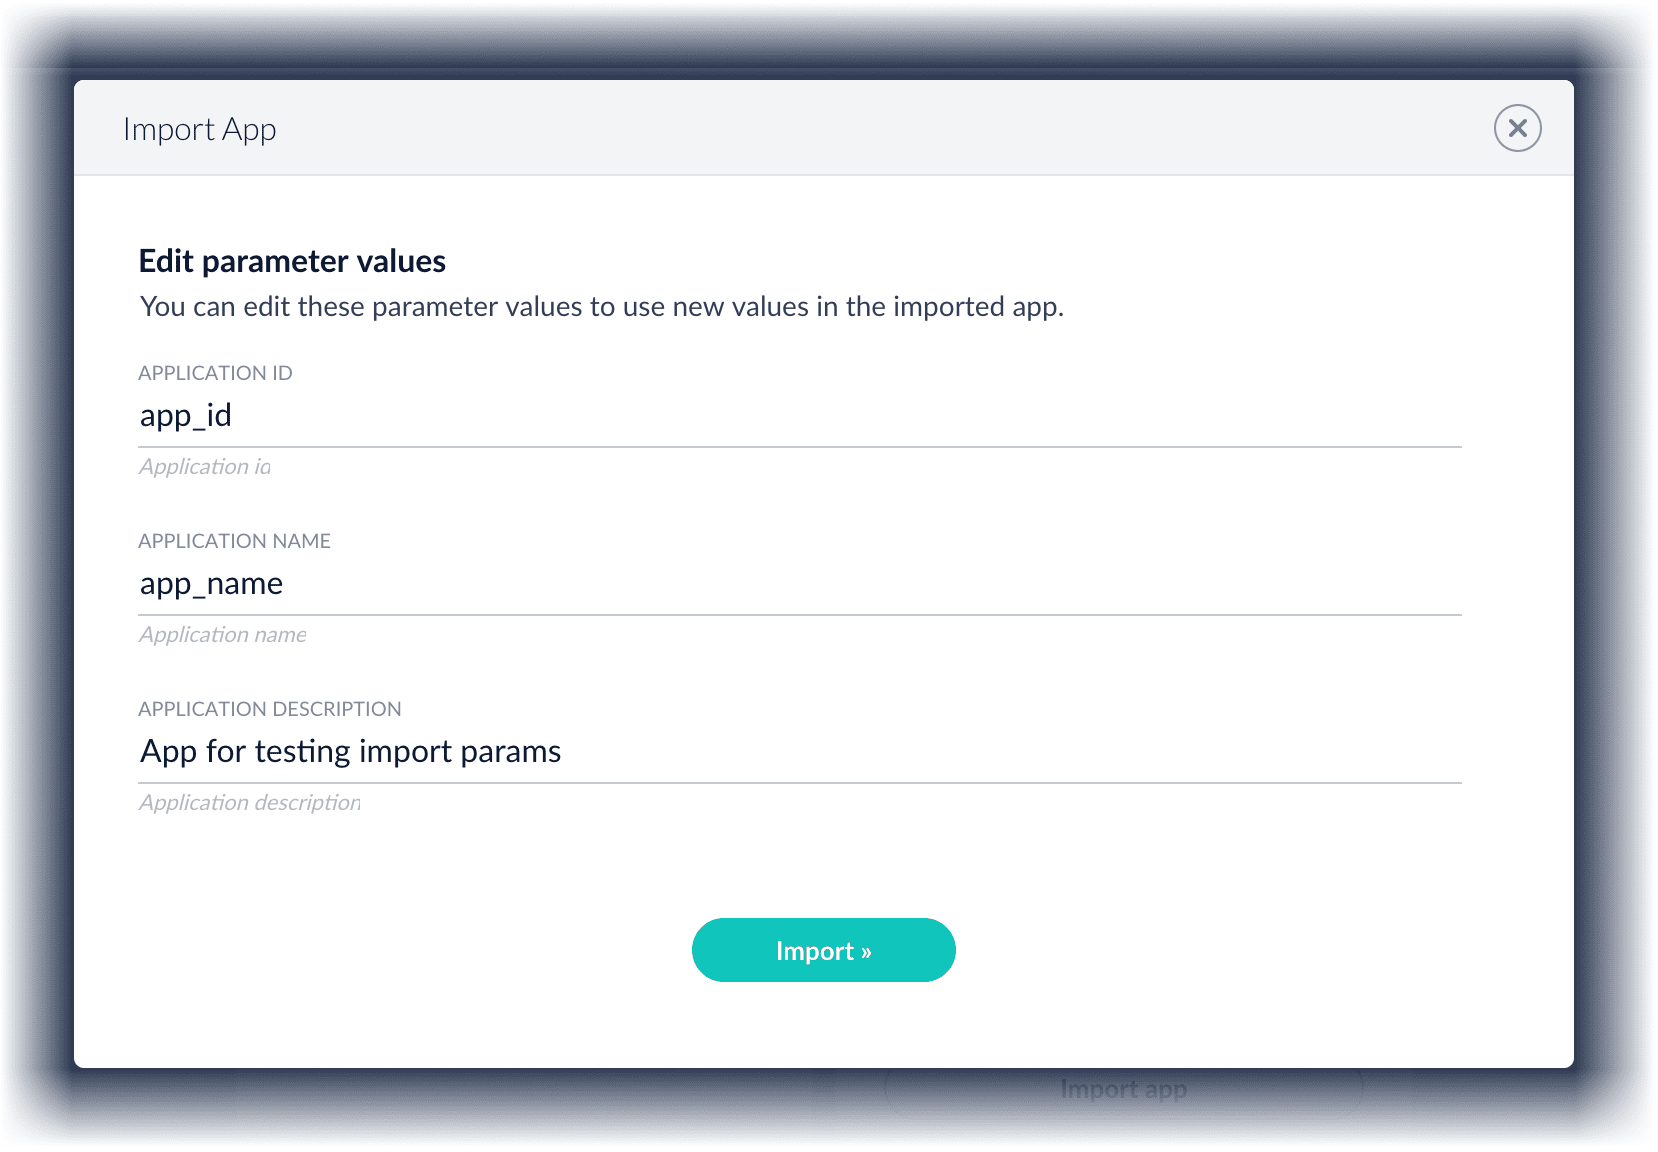
-
In Fusion 4.1 and later, you can sometimes edit parameter values to use the new values in the imported app. If this is the case, Fusion displays a dialog box that lets you edit the parameter values.
Copy an app
To copy an app from one deployment to a different one, export the app on the source deployment, and then import the app on the target deployment.Import objects into an app
You can import objects into the currently open app.How to import objects into an open app-
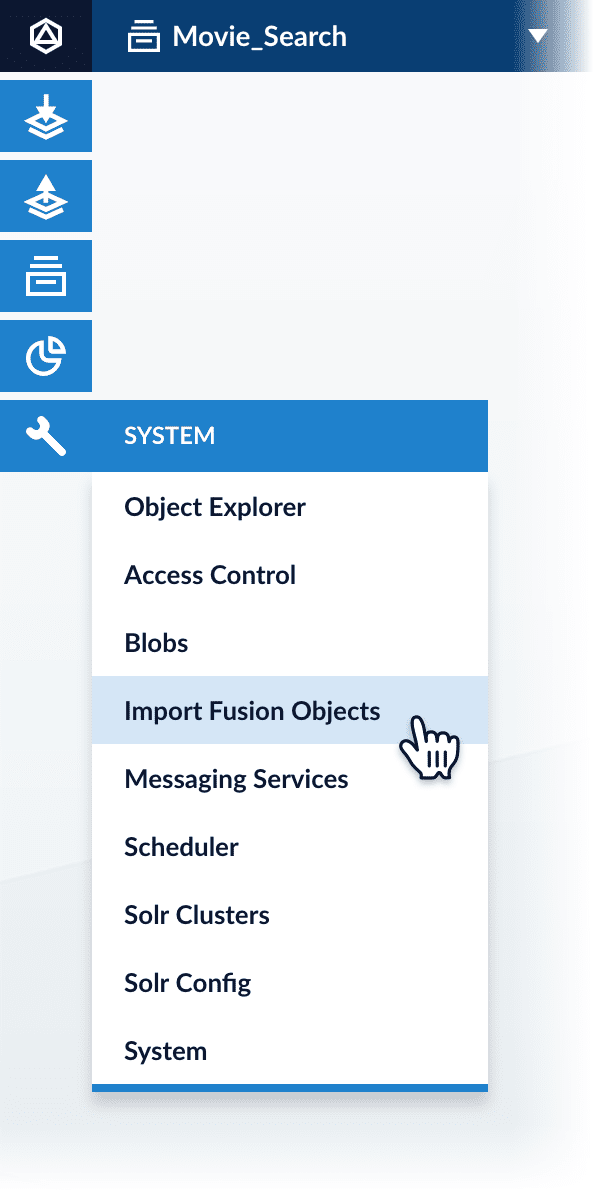
In the Fusion launcher, click the app into which you want to import objects.
The Fusion workspace appears. -
In the upper left, click System
 > Import Fusion Objects.
-
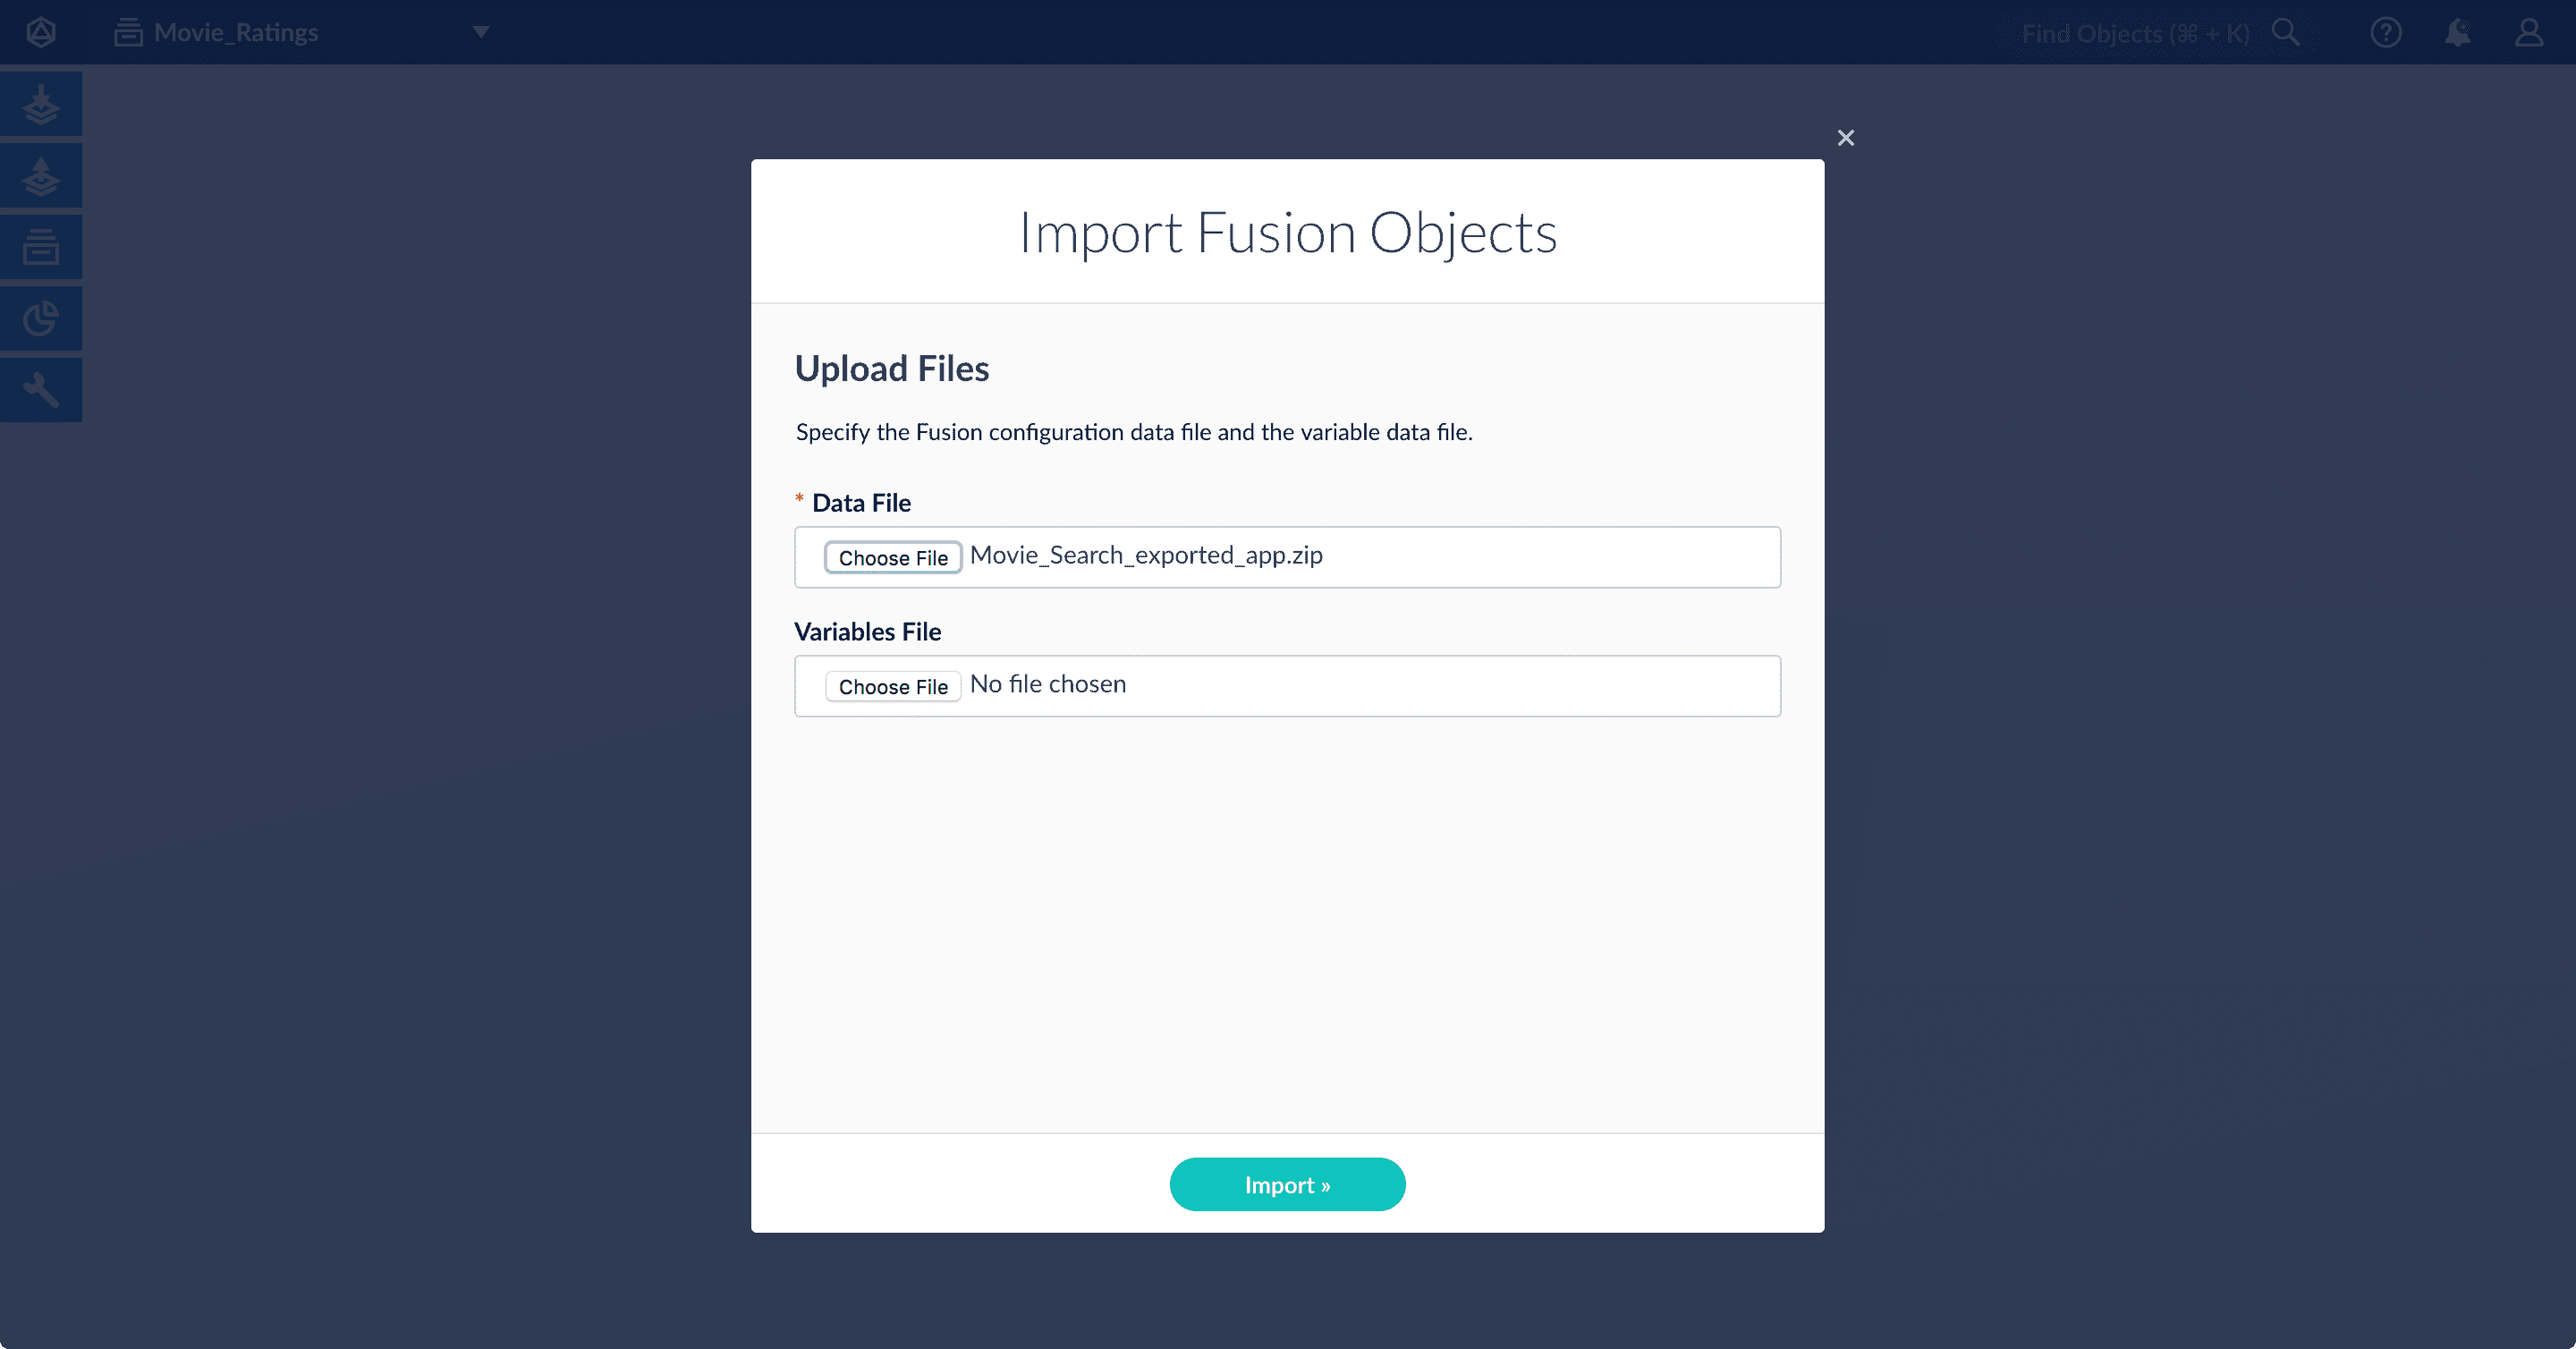
Select the data file from your local filesystem.
If you are importing usernames and passwords in a separate file, select it under Variables File. -
Click Import.
If there are conflicts, Fusion prompts you to specify an import policy: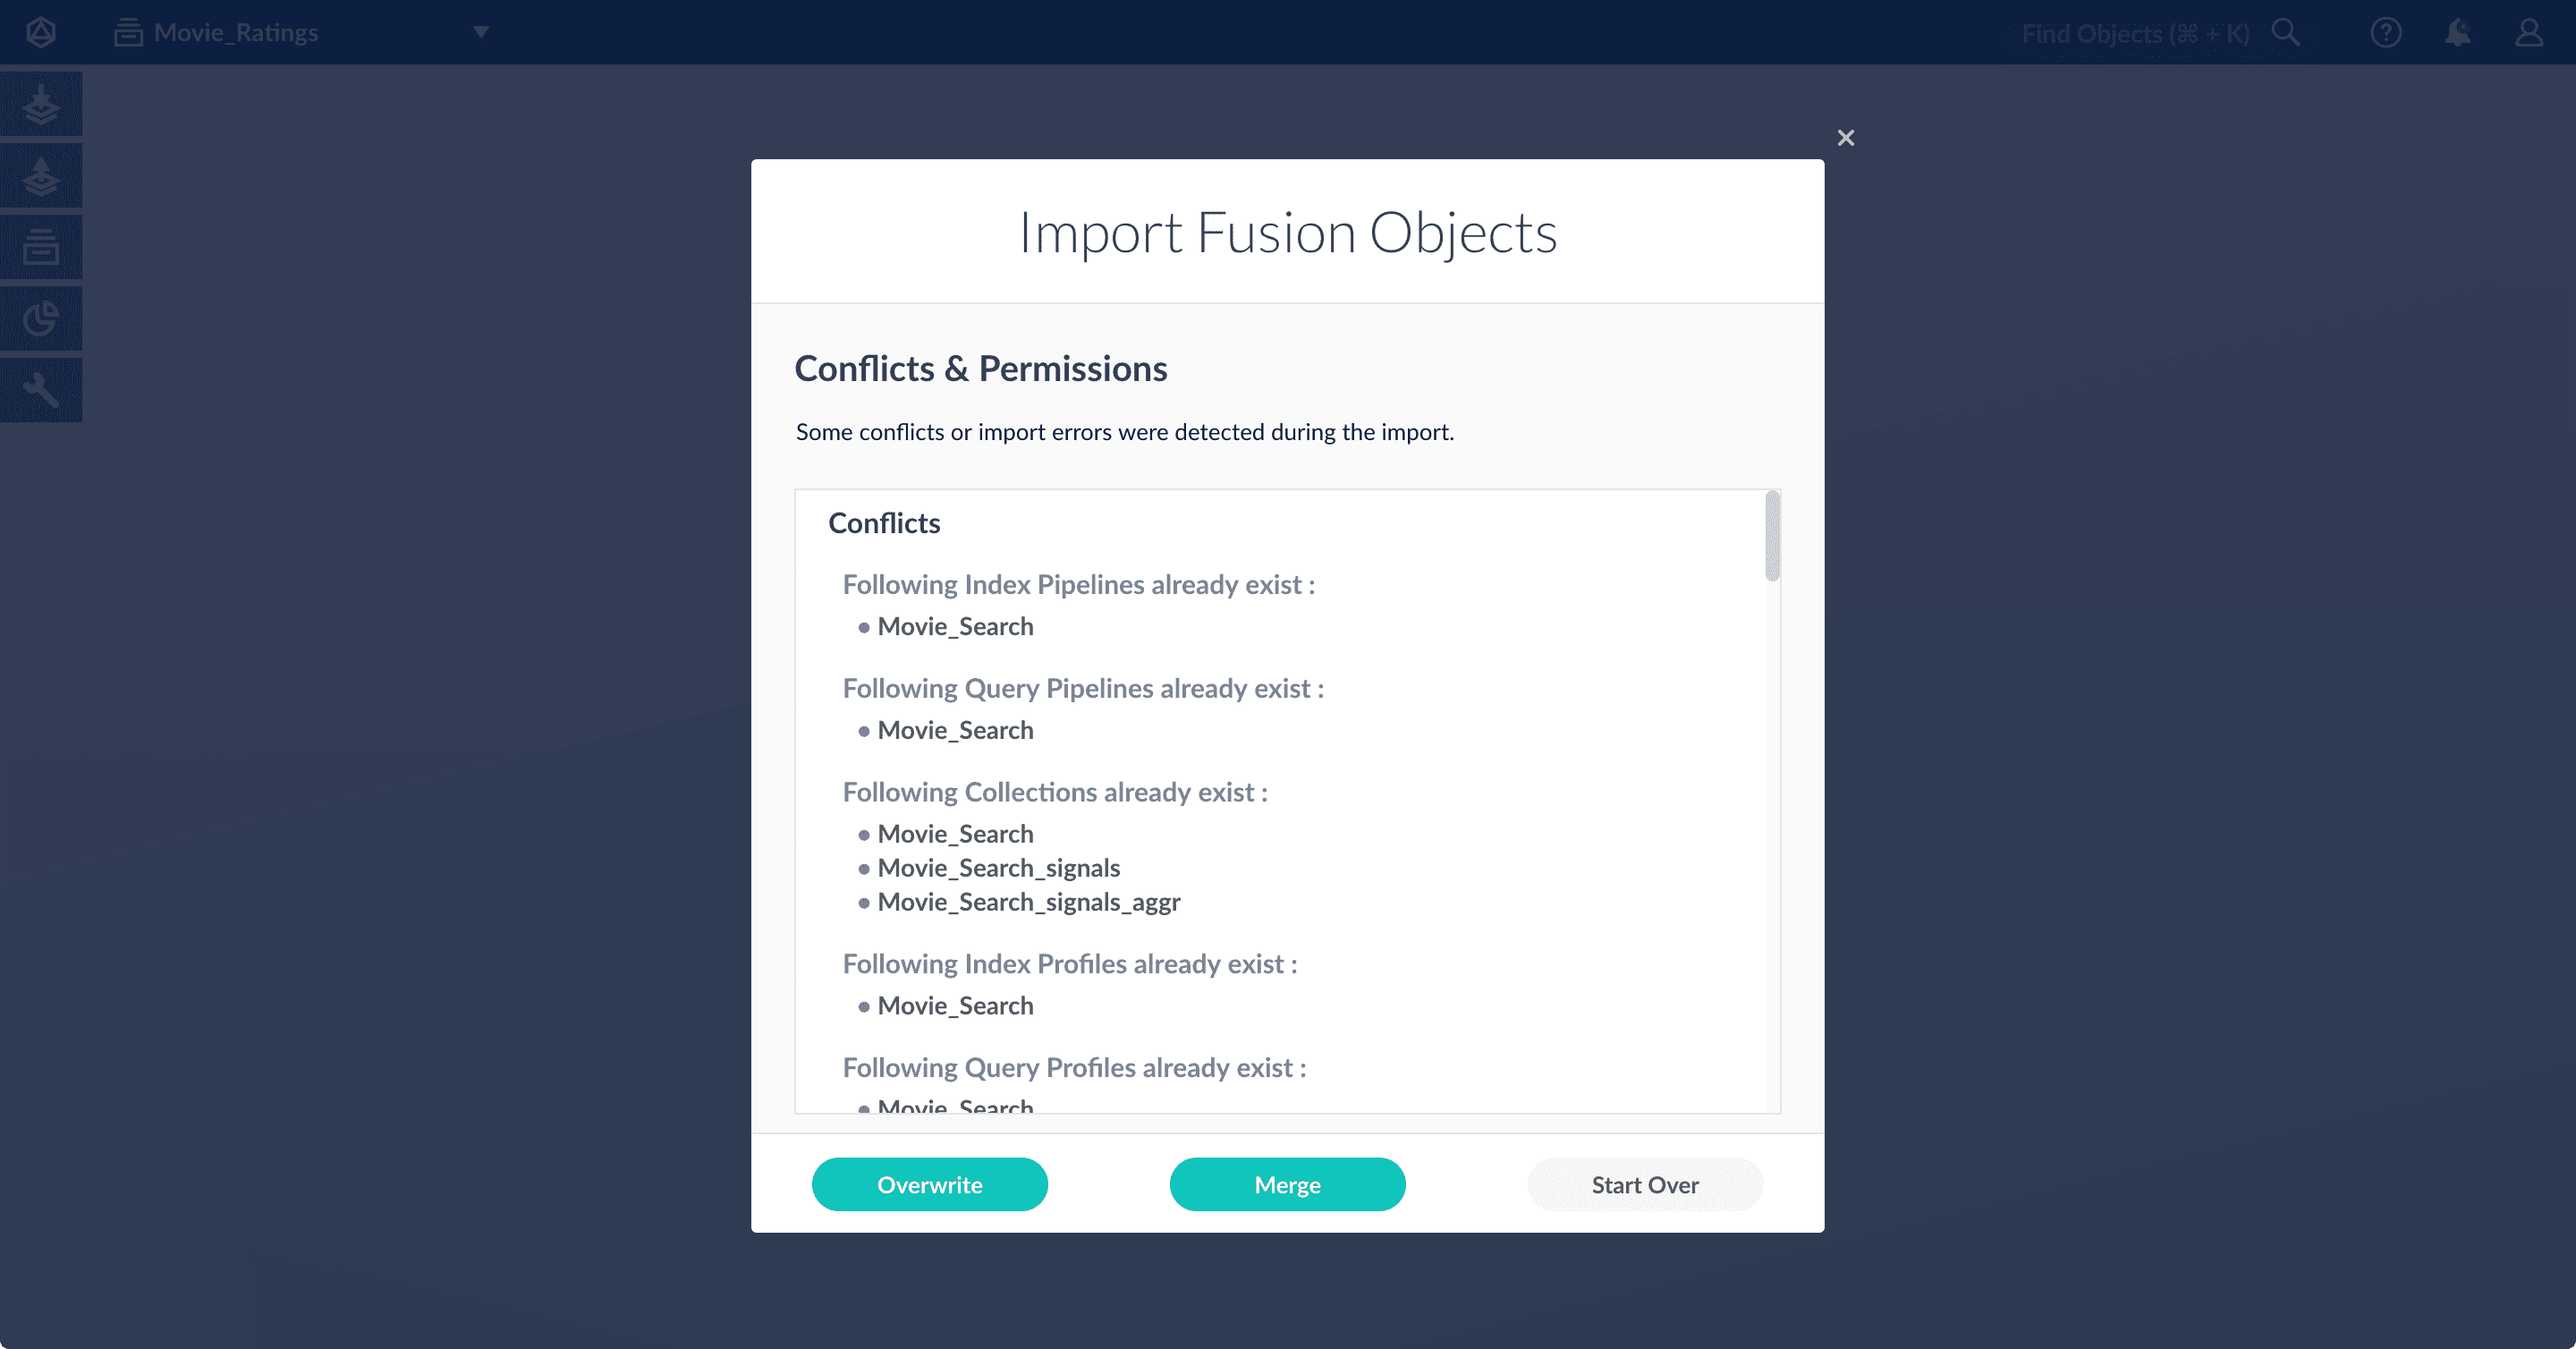
- Click Overwrite to overwrite the objects on the target system with the ones in the import file.
- Click Merge to skip all conflicting objects and import only the non-conflicting objects.
- Click Start Over to abort the import.
Fusion confirms that the import was successful:
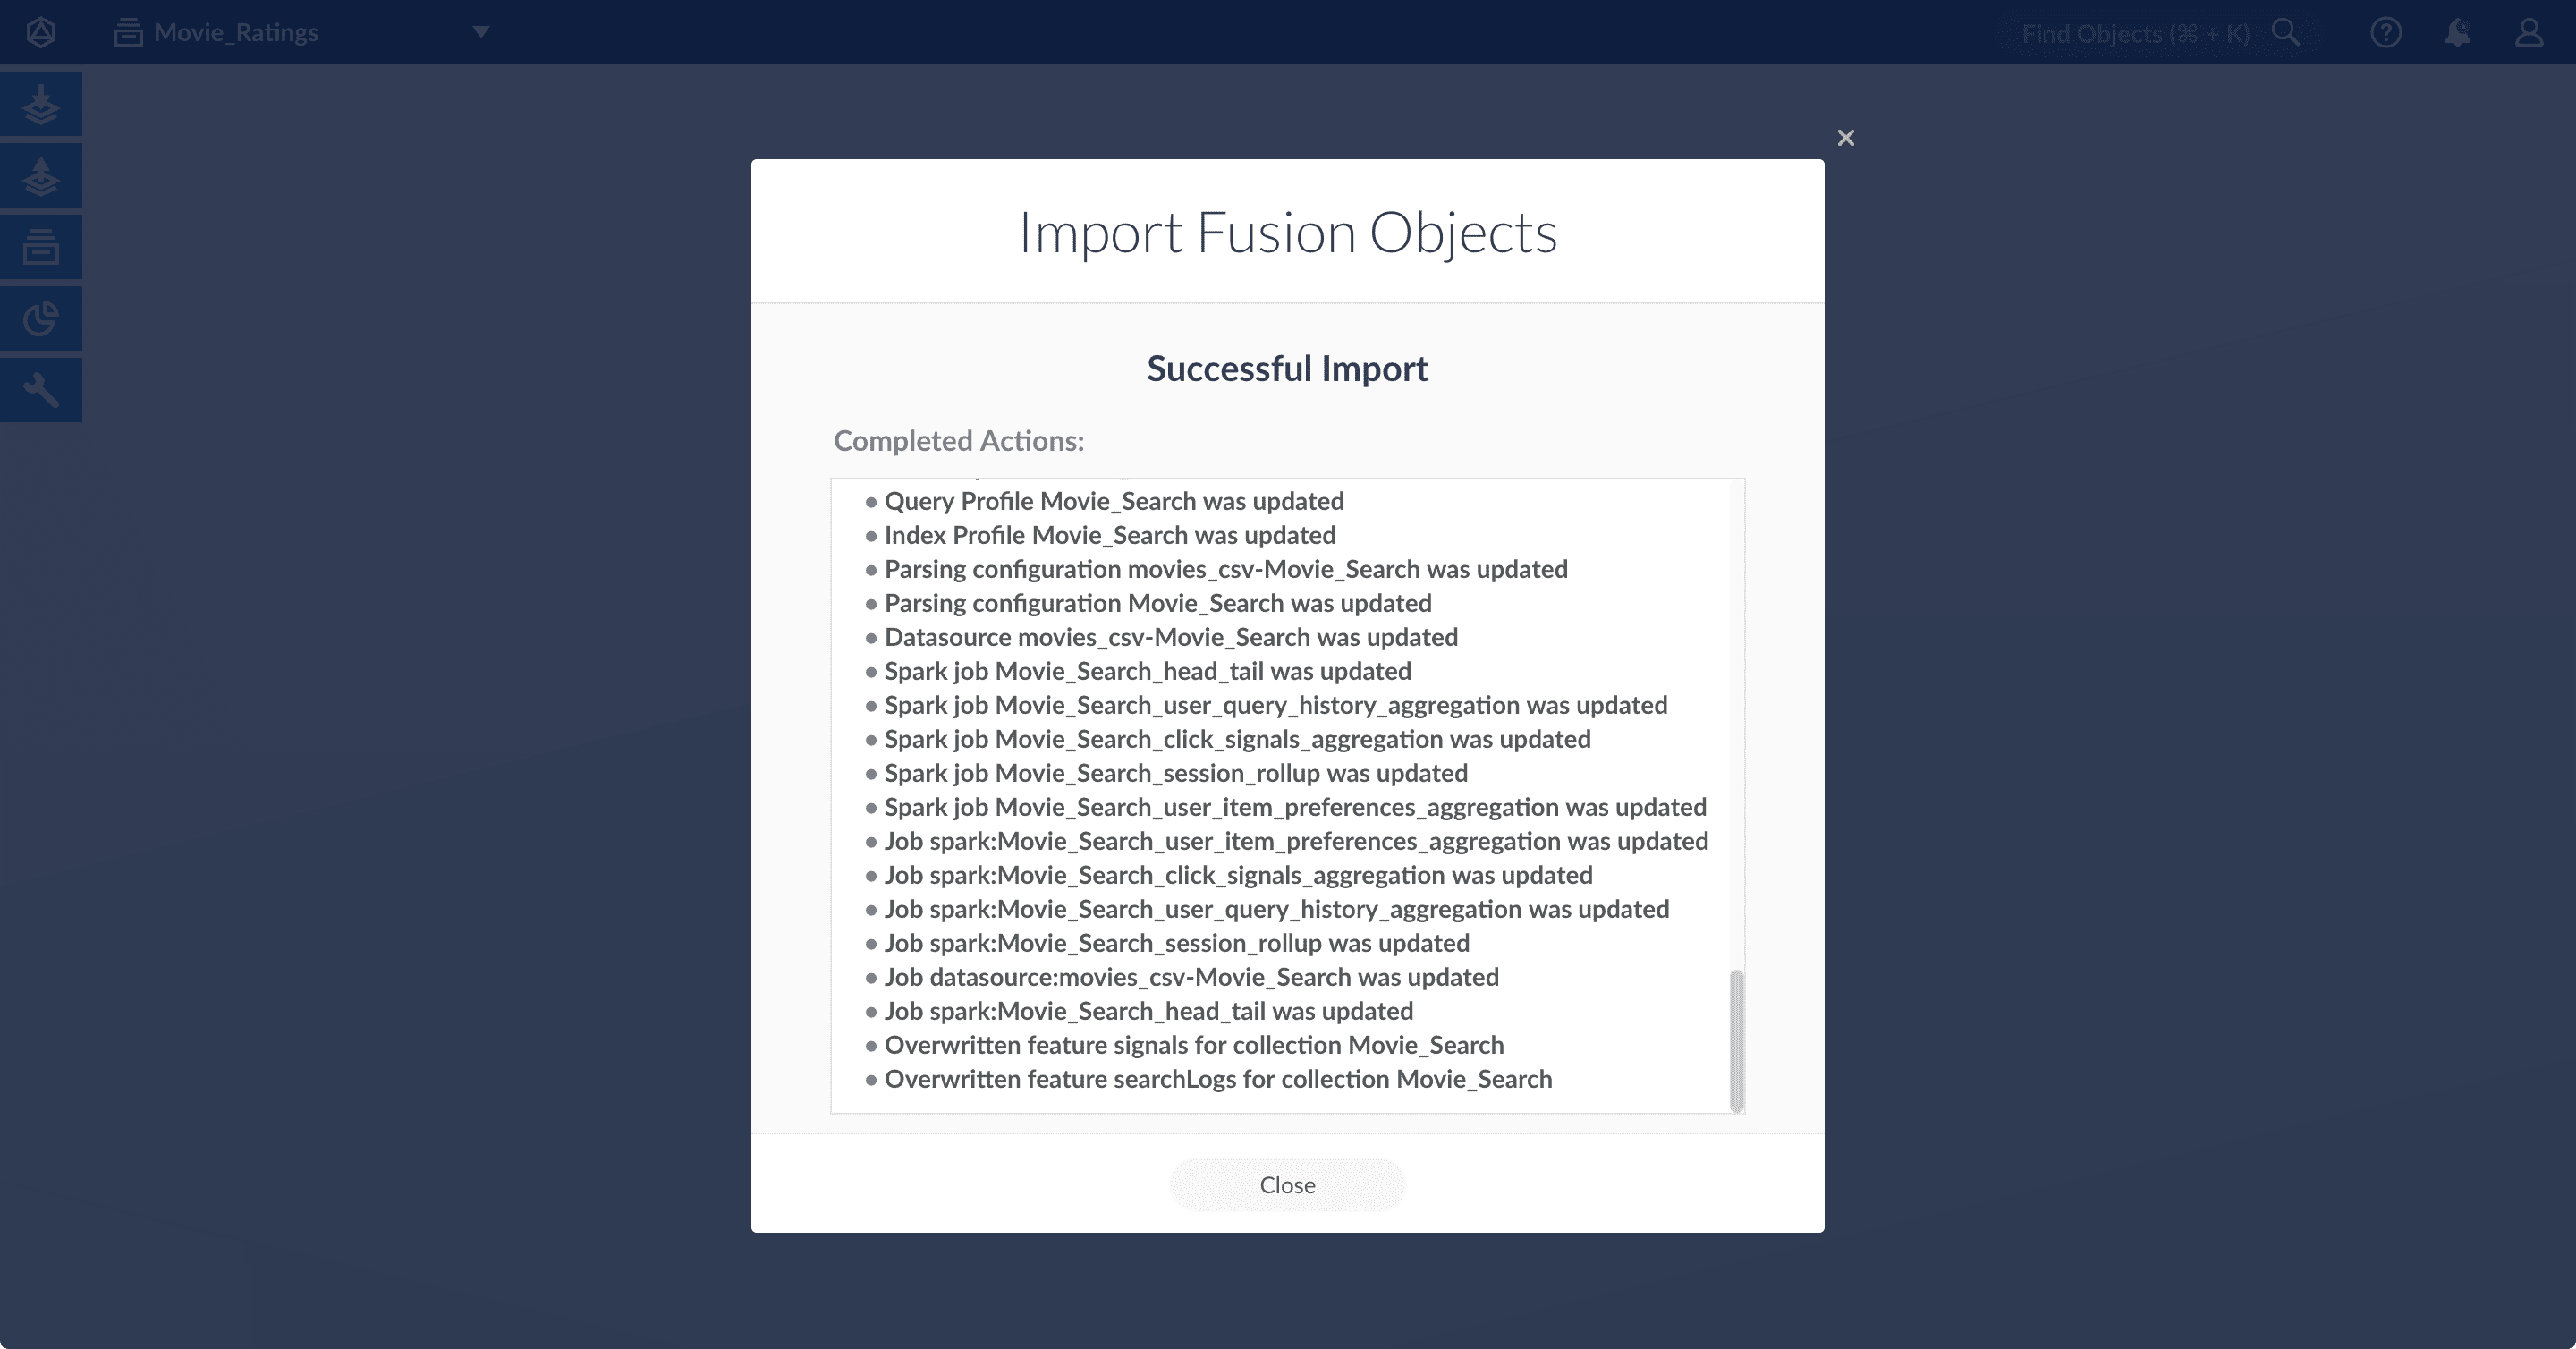
- Click Close to close the Import Fusion Objects window.
Add an object to an app
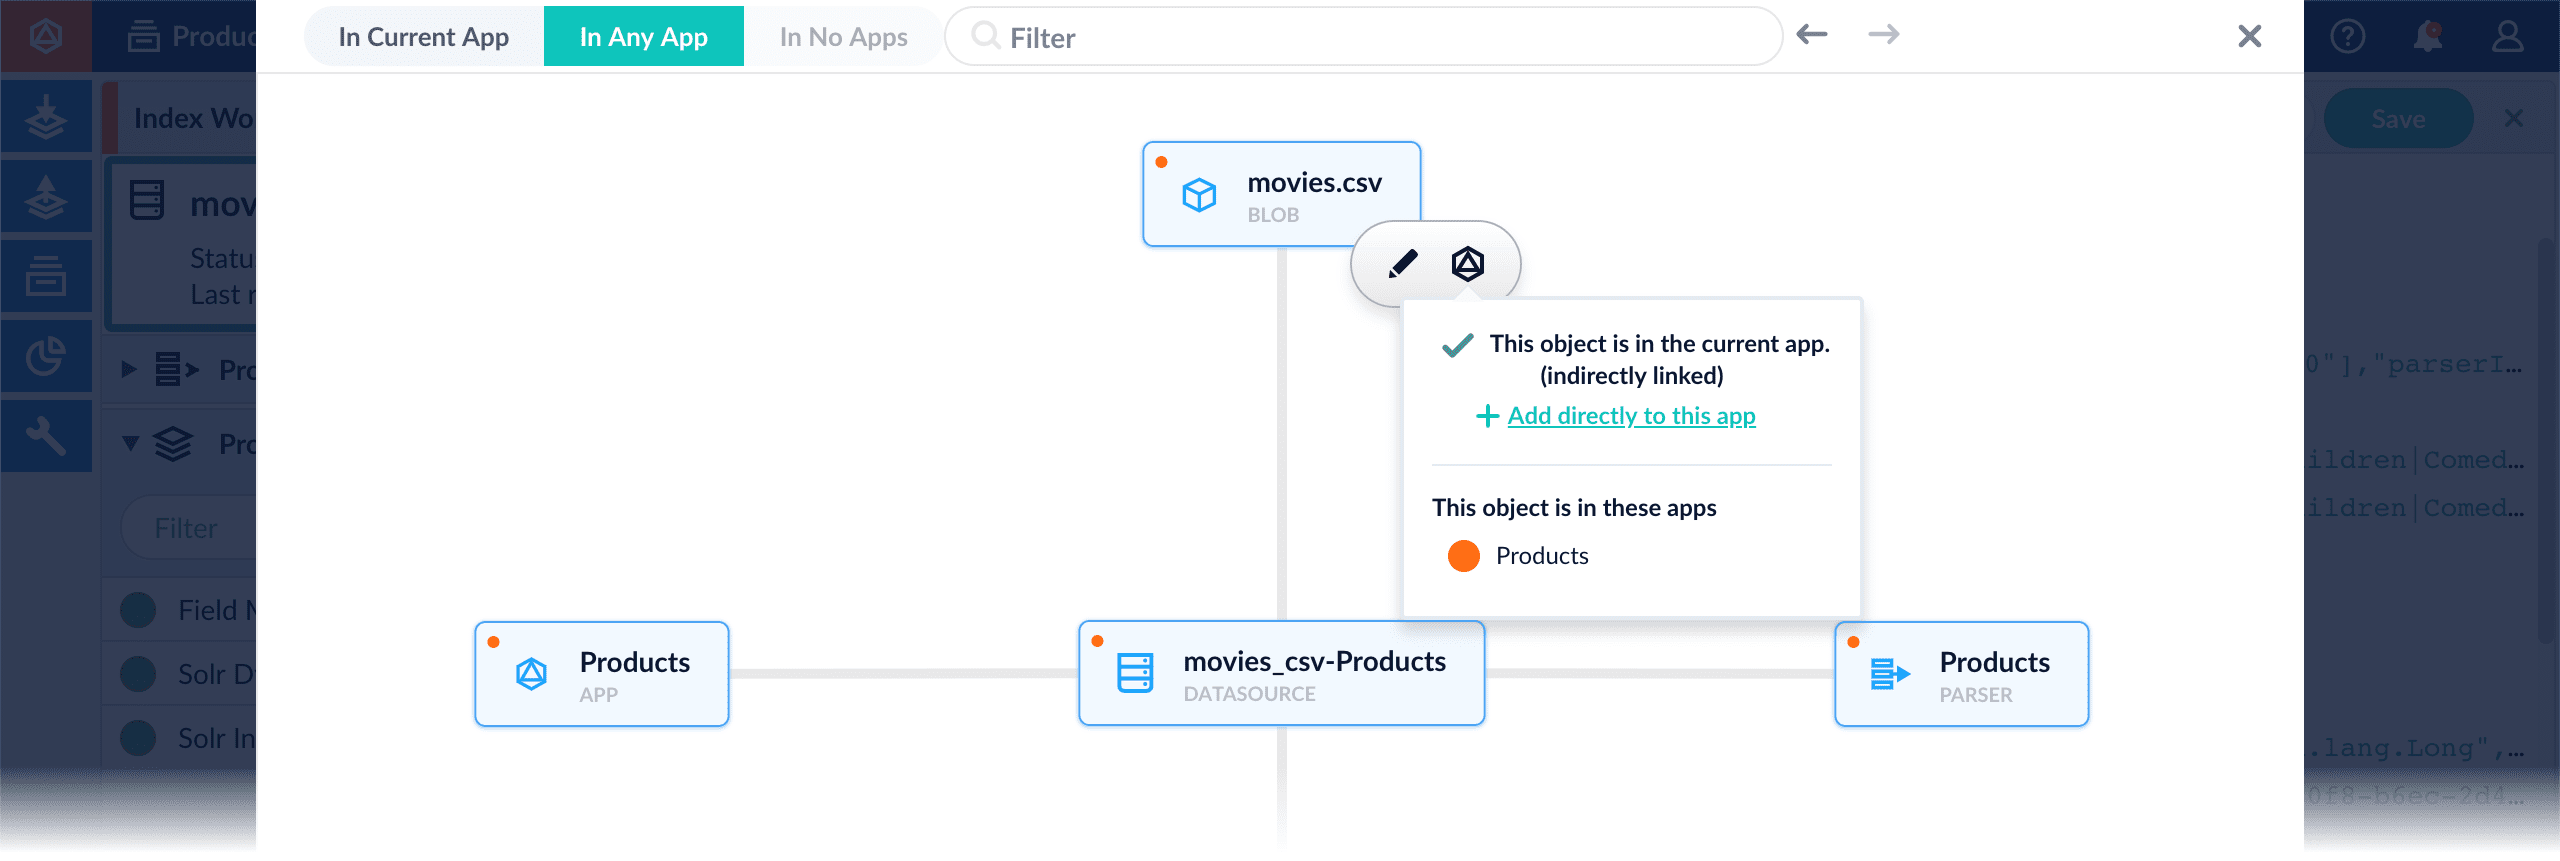
You can add objects present in other apps (or in no apps) to the open app. Some objects are linked to other apps. You can also add those directly to an app.-
Add an object to an app – While in the Fusion workspace for the app to which you want to add an object, open Object Explorer and click In Any App. Search for or browse to the object you want to add. Hover over the object, click the App
 icon, and then click Add to this app.

-
Add an object to an app directly – In cases when an object is linked to an app, but is not linked directly to the app (it is linked via some dependency), you can add the object to an app directly.
While in the Fusion workspace for the app to which you want to add an object directly, open Object Explorer and click In Any App. Search for or browse to the object you want to add. Hover over the object, click the App icon, and then click Add to this app directly.
Scale a Fusion 4.x Cluster
Scale a Fusion 4.x Cluster
To scale a Fusion cluster, you can add new Fusion nodes, add new dedicated indexing nodes, or move Fusion to new nodes.
Adding a new Fusion node to an existing cluster
Follow these steps to add a new node to an existing Fusion cluster:If you are running embedded zookeepers from Fusion in an ensemble for your cluster, ensure that the you are running an odd number of zookeepers for your environment after addition of the new node.
- Stop Fusion on all nodes in the cluster. This ensures that there is no data inconsistency between the instances when the new node comes up.
- Decompress the new copy of Fusion and place it in the desired directory.
-
Configure the
fusion.cors(fusion.propertiesin Fusion 4.x) file to match your requirements. If you will also run the embedded ZooKeeper, add the new node’s IP/hostname and port to thedefault.zk.connectstring and copy this change to all other instances in your cluster. Configure the memory and other JVM options for the Fusion modules, then save the file. -
If embedded ZooKeepers are used in your cluster and you intend to start ZooKeeper on this node, then follow the additional steps below. If not, then you are ready to start all nodes in the cluster.
- Copy the
$FUSION_HOME/conf/zookeeper/zoo.cfgfile from one of the existing nodes to the new node, overwriting the default file. - Add the entry for the new ZooKeeper to the server list in the
zoo.cfgfile.
The entry format isserver.x=IP:port:port. For example, if this is the 5th node, then the new entry inzoo.cfgisserver.5=IP:port:port. - Create a
zookeeperfolder under$FUSION_HOME/data. - Create a new
myidfile in$FUSION_HOME/data/zookeeper.
The contents of this file must be an integer equal to the number of the new ZooKeeper node in the ensemble. For example, if the new node will be the 5th node in your ZooKeeper ensemble, then themyidfile should contain the value “5”. - Copy the
$FUSION_HOME/data/zookeeper/version-2directory from one of the existing nodes to the new node, overwriting the default directory. - Modify the connect string for the default search cluster:
-
Start ZooKeeper on all nodes.
Next, you will need the
zkcliscript, located in$FUSION_HOME/apps/solr-dist/server/scripts/cloud-scripts. Usezkcli.shfor Unix orzkcli.batfor Windows. The examples below use the Unix script. -
Download the default search cluster file:
The path will differ depending on your Fusion version:
- 2.4.x:
/lucid/search-clusters/default - 3.x:
/lwfusion/<fusion_version>/core/search-clusters/default
- 2.4.x:
-
In the downloaded JSON file, find the
connectStringkey and replace the old IP value with the IP of the new Fusion node.For example:Be sure to specify the chroot if your cluster is configured to use it. -
Upload the modified search cluster file:
For example:
-
Start ZooKeeper on all nodes.
Next, you will need the
- Copy the
- Start Fusion on all nodes in the cluster.
Adding an indexing node to a Fusion cluster
If you need more capacity for indexing, you can add nodes dedicated to indexing. To do this, you add a new Fusion node, configure it to only run the Solr service, then allocate replicas of your collections to the new node.- Install the Fusion package on the new node.
-
Edit
fusion.cors(fusion.propertiesin Fusion 4.x) as follows:-
Edit
group.defaultto include only the Solr service.
For example, changeto -
Uncomment
default.zk.connectand point it to the cluster’s ZooKeeper instances.
For example, changeto - Save the file.
-
Edit
-
Start Fusion on the new node:
At this point, the new node is added to the cluster. No indexing takes place on the new node yet.
-
Allocate one or more collection replicas to this node:
- Open the Solr UI at
http://<new-node-hostname>:8983/solr/. - Click Collections
- Select a collection to replicate on the new indexing node.
- Click Shard: shard1 (or another shard if you have more than one for this collection).
- Click add replica.
- From the Node drop-down list, select the new node.
- Click Create Replica.
To verify that the collection is being replicated, you can click Cloud and view the replicas.
- Open the Solr UI at
Moving Fusion from one node to another
- Stop Fusion on all nodes in the cluster. This ensures that there is no data inconsistency between the instances when the new node comes up.
- Compress the Fusion node you wish to move.
- Copy the compressed file to the destination.
- Starting with step 2, follow the instructions above for adding a new node.