The Fusion platform is designed to support enterprise search applications at any scale. You can deploy Fusion across multiple nodes in order to store large amounts of data or to achieve high processing throughput or both. Fusion consists of a number of Java processes that run in JVMs, including theDocumentation Index
Fetch the complete documentation index at: https://doc.lucidworks.com/llms.txt
Use this file to discover all available pages before exploring further.
api, connectors-classic, connectors-rpc, and admin-ui processes, and possibly others such as spark-master and spark-worker. When you start Fusion, the processes that start are listed. You might also see zookeeper and solr processes, depending on the cluster arrangement.
For more information about Fusion components, see Fusion Components.
A complete list of Fusion services:
Start or Stop Fusion
Start or Stop Fusion
This topic explains how to start and stop Fusion Server and its services using the scripts in the
With the exception of the Even if only using RPC connectors, the In Fusion 4.0.x.Edit the In Fusion 4.0.x.For example, define this group property to start and stop services for Spark together:Define this group property to start and stop services for classic and RPC connectors together:To start any of Fusion’s services using Bash’s orShell mode is particularly useful in containerized environments, which generally assume that only one process runs per container and that process is “process 0”, that is, the initial process invoked within the container, not a separate spawned process.Log files for Fusion services are found in directories under If this complains with and similarly use How to start all required Fusion services as Windows services
bin directory below the Fusion home directory:/opt/fusion/latest.***__x__***/bin(Unix)C:\lucidworks\fusion{backslash}latest.***__x__***{backslash}bin(Windows)
Command summary
You can control all Fusion services at once under the management of the Fusion agent, or you can control services individually.How to control all services using the Fusion agent:- Unix.
/opt/fusion/latest.***__x__***/bin/fusion <command> - Windows.
C:\lucidworks\fusion{backslash}latest.***__x__***{backslash}bin{backslash}fusion.cmd <command>
-
Unix.
/opt/fusion/latest.***__x__***/bin/<servicename> <command>For example:/opt/fusion/latest.***__x__***/bin/proxy restart -
Windows.
C:\lucidworks\fusion{backslash}latest.***__x__***{backslash}bin{backslash}<servicename>.cmd <command>For example:C:\lucidworks\fusion{backslash}latest.***__x__***{backslash}bin{backslash}proxy.cmd restart
fusion/fusion.cmd script to issue the command to all services in the correct sequence, or they can be issued to an individual service.start | Start one or all Fusion services. |
status | Display the status of one or all Fusion services. |
restart | Restart one or all Fusion services. |
stop | Stop one or all Fusion services. |
run | Start one or all Fusion services in the foreground. |
run-in-shell (Unix only) (Fusion 4.2+ only.) | Start an individual service using Bash’s exec function, which allows the service to assume the shell process’s PID. See Run Fusion in shell mode below. |
Define groups of services
Thefusion.cors (fusion.properties in Fusion 4.x) file includes the property definition group.default. This property defines the Fusion services to start and stop by default (if no property is named in the start or stop command).The default list of services out-of-the-box is also the minimum set of services, with the exception of the log-shipper service, which you can remove if you do not use it.Here is the group.default definition in fusion.cors (fusion.properties in Fusion 4.x):In Fusion 4.1+.log-shipper service, these are all required services. Even if only using RPC connectors, the connectors-classic service is required. The log-shipper service is required to use the Log Shipper.In Fusion 4.0.x.connectors-classic service is required.How to modify the default list of services
In Fusion 4.1+.Edit thegroup.default property, for example, to include Spark and SQL related services:group.default property, for example, to include Spark related services:How to define other lists of services (Unix)
You can define other lists of services by defining othergroup properties.In Fusion 4.1+.For example, define this group property to start and stop services for Spark and SQL together:Unix
Start and stop Fusion on Unix.Start Fusion
All Fusion start scripts must be executed by a user who has permissions to read and write to the directories where Fusion is installed. These scripts do not need to be run as root (or sudo), nor should they be. Use a suitable user, or create a new one, and then ensure that it owns the directory where Fusion resides, (for example,C:\lucidworks).Give the commands that follow from the directory fusion/latest.***__x__***/bin.Start required services
Start the required services that are defined in thegroup.default property.How to start all required services./fusion startStart a group of services
You can start a group of services together. Reference the property infusion.cors (fusion.properties in Fusion 4.x) that defines the group.Examples of when this is useful are:-
Spark and SQL. The
spark-master,spark-worker, andsqlservices are interdependent and should be started and stopped together. -
Classic and RPC connectors. RPC connectors require both the
connectors-classicandconnectors-rpcservices to be running.
Start services individually
You can start services individually.How to start services individually-
Fusion UI service:
./admin-ui start -
API services:
./api start -
Classic Connectors services:
./connectors-classic start -
RPC Connectors services:
./connectors-rpc start -
Log shipper service (Fusion 4.1+ only):
./log-shipper start -
Proxy:
./proxy start -
Solr:
./solr start -
Spark Master:
./spark-master start -
Spark Worker:
./spark-worker start -
SQL service:
./sql start -
Web Apps:
./webapps start -
ZooKeeper:
./zookeeper start
Run Fusion in the foreground
To run Fusion or any of its services in the foreground, use therun command-line argument in place of start.Run Fusion in shell mode
This section applies to Fusion 4.2+ only.
exec function, which allows the service to assume the shell process’s PID, use the run-in-shell command-line argument in place of start or run. The run-in-shell argument can only be used to start one service at a time.ExamplesStop Fusion
How to stop Fusion servicesTo stop Fusion or any of its services, use the command above with thestop command-line argument in place of start, for example:./solr stopUsing systemd to manage processes
On Red Hat Enterprise Linux, CentOS 7 and newer, and Ubuntu 15.04 LTS and newer, we support using the operating system-providedsystemd for process management.Launching Fusion at system start
You can configuresystemd to launch Fusion when your system starts.How to launch Fusion at system start:-
Change your working directory to Fusion’s
systemddirectory, for example: -
Edit
fusion.serviceto provide correct values for theFUSION_HOMEandJAVA_HOMEenvironment variables. -
Stop Fusion if it is already running:
-
Create the
systemdmanagement file, which launches Fusion undersystemdmanagement:
Starting and stopping Fusion
You can use thesystemctl command to start and stop Fusion:https://FUSION_HOST:FUSION_PORT/var/log.Using Ubuntu Upstart to manage processes
Under Ubuntu 12.04 LTS through Ubuntu 14.10, we support using Upstart for process management. This requires Fusion to be installed in the/opt/lucidworks/ directory.To configure upstart, run the following commands:no JAVA_HOME set, replace sudo with sudo -E. Then you can use the service command to control the server:stop and status.Log files for Fusion services are found in directories under https://FUSION_HOST:FUSION_PORT/var/log.Windows
Start and stop Fusion on Windows.Start Fusion
All Fusion start scripts must be executed by a user who has permissions to read and write to the directories where Fusion is installed. Ensure that the user owns the directory where Fusion resides (for example,C:\lucidworks).Give the commands that follow from the directory fusion\latest.***__x__***\bin.Start required services
How to start all required Fusion services as Java processesStart services individually
How to start specific services as Java processes-
UI service:
admin-ui.cmd start -
API services:
api.cmd start -
Classic Connectors services:
connectors-classic.cmd start -
RPC Connectors services:
connectors-rpc.cmd start -
Log shipper service (Fusion 4.1+ only):
log-shipper.cmd start -
Proxy:
proxy.cmd start -
Solr:
solr.cmd start -
Spark Master:
spark-master.cmd start -
Spark Worker:
spark-worker.cmd start -
SQL service:
sql.cmd start -
Web Apps:
webapps.cmd start -
ZooKeeper:
zookeeper.cmd start
Run Fusion in the foreground
To run Fusion or any of its services in the foreground, use therun command-line argument in place of start, for example:connectors.cmd runStop Fusion
How to stop all Fusion servicesfusion.cmd stop(Stop all Fusion services, if they are running as Java processes)stop-services.cmd(Stop all Fusion services, if they are running as Windows services)
stop command-line argument in place of start, for example:connectors.cmd stopRun Fusion with a service account
This example assumes the following:| Field | Value |
|---|---|
| Account | FUSION_SVC |
| Domain | qe |
| Installation directory | C:\fusion<version> |
| Server | EC2AMAZ-79FD9JL |
-
As an administrator, create the service account, and install it to the server you want to use for Fusion:
-
Run
install-services.cmdas a local administrator: -
Grant the service account full access to Fusion:
-
Modify the Lucidworks Fusion service to use the service account.
- Open Administrative Tools > Services on your Windows server.
- Select the Lucidworks Fusion service.
- Open the Properties > Log On dialog.
-
Change the service user account to the
FUSION_SVCuser account.Only the account name is required. The password is managed by Windows.
Access Fusion after startup
After Fusion services have started, you can open the Fusion UI in a web browser athttp://localhost:8764/ (replace localhost with your server name or IP address if necessary).The first time you access Fusion, you must set the password for the user admin and agree to the Fusion Licensing Agreement (which contains terms of service). This is followed by an optional registration step. After this, Fusion displays the Fusion launcher (the page from which you can open apps).Deployment goals
- Demo, trial, and development deployments. The simplest possible architecture is the one you get out of the box, by unpacking the tar/zip file and running
https://FUSION_HOST:FUSION_PORT/bin/fusion start, so that all components (including the bundled Solr and ZooKeeper instances) run on a single host in their default configurations.
You can quickly install and run Fusion on a computer (even on your laptop) to explore its features and work with sample data. See Quickstart for instructions. This diagram illustrates a single-node Fusion deployment: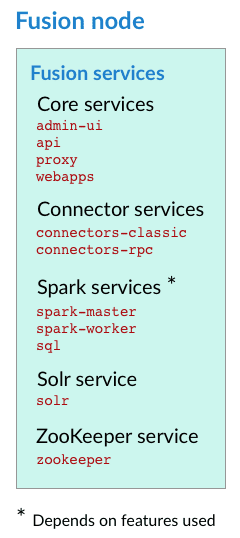
Quickstart
Quickstart
The Quickstart is a wizard that lets you explore some of Fusion’s core capabilities: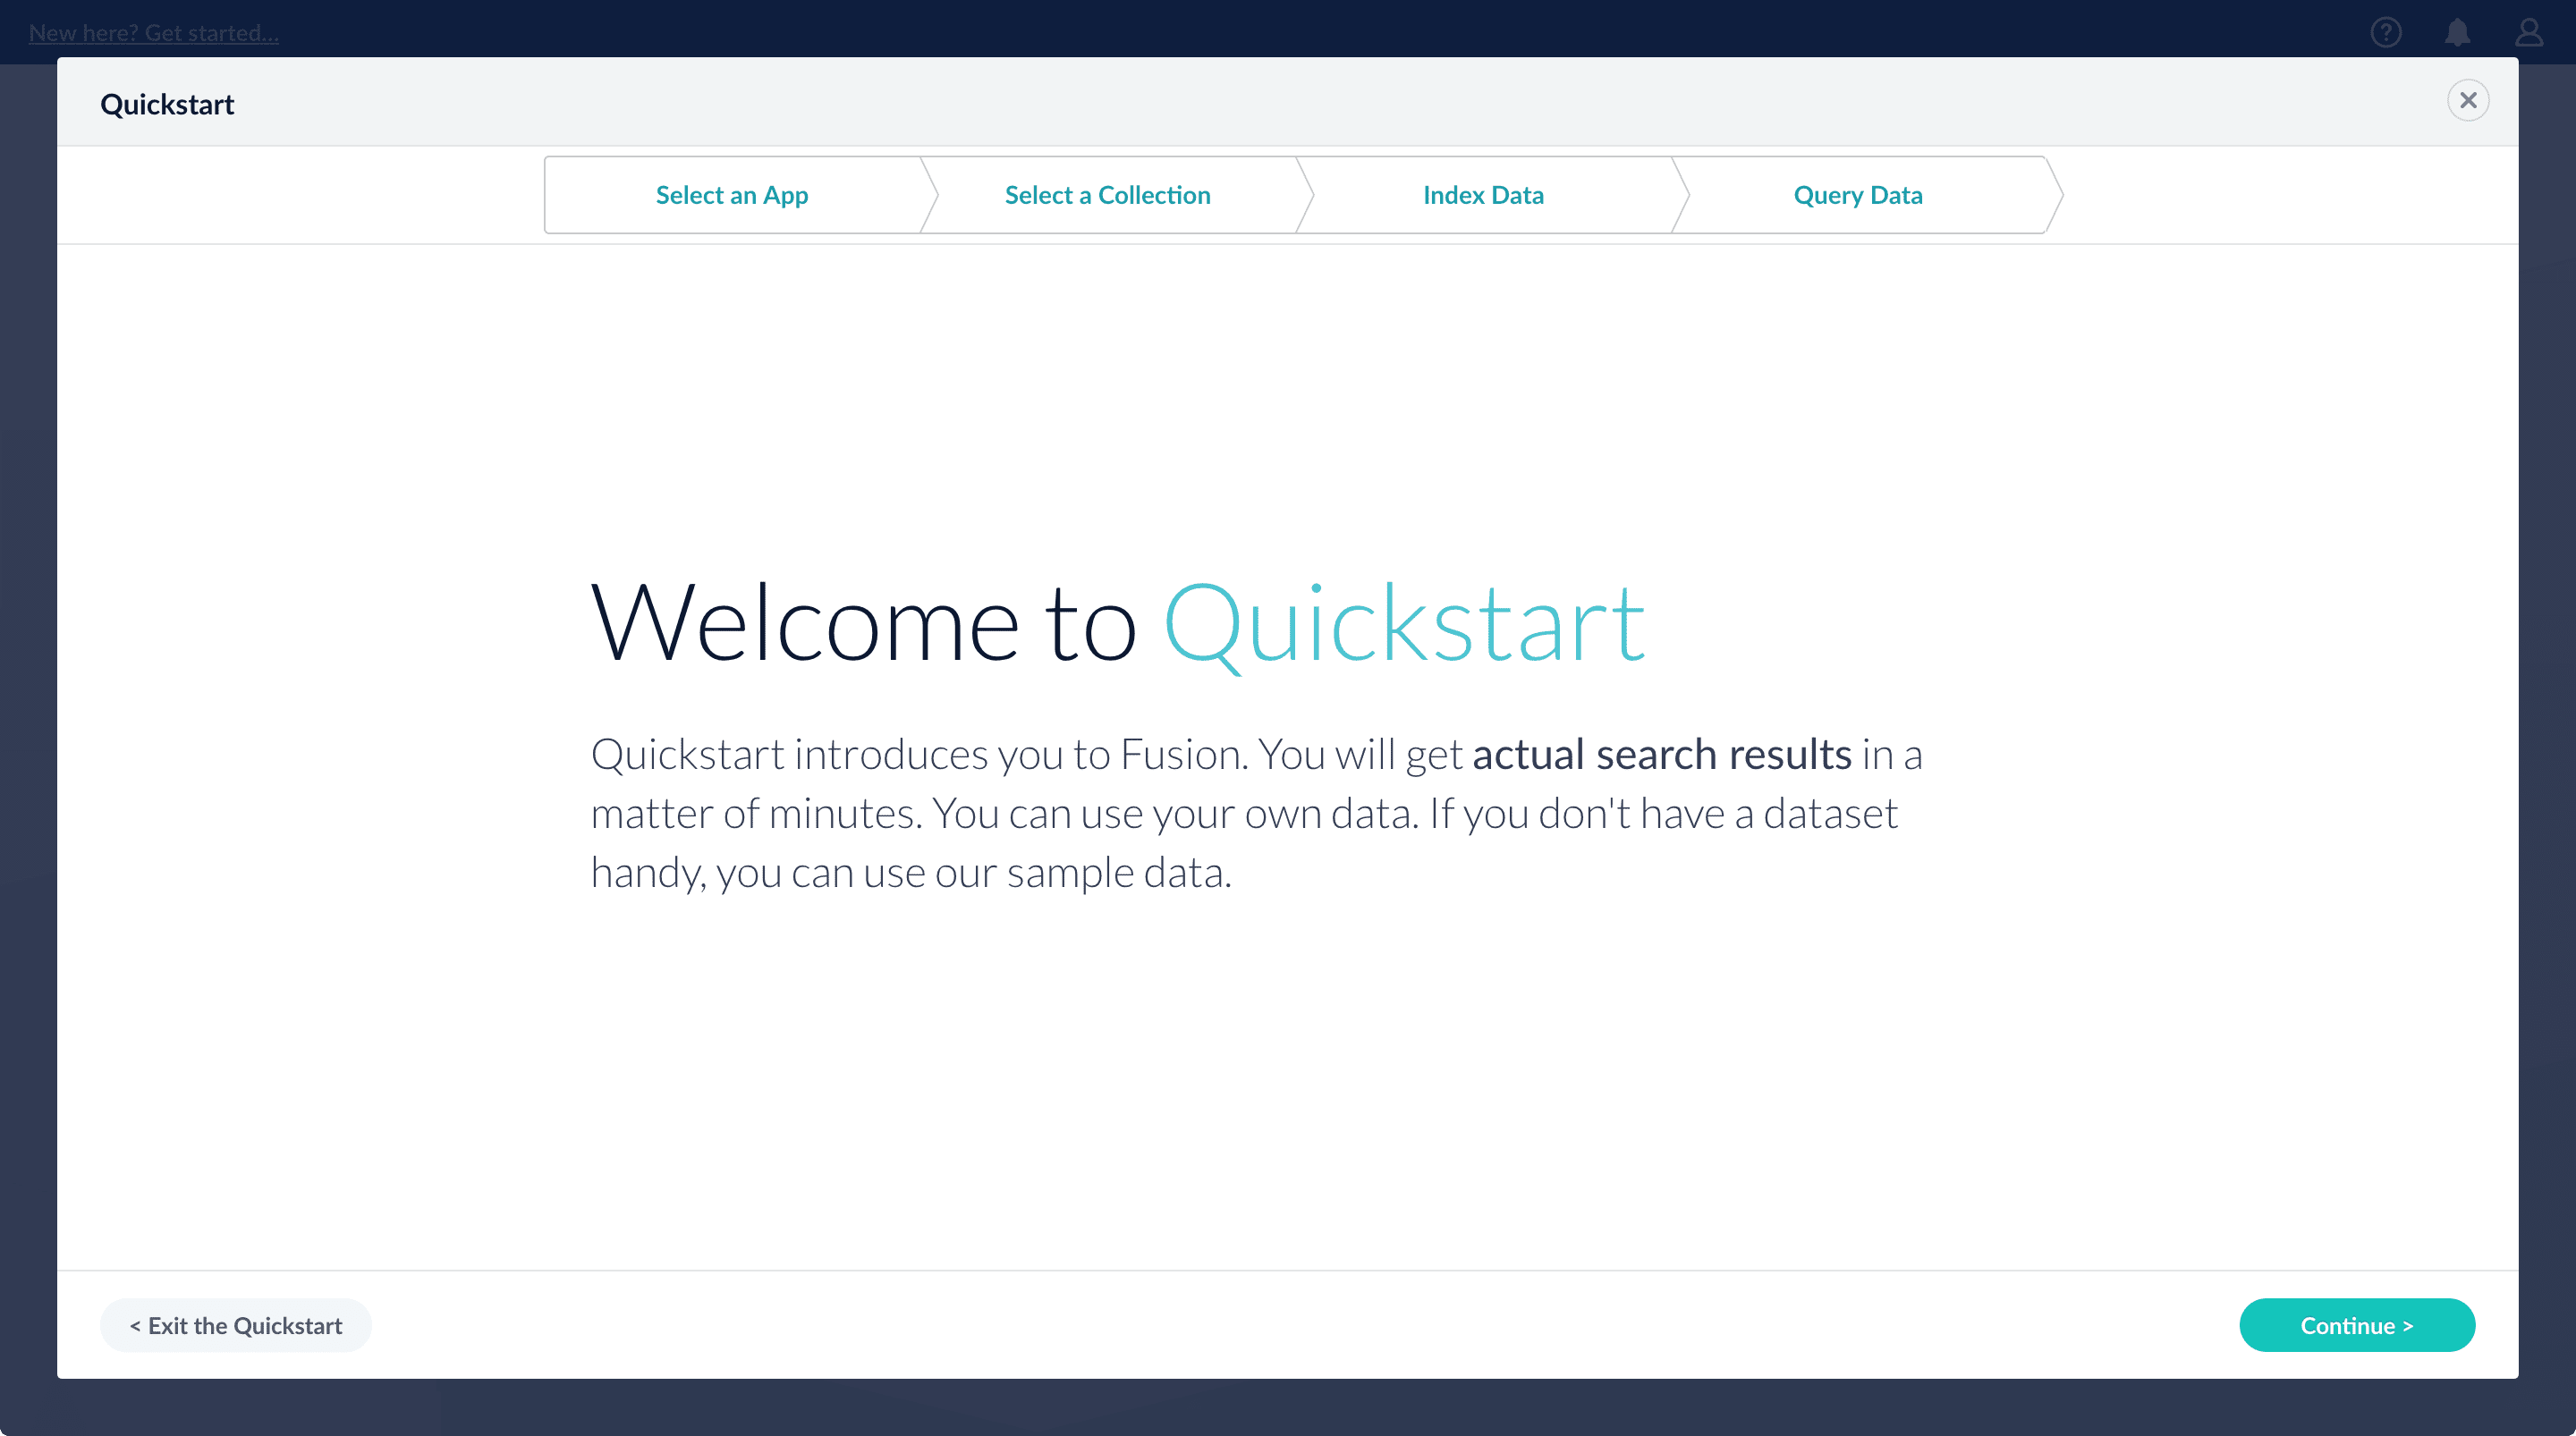
- Creating or selecting an app
- Selecting a collection (where data is stored)
- Indexing data
- Searching
Using The Quickstart Wizard
The course for Using The Quickstart Wizard focuses on using the wizard to practice using the key functions of Fusion.
Step through the Quickstart wizard
If it is not already open, open the Quickstart wizard. In the Fusion launcher, click New here? Get started….-
Click Continue.
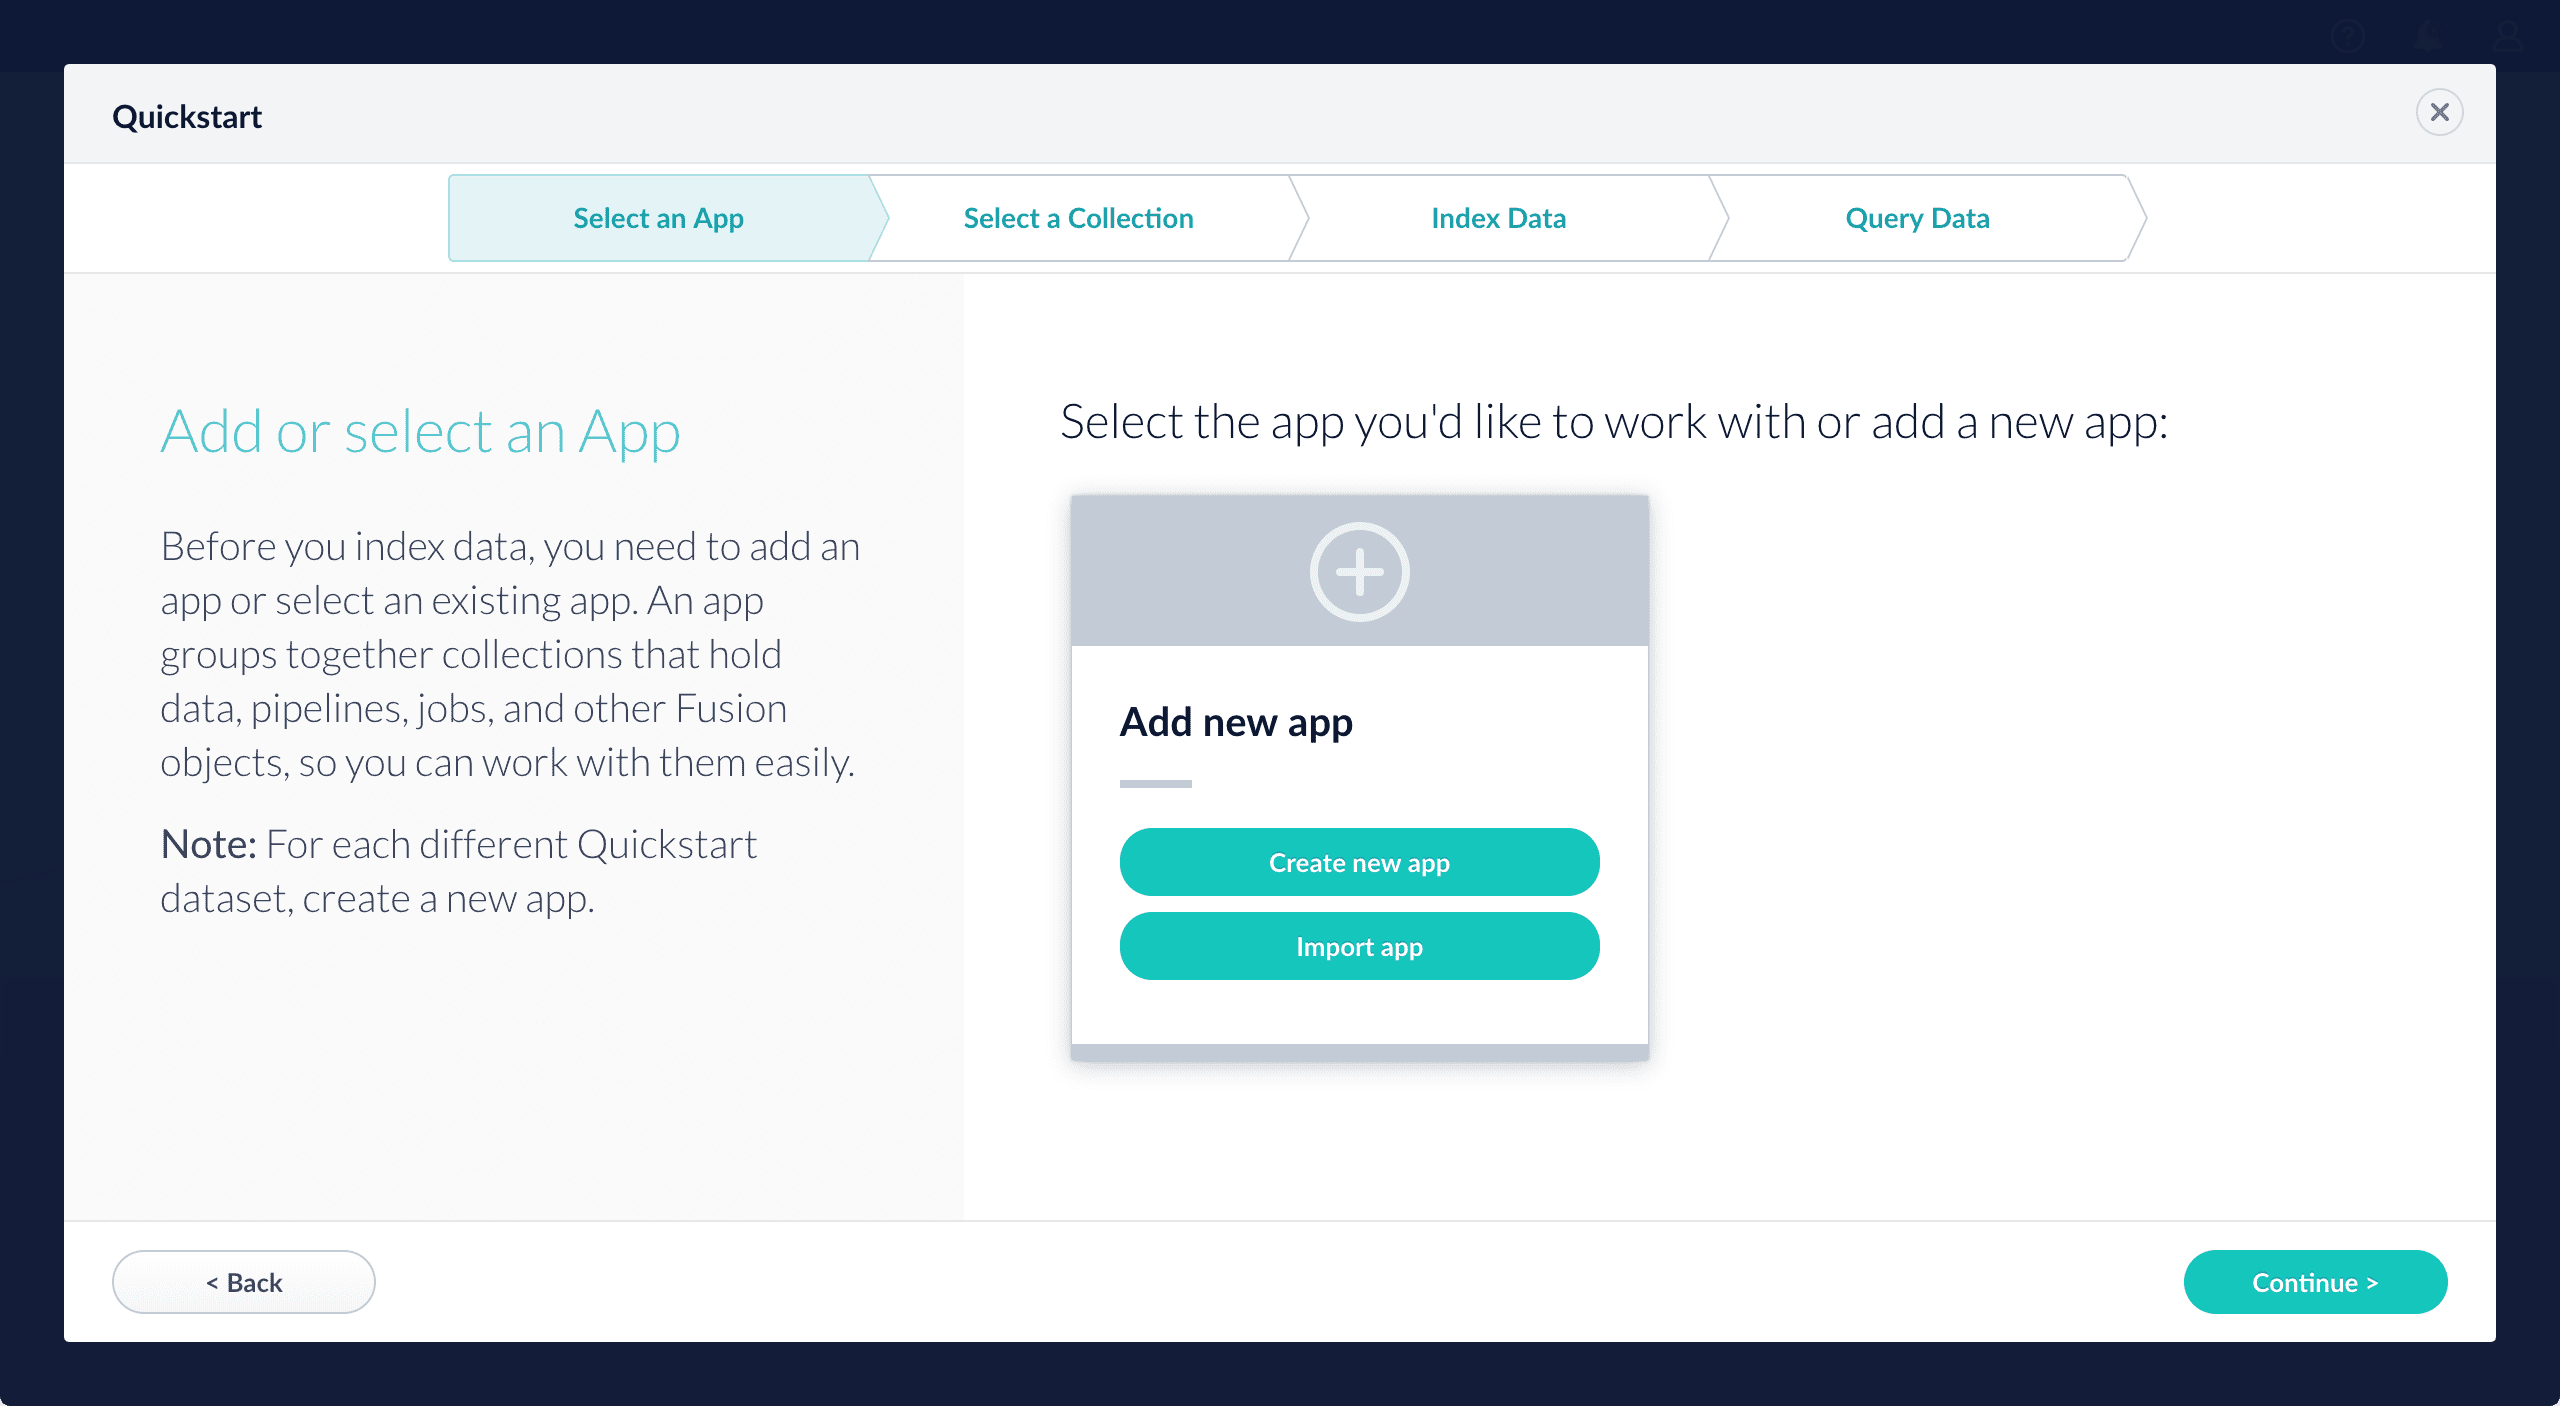
On the Select an App screen, you can select or create an app for your quickstart data.
-
After selecting an app, click Continue.
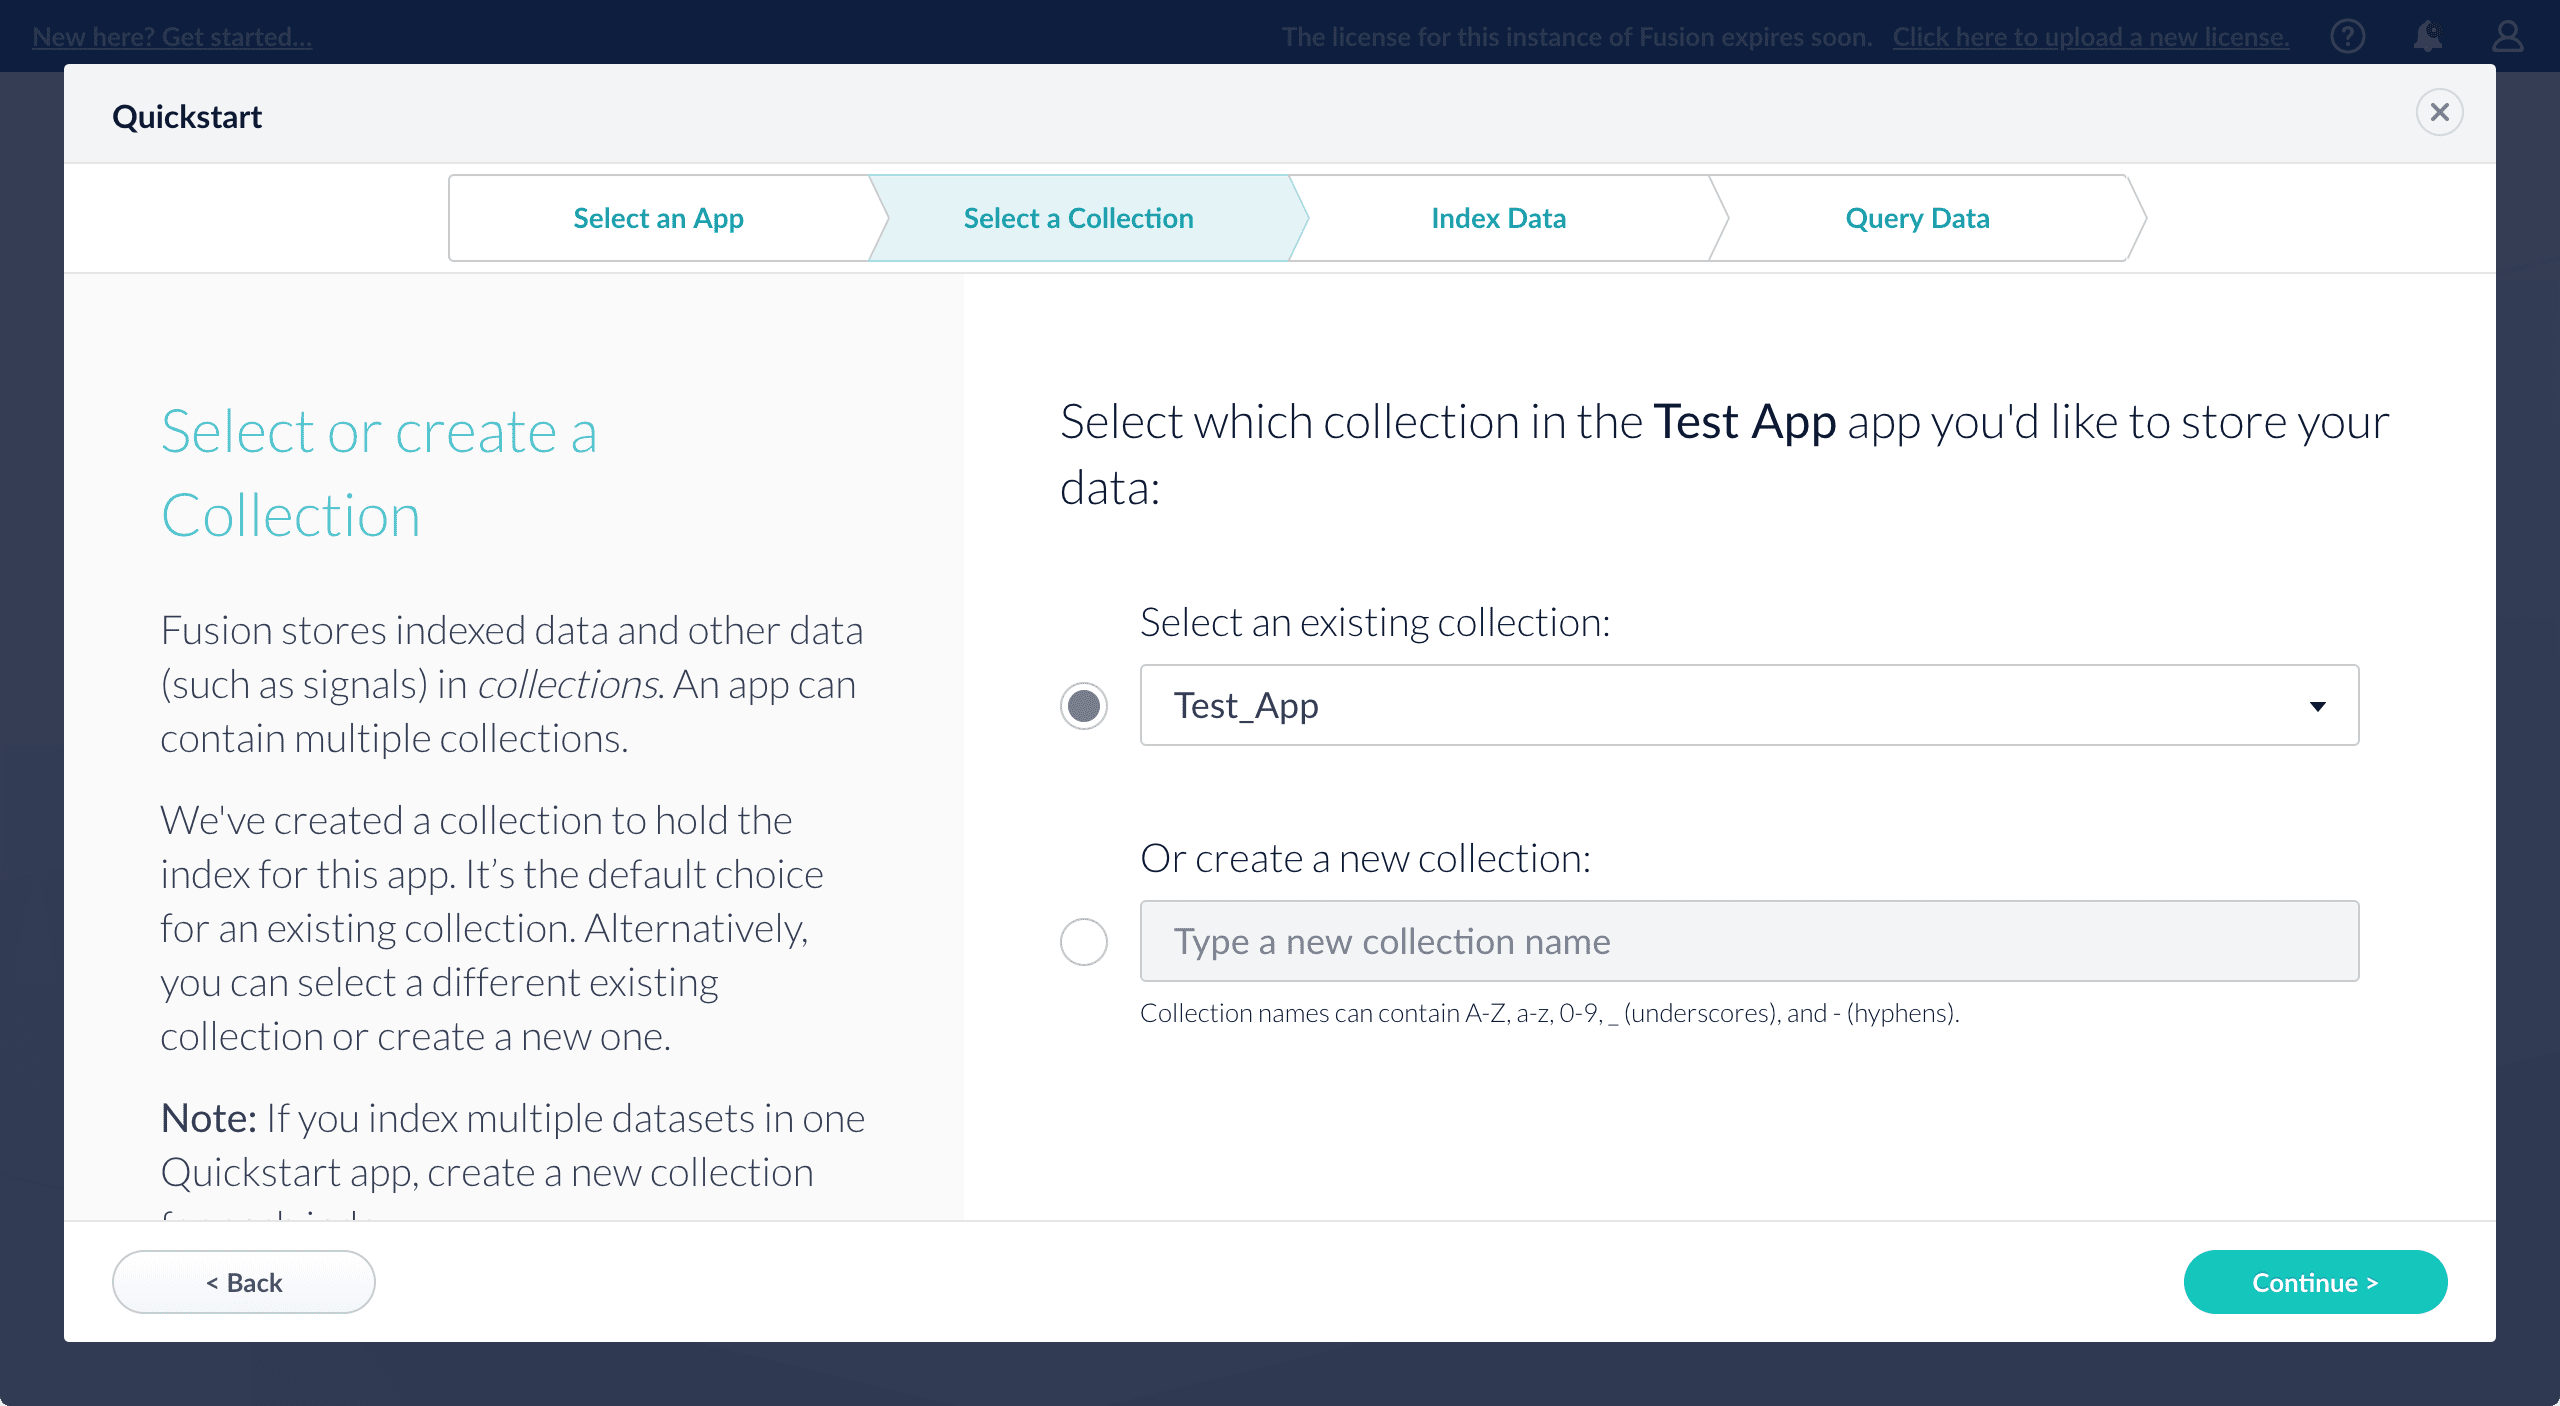
On the Select a Collection screen, you can select or create a collection for your quickstart data. A collection with the same name as your app is created automatically:
-
Click Continue.
On the Index Data screen, you can either select one of the built-in sample datasets or click Use my data to upload your own: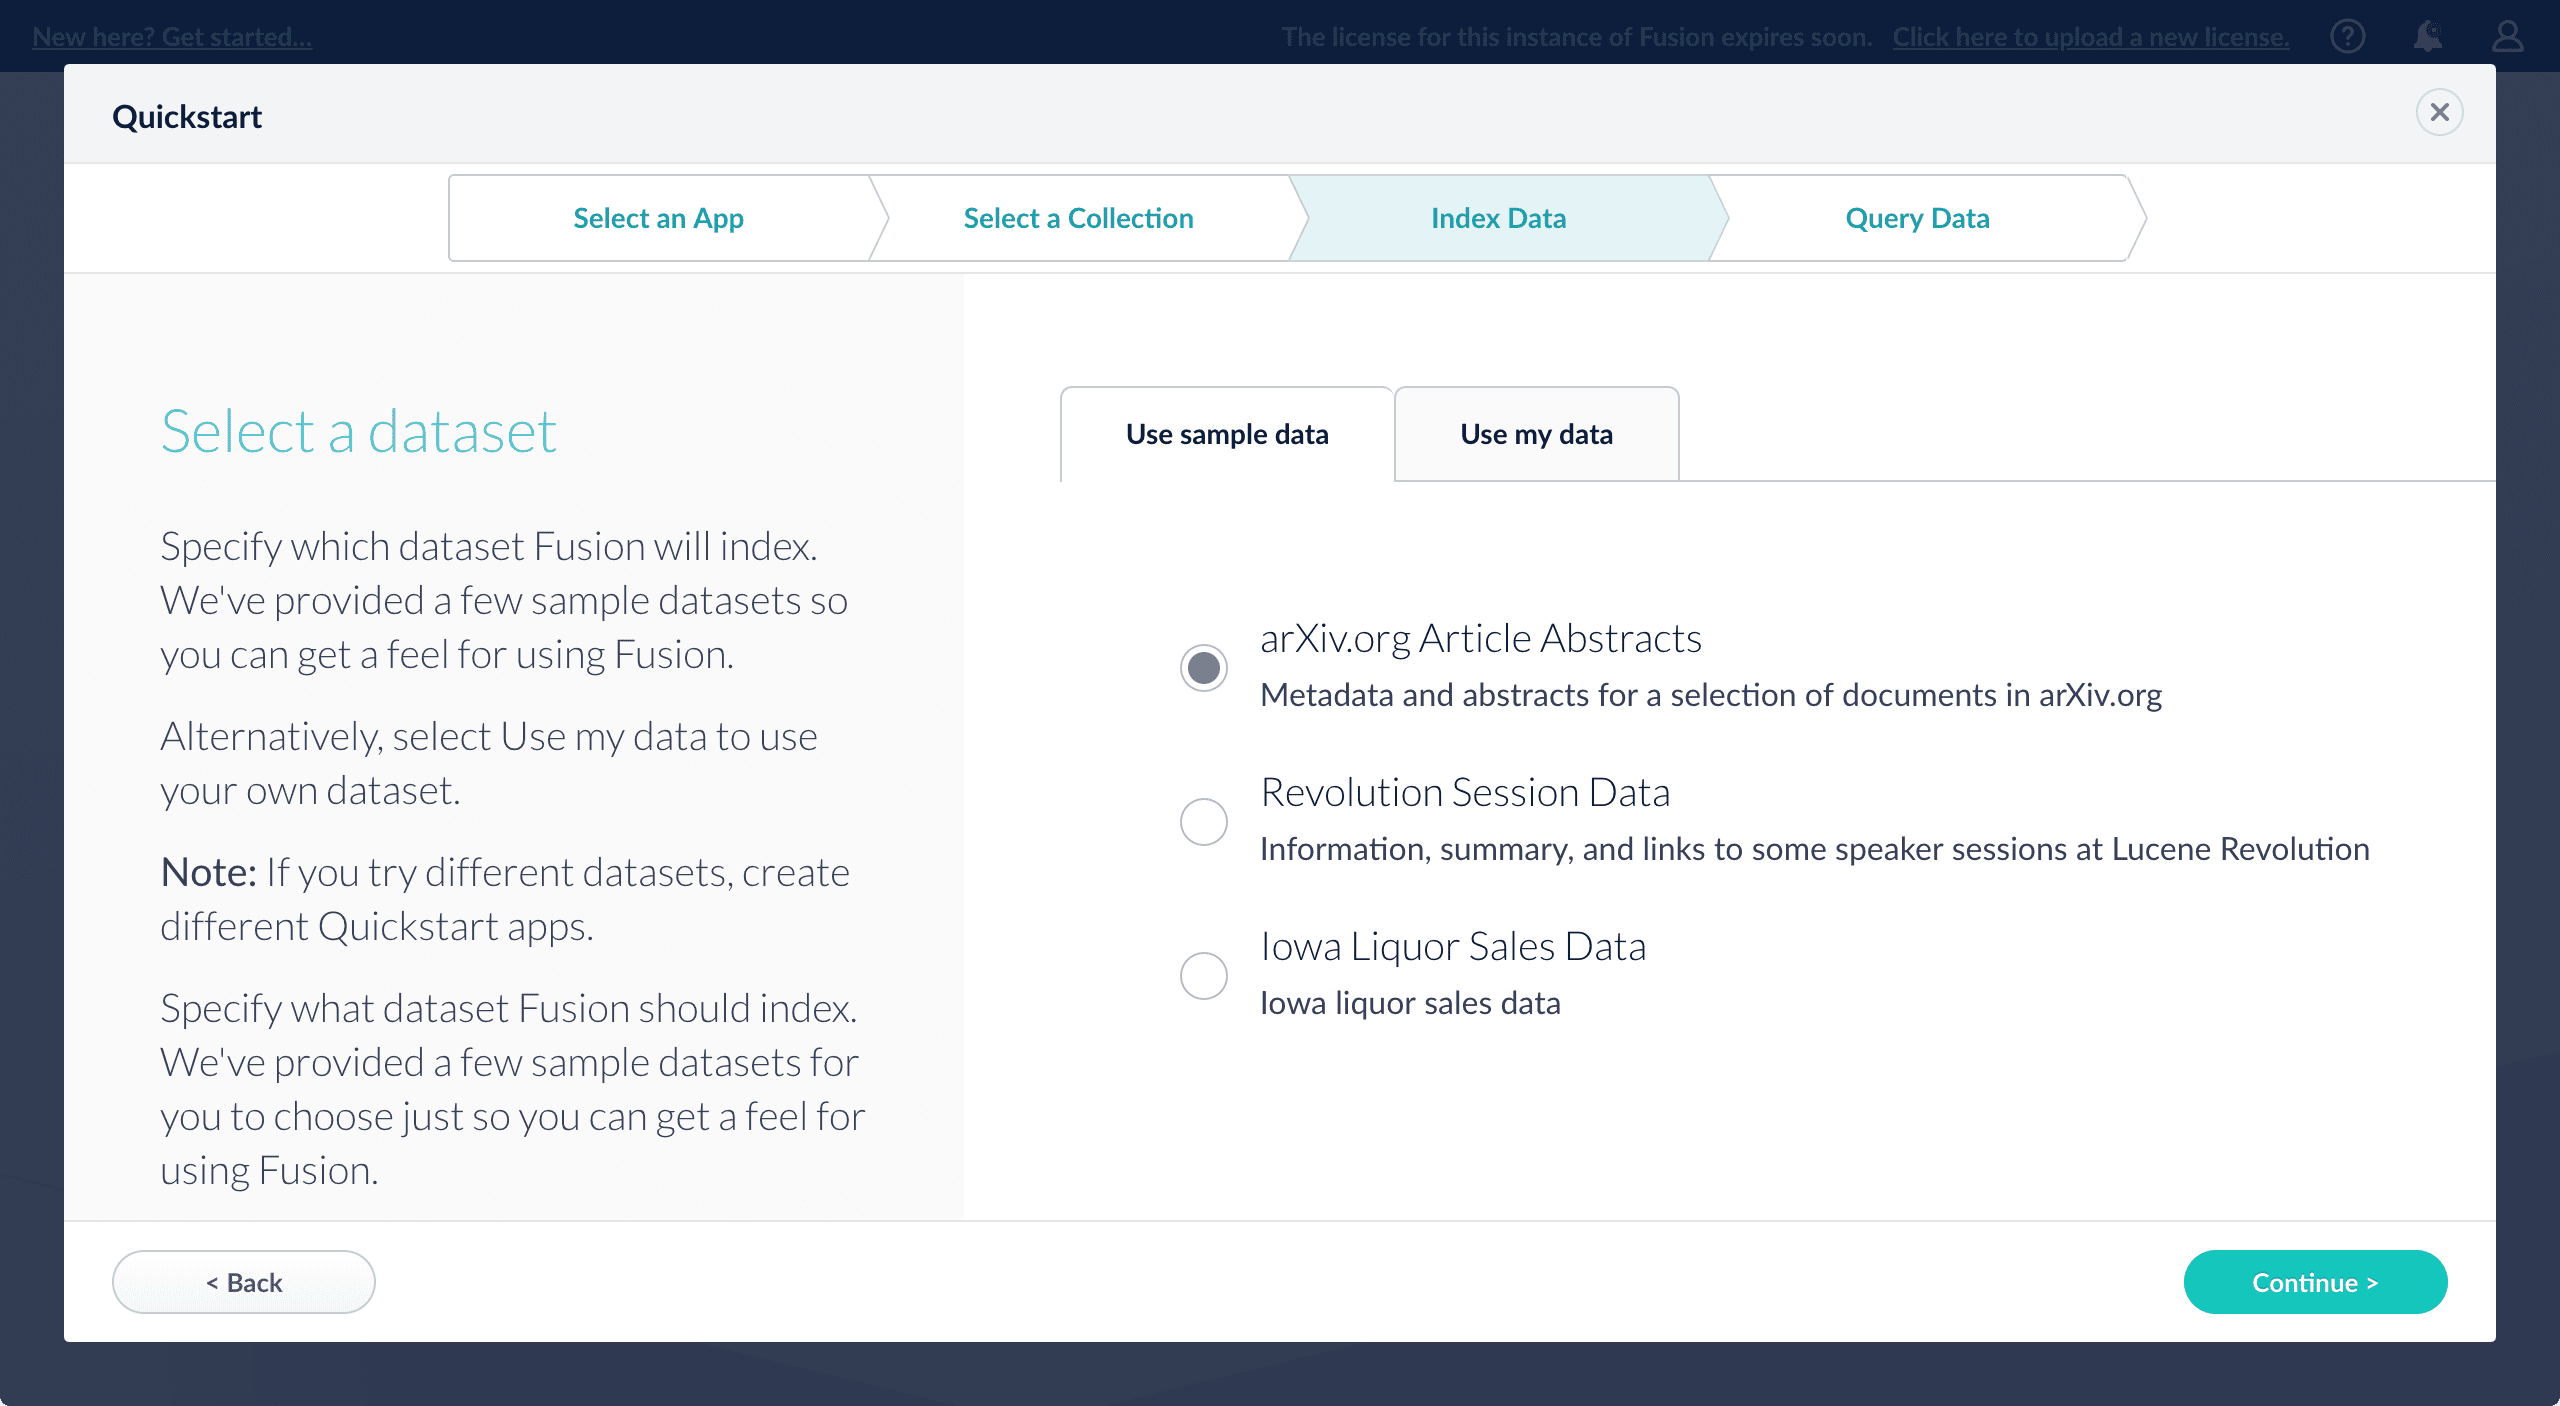
-
Click Continue.
On the Query Data screen, you can see all search results and enter your own search queries to test the indexed dataset. You can also select the display fields or view the parsed documents: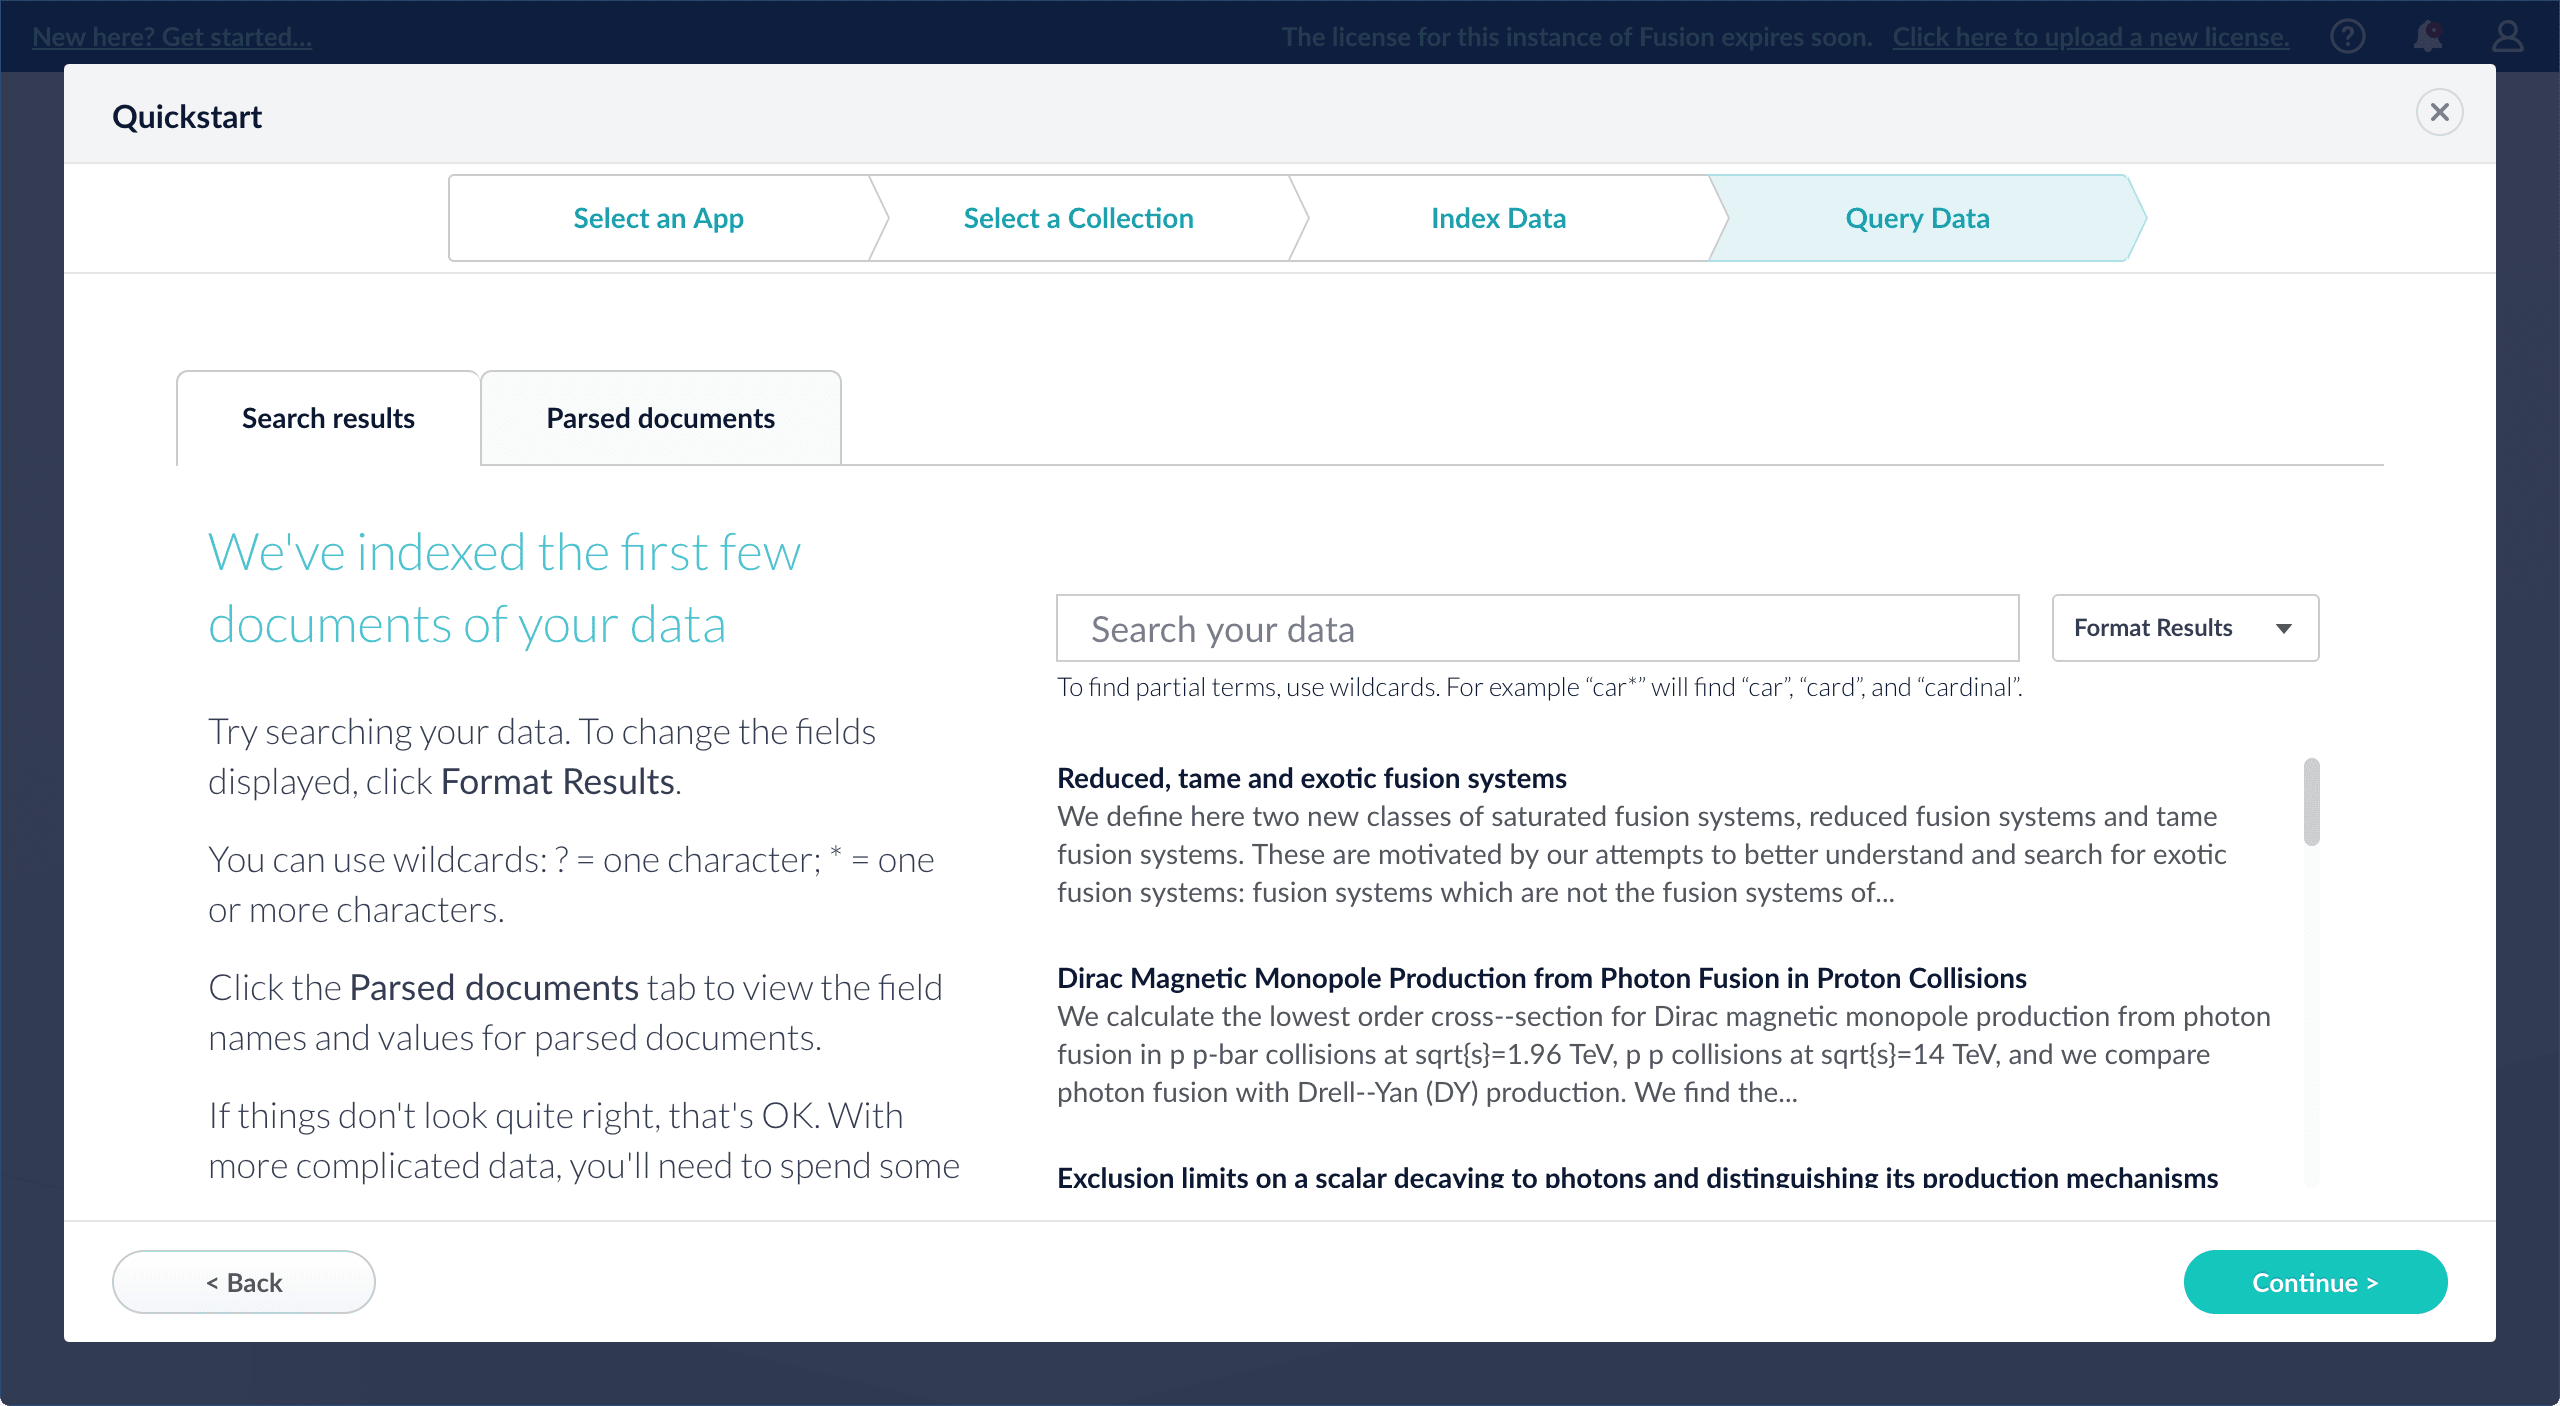
-
Click Continue.

- Open the Index Workbench to change the index pipeline.
- Open the Query Workbench to change the query pipeline. The workbenches are essentials tools in the Fusion workflow.
-
Open App Studio to create a user interface for searching this collection.
App Studio is only available in Fusion 4.1 and 4.2.
- Onsite late-stage development and test deployments. Ideally, an onsite deployment for late-stage development and testing should have the same architecture as the production deployment, though it does not need to be scaled to provide the same level of service.
- Production deployments. Fusion is designed for flexible, distributed deployment. Any of its components can be distributed across your network, and some can be clustered. A production deployment requires multiple Fusion nodes, each of which runs some or all Fusion services (including Solr and ZooKeeper).
Cluster Arrangements
You can deploy Fusion across multiple nodes in a Fusion cluster and use a ZooKeeper cluster as the centralized, synchronized store for both application configurations and user data. Regarding Solr, if you already have SolrCloud clusters managing your data, you can Integrate Fusion 4.x with an Existing Solr Deployment.Integrate Fusion 4.x with an Existing Solr Deployment
Integrate Fusion 4.x with an Existing Solr Deployment
If you have already implemented Solr as a standalone instance or as a SolrCloud cluster, you can add Fusion to your existing Solr deployment (if the Solr version is supported) and import your Solr collections into Fusion. Each Fusion collection can import one Solr collection.
- If your existing Solr instance is running in SolrCloud mode, you can use Fusion’s UI to modify configuration files (such as schema.xml or solrconfig.xml) and create Solr collections.
- If your existing Solr instance is running in standalone mode, you can still connect it to Fusion. Fusion can send documents to a standalone Solr instance and query the instance. But you will not be able to use Fusion’s UI to create Solr collections (Solr cores) or to modify Solr configuration files.
Prerequisites
- You have already installed Fusion.
- You have already installed Solr, which must meet these Solr requirements.
-
You have already installed ZooKeeper, which must meet these ZooKeeper requirements.
We recommend that you create an external ZooKeeper cluster (external to both Fusion and SolrCloud).
- Your Solr deployment must contain one or more collections (cores).
- In SolrCloud mode, Solr must be configured to use ZooKeeper.
Configure Fusion to use an existing Solr deployment
Use the Fusion UI to integrate Fusion with an existing Solr deployment.Use the Fusion UI
-
Create a Fusion search cluster:
- In the Fusion UI, navigate to System > Solr Clusters and click New Solr Cluster.
- Enter this information:
- A cluster ID of your choice
- Whether SolrCloud is enabled
- The connect string (to tell Fusion how to connect to the SolrCloud cluster or Solr instance)
- For SolrCloud, this is the ZooKeeper connect string.
- For a standalone Solr instance, this is the URL of the Solr instance.
- Verify that the connection is working by clicking Cores in the new cluster and inspecting the contents.
-
Create a Fusion collection that points to your Solr cluster and collection:
- In the UI, navigate to Collections and click Add a Collection.
- Enter a name for the new collection.
- Click Advanced.
- Select your SolrCloud cluster or Solr instance from the dropdown.
- Enter the name of the Solr collection to import.
Sending Documents to Solr through Fusion
You can use the Fusion connectors to crawl documents and index them to your existing Solr deployment.- Follow the steps above to create and configure a search cluster and a collection that points to Solr.
- Define an index pipeline that ends with a Solr Indexer stage that sends the documents to Solr.
- Use one of these methods to ingest your data:
- In the collection that points to your Solr collection, define a datasource using the connector of choice.
- Send prepared documents directly to the index pipeline for processing. See Importing Data with the REST API.
- It is also possible to use a different indexing process besides a connector, such as a script that sends documents through the index pipeline.
Querying Solr via Fusion requests
Indexed documents are stored in Solr indexes. You can query for these documents by using query pipelines. The query pipelines let you define your query parameters - such as how many records to return, the fields you would like, how to structure facets, and so on. You also have the ability to add JavaScript to the response processing, and define landing pages or specific boost levels depending on the user’s query. See Query Pipelines.If you prefer, you can also use the Solr API and SolrAdmin API to query Solr directly.- Nodes running core Fusion services and Solr also run ZooKeeper.
In this cluster arrangement, a ZooKeeper cluster runs on the same nodes that run core Fusion services and Solr. This arrangement works well for a small cluster with low usage and can reduce cost when compared with placing ZooKeeper on separate nodes.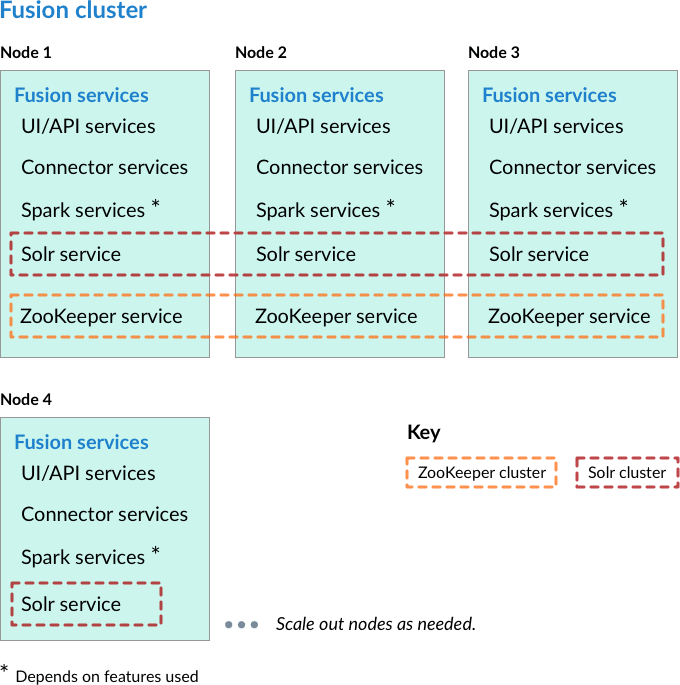
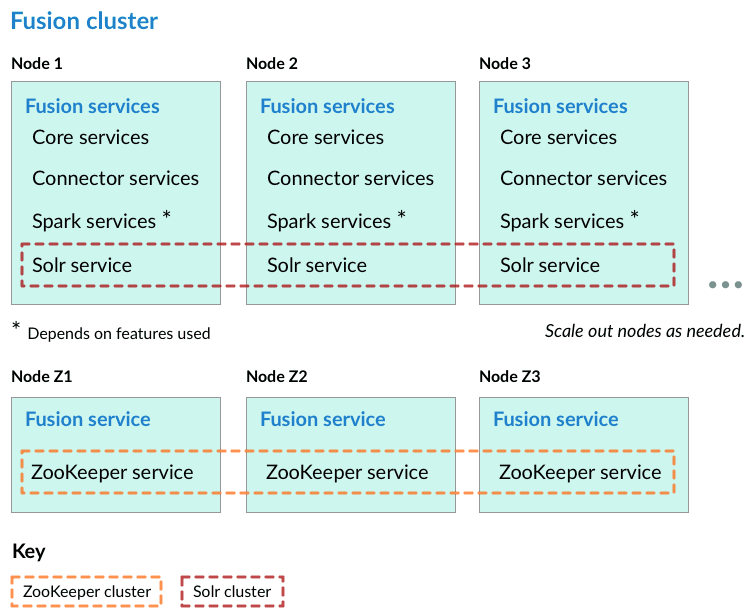
- Nodes running ZooKeeper are not running core Fusion services or Solr.
In this cluster arrangement, the ZooKeeper cluster runs on nodes in the Fusion cluster on which core Fusion services and Solr are not running. This arrangement is good for larger or more active clusters and can help reduce write latency. This also lets Fusion nodes scale horizontally without impacting the ZooKeeper nodes.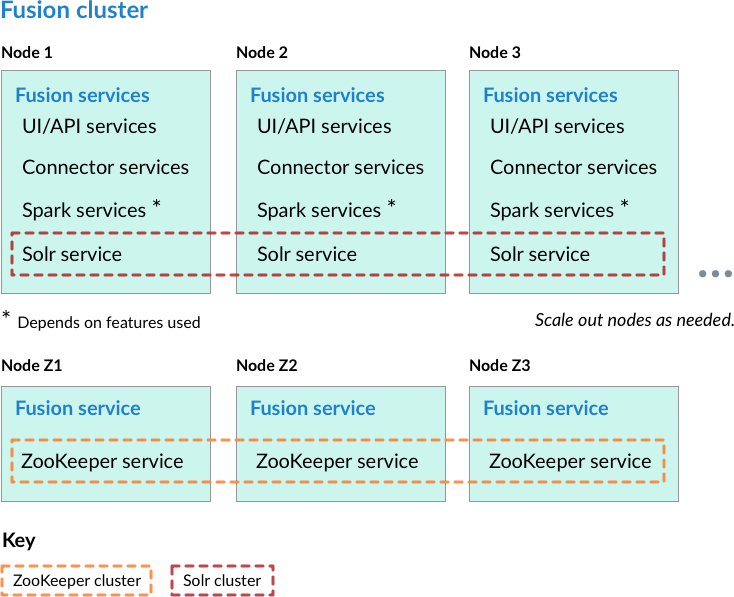
Learn more
Install a Fusion 4.x Cluster (Unix)
Install a Fusion 4.x Cluster (Unix)
This article describes how to install a Fusion cluster on multiple Unix nodes. Instructions are given for each of the cluster arrangements described in Deployment Types.
In the steps below, the port numbers reflect default port numbers and one common choice (port 2181 for nodes in an external ZooKeeper cluster). Port numbers for your nodes might differ.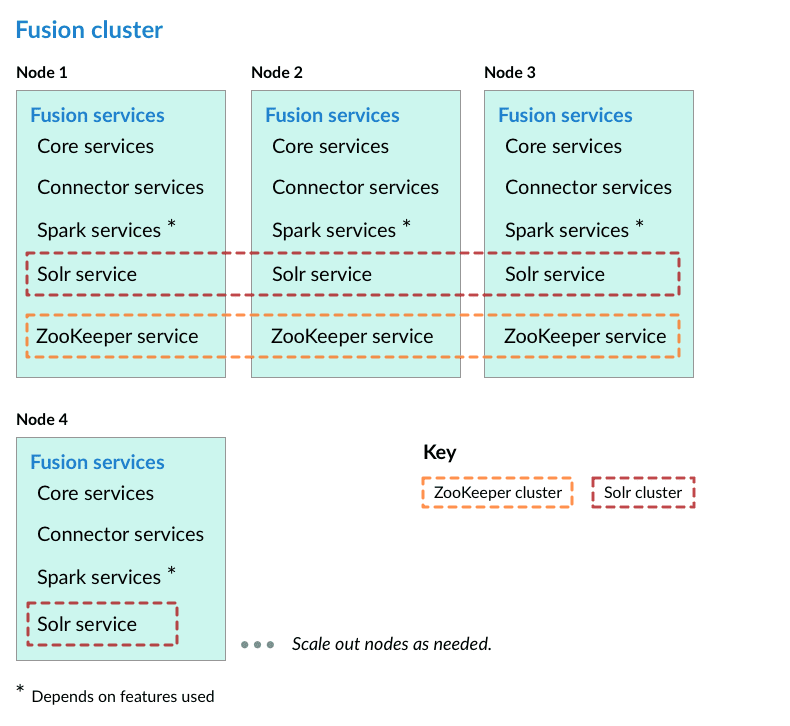
Preliminary steps
Before proceeding to one of the sections that follow, perform these steps:How to prepare for setting up a Fusion cluster- Prepare your firewall so that the Fusion nodes can communicate with each other. The default ports list contains a list of all ports used by Fusion. From this list, it is important that the ZooKeeper ports, Apache Ignite ports, and the Spark ports (if you are using Spark) are open between the different nodes for cross-cluster communication.
- Fusion for Unix is distributed as a compressed archive file (
.tar.gz). Move this file to each node that will run Fusion.To leverage the copies of Solr and/or ZooKeeper that are distributed with Fusion on nodes that will not run Fusion (as a simple means of obtaining compatible versions of the other software), also download the Fusion compressed archive file to each of those nodes. Below, you will edit configuration files so that Fusion does not run on those nodes. - On each node, change your working directory to the directory in which you placed the Fusion tar/zip file and unpack the archive, for example:
In the sections that follow, for every step on multiple nodes, complete the step on all nodes before going to the next step. It is especially important that you do not start Fusion on any node until the instructions say to do so.
Nodes running core Fusion services and Solr also run ZooKeeper
In this cluster arrangement, a ZooKeeper cluster runs on the same nodes that run core Fusion services and Solr.- Assign a number to each Fusion node, starting at 1. We refer to the number we assign to each node as the ZooKeeper myid.
- On each Fusion node, create a
https://FUSION_HOST:FUSION_PORT/data/zookeeperdirectory, and a file calledmyidin that directory. Edit the file and save the ZooKeeper myid assigned for this node as the only contents. - On each Fusion node, open the
https://FUSION_HOST:FUSION_PORT/conf/zookeeper/zoo.cfgfile in a text editor and add the following after theclientPortline (change the hostnames or IP addresses to the correct ones for your servers):For example:Do not uselocalhostor127.0.0.1as the hostname/IP. Specify the hostname/IP that other nodes will use when communicating with the current node. - On each Fusion node, edit
default.zk.connectinhttps://FUSION_HOST:FUSION_PORT/conf/fusion.cors(fusion.propertiesin Fusion 4.x) to point to the ZooKeeper hosts: - On each node, start ZooKeeper with
bin/zookeeper start. Zookeeper should start without errors. If a ZooKeeper instance fails to start, check the log athttps://FUSION_HOST:FUSION_PORT/var/log/zookeeper/zookeeper.log. - On each node, start the rest of Fusion using
bin/fusion start. - Create an admin password and log in to Fusion at
http://FIRST_NODE_IP:8764, whereFIRST_NODE_IPis the IP address of your first Fusion node. - Verify the Solr cluster is healthy by looking at
http://ANY_NODE_IP:8983/solr/#/~cloud, whereANY_NODE_IPis the IP address of a Solr node. All of the nodes should appear green. - If necessary, prepare high availability by setting up a load balancer in front of Fusion so that it load balances between the Fusion UI URL’s at
http://NODE_IP:8764.
Consult your load balancer’s documentation for instructions.
Nodes running ZooKeeper are not running core Fusion services or Solr
In this cluster arrangement, the ZooKeeper cluster runs on nodes in the Fusion cluster on which core Fusion services and Solr are not running.Each node in the Fusion cluster has Fusion and Solr installed. ZooKeeper runs on Fusion cluster nodes on which neither Fusion nor Solr is running.- Assign a number to each Fusion node, starting at 1. We refer to the number we assign to each node as the ZooKeeper myid.
- On each Fusion node, create a
fusion\latest.x\data\zookeeperdirectory, and a file calledmyidin that directory. Edit the file and save the ZooKeeper myid assigned for this node as the only contents. - On each Fusion node, open the
fusion\latest.x\conf\zookeeper\zoo.cfgfile in a text editor and add the following after theclientPortline (change the hostnames or IP addresses to the correct ones for your servers):For example: - Edit
conf/fusion.cors(fusion.propertiesin Fusion 4.x) and removezookeeperfrom thegroup.defaultlist. This will make it so that ZooKeeper does not start when you start Fusion. - On each Fusion node, edit
default.zk.connectinhttps://FUSION_HOST:FUSION_PORT/conf/fusion.cors(fusion.propertiesin Fusion 4.x) to point to the ZooKeeper hosts: - On each node, start ZooKeeper with
bin/zookeeper start. Zookeeper should start without errors. If a ZooKeeper instance fails to start, check the log athttps://FUSION_HOST:FUSION_PORT/var/log/zookeeper/zookeeper.log. - On each node, start the rest of Fusion using
bin/fusion start. - Create an admin password and log in to Fusion at
http://FIRST_NODE_IP:8764, whereFIRST_NODE_IPis the IP address of your first Fusion node. - Verify the Solr cluster is healthy by looking at
http://ANY_NODE_IP:8983/solr/#/~cloud, whereANY_NODE_IPis the IP address of a Solr node. All of the nodes should appear green. - If necessary, prepare high availability by setting up a load balancer in front of Fusion so that it load balances between the Fusion UI URL’s at
http://NODE_IP:8764. Consult your load balancer’s documentation for instructions.
Known issues
Metrics collection failure
When the Java virtual machine (JVM) is started, the/tmp/.java_pid<pid> file is created and is the socket used:- To attach a debugger
- By the agent to connect to the service that collects Java Management Extension (JMX) metrics
/tmp/.java_pid<pid> is deleted after ten days on a standard Amazon Linux in EC2.When the JVM code the agent uses cannot locate the file, then it:- Sends a
-QUITmessage to the JVM - Triggers a thread dump to be printed to standard out
- Is logged to the agent log
- Generates the “No metrics can be gathered” exception
- Prints a complete thread dump
- Sends the thread dump to system logs
- Exclude the
agent.logfrom the logstash configuration. The logshipping is turned off for the file. The disadvantage to this option is that the metrics are missing. - Change the cron job in the Linux distribution that deletes the
/tmpfiles older than “x” days to exclude deleting the/tmp/.java_pid<pid>files. If your system is running the Linux Systemd software suite on EC2, the setting is typically located in theusr/lib/tmpfiles.d/tmp.conffile. For Dial On Demand (DOD), remove the call that configures the JMX Metrics requirement for the debugger attachment to the Java service.
Install a Fusion 4.x Cluster (Windows)
Install a Fusion 4.x Cluster (Windows)
This article describes how to install a Fusion cluster on multiple Windows nodes. Instructions are given for each of the cluster arrangements described in Deployment Types.In the steps below, the port numbers reflect default port numbers and one common choice (port 2181 for nodes in an external ZooKeeper cluster). Port numbers for your nodes might differ.
Preliminary steps
Before proceeding to one of the sections that follow, perform these steps:How to prepare for setting up a Fusion cluster- Prepare your firewall so that the Fusion nodes can communicate with each other. The default ports list contains a list of all ports used by Fusion. From this list, it is important that the ZooKeeper ports, Apache Ignite ports, and the Spark ports (if you are using Spark) are open between the different nodes for cross-cluster communication.
- Fusion for Windows is distributed as a compressed archive file (
.zip). Download the Fusion zip file for the latest version of Fusion to each node that will run Fusion, and move the file to where you would like Fusion to reside in your filesystem. It will appear as a compressed folder.To leverage the copies of Solr and/or ZooKeeper that are distributed with Fusion on nodes that will not run Fusion (as a simple means of obtaining compatible versions of the other software), also download the Fusion zip file to each of those nodes. Below, you will edit configuration files so that Fusion does not run on those nodes. - Unpack the archive. In most cases, you need only right-click and choose “Extract all…”. If you do not see this option, check that you have permissions to extract folders on your system.
The resulting directory is namedfusion\latest.x. This directory is considered your Fusion home directory. You can rename it if you wish. See Directories, Files, and Ports for the contents of the Fusion home directory.
In the sections that follow, for every step on multiple nodes, complete the step on all nodes before going to the next step. It is especially important that you do not start Fusion on any node until the instructions say to do so.
Nodes running core Fusion services and Solr also run ZooKeeper
In this cluster arrangement, a ZooKeeper cluster runs on the same nodes that run core Fusion services and Solr.- Assign a number to each Fusion node, starting at 1. We refer to the number we assign to each node as the ZooKeeper myid.
- On each Fusion node, create a
fusion\latest.x\data\zookeeperdirectory, and a file calledmyidin that directory. Edit the file and save the ZooKeeper myid assigned for this node as the only contents. - On each Fusion node, open the
fusion\latest.x\conf\zookeeper\zoo.cfgfile in a text editor and add the following after theclientPortline (change the hostnames or IP addresses to the correct ones for your servers):For example:
do not use
localhost or 127.0.0.1 as the hostname/IP. Specify the hostname/IP that other nodes will use when communicating with the current node.default.zk.connect in fusion\latest.x\conf\fusion.cors (fusion.properties in Fusion 4.x) to point to the ZooKeeper hosts:- On each node, start ZooKeeper with
bin\zookeeper start. Zookeeper should start without errors. If a ZooKeeper instance fails to start, check the log atfusion\latest.x\var\log\zookeeper\zookeeper.log. - On each node, start the rest of Fusion using
bin\fusion start. - Create an admin password and log in to Fusion at
http://FIRST_NODE_IP:8764, whereFIRST_NODE_IPis the IP address of your first Fusion node. - Verify the Solr cluster is healthy by looking at
http://ANY_NODE_IP:8983/solr/#/~cloud, whereANY_NODE_IPis the IP address of a Solr node. All of the nodes should appear green. - If necessary, prepare high availability by setting up a load balancer in front of Fusion so that it load balances between the Fusion UI URL’s at
http://NODE_IP:8764.
Consult your load balancer’s documentation for instructions.
Nodes running ZooKeeper are not running core Fusion services or Solr
In this cluster arrangement, the ZooKeeper cluster runs on nodes in the Fusion cluster on which core Fusion services and Solr are not running.Each node in the Fusion cluster has Fusion and Solr installed. ZooKeeper runs on Fusion cluster nodes on which neither Fusion nor Solr is running.- Assign a number to each Fusion node, starting at 1. We refer to the number we assign to each node as the ZooKeeper myid.
- On each Fusion node, create a
fusion\latest.x\data\zookeeperdirectory, and a file calledmyidin that directory. Edit the file and save the ZooKeeper myid assigned for this node as the only contents. - On each Fusion node, open the
fusion\latest.x\conf\zookeeper\zoo.cfgfile in a text editor and add the following after theclientPortline (change the hostnames or IP addresses to the correct ones for your servers):For example: - Edit
conf\fusion.cors(fusion.propertiesin Fusion 4.x) and removezookeeperfrom thegroup.defaultlist. This will make it so that ZooKeeper does not start when you start Fusion. - On each Fusion node, edit
default.zk.connectinfusion\latest.x\conf\fusion.cors(fusion.propertiesin Fusion 4.x) to point to the ZooKeeper hosts: - On each node, start ZooKeeper with
bin\zookeeper start. Zookeeper should start without errors. If a ZooKeeper instance fails to start, check the log atfusion\latest.x\var\log\zookeeper\zookeeper.log. - On each node, start the rest of Fusion using
bin\fusion start. - Create an admin password and log in to Fusion at
http://FIRST_NODE_IP:8764, whereFIRST_NODE_IPis the IP address of your first Fusion node. - Verify the Solr cluster is healthy by looking at
http://ANY_NODE_IP:8983/solr/#/~cloud, whereANY_NODE_IPis the IP address of a Solr node. All of the nodes should appear green. - If necessary, prepare high availability by setting up a load balancer in front of Fusion so that it load balances between the Fusion UI URL’s at
http://NODE_IP:8764. Consult your load balancer’s documentation for instructions.
Secure Communication with a SolrCloud Cluster
Secure Communication with a SolrCloud Cluster
You can configure Fusion and an external SolrCloud cluster so that communication between Fusion and the SolrCloud cluster is secured. Use either Kerberos or basic authentication. You can secure communication for both the default search cluster and for other SolrCloud clusters.Note: Securing communication between Fusion and a bundled default search cluster is not supported.The required steps differ. These are the high-level steps. Detailed steps follow.
- Default search cluster. Define configuration parameters for bootstrapping Fusion, and then bootstrap Fusion.
- Other SolrCloud clusters. In the Fusion UI, add the external SolrCloud cluster.
Default Search Cluster
If your default search cluster is in an external SolrCloud cluster, then you can secure the cluster with Kerberos or basic authentication, and then configure Fusion to communicate securely with the cluster.Prerequisite
Prerequisite: Secure the default search cluster. Use either Solr’s Basic Authentication Plugin or Kerberos Authentication Plugin.Don’t start Fusion yet. Below, you will define bootstrap properties, and then bootstrap Fusion.Configure and Bootstrap Fusion
- Create a
.propertiesfile for the initial bootstrap of Fusion. Place the file outside of the Fusion installation, for example, in/tmp. You will delete the file at the end of this procedure: - Edit the
fusion-bootstrap.propertiesfile to define Fusion initial-bootstrap configuration properties. Example strings are in bold italics. Replace those with your own values.
- Kerberos authentication – Specify the authentication type (
kerberos), the Kerberos principal, and the Kerberos keytab file:
- Basic authentication: – Specify the authentication type (
basic), the username of the Solr user to use for authentication, and the password of that user:
The Solr user must be the admin user or a different user with full administrative privileges. +
Fusion doesn’t support Solr authorization plugins. - Kerberos authentication – Specify the authentication type (
- Edit the fusion.cors file:
- Uncomment and change the value of this property to point to an external ZooKeeper:
- Uncomment and change the value of this property to use an external SolrCloud cluster:
- Remove
zookeeperandsolrfrom thegroup.defaultproperty: - Add a configuration property for the path to the initial-bootstrap properties file:
- Uncomment and change the value of this property to point to an external ZooKeeper:
- Change your working directory to the directory that contains the Fusion binaries:
- Bootstrap Fusion:
- After Fusion starts:
- Delete the initial-bootstrap properties file:
- Edit the
fusion.cors(fusion.propertiesin Fusion 4.x) file to remove the entry for the initial-bootstrap properties file:
- Delete the initial-bootstrap properties file:
Other SolrCloud Cluster
You can secure an external SolrCloud cluster with Kerberos or basic authentication, and then configure Fusion to communicate securely with the cluster.Prerequisite
Prerequisite: Secure the default search cluster. Use either Solr’s Basic Authentication Plugin or Kerberos Authentication Plugin.Add the secure SolrCloud cluster in the Fusion UI (Basic Auth)
- log in to the Fusion UI as the user
admin. - Click System > Home > System > Solr Clusters > New Solr Cluster.
- Click Advanced.
- Specify the required values ID and Connect String. Under Solr Cluster Authentication, check include. Choose Authentication Type basic, and specify a username and password for authentication.
- Click Save new.
Add the secure SolrCloud cluster in the Fusion UI (Kerberos)
- log in to the Fusion UI as the user
admin. - Click System > Home > System > Solr Clusters > New Solr Cluster.
- Click Advanced.
- Specify the required values ID and Connect String. Under Solr Cluster Authentication, check include. Choose Authentication Type kerberos, and specify a Kerberos keytab file and Kerberos principal for authentication.
- Click Save new.