Documentation Index
Fetch the complete documentation index at: https://doc.lucidworks.com/llms.txt
Use this file to discover all available pages before exploring further.
Data Ingestion
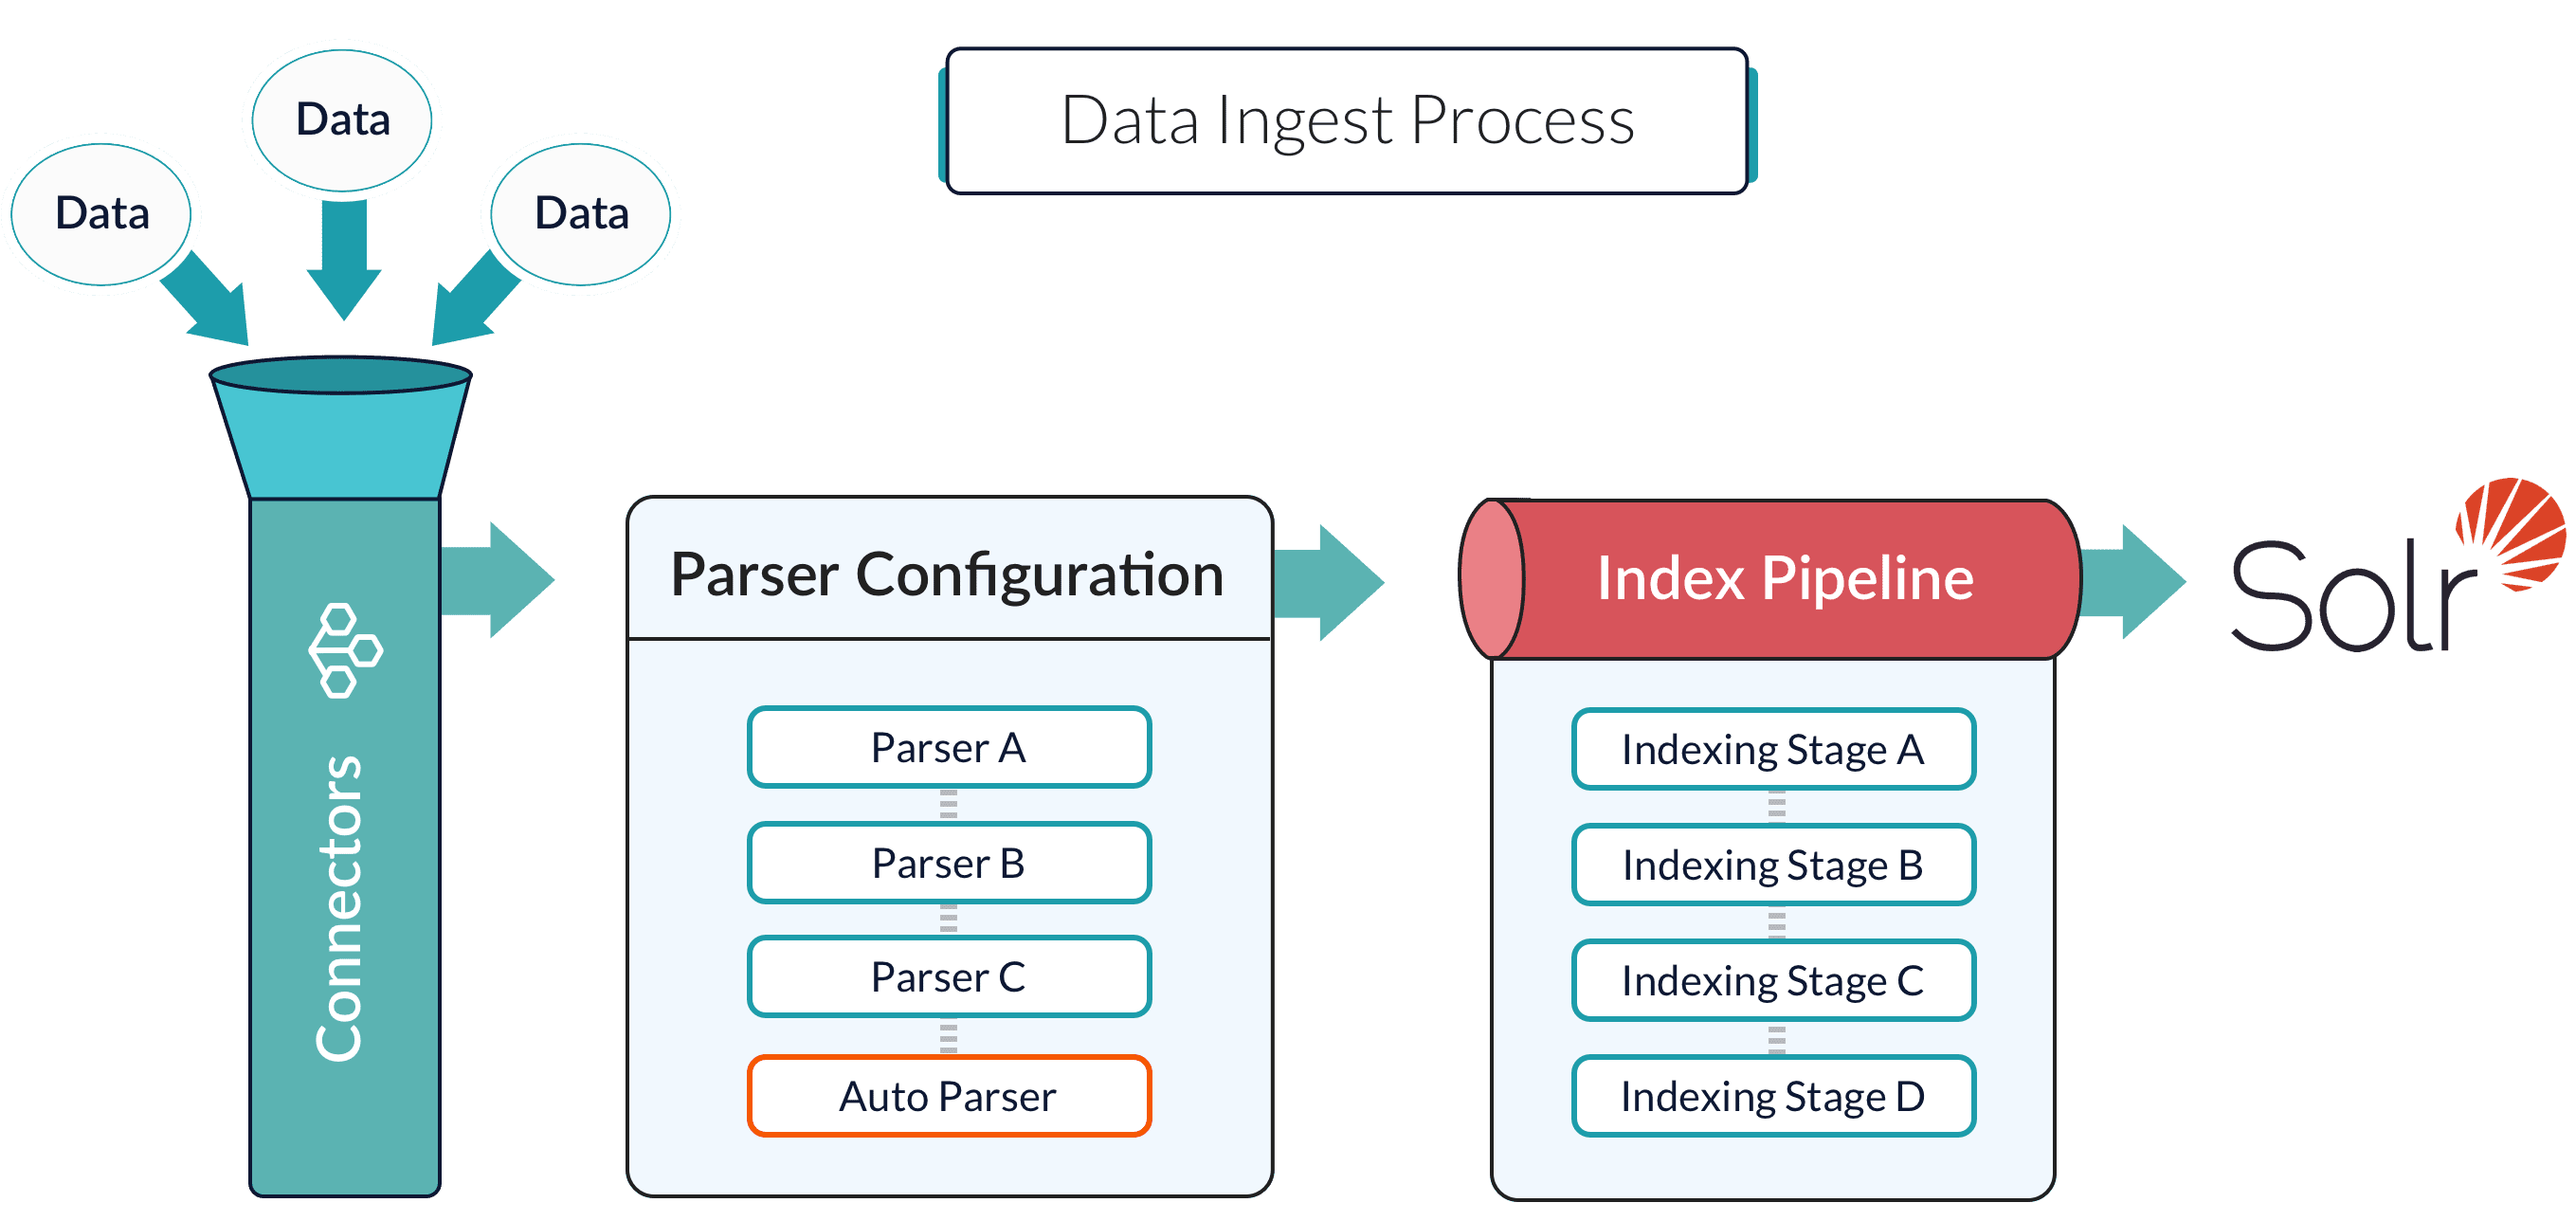
Data ingestion gets your data into Fusion Server, and data indexing stores it in a format that is optimized for searching. These topics explain how to get your data into Fusion Server in a search-optimized format.Collections
Collections are a way of grouping data sets so that related data sets can be managed together. Every data set that you ingest belongs to a collection. Any app can contain one or more collections. See Collection Management.Datasources
Datasources are configurations that determine how your data is handled during ingest by Fusion Server’s connectors, parsers, and index pipelines. When you run a fully-configured datasource, the result is an indexed data set that is optimized for search, depending on the shape of your data and how you want to search it. See Datasource Configuration.Connectors
Connectors are Fusion components that ingest and parse specific kinds of data. There is a Fusion connector for just about any data type.Blob storage
Blob storage is a way to upload binary data to Fusion Server. This can be your own data, such as images or executables, or it can be plugins for Fusion Server, such as connectors, JDBC drivers, and so on.Other methods
In some cases, you might find that it is best to use other ingestion methods, such as the Import with the Bulk Loader, Import Data with Hive, Import Data with Pig, or pushing data to a Import Data with the REST API endpoint.Import with the Bulk Loader
Import with the Bulk Loader
Create and run Parallel Bulk Loader jobs
Use the Jobs manager to create and run Parallel Bulk Loader jobs. You can also use the Scheduler to schedule jobs.In the procedures, select Parallel Bulk Loader as the job type and configure the job as needed.Configuration settings for the Parallel Bulk Loader job
This section provides configuration settings for the Parallel Bulk Loader job. Also see configuration properties in the Jobs Configuration Reference.Read settings
| Setting | Description |
|---|---|
format | Unique identifier of the data source provider. Spark scans the job’s classpath for a class named DefaultSource in the <format> package. For example, for the solr format, we provide the solr.DefaultSource class in our spark-solr repository: |
path (optional) | Comma-delimited list of paths to load. Some data sources, such as parquet, require a path. Others, such as Solr, do not. Refer to the documentation for your data source to determine if you need to provide a path. |
readOptions | Options passed to the Spark SQL data source to configure the read operation. Options differ for every data source. Refer to the specific data source documentation for more information. |
sparkConfig (optional) | List of Spark configuration settings needed to run the Parallel Bulk Loader. |
shellOptions | Behind the scenes, the Parallel Bulk Loader job submits a Scala script to the Fusion Spark shell. The shellOptions setting lets you pass any additional options needed by the Spark shell. The two most common options are --packages and --repositories: --packages Comma-separated list of Maven coordinates of JAR files to include on the driver and executor classpaths. Spark searches the local Maven repository, and then Maven central and any additional remote repositories given in the config. The format for the coordinates should be groupId:artifactId:version. The HBase example below demonstrates the use of the packages option for loading the com.hortonworks:shc-core:1.1.1-2.1-s_2.11 package. TIP: Use the https://spark-packages.org/ site to find interesting packages to add to your Parallel Bulk Loader jobs. --repositories Comma-separated list of additional remote Maven repositories to search for the Maven coordinates given in the packages config setting. The Index HBase tables example below demonstrates the use of the repositories option for loading the com.hortonworks:shc-core:1.1.1-2.1-s_2.11 package from the Hortonworks repository. |
timestampFieldName | For datasources that support time-based filters, the Parallel Bulk Loader computes the timestamp of the last document written to Solr and the current timestamp of the Parallel Bulk Loader job. For example, the HBase data source lets you filter the read between a MIN_STAMP and MAX_STAMP, for example: val timeRangeOpts = Map(HBaseRelation.MIN_STAMP -> minStamp.toString, HBaseRelation.MAX_STAMP -> maxStamp.toString) lets Parallel Bulk Loader jobs run on schedules, and pull only the newest rows from the underlying datasources. To support timestamp based filtering, the Parallel Bulk Loader provides two simple macros: $lastTimestamp(format) $nowTimestamp(format) The format argument is optional. If not supplied, then an ISO-8601 date/time string is used. The timestampFieldName setting is used to determine the value of lastTimestamp, using a Top 1 query to Solr to get the max timestamp. You can also pass $lastTimestamp(EPOCH) or $lastTimestamp(EPOCH_MS) to get the timestamp in seconds or milliseconds. See the Index HBase tables example below for an example of using this configuration property. |
Transformation settings
| Setting | Description |
|---|---|
transformScala | Sometimes, you can write a small script to transform input data into the correct form for indexing. But at other times, you might need the full power of the Spark API to transform data into an indexable form. The transformScala option lets you filter and/or transform the input DataFrame any way you would like. You can even define UDFs to use during your transformation. For an example of using Scala to transform the input DataFrame before indexing in Solr, see the Read from Parquet example. Another powerful use of the transformScala option is that you can pull in advanced libraries, such as Spark NLP (from John Snow Labs) to do NLP work on your content before indexing. See the Use NLP during indexing example. Your Scala script can do other things but, at a minimum, it must define the function that the Parallel Bulk Loader invokes (see below this table). |
transformSql | The transformSql option lets you write a SQL query to transform the input DataFrame. The SQL is executed after the transformScala script (if both are defined). The input DataFrame is exposed to your SQL as the _input view. See the Clean up data with SQL transformations example below for an example of using SQL to transform the input before indexing in Solr. This option also lets you leverage the UDF/UDAF functions provided by Spark SQL. |
mlModelId | If you have a Spark ML PipelineModel loaded into the blob store, you can supply the blob ID to the Parallel Bulk Loader and it will: 1. Load the model from the blob store. 2. Transform the input DataFrame (after the Scala transform but before the SQL transform). 3. Add the predicted output field (specified in the model metadata stored in the blob store) to the projected fields list.  This lets you use Spark ML models to make predictions in a more scalable, performant manner than what can be achieved with a Machine Learning index stage. This lets you use Spark ML models to make predictions in a more scalable, performant manner than what can be achieved with a Machine Learning index stage. |
transformScala:Output settings
| Setting | Description |
|---|---|
outputCollection | Name of the Fusion collection to write to. The Parallel Bulk Loader uses the Collections API to resolve the underlying Solr collection at runtime. |
outputIndexPipeline | Name of a Fusion index pipeline to which to send documents, instead of directly indexing to Solr. This option lets you perform additional ETL (extract, transform, and load) processing on the documents before they are indexed in Solr. If you need to write to time-partitioned indexes, then you must use an index pipeline, because writing directly to Solr is not partition aware. |
defineFieldsUsingInputSchema | Flag to indicate if the Parallel Bulk Loader should use the input schema to create fields in Solr, after applying the Scala and/or SQL transformations. If false, then the Parallel Bulk Loader relies on the Fusion index pipeline and/or Solr field guessing to create the fields. If true, only fields that do not exist already in Solr are created. Consequently, if there is a type mismatch between an existing field in Solr and the input schema, you will need to use a transformation to rename the field in the input schema. |
clearDatasource | If checked, the Parallel Bulk Loader deletes any existing documents in the output collection that match the query _lw_loader_id_s:<JOB>. Consequently, the Parallel Bulk Loader adds two metadata fields to each row: _lw_loader_id_s and _lw_loader_job_id_s. |
atomicUpdates | Flag to send documents directly to Solr as atomic updates instead of as new documents. This option is not supported when using an index profile. Also note that the Parallel Bulk Loader tracking fields _lw_loader_id_s and _lw_loader_job_id_s are not sent when using atomic updates, so the clear datasource option does not work with documents created using atomic updates. |
outputOptions | Options used when writing directly to Solr. See Spark-Solr: https://github.com/lucidworks/spark-solr#index-parameters For example, if your docs are relatively small, you might want to increase the batch_size (2000 default) as shown below: 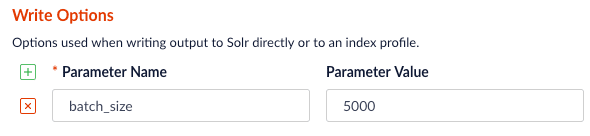 |
outputPartitions | Coalesce the DataFrame into N partitions before writing to Solr. This can help spread the indexing work out across more executors that are available in Spark, or limit the parallelism when writing to Solr. |
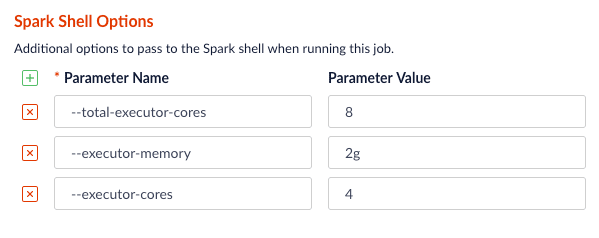
Tune performance
As the name of the Parallel Bulk Loader job implies, it is designed to ingest large amounts of data into Fusion by parallelizing the work across your Spark cluster. To achieve scalability, you might need to increase the amount of memory and/or CPU resources allocated to the job.By default, Fusion’s Spark configuration settings control the resources allocated to Parallel Bulk Loader jobs.You can pass these properties in the job configuration to override the default Spark shell options:| Parameter Name | Description and Default |
|---|---|
--driver-cores | Cores for the driver Default: 1 |
--driver-memory | Memory for the driver (for example, 1000M or 2G) Default: 1024M |
--executor-cores | Cores per executor Default: 1 in YARN mode, or all available cores on the worker in standalone mode |
--executor-memory | Memory per executor (for example, 1000M or 2G) Default: 1G |
--total-executor-cores | Total cores for all executors Default: Without setting this parameter, the total cores for all executors is the number of executors in YARN mode, or all available cores on all workers in standalone mode. |
Examples
Here we provide screenshots and example JSON job definitions to illustrate key points about how to load from different data sources.Use NLP during indexing
In this example, we leverage the John Snow labs NLP library during indexing. This is just quick-and-dirty to show the concept.Also see:- https://github.com/JohnSnowLabs/spark-nlp
-
https://databricks.com/blog/2017/10/19/introducing-natural-language-processing-library-apache-spark.html
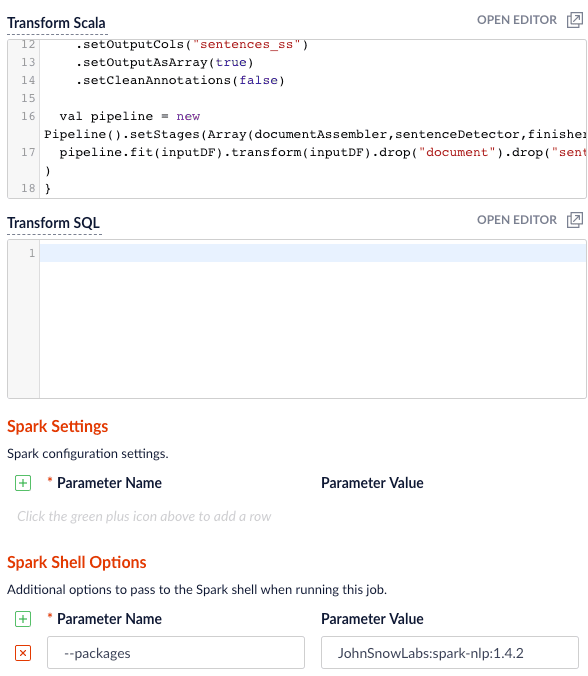
JohnSnowLabs:spark-nlp:1.4.2 package using Spark Shell Options.Clean up data with SQL transformations
Fusion has a Local Filesystem connector that can handle files such as CSV and JSON files. Using the Parallel Bulk Loader lets you leverage features that are not in the Local Filesystem connector, such as using SQL to clean up the input data.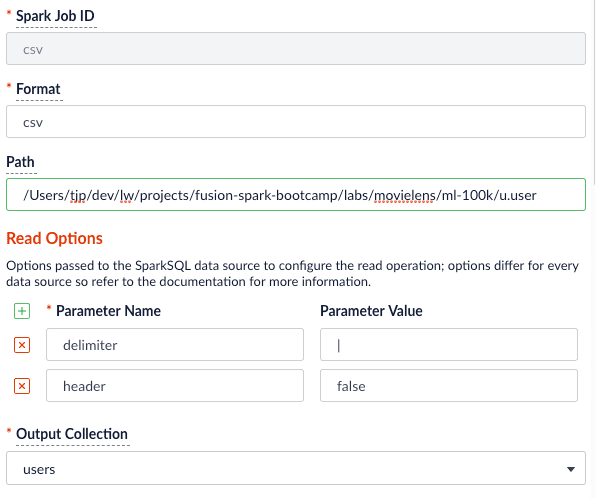
Read from S3
It is easy to read from an S3 bucket without pulling data down to your local workstation first. To avoid exposing your AWS credentials, add them to a file namedcore-site.xml in the apps/spark-dist/conf directory, such as:s3a://sstk-dev/data/u.user. If you are running a Fusion cluster then each instance of Fusion will need a core-site.xml file. S3a is the preferred protocol for reading data into Spark because it uses Amazon’s libraries to read from S3 instead of the legacy Hadoop libraries. If you need other S3 protocols (for example, s3 or s3n) you will need to add the equivalent properties to core-site.xml.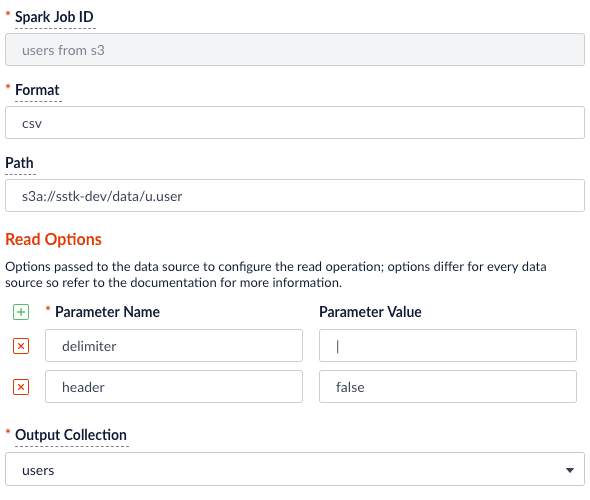
org.apache.hadoop:hadoop-aws:2.7.3 package to the job using the --packages Spark option. Also, you will need to exclude the com.fasterxml.jackson.core:jackson-core,joda-time:joda-time packages using the --exclude-packages option.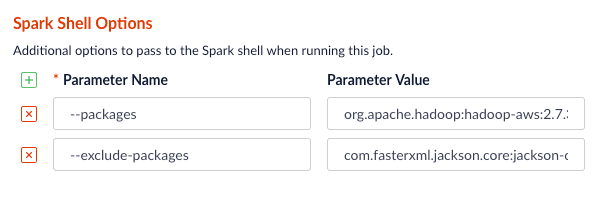
core-site.xml; see Installing the Cloud Storage connector.Read from Parquet
Reading from parquet files is built into Spark using the “parquet” format. For additional read options, see Configuration of Parquet.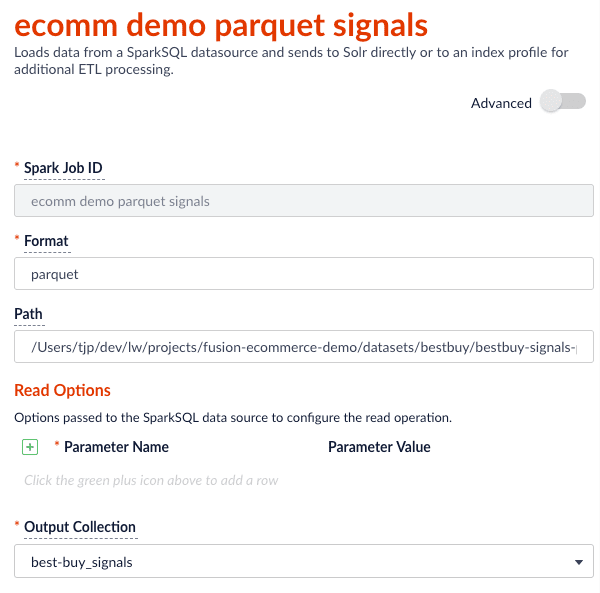
transformScala option to filter and transform the input DataFrame into a better form for indexing using the following Scala script:Read from JDBC tables
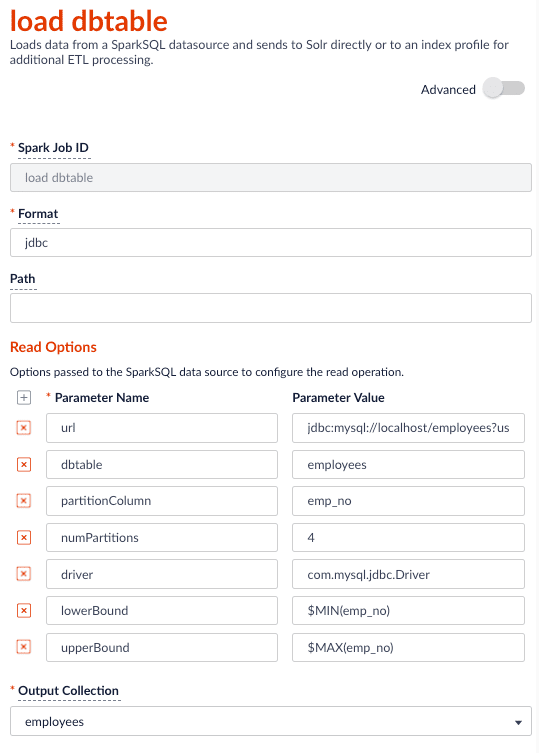
You can use the Parallel Bulk Loader to parallelize reads from JDBC tables, if the tables have numeric columns that can be partitioned into relatively equal partition sizes. In the example below, we partition the employees table into 4 partitions using theemp_no column (int). Behind the scenes, Spark sends four separate queries to the database and processes the result sets in parallel.Load the JDBC driver JAR file into the Blob store
Before you ingest from a JDBC data source, you need to use the Fusion Admin UI to upload the JDBC driver JAR file into the blob store.Alternatively, you can add the JAR file to the Fusion blob store withresourceType=spark:jar; for example:resourceType=spark:jar from the blob store to the appropriate classpaths before running a Parallel Bulk Loader job.Read from a table
- http://spark.apache.org/docs/latest/sql-programming-guide.html#jdbc-to-other-databases
- https://medium.com/@radek.strnad/tips-for-using-jdbc-in-apache-spark-sql-396ea7b2e3d3
$MIN(emp_no) and $MAX(emp_no) macros in the read options. These are macros offered by the Parallel Bulk Loader to help configure parallel reads of JDBC tables. Behind the scenes, the macros are translated into SQL queries to get the MAX and MIN values of the specified field, which Spark uses to compute splits for partitioned queries. As mentioned above, the field must be numeric and must have a relatively balanced distribution of values between MAX and MIN; otherwise, you are unlikely to see much performance benefit to partitioning.Index HBase tables
To index an HBase table, use the Hortonworks connector.The Parallel Bulk Loader lets us replace the HBase Indexer.
hbase-site.xml (and possibly core-site.xml) to apps/spark-dist/conf in Fusion, for example:- Launch the HBase shell and create a table named
fusion_numswith a single column family namedlw: - Do a list command to see your table:
- Fill the table with some data:
- Scan the fusion_nums table to see your data:
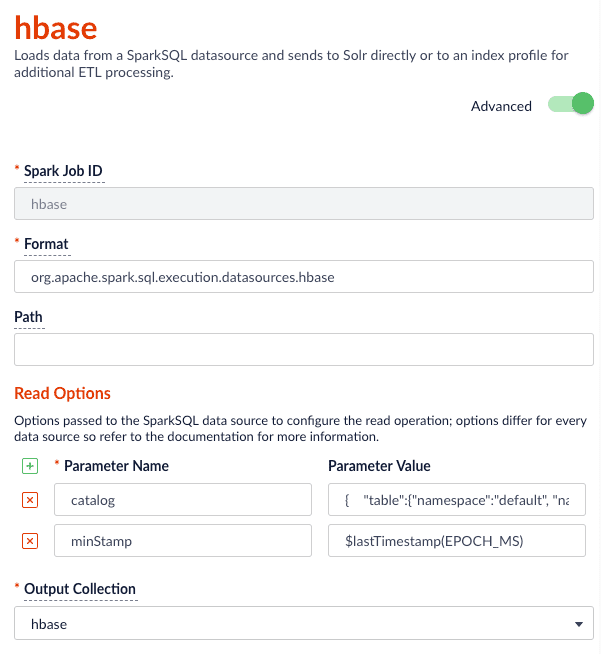
$lastTimestamp macro in the read options. This lets us filter rows read from HBase using the timestamp of the last document the Parallel Bulk Loader wrote to Solr, that is, to get the newest updates from HBase only (incremental updates). Most Spark data sources provide a way to filter results based on timestamp.Job JSON:Index Elastic data
With Elasticsearch 6.2.2 using theorg.elasticsearch:elasticsearch-spark-20_2.11:6.2.1 package, here is a Scala script to run in bin/spark-shell to index some test data: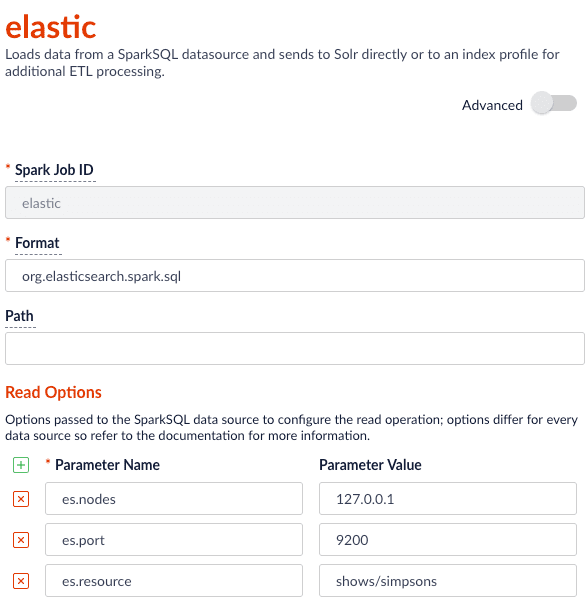
Read from Couchbase
To index a Couchbase bucket, use the official Couchbase Spark connector found here.For example, we will create a test bucket in Couchbase. If you already have a bucket in Couchbase, feel free to use that and skip to the test data setup section. This test was performed using Couchbase Server 6.0.0.- Create a bucket test in the Couchbase admin UI. Give access to a system account user to use in the Parallel Bulk Loader job config.
- Connect to Couchbase using the command line client cbq. For example,
cbq -e=http://<host>:8091 -u <user> -p <password>. Ensure the provided user is an authorized user of the test bucket. - Create a primary index on the test bucket:
CREATE PRIMARY INDEX 'test-primary-index' ON 'test' USING GSI;. - Insert some data:
INSERT INTO 'test' ( KEY, VALUE ) VALUES ( "1", { "id": "01", "field1": "a value", "field2": "another value"} ) RETURNING META().id as docid, *;. - Verify you can query the document just inserted:
select * from 'test';.
com.couchbase.spark.sql.DefaultSource. Then specify the com.couchbase.client:spark-connector_2.11:2.2.0 package as the spark shell --packages option, as well as a few spark settings that direct the connector to a particular Couchbase server and bucket to connect to using the provided credentials. See here for all of the available Spark configuration settings for the Couchbase Spark connector.Putting it all together: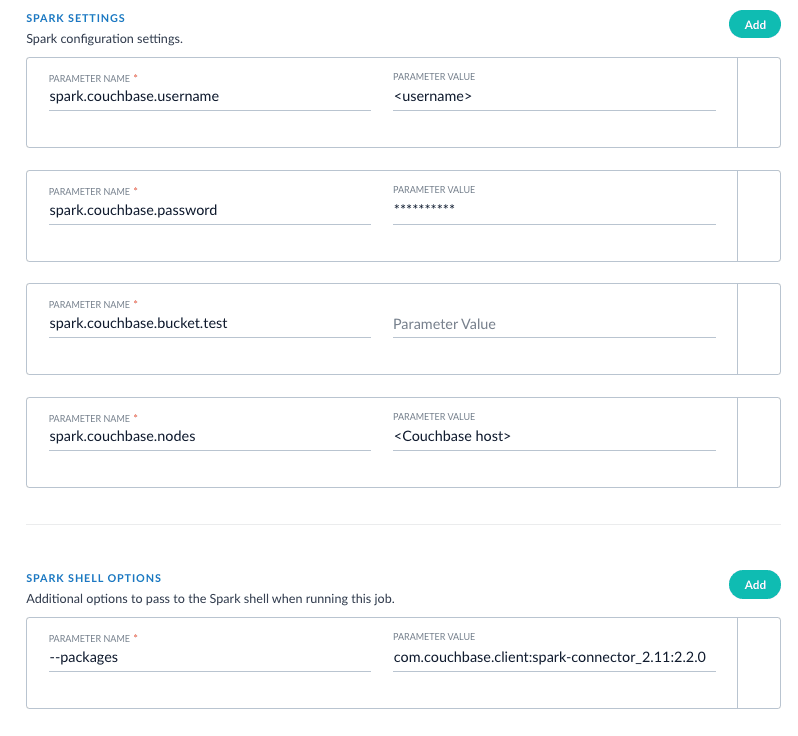
XML setup
XML is a supported format that requires settings forformat and --packages. In addition, you must specify the filepath in the readOptions section. For example:Import Data with Hive
Import Data with Hive
Fusion ships with a Serializer/Deserializer (SerDe) for Hive, included in the distribution as Use a short name for the namespace, containing only letters, digits, or dashes (no dots or underscores). The setup scripts in this repo use the namespace for the Helm release name by default.If you already have helm installed, make sure you’re using the latest version:For other OS, please refer to the Helm installation docs: https://helm.sh/docs/using_helm/The Fusion helm chart requires that helm is greater than version To use these role in a cluster, as an admin user first create the namespace that you wish to install fusion into:Apply the Then bind the rolebinding and clusterolebinding to the install user:You will then be able to run the You should get into the habit of pulling this repo for the latest changes before performing any maintenance operations on your Fusion cluster to ensure you have the latest updates to the scripts.Cloning the github repo is preferred so that you can pull in updates to the scripts, but if you are not a git user, then you can download the project: https://github.com/lucidworks/fusion-cloud-native/archive/master.zip.
Once downloaded, extract the zip and cd into the Use a short name for the namespace, containing only letters, digits, or dashes (no dots or underscores). The setup scripts in this repo use the namespace for the Helm release name by default.If you already have helm installed, make sure you’re using the latest version:For other OS, please refer to the Helm installation docs: https://helm.sh/docs/using_helm/The Fusion helm chart requires that helm is greater than version To use these role in a cluster, as an admin user first create the namespace that you wish to install fusion into:Apply the Then bind the rolebinding and clusterolebinding to the install user:You will then be able to run the You should get into the habit of pulling this repo for the latest changes before performing any maintenance operations on your Fusion cluster to ensure you have the latest updates to the scripts.Cloning the github repo is preferred so that you can pull in updates to the scripts, but if you are not a git user, then you can download the project: https://github.com/lucidworks/fusion-cloud-native/archive/master.zip.
Once downloaded, extract the zip and cd into the Once the submodule has been initialized, the command This will build a single .jar file, To fix this error, use the https://help.github.com/articles/generating-an-ssh-key/ tutorial.If you use Hive with Ambari (as with the Hortonworks HDP distribution), go to menu:Hive[Configs > Advanced], and scroll down to menu:Advanced hive-env[hive-env template]. Find the section where the If not using Ambari or similar cluster management tool, you can add the jar location to Another option is to launch Hive with the path defined with the In this example, we have created an external table named “fusion”, and defined a custom storage handler (Replace the table name as appropriate to use this example with your data.To join data from tables, you can make a request such as:And finally, to insert data to a table, simply use the Solr table as the target for the Hive INSERT statement, such as:
lucidworks-hive-serde-v2.2.6.jar in $FUSION_HOME/apps/connectors/resources/lucid.hadoop/jobs.For Fusion 4.1.x and 4.2.x, the preferred method of importing data with Hive is to use the Parallel Bulk Loader. The import procedure does not apply to Fusion 5.x.
Prerequisites
This section covers prerequisites and background knowledge needed to help you understand the structure of this document and how the Fusion installation process works with Kubernetes.Release Name and Namespace
Before installing Fusion, you need to choose a https://kubernetes.io/docs/concepts/overview/working-with-objects/namespaces/Kubernetes namespace to install Fusion into. Think of a K8s namespace as a virtual cluster within a physical cluster. You can install multiple instances of Fusion in the same cluster in separate namespaces. However, please do not install more than one Fusion release in the same namespace.All Fusion services must run in the same namespace, i.e. you should not try to split a Fusion cluster across multiple namespaces.__
Install Helm
Helm is a package manager for Kubernetes that helps you install and manage applications on your Kubernetes cluster. Regardless of which Kubernetes platform you’re using, you need to installhelm as it is required to install Fusion for any K8s platform.
On MacOS, you can do:3.0.0; check your Helm version by running helm version --short.Helm User Permissions
If you require that fusion is installed by a user with minimal permissions, instead of an admin user, then the role and cluster role that will have to be assigned to the user within the namespace that you wish to install fusion in are documented in theinstall-roles directory.When working with Kubernetes on the command-line, it’s useful to create a shell alias for
kubectl, e.g.:role.yaml and cluster-role.yaml files to that namespacehelm install command as the <install_user>Clone fusion-cloud-native from GitHub
You should clone this repo from github as you’ll need to run the scripts on your local workstation:fusion-cloud-native-master directory.Prerequisites
This section covers prerequisites and background knowledge needed to help you understand the structure of this document and how the Fusion installation process works with Kubernetes.Release Name and Namespace
Before installing Fusion, you need to choose a https://kubernetes.io/docs/concepts/overview/working-with-objects/namespaces/Kubernetes namespace to install Fusion into. Think of a K8s namespace as a virtual cluster within a physical cluster. You can install multiple instances of Fusion in the same cluster in separate namespaces. However, please do not install more than one Fusion release in the same namespace.All Fusion services must run in the same namespace, i.e. you should not try to split a Fusion cluster across multiple namespaces.__
Install Helm
Helm is a package manager for Kubernetes that helps you install and manage applications on your Kubernetes cluster. Regardless of which Kubernetes platform you’re using, you need to installhelm as it is required to install Fusion for any K8s platform.
On MacOS, you can do:3.0.0; check your Helm version by running helm version --short.Helm User Permissions
If you require that fusion is installed by a user with minimal permissions, instead of an admin user, then the role and cluster role that will have to be assigned to the user within the namespace that you wish to install fusion in are documented in theinstall-roles directory.When working with Kubernetes on the command-line, it’s useful to create a shell alias for
kubectl, e.g.:role.yaml and cluster-role.yaml files to that namespacehelm install command as the <install_user>Clone fusion-cloud-native from GitHub
You should clone this repo from github as you’ll need to run the scripts on your local workstation:fusion-cloud-native-master directory.Hive SerDe
This project includes tools to build a Hive SerDe to index Hive tables to Solr.Features
- Index Hive table data to Solr.
- Read Solr index data to a Hive table.
- Kerberos support for securing communication between Hive and Solr.
- As of v2.2.4 of the SerDe, integration with http://lucidworks.com/products is supported. *Fusion’s index pipelines can be used to index data to Fusion. *Fusion’s query pipelines can be used to query Fusion’s Solr instance for data to insert into a Hive table.
This version of
hive-solr supports Hive 3.0.0. For support for Hive 1.x, see the hive_1x branch.hive-solr should only be used with Solr 5.0 and higher.Build the SerDe Jar
This project has a dependency on thesolr-hadoop-common submodule (contained in a separate GitHub repository, https://github.com/lucidworks/solr-hadoop-common). This submodule must be initialized before building the SerDe .jar.To initialize the submodule, pull this repo, then:git submodule update will fetch all the data from that project and check out the appropriate commit listed in the superproject. You must initialize and update the submodule before attempting to build the SerDe jar.- If a build is happening from a branch, make sure that
solr-hadoop-commonis pointing to the correct SHA. (See https://github.com/blog/2104-working-with-submodules for more details.)
solr-hive-serde/build/libs/{packageUser}-hive-serde-{connectorVersion}.jar, which can be used with Hive v3.0. Other Hive versions (such as v2.x) may work with this jar, but have not been tested.Troubleshooting Clone Issues
If GitHub and SSH are not configured the following exception will be thrown:Add the SerDe Jar to Hive Classpath
In order for the Hive SerDe to work with Solr, the SerDe jar must be added to Hive’s classpath using thehive.aux.jars.path capability. There are several options for this, described below.It’s considered a best practice to use a single directory for all auxiliary jars you may want to add to Hive so you only need to define a single path. However, you must then copy any jars you want to use to that path.The following options all assume you have created such a directory at
/usr/hive/auxlib; if you use another path, update the path in the examples accordingly.HIVE_AUX_JARS_PATH is defined, and add the path to each line which starts with export. What you want will end up looking like:hive/conf/hive-site.xml:auxpath variable:
hive —auxpath /usr/hive/auxlibThere are also other approaches that could be used. Keep in mind, though, that the jar must be loaded into the classpath, adding it with the ADD JAR function is not sufficient.Indexing Data with a Hive External Table
Indexing data to Solr or Fusion requires creating a Hive external table. An external table allows the data in the table to be used (read or write) by another system or application outside of Hive.Indexing Data to Solr
For integration with Solr, the external table allows you to have Solr read from and write to Hive.To create an external table for Solr, you can use a command similar to below. The properties available are described after the example.-
<1>In this example, we have created an external table named “solr”, and defined a set of fields and types for the data we will store in the table. See the section<<Defining Fields for Solr>>below for best practices when naming fields. -
<2>This defines a custom storage handler (STORED BY 'com.lucidworks.hadoop.hive.LWStorageHandler'), which is one of the classes included with the Hive SerDe jar. -
<3>The LOCATION indicates the location in HDFS where the table data will be stored. In this example, we have chosen to use/tmp/solr. -
<4>In the section TBLPROPERTIES, we define several parameters for Solr so the data can be indexed to the right Solr installation and collection. See the section<<Table Properties>>below for details about these parameters.
Defining Fields for Solr
When defining the field names for the Hive table, keep in mind that the field types used to define the table in Hive are not sent to Solr when indexing data from a Hive table. The field names are sent, but not the field types. The field types must match or be compatible, however, for queries to complete properly.The reason why this might be a problem is due to a Solr feature called schema guessing. This is Solr’s default mode, and when it is enabled Solr looks at incoming data and makes a best guess at the field type.It can happen that Solr’s guess at the correct type may be different from the type defined in Hive, and if this happens you will get aClassCastException in response to queries.To avoid this problem, you can use a Solr feature called dynamic fields. These direct Solr to use specific field types based on a prefix or suffix found on an incoming field name, which overrides Solr guessing at the type. Solr includes by default dynamic field rules for nearly all types it supports, so you only need to use the same suffix on your field names in your Hive tables for the correct type to be defined.To illustrate this, note the field names in the table example above:CREATE EXTERNAL TABLE solr (id string, field1_s string, field2_i int)In this example, we have defined the id field as a string, field1_s as a string, and field2_i as an integer. In Solr’s default schema, there is a dynamic field rule that any field with a _s suffix should be a string. Similarly, there is another rule that any field with _i as a suffix should be an integer. This allows us to make sure the field types match.An alternative to this is to disable Solr’s field guessing altogether, but this would require you to create all of your fields in Solr before indexing any content from Hive.For more information about these features and options, please see the following sections of the Apache Solr Reference Guide:- https://lucene.apache.org/solr/guide/{refGuideVersion}/schemaless-mode.html
- https://lucene.apache.org/solr/guide/{refGuideVersion}/dynamic-fields.html
- https://lucene.apache.org/solr/guide/{refGuideVersion}/field-types-included-with-solr.html
Table Properties
The following parameters can be set when defining the table properties:solr.zkhost:
The location of the ZooKeeper quorum if using LucidWorks in SolrCloud mode. If this property is set along with the solr.server.url property, the solr.server.url property will take precedence.solr.server.url:
The location of the Solr instance if not using LucidWorks in SolrCloud mode. If this property is set along with the solr.zkhost property, this property will take precedence.solr.collection:
The Solr collection for this table. If not defined, an exception will be thrown.solr.query:
The specific Solr query to execute to read this table. If not defined, a default of \*:* will be used. This property is not needed when loading data to a table, but is needed when defining the table so Hive can later read the table.lww.commit.on.close:
If true, inserts will be automatically committed when the connection is closed. True is the default.lww.jaas.file:
Used only when indexing to or reading from a Solr cluster secured with Kerberos.
This property defines the path to a JAAS file that contains a service principal and keytab location for a user who is authorized to read from and write to Solr and Hive.
The JAAS configuration file must be copied to the same path on every node where a Node Manager is running (i.e., every node where map/reduce tasks are executed). Here is a sample section of a JAAS file:<1>The name of this section of the JAAS file. This name will be used with thelww.jaas.appnameparameter.<2>The location of the keytab file.<3>The service principal name. This should be a different principal than the one used for Solr, but must have access to both Solr and Hive.
lww.jaas.appname:
Used only when indexing to or reading from a Solr cluster secured with Kerberos.
This property provides the name of the section in the JAAS file that includes the correct service principal and keytab path.Indexing Data to Fusion
If you use Lucidworks Fusion, you can index data from Hive to Solr via Fusion’s index pipelines. These pipelines allow you several options for further transforming your data.This is an example Hive command to create an external table to index documents in Fusion and to query the table later.STORED BY 'com.lucidworks.hadoop.hive.FusionStorageHandler') that a class included with the Hive SerDe jar designed for use with Fusion.Note that all of the same caveats about field types discussed in the section <<Defining Fields for Solr>> apply to Fusion as well. In Fusion, however, you have the option of using an index pipeline to perform specific field mapping instead of using dynamic fields.The LOCATION indicates the location in HDFS where the table data will be stored. In this example, we have chosen to use /tmp/fusion.In the section TBLPROPERTIES, we define several properties for Fusion so the data can be indexed to the right Fusion installation and collection:fusion.endpoints:
The full URL to the index pipeline in Fusion. The URL should include the pipeline name and the collection data will be indexed to.fusion.fail.on.error:
If true, when an error is encountered, such as if a row could not be parsed, indexing will stop. This is false by default.fusion.buffer.timeoutms:
The amount of time, in milliseconds, to buffer documents before sending them to Fusion. The default is 1000. Documents will be sent to Fusion when either this value or fusion.batchSize is met.fusion.batchSize:
The number of documents to batch before sending the batch to Fusion. The default is 500. Documents will be sent to Fusion when either this value or fusion.buffer.timeoutms is met.fusion.realm:
This is used with fusion.user and fusion.password to authenticate to Fusion for indexing data. Two options are supported, KERBEROS or NATIVE.
Kerberos authentication is supported with the additional definition of a JAAS file. The properties java.security.auth.login.config and fusion.jaas.appname are used to define the location of the JAAS file and the section of the file to use.
Native authentication uses a Fusion-defined username and password. This user must exist in Fusion, and have the proper permissions to index documents.fusion.user:
The Fusion username or Kerberos principal to use for authentication to Fusion. If a Fusion username is used ('fusion.realm' = 'NATIVE'), the fusion.password must also be supplied.fusion.password:
This property is not shown in the example above. The password for the fusion.user when the fusion.realm is NATIVE.java.security.auth.login.config:
This property defines the path to a JAAS file that contains a service principal and keytab location for a user who is authorized to read from and write to Fusion and Hive.
The JAAS configuration file must be copied to the same path on every node where a Node Manager is running (i.e., every node where map/reduce tasks are executed). Here is a sample section of a JAAS file:<1>The name of this section of the JAAS file. This name will be used with thefusion.jaas.appnameparameter.<2>The location of the keytab file.<3>The service principal name. This should be a different principal than the one used for Fusion, but must have access to both Fusion and Hive. This name is used with thefusion.userparameter described above.
fusion.jaas.appname:
Used only when indexing to or reading from Fusion when it is secured with Kerberos.
This property provides the name of the section in the JAAS file that includes the correct service principal and keytab path.fusion.query.endpoints:
The full URL to a query pipeline in Fusion. The URL should include the pipeline name and the collection data will be read from. You should also specify the request handler to be used.
If you do not intend to query your Fusion data from Hive, you can skip this parameter.fusion.query:
The query to run in Fusion to select records to be read into Hive. This is \*:* by default, which selects all records in the index.
If you do not intend to query your Fusion data from Hive, you can skip this parameter.Query and Insert Data to Hive
Once the table is configured, any syntactically correct Hive query will be able to query the index.For example, to select three fields named “id”, “field1_s”, and “field2_i” from the “solr” table, you would use a query such as:Example Indexing Hive to Solr
Solr includes a small number of sample documents for use when getting started. One of these is a CSV file containing book metadata. This file is found in your Solr installation, at$SOLR_HOME/example/exampledocs/books.csv.Using the sample books.csv file, we can see a detailed example of creating a table, loading data to it, and indexing that data to Solr.<1>Define the tablebooks, and provide the field names and field types that will make up the table.<2>Load the data from thebooks.csvfile.<3>Create an external table namedsolr, and provide the field names and field types that will make up the table. These will be the same field names as in your local Hive table, so we can index all of the same data to Solr.<4>Define the custom storage handler provided by the{packageUser}-hive-serde-{connectorVersion}.jar.<5>Define storage location in HDFS.<6>The query to run in Solr to read records from Solr for use in Hive.<7>Define the location of Solr (or ZooKeeper if using SolrCloud), the collection in Solr to index the data to, and the query to use when reading the table. This example also refers to a JAAS configuration file that will be used to authenticate to the Kerberized Solr cluster.
Import Data with Pig
Import Data with Pig
You can use Pig to import data into Fusion, using the Once the submodule has been initialized, the command To fix this error, use the https://help.github.com/articles/generating-an-ssh-key/ tutorial.This relatively simple script is doing several things that help to understand how the Solr Pig functions work.The parameters to pass are:
lucidworks-pig-functions-v2.2.6.jar file found in $FUSION_HOME/apps/connectors/resources/lucid.hadoop/jobs.Features
- Functions to allow Pig scripts to index data to Solr or Fusion.
- Supports Kerberos for authentication.
- As of v2.2.4, integration with http://lucidworks.com/products is supported, allowing use of Fusion pipelines for further data transformation prior to indexing.
- Solr 5.x and higher
- Pig versions 0.12 through 0.16
- Hadoop 3.x
- Fusion 2.4.x and higher
Build the Functions Jar
This project has a dependency on thesolr-hadoop-common submodule (contained in a separate GitHub repository, https://github.com/lucidworks/solr-hadoop-common). This submodule must be initialized before building the Functions jar.To initialize the submodule, pull this repo, then:git submodule update will fetch all the data from that project and check out the appropriate commit listed in the superproject. You must initialize and update the submodule before attempting to build the Functions jar.- If a build is happening from a branch, please make sure that
solr-hadoop-commonis pointing to the correct SHA. (See https://github.com/blog/2104-working-with-submodules for more details.)
./gradlew clean shadowJar --infoThis will make a .jar file:solr-pig-functions/build/libs/-pig-functions-.jarThe .jar is required to use the Pig functions.Troubleshooting Clone Issues
If GitHub + SSH is not configured the following exception will be thrown:Available Functions
The Pig functions included in the{packageUser}-pig-functions-{connectorVersion}.jar are three UserDefined Functions (UDF) and two Store functions. These functions are:com/lucidworks/hadoop/pig/SolrStoreFunc.classcom/lucidworks/hadoop/pig/FusionIndexPipelinesStoreFunc.classcom/lucidworks/hadoop/pig/EpochToCalendar.classcom/lucidworks/hadoop/pig/Extract.classcom/lucidworks/hadoop/pig/Histogram.class
Using the Functions
Register the Functions
There are two approaches to using functions in Pig:REGISTER them in the script, or load them with your Pig command line request.If using REGISTER, the Pig function jars must be put in HDFS in order to be used by your Pig script. It can be located anywhere in HDFS; you can either supply the path in your script or use a variable and define the variable with -p property definition.The example below uses the second approach, loading the jars with the -Dpig.additional.jars system property when launching the script. With this approach, the jars can be located anywhere on the machine where the script will be run.Indexing Data to Solr
There are a few required parameters for your script to output data to Solr for indexing.These parameters can be defined in the script itself, or turned into variables that are defined each time the script runs. The example Pig script below shows an example of using these parameters with variables.solr.zkhost:
The ZooKeeper connection string if using Solr in SolrCloud mode. This should be in the form of server:port,server:port,server:port/chroot.If you are not using SolrCloud, use the solr.server.url parameter instead.solr.server.url:
The location of the Solr instance when Solr is running in standalone mode. This should be in the form of \http://server:port/solr.solr.collection:
The name of the Solr collection where documents will be indexed.Indexing to a Kerberos-Secured Solr Cluster
When a Solr cluster is secured with Kerberos for internode communication, Pig scripts must include the full path to a JAAS file that includes the service principal and the path to a keytab file that will be used to index the output of the script to Solr.Two parameters provide the information the script needs to access the JAAS file:lww.jaas.file:
The path to the JAAS file that includes a section for the service principal who will write to the Solr indexes. For example, to use this property in a Pig script:
set lww.jaas.file ‘/path/to/login.conf’;
The JAAS configuration file must be copied to the same path on every node where a Node Manager is running (i.e., every node where map/reduce tasks are executed).lww.jaas.appname:
The name of the section in the JAAS file that includes the correct service principal and keytab path. For example, to use this property in a Pig script:
set lww.jaas.appname ‘Client’;Here is a sample section of a JAAS file:<1>The name of this section of the JAAS file. This name will be used with thelww.jaas.appnameparameter.<2>The location of the keytab file.<3>The service principal name. This should be a different principal than the one used for Solr, but must have access to both Solr and Pig.
Indexing to a SSL-Enabled Solr Cluster
When SSL is enabled in a Solr cluster, Pig scripts must include the full paths to thekeystore and truststore with their respective passwords.set lww.keystore ‘/path/to/solr-ssl.keystore.jks’
set lww.keystore.password ‘secret’
set lww.truststore ‘/path/to/solr-ssl.truststore.jks’
set lww.truststore.password ‘secret’Indexing Data to Fusion
When indexing data to Fusion, there are several parameters to pass with your script in order to output data to Fusion for indexing.These parameters can be made into variables in the script, with the proper values passed on the command line when the script is initiated. The example script below shows how to do this for Solr. The theory is the same for Fusion, only the parameter names would change as appropriate:fusion.endpoints:
The full URL to the index pipeline in Fusion. The URL should include the pipeline name and the collection data will be indexed to.fusion.fail.on.error:
If true, when an error is encountered, such as if a row could not be parsed, indexing will stop. This is false by default.fusion.buffer.timeoutms:
The amount of time, in milliseconds, to buffer documents before sending them to Fusion. The default is 1000. Documents will be sent to Fusion when either this value or fusion.batchSize is met.fusion.batchSize:
The number of documents to batch before sending the batch to Fusion. The default is 500. Documents will be sent to Fusion when either this value or fusion.buffer.timeoutms is met.fusion.realm:
This is used with fusion.user and fusion.password to authenticate to Fusion for indexing data. Two options are supported, KERBEROS or NATIVE.
Kerberos authentication is supported with the additional definition of a JAAS file. The properties java.security.auth.login.config and fusion.jaas.appname are used to define the location of the JAAS file and the section of the file to use. These are described in more detail below.
Native authentication uses a Fusion-defined username and password. This user must exist in Fusion, and have the proper permissions to index documents.fusion.user:
The Fusion username or Kerberos principal to use for authentication to Fusion.
If a Fusion username is used ('fusion.realm' = 'NATIVE'), the fusion.password must also be supplied.fusion.pass:
This property is not shown in the example above. The password for the fusion.user when the fusion.realm is NATIVE.Indexing to a Kerberized Fusion Installation
When Fusion is secured with Kerberos, Pig scripts must include the full path to a JAAS file that includes the service principal and the path to a keytab file that will be used to index the output of the script to Fusion.Additionally, a Kerberos ticket must be obtained on the server for the principal usingkinit.java.security.auth.login.config:
This property defines the path to a JAAS file that contains a service principal and keytab location for a user who is authorized to write to Fusion.
The JAAS configuration file must be copied to the same path on every node where a Node Manager is running (i.e., every node where map/reduce tasks are executed). Here is a sample section of a JAAS file:<1>The name of this section of the JAAS file. This name will be used with thefusion.jaas.appnameparameter.<2>The location of the keytab file.<3>The service principal name. This should be a different principal than the one used for Fusion, but must have access to both Fusion and Pig. This name is used with thefusion.userparameter described above.
fusion.jaas.appname:
Used only when indexing to or reading from Fusion when it is secured with Kerberos.
This property provides the name of the section in the JAAS file that includes the correct service principal and keytab path.Sample CSV Script
The following Pig script will take a simple CSV file and index it to Solr.<1>This and the line above define parameters that are needed bySolrStoreFuncto know where Solr is.SolrStoreFuncneeds the propertiessolr.zkhostandsolr.collection, and these lines are mapping thezkhostandcollectionparameters we will pass when invoking Pig to the required properties.<2>Load the CSV file, the path and name we will pass with thecsvparameter. We also define the field names for each column in CSV file, and their types.<3>For each item in the CSV file, generate a document id from the first field ($0) and then define each field name and value inname, valuepairs.<4>Load the documents into Solr, using theSolrStoreFunc. While we don’t need to define the location of Solr here, the function will use thezkhostandcollectionproperties that we will pass when we invoke our Pig script.
-p option, such as in this command:csv:
The path and name of the CSV file we want to process.zkhost:
The ZooKeeper connection string for a SolrCloud cluster, in the form of zkhost1:port,zkhost2:port,zkhost3:port/chroot. In the script, we mapped this to the solr.zkhost property, which is required by the SolrStoreFunc to know where to send the output documents.collection:
The Solr collection to index into. In the script, we mapped this to the solr.collection property, which is required by the SolrStoreFunc to know the Solr collection the documents should be indexed to.Import Data with the REST API
Import Data with the REST API
It is often possible to get documents into Fusion Server by configuring a datasource with the appropriate connector.But if there are obstacles to using connectors, it can be simpler to index documents with a REST API call to an index profile or pipeline.To prevent the terminal from displaying all the data and metadata it indexes—useful if you are indexing a large file—you can optionally append In Fusion 5, documents can be created on the fly using the PipelineDocument JSON notation.The
Push documents to Fusion using index profiles
Index profiles allow you to send documents to a consistent endpoint (the profile alias) and change the backend index pipeline as needed. The profile is also a simple way to use one pipeline for multiple collections without any one collection “owning” the pipeline.Send data to an index profile that is part of an app
Accessing an index profile through an app lets a Fusion admin secure and manage all objects on a per-app basis. Security is then determined by whether a user can access an app. This is the recommended way to manage permissions in Fusion.The syntax for sending documents to an index profile that is part of an app is as follows:Spaces in an app name become underscores. Spaces in an index profile name become hyphens.
?echo=false to the URL.Be sure to set the content type header properly for the content being sent. Some frequently used content types are:- Text:
application/json,application/xml - PDF documents:
application/pdf - MS Office:
- DOCX:
application/vnd.openxmlformats-officedocument.wordprocessingml.document - XLSX:
application/vnd.openxmlformats-officedocument.spreadsheetml.sheet - PPTX:
application/vnd.vnd.openxmlformats-officedocument.presentationml.presentation - More types: http://filext.com/faq/office_mime_types.php
- DOCX:
Example: Send JSON data to an index profile under an app
In$FUSION_HOME/apps/solr-dist/example/exampledocs you can find a few sample documents. This example uses one of these, books.json.To push JSON data to an index profile under an app:- Create an index profile. In the Fusion UI, click Indexing > Index Profiles and follow the prompts.
- From the directory containing
books.json, enter the following, substituting your values for username, password, and index profile name: - Test that your data has made it into Fusion:
- Log into the Fusion UI.
- Navigate to the app where you sent your data.
- Navigate to the Query Workbench.
- Search for
\*:*. - Select relevant Display Fields, for example
authorandname.
Example: Send JSON data without defining an app
In most cases it is best to delegate permissions on a per-app basis. But if your use case requires it, you can push data to Fusion without defining an app.To send JSON data without app security, issue the following curl command:Example: Send XML data to an index profile with an app
To send XML data to an app, use the following:Remove documents
Example 1
The following example removes content:Example 2
A more specific example removes data frombooks.json. To delete “The Lightning Thief” and “The Sea of Monsters” from the index, use their id values in the JSON file.The del-json-data.json file to delete the two books:?echo=false can be used to turn off the response to the terminal.Example 3
Another example to delete items using the Push API is:Send documents to an index pipeline
Although sending documents to an index profile is recommended, if your use case requires it, you can send documents directly to an index pipeline.For more information about index pipeline REST API reference documentation, select the link for your Fusion release:Specify a parser
When you push data to a pipeline, you can specify the name of the parser by adding a parserId querystring parameter to the URL. For example:https://FUSION_HOST:FUSION_PORT/api/index-pipelines/INDEX_PIPELINE/collections/COLLECTION_NAME/index?parserId=PARSER.If you do not specify a parser, and you are indexing outside of an app (https://FUSION_HOST:FUSION_PORT/api/index-pipelines/...), then the _system parser is used.If you do not specify a parser, and you are indexing in an app context (https://FUSION_HOST:FUSION_PORT/api/apps/APP_NAME/index-pipelines/...), then the parser with the same name as the app is used.Indexing CSV Files
In the usual case, to index a CSV or TSV file, the file is split into records, one per row, and each row is indexed as a separate document.Import Signals
Import Signals
Normally, signals are indexed as streaming data during the natural activity of users. This topic describes how to load historical signals data in batches, in Parquet format, using Spark shell.
Fusion’s performance may be affected during this resource-intensive operation. Be sure to allocate sufficient memory for the Spark, Solr, and connectors services.
- Customize the code below by replacing the following strings:
path_of_folder. The absolute path to the folder containing your Parquet files.collection_name_signals. The name of the signals collection where you want to load these signals.localhost:9983/lwfusion/4.2.2/solr- You can verify the correct path by going to the Solr console athttp://fusion_host:8983/solr/#/and looking for the value ofDzkHost.
For information aboutcommit_withinandbatch_size, see https://github.com/lucidworks/spark-solr#commit_within. - Launch the Spark shell:
- At the
scala>prompt, enter paste mode: - Paste your modified code from step 1.
- Exit paste mode by pressing
CTRL-d. - When the operation is finished, navigate to Collections > Collections Manager to verify that the number of documents in the specified signals collection has increased as expected.
Indexing
Indexing converts your data into an indexed collection in Fusion’s Solr core. It is critical for ensuring that your data is stored in a format that is ideal for your search application.- Index pipelines determine the details of the conversion.
- Index pipeline stages are the building blocks of index pipelines.
- The Index Workbench is Fusion’s index pipeline development tool.