Fusion uses a number of security measures:Documentation Index
Fetch the complete documentation index at: https://doc.lucidworks.com/llms.txt
Use this file to discover all available pages before exploring further.
- Authenticating UI users – Fusion authenticates users when they log in. Logging in creates a new Fusion session. Fusion also authenticates users when the Sessions REST API creates a session.
-
Authorizing UI users – Fusion authorizes users to use specific parts of the Fusion UI.
UI users must also be authorized to make API requests, because the UI makes API requests.
-
Audit trail (log) with USERID generated for all successful and failed login attempts. Audit logs are sent to a Solr collection system logs. These logs are distinguished from other system logs in the collection by the following attribute:
logger_class_s:"com.lucidworks.cloud.gateway.audit"
- Authenticating and authorizing users who make API requests
- Password Encryption- Fusion uses 128-bit AES keys to encrypt passwords and “AES/CBC/PKCS7Padding” for the cipher. The ciphertext is also signed.
- Using session cookies
- Using an external authentication provider (optional) - A security realm can specify use of an external authentication provider, such as LDAP, JWT, or SAML.
- Using SSL/TLS to ensure that data in flight between your application and Fusion is not observable (optional) - See SSL Security (Unix) or SSL Security (Windows).
- Constraining the documents that are indexed (optional)
- Trimming the documents that are returned by queries based on authorization (optional)
SSL Security (Unix)
SSL Security (Unix)
Fusion’s UI (which is accessed through the Fusion Proxy service) can run over SSL for secure communication with any HTTP client, using the
Java Secure Socket Extension (JSSE) framework. You configure Fusion for SSL by configuring Fusion’s Proxy and UI services.If Fusion is behind a firewall, you can use a self-signed certificate for SSL communication with other hosts in your internal network. Create a keystore for the Fusion Proxy service and load the keystore with the self-signed PKCS #12 certificate.To store certificates, you can use the Java keytool
Key and Certificate Management utility which is a part of the JDK.How to create a keystore and load a self-signed certificateWhere In a production environment, SSL certificates typically originate with certificate signing requests (CSRs) and are signed by a trusted third-party Certificate Authority (CA).The steps here assume that you are the person who will be obtaining the SSL certificate chain and private key files. If you are not that person, contact your system administrator.With the certificate chain and private key as separate files, use the You can only use this alternative if your SSL certificate covers a hostname that can be accessed from the local host. For example, if your certificate only covers
Fusion 4.0.2 or later is required to enable SSL security. Version 4.0.2 fixed a bug in the authentication proxy that incorrectly redirected some requests when SSL is enabled.
Required software
Configuring Fusion for SSL requires the following software:- Java Development Kit. To store certificates, you can use the Java keytool Key and Certificate Management utility which is a part of the JDK. The JDK is also a requirement for Fusion Server.
-
OpenSSL. You might need the
opensslcommand line tool:- If you have the certificate chain and private key as separate files, then you can use the
opensslcommand line tool to create a PKCS #12 file. - If you have an intermediate CA certificate, then you can use it and
opensslto generate the certificate chain and private key files.
- If you have the certificate chain and private key as separate files, then you can use the
Load an SSL certificate into a Fusion keystore
The SSL protocol is based on public-key cryptography where encryption keys come in public key/private key pairs. An SSL certificate is used to verify the authenticity of a particular server. It contains the web site name, contact email address, company information and the public key used to encrypt the communication which is shared with the entities that communicate with the owner of the public/private key pair.The server has a locally-protected private key that is accessible via a JSEE keystore.The keystore maintains both the server certificate and the private key, so that when a server authenticates itself to the client, it uses the private key from its keystore for the initial SSL handshake.Load the certificate into a Fusion keystore. Perform the tasks in the appropriate section:- Self-signed certificate. If Fusion is behind a firewall, you can use a self-signed certificate for SSL communication with other hosts in your internal network. Create a keystore for the Fusion Proxy service and load the keystore with the self-signed PKCS #12 certificate.
- Certificate signed by a certificate authority. In a production environment, SSL certificates typically originate with certificate signing requests (CSRs) and are signed by a trusted third-party Certificate Authority (CA). Create a keystore for the Fusion Proxy service and load the keystore with the PKCS #12 certificate from a CA.
Alternative 1: Self-signed certificate
If you are using a CSR-originated certificate from a trusted certificate authority, proceed to Alternative 2: CA-signed certificate.
-
Set environment variables:
For example, in Fusion 4.1:In Fusion 4.0.x:
-
Create the Fusion Proxy service keystore, generate the key pair and self-signed certificate, and load them into the keystore:
Example command:You must include the qualified domain name and/or the IP address of the Fusion server in the
-ext SANpart of the command. Failure to do so results in SSL validation errors.
ProxyPort is the Fusion Proxy port.Alternative 2: CA-signed certificate
If Fusion is behind a firewall and you are using a self-signed certificate, skip this section. Perform the tasks in Alternative 1: Self-signed certificate.
Preliminary steps
- Obtain a domain from a domain registrar.
- Change the A record of your domain to the public IP address of your web server instance.
Generate SSL certificate files
Use an SSL certificate provider to generate the certificate chain and private key files, or a PKCS #12 certificate, from a trusted CA:- Certificate chain and private key files. In this case, you will need to convert these files into a single certificate file in PKCS #12 format.
- A PKCS #12 certificate. This must contain both the certificate chain and private key. In this case, no conversion is necessary.
- In most cases, you will need to temporarily open ports 80 and 443 in your firewall configuration. The SSL certificate provider must be able to make successful HTTP and HTTPS requests to your server through the Domain Name System (DNS).
- Use an SSL certificate provider to generate the certificate chain (
fullchain.pem) and private key (privkey.pem) files, or the PKCS #12 certificate, from a trusted CA. Steps will vary based on the certificate provider. Contact your certificate provider for details. - Close ports 80 and 443 in your firewall configuration.
- Change the A record of your domain to the public domain-name address of your web server instance.
- If you have certificate chain and private key files, perform the steps in Convert the certificate chain and private key files to a PKCS #12 certificate and Import the PKCS #12 certificate into the Fusion Proxy service keystore.
- If you have a PKCS #12 certificate, perform the steps in Import the PKCS #12 certificate into the Fusion Proxy service keystore.
Convert the certificate chain and private key files to a PKCS #12 certificate
If you have a PKCS #12 certificate, skip this section and proceed to the section Import the PKCS #12 certificate into the Fusion Proxy service keystore.
openssl command line tool in OpenSSL to create a PKCS #12 certificate.Do not enter a blank password.
Create the Fusion Proxy service keystore and import the PKCS #12 certificate
Use the Java keytool Key and Certificate Management utility to create a keystore for the Fusion Proxy service ($FUSION_HOME/apps/jetty/proxy/etc/keystore) and import the PKCS #12 certificate file. Fusion uses this certificate to perform SSL.- To create the keystore and import the PKCS #12 certificate:
-
Use the keytool
importcommand to create a JSSE keystore. -
(Optional) If desired, delete the PKCS #12 certificate file that resides outside of the Fusion Proxy service keystore (the one you created from the certificate chain and private key files, or obtained from a trusted CA.
Enable HTTPS in the Fusion Proxy service
Before beginning these steps, load an SSL certificate into a Fusion keystore.How to enable HTTPS in the Fusion Proxy service:-
(Only for Fusion Server 4.0.x and 4.1.0) Prevent the
start.jarprogram from downloading a default keystore file, which is not needed. Edit$FUSION_HOME/apps/jetty/home/modules/ssl.mod. Comment out the indicated line using#. Change:To: -
Set environment variables:
For example, in Fusion 4.1:In Fusion 4.0:
-
Add HTTPS protocol support to the Jetty TLS (SSL) connector:
Example output:
-
Get the obfuscated version of your keystore password:
Replace
PASSWORDwith the password you used for the keystore. If the password contains special characters, URL encode them. Example output: -
Edit the file
$FUSION_HOME/apps/jetty/proxy/start.ini:-
Include obfuscated passwords by adding these properties to the end of the file:
-
Use the OBF-encrypted password from step 4 (including the
OBF:string) as the value for all three of the properties.
For example: -
Set the local SSL port by adding the
jetty.ssl.portproperty to the end of the file, and providing the port number. For example: -
Save the file
$FUSION_HOME/apps/jetty/proxy/start.ini.
-
Include obfuscated passwords by adding these properties to the end of the file:
Restart Fusion and test access through HTTPS
-
Restart all Fusion services:
HTTPS should now be enabled in the Fusion Proxy service.
-
Sign in to the Fusion UI. Specify the HTTPS URL scheme and SSL port, for example,
https://search.mycorp:8443.
Disable HTTP access to the Fusion Proxy service
Disable HTTP access. You have a choice. Perform the tasks in the appropriate section:- Disable HTTP access on the firewall or load balancer - This is the preferred approach.
- Disable listening for HTTP requests in the Fusion Proxy service
Alternative 1: Disable HTTP access on the firewall or load balancer
Disable HTTP access to the Fusion Proxy service on the firewall or load balancer:- Disallow all requests for port 8764 from the outside world. Only
localhostshould be able to communicate with Fusion on the non-SSL port 8764. Block all other requestors. - If you are using a firewall or load balancer in front of Fusion, use it to redirect all HTTP requests to use HTTPS instead. For example, Apache would redirect all incoming HTTP traffic to HTTPS.
Alternative 2: Disable listening for HTTP requests in the Fusion Proxy service
Ideally, you should disable HTTP access using the firewall or load balancer. Follow the steps in this section only if disabling HTTP access on the firewall or load balancer is not feasible.
https://fusion.com, then your local machine must be able to access Fusion from that exact host. If necessary, change the hosts file so that this can work.How to disable HTTP- Edit
/opt/lucidworks/fusion/latest.x/apps/jetty/proxy/start.d/http.ini.-
Change this line:
To:
- Save the file.
-
Change this line:
- Edit the Fusion configuration file,
/opt/lucidworks/fusion/latest.x/conf/fusion.cors(fusion.propertiesin Fusion 4.x).-
Ensure that the Agent JVM uses the Fusion Proxy service’s keystore by adding this to the end of the file:
Replace
PASSWORDwith your Fusion keystore password. -
Uncomment the
default.addressand change it to the hostname of the server that is validated by your SSL certificate.
If the hostname saved indefault.addressis not validated by your SSL certificate, then the Fusion Proxy service will not start, because the agent’s liveness detector will not be able to access the HTTPS port to determine whether Fusion is running.For example, if your SSL certificate’s validated hostname isIf you self-signed the certificate, then thedefault.addressmust match the hostname you specified while signing the certificate. Failure to do this will result in the Fusion Proxy service not starting after you have disabled HTTP.search.mycorp, then change:To: -
Change the
proxy.portto the SSL port you chose. -
Uncomment
proxy.ssland change its value totrue. Change:To:
-
Ensure that the Agent JVM uses the Fusion Proxy service’s keystore by adding this to the end of the file:
References and tutorials
- Transport Layer Security (Wikipedia)
- Public Key Certificate (Wikipedia)
- OpenSSL Cookbook (free ebook)
- OpenSSL Command Line Utilities (OpenSSL wiki)
- Java Tutorials: Generating and Verifying Certificates
- IBM developerWorks: What is the JSSE all about?
SSL Security (Windows)
SSL Security (Windows)
Fusion’s UI (which is accessed through the Fusion Proxy service) can run over SSL for secure communication with any HTTP client, using the
Java Secure Socket Extension (JSSE) framework. You configure Fusion for SSL by configuring Fusion’s Proxy and UI services.If Fusion is behind a firewall, you can use a self-signed certificate for SSL communication with other hosts in your internal network. Create a keystore for the Fusion Proxy service and load the keystore with the self-signed PKCS #12 certificate.To store certificates, you can use the Java keytool
Key and Certificate Management utility which is a part of the JDK.How to create a keystore and load a self-signed certificateWhere In a production environment, SSL certificates typically originate with certificate signing requests (CSRs) and are signed by a trusted third-party Certificate Authority (CA).The steps here assume that you are the person who will be obtaining the SSL certificate chain and private key files. If you are not that person, contact your system administrator.How to create a PKCS #12 certificateWith the certificate chain and private key as separate files, use the You can only use this alternative if your SSL certificate covers a hostname that can be accessed from the local host. For example, if your certificate only covers
Fusion 4.0.2 or later is required to enable SSL security. Version 4.0.2 fixed a bug in the authentication proxy that incorrectly redirected some requests when SSL is enabled.
Required software
Configuring Fusion for SSL requires the following software:- Java Development Kit. To store certificates, you can use the Java keytool Key and Certificate Management utility which is a part of the JDK. The JDK is also a requirement for Fusion Server.
-
OpenSSL. You might need the
opensslcommand line tool:- If you have the certificate chain and private key as separate files, then you can use the
opensslcommand line tool to create a PKCS #12 file. - If you have an intermediate CA certificate, then you can use it and
opensslto generate the certificate chain and private key files.
- If you have the certificate chain and private key as separate files, then you can use the
Overview of procedure
How to configure Fusion for SSL:- Load an SSL certificate into a Fusion keystore.
- Enable SSL in the Fusion Proxy service.
- Restart Fusion and test access through HTTPS.
- Disable HTTP access to the Fusion Proxy service.
Load an SSL certificate into a Fusion keystore
The SSL protocol is based on public-key cryptography where encryption keys come in public key/private key pairs. An SSL certificate is used to verify the authenticity of a particular server. It contains the web site name, contact email address, company information and the public key used to encrypt the communication which is shared with the entities that communicate with the owner of the public/private key pair.The server has a locally-protected private key that is accessible via a JSEE keystore.The keystore maintains both the server certificate and the private key, so that when a server authenticates itself to the client, it uses the private key from its keystore for the initial SSL handshake.Load the certificate into a Fusion keystore. Perform the tasks in the appropriate section:- Self-signed certificate. If Fusion is behind a firewall, you can use a self-signed certificate for SSL communication with other hosts in your internal network. Create a keystore for the Fusion Proxy service and load the keystore with the self-signed PKCS #12 certificate.
- Certificate signed by a certificate authority. In a production environment, SSL certificates typically originate with certificate signing requests (CSRs) and are signed by a trusted third-party Certificate Authority (CA). Create a keystore for the Fusion Proxy service and load the keystore with the PKCS #12 certificate from a CA.
Alternative 1: Self-signed certificate
If you are using a CSR-originated certificate from a trusted certificate authority, proceed to Alternative 2: CA-signed certificate.
-
Set environment variables:
-
Create the Fusion Proxy service keystore, generate the key pair and self-signed certificate, and load them into the keystore:
Example command:You must include the qualified domain name and/or the IP address of the Fusion server in the
-ext SANpart of the command. Failure to do so results in SSL validation errors.The resulting certificate enables validated SSL transport to these hosts:
ProxyPort is the Fusion Proxy port.Alternative 2: CA-signed certificate
If Fusion is behind a firewall and you are using a self-signed certificate, skip this section. Perform the tasks in Alternative 1: Self-signed certificate.
Preliminary steps
- Obtain a domain from a domain registrar.
- Change the A record of your domain to the public IP address of your web server instance.
Generate SSL certificate files
Use an SSL certificate provider to generate the certificate chain and private key files, or a PKCS #12 certificate, from a trusted CA:- Certificate chain and private key files. In this case, you will need to convert these files into a single certificate file in PKCS #12 format.
- A PKCS #12 certificate that contains both the certificate chain and private key. In this case, no conversion is necessary.
- In most cases, you will need to temporarily open ports 80 and 443 in your firewall configuration. The SSL certificate provider must be able to make successful HTTP and HTTPS requests to your server through the Domain Name System (DNS).
- Use an SSL certificate provider to generate the certificate chain (
fullchain.pem) and private key (privkey.pem) files, or the PKCS #12 certificate, from a trusted CA. Steps will vary based on the certificate provider. Contact your certificate provider for details. - Close ports 80 and 443 in your firewall configuration.
- Change the A record of your domain to the public domain-name address of your web server instance.
- If you have certificate chain and private key files, perform the steps in Convert the certificate chain and private key files to a PKCS #12 certificate and Import the PKCS #12 certificate into the Fusion Proxy service keystore.
- If you have a PKCS #12 certificate, perform the steps in Import the PKCS #12 certificate into the Fusion Proxy service keystore.
Convert the certificate chain and private key files to a PKCS #12 certificate
If you have a PKCS #12 certificate, skip this section and proceed to the section Import the PKCS #12 certificate into the Fusion Proxy service keystore.
openssl command line tool in OpenSSL to create a PKCS #12 certificate.Do not enter a blank password.
Create the Fusion Proxy service keystore and import the PKCS #12 certificate
Use the Java keytool Key and Certificate Management utility to create a keystore for the Fusion Proxy service (%FUSION_HOME%\apps\jetty\proxy\etc\keystore) and import the PKCS #12 certificate file. Fusion uses this certificate to perform SSL.If you are starting with a certificate file in PFX format (file extension
.pfx), that format is now identical to PKCS #12 format.-
To create the keystore and import the PKCS #12 certificate:
-
Use the keytool
importcommand to create a JSSE keystore. -
(Optional) If desired, delete the PKCS #12 certificate file that resides outside of the Fusion Proxy service keystore (the one you created from the certificate chain and private key files, or obtained from a trusted CA.
Enable HTTPS in the Fusion Proxy service
Before beginning these steps, load an SSL certificate into a Fusion keystore.How to enable HTTPS in the Fusion Proxy service:-
Set environment variables:
-
Add HTTPS protocol support to the Jetty TLS (SSL) connector:
Example output:
-
Get the obfuscated version of your keystore password:
Replace
PASSWORDwith the password you used for the keystore. If the password contains special characters, URL encode them. Example output: -
Edit the file
%FUSION_HOME%\apps\jetty\proxy\start.ini:-
Include obfuscated passwords by adding these properties to the end of the file:
jetty.sslContext.keyStorePasswordjetty.sslContext.keyManagerPasswordjetty.sslContext.trustStorePassword
-
Use the OBF-encrypted password from step 4 (including the
OBF:string) as the value for all three of the properties.
For example: -
Set the local SSL port by adding the
jetty.ssl.portproperty to the end of the file, and providing the port number. For example: -
Save the file
%FUSION_HOME%\apps\jetty\proxy\start.ini.
-
Include obfuscated passwords by adding these properties to the end of the file:
Restart Fusion and test access through HTTPS
-
Restart all Fusion services:
HTTPS should now be enabled in the Fusion Proxy service.
-
Sign in to the Fusion UI. Specify the HTTPS URL scheme and SSL port, for example,
https://search.mycorp:8443.
Disable HTTP access to the Fusion Proxy service
Disable HTTP access. You have a choice. Perform the tasks in the appropriate section:- Disable HTTP access on the firewall or load balancer - This is the preferred approach.
- Disable listening for HTTP requests in the Fusion Proxy service
Alternative 1: Disable HTTP access on the firewall or load balancer
Disable HTTP access to the Fusion Proxy service on the firewall or load balancer:- Disallow all requests for port 8764 from the outside world. Only
localhostshould be able to communicate with Fusion on the non-SSL port 8764. Block all other requestors. - If you are using a firewall or load balancer in front of Fusion, use it to redirect all HTTP requests to use HTTPS instead. For example, Apache would redirect all incoming HTTP traffic to HTTPS.
Alternative 2: Disable listening for HTTP requests in the Fusion Proxy service
Ideally, you should disable HTTP access using the firewall or load balancer. Follow the steps in this section only if disabling HTTP access on the firewall or load balancer is not feasible.
https://fusion.com, then your local machine must be able to access Fusion from that exact host. If necessary, change the hosts file so that this can work.How to disable HTTP- Edit
\lucidworks\fusion{backslash}latest.x\apps\jetty\proxy\start.d\http.ini.-
Change this line:
To:
- Save the file.
-
Change this line:
- Edit the Fusion configuration file,
\lucidworks\fusion{backslash}latest.x\conf\fusion.cors(fusion.propertiesin Fusion 4.x).-
Ensure that the Agent JVM uses the Fusion Proxy service’s keystore by adding this to the end of the file:
Replace
PASSWORDwith your Fusion keystore password. -
Uncomment the
default.addressand change it to the hostname of the server that is validated by your SSL certificate.
If the hostname saved indefault.addressis not validated by your SSL certificate, then the Fusion Proxy service will not start, because the agent’s liveness detector will not be able to access the HTTPS port to determine whether Fusion is running.For example, if your SSL certificate’s validated hostname isIf you self-signed the certificate, then thedefault.addressmust match the hostname you specified while signing the certificate. Failure to do this will result in the Fusion Proxy service not starting after you have disabled HTTP.search.mycorp, then change:To: -
Change the
proxy.portto the SSL port you chose. For example, change:To: -
Uncomment
proxy.ssland change its value totrue. Change:To:
-
Ensure that the Agent JVM uses the Fusion Proxy service’s keystore by adding this to the end of the file:
References and tutorials
- Transport Layer Security (Wikipedia)
- Public Key Certificate (Wikipedia)
- OpenSSL Cookbook (free ebook)
- OpenSSL Command Line Utilities (OpenSSL wiki)
- Java Tutorials: Generating and Verifying Certificates
- IBM developerWorks: What is the JSSE all about?
Fusion user login
When logging into the Fusion UI, a user provides a username and password, as well as their assigned security realm. An administrator must specify these in Fusion (using the native security realm) or configure Fusion to use an external authentication provider (for example, LDAP or SAML). See Access control. Fusion uses roles defined by permissions to authorize Fusion UI access and perform tasks in Fusion, including searching. The recommended method to delegate permissions is as follows:- Assign each user to a role and create custom roles as needed.
- Assign permissions on a per-app basis.
Manage users with security realms
Fusion uses security realms to authenticate users of the Fusion UI. Each user has an assigned security realm, which the user must select when logging in. If the user selects a different realm, authentication fails. A security realm also provides a list of roles as follows:- The list always includes the role(s) that are specified in the security realm.
- (Optional) If an external directory service (such as LDAP) is used for authentication, the list can also contain roles that are mapped from the names of the directory-service groups. That is, you can configure a security realm to return group information for users from that same directory service.
- (Optional) The security realm can reference one or more Fusion roles or, when using an external directory service provider, use group membership information from the provider to determine roles for users. Fusion maps the group names to role names and adds these roles to the user’s list of roles.
Fusion does not use permissions from LDAP to authorize UI access or API requests. It only obtains group names (optionally), which are used as role names or are mapped to role names. If an Active Directory Security Query Trimming Stage is used, then directory-service permissions are used for trimming. If a connector supports security trimming, then connector permissions are used for trimming.
Per-Request Authentication
Requests to the Fusion REST API must specify a security realm for per-request authentication, unless a session cookie is used (which contains information about the security realm). Fusion authorizes requested operations based on API permissions specified for the user and for the user’s role(s). Fusion considers the role(s) specified in the user definition and in the security realm. Fusion creates a list of roles when a session is created, that is, when a user logs in or when the Sessions REST API creates a session. Authorization based on permissions and its layering is at request time. You can define multiple security realms for a Fusion instance. A Fusion instance can manage multiple security realms, which allows users from different domains to have (different levels of) access to specific Fusion collections.Learn more
Security LDAP Realm that Connects to Active Directory
Security LDAP Realm that Connects to Active Directory
Configure Fusion for a Security LDAP Realm that Connects to Active Directory
-
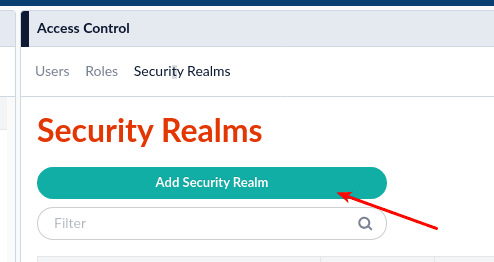
Log in as an admin to Fusion and go to Security Realms.\

-
Go to the Security Realms tab and click Add Security Realm.\
-
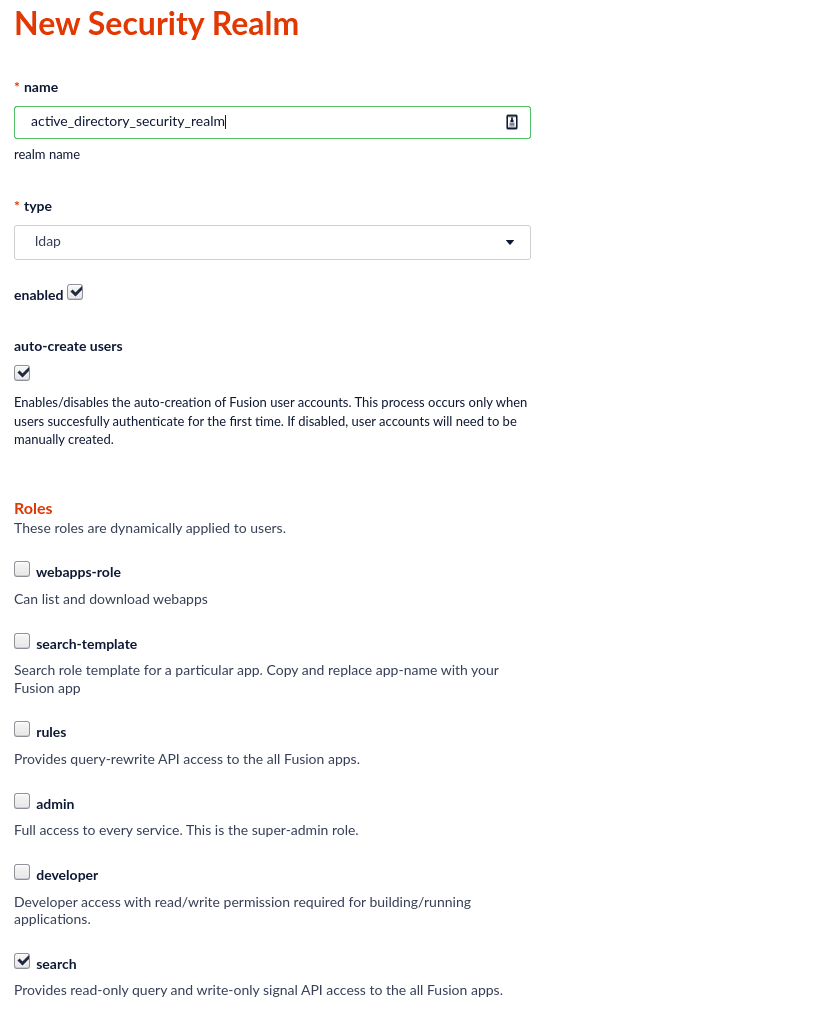
Give it a name and choose type: ldap.
- If you want an AD user to be automatically created in Fusion when they are seen for the first time, leave “Auto-create users” checked. Typically, you will leave this checked. Otherwise, you have to preload Fusion with users prior to them logging in.
- Specify what Roles you want users to have by default when logging in to this realm.\
-
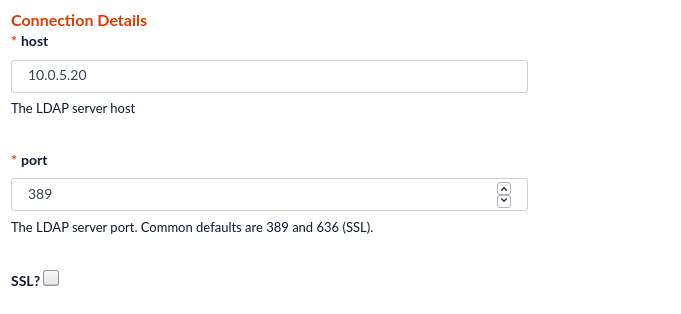
Specify your AD server hostname. Choose port 389 for non-SSL, and 636 for SSL.\
-
For Authentication Method: search, choose Search from the 3 options.
- In the Search Based Login: Base DN field, specify the DN of the lowest place in the AD tree where your users will need to be searched for. in my example, it is
cn=users,dc=sptest,dc=local. - For the Search Based Login: Filter Template, use
(&(sAMAccountName={})(objectClass=person)).\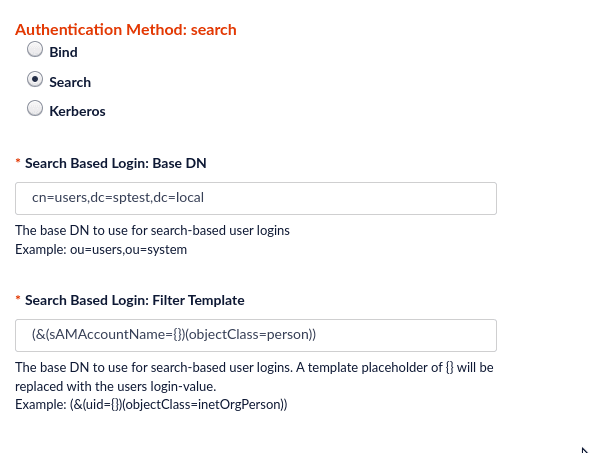
- In the Search Based Login: Base DN field, specify the DN of the lowest place in the AD tree where your users will need to be searched for. in my example, it is
-
For Super User - Bind DN enter the DN of a user with access to crawl and enter that user’s password.
\This says “Super User”, but the AD account does not need to be an Administrator. Your user only needs to be able to read group member attributes.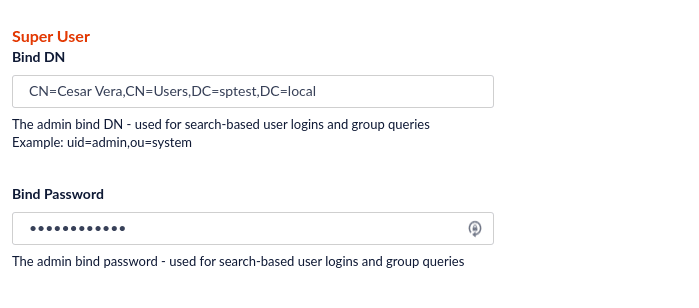
-
Next is the Group / Role Mapping.
- For Group Search: Base DN, similar to what you did for the user DN, enter the lowest level of the AD tree where applicable groups can be found.
- For Group Search: Name Attribute, enter
sAMAccountName. - For Group Search: Filter Template, enter
(&(member={})(objectClass=group)). - For Group Mapping, enter a mapping of each Fusion role name to the DN of a group you want to be in that role.
Example:\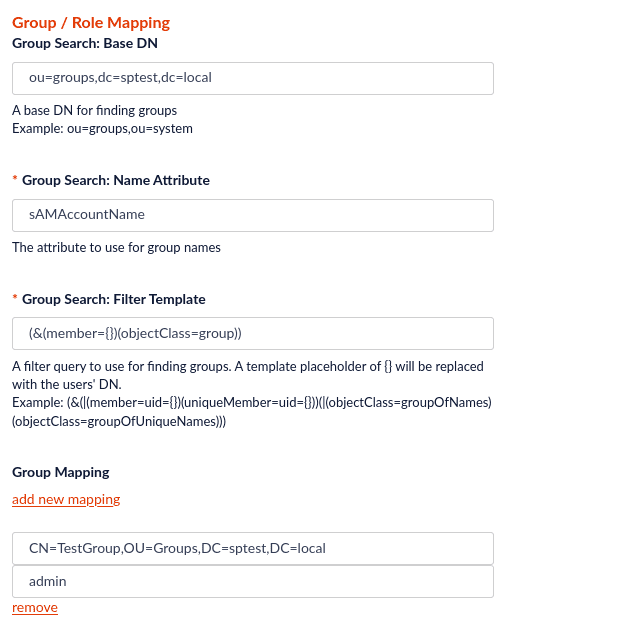
Creating a Delegation of Control of the bind user
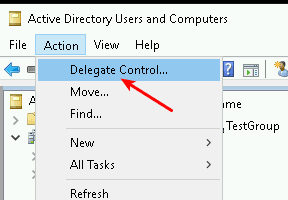
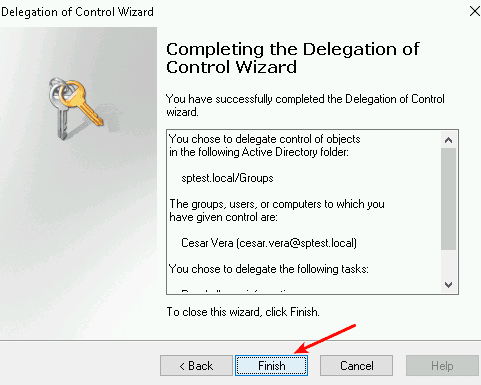
The LDAP Realm needs to be able to get a user’s groups in order to do the Group Mapping.By default, Active Directory allows all Authenticated Users to list group memberships. So chances are, everything will work.But, if your security is tightened in your environment, the user you choose in Super User section may not have access to list group memberships. This will result in your users having no roles because the role lookup will not be able to connect your user’s AD groups with their Fusion roles.In this case, you may need to delegate control of this account to be able to Read the tree.-
Go to Active Directory Users and Computers → Action → Delegate Control.\
-
Enter the user:\
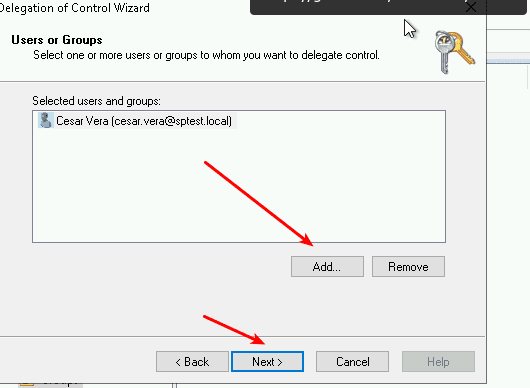
-
Add the Read all user information checkbox.\
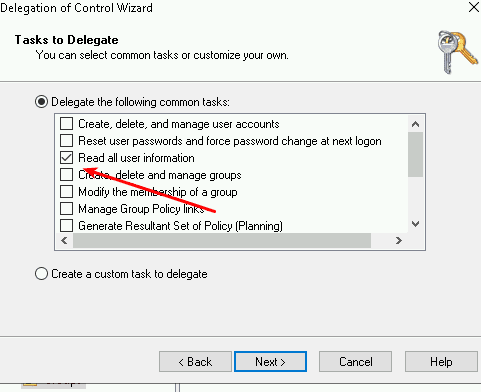
-
Finish.\
Configure Active Directory Federation Services (AD FS) authentication for Fusion
Configure Active Directory Federation Services (AD FS) authentication for Fusion
You can configure Active Directory Federation Services (AD FS) for SAML single sign-on (SSO) authentication in Fusion. This guide explains how to set up Spring Boot OAuth2 with AD FS.Replace the
OAuth-based authentication against AD FS requires AD FS 3.0 or later which is available from Windows Server 2012 R2 onwards.
Configure a Security Realm in Fusion
In Fusion, create a Security Realm for AD FS.- In the Fusion workspace, navigate to System > Access Control.
- Click Security Realms.
- Click Add Security Realm.
-
Enter the following information for the new realm:
- Enter a Name. The name must be unique and should be descriptive yet short.
- Select saml from the Type pulldown menu.
- The default value for Enabled is true. This setting controls whether or not Fusion allows user logins for this security realm.
- The default value for Ephemeral Users is false. When disabled, this setting prevents ephemeral users from being created in ZooKeeper during login. If enabled, this property negates Auto Create Users.
- The default value for Auto Create Users is true. If enabled, a user account is created automatically upon initial authentication. If disabled, then a Fusion user with admin permissions must create Fusion users.
-
Enter the Identity Provider URL. This URL is used by the SAML authority for single sign-on. For example:
https://www.example.com/APP-PATH/adfs/ls -
Enter the URL of the IdP Issuer. For example:
http://www.example.com/adfs/services/trust.- IdP Issuer must match
<saml:Issuer>in the SAML payload.
- IdP Issuer must match
-
Optional: Provide the App Issuer. This field is required if there is an
audienceRestrictionin the SAML assertion and must match<saml:Audience>in the SAML payload. - In the Certificate Fingerprint, paste the contents of the SAML authority certificate, without the certificate header and footer.
- Optional: Enter the User ID Attribute. By default, the Fusion username is the same as the login name known to the Identity Provider. When another field or attribute in the user record stored by the IdP should be used as the Fusion username, that attribute name is the value of the User ID Attribute.
- Optional: Provide a Post Login Redirect URL. If not set, the Fusion URL is used.
-
Optional: Provide a Logout URL.
- Optional: Under Groups Mapping, specify the Group Name Attribute and add group mappings.
- Click Save.
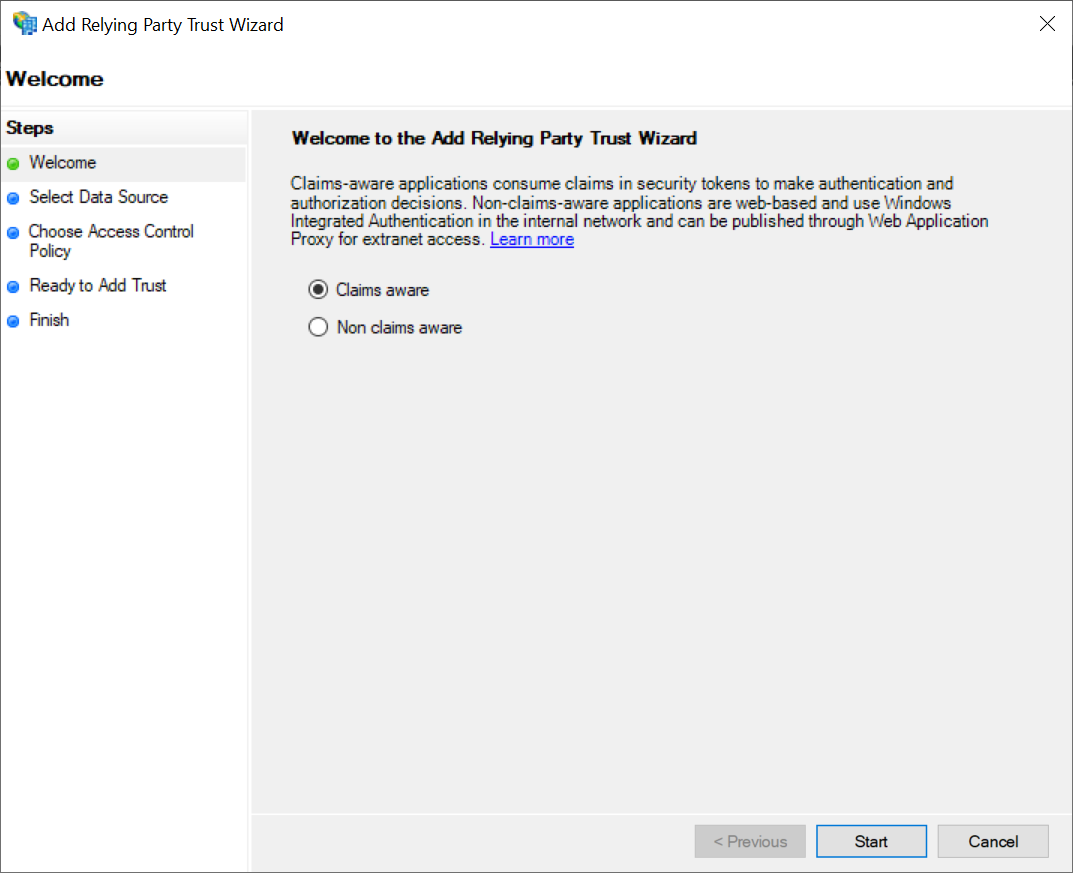
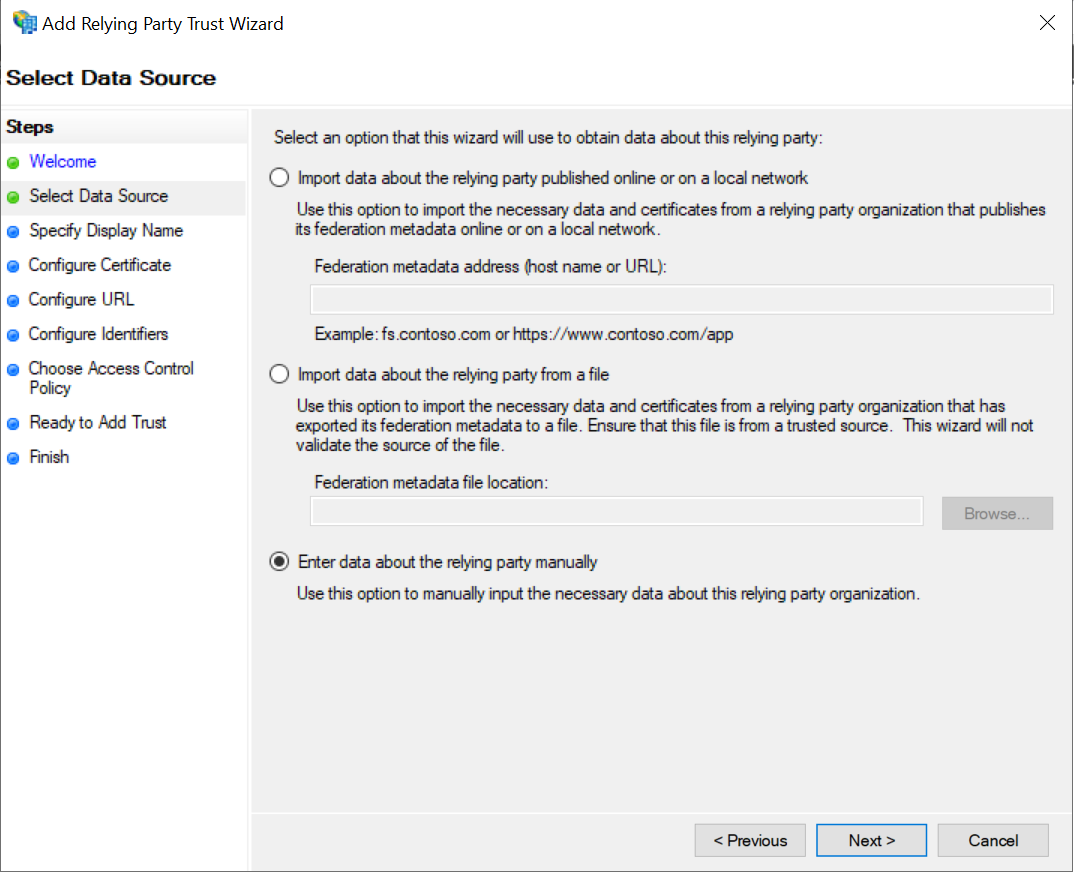
Set up the application (relying party trust) in AD FS
Create a relying party trust in the AD FS Management console. For more details, refer to the Microsoft AD FS documentation.The following screenshots may differ from your setup depending on the version of AD FS you’re using.
-
Launch the Add Relying Party Trust Wizard, then select Claims aware.
-
Choose the option to enter the data manually.
-
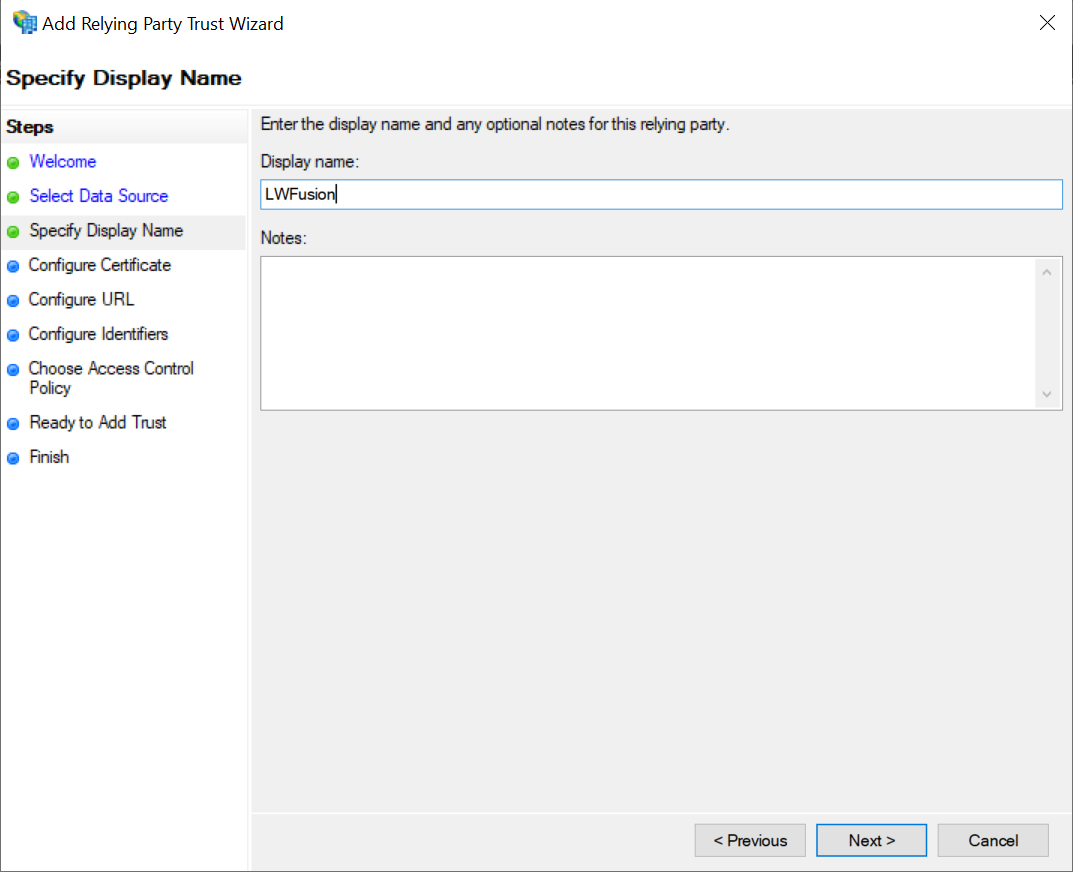
Set a Display name.
-
Configure URL. Enable the option for SAML 2.0 WebSSO protocol.

-
Set the Relying party trust identifier to the URL of the Fusion application.

-
Edit the Claim Rules to pass through the User Principal Name as the
NameIDclaim.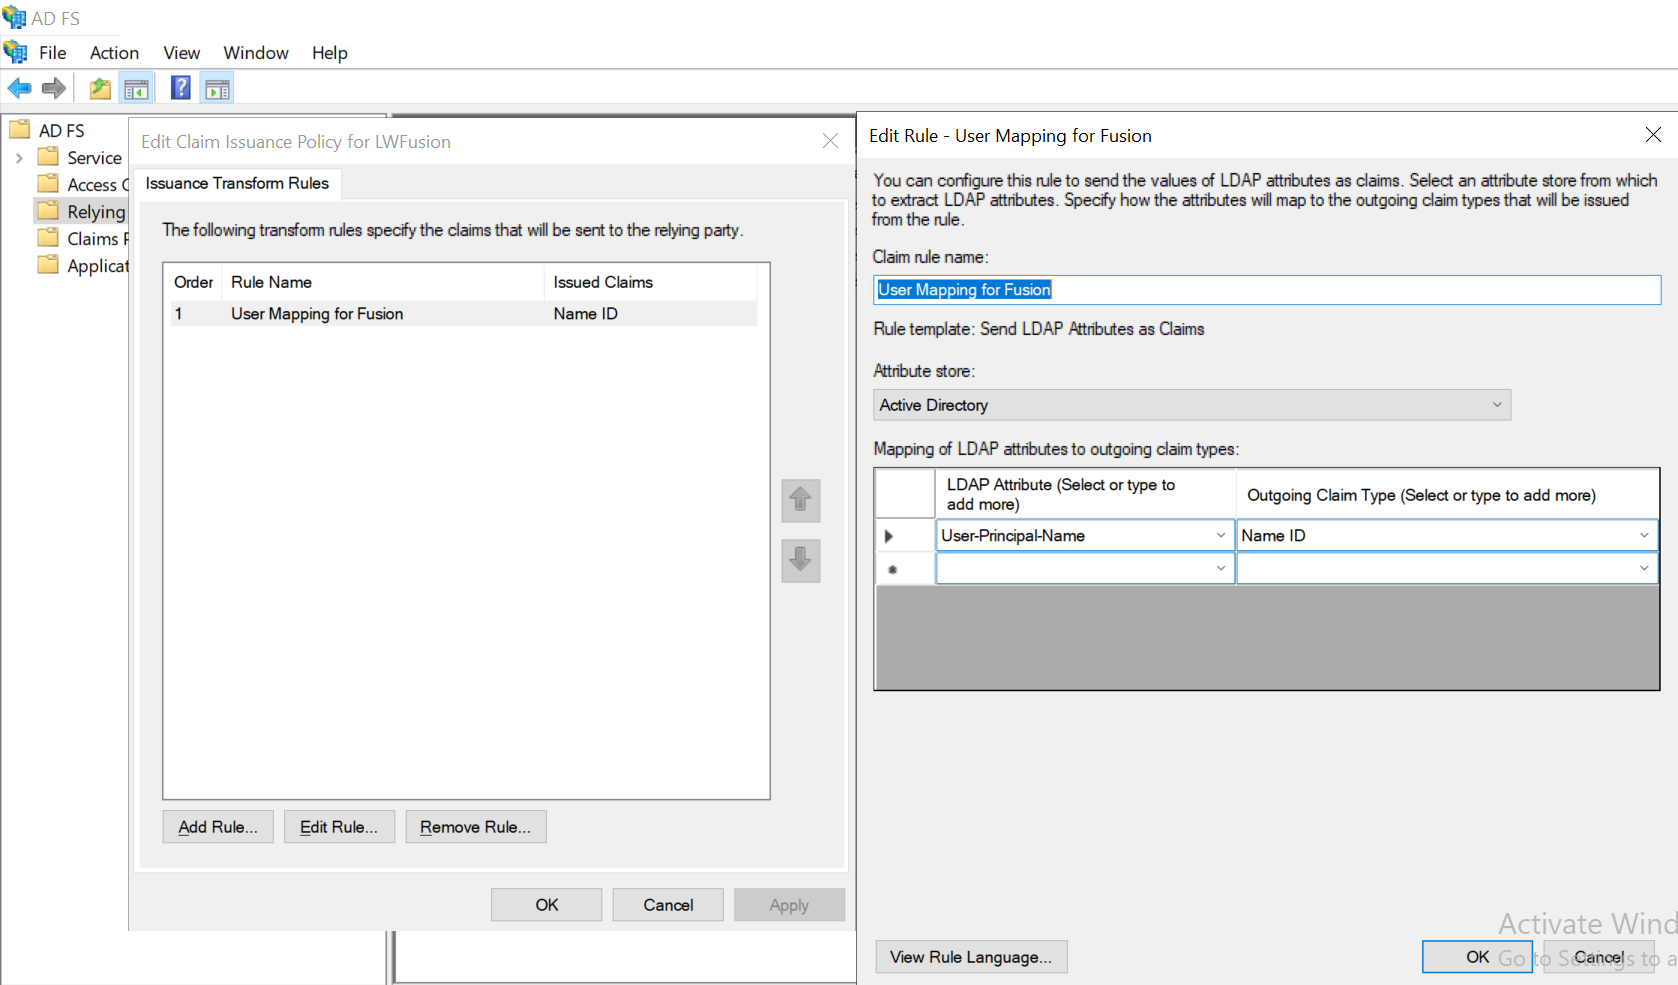
-
In a terminal, create the OAuth AD FS
clientfor the Fusion application:
ClientId should be a GUID and the RedirectUri must point to the Fusion application URL, with /oauthLogin appended. Here, localhost is used for testing a Fusion application running on the local development machine.Configure the OAuth module for the application setup in AD FS
Create a new configuration file inconf/security/oauth.conf.client-id, adfs-url and resource parameters for your environment.- The
client-idis the ID that was set up against AD FS using theAdd-ADFSClientPowerShell command. - The
adfs-urlis the URL of the AD FS server with the/adfscontext appended. - The
resourceis the relying party trust identifier set up in AD FS management. - The
high-trustparameter is only required when integrating the AD FS and SharePoint modules. This article is only concerned with authentication against AD FS.
Test the authentication
When a user goes to the Fusion login page, they will be redirected to the AD FS OAuth login page. After the user logs in, the user will be returned to Fusion as an authenticated user. The Fusion user’s details will also be populated with any basic information available from the decoded OAuth token such as roles and the user principal name.Configure SSL for Solr embedded in Fusion
Configure SSL for Solr embedded in Fusion
Prerequisite
Create or determine the fully qualified path for your Fusion directory, referred to as{FUSION_HOME} in this document. For example, c:/fusion/4.2/.Configure SSL for Solr embedded in Fusion
-
Navigate to the following directory:
{FUSION_HOME}/apps/jetty/solr/etc -
Create a self-signed certificate from an existing certificate in a production environment.
Use the following example and enter information for your system:
keytool -genkeypair -alias localhost -keyalg RSA -keysize 2048 -keypass secret -storepass secret -validity 365 -keystore keystore -ext SAN=DNS:localhost,IP:127.0.0.1 -dname "CN=localhost, OU=org unit, O=org, L=loc, ST=st, C=country"Only use a trusted Certificate Authority (CA) to generate certificates. -
Navigate to the following directory:
{FUSION_HOME}/apps/jetty/solr -
Enter the following command to enable SSL on the Solr jetty instance:
java -jar {FUSION_HOME}/apps/jetty/home/start.jar --add-to-start=https -
Navigate to the following directory:
cd {FUSION_HOME} -
Enter the following to create the obfuscated (OBF) password:
java -cp ./apps/libs/jetty-util-9.3.8.v20160314.jar org.eclipse.jetty.util.security.Password secret -
Open the
{FUSION_HOME}/apps/jetty/solr/start.inifile and set the following properties (using the designated OBF password):jetty.sslContext.keyStorePassword jetty.sslContext.keyManagerPassword jetty.sslContext.trustStorePassword -
Enter the following to set the Solr SSL port:
jetty.ssl.port=<PORT_FOR_HTTPS>
Disable HTTP for Solr
Open thefusion/4.2/apps/jetty/solr/start.d/http.ini file and enter a # to comment out the --module=http entry:#--module=httpEdit the fusion.properties file
-
Open the
fusion/4.2/conf/fusion.propertiesfile. -
Enter the Solr keystore information in the Java Virtual Machine (JVM) for all services:
-
Uncomment the
default.addressfield and enter the hostname of the server validated in the SSL certificate:default.address=localhost -
Enter the value designated in
jetty.ssl.port=<PORT_FOR_HTTPS>in thesolr.portfield. -
Append the
solr.ssl=trueentry to the file. - Save and close the file.
Start Zookeeper and Solr
-
Enter the following command to start Zookeeper:
${FUSION_HOME}/bin/zookeeper start -
Enter the following command to start Solr:
${FUSION_HOME}/bin/solr start
Configure Solr cluster for https
Enter the following command to use Zookeeper to configure the Solr cluster forhttps instead of http:${FUSION_HOME}/apps/solr-dist/server/scripts/cloud-scripts/zkcli.sh -zkhost localhost:9983/lwfusion/${FUSION_VERSION}/solr -cmd clusterprop -name urlScheme -val httpsSolr SSL shell script
Thesolr_ssl.sh script contains all of the steps to configure SSL for Solr embedded in Fusion. To use the script, enter your system’s values and information in the file, and then execute the script: