Use Business Rules in the Rules Editor
Use Business Rules in the Rules Editor
This article describes how to use the Business Rules screen in the Rules Editor.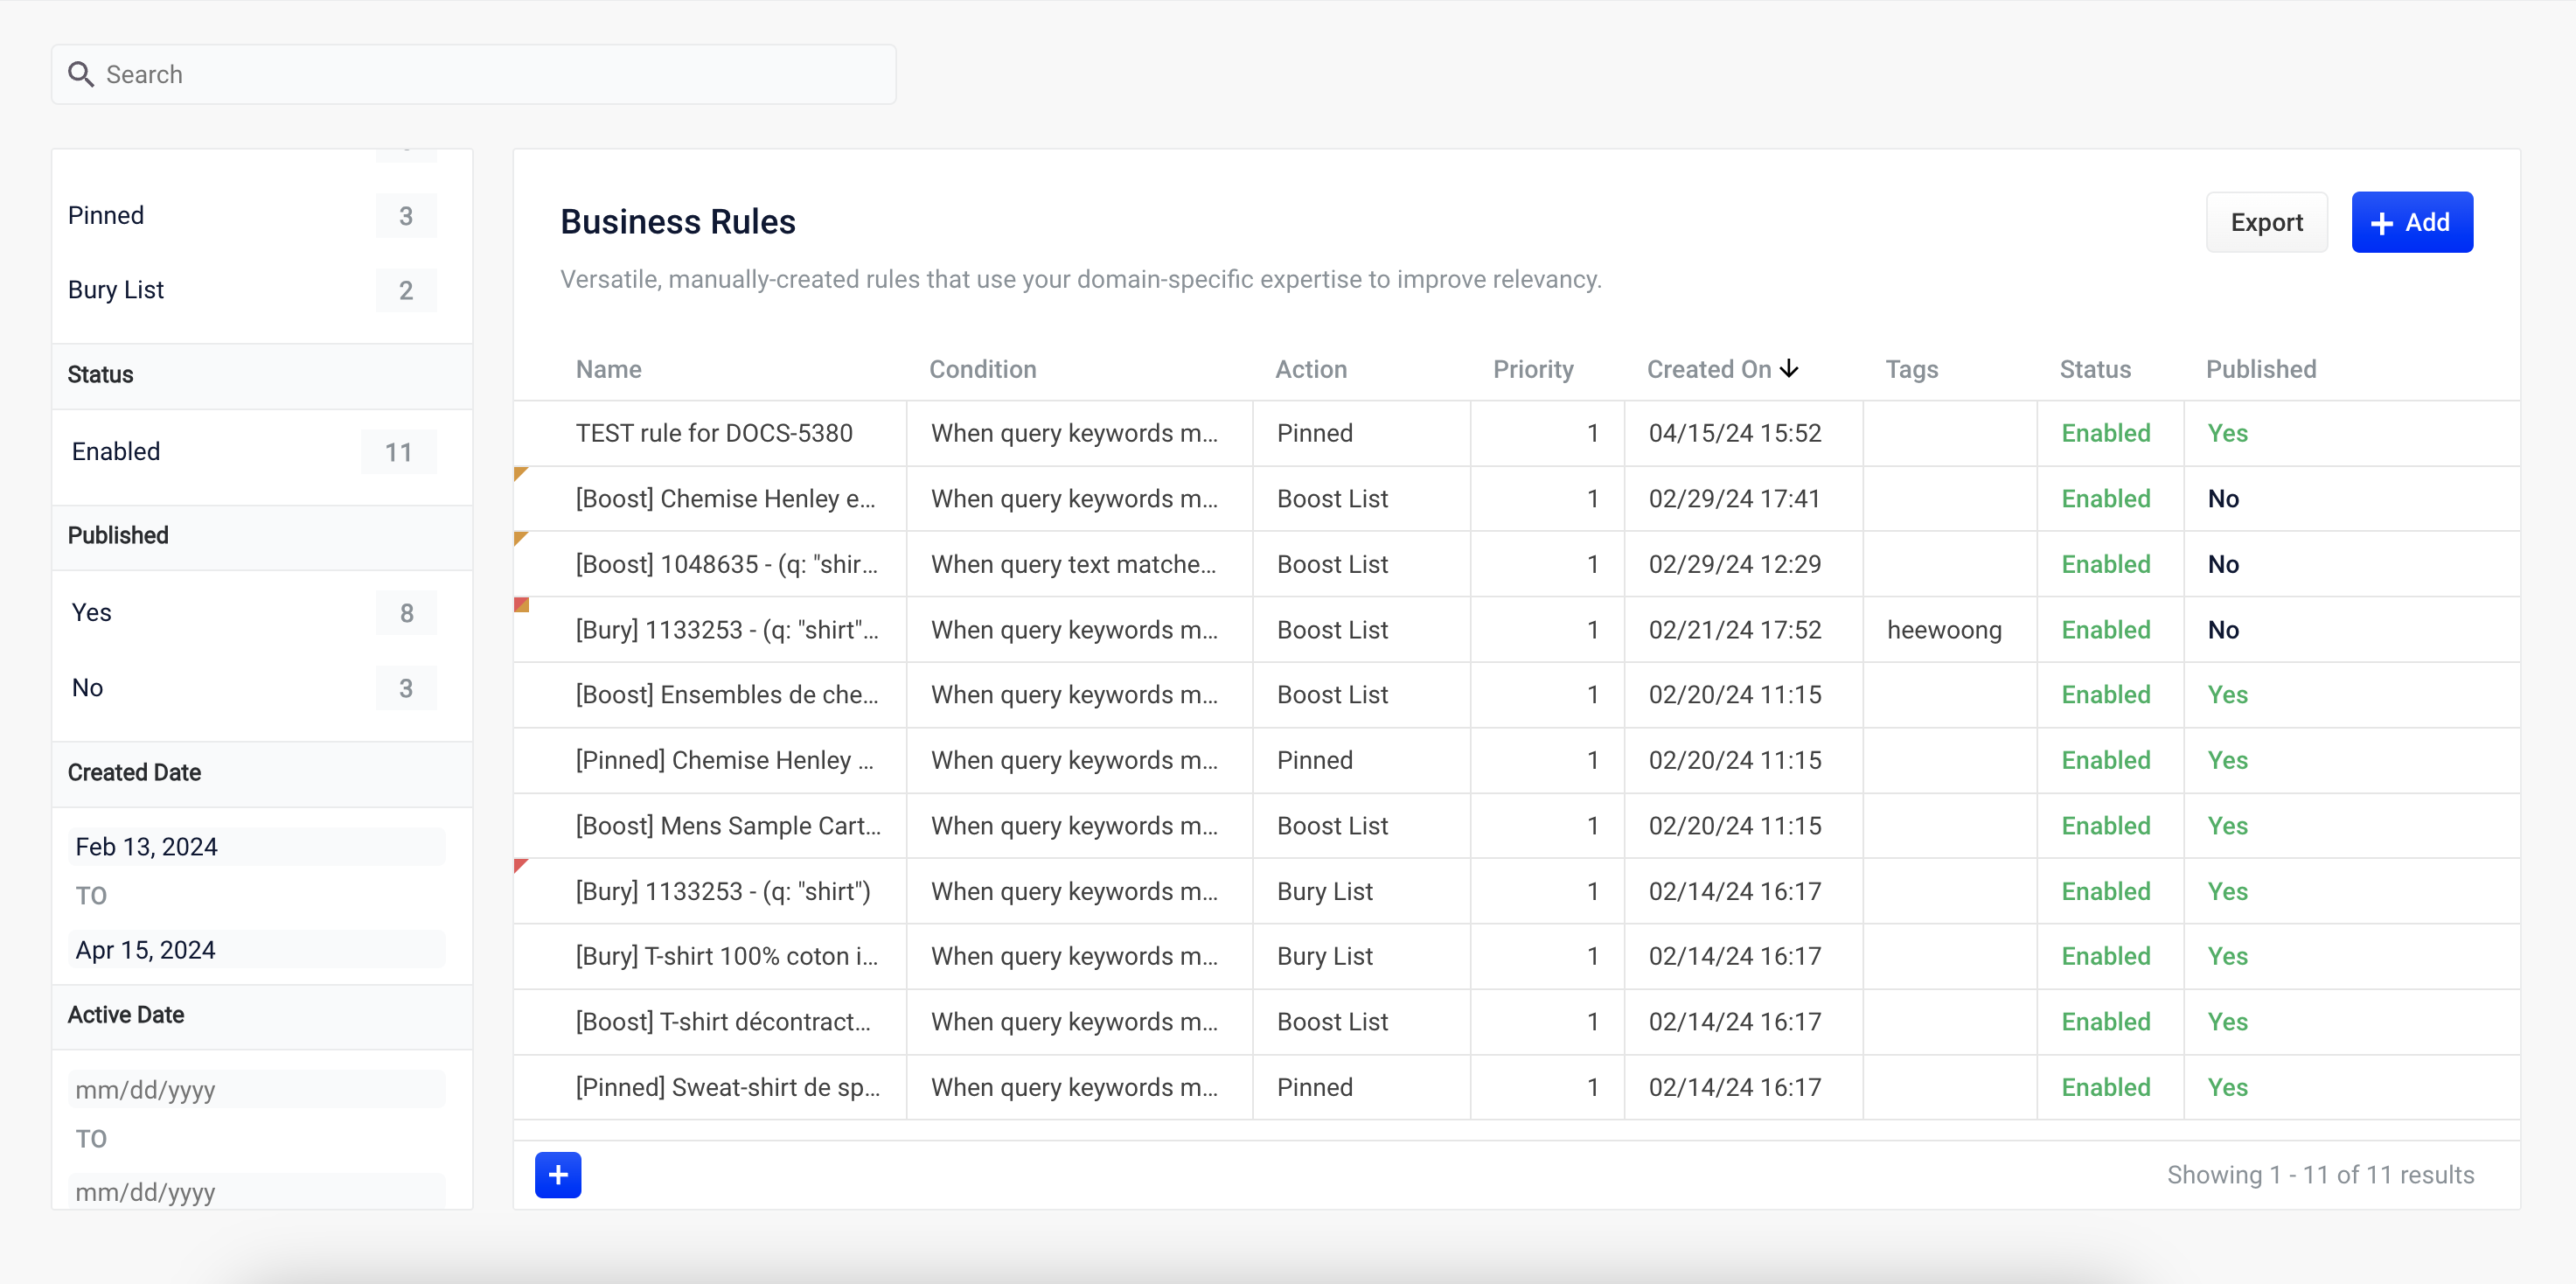
Query Rewriting with Business Rules and Search Rewrites
The course for Query Rewriting with Business Rules and Search Rewrites focuses on how using business rules and search rewrites gives you the opportunity to boost conversions and create better customer experiences by improving your relevancy.
Facet rules
Facet menu
-
Click the date start value. A calendar will appear.
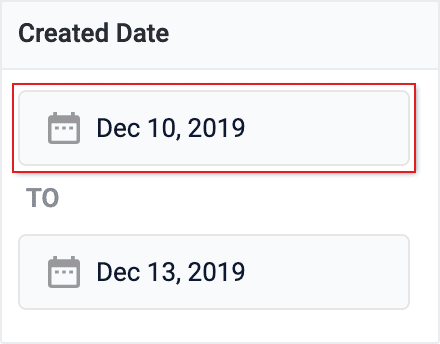
- Click a date to select the start of your facet range.
- Click the bottom date and select the end of your facet range.
Search
Enter a term in the search bar to quickly facet your business rules.Rules
Create a rule
-
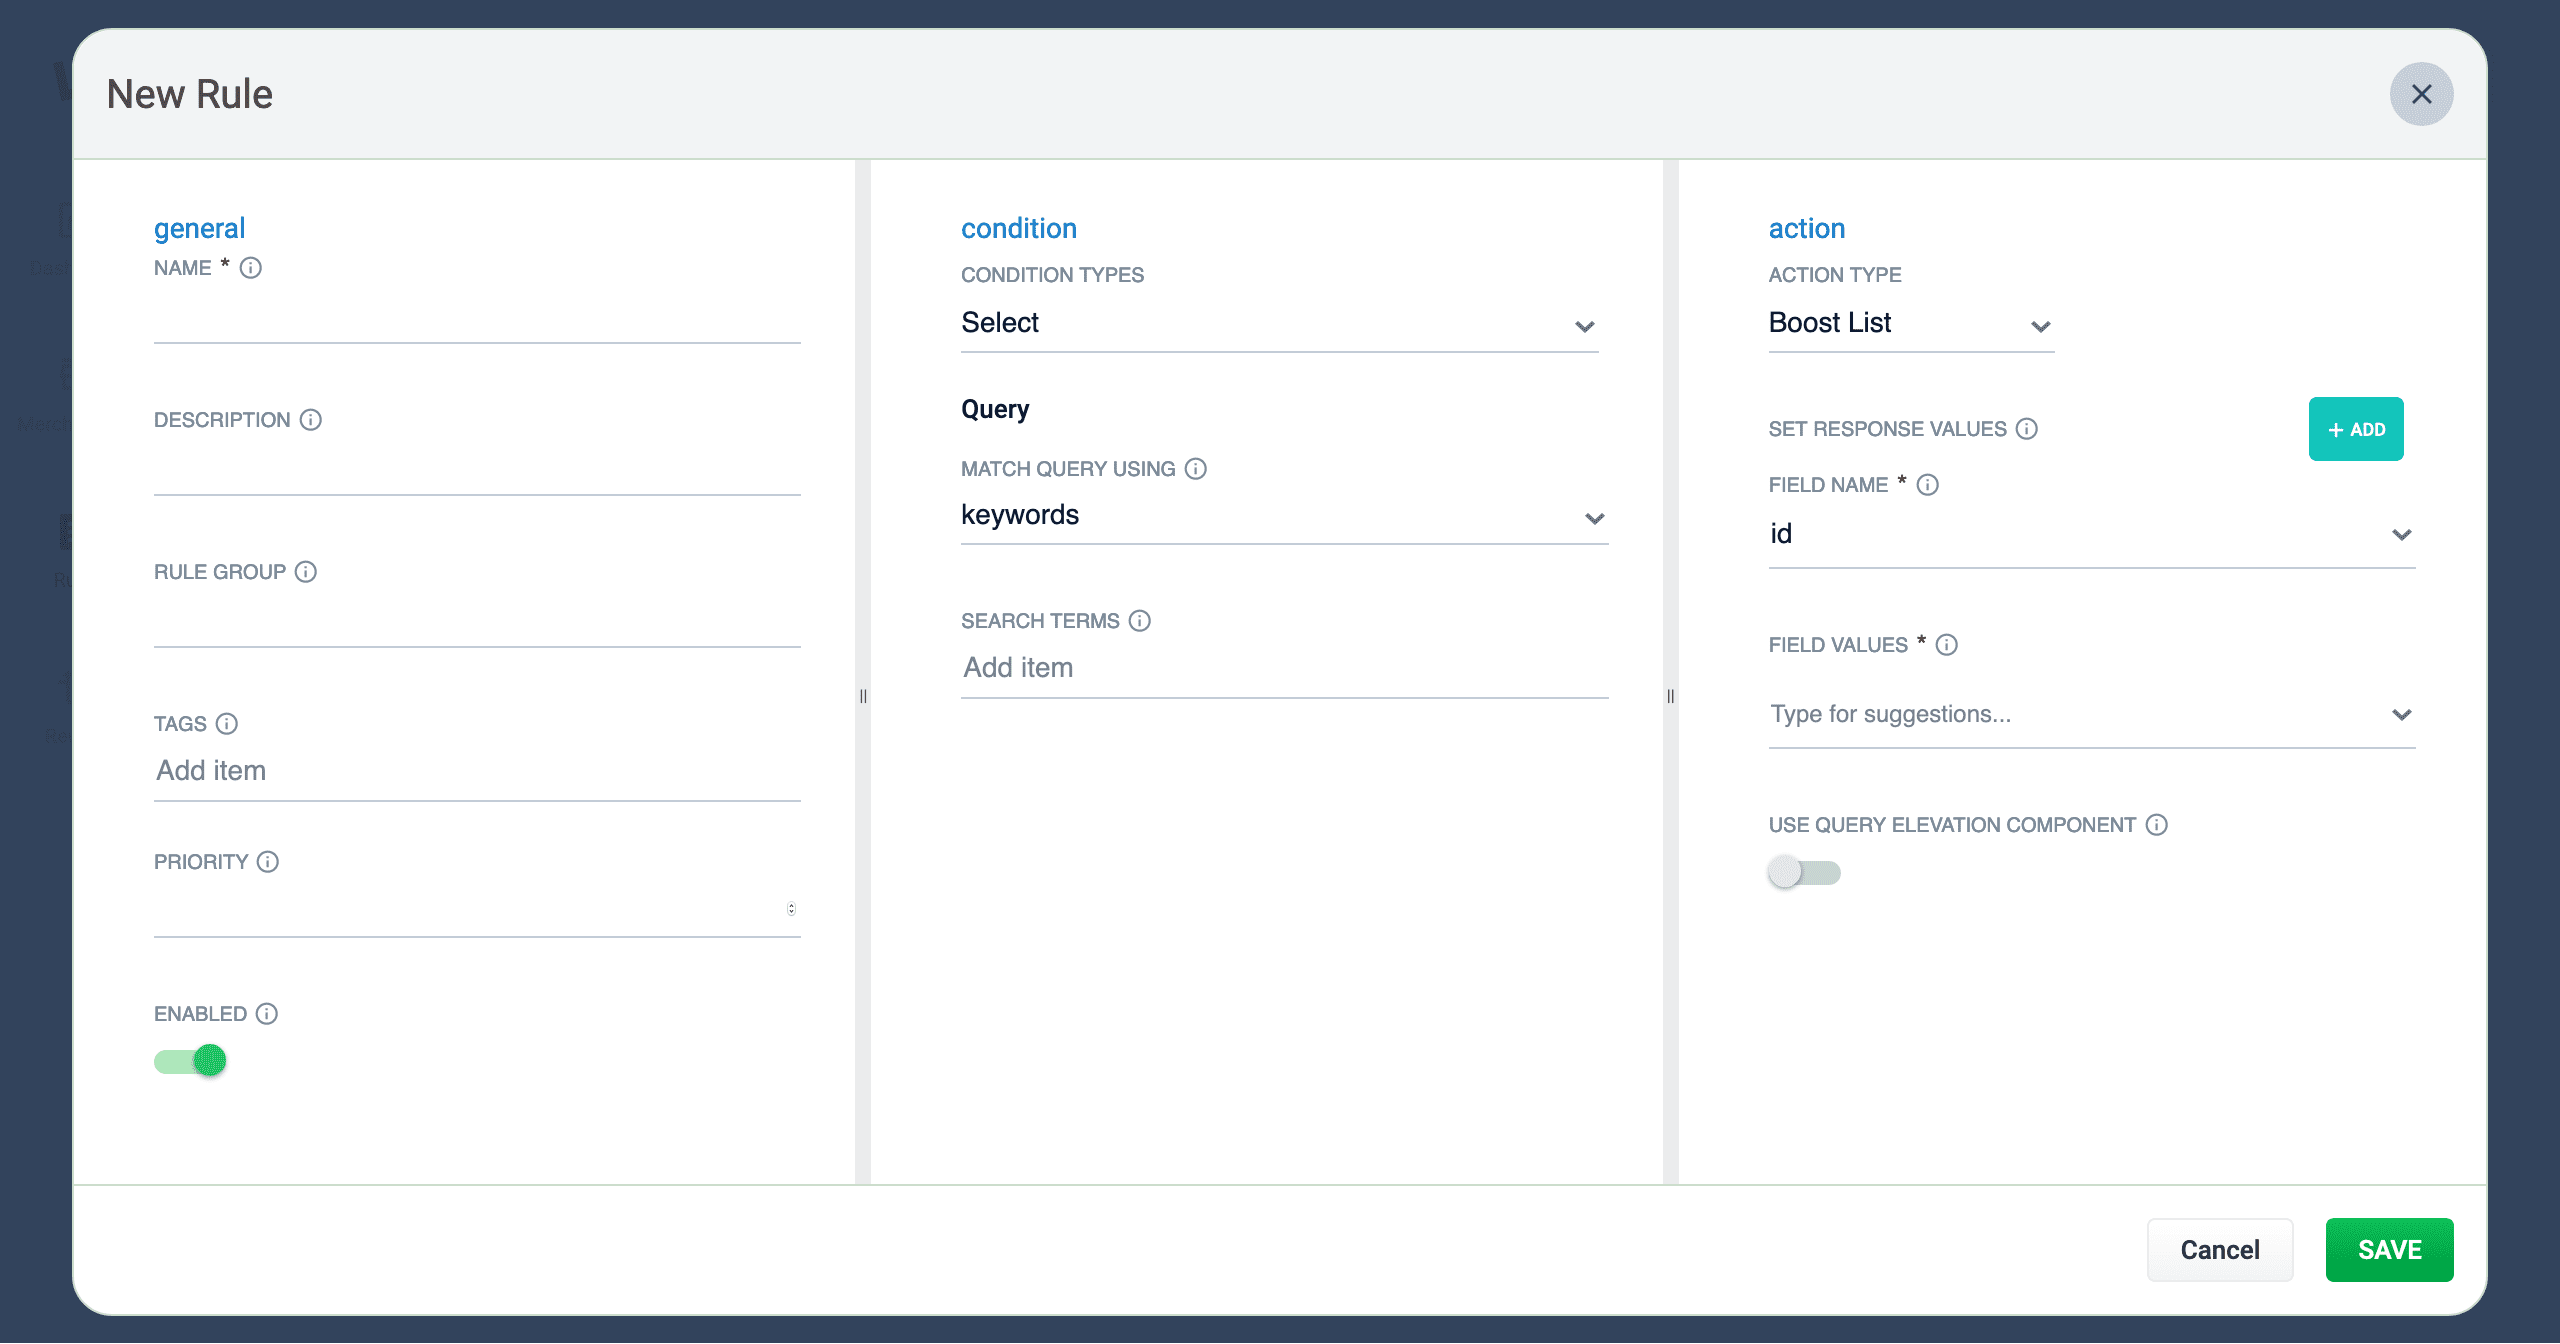
Click the button in the top-right corner of the card. Alternatively, click the button in the bottom-left corner of the card. The New Rule dialog box will appear.
-
Complete the required fields, at a minimum.
General Condition Action In the General column, only the Name field is required. Other fields are optional: - Description is an arbitrary string you can use to describe this rule.
- Rule Group can be a user-defined group that you use to organize your rules.
- Tags are another way to organize your rules. Tags appear as facets in the Business Rules interface, so you can filter the set of visible rules by tag.
- Priority can be used to determine which rule should apply first if multiple rules are activated for the same request. Priority is an integer value, ranging from 1 to infinity, with the value 1 given lowest priority. If multiple rules have the same value, those rules are applied in a random order.
- Enabled means that this rule is applied but not necessarily published. Disabling a rule helps ensure that it is not accidentally published.
Conditions are triggers that activate the rule when they match the current date and time, query, or field values. See Rule conditions for more information. A rule can take different types of actions when the specified conditions are met. See Action types for more information. You can also create custom actions. - Once complete, click the button.
Copy a rule
- Hover over a rule. A row of buttons will appear on the right.
-
Click the button. The Copy Rule dialog box will appear.
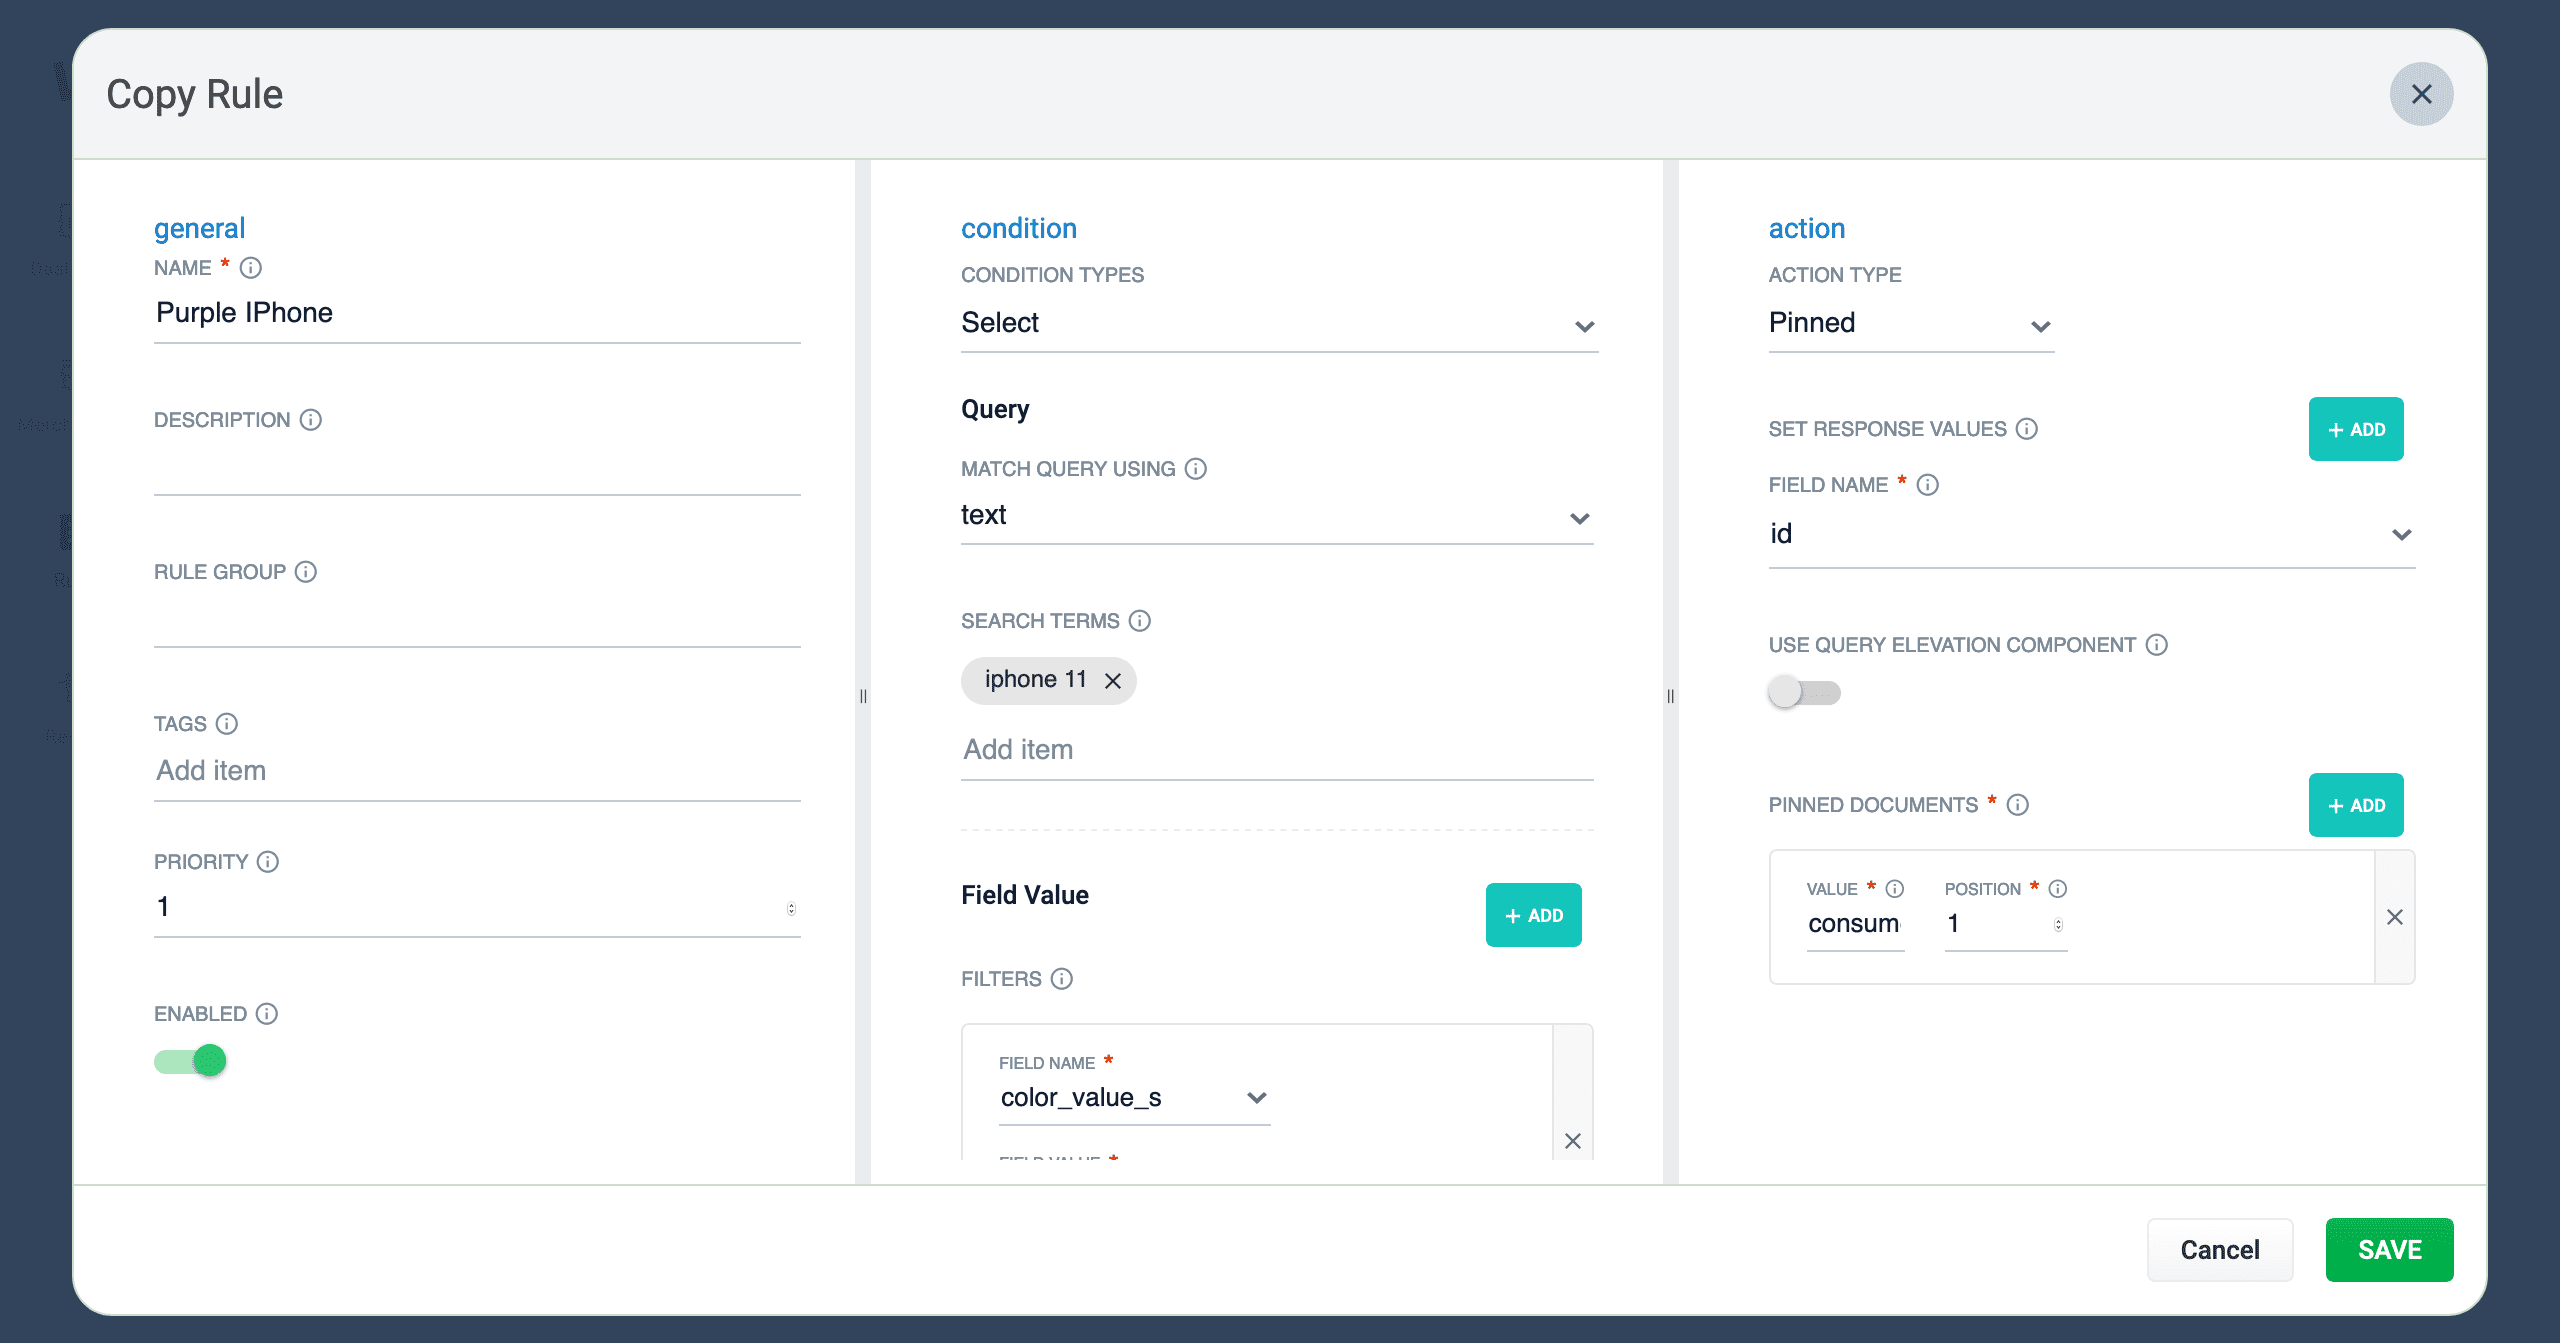
- At a minimum, change the title of the rule.
- Once complete, click the button.
Edit a rule
- Hover over a rule. A row of buttons will appear on the right.
-
Click the button. The Edit Rule dialog box appears.
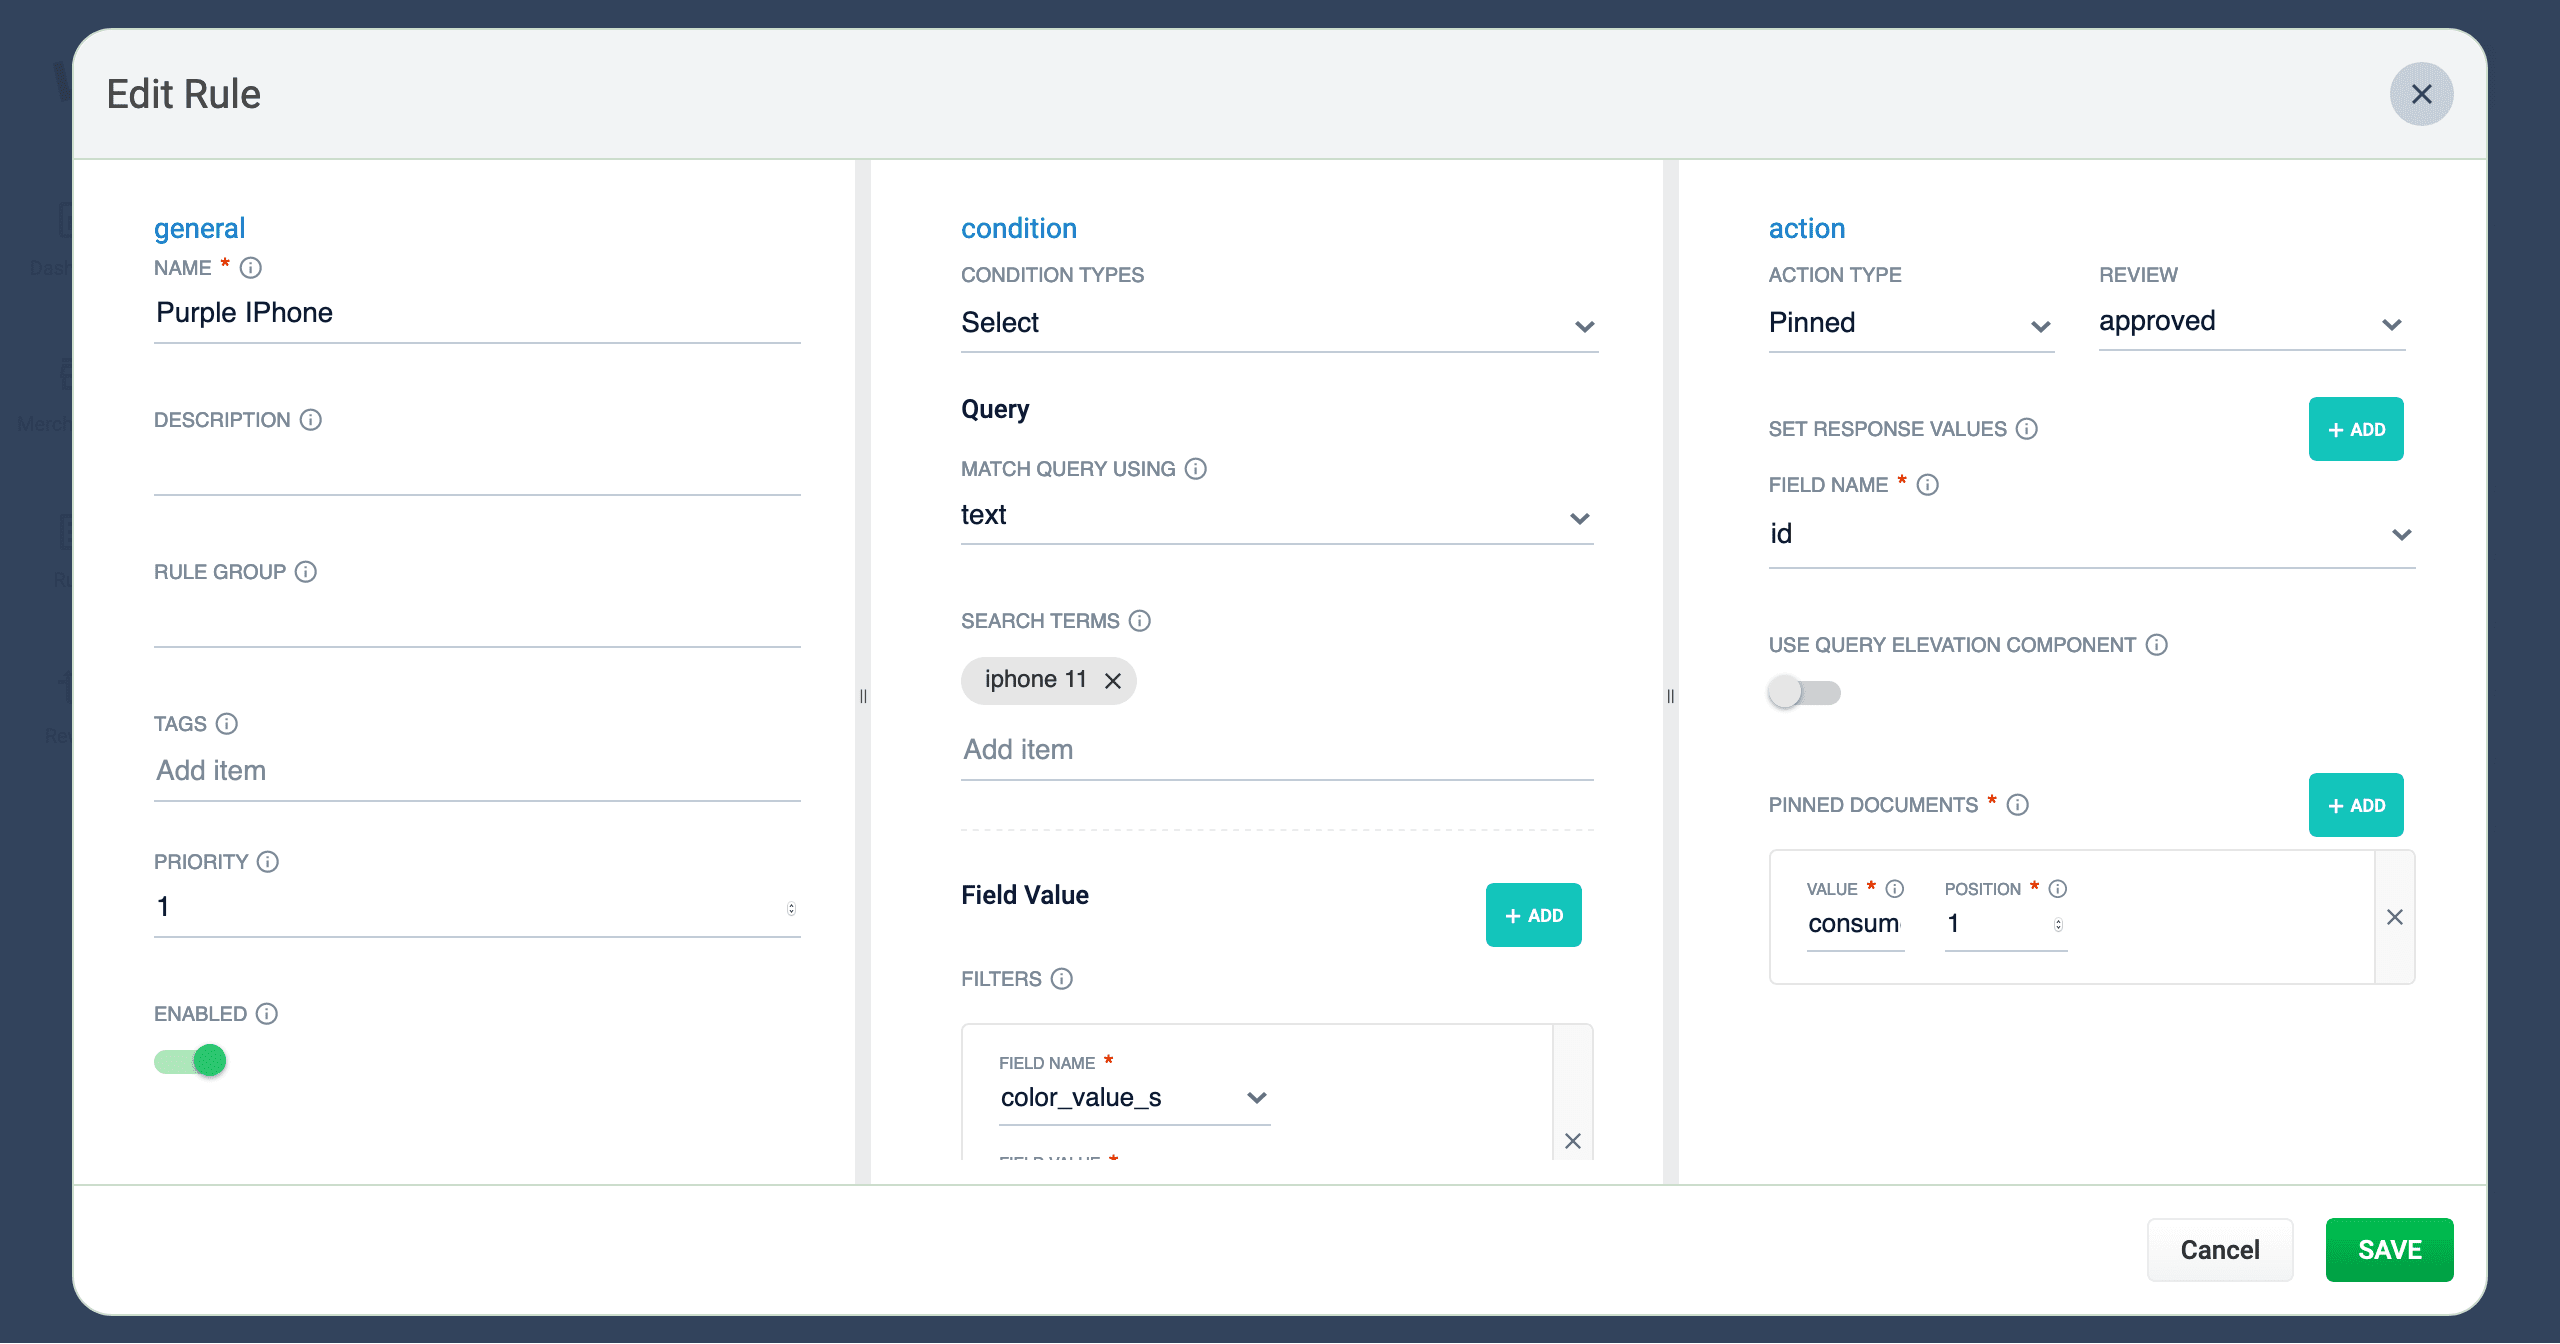
- Make your desired changes to the rule.
- Once complete, click the button.
Approve/deny rules
- Hover over a rule. A checkbox will appear on the left.
- Click the checkbox to select the rule.
- Repeat this process to select multiple rules. (optional)
- Click the Approve button to approve the selected rules, or click the Deny button to deny the rules.
Enable/disable a rule
- Hover over a rule. A checkbox will appear on the left.
- Click the checkbox to select the rule.
- Repeat this process to select multiple rules. (optional)
- Click the button to enable the selected rules, or click the button to disable the rules.
Publish a rule
- Hover over a rule. A checkbox will appear on the left.
- Click the checkbox to select the rule.
- Repeat this process to select multiple rules. (optional)
- Click the button to publish the selected rules.
Tag a rule
Tags are a powerful tool for organizing and publishing rules according to a keyword, such asblack-friday-sale.- Hover over a rule. A checkbox will appear on the left.
- Click the checkbox to select the rule.
- Repeat this process to select multiple rules. (optional)
- Click the button. A dialog box will appear.
- Enter a tag. To enter multiple tags, press Tab after writing each tag.
-
Click the button to add the tag to the rule.
See General Configuration Tags for information about how to use tagnames in the request URL to fire specific rules.
Delete rules
Delete a single rule
- Hover over a rule. A row of buttons will appear on the right.
- Click the button. A confirmation box will appear.
- Click the button to confirm.
Delete multiple rules
- Hover over a rule. A checkbox will appear on the left.
- Click the checkbox to select the rule.
- Repeat this process to select multiple rules. (optional)
- Click the button to delete the selected rules. A confirmation box will appear.
- Click the button to confirm.
Sort rules
- Hover over column titles. A icon will appear for some titles to indicate the rules list can be sorted by that column.
- Click on the title column to sort the rules.
The column that is currently sorting the rules list is indicated by an or icon.
Export rules
To export the rules list, simply click the button. This generates a.csv file containing your rules.Columns
Customize columns
To customize the columns:- Hover over the row of column titles. A button will appear on the right.
-
Click the button. The Customize Columns to Display dialog box will appear.
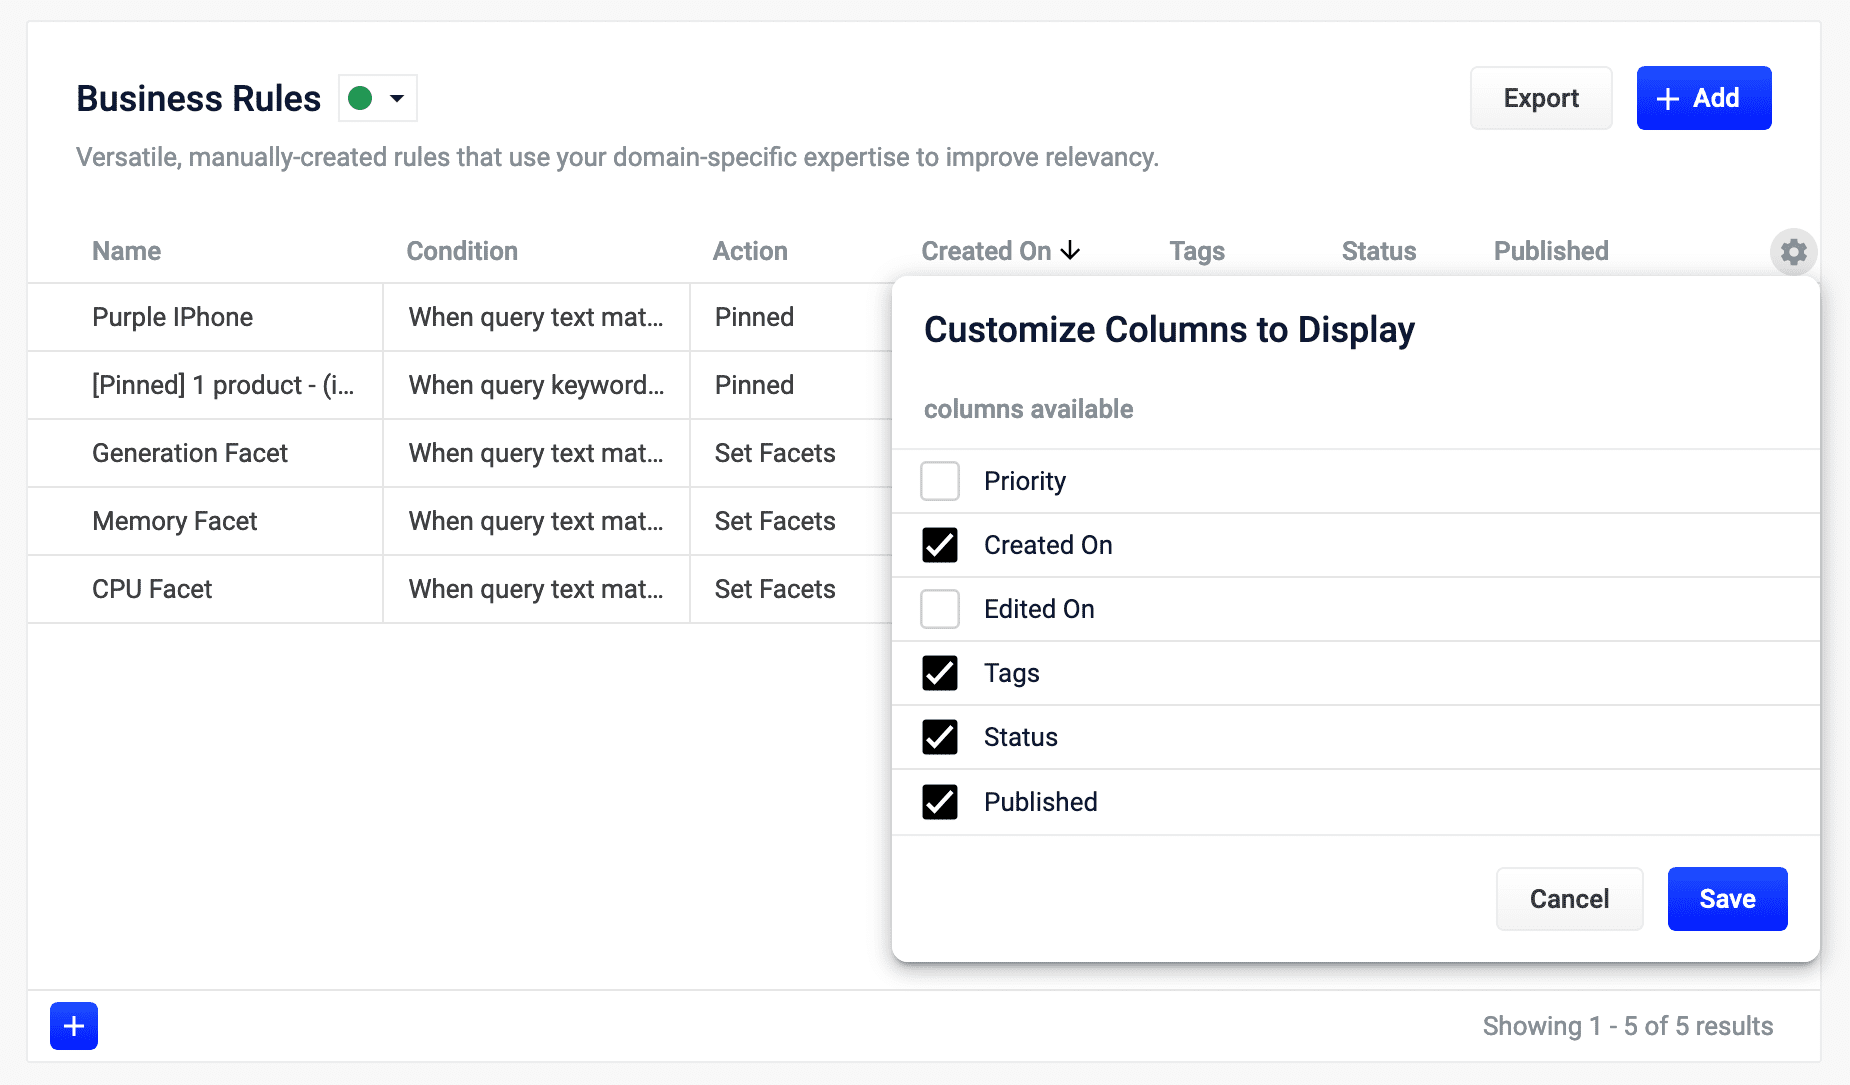
- Click the checkboxes to select or deselect the columns you want to display.
- Click the button to save your changes.
Configuration options
General
General configurations are used to characterize a rule, including its name, description, group, and more. They are also used to set a rule’s precedence, or priority over other rules. For complete details, see General Configurations.Condition
Conditions, or triggers, define the environment necessary for the rule action to fire. Any combination of conditions (date, field value, query, and query profile) can be defined for a rule. For complete details, see Conditions.Action
Business rule actions define what actions are taken when a rule fires. For complete details, see Actions.Custom Rule Actions
Custom rule actions allow you to define a unique action to take when certain conditions are met. They involve three primary components: a query pipeline, a custom rule type, and a rule that is triggered by conditions defined by the user. For complete details, see Custom Rule Actions. To learn use custom rule actions with the API, see Create Custom Rule Actions with the API.Create Custom Rule Actions with the API
Create Custom Rule Actions with the API
Custom rule actions allow you to define a unique action to take when certain conditions are met. They involve three primary components: a query pipeline, a custom rule type, and a rule that is triggered by conditions defined by the user.This article describes the general workflow for creating a custom rule action. The example assumes the following components are used:
| Component | Name |
|---|---|
| Query pipeline | custom-rule-pipeline |
| Custom rule type | custom-rule-type |
| Rule | custom-rule-action |
-
Create a query pipeline,
custom-rule-pipeline, that is used to complete the rule action. -
Create a custom rule type,
custom-rule-type, that uses your query pipeline. Here are some important parameters to include in yourPOSTrequest.Rule properties, included as part of theschema</code, define the values required from the user to create a rule that uses the custom rule type.A unique ID for the custom rule type. Theidvalue must be unique across all apps in Fusion (global namespace).
Example:custom-rule-typeThe ID of the pipeline that is invoked during rule processing.
Example:custom-rule-pipelineA user-friendly name for the custom rule type.
Example:My Custom RuleThe ID of the rule’s parameter. This field is used in the API but is not visible in the Rules Editor.
Example:1st-rule-parameterThe type of user-input.
Example:stringA user-friendly name for the parameter.
Example:ManufacturerFor example:A user-friendly description of what the field is used for. Thedescriptionvalue is shown in the field’s tooltip in the Rules Editor.
Example: The manufacturer of the product to which this rule applies. -
Verify the custom rule type was created by visiting
https://EXAMPLE_COMPANY.b.lucidworks.cloud/api/apps/myFusionApp/custom-rule-types. Custom rule types are also available in the Rules Editor: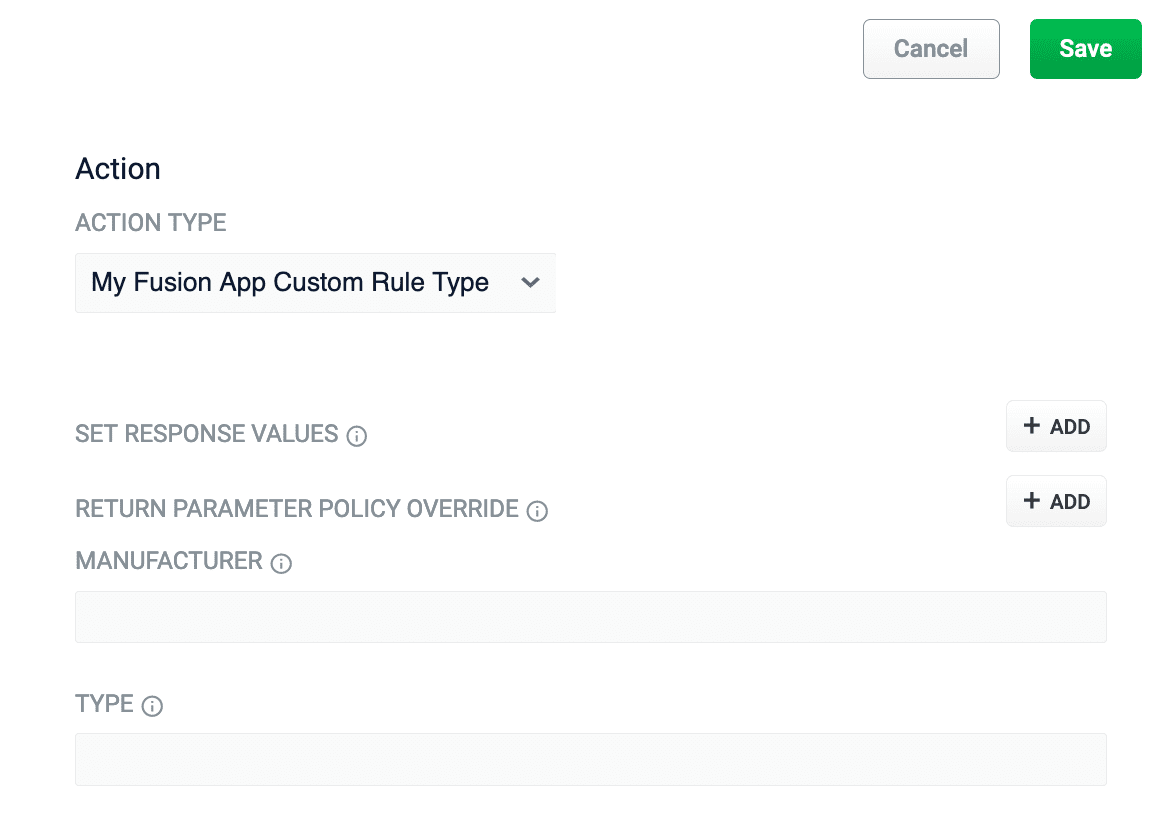
-
Create a rule,
custom-rule-action, that uses your custom rule,custom-rule-type. If you are creating the rule using the Query Rewrite API, the following image depicts which parameters are shared between the custom rule type and the rule: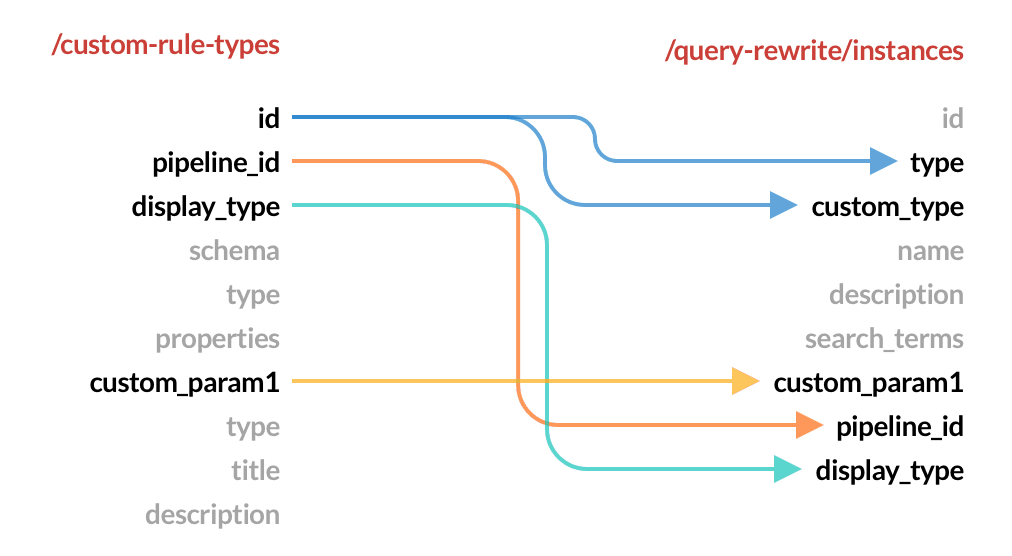
idvalue is used for the rule’stypeandcustom_typefields. Remember to assign values to the custom rule properties,custom_param1andcustom_param2. -
Verify your rule was created by checking the rule ID,
123456, with the Query Rewrite API:https://EXAMPLE_COMPANY.b.lucidworks.cloud/api/apps/myFusionApp/query-rewrite/instances/123456 - Test your custom rule using your normal rule development process.
Query Elevation Component
Fusion currently supports the use of the Query Elevation Component (QEC) with boost lists and filter lists. You must configure Solr in order to enable the QEC option. For instructions about using the QEC, see Use the Query Elevation Component.Use the Query Elevation Component
Use the Query Elevation Component
Fusion currently supports the use of the Query Elevation Component (QEC) with boost lists and filter lists. You must configure Solr in order to enable the QEC option.
Although it will not be accessed for the elevation process, Fusion requires an independent
elevate.xml file for the use of built-in rule actions with QEC due to a known issue in Solr.-
Create an XML file named
elevate.xmlin the same directory as thesolrconfig.xmlfile. -
Use the following as the contents of the
elevate.xmlfile: -
In the
solrconfig.xmlfile, add the following in the elevator search Component (searchComponent name="elevator"). Before adding, check to see if thesearchComponentalready exists within the file. -
Add
elevatoras a ‘last component’ part of the select handler in thesolrconfig.xmlfile. If alast-componentsarray is not already defined, create it at the end of the select handler’s configuration. If one is already defined, add<str>elevator</str>. -
When you create a new business rule, check the USE QUERY ELEVATION COMPONENT checkbox to use elevation.
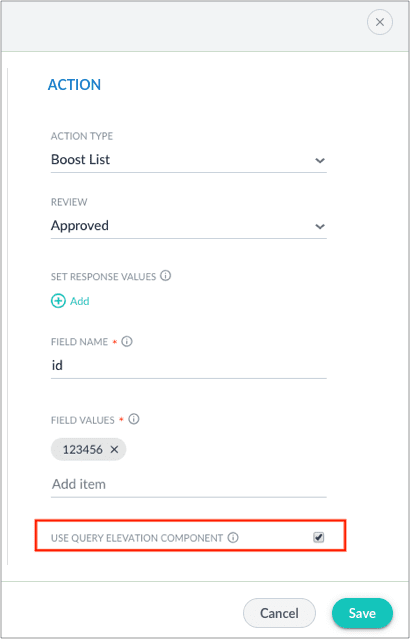
The Query Elevation Component only elevates documents within the query rewriting rules engine by the document
id field. Ensure id is entered in the “FIELD NAME” option.Additional details
Query pipeline stages for rules
These stages are part of the default query pipeline: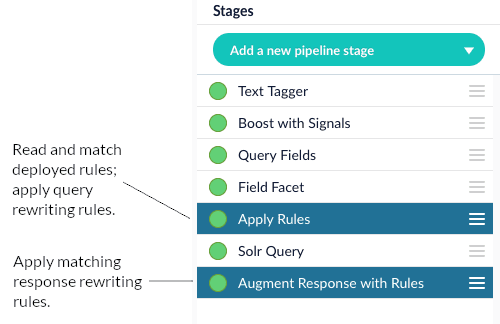
- Apply Rules
This stage looks up rules that have been deployed to theCOLLECTION_NAME_query_rewritecollection and matches them against the query. Matching rules that perform query rewriting are applied at this stage, while matching rules that perform response rewriting are applied by the Modify Response with Rules stage later in the pipeline.
To trigger a rule that contains a tag, specify the tagname in the request URL of the user search app. See Easily define triggers in tags for more information.
- Modify Response with Rules
Most rules operate on the request, but some rule types, such as banner rules or redirect rules, do their work when the response comes back. The Modify Response with Rules stage applies those rules to the response. For example, a banner rule can add a banner URL to the response before returning it to the client.
Rules on response signals
Response signals capture a list of rule IDs that match the query in a multi-valued field namedrule_ss.
Rules and experiments
The easiest way to integrate rules and experiments is to create one query pipeline with rules enabled and one without. Keep all other settings constant between the two pipelines. The pipeline without rules enabled must be configured manually. To create an experimental rule, use tags on the rule and set the tag in one of the variant pipelines.FAQ
What are arbitrary values? Arbitrary values are values that are not actively used by Fusion. Instead, they are used by the user or the search application. For example, the Description is considered an arbitrary value, as it serves only to inform the user what the business rule is used for.Learn more
Query Rewriting with Business Rules and Search Rewrites
The course for Query Rewriting with Business Rules and Search Rewrites focuses on how using business rules and search rewrites gives you the opportunity to boost conversions and create better customer experiences by improving your relevancy.