- Single sign-on via Windows Integrated Authentication
- Container-managed authentication
- Form-based authentication
- Cookie-based authentication
- Pass-through authentication
- Custom authentication providers via API
Authentication methods
OAuth
Authentication against OAuth 2.0 services is possible using the individual authentication provider modules which simplify the configuration of OAuth parameters and deal with the differences that exist between common OAuth endpoints. A general OAuth provider can be used by including thetwigkit.security.provider.oauth module. This requires a custom spring-security.xml file, but it is recommended to use one of the prepackaged modules we provide for these services.
Read more about OAuth authentication.
SAML
We have a method of configuring SAML authentication with a simplified process. SAML is still a complex standard and so a lot of the relevant information from the previous SAML instructions is still included here. Appkit provides an extension for SAML based authentication. SAML is a recognized standard for authentication with many providers and implementations available. Read more about SAML authentication.Available security providers
Appkit supports a range of security providers for authentication and authorization. Typically one of these providers is used in an application:Active Directory
While integration with Active Directory can be achieved using the LDAP setup, Spring Security provides a tailored security provider which makes configuring security using Active Directory easier. Set Up Active Directory Authentication for AppkitSet Up Active Directory Authentication for Appkit
Set Up Active Directory Authentication for Appkit
While integration with Active Directory can be achieved using the LDAP setup, Spring Security provides a tailored security provider which makes configuring security using Active Directory easier.This article describes how to set up authentication against an Active Directory server. It assumes that your Appkit application is managed as a Maven project with all project dependencies described in a Maven POM file.Added this as the first filter in the chain (at the top of the Configure this to point to the Active Directory server implementing the LDAP protocol and the domain under which users are located.
1. Add the security provider dependency
Authentication against Active Directory requires the Active Directory module.To enable the Active Directory module-
Remove any existing security provider dependency from the
pom.xmlunder the root of the project. -
Add this within the
dependenciestag: -
To configure Appkit to invoke this module on startup, change the
security.conffile insrc/main/resources/conf/security/to contain:
2. Configure security filtering in the application
Spring Security operates using a Servlet filter that must be mapped in theweb.xml file in src/main/webapp/WEB-INF:web.xml file).3. Point the application to the security backend
No Spring Security XML file is required. Just add this in a file namedactive-directory.conf in src/main/resources/conf/security:The LDAP protocol
Note the use of the LDAP protocol in the url -ldap://. In some cases, SSL encryption is used with the ‘LDAPS’ protocol. This requires the certificate is trusted by the authentication client (the JVM running Appkit). There are several ways to configure the keystore for the JVM to trust the certificate from the LDAP server. The most common way to do this is to import the certificate into the JVM’s default keystore.Authentication manager configuration
Unlike the configuration for the LDAP module, the Active Directory specific configuration is minimal. A user can then login using either their username or the fully qualified principal (for example,bloggsj@my-domain.com). By default roles are assigned using the memberOf attribute values of the user entry.4 Verify the configuration
You can now verify the authentication in an Appkit application using the login form on a login page which is typically located insrc/main/webapp/login.jsp in your application source tree.Fusion Sessions API
The Fusion security provider for Appkit allows authentication against Fusion using the Fusion Sessions API. With this provider configured, an application deployed within a Fusion defined ‘realm’ such asnative can securely authenticate a user against Fusion.
Set Up Lucidworks Fusion Authentication
Set Up Lucidworks Fusion Authentication
Set Up Lucidworks Fusion Authentication
The Fusion security provider for Appkit allows authentication against Fusion using the Fusion Sessions API. With this provider configured, an application deployed within a Fusion defined ‘realm’ such as Then configure the session host, which security realm to use and the session timeout in The session-timeout parameter should be a time in minutes and be equal to your Fusion session timeout. By default, this
value is 10. For further information, refer to the Fusion Session Api documentation.This should be added as the first filter in the chain (at the top of the web.xml file).Now when a user logs into Appkit, if they have been successfully authenticated against Fusion, they will receive a session cookie that can be re-used to send subsequent requests. Access to Fusion in this way can extend for up to 10 minutes if there is no activity and up to a maximum of 8-hours if a request is received within a 10-minute interval.
native can securely authenticate a user against Fusion.These sections describe how to set up Fusion authentication using the Sessions API within an Appkit application.1. Add the security provider dependency
Authentication against Fusion using the Sessions API requires Appkit’s Fusion security provider module. To enable this module, first remove any existing security provider dependency from thepom.xml under the root of the project and insert this within the dependencies tag:2. Update security.conf and add fusion.conf
To invoke this module when Appkit starts up, add this tosecurity.conf in src/main/resources/conf/security/:fusion.conf in src/main/resources/conf/security/fusion. For example:3. Configure security filtering in the application
Spring Security operates using a Servlet filter which must be mapped in the web.xml file insrc/main/webapp/WEB-INF:4. Instruct the application to use the Fusion security provider
For integration with security providers supported by Spring Security, configuration is managed in the spring-security.xml file insrc/main/resources.Leave the initial section of this file dealing with HTTP URL patterns as configured. Remove any existing authentication manager configuration below that initial section, and add this:HTTP Headers
Appkit supports authentication via generic HTTP headers passed through from a component behind a secure firewall sitting in front of the Appkit application. If there is such an authentication component in the environment where you are using Appkit, you can configure the HTTP headers that the application will use to pick up the user’s details. Set Up HTTP Headers AuthenticationSet Up HTTP Headers Authentication
Set Up HTTP Headers Authentication
Appkit supports authentication via generic HTTP headers passed through from a component behind a secure firewall sitting in front of the Appkit application. If there is such an authentication component in the environment where you are using Appkit, you can configure the HTTP headers that the application will use to pick up the user’s details.Here, the user’s ID will be extracted from the value of the
Adding header security
- Add this dependency to the
pom.xmlfile: - Modify
conf/security/security.confto contain this:
Configuring the headers used
Create a new configuration file inconf/security/header/header.conf.A typical configuration might look like:remote_user header and roles from the x-group header.All possible properties are listed here:user-id: name of header that contains the ID of the userroles: name of the header that contains the user’s roles - multiple values will be picked up from the header if specified by the comma separated header value conventiondomain: name of the header that contains the domain for the userdetail-prefix: prefix of any headers containing values which should be added to the user’s details (for example, if X-USER- a header with the name X-USER-DEPARTMENT and its value will be added as an entry to the user details map)Kerberos
The Kerberos security provider for Appkit allows authentication using Kerberos. With this provider configured, an application deployed within a Kerberos ‘realm’ can securely authenticate a user against a Kerberos ‘Key Distribution Center’. This module is primarily intended to simplify the process of authenticating a user silently in a Windows environment by leveraging the built in support for integrated Windows authentication in Internet Explorer. However it should be possible to use this module to authenticate the user in any Kerberos compliant environment. Set Up Kerberos AuthenticationSet Up Kerberos Authentication
Set Up Kerberos Authentication
The Kerberos security provider for Appkit allows authentication using Kerberos. With this provider configured, an application deployed within a Kerberos ‘realm’ can securely authenticate a user against a Kerberos ‘Key Distribution Center’. This module is primarily intended to simplify the process of authenticating a user silently in a Windows environment by leveraging the built in support for integrated Windows authentication in Internet Explorer. However it should be possible to use this module to authenticate the user in any Kerberos compliant environment.This guide focuses on how to set up Kerberos authentication within an Appkit application in a Windows environment. It assumes Kerberos is enabled and already working on a domain controller.Then to configure Appkit to invoke this module on startup change the This should be added as the first filter in the chain (at the top of the web.xml file). Remove any existing spring-security.xml file in the project because this configuration is pre-packaged by the Kerberos module.Set the service principal and keytab location accordingly. The debug parameter provides useful logging output from the Kerberos protocol interactions, and is recommended to be set to true for development. The login page is optional and provides a fallback page. If this is a standard Appkit login.jsp file, then the fallback form will be used to attempt login using form-based authentication (see Fallback strategy for more information). Alternatively this can direct to an ‘unauthorized’ error or debug page.
1 Add the security provider dependency
Authentication against Kerberos requires the Kerberos provider module. To enable this module first remove any existing security provider dependency from thepom.xml under the root of the project and add this within the dependencies tag:security.conf file in src/main/resources/conf/security/ to contain:2 Configure security filtering in the application
This module uses Spring Security which operates using a Servlet filter which must be mapped in theweb.xml file in src/main/webapp/WEB-INF:3 Configure the application for the Kerberos environment
To use Kerberos with an application, a ‘keytab’ file is required. This identifies the application (service) and the host on which it is running in a special encrypted host key. You must configure a service principal and obtain a keytab file (usually done on the domain controller using Windows powershell) prior to configuring the Appkit application. After you have the service principal name and the keytab file configuration is easy. Add a file namedkerberos.conf to src/main/resources/conf/security/ with these parameters:4 Test the authentication
Login to an account within the Kerberos ‘realm’ and navigate to the application in IE. The user should be silently authenticated.Further information on using the Kerberos provider
Fallback strategy
This module includes a default fallback strategy in the event Kerberos authentication fails. Reasons for failure can include:- Incorrect configuration of the application
- An invalid keytab file
- A browser that does not support Kerberos via the SPNEGO/Negotiate protocol
- Unauthorized access
- Access from outside the Kerberos ‘realm’
- The environment is not configured correctly for Kerberos (for example, some other authentication mechanism ‘preferred’)
General troubleshooting
First, check all of the above reasons the authentication can fail or ‘fall back’ from Kerberos. Use thedebug configuration parameter and check the logs for information that could help to identify the cause. If it is a Windows environment it is recommended to check with the systems administrators that everything works correctly on the domain controller (check the Kerberos key distribution service, permissions of the service principal account, etc). You can view the headers passed from the browser in the debug information in the logs, these might provide an indication of why authentication failed (if Kerberos is used).If you find or suspect that NTLM is used, ensure you are trying to access the site using the host name configured in the SPN (service principal name). For example, if the SPN is HTTP/sharepoint-sp@sharepoint-dev.twigkit.com, you must use the URL for the host machine sharepoint-sp: either http://sharepoint-sp/ or http://sharepoint-sp.sharepoint-dev.twigkit.com/. Using ‘localhost’ or another alias will not work.Authentication works but the user is prompted for a username and password
Usually in a Windows environment Kerberos allows silent authentication (single sign on via the account logged into the machine). In some cases the user is presented with a dialog (not an HTML form) the first time they visit the application or if the session expires, but when they enter their credentials it works fine. This can be a simple case that the user’s Windows credentials are not correctly configured or IE has ‘integrated windows authentication’ disabled. Make sure this is enabled in IE and that the credentials are saved correctly in the user account settings under the ‘Control Panel’.How does this differ from Integrated Windows Authentication?
Previously in Appkit, the only way to do silent ‘integrated’ authentication with Windows was using the Tomcat ISAPI connector, as described in our article about Integrated Windows Authentication.The Kerberos Security module simplifies the process for Kerberos enabled environments and keeps all of the configuration within the application.LDAP
Appkit allows for authentication against a server using LDAP (Lightweight Directory Access Protocol). It assumes that your Appkit application is managed as a Maven project with all project dependencies described in a Maven POM file. Set Up LDAP AuthenticationSet Up LDAP Authentication
Set Up LDAP Authentication
Appkit allows for authentication against a server using LDAP (Lightweight Directory Access Protocol). It assumes that your Appkit application is managed as a Maven project with all project dependencies described in a Maven POM file.Then to configure Appkit to invoke this module on startup change the Add this Servlet filter as the first filter in the chain (at the top of the The first three settings configure the LDAP server’s location and manager credentials. The manager is the account used by Spring Security to access the LDAP server. The DN for this user should be available from the LDAP server or directory containing the user.The remaining settings reference the LDAP server configuration to be used and provide the attributes required to determine the username and roles.
1 Add the security provider dependency
Authentication against LDAP requires the LDAP module. To enable this module first remove any existing security provider dependency from thepom.xml under the root of the project and add this within the dependencies tag:security.conf file in src/main/resources/conf/security/ to contain:2 Configure security filtering in the application
Spring Security operates using a Servlet filter that must be mapped in theweb.xml file in src/main/webapp/WEB-INF:web.xml file).3 Point the application to the security backend
No Spring Security XML file is required. Add this in a file namedldap.conf in src/main/resources/conf/security:user-search-baseis the DN used under which users are retrieveduser-search-filteris the property used to determine a match against the username specified by the usergroup-role-attributeis the property from which the name of the roles will be populatedgroup-search-baseis the DN used under which groups are retrievedgroup-search-filteris the property used to determine the group membership of a userrole-prefixis a prefix applied to the roles reported by Spring Security
The LDAP server protocol
Note the use of the LDAP protocol in the URL -ldap://. In some cases SSL encryption is used with the ‘LDAPS’ protocol. This requires the certificate is trusted by the authentication client (the JVM running Appkit). There are several ways to configure the keystore for the JVM to trust the certificate from the LDAP server. The most common way to do this is to import the certificate into the JVM’s default keystore.4 Verify the configuration
You can now verify the authentication in an Appkit application using the widget:login-form on a login page which is typically located insrc/main/webapp/login.jsp in your application source tree.Siteminder
Appkit can integrate with a SiteMinder single-sign-on authentication provider. SiteMinder is typically installed in a web server placed in front of the application server that runs Appkit. Set Up SiteMinder AuthenticationSet Up SiteMinder Authentication
Set Up SiteMinder Authentication
Appkit can integrate with a SiteMinder single-sign-on authentication provider. SiteMinder is typically installed in a web server placed in front of the application server that runs Appkit.To enable SiteMinder authentication:
-
Add this module to your POM (
pom.xmlfile in the root of the application): -
Update your
security.conf(found insrc/main/resources/conf/security/) to use SiteMinder:
Spring Security
The Spring Security authentication provider for Appkit interfaces with both Spring Security 3 and 4. Projects that adopt Appkit version 3 must switch to using Spring Security 4. Authorized Spring principals become fully-qualified Appkit user profiles, along with any roles or groups that the Spring module provides. Spring Security integrates with a number of authentication protocols, including LDAP, Active Directory, Basic Authentication, Kerberos, JAAS, and others. For a full list, see here. Set Up Spring AuthenticationSet Up Spring Authentication
Set Up Spring Authentication
The Spring Security authentication provider for Appkit interfaces with both Spring Security 3 and 4. Projects that adopt Appkit version 3 must switch to using Spring Security 4.Authorized Spring principals become fully-qualified Appkit user profiles, along with any roles or groups that the Spring module provides. Spring Security integrates with a number of authentication protocols, including LDAP, Active Directory, Basic Authentication, Kerberos, JAAS, and others. For a full list, see here.Below you will find some common configurations of the The first portion of the configuration file contains the required access levels for URL patterns used in Appkit and in most cases stays the same for all configurations.Here, you can see that two users are configured - ‘user’ and ‘admin’. Both have been assigned the role named ‘USER’ and the admin user also has the ‘ADMIN’ role.Note the use of the LDAP protocol. In some cases, SSL encryption is used with the ‘LDAPS’ protocol. This requires the certificate to be trusted by the authentication client (the JVM running Appkit). There are several ways to configure the keystore for the JVM to trust the certificate from the LDAP server. The most common way to do this is to import the certificate into the JVM’s default keystore.The
spring-security.xml file for integrating with different security mechanisms for authentication and authorization.The references given are for Spring Security 3. For information on how these configurations would change with Spring Security 4, refer to the Release Notes for Appkit 3.
Hard-coded users
LDAP
Spring ‘remember me’ feature
Spring Security comes with a mechanism for allowing a user’s details to be remembered beyond the current browser session, avoiding the user having to provide credentials on a login page every time. This integrates with the ‘remember’ attributes on the widget:login-form tag.There are two methods to allow the user’s session to be persistent using either a browser cookie or a database backed persistence method. The first is most commonly used, and to implement this all that is required is to add the remember-me line to thespring-security.xml HTTP configuration:Re-directing users to the original requested URL post-login
Spring Security provides an authentication strategy that allows a requested URL to be saved before requiring the user to log in; once credentials have been authenticated the user is re-directed to the original URL.This strategy is implemented as part of the<form-login ...> tag defined via the authentication-success-handler-ref. For example:login_success_handler is a reference to the Spring Security class that implements the described strategy. This class is defined via this bean that needs to be added to the spring-security.xml as follows:Tomcat Container
Apache Tomcat is an open source Java servlet container. Tomcat implements Java enterprise specs, including the Java Servlet, JavaServer Pages JSP, and WebSockets APIs. Set Up Tomcat Container AuthenticationSet Up Tomcat Container Authentication
Set Up Tomcat Container Authentication
Apache Tomcat is an open source Java servlet container. Tomcat implements Java enterprise specs, including the Java Servlet, JavaServer Pages JSP, and WebSockets APIs.To have Tomcat manage authentication for your application:
-
Add this module to your POM (
pom.xmlfile in the root of the application): -
Set the requisite type in
security.conf(found insrc/main/resources/conf/security/):
Windows
Appkit can be used with Integrated Windows Authentication for single sign on (SSO) in your search application using Microsoft Internet Information Services. Set Up Windows AuthenticationSet Up Windows Authentication
Set Up Windows Authentication
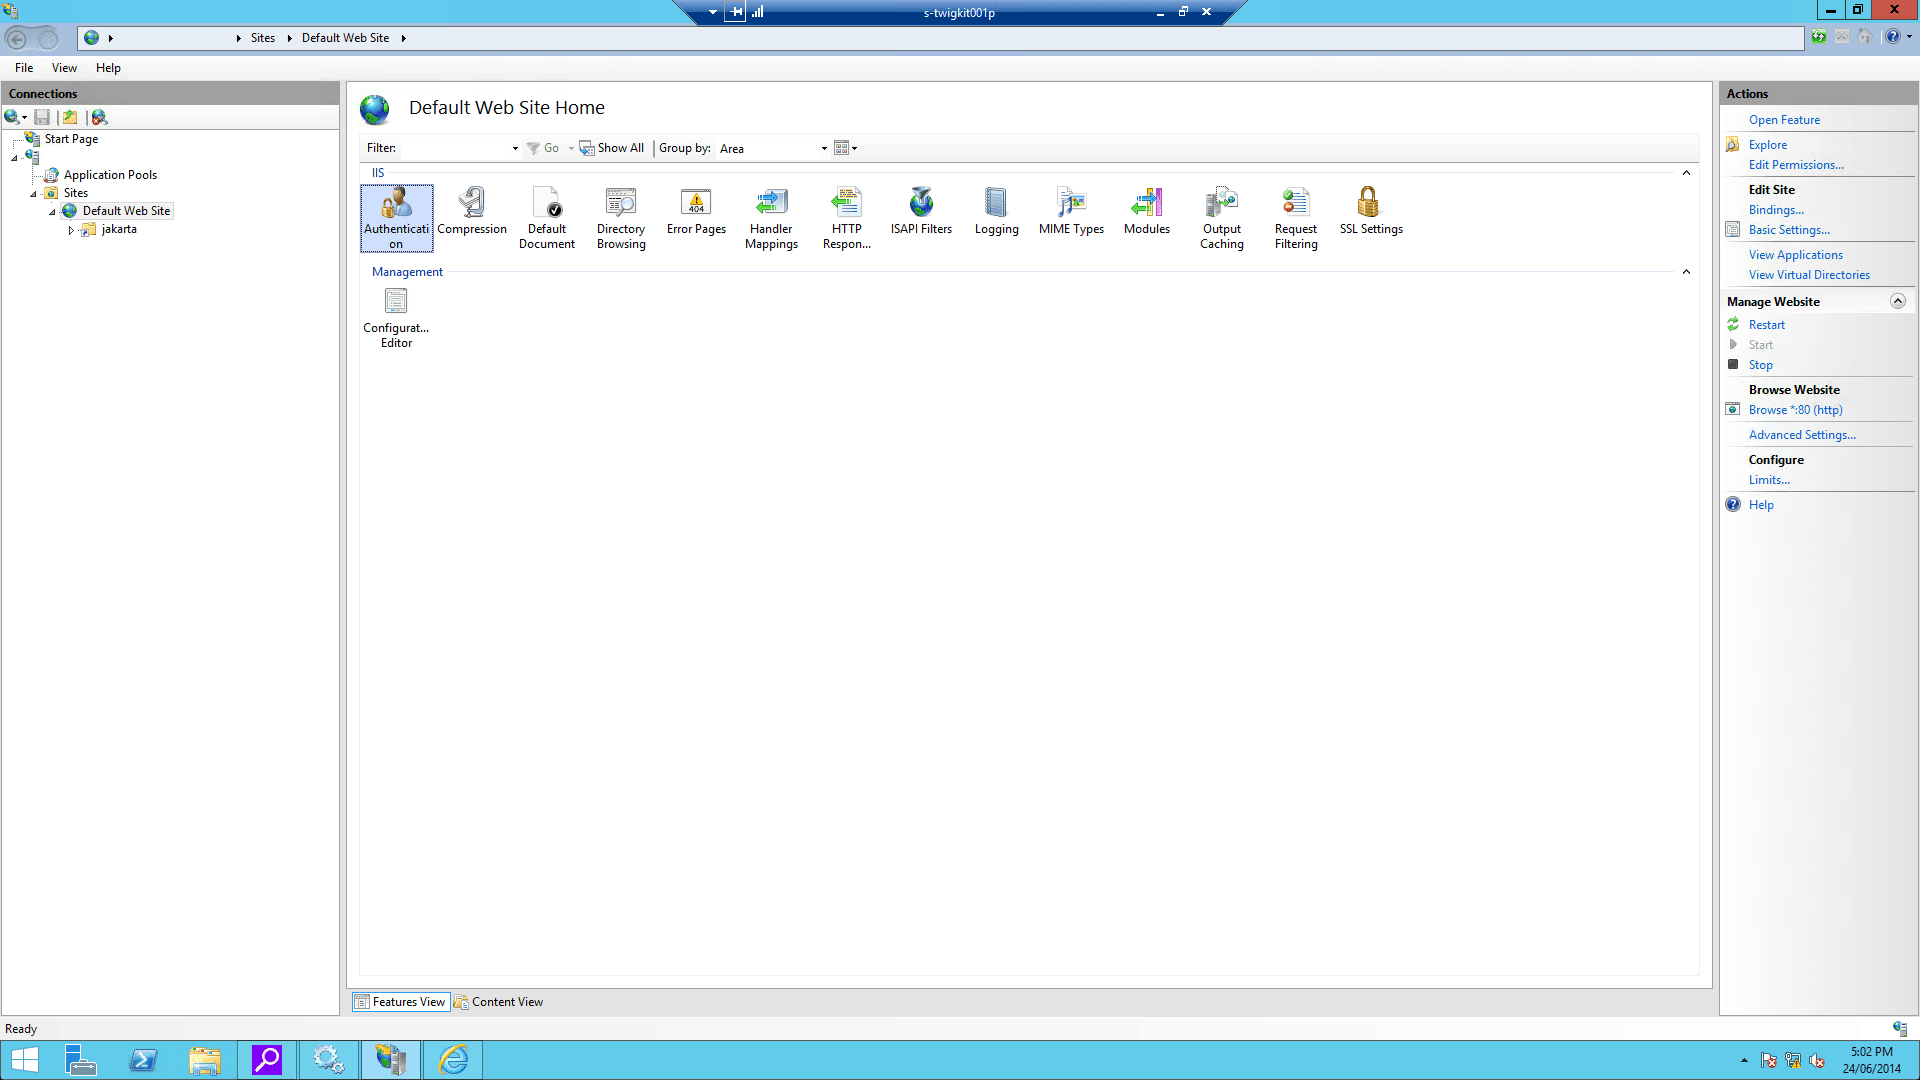
Appkit can be used with Integrated Windows Authentication for single sign on (SSO) in your search application using Microsoft Internet Information Services.This article includes all the necessary steps to configure the IIS component on the Windows server. These instructions assume that your Appkit application is managed as a Maven project with all project dependencies described in a Maven POM file.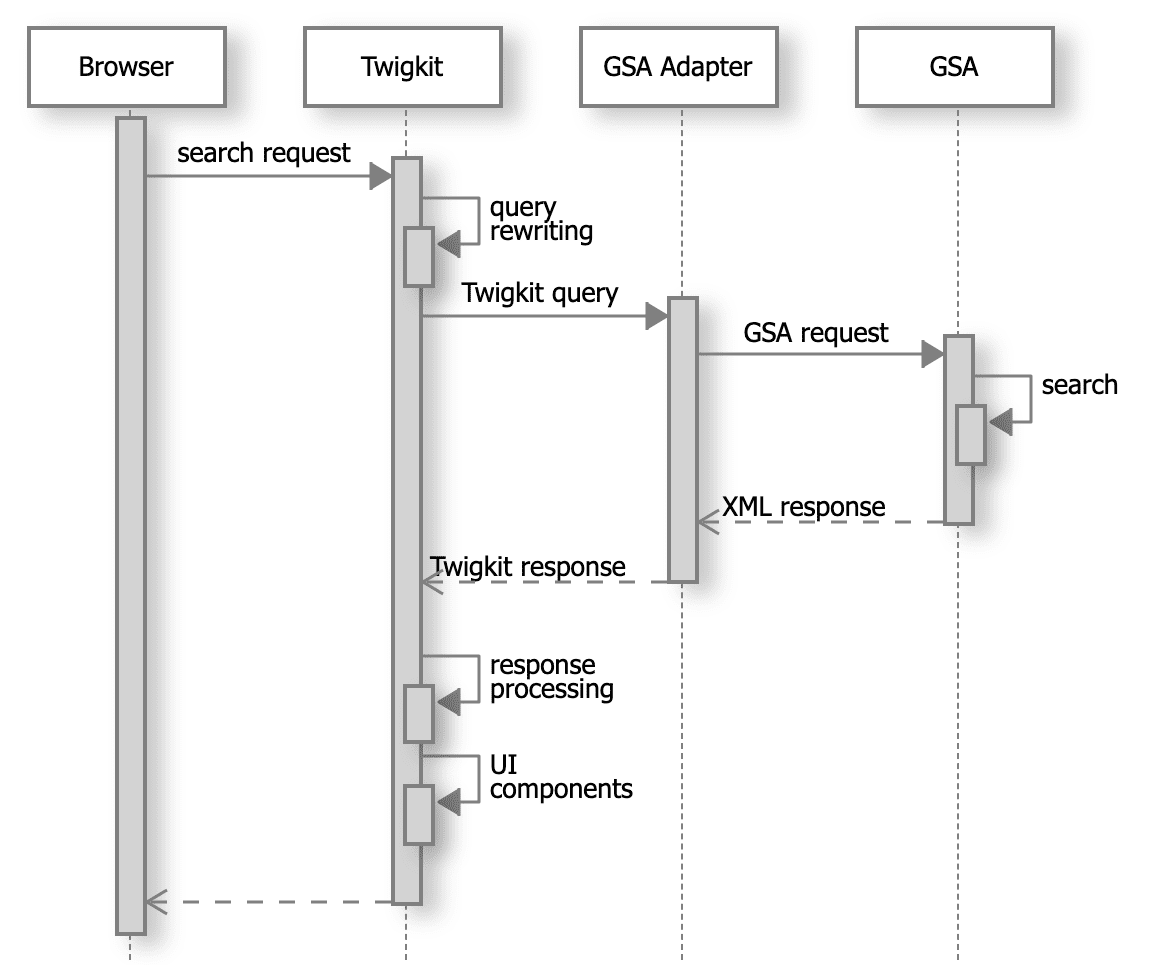
All screen shots and references to IIS configuration below were obtained from IIS 8.0 on a Windows Server 2012 VM. These might differ if using a different version of Windows or IIS.
Interaction diagram
1 Prerequisites
1.1 Make sure IIS is installed on your Windows server
Install IIS on your Windows server.1.2 Install the Oracle JDK on the Windows server
Install the Oracle Java SE Development Kit.1.3 Install Tomcat
Tomcat versions 7 and 8 are both supported. In this, we assume you are using Tomcat 8.0.21.To install Tomcat-
Download the Tomcat installer (Windows Service Installer
.exe) and follow the installation instructions. After installation is complete, do not start the Tomcat service just yet.Install Tomcat at a whitespace-free path (for example,D:\tomcat8). This path will be referred to asCATALINA_HOMEhereafter. All the screenshots that follow assume you installed Tomcat inD:\Tomcat8.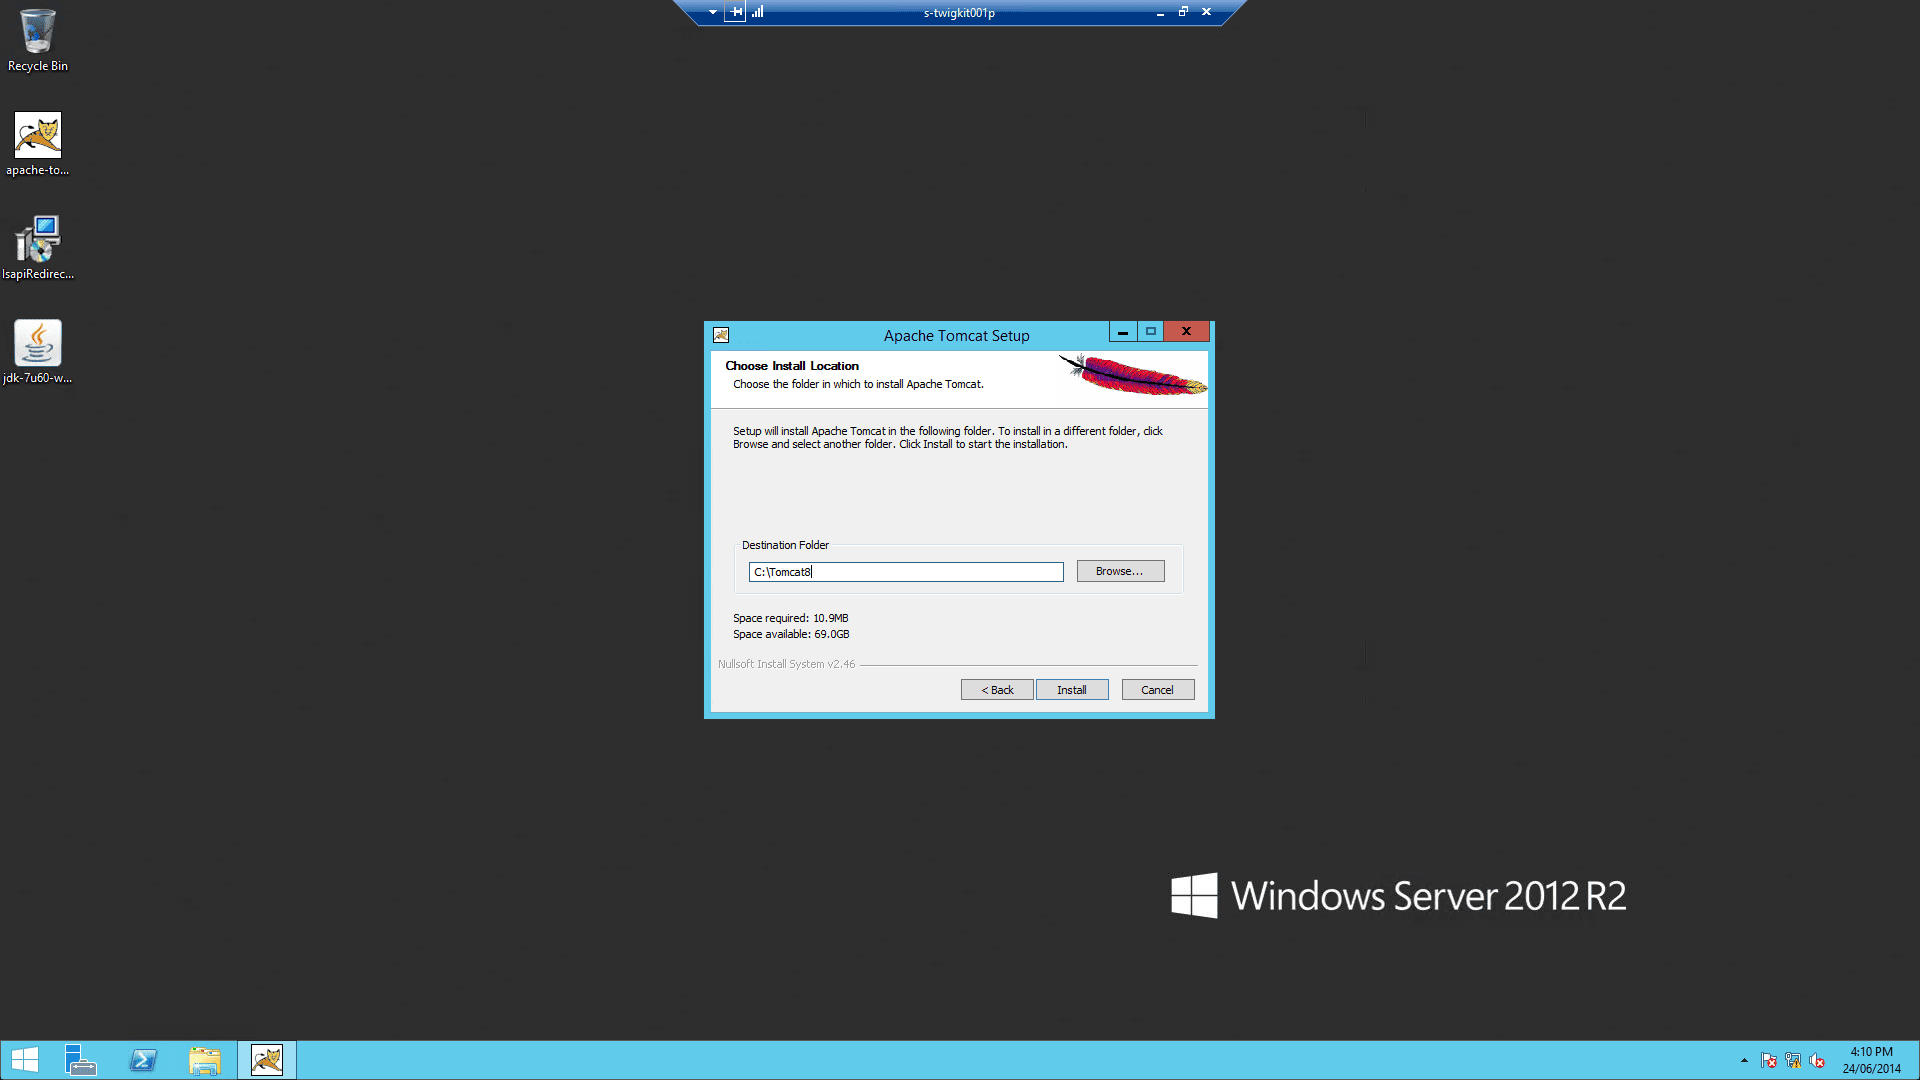
-
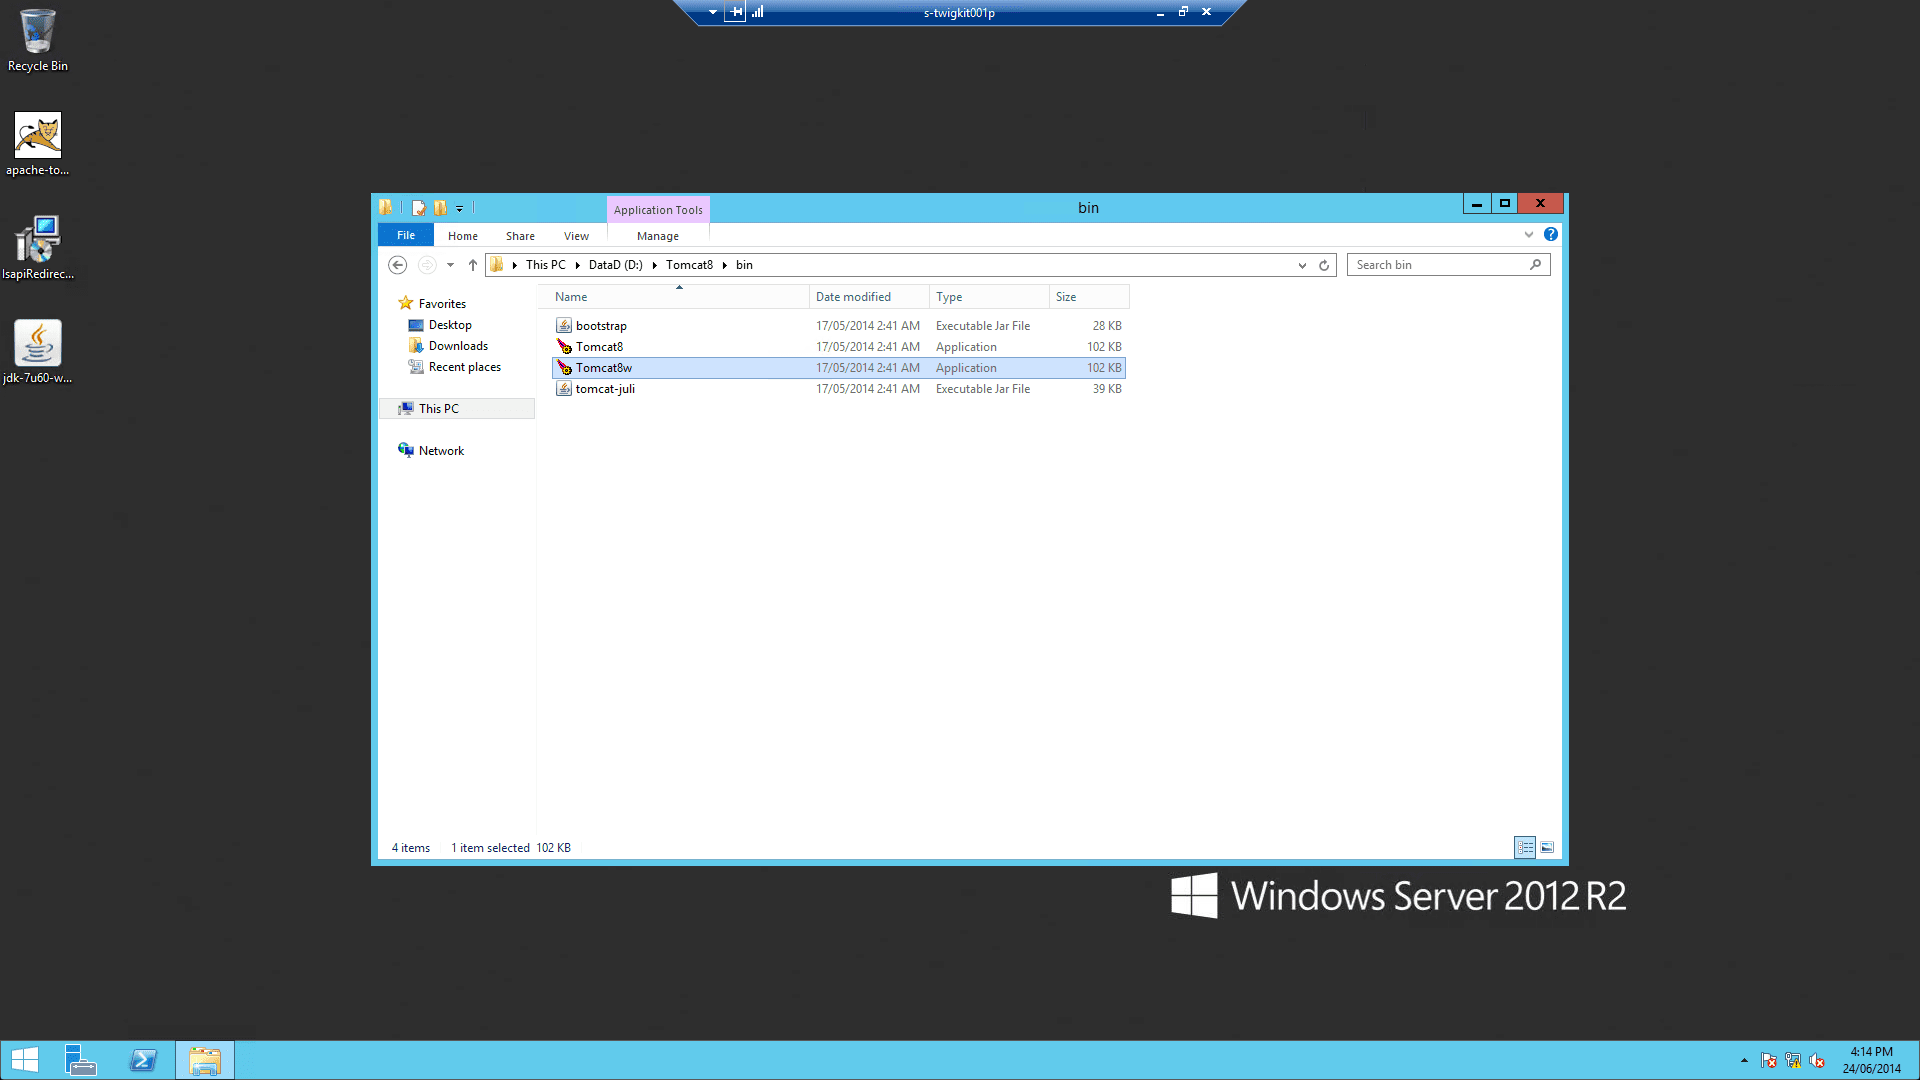
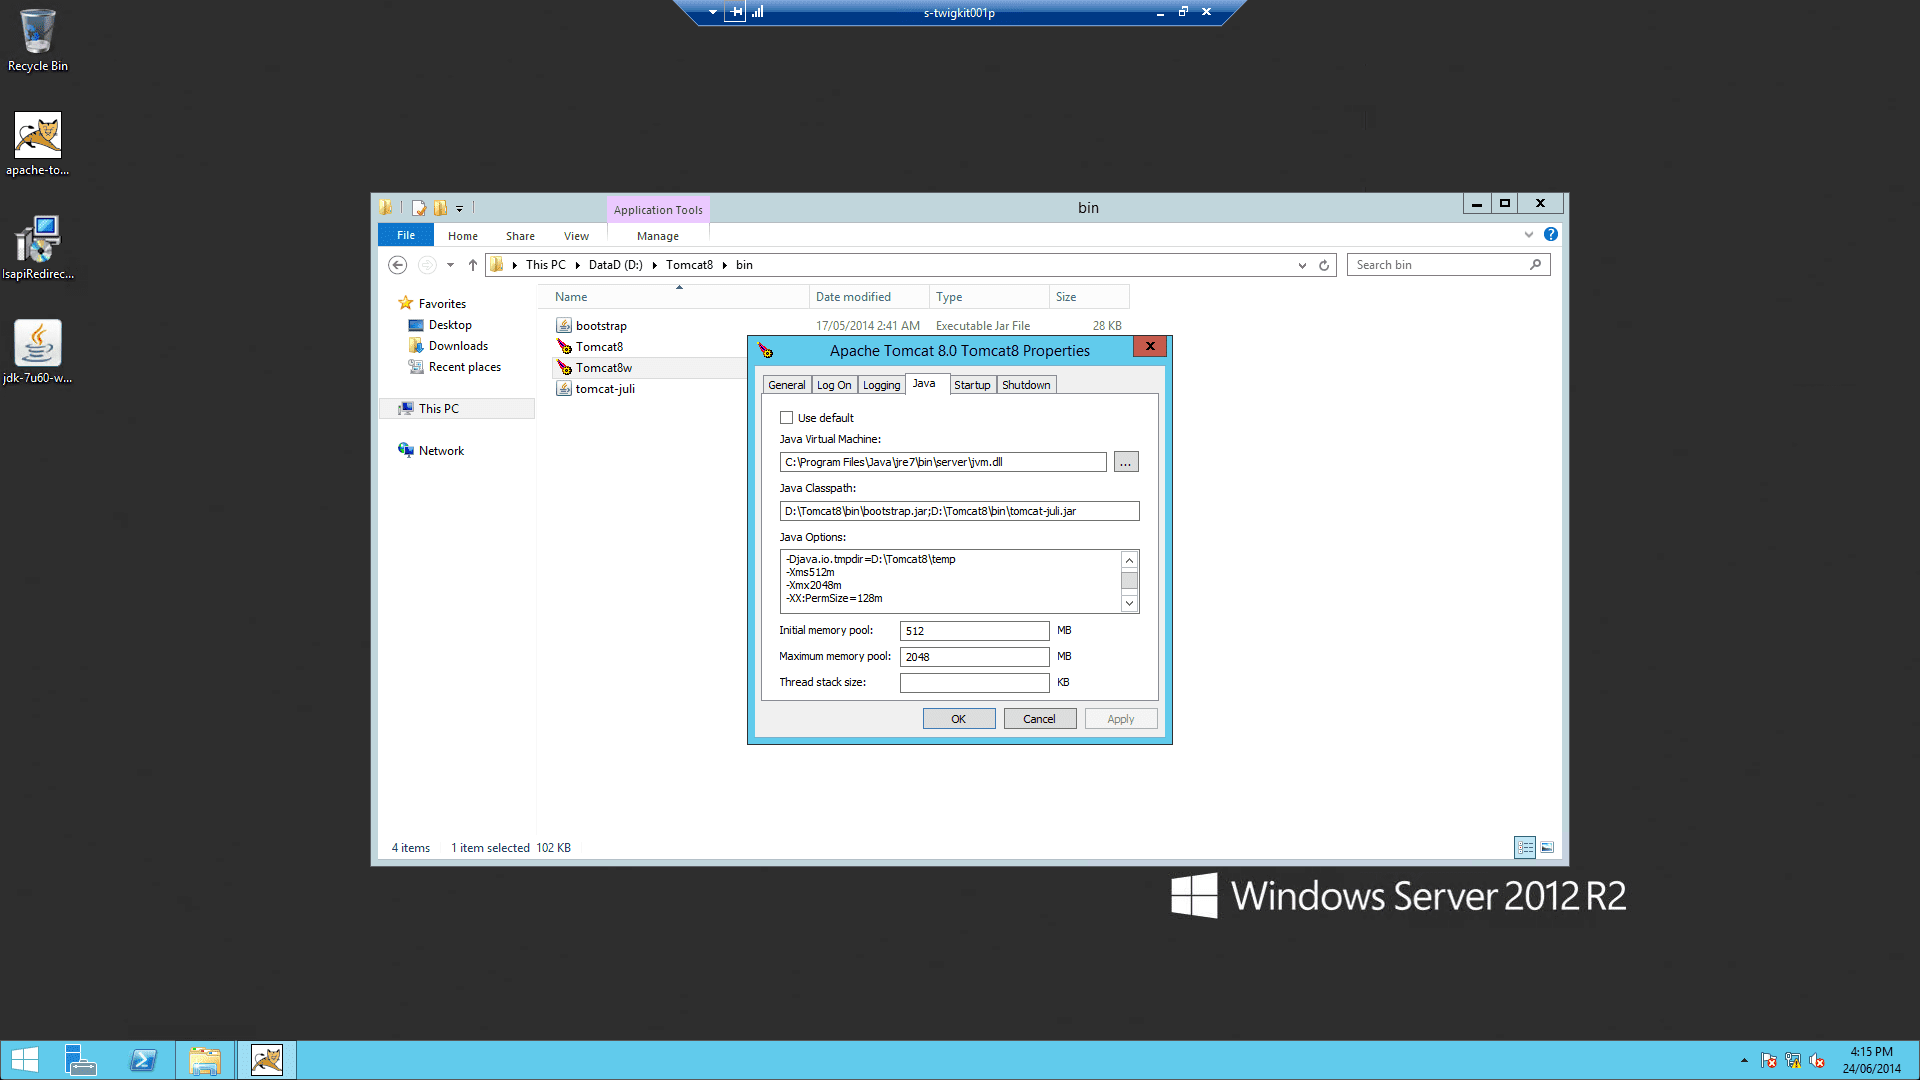
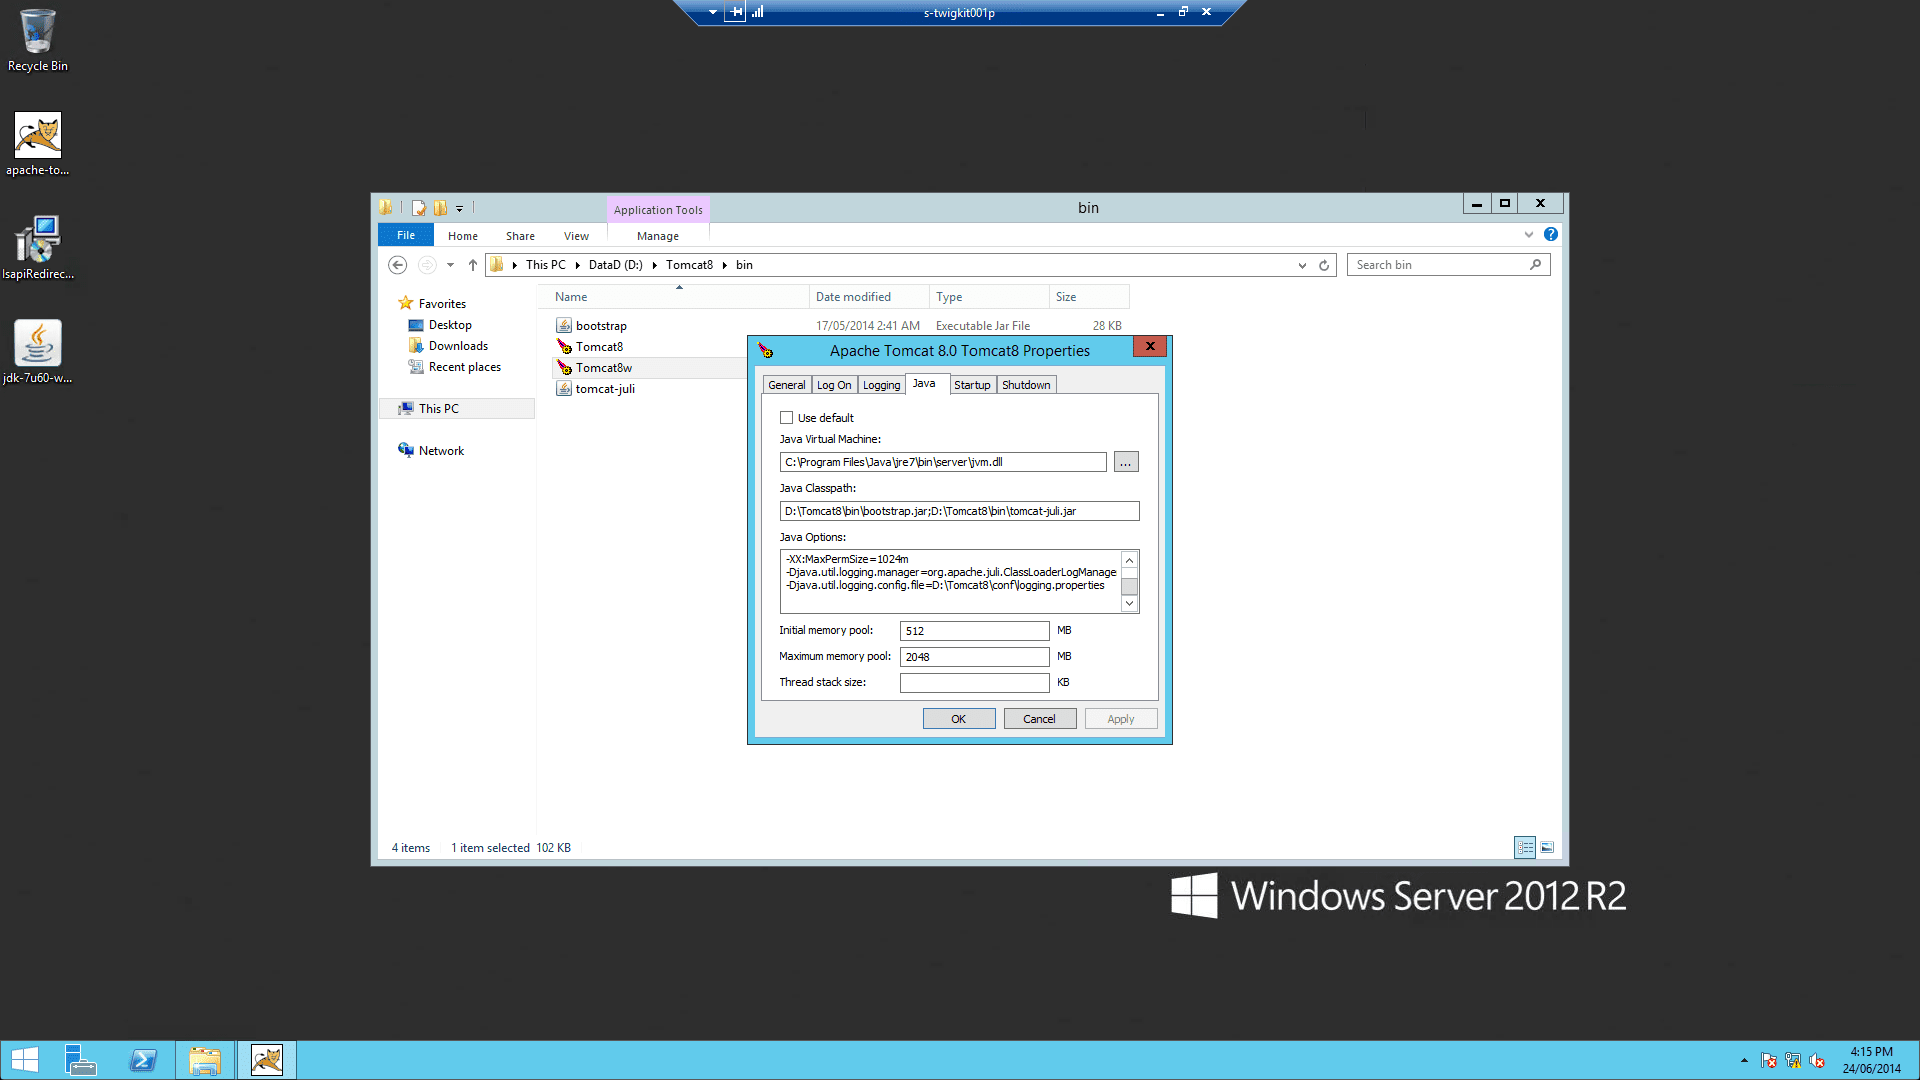
After the installation is complete, change Tomcat memory settings as follows:
-
Run
%CATALINA_HOME%\bin\Tomcat8w.exe -
On the Java tab, set Java Options to include:
-
Run
-
Repeat these settings in the input boxes below:
1.4 Verify the Tomcat installation
Start up Tomcat via Windows Services and go tohttp://localhost:8080. You should be presented with the default Tomcat manager application.2 Configure and deploy the Appkit application
2.1 Configure the security provider
Authentication against IIS requires the “generic” Appkit security provider module. This is a thin layer which integrates with the standard Java servlet API to pick up the user’s credentials for authentication. To enable this module first remove any existing security provider dependency from thepom.xml under the root of the project and add this within the dependencies tag:security.conf file in src/main/resources/conf/security/ to contain:web.xml file if Spring was previously being used in the application.2.2 Deploy the application to Tomcat
After these steps are completed, package your Appkit web application as a WAR file and deploy into Tomcat. Hereafter we assume you package the application asmyapp.war so that the application can be accessed as http://localhost:8080/myapp/.3 Configure the Tomcat-ISAPI connector
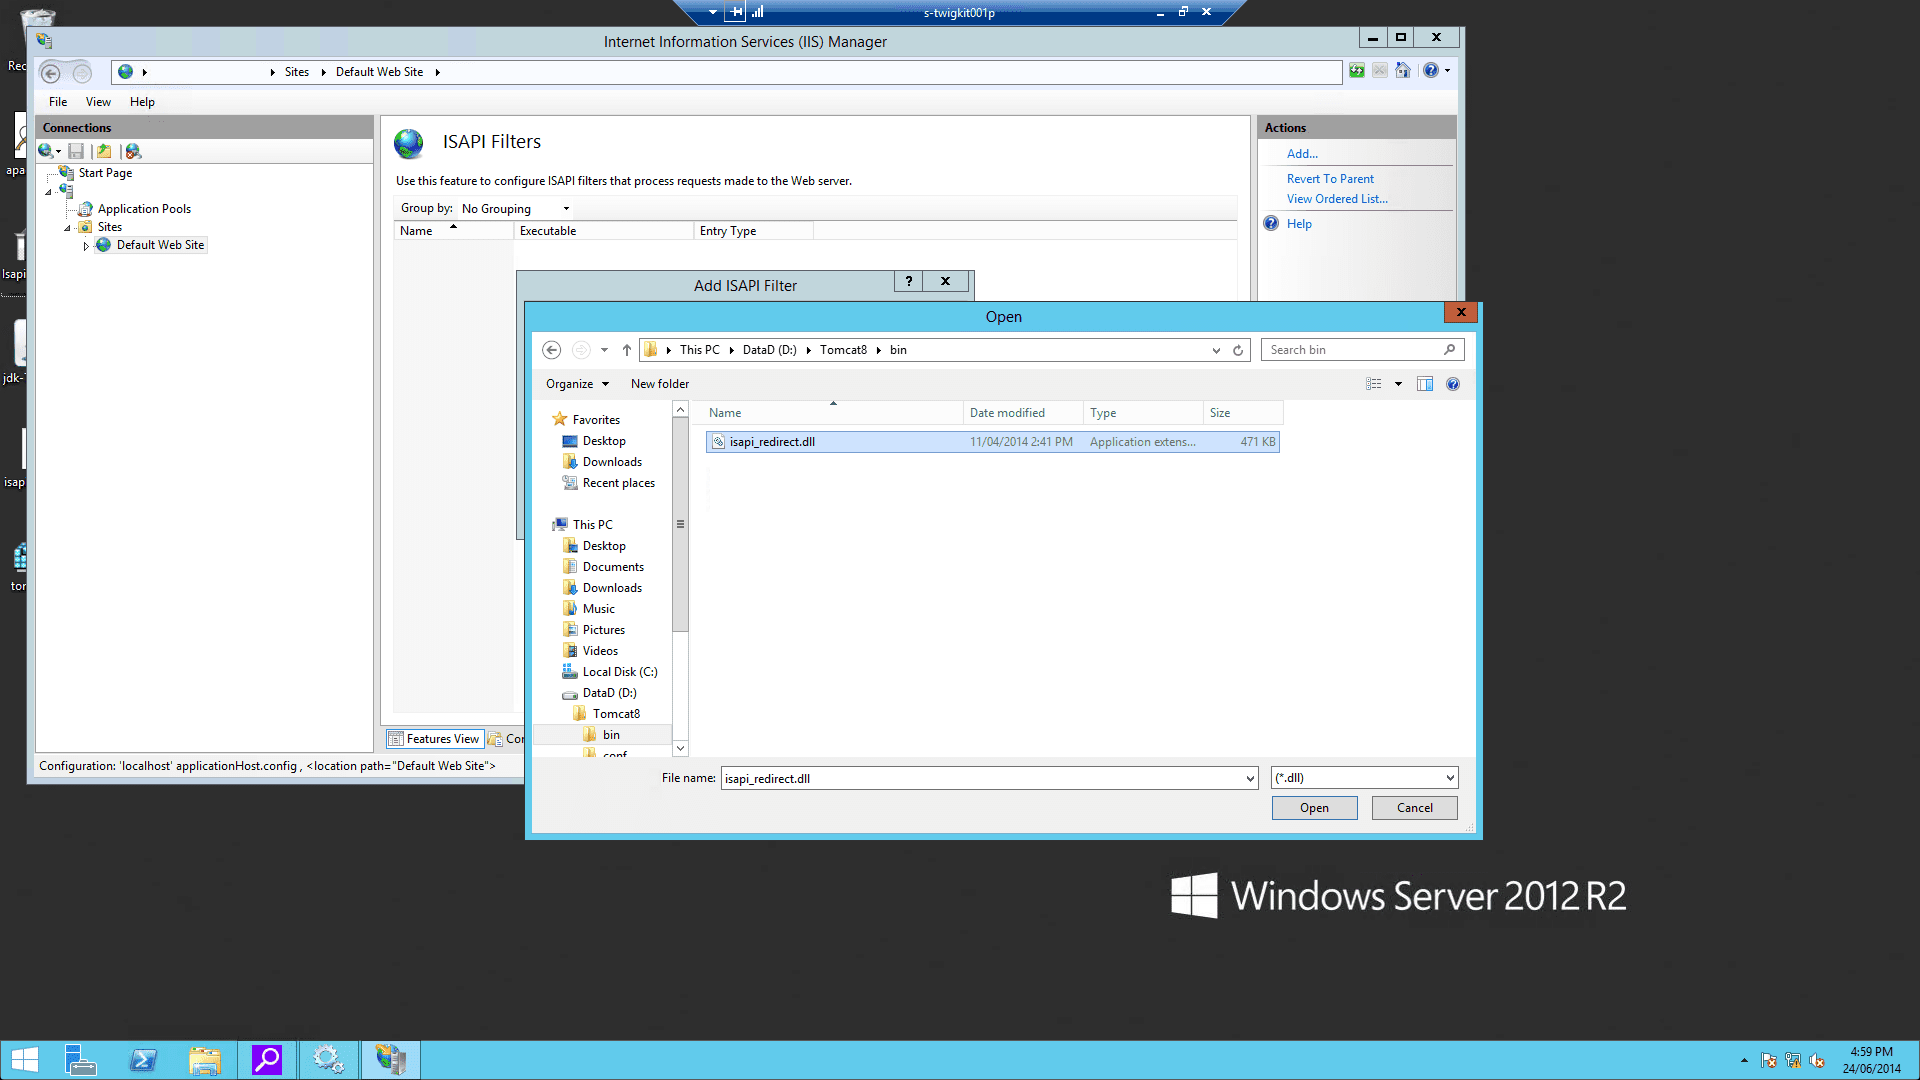
The Tomcat ISAPI connector is a DLL file that you can download from the Apache Tomcat website.Below, we assume that you have downloaded the ZIP file relevant to your OS type and extractedisapi_redirect.dll from the archive.3.1 Configure Tomcat for ISAPI
-
Add isapi_redirect.dll to
%CATALINA_HOME%\bin. -
Create
%CATALINA_HOME%\conf\workers.properties.minimalwith: -
Create
%CATALINA_HOME%\conf\uriworkermap.propertieswith: -
(Important) In
%CATALINA_HOME%\conf\server.xml, you must puttomcatAuthentication="false"on the AJP connector:
From now on, we assume you installed Tomcat in
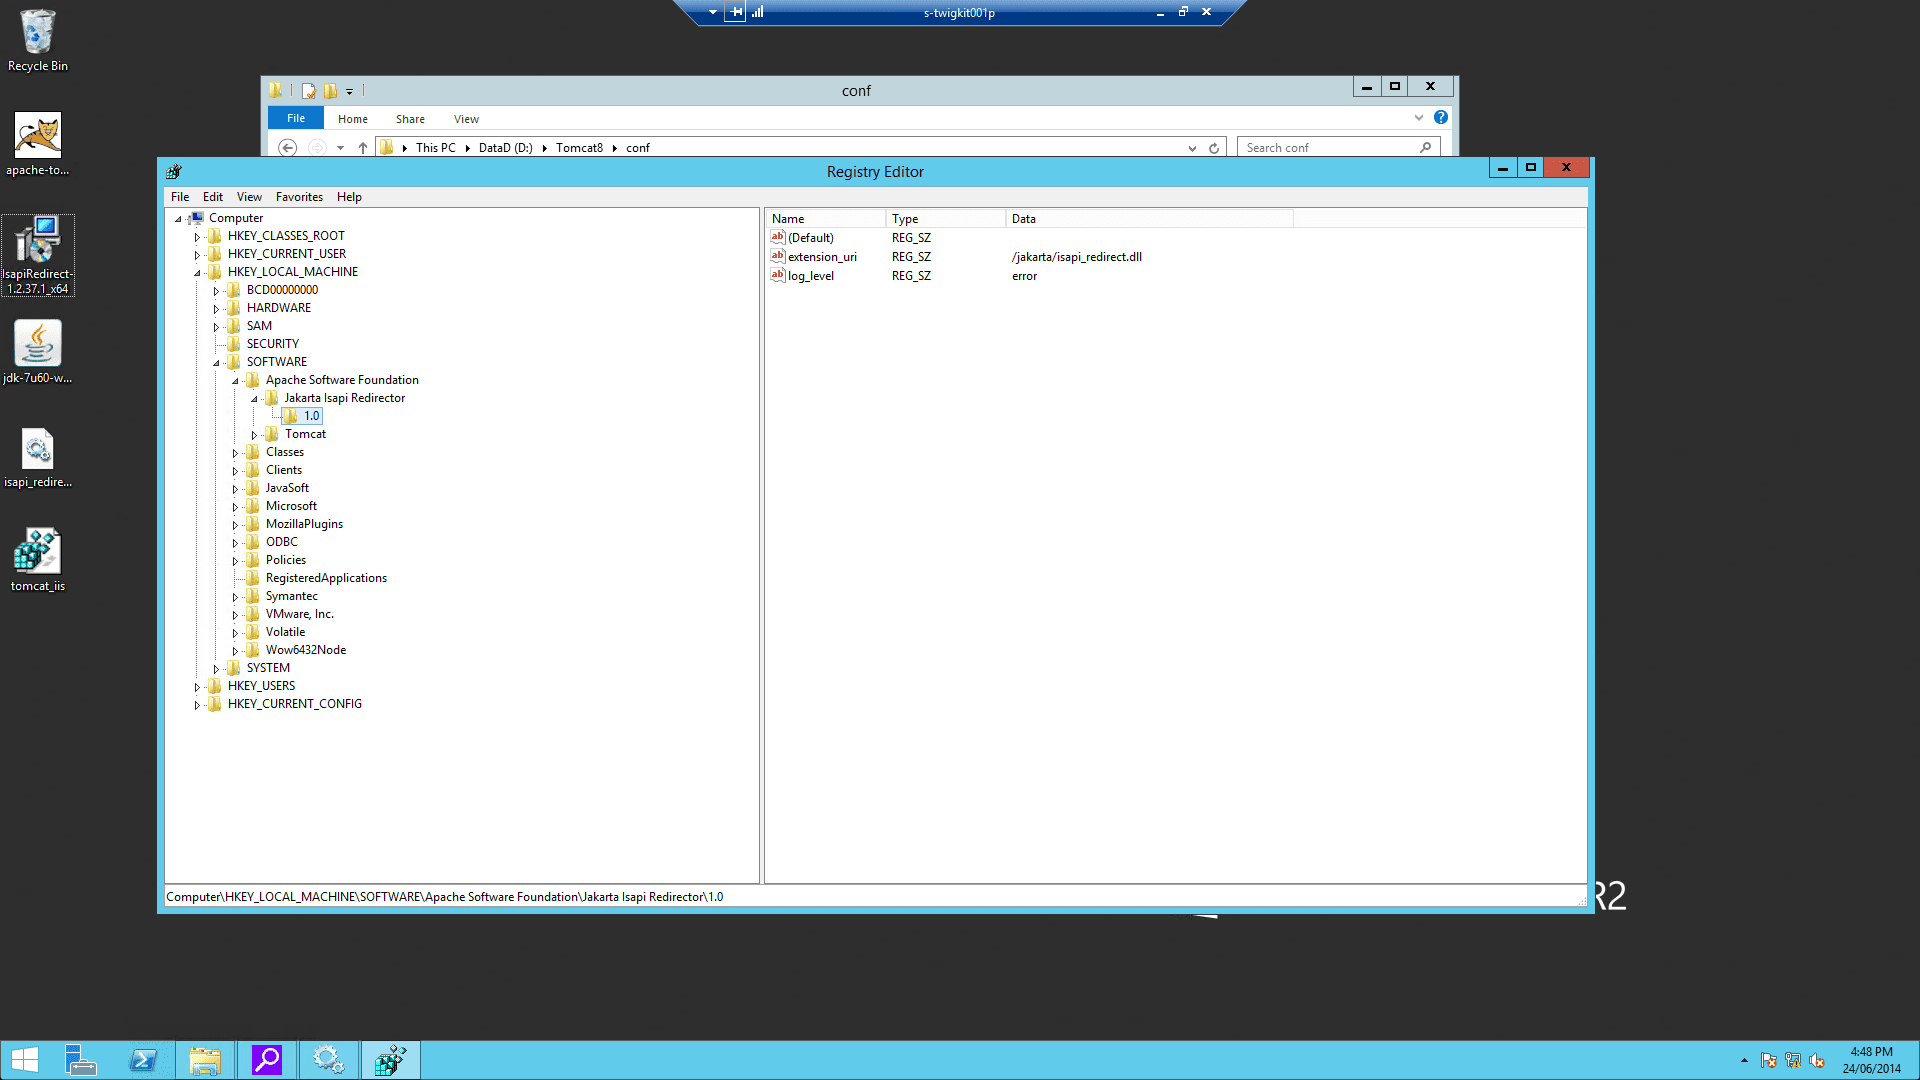
D:\Tomcat8 as noted above.3.2 Configure Windows registry settings
This key needs to be modified in the registry with the specified properties:-
Add a string value with the name
extension_uriand a value of/jakarta/isapi_redirect.dll -
Add a string value with the name
log_fileand a value pointing to where you want your log file to be (for example,D:\Tomcat8\logs\isapi.log). -
Add a string value with the name
log_leveland a value for your log level (can bedebug,info,errororemerg). -
Add a string value with the name
worker_fileand a value which is the full path to yourworkers.propertiesfile (for example,D:\Tomcat8\conf\workers.properties.minimal) -
Add a string value with the name
worker_mount_fileand a value which is the full path to youruriworkermap.propertiesfile (for example,D:\Tomcat8\conf\uriworkermap.properties) To save trouble, you can create a file namedtomcat_iis_settings.regthat includes this (replacingD:\Tomcat8with your ownCATALINA_HOME): -
On the Windows server, double-click the
tomcat_iis_settings.regfile to import the settings.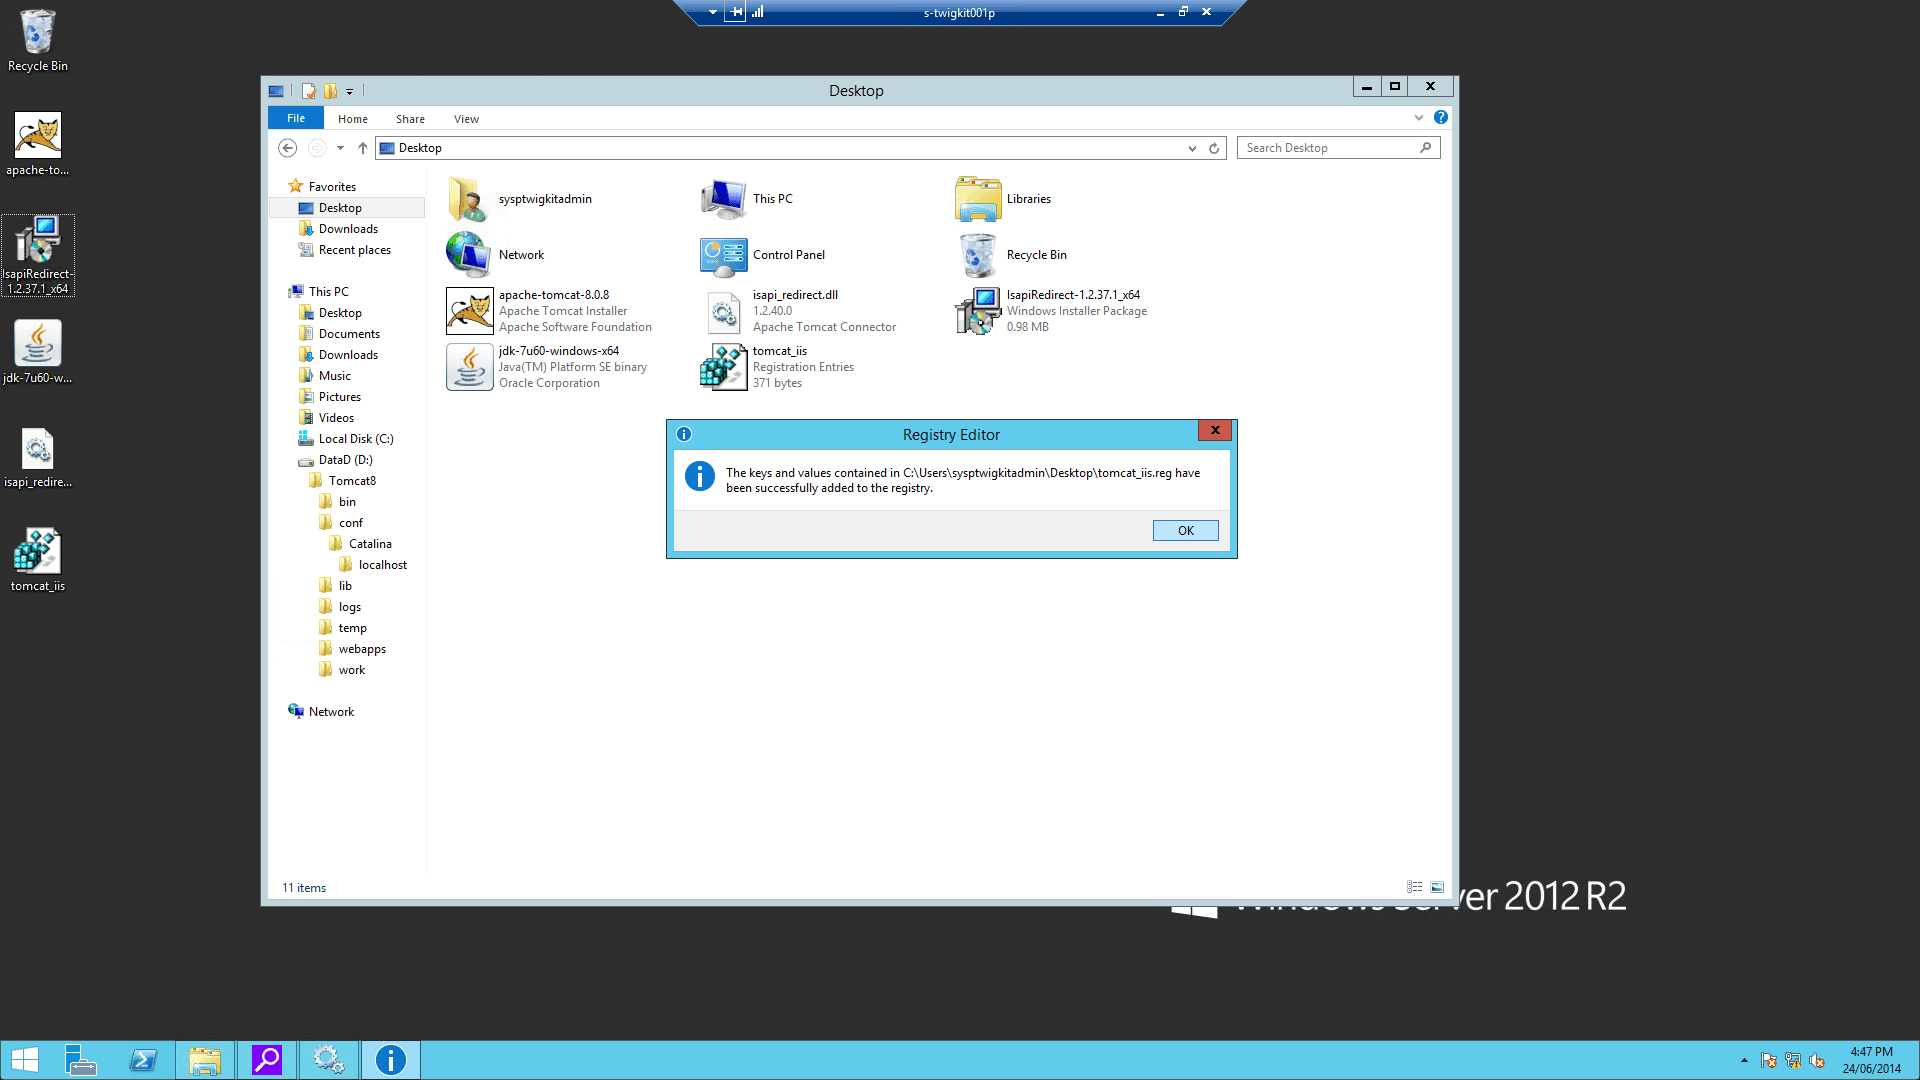
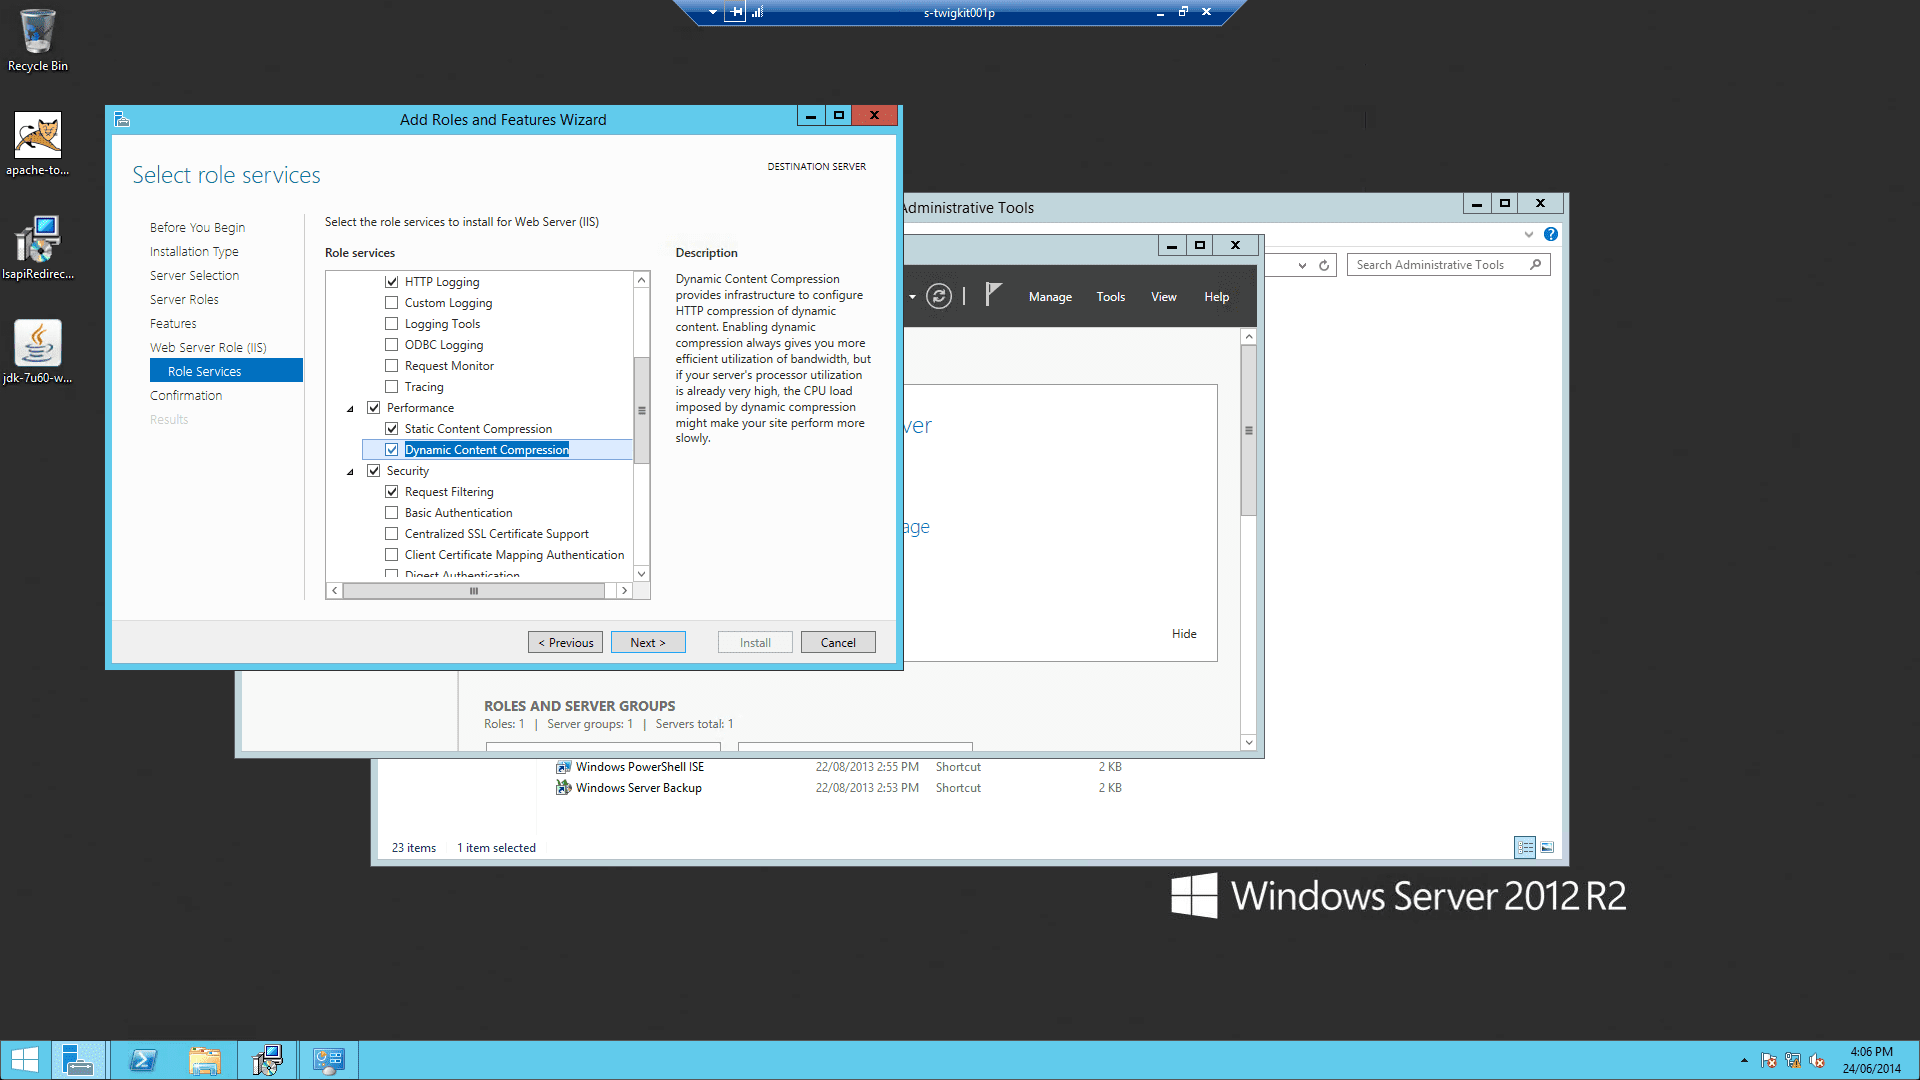
4 Configure the IIS
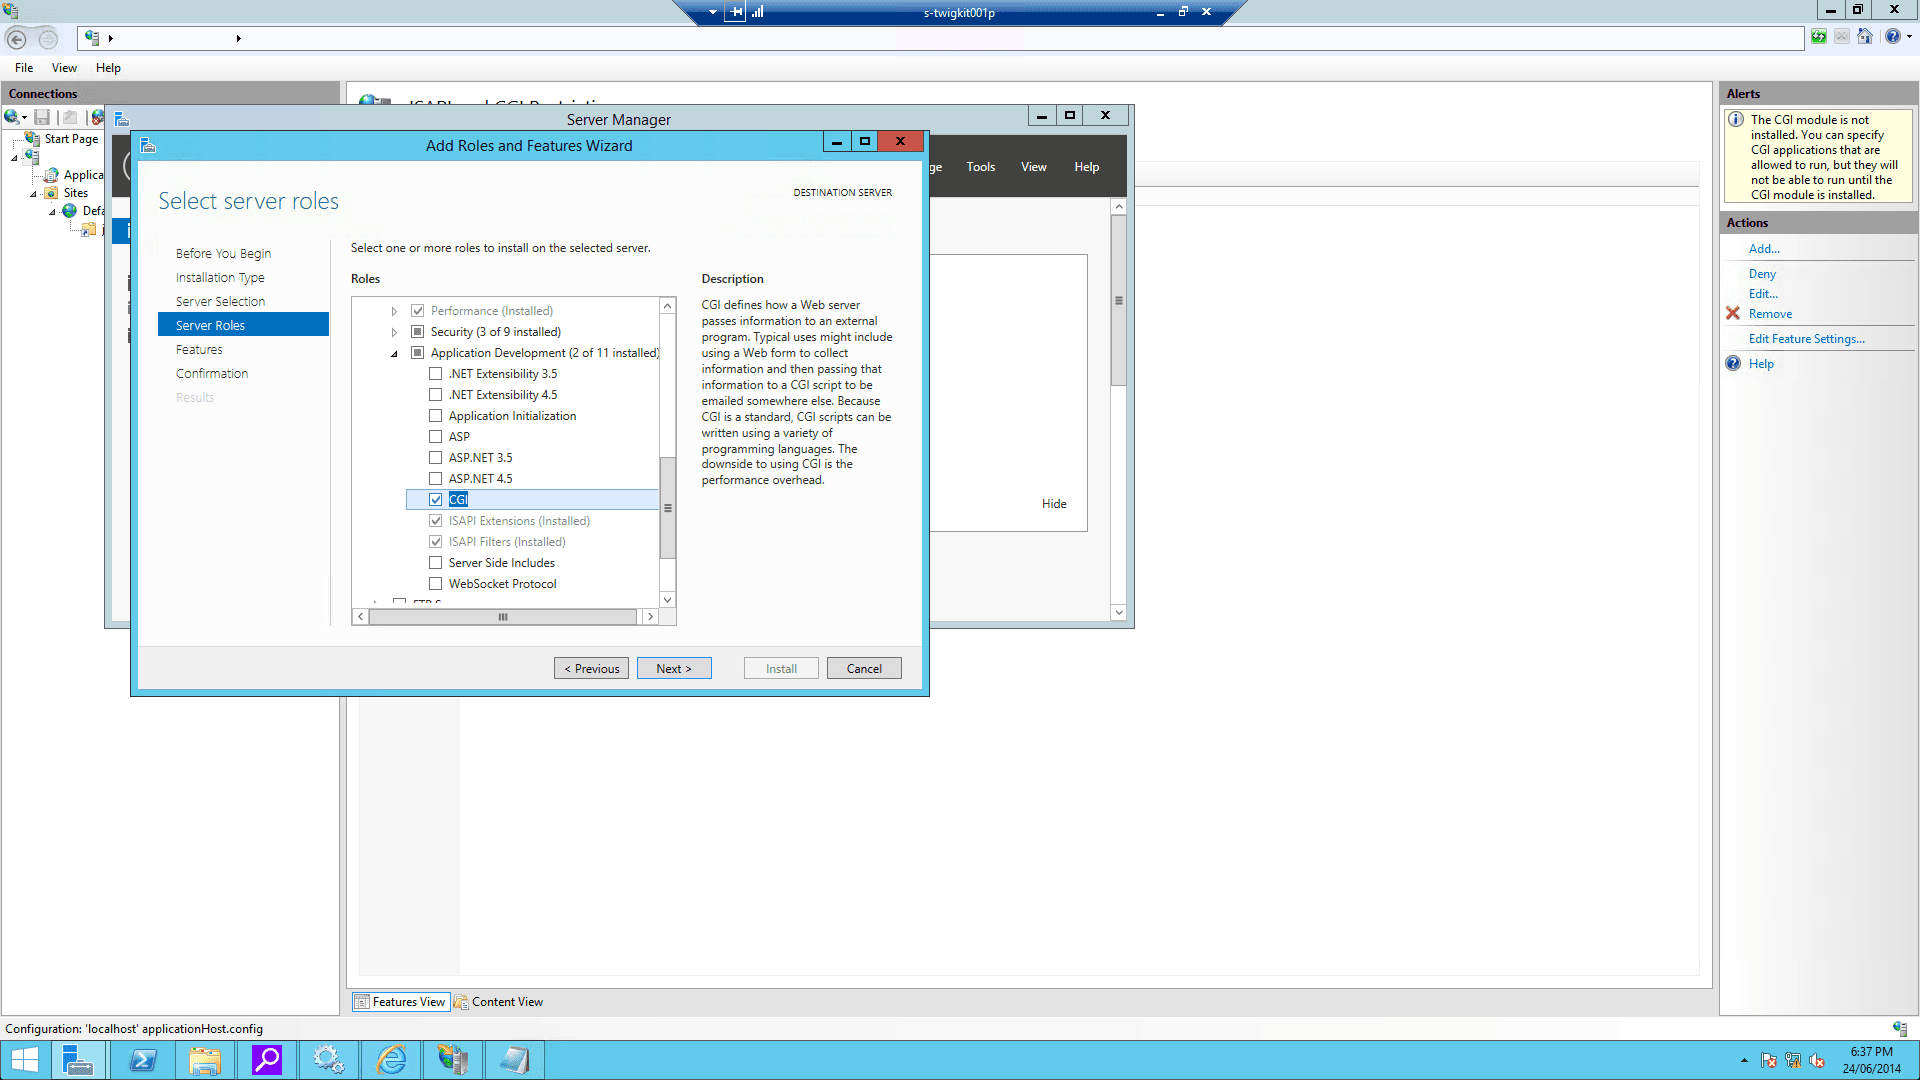
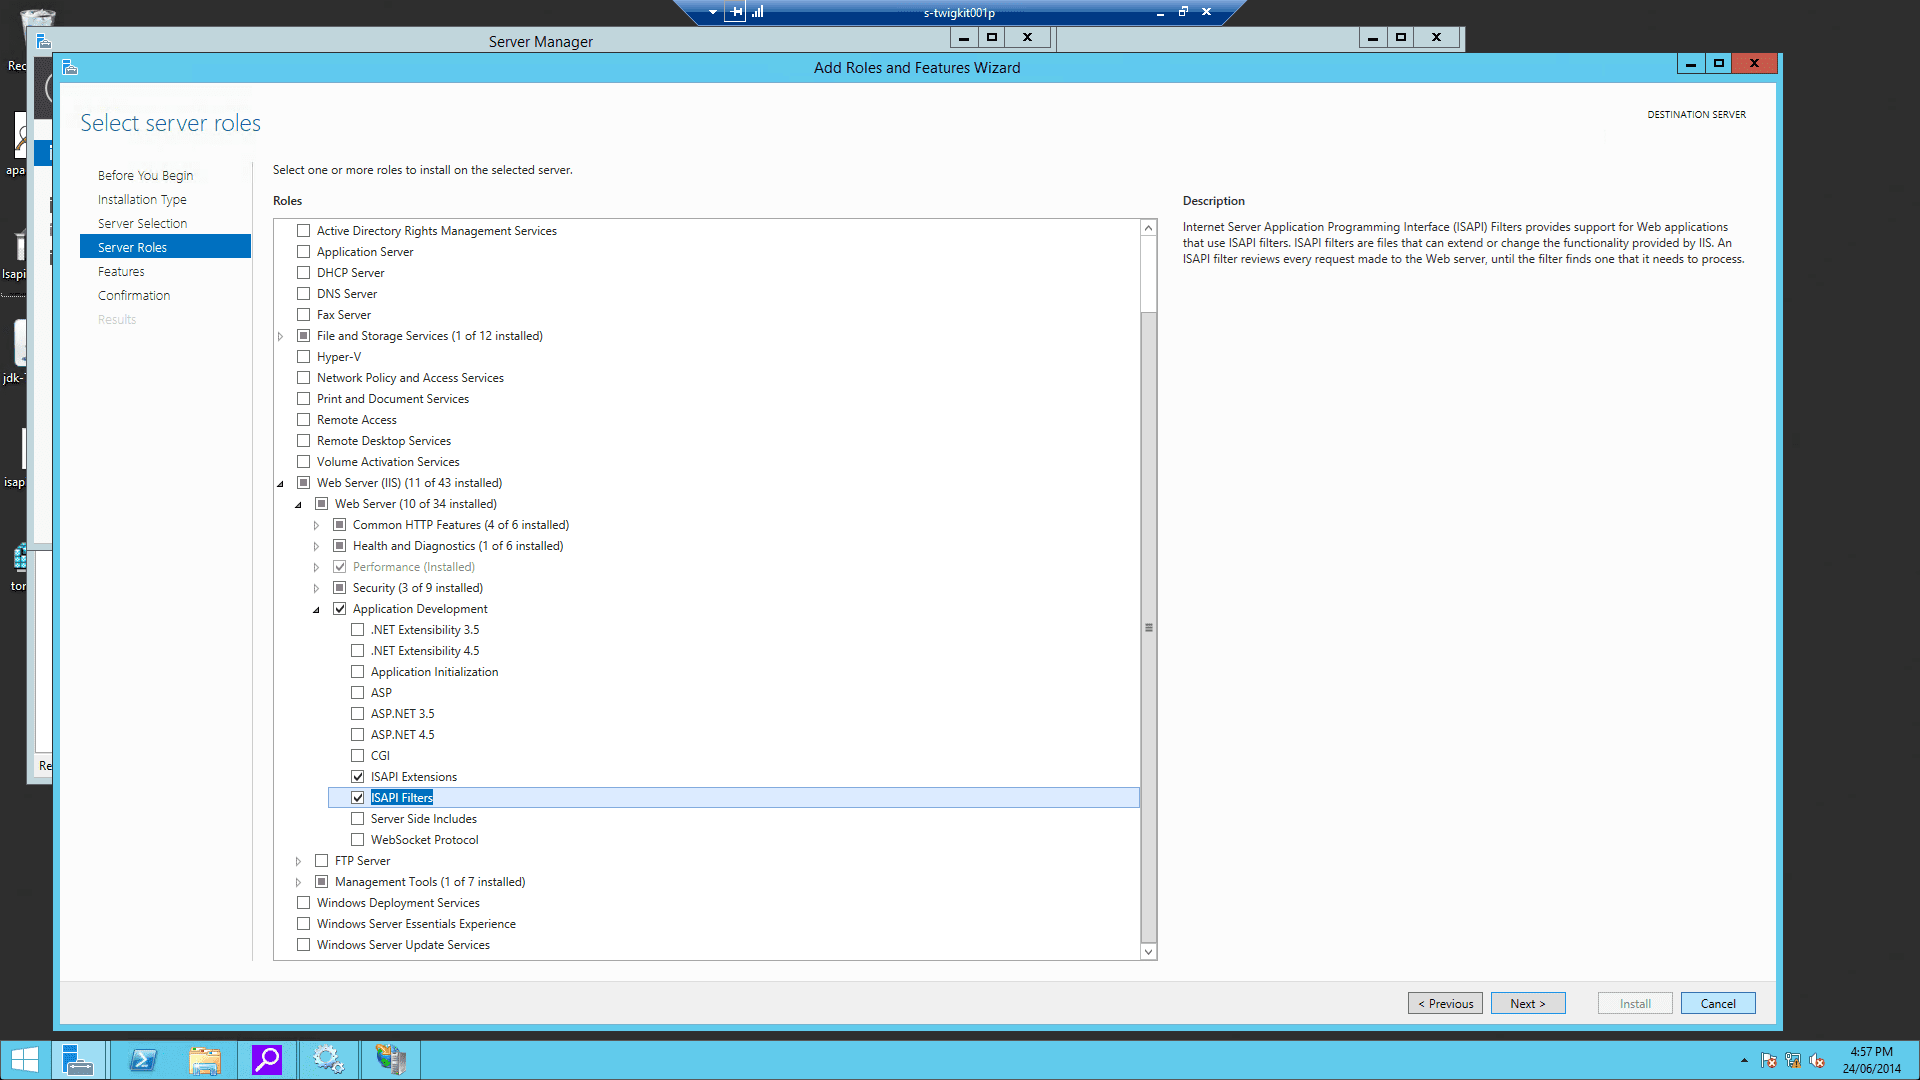
This assumes that IIS is already installed on the Windows server.4.1 Enable ISAPI Filters and ISAPI Extensions
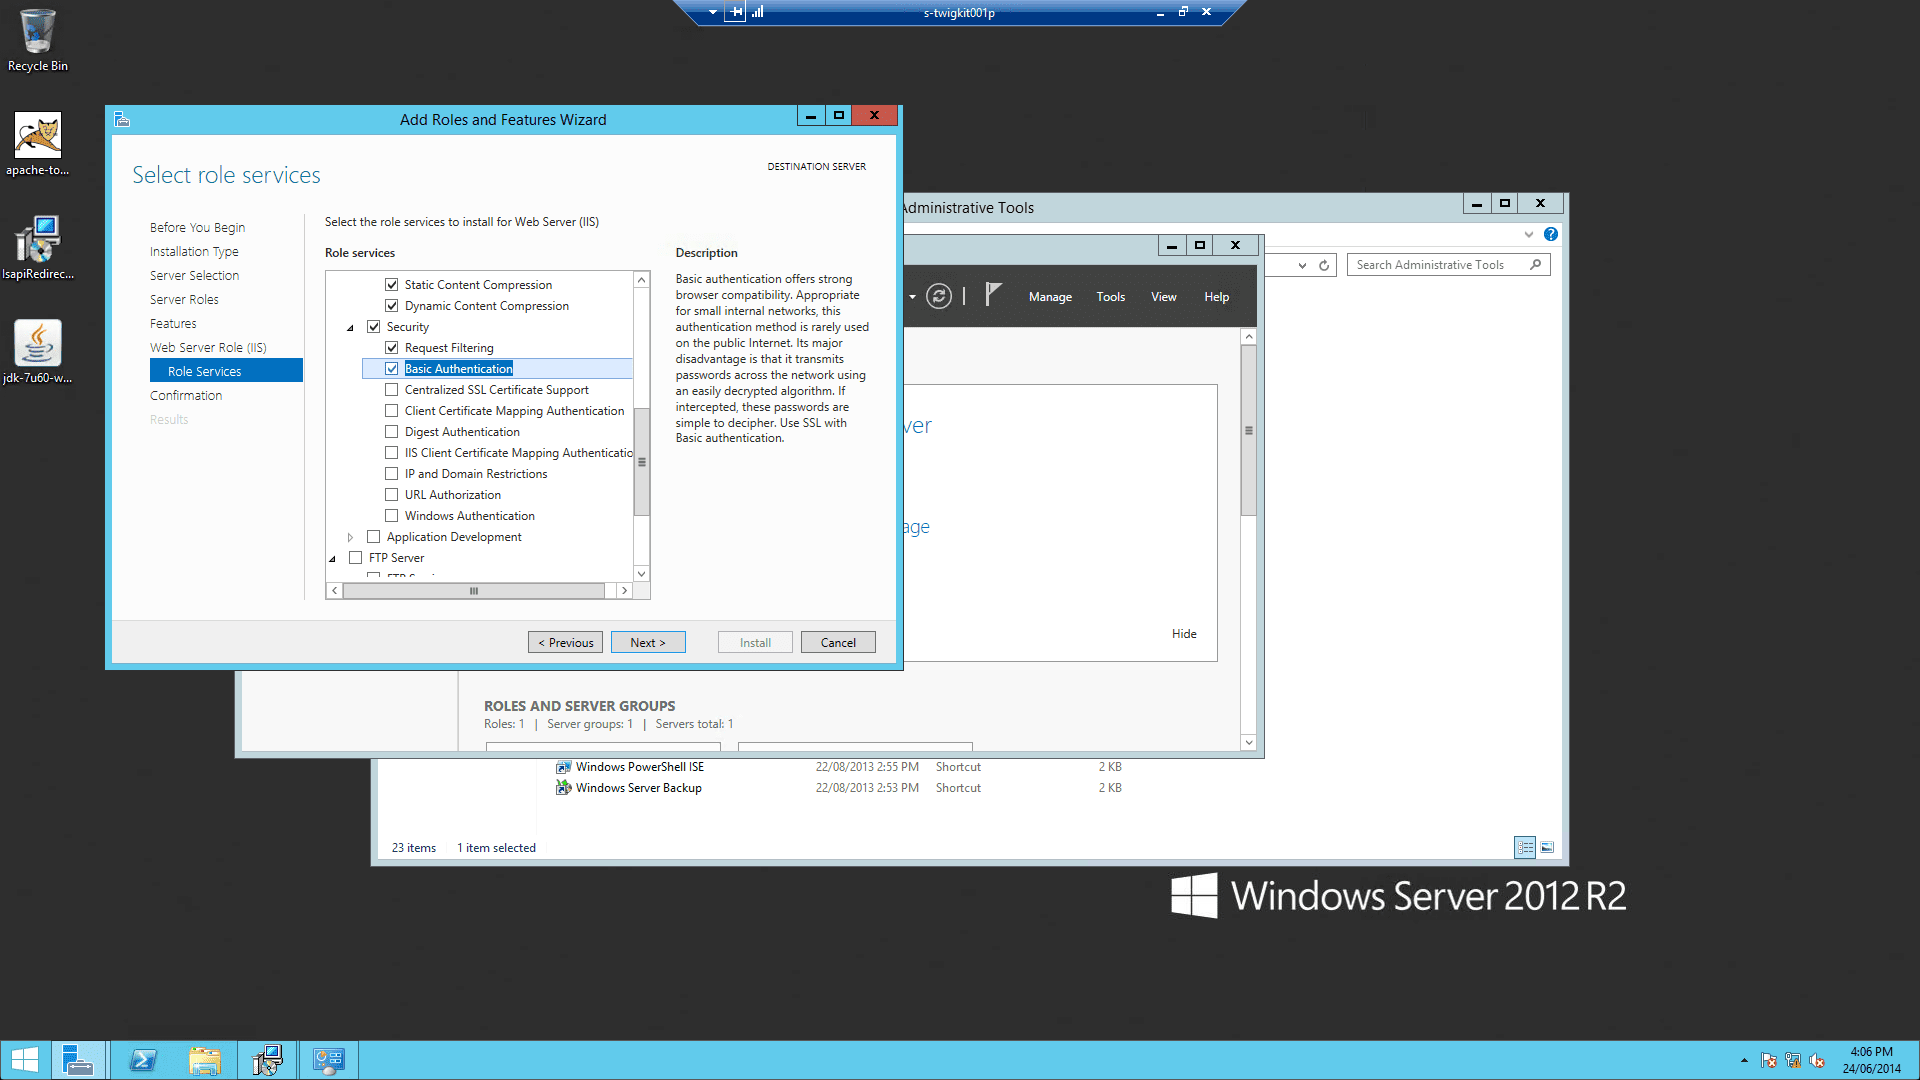
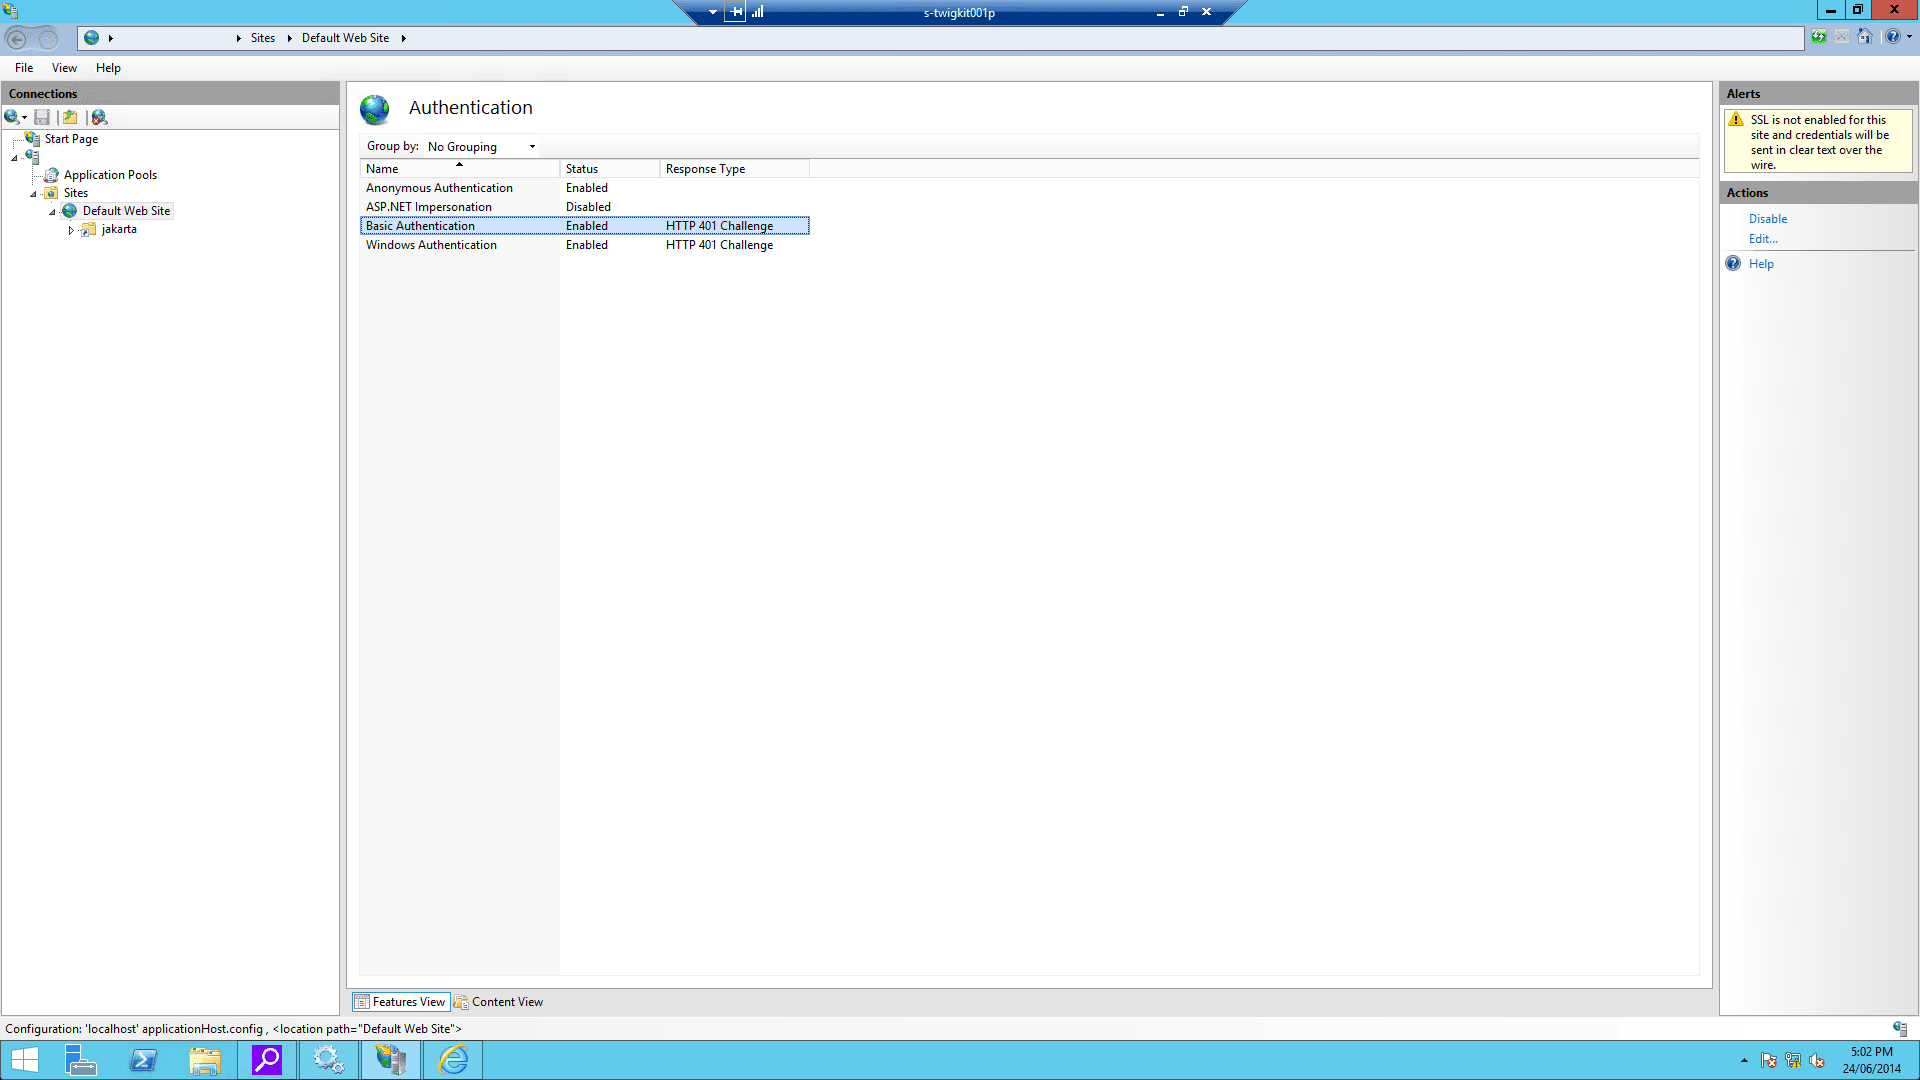
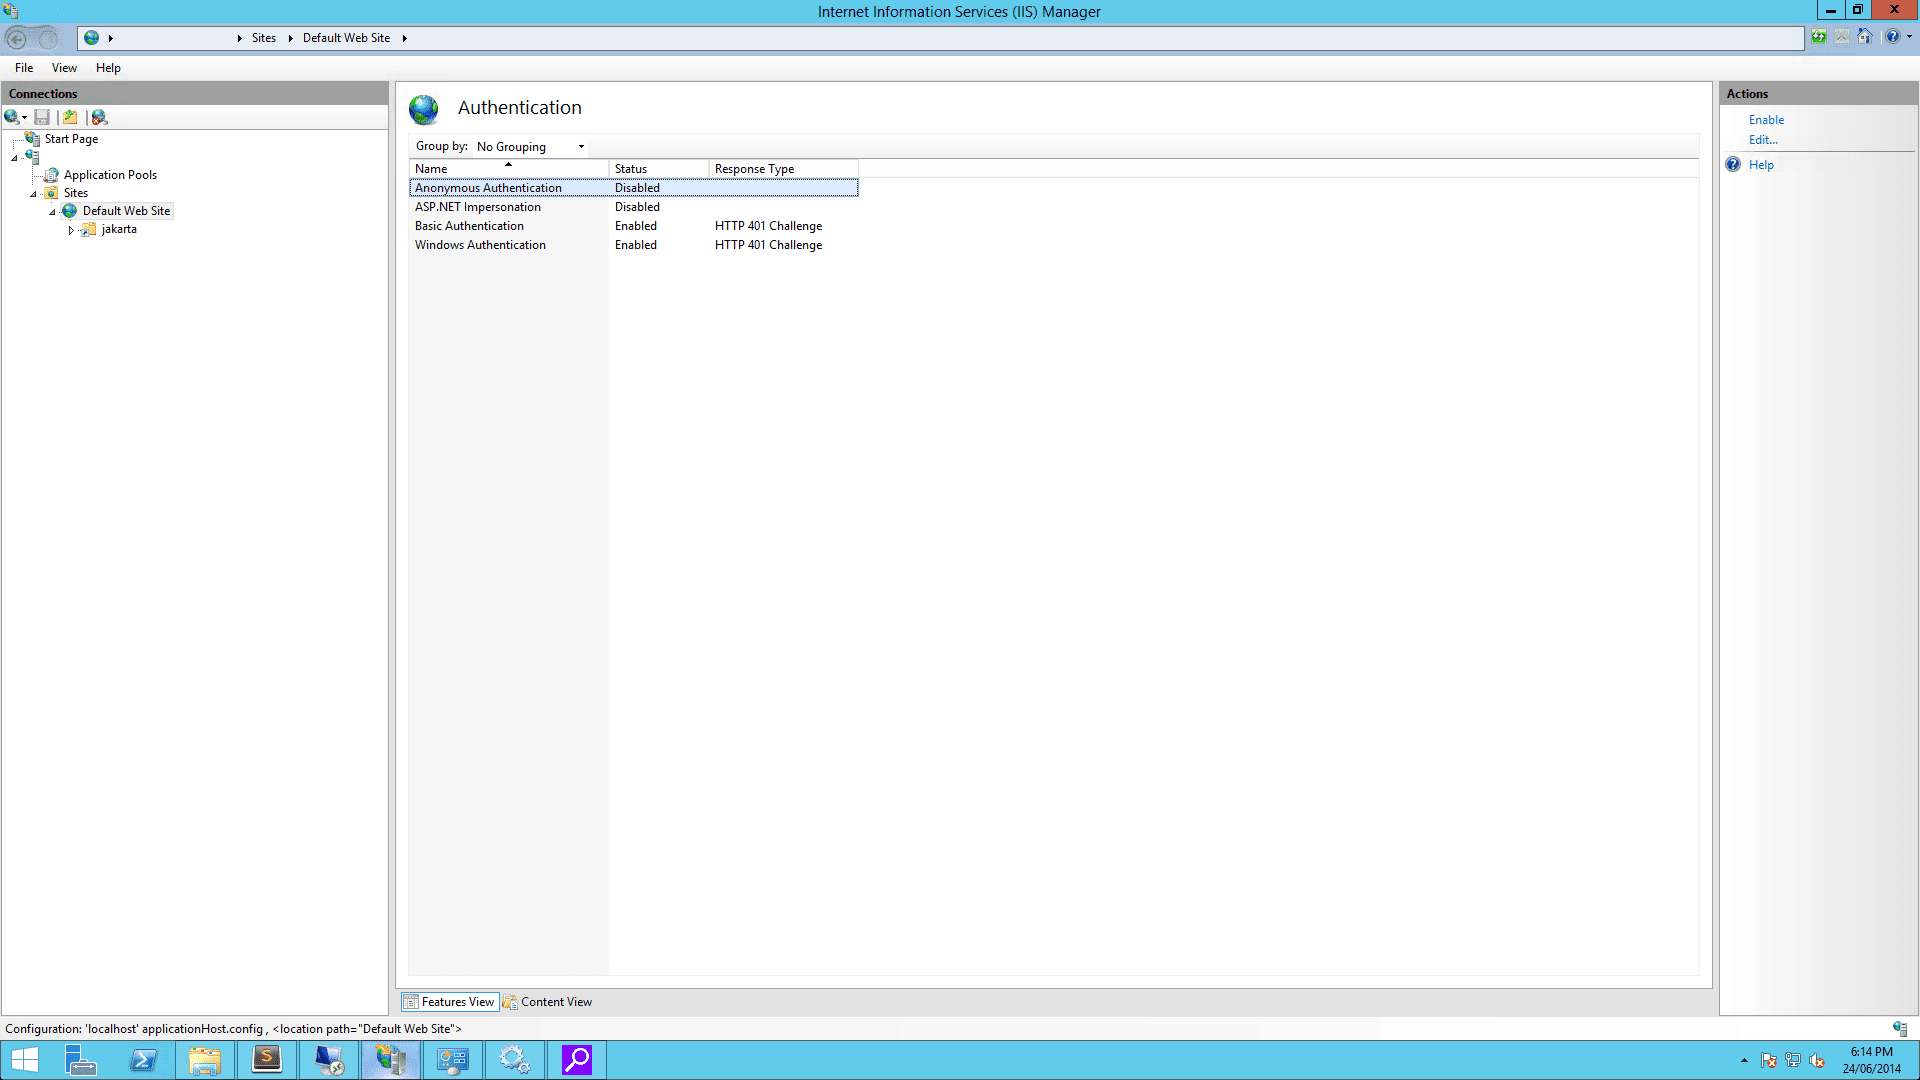
4.2 Enable Windows authentication
4.3 Enable CGI filtering
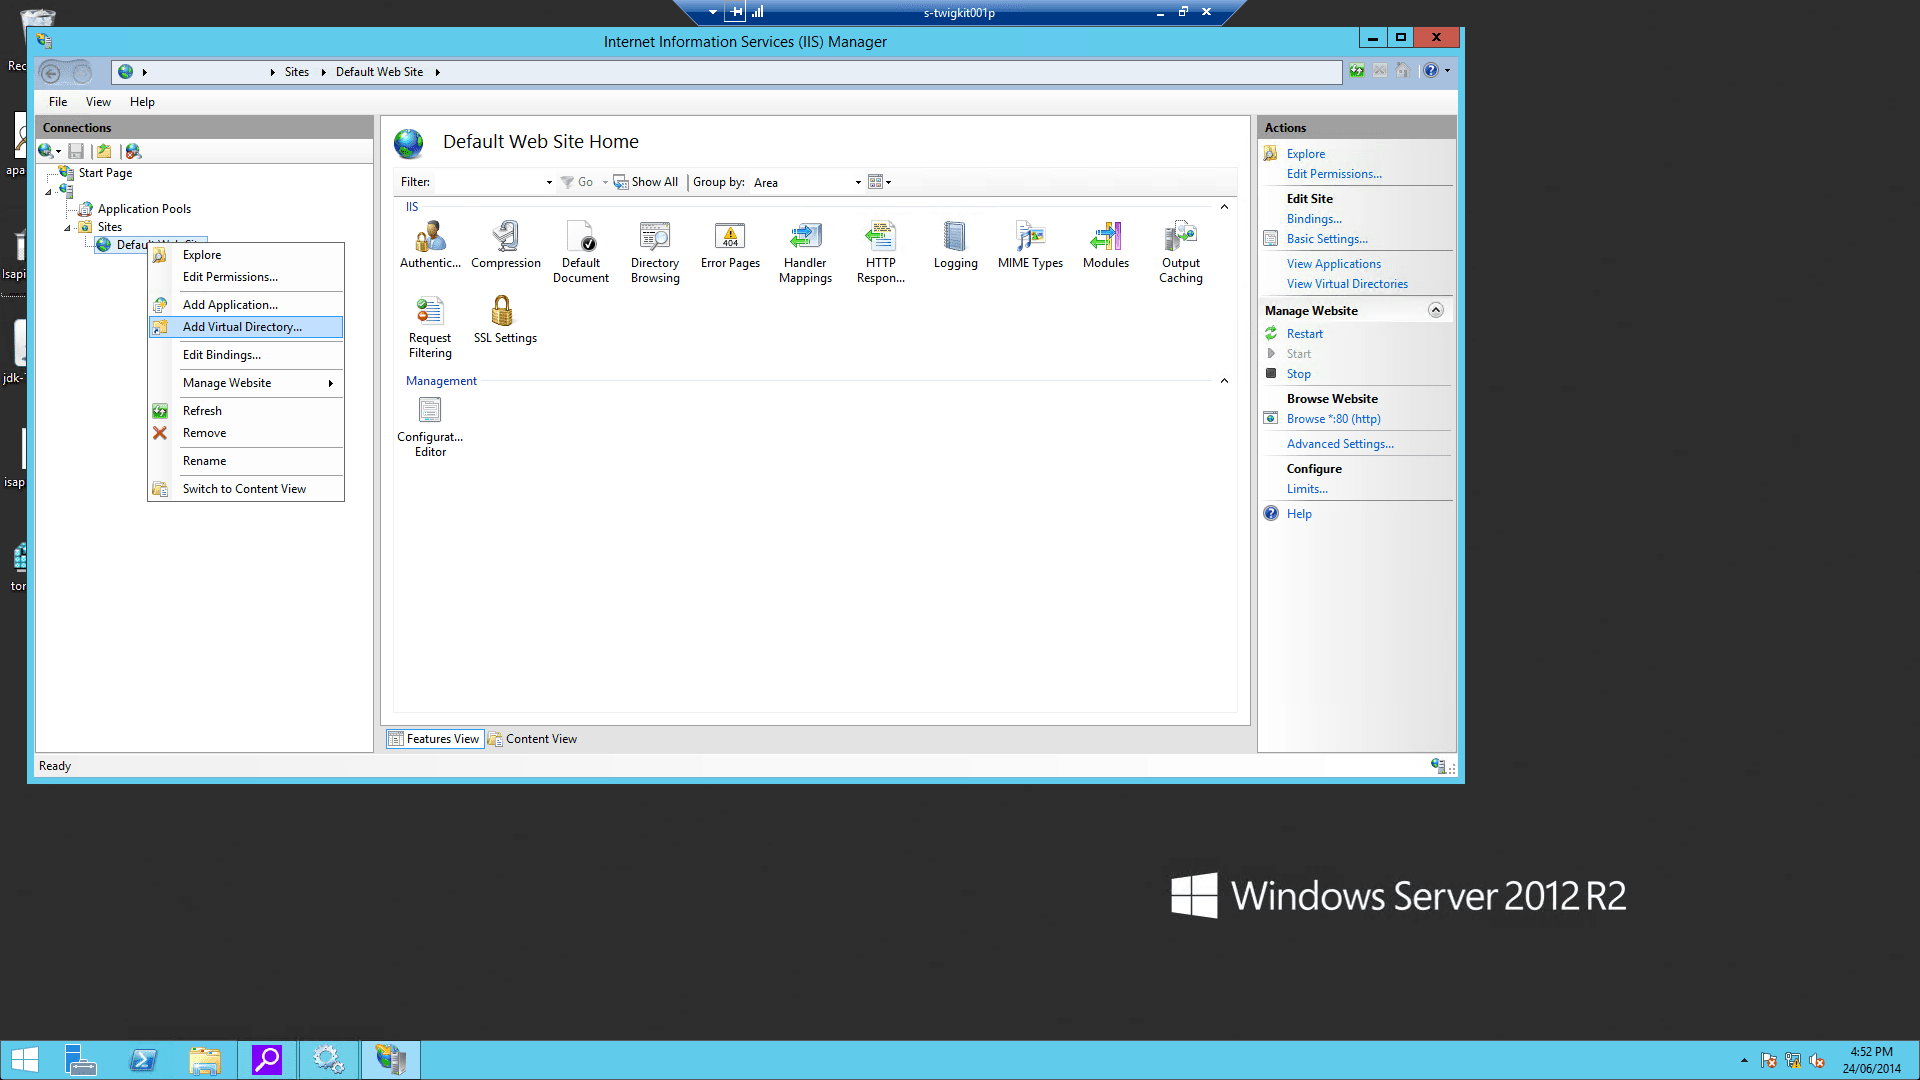
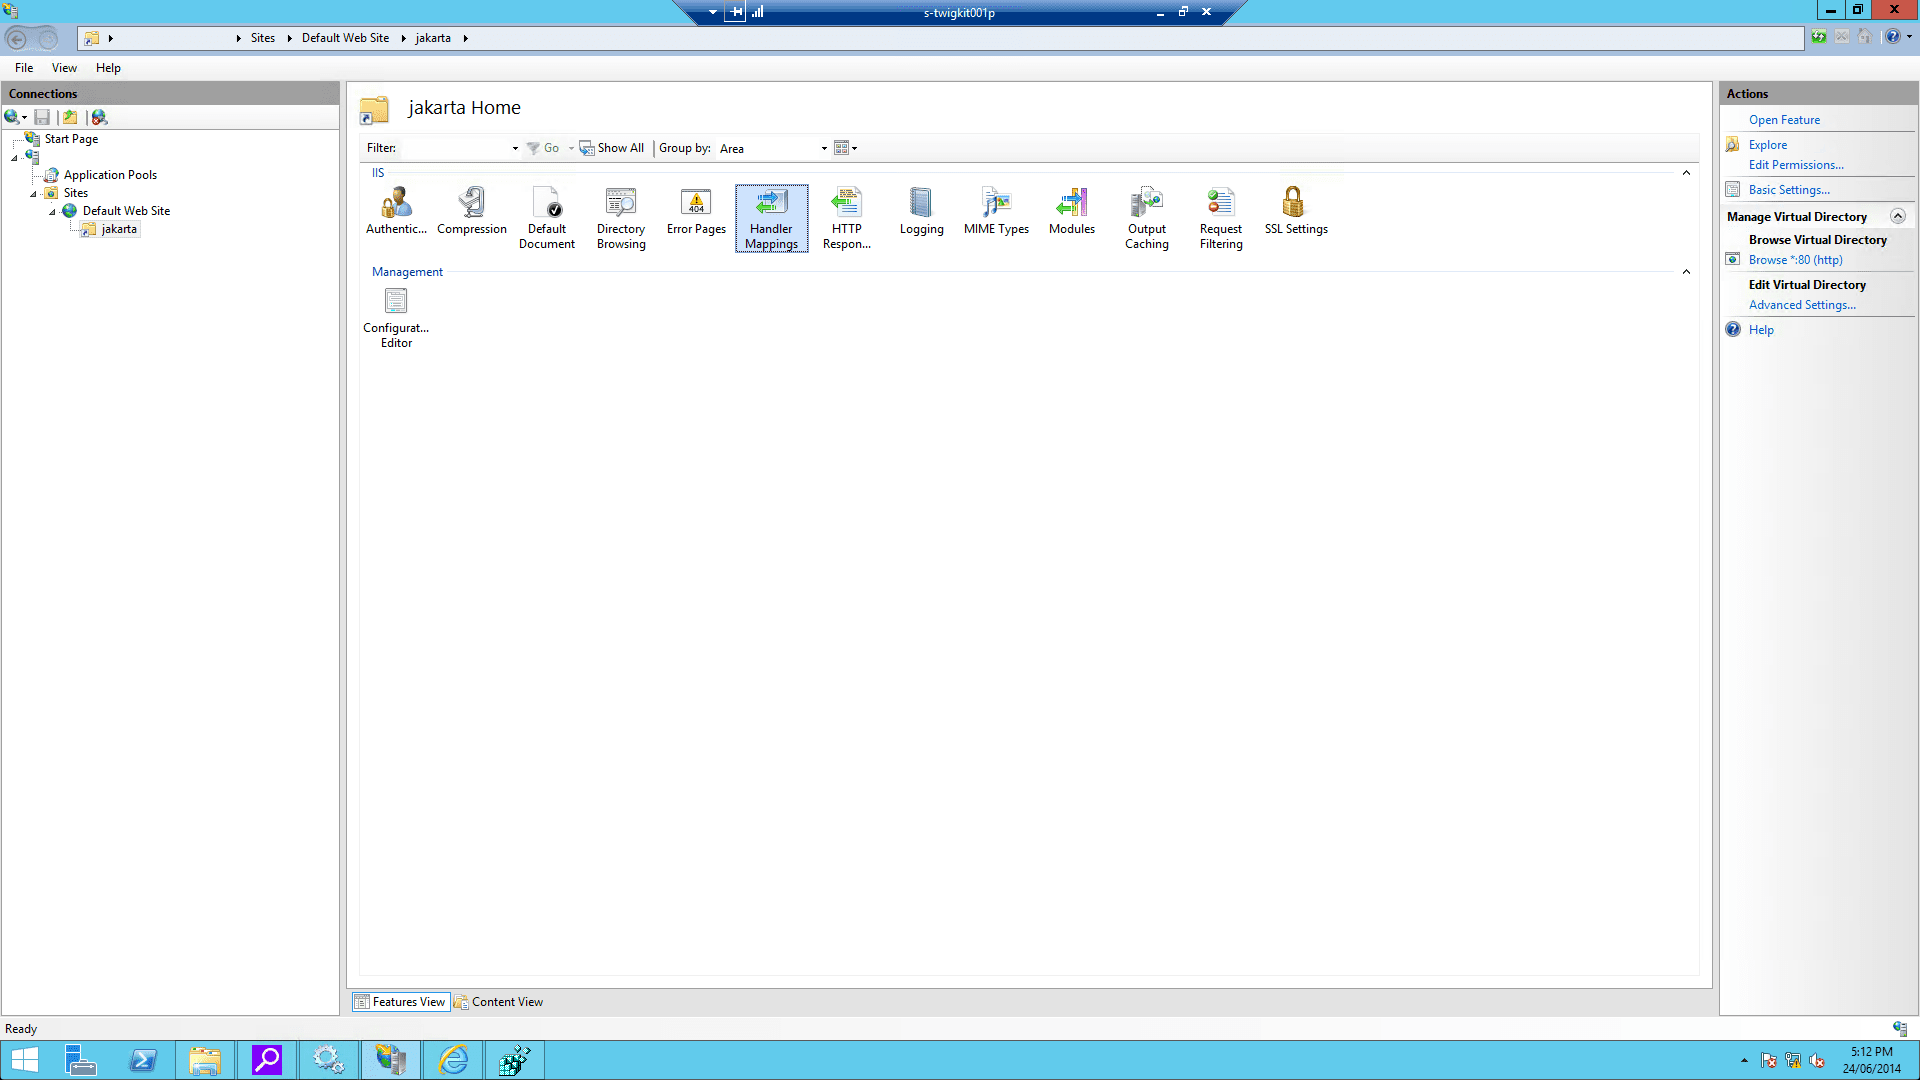
4.4 Configure the virtual directory and website on IIS
-
Using the IIS management console, add a new virtual directory to your IIS/PWS web site. The name of the virtual directory must be
jakarta. Its physical path should be the directory where you placedisapi_redirect.dll(in our example, it isD:\Tomcat8\bin). While creating this new virtual directory assign it with execute access.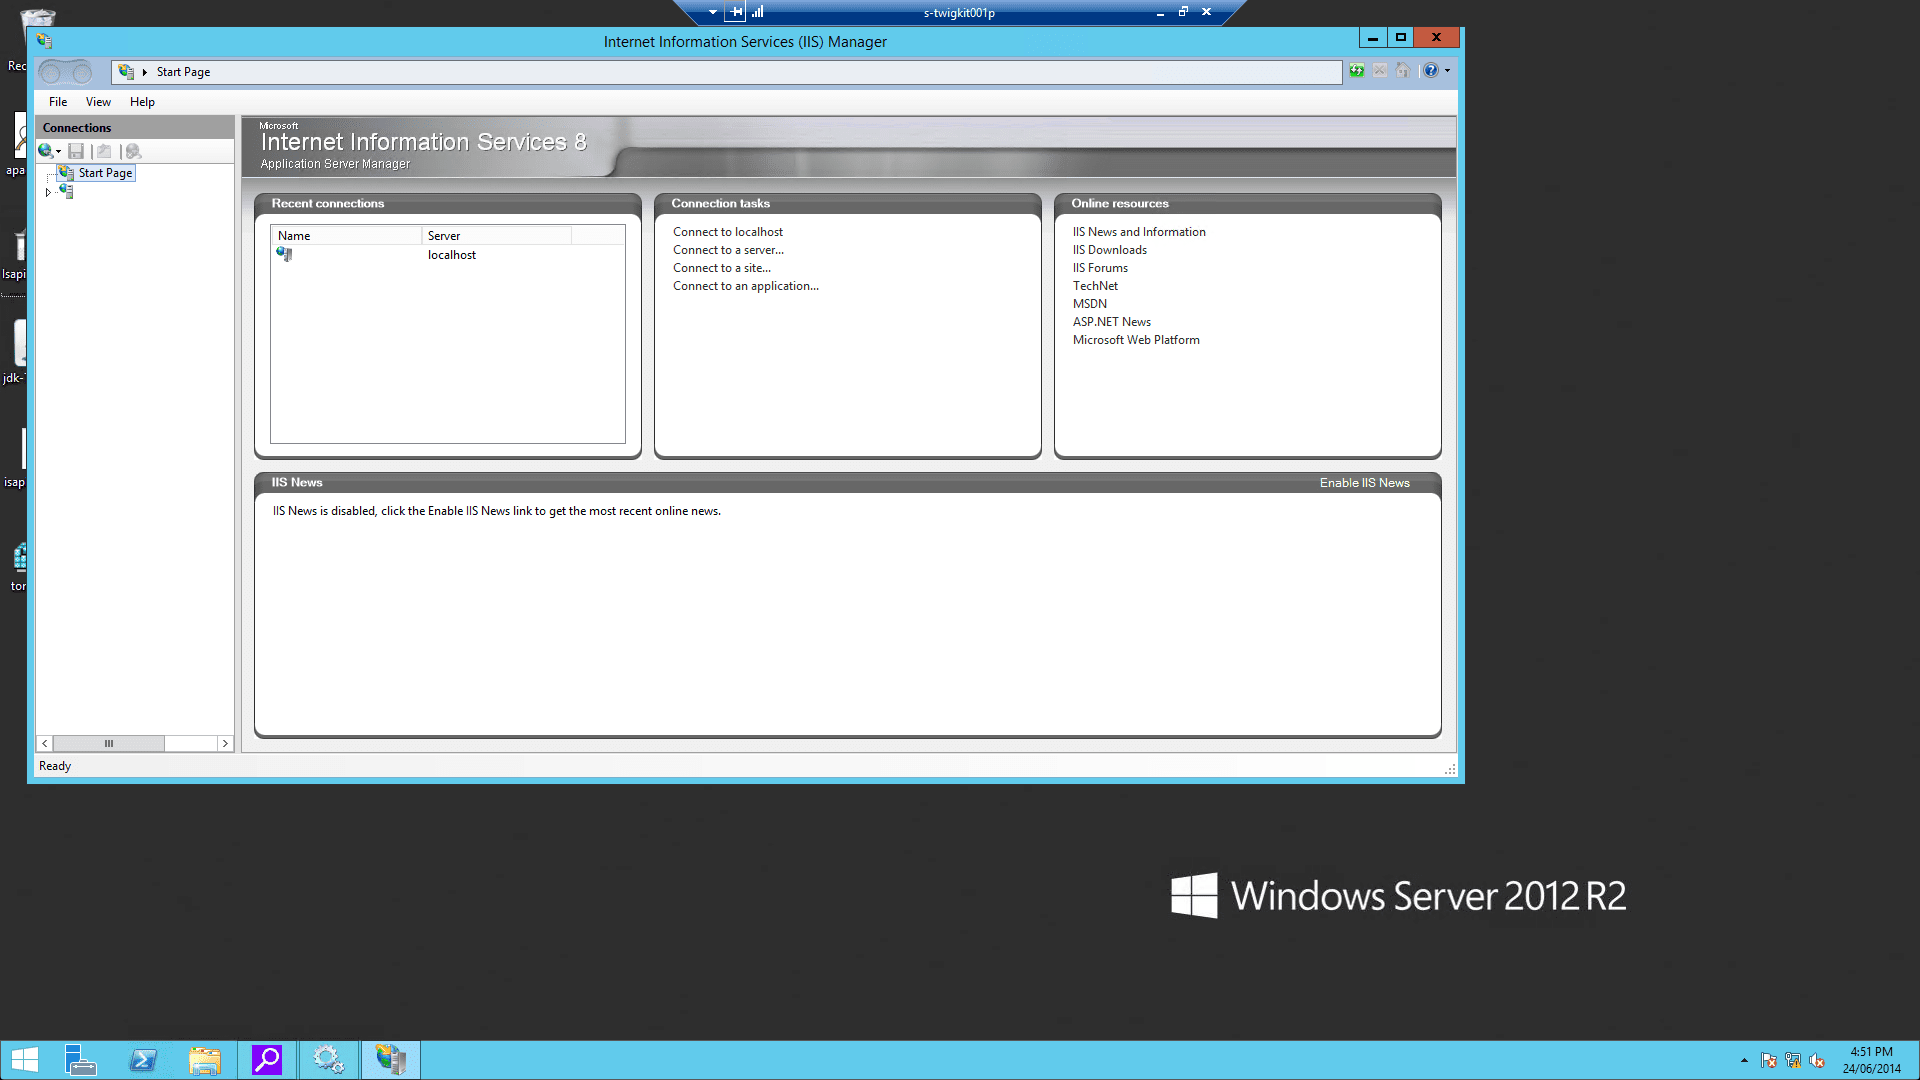

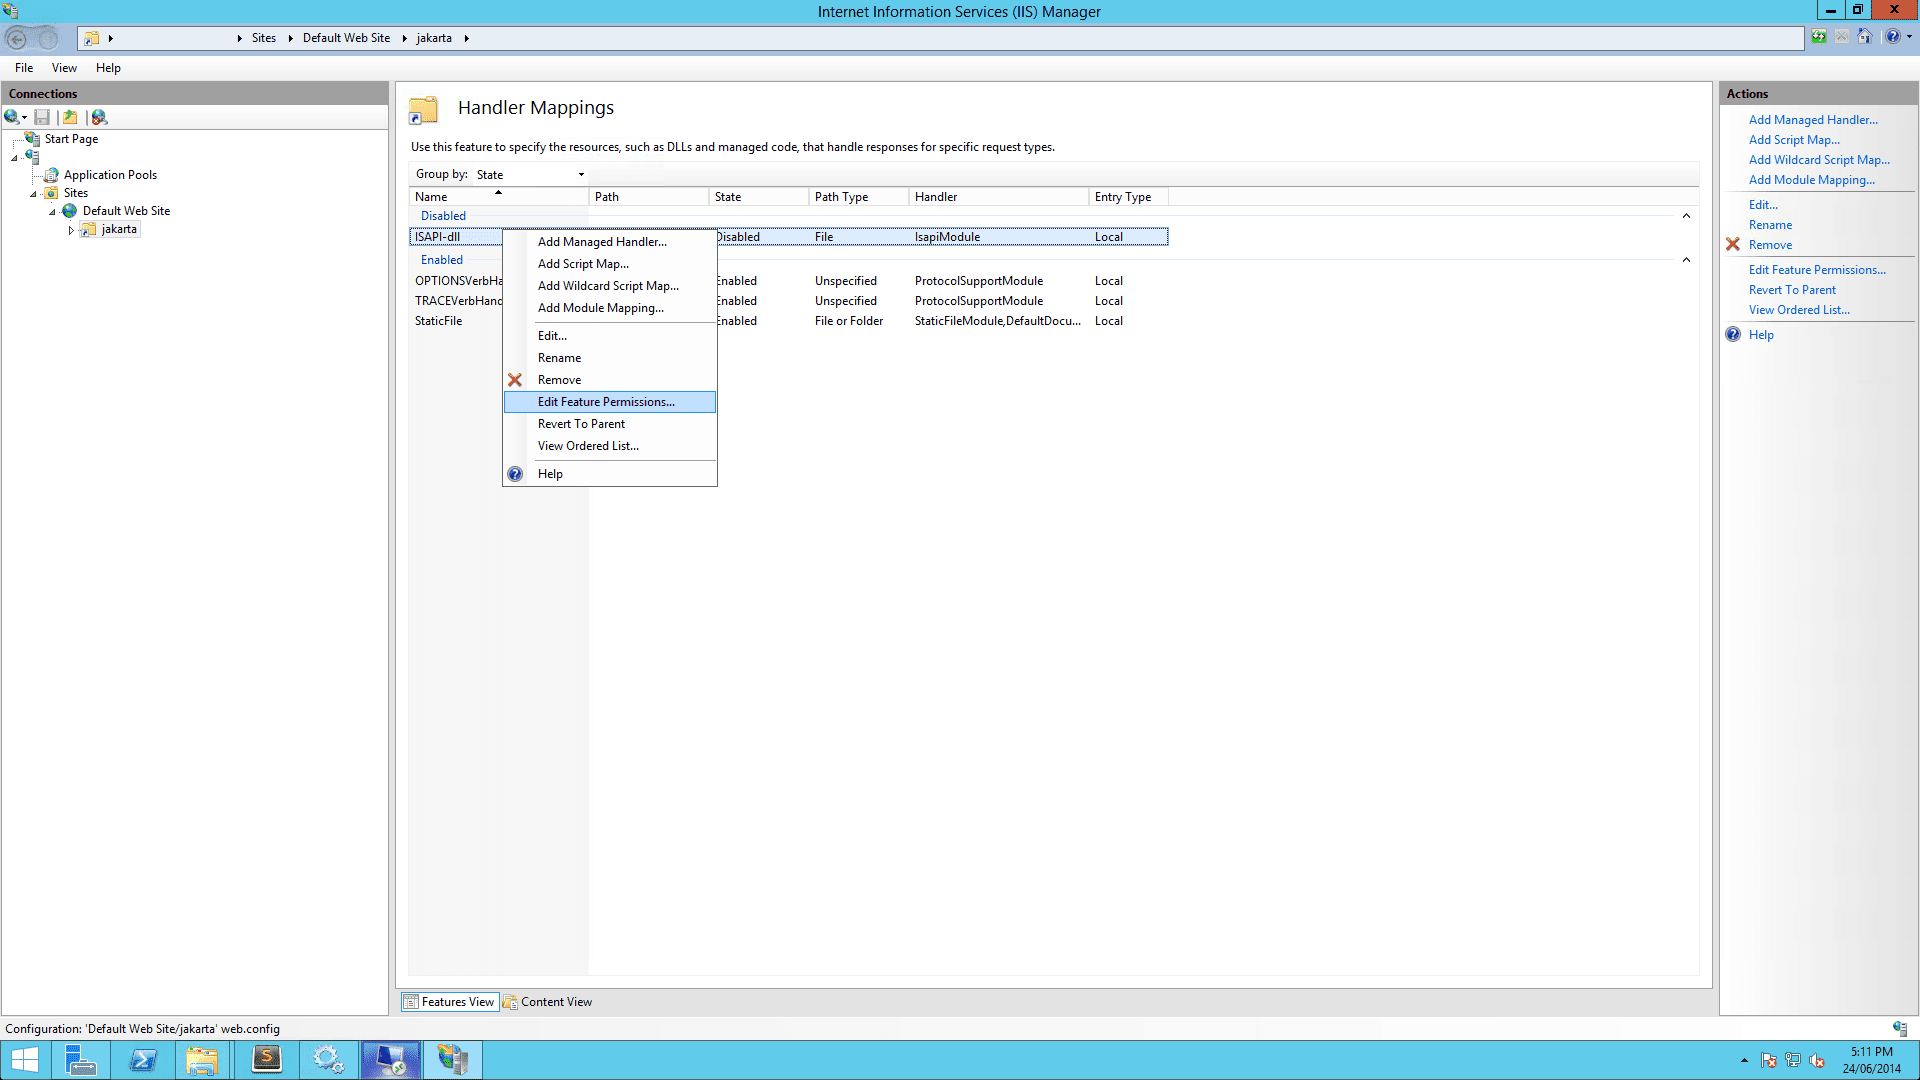
-
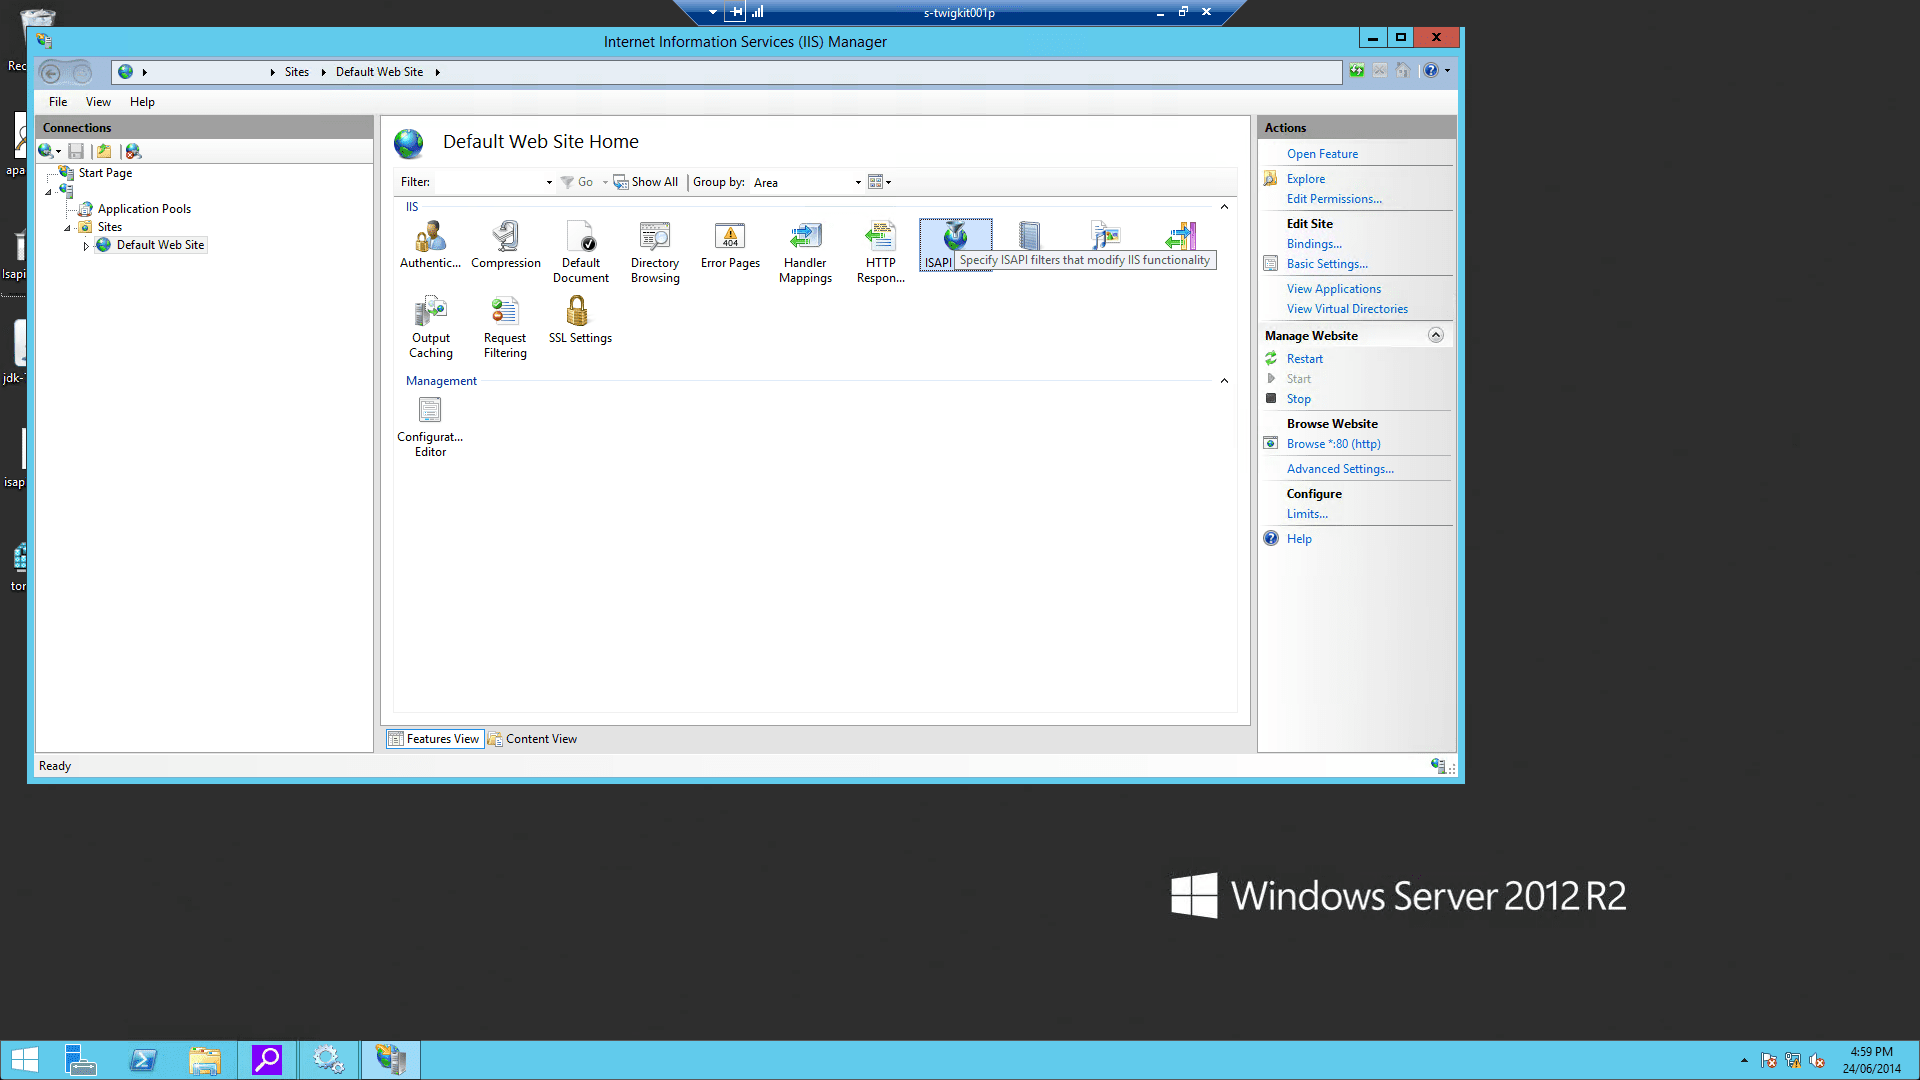
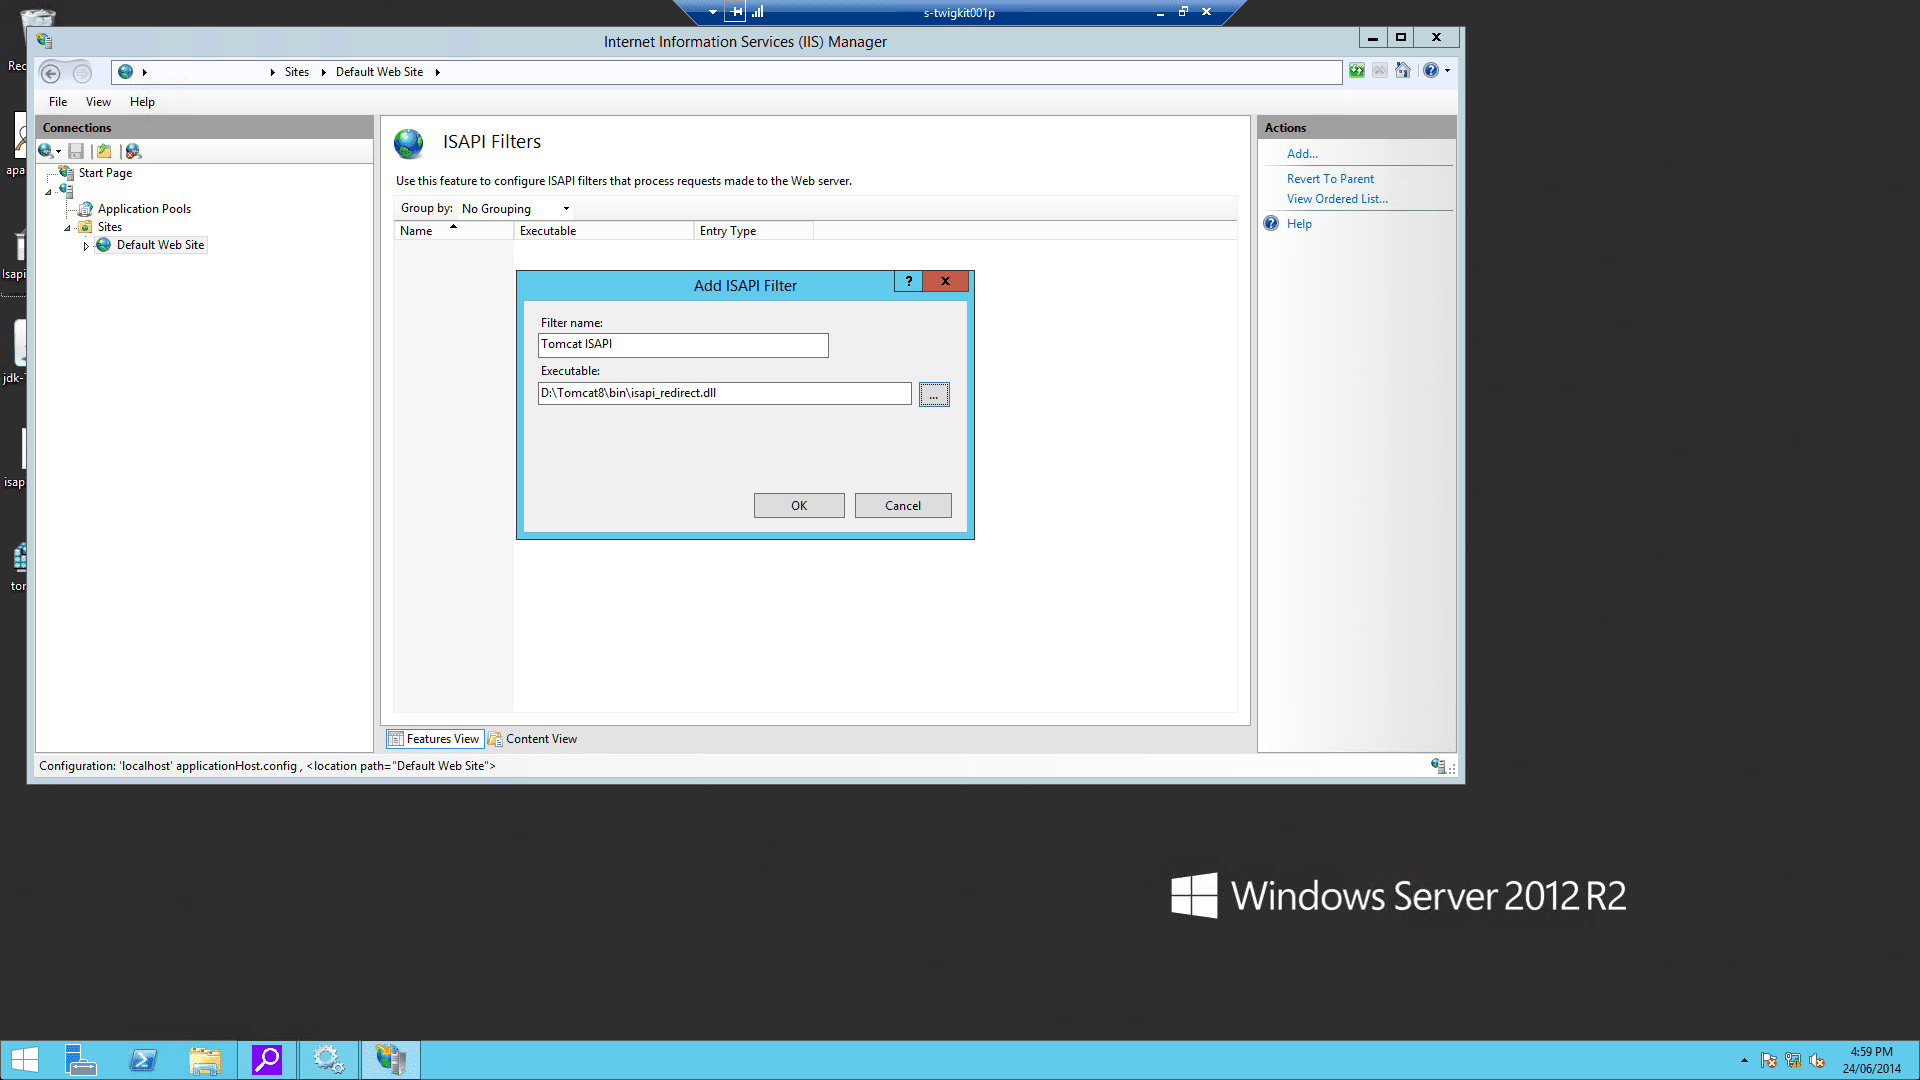
Using the IIS management console, add
isapi_redirect.dllas a filter in your IIS/PWS web site. The name of the filter should reflect its task (here we use the namejakarta). Its executable must beD:\Tomcat8\bin\isapi_redirect.dll.
-
Enable Windows authentication for your IIS website:
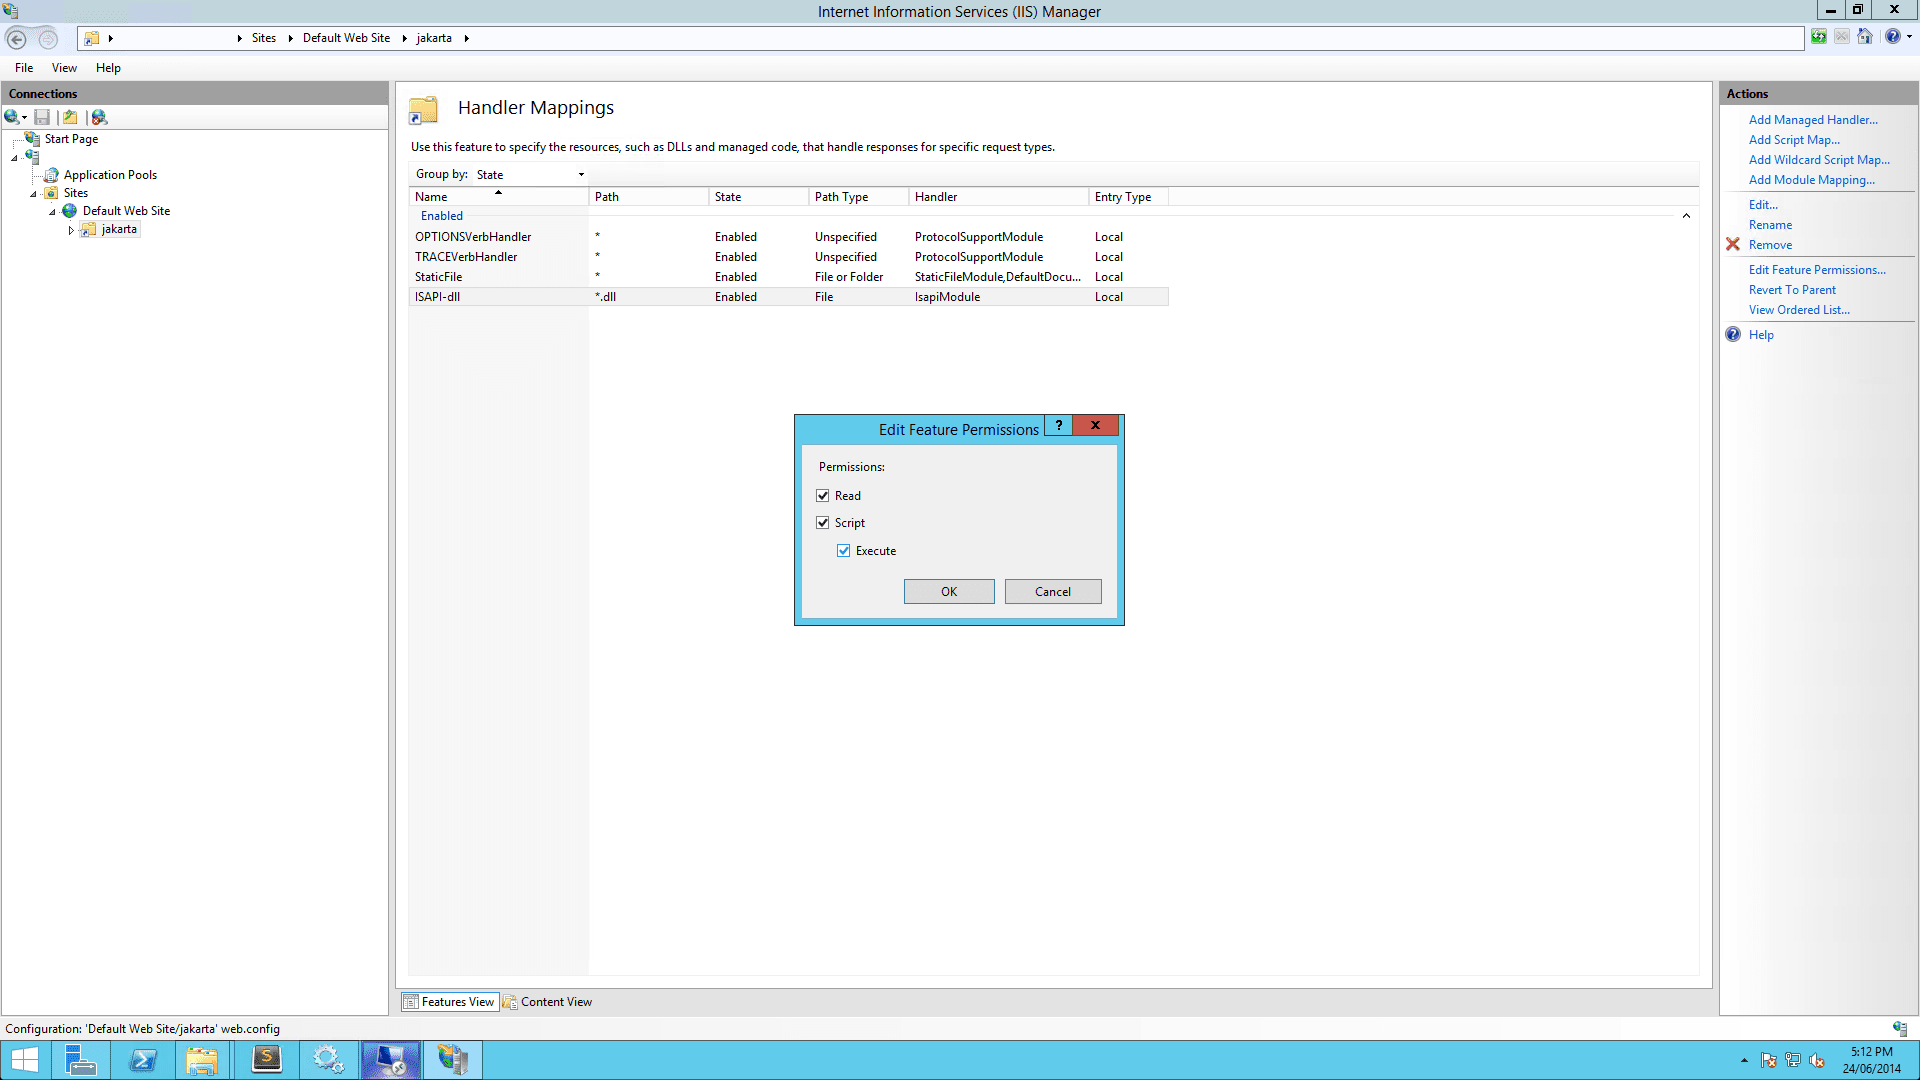
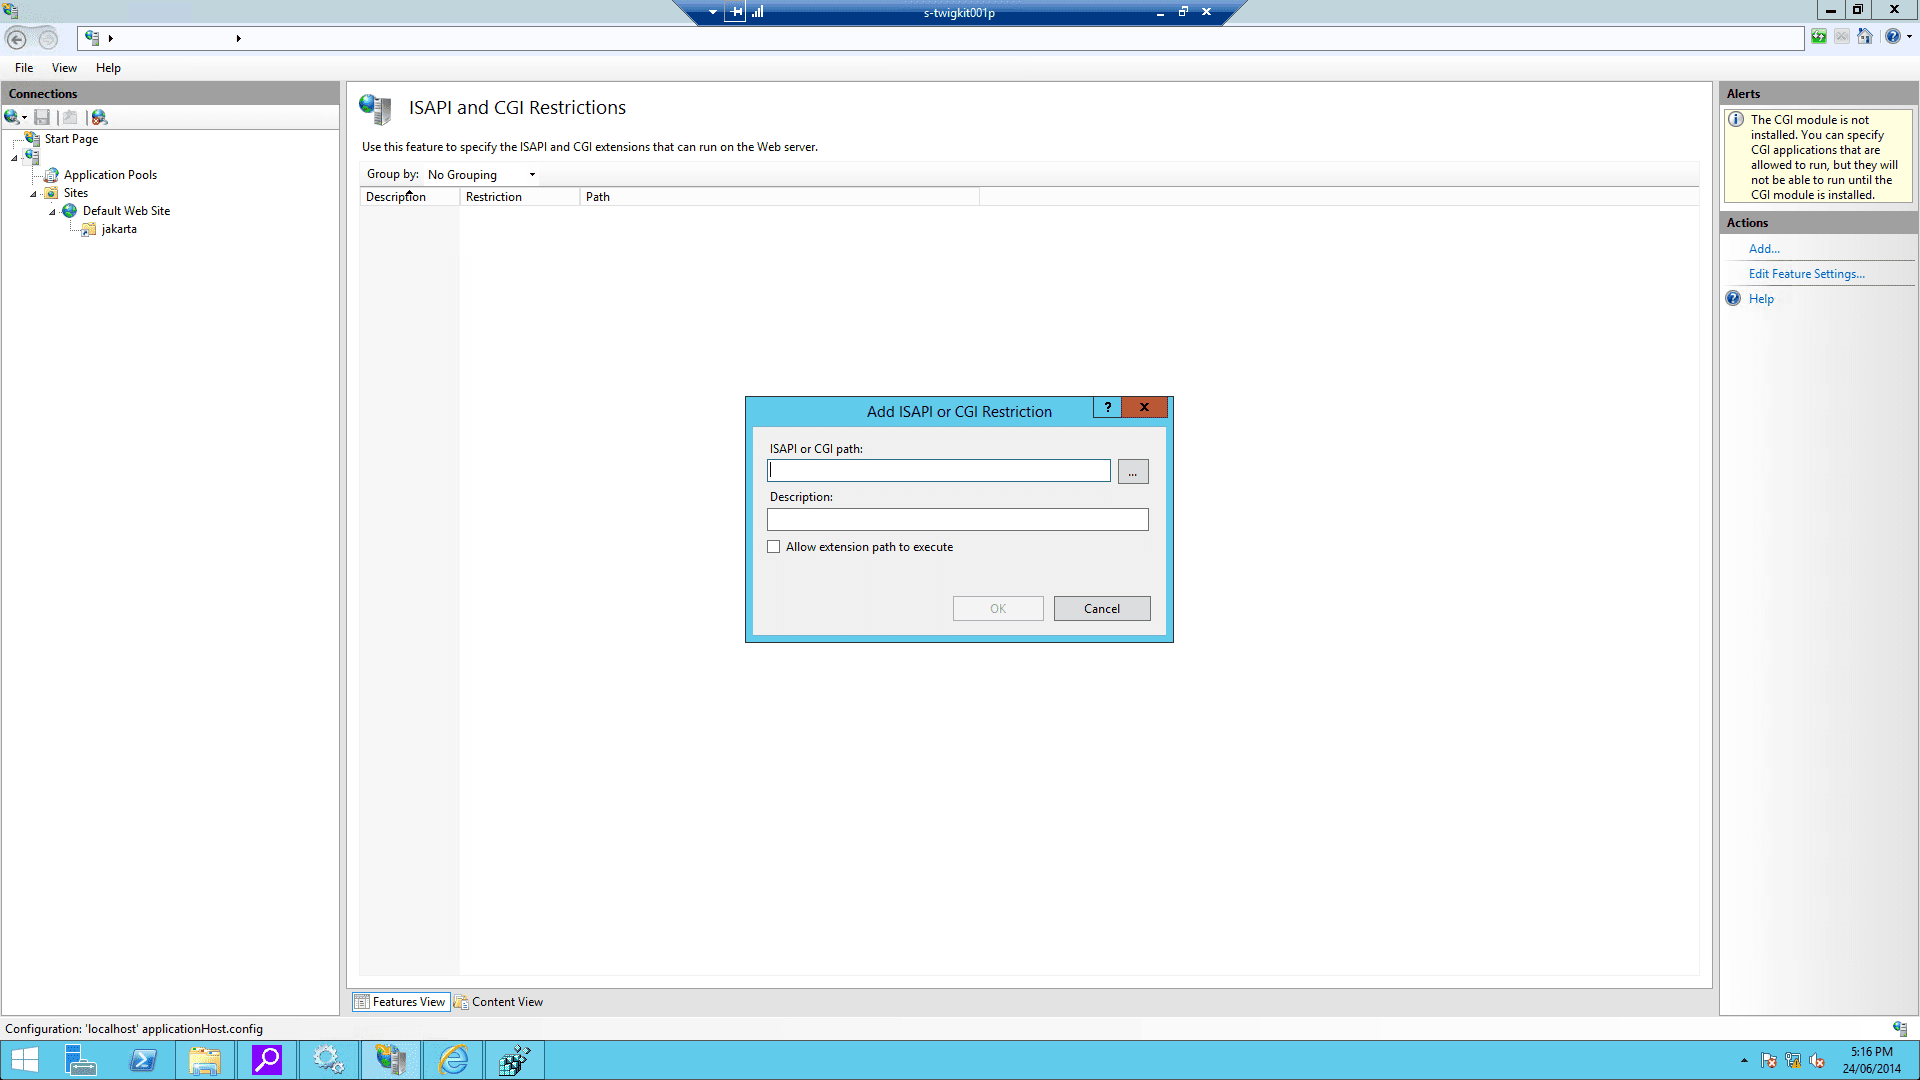
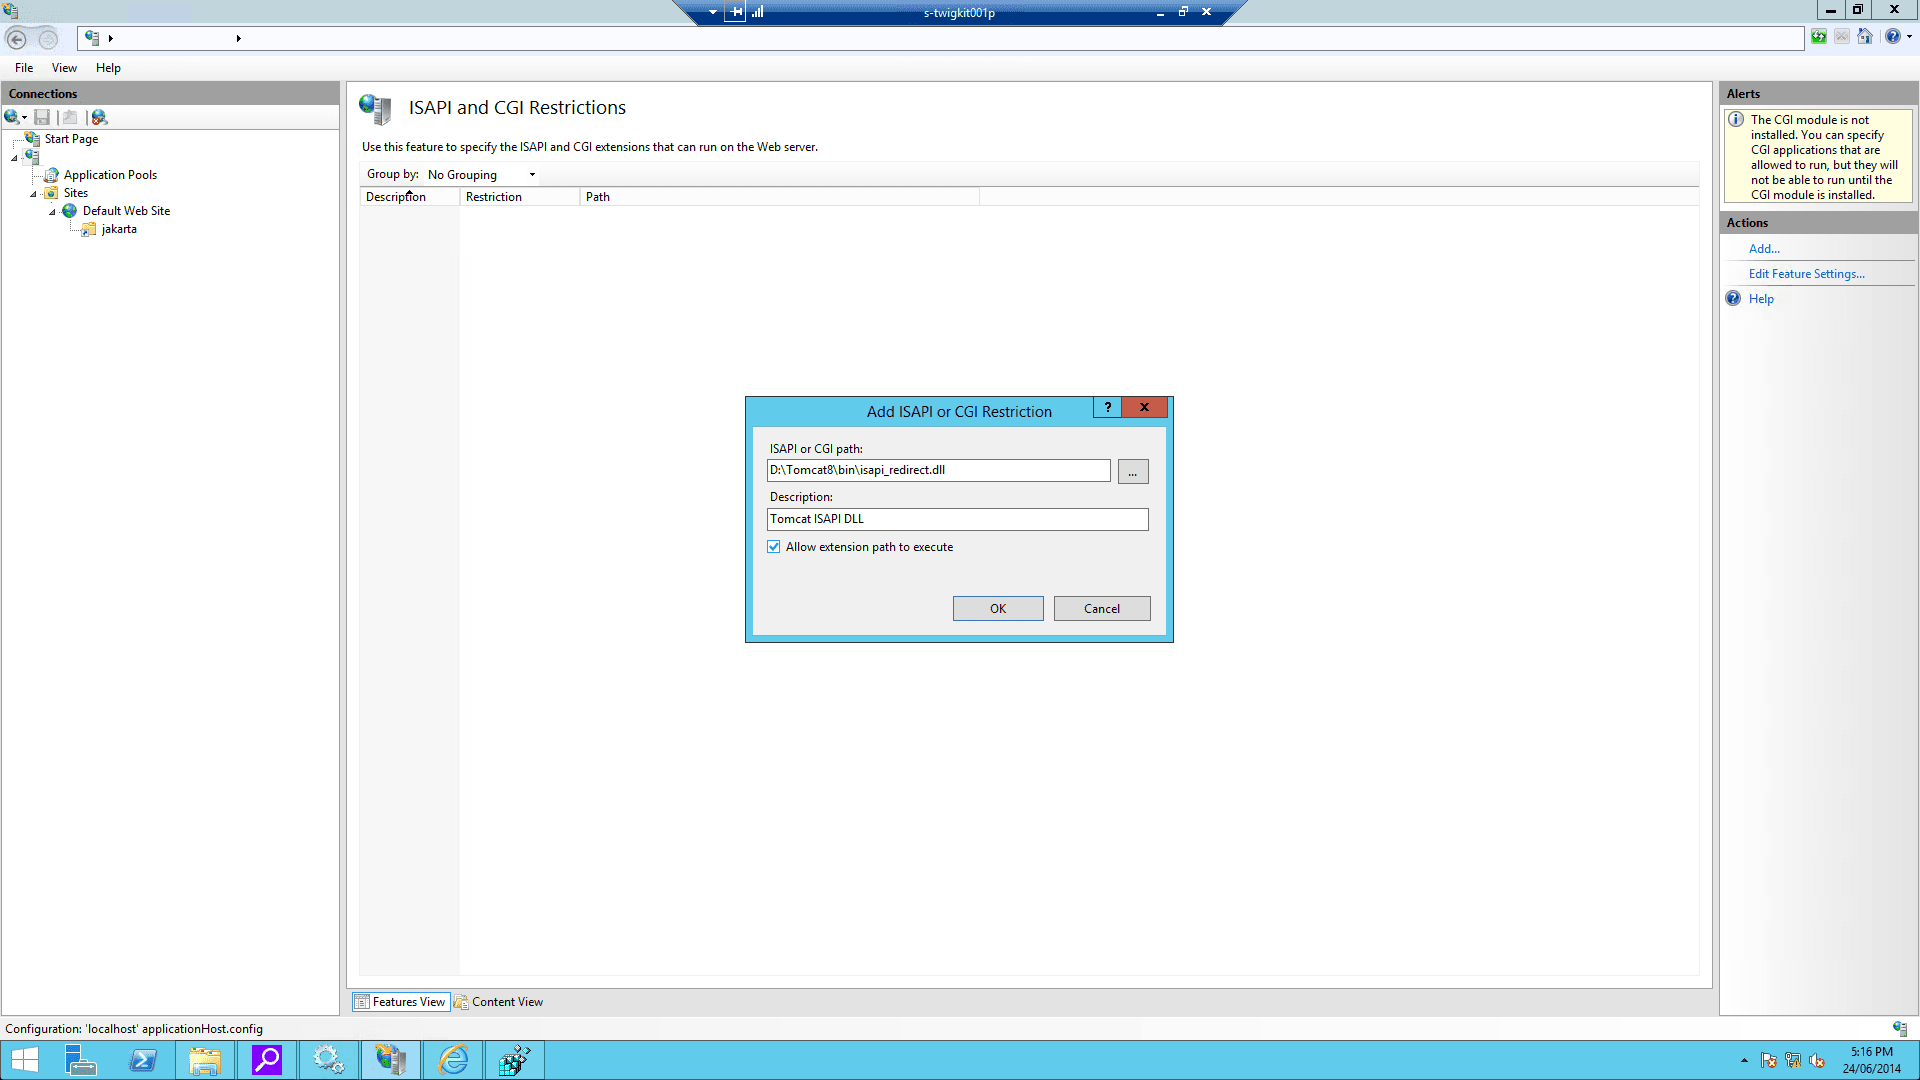
-
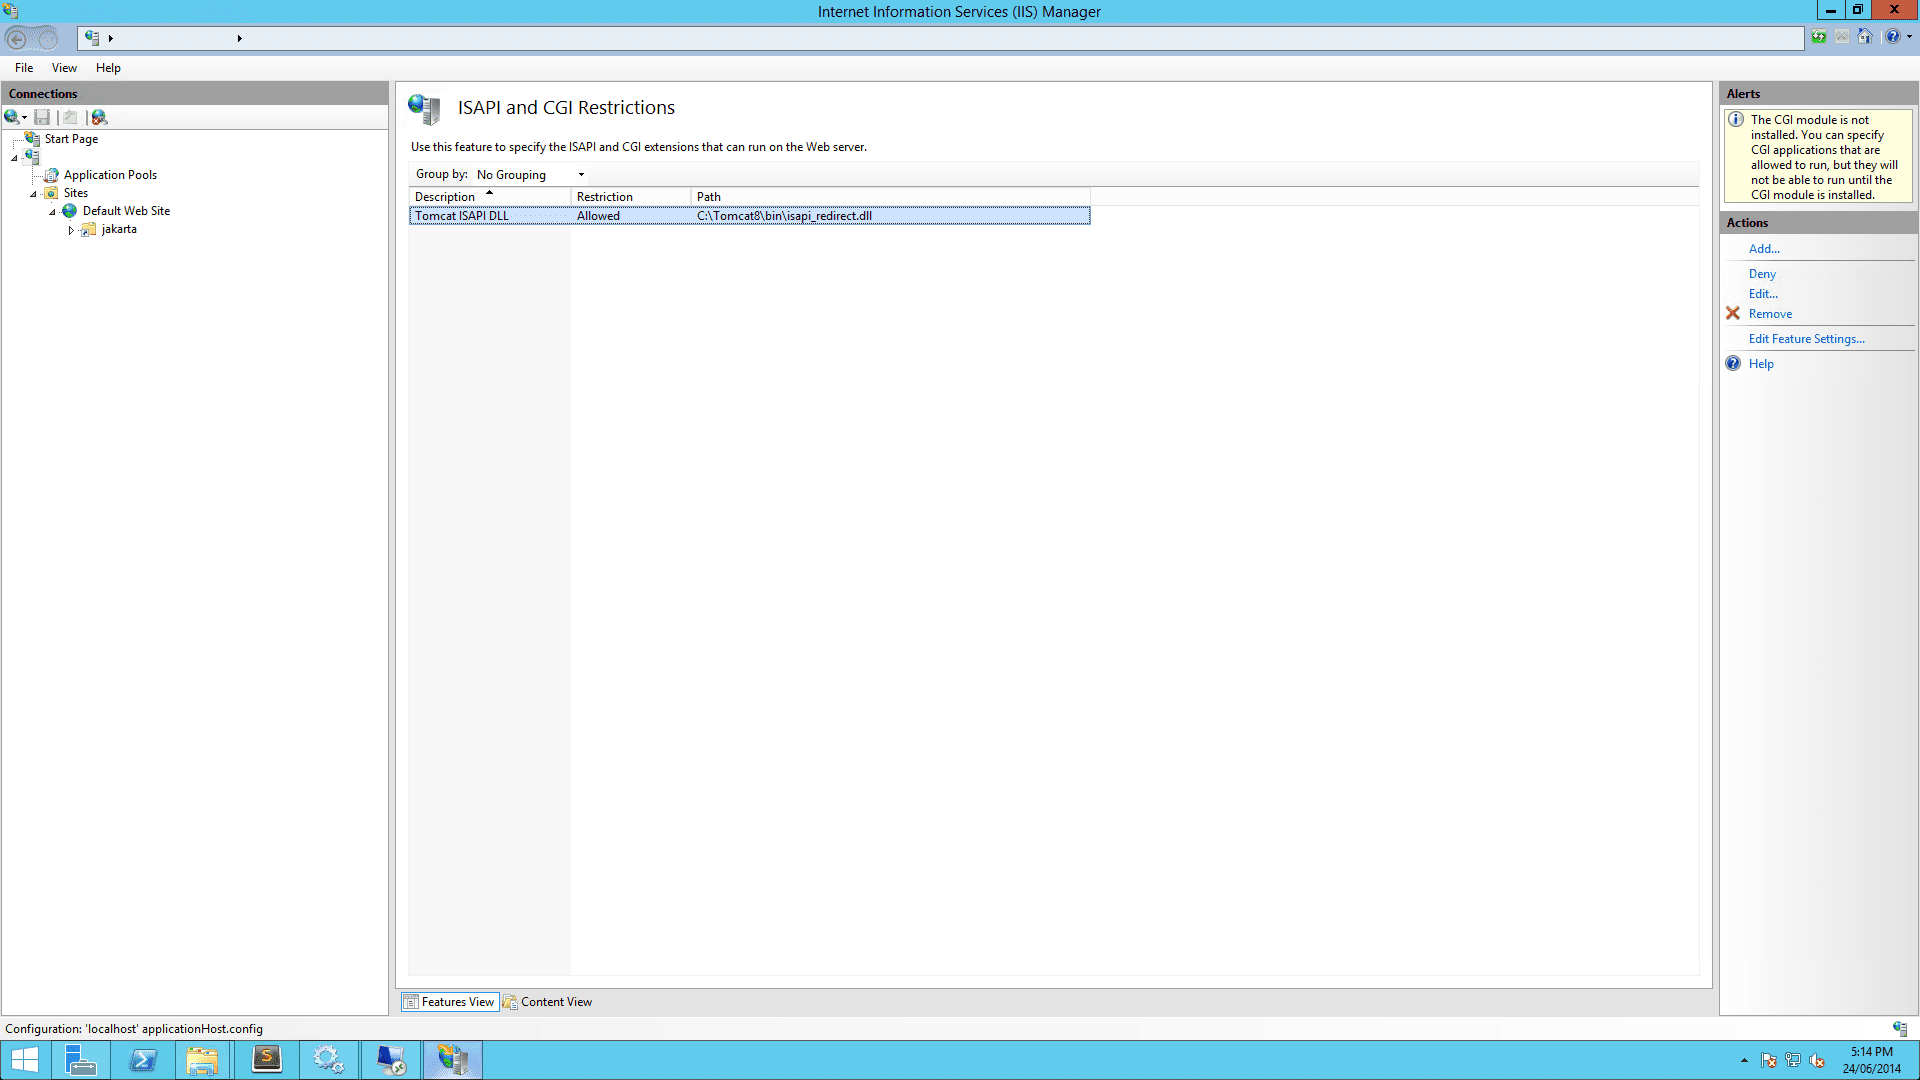
On IIS Admin, select the server, and click ISAPI and CGI Restrictions. Then open it and Add… with the correct
isapi_redirect.dllpath: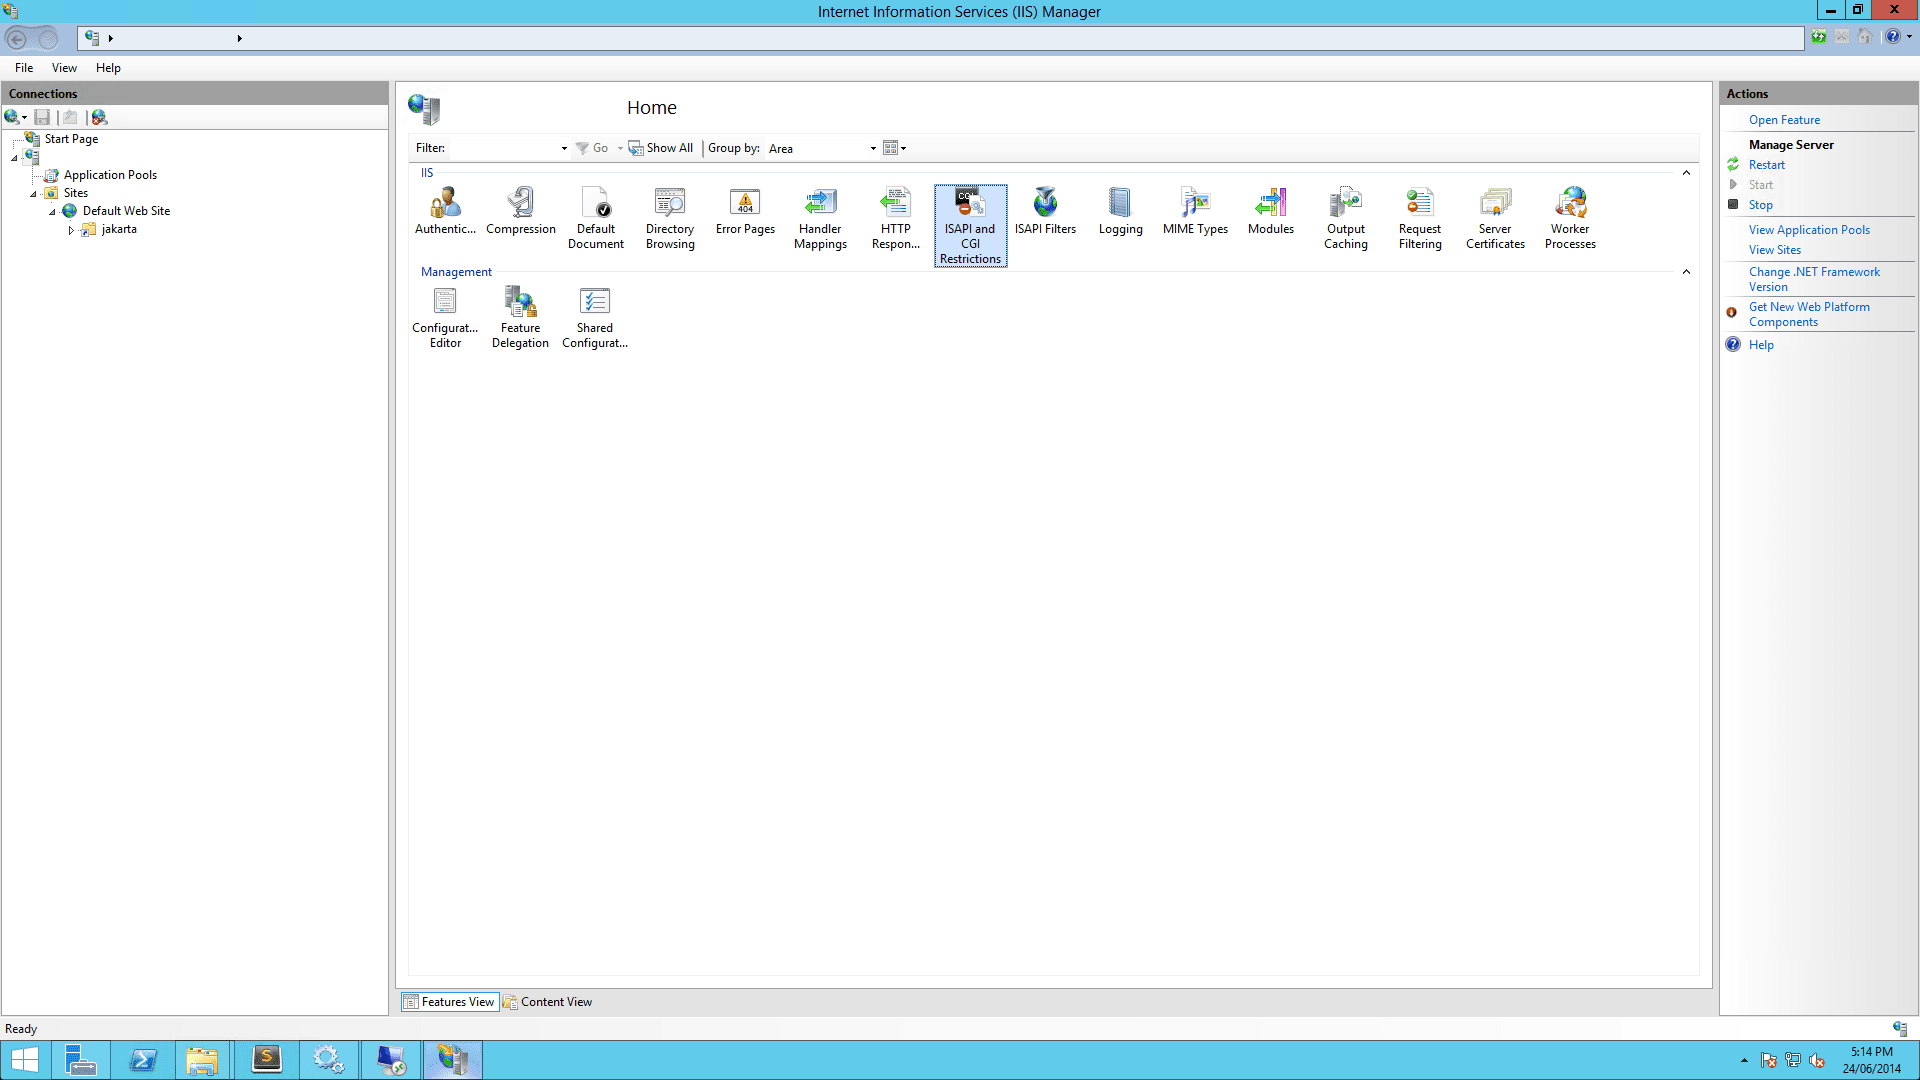
- Restart IIS and Tomcat.
5 Verify the installation
If all goes well, you should be able to visithttp://localhost/myapp/, which should present the authenticated Windows user to the Appkit application.At this point, Tomcat would still be accessible on port 8080, so if you visit
http://localhost:8080/myapp/, you should see the same interface, except that your user is not authenticated.6 Troubleshooting
Users receive the error ‘the request entity is too large’ in the browser
This is usually due to an issue with the Tomcat-ISAPI communication and the settings of the AJP connector in Tomcat must be modified to increase the maximum packet size:-
In the
workers.propertiesfile referenced by the tomcat-connection definition, set the packet size to the maximum: -
Set
packetSizein the AJP Connector definition:
Configuration
Primary configuration is done via thesecurity.conf configuration file and other files in the /conf/security/ folder. The Security Module however also supports mechanisms like Spring Security that might require its own configuration files (for example, spring-security.xml) and custom elements in web.xml.
Define the security provider in security.conf using one of the following options:
Spring security
Spring Security is an industry standard security framework for Java. It is a popular option allowing the security to be configured initially via a simple XML file, and offers a lot of flexibility due to its integration with many different technologies, supporting a range of security standards. The spring documentation contains thorough guides to the use of Spring Security. By default Appkit applications are configured to use Spring Security with a simple hard-coded set of credentials in the providedspring-security.xml file, but you can see some other common configurations Set Up Spring Authentication. Further documentation on configuring Spring Security can be found here.
Set Up Spring Authentication
Set Up Spring Authentication
The Spring Security authentication provider for Appkit interfaces with both Spring Security 3 and 4. Projects that adopt Appkit version 3 must switch to using Spring Security 4.Authorized Spring principals become fully-qualified Appkit user profiles, along with any roles or groups that the Spring module provides. Spring Security integrates with a number of authentication protocols, including LDAP, Active Directory, Basic Authentication, Kerberos, JAAS, and others. For a full list, see here.Below you will find some common configurations of the The first portion of the configuration file contains the required access levels for URL patterns used in Appkit and in most cases stays the same for all configurations.Here, you can see that two users are configured - ‘user’ and ‘admin’. Both have been assigned the role named ‘USER’ and the admin user also has the ‘ADMIN’ role.Note the use of the LDAP protocol. In some cases, SSL encryption is used with the ‘LDAPS’ protocol. This requires the certificate to be trusted by the authentication client (the JVM running Appkit). There are several ways to configure the keystore for the JVM to trust the certificate from the LDAP server. The most common way to do this is to import the certificate into the JVM’s default keystore.The
spring-security.xml file for integrating with different security mechanisms for authentication and authorization.The references given are for Spring Security 3. For information on how these configurations would change with Spring Security 4, refer to the Release Notes for Appkit 3.
Hard-coded users
LDAP
Spring ‘remember me’ feature
Spring Security comes with a mechanism for allowing a user’s details to be remembered beyond the current browser session, avoiding the user having to provide credentials on a login page every time. This integrates with the ‘remember’ attributes on the widget:login-form tag.There are two methods to allow the user’s session to be persistent using either a browser cookie or a database backed persistence method. The first is most commonly used, and to implement this all that is required is to add the remember-me line to thespring-security.xml HTTP configuration:Re-directing users to the original requested URL post-login
Spring Security provides an authentication strategy that allows a requested URL to be saved before requiring the user to log in; once credentials have been authenticated the user is re-directed to the original URL.This strategy is implemented as part of the<form-login ...> tag defined via the authentication-success-handler-ref. For example:login_success_handler is a reference to the Spring Security class that implements the described strategy. This class is defined via this bean that needs to be added to the spring-security.xml as follows:Container managed security
In this case the application server is responsible for authentication such as:- Internet Information Server and Integrated Windows Authentication
- Set Up Tomcat Container Authentication
Set Up Tomcat Container Authentication
Set Up Tomcat Container Authentication
Apache Tomcat is an open source Java servlet container. Tomcat implements Java enterprise specs, including the Java Servlet, JavaServer Pages JSP, and WebSockets APIs.To have Tomcat manage authentication for your application:
-
Add this module to your POM (
pom.xmlfile in the root of the application): -
Set the requisite type in
security.conf(found insrc/main/resources/conf/security/):
Generic security
The generic security option uses getRemoteUser() or the REMOTE_USER variable provided through the servlet API. This is for authentication only, but it can be combined with other methods for picking up the roles assigned to a user and submitting them to the search platform (see Active Directory and LDAP role extraction below).Custom Providers
You can add your own SecurityProvider which would be responsible for providing the user identity to Appkit. To do this, implement thetwigkit.security.SecurityProvider interface and bind the class using Guice in your custom module.
Authorization, Role Extraction, and other features
Active Directory and LDAP Role Extraction
After the user’s identity has been established during the authentication stage, it is possible to carry out further authorization tasks such as role extraction or adding other metadata about the current user.User and Domain Mapping
Appkit Security Module comes with pre-built filters to handle mapping between user names and domains. It is also possible to provide your own logic during this phase to deal with specific scenarios for determining a user’s credentials and details before rendering the page or passing them to the search platform.Security lifecycle
When the Security Module is installed, every request made to Appkit is filtered through the configured authentication provider. Credentials are added to the request via a ThreadLocal variable. Authentication providers can be container managed, single sign on or configured for form based authentication in Appkit. You can create your own authentication provider by implementing and binding the twigkit.security.SecurityProvider class. 2. Role Extraction
Next step in the filter chain can handle role/group extraction for the authenticated user. This is frequently done via an Active Directory/LDAP lookup. The role extraction mechanisms will add the roles for the user to the User object. 3. Query
When the Security Module is used queries should be created using the secure version of the Query tag. The secure query tag will provide a reference to the user that is logged in and pass the identity on to the search platform if necessary. The Security Module also provides a number of processors and utilities for adding filters to the query based on business rules or identity/role information. 4. Personalization
The User and Role information is available in the user interface. Using the Security Conditional tag you can customize the view to the user that is logged in.