Fusion 5.9.12 and later integrates with Lucidworks AI to perform chunking. Chunking helps your organization enhance relevance in searches and provides customers with exact information without the need to scan large documents. In addition, chunking improves the accuracy of AI assistants by delivering semantically rich training data in precise, context-aware pieces. When you include chunking in your index pipeline, Lucidworks AI automatically splits large documents into smaller, more focused segments. This approach is especially powerful when paired with Neural Hybrid Search (NHS) to surface the most relevant chunks instead of entire documents. Each chunk is a unique entity in the index that contains metadata and a reference to the original document. In addition, the chunk generates its own vector, resulting in multiple vectors that collectively represent a field from a single parent document. This is useful for large documents that exceed maximum vector dimensions. Click your use case below to see examples of how chunking can enhance the search experience:Documentation Index
Fetch the complete documentation index at: https://doc.lucidworks.com/llms.txt
Use this file to discover all available pages before exploring further.
- Business-to-Consumer
- Business-to-Business
- Knowledge Management
- Break product descriptions into focused chunks so customers can find relevant details faster.
- Reduce support tickets by training AI assistants on semantically-segmented help articles for more accurate answers.
- Split multimedia transcripts (like product videos or webinars) into meaningful chunks so customers can find answers in content they wouldn’t normally read.
Chunking stages
Chunking stages are the phases in document ingestion and processing where large documents are split into smaller, meaningful pieces before being embedded or indexed. These stages work together to make chunk-based search operations efficient. Based on the configuration you deploy, the stages assess and prepare content during indexing, translate user queries into vectors at search time, and combine semantic and lexical ranking to return accurate results from large or complex content collections. Chunking stages include the following:- LWAI Chunker Index asynchronous stage prepares documents for semantic retrieval at ingestion time, which can reduce manual processing and improve granular-level content searches. Specifically, the stage breaks down large text documents into smaller, semantically meaningful chunks, vectorizes those chunks for NHS, and stores those vectors in Solr. For information to set up the stage, see Set up LWAI Chunker index pipeline stage.
-
LWAI Vectorize Query stage converts natural-language user queries into vectors that retrieve semantically-similar chunks that indicate customer intent. Exact matching is not necessary for this stage to return highly relevant results. To accomplish this, the stage generates a vector based on the current query string (
qparameter). For information to set up the stage, see Set up LWAI Vectorize query stage. - Chunking Neural Hybrid Query stage helps your organization balance semantic searches and exact-match (lexical) relevance to improve ranking quality while accommodating the two ways users enter search terms. The stage performs hybrid lexical-semantic searches using Solr. For information to set up the stage, see Set up Chunking Neural Hybrid Query pipeline stage.
You can also use the Async Chunking API that asynchronously separates large pieces of text into chunks. The API then returns the chunks and their associated vectors. Using this API gives your organization the option to perform chunking actions outside of standard Fusion pipelines, and can be used for custom applications and specialized processing workflows.
Chunking strategies
Selecting the correct chunking strategy helps your organization manage system performance, and improve document and information retrieval while preserving content meaning. Chunking works by limiting the context length to 512 tokens. Ideally, a chunk represents a complete thought or idea and is usually a sentence or two in length. Chunking should also balance computational efficiency. For example, you should be careful to not generate too many chunks per document, because each chunk is represented by a vector of O(1000) floats, which can affect performance and resource usage.There are limits to both the request and response payloads sent to the LWAI Chunker from Fusion. Currently Fusion truncates the body of text sent to Lucidworks AI for chunking to 50,000 characters (O(100) pages).
-
dynamic-newline chunker is most effective with line-based or minimally-structured content that is already clearly separated. This strategy splits the provided text on all newline characters. Then all of the split chunks under the
maxChunkSizelimit will be merged. -
dynamic-sentence chunker splits the provided text into sentences while keeping content readable, so it can be easily searched and retrieved. Sentences are joined until they reach the
maxChunkSize. IfoverlapSizeis provided, adjacent chunks overlap by that many sentences. -
regex-splitter chunker splits highly-structured text such as technical templates and forms, or documents that contain repeated patterns. This strategy uses the specified regular expression (regex), according to the conventions employed by the
repython module. - semantic chunker is effective for highly-detailed content and splits text into sentences, encodes the sentences, and then compares the sentence to the building chunk to determine if they are similar enough to group together. It then merges two similar sentences and continues to encode and merge similar sentences.
- sentence chunker splits text on sentences.
Benefits of chunking
Chunking helps search because smaller pieces of text are easier to match accurately with a user’s query. When the AI searches through chunks instead of whole documents, it avoids irrelevant content and focuses only on the most relevant parts. This reduces noise, improves precision, and increases the chances of finding the exact answer or context the user needs. Chunking helps retrieval-augmented generation (RAG) by giving the system smaller, focused pieces of information to choose from when answering a question. Instead of pulling in a whole document, RAG can retrieve just the chunks that are most relevant. This makes the answer more accurate because the model is only looking at the parts that actually match the question. It also reduces the chance of including unrelated or confusing content in the final response.Chunking process diagram
This diagram displays how Fusion and Lucidworks AI work together to process, vectorize, and retrieve chunked content.
Prerequisites
These requirements ensure reliable operations to chunk, store, and process chunked data such as vectors and metadata. The collection must have a processor component added to the Solr schema:<processor class="solr.lw.MultiVectorsToChildDocsProcessorFactory" />. Here is an example of a default in the solrconfig.xml. After you add this, you must clear the collection and re-index.
Chunking in Neural Hybrid Search
If your organization uses chunking in NHS, keyword search is combined with semantic understanding at the chunk level. This approach is very effective where only portions of documents contain the answers to user queries. You can set up NHS to index, rank, and retrieve documents based on a combination of lexical and chunked vectors. For more information, see the Lucidworks AI Async Chunking API.If you have a Ray deployment, you can use the Local Chunker Index stage for chunking.
Configure A Lucidworks AI Gateway Integration
Configure A Lucidworks AI Gateway Integration
Before you can use Lucidworks AI with Lucidworks Platform, you must configure the Lucidworks AI Gateway to provide a secure, authenticated integration between self-hosted Fusion and your hosted models.
This configuration is done through a secret properties file that you can find in the Lucidworks Platform UI.Integrations are created for you by the Lucidworks team. But as a workspace owner, you can configure those integrations with Lucidworks AI Gateway.
Each account can have its own set of credentials and associated scopes, which define the operations it can perform.
If configuration properties are not provided at the account level, default settings are used instead.To configure the Lucidworks AI Gateway, navigate to the megamenu and click Models.
This feature is available starting in Fusion 5.9.5 and in all subsequent Fusion 5.9 releases.
- On the Integrations tab, click your integration. If you don’t see your integration, contact your Lucidworks representative.
-
Download or copy the YAML code and paste it into a file called
account.yaml. The file for a single integration should look similar to this one:For a configuration with multiple integrations, it should look like this:Non-admin users must have the following permissions to use Lucidworks AI integrations:PUT,POST,GET:/LWAI-ACCOUNT-NAME/**whereLWAI-ACCOUNT-NAMEmust match the value offusion.lwai.account[n].namein the integration YAML. -
Apply the file to your Fusion configuration file.
For example:
Configure Neural Hybrid Search
Configure Neural Hybrid Search
NHS combines lexical-semantic search with semantic vector search to optimize relevant results.To use semantic vector search in Fusion, you need to configure NHS.
Then you can choose the balance between lexical and semantic vector search that works best for your use case.Before you begin, see Neural Hybrid Search for conceptual information that can help you understand how to configure this feature.Lucidworks recommends setting up NHS with Lucidworks AI, but you can instead use Ray or Seldon vector search. If using Lucidworks AI, you may use the default LWAI Neural Hybrid Search pipeline.This query stage must be placed before the Solr Query stage.Construct a KNN exclusion query where topK is higher than the number of vectors in your collection
If the number of vectors in your collection exceeds 999,999 then increase the value to be at least equal to that value.If any are documents returned, there are orphans, and the
This feature is available starting in Fusion 5.9.5 and in all subsequent Fusion 5.9 releases.
Configure vector search
This section explains how to configure vector search using Lucidworks AI, but you can also configure it using Ray or Seldon. This can improve increased semantic meaning of user intent in queries.Before you set up the Lucidworks AI index and query stages, make sure you have set up your Lucidworks AI Gateway integration.Configure the LWAI Vectorize Field index stage
This stage encodes a string field into a vector representation, which can improve successful efforts to identify content relevant to user queries.To vectorize the index pipeline fields:- Sign in to Fusion and click Indexing > Index Pipelines.
- Click the pipeline you want to use.
- Click Add a new pipeline stage.
- In the AI section, click LWAI Vectorize Field.
- In the Label field, enter a unique identifier for this stage.
- In the Condition field, enter a script that results in true or false, which determines if the stage should process.
-
Select Asynchronous Execution Config if you want to run this stage asynchronously. If this field is enabled, complete the following fields:
-
Select Enable Async Execution. Fusion automatically assigns an Async ID value to this stage. Change this to a more memorable string that describes the asynchronous stages you are merging, such as
signalsoraccess_control. -
Copy the Async ID value.
For detailed information, see Asynchronous query pipeline processing.
-
Select Enable Async Execution. Fusion automatically assigns an Async ID value to this stage. Change this to a more memorable string that describes the asynchronous stages you are merging, such as
- In the Account Name field, select the Lucidworks AI API account name defined in the Lucidworks AI Gateway service. If you do not see your account name, check that your Lucidworks AI Gateway integration is correctly configured.
-
In the Model field, select the Lucidworks AI model to use for encoding.
If you do not see any models names and you are a non-admin Fusion user, check that you have these permissions:
PUT,POST,GET:/LWAI-ACCOUNT-NAME/**Your Fusion account name must match the name of the account that you selected in the Account Name dropdown. For more information about models, see: - In the Source field, enter the name of the string field where the value should be submitted to the model for encoding. If the field is blank or does not exist, this stage is not processed. Template expressions are supported.
- In the Destination field, enter the name of the field where the vector value from the model response is saved.
{Destination Field}is the vector field.{Destination Field}_bis the boolean value if the vector has been indexed.
- In the Use Case Configuration section, click the + sign to enter the parameter name and value to send to Lucidworks AI. The
useCaseConfigparameter that is common to embedding use cases isdataType, but each use case may have other parameters. The value for the query stage isquery. - Optionally, you can use the Model Configuration section for any additional parameters you want to send to Lucidworks AI.
Several
modelConfigparameters are common to generative AI use cases. For more information, see Prediction API. - Select the Fail on Error checkbox to generate an exception if an error occurs while generating a prediction for a document.
- Click Save.
- Index data using the new pipeline. Verify the vector field is indexed by confirming the field is present in documents.
Configure the LWAI Vectorize Query stage
This stage generates a vector based on the current query string (q parameter), which helps interpret the semantic meaning of user queries and improves results retrieved for natural language searches.To vectorize the query in the query pipeline:- Sign in to Fusion and click Querying > Query Pipelines.
- Select the pipeline you want to use.
- Click Add a new pipeline stage.
- Click LWAI Vectorize Query.
- In the Label field, enter a unique identifier for this stage.
- In the Condition field, enter a script that results in true or false, which determines if the stage should process.
-
Select Asynchronous Execution Config if you want to run this stage asynchronously. If this field is enabled, complete the following fields:
-
Select Enable Async Execution. Fusion automatically assigns an Async ID value to this stage. Change this to a more memorable string that describes the asynchronous stages you are merging, such as
signalsoraccess_control. -
Copy the Async ID value.
For detailed information, see Asynchronous query pipeline processing.
-
Select Enable Async Execution. Fusion automatically assigns an Async ID value to this stage. Change this to a more memorable string that describes the asynchronous stages you are merging, such as
- In the Account Name field, select the name of the Lucidworks AI account.
-
In the Model field, select the Lucidworks AI model to use for encoding.
If you do not see any model names and you are a non-admin Fusion user, verify with a Fusion administrator that your user account has these permissions:
PUT,POST,GET:/LWAI-ACCOUNT-NAME/**Your Fusion account name must match the name of the account that you selected in the Account Name dropdown. For more information about models, see: - In the Query Input field, enter the location from which the query is retrieved.
- In the Output context variable field, enter the name of the variable where the vector value from the response is saved.
-
In the Use Case Configuration section, click the + sign to enter the parameter name and value to send to Lucidworks AI. The
useCaseConfigparameter that is common to embedding use cases isdataType, but each use case may have other parameters. The value for the query stage isquery. -
Optionally, you can use the Model Configuration section for any additional parameters you want to send to Lucidworks AI.
Several
modelConfigparameters are common to generative AI use cases. For more information, see Prediction API. - Select the Fail on Error checkbox to generate an exception if an error occurs during this stage.
- Click Save.
The Top K setting is 100 by default, but a value as high as 1000 provides better recall if you have fewer than one million indexed documents.
You can raise it even higher, but keep in mind that higher recall also causes higher latency.
When raising this value, we recommend also setting a higher Min Return Vector Similarity value, in the 0.7-0.85 range.
When raising this value, we recommend also setting a higher Min Return Vector Similarity value, in the 0.7-0.85 range.
Modify Solr managed-schema (5.9.4 and earlier)
This step is required if you’re migrating a collection from a version of Fusion that does not support NHS. If creating a new collection in Fusion 5.9.5 and later, you can continue to Configure Hybrid Query stage.- Go to System > Solr Config and then click managed-schema to edit it.
-
Comment out
<copyField dest="\_text_" source="*"/>and add<copyField dest="text" source="*_t"/>below it. This will concatenate and index all*_t fields. -
Add the following code block to the managed-schema file:
This example uses 512 vector dimension. If your model uses a different dimension, modify the code block to match your model. For example,
_1024v. There is no limitation on supported vector dimensions.
Configure neural hybrid queries
In Fusion 5.9.10 and later, you use the Neural Hybrid Query stage to configure neural hybrid queries. In Fusion 5.9.9 and earlier, you use the Hybrid Query stage.Configure Neural Hybrid Query stage (5.9.10 and later)
- In the same query pipeline where you configured vector search, click Add a new pipeline stage, then select Neural Hybrid Query.
- In the Label field, enter a unique identifier for this stage or leave blank to use the default value.
- In the Condition field, enter a script that results in true or false, which determines if the stage should process, or leave blank.
- In the Lexical Query Input field, enter the location from which the lexical query is retrieved. For example, <request.params.q>. Template expressions are supported.
- In the Lexical Query Weight field, enter the relative weight of the lexical query. For example, 0.3. If this value is 0, no re-ranking will be applied using the lexical query scores.
- In the Lexical Query Squash Factor field, enter a value that will be used to squash the lexical query score. The squash factor controls how much difference there is between the top-scoring documents and the rest. It helps ensure that documents with slightly lower scores still have a chance to show up near the top. For this value, Lucidworks recommends entering the inverse of the lexical maximum score across all queries for the given collection.
- In the Vector Query Field, enter the name of the Solr field for k-nearest neighbor (KNN) vector search.
-
In the Vector Input field, enter the location from which the vector is retrieved. Template expressions are supported. For example, a value of
<ctx.vector>evaluates the context variable resulting from a previous stage, such as the LWAI Vectorize Query stage. - In the Vector Query Weight field, enter the relative weight of the vector query. For example, 0.7.
- In the Min Return Vector Similarity field, enter the minimum vector similarity value to qualify as a match from the Vector portion of the hybrid query.
- In the Min Traversal Vector Similarity field, enter the minimum vector similarity value to use when walking through the graph during the Vector portion of the hybrid query.
- When enabled, the Compute Vector Similarity for Lexical-Only Matches setting computes vector similarity scores for documents in lexical search results but not in the initial vector search results. Select the checkbox to enable this setting.
-
If you want to use pre-filtering:
-
Uncheck Block pre-filtering.
In the Javascript context (
ctx), thepreFilterKeyobject becomes available. -
Add a Javascript stage after the Neural Hybrid Query stage and use it to configure your pre-filter.
The
preFilterobject adds both the top-levelfqandpreFilterto the parameters for the vector query. You do not need to manually add the top levelfqin the javascript stage. See the example below:
-
Uncheck Block pre-filtering.
In the Javascript context (
- Click Save.
solrconfig.xml within the <config> tag:Configure Hybrid Query stage (5.9.9 and earlier)
If you’re setting up NHS in Fusion 5.9.9 and earlier, use the Hybrid Query stage. If you’re using Fusion 5.9.10 or later, use the Neural Hybrid Query stage.- In the same query pipeline where you configured vector search, click Add a new pipeline stage, then select Hybrid Query.
- In the Label field, enter a unique identifier for this stage or leave blank to use the default value.
- In the Condition field, enter a script that results in true or false, which determines if the stage should process, or leave blank.
- In the Lexical Query Input field, enter the location from which the lexical query is retrieved. For example, <request.params.q>. Template expressions are supported.
- In the Lexical Query Weight field, enter the relative weight of the lexical query. For example, 0.3. If this value is 0, no re-ranking will be applied using the lexical query scores.
- In the Number of Lexical Results field, enter the number of lexical search results to include in re-ranking. For example, 1000. A value is 0 is ignored.
- In the Vector Query Field, enter the name of the Solr field for k-nearest neighbor (KNN) vector search.
- In the Vector Input field, enter the location from which the vector is retrieved. Template expressions are supported. For example, a value of
<ctx.vector>evaluates the context variable resulting from a previous stage, such as the LWAI Vectorize Query stage. - In the Vector Query Weight field, enter the relative weight of the vector query. For example, 0.7.
- Select the Use KNN Query checkbox to use the knn query parser and configure its options. This option cannot be selected if Use VecSim Query checkbox is selected. In addition, Use KNN Query is used if neither Use KNN Query or Use VecSim Query is selected.
- If the Use KNN Query checkbox is selected, enter a value in the Number of Vector Results field. For example, 1000.
- Select the Use VecSim Query checkbox to use the vecSim query parser and configure its options. This option cannot be selected if Use KNN Query checkbox is selected.
- Min Return Vector Similarity. Enter the minimum vector similarity value to qualify as a match from the Vector portion of the hybrid query.
- Min Traversal Vector Similarity. Enter the minimum vector similarity value to use when walking through the graph during the Vector portion of the hybrid query. The value must be lower than, or equal to, the value in the Min Return Vector Similarity field.
- In the Minimum Vector Similarity Filter, enter the value for a minimum similarity threshold for filtering documents. This option applies to all documents, regardless of other score boosting such as rules or signals.
- Click Save.
Perform hybrid searches
After setting up the stages, you can perform hybrid searches via theknn query parser as you would with Solr.
Specify the search vector and include it in the query.
For example, change the q parameter to a knn query parser string.You can also preview the results in the Query Workbench.
Try a few different queries, and adjust the weights and parameters in the Hybrid Query stage to find the best balance between lexical and semantic vector search for your use case.
You can also disable and re-enable the Neural Hybrid Query stage to compare results with and without it.XDenseVectorField is not supported in Fusion 5.9.5 and above. Instead, use DenseVectorField.Troubleshoot inconsistent results
Neural Hybrid Search leverages Solr semantic vector search, which has known behaviors which can be inconsistent at query time. These behaviors include score fluctuations with re-querying, documents showing and disappearing on re-querying, and (when SVS is configured without Hybrid stages) completely unfindable documents. This section outlines possible reasons for inconsistent behavior and resolutions steps.NRT replicas and HNSW graph challenges
Lucidworks recommends using PULL and TLOG replicas. These replica types copy the index of the leader replica, which results in the same HNSW graph on every replica. When querying, the HNSW approximation query will be consistent given a static index.In contrast, NRT replicas have their own index, so they will also have their own HNWS graph. HNSW is an Approximate Nearest Neighbor (ANN) algorithm, so it will not return exactly the same results for differently constructed graphs. This means that queries performed can and will return different results per HNWS graph (number of NRT replicas in a shard) which can lead to noticeable result shifts. When using NRT replicas, the shifts can be made less noticeable by increasing thetopK parameter. Variation will still occur, but it should be lower in the documents. Another way to mitigate shifts is to use NHS with a vector similarity cutoff.For more information, refer to Solr Types of Replicas.In the case of NHS, lexical BM25 & TF-IDF score differences that can occur with NRT replicas because of index differences for deleted documents, can also affect combined Hybrid score.
If you choose to use NRT replicas then it is possible that any lexical and/or semantic vectors variations can and will be exacerbated.Orphaning (Disconnected Nodes)
Solr’s implementation of dense vector search depends on the Lucene implementation of HNSW ANN. The Lucene implementation has a known issue where, in some collections, nodes in the HNSW graph become unreachable via graph traversal, essentially becoming disconnected or “orphaned.”Identify orphaning
Run the following command to identify orphaning:If the collection doesn’t have a vector for every document, include a filter so only the documents that have vectors are included. Filter on the boolean vector, as in this example:
--form-string 'fq=VECTOR_FIELD_b:true' \ids you see are the orphans.
Proceed to Resolving orphans.
If no documents are returned, there are likely no orphans.
You can try a few varying vectors to be certain.Resolving orphans
To resolve orphans, do the following:- Increase the HNSW Solr schema parameters
hnswBeamWidthandhnswMaxConnectionsper the Suggested values below. - Save the schema.
- Clear the index.
- Re-index your collection.
Suggested values
| Orphaning rate | hnswBeamWidth | hnswMaxConnections |
|---|---|---|
| 5% or less | 300 | 64 |
| 5% - 25% | 500 | 100 |
| 25% or more | 3200 | 512 |
Set up LWAI Chunker index pipeline stage
This stage asynchronously chunks and vectorizes data, and stores those vectors in Solr. As with all chunking and vectorization, this uses system resources effectively and improves the relevancy of results.- Sign into Fusion, go to Indexing > Index Pipelines, then select an existing pipeline or create a new one.
- Click Add a new pipeline stage, then select LWAI Chunker Stage. For reference information, see LWAI Chunker Index Stage.
- In the Account Name field, select the Lucidworks AI API account name defined in Lucidworks AI Gateway.
-
In the Chunking Strategy field, select the strategy to use. For example,
sentence. -
In the Model for Vectorization field, select the Lucidworks AI model to use for encoding. For more information, see:
- Pre-trained embedding models
- Custom embedding model training To use a custom model, you must obtain the deployment ID from the deployments screen, or from the Lucidworks AI Models API and enter that in the Model field.
- In the Input context variable field, enter the variable in context to be used as input. This field supports template expressions.
- In the Source field, enter the name of the string field where the value should be submitted to the model for encoding. If the field is blank or does not exist, this stage is not processed. Template expressions are supported.
- In the Destination Field Name & Context Output field, enter the name of the field where the vector value from the model response is saved.
This field must contain
chunk_vector and must be a dense vector field type. This field is used to populate two things with the prediction results:- The field name in the document that will contain the prediction.
- The name of the context variable that will contain the prediction.
- In the Destination Field Name for Text Chunks (not the vectors) field, enter the field name that will contain the text chunks that are generated by the chunker. For example,
body_chunks_ss. - In the Chunker Configuration section, click the + sign to enter the parameter name and value for additional chunker keys to send to Lucidworks AI. For example, to limit the chunk size to two sentences, enter
chunkSizeand2, respectively. - In the Model Configuration section, click the + sign to enter the parameter name and value for additional model configurations to send to Lucidworks AI. Several
modelConfigparameters are common to generative AI use cases. - In the API Key field, enter the secret associated with the model. For example, for OpenAI models, the value would start with
sk-. - In the Maximum Asynchronous Call Tries field, enter the maximum number of attempts to issue an asynchronous Lucidworks AI API call. The default value is
3. - Select the Fail on Error checkbox to generate an exception if an error occurs while generating a prediction for a document.
- Click Save.
Additional requirements for the stage are:
- Use a V2 connector. Only V2 connectors work for this task and not other options, such as PBL or V1 connectors.
- Remove the
Apache Tikastage from your parser because it can cause datasource failures with the following error: “The following components failed: [class com.lucidworks.connectors.service.components.job.processor.DefaultDataProcessor : Only Tika Container parser can support Async Parsing.]”
Set up Solr Partial Update Indexer stage
Fusion’s asynchronous chunking process is optimized for efficiency and reliability. To achieve this, it leverages the Solr Partial Update Indexer stage and a single index pipeline visited twice.Chunking workflow using the Solr Partial Update Indexer stage
Chunking is a multi-step process that can slow indexing before a response is received during synchronous processing. So asynchronous processing, including partial updates, completes processes as efficiently as possible when system performance allows. This asynchronous chunking workflow may not index the original document and the chunking data derived from it at the same time. The typical indexing process for chunking data is as follows:- The document is ingested into the index pipeline and indexed in Solr.
- The chunking stage assesses the document and then generates multiple semantic chunks and vector embeddings.
- The chunks are processed asynchronously, and then returned to the same pipeline.
- The chunk data is written back to the existing Solr document. Because the chunk updates may not be processed in the original order, and occur after indexing the original document, the pipeline must allow incremental updates using the partial updater process.
- The Solr Partial Update Indexer processes documents and generates additional chunks and vector embeddings.
- Any updates are applied to the existing Solr document.
Configure the Solr Partial Update Indexer stage
Complete these steps to ensure the incremental or partial updates for chunking are configured in the Solr Partial Update Indexer stage. These settings most closely mirror regular Solr indexing functionality.- In the same pipeline, click Add a new pipeline stage, then select Solr Partial Update Indexer.
- Disable Map to Solr Schema. Disable schema mapping so the fields and vector embeddings added by the chunking stage are not filtered out.
- Disable Enable Concurrency Control. Chunking updates can be generated and submitted at any time asynchronously. If this field is not disabled, multiple asynchronous updates to the same document may fail.
- Disable Reject Update if Solr Document is not Present. Occasionally, a chunk update is processed before the original document is fully committed. If this is not disabled, the chunk update fails.
- Enable Process All Pipeline Doc Fields. Enable this field to ensure the new fields added by the chunking stages are included in the partial update request.
- Enable Allow reserved fields. Enable this field to ensure internal fields names reserved for chunking workflows are processed correctly in the pipeline.
- Click Save.
IMPORTANT:
Other indexing workflows may require different settings for the Solr Partial Update Indexer stage. For example, if updates must reflect the most recent state, enable concurrency control. Or if each update includes the complete document state, partial updates aren’t necessary. For more information, see Solr Partial Update Indexer.
Set up LWAI Vectorize Query stage
This stage converts natural-language user queries into vectors that retrieve semantically-similar chunks that indicate customer intent. Exact matching is not necessary for this stage to return highly relevant results. To accomplish this, the stage generates a vector based on the current query string (q parameter).
- Go to Querying > Query Pipelines, then select an existing pipeline or create a new one.
- To vectorize text, click Add a new pipeline stage.
- Click Add a new pipeline stage, then select LWAI Vectorize Query.
- In the Label field, enter a unique identifier for this stage.
- In the Condition field, enter a script that results in true or false, which determines if the stage should process.
-
Select Asynchronous Execution Config if you want to run this stage asynchronously. If this field is enabled, complete the following fields:
- Select Enable Async Execution. Fusion automatically assigns an Async ID value to this stage. Change this to a more memorable string that describes the asynchronous stages you are merging, such as
signalsoraccess_control. - Copy the Async ID value.
For detailed information, see link:/how-to/802/enable-asynchronous-query-pipeline-processing[Enable asynchronous query pipeline processing] and Asynchronous query pipeline processing. - Select Enable Async Execution. Fusion automatically assigns an Async ID value to this stage. Change this to a more memorable string that describes the asynchronous stages you are merging, such as
- In the Account Name field, select the name of the Lucidworks AI account.
- In the Model field, select the Lucidworks AI model to use for encoding.
- In the Query Input field, enter the location from which the query is retrieved.
- In the Output context variable field, enter the name of the variable where the vector value from the response is saved.
-
In the Use Case Configuration section, click the + sign to enter the parameter name and value to send to Lucidworks AI. The
useCaseConfigparameter that is common to generative AI and embedding use cases isdataType, but each use case may have other parameters. The value for the query stage isquery. -
In the Model Configuration section, click the + sign to enter the parameter name and value to send to Lucidworks AI. Several
modelConfigparameters are common to generative AI use cases. For more information, see Prediction API. - Select the Fail on Error checkbox to generate an exception if an error occurs during this stage.
- Click Save.
Set up Chunking Neural Hybrid Query pipeline stage
This stage helps your organization balance semantic searches and exact-match (lexical) relevance to improve ranking quality while accommodating the two ways users enter search terms. The stage performs hybrid lexical-semantic searches using Solr.- In the same query pipeline where you configured LWAI Vectorize Query stage, click Add a new pipeline stage, then select Chunking Neural Hybrid Query Stage. For reference information, see Chunking Neural Hybrid Query Stage.
- In the Lexical Query Input field, enter the location from which the lexical query is retrieved. For example,
<request.params.q>. Template expressions are supported. - In the Lexical Query Weight field, enter the relative weight of the lexical query. For example,
0.3. If this value is0, no re-ranking will be applied using the lexical query scores. - In the Lexical Query Squash Factor field, enter a value that will be used to squash the lexical query score. For this value, Lucidworks recommends entering the inverse of the lexical maximum score across all queries for the given collection.
- In the Vector Query Field, enter the name of the Solr field for k-nearest neighbor (KNN) vector search. For example,
body_chunk_vector_384v. - In the Vector Input field, enter the location from which the vector is retrieved. Template expressions are supported. For example, a value of
<ctx.vector>evaluates the context variable resulting from the LWAI Vectorize Query stage. - In the Vector Query Weight field, enter the relative weight of the vector query. For example, 0.7.
- In the Min Return Vector Similarity field, enter the minimum vector similarity value to qualify as a match from the Vector portion of the hybrid query.
- In the Min Traversal Vector Similarity field, enter the minimum vector similarity value to use when walking through the graph during the Vector portion of the hybrid query.
- Select the checkbox to enable the Compute Vector Similarity for Lexical-Only Matches setting. When enabled, this setting computes vector similarity scores for documents in lexical search results but not in the initial vector search results.
- Select the checkbox to enable the Block pre-filtering setting. When enabled, this setting prevents pre-filtering that can interfere with facets and cause other issues.
- Click Save.
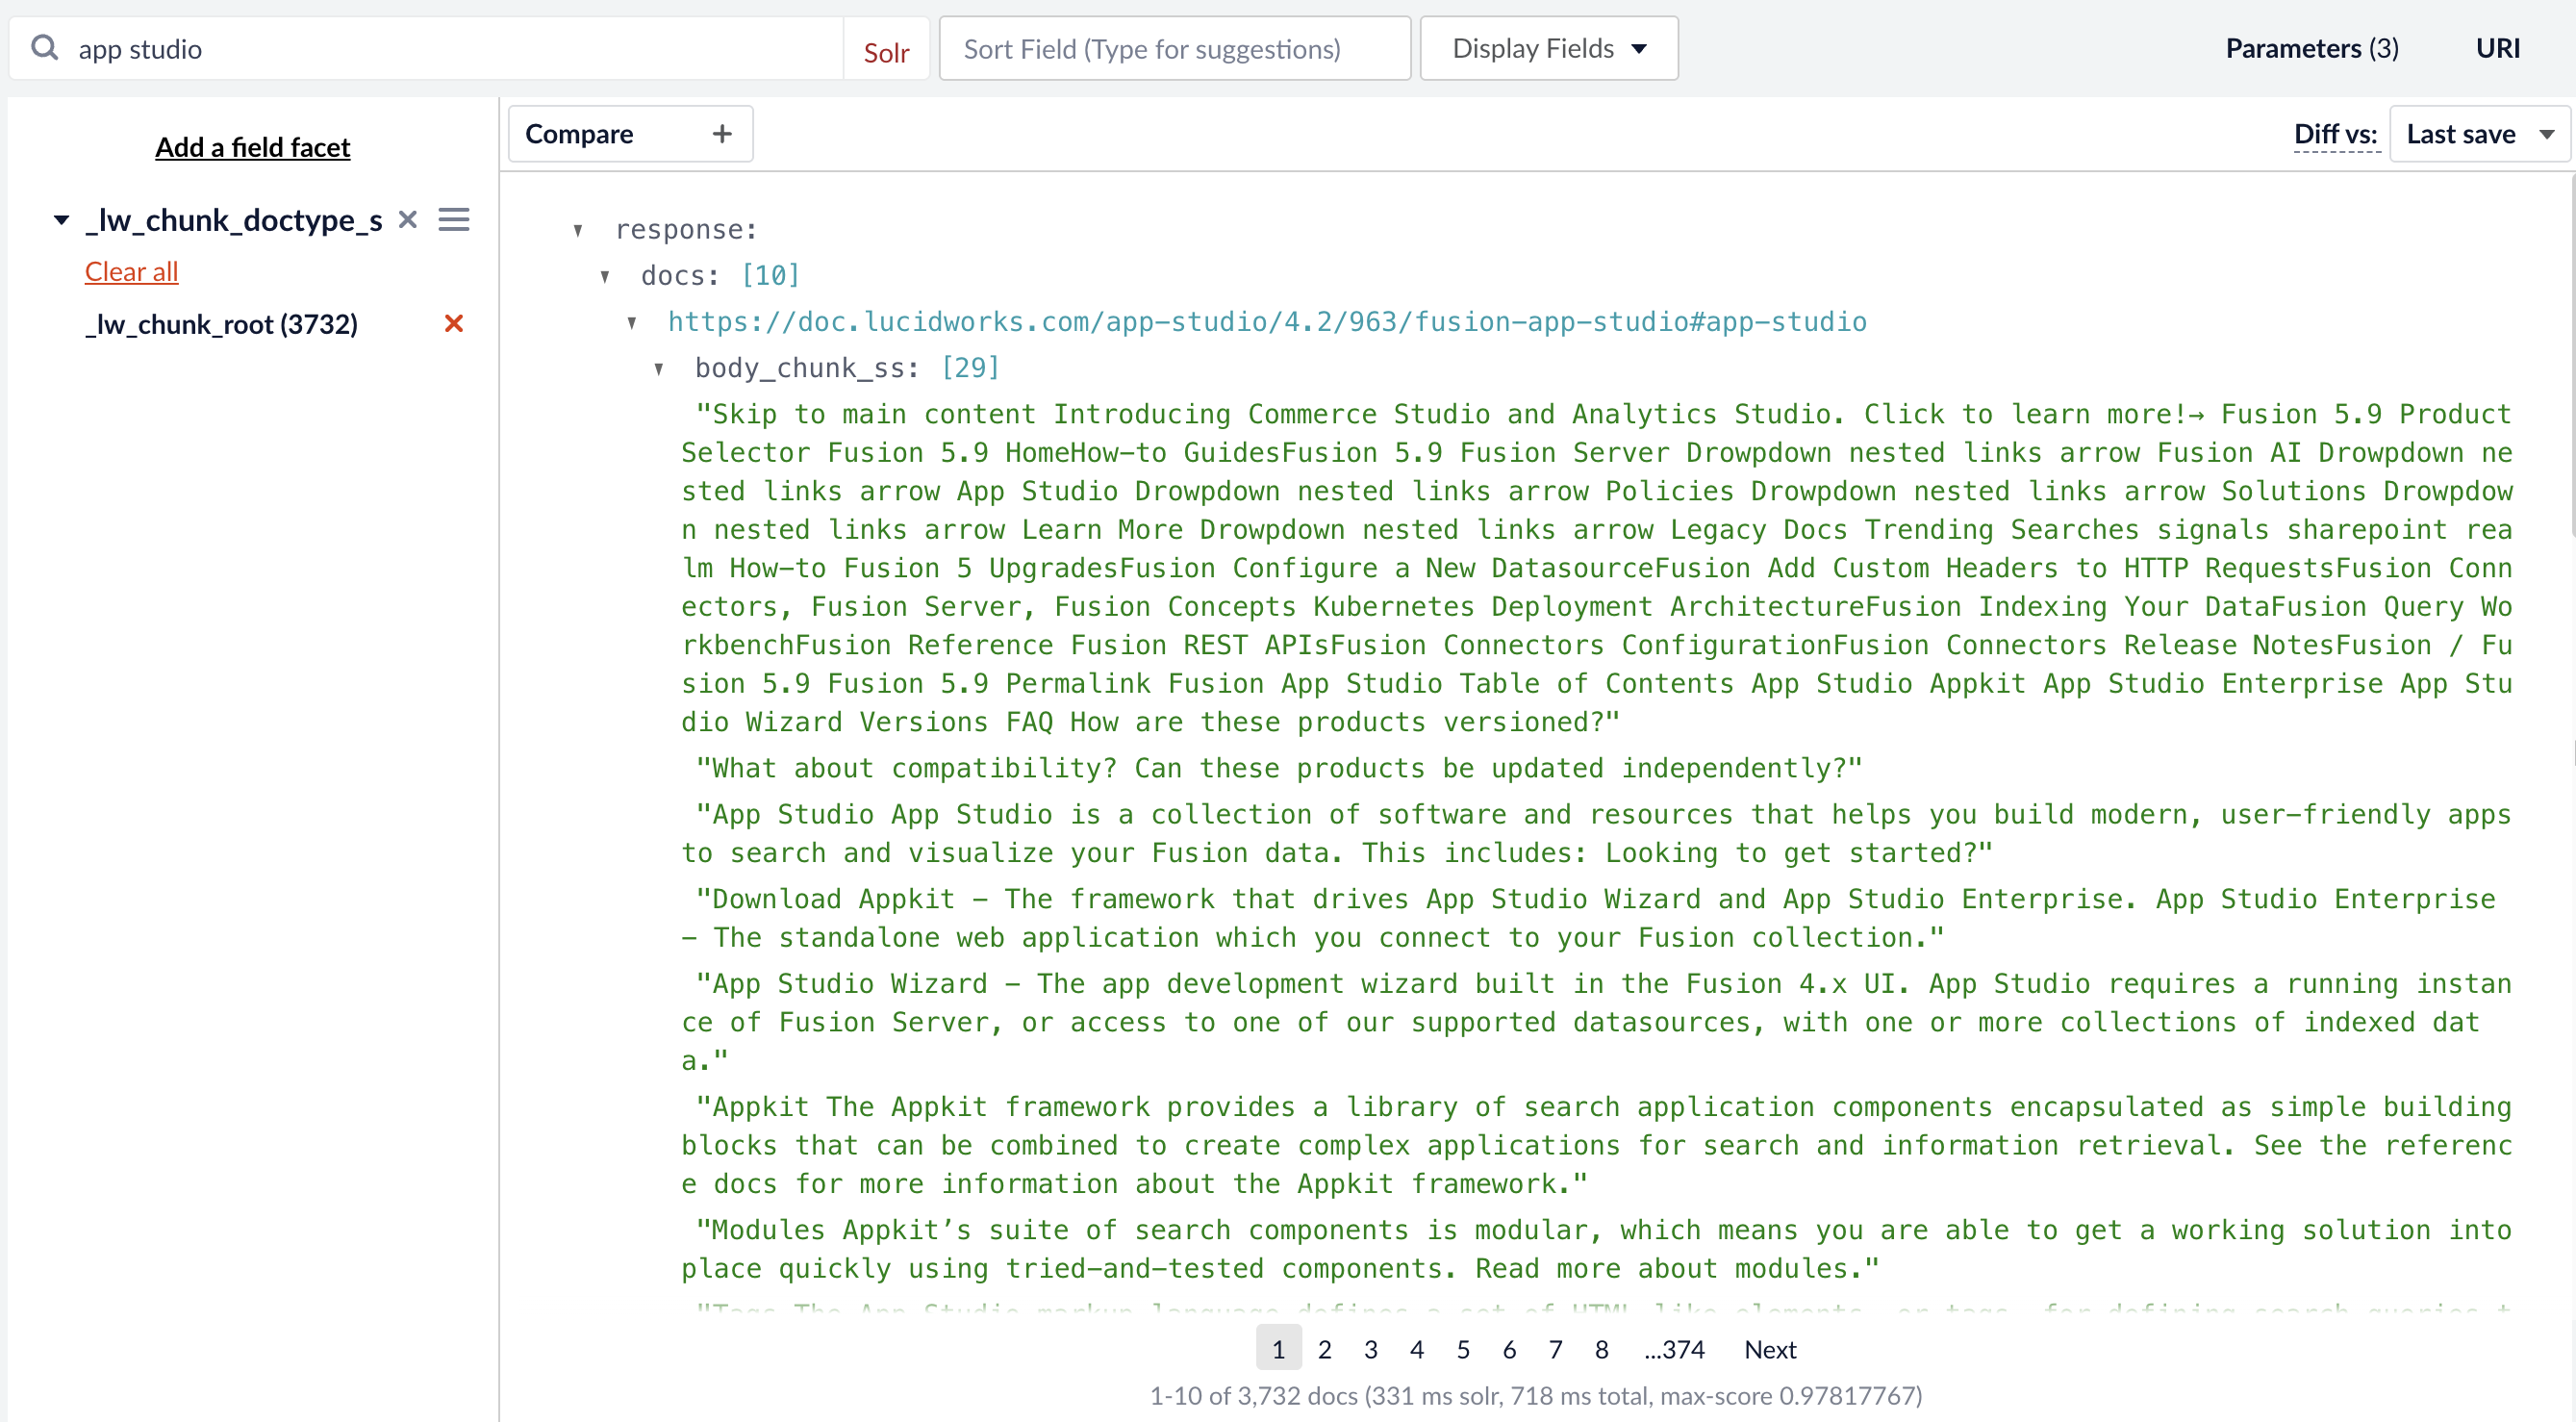
Validate chunking in the Query Workbench
Once configured, go to the Query Workbench to run some queries and check that vectorization and chunking are working properly before deploying them to your production environment. If you facet by the vector query field (in this example,body_chunk_vector_384v) you see your indexed documents have vectors.
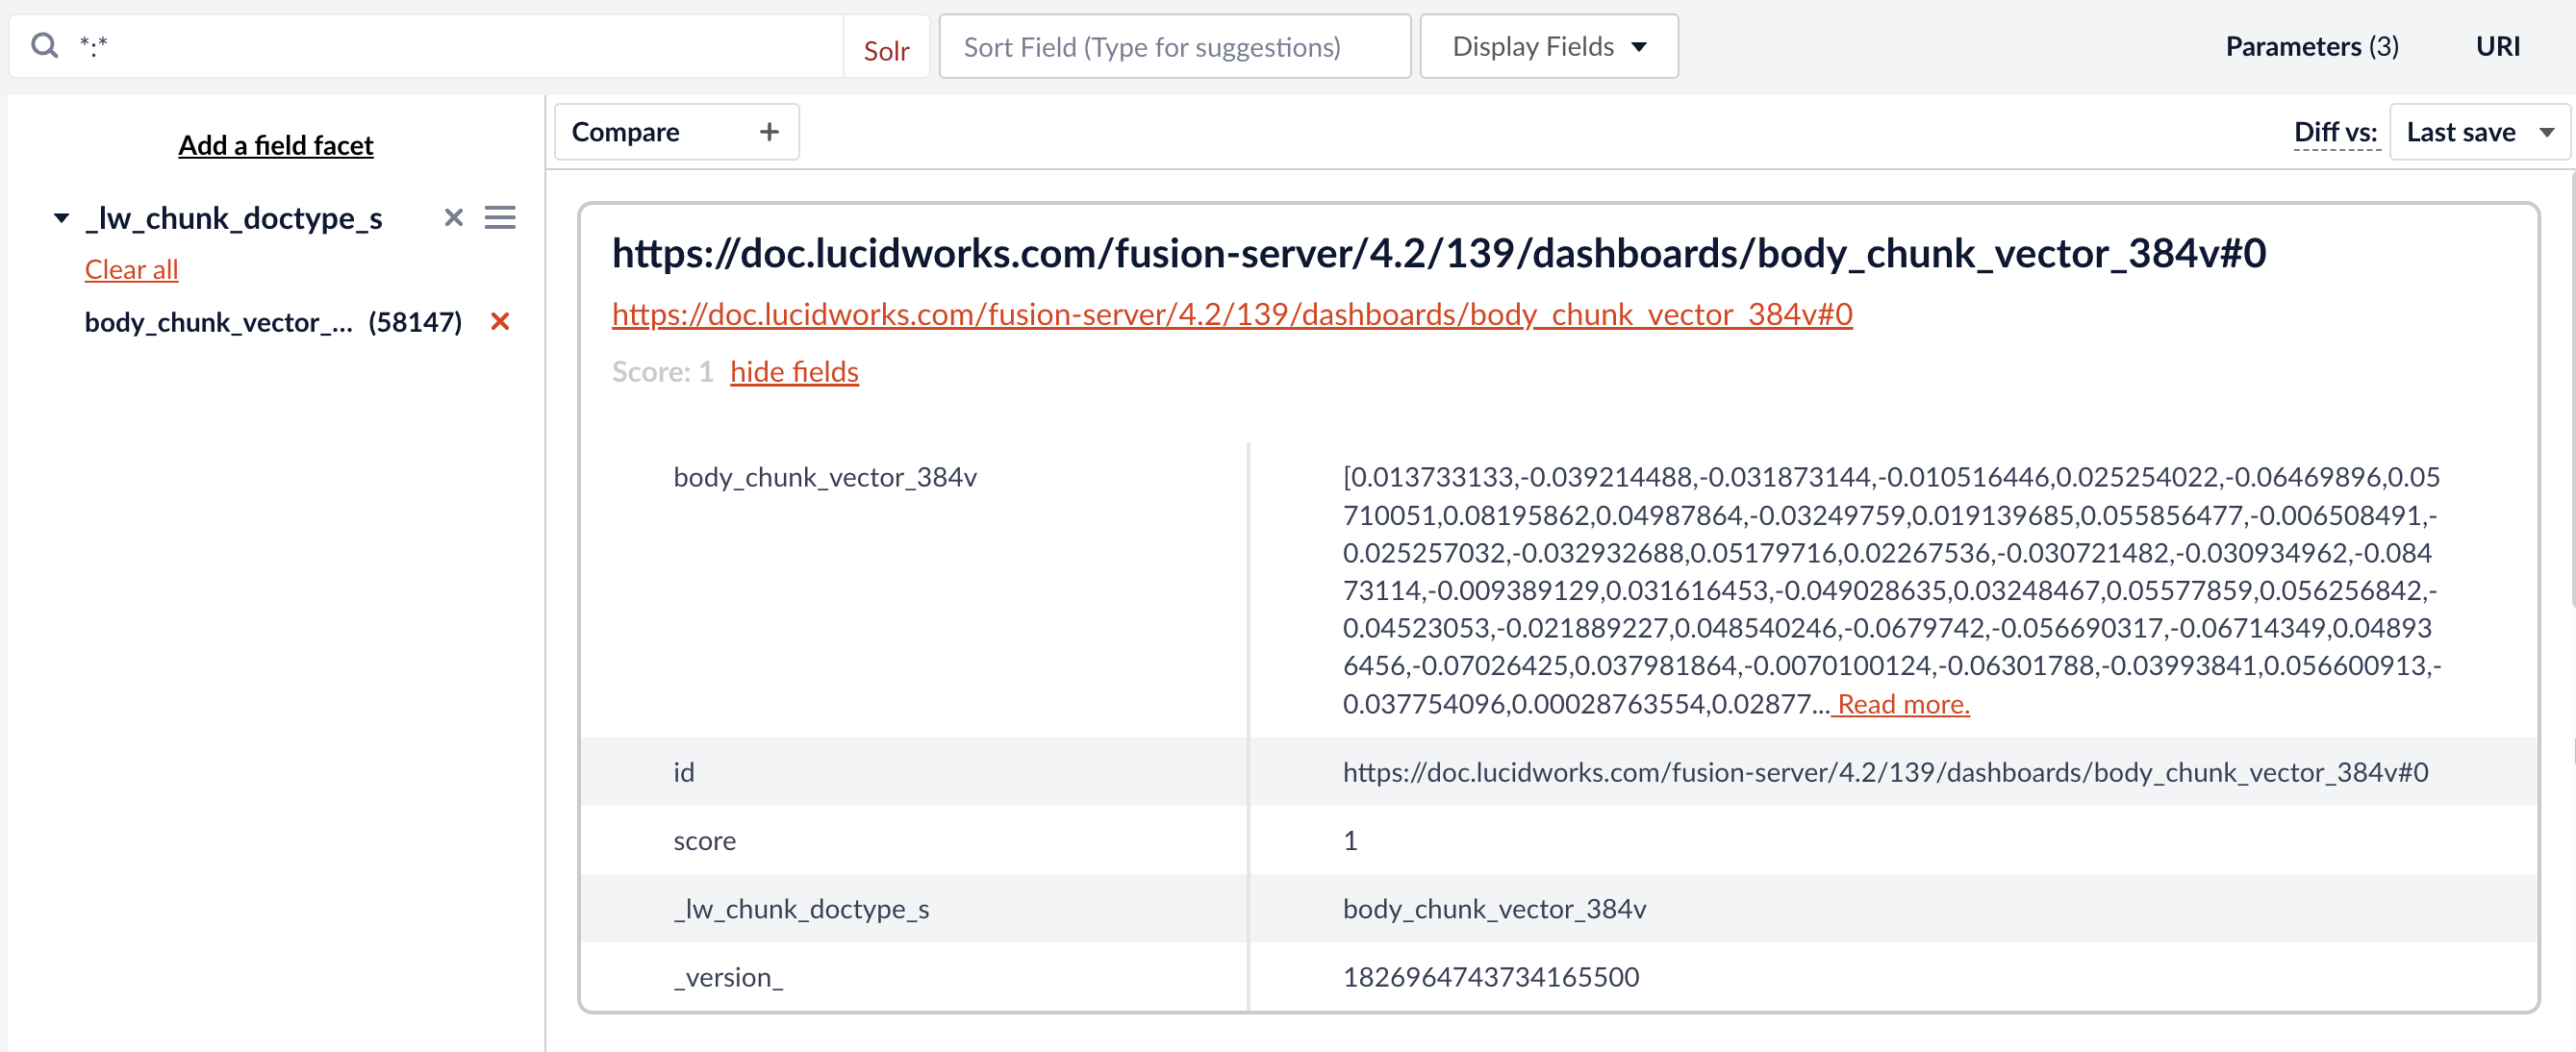
If you have a large dataset with thousands of docs, you should set this field to
stored=false. Storing vectors in Solr for that many docs can results in memory issues. Refer to the Solr documentation on override properties for more information._lw_chunk_root, you see body_chunk_ss. In this example, the chunk size is limited to two sentences, so this document has 29 chunks of two sentences each.