Urgent action required by November 26, 2025A patch is required by November 26, 2025 for all self-hosted Fusion deployments running on Amazon Elastic Kubernetes Service (EKS). Certain Java versions used by Fusion components reach end of life on this date. Failure to apply the patch will result in compatibility issues.
Instructions for applying the patch
Instructions for applying the patch
The following Fusion services require the
Follow these steps to apply the patched images:
cgroupv2 patch:| Service | Affected Fusion versions | Patch tag |
|---|---|---|
insights | 5.9.4 to 5.9.15 | lucidworks/insights:5.9-cgroupv2-patch |
spark-solr-etl | 5.9.4 to 5.9.11 | lucidworks/spark-solr-etl:5.9-cgroupv2-patch |
keytool-utils | 5.9.4 to 5.9.10 | lucidworks/keytool-utils:5.9-cgroupv2-patch |
- Open your Fusion Helm values file. For Fusion Cloud Native deployments, use the values file for your current deployment. For Helm deployments, use the values file you used to create the deployment.
- For each service listed in the following table that applies to your Fusion version, add or update the image configuration:
- Fusion 5.9.4 to 5.9.10
- Fusion 5.9.11
- Fusion 5.9.12 to 5.9.15
- Save the values file.
-
For Fusion Cloud Native deployments, run the
upgrade_fusion.shscript you used for your current deployment. For Helm deployments, run the following command: - Wait for the affected service pods to restart and verify they are using the patched images.
What’s new
Unidirectional multi-region Solr for self hosted Fusion (CrossDC)
This release introduces built-in support for Apache Solr’s CrossDC (Cross Data Center) replication framework, enabling seamless uni-directional synchronization of Solr updates between data centers. This feature is now integrated into Fusion’s packaging to reduce the operational complexity and cost of implementing high availability and disaster recovery in self-hosted environments. With CrossDC, Solr update requests (including indexing, collection, and configset changes) from a primary cluster are mirrored to a secondary cluster using Apache Kafka. The new support includes:- A preconfigured Solr plugin for mirroring updates directly from the source Fusion cluster
- A dedicated CrossDC consumer application for replaying those updates on the target cluster
- Centralized configuration support with Solr ZooKeeper
- Optional dead-letter queue handling for failed requests
- Support for selective replication using command whitelisting
Expanded support for collapsed search results
Now Fusion gives you access to all of the available Solr settings for collapsing search results, giving you finer control over how Fusion groups variations of each item into a single search result. You can use collapse to improve conversion rates and customer satisfaction by streamlining search results, reducing cognitive load, and surfacing the most relevant product variations first. For example, you can use aproduct_id field as the collapse field to group all versions or SKUs of a product into a single search result.
You can also control how Fusion selects the variation that represents the collapsed group; the default is the one most relevant to the user’s query.
For example, a user who searches for “red shoes” sees all of the red variations of shoes first, with the option to drill down and see all the variations.
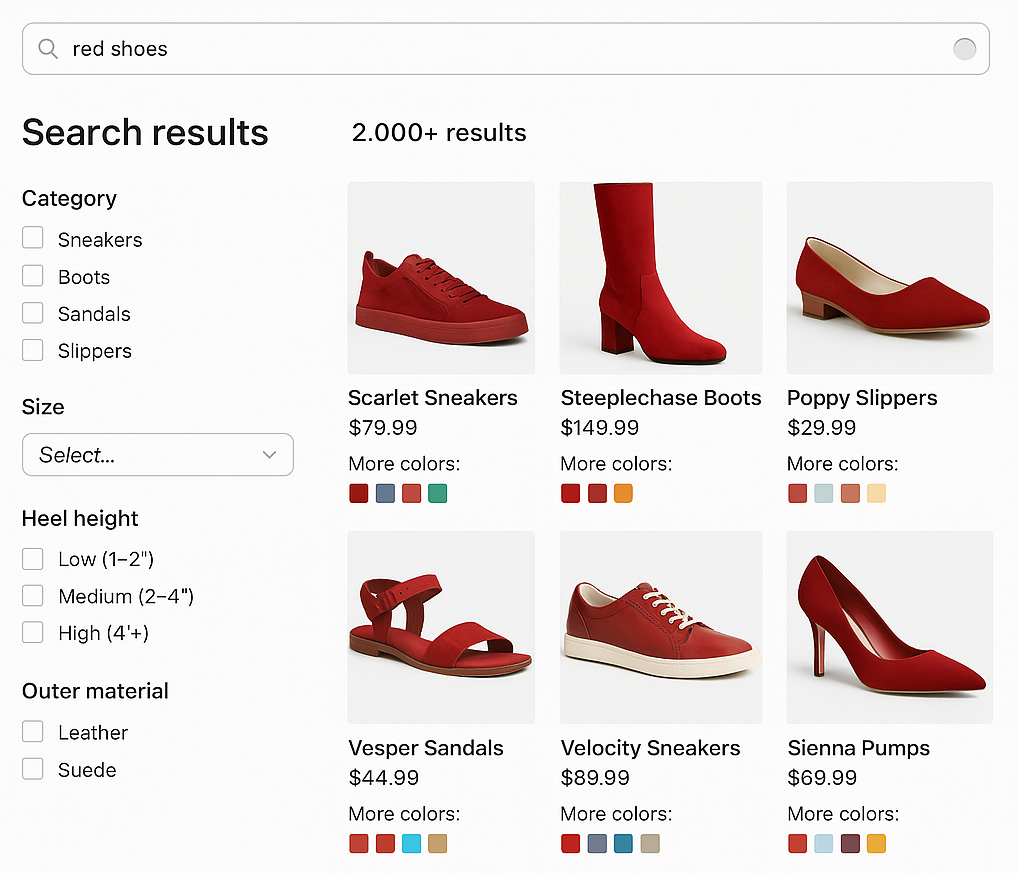
- Faceting compatibility: Facets can reflect counts based on collapsed groups instead of individual SKUs.
- Sorting options: Choose how the representative SKU is selected using sort fields like
sales_rankorpopularity_score. - Expand support: Optional expansion of collapsed groups allows users to see all SKUs for a product on demand.
- Commerce Studio integration: Merchandising actions such as pinning, boosting, and burying now apply to the entire product group, not just individual SKUs.
- Query Workbench support: You can preview collapsed and expanded result sets directly in Query Workbench for easy validation.
Kubernetes 1.32 support for better security and long-term compatibility
Fusion 5.9.13 introduces full compatibility with Kubernetes version 1.32, ensuring seamless deployment and operation on the latest Kubernetes platforms. This update allows you to take advantage of the latest stability, performance, and security improvements in Kubernetes, including better control over sidecar container behavior and improvements to admission webhooks and scheduling logic. By supporting Kubernetes 1.32, Fusion stays aligned with cloud provider upgrades and helps future-proof your infrastructure, especially on managed services like AKS, EKS, and GKE.Improved JWT authentication resilience with configurable timeout
Fusion now allows you to configure thejwkSetTimeout variable in the JWT Realm settings, enabling better control over how long Fusion waits for a response when retrieving a JSON Web Key (JWK) set.
This improves authentication reliability in environments where key providers may respond slowly.
By increasing the default 500 ms timeout as needed (for example, to 2000 ms), you can reduce the risk of failed authentication due to network latency or external service delays.
You can configure this in the Fusion UI under the System > Access Control > Security Realms tab.
Alternatively, you can set this in the security.initial-realm-configs spring boot properties:
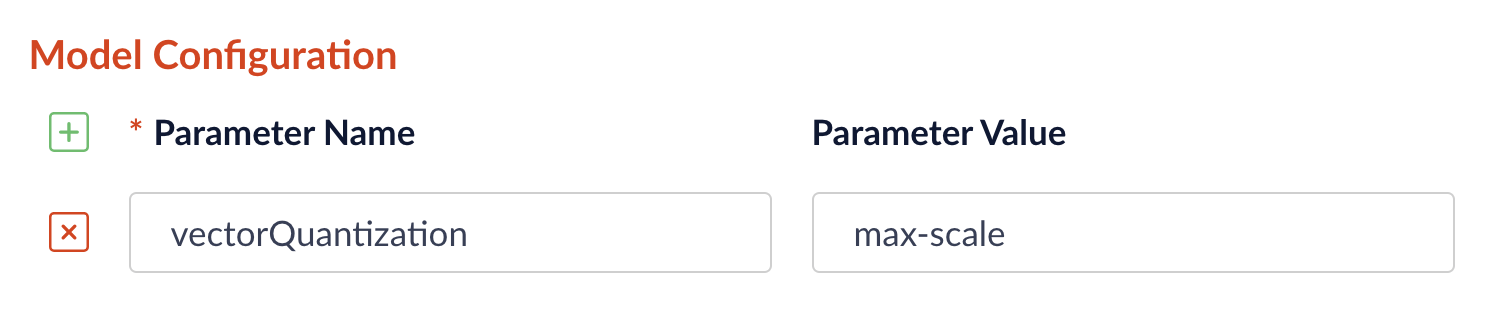
Configurable vector quantization method in LWAI pipeline stages
Fusion 5.9.13 adds vector quantization in certain Lucidworks AI (LWAI) pipeline stages, making it easier to reduce memory usage and accelerate vector search without sacrificing quality. Quantization converts high-precision float vectors into compact 8-bit integer vectors, significantly lowering storage and compute costs. Now you can choose betweenmin-max or max-scale quantization methods directly in the pipeline configuration interface for the LWAI vectorization stages:
To select the quantization method, go to Model Config in the LWAI pipeline stage configuration and enter the vectorQuantizationMethod parameter with the value for the desired method:
Custom certificates for indexing and querying services
Fusion 5.9.13 introduces the ability add custom certificates for indexing and querying services, making it easier to align to your organization’s specific security requirements. This feature allows a Helm chart update to support persistent custom certificates and adding them into truststores during pod startup. To add a custom certificate, create a new YAML file for your custom certificates and edit it to include your indexing or querying certificates. You must use different YAML files in order to use different certificates for indexing and querying services. See Deploy Fusion at Scale for full instructions, including the Helm chart update.Deploy Fusion at Scale
Deploy Fusion at Scale
Before you begin, see Fusion Server Deployment to understand the architecture and requirements.This article explains how to plan and execute a Fusion deployment at the scale required for staging or production.While the
② Every Fusion service has an implicit enabled flag that defaults to true, set to false to remove this service from your cluster
③ Node selector identifies the label find nodes to schedule pods on
④ Used to pass JVM options to the service
⑤ Pod annotations to allow Prometheus to scrape metrics from the serviceOnce we go through all of the configuration topics in this topic, you’ll have a well-configured custom values YAML file for your Fusion 5 installation. You’ll then use this file during the Helm v3 installation at the end of this topic.
Default
Use Then, pass To be clear, you can tune GC settings and number of replicas after the cluster is built. But changing the size of the persistent volumes is more complicated so you should try to pick a good size initially.and then provision into your cluster by calling:to then have Solr use the storage class by adding the following to the custom values YAML:① The empty string
② Overrides the settings for the analytics Solr pods.
③ Assigns the analytics Solr pods to the node pool and attaches the label
④ Overrides the settings for the search Solr pods.
⑤ Assigns the search Solr pods to the node pool and attaches the label
⑥ Sets the default settings for all Solr pods, if not specifically overridden in the
setup_f5_*.sh scripts are handy for getting started and proof-of-concept purposes, this article covers the planning process for building a production-ready environment.Preparing for Fusion Implementation
The course for Preparing for Fusion Implementation focuses on the key elements for a successful implementation, defining your business requirements, preparing clean data, and involving the right personnel.
Prerequisites
You must meet the following prerequisites before you can customize your Fusion cluster:- A local copy of the fusion-cloud-native repository. This must be up-to-date with the latest master branch.
- Any cloud provider-specific command line tools, such as
gcloudoraws, andkubectl.
See the platform-specific instructions linked above, or check with your cloud provider. - Helm v3
- To install on a Mac:
- For other operating systems, download from Helm Releases.
- Verify your installation:
- Kubernetes namespace
- Collect the following information about your Kubernetes environment:
- CLUSTER: Cluster name (passed to our setup scripts using the
-carg) - NAMESPACE: Kubernetes namespace where to install Fusion; a namespace should only contain lowercase letters (a-z), digits (0-9), or dash. No periods or underscores allowed.
- CLUSTER: Cluster name (passed to our setup scripts using the
- Collect the following information about your Kubernetes environment:
- (optional) Clarify your organization’s DockerHub policy. The Fusion Helm chart points to public Docker images on DockerHub. Your organization may not allow Kubernetes to pull images directly from DockerHub or may require extra security scanning before loading images into production clusters.
Consult your Kubernetes and Docker admin team to find how to get the Fusion images loaded into a registry that’s accessible to your cluster. You can update the image for each service using the custom values YAML file.
Custom values YAML file
-
Clone the
fusion-cloud-nativerepository:git clone https://github.com/lucidworks/fusion-cloud-native -
Run the
customize_fusion_values.shscript.The script creates the following files:For an explanation of these placeholder values, see Configuration Values below.File Description <provider>_<cluster>_<namespace>_fusion_values.yamlMain custom values YAML used to override Helm chart defaults for Fusion microservices. <provider>_<cluster>_<namespace>_monitoring_values.yamlCustom values yaml used to configure Prometheus and Grafana. <provider>_<cluster>_<namespace>_fusion_resources.yamlResource requests and limits for all Microservices. <provider>_<cluster>_<namespace>_fusion_affinity.yamlPod affinity rules to ensure multiple replicas for a single service are evenly distributed across zones and nodes. <provider>_<cluster>_<namespace>_upgrade_fusion.shScript used to install and/or upgrade Fusion using the aforementioned custom values YAML files. -
Add the new files to version control. You will make changes to it over time as you fine-tune your Fusion installation. You will also need it to perform upgrades. If you try to upgrade your Fusion installation and don’t provide the custom values YAML, your deployment will revert to chart defaults.
Review the<provider>_<cluster>_<release>_fusion_values.yamlfile to familiarize yourself with its structure and contents. Notice it contains a separate section for each of the Fusion microservices. The example configuration of thequery-pipelineservice below illustrates some important concepts about the custom values YAML file.
② Every Fusion service has an implicit enabled flag that defaults to true, set to false to remove this service from your cluster
③ Node selector identifies the label find nodes to schedule pods on
④ Used to pass JVM options to the service
⑤ Pod annotations to allow Prometheus to scrape metrics from the serviceOnce we go through all of the configuration topics in this topic, you’ll have a well-configured custom values YAML file for your Fusion 5 installation. You’ll then use this file during the Helm v3 installation at the end of this topic.
Deployment-specific values
The script creates a custom values YAML file using the naming convention:<provider>_<cluster>_<namespace>_fusion_values.yaml. For example, gke_search_f5_fusion_values.yaml.| Parameter | Description |
|---|---|
<provider> | The K8s platform you’re running on, such as gke. |
<cluster> | The name of your cluster. |
<namespace> | The K8s namespace where you want to install Fusion. |
<node_selector> | Specifies a nodeSelector label to find nodes to schedule Fusion pods on. |
nodeSelector labels are provider-specific. The fusion-cloud-native scripts use the following defaults for GKE and EKS:| Provider | Default node selector |
|---|---|
| GKE | cloud.google.com/gke-nodepool: default-pool |
| EKS | alpha.eksctl.io/nodegroup-name: standard-workers |
Flags
The script provides flags for additional configuration:| Flag | Description |
|---|---|
--node-pool | Add a Fusion specific label to your nodes. |
--with-resource-limits | Configure resource requests/limits. |
--with-replicas | Configure replica counts. |
--with-affinity-rules | Configure pod affinity rules for Fusion services. |
--node-pool to add a Fusion specific label to your nodes by doing:--node-pool 'fusion_node_type: <NODE_LABEL>'.Configure Solr sizing
When you’re ready to build a production-ready setup for Fusion 5, you need to customize the Fusion Helm chart to ensure Fusion is well-configured for production workloads.You’ll be able to scale the number of nodes for Solr up and down after building the cluster, but you need to establish the initial size of the nodes (memory and CPU) and the size and type of disks you need.See the example config below to learn which parameters to change in the custom values YAML file.Configure storage class for Solr pods (optional)
If you wish to run with a storage class other than the default you can create a storage class for your Solr pods before you install. For example, to create regional disks in GCP you can create a file calledstorageClass.yaml with the following contents:We’re not advocating that you must use regional disks for Solr storage, as that would be redundant with Solr replication. We’re just using this as an example of how to configure a custom storage class for Solr disks if you see the need. For instance, you could use regional disks without Solr replication for write-heavy type collections.
Configure multiple node pools
Lucidworks recommends isolating search workloads from analytics workloads using multiple node pools. The included scripts do not do this for you; this is a manual process.See the example script for GKE, see create_gke_cluster_node_pools.sh.In the custom values YAML file, you can add additional Solr StatefulSets by adding their names to the list under thenodePools property. If any property for that statefulset needs to be changed from the default set of values, then it can be set directly on the object representing the node pool, any properties that are omitted are defaulted to the base value. See the following example (additional whitespace added for display purposes only):"" is the suffix for the default partition.② Overrides the settings for the analytics Solr pods.
③ Assigns the analytics Solr pods to the node pool and attaches the label
fusion_node_type=analytics. You can use the fusion_node_type property in Solr auto-scaling policies to govern replica placement during collection creation.④ Overrides the settings for the search Solr pods.
⑤ Assigns the search Solr pods to the node pool and attaches the label
fusion_node_type=search.⑥ Sets the default settings for all Solr pods, if not specifically overridden in the
nodePools section above.In the example above, the analytics partition replicaCount, or number of Solr pods, is six. The search partition replicaCount is twelve.Each nodePool is automatically be assigned the -Dfusion_node_type property of <search>, <system>, or <analytics>. This value matches the name of the nodePool. For example, -Dfusion_node_type=<search>.The Solr pods have a fusion_node_type system property, as shown below:Solr auto-scaling policy
Use replica placement plugins to control how replicas are placed in Solr.Pod network policy
A Kubernetes network policy governs how groups of pods communicate with each other and other network endpoints. With Fusion, all incoming traffic flows through the API Gateway service. All Fusion services in the same namespace expect an internal JWT, which is supplied by the Gateway, as part of the request. As a result, Fusion services enforce a basic level of API security and don’t need an additional network policy to protect them from other pods in the cluster.To install the network policy for Fusion services, pass--set global.networkPolicyEnabled=true when installing the Fusion Helm chart.On-premises private Docker registries
For on-premises Kubernetes deployments, your organization may not allow Kubernetes to pull Fusion’s Docker images from DockerHub. See the instructions below for details on using a private Docker registry with Fusion. These are general instructions that may need to be adapted to work within your organization’s security policies:- Transfer the public images from DockerHub to your private Docker registry.
- Establish a workstation that has access to DockerHub. This workstation must connect to your internal Docker registry, most likely via VPN connection. In this example, the workstation is referred to as
envoy. - Install Docker on
envoy. You need at least 100GB of free disk for Docker. - Pull all of the images from DockerHub to
envoy’s local registry. For example, to pull the query pipeline image, rundocker pull lucidworks/query-pipeline:5.9.0. Seedocker pull --helpfor more information about pulling Docker images. - Establish a connection from
envoyto the private Docker registry, most likely via a VPN connection. In this example, the private Docker registry is referred to as<internal-private-registry>. - Push the images from
envoy’s Docker registry to the private registry. This will take a long time.- You’ll need to re-tag all images for the internal registry. For example, to tag the query-pipeline image, run:
- Push each image to the internal repo:
- Install the Docker registry secret in Kubernetes. Create the Docker registry secret in the Kubernetes namespace where you want to install Fusion:
For details, see the Kubernetes article Pull an Image from a Private Registry.
- Update the custom values YAML for your cluster to point to your private registry and secret to allow Kubernetes to pull images. For example:
Repeat the process for all Fusion services.
Customize Helm Chart
Every Fusion service allows you to override theimagePullSecrets setting using custom values YAML. However, other 3rd party services—including Zookeeper, Pulsar, Prometheus, and Grafana—don’t allow you to supply the pull secret using the custom values YAML.To patch the default service account for your namespace and add the pull secret, run the following:\) or reverse the order of single and double quotes:Replace
<internal-private-secret> with the name of the secret you created in the steps above.Add additional trusted certificate(s) to Fusion’s indexing and querying services (optional)
You can add custom trusted certificates to support Fusion’s indexing and querying services. You may want to use custom trusted certificates if, for example, you have specific security requirements for data handling or need to support an existing infrastructure and its security needs. This method involves updating your Helm chart.If you want to add custom trusted certificates for both the indexing and querying services, follow these instructions twice: once for the indexing service, and once for the querying service. To add different certificates to the indexing and querying services, create one YAML file with the indexing service certificates and one YAML file for the querying service certificates before following these instructions.To add custom trusted certificates:-
Create a new YAML file for your custom trusted certificates. The
customcerts.yamlfile is the example file in these instructions. -
Add the custom certificate(s) in the YAML file created in the previous step. For example:
-
Update the indexing or querying service by running the following Helm command. Replace
EXAMPLE-VALUES-FILE.yamlwith your previous values file. -
Verify the indexing or querying pod has a new
init-containerwith the nameimport-certs.
Add additional trusted certificate(s) for connectors to allow crawling of web resources with SSL/TLS enabled (optional)
To crawl a datasource which for some reason is using a self-signed certificate, add arbitrary certificates to connectors. For example:Generating the certificate on linux command line
Use the following command to generate a.crt file in $fusion_home/apps/jetty/connectors/etc/yourcertname.crt:Generating the certificate using Firefox web browser
- Navigate to the SharePoint host.
- Click the in the address bar, then click the icon.
- Next, navigate to More Information > View Certificate > Export.
Save the file to the following folder:$fusion_home/apps/jetty/connectors/etc/yourcertname.crt
Generating the certificate using Chrome web browser
- Navigate to Chrome menu > More Tools > Developer Tools > Security Tab. This will display the Security overview.
- Click the View certificate button.
- Save the file to the following folder:
$fusion_home/apps/jetty/connectors/etc/yourcertname.crtGenerating the certificate using powershell
Use the following script to generate a.crt`` file in $fusion_home\apps\jetty\connectors\etc\yourcertname.crt“:Install Fusion 5 on Kubernetes
At this point, you’re ready to install Fusion 5 using the custom values YAML files and upgrade script. If you used thecustomize_fusion_values.sh script, run it using BASH:Monitoring Fusion with Prometheus and Grafana
Lucidworks recommends using Prometheus and Grafana for monitoring the performance and health of your Fusion cluster. Your operations team may already have these services installed. If not, install them into the Fusion namespace.The Custom values YAML file shown above activates the Solr metrics exporter service and adds pod annotations so Prometheus can scrape metrics from Fusion services.
- Run the
customize_fusion_values.shscript with the--prometheus trueoption. This creates an extra custom values YAML file for installing Prometheus and Grafana,<provider>_<cluster>_<namespace>_monitoring_values.yaml. For example:gke_search_f5_monitoring_values.yaml. - Commit the YAML file to version control.
- Review its contents to ensure that the settings suit your needs. For example, decide how long you want to keep metrics. The default is 36 hours.
See the Prometheus documentation and Grafana documentation for details. - Run the
install_prom.shscript to install Prometheus & Grafana in your namespace. Include the provider, cluster name, namespace, and helm release as in the example below:The Grafana dashboards from monitoring/grafana are installed automatically by theinstall_prom.shscript.
Support for pre-filtering in the Chunking Neural Hybrid Query stage
For parity with the Neural Hybrid Query stage, the Chunking Neural Hybrid Query Stage now supports pre-filtering. Pre-filtering can improve performance by reducing the number of chunks that need to be processed. However, in some cases it can also lead to less accurate facet counts and search results. Pre-filtering is blocked by default. You can enable it by unchecking the Block pre-filtering checkbox in the Chunking Neural Hybrid Query stage configuration.Default Solr data commit parameter changed to autoCommit
Solr’scommitWithin parameter was removed as the default at the collection level. The default parameter is now autoCommit.
Solr offers three methods to determine when newly-indexed documents are made visible in searches. The methods are manual commits, auto commit settings, and the per-update commitWithin parameter.
Fusion relies on Solr’s commit mechanisms, but adds a Fusion-managed commitWithin policy per collection. Fusion’s typical commit configuration includes the following parameters:
-
The
autoCommitsetting (Solr hard commit) is Fusion’s default parameter for Solr data commits, is inherited from the collection’ssolrconfig.xml, and defaults to15seconds. This saves the data, but does not force the search results to refresh immediately. With this setting, search performance is not slowed, but the new data may not show in search results until the next refresh. This property can be used instead of thecommitWithinproperty. -
The
autoSoftCommitsetting (Solr soft commit) does not save the data, but makes the data visible to searches almost immediately. If the system crashes, that new data is lost because it has not been saved. The default is false, and search visibility is managed using thecommitWithinsetting. -
Solr’s
commitWithinparameter, configured at the collection level with a default of10000milliseconds, ensures data is committed and available for searching within 10 seconds. The default for signals collections is1000milliseconds. Fusion usescommitWithinto avoid relying on specific Solr-side configurations. Thecom.lucidworks.apollo.solr.commitWithinglobal property defines the defaultcommitWithinfor all documents added through Fusion. When you create a new collection in Fusion, its per-collectioncommitWithinis initialized from this global default.
Bug fixes
-
Corrected the health reporting behavior for the
job-configservice after ZooKeeper disruptions.
Fusion now ensures the/actuator/healthendpoint correctly reflects the actual status of thejob-configservice, even after temporary ZooKeeper unavailability.
This prevents falseDOWNreports that could affect monitoring or automated recovery systems. -
Updated the
fusion-spark-3.2.2image to resolve a Fabric8 token refresh bug.
The Fabric8 Kubernetes client in this Spark image has been patched to fix a bug that prevented token refresh under OIDC authentication.
This ensures that Spark jobs usingfusion-spark-3.2.2run reliably in Kubernetes environments that require token-based authentication. -
Fixed a bug that prevented Web V2 connector jobs from restarting after failure.
In previous versions, if a job was interrupted (such as by scaling down the connector pod), the connectors-backend service could enter a corrupted state, preventing future runs of the same job with errors likeThe state should never be null.
Fusion now properly resets internal job state, ensuring that failed jobs can be restarted reliably. -
Fixed Web connector indexing failure caused by corrupted job state.
Fusion 5.9.13 restores indexing functionality for the Webv2 connector (v2.0.1) by resolving an issue that caused a corrupted job state in theconnectors-backendservice. Jobs that previously failed withThe state should never be nullcan now complete successfully. -
Fixed an issue that prevented schedule changes from persisting for some datasources.
In Fusion 5.9.12, clicking Save after configuring a new schedule for a datasource in the “Run” dialog could fail silently in certain apps, leaving the schedule unsaved with no warning to the user.
This was due to ajob-confighandling issue that affected pre-existing app configurations.
Fusion 5.9.13 resolves this issue so that new schedules are reliably saved and acknowledged as expected. -
Fixed permission handling in the
job-configservice to ensure scheduled jobs run as expected.
Fusion now correctly handles permission checks when creating or modifying scheduled jobs, preventing failures caused by mismatches between user and service account permissions.
This resolves issues where job could not be scheduled or executed following upgrades. -
Helm charts now support Kubernetes secrets for TLS keystore passwords.
Fusion 5.9.13 updates the Helm charts to eliminate the use of plaintext passwords for TLS keystores. You can now securely manage the keystorePassword using a Kubernetes secret, aligning with hardened OpenShift and enterprise security policies. -
Upgraded the Spring framework in the
web-appsservice to improve security and ensure compatibility with token authentication behavior on modern Kubernetes platforms.
Known issues
-
Job-config service may appear “down” in UI even when running correctly
In Fusion 5.9.13, the job-config service may falsely report as “down” in the Fusion UI, particularly during startup or in TLS-enabled deployments.
This issue is fixed in Fusion 5.9.14.For thejob-configservice, the Next Run value is updated only after the current job completes. Because the same job cannot run multiple times simultaneously, if another run is scheduled before the current job completes, that run is not executed. -
Jobs and V2 datasources may fail when Fusion collections are remapped to different Solr collections.
In Fusion 5.9.13, strict validation in thejob-configservice causes “Collection not found” errors when jobs or V2 datasources target Fusion collections that point to differently named Solr collections. This issue is fixed in Fusion 5.9.14. As a workaround, use V1 datasources or avoid using REST call jobs on remapped collections. -
Saving large query pipelines may cause OOM failures under high load.
In Fusion 5.9.13, saving a large query pipeline during high query volume can result in thread lock, excessive memory use, and eventual OOM errors in the Query service.
This issue is fixed in Fusion 5.9.14. -
Some S3 and Web datasource jobs cannot be stopped in Fusion 5.9.13.
Clicking the Stop button has no effect in some cases where the backend job is no longer being tracked. This causes thejob-configservice to ignore the job and prevents the system from updating the job status. A workaround is to issue aPOST {"action": "start"}to the appropriate job actions endpoint, which aborts the stuck job.
This issue is fixed in Fusion 5.9.14. -
Spark jobs may disappear from the job list after pod deletion
In Fusion 5.9.12 and 5.9.13, Spark jobs may vanish from the job list if a Spark driver pod is deleted. This behavior can cause confusion and require a job-launcher restart to restore job visibility.
This issue is fixed in Fusion 5.9.13.
Deprecations and removals
For full details, see Deprecations and Removals.Bitnami removal
Fusion 5.9.13 will be re-released with the same functionality but updated image references. In the meantime, Lucidworks will self-host the required images while we work to replace Bitnami images with internally built open-source alternatives. If you are a self-hosted Fusion customer, you must upgrade before August 28 to ensure continued access to container images and prevent deployment issues. You can reinstall your current version of Fusion or upgrade to Fusion 5.9.14, which includes the updated Helm chart and prepares your environment for long-term compatibility. See Prevent image pull failures due to Bitnami deprecation in Fusion 5.9.5 to 5.9.13 for more information on how to prevent image pull failures.Hybrid Query pipeline stage
The Hybrid Query pipeline stage is now deprecated. Instead, use the Neural Hybrid Query stage, which combines lexical and vector search and includes improvements such as K-Nearest Neighbors (KNN), chunking, and more.Container image for kafka-exporter
Bitnami stopped supporting kafka-exporter and renamed the docker repository from bitnami/kafka-exporter to bitnami/kafka-exporter-archived.
If you were using kafka-exporter, then you need to update the repository name in your values.yaml file:
Removed deprecated X-XSS-Protection header from session API responses
Fusion 5.9.13 removes the deprecated X-XSS-Protection HTTP response header from the session API.
This header is no longer supported by modern browsers and has no effect on security behavior.
Its removal helps avoid confusion during security audits and aligns with current web security standards.
Platform support and component versions
Kubernetes platform support
Lucidworks has tested and validated support for the following Kubernetes platforms and versions:- Google Kubernetes Engine (GKE): 1.29, 1.30, 1.31, 1.32
- Microsoft Azure Kubernetes Service (AKS): 1.29, 1.30, 1.31, 1.32
- Amazon Elastic Kubernetes Service (EKS): 1.29, 1.30, 1.31, 1.32
Component versions
The following table details the versions of key components that may be critical to deployments and upgrades.| Component | Version |
|---|---|
| Solr | fusion-solr 5.9.13 (based on Solr 9.6.1) |
| ZooKeeper | 3.9.1 |
| Spark | 3.4.1 |
| Ingress Controllers | Nginx, Ambassador (Envoy), GKE Ingress Controller |
| Ray | ray[serve] 2.42.1 |