Rules
Rules affect the order in which products appear in your search results. Rules let you pin, boost, bury, and block specific items in your catalog. You can also use rules to display custom banners, redirect customers to a different page on your site, set facets, and more.
Rules vs. query rewrites
Both rules and query rewrites can be configured to help return the best search results to your users. Query rewrites allow you to alter and interpret search terms in multiple ways so relevant results are delivered. Rules changes the order in which search results are displayed, allowing you to promote certain items over others.
Although query rewrites are configured in the Rewrites screen, you may see the effects of those rewrites on the Rules screen.
How rules work
Rules contain conditions and actions. When a condition (or a combination of conditions) is met, the rule performs an action.
Conditions
You can trigger rules on a single condition or a combination of conditions.
| Type | Description | Notes |
|---|---|---|
Dates |
The date and time range for the rule. |
Click the field to select a date and time, or enter manually. For example, |
Field Value |
The field value to which the rule applies. |
You can add multiple fields. |
Query |
The query that triggers the rule. |
You must select a Query Matching Method:
|
Query Profile |
Trigger this rule on a specified query profile. |
This value must match an existing Fusion query profile, which points your search application to the specified static endpoint. |
Segments |
Category used to filter results. |
You can select this on the Editor screen to filter results. For example, all users or color group. |
Actions
You can only apply one action per rule.
| Commerce Studio alerts you if you create multiple rules with conflicting actions. For example, a conflict occurs if you create rules that boost, block, and bury the same item. |
| Type | Description |
|---|---|
Add banner |
Returns an image outside of the search results that can be displayed in the frontend. |
Block items |
Blocks the associated values from appearing in the search results. |
Boost attributes |
Boosts products with specific attributes in a search. Boosts can be one of the following:
|
Boost items |
Boosts products with a large multiplicative boost so the products appear at the top of the results. Larger boosts can override this action. |
Bury items |
Buries products with the selected values. This action minimizes certain products without blocking them. |
Filter items |
Applies filter queries ( |
Set JSON configuration |
Returns a JSON blob to your frontend when a condition is met. The JSON blob displays outside of the search results. |
Pin items |
Puts a product in a specified order within the search results. You also have the option to use Query Elevation Component. |
Redirect |
Displays a message that the frontend can use to redirect a user to a specific URL. You can use this action to send users to dedicated landing pages or campaigns. If you have queries that return zero results, you may opt to create a dedicated page to redirect those queries. |
Set response value |
Sends an arbitrary value to the frontend or pipeline to trigger another action. This action can be combined with other actions within the same rule. For example, an ecommerce website may use the response value action to display an advertisement. |
Set facets |
Customizes the facets (categories of groups) returned in the query response. For example, if your site sells clothing, you may set a number of facets as different colors (black, blue, red, yellow, and so on) so the customer can select a specific color for items they want to view. |
Set parameters |
Sets a parameter name and value to a search query. For example, the sort order for the results, or a filter that affects results. |
Query Elevation Component (QEC) applies the rule action to the top results regardless of the product’s (document’s) score.
Enabling QEC does not boost the document’s score. QEC only supports elevation through the id field.
Your Solr cluster must be configured to enable QEC. Contact your Lucidworks representative for more information.
|
Manage rules
You can create, edit, publish, or delete rules from the Rules screen.
Create a rule
-
Navigate to the Rules screen and click Create Rule.
-
Enter values in the Name and Precedence fields.
-
Optional: Enter values in the Rule Group, Tags, and Description fields.
-
Click Next.
-
Click Select Condition and then select one or more conditions. You can select and enter values for dates, field value, query, query profile, and segments. When you have created all conditions, click Next.
-
Click the Add Actions menu and then select an action. You can block, boost, bury, pin, or set values based on the previously-defined condition. When you have created all actions, click Next.
-
Review your rule’s settings, then click Save.
Edit a rule
-
Navigate to the Rules screen, hold the pointer over the rule, and click the pencil icon.
-
Enter your changes in the fields you want to change.
-
If you:
-
Have entered all of your changes, click Save to return to the Rules screen.
-
Want to enter changes to the conditions or actions, click Open Wizard, and then enter and save changes.
-
Delete a rule
-
Navigate to the Rules screen.
-
Hold the pointer over the rule to delete and click the trash can icon.
To delete multiple rules, select the checkbox for each of the rules to delete and then click the trash can icon.
You can also delete a rule if you click to edit it, click Open Wizard, and then click Delete Rule.
|
Rules are deleted permanently. There is no way to undo this action. |
Publish a rule
-
Navigate to the Rules screen, click the rule, and then click Publish.
-
Click the Published toggle to publish or unpublish a rule.
Manage multiple rules at a time
To modify multiple rules at the same time, select the checkbox for each of the rules to change. Options to publish, unpublish, tag, export, and delete display. The action you select goes into effect immediately.
Manage rule conflicts
When you create rules with the same conditions, targets, and precedences as each other but with different actions, you create conflicting rules. Commerce Studio alerts you to conflicting rules so you can resolve them.
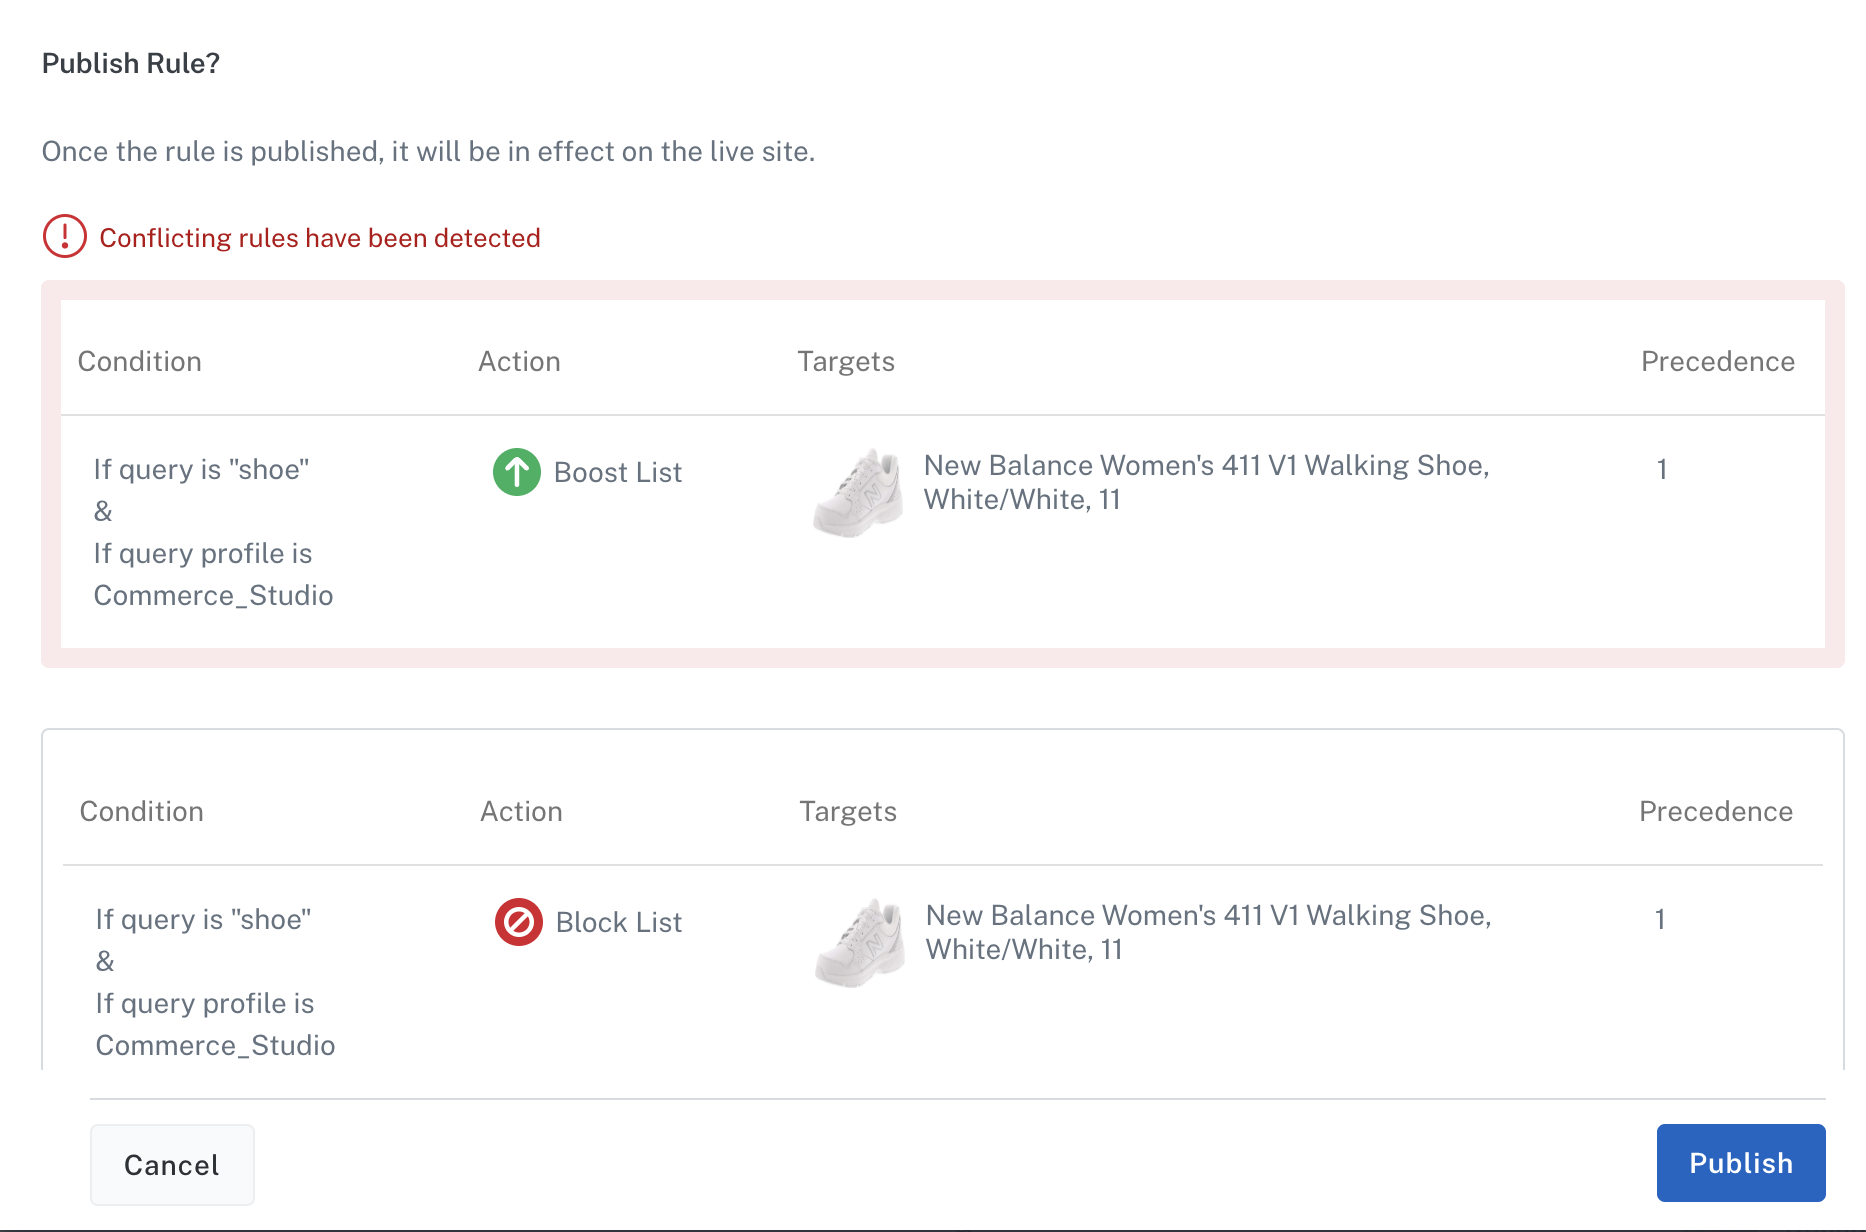
| It’s possible to create conflicting rules that aren’t flagged by Commerce Studio. For example, if you create one rule that targets an ID and one that targets a category with the same conditions, neither rule will fire and the UI does not indicate a conflict. Carefully review the Editor to ensure your rules are applied correctly. |
Effective workflows for teams
Commerce Studio has multiple options for actions that can occur when a query contains certain terms.
Here is an example situation to help understand how each action might be effectively used by a commerce website based on the specified goals and actions of the following personnel.
-
The VP of Ecommerce for a bookstore wants their team to use Commerce Studio to improve their search experience.
-
The Graphic Design team creates banners for books on sale that are displayed when users search for related terms.
-
The Merchandising Manager defines discounts by setting sale prices and calculating margins.
-
The Data Analyst and Marketing Specialist collaborate to track traffic and sales metrics for real-time performance monitoring, enabling adjustments to search configurations as needed.
To help improve product search, they decide to use the following Commerce Studio actions:
-
Boost attributes: Highlight books from a popular series by listing them toward the top of search results when the search query includes the author’s name.
-
Block items: Exclude books discontinued by the publisher from appearing in search results.
-
Boost items: Prioritize specific new or overstocked titles in search results.
-
Filter items: Show only children’s and young adult books when a user searches for
children’s books. -
Boost items in group: Ensure more popular titles from a book series appear earlier in search results when someone searches for that series.
-
Set facets: Display genre facets on the homepage and top author facets on the search page.
-
Set JSON configuration: Show a random advertisement for popular mystery books when a user searches for mystery titles.
Additionally, they decide to implement Commerce Studio actions in the Help section of their website to reduce support workload:
-
Pin items: Place a document with gift card information at the top of search results for queries like
gift. -
Redirect: Show a prominent link to the Contact Us form at the top of search results for queries such as
emailorcontact. -
Bury items: Deprioritize notices about a defunct membership program in search results.
-
Set parameters: Display PDF files from the Legal department at the top of search results when a user searches for
privacy policy. -
Bury items in group: Push rules for older e-reader models toward the bottom of search results when users search the Help section for support information about the company’s e-reader.
-
Pin items in group: Ensure a rule about the new membership card program consistently appears at the top of search results for queries like
membershiporcard.