- Access to latest features: Stay current with the latest features and functionality to ensure compatibility and optimal performance.
- Simplified process: Fusion 5.9.5 and later use an in-place upgrade strategy, making upgrades easier than ever.
- Extended support: Upgrading keeps you up-to-date with the latest supported Kubernetes versions, as outlined in the Lucidworks Fusion Product Lifecycle policy.
Urgent action required by November 26, 2025A patch is required by November 26, 2025 for all self-hosted Fusion deployments running on Amazon Elastic Kubernetes Service (EKS). Certain Java versions used by Fusion components reach end of life on this date. Failure to apply the patch will result in compatibility issues.
Instructions for applying the patch
Instructions for applying the patch
The following Fusion services require the
Follow these steps to apply the patched images:
cgroupv2 patch:| Service | Affected Fusion versions | Patch tag |
|---|---|---|
insights | 5.9.4 to 5.9.15 | lucidworks/insights:5.9-cgroupv2-patch |
spark-solr-etl | 5.9.4 to 5.9.11 | lucidworks/spark-solr-etl:5.9-cgroupv2-patch |
keytool-utils | 5.9.4 to 5.9.10 | lucidworks/keytool-utils:5.9-cgroupv2-patch |
- Open your Fusion Helm values file. For Fusion Cloud Native deployments, use the values file for your current deployment. For Helm deployments, use the values file you used to create the deployment.
- For each service listed in the following table that applies to your Fusion version, add or update the image configuration:
- Fusion 5.9.4 to 5.9.10
- Fusion 5.9.11
- Fusion 5.9.12 to 5.9.15
- Save the values file.
-
For Fusion Cloud Native deployments, run the
upgrade_fusion.shscript you used for your current deployment. For Helm deployments, run the following command: - Wait for the affected service pods to restart and verify they are using the patched images.
If you downloaded or installed Fusion 5.9.12 before May 14, 2025 and are encountering issues, you should pull the images again and re-install Fusion 5.9.12 to pick up the latest bug fixes. This ensures you benefit from critical stability, security, and compatibility improvements included in the re-released version. If you are using self-hosted Fusion and installed 5.9.12 prior to the re-release, see the self-hosted reinstallation instructions below.When requesting help from the Lucidworks support team about this release, be sure to specify whether you are running the original Fusion 5.9.12 release or the re-release, so we can provide accurate guidance and faster resolution.
Reinstall 5.9.12 for self-hosted Fusion
If you are a self-hosted Fusion client and installed 5.9.12 in your environment before the re-release, the standard image pull policy may prevent pulling the re-release version. With the original release, the worker nodes cache the images, and the new version won’t be pulled because they weren’t retagged with a newer version string.Instructions
-
Verify the job-launcher pod is using the correct image by comparing its sha256 digest to the expected value of
fusion/lucidworks/job-launcher@sha256:02624cfbc3eb536e4a29353b7bfe0846380a09f98ae3c78da859793686782092.-
Run the following command:
- If the digest output is different in any way, the image is not from the re-release.
-
Run the following command:
-
Check the
imagePullPolicyof your Deployments:-
If the policy is set to
IfNotPresent, patch it toAlways: -
Restart the Deployments and StatefulSets to apply the changes:
-
(Optional) Check the
imagePullPolicyfor StatefulSets specifically to ensure they are set correctly:
-
If the policy is set to
-
After the rollout, confirm again that the job-launcher pod is using the correct image:
- If the result matches the expected digest of
sha256:02624cfbc3eb536e4a29353b7bfe0846380a09f98ae3c78da859793686782092then the pod is running the latest re-release version.
- If the result matches the expected digest of
Key highlights
Improved relevance in large documents with chunking
Fusion 5.9.12 introduces document chunking, a major advancement for search and generative AI quality and performance. Chunking breaks large documents into smaller, meaningful segments—called chunks—that are stored and indexed using Solr’s block join capabilities. Each chunk captures either lexical content (for keyword-based search) or semantic vectors (for neural search), enabling Fusion to retrieve the most relevant part of a document, rather than treating the document as a single block. This improves:- Search relevance: Users get results that point to the most relevant sections within large documents, not just documents that match overall.
- Neural search precision: Vector chunks improve hybrid scoring by aligning semantic relevance with specific lexical content.
- Scalability and maintainability: Updates or deletions are applied at the chunk level, ensuring consistency and avoiding stale or orphaned content.
- Faceted search and UX: Results can be grouped and ranked more accurately, especially in use cases where dense documents contain multiple topics.
- A new LWAI Chunker index pipeline stage uses one of the available chunking strategies (chunkers) for the specified LW AI model to provide optimized storage and retrieval. The chunkers asynchronously split the provided text in various ways such as by sentence, new line, semantics, and regular expression (regex) syntax.
- A new Chunking Neural Hybrid Query pipeline stage now detects chunked documents and retrieves the most relevant lexical and vector segments for hybrid search.
- Updates and deletions now ensure consistent chunk synchronization to prevent orphaned data.
- This feature includes a new Lucidworks AI Async Chunking API.
Contact your Lucidworks account manager to confirm that your license includes this feature.
Model hosting with Ray
Fusion 5.9.12 introduces support for model hosting with Ray, replacing the previous Seldon-based approach. Ray offers a more scalable and efficient architecture for serving machine learning models, with native support for distributed inference, autoscaling, and streamlined deployment. This transition simplifies Fusion’s AI infrastructure, enhances performance, and aligns with modern MLOps practices to make deploying and managing models faster, more reliable, and easier to monitor. Ray is present by default but still needs to be configured to run and perform tasks. Istio is only required for using Ray if you require in-cluster TLS.- The Seldon vectorize stages have been renamed to Ray/Seldon Vectorize Field and Ray/Seldon Vectorize Query.
- There are two new jobs for deploying models with Ray:
If you previously deployed a model with Seldon, you can deploy the same model with Ray.Just follow the instructions in Develop and deploy a machine learning model with Ray, and deploy the model with a different name to avoid conflicts.
When you have verified that the Ray model is working after deployment with Ray, you can delete the Seldon model using the Delete Seldon Core Model Deployment job.
Develop and deploy a machine learning model with Ray
Develop and deploy a machine learning model with Ray
This tutorial walks you through deploying your own model to Fusion with Ray.A real instance of this class with the In the preceding code, logging has been added for debugging purposes.The preceding code example contains the following functions:In the preceding example, the Python file is named Any recent ray[serve] version should work, but the tested value and known supported version is 2.42.1.
In general, if an item was used in an Using the example model, the terminal commands would be as follows:This repository is public and you can visit it here: e5-small-v2-ray
This feature is only available in Fusion 5.9.x for versions 5.9.12 and later.
Prerequisites
- A Fusion instance with an app and indexed data.
- An understanding of Python and the ability to write Python code.
- Docker installed locally, plus a private or public Docker repository.
- Ray installed locally:
pip install ray[serve]using the version of ray[serve] found in the release notes for your version of Fusion. - Code editor; you can use any editor, but Visual Studio Code is used in this example.
- Model: intfloat/e5-small-v2
- Docker image: e5-small-v2-ray
Tips
- Always test your Python code locally before uploading to Docker and then Fusion. This simplifies troubleshooting significantly.
- Once you’ve created your Docker you can also test locally by doing
docker runwith a specified port, like 9000, which you can thencurlto confirm functionality in Fusion. See the testing example below. - If you previously deployed a model with Seldon, you can deploy the same model with Ray after making a few changes to your Docker image as explained in this topic. To avoid conflicts, deploy the model with a different name. When you have verified that the Ray model is working after deployment with Ray, you can delete the Seldon model using the Delete Seldon Core Model Deployment job.
- If you run into an issue with the model not deploying and you’re using the ‘real’ example, there is a very good chance you haven’t allocated enough memory or CPU in your job spec or in the Ray-Argo config.
It’s easy to increase the resources. To edit the ConfigMap, run
kubectl edit configmap argo-deploy-ray-model-workflow -n <namespace>and then find theray-headcontainer in the artisanal escaped YAML and change the memory limit. Exercise caution when editing because it can break the YAML. Just delete and replace a single character at a time without changing any formatting.- For additional guidance, see the testing locally e5-model example.
Intro to Machine Learning in Fusion
The course for Intro to Machine Learning in Fusion focuses on using machine learning to infer the goals of customers and users in order to deliver a more sophisticated search experience.
Local testing example
- Docker command:
- Curl to hit Docker:
- Curl model in Fusion:
- See all your deployed models:
- Check the Ray UI to see Replica State, Resources, and Logs.
If you are getting an internal model error, the best way to see what is going on is to query via port-forwarding the model.
TheMODEL_DEPLOYMENTin the command below can be found withkubectl get svc -n NAMESPACE. It will have the same name as set in the model name in the Create Ray Model Deployment job.Once port-forwarding is successful, you can use the below cURL command to see the issue. At that point your worker logs should show helpful error messages.
Download the model
This tutorial uses thee5-small-v2 model from Hugging Face, but any pre-trained model from https://huggingface.co will work with this tutorial.If you want to use your own model instead, you can do so, but your model must have been trained and then saved though a function similar to the PyTorch’s torch.save(model, PATH) function.
See Saving and Loading Models in the PyTorch documentation.Format a Python class
The next step is to format a Python class which will be invoked by Fusion to get the results from your model. The skeleton below represents the format that you should follow. See also Getting Started in the Ray Serve documentation.e5-small-v2 model is as follows:This code pulls from Hugging Face. To have the model load in the image without pulling from Hugging Face or other external sources, download the model weights into a folder name and change the model name to the folder name preceded by
./.__call__: This function is non-negotiable.init: Theinitfunction is where models, tokenizers, vectorizers, and the like should be set to self for invoking.
It is recommended that you include your model’s trained parameters directly into the Docker container rather than reaching out to external storage insideinit.encode: Theencodefunction is where the field or query that is passed to the model from Fusion is processed.
Alternatively, you can process it all in the__call__function, but it is cleaner not to.
Theencodefunction can handle any text processing needed for the model to accept input invoked in itsmodel.predict()or equivalent function which gets the expected model result.
The class name must be
Deployment() and the name of this file must be deployment.py.deployment.py and the class name is Deployment().Create a Dockerfile
The next step is to create a Dockerfile. The Dockerfile should follow this general outline; read the comments for additional details:Create a requirements file
Therequirements.txt file is a list of installs for the Dockerfile to run to ensure the Docker container has the right resources to run the model.
For the e5-small-v2 model, the requirements are as follows:import statement in your Python file, it should be included in the requirements file.To populate the requirements, use the following command in the terminal, inside the directory that contains your code:Build and push the Docker image
After creating theMODEL_NAME.py, Dockerfile, and requirements.txt files, you need to run a few Docker commands.
Run the following commands in order:Deploy the model in Fusion
Now you can go to Fusion to deploy your model.- In Fusion, navigate to Collections > Jobs.
- Add a job by clicking the Add+ Button and selecting Create Ray Model Deployment.
-
Fill in each of the text fields:
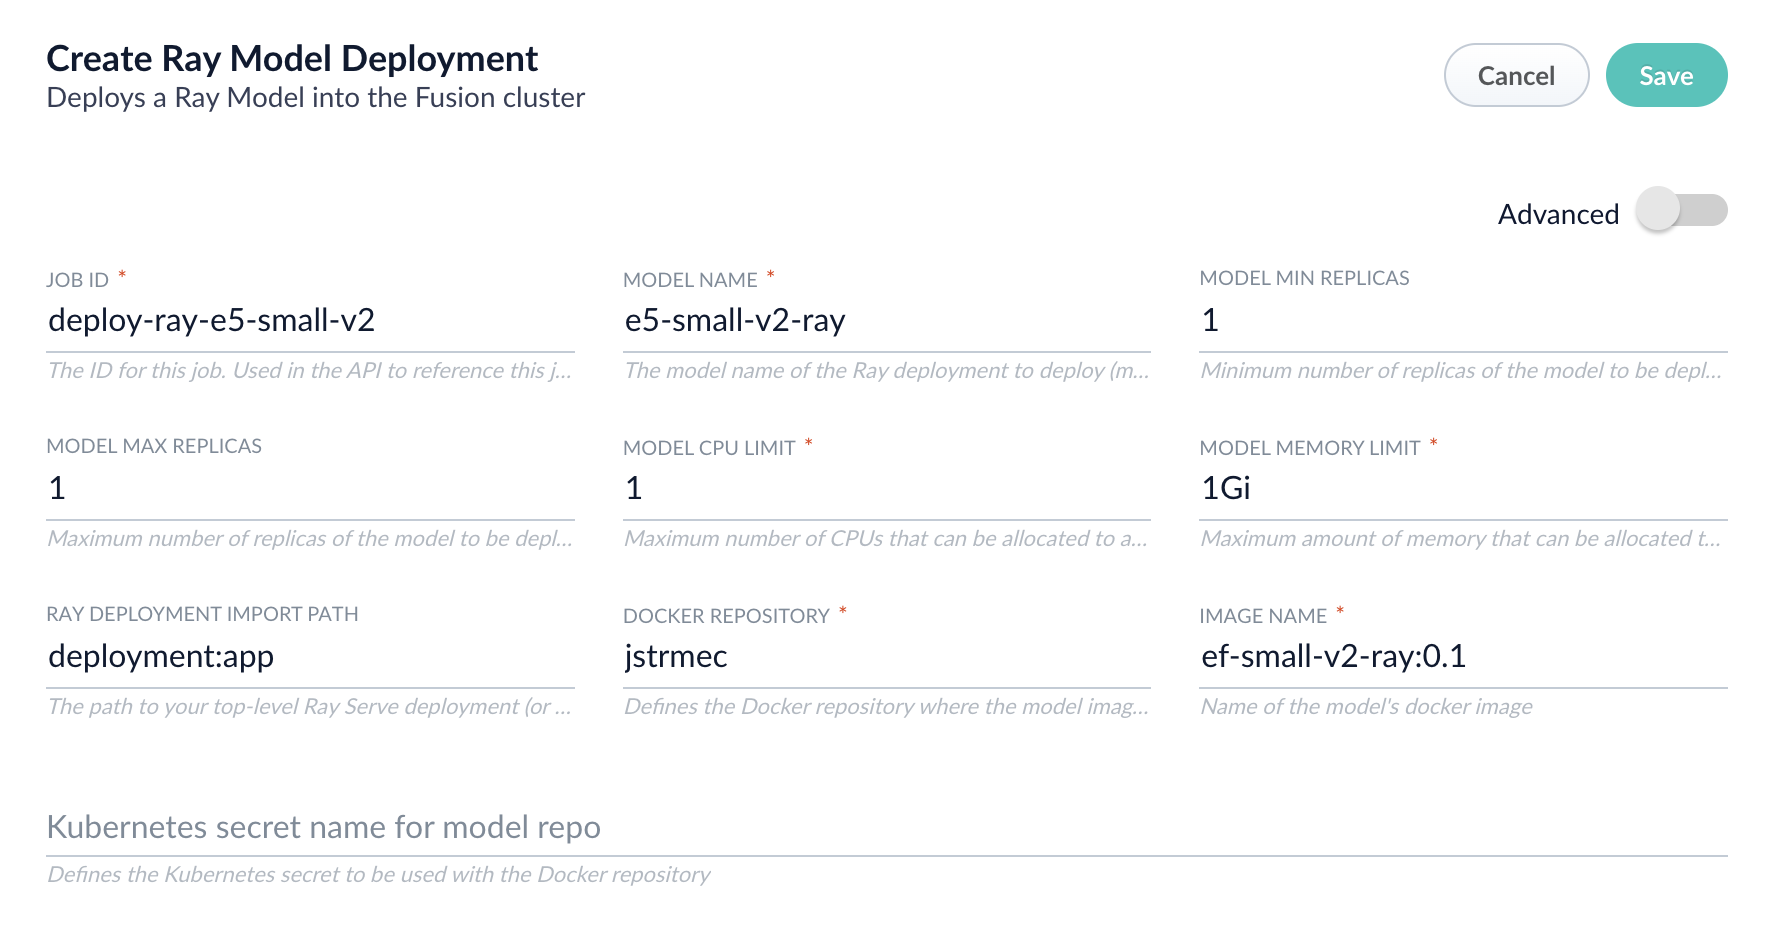
Parameter Description Job ID A string used by the Fusion API to reference the job after its creation. Model name A name for the deployed model. This is used to generate the deployment name in Ray. It is also the name that you reference as a model-idwhen making predictions with the ML Service.Model min replicas The minimum number of load-balanced replicas of the model to deploy. Model max replicas The maximum number of load-balanced replicas of the model to deploy. Specify multiple replicas for a higher-volume intake. Model CPU limit The number of CPUs to allocate to a single model replica. Model memory limit The maximum amount of memory to allocate to a single model replica. Ray Deployment Import Path The path to your top-level Ray Serve deployment (or the same path passed to serve run). For example,deployment:appDocker Repository The public or private repository where the Docker image is located. If you’re using Docker Hub, fill in the Docker Hub username here. Image name The name of the image. For example, e5-small-v2-ray:0.1.Kubernetes secret If you’re using a private repository, supply the name of the Kubernetes secret used for access. -
Click Advanced to view and configure advanced details:
Parameter Description Additional parameters. This section lets you enter parameter name:parametervalue options to be injected into the training JSON map at runtime. The values are inserted as they are entered, so you must surround string values with". This is the sparkConfig field in the configuration file.Write Options. This section lets you enter parameter name:parametervalue options to use when writing output to Solr or other sources. This is the writeOptions field in the configuration file.Read Options. This section lets you enter parameter name:parametervalue options to use when reading input from Solr or other sources. This is the readOptions field in the configuration file. -
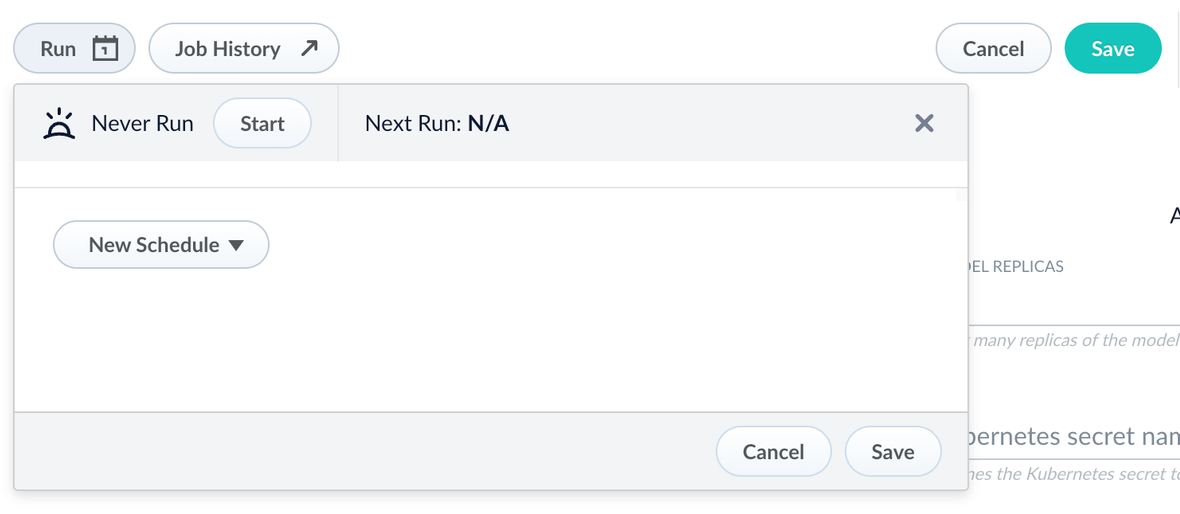
Click Save, then Run and Start.
Configure the Fusion pipelines
Your real-world pipeline configuration depends on your use case and model, but for our example we will configure the index pipeline and then the query pipeline.Configure the index pipeline- Create a new index pipeline or load an existing one for editing.
- Click Add a Stage and then Machine Learning.
- In the new stage, fill in these fields:
- The model ID
- The model input
- The model output
- Save the stage in the pipeline and index your data with it.
- Create a new query pipeline or load an existing one for editing.
- Click Add a Stage and then Machine Learning
- In the new stage, fill in these fields:
- The model ID
- The model input
- The model output
- Save the stage and then run a query by typing a search term.
- To verify the Ray results are correct, use the Compare+ button to see another pipeline without the model implementation and compare the number of results.
AI and machine learning features
Fusion’s machine learning services now run on Python 3.10 and Java 11, bringing improved performance, security, and compatibility with the latest libraries. These upgrades enhance model execution speed, memory efficiency, and long-term support, ensuring Fusion’s machine learning capabilities remain optimized for your evolving AI workloads. No configuration changes are required to take advantage of these improvements.Improved prefiltering support for Neural Hybrid Search (NHS)
Fusion 5.9.12 introduces early improvements for a more robust prefiltering strategy with Neural Hybrid Search, including support for chunked document queries. Prefiltering is a technique that can improve performance and accuracy by filtering documents before applying the algorithm, reducing the number of documents that need to be processed. You can enable prefiltering in any NHS query pipeline stage; see the configuration reference topics for details:Bug fixes
-
Fixed a Helm chart rendering issue that blocked ArgoCD deployments with TLS flags enabled.
In previous releases, using TLS flags during deployment caused Helm chart rendering to fail in ArgoCD due to the use of the unsupportedlookupfunction. Fusion 5.9.12 resolves this issue by modifying the chart templates for compatibility with ArgoCD, restoring support for TLS-enabled deployments in GitOps workflows. -
Fixed incorrect image repository for Solr in Helm charts.
In Fusion 5.9.11, the Helm chart specified an internal Lucidworks Artifactory repository for the Solr image.
This has been corrected in 5.9.12 so the Solr image repository is either empty or points tolucidworks/fusion-solr, aligning with other components and simplifying deployment for external environments. -
Added support for configuring the Spark version used by Fusion.
Fusion 5.9.12 now lets you switch from the default Spark 3.4.1 version(introduced in Fusion 5.9.10) to the earlier Spark 3.2.2 version used in Fusion 5.9.9.
This flexibility helps maintain compatibility with legacy Python (3.7.3) and Scala environments, especially for apps that depend on specific Spark runtime behaviors. When Spark 3.4.1 is enabled, custom Python jobs require Python 3.10.
To enable Spark 3.2.2 instead, change thefusion-sparkimage in the configmap of thejob-launcher, like this:In the long term, we recommend migrating to theThe Spark 3.4.1 runtime is incompatible with Azure Blob Storage when accessed via the deprecatedwasbs://protocol due to a Jetty version conflict; run Spark 3.2.2 instead if your jobs rely onwasbs://.abfs://protocol for Azure Blob Storage access, which is fully supported in Spark 3.4.1. -
Fixed incorrect
started-byvalues for datasource jobs in the job history.
In previous versions, datasource jobs started from the Fusion UI were incorrectly shown as started bydefault-subjectinstead of the actual user.
Fusion now correctly records and displays the initiating user in the job history, restoring accurate audit information for datasource operations. -
Fixed a schema loading issue that prevented older apps from working with the Schema API.
Fusion now correctly handles bothmanaged-schemaandmanaged-schema.xmlfiles when reading Solr config sets, ensuring backward compatibility with apps created before the move to template-based config sets.
This prevents Schema API failures caused by unhandled exceptions during schema file lookup. -
Scheduled jobs now correctly trigger dependent jobs.
In Fusion 5.9.12, we fixed an issue that prevented scheduled jobs from triggering other jobs based on their success or failure status.
This includes jobs configured to run “on_success_or_failure” or using the “Start + Interval” option.
With this fix, dependent jobs now execute as expected, restoring reliable job chaining and scheduling workflows. -
Fixed an issue that prevented updates to existing scheduled job triggers in the Schedulers view.
This bug was caused by inconsistencies in how the API returned UTC timestamps, particularly for times after 12:00 UTC. The Admin UI now correctly detects changes and allows updates to trigger times without requiring the entry to be deleted and recreated. -
Fixed multiple scheduling issues in the
job-configservice to improve reliability and user experience.
This release includes several important fixes to ensure that scheduled jobs function correctly across upgrades and user actions:- Improved leader election recovery: Ensures the scheduler service recovers if all
job-configpods lose connection to ZooKeeper. - Corrected permission checks: Prevents scheduling failures caused by mismatches between user and service account permissions.
- Fixed job history display for system jobs: Resolved an issue where delete-old-system-logs and delete-old-job-history jobs did not appear in the UI after upgrade, despite existing in the backend.
- Restored schedule creation in certain apps: Fixed a bug where clicking Save when adding a schedule in the Run dialog appeared to succeed but failed to persist the schedule in specific app states.
- Improved leader election recovery: Ensures the scheduler service recovers if all
-
Fixed a simulation failure in the Index Workbench when configuring new datasources.
Fusion 5.9.12 resolves an issue where Index Workbench failed to simulate results after configuring a new datasource, displaying the error “Failed to simulate results from a working pipeline.” This fix restores full functionality to the Index Workbench, allowing you to preview and configure indexing workflows in one place without switching between multiple views. -
Fixed a bug that caused aborted jobs to appear twice in the job history.
Previously, when you manually aborted a job, it was recorded twice in the job history.
This duplication has been resolved, and each aborted job now appears only once in the history log. -
Fixed an issue that prevented segment-based rule filtering from working correctly in Commerce Studio. Fusion now honors the
lw.rules.target_segmentparameter, ensuring only matching rules are triggered and improving rule targeting and safety. -
This release eliminates extra warning messages in the API Gateway related to undetermined service ports. Previously, the gateway logged repeated warnings about missing
primary-port-namelabels, even though this did not impact functionality. This fix reduces unnecessary log noise and improves the clarity of your logs. -
Fixed in the Fusion 5.9.15 release, this patch was also applied to Fusion 5.9.12:
Added a custom module that serializes Nashorn
undefinedvalues as JSONnull, preventing serialization errors when such values appear in Java objects. When using the OpenJDK version of Nashorn, an exception was thrown when the context contained keys with undefined JavaScript values. This exception occurred because the class for the undefined values was not visible outside of the OpenJDK Nashorn package. A custom object mapper is added for the class so serialization issues are now resolved when handlingundefinedin JavaScript pipeline to run reliably under Java 17.
Known issues
-
Job-config service may appear “down” in UI even when running correctly.
In Fusion versions 5.9.12 through 5.9.13, the job-config service may falsely report as “down” in the Fusion UI, particularly during startup or in TLS-enabled deployments. This issue is fixed in Fusion 5.9.14.For thejob-configservice, the Next Run value is updated only after the current job completes. Because the same job cannot run multiple times simultaneously, if another run is scheduled before the current job completes, that run is not executed. -
Jobs and V2 datasources may fail when Fusion collections are remapped to different Solr collections.
In Fusion versions 5.9.12 through 5.9.13, strict validation in thejob-configservice causes “Collection not found” errors when jobs or V2 datasources target Fusion collections that point to differently named Solr collections.
This issue is fixed in Fusion 5.9.14.
As a workaround, use V1 datasources or avoid using REST call jobs on remapped collections. -
Saving large query pipelines may cause OOM failures under high load.
In Fusion versions 5.9.12 through 5.9.13, saving a large query pipeline during high query volume can result in thread lock, excessive memory use, and eventual OOM errors in the Query service.
This issue is fixed in Fusion 5.9.14. -
Some S3 and Web datasource jobs cannot be stopped in Fusion 5.9.12.
Clicking the Stop button has no effect in some cases where the backend job is no longer being tracked. This causes thejob-configservice to ignore the job and prevents the system from updating the job status. A workaround is to issue aPOST {"action": "start"}to the appropriate job actions endpoint, which aborts the stuck job.
This issue is fixed in Fusion 5.9.14. -
Spark jobs may disappear from the job list after pod deletion
In Fusion 5.9.12 and 5.9.13, Spark jobs may vanish from the job list if a Spark driver pod is deleted. This behavior can cause confusion and require a job-launcher restart to restore job visibility.
This issue is fixed in Fusion 5.9.12. -
Jobs for Web V2 connectors may fail to start after an earlier failure.
A bug in the connectors-backend service can prevent jobs from running if a previous crawl attempt was interrupted—for example, if the connector pod was scaled down mid-job.
A subsequent crawl attempt may fail with the errorThe state should never be null, even after clearing the datasource configuration.
This issue is fixed in Fusion 5.9.13. -
The
fusion-spark-3.2.2image included in Fusion 5.9.12 contains a Fabric8 token refresh bug.
This issue affects Spark jobs running in Kubernetes environments that rely on token-based authentication.
Due to an outdated Fabric8 client library, the image fails to refresh Kubernetes tokens correctly, which can cause authentication errors in long-running or distributed Spark jobs.
This issue is fixed in Fusion 5.9.13. -
The
job-configservice may report aDOWNstatus at/actuator/healtheven when it is fully operational.
This issue can occur after a prolonged ZooKeeper outage when TLS is enabled.
Despite the service being healthy and showingUPstatus on readiness and liveness checks, the/job-config/actuator/healthendpoint may still reportDOWN, potentially triggering false alarms or unnecessary restarts.
This issue is fixed in Fusion 5.9.13. -
When upgrading to Fusion 5.9.12, add the following to your
values.yamlfile to avoid a known issue that prevents thekuberay-operatorpod from launching successfully:
-
Web connector may fail to index due to corrupted job state
Fusion 5.9.12 may fail to index with the Webv2 connector (v2.0.1) due to a corrupted job state in theconnectors-backendservice.
Affected jobs log the errorThe state should never be null, and common remediation steps like deleting the datasource or reinstalling the connector plugin may not resolve the issue.
The issue is fixed in Fusion 5.9.13. -
Saving new datasource schedules may fail silently.
In some Fusion 5.9.12 environments, clicking Save when adding a schedule from the datasource “Run” dialog does not persist the schedule or show an error message, particularly in apps created before the upgrade.
As a workaround, use a new app or manually verify that the job configuration was saved.
This issue is fixed in Fusion 5.9.13. - The Apache Tika Container parser in Fusion 5.9.12 does not index the body field for SharePoint connector documents, such as DOCS, PPTX, and XLSX files. Documents are split into multiple parts, so the body content only ends up in child documents, while the parent document lacks the body field. This issue is fixed in Fusion 5.9.15.
-
Fusion 5.9.12 introduces updated built-in Solr configsets used by Fusion collections. The managed schema filename is
managed-schema.xml, with updated configset names such as_fusion_default,_fusion_query_rewrite,_fusion_signals,_fusion_user_prefs, and_fusion_blobs. Collections created prior to this change may still referencemanaged-schemawithout the.xmlextension. While these collections serve queries normally after upgrade, Fusion UI features and APIs that access Solr configuration files may fail to load schema or configset data. If you encounter schema or configuration access errors after upgrading, verify that affected collections usemanaged-schema.xmlin their ZooKeeper configsets. Lucidworks recommends removing the legacymanaged-schemafile once the XML version is present to avoid ambiguity.
Removals
For full details on removals, see Deprecations and Removals.Bitnami removal
Fusion 5.9.12 will be re-released with the same functionality but updated image references. In the meantime, Lucidworks will self-host the required images while we work to replace Bitnami images with internally built open-source alternatives. If you are a self-hosted Fusion customer, you must upgrade before August 28 to ensure continued access to container images and prevent deployment issues. You can reinstall your current version of Fusion or upgrade to Fusion 5.9.14, which includes the updated Helm chart and prepares your environment for long-term compatibility. See Prevent image pull failures due to Bitnami deprecation in Fusion 5.9.5 to 5.9.13 for more information on how to prevent image pull failures.Tika Server Parser removal
The Tika Server Parser is removed in this release. Use the Tika Asynchronous Parser instead. Asynchronous Tika parsing performs parsing in the background. This allows Fusion to continue indexing documents while the parser is processing others, resulting in improved indexing performance for large numbers of documents.MLeap removal
MLeap is removed from theml-model service. MLeap was deprecated in Fusion 5.2.0 and was no longer used by Fusion.
Platform support and component versions
Kubernetes platform support
Lucidworks has tested and validated support for the following Kubernetes platforms and versions:- Google Kubernetes Engine (GKE): 1.29, 1.30, 1.31
- Microsoft Azure Kubernetes Service (AKS): 1.29, 1.30, 1.31
- Amazon Elastic Kubernetes Service (EKS): 1.29, 1.30, 1.31
Component versions
The following table details the versions of key components that may be critical to deployments and upgrades.| Component | Version |
|---|---|
| Solr | fusion-solr 5.9.12 (based on Solr 9.6.1) |
| ZooKeeper | 3.9.1 |
| Spark | 3.4.1 |
| Ingress Controllers | Nginx, Ambassador (Envoy), GKE Ingress Controller |
| Ray | ray[serve] 2.42.1 |