| State | Options | Description |
|---|---|---|
| Status | Enabled or Disabled | If a rule’s status is Enabled, the rule is in effect. If a rule’s status is Disabled, the rule is not in effect. This is only true if the rule is published, as described below. |
| Review | Approved or Denied | If a rule’s review state is Approved, and you publish the changes, the latest changes to that rule are in effect. If the state is Denied, and you publish the changes, the Rules Manager deletes the rule. |
| Published | Yes or No | If a rule’s published state is Yes, the latest changes to the rule are in effect. If the state is No, the latest changes are not in effect. This also applies to changes to the rule’s status, such as disabling to rule. |
- Use the Analytics Screen in the Rules Editor
- Use Business Rules in the Rules Editor
- Use Query Rewrites in the Rules Editor
Use the Analytics Screen in the Rules Editor
Use the Analytics Screen in the Rules Editor
This article describes how to use the Analytics screen in the Rules Editor.
Job configuration affects the data that displays on the dashboard. For example, the
COLLECTION_NAME_session_rollup job aggregates related user activity into a session signal that contains activity count, duration, and keywords (based on user search terms).UI elements
Data date range
-
Quick Range Selectors. Click one of the quick range selectors to facet your data.

-
Calendar Selector. Use the calendar selector to specify a start and end date and time facet for your data.
Visitor data
-
Data Cards

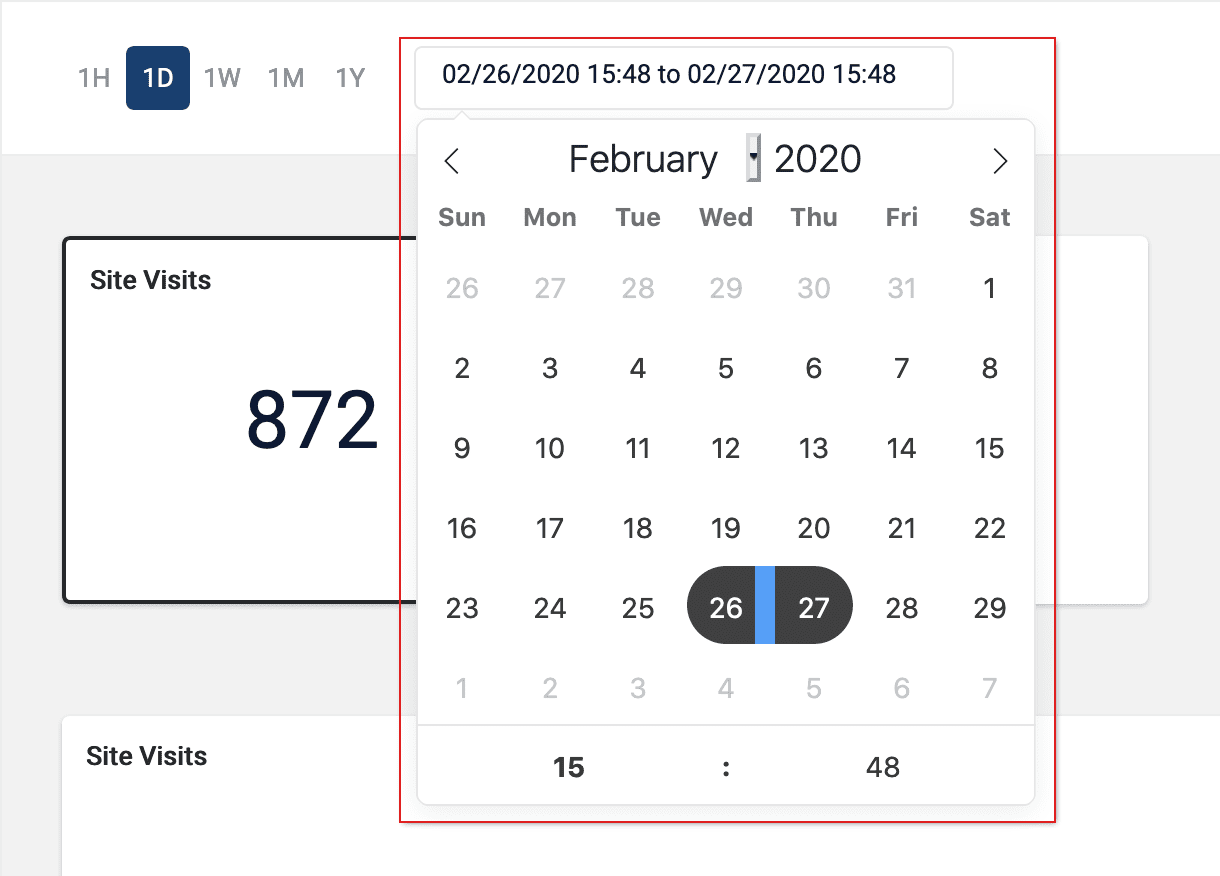
- Site Visits. The total number of visits.
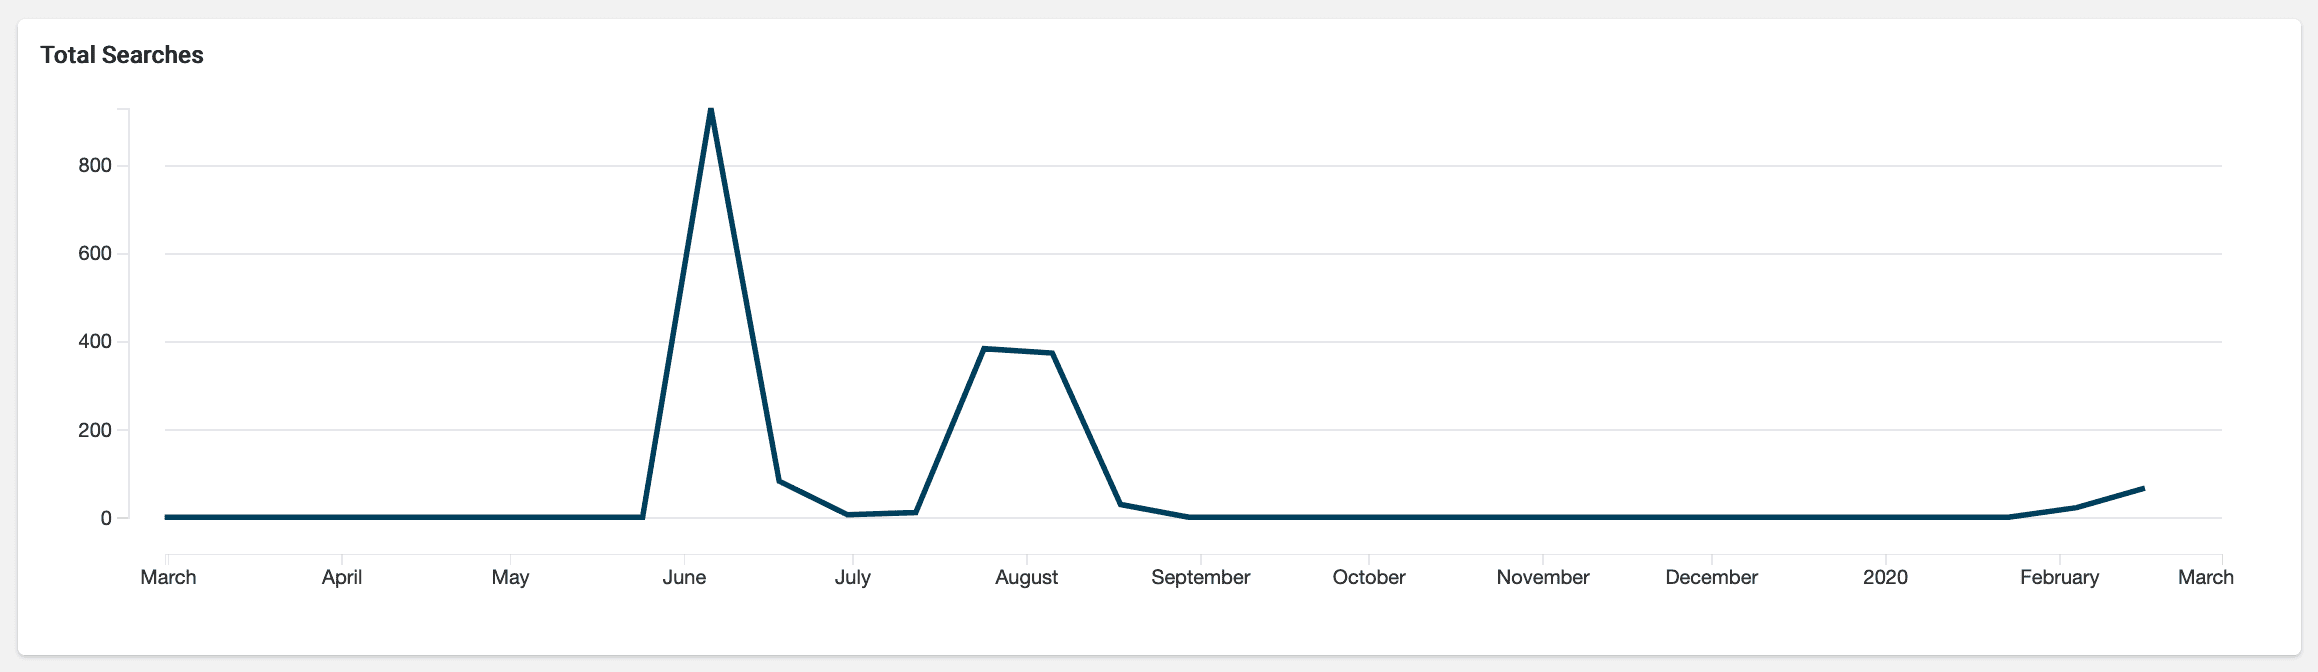
- Total Searches. The total number of searches performed.
- Unique Visitors. The number of unique visitors to your site.
- Average Session. The average length of time spent on your site.
-
Data Graph. Detailed information for the selected data card.
View data by date range
The Rules Editor analytics allows you to view data by a date range. To do this, you can either:-
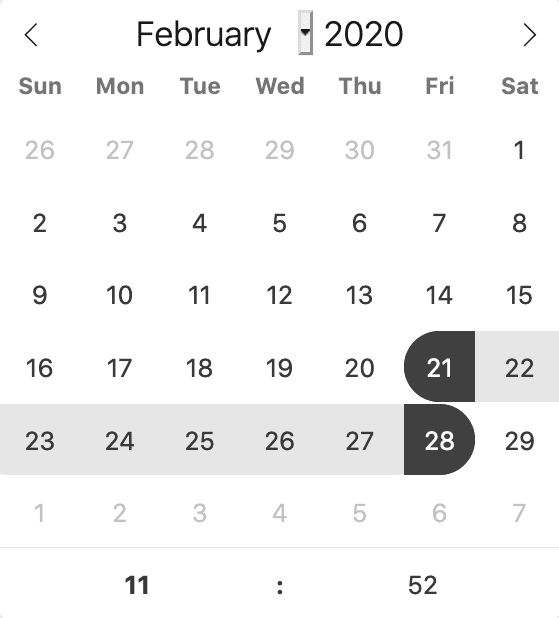
Click one of the date range presets:

-
Click the date range details to display and select your range on the calendar that appears:
View additional card details
Click one of the analytics cards to view additional details for that card’s data.Configure Analytics cards
- Hover over one of the cards.
- Click the Edit button that appears:

- Complete the form that appears.
- Click the Save button.
Use Business Rules in the Rules Editor
Use Business Rules in the Rules Editor
This article describes how to use the Business Rules screen in the Rules Editor.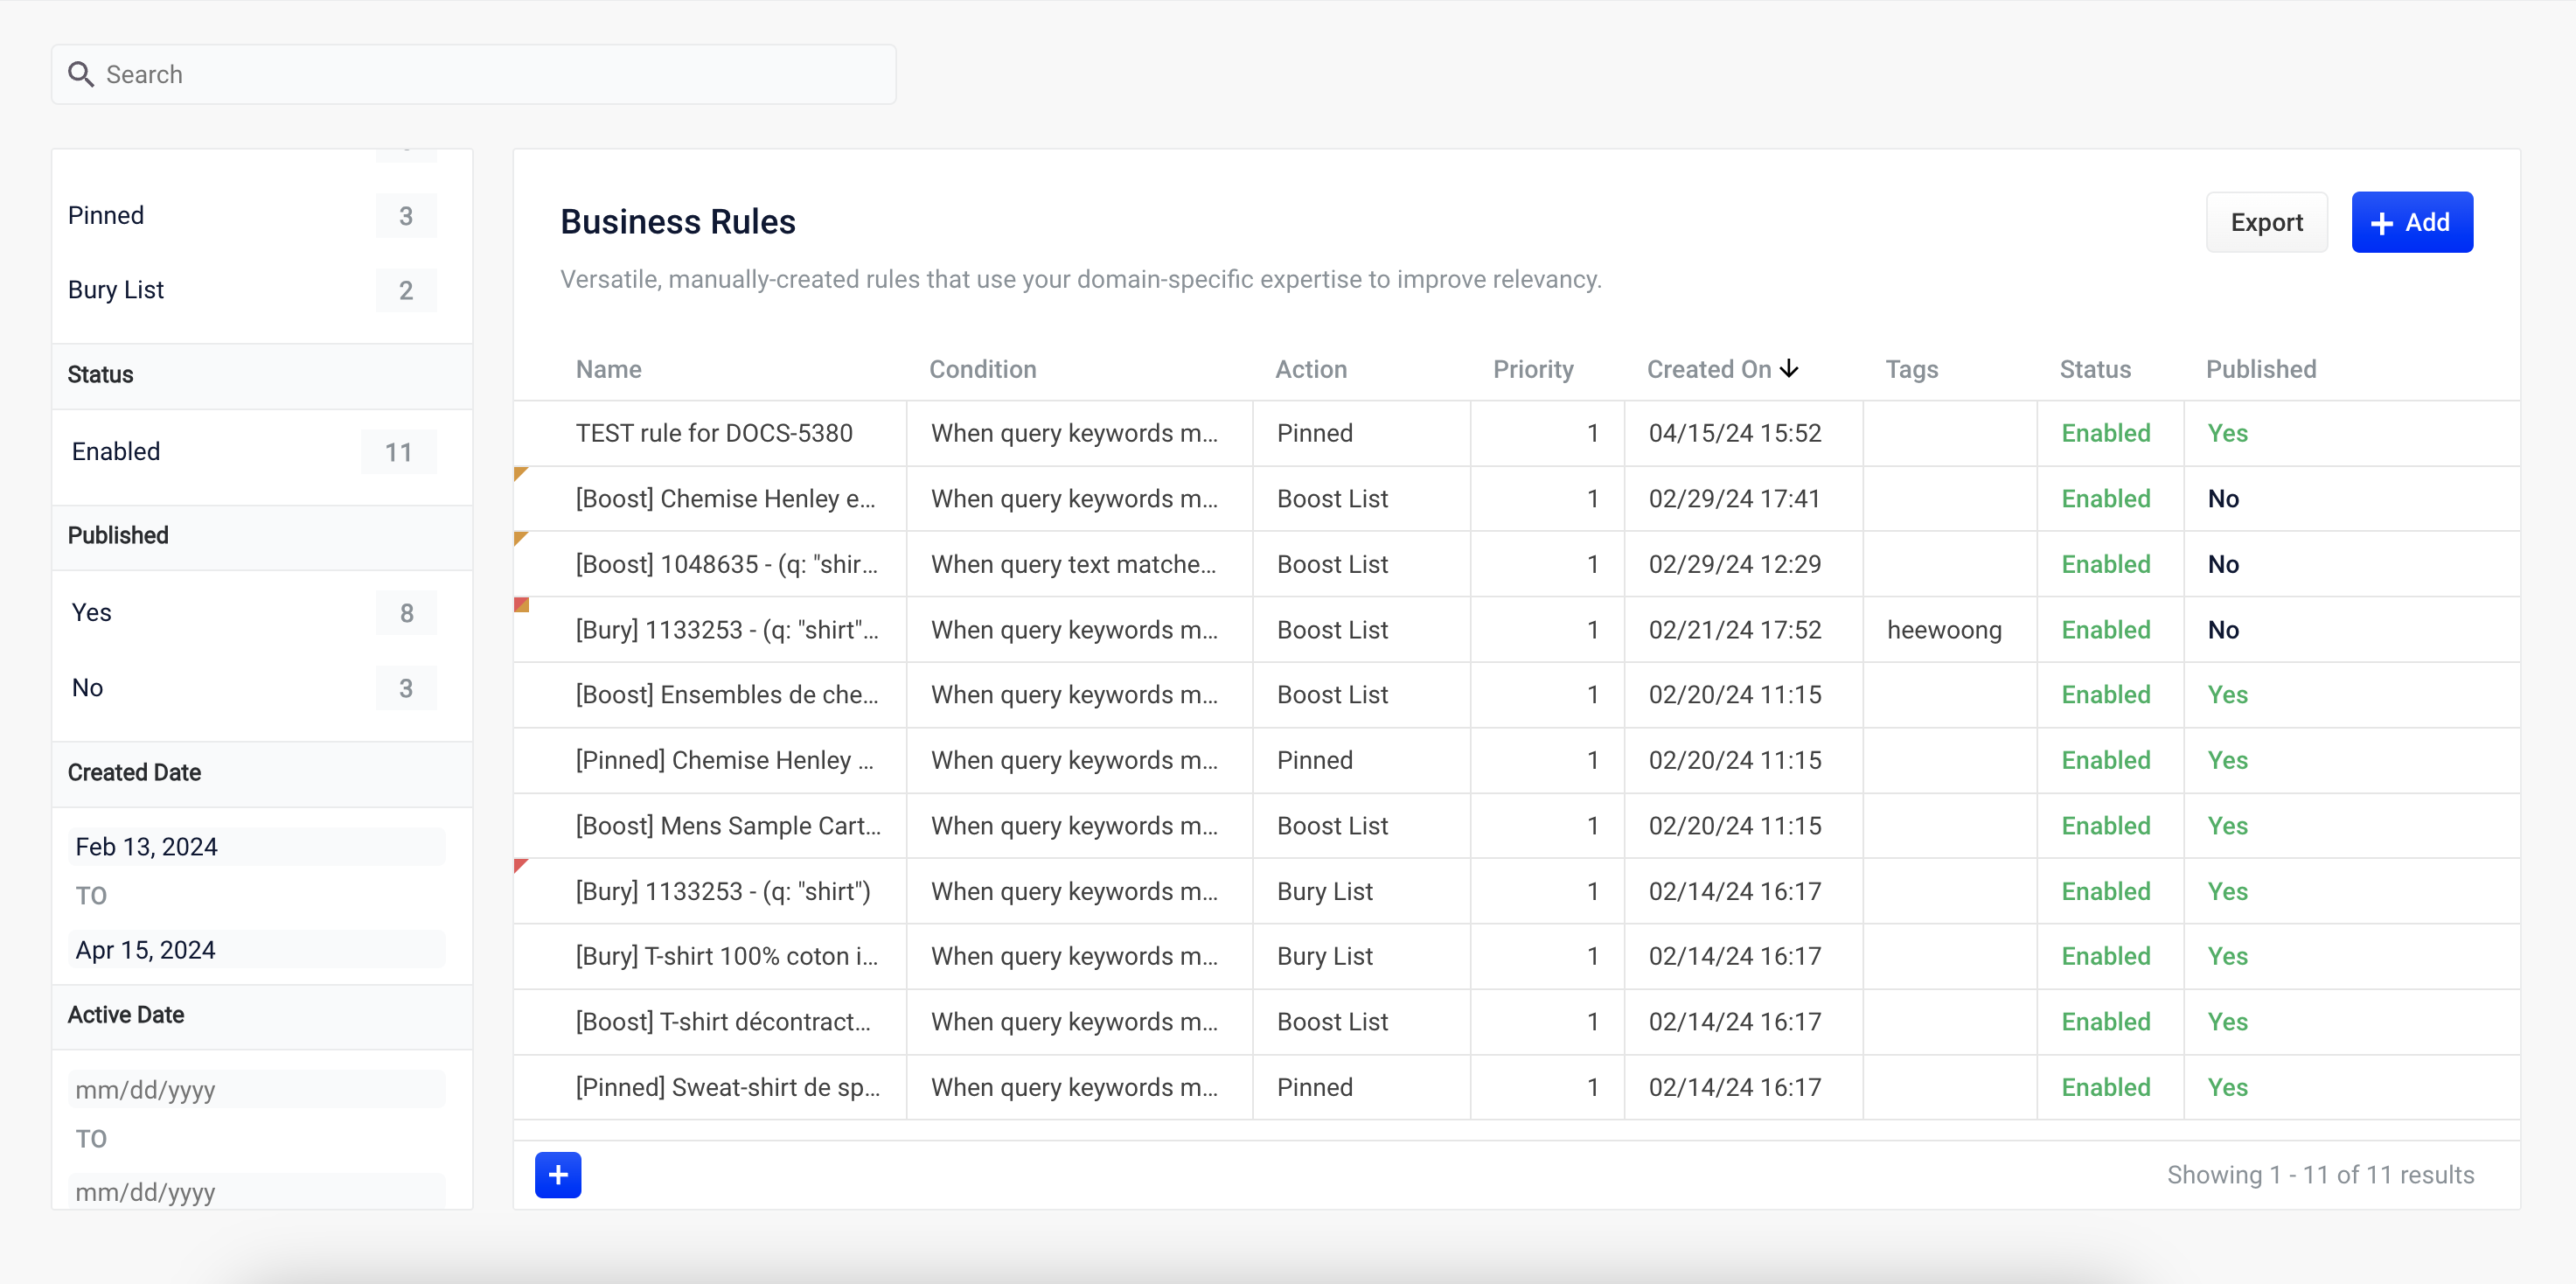
Query Rewriting with Business Rules and Search Rewrites
The course for Query Rewriting with Business Rules and Search Rewrites focuses on how using business rules and search rewrites gives you the opportunity to boost conversions and create better customer experiences by improving your relevancy.
Facet rules
Facet menu
-
Click the date start value. A calendar will appear.
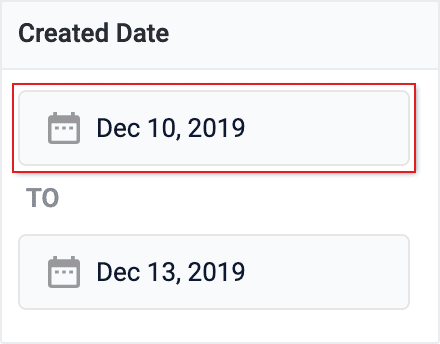
- Click a date to select the start of your facet range.
- Click the bottom date and select the end of your facet range.
Search
Enter a term in the search bar to quickly facet your business rules.Rules
Create a rule
-
Click the button in the top-right corner of the card. Alternatively, click the button in the bottom-left corner of the card. The New Rule dialog box will appear.
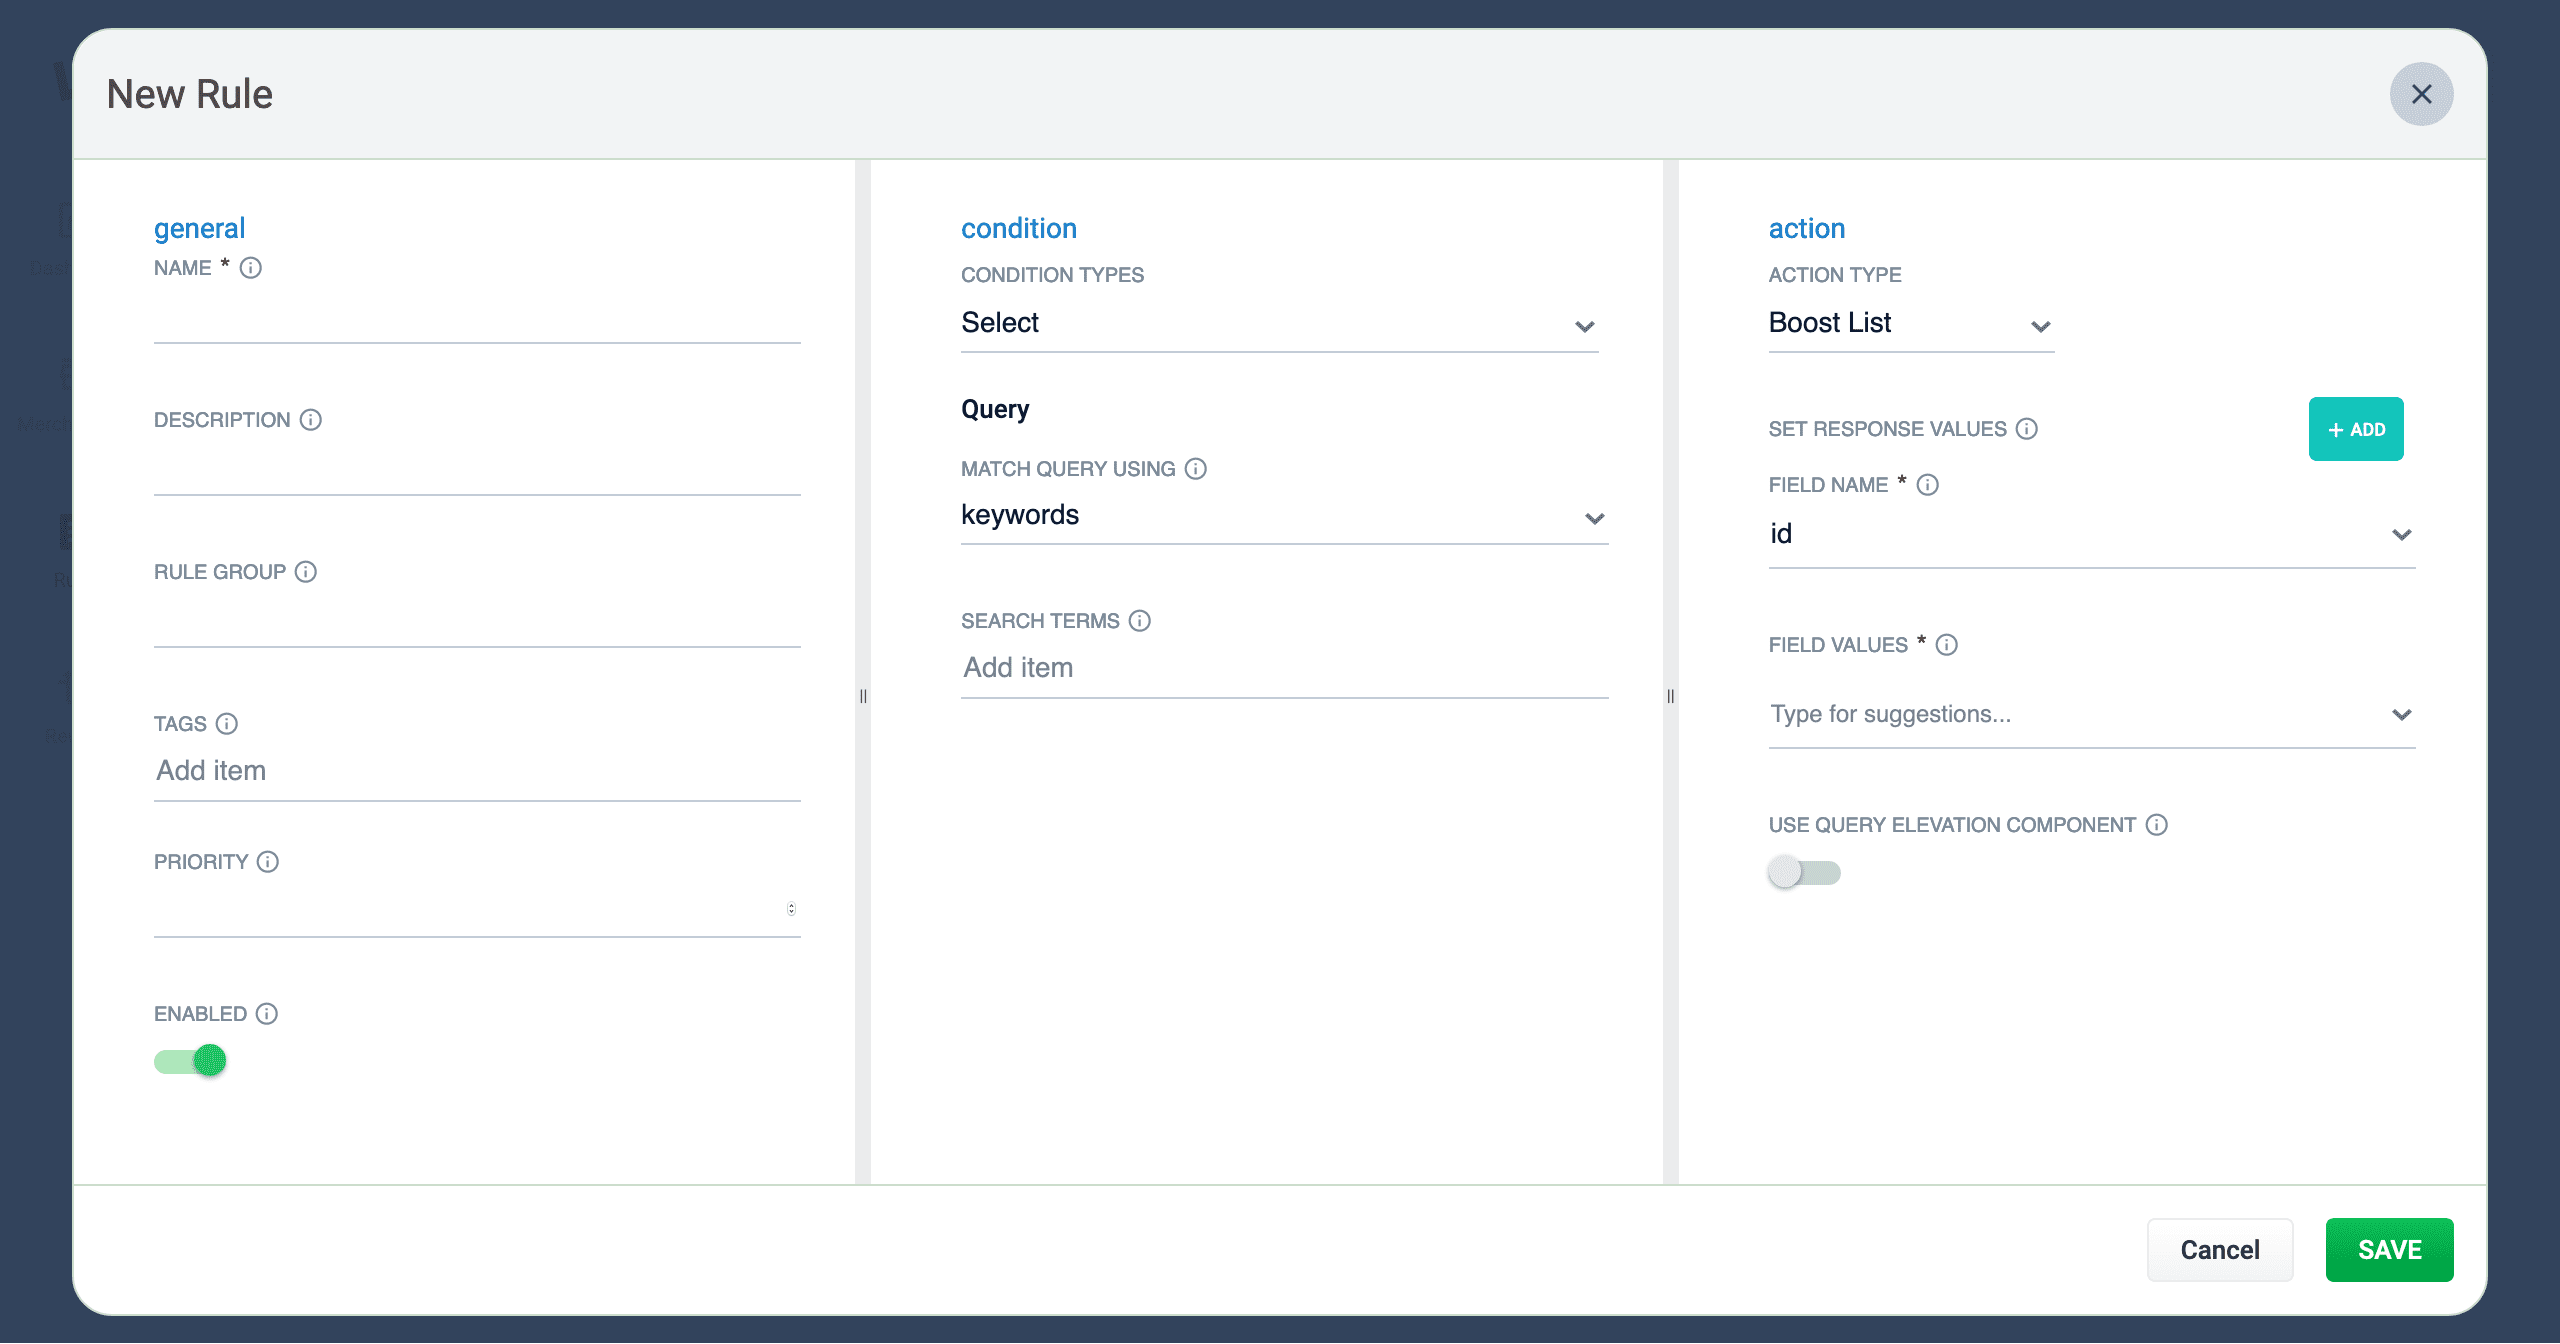
-
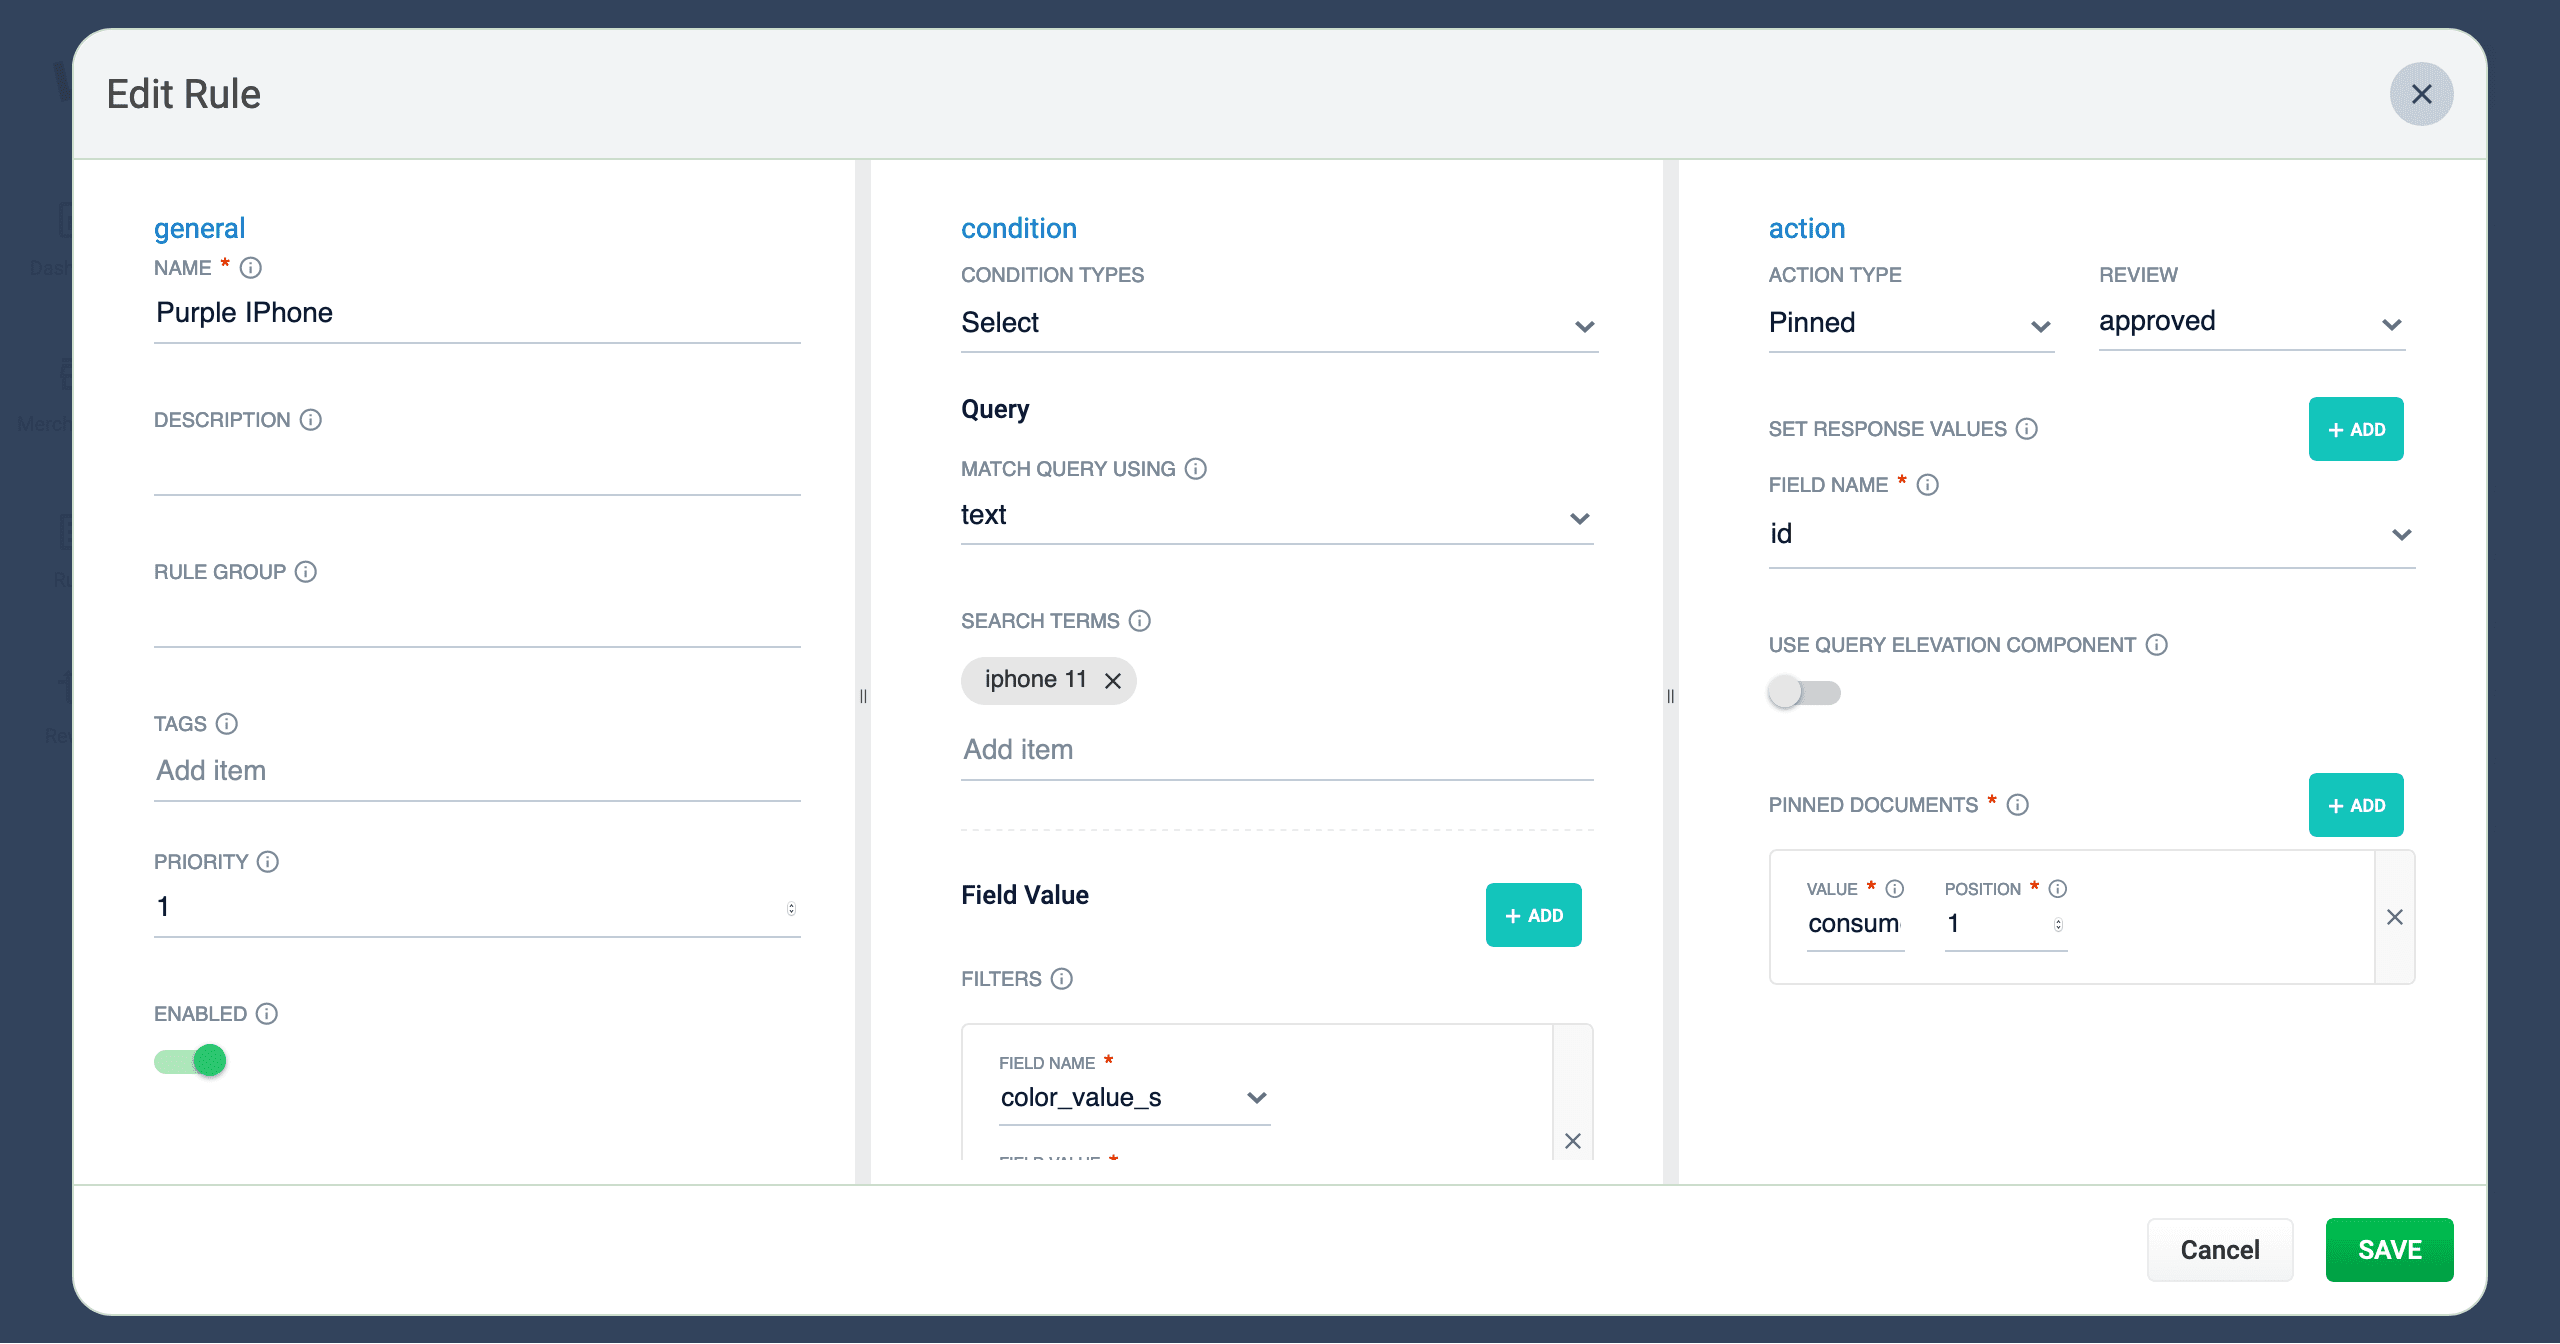
Complete the required fields, at a minimum.
General Condition Action In the General column, only the Name field is required. Other fields are optional: - Description is an arbitrary string you can use to describe this rule.
- Rule Group can be a user-defined group that you use to organize your rules.
- Tags are another way to organize your rules. Tags appear as facets in the Business Rules interface, so you can filter the set of visible rules by tag.
- Priority can be used to determine which rule should apply first if multiple rules are activated for the same request. Priority is an integer value, ranging from 1 to infinity, with the value 1 given lowest priority. If multiple rules have the same value, those rules are applied in a random order.
- Enabled means that this rule is applied but not necessarily published. Disabling a rule helps ensure that it is not accidentally published.
Conditions are triggers that activate the rule when they match the current date and time, query, or field values. See Rule conditions for more information. A rule can take different types of actions when the specified conditions are met. See Action types for more information. You can also create custom actions. - Once complete, click the button.
Copy a rule
- Hover over a rule. A row of buttons will appear on the right.
-
Click the button. The Copy Rule dialog box will appear.
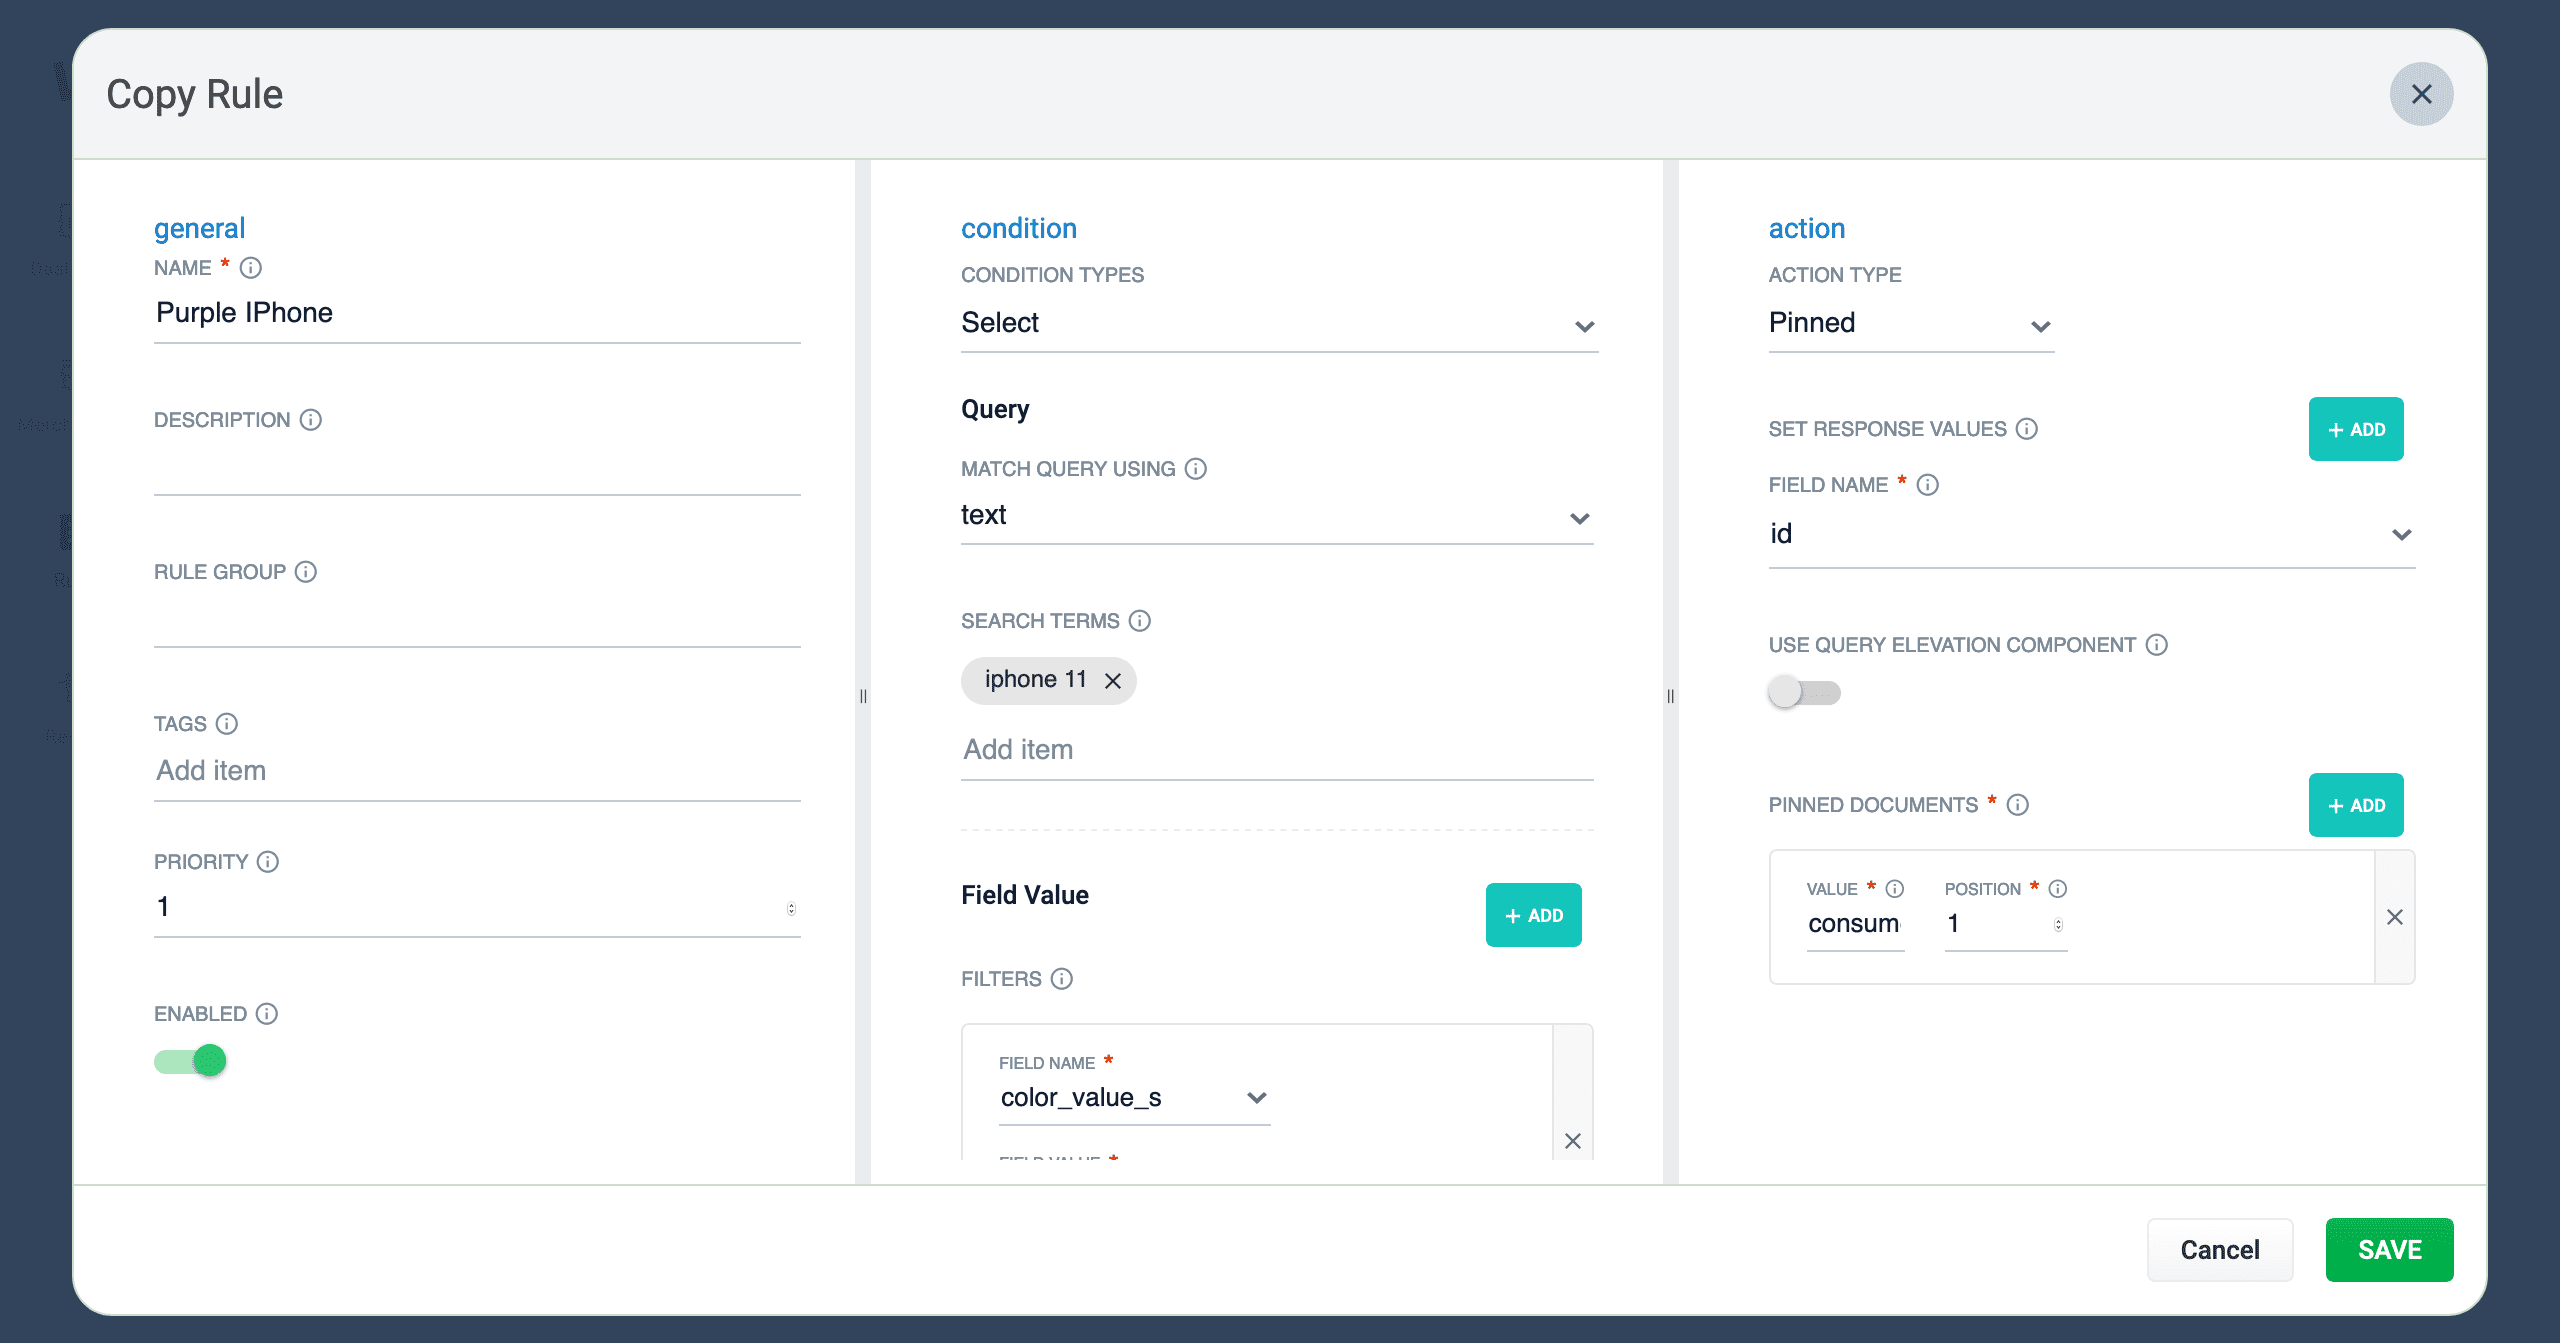
- At a minimum, change the title of the rule.
- Once complete, click the button.
Edit a rule
- Hover over a rule. A row of buttons will appear on the right.
-
Click the button. The Edit Rule dialog box appears.
- Make your desired changes to the rule.
- Once complete, click the button.
Approve/deny rules
- Hover over a rule. A checkbox will appear on the left.
- Click the checkbox to select the rule.
- Repeat this process to select multiple rules. (optional)
- Click the Approve button to approve the selected rules, or click the Deny button to deny the rules.
Enable/disable a rule
- Hover over a rule. A checkbox will appear on the left.
- Click the checkbox to select the rule.
- Repeat this process to select multiple rules. (optional)
- Click the button to enable the selected rules, or click the button to disable the rules.
Publish a rule
- Hover over a rule. A checkbox will appear on the left.
- Click the checkbox to select the rule.
- Repeat this process to select multiple rules. (optional)
- Click the button to publish the selected rules.
Tag a rule
Tags are a powerful tool for organizing and publishing rules according to a keyword, such asblack-friday-sale.- Hover over a rule. A checkbox will appear on the left.
- Click the checkbox to select the rule.
- Repeat this process to select multiple rules. (optional)
- Click the button. A dialog box will appear.
- Enter a tag. To enter multiple tags, press Tab after writing each tag.
-
Click the button to add the tag to the rule.
See General Configuration Tags for information about how to use tagnames in the request URL to fire specific rules.
Delete rules
Delete a single rule
- Hover over a rule. A row of buttons will appear on the right.
- Click the button. A confirmation box will appear.
- Click the button to confirm.
Delete multiple rules
- Hover over a rule. A checkbox will appear on the left.
- Click the checkbox to select the rule.
- Repeat this process to select multiple rules. (optional)
- Click the button to delete the selected rules. A confirmation box will appear.
- Click the button to confirm.
Sort rules
- Hover over column titles. A icon will appear for some titles to indicate the rules list can be sorted by that column.
- Click on the title column to sort the rules.
The column that is currently sorting the rules list is indicated by an or icon.
Export rules
To export the rules list, simply click the button. This generates a.csv file containing your rules.Columns
Customize columns
To customize the columns:- Hover over the row of column titles. A button will appear on the right.
-
Click the button. The Customize Columns to Display dialog box will appear.
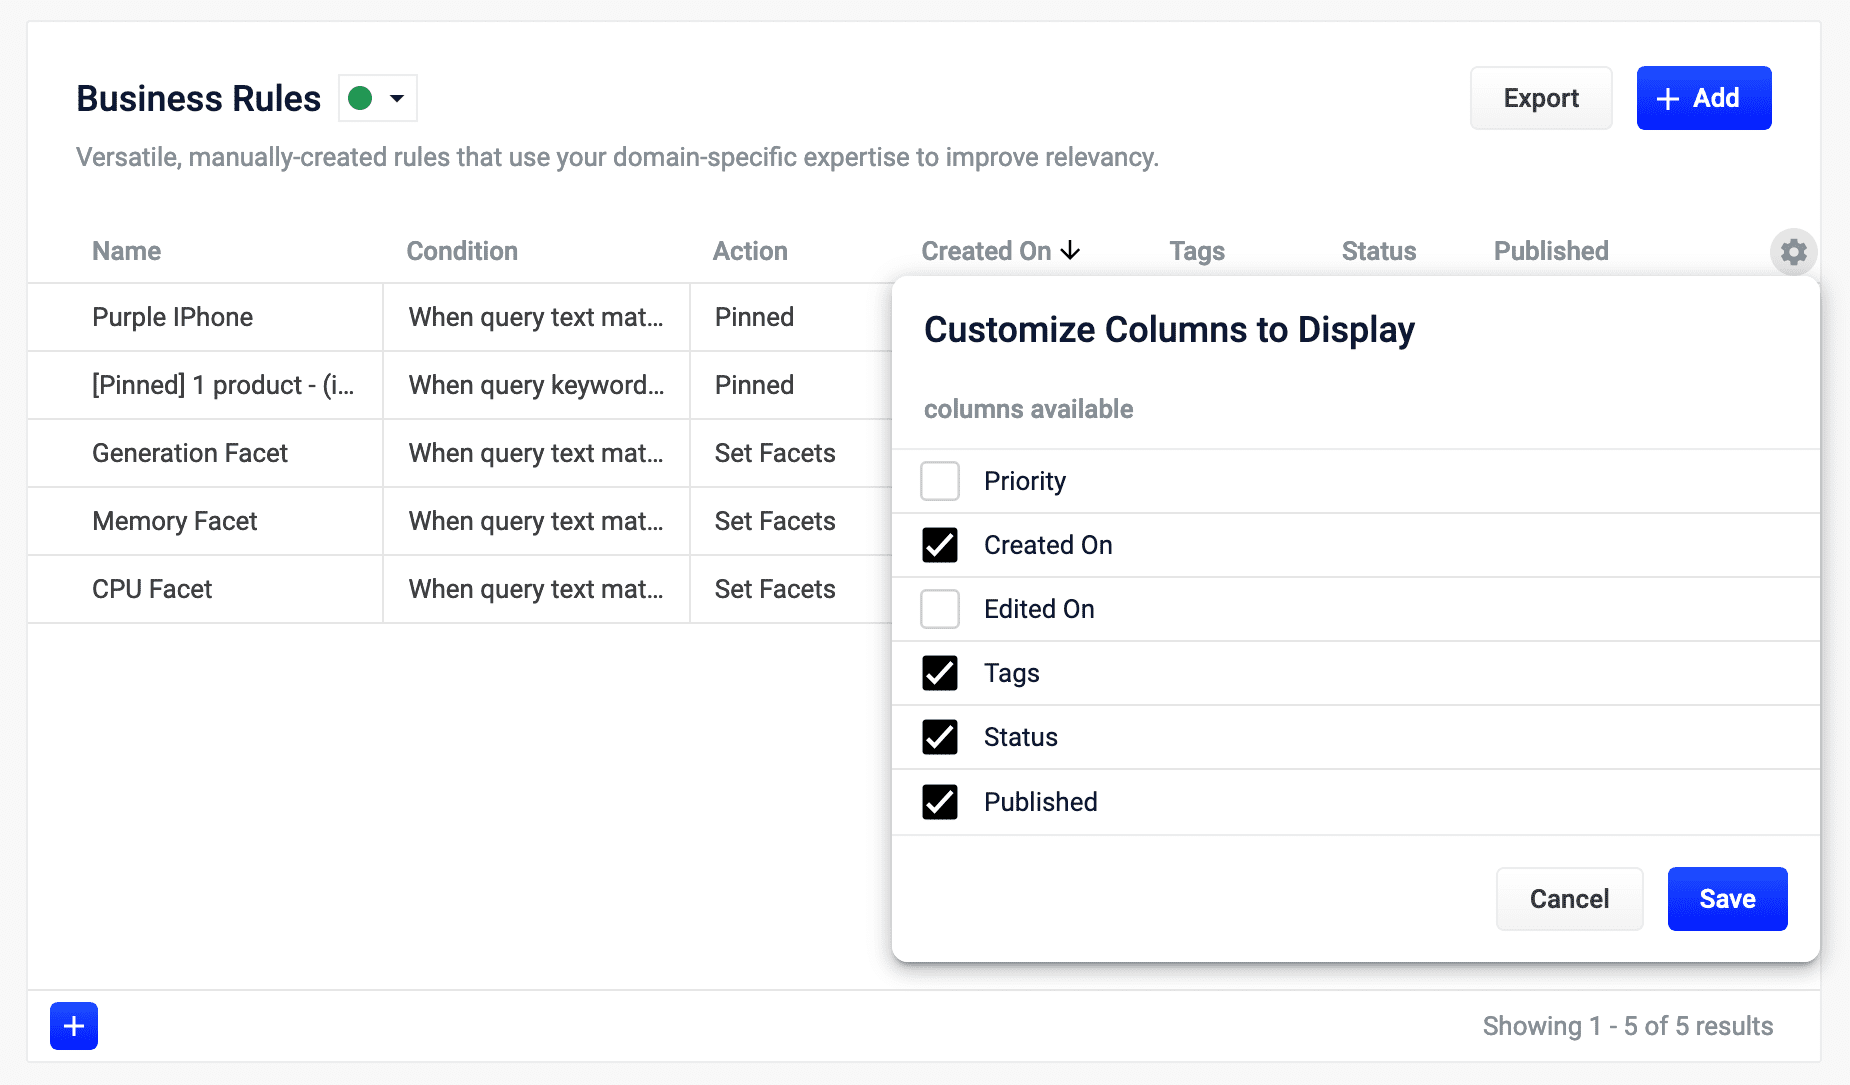
- Click the checkboxes to select or deselect the columns you want to display.
- Click the button to save your changes.
Use Query Rewrites in the Rules Editor
Use Query Rewrites in the Rules Editor
This article describes how to use the Rewrites screen in the Rules Editor.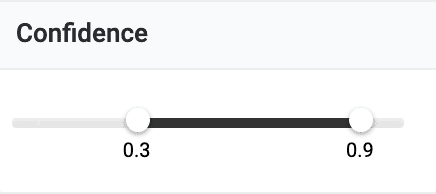
Query rewrite rule types
- Head/Tail. Replace underperforming queries with queries that produce higher click-through rates. Query improvements always require review before they are published. Schedule the Head/Tail Analysis job to get AI-generated query improvements based on your signals collection.
Manually created Head/Tail rewrites must provide an “Improved Query” in a format appropriate to the type of request the rewrite will be applied to. For Legacy requests, this means a valid Solr query fit for use as theqparameter. For DSL requests this means a JSON string representing the main DSL query.
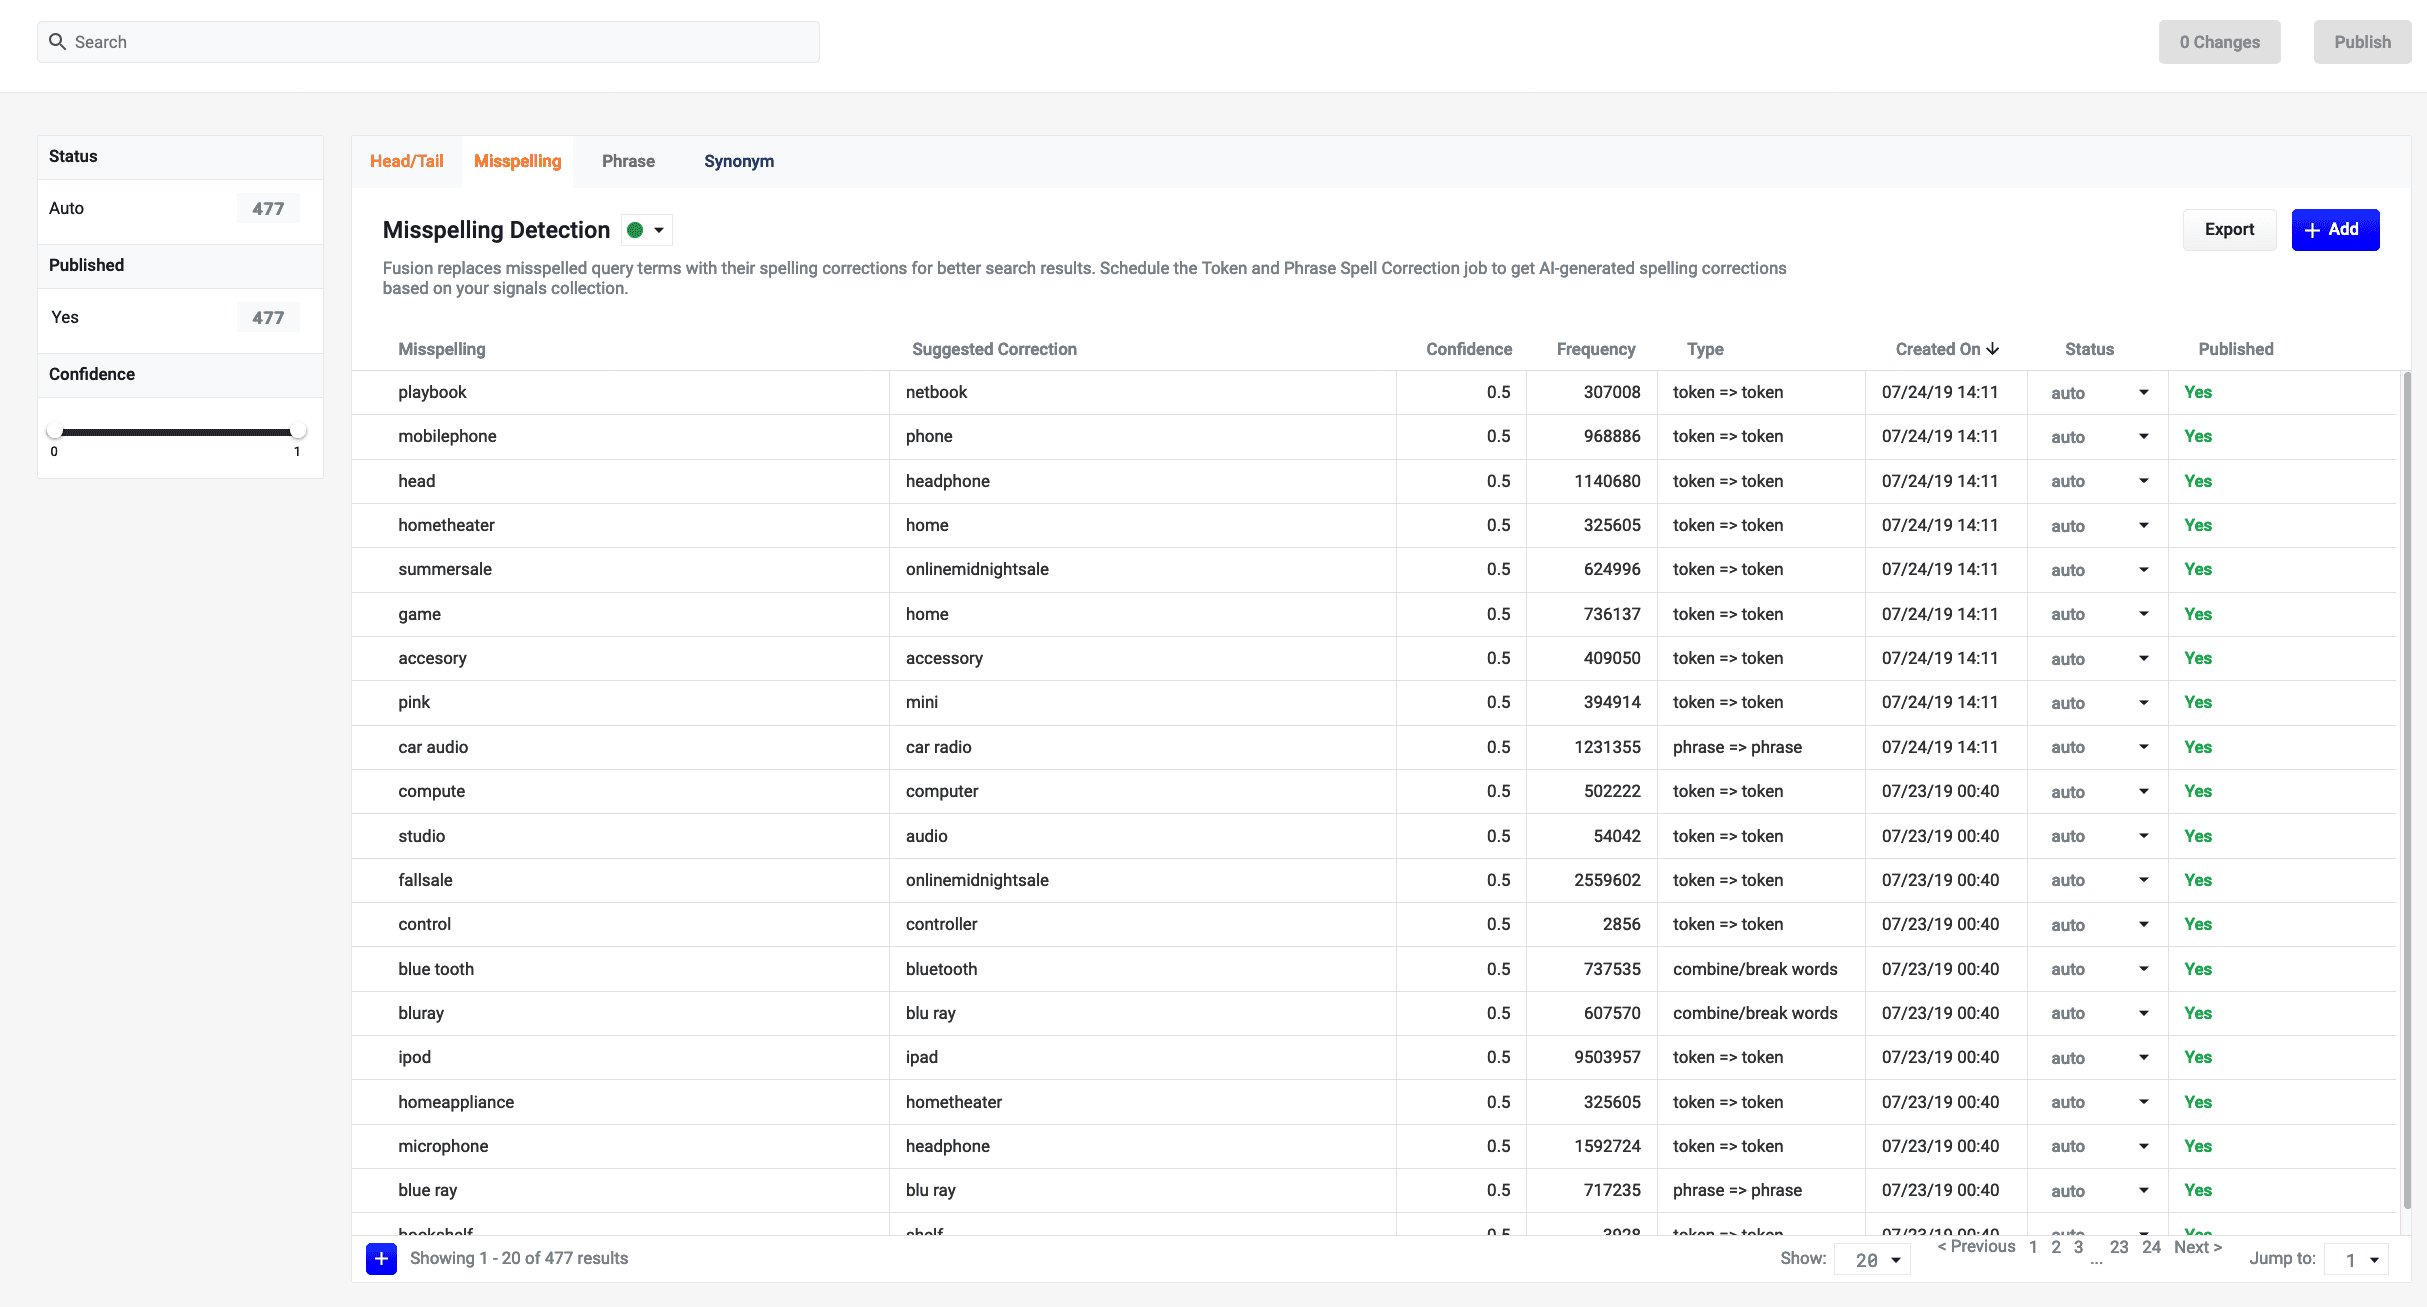
For more information, see: - Misspelling. Fusion replaces misspelled query terms with their spelling corrections for better search results. Schedule the Token and Phrase Spell Correction job to get AI-generated spelling corrections based on your signals collection. For more information, see Misspelling Detection.
- Phrase. Known phrases are boosted when they appear in new queries. Schedule the Phrase Extraction job to get AI-generated phrases based on your signals collection. For more information, see Phrase Detection.
- Synonym. Synonyms are used to expand queries so that they include all known synonyms of the query terms. To retrieve AI-generated synonyms based on your signals collection, schedule the Synonym Detection job.
- Remove Words - Remove particular phrases from queries. Unlike other rewrites, these should be entered manually and are not generated by a job. For more information, see Remove Words.
Facets
Facet menu
Faceting rules by confidence is not available for Head/Tail rewrites.
Search
Enter a term in the search bar to quickly facet your query rewrite rules.Rules
Begin by selecting one of the query rewrite rule types you will create.Create a rule
- Click +Add.
- In the new table row, complete the required fields, and additional fields as needed.
- Click the checkmark to save, or close to cancel the changes.
Edit a rule
- Hold the pointer over the rule to edit.
- Click the pencil icon.
- Enter desired changes and click the checkmark to save, or close to cancel the changes.
Approve/deny rules
- Hold the pointer over a rule.
- Select the checkbox that displays for that rule.
- To modify multiple rules, hold the pointer over each rule and select its corresponding checkbox.
- Click Approve or Deny as needed.
Publish a rule
- Hold the pointer over a rule.
- Select the checkbox that displays for that rule.
- To publish multiple rules, hold the pointer over each rule and select its corresponding checkbox.
- Click Publish Selected to publish the selected rules.
Publish an individual rule
- Hold the pointer over a rule.
- Click the button.
- To confirm, click Publish.
Delete rules
Delete a single rule
- Hold the pointer over a rule.
- Click the trash can.
- To confirm, click Delete.
Delete multiple rules
- Hold the pointer over a rule.
- Select the checkbox that displays for that rule.
- To delete multiple rules, hold the pointer over each rule and select its corresponding checkbox.
- Click Delete.
- To confirm, click Delete again.
Sort rules
- Hold the pointer over column titles. A icon displays for some titles to indicate the rules list can be sorted by that column.
- Click the title column to sort the rules.
The column that is currently sorting the rules list is indicated by an or icon.
Export rules
To export the rules list, click Export. This generates a.csv file that contains your rules.Columns
Customize columns
To customize columns:- Hold the pointer over the row of column titles.
-
Click the button.
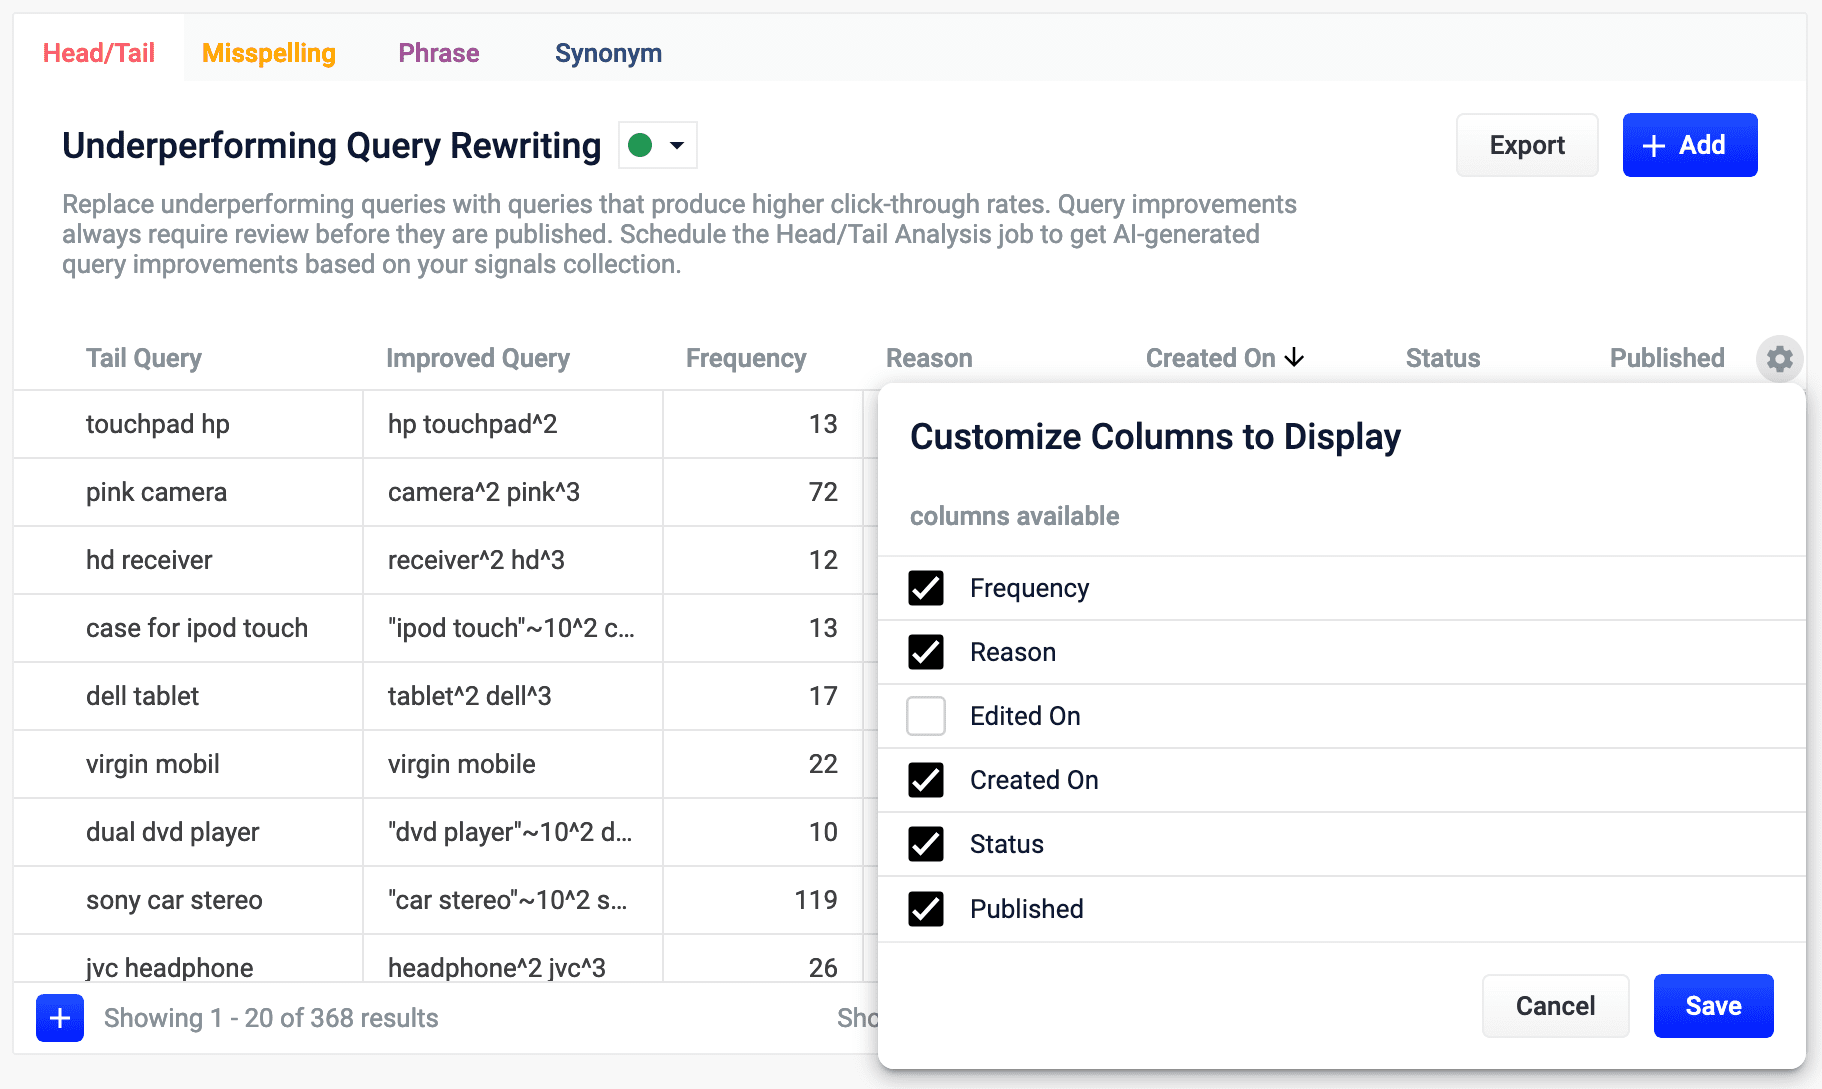
- In the Customize Columns to Display screen, select the checkboxes for the columns you want to display. Clear the checkboxes for columns you do not want to display.
- Click Save. To exit without saving your changes, click Cancel.
Experience Optimizer: Rules Manager
The course for Experience Optimizer: Rules Manager focuses on how to create and utilize business rules to create more relevant search results for your users.
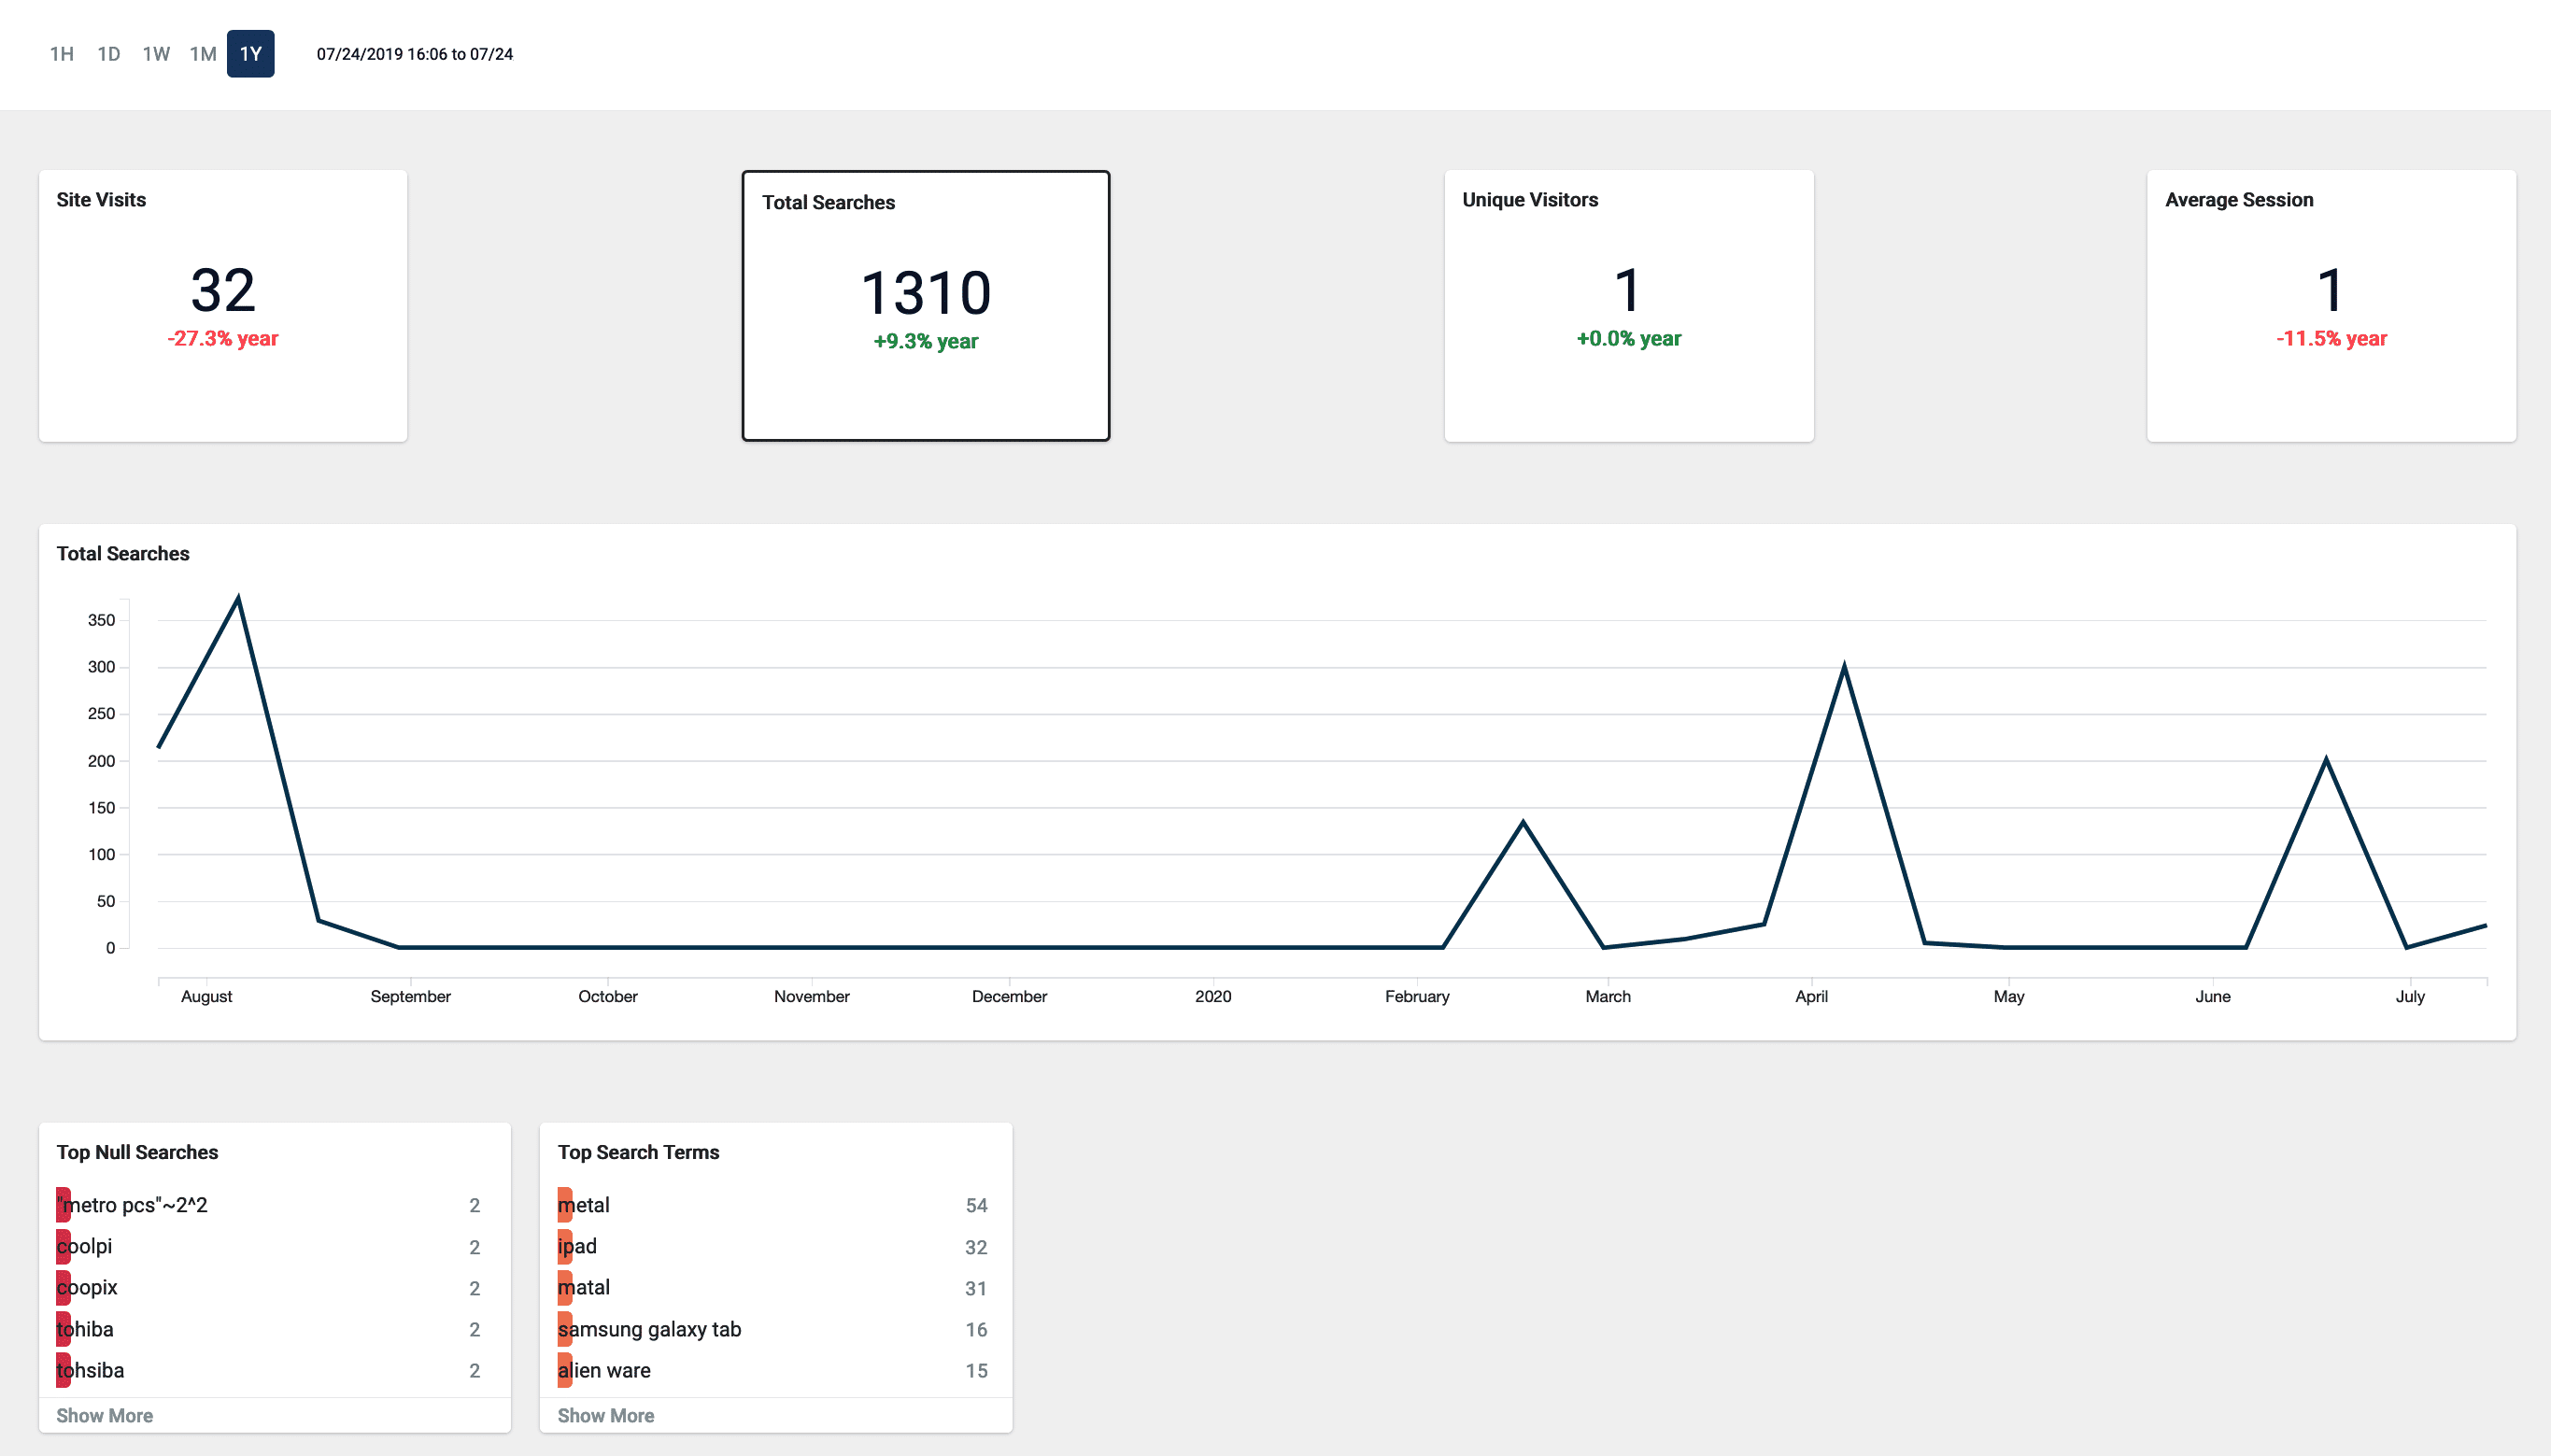
Signals data
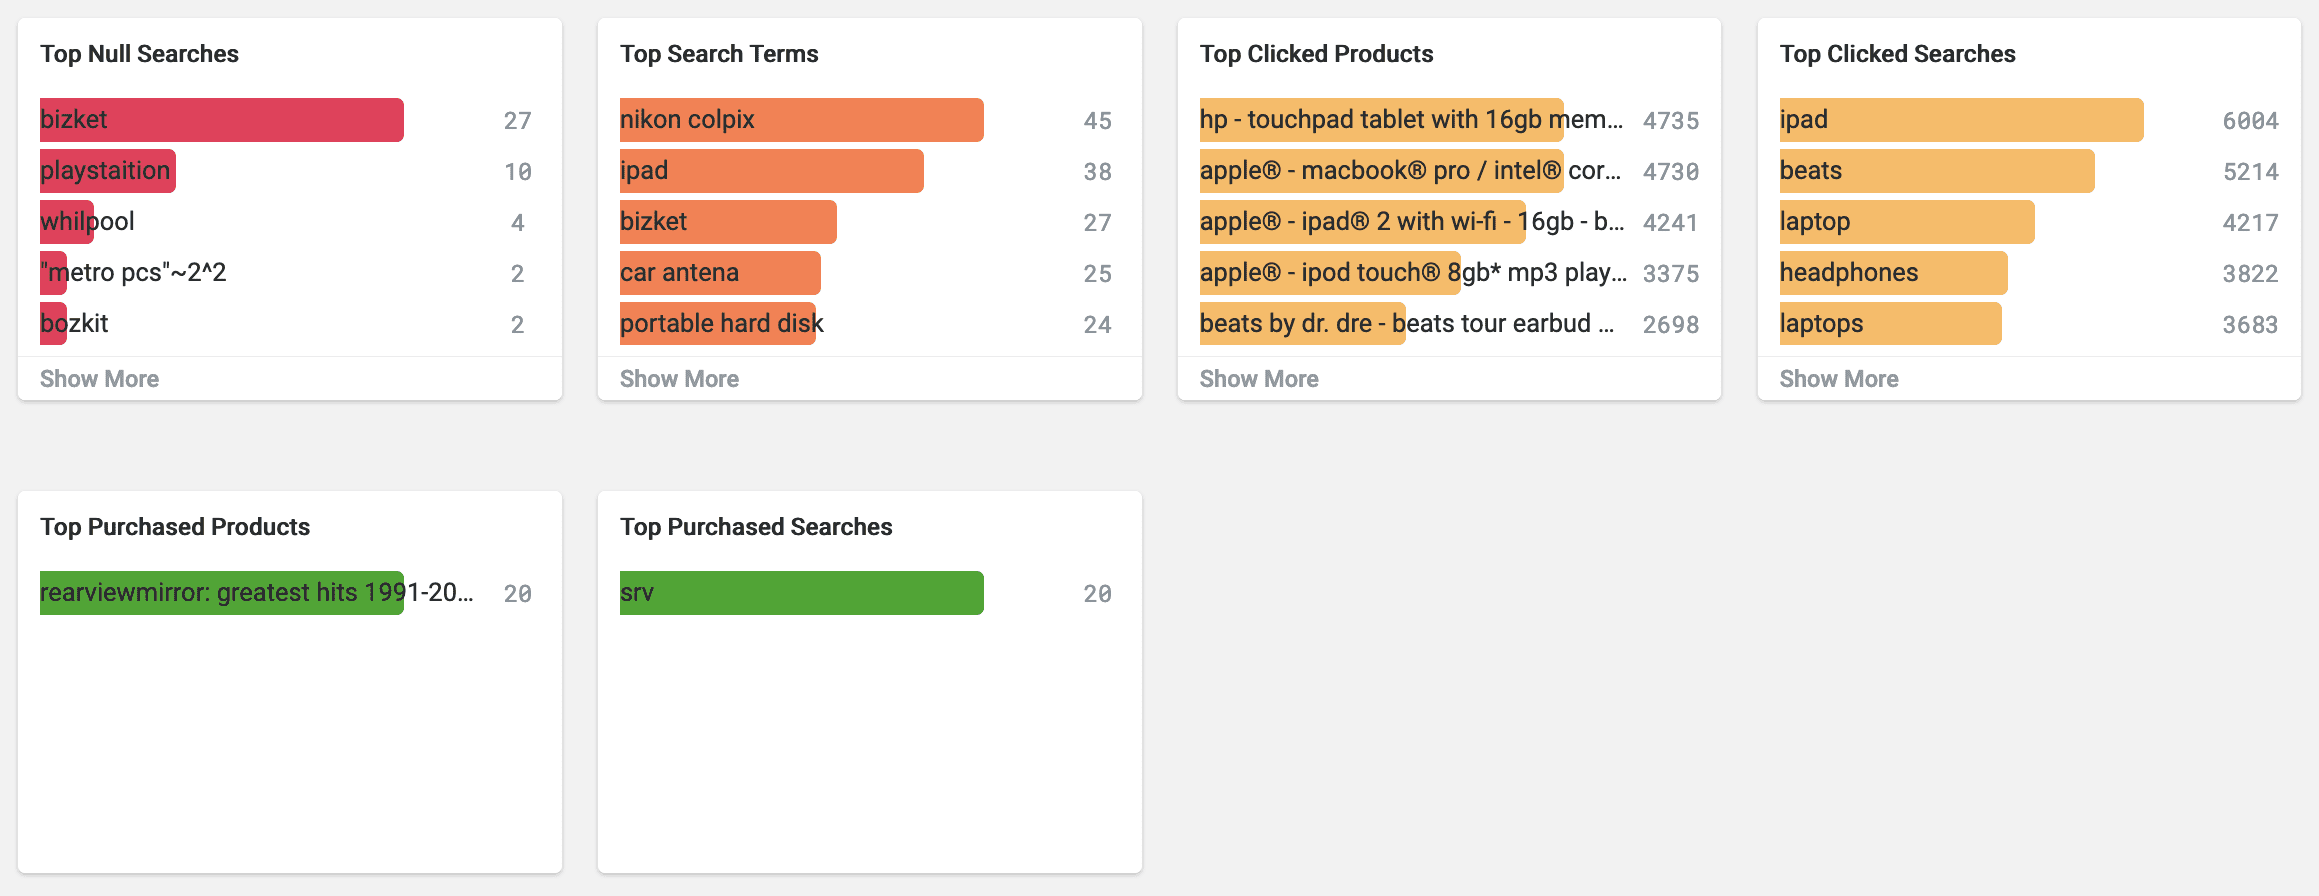
- Top Null Searches. The top search terms that yielded 0 results. A null search is considered a poor user experience. Use Use Query Rewrites in the Rules Editor to reduce the likelihood of a visitor receiving 0 results.
- Top Search Terms. The most commonly searched terms.
- Top Clicked Products. The most commonly clicked products or documents. This may include searches, recommendations, static links, or outside referrals.
- Top Clicked Searches. The most common searches that resulted in a click.
- Top Purchased Products. The most commonly purchased products. This may include searches, recommendations, static links, or referrals.
- Top Purchased Searches. The most commonly purchased products that were identified from a search.
Use Query Rewrites in the Rules Editor
Use Query Rewrites in the Rules Editor
This article describes how to use the Rewrites screen in the Rules Editor.
Query rewrite rule types
- Head/Tail. Replace underperforming queries with queries that produce higher click-through rates. Query improvements always require review before they are published. Schedule the Head/Tail Analysis job to get AI-generated query improvements based on your signals collection.
Manually created Head/Tail rewrites must provide an “Improved Query” in a format appropriate to the type of request the rewrite will be applied to. For Legacy requests, this means a valid Solr query fit for use as theqparameter. For DSL requests this means a JSON string representing the main DSL query.
For more information, see: - Misspelling. Fusion replaces misspelled query terms with their spelling corrections for better search results. Schedule the Token and Phrase Spell Correction job to get AI-generated spelling corrections based on your signals collection. For more information, see Misspelling Detection.
- Phrase. Known phrases are boosted when they appear in new queries. Schedule the Phrase Extraction job to get AI-generated phrases based on your signals collection. For more information, see Phrase Detection.
- Synonym. Synonyms are used to expand queries so that they include all known synonyms of the query terms. To retrieve AI-generated synonyms based on your signals collection, schedule the Synonym Detection job.
- Remove Words - Remove particular phrases from queries. Unlike other rewrites, these should be entered manually and are not generated by a job. For more information, see Remove Words.
Facets
Facet menu
Faceting rules by confidence is not available for Head/Tail rewrites.
Search
Enter a term in the search bar to quickly facet your query rewrite rules.Rules
Begin by selecting one of the query rewrite rule types you will create.Create a rule
- Click +Add.
- In the new table row, complete the required fields, and additional fields as needed.
- Click the checkmark to save, or close to cancel the changes.
Edit a rule
- Hold the pointer over the rule to edit.
- Click the pencil icon.
- Enter desired changes and click the checkmark to save, or close to cancel the changes.
Approve/deny rules
- Hold the pointer over a rule.
- Select the checkbox that displays for that rule.
- To modify multiple rules, hold the pointer over each rule and select its corresponding checkbox.
- Click Approve or Deny as needed.
Publish a rule
- Hold the pointer over a rule.
- Select the checkbox that displays for that rule.
- To publish multiple rules, hold the pointer over each rule and select its corresponding checkbox.
- Click Publish Selected to publish the selected rules.
Publish an individual rule
- Hold the pointer over a rule.
- Click the button.
- To confirm, click Publish.
Delete rules
Delete a single rule
- Hold the pointer over a rule.
- Click the trash can.
- To confirm, click Delete.
Delete multiple rules
- Hold the pointer over a rule.
- Select the checkbox that displays for that rule.
- To delete multiple rules, hold the pointer over each rule and select its corresponding checkbox.
- Click Delete.
- To confirm, click Delete again.
Sort rules
- Hold the pointer over column titles. A icon displays for some titles to indicate the rules list can be sorted by that column.
- Click the title column to sort the rules.
The column that is currently sorting the rules list is indicated by an or icon.
Export rules
To export the rules list, click Export. This generates a.csv file that contains your rules.Columns
Customize columns
To customize columns:- Hold the pointer over the row of column titles.
-
Click the button.
- In the Customize Columns to Display screen, select the checkboxes for the columns you want to display. Clear the checkboxes for columns you do not want to display.
- Click Save. To exit without saving your changes, click Cancel.
Predictive Merchandiser and Experience Optimizer
Predictive Merchandiser and Experience Optimizer are both AI-powered tools that provide insights, customer recommendations, and search optimization in a single comprehensive product.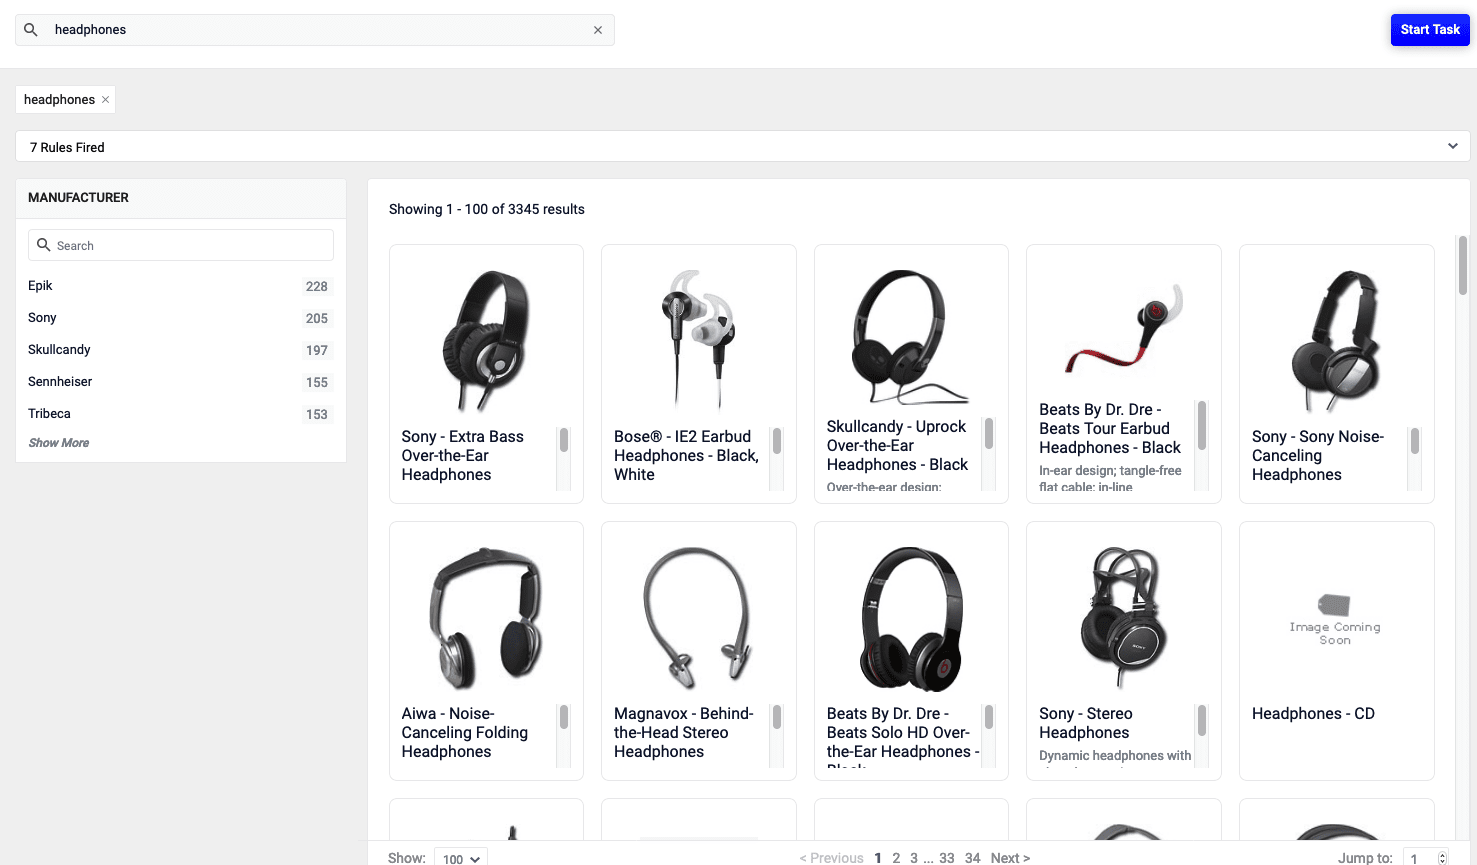
Rules
Use Business Rules in the Rules Editor
Use Business Rules in the Rules Editor
This article describes how to use the Business Rules screen in the Rules Editor.
Query Rewriting with Business Rules and Search Rewrites
The course for Query Rewriting with Business Rules and Search Rewrites focuses on how using business rules and search rewrites gives you the opportunity to boost conversions and create better customer experiences by improving your relevancy.
Facet rules
Facet menu
-
Click the date start value. A calendar will appear.
- Click a date to select the start of your facet range.
- Click the bottom date and select the end of your facet range.
Search
Enter a term in the search bar to quickly facet your business rules.Rules
Create a rule
-
Click the button in the top-right corner of the card. Alternatively, click the button in the bottom-left corner of the card. The New Rule dialog box will appear.
-
Complete the required fields, at a minimum.
General Condition Action In the General column, only the Name field is required. Other fields are optional: - Description is an arbitrary string you can use to describe this rule.
- Rule Group can be a user-defined group that you use to organize your rules.
- Tags are another way to organize your rules. Tags appear as facets in the Business Rules interface, so you can filter the set of visible rules by tag.
- Priority can be used to determine which rule should apply first if multiple rules are activated for the same request. Priority is an integer value, ranging from 1 to infinity, with the value 1 given lowest priority. If multiple rules have the same value, those rules are applied in a random order.
- Enabled means that this rule is applied but not necessarily published. Disabling a rule helps ensure that it is not accidentally published.
Conditions are triggers that activate the rule when they match the current date and time, query, or field values. See Rule conditions for more information. A rule can take different types of actions when the specified conditions are met. See Action types for more information. You can also create custom actions. - Once complete, click the button.
Copy a rule
- Hover over a rule. A row of buttons will appear on the right.
-
Click the button. The Copy Rule dialog box will appear.
- At a minimum, change the title of the rule.
- Once complete, click the button.
Edit a rule
- Hover over a rule. A row of buttons will appear on the right.
-
Click the button. The Edit Rule dialog box appears.
- Make your desired changes to the rule.
- Once complete, click the button.
Approve/deny rules
- Hover over a rule. A checkbox will appear on the left.
- Click the checkbox to select the rule.
- Repeat this process to select multiple rules. (optional)
- Click the Approve button to approve the selected rules, or click the Deny button to deny the rules.
Enable/disable a rule
- Hover over a rule. A checkbox will appear on the left.
- Click the checkbox to select the rule.
- Repeat this process to select multiple rules. (optional)
- Click the button to enable the selected rules, or click the button to disable the rules.
Publish a rule
- Hover over a rule. A checkbox will appear on the left.
- Click the checkbox to select the rule.
- Repeat this process to select multiple rules. (optional)
- Click the button to publish the selected rules.
Tag a rule
Tags are a powerful tool for organizing and publishing rules according to a keyword, such asblack-friday-sale.- Hover over a rule. A checkbox will appear on the left.
- Click the checkbox to select the rule.
- Repeat this process to select multiple rules. (optional)
- Click the button. A dialog box will appear.
- Enter a tag. To enter multiple tags, press Tab after writing each tag.
-
Click the button to add the tag to the rule.
See General Configuration Tags for information about how to use tagnames in the request URL to fire specific rules.
Delete rules
Delete a single rule
- Hover over a rule. A row of buttons will appear on the right.
- Click the button. A confirmation box will appear.
- Click the button to confirm.
Delete multiple rules
- Hover over a rule. A checkbox will appear on the left.
- Click the checkbox to select the rule.
- Repeat this process to select multiple rules. (optional)
- Click the button to delete the selected rules. A confirmation box will appear.
- Click the button to confirm.
Sort rules
- Hover over column titles. A icon will appear for some titles to indicate the rules list can be sorted by that column.
- Click on the title column to sort the rules.
The column that is currently sorting the rules list is indicated by an or icon.
Export rules
To export the rules list, simply click the button. This generates a.csv file containing your rules.Columns
Customize columns
To customize the columns:- Hover over the row of column titles. A button will appear on the right.
-
Click the button. The Customize Columns to Display dialog box will appear.
- Click the checkboxes to select or deselect the columns you want to display.
- Click the button to save your changes.
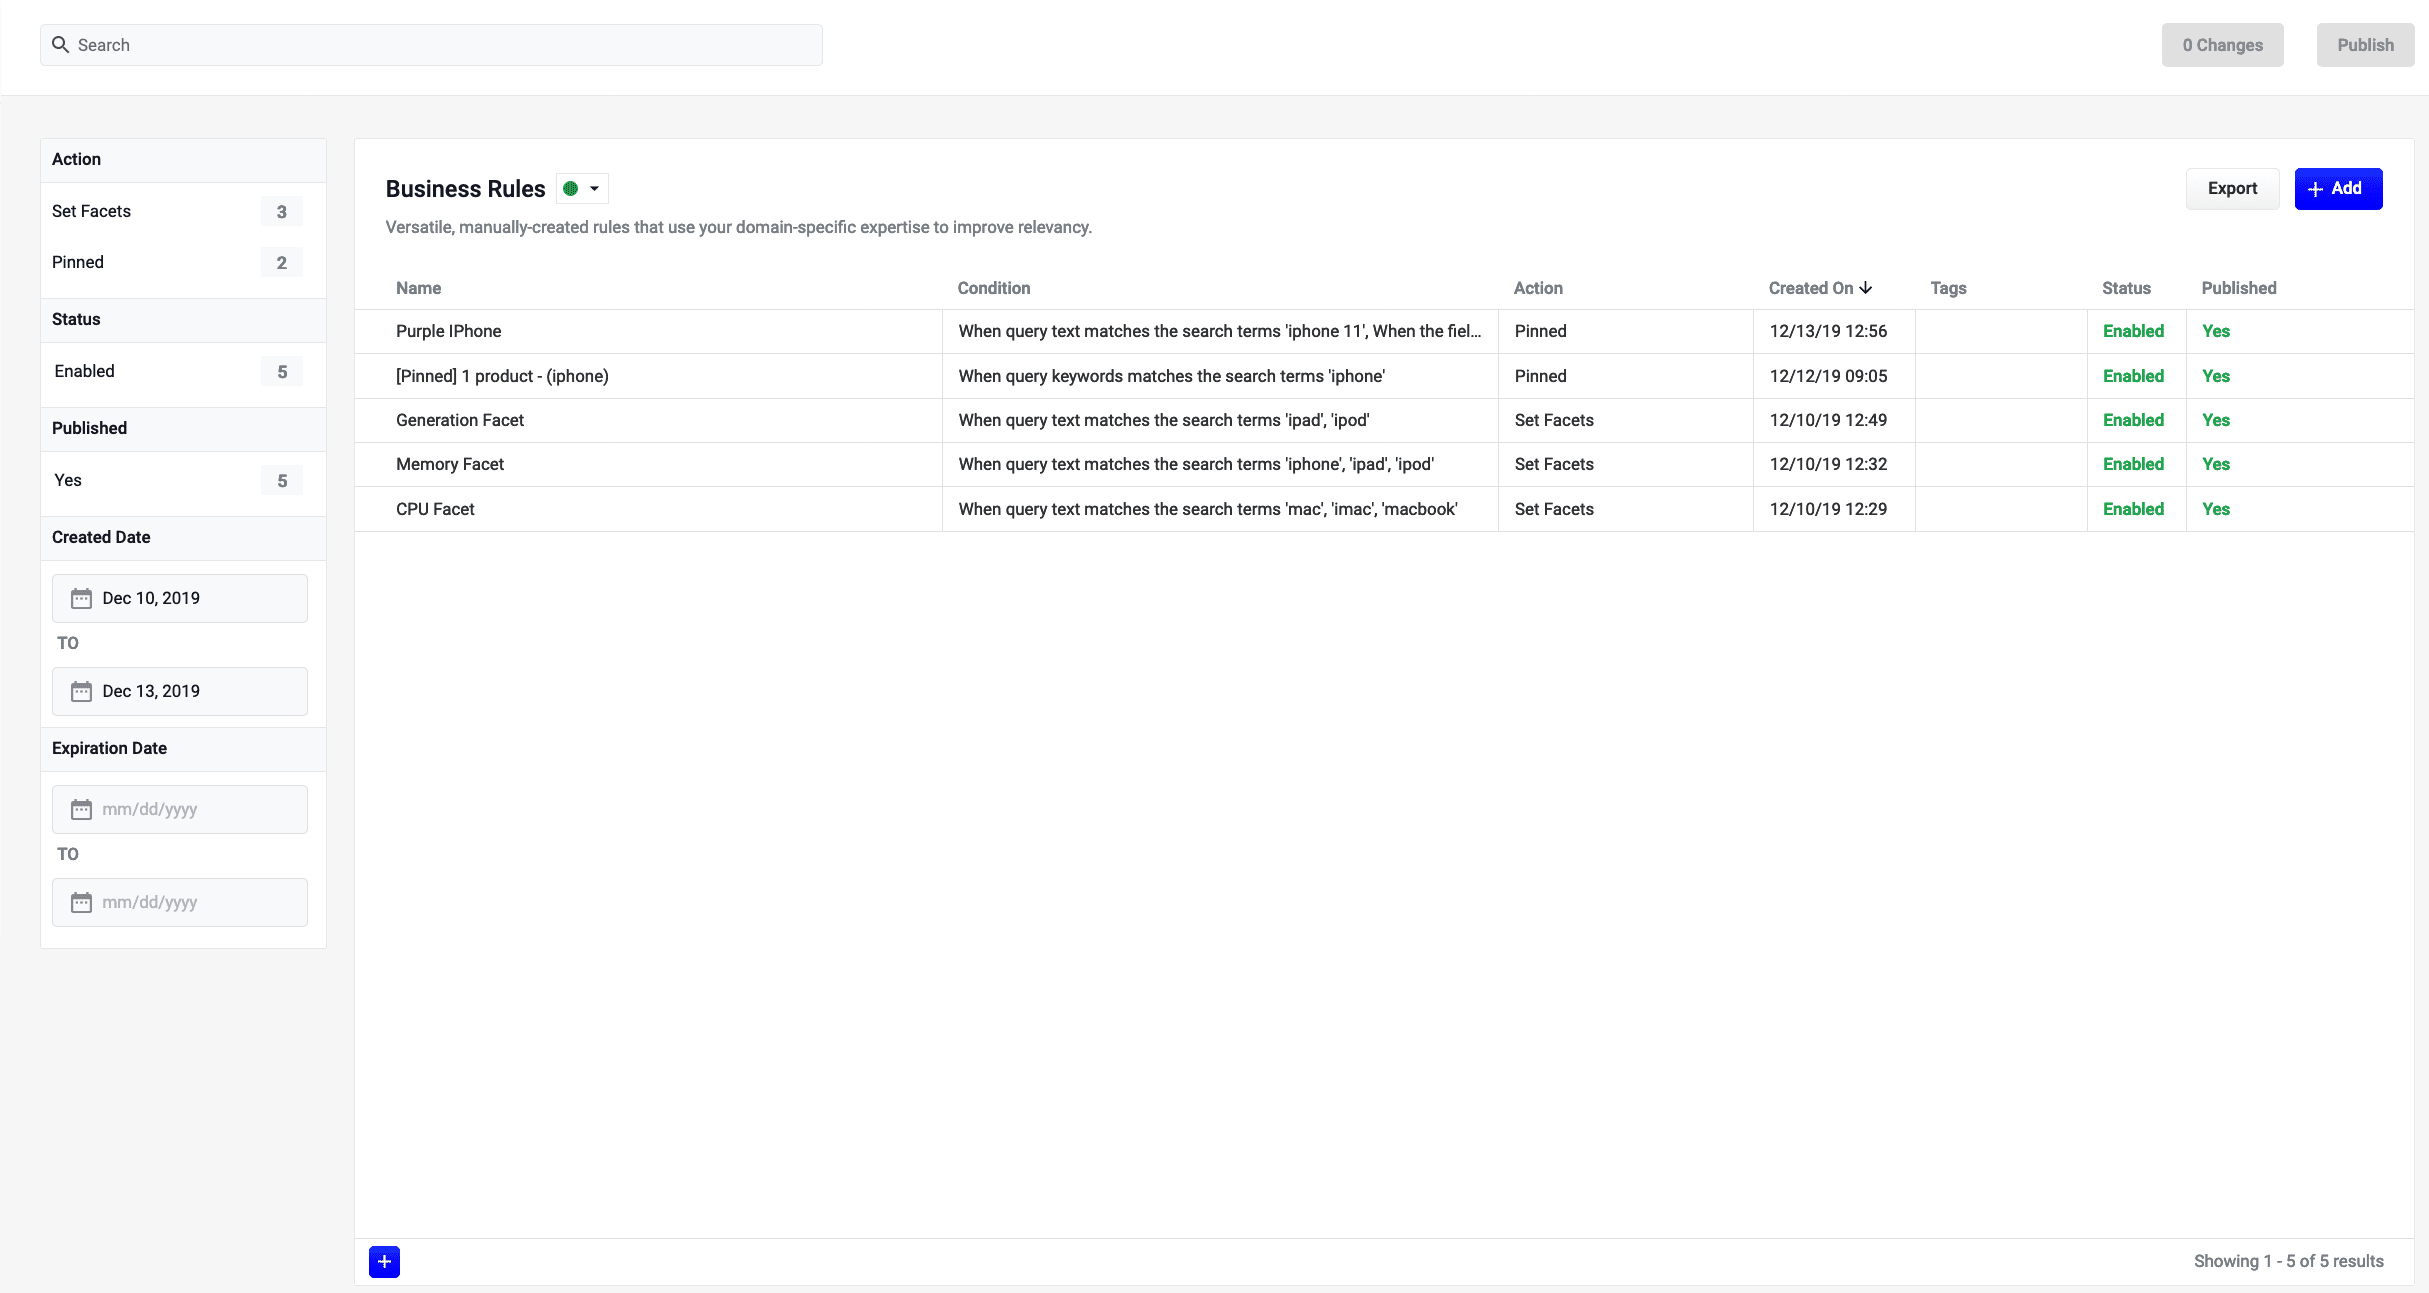
UI elements
Facets
- Action. The built-in rule action for the rule.
- Status. Whether a rule is enabled or disabled.
- Published. Whether or not a rule has been published.
- Created Date. The date the rule was created.
- Expiration Date. The date the rule will expire.
Rules list
The rules list can be faceted, searched, or sorted according to the various values the rules hold.Rewrite
Use Query Rewrites in the Rules Editor
Use Query Rewrites in the Rules Editor
This article describes how to use the Rewrites screen in the Rules Editor.
Query rewrite rule types
- Head/Tail. Replace underperforming queries with queries that produce higher click-through rates. Query improvements always require review before they are published. Schedule the Head/Tail Analysis job to get AI-generated query improvements based on your signals collection.
Manually created Head/Tail rewrites must provide an “Improved Query” in a format appropriate to the type of request the rewrite will be applied to. For Legacy requests, this means a valid Solr query fit for use as theqparameter. For DSL requests this means a JSON string representing the main DSL query.
For more information, see: - Misspelling. Fusion replaces misspelled query terms with their spelling corrections for better search results. Schedule the Token and Phrase Spell Correction job to get AI-generated spelling corrections based on your signals collection. For more information, see Misspelling Detection.
- Phrase. Known phrases are boosted when they appear in new queries. Schedule the Phrase Extraction job to get AI-generated phrases based on your signals collection. For more information, see Phrase Detection.
- Synonym. Synonyms are used to expand queries so that they include all known synonyms of the query terms. To retrieve AI-generated synonyms based on your signals collection, schedule the Synonym Detection job.
- Remove Words - Remove particular phrases from queries. Unlike other rewrites, these should be entered manually and are not generated by a job. For more information, see Remove Words.
Facets
Facet menu
Faceting rules by confidence is not available for Head/Tail rewrites.
Search
Enter a term in the search bar to quickly facet your query rewrite rules.Rules
Begin by selecting one of the query rewrite rule types you will create.Create a rule
- Click +Add.
- In the new table row, complete the required fields, and additional fields as needed.
- Click the checkmark to save, or close to cancel the changes.
Edit a rule
- Hold the pointer over the rule to edit.
- Click the pencil icon.
- Enter desired changes and click the checkmark to save, or close to cancel the changes.
Approve/deny rules
- Hold the pointer over a rule.
- Select the checkbox that displays for that rule.
- To modify multiple rules, hold the pointer over each rule and select its corresponding checkbox.
- Click Approve or Deny as needed.
Publish a rule
- Hold the pointer over a rule.
- Select the checkbox that displays for that rule.
- To publish multiple rules, hold the pointer over each rule and select its corresponding checkbox.
- Click Publish Selected to publish the selected rules.
Publish an individual rule
- Hold the pointer over a rule.
- Click the button.
- To confirm, click Publish.
Delete rules
Delete a single rule
- Hold the pointer over a rule.
- Click the trash can.
- To confirm, click Delete.
Delete multiple rules
- Hold the pointer over a rule.
- Select the checkbox that displays for that rule.
- To delete multiple rules, hold the pointer over each rule and select its corresponding checkbox.
- Click Delete.
- To confirm, click Delete again.
Sort rules
- Hold the pointer over column titles. A icon displays for some titles to indicate the rules list can be sorted by that column.
- Click the title column to sort the rules.
The column that is currently sorting the rules list is indicated by an or icon.
Export rules
To export the rules list, click Export. This generates a.csv file that contains your rules.Columns
Customize columns
To customize columns:- Hold the pointer over the row of column titles.
-
Click the button.
- In the Customize Columns to Display screen, select the checkboxes for the columns you want to display. Clear the checkboxes for columns you do not want to display.
- Click Save. To exit without saving your changes, click Cancel.
UI elements
Facets
- Status. Whether a rule is enabled or disabled.
- Published. Whether or not a rule has been published.
-
Confidence. The confidence score for the rule. A confidence score is automatically set by Fusion. It can be manually set for user-created rules. The confidence score is used, in part, to decided whether a rule is automatically published or not. See Query Rewriting concepts for more information.
Confidence is not used for Head/Tail query rewrites.
Rules list
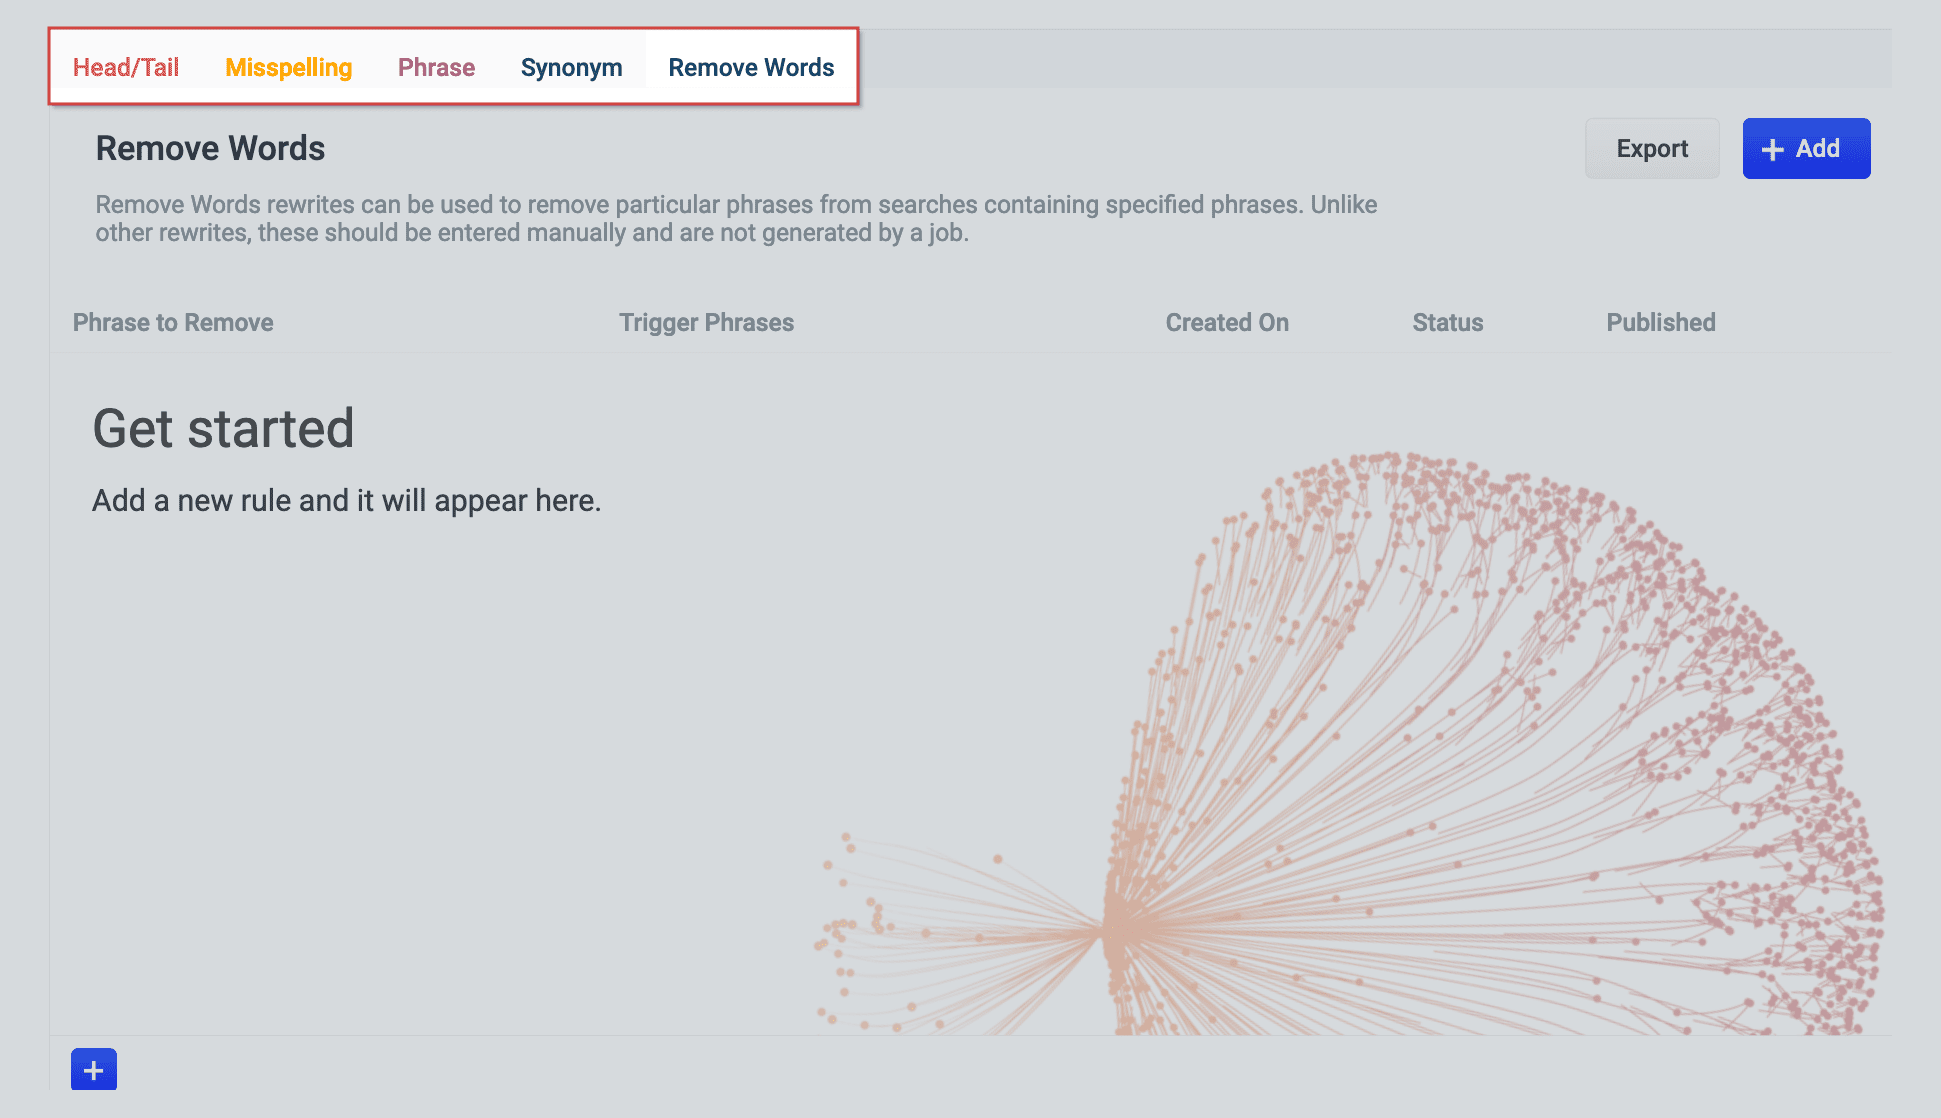
You can facet, search, or sort the rules list according to the values the rules hold.Rule type selectors
There are buttons at the top of the rules list that allow you to choose what query rewrite rule types you would like to work with: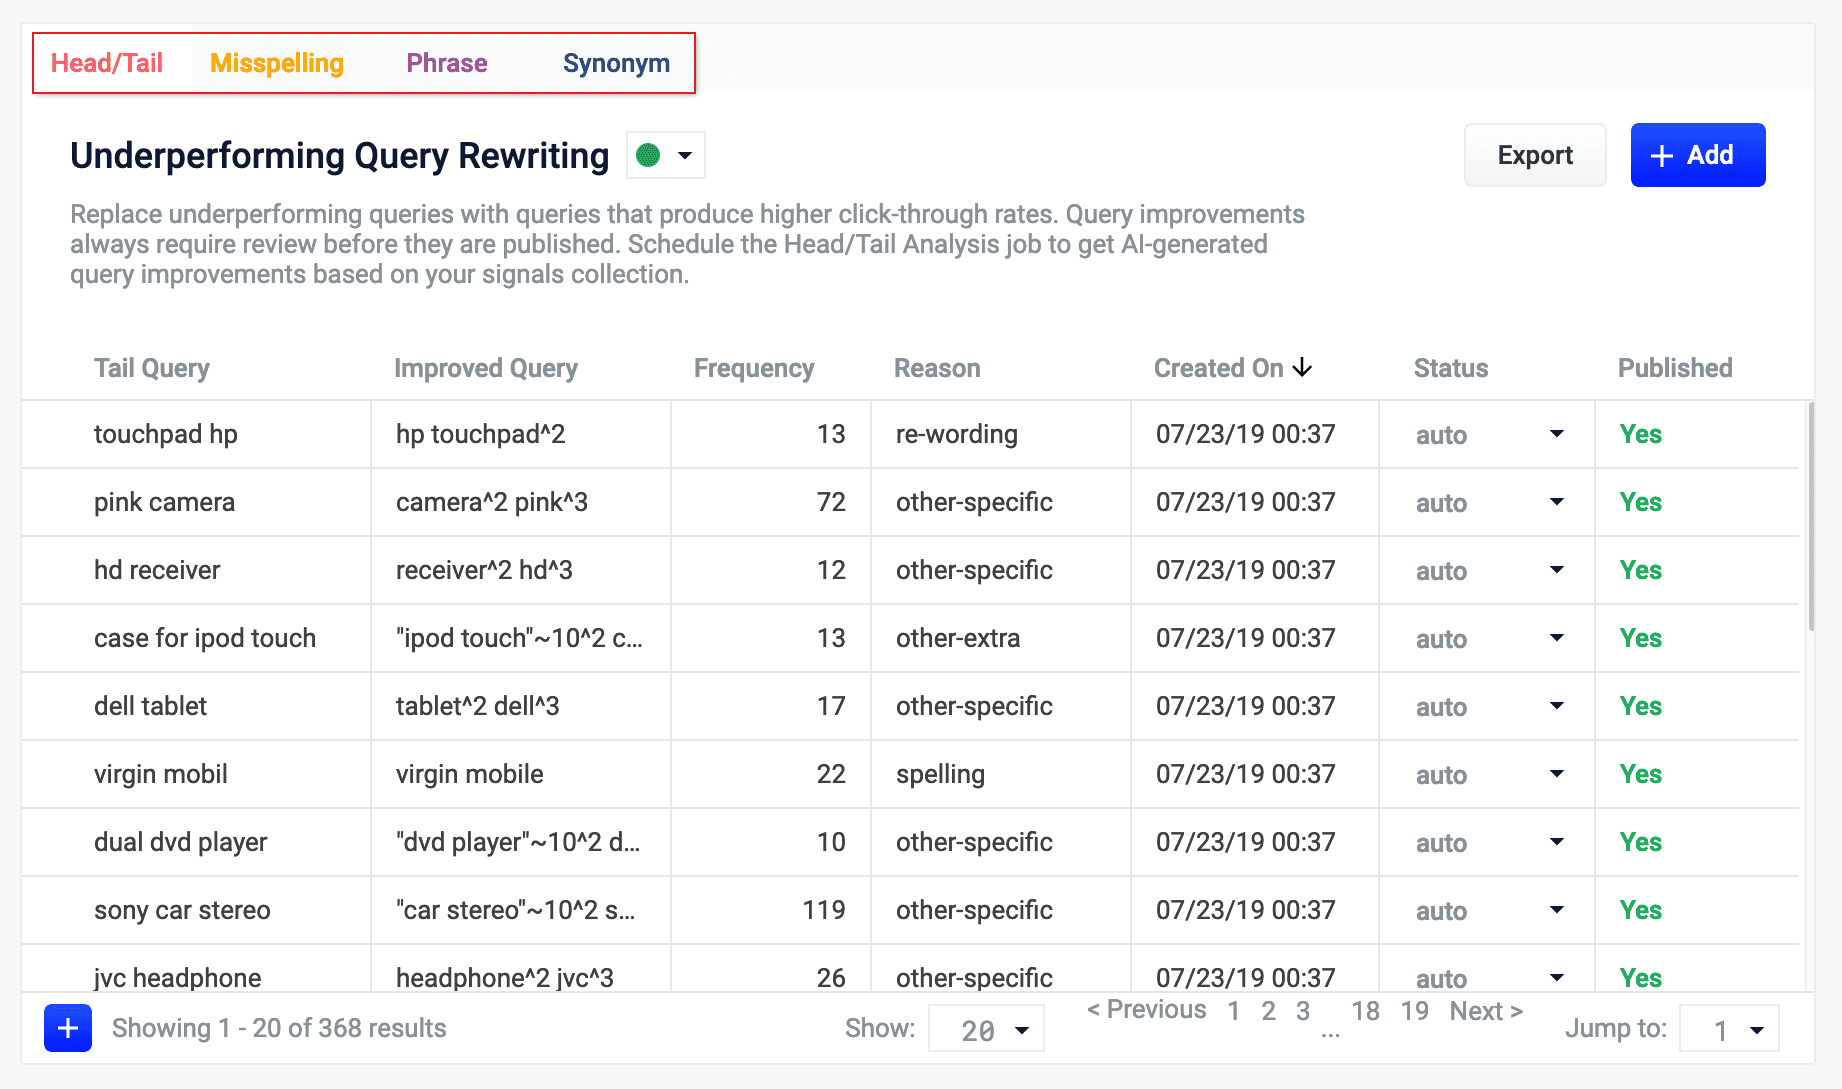
- Head/Tail. Replace underperforming queries with queries that produce higher click-through rates. Query improvements always require review before they are published. Schedule the Head/Tail Analysis job to get AI-generated query improvements based on your signals collection. See Underperforming Query Rewriting.
- Misspelling. Fusion replaces misspelled query terms with their spelling corrections for better search results. Schedule the Token and Phrase Spell Correction job to get AI-generated spelling corrections based on your signals collection. See Misspelling Detection.
- Phrase. Known phrases are boosted when they appear in new queries. Schedule the Phrase Extraction job to get AI-generated phrases based on your signals collection. See Phrase Detection.
- Synonym. Synonyms expand queries so that they include all known synonyms of the query terms. Schedule the Synonym Detection job to get AI-generated synonyms based on your signals collection. See Synonym Detection.
- Remove Words. Remove particular phrases from queries. Unlike other rewrites, these should be entered manually and are not generated by a job. See Remove Words.
Templates
The Templates screen in the Rules Editor allows you to design, test, and implement a wide variety of search experiences. Results are conditionally delivered from multiple different query pipelines, enabling you to use Fusion’s search, browse, and AI-driven functionality throughout your site.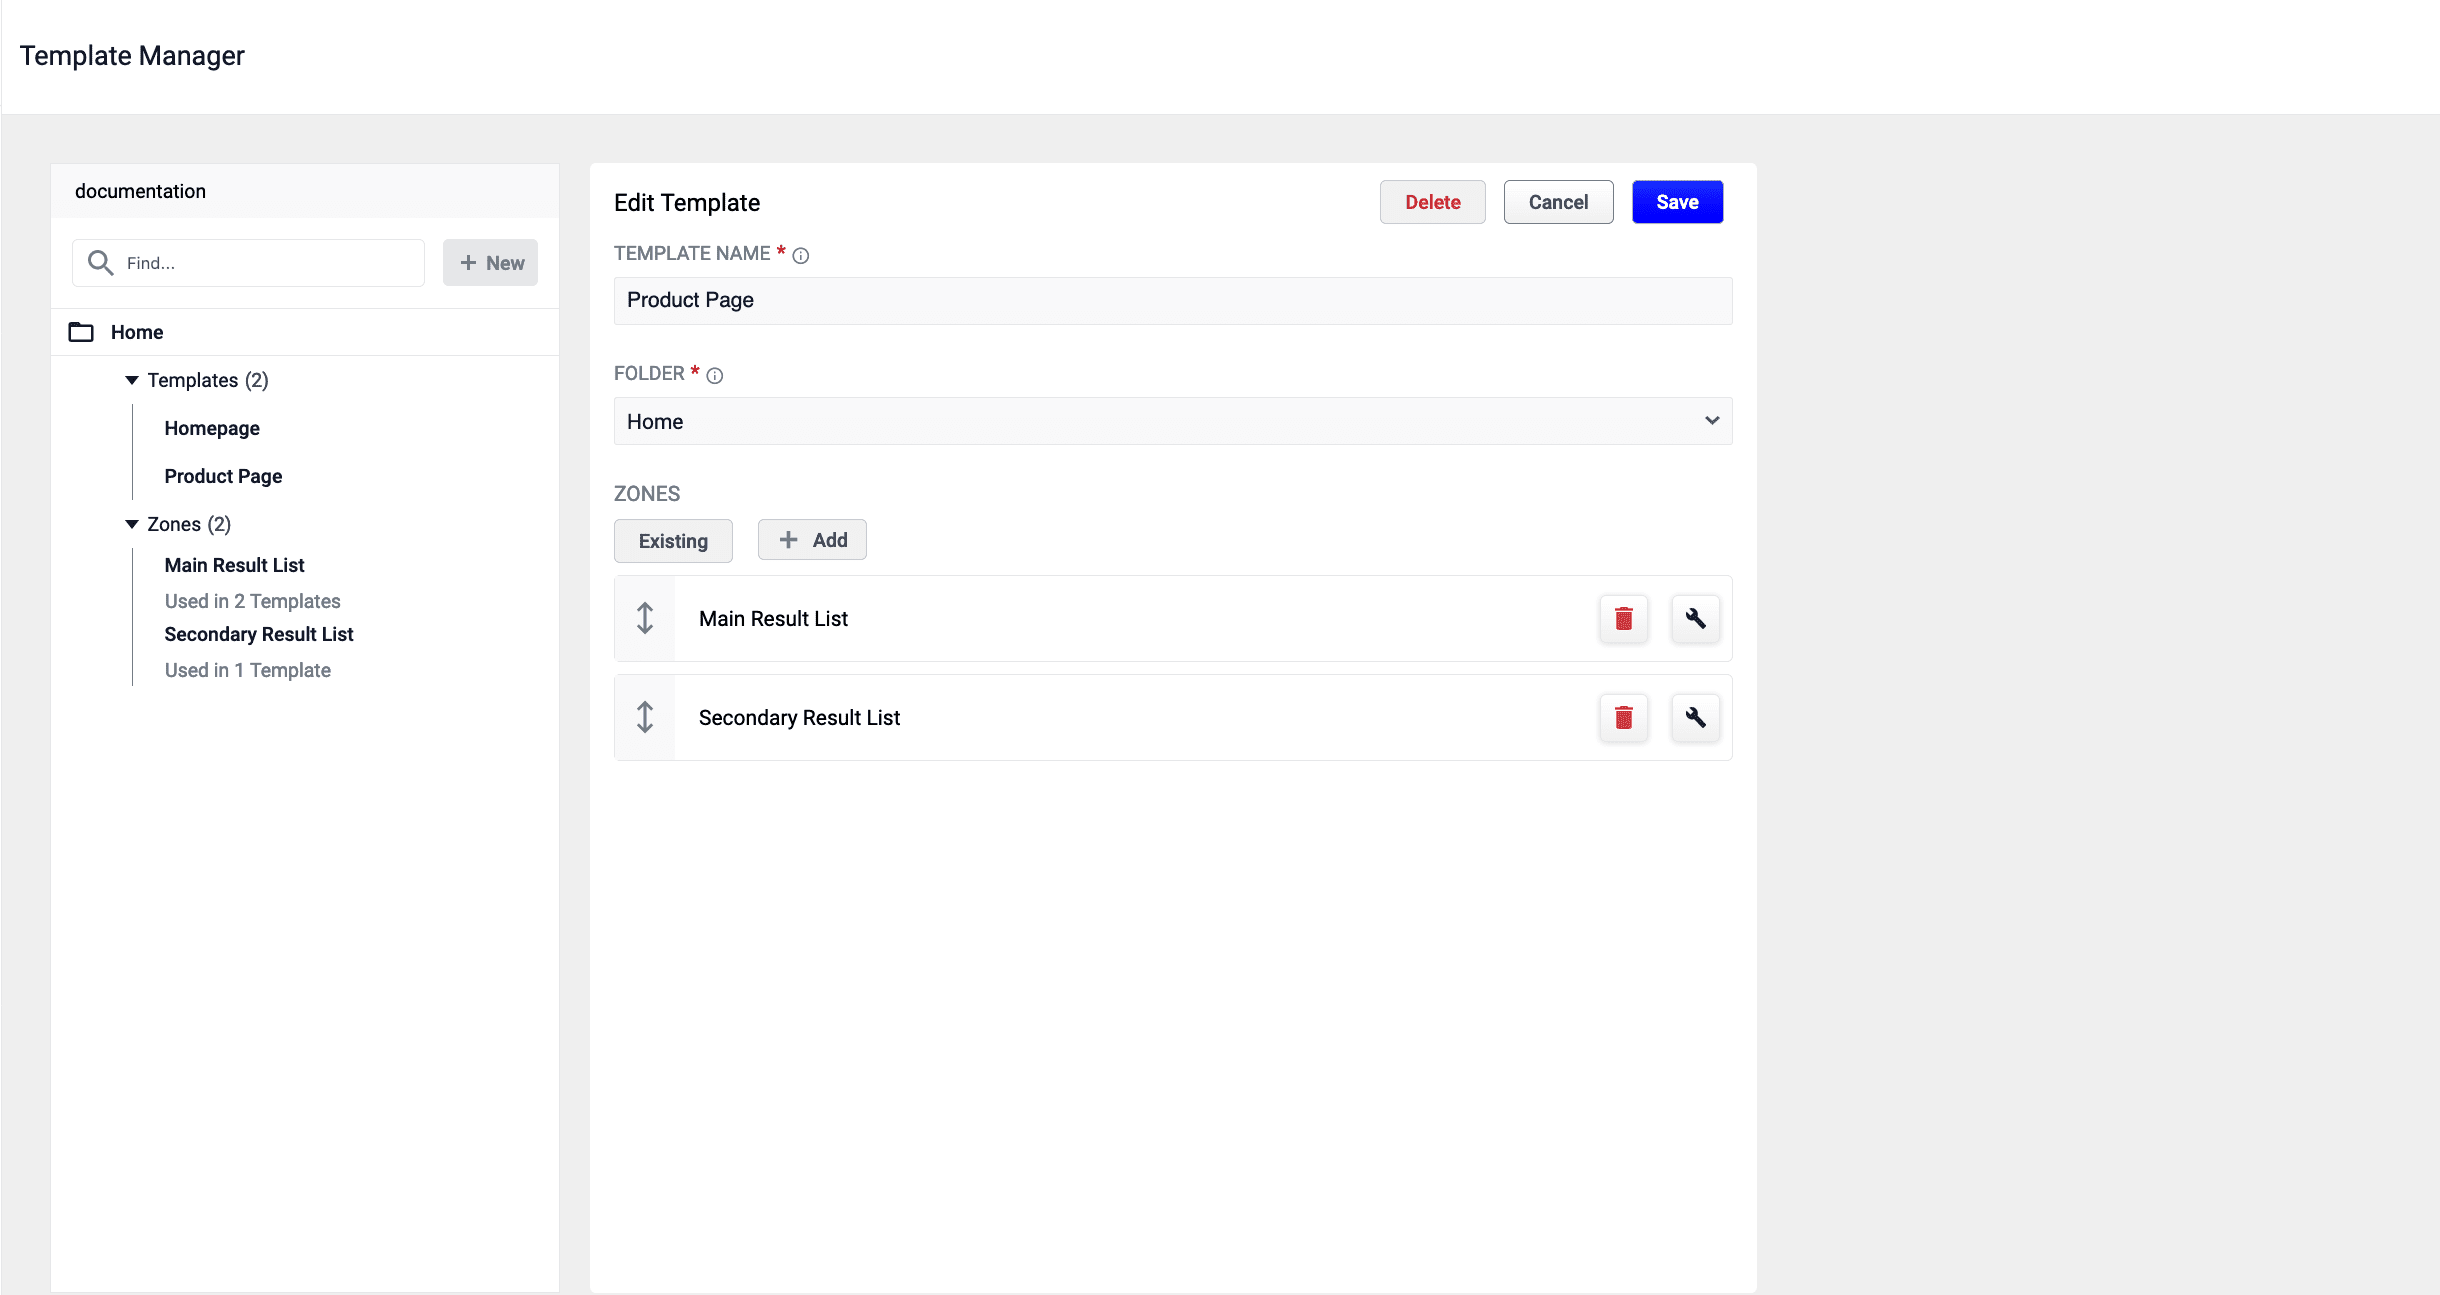
Simulator
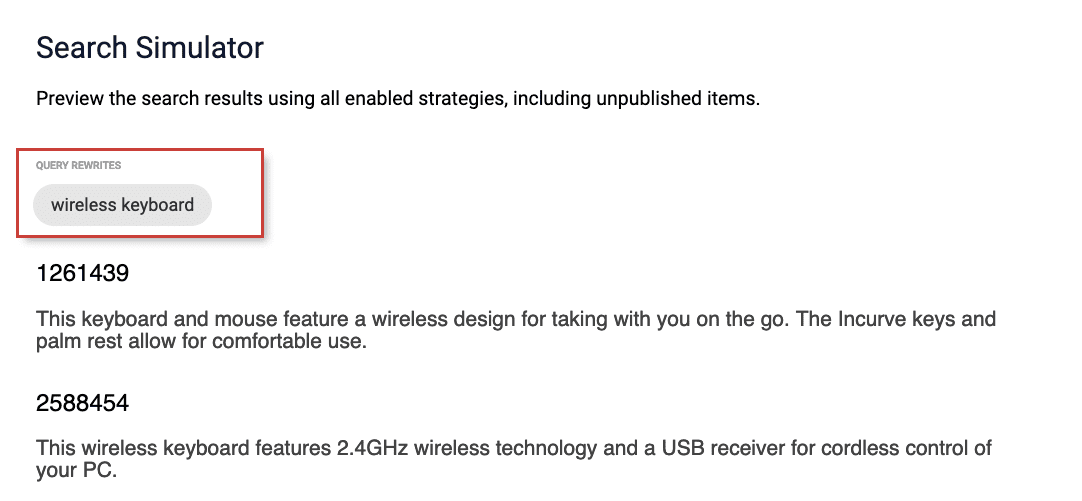
The Simulator provides an interactive preview of how your staged rules affect relevancy, using your search data and a simple search interface. When you enter a query, the Simulator shows you the triggered rules, in the order in which they were triggered, along with any triggered facets.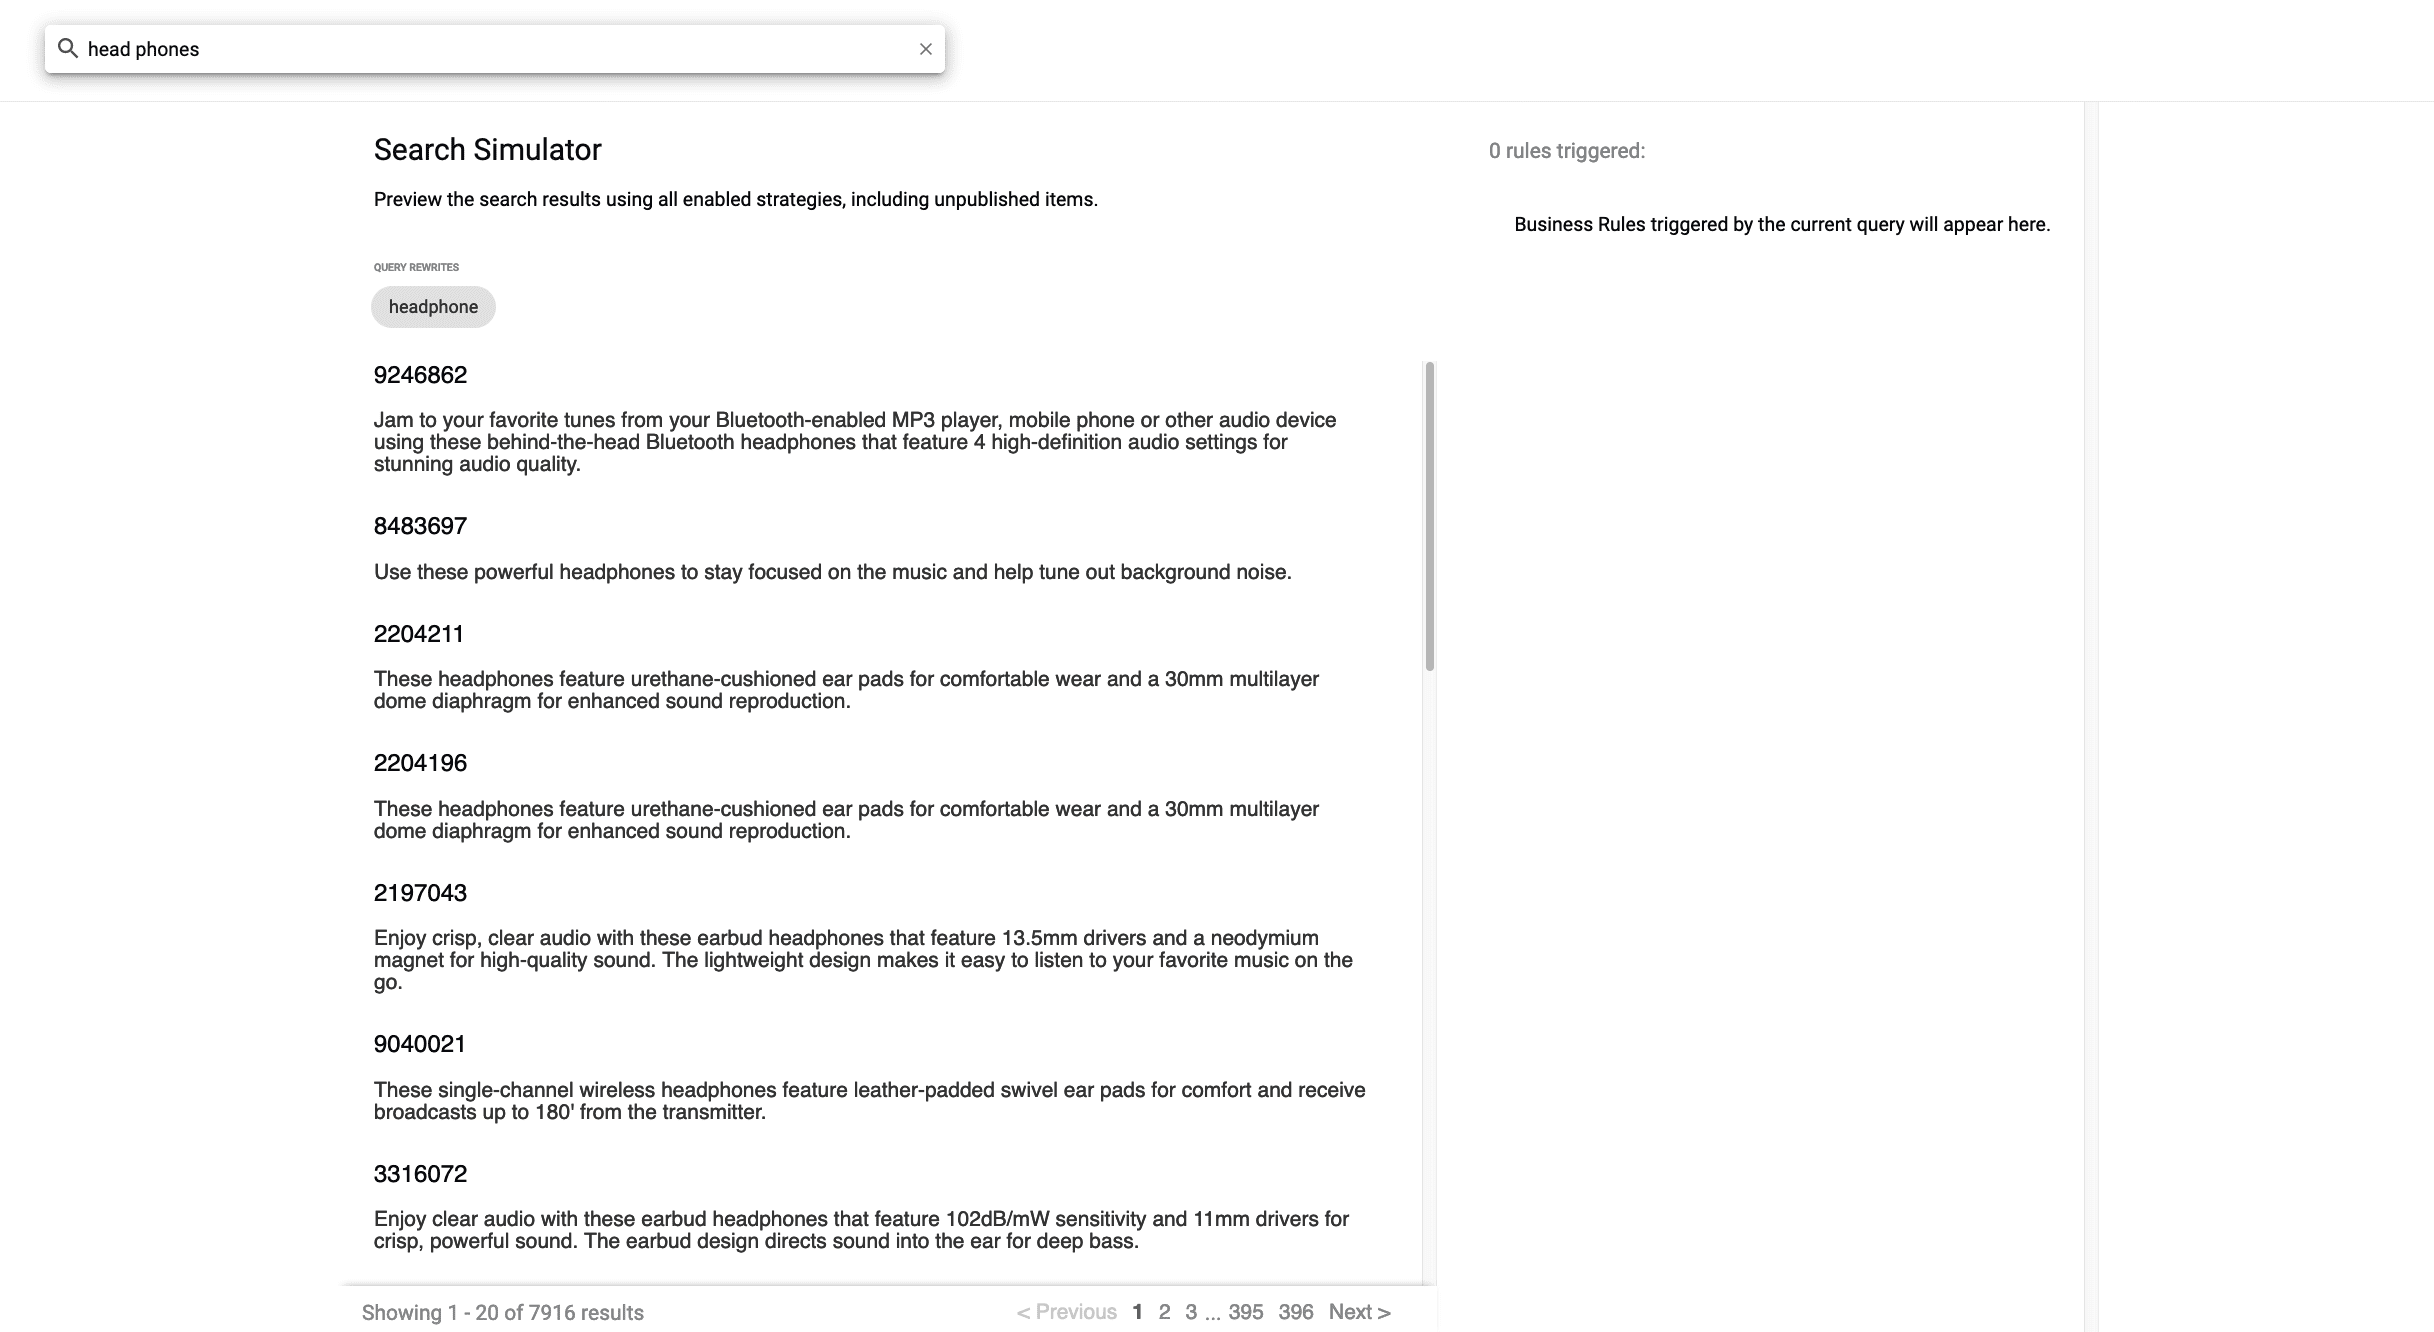
COLLECTION_NAME_rules_simulator query profile, which you can configure to point to any pipeline and collection in your app.
The Simulator is only visible in the Rules Editor if you do not have a valid license for Predictive Merchandiser. If available, you will see the simulator icon in the left navigation panel.
Search

Rule indicators
After entering a search query, the active rules affecting the results are displayed above the results. For example, a query for the termkeyboard with a query rewrite rule would display an indicator for the rewritten query wireless keyboard in the left panel of the Simulator:

Analytics
Use the Analytics Screen in the Rules Editor
Use the Analytics Screen in the Rules Editor
This article describes how to use the Analytics screen in the Rules Editor.
Job configuration affects the data that displays on the dashboard. For example, the
COLLECTION_NAME_session_rollup job aggregates related user activity into a session signal that contains activity count, duration, and keywords (based on user search terms).UI elements
Data date range
-
Quick Range Selectors. Click one of the quick range selectors to facet your data.
-
Calendar Selector. Use the calendar selector to specify a start and end date and time facet for your data.
Visitor data
-
Data Cards
- Site Visits. The total number of visits.
- Total Searches. The total number of searches performed.
- Unique Visitors. The number of unique visitors to your site.
- Average Session. The average length of time spent on your site.
-
Data Graph. Detailed information for the selected data card.
View data by date range
The Rules Editor analytics allows you to view data by a date range. To do this, you can either:-
Click one of the date range presets:
-
Click the date range details to display and select your range on the calendar that appears:
View additional card details
Click one of the analytics cards to view additional details for that card’s data.Configure Analytics cards
- Hover over one of the cards.
- Click the Edit button that appears:
- Complete the form that appears.
- Click the Save button.
UI elements
Data date range
-
Quick Range Selectors. Click one of the quick range selectors to facet your data.
-
Calendar Selector. Use the calendar selector to specify a start and end date and time facet for your data.
Visitor data
-
Data Cards
- Site Visits. The total number of visits.
- Total Searches. The total number of searches performed.
- Unique Visitors. The number of unique visitors to your site.
- Average Session. The average length of time spent on your site.
-
Data Graph. Detailed information for the selected data card.
Learn more
Keep Rules Consistent Between Clusters
Keep Rules Consistent Between Clusters
This article teaches you how to keep business rules consistent between clusters. Use a
This outputs your rules to a new JSON file, exported-rules.json. The result resembles the following:Use
In this example, you’ll recreate the rules from your development cluster on your production cluster.Use
Use
In some cases, you may want to delete rules in bulk. For example, if you created rules using the steps above but decide you want to undo that action.The Use
You may want to determine which rules to include in the
PUT API call to the Query Rewrite) API’s /query-rewrite/instances endpoint for bulk operations. The JSON payload sent with the PUT call must adhere to the following format:create. If the rule does not exist, create it.update. If the rule exists, update it to use the latest values.delete. If the rule exists, delete it.
id value for every rule. The API operations use this value as a reference point.The instructions in the sections below use these example values:| Parameter | Value 2+ |
|---|---|
| Development cluster | Address |
| https://FUSION_HOST_DEV:6764 | Username |
| DEV_USER | Password |
| DEV_PASSWORD | App name |
| DEV_APP_NAME 2+ | Production cluster |
| Address | https://FUSION_HOST_PROD:6764 |
| Username | PROD_USER |
| Password | PROD_PASSWORD |
| App name | PROD_APP_NAME |
When you use the API to conduct bulk rules operations, you must publish the changes in the UI. 1. Log into Fusion with the same user credentials that you used to make the bulk API rules operations. 2. Navigate to Relevance > Rules to access the rules editor. 3. Click the Publish button.
Export rules
In these examples, you’ll export rules from an app on a development cluster. This is useful if you have a large number of rule changes you need to port from a development cluster to a production cluster.All rules
Export all rules from the development cluster by sending aGET API call to the /query-rewrite/instances endpoint:Specific rules
You can specify which rules you want to export by adding parameters to the API endpoint. For example, if you want to export synonym rules only, send aGET API call to /query-rewrite/instances?type=synonym. If you want to export a list of rules that are disabled, use /query-rewrite/instances?enabled=false.Use the same GET API call, but change the endpoint:Use create
In this example, you’ll recreate the rules from your development cluster on your production cluster.- Manually reformat the JSON so it uses the following format:
We are recreating the development cluster’s rules on the production cluster, so we can use
createonly. Replace[<object array>]with the contents of exported-rules.json. For example: - Save the file.
- Send a
PUTAPI call to the/query-rewrite/instancesendpoint to recreate the rules from the development cluster on the production cluster:
- Verify that the
PUTAPI was successful by checking the Fusion UI or fetching the rules with the API.
Use update
- Manually reformat the JSON so it uses the following format:
Replace
[<object array>]with the contents of exported-rules.json. For example: - Save the file.
- Send a
PUTAPI call to the/query-rewrite/instancesendpoint to update the production cluster with the rules from the development cluster:
Use delete
In some cases, you may want to delete rules in bulk. For example, if you created rules using the steps above but decide you want to undo that action.The delete bulk operation uses a different format than create and update. Instead of passing the entire rules JSON as an object array, you must pass the rule id values as an item array.- Manually reformat the JSON so it uses the following format:
Replace
<item array>with theidvalues of the rules you want to delete. These values must be comma separated and wrapped in double quotes ("). For example: - Save the file.
- Send a
PUTAPI call to the/query-rewrite/instancesendpoint to update the production cluster with the rules from the development cluster:
Use create with update
You may want to determine which rules to include in the create array and which to include in the update array, but it can be difficult to determine which rules already exist. Fortunately, the operations don’t conflict:create. If the rule does not exist, create it.update. If the rule exists, update it to use the latest values.
[<object array>] for create and update with the same rules JSON to create the missing rules and update the existing rules.- Manually reformat the JSON so it uses the following format:
Replace
[<object array>]with the contents of exported-rules.json. For example: - Save the file.
- Send a
PUTAPI call to the/query-rewrite/instancesendpoint to update the production cluster with the rules from the development cluster:
Use the Analytics Screen in the Rules Editor
Use the Analytics Screen in the Rules Editor
This article describes how to use the Analytics screen in the Rules Editor.
The Analytics screen was renamed from the Dashboard screen in Fusion 5.2.0. All functionality remained the same.
UI elements
Data date range
-
Quick Range Selectors. Click one of the quick range selectors to facet your data.
-
Calendar Selector. Use the calendar selector to specify a start and end date and time facet for your data.
Visitor data
-
Data Cards
- Site Visits. The total number of visits.
- Total Searches. The total number of searches performed.
- Unique Visitors. The number of unique visitors to your site.
- Average Session. The average length of time spent on your site.
-
Data Graph. Detailed information for the selected data card.
View data by date range
The Rules Editor analytics allows you to view data by a date range. To do this, you can either:-
Click one of the date range presets:
-
Click the date range details to display and select your range on the calendar that appears: