- Latest version: v2.2.0
- Compatible with Fusion version: 5.9.4 and later
Prerequisites
Perform these prerequisites to ensure the connector can reliably access, crawl, and index your data. Proper setup helps avoid configuration or permission errors, so use the following guidelines to keep your content available for discovery and search in Fusion. Configure the Box app and authentication:- To crawl multiple users’ content, create a Box app configured for OAuth 2.0 with JWT.
- For single users, you may use a Box app with standard OAuth 2.0 credentials.
- Fusion must be able to reach the Box APIs over HTTPS. If running the connector remotely, you also need to allow HTTP/2 (gRPC) egress from your network into your Fusion cluster.
- A Fusion user with the
remote-connectorsoradminrole for gRPC authentication. - The
connector-plugin-standalone.jaralongside the plugin ZIP on the remote host. - A configured connector backend gRPC endpoint (
hostname:port) in your YAML. - If the remote host doesn’t trust Fusion’s TLS cert, point to a truststore file path in your config.
Authentication
Setting up the correct authentication according to your organization’s data governance policies helps keep sensitive data secure while allowing authorized indexing. The Box.com V2 connector supports two OAuth-based schemes:- OAuth 2.0 for single-user access
- JWT service account for enterprise-wide crawling
Standard OAuth 2.0 user authentication for single-user testing
For limited or single account crawls, you can create a Box app with the standard OAuth 2.0 “User Authentication” flow. See the Box documentation for additional guidance. In Fusion, you then add the:- API key using the Box client ID.
- API secret using the Box client secret.
- Refresh token as obtained through the OAuth consent flow.
JWT server authentication for enterprise-wide crawls
To fetch content from multiple Box users, you must register a Box app and enable JWT authentication. See the Box documentation for additional guidance. In Fusion, you then add the following:App Entity IDusing the Box app entity IDPublic Key IDusing the Box public key IDPrivate Key (Base64)using the Box private key in Base64Private Key PasswordEncryption Algorithm, such asRSA_SHA_256Account Typeas eitherUSERorENTERPRISE
Configure a Box.com datasource
Configure a Box.com datasource
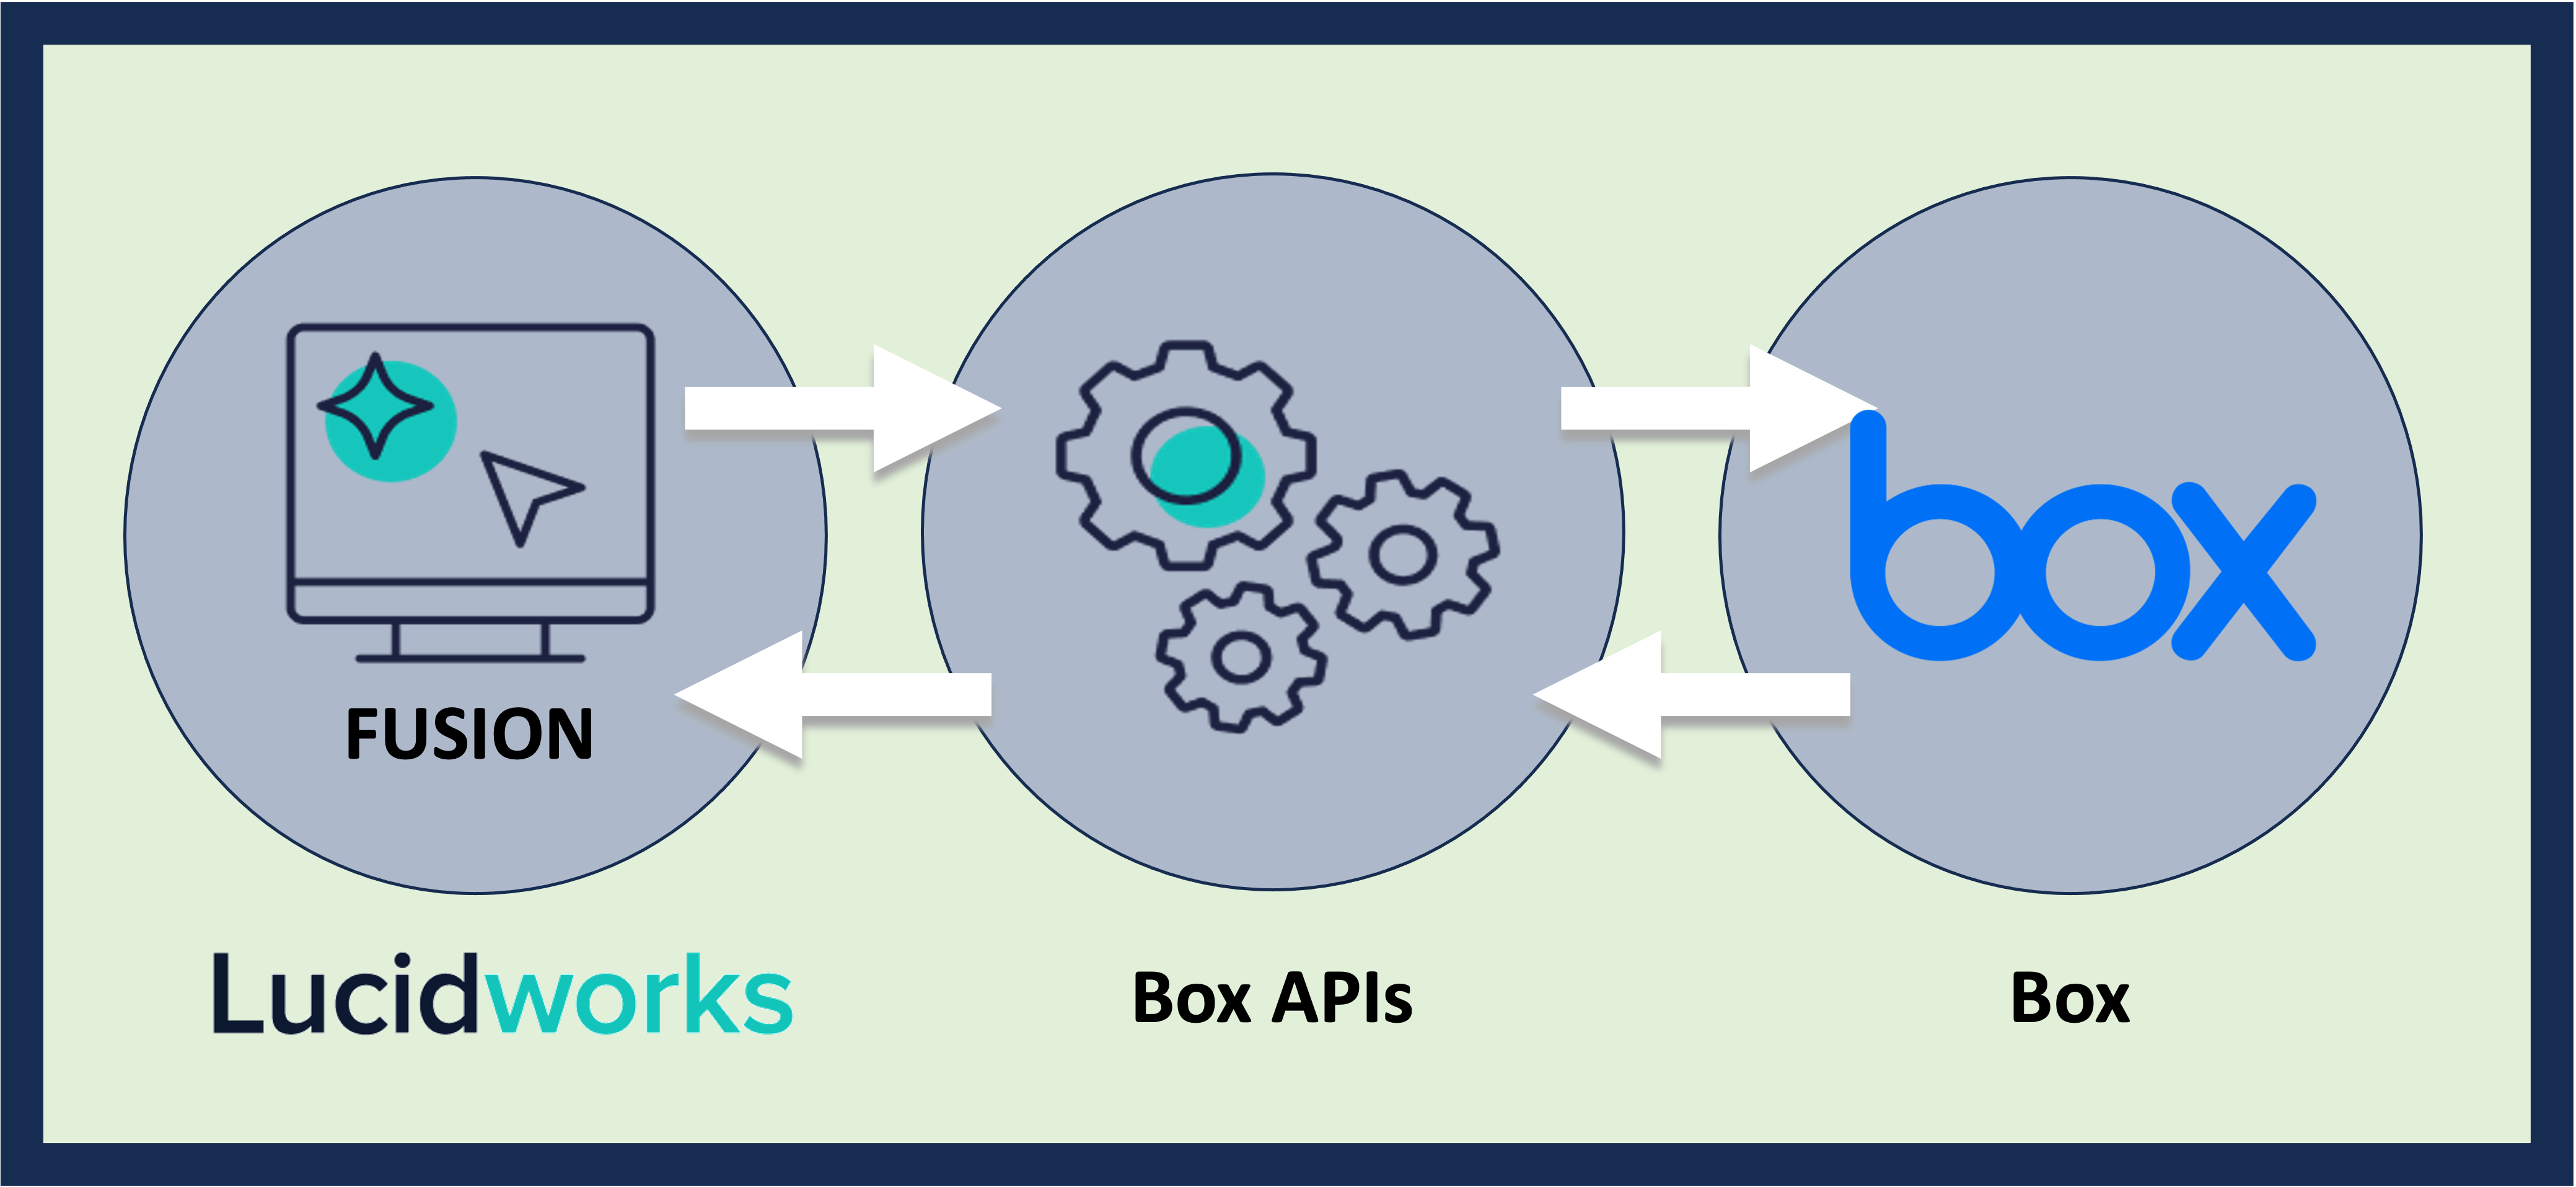
The Box connector retrieves data from a Box.com cloud-based data repository.This topic applies to the Box.com V1 and Box.com V2 connectors. The Box.com V1 connector is available in Fusion 5.2 and earlier. The Box.com V2 connector is available in Fusion 5.3 and later.Following is an overview of the steps required to set up Box and Fusion, and to crawl a Box data repository.
Configuration overview
These steps are for a multi-user Box.com data repository. For limited testing using a single user account, you can create a Box app that uses Standard OAuth 2.0 authentication.
- Sign up for a Box developer account.
- Enable 2-step verification.
- Create a Box app that Fusion can use to crawl the Box files.
- Configure your app to use a Box service account.
- Install Fusion’s Box Connector.
- Create datasources in Fusion that use the Box connector.
- Crawl the Fusion datasources.
Set Up Box
Set up Box so that Fusion can crawl Box data repositories.Step 1: Sign Up for a Box Developer Account
If you already have an account, proceed to Step 2: Enable 2-Step Verification.- Open the Box Developers Console.
- In the top right corner, click Sign Up.
- Select an appropriate Platform Developer plan.
- Enter the requested information and click Submit.
- Open the confirmation email and click Verify Email.
- Log in to your Box account.
Step 2: Enable 2-Step Verification
- Log in to your Box developer account.
- Open the Box Developers Console.
- Log in as the admin.
- Create the Box account that you want to use for crawling.
- Open the Users page in the Box admin console.
- Click +Users to create a new user account.
- Enter the Name and Email for the user, and then click Add user.
- Click the user you just created to enter its user settings.
-
Make this user a Co-Admin by selecting Co-Admin checkbox. Once clicked, a pane titled “User is granted the following administrative privileges” appears. Select all of the following:
- Manage users
- Manage groups
- View users’ content
- Log in to users’ accounts
-
Run new reports and access existing reports
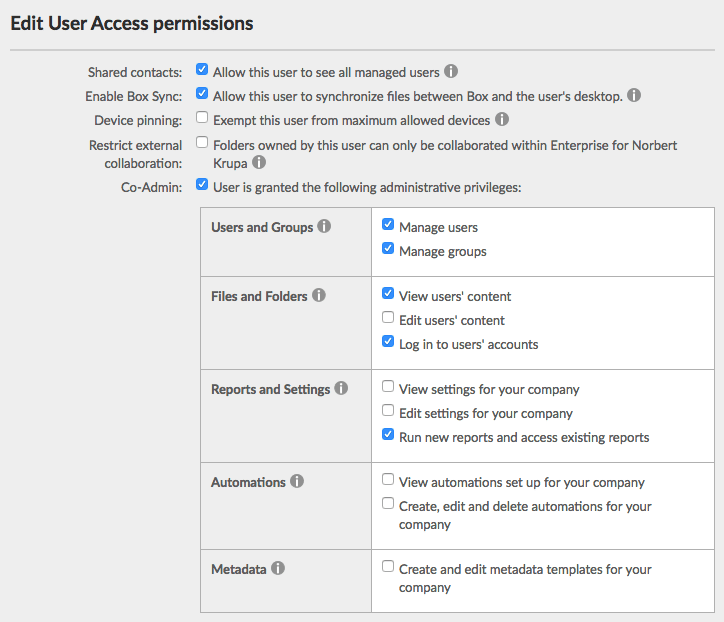
- Click Save.
- Close the Admin Console browser tab.
- Enable 2-step verification for unrecognized logins:
- Open the Account Settings page. (You can reach this page from the drop-down menu under your initials.)
- On the Account tab, under Authentication, select Require 2-step verification for unrecognized logins.
- Choose your Country and enter a Mobile Phone Number, and then click Continue.
- Enter the verification code you receive, and then click Continue.
- If you are using a new mobile device, Box will send you a second code. Enter it, and then click Submit.
- Click Save Changes.
Step 3: Create a Box App that Fusion Can Use to Crawl the Box files
Create a Box app that uses OAuth 2.0 with JWT server authentication.If you already have an app, proceed to Step 4: Configure Your App to Use a Box Service Account.- Open the Box Developers Console.
- Click Create New App.
- Select Custom App, and then click Next.
- Click OAuth 2.0 with JWT (Server Authentication), and then click Next.
- Name your app, and then click Create App. The name must be globally unique across all apps created by all Box users.
- Click View Your App.
Step 4: Configure Your App to Use a Box Service Account
-
Use OpenSSL to create a private/public key pair:
- Install OpenSSL if you need to. Windows instructions are here.
-
Open a Command Prompt window and run these commands to generate a private/public key pair:
Enter a password for the private key when prompted.In the current directory of the Command Prompt, you now have private and public key files,
private_key.pemandpublic_key.pemrespectively.
- Open the Box Developers Console, log in as Admin if you are asked to log in, and click your app.
- In the left navigation menu, click Configuration.
-
Configure scopes and advanced features:
- Under Application Access, select Enterprise.
- Under Application Scopes, deselect Manage groups.
- Under Advanced Features, enable Generate User Access Tokens and Perform Actions as Users.
- Click Save Changes.
-
In the Add and Manage Public Keys area, click Add a Public Key and paste the contents of the
public_key.pemfile (generated from Step 4: Configure Your App to Use a Box Service Account) into the text box.- Make a note of the new Public Key ID that you just created.
- Under OAuth 2.0 Credentials, click COPY for the Client ID.
-
Authorize your app:
- Open the Box Admin Console.
- In the left navigation menu, click Settings > Enterprise Settings (or Business Settings) > Apps.
- Under Custom Applications, click Authorize New App.
- In the API Key box, paste the Client ID credential you copied in Step 6, and then click Next.
- Read the App Authorization dialog and click Authorize.
- Close the Admin Console browser tab.
If you change your app’s configuration later, you must repeat this step to re-authorize your app. - Close the Dev Console browser tab.
Set Up Fusion
Set up Fusion to crawl Box data repositories.Step 5: Install Fusion’s Box Connector
- Navigate to the Fusion 4.x Connector Downloads
- Select the Box connector link for the release to download. The .zip file is downloaded.
- Do not unzip the file.
- Open the Fusion UI and click System > Blobs.
- Click Add.
- Select Connector Plugin.
- Click Choose File, select the file, and then click Open.
- Click Upload.
Step 6: Create Datasources
Create datasources that use the Box connector to access the Box data repository.For each datasource:- In the Fusion UI, Navigate to Indexing > Datasources.
- Click Add.
- Select Box.com.
-
Fill in the form. Note the following regarding configuration settings to use:
Setting Notes Start Links Each start link defined for the datasource must consist of a numeric Box file ID or directory ID. The root directory of any Box account has ID 0 (zero). To crawl your entire Box repository, enter ‘0’. These images indicate with underlines where you can get a folder ID or file ID. Select a folder or file at Box.com. Folder ID:  Enter the start link
 34192617287. File ID: Enter the start link
 204871656422:API Key In the Box Developers Console, select the app. On the Configuration tab under OAuth 2.0 Credentials, use the Client ID. API Secret In the Box Developers Console, select the app. On the Configuration tab under OAuth 2.0 Credentials, use the Client Secret. JWT App User ID Email address that you use to sign in to your Box co-admin account. Use the Co-admin account you created in Step 4. JWT Public Key Id In the Box Developers Console, select the app. On the Configuration tab, under Add and Manage Public Keys, use the ID for a public key. JWT Private Key Base64-encoded contents of the private-key file that matches your JWT Public Key Id. Base64 encode the entire contents of the file, including the first and last lines. (Fusion 5.0+ only.) JWT Private Key File Full path to the private-key file you created that matches your JWT Public Key Id. (Prior to Fusion 5.0 only.) JWT Private Key Password Passphrase for the private key (from the private-key file you created in Step 4). Distributed crawl collection name Collection that contains the pre-fetch index. Box.com children responses per page Use the default value of 1000. Nested folder depth limit Generally, you want a number that will crawl all documents, so keep the default value. For testing, you could reduce the number substantially to speed up the crawl. Number of partition buckets Divide the number of files by 5000. Use that number or 10000, whichever is smaller. Number distributed crawl datasources Use 1 to 27. Number of pre-fetch index creator threads A number between 2 and 5. Use 2 for small datasources and 5 for huge datasources (over 10 million files). - Click Save.
Crawl a Box Data Repository
Crawl a Box data repository.Step 7: Crawl the Fusion Datasources
Crawl the datasources, which use Fusion’s Box connector to access the Box data repository. Fusion’s Box connector uses the pre-fetch index to fetch the contents of each file from Box.com, get metadata from both the distributed index and Box.com, and index the documents through Fusion’s index pipeline.You can:-
Run the crawl now.
- From the Fusion launcher, click Search > Home > Datasources.
- Click the datasource.
- Click Start Crawl.
-
Schedule the crawl (For Fusion 4.2 through 5.5):
- From the Fusion launcher, click Devops > Home > Scheduler.
- Click the row for the job that corresponds to the datasource.
- Specify schedule information, and then click Save.
Configure Box.com tokens
Configure Box.com tokens
This topic explains how to configure Box.com authorization, access, and refresh tokens. The information applies to the Box.com V1 and Box.com V2 connectors. The Box.com V1 connector is available in Fusion 5.2 and earlier. The Box.com V2 connector is available in Fusion 5.3 and later.Fusion supports two methods of authentication with the Box API:
- JSON Web Token (JWT)
- OAuth2
Box App Users Using JWT
Box.com has rather recently released a Box Developer Edition. The Box Developer Edition lets a user access an application without having to create their own Box account.App Auth uses the JSON Web Token (JWT) authentication architecture to establish a trusted connection with Box, allowing an application to provision and manage a Box account while minimizing the number of logins for a user and authentication services to manage.For this option, Fusion needs the inputs below to crawl your Box data.Required options are highlighted.Authentication Using OAuth 2.0
For limited testing using a single user account, you can create a Box app that uses Standard OAuth 2.0 authentication.- Log in to your Box developer account as the Admin.
- Open the Box Developers web portal.
- In the top right corner, click Log In.
- Open the page for creating a new app and click Create New App.
- Click Custom App, and then click Next.
- Click Standard OAuth 2.0 (User Authentication), and then click Next.
- Name your app, and then click Create App. The name must be globally unique across all apps created by all Box users.
- Click View Your App.
- On the Configuration page:
- Click the Authentication Method Standard OAuth 2.0 (User Authentication).
- Set the Redirect URI to
http://localhostorhttp://0.0.0.0. This address is not used by Fusion, but cannot be left blank. - Click Save Changes.
Security trimming
The Box V2 connector supports graph security trimming. If you are using Fusion 5.18.0 or later, you can use separate collections to store your content and your ACLs. Use a separate sidecar collection if you need to manage ACL data independently of the rest of your content. To use a sidecar collection for your ACLs, you must create the ACL collection before configuring your datasource to read from this collection. To enable graph security trimming for your datasource:- Navigate to Indexing > Datasources.
- Open your datasource.
- Under Graph Security Filtering Configuration, select Enable security trimming.
- If you are using a sidecar collection in Fusion 5.18.0 or later, set ACL Collection ID to your ACL collection name (for example,
acl_collection). - Save your changes.
If you are transitioning from using the same collection to creating a sidecar collection for ACLs, you must run a full recrawl of your datasource so the ACLs route to the sidecar collection. ACL documents stored in the content collection from before the migration remain in the content collection unless the collection is reindexed or manually cleaned.
Remote connectors
V2 connectors support running remotely in Fusion versions 5.7.1 and later.Configure remote V2 connectors
Configure remote V2 connectors
If you need to index data from behind a firewall, you can configure a V2 connector to run remotely on-premises using TLS-enabled gRPC.The gRPC connector backend is not supported in Fusion environments deployed on AWS.The
Prerequisites
Before you can set up an on-prem V2 connector, you must configure the egress from your network to allow HTTP/2 communication into the Fusion cloud. You can use a forward proxy server to act as an intermediary between the connector and Fusion.The following is required to run V2 connectors remotely:- The plugin zip file and the connector-plugin-standalone JAR.
- A configured connector backend gRPC endpoint.
- Username and password of a user with a
remote-connectorsoradminrole. - If the host where the remote connector is running is not configured to trust the server’s TLS certificate, you must configure the file path of the trust certificate collection.
If your version of Fusion doesn’t have the
remote-connectors role by default, you can create one. No API or UI permissions are required for the role.Connector compatibility
Only V2 connectors are able to run remotely on-premises. You also need the remote connector client JAR file that matches your Fusion version. You can download the latest files at V2 Connectors Downloads.Whenever you upgrade Fusion, you must also update your remote connectors to match the new version of Fusion.
System requirements
The following is required for the on-prem host of the remote connector:- (Fusion 5.9.0-5.9.10) JVM version 11
- (Fusion 5.9.11) JVM version 17
- Minimum of 2 CPUs
- 4GB Memory
Enable backend ingress
In yourvalues.yaml file, configure this section as needed:-
Set
enabledtotrueto enable the backend ingress. -
Set
pathtypetoPrefixorExact. -
Set
pathto the path where the backend will be available. -
Set
hostto the host where the backend will be available. -
In Fusion 5.9.6 only, you can set
ingressClassNameto one of the following:nginxfor Nginx Ingress Controlleralbfor AWS Application Load Balancer (ALB)
-
Configure TLS and certificates according to your CA’s procedures and policies.
TLS must be enabled in order to use AWS ALB for ingress.
Connector configuration example
Minimal example
Logback XML configuration file example
Run the remote connector
logging.config property is optional. If not set, logging messages are sent to the console.Test communication
You can run the connector in communication testing mode. This mode tests the communication with the backend without running the plugin, reports the result, and exits.Encryption
In a deployment, communication to the connector’s backend server is encrypted using TLS. You should only run this configuration without TLS in a testing scenario. To disable TLS, setplain-text to true.Egress and proxy server configuration
One of the methods you can use to allow outbound communication from behind a firewall is a proxy server. You can configure a proxy server to allow certain communication traffic while blocking unauthorized communication. If you use a proxy server at the site where the connector is running, you must configure the following properties:- Host. The hosts where the proxy server is running.
- Port. The port the proxy server is listening to for communication requests.
- Credentials. Optional proxy server user and password.
Password encryption
If you use a login name and password in your configuration, run the following utility to encrypt the password:- Enter a user name and password in the connector configuration YAML.
-
Run the standalone JAR with this property:
- Retrieve the encrypted passwords from the log that is created.
- Replace the clear password in the configuration YAML with the encrypted password.
Connector restart (5.7 and earlier)
The connector will shut down automatically whenever the connection to the server is disrupted, to prevent it from getting into a bad state. Communication disruption can happen, for example, when the server running in theconnectors-backend pod shuts down and is replaced by a new pod. Once the connector shuts down, connector configuration and job execution are disabled. To prevent that from happening, you should restart the connector as soon as possible.You can use Linux scripts and utilities to restart the connector automatically, such as Monit.Recoverable bridge (5.8 and later)
If communication to the remote connector is disrupted, the connector will try to recover communication and gRPC calls. By default, six attempts will be made to recover each gRPC call. The number of attempts can be configured with themax-grpc-retries bridge parameters.Job expiration duration (5.9.5 only)
The timeout value for irresponsive backend jobs can be configured with thejob-expiration-duration-seconds parameter. The default value is 120 seconds.Use the remote connector
Once the connector is running, it is available in the Datasources dropdown. If the standalone connector terminates, it disappears from the list of available connectors. Once it is re-run, it is available again and configured connector instances will not get lost.Enable asynchronous parsing (5.9 and later)
To separate document crawling from document parsing, enable Tika Asynchronous Parsing on remote V2 connectors.connector-plugins entry in your values.yaml file: