Documentation Index
Fetch the complete documentation index at: https://doc.lucidworks.com/llms.txt
Use this file to discover all available pages before exploring further.
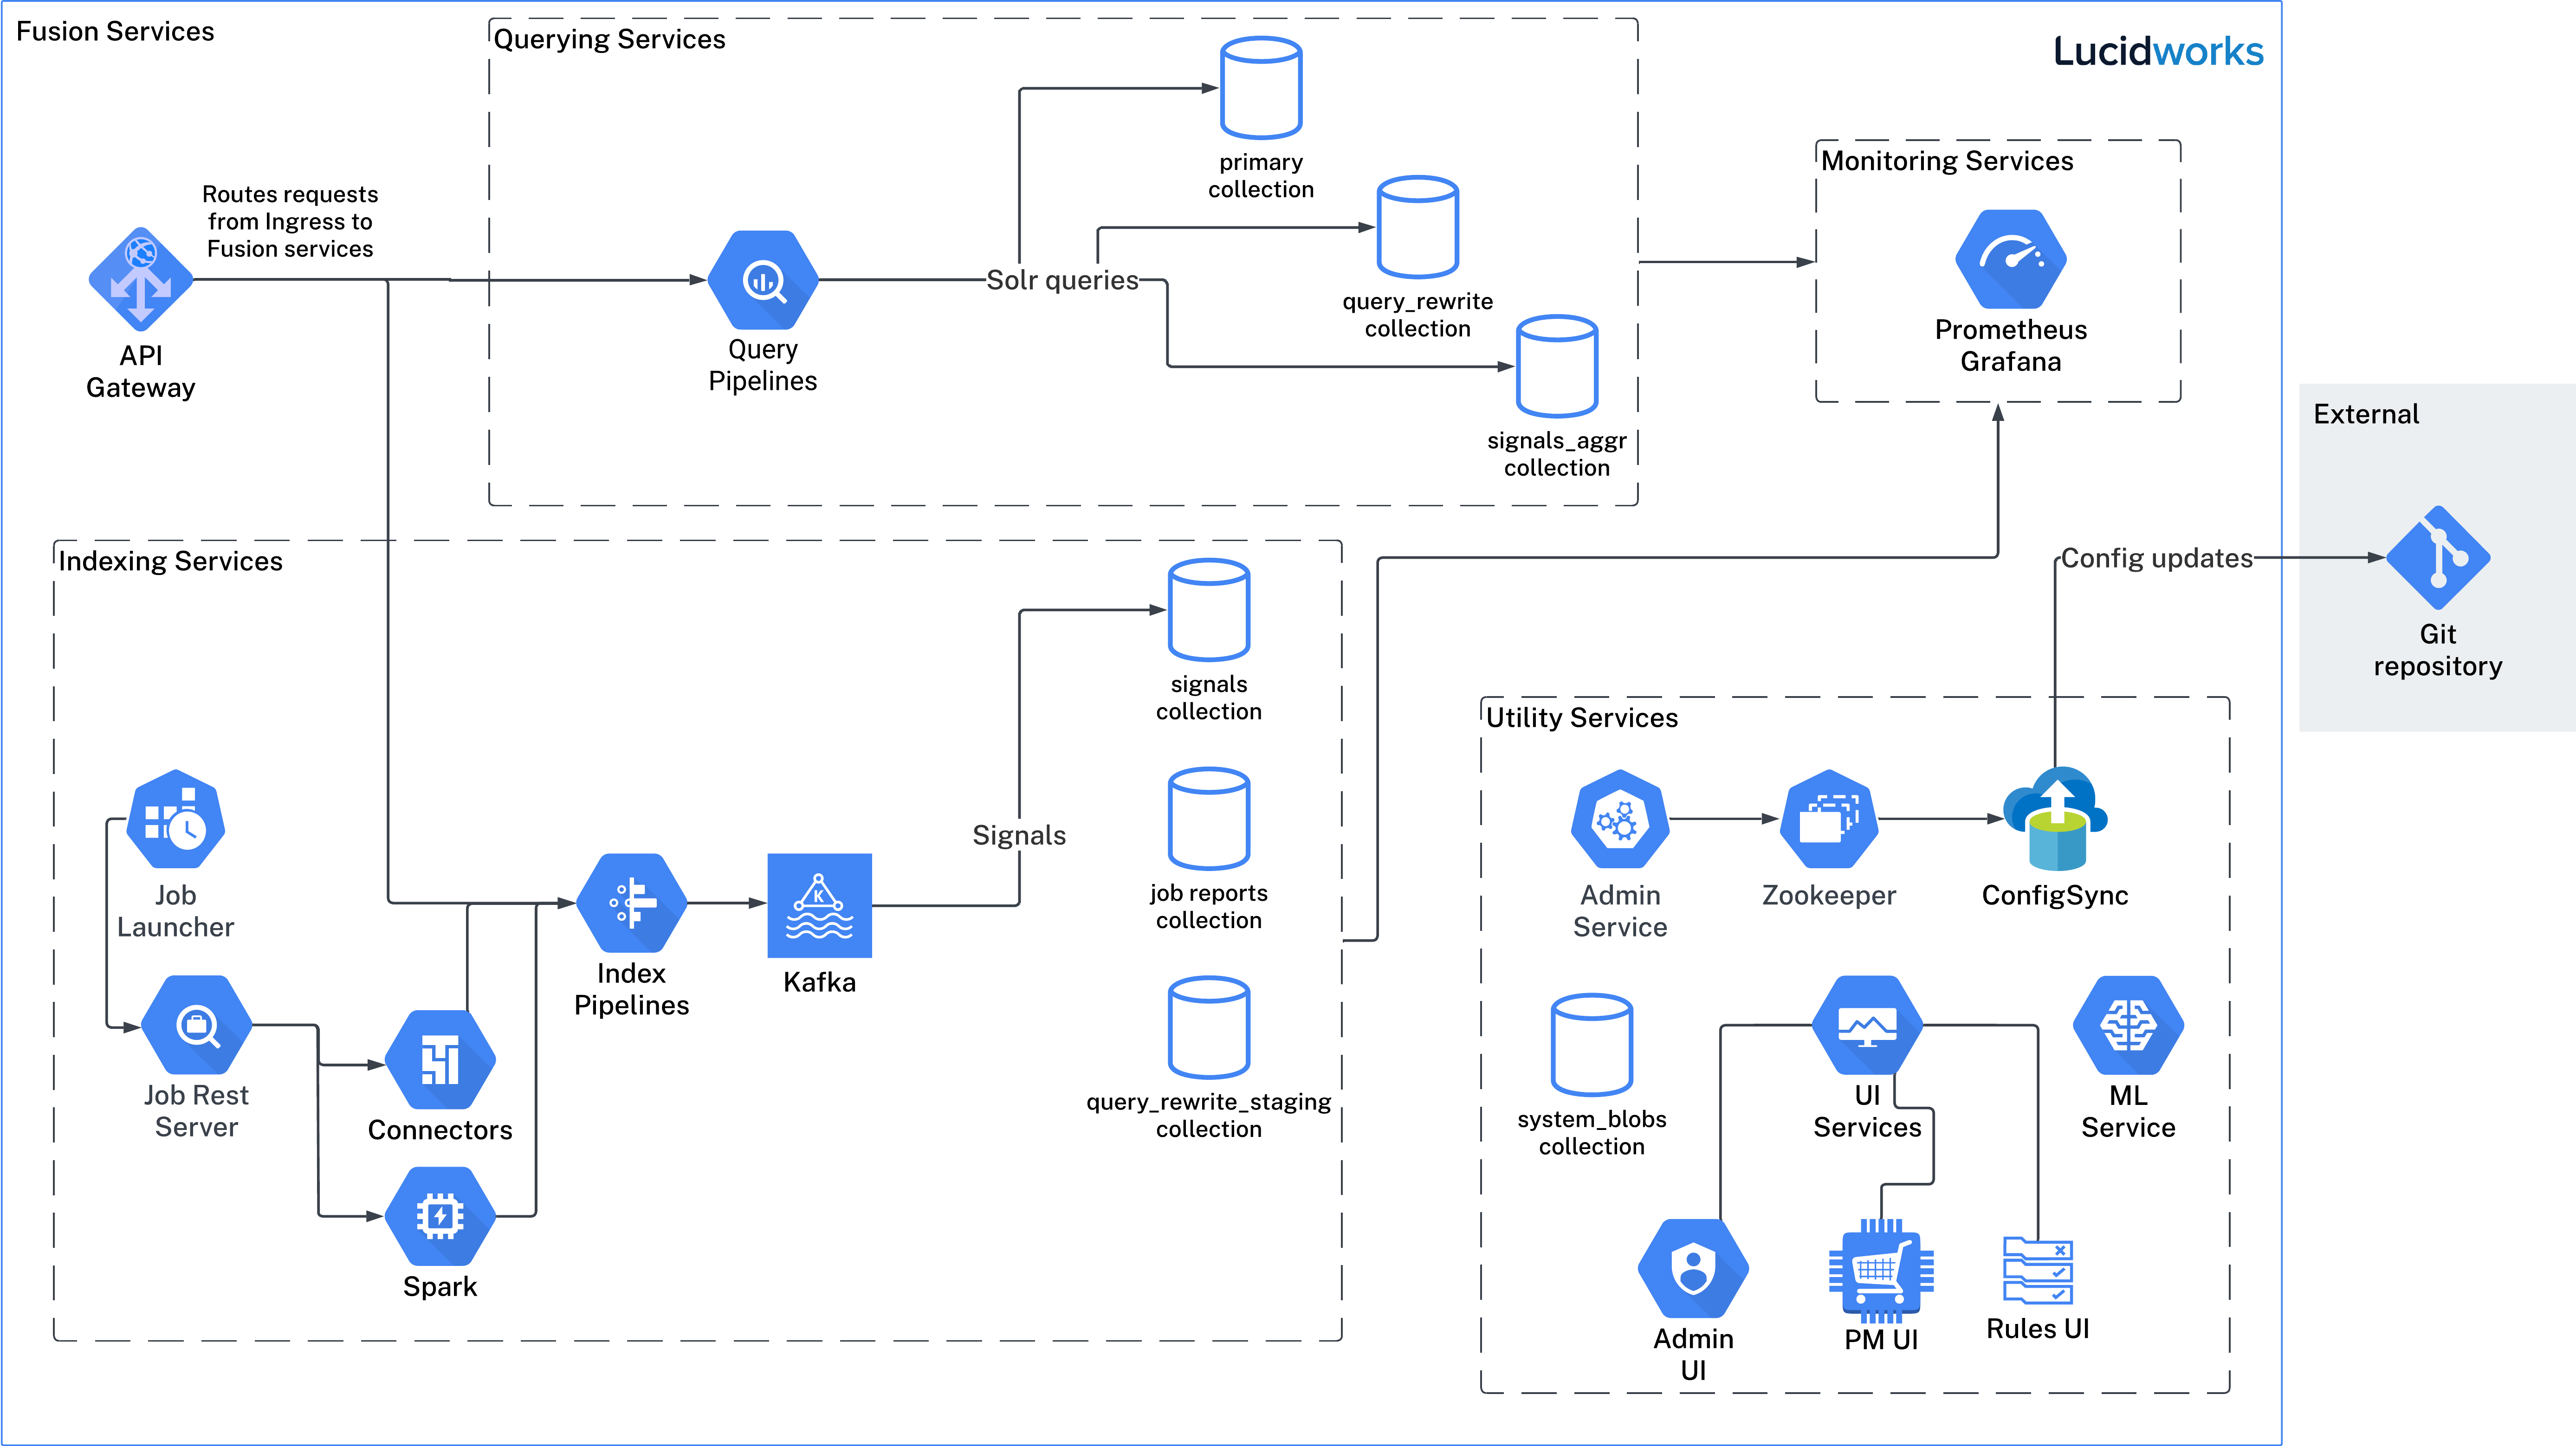
The image above is for illustrative purposes only. It depicts services available in Fusion 5.9, but your actual implementation may differ.
Although GKE refers to the latest stable version as the “stable release channel,” your cloud provider may use different terminology.
More information
Here are instructions for deploying on some popular Kubernetes platforms:Deploy Fusion 5 on Google Kubernetes Engine (GKE)
Deploy Fusion 5 on Google Kubernetes Engine (GKE)
Fusion supports deployment on Google Kubernetes Engine (GKE). This topic explains how to deploy a Fusion cluster on GKE using the Use a short name for the namespace, containing only letters, digits, or dashes (no dots or underscores). The setup scripts in this repo use the namespace for the Helm release name by default.If you already have helm installed, make sure you’re using the latest version:For other OS, please refer to the Helm installation docs: https://helm.sh/docs/using_helm/The Fusion helm chart requires that helm is greater than version To use these role in a cluster, as an admin user first create the namespace that you wish to install fusion into:Apply the Then bind the rolebinding and clusterolebinding to the install user:You will then be able to run the You should get into the habit of pulling this repo for the latest changes before performing any maintenance operations on your Fusion cluster to ensure you have the latest updates to the scripts.Cloning the github repo is preferred so that you can pull in updates to the scripts, but if you are not a git user, then you can download the project: https://github.com/lucidworks/fusion-cloud-native/archive/master.zip.
Once downloaded, extract the zip and cd into the Use a short name for the namespace, containing only letters, digits, or dashes (no dots or underscores). The setup scripts in this repo use the namespace for the Helm release name by default.If you already have helm installed, make sure you’re using the latest version:For other OS, please refer to the Helm installation docs: https://helm.sh/docs/using_helm/The Fusion helm chart requires that helm is greater than version To use these role in a cluster, as an admin user first create the namespace that you wish to install fusion into:Apply the Then bind the rolebinding and clusterolebinding to the install user:You will then be able to run the You should get into the habit of pulling this repo for the latest changes before performing any maintenance operations on your Fusion cluster to ensure you have the latest updates to the scripts.Cloning the github repo is preferred so that you can pull in updates to the scripts, but if you are not a git user, then you can download the project: https://github.com/lucidworks/fusion-cloud-native/archive/master.zip.
Once downloaded, extract the zip and cd into the Use the #WARNING# If using Helm V2, the After running the Please refer to the Kubernetes documentation on configuring an Ingress for GKE: https://cloud.google.com/kubernetes-engine/docs/tutorials/http-balancerCreate a BackendConfig object in your namespace:Then make sure that the following entries are in the right place in your values.yaml file:and upgrade your release to apply the configuration changesThe To make things easier for you when upgrading, you should add the settings from this file into your main custom values yaml file, e.g.:This way you don’t have to remember to pass the additional This saves you from having to pass If all goes well, you should see a list of pods similar to:The number of pods per deployment / statefulset will vary based on your cluster size and replicaCount settings in your custom values YAML file.
Also, don’t worry if you see some pods having been restarted as that just means they were too slow to come up and Kubernetes killed and restarted them.
You do want to see at least one pod running for every service. If a pod is not running after waiting a sufficient amount of time,
use For an overview of the various Fusion 5 microservices, see: Fusion microservices.Once you’re ready to build a Fusion cluster for production, please see see more information at Fusion 5 Survival Guide.With Grafana, you can either setup a temporary port-forward to a Grafana pod or expose Grafana on an external IP using a K8s LoadBalancer.
To define a LoadBalancer, do (replace $ with your Helm release label):You can use
setup_f5_gke.sh script in the fusion-cloud-native repository.Prerequisites
This section covers prerequisites and background knowledge needed to help you understand the structure of this document and how the Fusion installation process works with Kubernetes.Release Name and Namespace
Before installing Fusion, you need to choose a https://kubernetes.io/docs/concepts/overview/working-with-objects/namespaces/ Kubernetes namespace to install Fusion into. Think of a K8s namespace as a virtual cluster within a physical cluster. You can install multiple instances of Fusion in the same cluster in separate namespaces. However, please do not install more than one Fusion release in the same namespace.All Fusion services must run in the same namespace, i.e. you should not try to split a Fusion cluster across multiple namespaces.__
Install Helm
Helm is a package manager for Kubernetes that helps you install and manage applications on your Kubernetes cluster. Regardless of which Kubernetes platform you’re using, you need to installhelm as it is required to install Fusion for any K8s platform.
On MacOS, you can do:3.0.0; check your Helm version by running helm version --short.Helm User Permissions
If you require that fusion is installed by a user with minimal permissions, instead of an admin user, then the role and cluster role that will have to be assigned to the user within the namespace that you wish to install fusion in are documented in theinstall-roles directory.When working with Kubernetes on the command-line, it’s useful to create a shell alias for
kubectl, e.g.:role.yaml and cluster-role.yaml files to that namespacehelm install command as the <install_user>Clone fusion-cloud-native from GitHub
You should clone this repo from github as you’ll need to run the scripts on your local workstation:fusion-cloud-native-master directory.Prerequisites
This section covers prerequisites and background knowledge needed to help you understand the structure of this document and how the Fusion installation process works with Kubernetes.Release Name and Namespace
Before installing Fusion, you need to choose a https://kubernetes.io/docs/concepts/overview/working-with-objects/namespaces/ Kubernetes namespace to install Fusion into. Think of a K8s namespace as a virtual cluster within a physical cluster. You can install multiple instances of Fusion in the same cluster in separate namespaces. However, please do not install more than one Fusion release in the same namespace.All Fusion services must run in the same namespace, i.e. you should not try to split a Fusion cluster across multiple namespaces.__
Install Helm
Helm is a package manager for Kubernetes that helps you install and manage applications on your Kubernetes cluster. Regardless of which Kubernetes platform you’re using, you need to installhelm as it is required to install Fusion for any K8s platform.
On MacOS, you can do:3.0.0; check your Helm version by running helm version --short.Helm User Permissions
If you require that fusion is installed by a user with minimal permissions, instead of an admin user, then the role and cluster role that will have to be assigned to the user within the namespace that you wish to install fusion in are documented in theinstall-roles directory.When working with Kubernetes on the command-line, it’s useful to create a shell alias for
kubectl, e.g.:role.yaml and cluster-role.yaml files to that namespacehelm install command as the <install_user>Clone fusion-cloud-native from GitHub
You should clone this repo from github as you’ll need to run the scripts on your local workstation:fusion-cloud-native-master directory.The https://github.com/lucidworks/fusion-cloud-native/blob/master/setup_f5_gke.sh setup_f5_gke.sh script provided in this repo is strictly optional.
The script is mainly to help those new to Kubernetes and/or Fusion get started quickly.
If you’re already familiar with K8s, Helm, and GKE, then you can skip the script and just use Helm directly to install Fusion into an existing cluster or one you create yourself using the process described <<helm-only,here>>.Set up the Google Cloud SDK (one time only)
If you’ve already installed thegcloud command-line tools, you can skip to <<cluster-create,Create a Fusion cluster in GKE>>.These steps set up your local Google Cloud SDK environment so that you’re ready to use the command-line tools to manage your Fusion deployment.Usually, you only need to perform these setup steps once. After that, you’re ready to create a cluster.For a nice getting started tutorial for GKE, see: https://cloud.google.com/kubernetes-engine/docs/deploy-app-clusterHow to set up the Google Cloud SDK:- https://console.cloud.google.com/apis/library/container.googleapis.com?q=kubernetes%20engine
- Log in to Google Cloud:
gcloud auth login - Set up the Google Cloud SDK:
gcloud config set compute/zone <zone-name>If you are working with regional clusters instead of zone clusters, usegcloud config set compute/region <region-name>instead.gcloud config set core/account <email address>- New GKE projects only:
gcloud projects create <new-project-name>If you have already created a project, for example in https://console.cloud.google.com/, then skip to the next step. gcloud config set project <project-name>
kubectl using:Create a single-node demo cluster
Run the https://github.com/lucidworks/fusion-cloud-native/blob/master/setup_f5_gke.shsetup_f5_gke.sh script to install Fusion 5.x in a GKE cluster. To create a new, single-node demo cluster and install Fusion, simply do:--help option to see script usage. If you want the script to create a cluster for you, then you need to pass the --create option with either demo or multi_az. If you don’t want the script to create a cluster, then you need to create a cluster before running the script and simply pass the name of the existing cluster using the -c parameter.If you pass --create demo to the script, then we create a single node GKE cluster (defaults to using n1-standard-8 node type). The minimum node type you’ll need for a 1 node cluster is an n1-standard-8 (on GKE) which has 8 CPU and 30 GB of memory. This is cutting it very close in terms of resources as you also need to host all of the Kubernetes system pods on this same node. Obviously, this works for kicking the tires on Fusion 5.1 but is not sufficient for production workloads.You can change the instance type using the -i parameter; see: https://cloud.google.com/compute/docs/regions-zones/#available for a list of which machine types are available in your desired region.If not provided the script generates a custom values file named
gke_<cluster>_<namespace>_fusion_values.yaml which you can use to customize the Fusion chart.__setup_f5_gke.sh script installs Helm’s tiller component into your GKE cluster with the cluster admin role. If you don’t want this, then please upgrade to Helm v3.If you see an error similar to the following, then wait a few seconds and try running the setup_f5_gke.sh script again with the same arguments as this is usually a transient issue:setup_f5_gke.sh script, proceed to the <<verifying,Verifying the Fusion Installation>> section below.When you’re ready to deploy Fusion to a production-like environment, see more information at Fusion 5 Survival Guide.Create a three-node regional cluster to withstand a zone outage
With a three-node regional cluster, nodes are deployed across three separate availability zones.<cluster>value should be the name of a non-existent cluster; the script will create the new cluster.<project>must match the name of an existing project in GKE. Rungcloud config get-value projectto get this value, or see the GKE setup instructions.<namespace>Kubernetes namespace to install Fusion into, defaults todefaultwith releasef5<region-name>value should be the name of a GKE region, defaults tous-west1. Rungcloud config get-value compute/zoneto get this value, or see the GKE setup instructions to set the value.
solr_zone system property set to the zone it is running in, such as -Dsolr_zone=us-west1-a.After running the setup_f5_gke.sh script, proceed to the <<verifying,Verifying the Fusion Installation>> section below.When you’re ready to deploy Fusion to a production-like environment, see more information at Fusion 5 Survival Guide.GKE Ingress and TLS
The Fusion proxy service provides authentication and serves as an API gateway for accessing all other Fusion services. It’s typical to use an Ingress for TLS termination in front of the proxy service.Thesetup_f5_gke.sh supports creating an Ingress with a TLS cert for a domain you own by passing: -t -h <hostname>After the script runs, you need to create an A record in GCP’s DNS service to map your domain name to the Ingress IP. Once this occurs, our script setup uses https://letsencrypt.org/ to issue a TLS cert for your Ingress.To see the status of the Let’s Encrypt issued certificate, do:The GCP Ingress defaults to a 30 second timeout, which can lead to false negatives for long running requests such as importing apps. To configure the timeout for the backend in kubernetes:
Ingresses and externalTrafficPolicy
When running a fusion cluster behind an externally controlled LoadBalancer it can be advantageous to configure theexternalTrafficPolicy of the proxy service to Local. This preserves the client
source IP and avoids a second hop for LoadBalancer and NodePort type services, but risks potentially
imbalanced traffic spreading. Although when running in a cluster with a dedicated pool for spark jobs
that can scale up and down freely it can prevent unwanted request failures. This behaviour can be
altered with the api-gateway.service.externalTrafficPolicy value, which is set to Local if the example values
file is used.You must use externalTrafficPolicy=Local for the Trusted HTTP Realm to work correctly.If you are already using a custom ‘values.yaml’ file, create an entry for externalTrafficPolicy under api-gateway service.Considerations when using the nginx ingress controller
If you are using thenginx ingress controller to fulfil your ingress definitions there are a couple
of options that are recommended to be set in the configmap:Custom values
There are some example values files that can be used as a starting point for resources, affinity and replica count configuration in theexample-values folder.
These can be passed to the install script using the --values option, for example:--values option can be passed multiple times, if the same configuration property is contained within multiple values files then the values from the latest file passed as a --values option are used.Connectors custom values
If you are using Fusion 5.9 or later, you can specify resources and replica count per connector. This allows you to set different resource limits for each connector. If you do not set custom values for a connector, that connector uses the default values.Set each connector’s resource values in theconnector-plugin section under pluginValues. The pluginValues section is a list of plugins and its resources. The following sample shows an example.-
<1>The plugin ID. The plugin ID must match the plugin ID on the plugin ZIP file. without thelucidworks.prefix. For example, if the plugin ID on the plugin ZIP file islucidworks.sharepoint-optimized, the plugin ID issharepoint-optimized. -
<2>The resources settings. You may specify the limits, the requests, and the CPU and memory for each. -
<3>The number of replicas per connector. This value is 1 by default.
After editing the
connector-plugin section, you must reinstall the affected connector.Upgrades and Ingress
If you used the
-t -h <hostname> options when installing your cluster, our script created an additional values yaml file named tls-values.yaml.tls-values.yaml file when upgrading.Verifying the Fusion Installation
In this section, we provide some tips on how to verify the Fusion installation.Let’s review some useful kubectl commands.Enhance the K8s Command-line Experience
Here is a list of tools we found useful for improving your command-line experience with Kubernetes:- krew (kubectl plugin mgr): https://github.com/kubernetes-sigs/krew/
- kube-ps1 (show current context on command line prompt): https://github.com/jonmosco/kube-ps1
- kubectx / kubens (switch between clusters / namespaces): https://github.com/ahmetb/kubectx
Useful kubectl commands
kubectl reference: https://kubernetes.io/docs/reference/generated/kubectl/kubectl-commandsSet the namespace forkubectl if not using the default:-n with every command.Get a list of running pods: k get podsGet logs for a pod using a label: k logs –l app.kubernetes.io/component=query-pipelineGet pod deployment spec and details: k get pods <pod_id> -o yamlGet details about a pod events: k describe po <pod_id>Port forward to a specific pod: k port-forward <pod_id> 8983:8983SSH into a pod: k exec -it <pod_id> -- /bin/bashCPU/Memory usage report for pods: k top podsForcefully kill a pod: k delete po <pod_id> --force --grace-period 0Scale up (or down) a deployment: k scale deployment.v1.apps/<id> --replicas=NGet a list of pod versions: k get po -o jsonpath='{..image}' | tr -s '[[:space:]]' '\n' | sort | uniqCheck Fusion Pods and Services
Once the install script completes, you can check that all pods and services are available using:kubectl logs <pod_id> to see the logs for that pod; to see the logs for previous versions of a pod, use: kubectl logs <pod_id> -p.
You can also look at the actions Kubernetes performed on the pod using kubectl describe po <pod_id>.To see a list of Fusion services, do:Upgrading with Zero Downtime
One of the most powerful features provided by Kubernetes and a cloud-native microservices architecture is the ability to do a rolling update on a live cluster. Fusion 5 allows customers to upgrade from Fusion 5.x.y to a later 5.x.z version on a live cluster with zero downtime or disruption of service.When Kubernetes performs a rolling update to an individual microservice, there will be a mix of old and new services in the cluster concurrently (only briefly in most cases) and requests from other services will be routed to both versions. Consequently, Lucidworks ensures all changes we make to our service do not break the API interface exposed to other services in the same 5.x line of releases. We also ensure stored configuration remains compatible in the same 5.x release line.Lucidworks releases minor updates to individual services frequently, so our customers can pull in those upgrades using Helm at their discretion.To upgrade your cluster at any time, use the--upgrade option with our setup scripts in this repo.The scripts in this repo automatically pull in the latest chart updates from our Helm repository and deploy any updates needed by doing a diff of your current installation and the latest release from Lucidworks.
To see what would be upgraded, you can pass the --dry-run option to the script.Grafana Dashboards
Get the initial Grafana password from a K8s secret by doing:kubectl get services --namespace <namespace> to determine when the load balancer is setup and its IP address. Direct your browser to http://<GrafanaIP>:3000 and enter the username admin@localhost and the password that was returned in the previous step.This will log you into the application. It is recommended that you create another administrative user with a more desirable password.The dashboards and datasoure will be setup for you in grafana, simply navigate to Dashboards -> Manage to view the available dashboardsLearn more
Deploying Fusion 5
The course for Deploying Fusion 5 focuses on the prerequisite software needed to deploy Fusion, the necessary setup steps, and the physical act of deployment.
Deploy Fusion 5 on Amazon Elastic Kubernetes Service (EKS)
Deploy Fusion 5 on Amazon Elastic Kubernetes Service (EKS)
Fusion supports deployment on Amazon Elastic Kubernetes Service (EKS). This topic explains how to deploy a Fusion cluster on EKS using the Use a short name for the namespace, containing only letters, digits, or dashes (no dots or underscores). The setup scripts in this repo use the namespace for the Helm release name by default.If you already have helm installed, make sure you’re using the latest version:For other OS, please refer to the Helm installation docs: https://helm.sh/docs/using_helm/The Fusion helm chart requires that helm is greater than version To use these role in a cluster, as an admin user first create the namespace that you wish to install fusion into:Apply the Then bind the rolebinding and clusterolebinding to the install user:You will then be able to run the You should get into the habit of pulling this repo for the latest changes before performing any maintenance operations on your Fusion cluster to ensure you have the latest updates to the scripts.Cloning the github repo is preferred so that you can pull in updates to the scripts, but if you are not a git user, then you can download the project: https://github.com/lucidworks/fusion-cloud-native/archive/master.zip.
Once downloaded, extract the zip and cd into the VPC Permissions:.IAM PermissionsDownload and run the https://github.com/lucidworks/fusion-cloud-native/blob/master/setup_f5_eks.sh By default the This saves you from having to pass If all goes well, you should see a list of pods similar to:The number of pods per deployment / statefulset will vary based on your cluster size and replicaCount settings in your custom values YAML file.
Also, don’t worry if you see some pods having been restarted as that just means they were too slow to come up and Kubernetes killed and restarted them.
You do want to see at least one pod running for every service. If a pod is not running after waiting a sufficient amount of time,
use For an overview of the various Fusion 5 microservices, see: Fusion microservices.Once you’re ready to build a Fusion cluster for production, please see see more information at Fusion 5 Survival Guide.With Grafana, you can either setup a temporary port-forward to a Grafana pod or expose Grafana on an external IP using a K8s LoadBalancer.
To define a LoadBalancer, do (replace $ with your Helm release label):You can use For more information, see:
setup_f5_eks.sh script in the fusion-cloud-native repository.In addition, this topic provides information about how to configure IAM roles for the service account.Prerequisites
This section covers prerequisites and background knowledge needed to help you understand the structure of this document and how the Fusion installation process works with Kubernetes.Release Name and Namespace
Before installing Fusion, you need to choose a https://kubernetes.io/docs/concepts/overview/working-with-objects/namespaces/ Kubernetes namespace to install Fusion into. Think of a K8s namespace as a virtual cluster within a physical cluster. You can install multiple instances of Fusion in the same cluster in separate namespaces. However, please do not install more than one Fusion release in the same namespace.All Fusion services must run in the same namespace, i.e. you should not try to split a Fusion cluster across multiple namespaces.__
Install Helm
Helm is a package manager for Kubernetes that helps you install and manage applications on your Kubernetes cluster. Regardless of which Kubernetes platform you’re using, you need to installhelm as it is required to install Fusion for any K8s platform.
On MacOS, you can do:3.0.0; check your Helm version by running helm version --short.Helm User Permissions
If you require that fusion is installed by a user with minimal permissions, instead of an admin user, then the role and cluster role that will have to be assigned to the user within the namespace that you wish to install fusion in are documented in theinstall-roles directory.When working with Kubernetes on the command-line, it’s useful to create a shell alias for
kubectl, e.g.:role.yaml and cluster-role.yaml files to that namespacehelm install command as the <install_user>Clone fusion-cloud-native from GitHub
You should clone this repo from github as you’ll need to run the scripts on your local workstation:fusion-cloud-native-master directory.The https://github.com/lucidworks/fusion-cloud-native/blob/master/setup_f5_eks.sh setup_f5_eks.sh script provided in this repo is strictly optional.
The script is mainly to help those new to Kubernetes and/or Fusion get started quickly.
If you’re already familiar with K8s, Helm, and EKS, then you use Helm directly to install Fusion into an existing cluster or one you create yourself using the process described <<helm-only,here>>.If you’re new to Amazon Web Services (AWS), then please visit the Amazon Web Services https://aws.amazon.com/getting-started/ to set up an account.If you’re new to Kubernetes and EKS, then we recommend going through Amazon’s https://eksworkshop.com/introduction/ before proceeding with Fusion.Set up the AWS CLI tools
Before launching an EKS cluster, you need to install and configurekubectl, aws, eksctl, aws-iam-authenticator using the links provided below:Required AWS Command-line Tools:- kubectl: https://kubernetes.io/docs/tasks/tools/install-kubectl/
- aws: https://docs.aws.amazon.com/cli/latest/userguide/cli-chap-install.html
- eksctl: https://docs.aws.amazon.com/eks/latest/userguide/getting-started-eksctl.html
- aws-iam-authenticator: https://docs.aws.amazon.com/eks/latest/userguide/install-aws-iam-authenticator.html
aws configure to configure a profile for authenticating to AWS. You’ll use the profile name you configure in this step, which defaults to default, as the -p argument to the setup_f5_eks.sh script in the next section.When working in Ubuntu, avoid using the eksctl snap version. Alternative sources can have different versions that could cause command failures. Also, always make sure you are using the latest version for each one of the required tools.
Set up Fusion on EKS
To create a cluster in EKS the following IAM policies are required:- AmazonEC2FullAccess
- AWSCloudFormationFullAccess
setup_f5_eks.sh script to install Fusion 5.x in an EKS cluster.This script does not support multiple node pools and should not be used for production clusters.
- To create a new cluster and install Fusion, run the following command:
- Replace
my-eks-cluster,profile-name, andfusion-namespacewith your cluster, profile, and namespace values. - Pass the
--createoption with eitherdemoormulti_az.
- Replace
- To use an existing cluster and install Fusion, run the following command:
- Replace
cluster-namewith the name of the cluster you already created. - Replace
profile-namewith the name of your profile.
- Replace
default if you ran the AWS configure command without giving the profile a name.Use the --help option to see full script usage.After running the setup_f5_eks.sh script, proceed to the <<verifying,Verifying the Fusion Installation>> section below.EKS cluster overview
The EKS cluster is created usingeksctl (https://eksctl.io/). By default it will setup the following resources in your AWS account:- A dedicated VPC for the EKS cluster in the specified region with CIDR:
192.168.0.0/16 - 3 Public and 3 Private subnets within the created VPC, each with a
/19CIDR range, along with the corresponding route tables. - A NAT gateway in each Public subnet
- An Auto Scaling Group of the instance type specified by the script, which defaults to
m5.2xlarge, with 3 instances spanning the public subnets.
EKS Ingress
Thesetup_f5_eks.sh script exposes the Fusion proxy service on an external DNS name provided by an ELB over HTTP. This is done for demo or getting started purposes. However, you’re strongly encouraged to configure a K8s Ingress with TLS termination in front of the proxy service.
See: https://aws.amazon.com/premiumsupport/knowledge-center/terminate-https-traffic-eks-acm/Our EKS script creates a classic ELB for exposing fusion proxy service. In case you need to change this behavior and use https://github.com/kubernetes-sigs/aws-load-balancer-controller instead you can use the following parameters when running the setup_f5_eks.sh script:kube-system namespace is being used for installing the aws-load-balancer-controller because pods priorityClassName is set to system-cluster-critical.In case you need to deploy an internal ALB you can use the --internal-alb option. This will create the nodes in the internal subnets. Fusion will be reachable from an AWS instance located in any of the external subnets on the same VPC. To use an ALB also an ingress with a DNS name is required, you can use the -h option to create an ingress with the required DNS name.Finally, use Route 53 or your DNS provider for creating an A ALIAS DNS record for your DNS name pointing to the ingress ADRESS. You can get the address listing the ingress using the command kubectl get ing.Verifying the Fusion Installation
In this section, we provide some tips on how to verify the Fusion installation.Let’s review some useful kubectl commands.Enhance the K8s Command-line Experience
Here is a list of tools we found useful for improving your command-line experience with Kubernetes:- krew (kubectl plugin mgr): https://github.com/kubernetes-sigs/krew/
- kube-ps1 (show current context on command line prompt): https://github.com/jonmosco/kube-ps1
- kubectx / kubens (switch between clusters / namespaces): https://github.com/ahmetb/kubectx
Useful kubectl commands
kubectl reference: https://kubernetes.io/docs/reference/generated/kubectl/kubectl-commandsSet the namespace forkubectl if not using the default:-n with every command.Get a list of running pods: k get podsGet logs for a pod using a label: k logs –l app.kubernetes.io/component=query-pipelineGet pod deployment spec and details: k get pods <pod_id> -o yamlGet details about a pod events: k describe po <pod_id>Port forward to a specific pod: k port-forward <pod_id> 8983:8983SSH into a pod: k exec -it <pod_id> -- /bin/bashCPU/Memory usage report for pods: k top podsForcefully kill a pod: k delete po <pod_id> --force --grace-period 0Scale up (or down) a deployment: k scale deployment.v1.apps/<id> --replicas=NGet a list of pod versions: k get po -o jsonpath='{..image}' tr -s '[[:space:]]' '\n' sort uniqCheck Fusion Pods and Services
Once the install script completes, you can check that all pods and services are available using:kubectl logs <pod_id> to see the logs for that pod; to see the logs for previous versions of a pod, use: kubectl logs <pod_id> -p.
You can also look at the actions Kubernetes performed on the pod using kubectl describe po <pod_id>.To see a list of Fusion services, do:Upgrading with Zero Downtime
One of the most powerful features provided by Kubernetes and a cloud-native microservices architecture is the ability to do a rolling update on a live cluster. Fusion 5 allows customers to upgrade from Fusion 5.x.y to a later 5.x.z version on a live cluster with zero downtime or disruption of service.When Kubernetes performs a rolling update to an individual microservice, there will be a mix of old and new services in the cluster concurrently (only briefly in most cases) and requests from other services will be routed to both versions. Consequently, Lucidworks ensures all changes we make to our service do not break the API interface exposed to other services in the same 5.x line of releases. We also ensure stored configuration remains compatible in the same 5.x release line.Lucidworks releases minor updates to individual services frequently, so our customers can pull in those upgrades using Helm at their discretion.To upgrade your cluster at any time, use the--upgrade option with our setup scripts in this repo.The scripts in this repo automatically pull in the latest chart updates from our Helm repository and deploy any updates needed by doing a diff of your current installation and the latest release from Lucidworks.
To see what would be upgraded, you can pass the --dry-run option to the script.Grafana Dashboards
Get the initial Grafana password from a K8s secret by doing:kubectl get services --namespace <namespace> to determine when the load balancer is setup and its IP address. Direct your browser to http://<GrafanaIP>:3000 and enter the username admin@localhost and the password that was returned in the previous step.This will log you into the application. It is recommended that you create another administrative user with a more desirable password.The dashboards and datasoure will be setup for you in grafana, simply navigate to Dashboards -> Manage to view the available dashboardsConfigure IAM roles for the service account
Configuring IAM roles lets you utilize the Amazon Web Services Security Token Service (AWS STS) for short-term authentication credentials to access services like the Amazon S3 simple storage service.To configure IAM roles, your user account must be grantedadmin permissions or IAM:FullAccess. Complete the following steps:- To create the OpenID Connect (OIDC) provider, run the following command:
- To create an IAM role for the service account associated with the plugin-pod, run the following command:
This command:
- Creates an IAM role and attaches the target policy.
- Updates the existing Kubernetes
f5-connector-pluginservice account and annotates it with the IAM role. - Uses the existing
policy/AmazonS3ReadOnlyAccesspolicy.
To utilize this feature, create a data source with the settings in S3 Authentication Settings > AWS Instance Credentials Authentication Settings. For detailed installation information, AWS S3 V2 connector.
- Welcome to the AWS Security Token Service API Reference
- Temporary security credentials in IAM
- IAM roles for service accounts
- What is Amazon EKS?
- Fine-grained IAM roles for service accounts
Learn more
Deploying Fusion 5
The course for Deploying Fusion 5 focuses on the prerequisite software needed to deploy Fusion, the necessary setup steps, and the physical act of deployment.
Deploy Fusion 5 on Azure Kubernetes Service (AKS)
Deploy Fusion 5 on Azure Kubernetes Service (AKS)
Fusion supports deployment on Azure Kubernetes Service (AKS). This topic explains how to deploy a Fusion cluster on AKS using the Use a short name for the namespace, containing only letters, digits, or dashes (no dots or underscores). The setup scripts in this repo use the namespace for the Helm release name by default.If you already have helm installed, make sure you’re using the latest version:For other OS, please refer to the Helm installation docs: https://helm.sh/docs/using_helm/The Fusion helm chart requires that helm is greater than version To use these role in a cluster, as an admin user first create the namespace that you wish to install fusion into:Apply the Then bind the rolebinding and clusterolebinding to the install user:You will then be able to run the You should get into the habit of pulling this repo for the latest changes before performing any maintenance operations on your Fusion cluster to ensure you have the latest updates to the scripts.Cloning the github repo is preferred so that you can pull in updates to the scripts, but if you are not a git user, then you can download the project: https://github.com/lucidworks/fusion-cloud-native/archive/master.zip.
Once downloaded, extract the zip and cd into the To recap, you should have the following requirements in place:If you don’t want the script to create a cluster, then you need to create a cluster before running the script and simply pass the name of the existing cluster using the This way, you don’t have to remember to pass the additional This saves you from having to pass If all goes well, you should see a list of pods similar to:The number of pods per deployment / statefulset will vary based on your cluster size and replicaCount settings in your custom values YAML file.
Also, don’t worry if you see some pods having been restarted as that just means they were too slow to come up and Kubernetes killed and restarted them.
You do want to see at least one pod running for every service. If a pod is not running after waiting a sufficient amount of time,
use For an overview of the various Fusion 5 microservices, see: Fusion microservices.Once you’re ready to build a Fusion cluster for production, please see see more information at Fusion 5 Survival Guide.With Grafana, you can either setup a temporary port-forward to a Grafana pod or expose Grafana on an external IP using a K8s LoadBalancer.
To define a LoadBalancer, do (replace $ with your Helm release label):You can use
setup_f5_aks.sh script in the fusion-cloud-native repository.The
setup_f5_aks.sh script is the basic foundation for getting started and proof-of-concept purposes. For information about custom values in a production-ready environment, see Custom values YAML file.Prerequisites
This section covers prerequisites and background knowledge needed to help you understand the structure of this document and how the Fusion installation process works with Kubernetes.Release Name and Namespace
Before installing Fusion, you need to choose a https://kubernetes.io/docs/concepts/overview/working-with-objects/namespaces/ namespace to install Fusion into. Think of a K8s namespace as a virtual cluster within a physical cluster. You can install multiple instances of Fusion in the same cluster in separate namespaces. However, please do not install more than one Fusion release in the same namespace.All Fusion services must run in the same namespace, i.e. you should not try to split a Fusion cluster across multiple namespaces.__
Install Helm
Helm is a package manager for Kubernetes that helps you install and manage applications on your Kubernetes cluster. Regardless of which Kubernetes platform you’re using, you need to installhelm as it is required to install Fusion for any K8s platform.
On MacOS, you can do:3.0.0; check your Helm version by running helm version --short.Helm User Permissions
If you require that fusion is installed by a user with minimal permissions, instead of an admin user, then the role and cluster role that will have to be assigned to the user within the namespace that you wish to install fusion in are documented in theinstall-roles directory.When working with Kubernetes on the command-line, it’s useful to create a shell alias for
kubectl, e.g.:role.yaml and cluster-role.yaml files to that namespacehelm install command as the <install_user>Clone fusion-cloud-native from GitHub
You should clone this repo from github as you’ll need to run the scripts on your local workstation:fusion-cloud-native-master directory.The https://github.com/lucidworks/fusion-cloud-native/blob/master/setup_f5_aks.sh script provided in this repo is strictly optional.
The script is mainly to help those new to Kubernetes and/or Fusion get started quickly.
If you’re already familiar with K8s, Helm, and AKS, then you use Helm directly to install Fusion into an existing cluster or one you create yourself using the process described <<helm-only,here>>.If you’re new to Azure, then please visit https://azure.microsoft.com/en-us/free/search/ to set up an account.Set up the AKS CLI tools
Before launching an AKS cluster, you need to install and configurekubectl and az using the links provided below:Required AKS Command-line Tools:kubectl: https://kubernetes.io/docs/tasks/tools/install-kubectl/az: https://docs.microsoft.com/en-us/cli/azure/install-azure-cli?view=azure-cli-latest
az login command (az login –help to see available options).Azure Prerequisites
To launch a cluster in AKS (or pretty much do anything with Azure) you need to setup a Resource Group. Resource Groups are a way of organizing and managing related resources in Azure. For more information about resource groups, see https://docs.microsoft.com/en-us/azure/azure-resource-manager/resource-group-overview#resource-groups.You also need to choose a location where you want to spin up your AKS cluster, such aswestus2. For a list of locations you can choose, see https://azure.microsoft.com/en-us/global-infrastructure/locations/.Use the Azure console in your browser to create a resource group, or simply do:- Azure Account set up.
azure-cli(az) command-line tools installed.azlogin working.- Created an Azure Resource Group and selected a location to launch the cluster.
Set up Fusion on AKS
Download and run the https://github.com/lucidworks/fusion-cloud-native/blob/master/setup_f5_aks.sh to install Fusion 5.x in a AKS cluster. To create a new cluster and install Fusion, simply do:-c parameter.Use the --help option to see full script usage.By default, our script installs Fusion into the default namespace; think of a K8s namespace as a virtual cluster within a physical cluster. You can install multiple instances of Fusion in the same cluster in separate namespaces. However, please do not install more than one Fusion release in the same namespace.You can override the namespace using the -n option. In addition, our script uses f5 for the Helm release name; you can customize this using the -r option. Helm uses the release name you provide to track a specific instance of an installation, allowing you to perform updates and rollback changes for that specific release only.You can also pass the --preview option to the script, which enables soon-to-be-released features for AKS, such as deploying a multi-zone cluster across 3 availability zones for higher availability guarantees. For more information about the Availability Zone feature, see https://docs.microsoft.com/en-us/azure/aks/availability-zones.It takes a while for AKS to spin up the new cluster. The cluster will have three Standard_D4_v3 nodes which have 4 CPU cores and 16 GB of memory. Behind the scenes, our script calls the az aks create command.After running the setup_f5_aks.sh script, proceed to <<verifying,Verifying the Fusion Installation>>.AKS Ingress
Thesetup_f5_aks.sh script exposes the Fusion proxy service on an external IP over HTTP. This is done for demo or getting started purposes. However, you’re strongly encouraged to configure a K8s Ingress with TLS termination in front of the proxy service.Use the -t and -h <hostname> options to have our script create an Ingress with a TLS certificate issued by Let’s Encrypt.Upgrades and Ingress
IMPORTANT: If you used the-t -h <hostname> options when installing your cluster, our script created an additional values yaml file named tls-values.yaml.To make things easier for you when upgrading, you should add the settings from this file into your main custom values yaml file. For example:tls-values.yaml file when upgrading.Verifying the Fusion Installation
In this section, we provide some tips on how to verify the Fusion installation.Let’s review some useful kubectl commands.Enhance the K8s Command-line Experience
Here is a list of tools we found useful for improving your command-line experience with Kubernetes:- krew (kubectl plugin mgr): https://github.com/kubernetes-sigs/krew/
- kube-ps1 (show current context on command line prompt): https://github.com/jonmosco/kube-ps1
- kubectx / kubens (switch between clusters / namespaces): https://github.com/ahmetb/kubectx
Useful kubectl commands
kubectl reference: https://kubernetes.io/docs/reference/generated/kubectl/kubectl-commandsSet the namespace forkubectl if not using the default:-n with every command.Get a list of running pods: k get podsGet logs for a pod using a label: k logs –l app.kubernetes.io/component=query-pipelineGet pod deployment spec and details: k get pods <pod_id> -o yamlGet details about a pod events: k describe po <pod_id>Port forward to a specific pod: k port-forward <pod_id> 8983:8983SSH into a pod: k exec -it <pod_id> -- /bin/bashCPU/Memory usage report for pods: k top podsForcefully kill a pod: k delete po <pod_id> --force --grace-period 0Scale up (or down) a deployment: k scale deployment.v1.apps/<id> --replicas=NGet a list of pod versions: k get po -o jsonpath='{..image}' | tr -s '[[:space:]]' '\n' | sort | uniqCheck Fusion Pods and Services
Once the install script completes, you can check that all pods and services are available using:kubectl logs <pod_id> to see the logs for that pod; to see the logs for previous versions of a pod, use: kubectl logs <pod_id> -p.
You can also look at the actions Kubernetes performed on the pod using kubectl describe po <pod_id>.To see a list of Fusion services, do:Upgrading with Zero Downtime
One of the most powerful features provided by Kubernetes and a cloud-native microservices architecture is the ability to do a rolling update on a live cluster. Fusion 5 allows customers to upgrade from Fusion 5.x.y to a later 5.x.z version on a live cluster with zero downtime or disruption of service.When Kubernetes performs a rolling update to an individual microservice, there will be a mix of old and new services in the cluster concurrently (only briefly in most cases) and requests from other services will be routed to both versions. Consequently, Lucidworks ensures all changes we make to our service do not break the API interface exposed to other services in the same 5.x line of releases. We also ensure stored configuration remains compatible in the same 5.x release line.Lucidworks releases minor updates to individual services frequently, so our customers can pull in those upgrades using Helm at their discretion.To upgrade your cluster at any time, use the--upgrade option with our setup scripts in this repo.The scripts in this repo automatically pull in the latest chart updates from our Helm repository and deploy any updates needed by doing a diff of your current installation and the latest release from Lucidworks.
To see what would be upgraded, you can pass the --dry-run option to the script.Grafana Dashboards
Get the initial Grafana password from a K8s secret by doing:kubectl get services --namespace <namespace> to determine when the load balancer is setup and its IP address. Direct your browser to http://<GrafanaIP>:3000 and enter the username admin@localhost and the password that was returned in the previous step.This will log you into the application. It is recommended that you create another administrative user with a more desirable password.The dashboards and datasoure will be setup for you in grafana, simply navigate to Dashboards -> Manage to view the available dashboardsMore deployment options
- How to deploy Fusion 5 in Google Kubernetes Engine
- How to deploy Fusion 5 in Amazon Elastic Kubernetes Service
- How to deploy Fusion on 5 other Kubernetes platforms
Frequently Asked Questions
Can the stateful database services, for example, MySQL, be supported by an Azure PaaS service?This option is not supported. In theory, it may be possible to implement this function.Is it possible to use cross-zone storage solutions rather than volumes, such as Microsoft Azure file storage, for stateful services?While in theory it may be possible to implement this functionality, the configuration has not been tested by Lucidworks and is not supported.Learn more
Deploying Fusion 5
The course for Deploying Fusion 5 focuses on the prerequisite software needed to deploy Fusion, the necessary setup steps, and the physical act of deployment.
Deploy Fusion 5 on Other Kubernetes Platforms
Deploy Fusion 5 on Other Kubernetes Platforms
The Use a short name for the namespace, containing only letters, digits, or dashes (no dots or underscores). The setup scripts in this repo use the namespace for the Helm release name by default.If you already have helm installed, make sure you’re using the latest version:For other OS, please refer to the Helm installation docs: https://helm.sh/docs/using_helm/The Fusion helm chart requires that helm is greater than version To use these role in a cluster, as an admin user first create the namespace that you wish to install fusion into:Apply the Then bind the rolebinding and clusterolebinding to the install user:You will then be able to run the You should get into the habit of pulling this repo for the latest changes before performing any maintenance operations on your Fusion cluster to ensure you have the latest updates to the scripts.Cloning the github repo is preferred so that you can pull in updates to the scripts, but if you are not a git user, then you can download the project: https://github.com/lucidworks/fusion-cloud-native/archive/master.zip.
Once downloaded, extract the zip and cd into the In this example:This file is referred to as The This saves you from having to pass If all goes well, you should see a list of pods similar to:The number of pods per deployment / statefulset will vary based on your cluster size and replicaCount settings in your custom values YAML file.
Also, don’t worry if you see some pods having been restarted as that just means they were too slow to come up and Kubernetes killed and restarted them.
You do want to see at least one pod running for every service. If a pod is not running after waiting a sufficient amount of time,
use For an overview of the various Fusion 5 microservices, see: Fusion microservices.Once you’re ready to build a Fusion cluster for production, please see see more information at Fusion 5 Survival Guide.With Grafana, you can either setup a temporary port-forward to a Grafana pod or expose Grafana on an external IP using a K8s LoadBalancer.
To define a LoadBalancer, do (replace $ with your Helm release label):You can use
setup_f5_k8s.sh script in the fusion-cloud-native repository provides deployment support for any Kubernetes platform, including on-premise, private cloud, public cloud, and hybrid platforms.This script is used by the setup_f5_gke.sh, setup_f5_eks.sh, and setup_f5_aks.sh scripts, which provide additional platform-specific support for Google Kubernetes Engine (GKE), Amazon Elastic Kubernetes Service (EKS), and Azure Kubernetes Service (AKS).This topic explains how to deploy a Fusion cluster in Kubernetes using the setup_f5_k8s.sh script in the fusion-cloud-native repository.If you’re deploying on-premises or using a localized repository, you’ll need to use a private repository for Docker images.Prerequisites
This section covers prerequisites and background knowledge needed to help you understand the structure of this document and how the Fusion installation process works with Kubernetes.Release Name and Namespace
Before installing Fusion, you need to choose a https://kubernetes.io/docs/concepts/overview/working-with-objects/namespaces/ Kubernetes namespace to install Fusion into. Think of a K8s namespace as a virtual cluster within a physical cluster. You can install multiple instances of Fusion in the same cluster in separate namespaces. However, please do not install more than one Fusion release in the same namespace.All Fusion services must run in the same namespace, i.e. you should not try to split a Fusion cluster across multiple namespaces.__
Install Helm
Helm is a package manager for Kubernetes that helps you install and manage applications on your Kubernetes cluster. Regardless of which Kubernetes platform you’re using, you need to installhelm as it is required to install Fusion for any K8s platform.
On MacOS, you can do:3.0.0; check your Helm version by running helm version --short.Helm User Permissions
If you require that fusion is installed by a user with minimal permissions, instead of an admin user, then the role and cluster role that will have to be assigned to the user within the namespace that you wish to install fusion in are documented in theinstall-roles directory.When working with Kubernetes on the command-line, it’s useful to create a shell alias for
kubectl, e.g.:role.yaml and cluster-role.yaml files to that namespacehelm install command as the <install_user>Clone fusion-cloud-native from GitHub
You should clone this repo from github as you’ll need to run the scripts on your local workstation:fusion-cloud-native-master directory.Deployment
If you’re not running on a managed K8s platform like GKE, AKS, or EKS, you can use Helm to install the Fusion chart to an existing Kubernetes cluster.Fusion version 5.5 now includes support for the Rancher Kubernetes Engine (RKE) platform. Before deploying Fusion to RKE, you must download and install the latest RKE software. After configuring your cluster, you can proceed with the Helm v3 installation.You must have a working cluster configured before performing the Helm v3 installation.
Use Helm v3 to Install Fusion
You should upgrade to the latest version of Helm v3 for working with Fusion. If you need to keep Helm V2 for other clusters, ensure Helm V3 is ahead of Helm V2 in your working shell’s PATH before proceeding.Customize Fusion Chart Settings
Fusion aims to be well-configured out-of-the-box, but you can customize any of the built-in settings using a custom valuesYAML file. If you use one of our setup scripts, such as setup_f5_gke.sh, then it will create a custom values YAML file for you the first time you run it using https://github.com/lucidworks/fusion-cloud-native/blob/master/customize_fusion_values.yaml.example as a template.If you’re working with Helm directly and not using one of our setup scripts, then run the https://github.com/lucidworks/fusion-cloud-native/blob/master/customize_fusion_values.sh script to create a custom values YAML file from our https://github.com/lucidworks/fusion-cloud-native/blob/master/customize_fusion_values.yaml.example template as a starting point:Pass
--help for usage details.-
<provider>is the K8s platform you’re running on, such asgke -
<cluster>is the name of your cluster -
<namespace>is the K8s namespace where you plan to install Fusion
The
--node-pool option specifies the node selector label for determining which nodes to run Fusion pods. You can pass "{}" to let Kubernetes decide which nodes to schedule pods on.${MY_VALUES} in the commands belo. Replace the filename with the correct filename for your environment. Keep this file handy, as you’ll need it to customize Fusion settings and upgrade to a newer version.Review the settings in the custom values YAML file to ensure the defaults are appropriate for your environment, including the number of Solr and Zookeeper replicas.Add the Lucidworks Helm repo:customize_fusion_values.sh script creates an upgrade script to install/upgrade Fusion into Kubernetes using Helm. Look in the directory where you ran customize_fusion_values.sh for a script named like:
<provider>_<cluster>_<namespace>_upgrade_fusion.sh. Run this script to install Fusion.Verifying the Fusion Installation
In this section, we provide some tips on how to verify the Fusion installation.Let’s review some useful kubectl commands.Enhance the K8s Command-line Experience
Here is a list of tools we found useful for improving your command-line experience with Kubernetes:- krew (kubectl plugin mgr): https://github.com/kubernetes-sigs/krew/
- kube-ps1 (show current context on command line prompt): https://github.com/jonmosco/kube-ps1
- kubectx / kubens (switch between clusters / namespaces): https://github.com/ahmetb/kubectx
Useful kubectl commands
kubectl reference: https://kubernetes.io/docs/reference/generated/kubectl/kubectl-commandsSet the namespace forkubectl if not using the default:-n with every command.Get a list of running pods: k get podsGet logs for a pod using a label: k logs –l app.kubernetes.io/component=query-pipelineGet pod deployment spec and details: k get pods <pod_id> -o yamlGet details about a pod events: k describe po <pod_id>Port forward to a specific pod: k port-forward <pod_id> 8983:8983SSH into a pod: k exec -it <pod_id> -- /bin/bashCPU/Memory usage report for pods: k top podsForcefully kill a pod: k delete po <pod_id> --force --grace-period 0Scale up (or down) a deployment: k scale deployment.v1.apps/<id> --replicas=NGet a list of pod versions: k get po -o jsonpath='{..image}' | tr -s '[[:space:]]' '\n' | sort | uniqCheck Fusion Pods and Services
Once the install script completes, you can check that all pods and services are available using:kubectl logs <pod_id> to see the logs for that pod; to see the logs for previous versions of a pod, use: kubectl logs <pod_id> -p.
You can also look at the actions Kubernetes performed on the pod using kubectl describe po <pod_id>.To see a list of Fusion services, do:Upgrading with Zero Downtime
One of the most powerful features provided by Kubernetes and a cloud-native microservices architecture is the ability to do a rolling update on a live cluster. Fusion 5 allows customers to upgrade from Fusion 5.x.y to a later 5.x.z version on a live cluster with zero downtime or disruption of service.When Kubernetes performs a rolling update to an individual microservice, there will be a mix of old and new services in the cluster concurrently (only briefly in most cases) and requests from other services will be routed to both versions. Consequently, Lucidworks ensures all changes we make to our service do not break the API interface exposed to other services in the same 5.x line of releases. We also ensure stored configuration remains compatible in the same 5.x release line.Lucidworks releases minor updates to individual services frequently, so our customers can pull in those upgrades using Helm at their discretion.To upgrade your cluster at any time, use the--upgrade option with our setup scripts in this repo.The scripts in this repo automatically pull in the latest chart updates from our Helm repository and deploy any updates needed by doing a diff of your current installation and the latest release from Lucidworks.
To see what would be upgraded, you can pass the --dry-run option to the script.Grafana Dashboards
Get the initial Grafana password from a K8s secret by doing:kubectl get services --namespace <namespace> to determine when the load balancer is setup and its IP address. Direct your browser to http://<GrafanaIP>:3000 and enter the username admin@localhost and the password that was returned in the previous step.This will log you into the application. It is recommended that you create another administrative user with a more desirable password.The dashboards and datasoure will be setup for you in grafana, simply navigate to Dashboards -> Manage to view the available dashboardsLearn more
Deploying Fusion 5
The course for Deploying Fusion 5 focuses on the prerequisite software needed to deploy Fusion, the necessary setup steps, and the physical act of deployment.