> ## Documentation Index
> Fetch the complete documentation index at: https://doc.lucidworks.com/llms.txt
> Use this file to discover all available pages before exploring further.
# Quickstart
> Lucidworks AI Neural Hybrid Search and RAG
export const LwTemplate = ({title = "Key questions to get you started", icon = "sparkles", cta = "Powered by Agent Studio", linkHref = "https://lucidworks.com/demo/?utm_source=docs&utm_medium=referral&utm_campaign=docs_cta_ai"}) => {
const [isLoaded, setIsLoaded] = useState(false);
useEffect(() => {
const timer = setTimeout(() => {
setIsLoaded(true);
}, 500);
return () => clearTimeout(timer);
}, []);
return
{isLoaded && `
}} />}
Powered by Lucidworks Agent Studio
;
};
[localhost link]: http://localhost:3000/docs/lw-platform/lw-ai/quickstart-lucidworks-ai-nhs-rag
[mintlify link]: https://doc.lucidworks.com/docs/lw-platform/lw-ai/quickstart-lucidworks-ai-nhs-rag
This quickstart guide walks you through setting up Lucidworks AI using Neural Hybrid Search (NHS) and retrieval-augmented generation (RAG).
You’ll prepare your data, vectorize documents and queries, configure query blending, and enable AI-powered responses. Each step builds a working configuration that combines lexical relevance with semantic understanding for search, and generates natural language answers using your own content.
Click your use case below to see examples of how NHS and RAG can enhance the search experience. Based on the model used, chunking type, and other factors, results can vary. For each use case, a combination of NHS and RAG generates accurate responses to customer queries that minimize employee research and troubleshooting resources.
Using neural hybrid search, keyword matches and semantic similarities can be combined with RAG to generate answers from your site's guidelines, procedures, and information. For example, if a customer requests information about return policies, NHS blends matches to "return" with semantically similar information, and then uses RAG to generate a comprehensive, contextual answer from existing site documents.
Using neural hybrid search and RAG, B2B organizations can, for example, index complex specifications, diagrams, and technical manuals. If a customer requests information about technical specifications and install instructions for a particular component, NHS matches keywords and semantically similar information, and then RAG scrutinizes the documents to generate a concise, complete explanation.
While most businesses use some knowledge management for internal or external purposes, knowledge management is the focus of some organizations. For example, if your organization provides medical or scientific data to customers, a customer may request the latest results of medication trials. NHS matches keywords and semantically similar information, and then RAG analyzes the documents to generate a comprehensive, accurate reference document.
## For self-hosted Fusion: Enable Lucidworks AI
Before you can begin using Lucidworks AI features with self-hosted Fusion, a couple of one-time setup steps are required.
If you are using Lucidworks Search, these steps have already been performed for you by the Lucidworks team.
Lucidworks AI Gateway provides secure, authenticated communication between your self-hosted Fusion instance and Lucidworks AI.
You must configure the integration between the two before you can begin using Lucidworks AI features in Fusion.
Before you can use Lucidworks AI with Lucidworks Platform, you must configure the [Lucidworks AI Gateway](/docs/lw-platform/lw-ai/lw-ai-gateway) to provide a secure, authenticated integration between self-hosted Fusion and your hosted models.
This configuration is done through a secret properties file that you can find in the Lucidworks Platform UI.
This feature is available starting in Fusion 5.9.5 and in all subsequent Fusion 5.9 releases.
Integrations are created for you by the Lucidworks team. But as a workspace owner, you can configure those integrations with Lucidworks AI Gateway.
Each account can have its own set of credentials and associated scopes, which define the operations it can perform.
If configuration properties are not provided at the account level, default settings are used instead.
To configure the Lucidworks AI Gateway, navigate to the megamenu and click **Models**.
1. On the Integrations tab, click your integration. If you don’t see your integration, contact your Lucidworks representative.
2. Download or copy the YAML code and paste it into a file called `account.yaml`.
The file for a single integration should look similar to this one:
```yaml theme={"dark"}
lwai-gateway:
lwai:
credentials: |
fusion.lwai.default.baseUrl: https://APPLICATION_ID.applications.lucidworks.com
fusion.lwai.default.authEndpoint: https://identity.lucidworks.com/oauth2/XXXXXXXXXX/v1/token
fusion.lwai.account[0].name: ACCOUNT_NAME
fusion.lwai.account[0].scopes: machinelearning.predict,machinelearning.model
fusion.lwai.account[0].clientId: *****
fusion.lwai.account[0].clientSecret: *****
```
For a configuration with multiple integrations, it should look like this:
```yaml theme={"dark"}
lwai-gateway:
lwai:
credentials: |
fusion.lwai.default.authEndpoint: https://identity.lucidworks.com/oauth2/XXXXXXXXXX/v1/token
fusion.lwai.account[0].baseUrl: https://APPLICATION_ID.applications.lucidworks.com
fusion.lwai.account[0].name: ACCOUNT_NAME
fusion.lwai.account[0].scopes: machinelearning.predict,machinelearning.model
fusion.lwai.account[0].clientId: *****
fusion.lwai.account[0].clientSecret: *****
fusion.lwai.account[1].baseUrl: https://APPLICATION_ID2.applications.lucidworks.com
fusion.lwai.account[1].name: ACCOUNT_NAME
fusion.lwai.account[1].scopes: machinelearning.predict,machinelearning.model
fusion.lwai.account[1].clientId: *****
fusion.lwai.account[1].clientSecret: *****
```
3. Apply the file to your Fusion configuration file.
For example:
```bash theme={"dark"}
helm upgrade KUBERNETES_NAMESPACE lucidworks/fusion -f FUSION_VALUES.yaml
```
To use Lucidworks AI features in Fusion, non-admin users must have the following permissions:
```
PUT,POST,GET:/LWAI-ACCOUNT-NAME/**
```
The `LWAI-ACCOUNT-NAME` must match the value of `fusion.lwai.account[n].name` in the integration YAML you copied when you set up Lucidworks AI Gateway.
## Set up Neural Hybrid Search and RAG
In just a few steps, you’ll have a functional pipeline you can test, tune, and use as a starting point for future implementations.
As your documents are indexed, they need to be prepared for Lucidworks AI. This includes chunking and vectorizing.
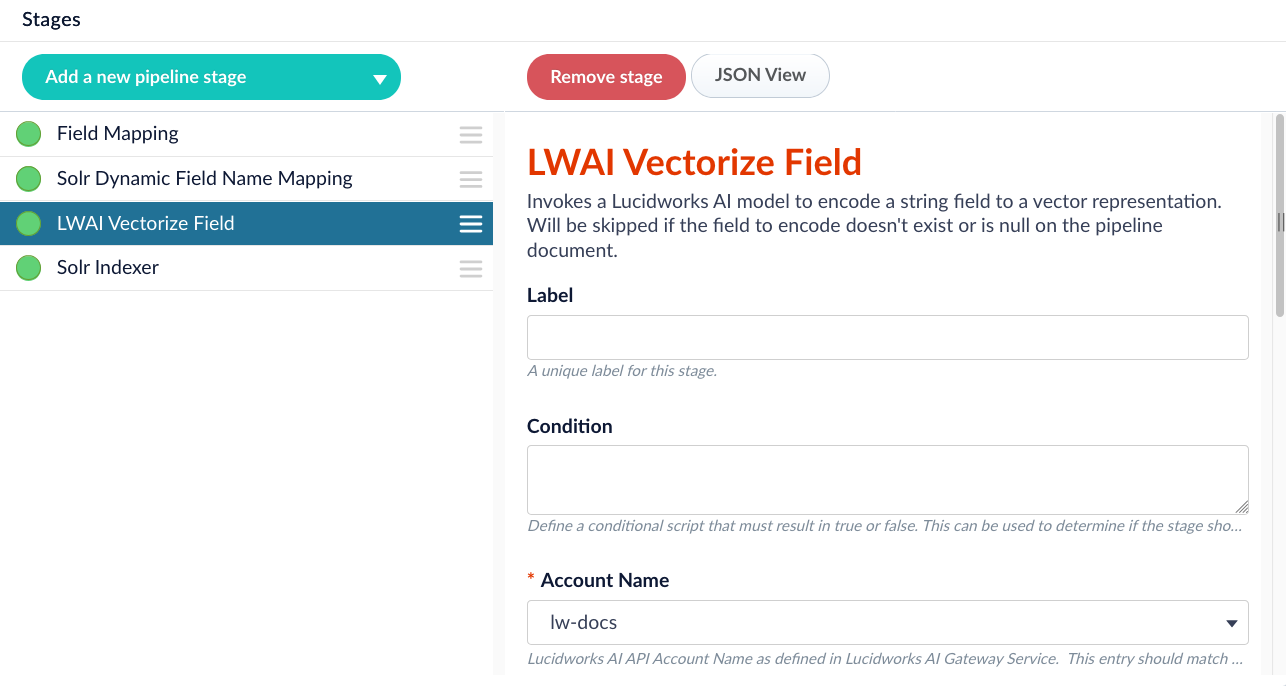
Both steps run in one stage called the **LWAI Chunker Stage**. Add it to your index pipeline anywhere before the **Solr Partial Update Indexer** stage.
Configuration is straightforward, but if you need additional guidance, expand the related sections in this step.
Select the chunking strategy that fits your use case. Lucidworks recommends starting with the *Sentence* strategy. You can try other strategies as needed.
Choose a model for vectorization. You don't need the most advanced model to get excellent results. Start with *snowflake\_l\_chunk\_vector\_1024v* and adjust as needed. Make sure the model fits your use case and goals.
Set the *Input context variable* field to the location where Fusion should store the vectors. For example, ``.
Index some documents and continue to the next step.
Lucidworks AI supports several chunking strategies. Each one splits text differently and is suited to specific content types. The strategy you choose affects both performance and response quality. Lucidworks recommends starting with the *Sentence* strategy and experimenting from there.
The sentence chunker splits text into fixed-size chunks based on a set number of sentences. This approach is simple and consistent, making it a good choice for most use cases where the structure of the text is clear.
Best for:
* FAQs
* Help articles
* Structured documentation
The dynamic sentence chunker splits text into individual sentences, then combines them until a token limit is reached. It can also include overlapping sentences between chunks for better context continuity.
This strategy is effective when your content has varied sentence lengths or inconsistent formatting and needs flexible chunk sizes based on token count.
Best for:
* Long articles
* Varied-length documents
* API references
The dynamic newline chunker splits text on newline characters, then merges lines until they reach a token limit. It assumes that meaningful structure is indicated by line breaks rather than sentence punctuation.
This strategy works well when your content is line-oriented and does not follow conventional sentence structure.
Best for:
* Logs
* Plaintext lists
* Exported structured data
The regex splitter chunker uses a regular expression to divide the text. It gives you full control over how and where the text is split, based on patterns you define.
This strategy is useful when working with custom formats or data that uses consistent delimiters outside standard punctuation.
Best for:
* Config files
* Code blocks
* Formatted forms
The semantic chunker groups sentences based on meaning, using a model to compare their vector similarity. It dynamically builds chunks by merging content that is semantically related.
This strategy is valuable when structure is weak or missing, and meaning is the most reliable way to group information. It is slower than other options and should be used only when semantic accuracy is critical.
Best for:
* Chat logs
* Interview transcripts
* Informal or unstructured text
The model you choose at indexing time controls how your documents are vectorized. These vectors are what Lucidworks AI uses to compare queries to document chunks. A good model captures the meaning of your content clearly and compactly. Model quality affects how accurately the system retrieves relevant chunks during search or generation. Model size affects indexing speed, storage cost, and system performance.
Start with a clear goal for your retrieval use case. If you need fast responses and can tolerate a small drop in relevance, choose a smaller model. If you need precise chunk matching across large or complex content, use a higher-quality model—even if it’s slower.
**Common starting points**
* **e5-base-v2**: Balanced quality and speed. Works well for general-purpose indexing in English.
* **bge-base**: Strong semantic performance.
* **snowflake-arctic-embed-m-v2.0**: High retrieval accuracy with optional dimension reduction for performance tuning.
* **multilingual-e5-base**: Recommended if your content includes multiple languages.
**Tips for evaluation**
1. Start with a base or small model to establish a performance and relevance baseline.
2. Index a representative sample and test retrieval using real queries.
3. Use Query Workbench to inspect which chunks are returned for each query.
4. Measure indexing time and vector storage to catch early scalability issues.
5. Use `dimReductionSize` with supported models to reduce vector size without retraining.
6. If chunk retrieval is weak, try a different model before adjusting chunking strategy.
Just as you needed to vectorize documents, you need to vectorize queries so Lucidworks AI can find the best matching document chunks.
Add the **LWAI Vectorize Query** stage before any stage that alters the query in your query pipeline. Use the same model you selected for the **LWAI Chunker Stage** in the index pipeline.
Now, your queries are vectorized for Neural Hybrid Search (NHS) and retrieval-augmented generation (RAG).
Neural Hybrid Search combines lexical and semantic queries to create a flexible balance for any use case.
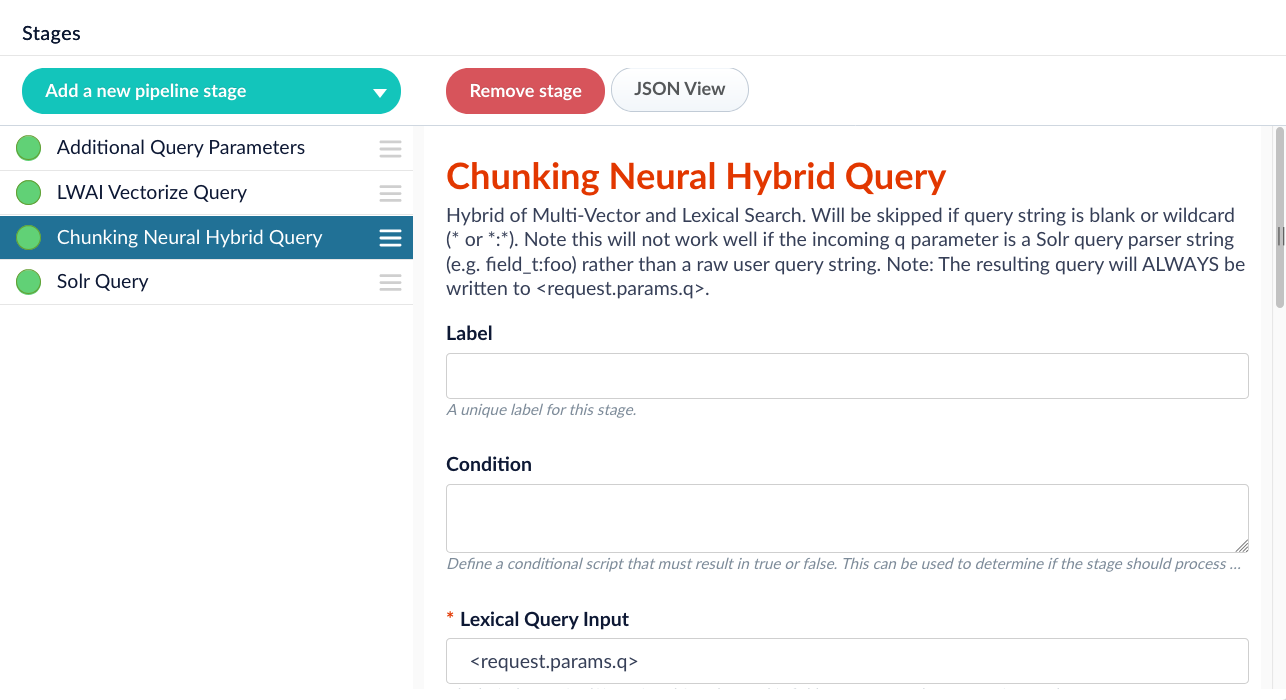
Add the **Chunking Neural Hybrid Query** stage anywhere between the **LWAI Vectorize Query** and **Solr Query** stages. The default configuration is a good starting point, but you must set the *Vector Query Field* to match the value in the *Destination Field Name & Context Output* field from the **LWAI Chunker Stage**.
Enter several queries and test the results. Then adjust the lexical and vector query weights and squash factors as needed. Keep experimenting until you find the right balance for your use case.
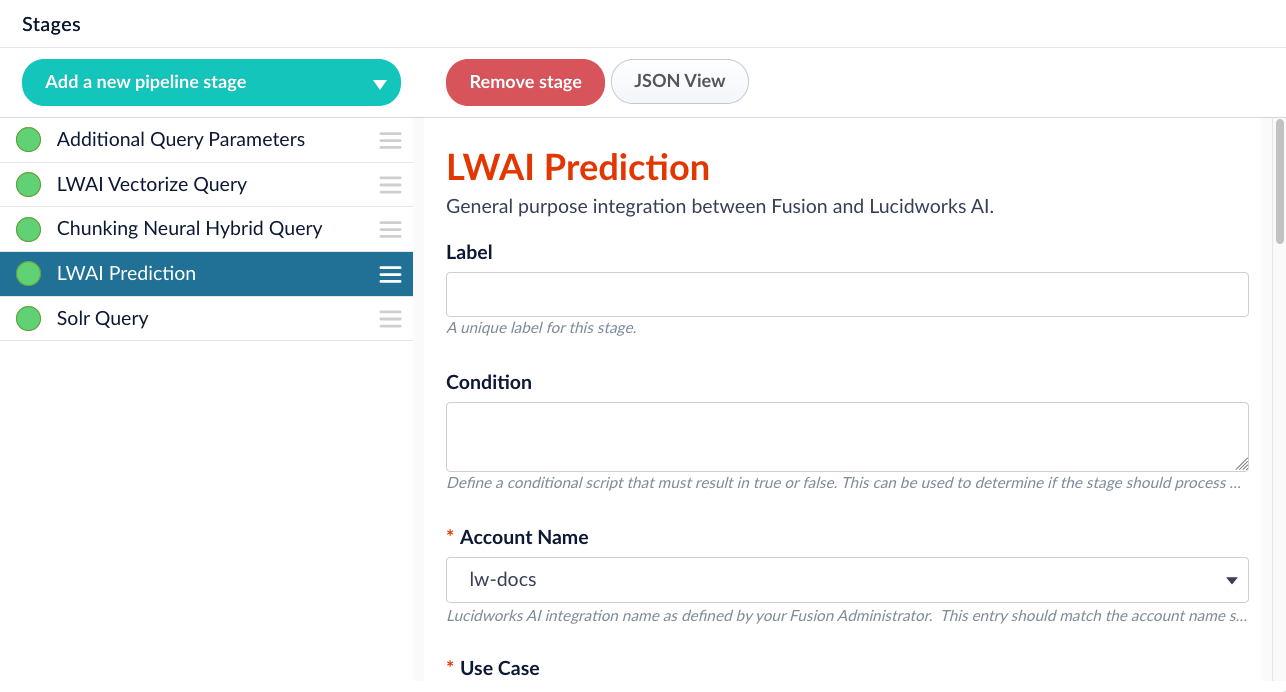
Add the **LWAI Prediction** stage anywhere between the **LWAI Vectorize Query** and **Solr Query** stages. For this use case, select RAG.
Choose a model that fits your retrieval-augmented generation needs. It does not have to match the model used for indexing. Start with a model that aligns with your goals, and switch to more advanced options if needed. For additional guidance, expand the related section in this step.
Lucidworks AI supports many use cases. To explore more, see [Lucidworks AI use cases](#).
Lucidworks AI needs specific information to perform RAG. In the *Document Field Mappings* section, configure at least the `body` and `source` fields. You can include additional fields if they help improve the responses.
If your model requires an API key, add it to the configuration. The key is stored securely.
Choosing the right embedding model for RAG starts with understanding what you want retrieval to achieve. Embedding models offer different tradeoffs in quality, performance, and language support. The best option depends on your data, your users’ expectations, and your system constraints. Start with a clear goal: Are you trying to surface precise answers from a product catalog? Return relevant support content? Summarize technical documentation?
Lucidworks provides a set of pre-trained models that support a wide range of domains. The guidance below focuses on common RAG retrieval needs in B2B commerce, B2C commerce, and knowledge management.
RAG in B2B typically supports technical queries against complex product catalogs, configuration rules, and documentation. Accuracy and domain fit matter more than general language quality.
* **snowflake-arctic-embed-m-v2.0**: High retrieval quality with support for vector size reduction. Recommended starting point for B2B. Optimized for long, structured product content.
* **multilingual-e5-base**: Strong multilingual support with consistent performance across languages and formats. Good fallback when content spans languages or includes inconsistent structure.
* **e5-base-v2**: Balanced quality and speed if your data is mostly English and latency is a concern.
Avoid large models unless your environment is low-volume or can tolerate slower response times.
In B2C, queries are typically short and goal-driven. Users expect quick answers about products, orders, and policies. The embedding model needs to capture natural phrasing and deliver speed.
* **e5-base-v2**: Reliable quality and performance for consumer-facing applications in English.
* **multilingual-e5-small**: Lightweight model that supports multilingual storefronts with strong baseline relevance.
* **gte-small** or **bge-small**: Fastest models with acceptable quality for simple support queries or product lookups.
Start small and scale up only if relevance is noticeably off or your content includes complex product descriptions.
Knowledge management systems support internal users with long-form content, process documentation, and policies. Chunk retrieval must prioritize semantic accuracy and summarization across larger documents.
* **bge-base**: High-quality embeddings suited to varied internal content. Strong starting point for most knowledge systems.
* **bge-large** or **e5-large-v2**: Better for deeper retrieval when latency is not a concern. Useful for high-accuracy needs or long documents.
* **multilingual-e5-base**: Best option when content or queries span multiple languages.
**Tips for evaluation**
1. Use real queries from actual users, including edge cases, to measure effectiveness.
2. Start with a base or small model and scale up only if needed.
3. Inspect retrieved chunks in Query Workbench to verify relevance.
4. Reduce vector size using `dimReductionSize` in supported models to improve performance.
5. Switch models easily in the **LWAI Prediction** stage as your use case evolves.
Lucidworks AI is designed to support model experimentation, so choose pragmatically, test early, and adjust based on actual retrieval results.
Everything is set up. Now test your configuration in the Query Workbench. Switch to the JSON view to inspect Neural Hybrid Search results and RAG responses.
Enter queries and evaluate the responses. Neural Hybrid Search should return relevant results. If the results are weak, adjust the query weights and squash factors.
Lucidworks AI is flexible and supports many use cases. Use the following checks to guide your evaluation:
1. **Is the answer backed by retrieved content?** The response should only include facts found in the retrieved documents.
2. **Do citations match the content?** References must point to documents that support the answer.
3. **What happens if nothing useful is retrieved?** The system should avoid generating unsupported content.
4. **Does the answer stay on topic?** The response should directly address the query.
5. **Does the system handle edge cases well?** Use ambiguous or off-topic queries to test its behavior.
If results are still unsatisfactory, adjust the model configuration. If issues persist, review your model selection.
## Learn more
This pipeline uses the following stages:
* Additional Query Parameters
* LWAI Query Rewrite
* Additional Query Parameters
* LWAI Vectorize Query
* Hybrid Query
* Solr Query
* LWAI Prediction
## Add the pipeline
1. Navigate to **Querying > Query Pipelines**.
2. Click **Add+**.
3. Enter the **Pipeline ID**, for example `LWAI-NHS-plus-RAG`.
4. Remove the default stages except for Solr Query:
1. Remove the Text Tagger stage.
2. Remove the Boost with Signals stage.
3. Remove the Query Fields stage.
4. Remove the Facets stage.
5. Remove the Apply Rules stage.
6. Remove the Modify Response with Rules stage.
## Additional Query Parameters
Configure the Additional Query Parameters stage as follows.
1. Click **Add a new pipeline stage > Additional Query Parameters**.
2. Enter names, values, and policies for the **Parameters and Values**:
1. `orig_q` - `` - `replace`.
2. `rewritten_q` - `` - `replace`.
3. Save the pipeline.
## LWAI Query Rewrite
LWAI Query Rewrite is set up using the LWAI Prediction stage.
1. Click **Add a new pipeline stage > LWAI Prediction**.
2. Enter a **Label**, such as `[LWAI] Query Rewrite`.
3. In the **Condition** field, enter `request.getFirstFieldValue('q') != '**:**' && request.hasParam('memory_uuid')`.
4. Select the Lucidworks AI integration **Account Name** as defined by your Fusion Administrator.
5. Select the **Use Case**, such as `standalone-query-rewriter`.
6. Select the **Model** to use.
7. Enter the **Input context variable** as ``.
8. Enter the **Destination Variable Name & Context Output** as `standalone`.
9. Enter the following under **Use Case Configuration**:
1. **Parameter Name**: `memoryUuid`.
2. **Parameter Value**: ``.
10. Save the pipeline.
## Additional Query Parameters
Configure another Additional Query Parameters stage as follows.
1. Click \**Add a new pipeline stage > *Additional Query Parameters**.
2. Enter the following under **Parameters and Values**:
1. **Parameter Name**: `rewritten_q`.
2. **Parameter Value**: ``.
3. **Update Policy**: `replace`.
3. Save the pipeline.
## LWAI Vectorize Query
Configure the LWAI Vectorize Query stage as follows.
1. Click **Add a new pipeline stage > LWAI Vectorize Query**.
2. In the **Label** field, enter a unique identifier for this stage.
3. In the **Condition** field, enter a script that results in true or false, which determines if the stage should process.
4. Select **Asynchronous Execution Config** if you want to run this stage asynchronously. If this field is enabled, complete the following fields:
1. Select **Enable Async Execution**. Fusion automatically assigns an **Async ID** value to this stage. Change this to a more memorable string that describes the asynchronous stages you are merging, such as `signals` or `access_control`.
2. Copy the **Async ID** value.\
For detailed information, see Enable asynchronous query pipeline processing and [Asynchronous query pipeline processing](/docs/lucidworks-search/05-move-data-out/query-pipeline/query-pipeline-stages#asynchronous-query-pipeline-processing).
5. Select the **Account Name**.
6. Select the Model to use.
7. Set the **Query Input** to ``.
8. Enter the **Output Context Variable** as `vector`.
9. Save the pipeline.
## Hybrid Query
Configure the Hybrid Query stage as follows.
1. Click **Add a new pipeline stage > Hybrid Query**.
2. Set the **Lexical Query Input** as ``.
3. Enter a value for the **Lexical Query Weight**, for example, `0.3`.
4. Set the **Number of Lexical Results**, such as `1000`.
5. In the **Vector Query Field**, enter the name of the Solr field for KNN vector search.
6. Set the **Vector Input** to ``.
7. Enter a value for the **Vector Query Weight**, for example, `0.7`.
8. Check the box for **Use KNN Query**.
9. Under **Use KNN Query**, enter **Number of Vector Results**, such as `1000`.
10. Save the pipeline.
## Solr Query
Configure the Solr Query stage as follows.
1. Select the **HTTP Method** as POST.
2. Make sure the **Generate Response Signal** is checked.
3. Set the **Preferred Replica Type** to pull.
4. Save the pipeline.
## LWAI Prediction
Configure the LWAI Prediction stage as follows.
1. Click **Add a new pipeline stage > LWAI Prediction**.
2. In the **Label** field, enter a unique identifier for this stage.
3. In the **Condition** field, enter a script that results in true or false, which determines if the stage should process.
4. Select **Asynchronous Execution Config** if you want to run this stage asynchronously. If this field is enabled, complete the following fields:
1. Select **Enable Async Execution**. Fusion automatically assigns an **Async ID** value to this stage. Change this to a more memorable string that describes the asynchronous stages you are merging, such as `signals` or `access_control`.
2. Copy the **Async ID** value.\
For detailed information, see Enable asynchronous query pipeline processing and [Asynchronous query pipeline processing](/docs/lucidworks-search/05-move-data-out/query-pipeline/query-pipeline-stages#asynchronous-query-pipeline-processing).
5. Set the **Account Name** to the Lucidworks AI integration name as defined by your Fusion Administrator.
6. Select the **Use Case** as `rag`.
7. Select the **Model** to use.
8. Set the **Input context variable** to ``.
9. Make sure **Include Response Documents?** is checked.
10. Enter values into the **Use Case Configuration**:
1. **Parameter Name**: `answerNotFoundMessage`.
2. **Parameter Value**: `Not possible to answer given this content`.
11. Save the pipeline.
## Order the stages
1. Make sure the stages are in the following order:
1. Additional Query Parameters
2. LWAI Query Rewrite
3. Additional Query Parameters
4. LWAI Vectorize Query
5. Hybrid Query
6. Solr Query
7. LWAI Prediction
2. Save the pipeline.
 Configuration is straightforward, but if you need additional guidance, expand the related sections in this step.
Select the chunking strategy that fits your use case. Lucidworks recommends starting with the *Sentence* strategy. You can try other strategies as needed.
Choose a model for vectorization. You don't need the most advanced model to get excellent results. Start with *snowflake\_l\_chunk\_vector\_1024v* and adjust as needed. Make sure the model fits your use case and goals.
Set the *Input context variable* field to the location where Fusion should store the vectors. For example, `
Configuration is straightforward, but if you need additional guidance, expand the related sections in this step.
Select the chunking strategy that fits your use case. Lucidworks recommends starting with the *Sentence* strategy. You can try other strategies as needed.
Choose a model for vectorization. You don't need the most advanced model to get excellent results. Start with *snowflake\_l\_chunk\_vector\_1024v* and adjust as needed. Make sure the model fits your use case and goals.
Set the *Input context variable* field to the location where Fusion should store the vectors. For example, `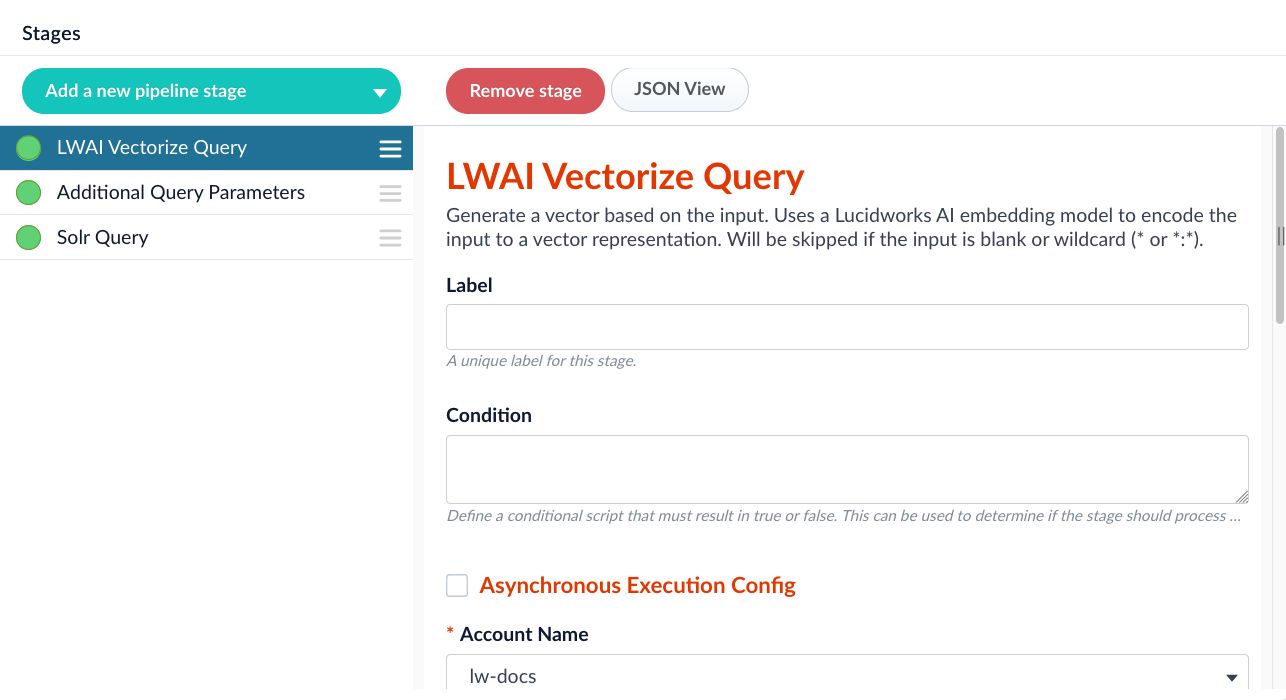 Now, your queries are vectorized for Neural Hybrid Search (NHS) and retrieval-augmented generation (RAG).
 Enter several queries and test the results. Then adjust the lexical and vector
  Choose a model that fits your retrieval-augmented generation needs. It does not have to match the model used for indexing. Start with a model that aligns with your goals, and switch to more advanced options if needed. For additional guidance, expand the related section in this step.
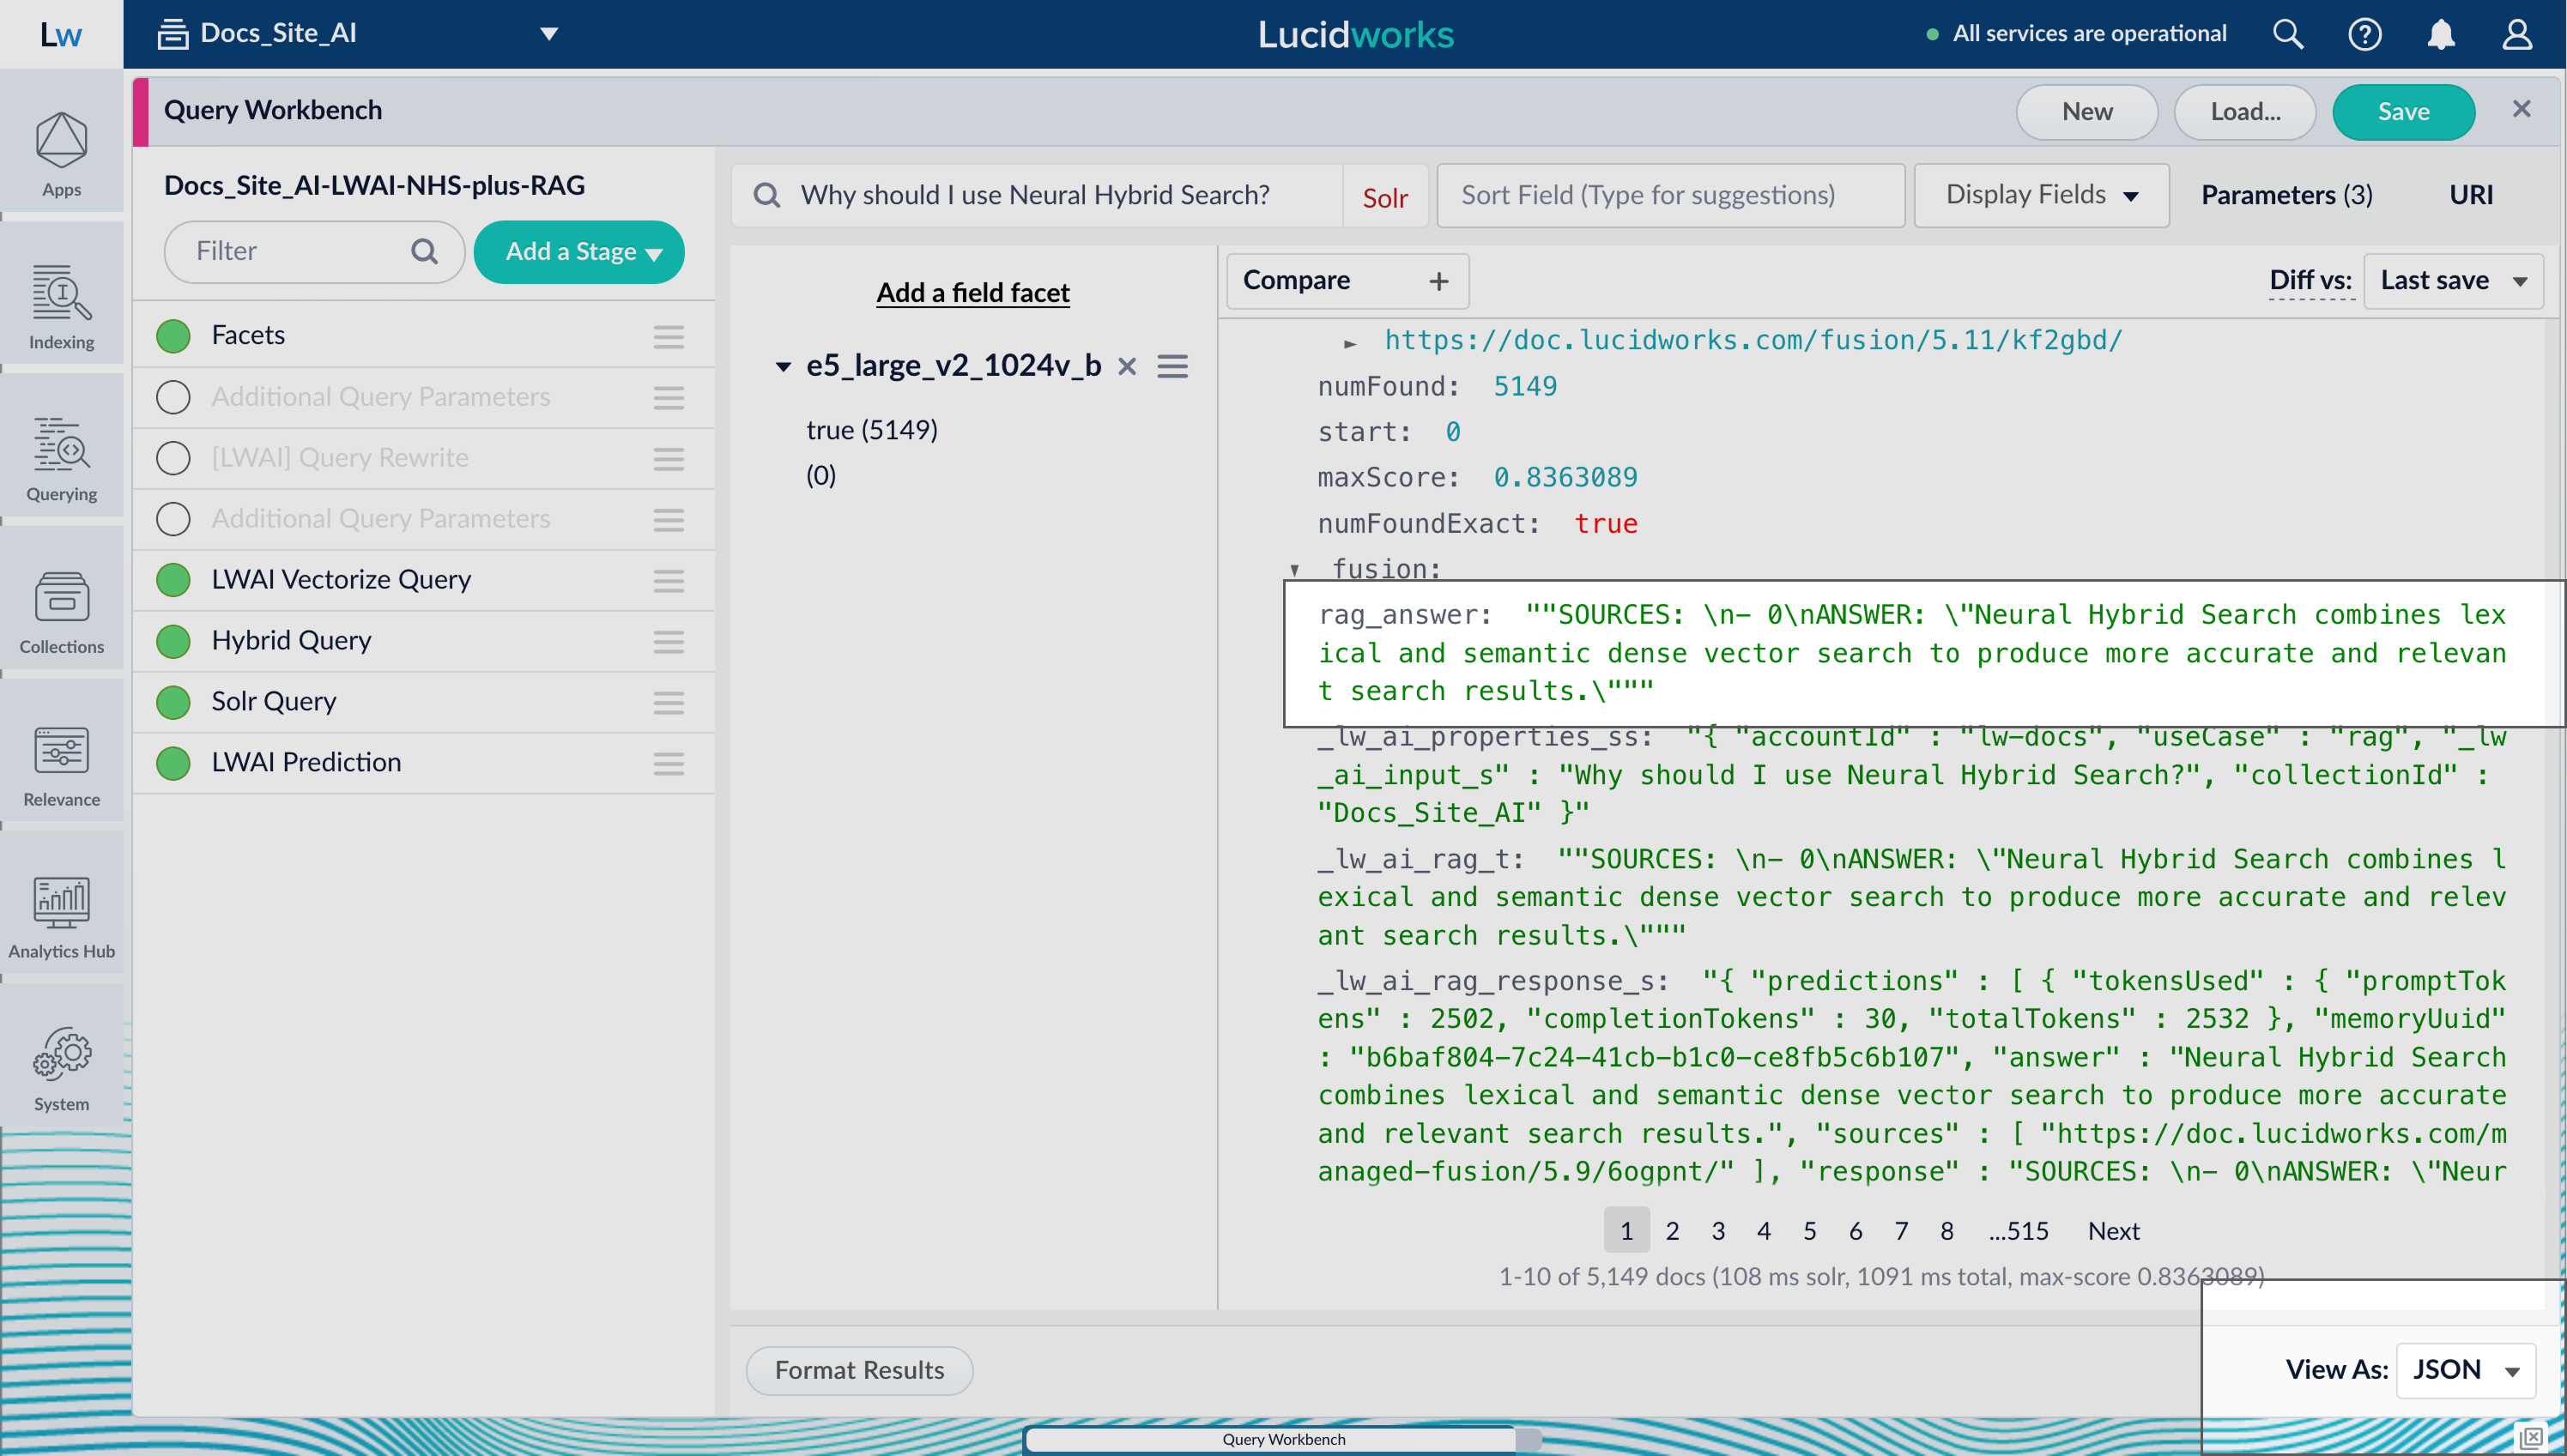 Enter queries and evaluate the responses. Neural Hybrid Search should return relevant results. If the results are weak, adjust the query weights and squash factors.
Lucidworks AI is flexible and supports many use cases. Use the following checks to guide your evaluation:
1. **Is the answer backed by retrieved content?** The response should only include facts found in the retrieved documents.
2. **Do citations match the content?** References must point to documents that support the answer.
3. **What happens if nothing useful is retrieved?** The system should avoid generating unsupported content.
4. **Does the answer stay on topic?** The response should directly address the query.
5. **Does the system handle edge cases well?** Use ambiguous or off-topic queries to test its behavior.
If results are still unsatisfactory, adjust the model configuration. If issues persist, review your model selection.
Enter queries and evaluate the responses. Neural Hybrid Search should return relevant results. If the results are weak, adjust the query weights and squash factors.
Lucidworks AI is flexible and supports many use cases. Use the following checks to guide your evaluation:
1. **Is the answer backed by retrieved content?** The response should only include facts found in the retrieved documents.
2. **Do citations match the content?** References must point to documents that support the answer.
3. **What happens if nothing useful is retrieved?** The system should avoid generating unsupported content.
4. **Does the answer stay on topic?** The response should directly address the query.
5. **Does the system handle edge cases well?** Use ambiguous or off-topic queries to test its behavior.
If results are still unsatisfactory, adjust the model configuration. If issues persist, review your model selection.