> ## Documentation Index
> Fetch the complete documentation index at: https://doc.lucidworks.com/llms.txt
> Use this file to discover all available pages before exploring further.
# Neural Hybrid Search
export const LwTemplate = ({title = "Key questions to get you started", icon = "sparkles", cta = "Powered by Agent Studio", linkHref = "https://lucidworks.com/demo/?utm_source=docs&utm_medium=referral&utm_campaign=docs_cta_ai"}) => {
const [isLoaded, setIsLoaded] = useState(false);
useEffect(() => {
const timer = setTimeout(() => {
setIsLoaded(true);
}, 500);
return () => clearTimeout(timer);
}, []);
return
{isLoaded && `
}} />}
Powered by Lucidworks Agent Studio
;
};
[localhost link]: http://localhost:3000/docs/5/fusion/hybrid-search/overview
[mintlify link]: https://doc.lucidworks.com/docs/5/fusion/hybrid-search/overview
[old doc.lw link]: https://doc.lucidworks.com/fusion/5.9/hao5f4
Neural Hybrid Search is a capability that combines lexical and semantic dense vector search to produce more accurate and relevant search results.
Lexical search works by looking for literal matches of keywords.
For example, a query for `chips` would result in potato chips and tortilla chips, but it could also result in chocolate chips.
Semantic vector search, however, imports meaning.
Semantic search could serve up results for potato chips, as well as other salty snacks like dried seaweed or cheddar crackers.
Both methods have their advantages, and often you’ll want one or the other depending on your use case or search query.
Neural Hybrid Search lets you use both: it combines the precision of lexical search with the nuance of semantic search.
To use semantic vector search in Fusion, you need to configure Neural Hybrid Search.
Then you can choose the balance between lexical and semantic vector search that works best for your use case.
For example, you can use a 70/30 split between semantic and lexical search, or a 50/50 split, or any other ratio that works for you.
This topic explains the concepts that you need to understand to configure and use Neural Hybrid Search in Fusion.
For instructions for enabling and configuring it in your pipeline, see **Configure Neural Hybrid Search**.
{/* // tag::intro[] */}
Neural Hybrid Search combines lexical-semantic search with semantic vector search.
{/* // end::intro[] */}
To use semantic vector search in Fusion, you need to configure Neural Hybrid Search.
Then you can choose the balance between lexical and semantic vector search that works best for your use case.
Before you begin, see [Neural Hybrid Search](/docs/5/fusion/hybrid-search/overview) for conceptual information that can help you understand how to configure this feature.
This feature is currently only available to clients who have contracted with Lucidworks for features related to Neural Hybrid Search and Lucidworks AI. You also need a [Lucidworks AI Gateway](/docs/lw-platform/lw-ai/lw-ai-gateway) integration with Lucidworks AI.This feature is available starting in Fusion 5.9.5 and in all subsequent Fusion 5.9 releases.
Lucidworks recommends setting up Neural Hybrid Search with Lucidworks AI, but you can instead use Ray or Seldon vector search. If using Lucidworks AI, you may use the default LWAI Neural Hybrid Search pipeline.
## Configure vector search
This section explains how to configure vector search using Lucidworks AI, but you can also configure it using Ray or Seldon.
Before you set up the Lucidworks AI index and query stages, make sure you have set up your Lucidworks AI Gateway integration.
### Configure the LWAI Vectorize Field index stage
To vectorize the index pipeline fields:
1. Sign in to Fusion and click **Indexing > Index Pipelines**.
2. Click the pipeline you want to use.
3. Click **Add a new pipeline stage**.
4. In the AI section, click **LWAI Vectorize Field**.
5. In the **Label** field, enter a unique identifier for this stage.
6. In the **Condition** field, enter a script that results in true or false, which determines if the stage should process.
7. Select **Asynchronous Execution Config** if you want to run this stage asynchronously. If this field is enabled, complete the following fields:
1. Select *Enable Async Execution*. Fusion automatically assigns an *Async ID* value to this stage. Change this to a more memorable string that describes the asynchronous stages you are merging, such as `signals` or `access_control`.
2. Copy the *Async ID* value.
For detailed information, see [Asynchronous query pipeline processing](/docs/5/fusion/getting-data-out/query-basics/query-pipelines/overview#asynchronous-query-pipeline-processing).
8. In the **Account Name** field, select the Lucidworks AI API account name defined in the Lucidworks AI Gateway service.
If you do not see your account name, check that your Lucidworks AI Gateway integration is correctly configured.
9. In the **Model** field, select the Lucidworks AI model to use for encoding.
If you do not see any models names and you are a non-admin Fusion user, check that you have these permissions: `PUT,POST,GET:/LWAI-ACCOUNT-NAME/**`
Your Fusion account name must match the name of the account that you selected in the **Account Name** dropdown.
For more information about models, see:
* [Pre-trained embedding models](/docs/lw-platform/lw-ai/lw-ai-pre-trained-embedding-models)
* [Custom embedding model training](/docs/lw-platform/lw-ai/lw-ai-custom-embedding-model-training/overview)
10. In the **Source** field, enter the name of the string field where the value should be submitted to the model for encoding. If the field is blank or does not exist, this stage is not processed. Template expressions are supported.
11. In the **Destination** field, enter the name of the field where the vector value from the model response is saved.
{/* // tag::lwai-prediction-query-stage[] */}
If a value is entered in this field, the following information is added to the document:
* `{Destination Field}` is the vector field.
* `{Destination Field}_b` is the boolean value if the vector has been indexed.
{/* // end::lwai-prediction-query-stage[] */}
11. In the **Use Case Configuration** section, click the **+** sign to enter the parameter name and value to send to Lucidworks AI. The `useCaseConfig` parameter that is common to embedding use cases is `dataType`, but each use case may have other parameters. The value for the query stage is `query`.
12. Optionally, you can use the **Model Configuration** section for any additional parameters you want to send to Lucidworks AI.
Several `modelConfig` parameters are common to generative AI use cases.
For more information, see [Prediction API](/docs/lw-platform/lw-ai/lw-ai-apis/lw-ai-prediction-api/overview).
13. Select the **Fail on Error** checkbox to generate an exception if an error occurs while generating a prediction for a document.
14. Click **Save**.
15. Index data using the new pipeline. Verify the vector field is indexed by confirming the field is present in documents.
For reference information, see [Lucidworks AI Vectorize Field](/docs/lw-platform/lw-ai/lw-ai-stages/vectorize-field-via-lucidworks-ai-index-stage).
### Configure the LWAI Vectorize Query stage
To vectorize the query in the query pipeline:
1. Sign in to Fusion and click **Querying > Query Pipelines**.
2. Select the pipeline you want to use.
3. Click **Add a new pipeline stage**.
4. Click **LWAI Vectorize Query**.
5. In the **Label** field, enter a unique identifier for this stage.
6. In the **Condition** field, enter a script that results in true or false, which determines if the stage should process.
7. Select **Asynchronous Execution Config** if you want to run this stage asynchronously. If this field is enabled, complete the following fields:
1. Select **Enable Async Execution**. Fusion automatically assigns an **Async ID** value to this stage. Change this to a more memorable string that describes the asynchronous stages you are merging, such as `signals` or `access_control`.
2. Copy the **Async ID** value.
For detailed information, see [Asynchronous query pipeline processing](/docs/5/fusion/getting-data-out/query-basics/query-pipelines/overview).
8. In the **Account Name** field, select the name of the Lucidworks AI account.
9. In the **Model** field, select the Lucidworks AI model to use for encoding.
If you do not see any model names and you are a non-admin Fusion user, verify with a Fusion administrator that your user account has these permissions: `PUT,POST,GET:/LWAI-ACCOUNT-NAME/**`
Your Fusion account name must match the name of the account that you selected in the **Account Name** dropdown.
For more information about models, see:
* [Pre-trained embedding models](/docs/lw-platform/lw-ai/lw-ai-pre-trained-embedding-models)
* [Custom embedding model training](/docs/lw-platform/lw-ai/lw-ai-custom-embedding-model-training/overview)
10. In the **Query Input** field, enter the location from which the query is retrieved.
11. In the **Output context variable** field, enter the name of the variable where the vector value from the response is saved.
12. In the **Use Case Configuration** section, click the **+** sign to enter the parameter name and value to send to Lucidworks AI. The `useCaseConfig` parameter that is common to embedding use cases is `dataType`, but each use case may have other parameters. The value for the query stage is `query`.
13. Optionally, you can use the **Model Configuration** section for any additional parameters you want to send to Lucidworks AI.
Several `modelConfig` parameters are common to generative AI use cases.
For more information, see [Prediction API](/docs/lw-platform/lw-ai/lw-ai-apis/lw-ai-prediction-api/overview).
14. Select the **Fail on Error** checkbox to generate an exception if an error occurs during this stage.
15. Click **Save**.
The **Top K** setting is 100 by default, but a value as high as 1000 provides better recall if you have fewer than one million indexed documents.
You can raise it even higher, but keep in mind that higher recall also causes higher latency.\
When raising this value, we recommend also setting a higher **Min Return Vector Similarity** value, in the 0.7-0.85 range.
This query stage must be placed *before* the **[Solr Query stage](/docs/5/fusion/reference/config-ref/pipeline-stages/query-stages/solr-query-stage)**.
**Using additional pipeline stages**
For optimal vector search functionality, use the following stages in the order specified: either the LWAI Vectorize Query or Ray/Seldon Vectorize Field, Query Fields (if present), Neural Hybrid Query, and Solr Query. Other stages can be used, but must be placed in the correct processing order in relation to these stages.
## Modify Solr managed-schema (5.9.4 and earlier)
This step is required if you’re migrating a collection from a version of Fusion that does not support Neural Hybrid Search. If creating a new collection in Fusion 5.9.5 and later, you can continue to [Configure Hybrid Query stage](#configure-neural-hybrid-queries).
1. Go to **System** > **Solr Config** and then click **managed-schema** to edit it.
2. Comment out `` and add `` below it. This will concatenate and index all `*_t fields`.
3. Add the following code block to the **managed-schema** file:
```xml theme={"dark"}
```
This example uses 512 vector dimension. If your model uses a different dimension, modify the code block to match your model. For example, `_1024v`. There is no limitation on supported vector dimensions.
## Configure neural hybrid queries
In Fusion 5.9.10 and later, you use the Neural Hybrid Query stage to configure neural hybrid queries.
In Fusion 5.9.9 and earlier, you use the Hybrid Query stage.
### Configure Neural Hybrid Query stage (5.9.10 and later)
1. In the same query pipeline where you configured vector search, click **Add a new pipeline stage**, then select **Neural Hybrid Query**.
{/* // tag::configure-neural-hybrid-queries[] */}
2. In the **Label** field, enter a unique identifier for this stage or leave blank to use the default value.
3. In the **Condition** field, enter a script that results in true or false, which determines if the stage should process, or leave blank.
4. In the **Lexical Query Input** field, enter the location from which the lexical query is retrieved. For example, **\**. Template expressions are supported.
5. In the **Lexical Query Weight** field, enter the relative weight of the lexical query. For example, **0.3**. If this value is **0**, no re-ranking will be applied using the lexical query scores.
6. In the **Lexical Query Squash Factor** field, enter a value that will be used to squash the lexical query score.
The squash factor controls how much difference there is between the top-scoring documents and the rest.
It helps ensure that documents with slightly lower scores still have a chance to show up near the top.
For this value, Lucidworks recommends entering the inverse of the lexical maximum score across all queries for the given collection.
7. In the **Vector Query Field**, enter the name of the Solr field for k-nearest neighbor (KNN) vector search.
8. In the **Vector Input** field, enter the location from which the vector is retrieved. Template expressions are supported. For example, a value of `` evaluates the context variable resulting from a previous stage, such as the [LWAI Vectorize Query](/docs/5/fusion/reference/config-ref/pipeline-stages/query-stages/lwai-vectorize-query) stage.
9. In the **Vector Query Weight** field, enter the relative weight of the vector query. For example, **0.7**.
10. In the **Min Return Vector Similarity** field, enter the minimum vector similarity value to qualify as a match from the Vector portion of the hybrid query.
11. In the **Min Traversal Vector Similarity** field, enter the minimum vector similarity value to use when walking through the graph during the Vector portion of the hybrid query.
12. When enabled, the **Compute Vector Similarity for Lexical-Only Matches** setting computes vector similarity scores for documents in lexical search results but not in the initial vector search results. Select the checkbox to enable this setting.
13. If you want to use pre-filtering:
1. Uncheck **Block pre-filtering**.
In the Javascript context (`ctx`), the `preFilterKey` object becomes available.
2. Add a [Javascript stage](/docs/5/fusion/reference/config-ref/pipeline-stages/query-stages/javascript-query-stage) *after* the Neural Hybrid Query stage and use it to configure your pre-filter.
The `preFilter` object adds both the top-level `fq` and `preFilter` to the parameters for the vector query.
You do not need to manually add the top level `fq` in the javascript stage.
See the example below:
```js theme={"dark"}
var QueryRequestAndResponse = Java.type('com.lucidworks.apollo.pipeline.query.QueryRequestAndResponse');
if(ctx.hasProperty("preFilterKey")) {
var preFilter = ctx.getProperty("preFilterKey");
var wrapper = QueryRequestAndResponse.create(request,response,0)
preFilter.addFilter(wrapper, 'id:* OR foo_s:bar');
}
```
14. Click **Save**.
{/* // end::configure-neural-hybrid-queries[] */}
Make sure the **Hybrid Query** stage is ordered before the **Solr Query** stage.
Be aware that the Neural Hybrid Query stage uses new query parsers, so if you are *not* setting up a new collection, the following must be added to `solrconfig.xml` within the `` tag:
```xml theme={"dark"}
```
### Configure Hybrid Query stage (5.9.9 and earlier)
If you’re setting up Neural Hybrid Search in Fusion 5.9.9 and earlier, use the Hybrid Query stage.
If you’re using Fusion 5.9.10 or later, use the [Neural Hybrid Query stage](#configure-neural-hybrid-queries).
1. In the same query pipeline where you configured vector search, click **Add a new pipeline stage**, then select **Hybrid Query**.
{/* // tag::configure-hybrid-query-stage[] */}
2. In the **Label** field, enter a unique identifier for this stage or leave blank to use the default value.
3. In the **Condition** field, enter a script that results in true or false, which determines if the stage should process, or leave blank.
4. In the **Lexical Query Input** field, enter the location from which the lexical query is retrieved. For example, **\**. Template expressions are supported.
5. In the **Lexical Query Weight** field, enter the relative weight of the lexical query. For example, **0.3**. If this value is **0**, no re-ranking will be applied using the lexical query scores.
6. In the **Number of Lexical Results** field, enter the number of lexical search results to include in re-ranking. For example, **1000**. A value is **0** is ignored.
7. In the **Vector Query Field**, enter the name of the Solr field for k-nearest neighbor (KNN) vector search.
8. In the **Vector Input** field, enter the location from which the vector is retrieved. Template expressions are supported. For example, a value of `` evaluates the context variable resulting from a previous stage, such as the [LWAI Vectorize Query](/docs/5/fusion/reference/config-ref/pipeline-stages/query-stages/lwai-vectorize-query) stage.
9. In the **Vector Query Weight** field, enter the relative weight of the vector query. For example, **0.7**.
10. Select the **Use KNN Query** checkbox to use the **knn** query parser and configure its options. This option cannot be selected if **Use VecSim Query** checkbox is selected. In addition, **Use KNN Query** is used if neither **Use KNN Query** or **Use VecSim Query** is selected.
1. If the **Use KNN Query checkbox** is selected, enter a value in the **Number of Vector Results** field. For example, **1000**.
11. Select the **Use VecSim Query** checkbox to use the **vecSim** query parser and configure its options. This option cannot be selected if **Use KNN Query** checkbox is selected.
If the **Use VecSim Query** checkbox is selected, enter values in the following fields:
* **Min Return Vector Similarity**. Enter the minimum vector similarity value to qualify as a match from the Vector portion of the hybrid query.
* **Min Traversal Vector Similarity**. Enter the minimum vector similarity value to use when walking through the graph during the Vector portion of the hybrid query. The value must be lower than, or equal to, the value in the Min Return Vector Similarity field.
12. In the **Minimum Vector Similarity Filter**, enter the value for a minimum similarity threshold for filtering documents. This option applies to all documents, regardless of other score boosting such as rules or signals.
13. Click **Save**.
{/* // end::configure-hybrid-query-stage[] */}
Make sure the **Hybrid Query** stage is ordered before the **Solr Query** stage.
## Perform hybrid searches
After setting up the stages, you can perform hybrid searches via the [`knn` query parser](https://solr.apache.org/guide/solr/latest/query-guide/dense-vector-search.html#knn-query-parser) as you would with Solr.
Specify the search vector and include it in the query.
For example, change the `q` parameter to a `knn` query parser string.
You can also preview the results in the [Query Workbench](/docs/5/fusion/getting-data-out/query-basics/query-workbench).
Try a few different queries, and adjust the weights and parameters in the Hybrid Query stage to find the best balance between lexical and semantic vector search for your use case.
You can also disable and re-enable the Neural Hybrid Query stage to compare results with and without it.
`XDenseVectorField` is not supported in Fusion 5.9.5 and above. Instead, use `DenseVectorField`.
## Troubleshoot inconsistent results
Neural Hybrid Search leverages Solr semantic vector search, which has known behaviors which can be inconsistent at query time.
These behaviors include score fluctuations with re-querying, documents showing and disappearing on re-querying, and (when SVS is configured without Hybrid stages) completely unfindable documents.
This section outlines possible reasons for inconsistent behavior and resolutions steps.
### NRT replicas and HNSW graph challenges
Lucidworks recommends using PULL and TLOG replicas. These replica types copy the index of the leader replica, which results in the same HNSW graph on every replica. When querying, the HNSW approximation query will be consistent given a static index.
In contrast, NRT replicas have their own index, so they will also have their own HNWS graph. HNSW is an Approximate Nearest Neighbor (ANN) algorithm, so it will not return exactly the same results for differently constructed graphs. This means that queries performed can and will return different results per HNWS graph (number of NRT replicas in a shard) which can lead to noticeable result shifts. When using NRT replicas, the shifts can be made less noticeable by increasing the `topK` parameter. Variation will still occur, but it should be lower in the documents. Another way to mitigate shifts is to use Neural Hybrid Search with a vector similarity cutoff.
For more information, refer to [Solr Types of Replicas](https://solr.apache.org/guide/solr/latest/deployment-guide/solrcloud-shards-indexing.html#types-of-replicas).
In the case of Neural Hybrid Search, lexical BM25 & TF-IDF score differences that can occur with NRT replicas because of index differences for deleted documents, can also affect combined [Hybrid score](/docs/5/fusion/hybrid-search/overview).
If you choose to use NRT replicas then it is possible that any lexical and/or semantic vectors variations can and will be exacerbated.
### Orphaning (Disconnected Nodes)
Solr’s implementation of dense vector search depends on the Lucene implementation of HNSW ANN.
The Lucene implementation has a known issue where, in some collections, nodes in the HNSW graph become unreachable via graph traversal, essentially becoming disconnected or “orphaned.”
#### Identify orphaning
Run the following command to identify orphaning:
```bash theme={"dark"}
curl -sS -u 'USERNAME:PASSWORD' 'https://FUSION_HOST:FUSION_PORT/api/solrAdmin/default/COLLECTION_NAME/select'\
--form-string 'fl=id,vecSim:$vecSim' \
--form-string 'rows=1' \
--form-string 'q=(*:* -{!knn f=VECTOR_FIELD topK=999999 v=$vec})' \
--form-string 'vecSim=vectorSimilarity(VECTOR_FIELD,$vec)' \
--form-string 'vec=COMPATIBLE_VECTOR'
```
If the collection doesn’t have a vector for every document, include a filter so only the documents that have vectors are included. Filter on the boolean vector, as in this example: `--form-string 'fq=VECTOR_FIELD_b:true' \`
Construct a KNN exclusion query where topK is higher than the number of vectors in your collection
If the number of vectors in your collection exceeds 999,999 then increase the value to be at least equal to that value.
If any are documents returned, there are orphans, and the `ids` you see are the orphans.
Proceed to [Resolving orphans](#resolving-orphans).
If no documents are returned, there are likely no orphans.
You can try a few varying vectors to be certain.
{/* [#resolve] */}
#### Resolving orphans
To resolve orphans, do the following:
1. Increase the HNSW Solr schema parameters `hnswBeamWidth` and `hnswMaxConnections` per the [Suggested values](#suggested-values) below.
2. Save the schema.
3. Clear the index.
4. Re-index your collection.
{/* [#suggested] */}
##### Suggested values
| Orphaning rate | `hnswBeamWidth` | `hnswMaxConnections` |
| -------------- | --------------- | -------------------- |
| 5% or less | 300 | 64 |
| 5% - 25% | 500 | 100 |
| 25% or more | 3200 | 512 |
**Important**
This feature is currently only available to clients who have contracted with Lucidworks for features related to Neural Hybrid Search and Lucidworks AI.
This feature is available starting in Fusion 5.9.5 and in all subsequent Fusion 5.9 releases.
## Hybrid scoring
The combination of lexical and semantic score is based on this function:
```txt theme={"dark"}
(vector_weight*vector_score + lexical_weight*scaled(lexical_score))
```
Because lexical scores can be arbitrarily large due to the use of TF-IDF and BM25, `scaled()` means that the lexical scores are scaled close to `0` and `1` to be aligned with the bounded vector scores. This scaling of `1` is achieved by taking the largest lexical score and dividing all lexical scores by that high score.
Hybrid scoring tips:
* For highly tuned lexical and semantic search, the ratio will be closer to `0.3` lexical weight and `0.7` semantic weight.
* When using the [Boost with Signals stage](/docs/5/fusion/reference/config-ref/pipeline-stages/query-stages/recommendation-boosting-query-stage) use `bq`, not `boost`, and enable **Scale Boosts** to control how much the signals can impact the overall hybrid score. Lucidworks recommends keeping the scale boost values low, since SVS with scale scores with a max of `1`.
**Important**
In Fusion 5.9.5 - 5.9.9, all of the documents within the search collection *must* have an associated vector field. Otherwise, hybrid search fails on that vector field. This does not apply to Fusion 5.9.10 and later.
For more information, see [Semantic vector search test guidelines.](/docs/5/fusion/hybrid-search/testing-svs)
## Solr vector query types
Solr supports vector query types for semantic search that compare the similarity between encoded vector representations of content. These query types determine how results are retrieved and ranked based on proximity or similarity within the vector space.
The two vector query types used at Lucidworks are K-Nearest Neighbors (KNN) and Vector Similarity Threshold (VecSim).
The simplest difference between the two is how they return results:
* KNN always returns a fixed number of results (topK), no matter the input. For example, if topK = 10, you’ll always get 10 results.
* VecSim returns a varying number of results based on similarity score (from 0 to 1). Only items above a set threshold are returned, so it’s possible to get zero results if nothing is similar enough.
Read below to learn more about their details.
### K-Nearest Neighbors (KNN)
This is a query where a top value (k) is always returned, referred to as topK. Regardless of the input vector there will always be k vectors returned because within the vector space of your encoded vectors there is always something in proximity.
Sharding with topK pulls k from each shard, so the final top k on a sharded collection will be `topK*Shard_count`.
Using prefiltering makes it possible for top level filters to filter out results and still allow for results that were collected by the KNN query. Otherwise, when prefiltering is blocked it is possible to have 0 results after the KNN query after the filters are applied, to mitigate that risk a larger topK can be used at the cost of performance.
#### KNN Solr scoring
Solr supports three different similarity score metrics: `euclidean`, `dot_product` or `cosine`. In Fusion, the default is `cosine`. It’s important to note that Lucene bounds cosine to `0` to `1`, and therefore differs from standard [cosine similarity](https://en.wikipedia.org/wiki/Cosine_similarity). For more information, refer to the [Lucene documentation on scoring formula](https://lucene.apache.org/core/4_10_0/core/org/apache/lucene/search/similarities/TFIDFSimilarity.html) and the [Solr documentation on Dense Vector Search](https://solr.apache.org/guide/solr/latest/query-guide/dense-vector-search.html#densevectorfield).
In Fusion 5.9.5 - 5.9.9, Solr Collapse does not work well with Neural Hybrid Search because the computed hybrid score uses the vector score that is based on the `head` node and not the most relevant vector document within the collapse. This does not apply to Fusion 5.9.10 and later.
### Vector Cosine Similarity (VecSim) cutoff/threshold
This is a query where a cosine float value between 0 and 1 is given to compare similarity scores of the vectors to the input vector, everything above and at the threshold is kept, everything else is left out. It is possible to get zero results when using a similarity threshold because there may not be any documents that are within the given threshold.
This can be slower because the number of vectors is unknowable and it’s impossible to control the size of the vector result set. VecSim will speed up when prefiltering is enabled.
## Replica choice
Lucidworks recommends using PULL and TLOG replicas. These replica types copy the index of the leader replica, which results in the same HNSW graph on every replica. When querying, the HNSW approximation query will be consistent given a static index.
In contrast, NRT replicas have their own index, so they will also have their own HNWS graph. HNSW is an Approximate Nearest Neighbor (ANN) algorithm, so it will not return exactly the same results for differently constructed graphs. This means that queries performed can and will return different results per HNWS graph (number of NRT replicas in a shard) which can lead to noticeable result shifts. When using NRT replicas, the shifts can be made less noticeable by increasing the `topK` parameter. Variation will still occur, but it should be lower in the documents. Another way to mitigate shifts is to use Neural Hybrid Search with a vector similarity cutoff.
For more information, refer to [Solr Types of Replicas](https://solr.apache.org/guide/solr/latest/deployment-guide/solrcloud-shards-indexing.html#types-of-replicas).
## Considerations for multi-sharded collections
* The Fusion UI will show vectors floats encapsulated by `“ ”`. This is expected behavior.
* Sharding with `topK` pulls `K` from each shard `topK*Shard_count`.
## More resources
Milvus is deprecated, but you may need to move Milvus data to Solr vectors.
## 1. Add Solr vector schema
The first step to migration is to ensure the Solr schema for the collections has vector field definitions. If the collection was created in Fusion 5.9.5 or later, it will automatically have the vector schemas.
Vector field definitions to add:
```xml wrap theme={"dark"}
```
If in your Create Collections in Milvus job you have a vector dimension not included above, be sure to add it.
## 2. Add query parsers used with Solr vector search
If you are using Fusion 5.9.5-5.9.9, add the following to the Solr schema because this query parser is used with Solr-based vector search:
```xml wrap theme={"dark"}
```
If you are using Fusion 5.9.10 and later, add the following to the Solr schema because these query parsers are used with Solr-based vector search:
```xml wrap theme={"dark"}
```
## 3. Add Ray/Seldon Vectorize stage
In the index pipeline, instead of using the **Encode into Milvus** stage you will need to use **Ray/Seldon Vectorize Field** (in Fusion 5.9.11 and earlier, this stage is called **Seldon Vectorize Field**).
The Milvus stage field **Encode into Milvus** maps to the **Vectorize stage** field **Source Field**, **Encoder Output Vector** to **Model Output Vector Field**, and the other fields map to the fields of the same name.
The last key field to know is **Destination Field**, which is the Solr vector field name. The field can be named anything as long as the *suffix* matches the *dimension size* of the vector your model returns in your Solr vector field definitions.
For example, for a Milvus collection dimension size of `384`, the **Destination Field** should use the suffix `_384v`.
At this point you can start indexing.
On the query side, there is a **Ray/Seldon Vectorize Field** stage which will be set up mostly the same as on the index side. The only difference is there is no need to put in the vector field name, as it is done in the next step.
## 4. Add hybrid stage
The final step before you are fully migrated over to Solr vectors is adding a variation of [Fusion Neural Hybrid Query](/docs/5/fusion/reference/config-ref/pipeline-stages/query-stages/neural-hybrid-query) or [Lucidworks Search Hybrid Query stage](/docs/lucidworks-search/09-developer-documentation/config-specs/query-pipeline-stages/neural-hybrid-query-stage) (known as Neural Hybrid Query stage in Lucidworks Search 5.9.10 and later).
In this stage, all you need to do is put in the **Vector Query Field** you have defined in your index pipeline.
Make sure the hybrid stage is placed before any boosting, Apply Rules, or Security Trimming stages.
At this point you can query. After determining the query works you can tune your setup before removing your Milvus collections and pipelines.
{/* // tag::intro[] */}
Neural Hybrid Search combines lexical-semantic search with semantic vector search.
{/* // end::intro[] */}
To use semantic vector search in Fusion, you need to configure Neural Hybrid Search.
Then you can choose the balance between lexical and semantic vector search that works best for your use case.
Before you begin, see [Neural Hybrid Search](/docs/5/fusion/hybrid-search/overview) for conceptual information that can help you understand how to configure this feature.
This feature is currently only available to clients who have contracted with Lucidworks for features related to Neural Hybrid Search and Lucidworks AI.This feature is available starting in Fusion 5.9.5 and in all subsequent Fusion 5.9 releases.
Lucidworks recommends setting up Neural Hybrid Search with Lucidworks AI, but you can instead use Ray or Seldon vector search. If using Lucidworks AI, you may use the default LWAI Neural Hybrid Search pipeline.
## Configure vector search
This section explains how to configure vector search using Lucidworks AI, but you can also configure it using Ray or Seldon.
Before you set up the Lucidworks AI index and query stages, make sure you have set up your Lucidworks AI Gateway integration.
### Configure the LWAI Vectorize Field index stage
To vectorize the index pipeline fields:
1. Sign in to Fusion and click **Indexing > Index Pipelines**.
2. Click the pipeline you want to use.
3. Click **Add a new pipeline stage**.
4. In the AI section, click **LWAI Vectorize Field**.
5. In the **Label** field, enter a unique identifier for this stage.
6. In the **Condition** field, enter a script that results in true or false, which determines if the stage should process.
7. Select **Asynchronous Execution Config** if you want to run this stage asynchronously. If this field is enabled, complete the following fields:
1. Select *Enable Async Execution*. Fusion automatically assigns an *Async ID* value to this stage. Change this to a more memorable string that describes the asynchronous stages you are merging, such as `signals` or `access_control`.
2. Copy the *Async ID* value.
For detailed information, see [Asynchronous query pipeline processing](/docs/5/fusion/getting-data-out/query-basics/query-pipelines/overview#asynchronous-query-pipeline-processing).
8. In the **Account Name** field, select the Lucidworks AI API account name defined in the Lucidworks AI Gateway service.
If you do not see your account name, check that your Lucidworks AI Gateway integration is correctly configured.
9. In the **Model** field, select the Lucidworks AI model to use for encoding.
If you do not see any models names and you are a non-admin Fusion user, check that you have these permissions: `PUT,POST,GET:/LWAI-ACCOUNT-NAME/**`
Your Fusion account name must match the name of the account that you selected in the **Account Name** dropdown.
For more information about models, see:
* [Pre-trained embedding models](/docs/lw-platform/lw-ai/lw-ai-pre-trained-embedding-models)
* [Custom embedding model training](/docs/lw-platform/lw-ai/lw-ai-custom-embedding-model-training/overview)
10. In the **Source** field, enter the name of the string field where the value should be submitted to the model for encoding. If the field is blank or does not exist, this stage is not processed. Template expressions are supported.
11. In the **Destination** field, enter the name of the field where the vector value from the model response is saved.
{/* // tag::lwai-prediction-query-stage[] */}
If a value is entered in this field, the following information is added to the document:
* `{Destination Field}` is the vector field.
* `{Destination Field}_b` is the boolean value if the vector has been indexed.
{/* // end::lwai-prediction-query-stage[] */}
11. In the **Use Case Configuration** section, click the **+** sign to enter the parameter name and value to send to Lucidworks AI. The `useCaseConfig` parameter that is common to embedding use cases is `dataType`, but each use case may have other parameters. The value for the query stage is `query`.
12. Optionally, you can use the **Model Configuration** section for any additional parameters you want to send to Lucidworks AI.
Several `modelConfig` parameters are common to generative AI use cases.
For more information, see [Prediction API](/docs/lw-platform/lw-ai/lw-ai-apis/lw-ai-prediction-api/overview).
13. Select the **Fail on Error** checkbox to generate an exception if an error occurs while generating a prediction for a document.
14. Click **Save**.
15. Index data using the new pipeline. Verify the vector field is indexed by confirming the field is present in documents.
For reference information, see [Lucidworks AI Vectorize Field](/docs/lw-platform/lw-ai/lw-ai-stages/vectorize-field-via-lucidworks-ai-index-stage).
### Configure the LWAI Vectorize Query stage
To vectorize the query in the query pipeline:
1. Sign in to Fusion and click **Querying > Query Pipelines**.
2. Select the pipeline you want to use.
3. Click **Add a new pipeline stage**.
4. Click **LWAI Vectorize Query**.
5. In the **Label** field, enter a unique identifier for this stage.
6. In the **Condition** field, enter a script that results in true or false, which determines if the stage should process.
7. Select **Asynchronous Execution Config** if you want to run this stage asynchronously. If this field is enabled, complete the following fields:
1. Select **Enable Async Execution**. Fusion automatically assigns an **Async ID** value to this stage. Change this to a more memorable string that describes the asynchronous stages you are merging, such as `signals` or `access_control`.
2. Copy the **Async ID** value.
For detailed information, see [Asynchronous query pipeline processing](/docs/5/fusion/getting-data-out/query-basics/query-pipelines/overview).
8. In the **Account Name** field, select the name of the Lucidworks AI account.
9. In the **Model** field, select the Lucidworks AI model to use for encoding.
If you do not see any model names and you are a non-admin Fusion user, verify with a Fusion administrator that your user account has these permissions: `PUT,POST,GET:/LWAI-ACCOUNT-NAME/**`
Your Fusion account name must match the name of the account that you selected in the **Account Name** dropdown.
For more information about models, see:
* [Pre-trained embedding models](/docs/lw-platform/lw-ai/lw-ai-pre-trained-embedding-models)
* [Custom embedding model training](/docs/lw-platform/lw-ai/lw-ai-custom-embedding-model-training/overview)
10. In the **Query Input** field, enter the location from which the query is retrieved.
11. In the **Output context variable** field, enter the name of the variable where the vector value from the response is saved.
12. In the **Use Case Configuration** section, click the **+** sign to enter the parameter name and value to send to Lucidworks AI. The `useCaseConfig` parameter that is common to embedding use cases is `dataType`, but each use case may have other parameters. The value for the query stage is `query`.
13. Optionally, you can use the **Model Configuration** section for any additional parameters you want to send to Lucidworks AI.
Several `modelConfig` parameters are common to generative AI use cases.
For more information, see [Prediction API](/docs/lw-platform/lw-ai/lw-ai-apis/lw-ai-prediction-api/overview).
14. Select the **Fail on Error** checkbox to generate an exception if an error occurs during this stage.
15. Click **Save**.
The **Top K** setting is 100 by default, but a value as high as 1000 provides better recall if you have fewer than one million indexed documents.
You can raise it even higher, but keep in mind that higher recall also causes higher latency.\
When raising this value, we recommend also setting a higher **Min Return Vector Similarity** value, in the 0.7-0.85 range.
This query stage must be placed *before* the **[Solr Query stage](/docs/5/fusion/reference/config-ref/pipeline-stages/query-stages/solr-query-stage)**.
**Using additional pipeline stages**
For optimal vector search functionality, use the following stages in the order specified: either the LWAI Vectorize Query or Ray/Seldon Vectorize Field, Query Fields (if present), Neural Hybrid Query, and Solr Query. Other stages can be used, but must be placed in the correct processing order in relation to these stages.
## Modify Solr managed-schema (5.9.4 and earlier)
This step is required if you’re migrating a collection from a version of Fusion that does not support Neural Hybrid Search. If creating a new collection in Fusion 5.9.5 and later, you can continue to [Configure Hybrid Query stage](#configure-neural-hybrid-queries).
1. Go to **System** > **Solr Config** and then click **managed-schema** to edit it.
2. Comment out `` and add `` below it. This will concatenate and index all `*_t fields`.
3. Add the following code block to the **managed-schema** file:
```xml theme={"dark"}
```
This example uses 512 vector dimension. If your model uses a different dimension, modify the code block to match your model. For example, `_1024v`. There is no limitation on supported vector dimensions.
## Configure neural hybrid queries
In Fusion 5.9.10 and later, you use the Neural Hybrid Query stage to configure neural hybrid queries.
In Fusion 5.9.9 and earlier, you use the Hybrid Query stage.
### Configure Neural Hybrid Query stage (5.9.10 and later)
1. In the same query pipeline where you configured vector search, click **Add a new pipeline stage**, then select **Neural Hybrid Query**.
{/* // tag::configure-neural-hybrid-queries[] */}
2. In the **Label** field, enter a unique identifier for this stage or leave blank to use the default value.
3. In the **Condition** field, enter a script that results in true or false, which determines if the stage should process, or leave blank.
4. In the **Lexical Query Input** field, enter the location from which the lexical query is retrieved. For example, **\**. Template expressions are supported.
5. In the **Lexical Query Weight** field, enter the relative weight of the lexical query. For example, **0.3**. If this value is **0**, no re-ranking will be applied using the lexical query scores.
6. In the **Lexical Query Squash Factor** field, enter a value that will be used to squash the lexical query score.
The squash factor controls how much difference there is between the top-scoring documents and the rest.
It helps ensure that documents with slightly lower scores still have a chance to show up near the top.
For this value, Lucidworks recommends entering the inverse of the lexical maximum score across all queries for the given collection.
7. In the **Vector Query Field**, enter the name of the Solr field for k-nearest neighbor (KNN) vector search.
8. In the **Vector Input** field, enter the location from which the vector is retrieved. Template expressions are supported. For example, a value of `` evaluates the context variable resulting from a previous stage, such as the [LWAI Vectorize Query](/docs/5/fusion/reference/config-ref/pipeline-stages/query-stages/lwai-vectorize-query) stage.
9. In the **Vector Query Weight** field, enter the relative weight of the vector query. For example, **0.7**.
10. In the **Min Return Vector Similarity** field, enter the minimum vector similarity value to qualify as a match from the Vector portion of the hybrid query.
11. In the **Min Traversal Vector Similarity** field, enter the minimum vector similarity value to use when walking through the graph during the Vector portion of the hybrid query.
12. When enabled, the **Compute Vector Similarity for Lexical-Only Matches** setting computes vector similarity scores for documents in lexical search results but not in the initial vector search results. Select the checkbox to enable this setting.
13. If you want to use pre-filtering:
1. Uncheck **Block pre-filtering**.
In the Javascript context (`ctx`), the `preFilterKey` object becomes available.
2. Add a [Javascript stage](/docs/5/fusion/reference/config-ref/pipeline-stages/query-stages/javascript-query-stage) *after* the Neural Hybrid Query stage and use it to configure your pre-filter.
The `preFilter` object adds both the top-level `fq` and `preFilter` to the parameters for the vector query.
You do not need to manually add the top level `fq` in the javascript stage.
See the example below:
```js theme={"dark"}
var QueryRequestAndResponse = Java.type('com.lucidworks.apollo.pipeline.query.QueryRequestAndResponse');
if(ctx.hasProperty("preFilterKey")) {
var preFilter = ctx.getProperty("preFilterKey");
var wrapper = QueryRequestAndResponse.create(request,response,0)
preFilter.addFilter(wrapper, 'id:* OR foo_s:bar');
}
```
14. Click **Save**.
{/* // end::configure-neural-hybrid-queries[] */}
Make sure the **Hybrid Query** stage is ordered before the **Solr Query** stage.
Be aware that the Neural Hybrid Query stage uses new query parsers, so if you are *not* setting up a new collection, the following must be added to `solrconfig.xml` within the `` tag:
```xml theme={"dark"}
```
### Configure Hybrid Query stage (5.9.9 and earlier)
If you’re setting up Neural Hybrid Search in Fusion 5.9.9 and earlier, use the Hybrid Query stage.
If you’re using Fusion 5.9.10 or later, use the [Neural Hybrid Query stage](#configure-neural-hybrid-queries).
1. In the same query pipeline where you configured vector search, click **Add a new pipeline stage**, then select **Hybrid Query**.
{/* // tag::configure-hybrid-query-stage[] */}
2. In the **Label** field, enter a unique identifier for this stage or leave blank to use the default value.
3. In the **Condition** field, enter a script that results in true or false, which determines if the stage should process, or leave blank.
4. In the **Lexical Query Input** field, enter the location from which the lexical query is retrieved. For example, **\**. Template expressions are supported.
5. In the **Lexical Query Weight** field, enter the relative weight of the lexical query. For example, **0.3**. If this value is **0**, no re-ranking will be applied using the lexical query scores.
6. In the **Number of Lexical Results** field, enter the number of lexical search results to include in re-ranking. For example, **1000**. A value is **0** is ignored.
7. In the **Vector Query Field**, enter the name of the Solr field for k-nearest neighbor (KNN) vector search.
8. In the **Vector Input** field, enter the location from which the vector is retrieved. Template expressions are supported. For example, a value of `` evaluates the context variable resulting from a previous stage, such as the [LWAI Vectorize Query](/docs/5/fusion/reference/config-ref/pipeline-stages/query-stages/lwai-vectorize-query) stage.
9. In the **Vector Query Weight** field, enter the relative weight of the vector query. For example, **0.7**.
10. Select the **Use KNN Query** checkbox to use the **knn** query parser and configure its options. This option cannot be selected if **Use VecSim Query** checkbox is selected. In addition, **Use KNN Query** is used if neither **Use KNN Query** or **Use VecSim Query** is selected.
1. If the **Use KNN Query checkbox** is selected, enter a value in the **Number of Vector Results** field. For example, **1000**.
11. Select the **Use VecSim Query** checkbox to use the **vecSim** query parser and configure its options. This option cannot be selected if **Use KNN Query** checkbox is selected.
If the **Use VecSim Query** checkbox is selected, enter values in the following fields:
* **Min Return Vector Similarity**. Enter the minimum vector similarity value to qualify as a match from the Vector portion of the hybrid query.
* **Min Traversal Vector Similarity**. Enter the minimum vector similarity value to use when walking through the graph during the Vector portion of the hybrid query. The value must be lower than, or equal to, the value in the Min Return Vector Similarity field.
12. In the **Minimum Vector Similarity Filter**, enter the value for a minimum similarity threshold for filtering documents. This option applies to all documents, regardless of other score boosting such as rules or signals.
13. Click **Save**.
{/* // end::configure-hybrid-query-stage[] */}
Make sure the **Hybrid Query** stage is ordered before the **Solr Query** stage.
## Perform hybrid searches
After setting up the stages, you can perform hybrid searches via the [`knn` query parser](https://solr.apache.org/guide/solr/latest/query-guide/dense-vector-search.html#knn-query-parser) as you would with Solr.
Specify the search vector and include it in the query.
For example, change the `q` parameter to a `knn` query parser string.
You can also preview the results in the [Query Workbench](/docs/5/fusion/getting-data-out/query-basics/query-workbench).
Try a few different queries, and adjust the weights and parameters in the Hybrid Query stage to find the best balance between lexical and semantic vector search for your use case.
You can also disable and re-enable the Neural Hybrid Query stage to compare results with and without it.
`XDenseVectorField` is not supported in Fusion 5.9.5 and above. Instead, use `DenseVectorField`.
## Prerequisites
### Seldon
To vectorize text with Seldon, you first need to develop and deploy a machine learning model with Seldon.
### Ray
This feature is only available in Fusion 5.9.x for versions 5.9.12 and later.
To vectorize text with Ray, you first need to [develop and deploy a machine learning model with Ray](#develop-and-deploy-a-machine-learning-model-with-ray).
## Configure index pipeline
1. Sign into Fusion, go to **Indexing** > **Index Pipelines**, then select an existing pipeline or create a new one.
2. Click **Add a new pipeline stage**, then select **Ray/Seldon Vectorize Field**. In Fusion 5.9.11 and earlier, this stage is called **Seldon Vectorize Field**.
3. Fill in the required fields:
1. Enter a **Model ID**. This is the name of the model you developed and deployed.
2. Enter the **Model Input Field**. For example, `text`.
3. Enter the **Model Output Vector Field**. For example, `vector`.
4. Enter the **Source Field**. For example, `body_t`.
5. Enter the **Destination Field**. For example, `body_512_v`.
4. Click **Save**.
5. Make sure the **Seldon Vectorize Field** stage is ordered before the **Solr Indexer** stage.
Index data using the new pipeline. Confirm that your vector field is indexed by checking to see that the field is present in documents.
## Configure query pipeline
1. Go to **Querying** > **Query Pipelines**, then select an existing pipeline.
2. Click **Add a new pipeline stage**, then select **Ray/Seldon Vectorize Query**. In Fusion 5.9.11 and earlier, this stage is called **Seldon Vectorize Field**.
3. Fill in the required fields, making sure to search against the field into which you indexed the vectors:
1. Enter a **Model ID**. This is the name of the model you developed and deployed].
2. Enter the **Query Input**.
3. Enter the **Model Input Field**. For example, `text`.
4. Enter the **Model Output Vector Field**. For example, `vector`.
5. Enter the **Vector Context Key**. For example, `vector`.
4. Click **Save**.
5. Make sure the **Ray/Seldon Vectorize Query** stage is ordered before the **Solr Query** stage.
## Perform vector searches
After setting up the stages, you can perform vector searches via the [`knn` query parser](https://solr.apache.org/guide/solr/latest/query-guide/dense-vector-search.html#knn-query-parser) as you would with Solr. Specify the search vector and include it in the query. For example, change the `q` parameter to a `knn` query parser string.
The **Ray/Seldon Vectorize Query** stage will encode user queries using the specified model and modify the `q` parameter to use the `knn` query parser, turning the query into a vector search.
This tutorial walks you through deploying your own model to Fusion with Ray.
This feature is only available in Fusion 5.9.x for versions 5.9.12 and later.
## Prerequisites
* A Fusion instance with an app and indexed data.
* An understanding of Python and the ability to write Python code.
* [Docker](https://docs.docker.com/get-docker/) installed locally, plus a private or public Docker repository.
* Ray installed locally: `pip install ray[serve]` using the version of ray\[serve] found in the release notes for your version of Fusion.
* Code editor; you can use any editor, but Visual Studio Code is used in this example.
* Model: [intfloat/e5-small-v2](https://huggingface.co/intfloat/e5-small-v2)
* Docker image: [e5-small-v2-ray](https://hub.docker.com/r/jstrmec/e5-small-v2-ray/)
## Tips
* Always test your Python code locally before uploading to Docker and then Fusion.
This simplifies troubleshooting significantly.
* Once you’ve created your Docker you can also test locally by doing `docker run` with a specified port, like 9000, which you can then `curl` to confirm functionality in Fusion.
See the testing example below.
* If you previously deployed a model with Seldon, you can deploy the same model with Ray after making a few changes to your Docker image as explained in this topic.
To avoid conflicts, deploy the model with a different name.
When you have verified that the Ray model is working after deployment with Ray, you can delete the Seldon model using the [Delete Seldon Core Model Deployment job](/docs/5/fusion/reference/config-ref/jobs/delete-seldon-core-model-deployment).
* If you run into an issue with the model not deploying and you’re using the 'real' example, there is a very good chance you haven’t allocated enough memory or CPU in your job spec or in the Ray-Argo config.
It’s easy to increase the resources. To edit the ConfigMap, run `kubectl edit configmap argo-deploy-ray-model-workflow -n ` and then find the `ray-head` container in the artisanal escaped YAML and change the memory limit.
Exercise caution when editing because it can break the YAML.
Just delete and replace a single character at a time without changing any formatting.
* For additional guidance, see the [testing locally e5-model example](https://colab.research.google.com/drive/1ef-NTJBtP8p77aAa8Pp9SPXtQyozJEas?usp=sharing).
The course for **Intro to Machine Learning in Fusion** focuses on using machine learning to infer the goals of customers and users in order to deliver a more sophisticated search experience.
## Local testing example
1. Docker command:
```bash theme={"dark"}
docker run -p 127.0.0.1:9000:9000 DOCKER_IMAGE
```
2. Curl to hit Docker:
```bash theme={"dark"}
curl -i -X POST http://127.0.0.1:8000 -H 'Content-Type: application/json' -d '{"text": "The quick brown fox jumps over the lazy dog."}'
```
3. Curl model in Fusion:
```bash theme={"dark"}
curl -u $FUSION_USER:$FUSION_PASSWORD -X POST -H 'Content-Type: application/json' -d '{"text": "i love fusion"}' https://FUSION_HOST.com:6764/api/ai/ml-models/MODEL_NAME/prediction
```
4. See all your deployed models:
```bash theme={"dark"}
curl -u USERNAME:PASSWORD http://FUSION_HOST:FUSION_PORT/api/ai/ml-models
```
5. Check the Ray UI to see Replica State, Resources, and Logs.\
If you are getting an internal model error, the best way to see what is going on is to query via port-forwarding the model.\
The `MODEL_DEPLOYMENT` in the command below can be found with `kubectl get svc -n NAMESPACE`. It will have the same name as set in the model name in the **Create Ray Model Deployment** job.
```bash theme={"dark"}
kubectl -n NAMESPACE port-forward svc/MODEL_DEPLOYMENT-head-svc 8000:8000
```
Once port-forwarding is successful, you can use the below cURL command to see the issue.
At that point your worker logs should show helpful error messages.
```bash theme={"dark"}
curl --location 'http://127.0.0.1:8000/' \
--header 'charset: utf-8' \
--header 'Content-Type: application/json' \
--data '{"text": "i love fusion"}'
```
## Download the model
This tutorial uses the [`e5-small-v2`](https://huggingface.co/intfloat/e5-small-v2) model from Hugging Face, but any pre-trained model from [https://huggingface.co](https://huggingface.co) will work with this tutorial.
If you want to use your own model instead, you can do so, but your model must have been trained and then saved though a function similar to the PyTorch’s `torch.save(model, PATH)` function.
See [Saving and Loading Models](https://pytorch.org/tutorials/beginner/saving_loading_models.html) in the PyTorch documentation.
## Format a Python class
The next step is to format a Python class which will be invoked by Fusion to get the results from your model.
The skeleton below represents the format that you should follow.
See also [Getting Started](https://docs.ray.io/en/latest/serve/getting_started.html) in the Ray Serve documentation.
```python wrap expandable theme={"dark"}
from ray import serve
from starlette.requests import Request
# These defaults are for the ray serve deployment
# when running simply from docker. The 'Create Ray Model Deployment'
# job can override these replicas and resources if needed.
@serve.deployment(num_replicas=1, ray_actor_options={"num_cpus": 1})
class Deployment(object):
def __init__(self):
"""
Add any initialization parameters. Generally this is where you would load
your model. This method will be called once when the deployment is created.
"""
print("Initializing")
self.model = load_model() #faux code
# This can be named as any method which takes a dictionary as input and returns a dictionary
# as output. In this example, we are using the encode method to encode the
# input text into a vector.
def encode(self, input_dict: Dict[str, Any]) -> Dict[str, Any]:
"""
This method will be called when the deployment is queried. It will receive
the input data and should return the output data.
"""
text = input_dict["text"]
embeddings = self.model.encode #faux code
return { "vector": embeddings } # To use the 'Ray / Seldon Vectorize Field' stage, the output key should be `vector`, if using the 'Machine Learning' stage you must ensure the output key matches the output key in the 'Machine Learning' stage
async def __call__(self, http_request: Request) -> Dict[str, Any]:
input_dict: Dict[str, Any] = await http_request.json()
return self.encode(input_dict=input_dict) # This will be the function you defined above, in this case encode
app = Deployment.bind()
```
A real instance of this class with the `e5-small-v2` model is as follows:
This code pulls from Hugging Face. To have the model load in the image without pulling from Hugging Face or other external sources, download the model weights into a folder name and change the model name to the folder name preceded by `./`.
```python wrap expandable theme={"dark"}
import json
import sys
from time import time
from typing import Any, Dict
import torch
import torch.nn.functional as F
from ray import serve
from starlette.requests import Request
from starlette.responses import JSONResponse
from torch import Tensor
from transformers import AutoModel, AutoTokenizer
HUB_MODEL_NAME = "intfloat/e5-small-v2"
@serve.deployment(num_replicas=1, ray_actor_options={"num_cpus": 1})
class Deployment(object):
def __init__(self):
from loguru import logger
self.logger = logger
# Initializing logger
self.logger.remove()
self.logger.add(sys.stdout, level="INFO", serialize=False, colorize=True)
# Initializing model
self.logger.info("Loading model...")
self.tokenizer = AutoTokenizer.from_pretrained(HUB_MODEL_NAME)
self.model = AutoModel.from_pretrained(HUB_MODEL_NAME)
self.model.eval()
self.logger.info("Model initialization finished!")
def encode(self, input_dict: Dict[str, Any]) -> Dict[str, Any]:
_start_time = time()
# Extracting text from input
text = input_dict["text"]
# Tokenization
tokenized_texts = self.tokenizer(
text,
max_length=512,
padding=True,
truncation=True,
return_tensors="pt",
)
# Encoding
with torch.inference_mode():
# Forward pass of the model
outputs = self.model(**tokenized_texts)
# Average pooling the last hidden states
embeddings = self.average_pool(
outputs.last_hidden_state, tokenized_texts["attention_mask"]
)
# Normalizing embeddings
embeddings = F.normalize(embeddings, p=2, dim=1)
# Converting into output format
output_dict = {"vector": embeddings.squeeze().tolist()}
prediction_time = (time() - _start_time) * 1000
self.logger.info(f"Time taken to make a prediction: {prediction_time:.0f}ms")
return output_dict
async def __call__(self, http_request: Request) -> Dict[str, Any]:
try:
input_dict: Dict[str, Any] = await http_request.json()
except UnicodeDecodeError:
body_bytes = await http_request.body()
try:
decoded = body_bytes.decode("utf-8", errors="replace")
input_dict = json.loads(decoded)
except json.JSONDecodeError:
return JSONResponse({"error": "Invalid JSON"}, status_code=400)
return self.encode(input_dict=input_dict)
@staticmethod
def average_pool(last_hidden_states: Tensor, attention_mask: Tensor) -> Tensor:
last_hidden = last_hidden_states.masked_fill(
~attention_mask[..., None].bool(), 0.0
)
return last_hidden.sum(dim=1) / attention_mask.sum(dim=1)[..., None]
app = Deployment.bind()
```
In the preceding code, logging has been added for debugging purposes.
The preceding code example contains the following functions:
* `__call__`: This function is non-negotiable.
* `init`: The `init` function is where models, tokenizers, vectorizers, and the like should be set to self for invoking.
It is recommended that you include your model’s trained parameters directly into the Docker container rather than reaching out to external storage inside `init`.
* `encode`: The `encode` function is where the field or query that is passed to the model from Fusion is processed.
Alternatively, you can process it all in the `__call__` function, but it is cleaner not to.
The `encode` function can handle any text processing needed for the model to accept input invoked in its `model.predict()` or equivalent function which gets the expected model result.
If the output needs additional manipulation, that should be done before the result is returned.
For embedding models, the return value must have the shape of (1, DIM), where DIM (vector dimension) is a consistent integer, to enable Fusion to handle the vector encoding into Ray.
Use the *exact* name of the class when naming this file.
In the preceding example, the Python file is named `deployment.py` and the class name is `Deployment()`.
## Create a Dockerfile
The next step is to create a Dockerfile. The Dockerfile should follow this general outline; read the comments for additional details:
```dockerfile theme={"dark"}
#It is important that python version is 3.x-slim
FROM python:3.10-slim
# Install dependencies
RUN apt-get update && apt-get install -y wget
# Create working app directory
RUN mkdir -p /app
WORKDIR /app
# Copy the requirements file and install the dependencies
COPY requirements.txt /app
RUN pip install -r requirements.txt --no-cache-dir
# Copy source code
COPY deployment.py /app
# Expose serving port for HTTP communication with Fusion
EXPOSE 8000
# The end of the command follows module:application and the below value should be set in the RAY DEPLOYMENT IMPORT PATH field in 'Create Ray Model Deployment' job
CMD exec serve run deployment:app
```
## Create a requirements file
The `requirements.txt` file is a list of installs for the `Dockerfile` to run to ensure the Docker container has the right resources to run the model.
For the `e5-small-v2` model, the requirements are as follows:
```text theme={"dark"}
torch -f https://download.pytorch.org/whl/torch_stable.html # Make sure that we download CPU version of PyTorch
transformers
loguru
ray[serve]==2.42.1
```
Any recent ray\[serve] version should work, but the tested value and known supported version is 2.42.1.
In general, if an item was used in an `import` statement in your Python file, it should be included in the requirements file.
To populate the requirements, use the following command in the terminal, inside the directory that contains your code:
```bash theme={"dark"}
pip freeze > requirements.txt
```
## Build and push the Docker image
After creating the `MODEL_NAME.py`, `Dockerfile`, and `requirements.txt` files, you need to run a few Docker commands.
Run the following commands in order:
```bash theme={"dark"}
DOCKER_DEFAULT_PLATFORM=linux/amd64 docker build . -t [DOCKERHUB-USERNAME]/[REPOSITORY]:[VERSION-TAG]
```
```bash theme={"dark"}
docker push [DOCKERHUB USERNAME]/[REPOSITORY]:[VERSION-TAG]
```
Using the example model, the terminal commands would be as follows:
```bash theme={"dark"}
DOCKER_DEFAULT_PLATFORM=linux/amd64 docker build . -t jstrmec/e5-small-v2-ray:0.1
```
```bash theme={"dark"}
docker push jstrmec/e5-small-v2-ray:0.1
```
This repository is public and you can visit it here: [e5-small-v2-ray](https://hub.docker.com/r/jstrmec/e5-small-v2-ray/)
## Deploy the model in Fusion
Now you can go to Fusion to deploy your model.
When deploying your Ray model, you have two options for handling traffic:
* Use a single deployment. Deploy one model job that handles both indexing and query traffic. This is simpler to manage and requires only one deployment.
* Use separate deployments for indexing and querying. Deploy two separate model jobs: one dedicated to indexing and another for query traffic. This approach eliminates the risk of indexing workloads impacting query response times, providing better performance isolation and independent scaling control.
Choose separate deployments if query performance is critical and you want to ensure indexing operations don't compete with user-facing queries for resources.
To use separate deployments, follow the deployment steps to create two Ray model deployment jobs with different job IDs (for example, `EXAMPLE_MODEL_INDEX` and `EXAMPLE_MODEL_QUERY`). Use the index-specific model in your index pipeline stages and the query-specific model in your query pipeline stages. To keep both deployments in sync, ensure both jobs use the exact same model name, Ray deployment import path, Docker repository, and image name.
To deploy your model in Fusion:
1. In Fusion, navigate to **Collections** > **Jobs**.
2. Add a job by clicking the **Add+** Button and selecting **Create Ray Model Deployment**.
3. Fill in each of the text fields:
| Parameter | Description |
| -------------------------- | --------------------------------------------------------------------------------------------------------------------------------------------------------------------------------------- |
| Job ID | A string used by the Fusion API to reference the job after its creation. |
| Model name | A name for the deployed model. This is used to generate the deployment name in Ray. It is also the name that you reference as a `model-id` when making predictions with the ML Service. |
| Model min replicas | The minimum number of load-balanced replicas of the model to deploy. |
| Model max replicas | The maximum number of load-balanced replicas of the model to deploy. Specify multiple replicas for a higher-volume intake. |
| Model CPU limit | The number of CPUs to allocate to a single model replica. |
| Model memory limit | The maximum amount of memory to allocate to a single model replica. |
| Ray Deployment Import Path | The path to your top-level Ray Serve deployment (or the same path passed to `serve run`). For example, `deployment:app` |
| Docker Repository | The public or private repository where the Docker image is located. If you’re using Docker Hub, fill in the Docker Hub username here. |
| Image name | The name of the image. For example, `e5-small-v2-ray:0.1`. |
| Kubernetes secret | If you’re using a private repository, supply the name of the Kubernetes secret used for access. |
4. Click **Advanced** to view and configure advanced details:
| | |
| ---------------------- | ----------------------------------------------------------------------------------------------------------------------------------------------------------------------------------------------------------------------------------------------------------------------------- |
| Parameter | Description |
| Additional parameters. | This section lets you enter parameter `name:parameter` value options to be injected into the training JSON map at runtime. The values are inserted as they are entered, so you must surround string values with `"`. This is the sparkConfig field in the configuration file. |
| Write Options. | This section lets you enter parameter `name:parameter` value options to use when writing output to Solr or other sources. This is the writeOptions field in the configuration file. |
| Read Options. | This section lets you enter parameter `name:parameter` value options to use when reading input from Solr or other sources. This is the readOptions field in the configuration file. |
5. Click **Save**, then **Run** and **Start**.
When the job finishes successfully, you can proceed to the next section.
Now that the model is in Fusion, you can use it in the Machine Learning or Ray / Seldon Vectorize index and query stages.
## Configure the Fusion pipelines
Your real-world pipeline configuration depends on your use case and model, but for our example we will configure the index pipeline and then the query pipeline.
**Configure the index pipeline**
1. Create a new index pipeline or load an existing one for editing.
2. Click **Add a Stage** and then **Machine Learning**.
3. In the new stage, fill in these fields:
* The model ID
* The model input
* The model output
4. Save the stage in the pipeline and index your data with it.
**Configure the query pipeline**
1. Create a new query pipeline or load an existing one for editing.
2. Click **Add a Stage** and then **Machine Learning**
3. In the new stage, fill in these fields:
* The model ID
* The model input
* The model output
4. Save the stage and then run a query by typing a search term.
5. To verify the Ray results are correct, use the **Compare+** button to see another pipeline without the model implementation and compare the number of results.
You have now successfully uploaded a Ray model to Fusion and deployed it.
The LWAI Neural Hybrid Search pipeline is a default pipeline that contains all the required query stages to set up [Neural Hybrid Search](/docs/5/fusion/hybrid-search/overview) using [Lucidworks AI](/docs/lw-platform/lw-ai/overview).
This feature is currently only available to clients who have contracted with Lucidworks for features related to Neural Hybrid Search and Lucidworks AI.This feature is available starting in Fusion 5.9.5 and in all subsequent Fusion 5.9 releases.
This pipeline uses the following stages:
* [Text Tagger](#text-tagger)
* [Boost with Signals](#boost-with-signals)
* [Query Fields](#query-fields)
* [LWAI Vectorize Query](#lwai-vectorize-query)
* [Hybrid Query (5.9.9 and earlier)](#configure-hybrid-query-stage-5-9-9-and-earlier)
* [Neural Hybrid Query (5.9.10 and later)](#configure-neural-hybrid-query-stage-5-9-10-and-later)
* [Apply Rules](#apply-rules)
* [Solr Query](#solr-query)
* [Modify Response with Rules](#modify-response-with-rules)
Milvus is deprecated. To migrate an existing Milvus collection to Solr vector, see the Milvus to Solr migration guide. Migrating prior to Milvus removal is important to prevent disruptions to pipeline performance.
## Configure the pipeline
To add the Neural Hybrid Search (NHS) query pipeline:
1. Sign in to Fusion and click **Querying > Query Pipelines**.
2. Select the default **LWAI-neural-hybrid-search-NHS** pipeline.
3. Configure the following stages included in the default pipeline.
### Text Tagger
The [Text Tagger](/docs/5/fusion/reference/config-ref/pipeline-stages/query-stages/text-tagger-query-stage) stage queries a Solr text tagger request handler to perform spell correction, phrase boosting, and synonym expansion.
1. In the **Label** field, enter a unique identifier for this stage or leave blank to use the default value.
2. In the **Condition** field, enter a script that results in true or false, which determines if the stage should process, or leave blank.
3. In the **Tagger Collection** field, enter where the tagger request is sent. The default is the **query\_rewrite** collection for the application selected. You must enter a collection with only one shard because Text Tagger does not support multi-shard collections. Template expressions are supported.
4. In the **Param to Tag** field, enter a value of **q**, which is the name of the parameter in the request containing text to tag. This field is ignored on DSL requests.
5. In the **Save Tags in Context** field, enter the tags to save in context instead of applying directly to the incoming query in this stage. This enables downstream stages to apply the tags after completing other processing. This field is ignored on DSL requests.
6. Select the following checkboxes:
* Spell Correction
* Phrase Boosting
* Synonym Expansion
* Remove Words
* Tail Rewrites
7. In the **Filter Override** field, enter your filter to override filtering for built-in tagger doc types.
8. In the **Original Term Boost for Synonyms** field, enter the boost to use for the original term during synonym expansion. For example, **2**. To disable this function, enter **-1**.
9. In the **Default Phrase Boost** field, enter the boost to use as a default for phrases that do not have a boost value set. For example, **2**. To disable this function, enter **-1**.
10. In the **Default Phrase Slop** field, enter the distance between the terms of the query while still considering it a phrase match. For example, **10**.
11. In the **Overlapping Tag Policy** field, select the default value of **longest\_dominant\_right** to ensure the retained tags have no overlaps. The value is the algorithm that determines which tags in an overlapping set should be retained, versus being pruned away. On DSL requests, this field is ignored so the default value of **longest\_dominant\_right** is always used. The available options correspond to Solr Tagger Handler overlaps: **all**, **no\_sub**, or **longest\_dominant\_right**. Setting the value to **all** or **no\_sub** allows more rewrites to potentially be applied to a query, but can increase the chance of producing undesirable rewrites.
12. In the **Additional Params to be included in the Text Tagger Request** section, enter optional values you want to include.
13. In the **Max Wait for Lookup (ms)** field, enter the number of milliseconds to wait for the call to the remote tagger collection to return. For example, **500**. To disable this function, enter **-1**.
14. In the **Skip Query Regex** field, enter the pattern that identifies queries that are skipped because they contain that pattern. For example, you may want to skip single term queries with wildcards.
15. Click **Save**.
### Boost with Signals
The [Boost with Signals](/docs/5/fusion/reference/config-ref/pipeline-stages/query-stages/recommendation-boosting-query-stage) stage uses aggregated signals to selectively boost items in the set of search results.
1. In the **Label** field, enter a unique identifier for this stage or leave blank to use the default value.
2. In the **Condition** field, enter a script that results in true or false, which determines if the stage should process, or leave blank.
3. Select the **Asynchronous Execution Config** check box to process this stage asynchronously.
4. In the **Number of Recommendations field**, enter the number of documents to return in the query. For example, **10**.
5. In the **Number of Signals** field, enter the number of signals to process when getting recommended items. For example, **100**.
6. In the **Aggregation Type** field, enter an applicable value. For example, **click\@doc\_id,filters,query**.
7. In the **Solr Field to Boost On** field, enter which Solr field to use when applying recommendation boosts. For example, **id**.
8. In the **Boost Method** field, select the boost method to use. If the **defType!=edismax** for the main query, select **query-parser**. Another example is **query-param**.
9. In the **Boost Param** field, select one of the following values:
* **boost** to multiply scores by the boost values
* **bq** to add optional clauses to main query
10. In the **Solr Query parameters** section, enter the following **Parameter Name:Parameter Value** entries:
* `qf`: `query_t`
* `pf`: `query_t^50`
* `pf`: `query_t-3^20`
* `pf2`: `query_t^20`
* `pf2`: `query_t~3^10`
* `pf3`: `query_t^10`
* `pf3`: `query_t~3^5`
* `boost`: `map(query({!field f=query_s v=$q}),0,0,1,20)`
* `mm`: `50%`
* `defType`: `edismax`
* `sort`: `score desc, weight_d desc`
* `fq`: `weight_d:[ TO **]`
11. In the **Rollup Field**, enter the field name to use when rolling up documents that have the same doc id. For example, **doc\_id\_s**.
12. In the **Rollup weight field**, enter the field name to use for signal weights. For example, **weight\_d**.
13. In the **Rollup weight strategy** field, select one of the following methods to use when rolling up the weight:
* **max**
* **sum**
14. In the **Final Boost Weight Expression** field, enter the optional expression to compute the final boost weight using a combination of fields returned by Solr. For example, **score** and **weight\_d**. Set to **weight\_d** for similar behavior as older versions. Another example is **math:log(weight\_d + 1) + 10 \* math:log(score+1)**.
15. In the **Document Weights Context Key** field, enter the context key in which to save boosts for **docId:weight\_d**.
16. In the **Query Param** field, enter the default value of **q**, which is the name of the parameter in the request containing query to boost.
17. Select the **Include Enriched Query** checkbox to:
* Enable the stage to combine the user’s original query with the output of any stages that enrich the query, such as the Text Tagger stage.
* Expand the recall of the boost lookup. However, precision may be impacted.
* Enable the stage to change the configured **mm** parameter to accommodate additional terms added to the boost lookup query.
18. In the **Update Policy** field, select to **replace** or **append** the boost parameter in the final query.
19. Click **Save**.
### Query Fields
The [Query Fields](/docs/5/fusion/reference/config-ref/pipeline-stages/query-stages/search-fields-query-stage) stage configures query parameters for a Solr search.
1. In the **Label** field, enter a unique identifier for this stage or leave blank to use the default value.
2. In the **Condition** field, enter a script that results in true or false, which determines if the stage should process, or leave blank.
3. In the **Number of Results** field, enter the number of query fields to return. For example, **10**.
4. In the **Result Offset** field, enter the value that designates the starting position of the first result from the beginning of the data being queried. Offset is zero-based, so a value of **9** counts from 0 through 9 and the first record returned is the 10th record discovered in the query.
5. In the **Results Sort Order** section, enter values for the following fields:
* Sort Type. For example, sort on expression, field, query, or relevancy.
* Field Name or Expression on which to sort.
* Sort Order. Select either **asc** or **desc**.
6. In the **Search Fields** section, enter the field name and boost values to include in this stage.
7. In the **Return Fields** section, enter the field names to include in this stage.
8. Select the **Return Score** checkbox to set as **true** and determine if a score is determined for this stage.
9. In the **Minimum Should Match** field, enter the minimum string to match for this stage.
10. Select the **Grouping Options** checkbox to enter values in the following fields:
* Grouping Field. The field name on which to group results.
* Group Size. The number of results per group.
* Group Sort. Enter values in the following fields:
* Sort Type. For example, sort on expression, field, query, or relevancy.
* Field Name or Expression on which to sort.
* Sort Order. Select either **asc** or **desc**.
* Group Leader Strategy. Select this checkbox to define selection criteria for the representative document from each group. Only one method may be used at a time. Defaults to **relevancy** if not specified. Values are:
* By Field Value. If selected, include documents with the minimum or maximum value for the indicated field to be the representative document for each group.
* By Sort. If selected, include the representative document for each group based on the order in which they are returned with the given sort criteria.
11. Click **Save**.
### LWAI Vectorize Query
The [LWAI Vectorize Query](/docs/5/fusion/reference/config-ref/pipeline-stages/query-stages/lwai-vectorize-query) stage configures parameters to generate a vector by using a Lucidworks AI (LWAI) embedding model to encode the input to a vector representation. This stage is ignored if the input is blank or a wildcard of either an asterisk `\*` or a colon `:` is used.
1. In the **Label** field, enter a unique identifier for this stage.
2. In the **Condition** field, enter a script that results in true or false, which determines if the stage should process.
1. Select **Enable Async Execution**. Fusion automatically assigns an **Async ID** value to this stage. Change this to a more memorable string that describes the asynchronous stages you are merging, such as `signals` or `access_control`.
2. Copy the **Async ID** value.
For detailed information, see [Asynchronous query pipeline processing](/docs/5/fusion/getting-data-out/query-basics/query-pipelines/overview).
3. In the **Account Name** field, select the name of the Lucidworks AI account.
If your account name does not appear in the list or you are unsure which one to select, check your Lucidworks AI Gateway configuration.
4. In the **Model** field, select the Lucidworks AI model to use for encoding.
If you do not see any model names and you are a non-admin Fusion user, verify with a Fusion administrator that your user account has these permissions: `PUT,POST,GET:/LWAI-ACCOUNT-NAME/**`\
Your Fusion account name must match the name of the account that you selected in the **Account Name** dropdown.\
For more information about models, see:
* [Pre-trained embedding models](/docs/lw-platform/lw-ai/lw-ai-pre-trained-embedding-models)
* [Custom embedding model training](/docs/lw-platform/lw-ai/lw-ai-custom-embedding-model-training/overview)
5. In the **Query Input** field, enter the location from which the query is retrieved.
6. In the **Output context variable** field, enter the name of the variable where the vector value from the response is saved.
7. In the **Use Case Configuration** section, click the **+** sign to enter the parameter name and value to send to Lucidworks AI. The `useCaseConfig` parameter that is common to generative AI and embedding use cases is `dataType`, but each use case may have other parameters. The value for the query stage is `query`.
8. In the **Model Configuration** section, click the **+** sign to enter the parameter name and value to send to Lucidworks AI. Several `modelConfig` parameters are common to generative AI use cases. For more information, see [Prediction API](/docs/lw-platform/lw-ai/lw-ai-apis/lw-ai-prediction-api/overview).
9. Select the **Fail on Error** checkbox to generate an exception if an error occurs during this stage.
10. Click **Save**.
The **Top K** setting is 100 by default, but a value as high as 1000 provides better recall if you have fewer than one million indexed documents.
You can raise it even higher, but keep in mind that higher recall also causes higher latency.\
When raising this value, we recommend also setting a higher **Min Return Vector Similarity** value, in the 0.7-0.85 range.
This query stage must be placed **before** the [Solr Query stage](/docs/5/fusion/reference/config-ref/pipeline-stages/query-stages/solr-query-stage).
### Hybrid Query (5.9.9 and earlier) - deprecated
The [Hybrid Query](/docs/5/fusion/reference/config-ref/pipeline-stages/query-stages/hybrid-search-query) stage is a combination of semantic vector search and lexical search. This stage is ignored if the input is blank or a wildcard of either an asterisk `\*` or a colon `:`.
In addition, this stage does not function correctly if the incoming **q** parameter is a Solr query parser string. For example, **field\_t:foo** rather than a raw user query string.
The resulting query is *always* written to``.
1. In the **Label** field, enter a unique identifier for this stage or leave blank to use the default value.
2. In the **Condition** field, enter a script that results in true or false, which determines if the stage should process, or leave blank.
3. In the **Lexical Query Input** field, enter the location from which the lexical query is retrieved. For example,``. Template expressions are supported.
4. In the **Lexical Query Weight** field, enter the relative weight of the lexical query. For example, **0.3**. If this value is **0**, no re-ranking will be applied using the lexical query scores.
5. In the **Number of Lexical Results** field, enter the number of lexical search results to include in re-ranking. For example, **1000**. A value is **0** is ignored.
6. In the **Vector Query Field**, enter the name of the Solr field for k-nearest neighbor (KNN) vector search.
7. In the **Vector Input** field, enter the location from which the vector is retrieved. Template expressions are supported. For example, a value of `` evaluates the context variable resulting from a previous stage, such as the [LWAI Vectorize Query](/docs/5/fusion/reference/config-ref/pipeline-stages/query-stages/lwai-vectorize-query) stage.
8. In the **Vector Query Weight** field, enter the relative weight of the vector query. For example, **0.7**.
9. Select the **Use KNN Query** checkbox to use the **knn** query parser and configure its options. This option cannot be selected if **Use VecSim Query** checkbox is selected. In addition, **Use KNN Query** is used if neither **Use KNN Query** or **Use VecSim Query** is selected.
1. If the **Use KNN Query checkbox** is selected, enter a value in the **Number of Vector Results** field. For example, **1000**.
10. Select the **Use VecSim Query** checkbox to use the **vecSim** query parser and configure its options. This option cannot be selected if **Use KNN Query** checkbox is selected.\
If the **Use VecSim Query** checkbox is selected, enter values in the following fields:
* **Min Return Vector Similarity**. Enter the minimum vector similarity value to qualify as a match from the Vector portion of the hybrid query.
* **Min Traversal Vector Similarity**. Enter the minimum vector similarity value to use when walking through the graph during the Vector portion of the hybrid query. The value must be lower than, or equal to, the value in the Min Return Vector Similarity field.
11. In the **Minimum Vector Similarity Filter**, enter the value for a minimum similarity threshold for filtering documents. This option applies to all documents, regardless of other score boosting such as rules or signals.
12. Click **Save**.
### Neural Hybrid Query (5.9.10 and later)
The [Neural Hybrid Query](/docs/5/fusion/reference/config-ref/pipeline-stages/query-stages/neural-hybrid-query) stage is a combination of semantic vector search and lexical search. This stage is ignored if the input is blank or a wildcard of either an asterisk `\*` or a colon `:`.
In addition, this stage does not function correctly if the incoming **q** parameter is a Solr query parser string. For example, **field\_t:foo** rather than a raw user query string.
The resulting query is *always* written to``.
1. In the **Label** field, enter a unique identifier for this stage or leave blank to use the default value.
2. In the **Condition** field, enter a script that results in true or false, which determines if the stage should process, or leave blank.
3. In the **Lexical Query Input** field, enter the location from which the lexical query is retrieved. For example,``. Template expressions are supported.
4. In the **Lexical Query Weight** field, enter the relative weight of the lexical query. For example, **0.3**. If this value is **0**, no re-ranking will be applied using the lexical query scores.
5. In the **Lexical Query Squash Factor** field, enter a value that will be used to squash the lexical query score.\
The squash factor controls how much difference there is between the top-scoring documents and the rest.
It helps ensure that documents with slightly lower scores still have a chance to show up near the top.
For this value, Lucidworks recommends entering the inverse of the lexical maximum score across all queries for the given collection.
6. In the **Vector Query Field**, enter the name of the Solr field for k-nearest neighbor (KNN) vector search.
7. In the **Vector Input** field, enter the location from which the vector is retrieved. Template expressions are supported. For example, a value of `` evaluates the context variable resulting from a previous stage, such as the [LWAI Vectorize Query](/docs/5/fusion/reference/config-ref/pipeline-stages/query-stages/lwai-vectorize-query) stage.
8. In the **Vector Query Weight** field, enter the relative weight of the vector query. For example, **0.7**.
9. In the **Min Return Vector Similarity** field, enter the minimum vector similarity value to qualify as a match from the Vector portion of the hybrid query.
10. In the **Min Traversal Vector Similarity** field, enter the minimum vector similarity value to use when walking through the graph during the Vector portion of the hybrid query.
11. When enabled, the **Compute Vector Similarity for Lexical-Only Matches** setting computes vector similarity scores for documents in lexical search results but not in the initial vector search results. Select the checkbox to enable this setting.
12. If you want to use pre-filtering:
1. Uncheck **Block pre-filtering**.\
In the Javascript context (`ctx`), the `preFilterKey` object becomes available.
2. Add a [Javascript stage](/docs/5/fusion/reference/config-ref/pipeline-stages/query-stages/javascript-query-stage) *after* the Neural Hybrid Query stage and use it to configure your pre-filter.\
The `preFilter` object adds both the top-level `fq` and `preFilter` to the parameters for the vector query.\
You do not need to manually add the top level `fq` in the javascript stage.\
See the example below:
```js wrap theme={"dark"}
var QueryRequestAndResponse = Java.type('com.lucidworks.apollo.pipeline.query.QueryRequestAndResponse');
if(ctx.hasProperty("preFilterKey")) {
var preFilter = ctx.getProperty("preFilterKey");
var wrapper = QueryRequestAndResponse.create(request,response,0)
preFilter.addFilter(wrapper, 'id:* OR foo_s:bar');
}
```
13. Click **Save**.
### Apply Rules
The [Apply Rules](/docs/5/fusion/reference/config-ref/pipeline-stages/query-stages/query-rules-query-stage) stage applies the rules configured in the collection to the query.
1. In the **Label** field, enter a unique identifier for this stage or leave blank to use the default value.
2. In the **Condition** field, enter a script that results in true or false, which determines if the stage should process, or leave blank.
3. Select the **Asynchronous Execution Config** check box to process this stage asynchronously.
4. In the **Collection field**, enter the name of the collection that contains the rules. If this field does not contain a value, the default rules collection for the selected application is used. Template expressions are supported.
5. In the **Request Handler** field, enter a value of **select**.
6. In the **HTTP Method** field, select **POST**.
7. In the **Rule Triggering Limit** field, enter the maximum number of business rules to be triggered by the query. The default rules matching limit is **100**. This configuration overwrites the **rows** parameter set in Query Parameters section.
8. In the **Query Parameters** section, enter the names and values to use when querying the rules collection. If you set the **rows** parameter here, it will be overwritten by the configuration in the Rule Triggering Limit field.
9. In the **Subquery Rewrite Pipeline id** field, enter the value to call a Fusion query pipeline to modify the rule-retrieving subquery. Template expressions are supported.
10. In the **Headers** section, enter the names and values to use in this stage.
11. Select the **Use Original Query If No Rules Match** checkbox so the stage will try to match rules using the original query (un-tagged) sent into the Text Tagger stage, if available.
12. Select the **Partially Matched Filter Queries Will Trigger the Rule** checkbox so the stage will trigger filter rules as long as there is one filter query in the query parameter that matches the filter specified in the rule.
13. In the **Max Wait for Lookup (ms)**, enter the number of milliseconds to wait for the call to the remote tagger collection to return. For example, **500**. To disable this function, enter **-1**.
14. Click **Save**.
### Solr Query
The [Solr Query](/docs/5/fusion/reference/config-ref/pipeline-stages/query-stages/solr-query-stage) stage sends the search request to Solr.
1. In the **Label** field, enter a unique identifier for this stage or leave blank to use the default value.
2. In the **Condition** field, enter a script that results in true or false, which determines if the stage should process, or leave blank.
3. In the **Configure Request Handlers Allowed for Queries** section, enter a value for the request handlers used in this stage.
4. In the **HTTP Method** field, select **POST**.
5. Select the **Allow Federated Search** checkbox to enable the use of Solr **collection** and **shards** parameters for this stage.
6. Select the **Generate Response Signal** checkbox to generate a response signal containing metadata about the response from Solr. Response signals are used by App Insights and experiments. This setting only applies if the searchLogs and signals features are enabled for the collection. To avoid generating response signals as Users type, do not select this option.
7. In the **Exclude Response Signal Criteria** section, enter query parameters and Regex patterns to prevent generating a response signal based on specific parameters in the query. For example, use these fields to enable response signals in general, but to disable for auto-complete queries.
8. In the **Preferred Replica Type** field, select **pull** to specify a replicate type that will be given a higher order of precedence when querying Solr. This preference will only be applied for queries that target multiple shards.
9. Click **Save**.
### Modify Response with Rules
The [Modify Response with Rules](/docs/5/fusion/reference/config-ref/pipeline-stages/query-stages/rules-augment-response-query-stage) stage modifies the response from Solr using matching rules from the Apply Rules stage.
1. In the **Label** field, enter a unique identifier for this stage or leave blank to use the default value.
2. In the **Condition** field, enter a script that results in true or false, which determines if the stage should process, or leave blank.
3. In the **Facet Field Label Blob ID**, enter the ID for a blob containing labels for facet fields to add to the response.
4. In the **Facet Label Parse Delimiter** field, enter `||` as the delimiter to parse each facet label mapping in the blob. A Java regular expression is also a valid value. Regex must start with `^` and end with `$`.
5. Click **Save**.
## Order the stages
For the pipeline to operate correctly, the stages must be in the following order:
* [Text Tagger](#text-tagger)
* [Boost with Signals](#boost-with-signals)
* [Query Fields](#query-fields)
* [LWAI Vectorize Query](#lwai-vectorize-query)
* [Hybrid Query](#configure-hybrid-query-stage-5-9-9-and-earlier)
* [Apply Rules](#apply-rules)
* [Solr Query](#solr-query)
* [Modify Response with Rules](#modify-response-with-rules)
When you have ordered the stages, click **Save**.
The LWAI Vectorize pipeline is a default pipeline that contains the required index stages to set up vector search using [Lucidworks AI](/docs/lw-platform/lw-ai/overview).
For more information,refer to Configure Neural Hybrid Search.
This feature is currently only available to clients who have contracted with Lucidworks for features related to Neural Hybrid Search and Lucidworks AI.This feature is available starting in Fusion 5.9.5 and in all subsequent Fusion 5.9 releases.
This pipeline uses the following stages:
* [Field Mapping](#field-mapping)
* [Solr Dynamic Field Name Mapping](#solr-dynamic-field-name-mapping)
* [LWAI Vectorize Field](#lwai-vectorize-field)
* [Solr Indexer](#solr-indexer)
## Configure the pipeline
To add the Lucidworks AI (LWAI) Vectorize index pipeline:
1. Sign in to Fusion and click **Indexing > Index Pipelines**.
2. Select the default **LWAI-vectorize** pipeline.
3. Configure the following stages included in the default pipeline.
## Field Mapping
The [Field Mapping](/docs/5/fusion/reference/config-ref/pipeline-stages/index-stages/field-mapper-index-stage) stage customizes mapping of the fields in an index pipeline document to fields in the Solr scheme.
To configure this stage for the index pipeline:
1. In the **Label** field, enter a unique identifier for this stage or leave blank to use the default value.
2. In the **Condition** field, enter a script that results in true or false, which determines if the stage should process, or leave blank.
3. Select the **Allow System Fields Mapping?** checkbox to map system fields in this stage.
4. In the **Field Retention** section, enter specific fields to either keep or delete.
5. In the **Field Value Updates** section, enter specific fields and then designate the value to either add to the field, or set on the field. When a value is added, any values previously on the field are retained. When a value is set, any values previously on the field are overwritten by the new value entered.
6. In the **Field Translations** section, enter specific fields to either move or copy to a different field. When a field is moved, the values from the source field are moved over to the target field and the source field is removed. When a field is copied, the values from the source field are copied over to the target field and the source field is retained.
7. Select the **Unmapped Fields** checkbox to specify the operation on the fields *not* mapped in the previous sections. Select the **Keep** checkbox to keep all unmapped fields. This is the only option you need to select for the LWAI-vectorize stage.
8. Click **Save**.
## Solr Dynamic Field Name Mapping
The [Solr Dynamic Field Name Mapping](/docs/5/fusion/reference/config-ref/pipeline-stages/index-stages/solr-dynamic-field-name-mapping-index-stage) stage maps pipeline document fields to Solr dynamic fields.
1. In the **Label** field, enter a unique identifier for this stage or leave blank to use the default value.
2. In the **Condition** field, enter a script that results in true or false, which determines if the stage should process, or leave blank.
3. Select the **Duplicate Single-Valued Fields as Multi-Valued Fields** checkbox to enable indexing of field data into both single-valued and multi-valued Solr fields. For example, if this option is selected, the `phone` field is indexed into both the `phone_s` single-valued field and the `phone_ss` multi-valued field. If this option is not selected, the `phone` field is indexed into only the `phone_s` single-valued field.
4. In the **Field Not To Map** section, enter the names of the fields that should not be mapped by this stage.
5. Select the **Text Fields Advanced Indexing** checkbox to enable indexing of text data that doesn’t exceed a specific maximum length, into both tokenized and non-tokenized fields. For example, if this option is selected, the `name` text field with a value of **John Smith** is indexed into both the `name_t` and `name_s` fields allowing relevant search using `name_t` field (by matching to a Smith query) and also proper faceting and sorting using `name_s` field (using John Smith for sorting or faceting). If this option is not selected, the `name` text field is indexed into only the `name_t` text field by default.
6. In the **Max Length for Advanced Indexing of Text Fields** field, enter a value used to determine how many characters of the incoming text is indexed. For example, **100**.
7. Click **Save**.
## LWAI Vectorize Field
The [LWAI Vectorize](/docs/5/fusion/reference/config-ref/pipeline-stages/index-stages/lwai-vectorize-field) stage invokes a Lucidworks AI model to encode a string field to a vector representation. This stage is skipped if the field to encode doesn’t exist or is null on the pipeline document.
1. In the **Label** field, enter a unique identifier for this stage.
2. In the **Condition** field, enter a script that results in true or false, which determines if the stage should process.
3. In the **Account Name** field, select the Lucidworks AI API account name defined in [Lucidworks AI Gateway](/docs/lw-platform/lw-ai/lw-ai-gateway).\
If your account name does not appear in the list or you are unsure which one to select, check your Lucidworks AI Gateway configuration.
4. In the **Model** field, select the Lucidworks AI model to use for encoding.\
If your model does not appear in the list or you are unsure which one to select, check your Lucidworks AI Gateway configuration.\
For more information, see:
* [Pre-trained embedding models](/docs/lw-platform/lw-ai/lw-ai-pre-trained-embedding-models)
* [Custom embedding model training](/docs/lw-platform/lw-ai/lw-ai-custom-embedding-model-training/overview)
5. In the **Source** field, enter the name of the string field where the value should be submitted to the model for encoding. If the field is blank or does not exist, this stage is not processed. Template expressions are supported.
6. In the **Destination** field, enter the name of the field where the vector value from the model response is saved.
* If a value is entered in this field, the following information is added to the document:
* `{Destination Field}_b` is the boolean value if the vector has been indexed.
* `{Destination Field}` is the vector field.
7. In the **Use Case Configuration** section, click the **+** sign to enter the parameter name and value to send to Lucidworks AI. The `useCaseConfig` parameter that is common to embedding use cases is `dataType`, but each use case may have other parameters. The value for the query stage is `query`.
8. In the **Model Configuration** section, click the **+** sign to enter the parameter name and value to send to Lucidworks AI. Several `modelConfig` parameters are common to generative AI use cases. For more information, see [Prediction API](/docs/lw-platform/lw-ai/lw-ai-apis/lw-ai-prediction-api/overview).
9. Select the **Fail on Error** checkbox to generate an exception if an error occurs while generating a prediction for a document.
10. Click **Save**.
11. Index data using the new pipeline. Verify the vector field is indexed by confirming the field is present in documents.
## Solr Indexer
The [Solr Indexer](/docs/5/fusion/reference/config-ref/pipeline-stages/index-stages/solr-indexer-stage) stage transforms a Fusion pipeline document into a Solr document, and sends it to Solr for indexing into a collection.
To configure this stage for the index pipeline:
1. In the **Label** field, enter a unique identifier for this stage or leave blank to use the default value.
2. In the **Condition** field, enter a script that results in true or false, which determines if the stage should process, or leave blank.
3. Select the **Map to Solr Schema** checkbox to select and add static and dynamic fields to map in this stage.
4. Select the **Add a field listing all document fields** checkbox to add the `_lw_fields_ss` multi-valued field to the document, which lists all fields that are being sent to Solr.
5. In the **Additional Date Formats** section, enter date formats to include in this stage.
6. In the **Additional Update Request Parameters** section, enter the parameter names and values to update the request parameters.
7. Select the **Buffer Documents and Send Them To Solr in Batches** checkbox to process the documents in batches for this stage.
8. In the **Buffer Size** field, enter the number of documents in a batch before sending the batch to Solr. If no value is specified, the default value for this search cluster is used.
9. In the **Buffer Flush Interval (milliseconds)** field, enter the maximum number of milliseconds to hold the batch before sending the batch to Solr. If no value is specified, the default value for this search cluster is used.
10. Select the **Allow expensive request parameters** checkbox to allow `commit=true` and `optimize=true` to be passed to Solr when specified as request parameters coming into this pipeline. Document commands that specify commit or optimize are still respected even if this checkbox is not selected.
11. Select the **Unmapped Fields Mapping** checkbox to specify the information for all of the fields *not* mapped in the previous sections.
* In the **Source** Field, enter the name of the unmapped field to be mapped.
* In the **Target** Field, enter the name of the Solr field to which the unmapped field is mapped.
* In the **Operation** field, select how the field is mapped. The options are:
* **Add** the unmapped field to the Solr field.
* **Copy** the unmapped field to the Solr field and retain the value in the Source field.
* **Delete** the unmapped field.
* **Keep** the unmapped field and do not map it to a Solr field.
* **Move** (replace) the Solr field value with the unmapped field Source value and remove the value from the Source field.
* **Set** the value of the unmapped field to the value in the Solr field.
12. Click **Save**.
## Order the stages
For the pipeline to operate correctly, the stages must be in the following order:
* [Field Mapping](#field-mapping)
* [Solr Dynamic Field Name Mapping](#solr-dynamic-field-name-mapping)
* [LWAI Vectorize Field](#lwai-vectorize-field)
* [Solr Indexer](#solr-indexer)
When you have ordered the stages, click **Save**.
### Index stages
* [LWAI Batch Vectorize](/docs/5/fusion/reference/config-ref/pipeline-stages/index-stages/lwai-batch-vectorize-index-stage)
* [LWAI Vectorize Field](/docs/5/fusion/reference/config-ref/pipeline-stages/index-stages/lwai-vectorize-field)
* [Ray/Seldon Vectorize Field Stage](/docs/5/fusion/reference/config-ref/pipeline-stages/index-stages/vectorize-field-via-seldon-index-stage)
### Query stages
* [Hybrid Query (5.9.9 and earlier)](/docs/5/fusion/reference/config-ref/pipeline-stages/query-stages/hybrid-search-query)
* [Neural Hybrid Query (5.9.10 and later)](/docs/5/fusion/reference/config-ref/pipeline-stages/query-stages/neural-hybrid-query)
* [Chunking Neural Hybrid Query (5.9.12 and later)](/docs/5/fusion/reference/config-ref/pipeline-stages/query-stages/chunking-neural-hybrid-query)
* [LWAI Vectorize Query](/docs/5/fusion/reference/config-ref/pipeline-stages/query-stages/lwai-vectorize-query)
* [Ray/Seldon Vectorize Query Stage](/docs/5/fusion/reference/config-ref/pipeline-stages/query-stages/vectorize-query-via-seldon-query-stage)
For information about which hybrid stage to select and why, see [Differences between hybrid query stages](/docs/5/fusion/hybrid-search/hybrid-stage-differences).
## Neural Hybrid Search diagrams
These diagrams display neural hybrid search process flows for different pipelines, models, and use cases.
### Neural Hybrid Search process flow for Lucidworks AI models
### Neural Hybrid Search process flow for Seldon/Ray models
### Neural Hybrid Search process flow for Lucidworks AI RAG use case
For more information, see:
* [Lucidworks Prediction API RAG use case](/docs/lw-platform/lw-ai/lw-ai-apis/lw-ai-prediction-api/rag-prediction#neural-hybrid-search-process-flow-with-retrieval-augmented-generation-rag)
* [Lucidworks Async Prediction API RAG use case](/docs/lw-platform/lw-ai/lw-ai-apis/lw-ai-async-prediction-api/rag-async#neural-hybrid-search-process-flow-with-retrieval-augmented-generation-rag)
## Learn more
The quick learning for **Neural Hybrid Search** focuses on a quick introduction to NHS.
The course for **Neural Hybrid Search** focuses on understanding how Neural Hybrid Search works.
See also [Debugging](/docs/lw-platform/lw-ai/lw-ai-stages/overview#debugging) in the Lucidworks AI docs to learn how to debug a Lucidworks AI pipeline that doesn't produce the expected results.
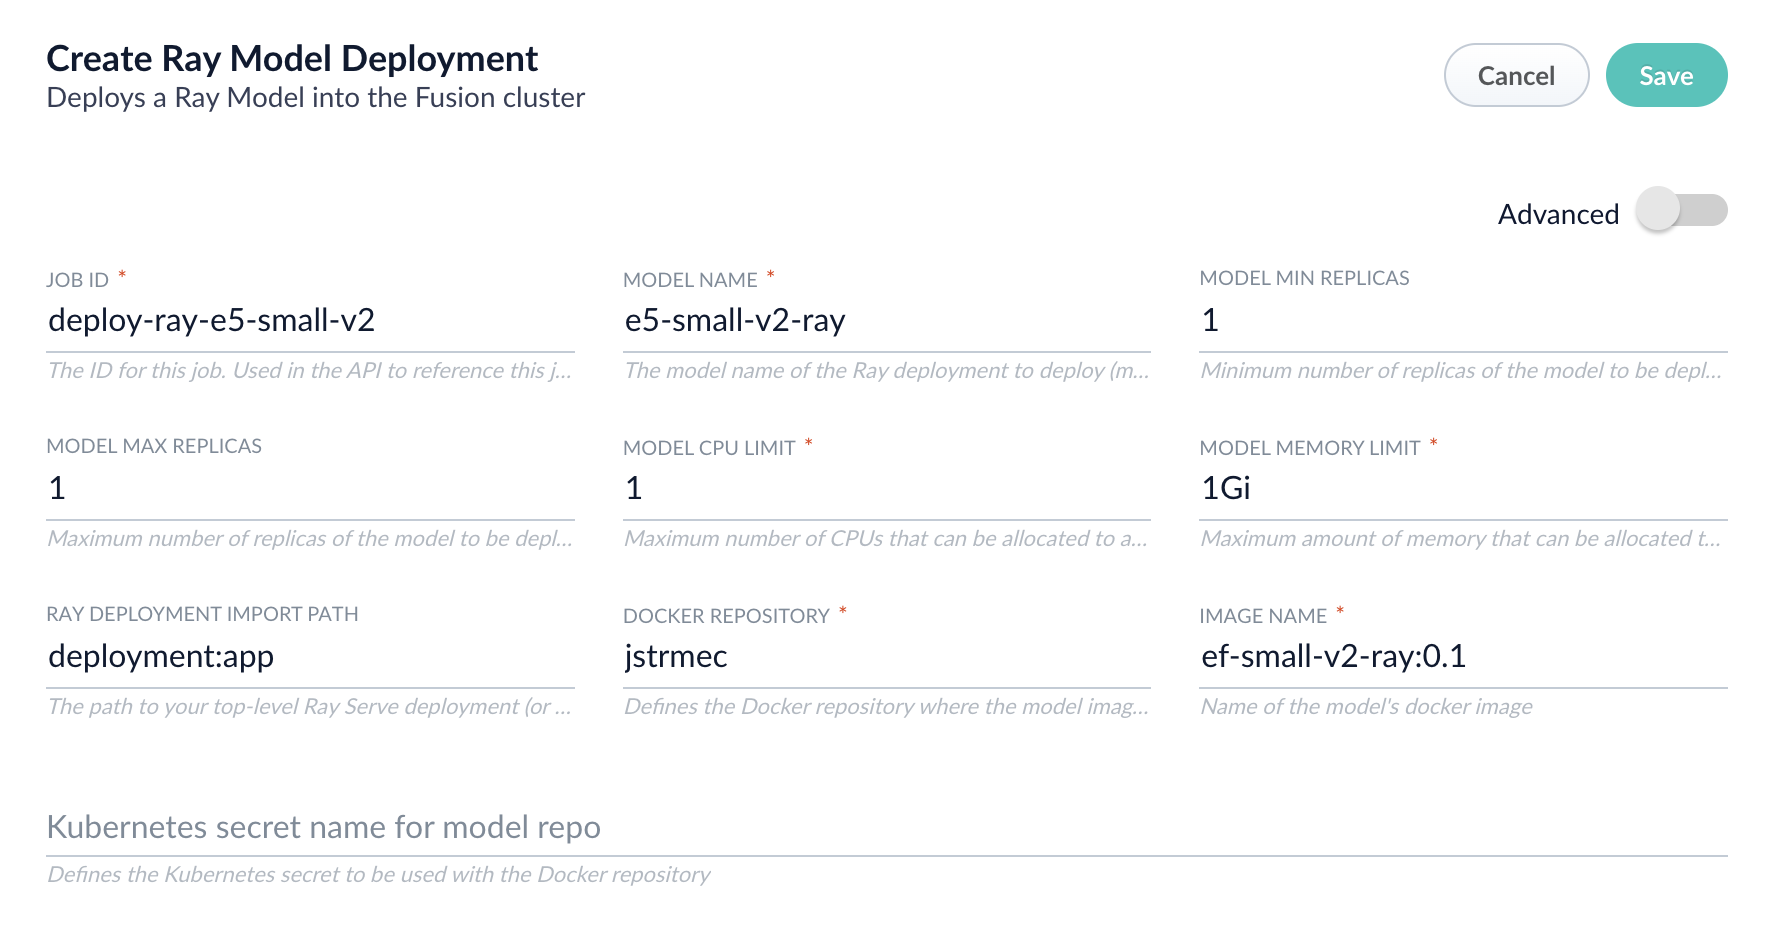 | Parameter | Description |
| -------------------------- | --------------------------------------------------------------------------------------------------------------------------------------------------------------------------------------- |
| Job ID | A string used by the Fusion API to reference the job after its creation. |
| Model name | A name for the deployed model. This is used to generate the deployment name in Ray. It is also the name that you reference as a `model-id` when making predictions with the ML Service. |
| Model min replicas | The minimum number of load-balanced replicas of the model to deploy. |
| Model max replicas | The maximum number of load-balanced replicas of the model to deploy. Specify multiple replicas for a higher-volume intake. |
| Model CPU limit | The number of CPUs to allocate to a single model replica. |
| Model memory limit | The maximum amount of memory to allocate to a single model replica. |
| Ray Deployment Import Path | The path to your top-level Ray Serve deployment (or the same path passed to `serve run`). For example, `deployment:app` |
| Docker Repository | The public or private repository where the Docker image is located. If you’re using Docker Hub, fill in the Docker Hub username here. |
| Image name | The name of the image. For example, `e5-small-v2-ray:0.1`. |
| Kubernetes secret | If you’re using a private repository, supply the name of the Kubernetes secret used for access. |
4. Click **Advanced** to view and configure advanced details:
| | |
| ---------------------- | ----------------------------------------------------------------------------------------------------------------------------------------------------------------------------------------------------------------------------------------------------------------------------- |
| Parameter | Description |
| Additional parameters. | This section lets you enter parameter `name:parameter` value options to be injected into the training JSON map at runtime. The values are inserted as they are entered, so you must surround string values with `"`. This is the sparkConfig field in the configuration file. |
| Write Options. | This section lets you enter parameter `name:parameter` value options to use when writing output to Solr or other sources. This is the writeOptions field in the configuration file. |
| Read Options. | This section lets you enter parameter `name:parameter` value options to use when reading input from Solr or other sources. This is the readOptions field in the configuration file. |
5. Click **Save**, then **Run** and **Start**.
| Parameter | Description |
| -------------------------- | --------------------------------------------------------------------------------------------------------------------------------------------------------------------------------------- |
| Job ID | A string used by the Fusion API to reference the job after its creation. |
| Model name | A name for the deployed model. This is used to generate the deployment name in Ray. It is also the name that you reference as a `model-id` when making predictions with the ML Service. |
| Model min replicas | The minimum number of load-balanced replicas of the model to deploy. |
| Model max replicas | The maximum number of load-balanced replicas of the model to deploy. Specify multiple replicas for a higher-volume intake. |
| Model CPU limit | The number of CPUs to allocate to a single model replica. |
| Model memory limit | The maximum amount of memory to allocate to a single model replica. |
| Ray Deployment Import Path | The path to your top-level Ray Serve deployment (or the same path passed to `serve run`). For example, `deployment:app` |
| Docker Repository | The public or private repository where the Docker image is located. If you’re using Docker Hub, fill in the Docker Hub username here. |
| Image name | The name of the image. For example, `e5-small-v2-ray:0.1`. |
| Kubernetes secret | If you’re using a private repository, supply the name of the Kubernetes secret used for access. |
4. Click **Advanced** to view and configure advanced details:
| | |
| ---------------------- | ----------------------------------------------------------------------------------------------------------------------------------------------------------------------------------------------------------------------------------------------------------------------------- |
| Parameter | Description |
| Additional parameters. | This section lets you enter parameter `name:parameter` value options to be injected into the training JSON map at runtime. The values are inserted as they are entered, so you must surround string values with `"`. This is the sparkConfig field in the configuration file. |
| Write Options. | This section lets you enter parameter `name:parameter` value options to use when writing output to Solr or other sources. This is the writeOptions field in the configuration file. |
| Read Options. | This section lets you enter parameter `name:parameter` value options to use when reading input from Solr or other sources. This is the readOptions field in the configuration file. |
5. Click **Save**, then **Run** and **Start**.
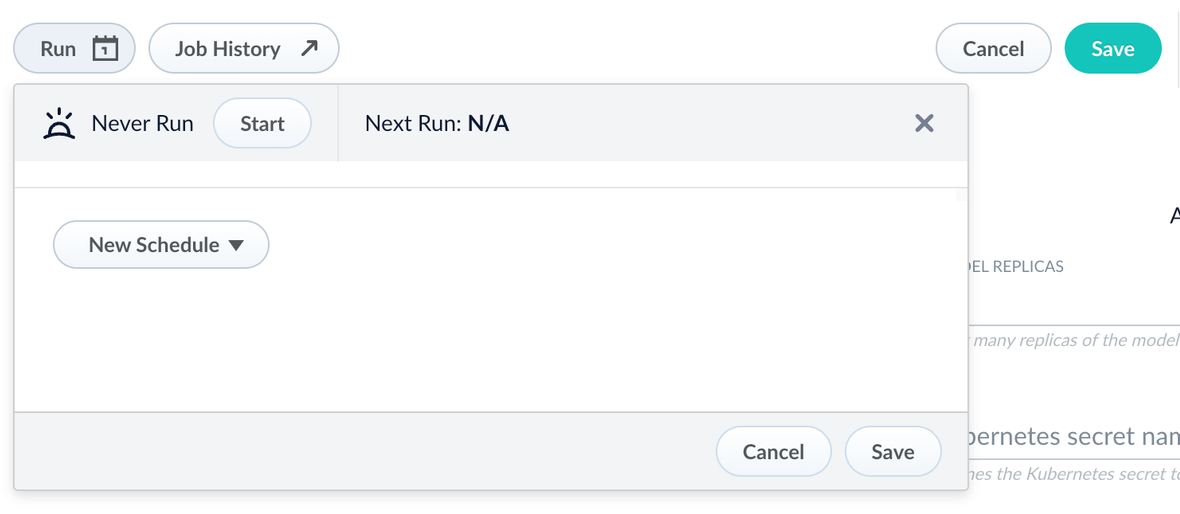 When the job finishes successfully, you can proceed to the next section.
Now that the model is in Fusion, you can use it in the Machine Learning or Ray / Seldon Vectorize index and query stages.
## Configure the Fusion pipelines
Your real-world pipeline configuration depends on your use case and model, but for our example we will configure the index pipeline and then the query pipeline.
**Configure the index pipeline**
1. Create a new index pipeline or load an existing one for editing.
2. Click **Add a Stage** and then **Machine Learning**.
3. In the new stage, fill in these fields:
* The model ID
* The model input
* The model output
4. Save the stage in the pipeline and index your data with it.
**Configure the query pipeline**
1. Create a new query pipeline or load an existing one for editing.
2. Click **Add a Stage** and then **Machine Learning**
3. In the new stage, fill in these fields:
* The model ID
* The model input
* The model output
4. Save the stage and then run a query by typing a search term.
5. To verify the Ray results are correct, use the **Compare+** button to see another pipeline without the model implementation and compare the number of results.
You have now successfully uploaded a Ray model to Fusion and deployed it.
When the job finishes successfully, you can proceed to the next section.
Now that the model is in Fusion, you can use it in the Machine Learning or Ray / Seldon Vectorize index and query stages.
## Configure the Fusion pipelines
Your real-world pipeline configuration depends on your use case and model, but for our example we will configure the index pipeline and then the query pipeline.
**Configure the index pipeline**
1. Create a new index pipeline or load an existing one for editing.
2. Click **Add a Stage** and then **Machine Learning**.
3. In the new stage, fill in these fields:
* The model ID
* The model input
* The model output
4. Save the stage in the pipeline and index your data with it.
**Configure the query pipeline**
1. Create a new query pipeline or load an existing one for editing.
2. Click **Add a Stage** and then **Machine Learning**
3. In the new stage, fill in these fields:
* The model ID
* The model input
* The model output
4. Save the stage and then run a query by typing a search term.
5. To verify the Ray results are correct, use the **Compare+** button to see another pipeline without the model implementation and compare the number of results.
You have now successfully uploaded a Ray model to Fusion and deployed it.
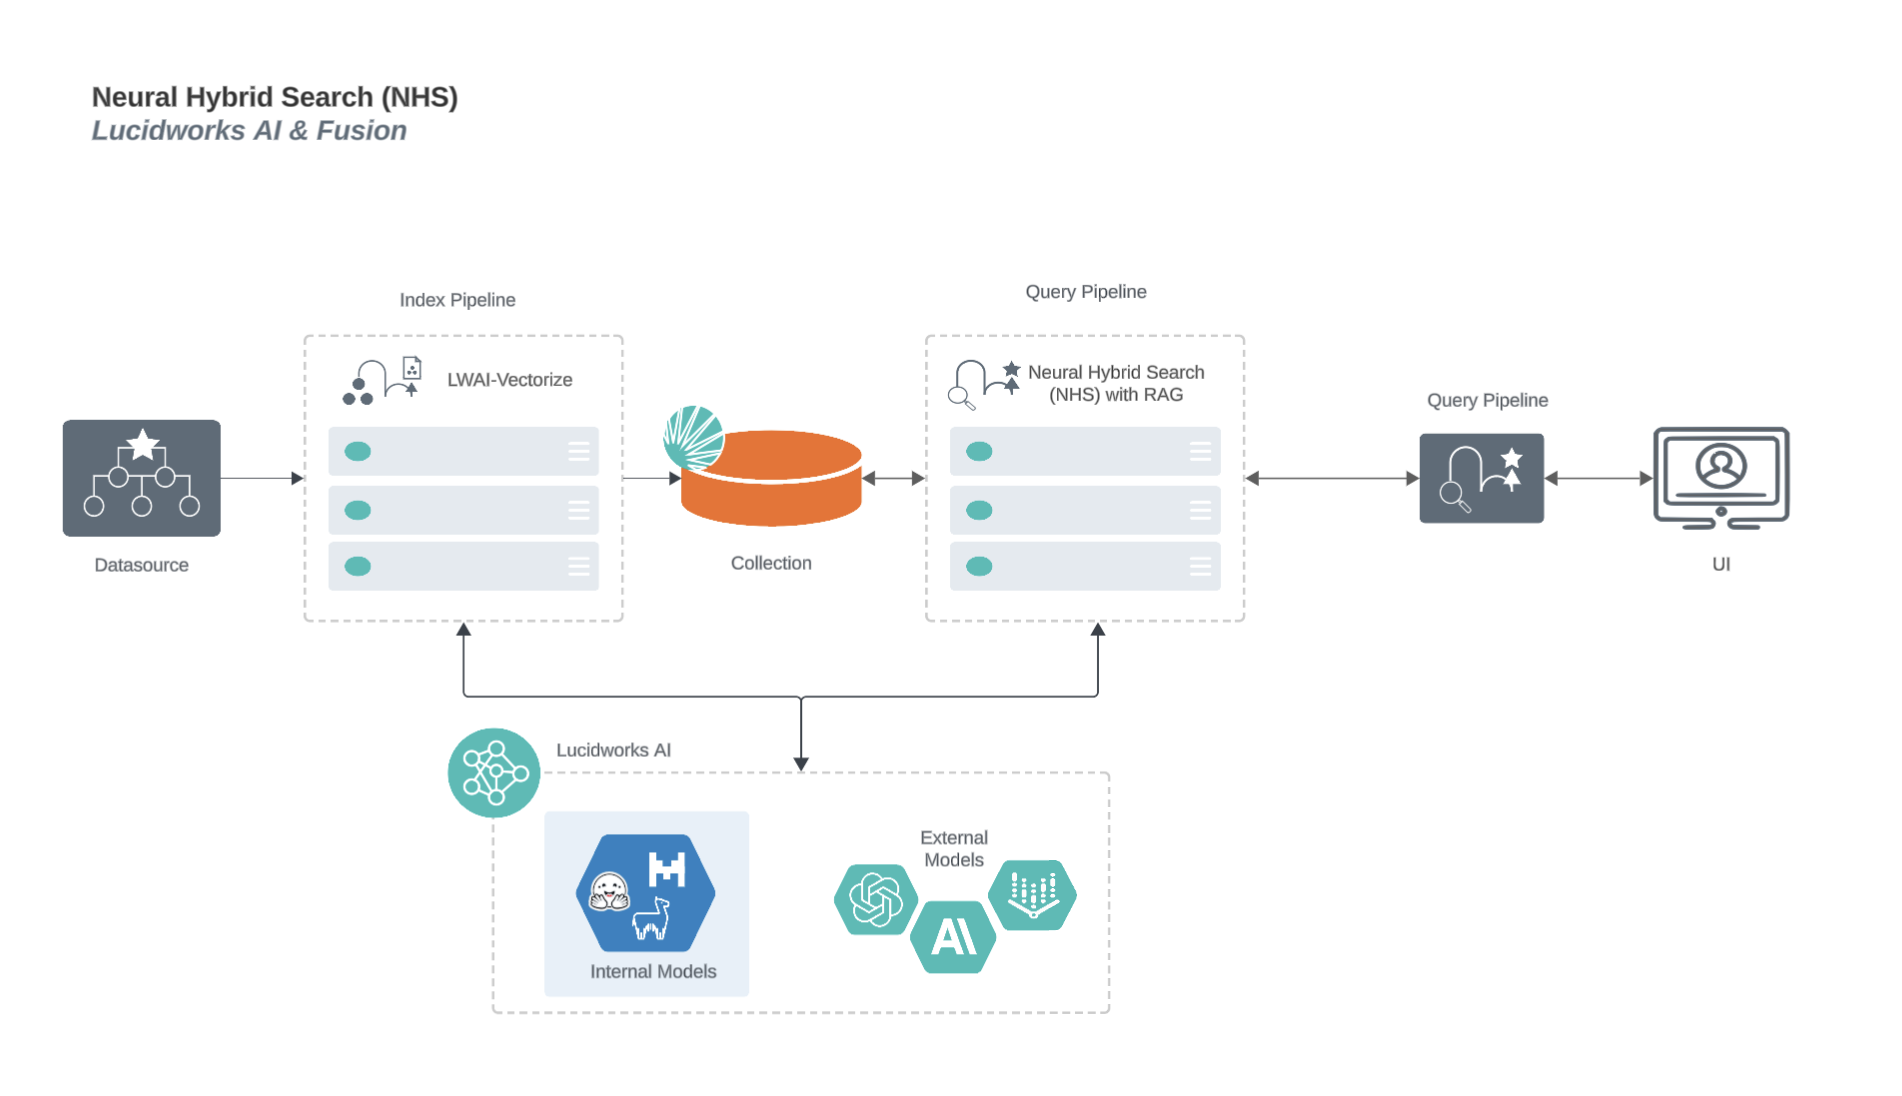 ### Neural Hybrid Search process flow for Seldon/Ray models
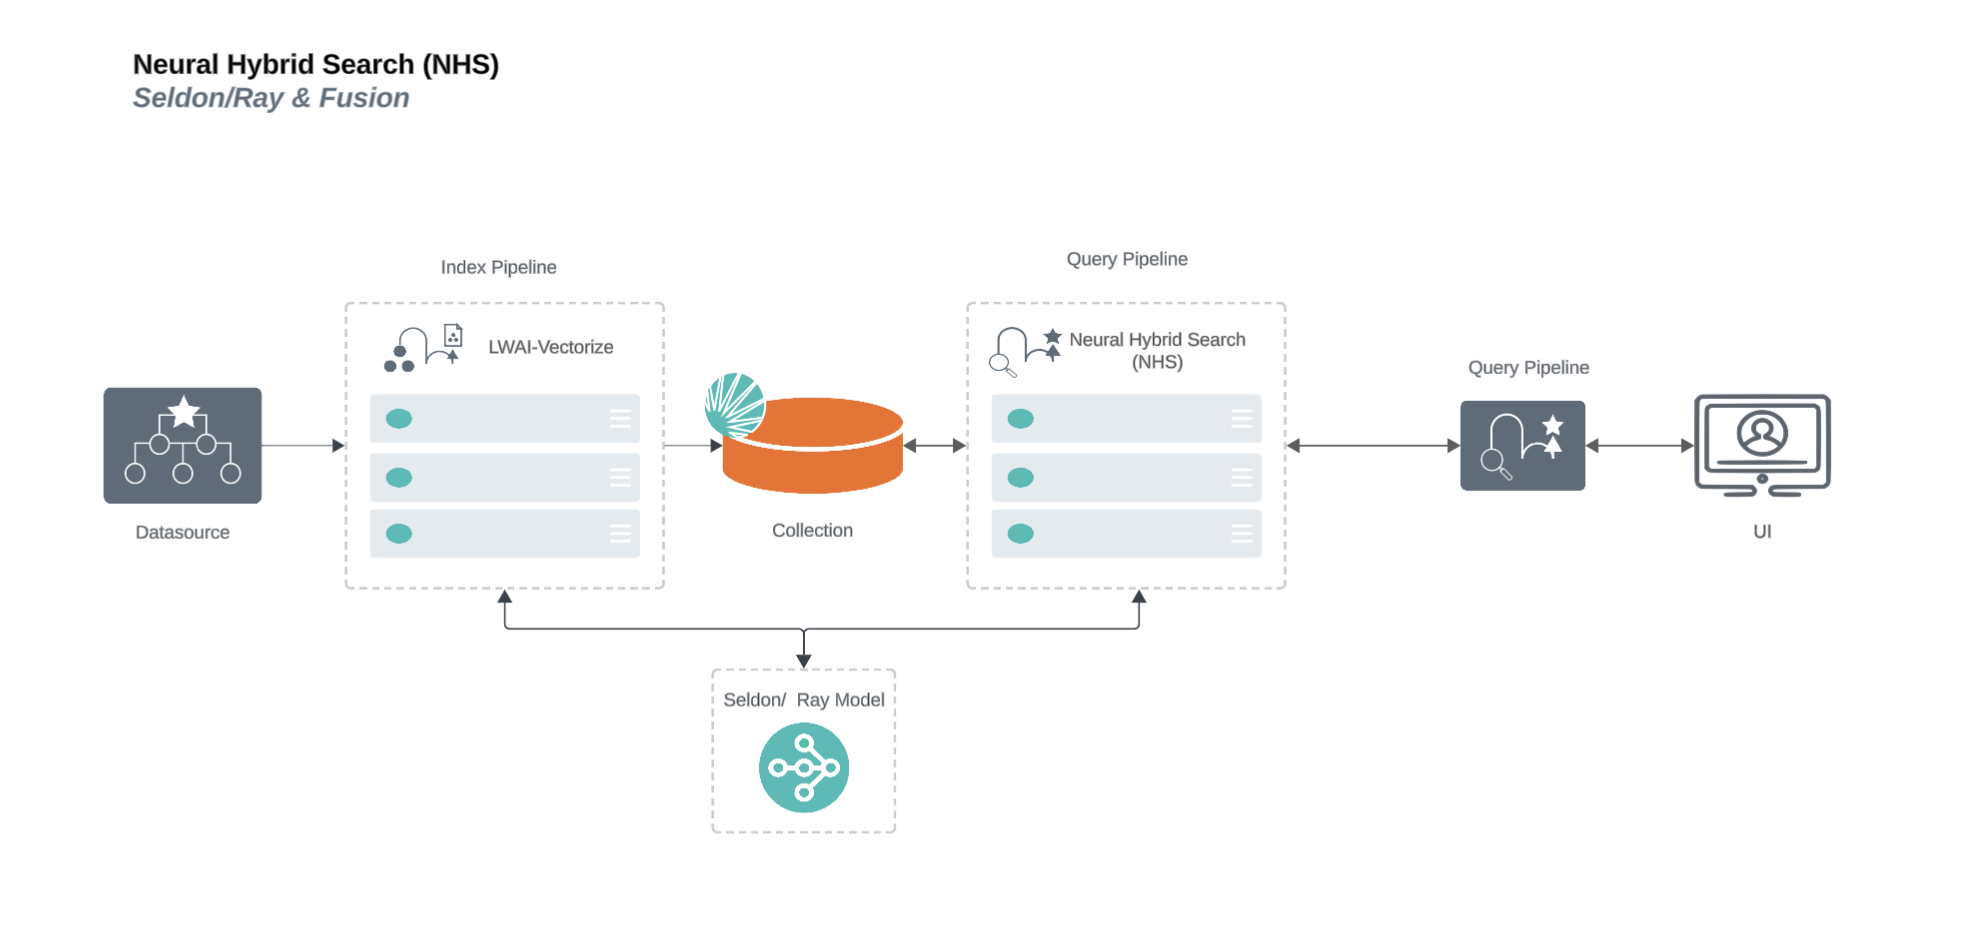 ### Neural Hybrid Search process flow for Lucidworks AI RAG use case
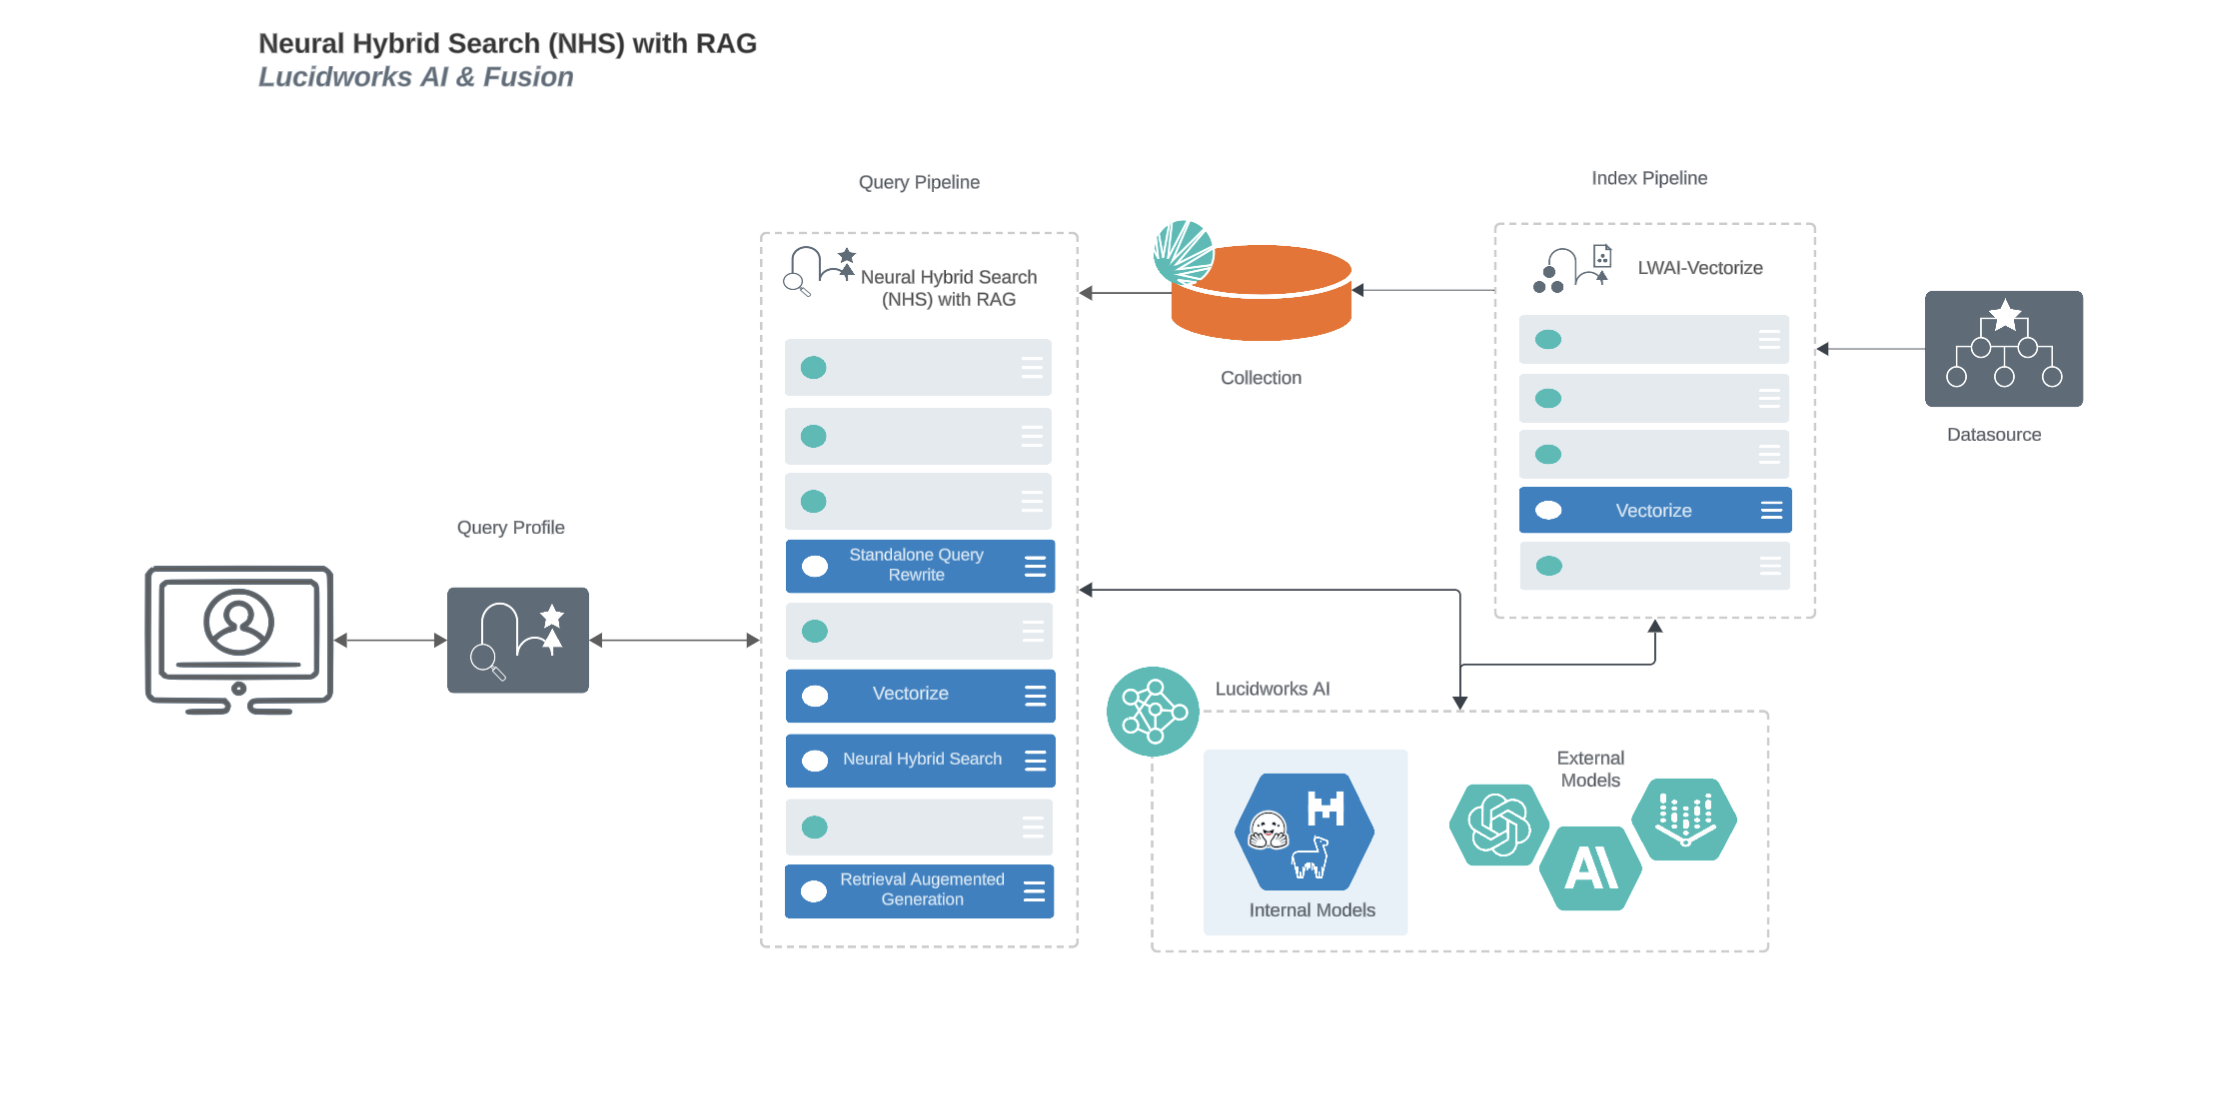 For more information, see:
* [Lucidworks Prediction API RAG use case](/docs/lw-platform/lw-ai/lw-ai-apis/lw-ai-prediction-api/rag-prediction#neural-hybrid-search-process-flow-with-retrieval-augmented-generation-rag)
* [Lucidworks Async Prediction API RAG use case](/docs/lw-platform/lw-ai/lw-ai-apis/lw-ai-async-prediction-api/rag-async#neural-hybrid-search-process-flow-with-retrieval-augmented-generation-rag)
## Learn more
For more information, see:
* [Lucidworks Prediction API RAG use case](/docs/lw-platform/lw-ai/lw-ai-apis/lw-ai-prediction-api/rag-prediction#neural-hybrid-search-process-flow-with-retrieval-augmented-generation-rag)
* [Lucidworks Async Prediction API RAG use case](/docs/lw-platform/lw-ai/lw-ai-apis/lw-ai-async-prediction-api/rag-async#neural-hybrid-search-process-flow-with-retrieval-augmented-generation-rag)
## Learn more