> ## Documentation Index
> Fetch the complete documentation index at: https://doc.lucidworks.com/llms.txt
> Use this file to discover all available pages before exploring further.
# The Query Workbench
export const LwTemplate = ({title = "Key questions to get you started", icon = "sparkles", cta = "Powered by Agent Studio", linkHref = "https://lucidworks.com/demo/?utm_source=docs&utm_medium=referral&utm_campaign=docs_cta_ai"}) => {
const [isLoaded, setIsLoaded] = useState(false);
useEffect(() => {
const timer = setTimeout(() => {
setIsLoaded(true);
}, 500);
return () => clearTimeout(timer);
}, []);
return
{isLoaded && `
}} />}
Powered by Lucidworks Agent Studio
;
};
[localhost link]: http://localhost:3000/docs/5/fusion/getting-data-out/query-basics/query-workbench
[mintlify link]: https://doc.lucidworks.com/docs/5/fusion/getting-data-out/query-basics/query-workbench
[old doc.lw link]: https://doc.lucidworks.com/fusion/5.9/10918
The Query Workbench is where you edit query pipeline stages, results parameters, and more, then preview the impacts of the changes in real time before saving them. Relevancy tools such as boosting and blocking can be accessed and altered through the Query Workbench. The Query Workbench streamlines the process of querying indexed results and fine-tuning Query Pipelines to surface the results that best satisfy the end user’s needs.
See the [Query Language Cheat Sheet](/docs/5/fusion/getting-data-out/query-basics/query-language-cheat-sheet) for help constructing queries.
With this sandbox paradigm, you can experiment with query pipelines without consequence because Fusion uses a copy of a pipeline to simulate the new results, and it is not permanently modified in the collection until you click **Save**.
## Query pipelines and pipeline stages
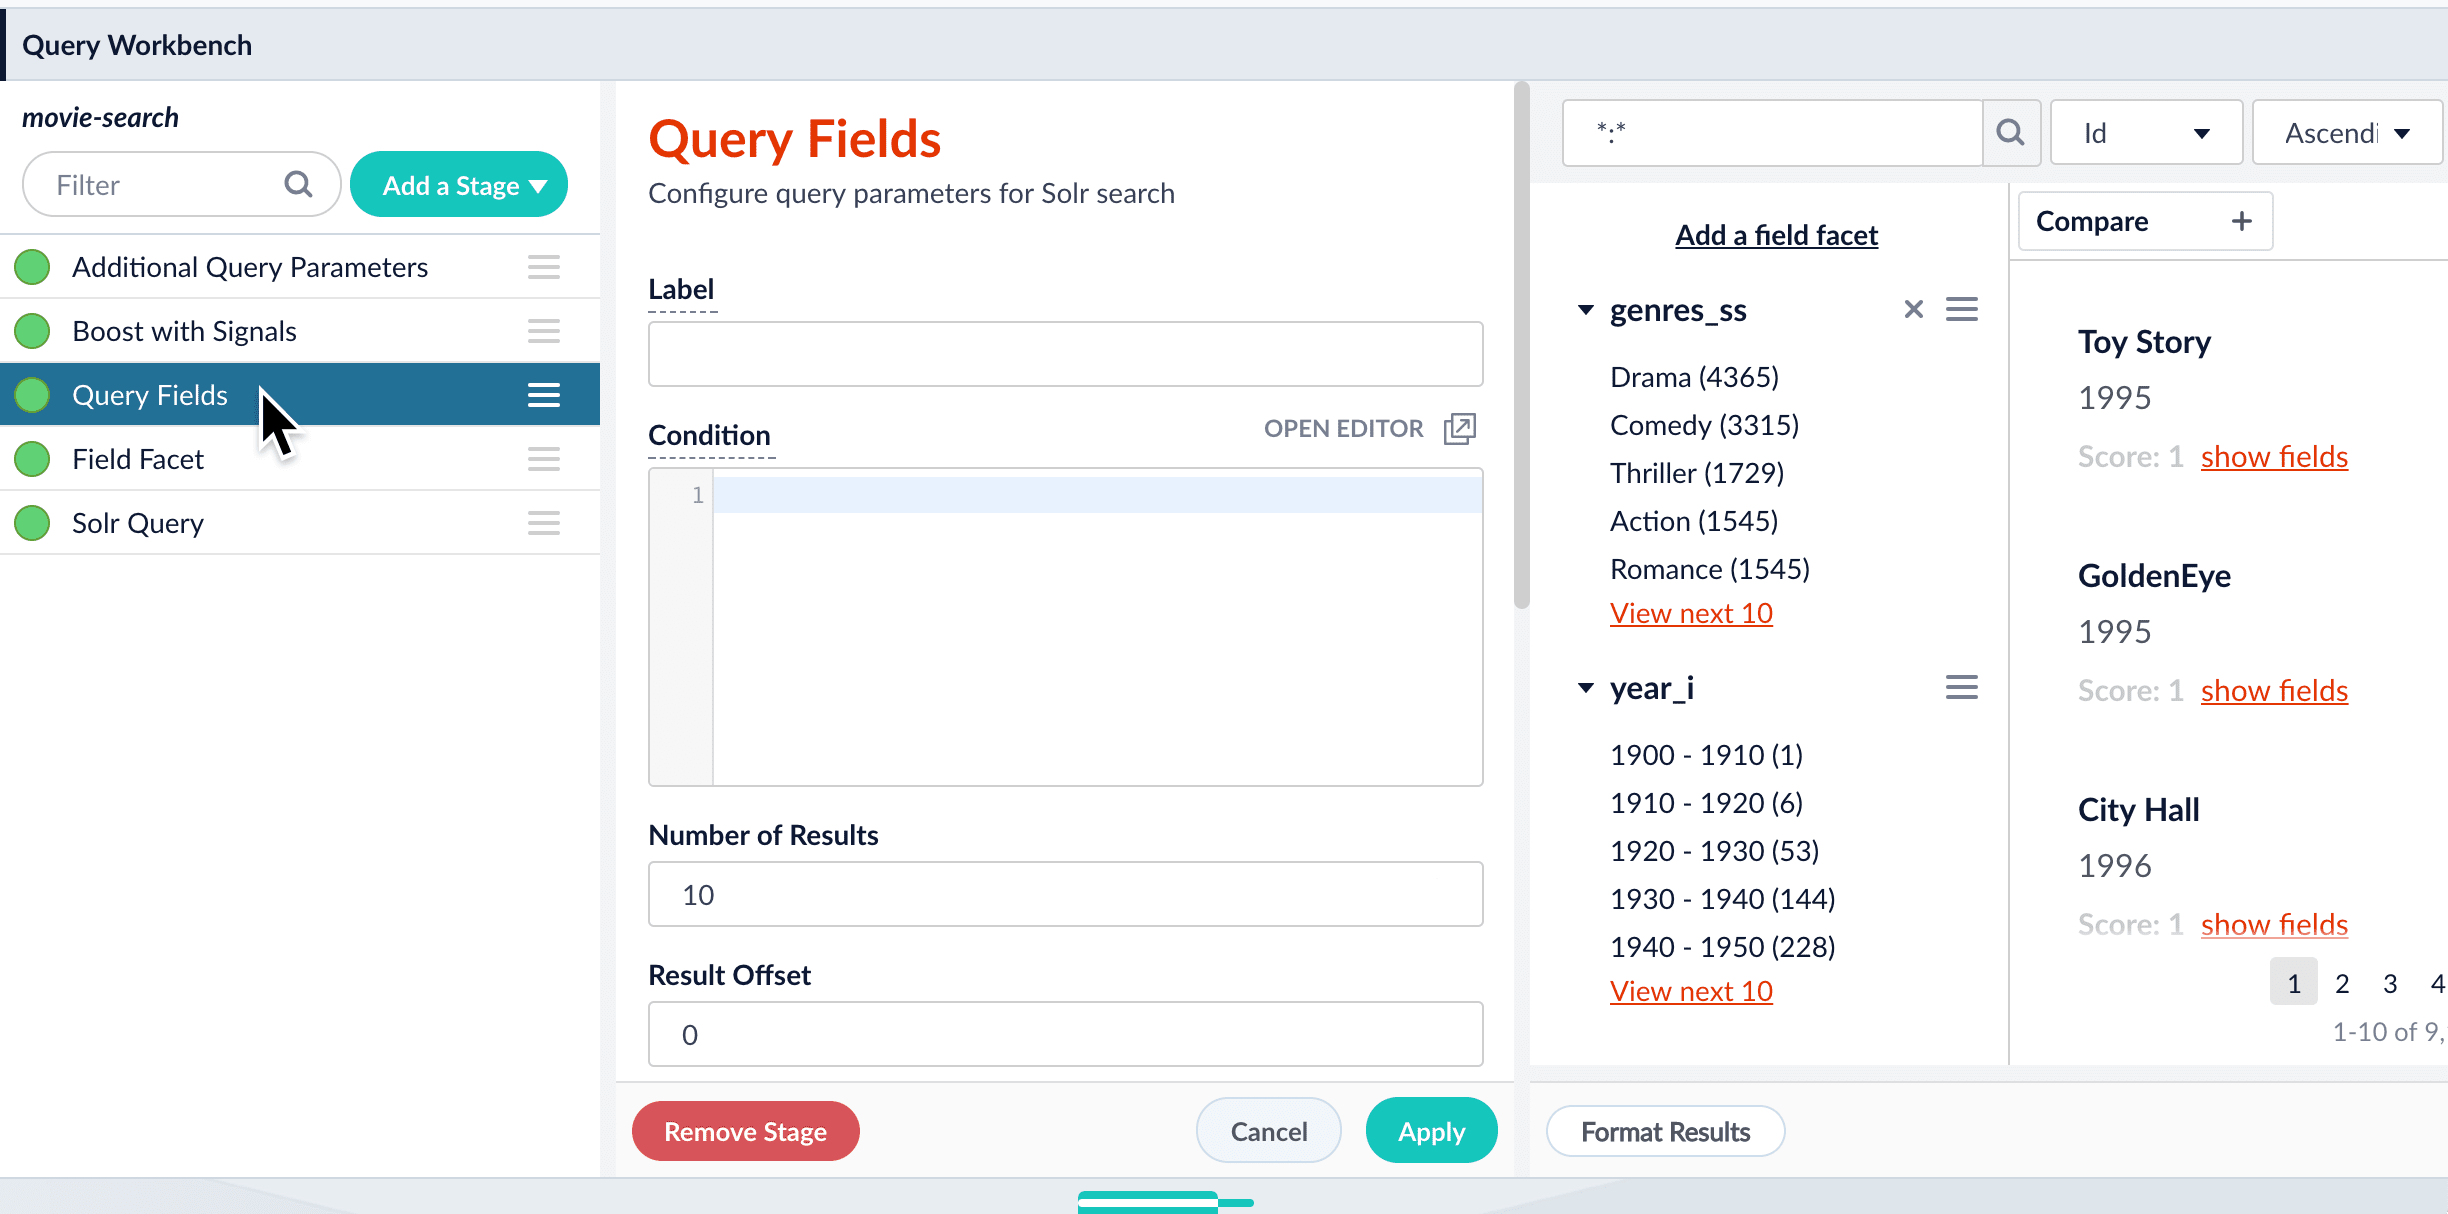
[Query pipelines](/docs/5/fusion/getting-data-out/query-basics/query-pipelines/overview) work by processing search requests and returning an ordered list of matching documents. Each pipeline consists of a series of query stages that can be added, ordered, and configured using the Query Workbench.
Select any stage in the pipeline to open its configuration panel:
## Boosting and blocking
As you search your data and inspect the results, you can manipulate the rankings of individual documents. Boosting a document raises its ranking, while blocking a document removes it from search results.
Boosting and blocking affects the results for specific queries. For example, when you search for "citizen" and boost the document for "Citizen Kane", your end users will see that title boosted to the top when they also search for "citizen", but not necessarily when they search for "kane".
The Query Workbench provides convenient buttons for instantly blocking or boosting the documents that you see in the preview panel. Clicking **Boost** automatically adds the [Boost Documents stage](/docs/5/fusion/reference/config-ref/pipeline-stages/query-stages/boost-documents-query-stage) to your query pipeline, with a boost rule that matches your query and the document you clicked. Likewise, clicking **Block** adds and configures the [Block Documents stage](/docs/5/fusion/reference/config-ref/pipeline-stages/query-stages/block-documents-query-stage).
## Compare mode
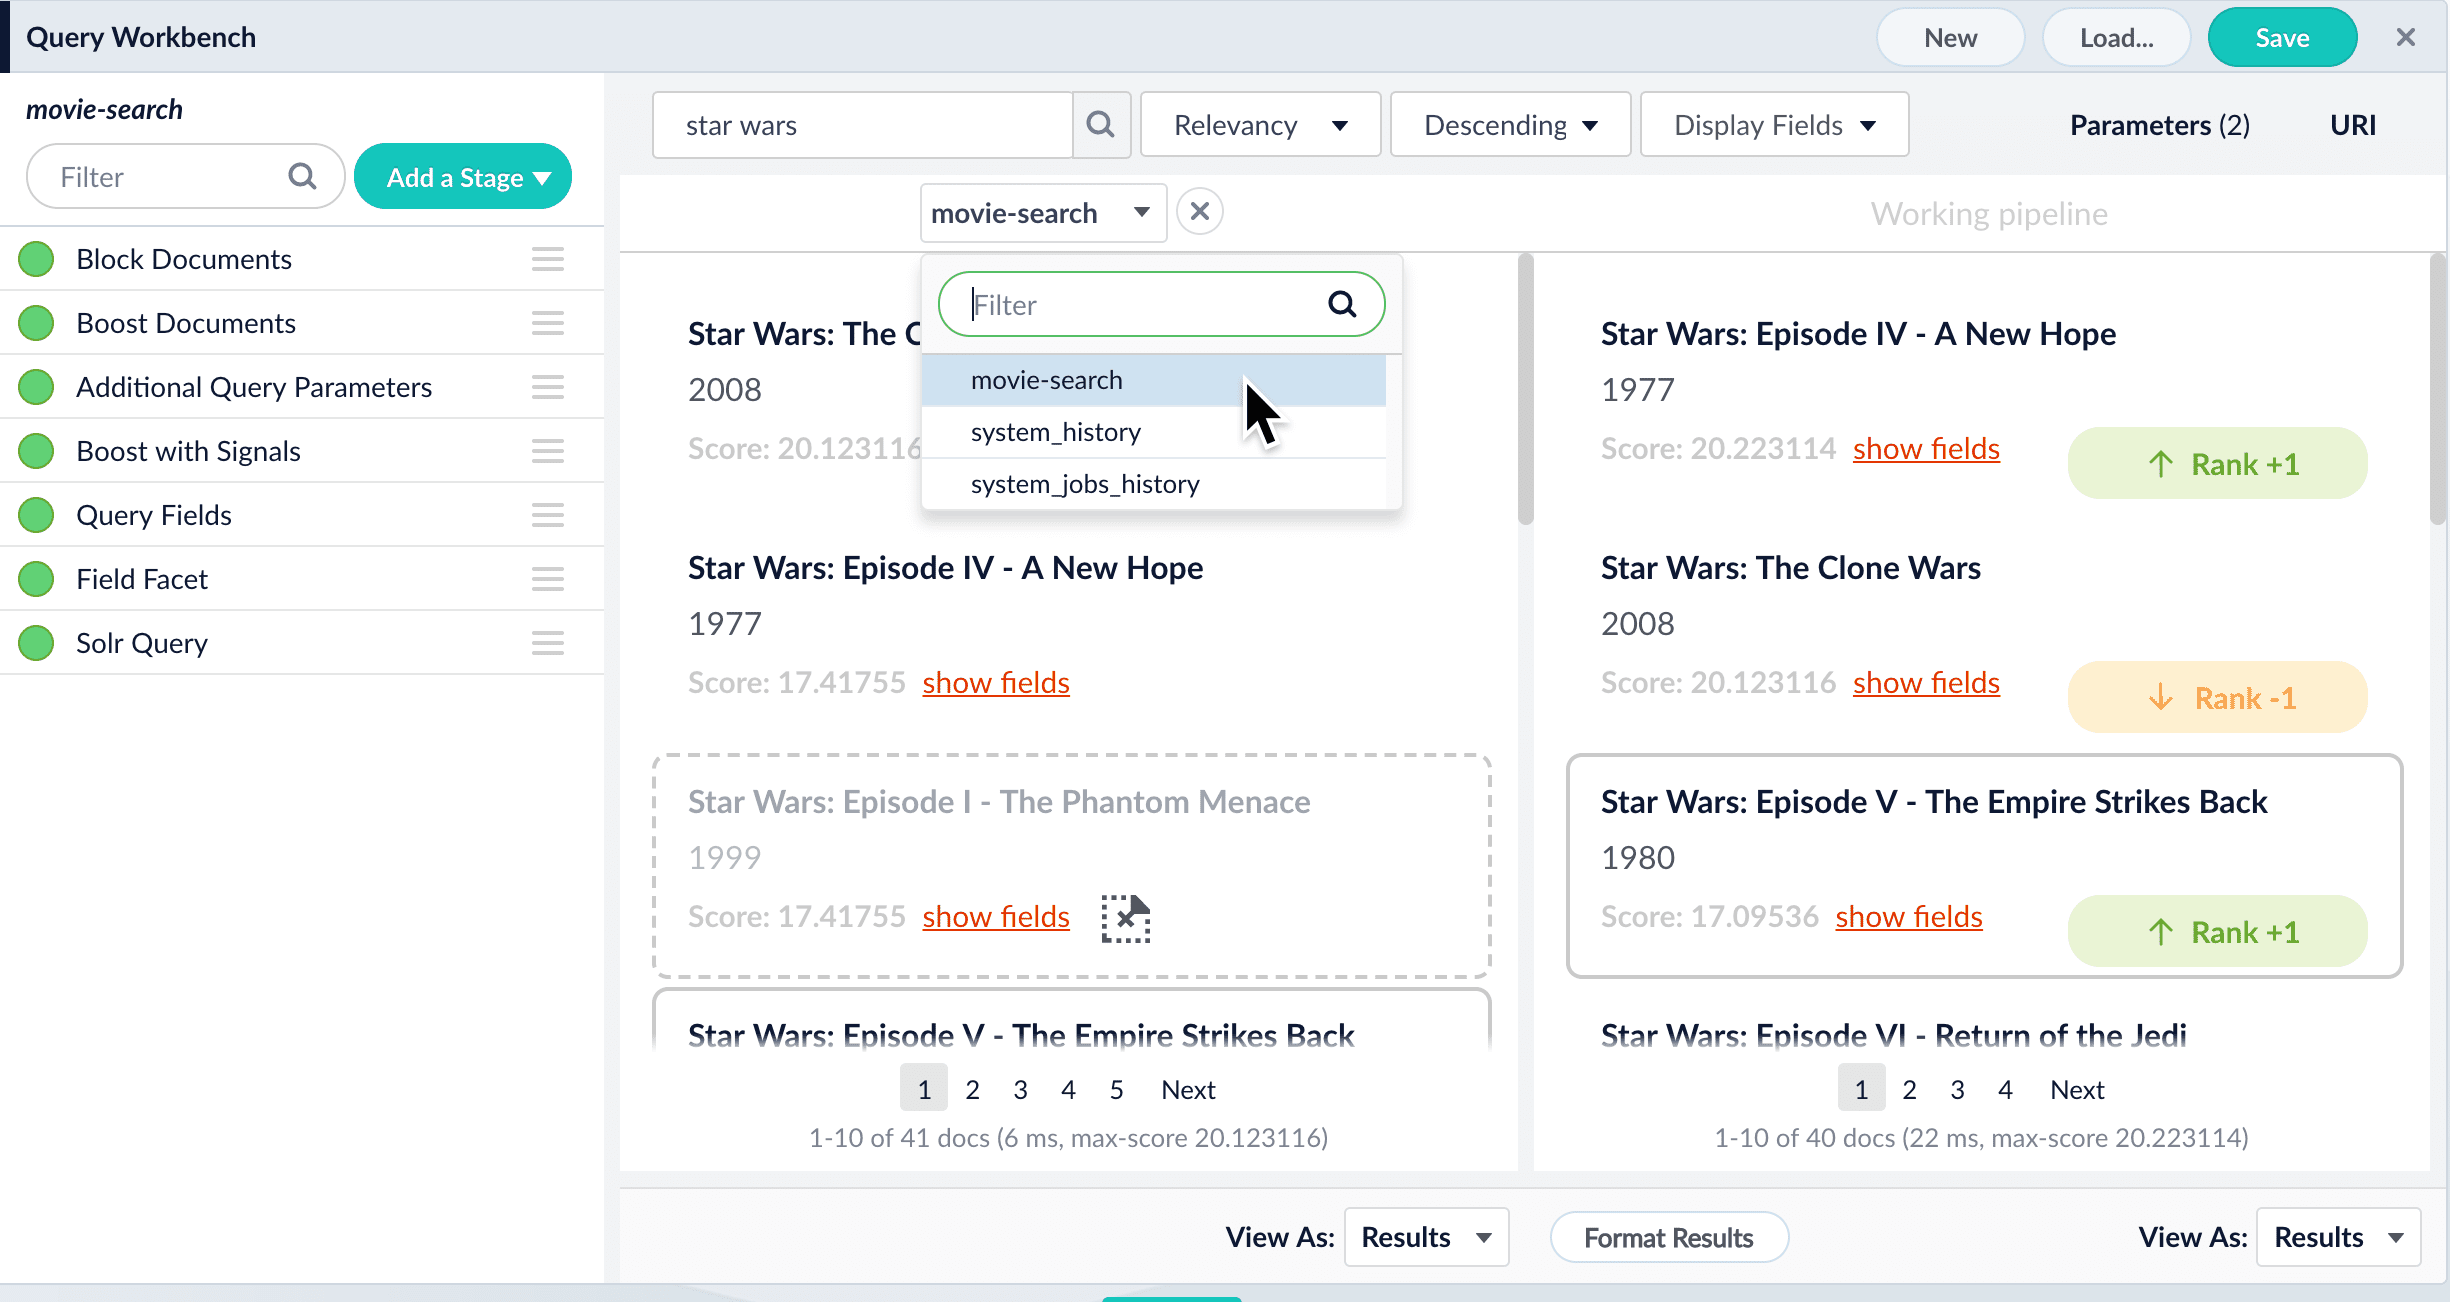
Compare mode allows you to compare search results using two different query pipelines, or compare search results from the original query pipeline and the copy being modified in the Query Workbench. On the right is the working pipeline, which you can edit. On the left is one of your saved pipelines.
## Learn more
1. How to boost a document in the Query Workbench
2. In the preview panel, hover over the document you want to boost.
3. Click **Boost**.
The preview panel automatically updates the rankings of the search results, and tags the differences:
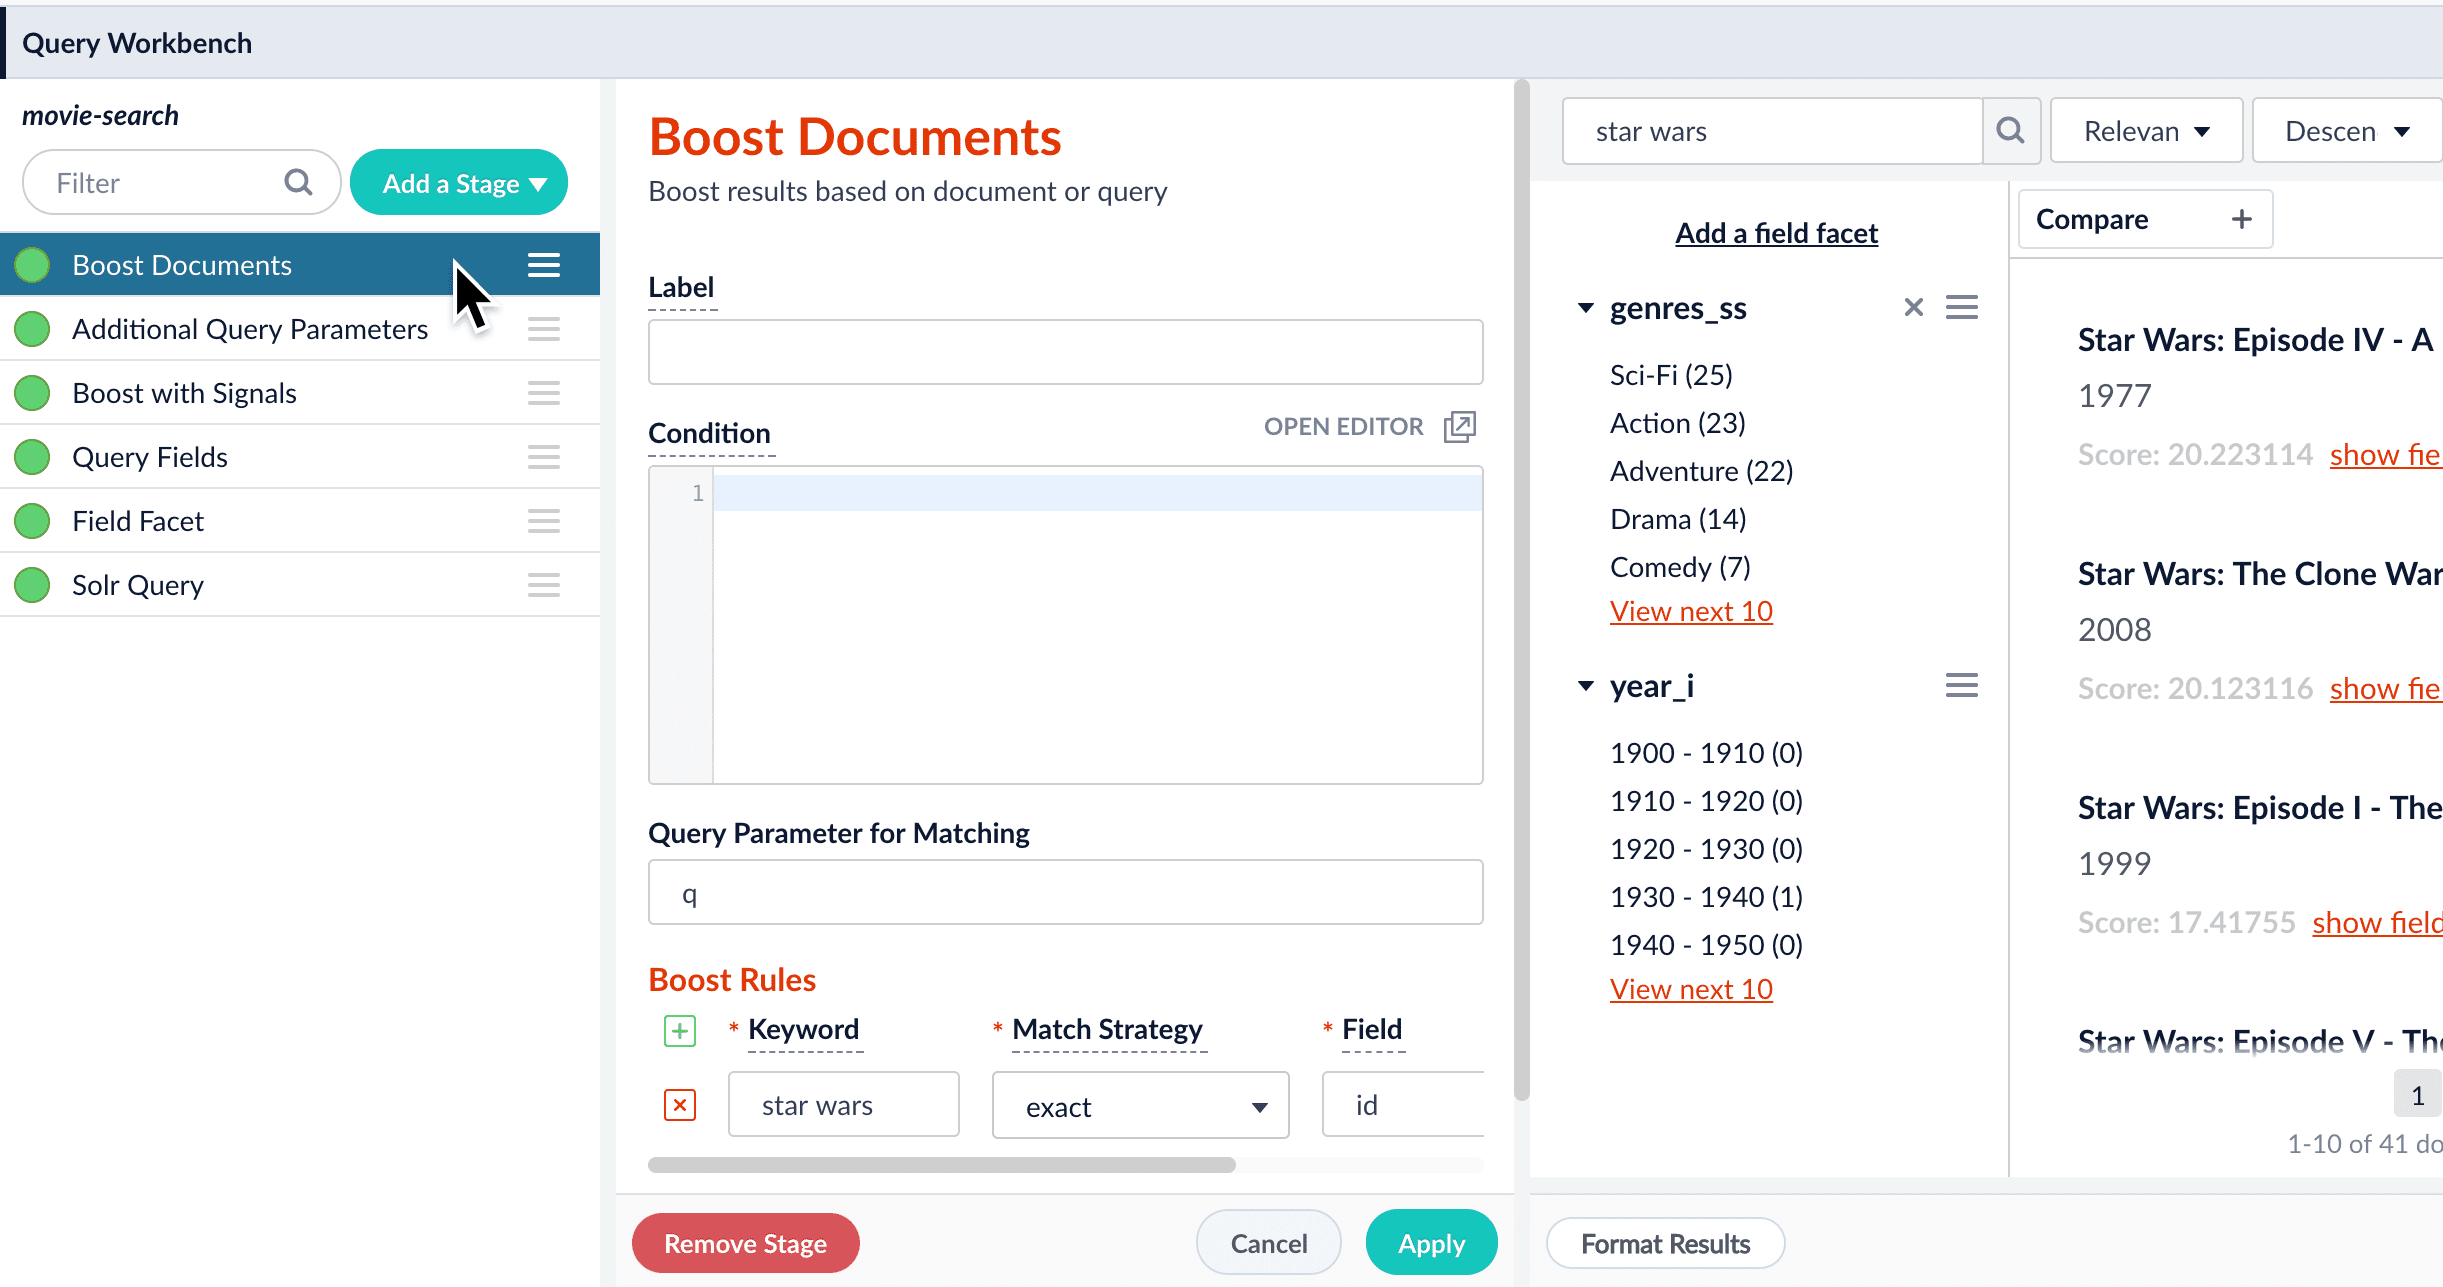
Notice that the Boost Documents stage is now in our pipeline. You can click this stage to view the boost rules you have added. This is also where you can remove boost rules:
4. When you are satisfied with the results, save the query pipeline.
**How to block a document in the Query Workbench**
1. In the preview panel, hover over the document you want to block.
2. Click **Block**
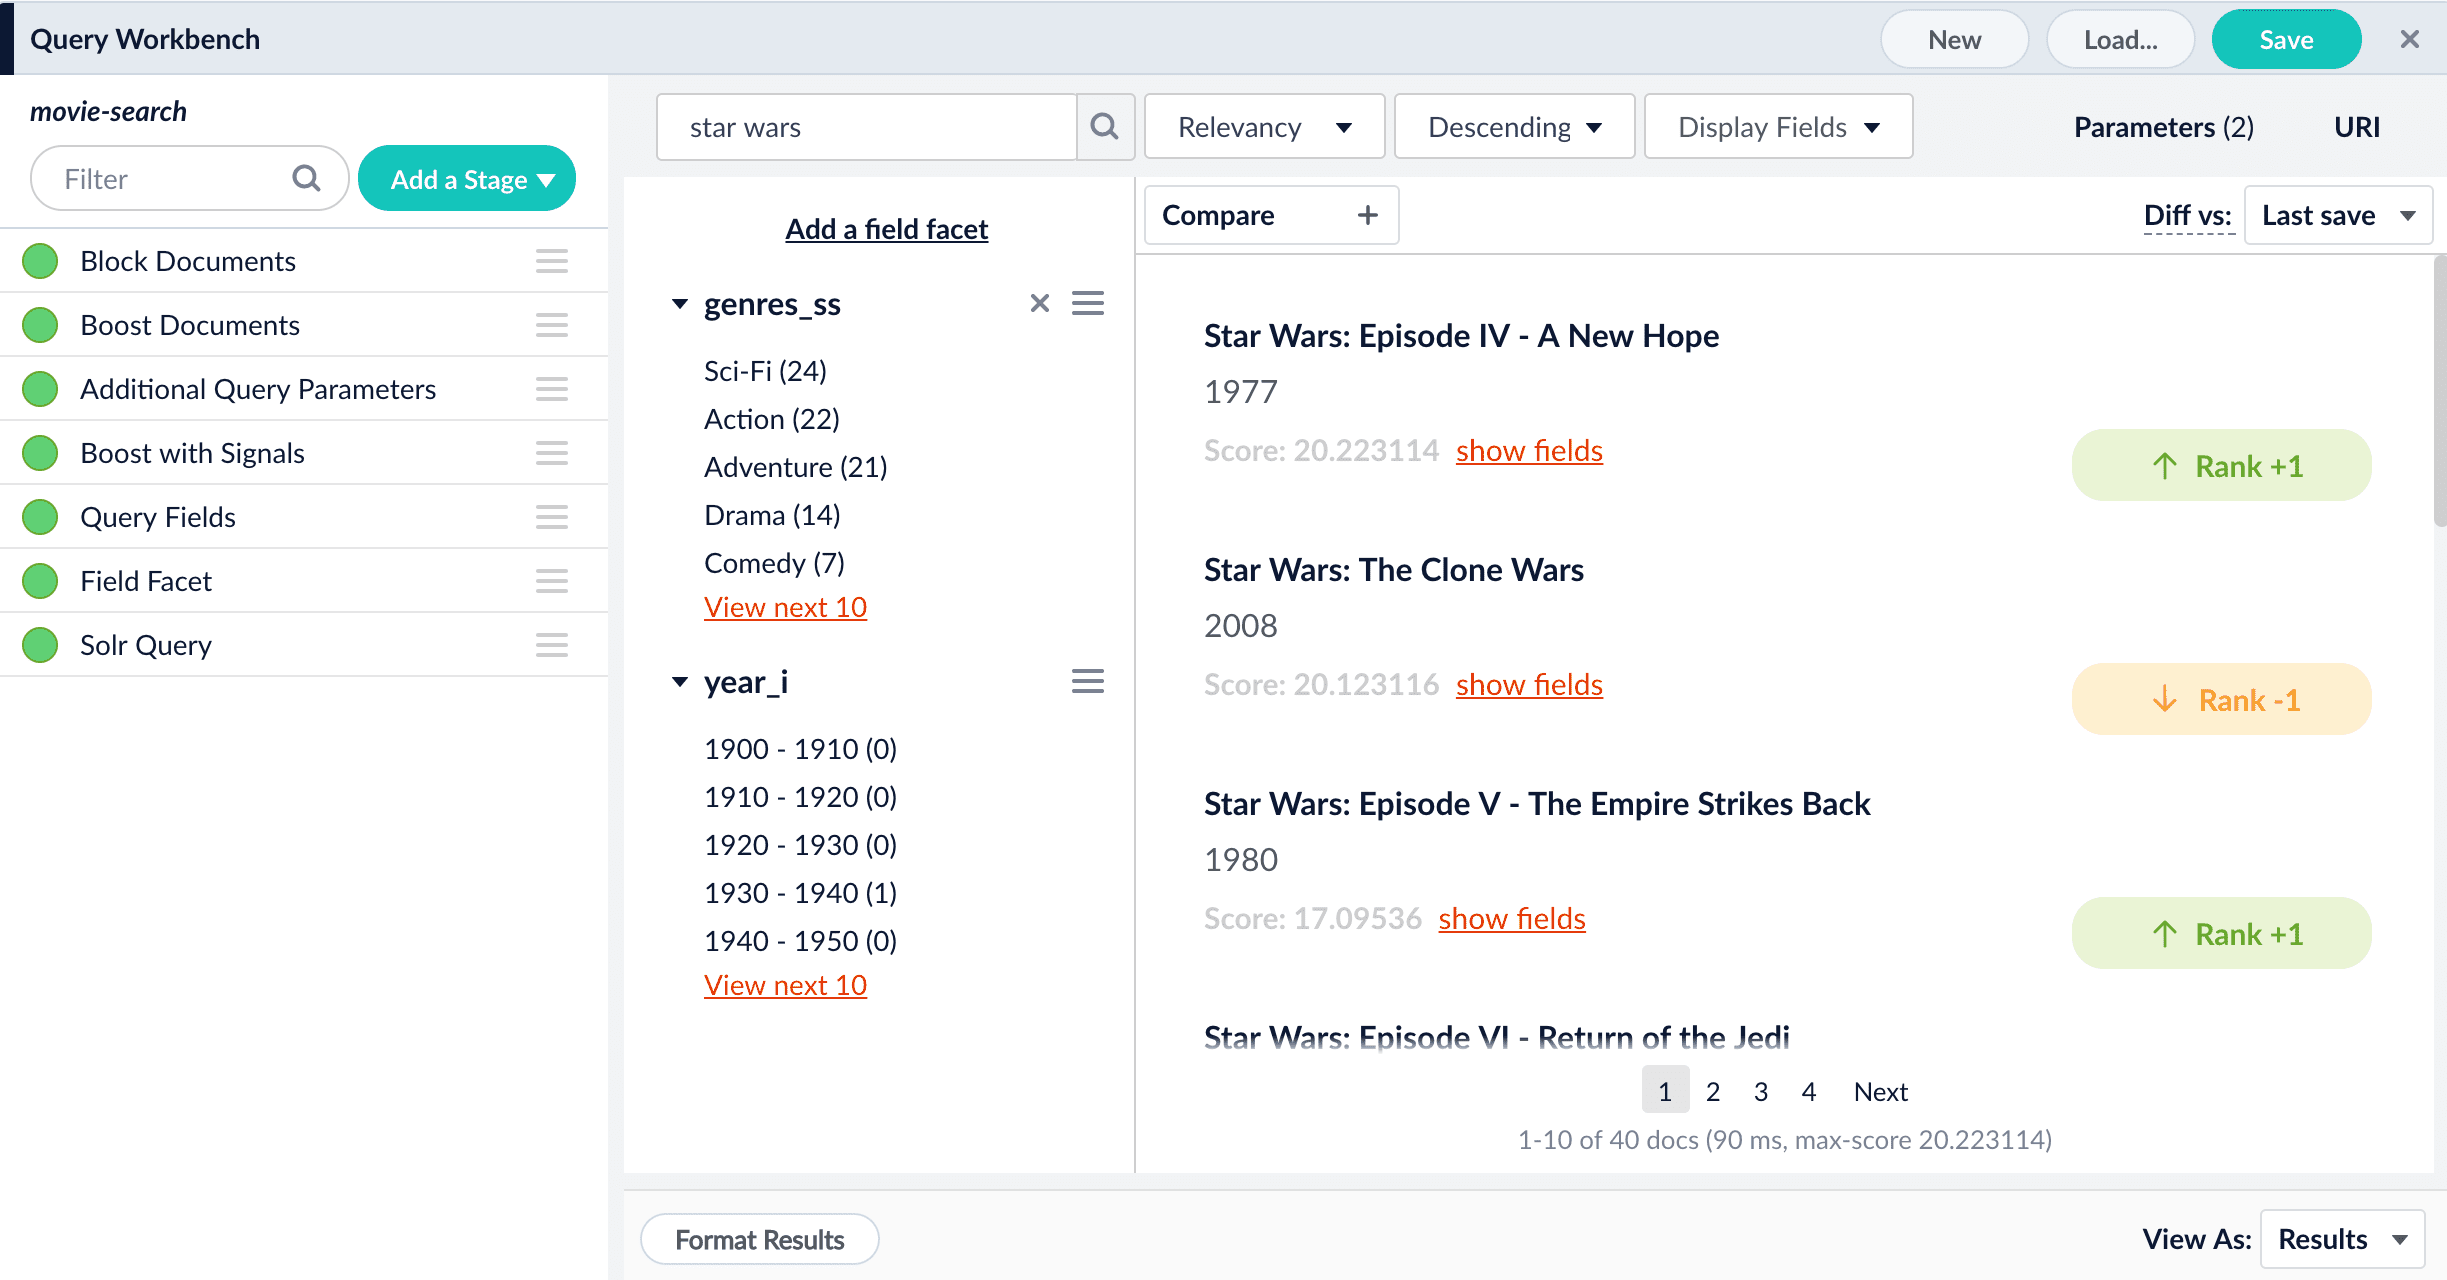
The preview panel automatically updates the rankings of the search results, and tags the differences.
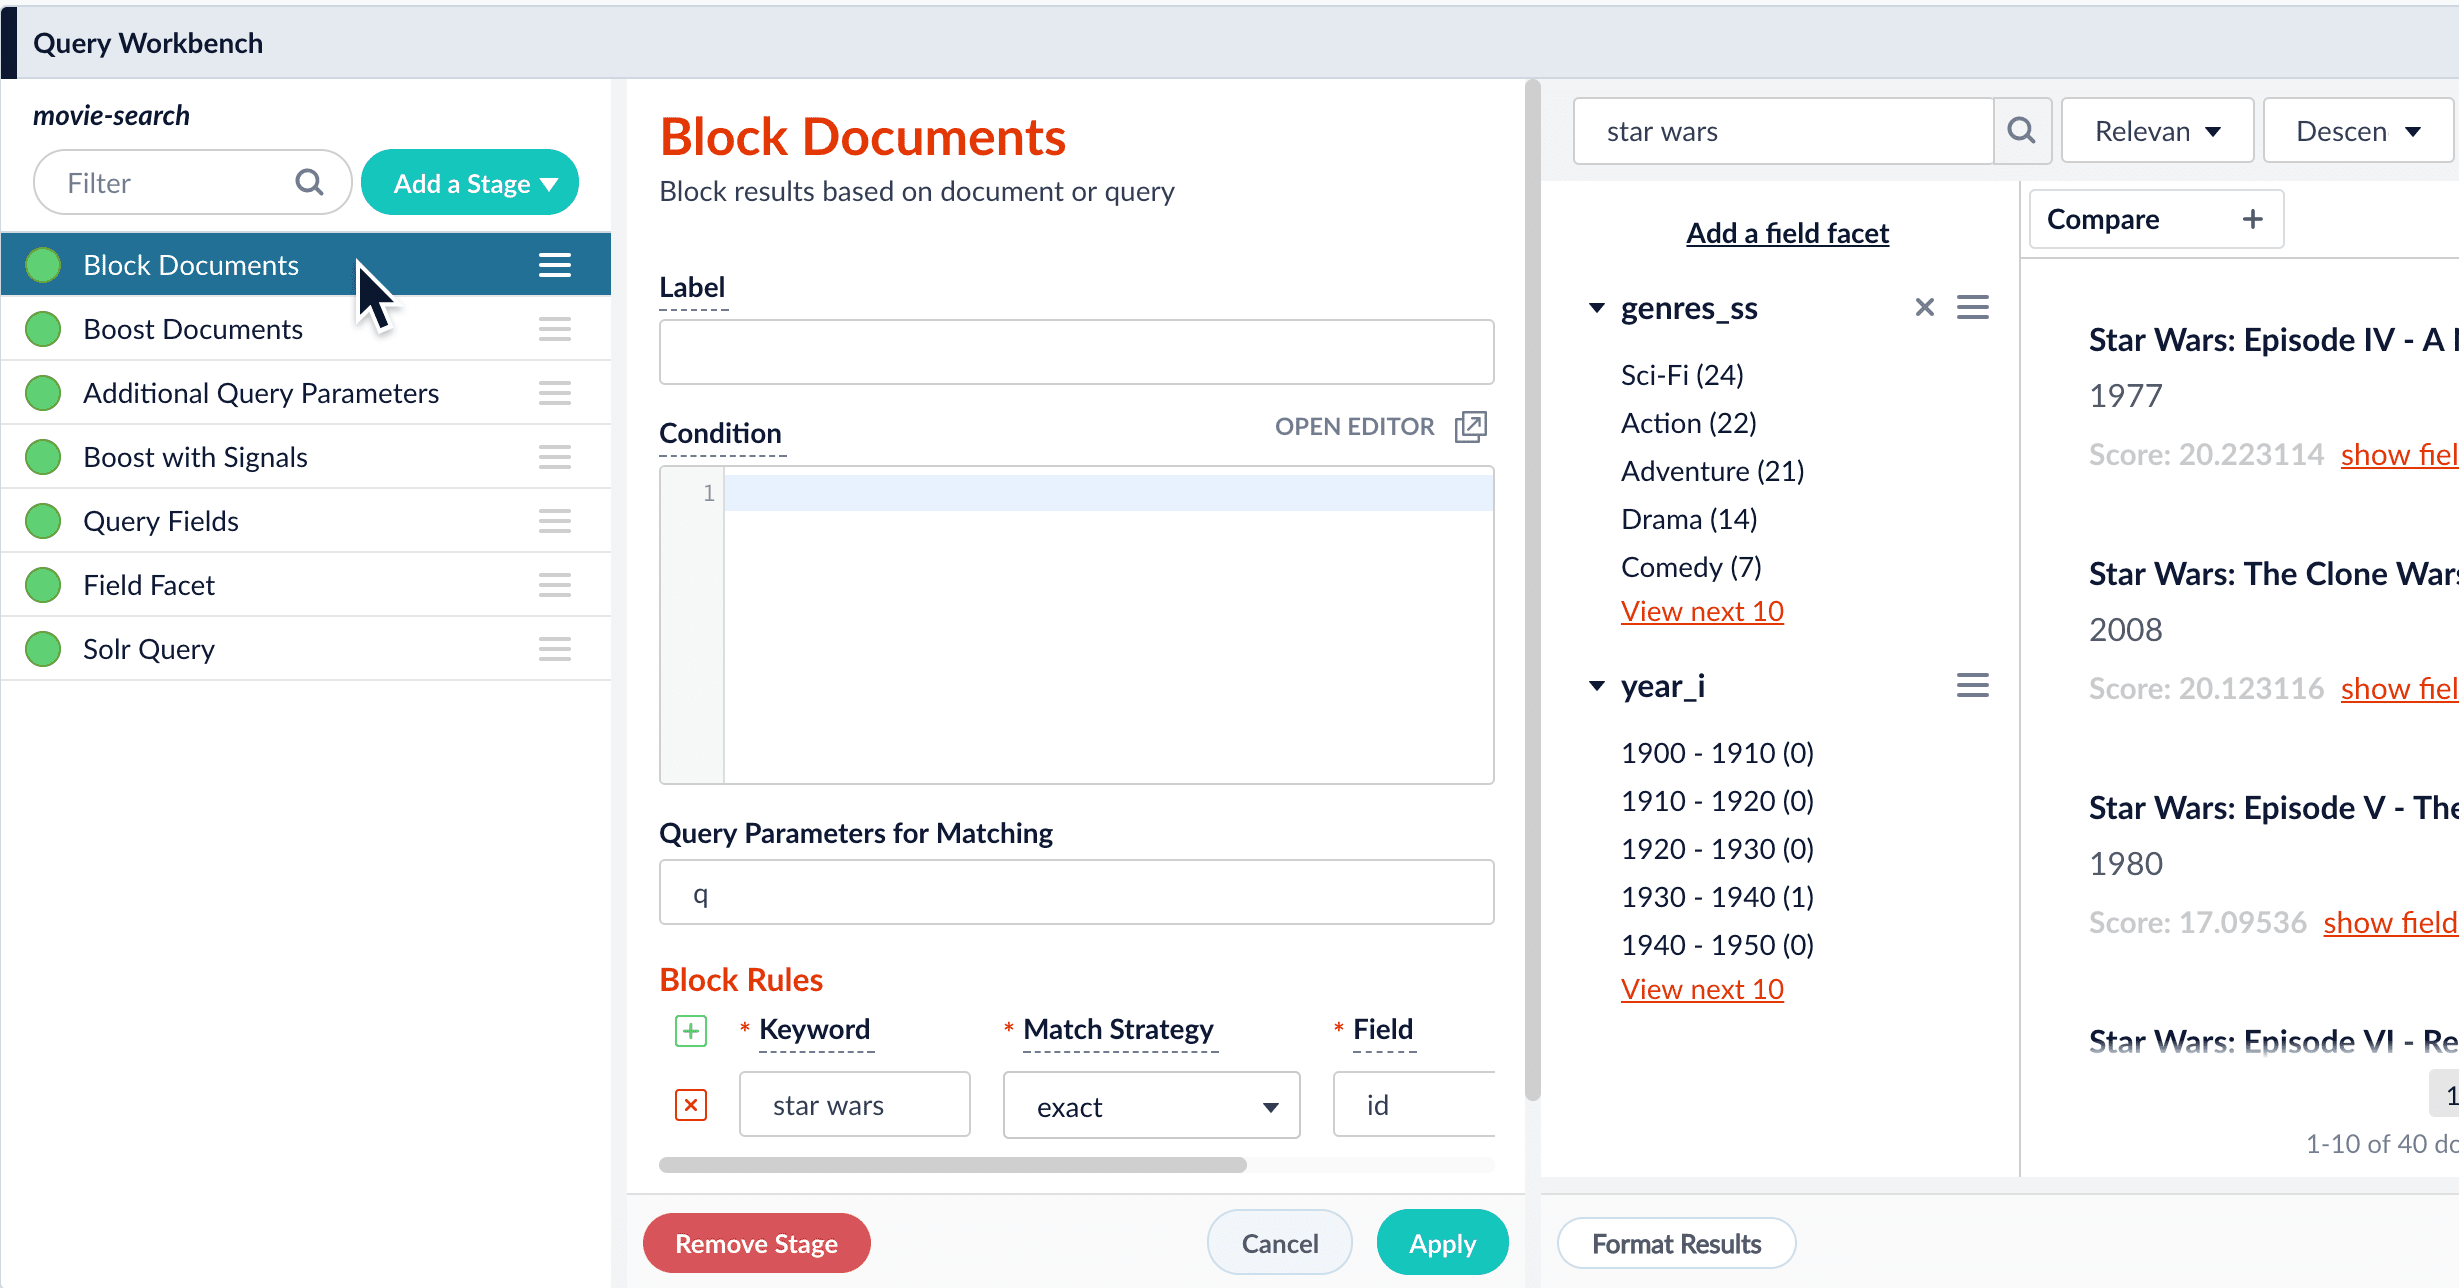
Notice that the Block Documents stage is now in our pipeline. You can click this stage to view the block rules you have added. This is also where you can remove block rules:
3. When you are satisfied with the results, save the query pipeline.
The Query Workbench allows you to edit the search parameters. Click **Parameters** to display the current search parameters and the **Edit parameters** button:
Then, click **Edit parameters** to open the "Parameters and Values" window where you can add, modify, or remove search parameters:
1. In the Query Workbench, open the query pipeline you want to modify.
2. Click **Add a Stage** and select a stage that supports asynchronous processing:
* Active Directory Security Trimming
* Security Trimming
* Boost with Signals
* Apply Rules
* JDBC Lookup
* LWAI Vectorize Query
* Solr Subquery
* LWAI Prediction Query
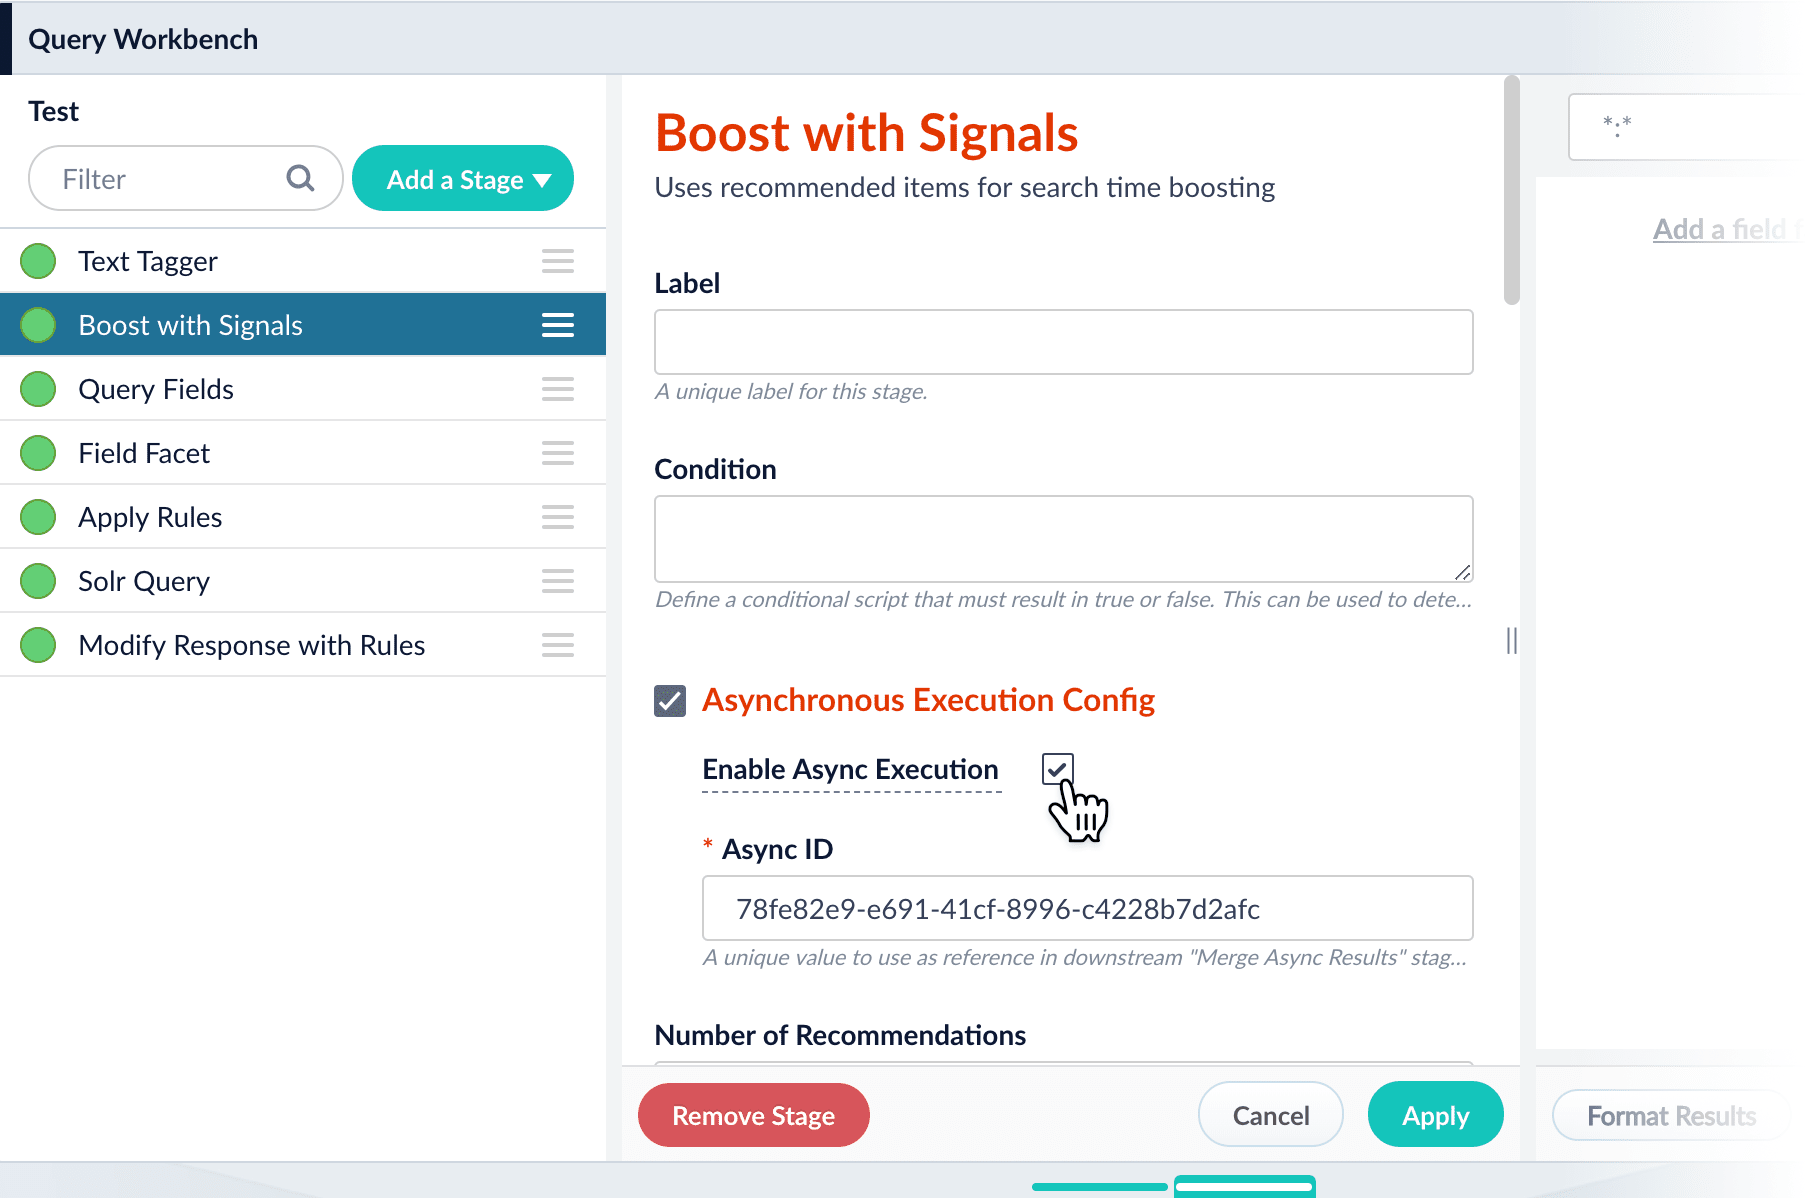
3. In the stage configuration panel, select **Asynchronous Execution Config**.
4. Select **Enable Async Execution**.\\
Fusion automatically assigns an **Async ID** value to this stage. Change this to a more memorable string that describes the asynchronous stages you are merging, such as `signals` or `access_control`.
5. Copy the **Async ID** value.
6. Click **Apply**.\
Verify that the stage is in the correct position in your pipeline.
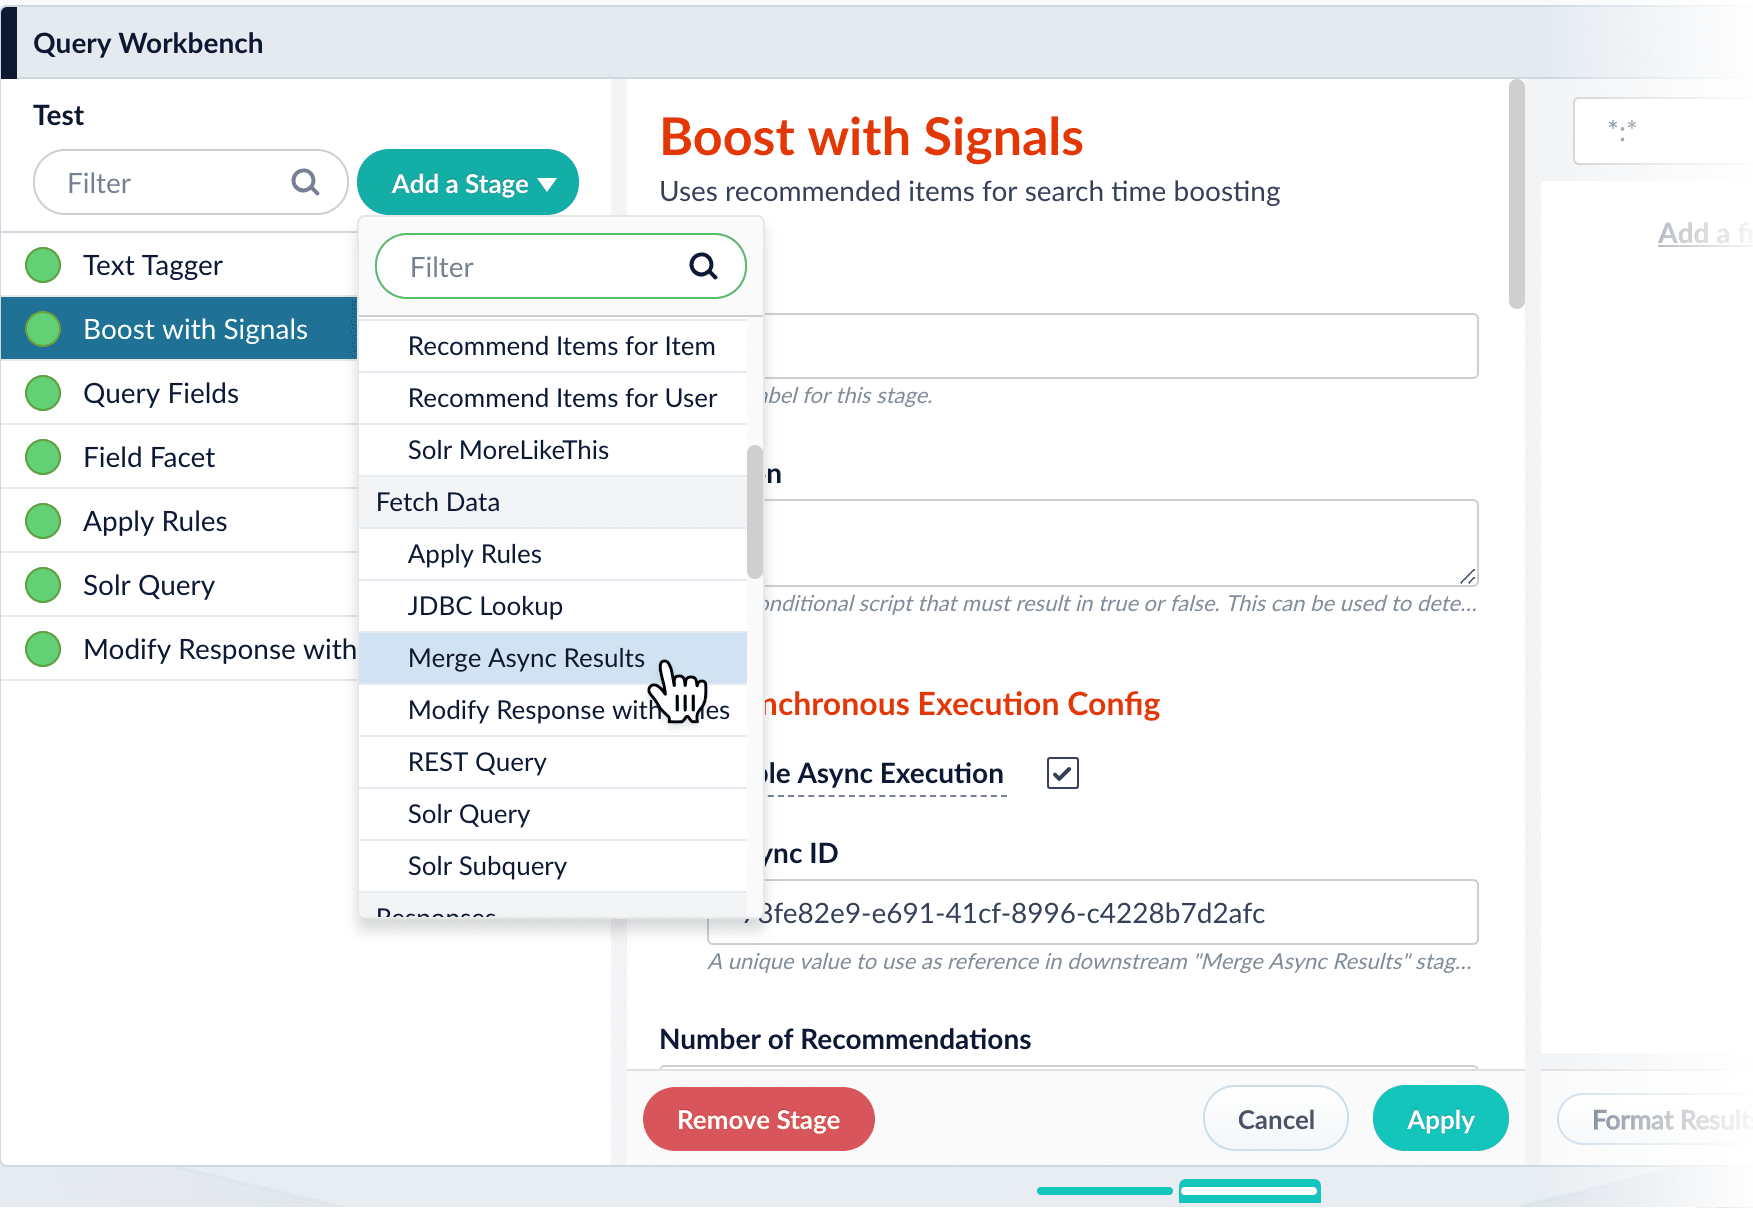
7. Click **Add a Stage** and select the Merge Async Results stage.\\
8. In the stage configuration panel, click the Add button next to **Async IDs**.
9. Paste the ID from the asynchronous query stage into the new ID field.
When using multiple asynchronous stages, the order in which IDs are entered here is the order in which they are joined back into the pipeline.
10. Click **Apply**.\
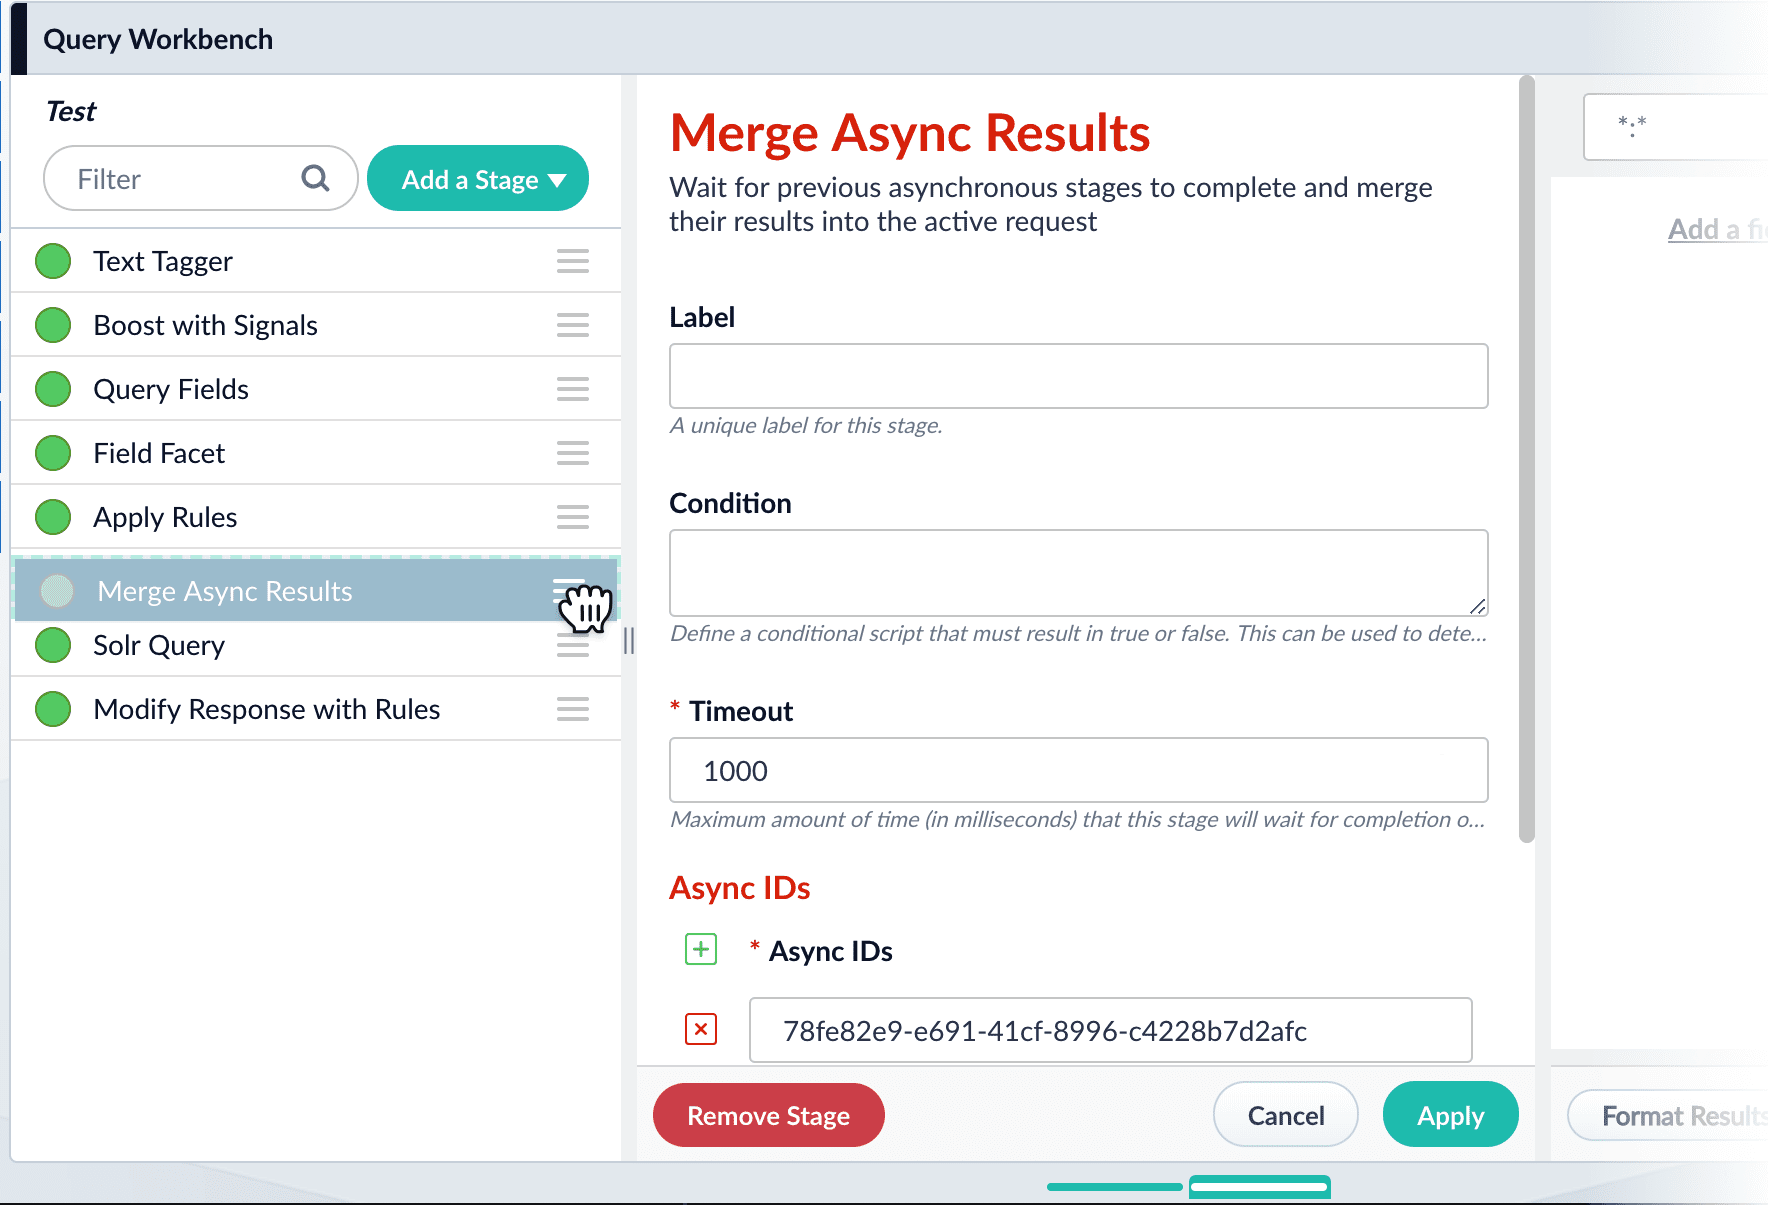
The Merge Async Results stage is now the first stage in the pipeline.
11. Drag the Merge Async Results stage down so that it appears immediately before the Solr Query stage:
12. Click **Save**.
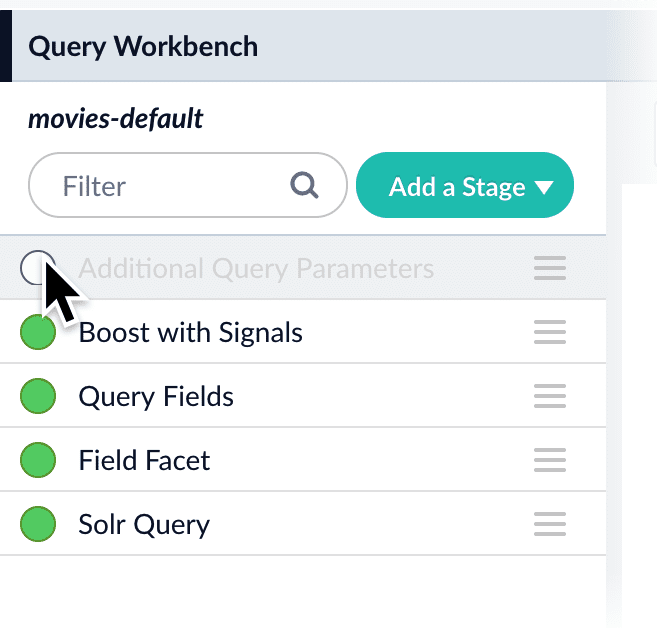
By default, every stage in a query pipeline is enabled. While working with a query pipeline, it can be helpful to disable stages without removing them completely. This allows you to preserve a stage’s configuration while observing how the search results change in its absence. You can re-enable the stage at any time. When you save a query pipeline, the enabled/disabled state of each stage is also saved.
Click the circle next to any stage in order to enable or disable it.
Federated search lets you query across multiple collections in Fusion. This is useful if you keep separate data collections for security or compliance reasons or maintain different collections based on data type.
1. In the Fusion workspace, navigate to **Querying > Query Workbench**.
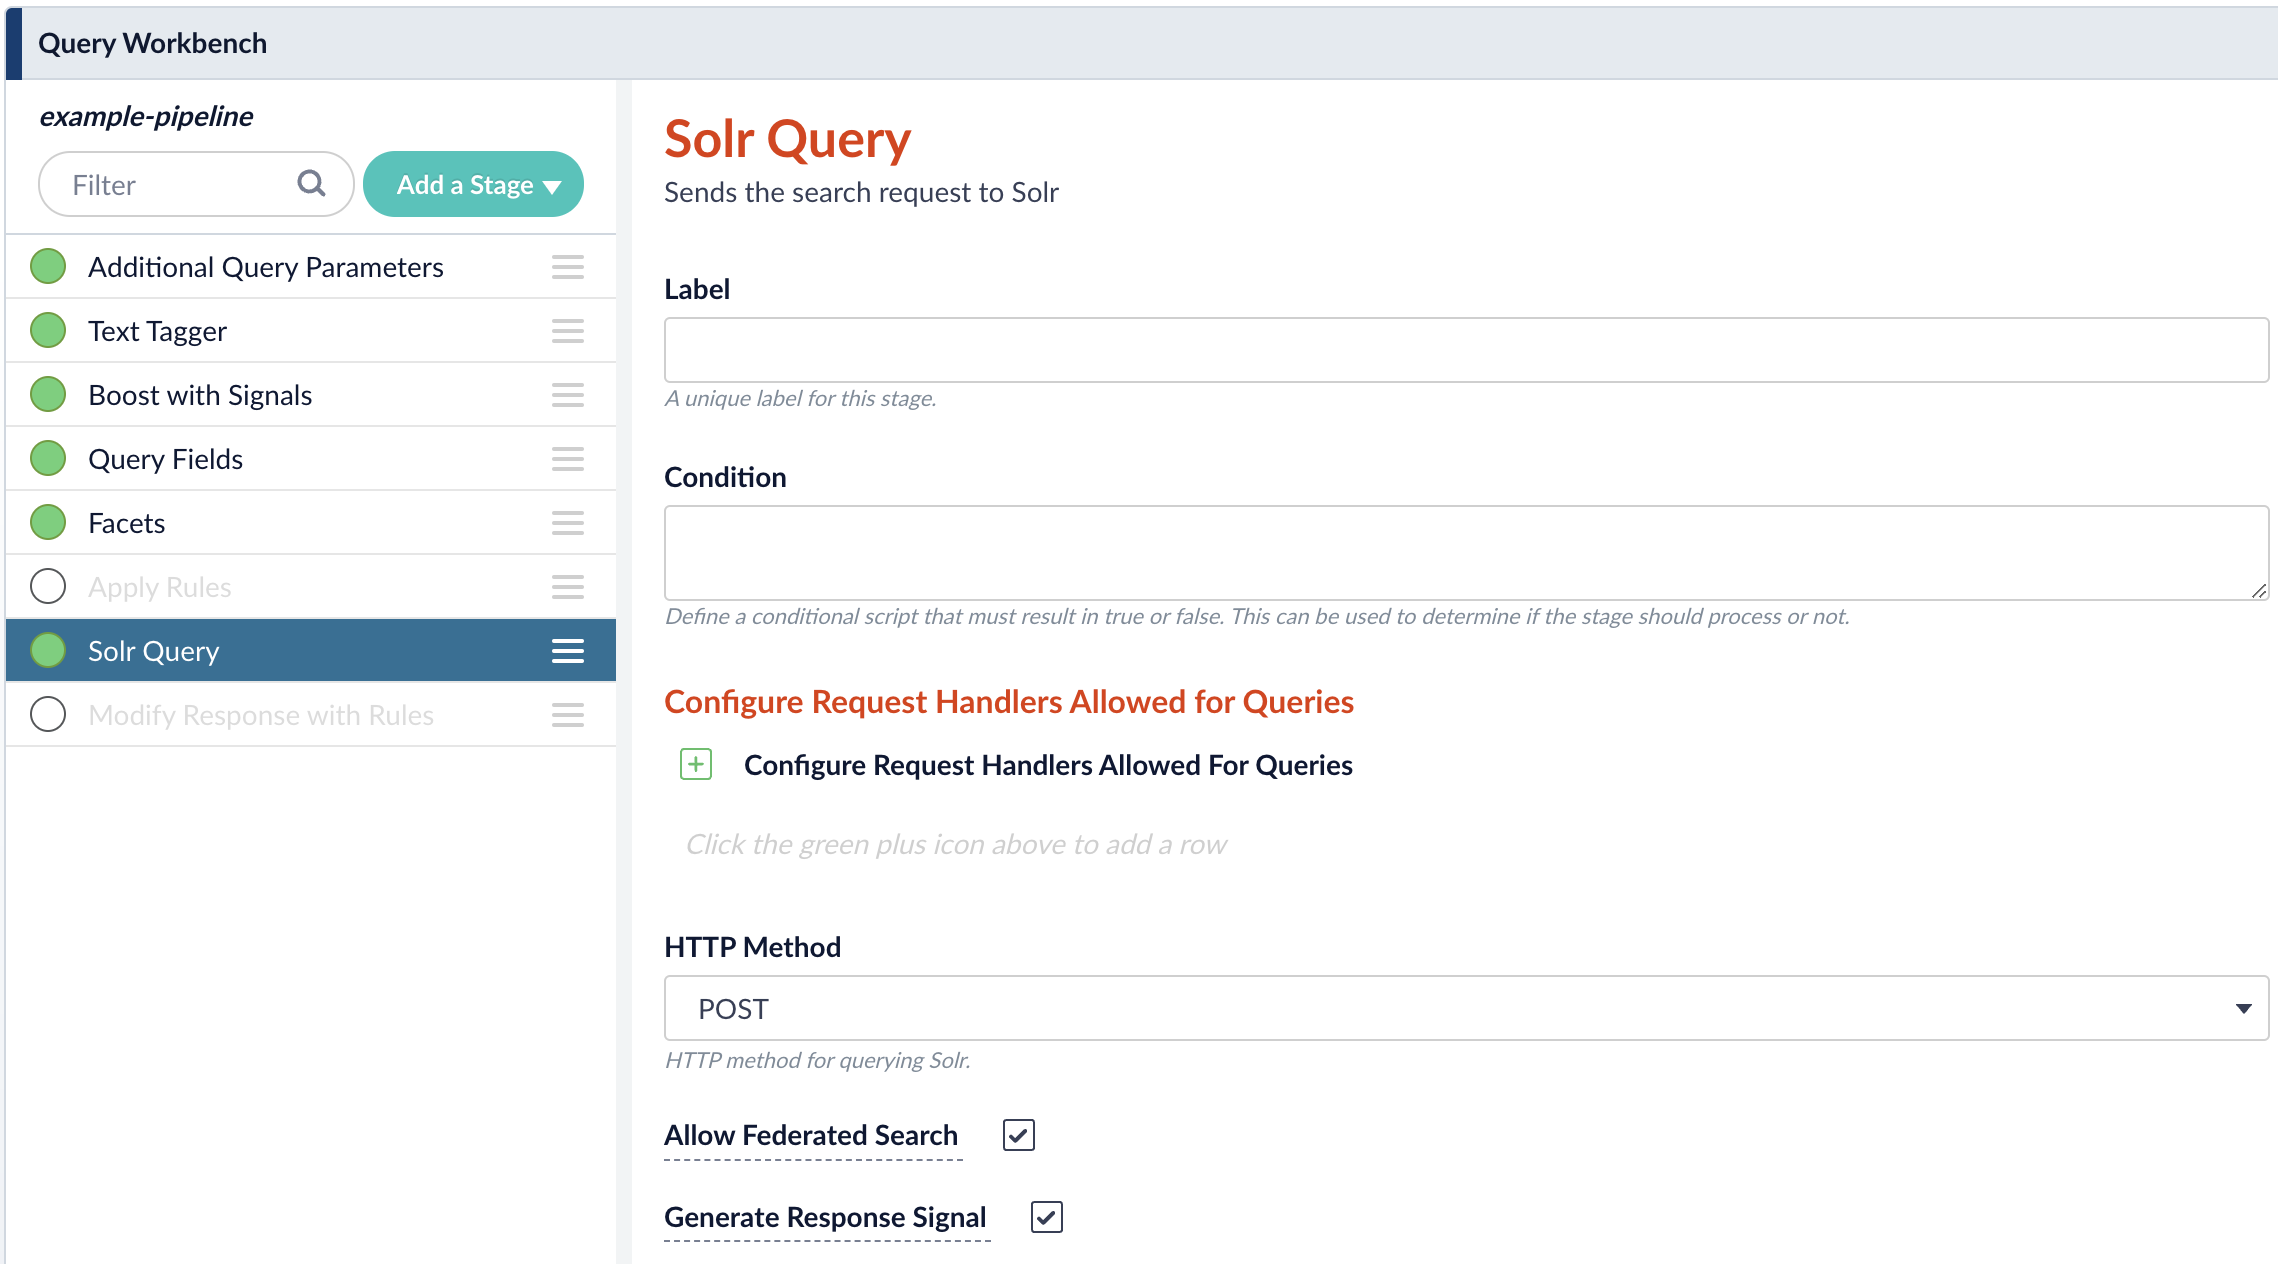
2. Click **Solr Query** to open the Solr Query panel.
3. Enable **Allow Federated Search** then click **Apply**.\\
4. In the workbench area, click **Parameters** then click **Edit Parameters**.
5. Click Add to add a parameter. For the **Name**, enter `collection` and for the **Parameter Value**, enter a comma-separated list of collections you want to query. For example, `movies-collection,books-collection,music-collection`.\\
6. Click **Close**.
7. Check that your pipeline is querying documents from all specified collections.\\
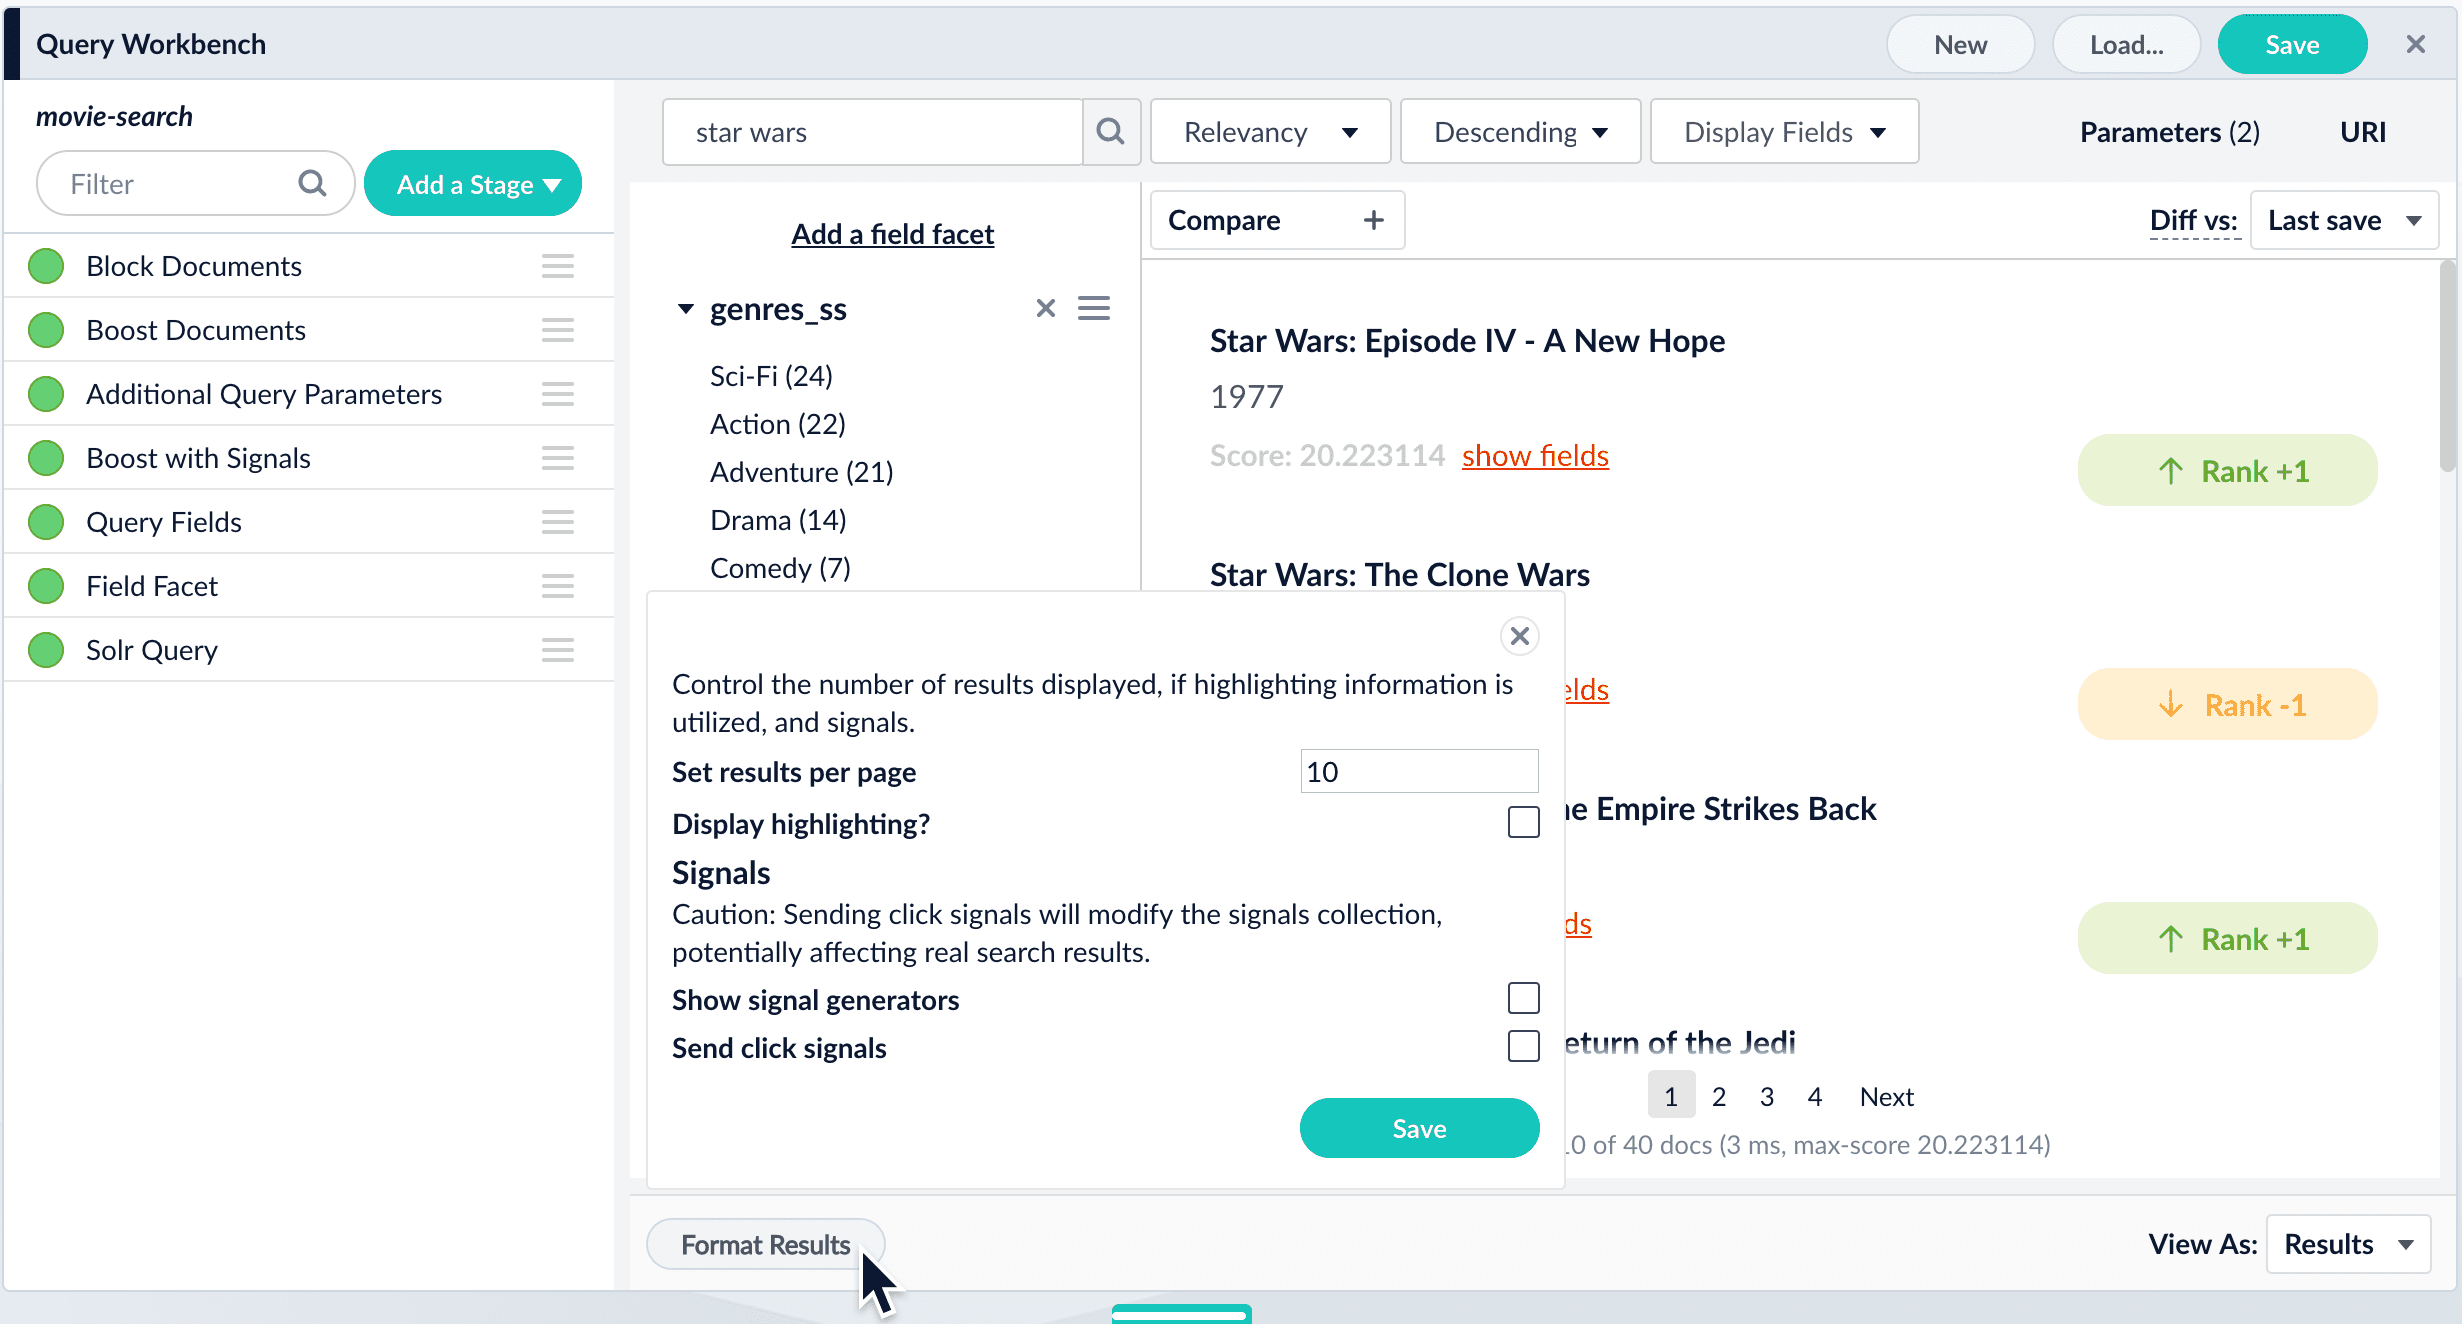
Ultimately, your search application will format the search results that end users see. The Query Workbench provides some formatting options for the preview panel.
At the bottom of the screen, click **Format Results** to configure how results are displayed in the QWB:
These options only affect how the Query Workbench displays results; they have no effect on how your search application displays them.
1. Use the Index Workbench to set up datasource(s).
2. Run a crawl on the data.
3. Open the Query Workbench.
4. Select a query pipeline to use or create a new, blank pipeline (the Default pipeline is created automatically and can be used as-is or with modification).
5. Modify the pipeline stages and set the order in which the queries will run.
6. Examine the live results in the Search panel.
7. Modify any pertinent stage settings to fine tune your results.
8. Click **Save** to commit the new settings to the pipeline
After a custom Query Pipeline configuration is saved, it becomes available throughout Fusion and can be re-used and modified.
The order of the pipeline stages matters, because the output from one stage becomes the input to the next stage. For example, the Solr Query stage must always come last in the sequence, so that data is indexed only after it has been processed by all other stages. Putting this stage first in the sequence means that subsequent stages have no effect on the indexed data.
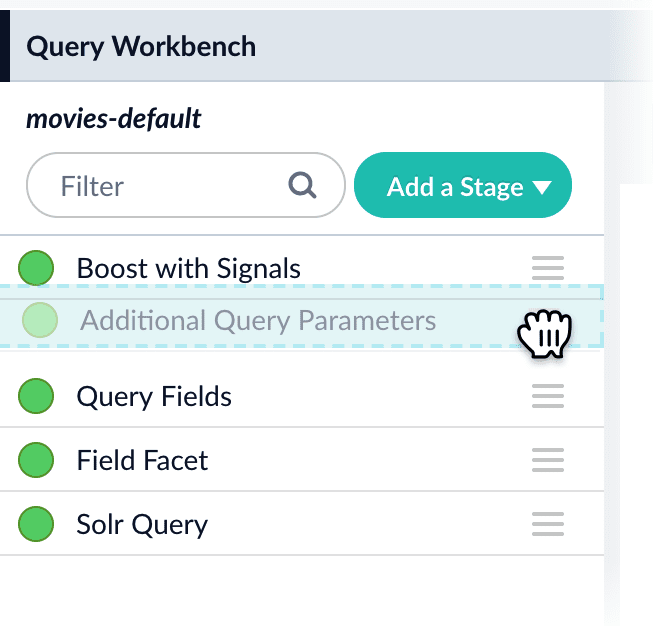
Drag any stage in the pipeline to move it up or down in the sequence of stages. The preview panel automatically updates the search results to reflect the output of the new sequence.
While the Query Fields stage configures which fields match against incoming queries, the search application itself determines which fields to display in the search results.
For example, the search results below use the `title_s` field as the document name and the `year_i` field as the document description:
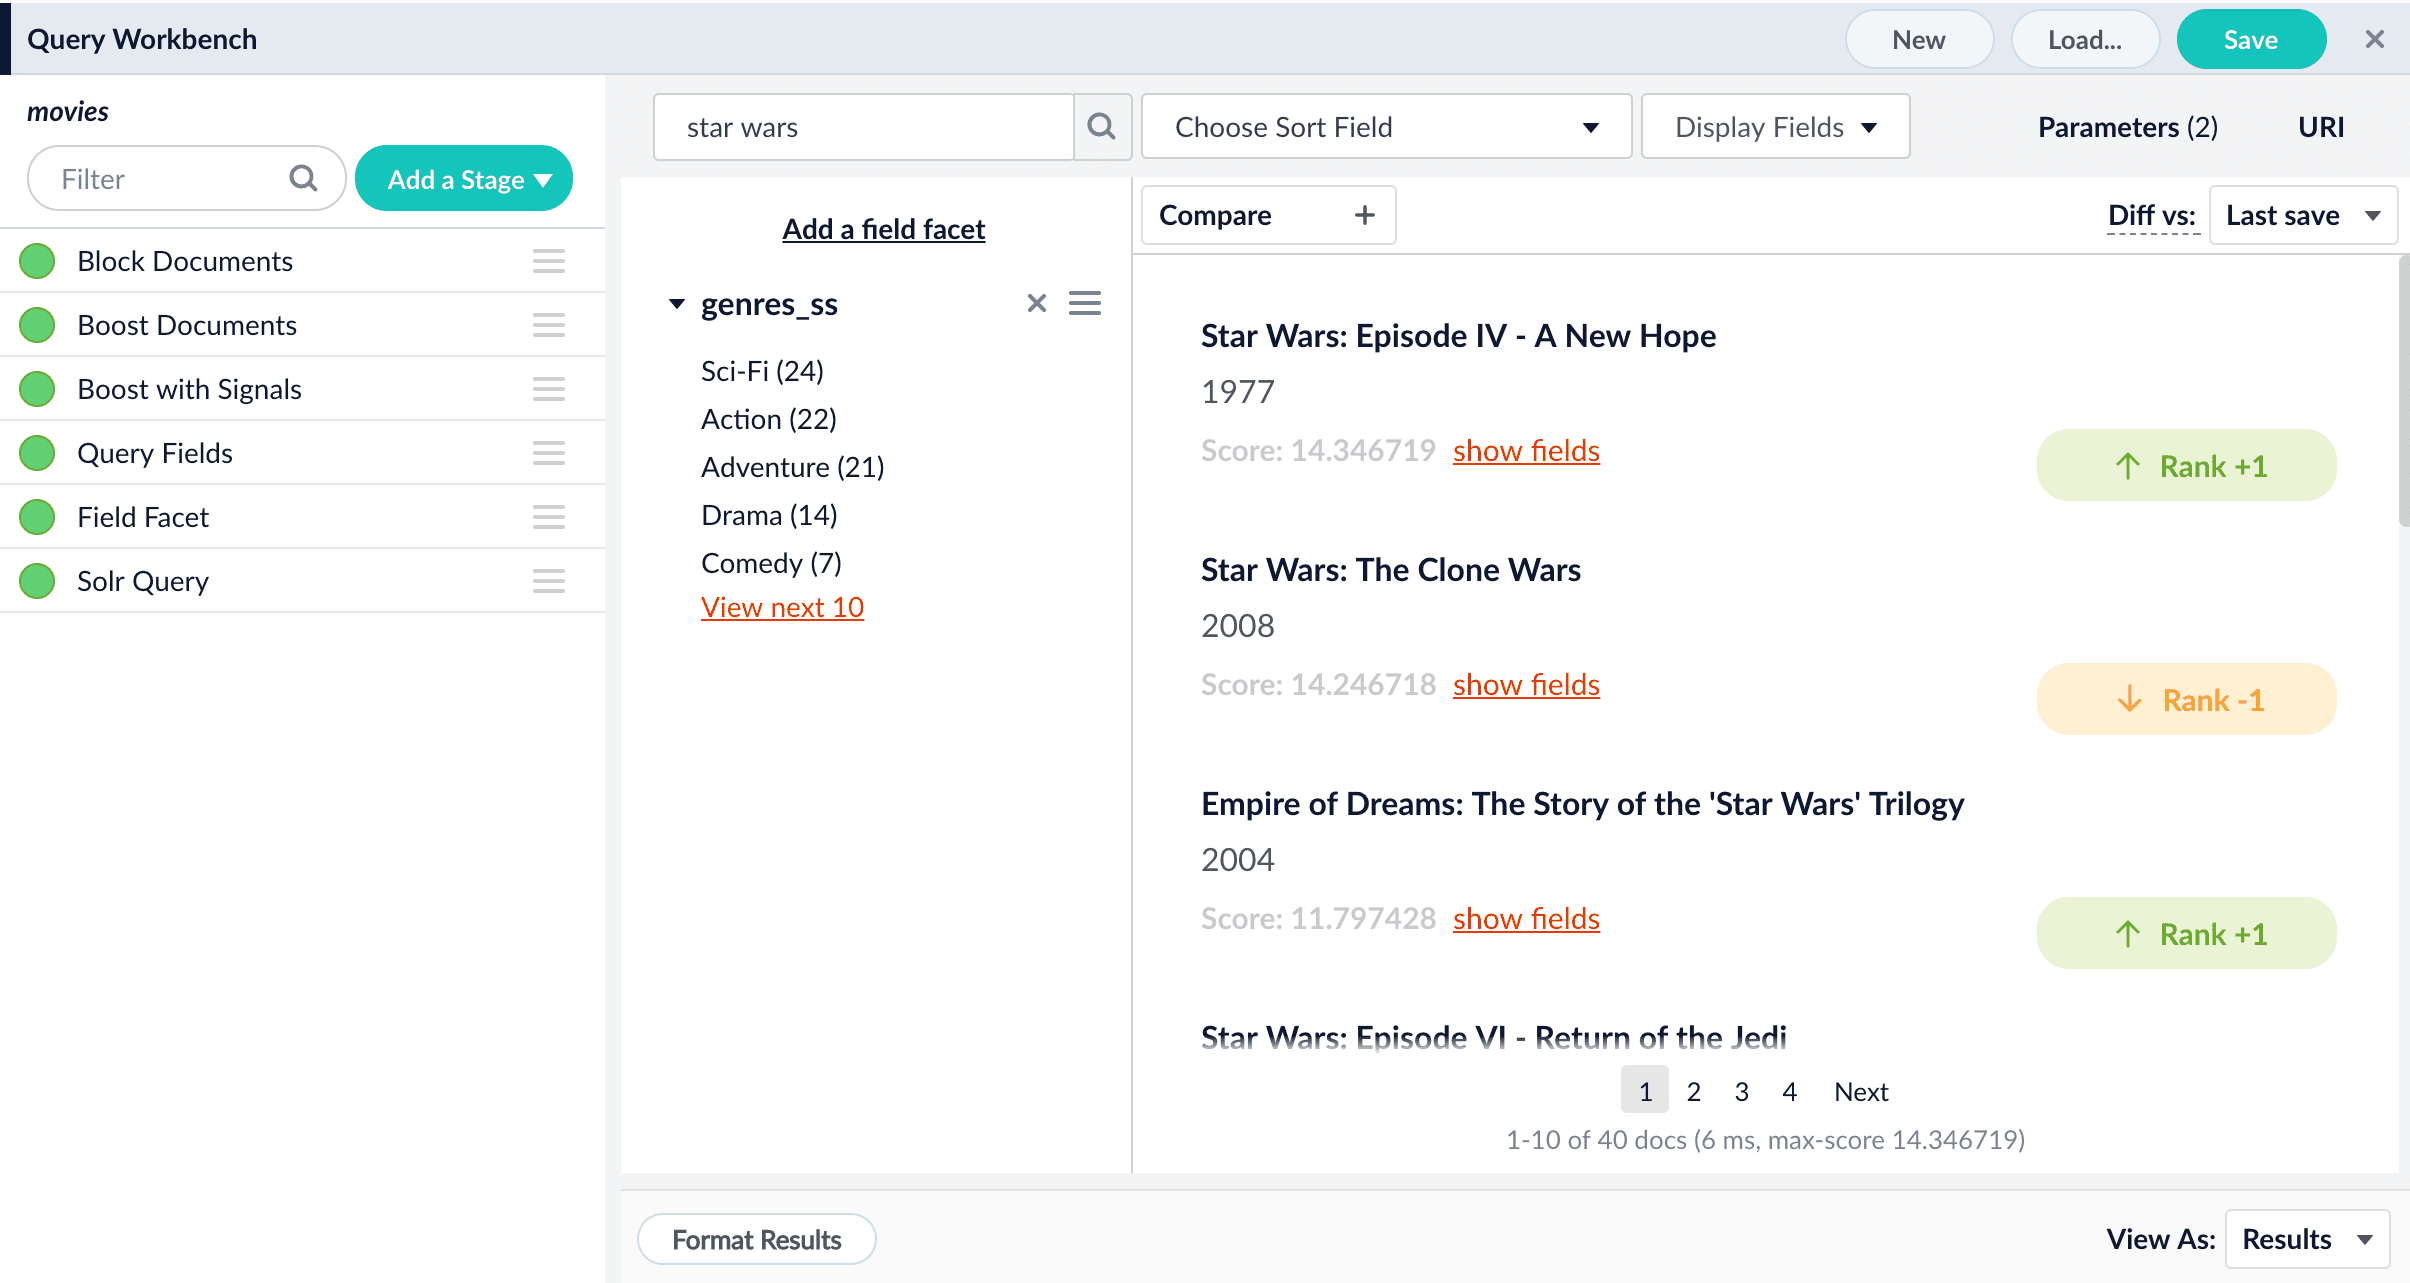
Adding `year_i` as the description removed it from the list of field facets and now we see the year of release for each movie title in the search results:
1. In the Query Workbench, click **Compare**.\
Another preview panel opens. In this view, you can compare results from one query pipeline side by side with another query pipeline.
2. In the left panel, select a pipeline to compare to your working pipeline.\
Now you can see how the search results differ between the two pipelines:
When you click a document in one panel, the other panel automatically scrolls to the same document.
To exit compare mode, click the Close icon.
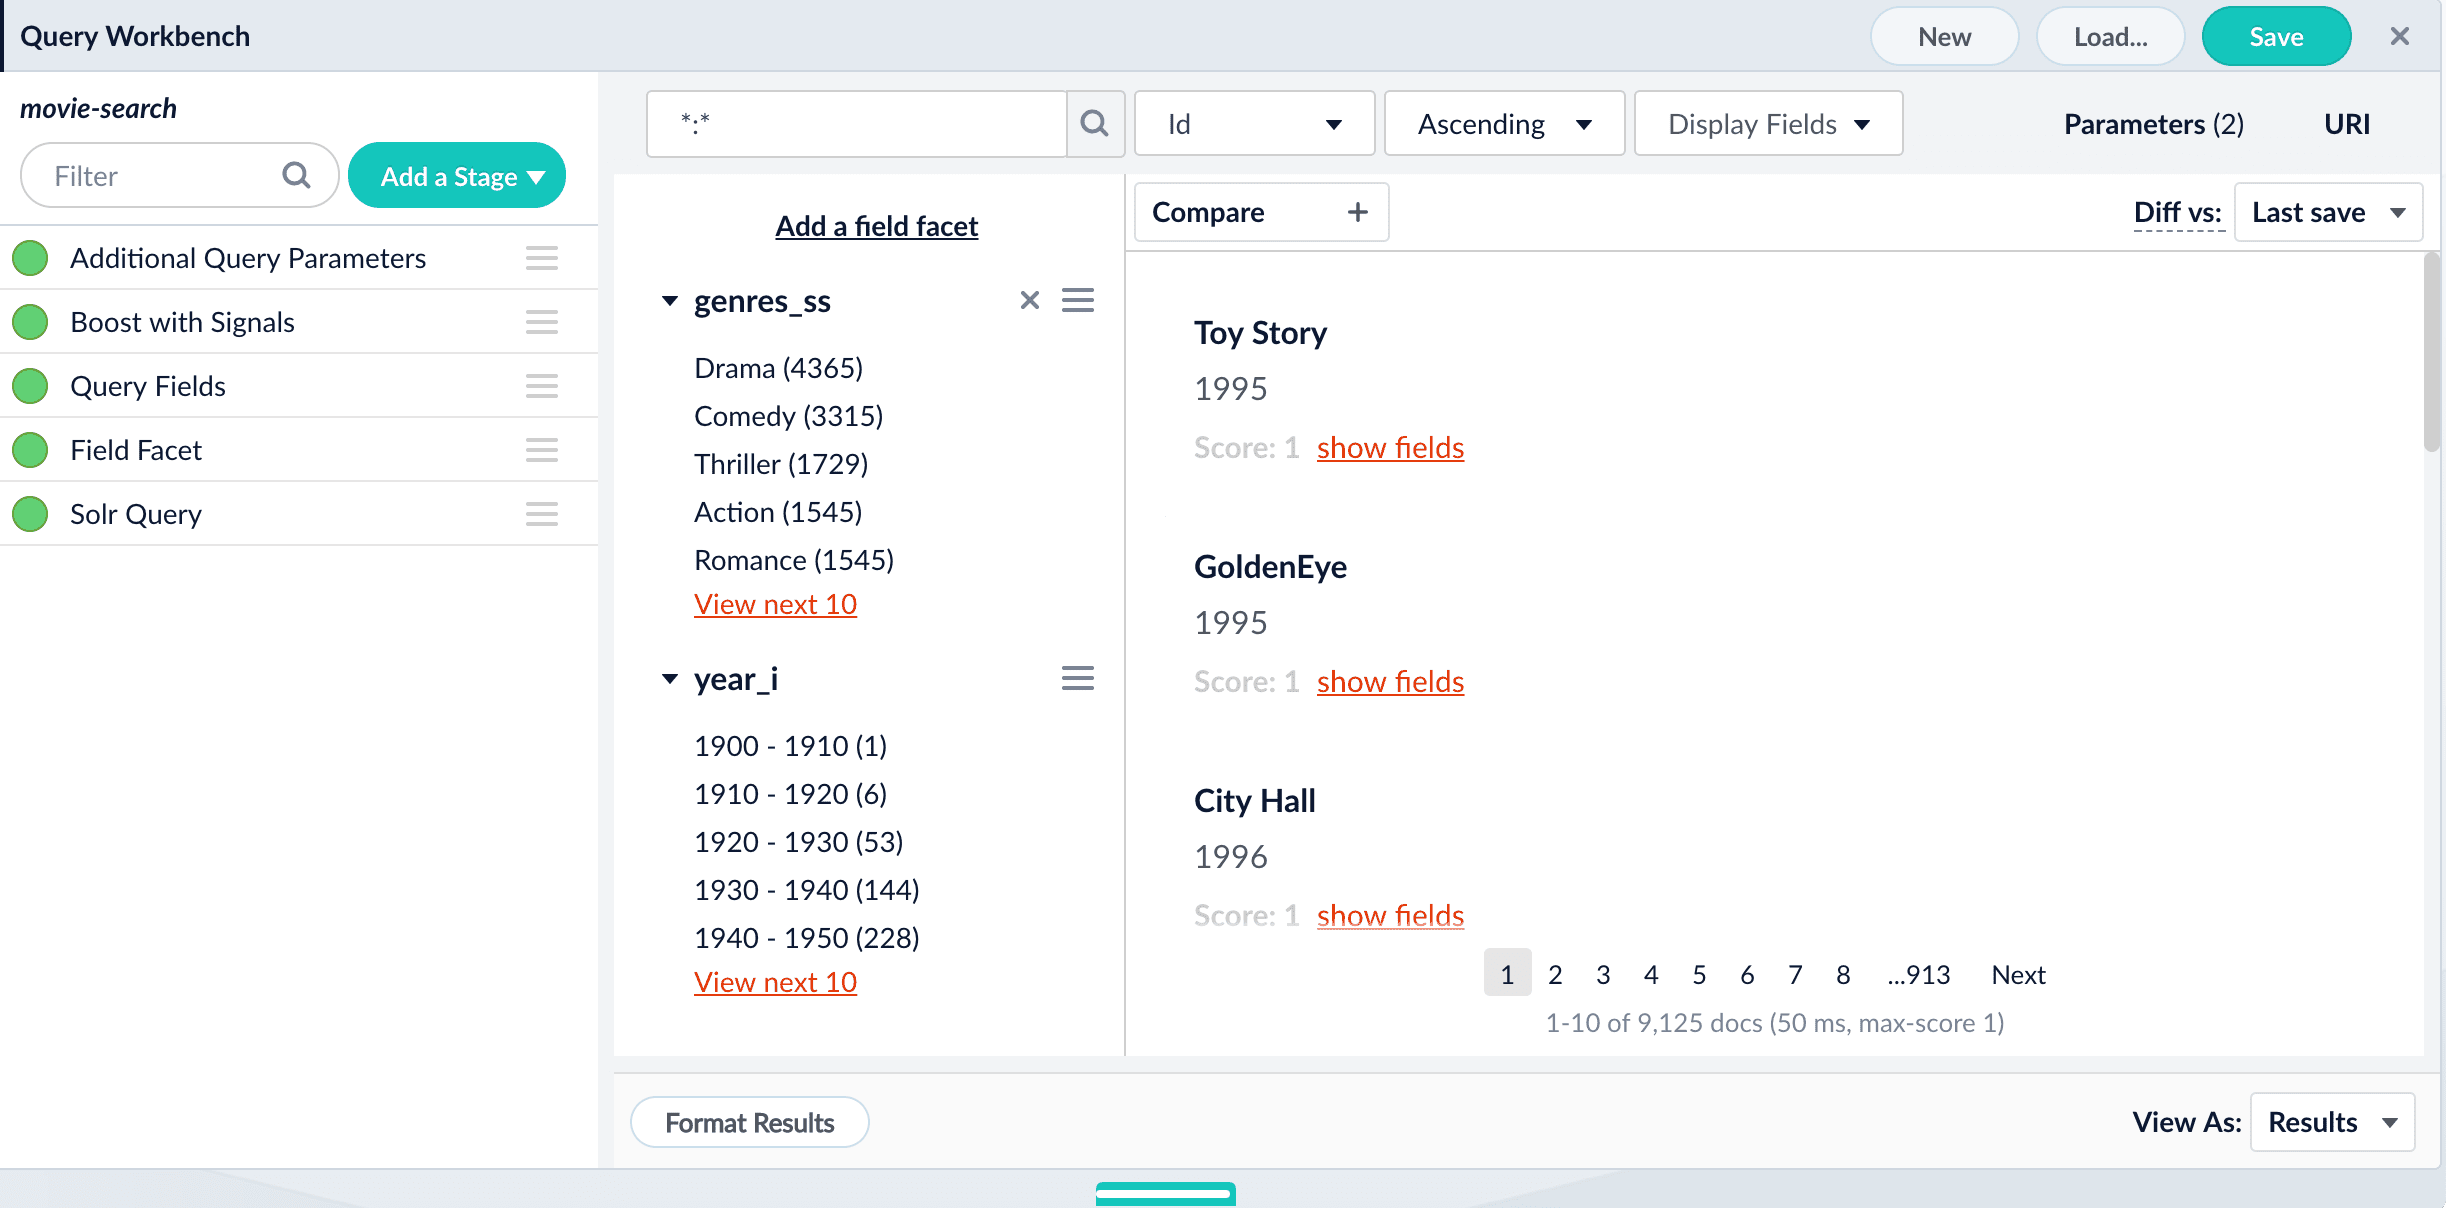 With this sandbox paradigm, you can experiment with query pipelines without consequence because Fusion uses a copy of a pipeline to simulate the new results, and it is not permanently modified in the collection until you click **Save**.
 ## Boosting and blocking
As you search your data and inspect the results, you can manipulate the rankings of individual documents. Boosting a document raises its ranking, while blocking a document removes it from search results.
Boosting and blocking affects the results for specific queries. For example, when you search for "citizen" and boost the document for "Citizen Kane", your end users will see that title boosted to the top when they also search for "citizen", but not necessarily when they search for "kane".
The Query Workbench provides convenient buttons for instantly blocking or boosting the documents that you see in the preview panel. Clicking **Boost** automatically adds the [Boost Documents stage](/docs/5/fusion/reference/config-ref/pipeline-stages/query-stages/boost-documents-query-stage) to your query pipeline, with a boost rule that matches your query and the document you clicked. Likewise, clicking **Block** adds and configures the [Block Documents stage](/docs/5/fusion/reference/config-ref/pipeline-stages/query-stages/block-documents-query-stage).
## Compare mode
Compare mode allows you to compare search results using two different query pipelines, or compare search results from the original query pipeline and the copy being modified in the Query Workbench. On the right is the working pipeline, which you can edit. On the left is one of your saved pipelines.
## Learn more
## Boosting and blocking
As you search your data and inspect the results, you can manipulate the rankings of individual documents. Boosting a document raises its ranking, while blocking a document removes it from search results.
Boosting and blocking affects the results for specific queries. For example, when you search for "citizen" and boost the document for "Citizen Kane", your end users will see that title boosted to the top when they also search for "citizen", but not necessarily when they search for "kane".
The Query Workbench provides convenient buttons for instantly blocking or boosting the documents that you see in the preview panel. Clicking **Boost** automatically adds the [Boost Documents stage](/docs/5/fusion/reference/config-ref/pipeline-stages/query-stages/boost-documents-query-stage) to your query pipeline, with a boost rule that matches your query and the document you clicked. Likewise, clicking **Block** adds and configures the [Block Documents stage](/docs/5/fusion/reference/config-ref/pipeline-stages/query-stages/block-documents-query-stage).
## Compare mode
Compare mode allows you to compare search results using two different query pipelines, or compare search results from the original query pipeline and the copy being modified in the Query Workbench. On the right is the working pipeline, which you can edit. On the left is one of your saved pipelines.
## Learn more
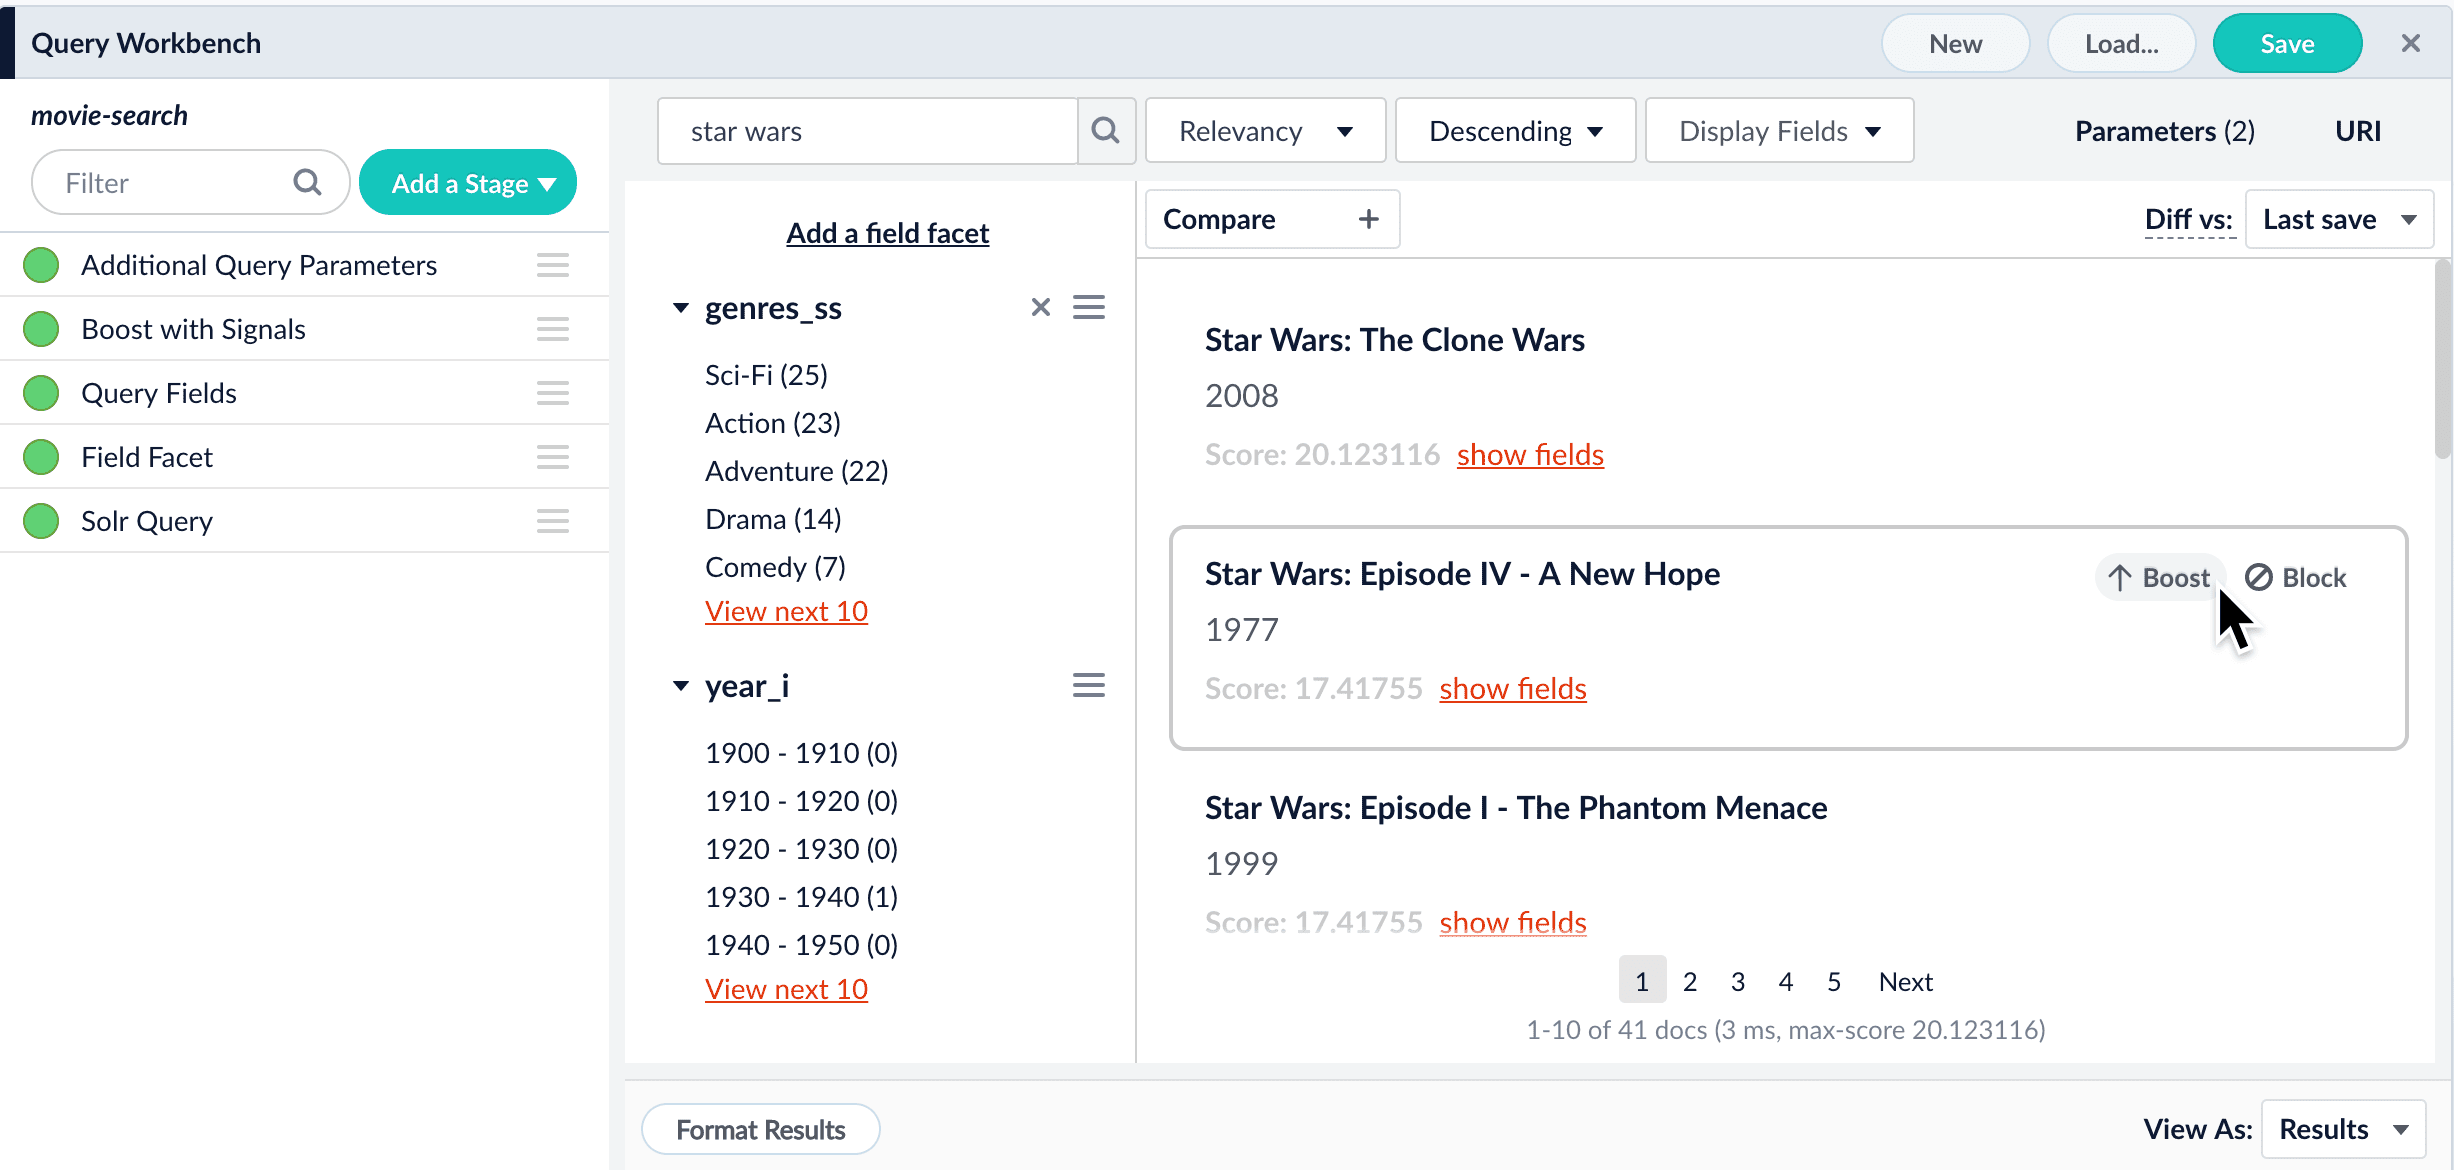 3. Click **Boost**.
The preview panel automatically updates the rankings of the search results, and tags the differences:
3. Click **Boost**.
The preview panel automatically updates the rankings of the search results, and tags the differences:
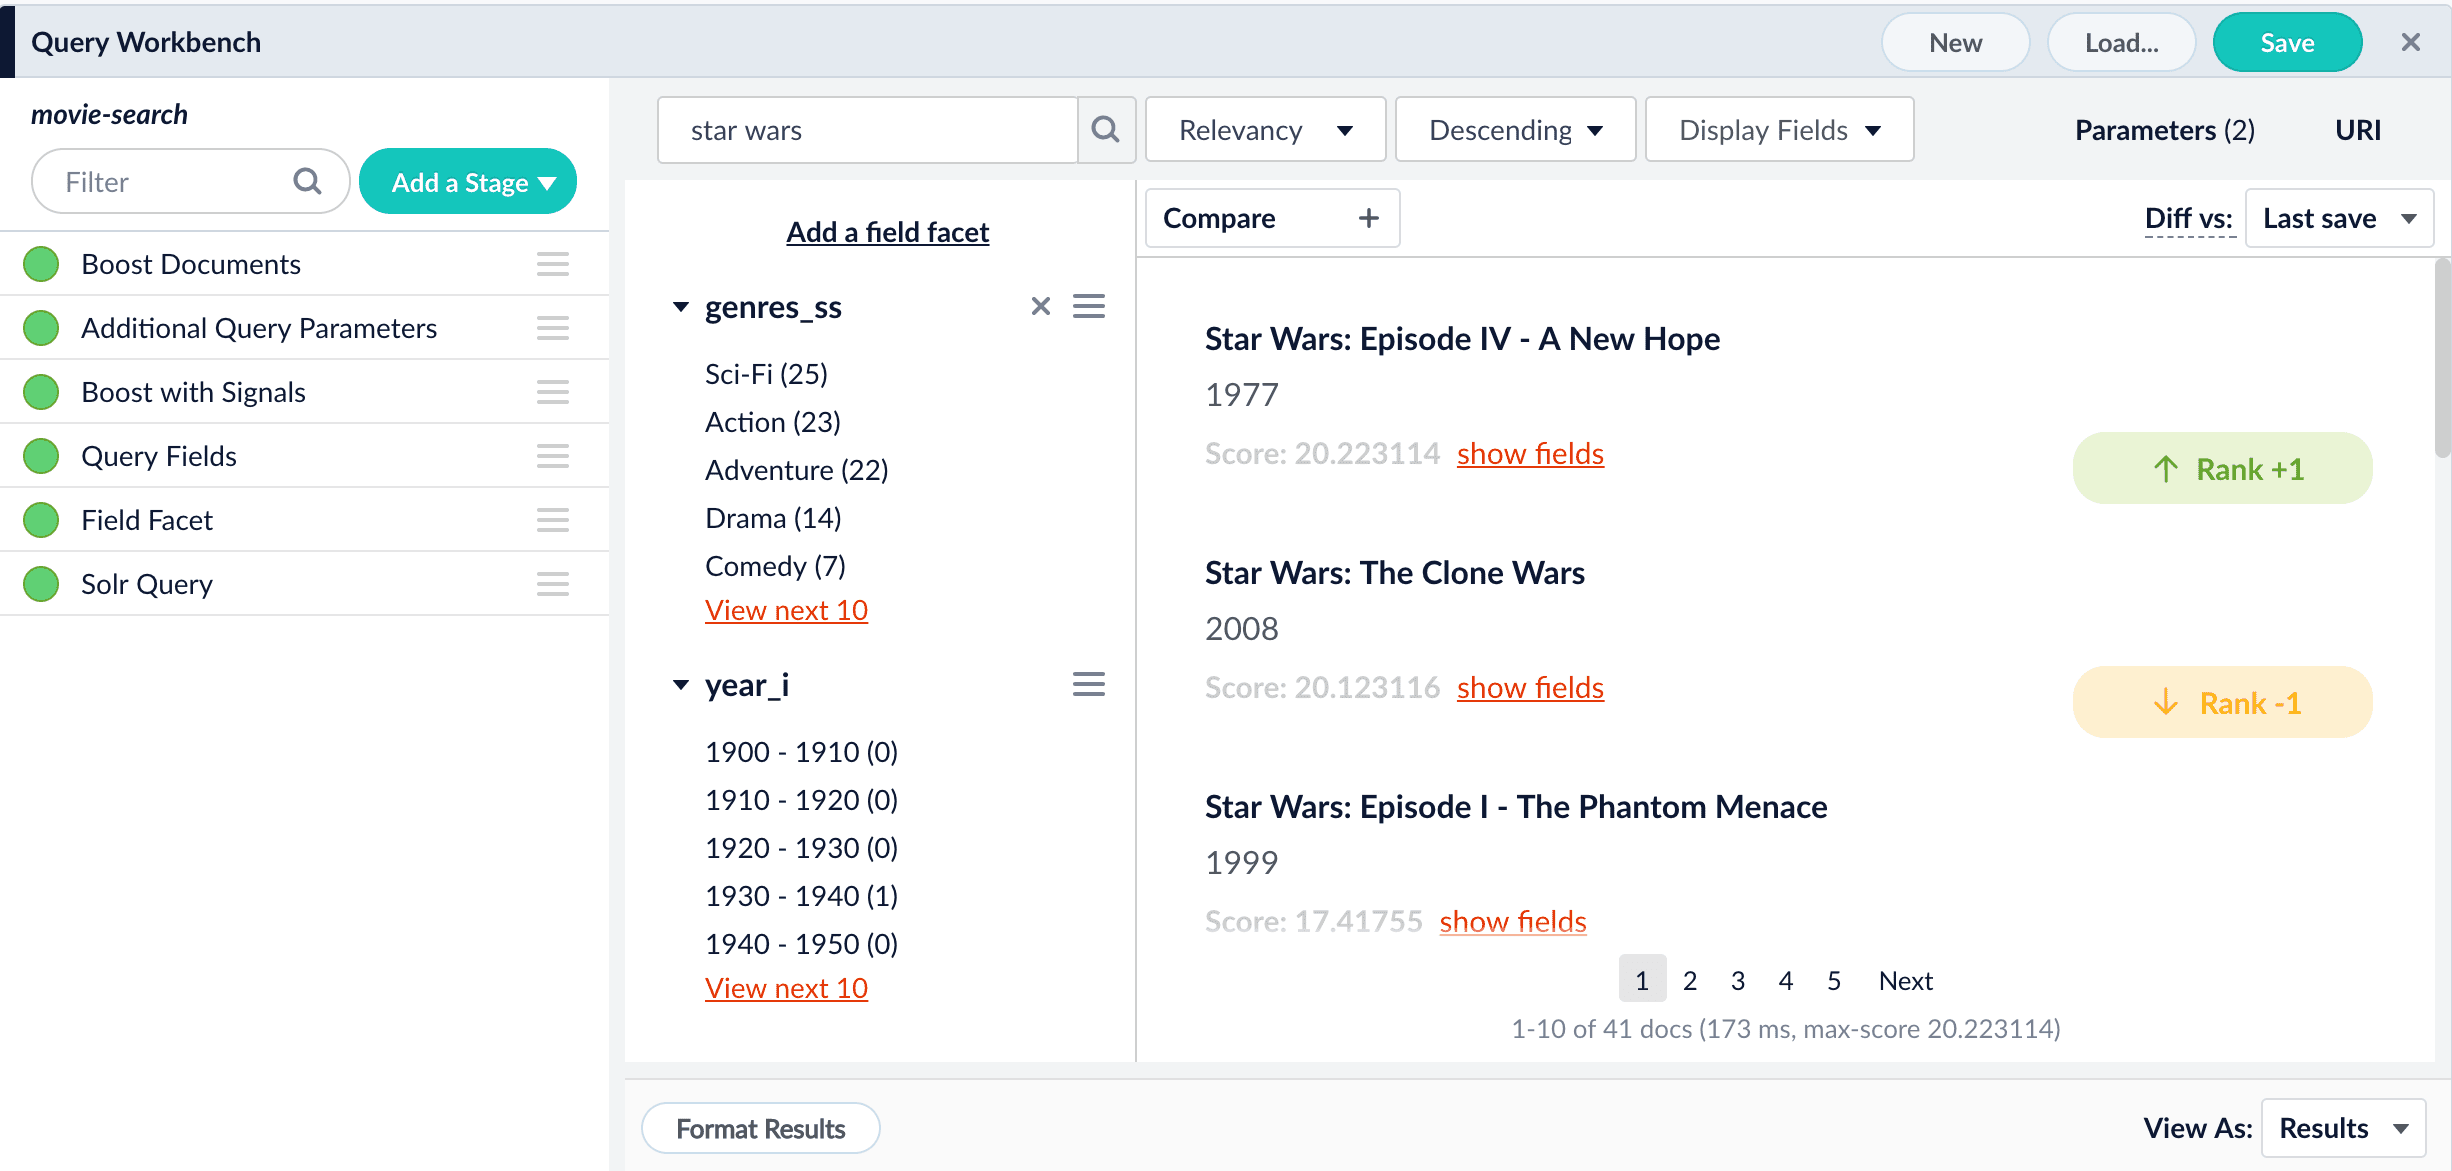 Notice that the Boost Documents stage is now in our pipeline. You can click this stage to view the boost rules you have added. This is also where you can remove boost rules:
 4. When you are satisfied with the results, save the query pipeline.
**How to block a document in the Query Workbench**
1. In the preview panel, hover over the document you want to block.
4. When you are satisfied with the results, save the query pipeline.
**How to block a document in the Query Workbench**
1. In the preview panel, hover over the document you want to block.
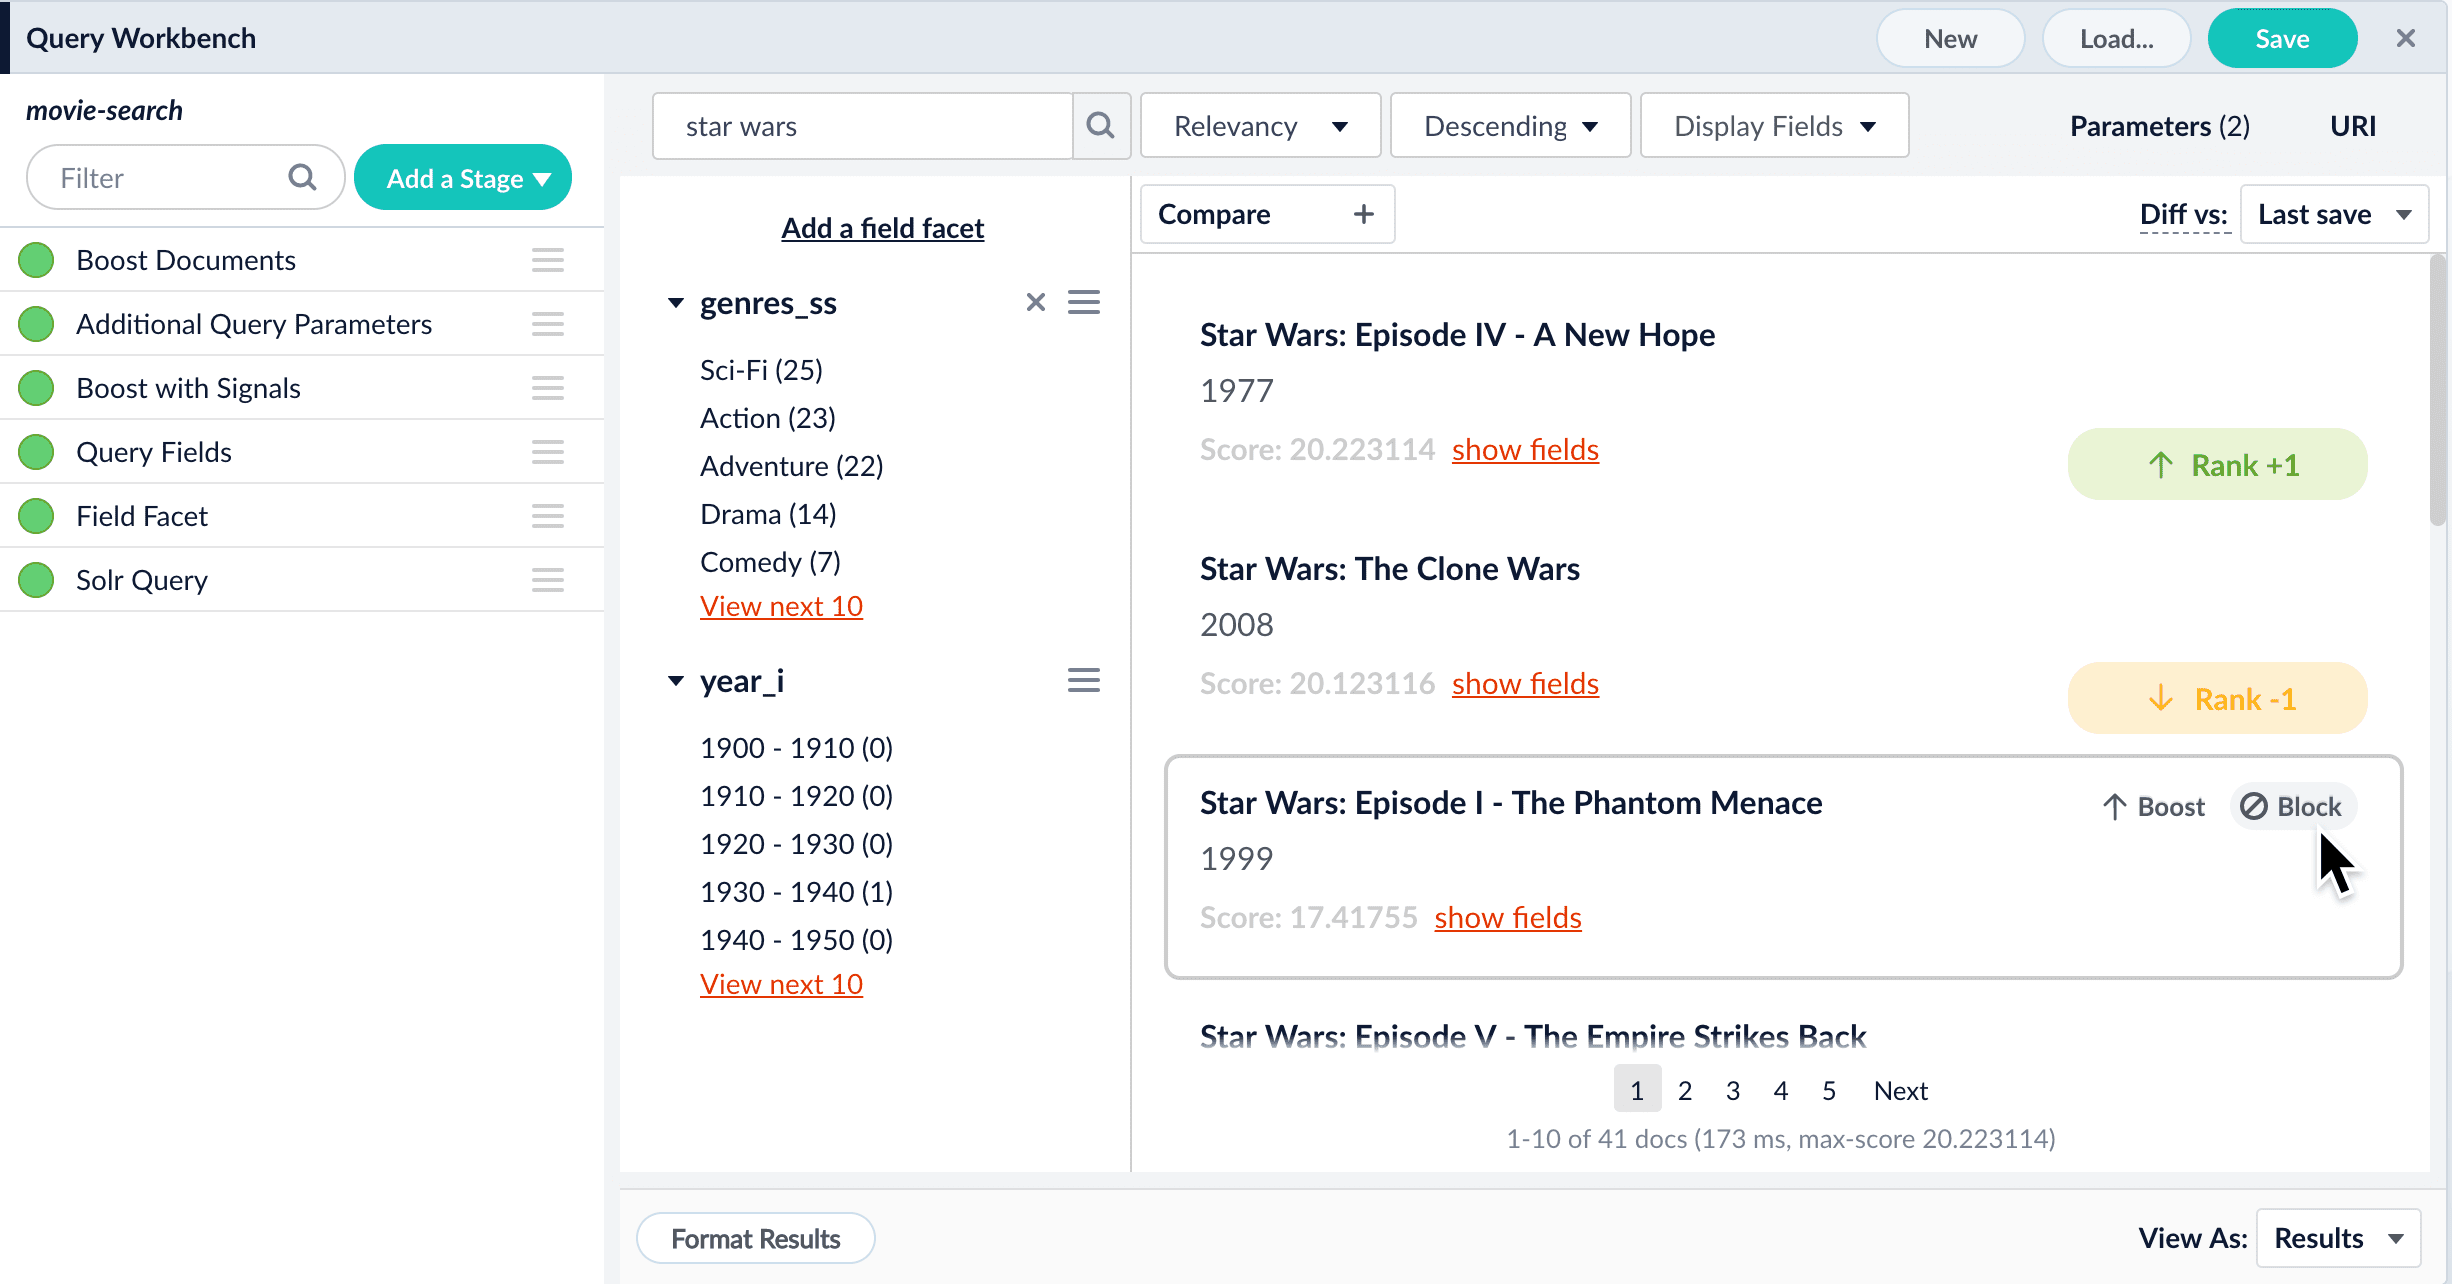 2. Click **Block**
The preview panel automatically updates the rankings of the search results, and tags the differences.
2. Click **Block**
The preview panel automatically updates the rankings of the search results, and tags the differences.
 Notice that the Block Documents stage is now in our pipeline. You can click this stage to view the block rules you have added. This is also where you can remove block rules:
 3. When you are satisfied with the results, save the query pipeline.
 Then, click **Edit parameters** to open the "Parameters and Values" window where you can add, modify, or remove search parameters:

 8. In the stage configuration panel, click the Add
  button next to **Async IDs**.
9. Paste the ID from the asynchronous query stage into the new ID field.
button next to **Async IDs**.
9. Paste the ID from the asynchronous query stage into the new ID field.
 12. Click **Save**.
 Click the circle next to any stage in order to enable or disable it.
 4. In the workbench area, click **Parameters** then click **Edit Parameters**.
5. Click Add
4. In the workbench area, click **Parameters** then click **Edit Parameters**.
5. Click Add 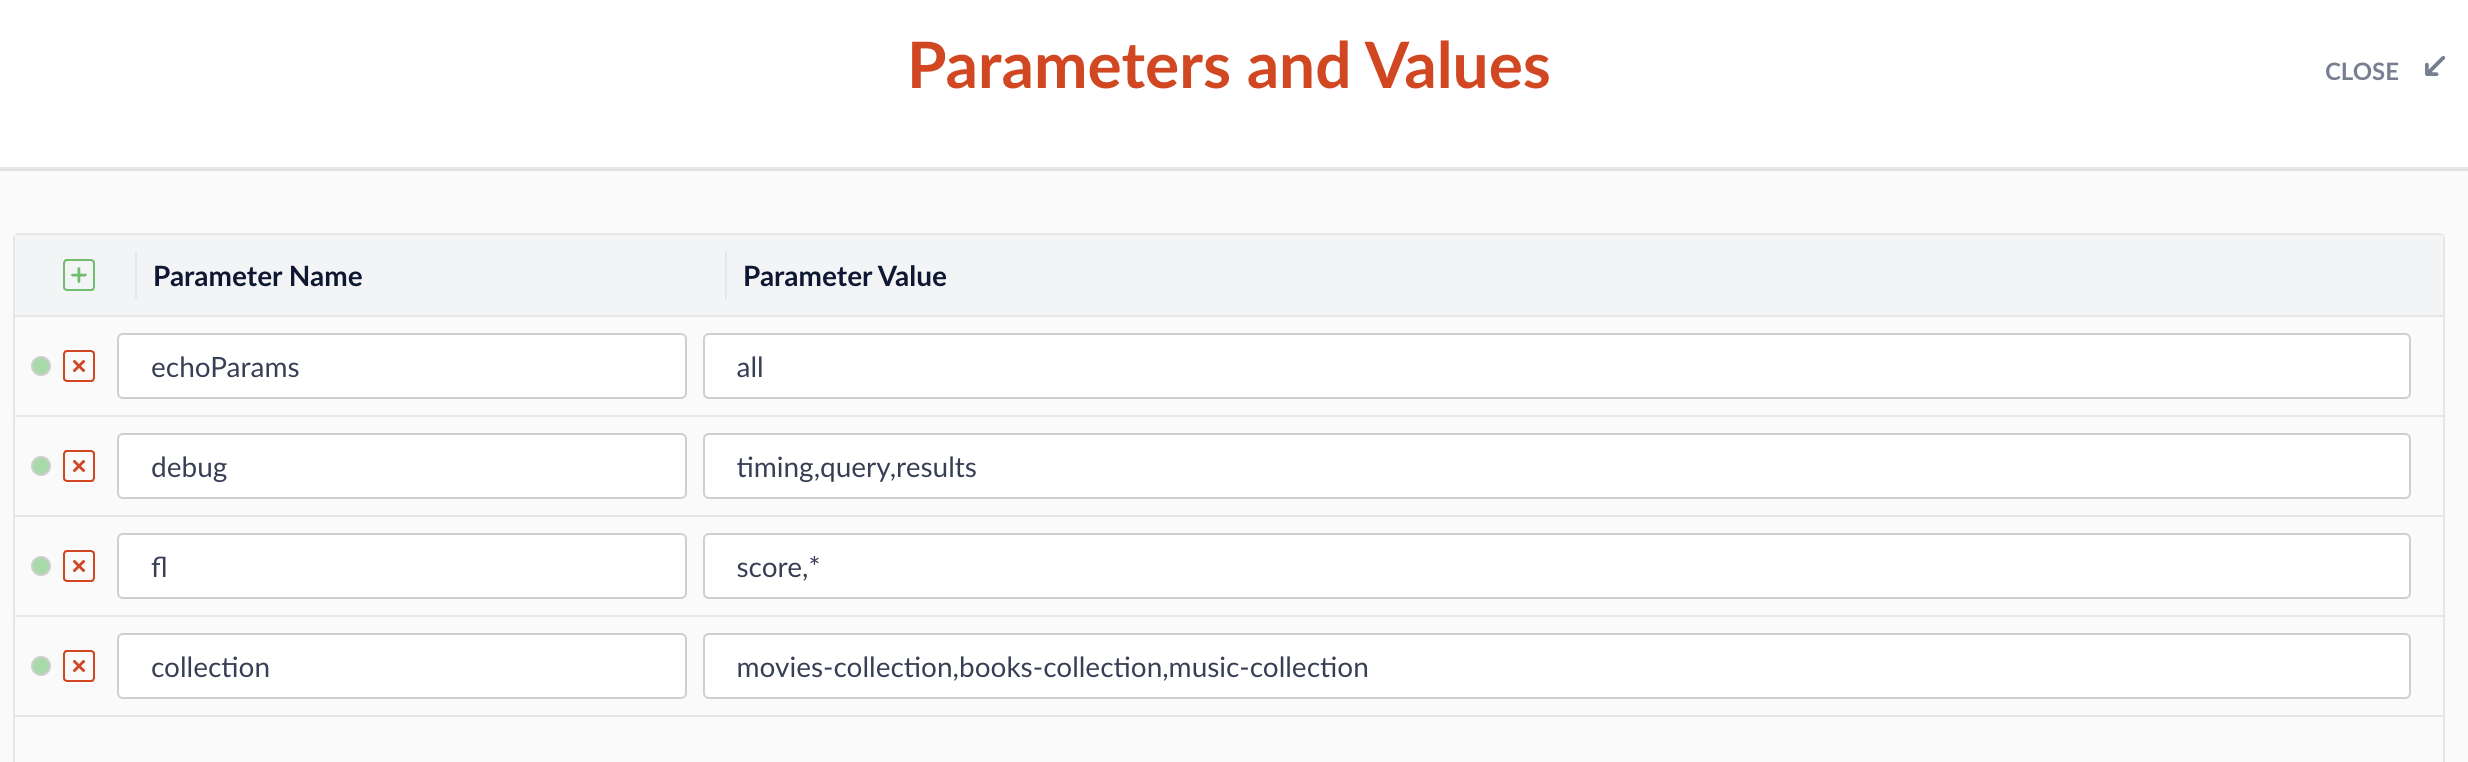 6. Click **Close**.
7. Check that your pipeline is querying documents from all specified collections.\\
6. Click **Close**.
7. Check that your pipeline is querying documents from all specified collections.\\

 These options only affect how the Query Workbench displays results; they have no effect on how your search application displays them.
 Drag any stage in the pipeline to move it up or down in the sequence of stages. The preview panel automatically updates the search results to reflect the output of the new sequence.
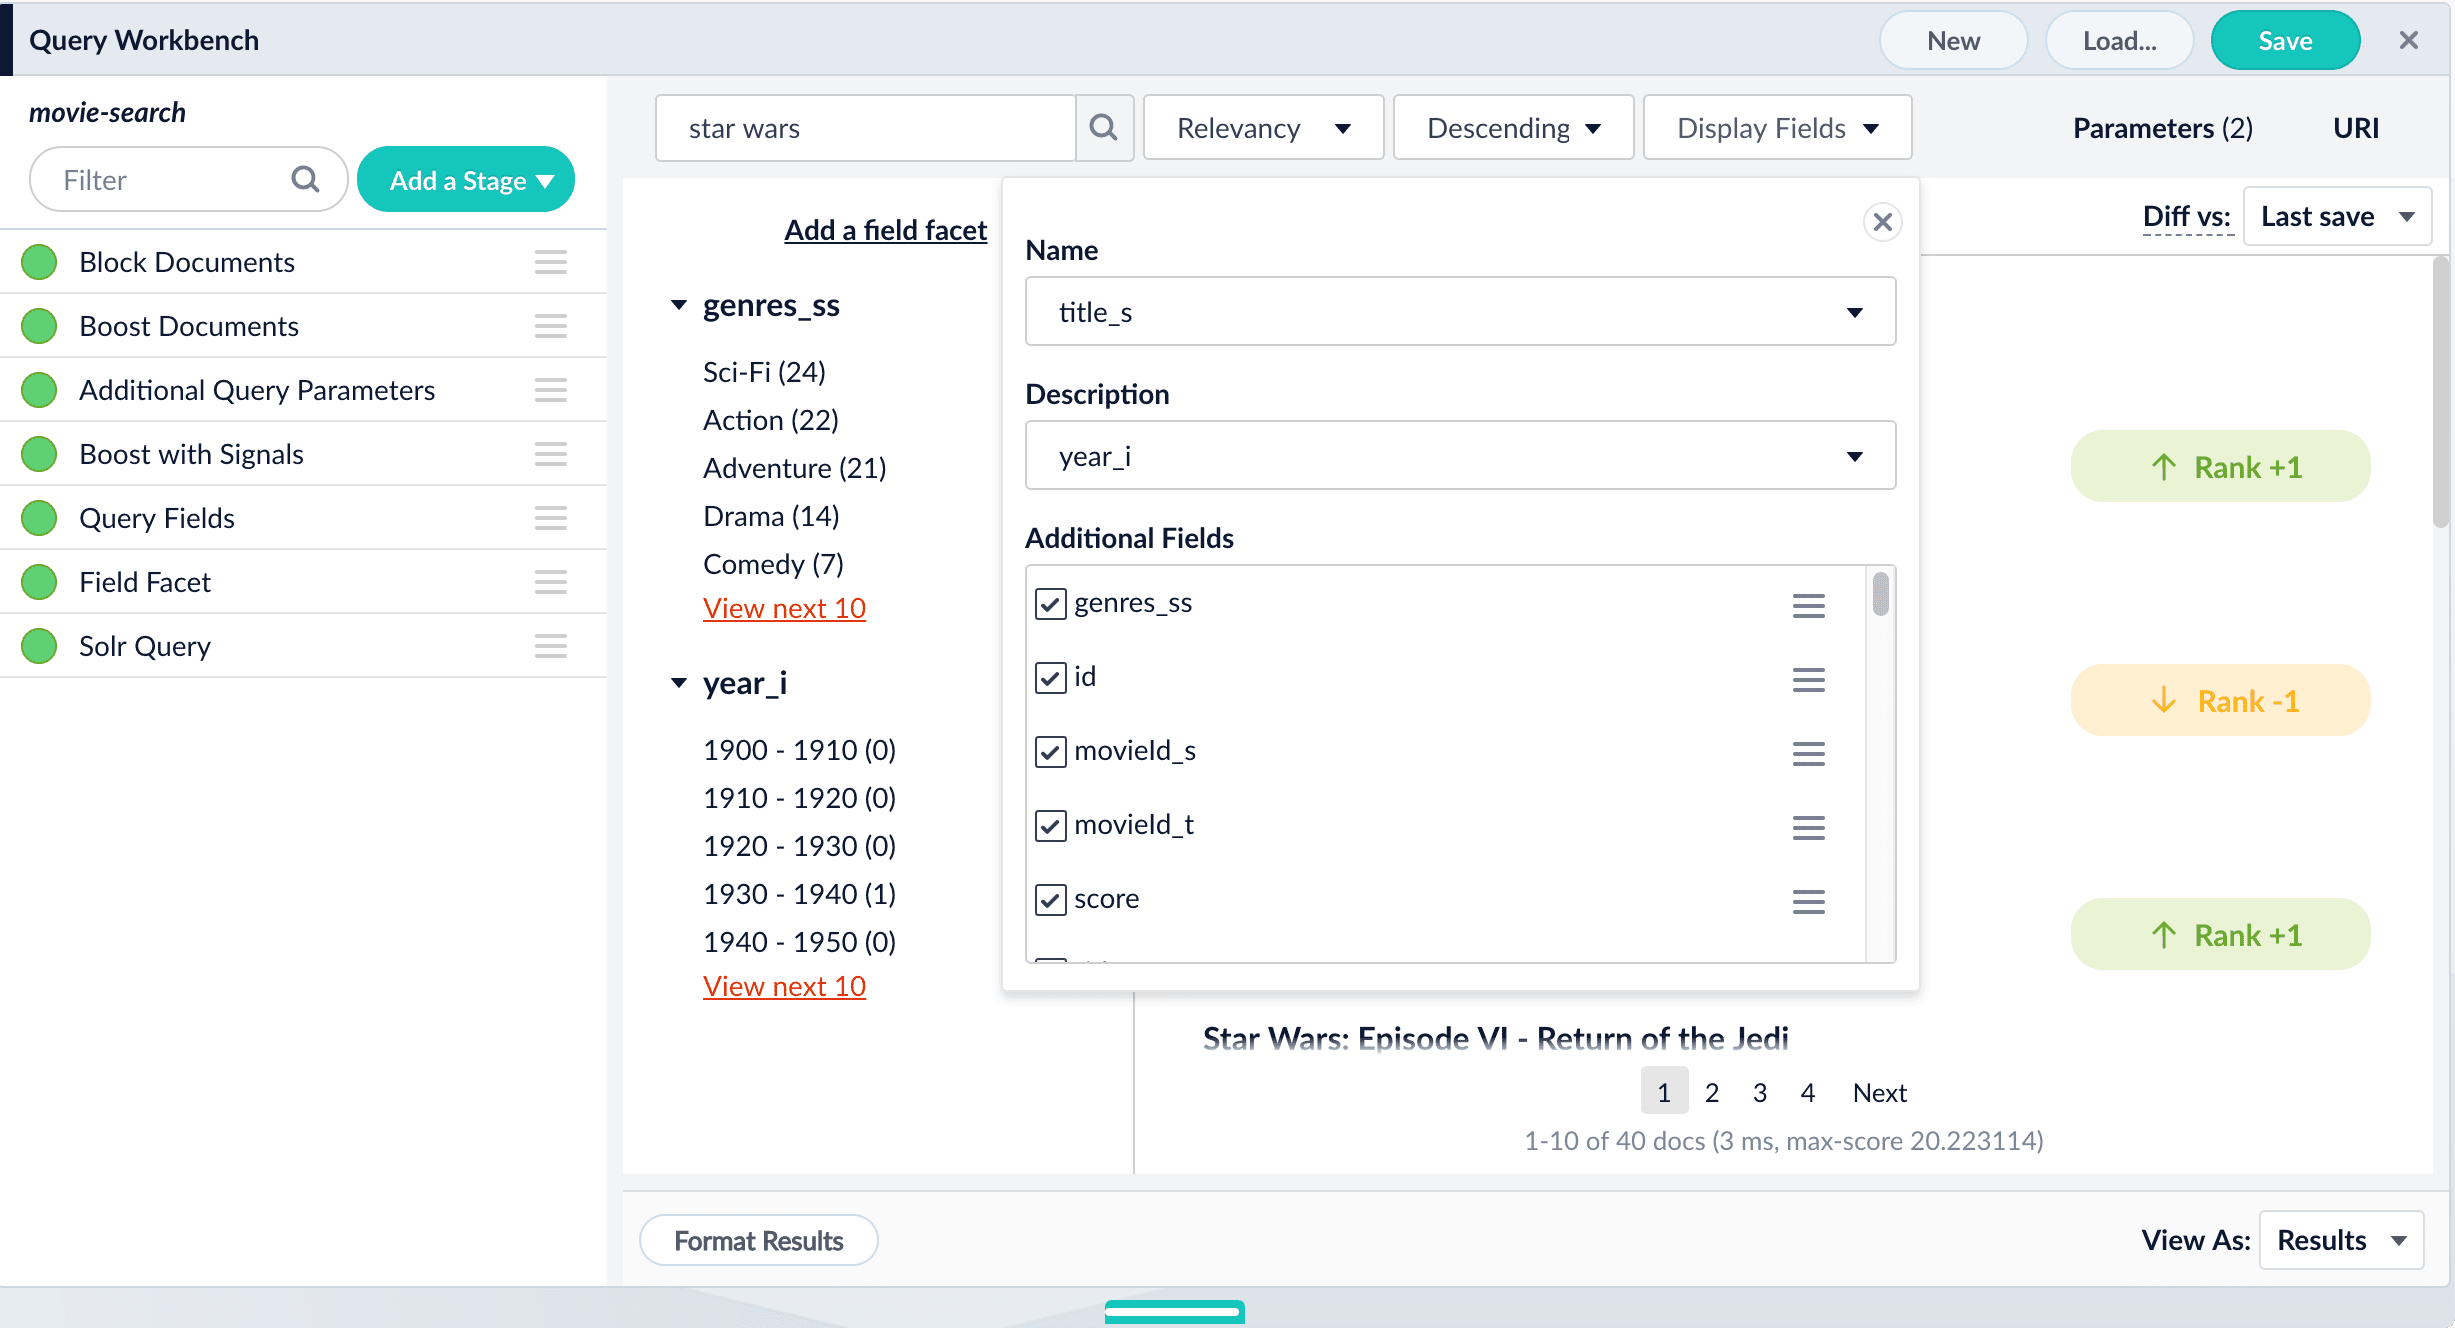 Adding `year_i` as the description removed it from the list of field facets and now we see the year of release for each movie title in the search results:
 icon.
icon.