> ## Documentation Index
> Fetch the complete documentation index at: https://doc.lucidworks.com/llms.txt
> Use this file to discover all available pages before exploring further.
# Advanced Model Training Configuration for Smart Answers
export const LwTemplate = ({title = "Key questions to get you started", icon = "sparkles", cta = "Powered by Agent Studio", linkHref = "https://lucidworks.com/demo/?utm_source=docs&utm_medium=referral&utm_campaign=docs_cta_ai"}) => {
const [isLoaded, setIsLoaded] = useState(false);
useEffect(() => {
const timer = setTimeout(() => {
setIsLoaded(true);
}, 500);
return () => clearTimeout(timer);
}, []);
return
{isLoaded && `
}} />}
Powered by Lucidworks Agent Studio
;
};
[localhost link]: http://localhost:3000/docs/5/fusion/getting-data-out/advanced-query-enhancement/smart-answers/smart-answers-advanced-model-config
[mintlify link]: https://doc.lucidworks.com/docs/5/fusion/getting-data-out/advanced-query-enhancement/smart-answers/smart-answers-advanced-model-config
[old doc.lw link]: https://doc.lucidworks.com/fusion/5.9/724
This topic provides tips for training your [Smart Answers](/docs/5/fusion/getting-data-out/advanced-query-enhancement/smart-answers/overview) deep learning model.
## Model Base
There are several types of model bases that can be used for training and fine-tuning:
* **word\_en\_300d\_2M** are general pre-trained word embeddings. It is a good default choice to start with for English language.
* **bpe\_\{language}\_\{dim\_size}\_\{vocab\_size}** are general pre-trained [BPE](https://nlp.h-its.org/bpemb) embeddings that are available for different languages, including CJK languages and multilingual. Also useful in scenarios when vocabulary is very big or when the data might have a lot of misspellings.
* **word\_custom** or **bpe\_custom** specifies that custom embeddings should be trained on users data via Word2Vec algorithm. It might be useful when your domain has a very unusual specific vocabulary.
* **transformer** based models such as **distilbert\_\{language}** and **biobert**. Much bigger and expensive models that might provide even better quality for FAQ, Chatbot and virtual Assistance use-cases. Also useful when the training data is limited.
If **word** or **bpe** based models are used, one or more RNN layers are added on top of the embeddings to be trained to capture contextual and semantic information. It is configurable in the **RNN Encoder Parameters** section. If you wish to use embeddings initialized on your data, refer to the **Custom Embeddings Initialization** to configure Word2Vec algorithm.
Transformer-based models already have specified fixed model architecture which is fine-tuned during the training procedure.
Dimension size of vectors for Transformer-based models is 768. For RNN-based models it is 2 times the number units of the last layer. To find the dimension size: download the model, expand the zip, open the log and search for `Encoder output dim size:` line. You might need this information when creating collections in Milvus.
We recommend to use Transformer-based models only if you can allocate GPU for the training job as these models are very computationally expensive.
At the end, Attention mechanism to aggregate output into final single vector for all models.
## Auto hyperparameter tuning
By default, training module tries to select the most optimal parameter values (for those left as blank) based on the training data statistics. Auto-tune can extend it by automatically finding even better training configuration through hyper-parameter search.
If **Perform auto hyperparameter tuning** is enabled, multiple models will be trained across several stages. On each stage the most impactful parameters are tuned to find the best configuration. All other parameters are used with default values or those specified on UI.
Although this is a resource-intensive operation, it can be useful to identify better RNN-based configuration. Transformer-based models are not used during auto hyperparameter tuning as they have a fixed architecture. They usually perform better on Q\&A tasks yet they are much more expensive on both training and inference time.
## Input/Output parameters
Here you can specify the input data that should be used for training with possibility to filter or sample it.
You can also configure this job to read from or write to cloud storage. See **Configure An Argo-Based Job to Access GCS** and **Configure An Argo-Based Job to Access S3**.
Some jobs can be configured to read from or write to Google Cloud Storage (GCS).
You can configure a combination of Solr and cloud-based input or output, that is, you can read from GCS and then write to Solr or vice versa.
However, you cannot configure multiple storage sources for input or multiple storage targets for output; only one can be configured for each.
## Supported jobs
This procedure applies to these Argo jobs:
* Content based Recommender
* BPR Recommender
* Classification
* Evaluate QnA Pipeline
* QnA Coldstart Training
* QnA Supervised Training
For Spark jobs, see Configure A Spark-Based Job to Access Cloud Storage.
## How to configure a job to access GCS
1. Gather the access key for your GCS account.\
See the [GCS documentation](https://cloud.google.com/iam/docs/creating-managing-service-account-keys).
2. Create a Kubernetes secret:
```
kubectl create secret generic my-gcs-serviceaccount-key --from-file=.json --namespace
```
3. In the job’s **Cloud storage secret name** field, enter the name of the secret for the GCS target as mounted in the Kubernetes namespace.\
This is the name you specified in the previous step. In the example above, the secret name is `my-gcs-serviceaccount-key`.
You can also find this name using `kubectl get secret -n `.
4. In the job’s **Additional Parameters**, add this parameter:
* Parameter name: `google.cloud.auth.service.account.json.keyfile`
* Parameter value: ``
The file name may be different than the secret name. You can check using `kubectl get secret -n -o yaml`.
Some jobs can be configured to read from or write to Amazon S3 (S3).
You can configure a combination of Solr and cloud-based input or output, that is, you can read from S3 and then write to Solr or vice versa.
However, you cannot configure multiple storage sources for input or multiple storage targets for output; only one can be configured for each.
## Supported jobs
This procedure applies to these Argo jobs:
* Content based Recommender
* BPR Recommender
* Classification
* Evaluate QnA Pipeline
* QnA Coldstart Training
* QnA Supervised Training
For Spark jobs, see Configure A Spark-Based Job to Access Cloud Storage.
## How to configure a job to access S3
1. Gather the access key and secret key for your S3 account.\
See the [AWS documentation](https://aws.amazon.com/premiumsupport/knowledge-center/create-access-key).
2. Create a Kubernetes secret:
```
kubectl create secret generic aws-secret --from-literal=my-aws-key-file='' --from-literal=my-aws-secret-path='' --namespace
```
3. In the job’s **Cloud storage secret name** field, enter the name of the secret for the S3 target as mounted in the Kubernetes namespace.\
This is the name you specified in the previous step. In the example above, the secret name is `aws-secret`.
You can also find this name using `kubectl get secret -n `.
4. In the job’s **Additional Parameters**, add these two parameters:
* Param name: `fs.s3a.access.keyPath`\
Param value: ``
* Param name: `fs.s3a.secret.keyPath`\
Param value: ``
The file name may be different than the secret name. You can check using `kubectl get secret -n -o yaml`.
If you have additional text data that can be used for **custom embeddings initialization** or to learn and capture bigger vocabulary when **word\_en\_300d\_2M** is used, please provide it in the **Texts Data Path** field.
**Model Replicas** parameter allows to specify how many replicas of the model should be deployed. Auto-balancing mechanism is used to distribute queries between model replicas, so more replicas might provide faster indexing as well as higher QPS.
If you use aggregated signals data for training or have weights for each training pair, you can also specify **Weight Field**. It will be used for sampling positive answers for a particular query if there are more than one possible. It is useful for eCommerce use-cases when for one unique query there might be a lot of different paired products.
**Weight Field** will not be used if **Use Labelling Resolution** is set on. These parameters are mutually exclusive.
## Data pre-processing parameters
**Labeling Resolution** allows to find missing query/response pairs in the training data which helps in the training. When set on, a graph of all pairs connections is built. Then connected components are obtained to match missing query/response pairs. For example if there are three existing pairs: `q1-a1`, `q2-a1` and `q2-a2`. Then Labelling Resolution will match `q1-a2` as additional pair through `q2-a1` connection.
This is useful in Q\&A use-cases when there are not a lot of answers per unique question, otherwise too big connected components will be found. If you have data when for one query there might be a lot of different responses, like in eCommerce, it is better to leave it off.
If **Use Labelling Resolution** is set on, **Weight Field** is ignored. These parameters are mutually exclusive.
The **Maximum vocabulary size**, **Lower case all words** and **Apply unidecode decoding** parameters impact the vocabulary size if `word_en_300d_2M`, `word_custom` or `bpe_custom` model bases are used. Otherwise these parameters are ignored and model specific pre-processing is used. Default values should work in most cases, given enough RAM and time to train.
If you want to train custom embeddings for languages like CJK, disable **Apply unidecode decoding**.
If you see an out-of-memory error, try reducing the vocabulary size and/or the training batch size. The **Minimum number of words** and **Maximum number of words** parameters can help trim problematic documents.
## Custom embeddings initialization parameters
If **word\_custom** or **bpe\_custom** model bases are chosen, then custom embeddings will be trained on the provided data.
If you want to use addition dataset to train custom embeddings, please specify **Texts Data Path** and **Text Fields** in the **Input/Output parameters**.
Additionally, commonly-used Word2vec training parameters are **Word2Vec Training Epochs**, **Size of Word Vectors** and **Word2Vec Window Size**. Default values should work in most cases.
Smaller word vectors size makes models smaller and more robust to overfitting. However, dimensions smaller than 100 may impact the quality.
## Evaluation parameters
**Validation Sample Size** controls how much *unique* queries should be hold-out and used for validation. It is a fraction if the value below 1.0 or specific number of queries if it is integer value higher than 1.
During evaluation, all responses/answers are used. They form an index which is queried by unique validation queries. **Eval ANN Index** parameter controls should it be ANN index or brute-force search with auto value by default. If you notice that evaluation takes a lot of time, try to enable ANN index or reduce the number of evaluation queries.
Generally, this evaluation setup is similar to how it will work in index and query pipelines, so the evaluation results should provide good approximation of the quality. To evaluate the configured pipelines on the test data, please use **Evaluate a Smart Answers Query Pipeline**.
The [Smart Answers Evaluate Pipeline job](/docs/5/fusion/reference/config-ref/jobs/smart-answers-evaluate-pipeline) evaluates the rankings of results from any [Smart Answers](/docs/5/fusion/getting-data-out/advanced-query-enhancement/smart-answers/overview) pipeline and finds the best set of weights in the ensemble score. This topic explains how to set up the job.
Before beginning this procedure, prepare a machine learning model using either the Supervised method or the Cold start method, or by selecting one of the pre-trained cold start models, then Configure your pipelines.
The input for this job is a set of test queries and the text or ID of the correct responses. At least 100 entries are needed to obtain useful results. The job compares the test data with Fusion’s actual results and computes variety of the ranking metrics to provide insights of how well the pipeline works. It is also useful to use to compare with other setups or pipelines.
## Prepare test data
1. Format your test data as query/response pairs, that is, a query and its corresponding answer in each row.
You can do this in any format that Fusion support, but parquet file would be preferable to reduce the amount of possible encoding issues.
The response value can be either the document ID of the correct answer in your Fusion index (preferable), or the text of the correct answer.
If you use answer text instead of an ID, make sure that the answer text in the evaluation file is formatted identically to the answer text in Fusion.
If there are multiple possible answers for a unique question, then repeat the questions and put the pair into different rows to make sure each row has exactly one query and one response.
2. If you wish to index test data into Fusion, create a collection for your test data, such as `sa_test_input` and index the test data into that collection.
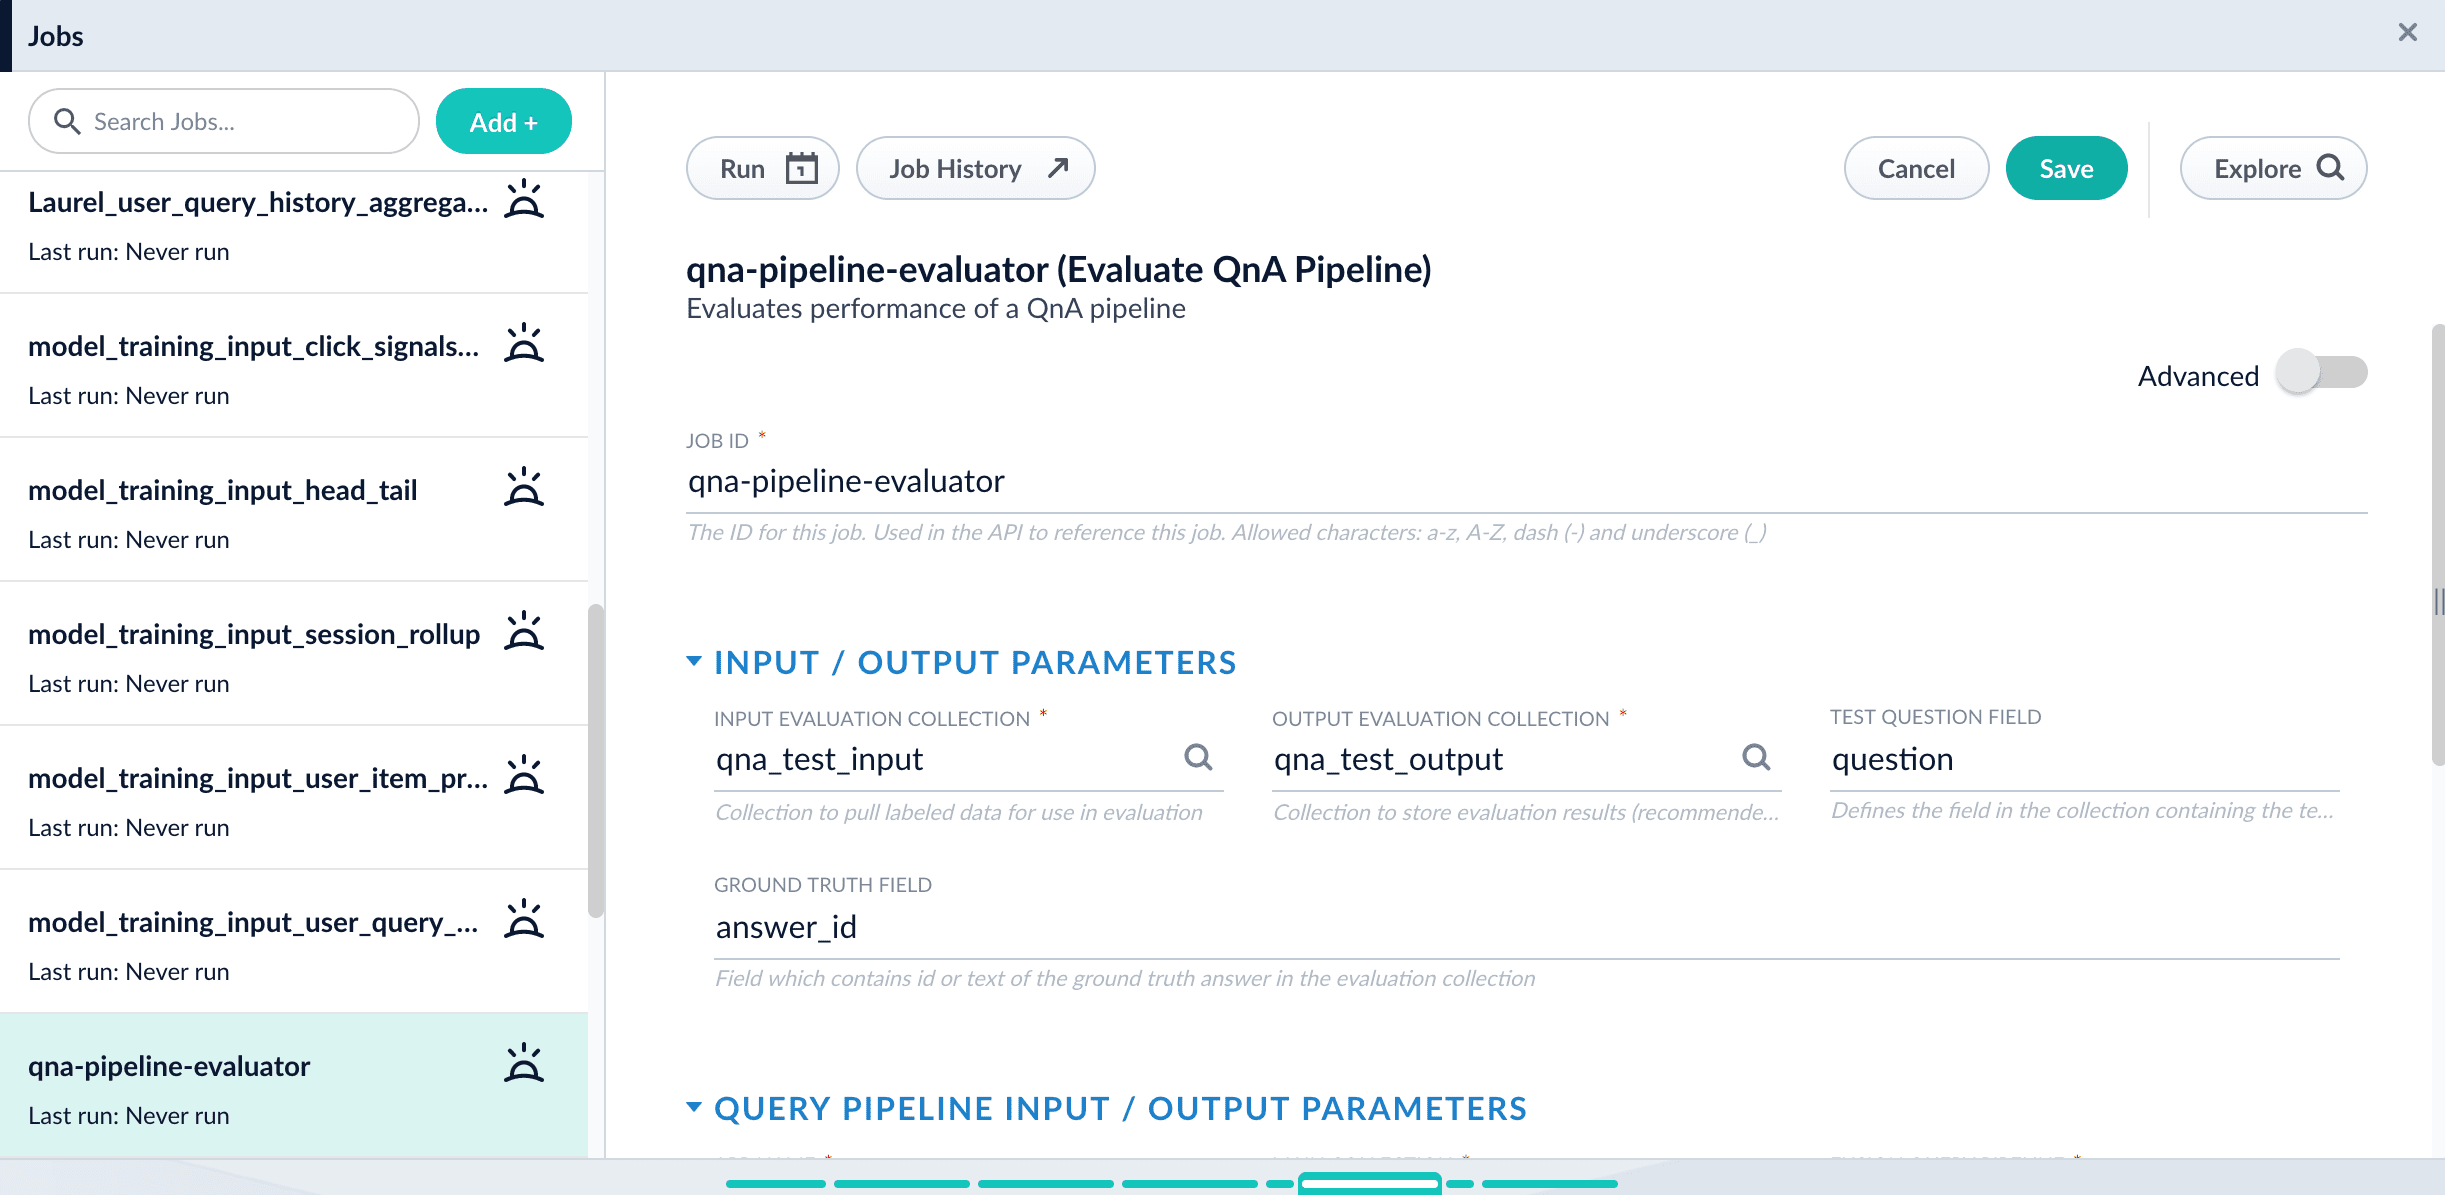
## Configure the evaluation job
1. If you wish to save the job output in Fusion, create a collection for your evaluation data such as `sa_test_output`.
2. Navigate to **Collections** > **Jobs**.
3. Select **New** > **Smart Answers Evaluate Pipeline** (**Evaluate QnA Pipeline** in Fusion 5.1 and 5.2).
4. Enter a **Job ID**, such as `sa-pipeline-evaluator`.
5. Enter the name of your test data collection (such as `sa_test_input`) in the **Input Evaluation Collection** field.
6. Enter the name of your output collection (such as `sa_test_output`) in the **Output Evaluation Collection** field.
You can also configure this job to read from or write to cloud storage.
7. Enter the name of the **Test Question Field** in the input collection.
8. Enter the name of the answer field as the **Ground Truth Field**.
9. Enter the **App Name** of the Fusion app where the main Smart Answers content is indexed.
10. In the **Main Collection** field, enter the name of the Fusion collection that contains your Smart Answers content.
11. In the **Fusion Query Pipeline** field, enter the name of the Smart Answers query pipeline you want to evaluate.
12. In the **Answer Or ID Field In Fusion** field, enter the name of the field that Fusion will return containing the answer text or answer ID.
13. Optionally, you can configure the **Return Fields** to pass from Smart Answers collection into the evaluation output.
Check the Query Workbench to see which fields are available to be returned.
14. Configure the **Metrics** parameters:
* **Solr Scale Function**
Specify the function used in the Compute Mathematical Expression stage of the query pipeline, one of the following:
* `max`
* `log10`
* `pow0.5`
* **List of Ranking Scores For Ensemble**
To find the best weights for different ranking scores, list the names of the ranking score fields, separated by commas. Different ranking scores might include Solr score, query-to-question distance, or query-to-answer distance from the Compute Mathematical Expression pipeline stage.
* **Target Metric To Use For Weight Selection**
The target ranking metric to optimize during weights selection. The default is `mrr@3`.
{/* //+ */}
{/* //Target metric to use for weight selection parameter allows to specify metric that should be optimized during weights selection, for example `recall@3`. Metric values at different positions for different weights combinations will be shown in the log, sorted descendingly based on metric specified above. NOTE: Weights selection can take a while to run for big evaluation datasets, thus if only interested in comparing pipelines, please turn this function off by uncheck Perform weights selection box. */}
15. Optionally, [read about the advanced parameters](/docs/5/fusion/reference/config-ref/jobs/smart-answers-evaluate-pipeline) and consider whether to configure them as well.
For example, **Sampling proportion** and **Sampling seed** provide a way to run the job only on a sample of the test data.
16. Click **Save**.
17\. Click **Run** > **Start**.
## Examine the output
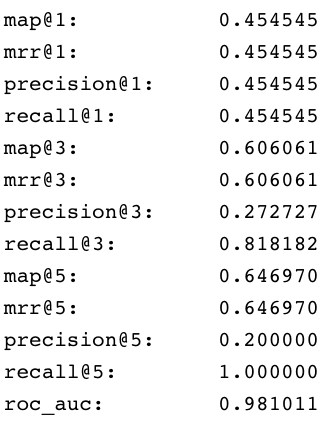
The job provides a variety of metrics (controlled by the **Metrics list** advanced parameter) at different positions (controlled by the **Metrics\@k list** advanced parameter) for the chosen final ranking score (specified in **Ranking score** parameter).
**Example: Pipeline evaluation metrics**
**Example: recall\@1,3,5 for different weights and distances**
In addition to metrics, a results evaluation file is indexed to the specified output evaluation collection. It provides the correct answer position for each test question as well as the top returned results for each field specified in **Return fields** parameter.
A list of evaluation metrics is provided to monitor the training process and measure the quality of the final model:
* Mean Average Precision (MAP)
* Mean Reciprocal Rank (MRR)
* Recall
You can choose from the list in the **Metrics list** parameter. It uses all metrics by default.
You can also specify measuring the ranking position for each metric. For example, if you specify **Metrics\@k list** as `[1,3]`, with **Metrics list** `[“map”,”mrr”,”recall”]`, then the metrics `map@1`, `map@3`, `mrr@1`, `mrr@3`, `recall@1`, and `recall@3` will be logged for each training epoch and final model.
You can choose a particular metric at a particular `k` (controlled by the **Monitoring metric** parameter) to help decide when to stop training. Specifically, when there is no increase in the Monitoring metric value for a particular number of epochs (controlled by the **Patience during monitoring** parameter), then training stops.
During the training we evaluate the result using similar cold-start model (weighted average of word vectors) as a baseline. Look for the *Cold-start encoder validation evaluation* section of the logs, it is printed before first training epoch.
## General Encoder parameters
Note that the following parameters are common across all model bases including RNN and Transformer architectures.
* **Fine-tune Token Embeddings** will allow to fine-tune embeddings (word vectors) layer to be updated during the training alongside with all other layers. It is disabled by default as it is usually one of the biggest layer in the network and updating it might lead to overfitting. It is useful to enable if your data have a lot of specific or misspelled words.
* **Max Length** controls the maximum context window that model can process. Texts longer than this value will be trimmed. The default value is the max value between three times the STD of question lengths and two times the STD of answer lengths.\
The longer the context the longer and harder it takes for model to process. This parameter is especially important for Transformer-based models as it affects training and inference time. Note that the maximum supported length for Transformer models is 512 tokens, so you can specify any value up to that.
* **Global Pool Type** specifies how token vectors should be aggregated to obtain final content vector. The default mechanism is self-attention which provides the best quality in most cases.
* **Number of clusters** and **Top K of clusters to return** are deprecated since 5.3 and will be removed in the following releases. There is no practical need to use them after Milvus vectors similarity search integration.
## RNN Encoder parameters
We use [RNN-based deep learning](https://en.wikipedia.org/wiki/Recurrent_neural_network) architecture for `word` and `bpe` model bases, with the flexibility to choose between `LSTM` and `GRU` layers with more than one layer. We don’t recommend using more than three layers. The layers and layer sizes are controlled by the **RNN function list** and **RNN function units list** parameters.
**Dropout ratio** parameters provides regularization effect and is applied between embeddings layer and the first RNN layer.
## Training parameters
These parameters controls the training procedure. Most of them are left blank so the robust default values can be determined by the training module based on the dataset statistics.
The learning rate scheduler has 3 stages. Firstly, it linearly increases the LR from **Minimum Learning Rate** value to **Base Learning Rate** value over **Number of Warm-Up epochs**. Then it stays consistent for **Number of Flat epochs**. And at the last stage Cosine Annealing is used for the remain number of epochs.
**Use Mixed Precision** parameter can enable mixed precision during the training for Transformer-based models if modern GPU are used (Turing and later). It helps to get more VRAM so bigger batch size can be used. As well as provides some performance boost in training time.
**Cross-Batch Memory** parameters allow to re-use encoded representations from the previous batches during loss computation, so loss function can process more positive and negative examples for the model update. It works well with Transformer-based models that consumes more VRAM and can be used with only with limited batch size. This is not necessary when the training batch size is large. When configured, this number needs to be greater than or equal to the training batch size.
 17\. Click **Run** > **Start**.
## Examine the output
The job provides a variety of metrics (controlled by the **Metrics list** advanced parameter) at different positions (controlled by the **Metrics\@k list** advanced parameter) for the chosen final ranking score (specified in **Ranking score** parameter).
**Example: Pipeline evaluation metrics**
17\. Click **Run** > **Start**.
## Examine the output
The job provides a variety of metrics (controlled by the **Metrics list** advanced parameter) at different positions (controlled by the **Metrics\@k list** advanced parameter) for the chosen final ranking score (specified in **Ranking score** parameter).
**Example: Pipeline evaluation metrics**
 **Example: recall\@1,3,5 for different weights and distances**