> ## Documentation Index
> Fetch the complete documentation index at: https://doc.lucidworks.com/llms.txt
> Use this file to discover all available pages before exploring further.
# Getting Data In
export const LwTemplate = ({title = "Key questions to get you started", icon = "sparkles", cta = "Powered by Agent Studio", linkHref = "https://lucidworks.com/demo/?utm_source=docs&utm_medium=referral&utm_campaign=docs_cta_ai"}) => {
const [isLoaded, setIsLoaded] = useState(false);
useEffect(() => {
const timer = setTimeout(() => {
setIsLoaded(true);
}, 500);
return () => clearTimeout(timer);
}, []);
return
{isLoaded && `
}} />}
Powered by Lucidworks Agent Studio
;
};
[localhost link]: http://localhost:3000/docs/5/fusion/getting-data-in/overview
[mintlify link]: https://doc.lucidworks.com/docs/5/fusion/getting-data-in/overview
[old doc.lw link]: https://doc.lucidworks.com/fusion/5.9/3218
There are many methods for getting data into Fusion, depending on the type of data:
* Your searchable content, [signals](/docs/5/fusion/getting-data-out/query-enhancement/signals/overview), and logs are all ingested by [indexing them](/docs/5/fusion/getting-data-in/indexing/overview) in Solr.
* [Connectors](/docs/fusion-connectors/overview), [machine learning models](/docs/5/fusion/intro/machine-learning/machine-learning-models), JDBC drivers, analytics catalogs, and [Banana dashboards](/docs/5/fusion/operations/monitoring-and-reporting/banana-dashboards/overview) can be uploaded to the blob store.
* The [Parallel Bulk Loader (PBL)](/docs/5/fusion/getting-data-in/parallel-bulk-loader) can perform distributed reads on any data source that implements the SparkSQL (2.2.1 or later) Data Sources API.
* In some cases, you might find that it’s best to use other ingestion methods, such as
**Import Data with Hive**, **Import Data with Pig**, or pushing data to a **Import Data with the REST API** endpoint.
The JDBC V2 connector is supported, and fetches documents from a relational database via SQL queries. Under the hood, this connector implements the Solr [DataImportHandler (DIH)](https://wiki.apache.org/solr/DataImportHandler) plugin.
Fusion stores JDBC drivers in the blob store. You can upload a driver using the Fusion UI or the Blob Store API.
## How to upload a JDBC driver using the Fusion UI
{/* // tag::upload[] */}
1. In the Fusion UI, navigate to **System** > **Blobs**.
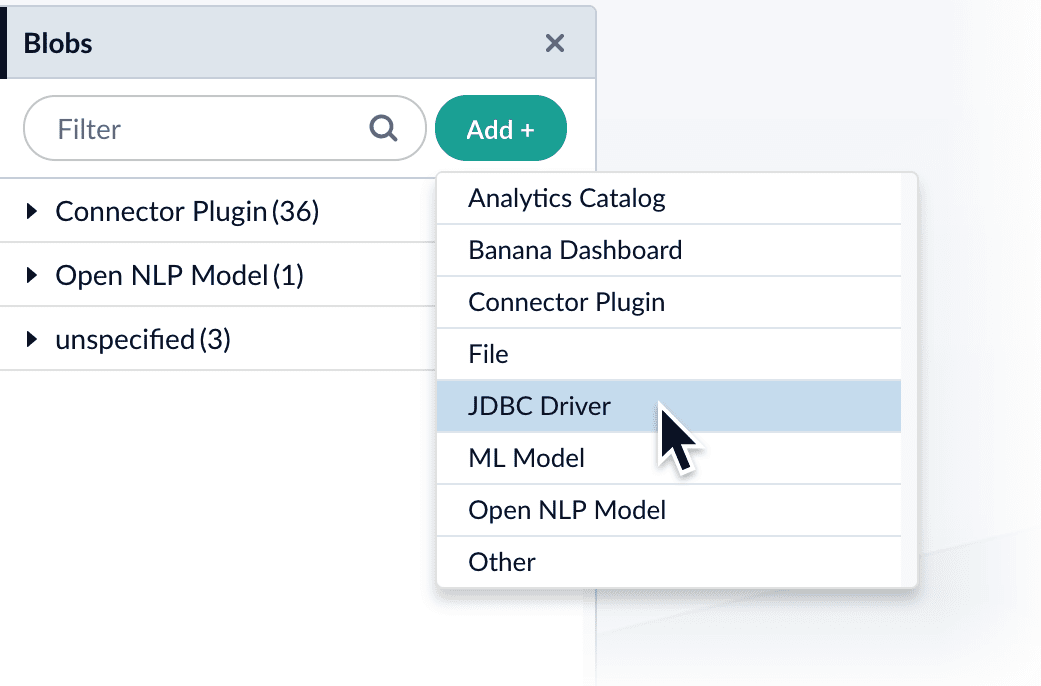
2. Click **Add**.
3. Select **JDBC Driver**.
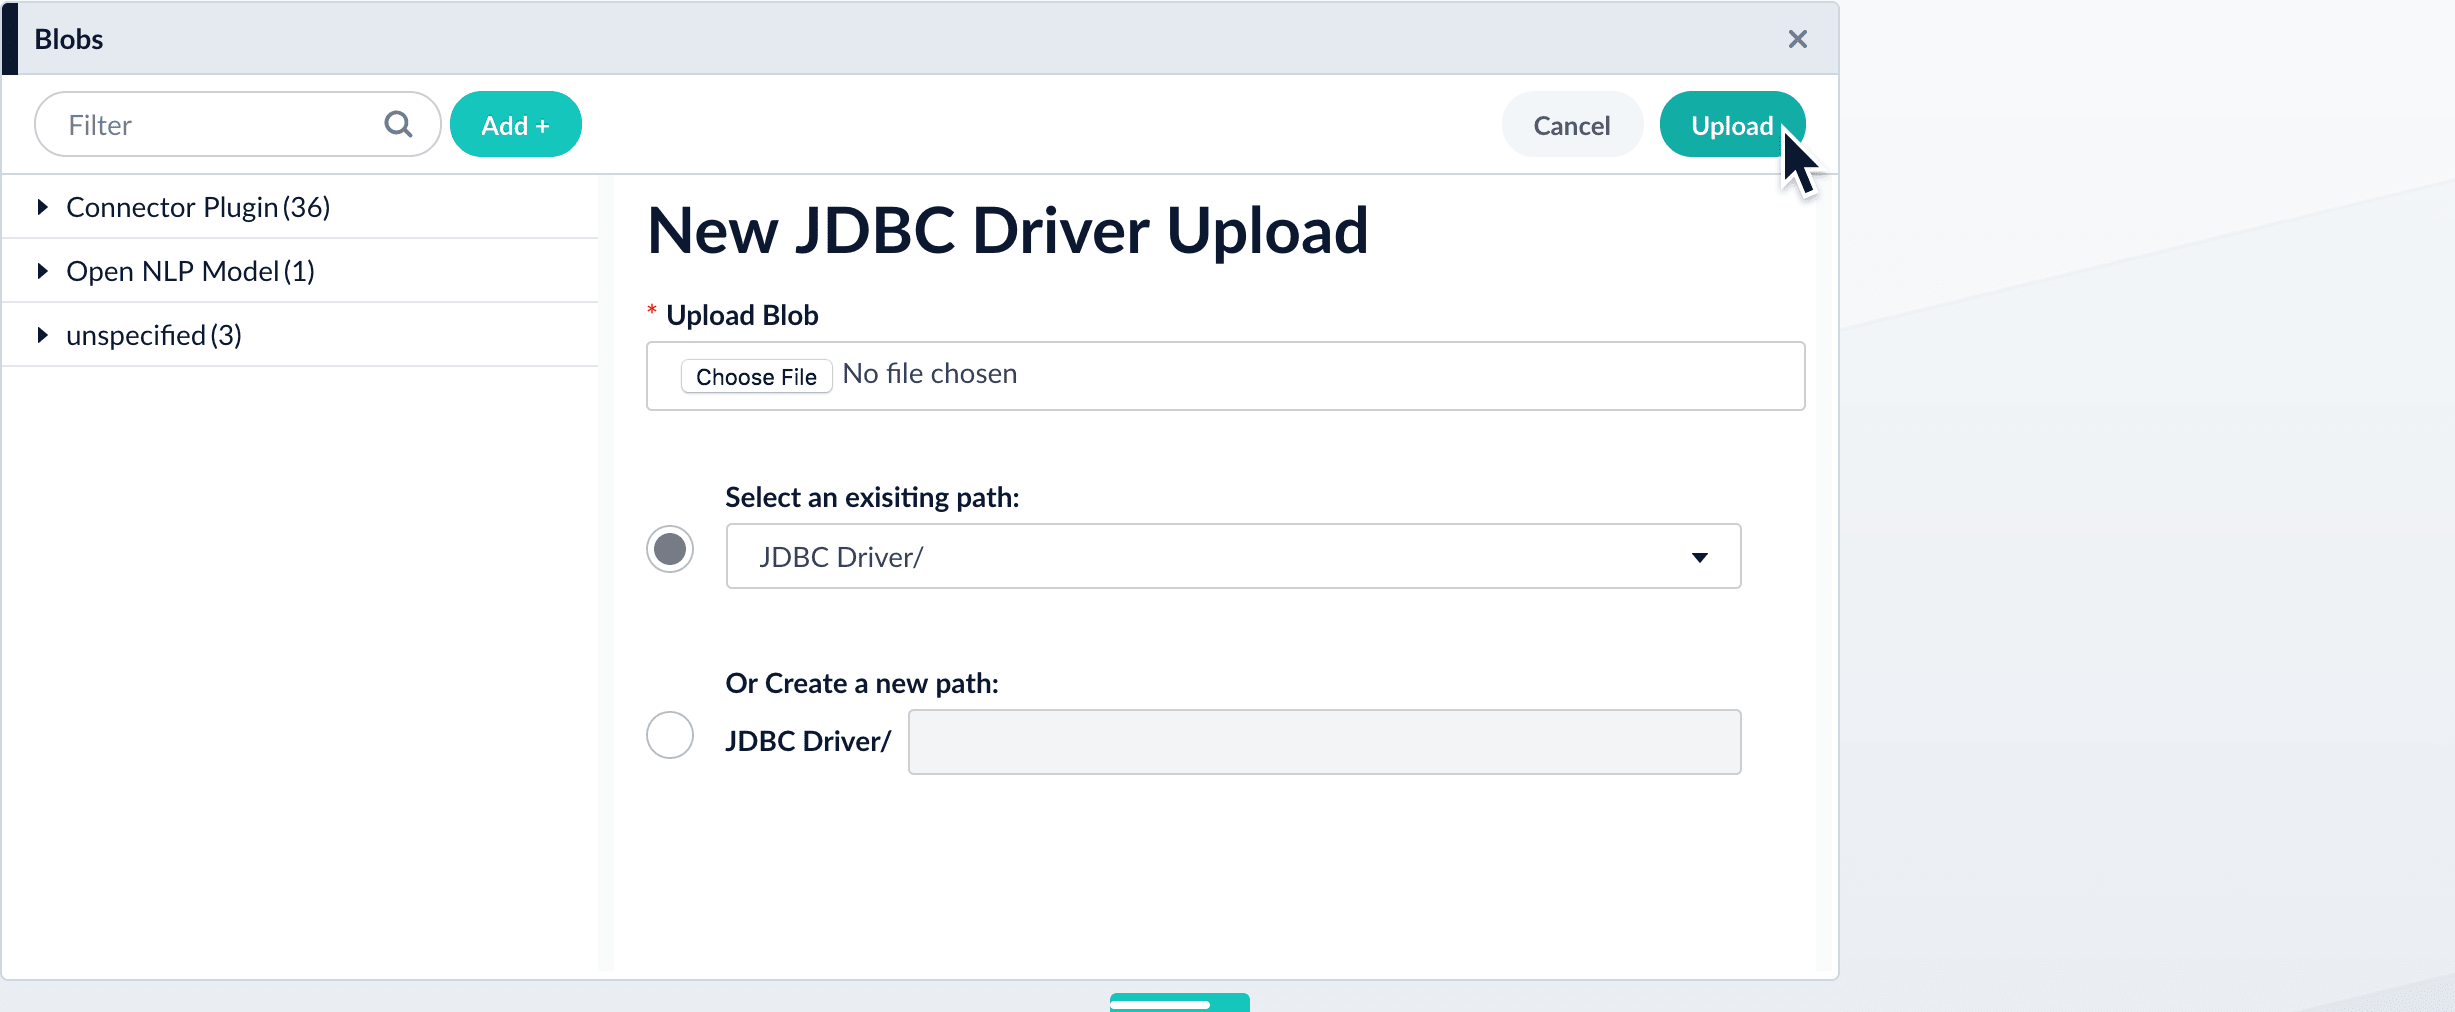
The "New 'JDBC Driver' Upload" panel appears.
4. Click **Choose File** and select the .jar file from your file system.
5. Click **Upload**.
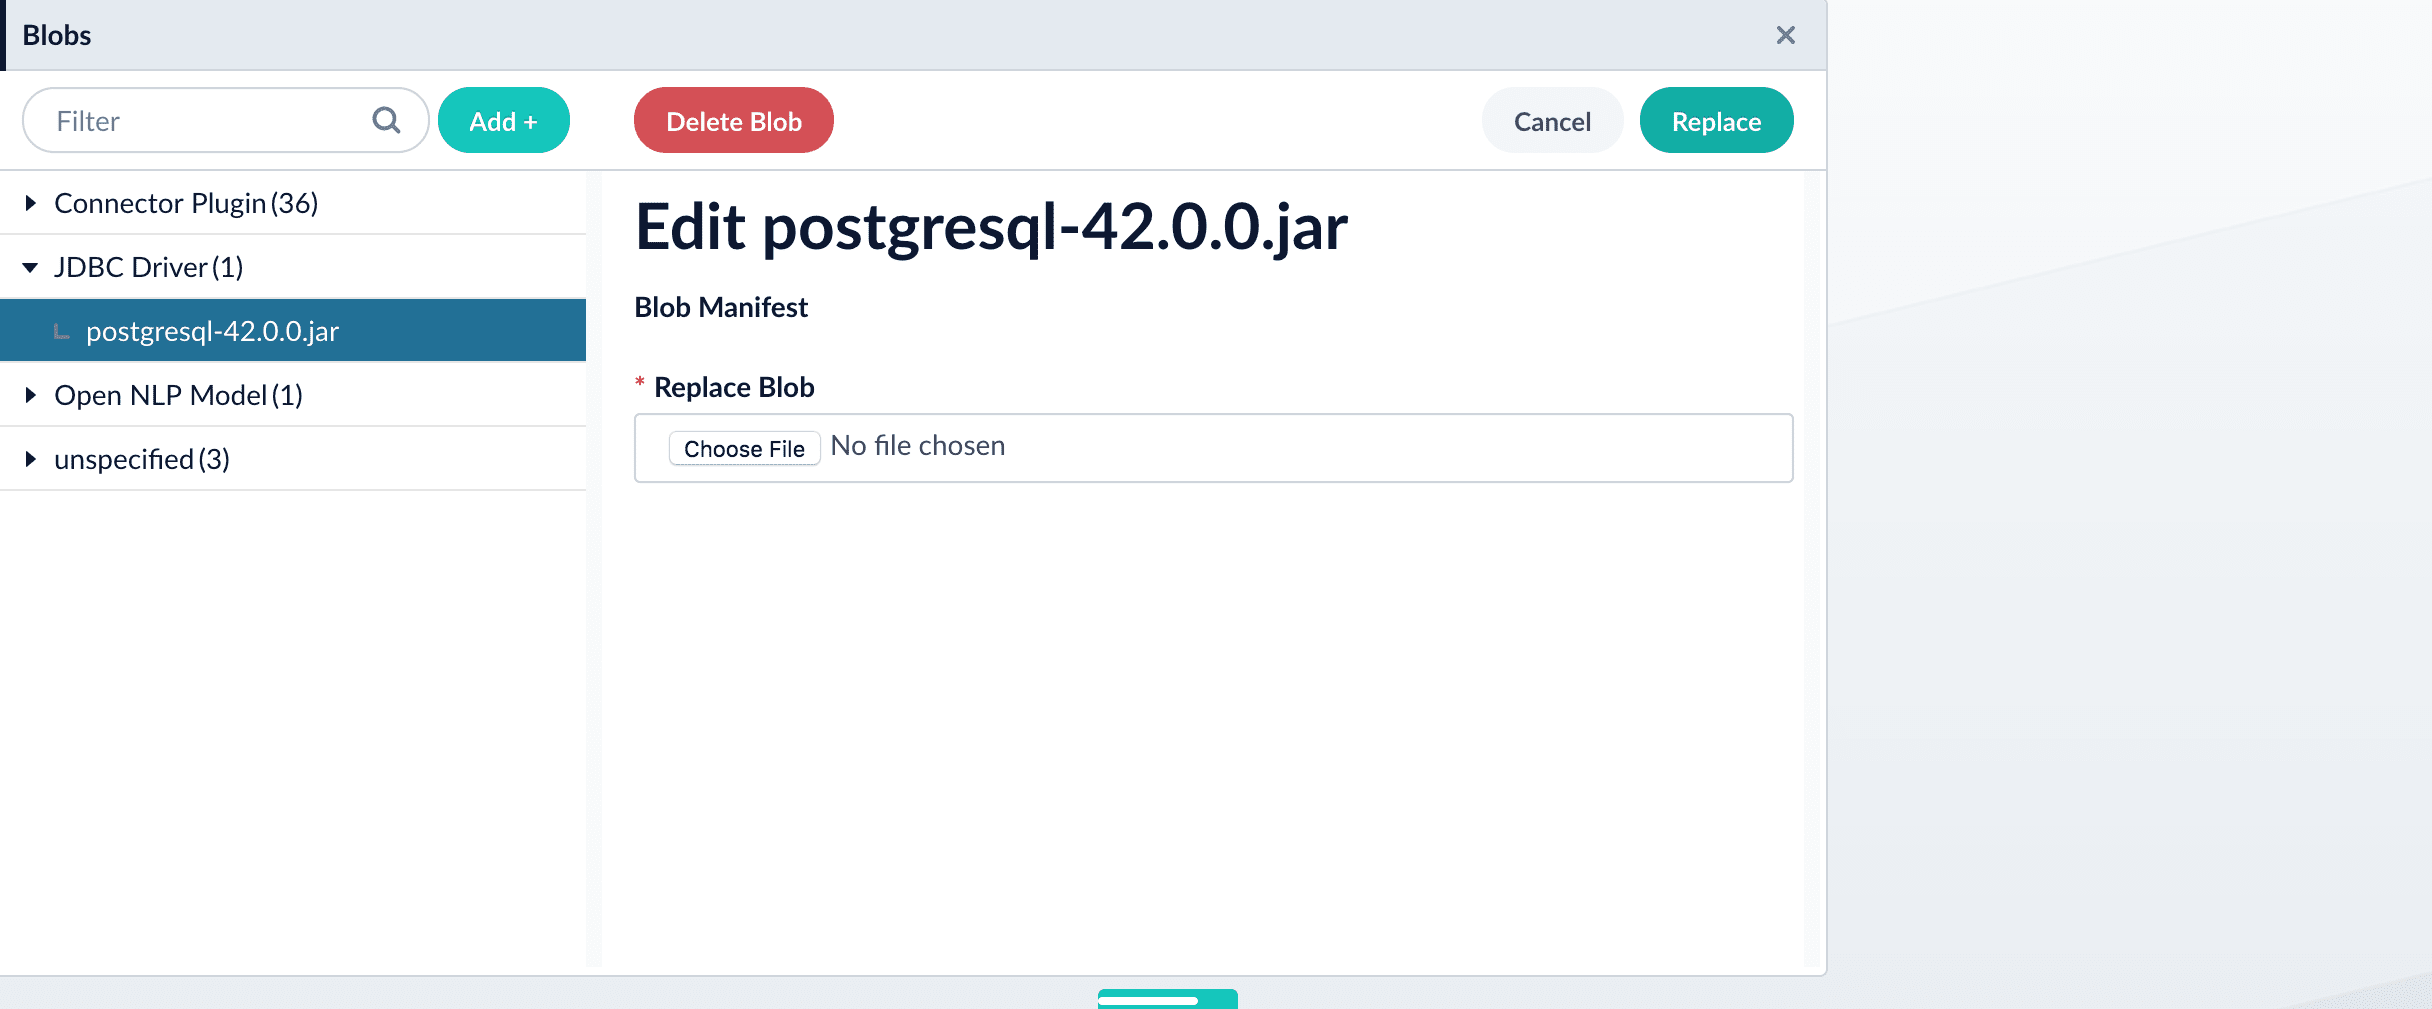
The new driver’s blob manifest appears.
From this screen you can also delete or replace the driver.
{/* // end::upload[] */}
## How to install a JDBC driver using the API
1. Upload the JAR file to Fusion’s blob store using the [`/blobs/{id}` endpoint](/api-reference/blobs/upload-a-blob).
Specify an arbitrary blob ID, and a `resourceType` value of `plugin:connector`, as in this example:
```bash theme={"dark"}
curl -u USERNAME:PASSWORD -H "content-type:application/java-archive" -H "content-length:707261" -X PUT --data-binary @postgresql-42.0.0.jar http://localhost:8764/api/blobs/mydriver?resourceType=driver:jdbc
```
Success response:
```json theme={"dark"}
{
"name" : "mydriver",
"contentType" : "application/java-archive",
"size" : 707261,
"modifiedTime" : "2017-06-09T19:00:48.919Z",
"version" : 0,
"md5" : "c67163ca764bfe632f28229c142131b5",
"metadata" : {
"subtype" : "driver:jdbc",
"drivers" : "org.postgresql.Driver",
"resourceType" : "driver:jdbc"
}
}
```
Fusion automatically publishes the event to the cluster, and the listeners perform the driver installation process on each node.
If the blob ID is identical to an existing one, the old driver will be uninstalled and the new driver will installed in its place. To get the list of existing blob IDs, run: `curl -u USERNAME:PASSWORD https://FUSION_HOST:FUSION_PORT/api/blobs`
2. To verify the uploaded driver, run:
```bash theme={"dark"}
curl -u USERNAME:PASSWORD https://FUSION_HOST:FUSION_PORT/api/blobs/BLOB_ID/manifest
```
Where the `BLOB_ID` is the name specified during upload, such as "mydriver" above. A success response looks like this:
```json theme={"dark"}
{
"name" : "mydriver",
"contentType" : "application/java-archive",
"size" : 707261,
"modifiedTime" : "2017-06-09T19:05:17.897Z",
"version" : 1569755095787110400,
"md5" : "c67163ca764bfe632f28229c142131b5",
"metadata" : {
"subtype" : "driver:jdbc",
"drivers" : "org.postgresql.Driver",
"resourceType" : "driver:jdbc"
}
}
```
Fusion ships with a Serializer/Deserializer (SerDe) for Hive, included in the distribution as `lucidworks-hive-serde-v2.2.6.jar` in `$FUSION_HOME/apps/connectors/resources/lucid.hadoop/jobs`.
For Fusion 4.1.x and 4.2.x, the preferred method of importing data with Hive is to use the Parallel Bulk Loader. The import procedure does not apply to Fusion 5.x.
## Features
* Index Hive table data to Solr.
* Read Solr index data to a Hive table.
* Kerberos support for securing communication between Hive and Solr.
* As of v2.2.4 of the SerDe, integration with Fusion is supported.
\*Fusion's index pipelines can be used to index data to Fusion.
\*Fusion's query pipelines can be used to query Fusion's Solr instance for data to insert into a Hive table.
## Add the SerDe Jar to Hive Classpath
In order for the Hive SerDe to work with Solr, the SerDe jar must be added to Hive's classpath using the `hive.aux.jars.path` capability. There are several options for this, described below.
It's considered a best practice to use a single directory for all auxiliary jars you may want to add to Hive so you only need to define a single path. However, you must then copy any jars you want to use to that path.
The following options all assume you have created such a directory at `/usr/hive/auxlib`; if you use another path, update the path in the examples accordingly.
If you use Hive with Ambari (as with the Hortonworks HDP distribution), go to **menu:Hive\[Configs > Advanced]**, and scroll down to **menu:Advanced hive-env\[hive-env template]**. Find the section where the `HIVE_AUX_JARS_PATH` is defined, and add the path to each line which starts with `export`. What you want will end up looking like:
```java wrap theme={"dark"}
# Folder containing extra libraries required for hive compilation/execution can be controlled by:
if [ "${HIVE_AUX_JARS_PATH}" != "" ]; then
if [ -f "${HIVE_AUX_JARS_PATH}" ]; then
export HIVE_AUX_JARS_PATH=${HIVE_AUX_JARS_PATH},/usr/hive/auxlib
elif [ -d "/usr/hdp/current/hive-webhcat/share/hcatalog" ]; then
export HIVE_AUX_JARS_PATH=/usr/hdp/current/hive-webhcat/share/hcatalog/hive-hcatalog-core.jar,/usr/hive/auxlib
fi
elif [ -d "/usr/hdp/current/hive-webhcat/share/hcatalog" ]; then
export HIVE_AUX_JARS_PATH=/usr/hdp/current/hive-webhcat/share/hcatalog/hive-hcatalog-core.jar,/usr/hive/auxlib
fi
```
If you are not using Ambari or a similar cluster management tool, you can add the jar location to `hive/conf/hive-site.xml`:
```xml theme={"dark"}
hive.aux.jars.path/usr/hive/auxlib
```
Another option is to launch Hive with the path defined with the `auxpath` variable:
hive --auxpath /usr/hive/auxlib
There are also other approaches that could be used. Keep in mind, though, that the jar *must* be loaded into the classpath, adding it with the `ADD JAR` function is not sufficient.
### Indexing Data to Fusion
If you use Lucidworks Fusion, you can index data from Hive to Solr via Fusion's index pipelines. These pipelines allow you several options for further transforming your data.
If you are using Fusion v3.0.x, you already have the Hive SerDe in Fusion's `./apps/connectors/resources/lucid.hadoop/jobs` directory. The SerDe jar that supports Fusion is v2.2.4 or higher. This was released with Fusion 3.0.
If you are using Fusion 3.1.x and higher, you will need to download the Hive SerDe from [http://lucidworks.com/connectors/](http://lucidworks.com/connectors/). Choose the proper Hadoop distribution and the resulting .zip file will include the Hive SerDe.
A 2.2.4 or higher jar built from this repository will also work with Fusion 2.4.x releases.
This is an example Hive command to create an external table to index documents in Fusion and to query the table later.
```bash wrap theme={"dark"}
hive> CREATE EXTERNAL TABLE fusion (id string, field1_s string, field2_i int)
STORED BY 'com.lucidworks.hadoop.hive.FusionStorageHandler'
LOCATION '/tmp/fusion'
TBLPROPERTIES('fusion.endpoints' = 'http://localhost:8764/api/apollo/index-pipelines//collections//index',
'fusion.fail.on.error' = 'false',
'fusion.buffer.timeoutms' = '1000',
'fusion.batchSize' = '500',
'fusion.realm' = 'KERBEROS',
'fusion.user' = 'fusion-indexer@FUSIONSERVER.COM',
'java.security.auth.login.config' = '/path/to/JAAS/file',
'fusion.jaas.appname' = 'FusionClient',
'fusion.query.endpoints' = 'http://localhost:8764/api/apollo/query-pipelines/pipeline-id/collections/collection-id',
'fusion.query' = '*:*');
```
In this example, we have created an external table named "fusion", and defined a custom storage handler (`STORED BY 'com.lucidworks.hadoop.hive.FusionStorageHandler'`) that a class included with the Hive SerDe jar designed for use with Fusion.
Note that all of the same caveats about field types discussed in the section `<>` apply to Fusion as well. In Fusion, however, you have the option of using an index pipeline to perform specific field mapping instead of using dynamic fields.
The LOCATION indicates the location in HDFS where the table data will be stored. In this example, we have chosen to use `/tmp/fusion`.
In the section TBLPROPERTIES, we define several properties for Fusion so the data can be indexed to the right Fusion installation and collection:
* `fusion.endpoints`:
The full URL to the index pipeline in Fusion. The URL should include the pipeline name and the collection data will be indexed to.
* `fusion.fail.on.error`:
If `true`, when an error is encountered, such as if a row could not be parsed, indexing will stop. This is `false` by default.
* `fusion.buffer.timeoutms`:
The amount of time, in milliseconds, to buffer documents before sending them to Fusion. The default is 1000. Documents will be sent to Fusion when either this value or `fusion.batchSize` is met.
* `fusion.batchSize`:
The number of documents to batch before sending the batch to Fusion. The default is 500. Documents will be sent to Fusion when either this value or `fusion.buffer.timeoutms` is met.
* `fusion.realm`:
This is used with `fusion.user` and `fusion.password` to authenticate to Fusion for indexing data. Two options are supported, `KERBEROS` or `NATIVE`.
Kerberos authentication is supported with the additional definition of a JAAS file. The properties `java.security.auth.login.config` and `fusion.jaas.appname` are used to define the location of the JAAS file and the section of the file to use.
Native authentication uses a Fusion-defined username and password. This user must exist in Fusion, and have the proper permissions to index documents.
* `fusion.user`:
The Fusion username or Kerberos principal to use for authentication to Fusion. If a Fusion username is used (`'fusion.realm' = 'NATIVE'`), the `fusion.password` must also be supplied.
* `fusion.password`:
This property is not shown in the example above. The password for the `fusion.user` when the `fusion.realm` is `NATIVE`.
* `java.security.auth.login.config`:
This property defines the path to a JAAS file that contains a service principal and keytab location for a user who is authorized to read from and write to Fusion and Hive.
The JAAS configuration file *must* be copied to the same path on every node where a Node Manager is running (i.e., every node where map/reduce tasks are executed). Here is a sample section of a JAAS file:
```bash theme={"dark"}
Client { <1>
com.sun.security.auth.module.Krb5LoginModule required
useKeyTab=true
keyTab="/data/fusion-indexer.keytab" <2>
storeKey=true
useTicketCache=true
debug=true
principal="fusion-indexer@FUSIONSERVER.COM"; <3>
};
```
* `<1>` The name of this section of the JAAS file. This name will be used with the `fusion.jaas.appname` parameter.
* `<2>` The location of the keytab file.
* `<3>` The service principal name. This should be a different principal than the one used for Fusion, but must have access to both Fusion and Hive. This name is used with the `fusion.user` parameter described above.
* `fusion.jaas.appname`:
Used only when indexing to or reading from Fusion when it is secured with Kerberos.
This property provides the name of the section in the JAAS file that includes the correct service principal and keytab path.
* `fusion.query.endpoints`:
The full URL to a query pipeline in Fusion. The URL should include the pipeline name and the collection data will be read from. You should also specify the request handler to be used.
If you do not intend to query your Fusion data from Hive, you can skip this parameter.
* `fusion.query`:
The query to run in Fusion to select records to be read into Hive. This is `\*:*` by default, which selects all records in the index.
If you do not intend to query your Fusion data from Hive, you can skip this parameter.
## Query and Insert Data to Hive
Once the table is configured, any syntactically correct Hive query will be able to query the index.
For example, to select three fields named "id", "field1\_s", and "field2\_i" from the "solr" table, you would use a query such as:
```bash theme={"dark"}
hive> SELECT id, field1_s, field2_i FROM solr;
```
Replace the table name as appropriate to use this example with your data.
To join data from tables, you can make a request such as:
```bash theme={"dark"}
hive> SELECT id, field1_s, field2_i FROM solr left
JOIN sometable right
WHERE left.id = right.id;
```
And finally, to insert data to a table, simply use the Solr table as the target for the Hive INSERT statement, such as:
```bash theme={"dark"}
hive> INSERT INTO solr
SELECT id, field1_s, field2_i FROM sometable;
```
## Example Indexing Hive to Solr
Solr includes a small number of sample documents for use when getting started. One of these is a CSV file containing book metadata. This file is found in your Solr installation, at `$SOLR_HOME/example/exampledocs/books.csv`.
Using the sample `books.csv` file, we can see a detailed example of creating a table, loading data to it, and indexing that data to Solr.
```bash wrap theme={"dark"}
CREATE TABLE books (id STRING, cat STRING, title STRING, price FLOAT, in_stock BOOLEAN, author STRING, series STRING, seq INT, genre STRING) ROW FORMAT DELIMITED FIELDS TERMINATED BY ','; <1>
LOAD DATA LOCAL INPATH '/solr/example/exampledocs/books.csv' OVERWRITE INTO TABLE books; <2>
CREATE EXTERNAL TABLE solr (id STRING, cat_s STRING, title_s STRING, price_f FLOAT, in_stock_b BOOLEAN, author_s STRING, series_s STRING, seq_i INT, genre_s STRING) <3>
STORED BY 'com.lucidworks.hadoop.hive.LWStorageHandler' <4>
LOCATION '/tmp/solr' <5>
TBLPROPERTIES('solr.zkhost' = 'zknode1:2181,zknode2:2181,zknode3:2181/solr',
'solr.collection' = 'gettingstarted',
'solr.query' = '*:*', <6>
'lww.jaas.file' = '/data/jaas-client.conf'); <7>
INSERT OVERWRITE TABLE solr SELECT b.* FROM books b;
```
* `<1>` Define the table `books`, and provide the field names and field types that will make up the table.
* `<2>` Load the data from the `books.csv` file.
* `<3>` Create an external table named `solr`, and provide the field names and field types that will make up the table. These will be the same field names as in your local Hive table, so we can index all of the same data to Solr.
* `<4>` Define the custom storage handler provided by the `lucidworks-hive-serde-v2.2.6.jar`.
* `<5>` Define storage location in HDFS.
* `<6>` The query to run in Solr to read records from Solr for use in Hive.
* `<7>` Define the location of Solr (or ZooKeeper if using SolrCloud), the collection in Solr to index the data to, and the query to use when reading the table. This example also refers to a JAAS configuration file that will be used to authenticate to the Kerberized Solr cluster.
You can use Pig to import data into Fusion, using the `lucidworks-pig-functions-v2.2.6.jar` file found in `$FUSION_HOME/apps/connectors/resources/lucid.hadoop/jobs`.
## Available Functions
The Pig functions included in the `{packageUser}-pig-functions-{connectorVersion}.jar` are three UserDefined Functions (UDF) and two Store functions. These functions are:
* `com/lucidworks/hadoop/pig/SolrStoreFunc.class`
* `com/lucidworks/hadoop/pig/FusionIndexPipelinesStoreFunc.class`
* `com/lucidworks/hadoop/pig/EpochToCalendar.class`
* `com/lucidworks/hadoop/pig/Extract.class`
* `com/lucidworks/hadoop/pig/Histogram.class`
## Using the Functions
### Register the Functions
There are two approaches to using functions in Pig: `REGISTER` them in the script, or load them with your Pig command line request.
If using `REGISTER`, the Pig function jars must be put in HDFS in order to be used by your Pig script. It can be located anywhere in HDFS; you can either supply the path in your script or use a variable and define the variable with `-p` property definition.
The example below uses the second approach, loading the jars with the `-Dpig.additional.jars` system property when launching the script. With this approach, the jars can be located anywhere on the machine where the script will be run.
### Indexing Data to Fusion
When indexing data to Fusion, there are several parameters to pass with your script in order to output data to Fusion for indexing.
These parameters can be made into variables in the script, with the proper values passed on the command line when the script is initiated. The example script below shows how to do this for Solr. The theory is the same for Fusion, only the parameter names would change as appropriate:
* `fusion.endpoints`:
The full URL to the index pipeline in Fusion. The URL should include the pipeline name and the collection data will be indexed to.
* `fusion.fail.on.error`:
If `true`, when an error is encountered, such as if a row could not be parsed, indexing will stop. This is `false` by default.
* `fusion.buffer.timeoutms`:
The amount of time, in milliseconds, to buffer documents before sending them to Fusion. The default is 1000. Documents will be sent to Fusion when either this value or `fusion.batchSize` is met.
* `fusion.batchSize`:
The number of documents to batch before sending the batch to Fusion. The default is 500. Documents will be sent to Fusion when either this value or `fusion.buffer.timeoutms` is met.
* `fusion.realm`:
This is used with `fusion.user` and `fusion.password` to authenticate to Fusion for indexing data. Two options are supported, `KERBEROS` or `NATIVE`.
Kerberos authentication is supported with the additional definition of a JAAS file. The properties `java.security.auth.login.config` and `fusion.jaas.appname` are used to define the location of the JAAS file and the section of the file to use. These are described in more detail below.
Native authentication uses a Fusion-defined username and password. This user must exist in Fusion, and have the proper permissions to index documents.
* `fusion.user`:
The Fusion username or Kerberos principal to use for authentication to Fusion.
If a Fusion username is used (`'fusion.realm' = 'NATIVE'`), the `fusion.password` must also be supplied.
* `fusion.pass`:
This property is not shown in the example above. The password for the `fusion.user` when the `fusion.realm` is `NATIVE`.
#### Indexing to a Kerberized Fusion Installation
When Fusion is secured with Kerberos, Pig scripts must include the full path to a JAAS file that includes the service principal and the path to a keytab file that will be used to index the output of the script to Fusion.
Additionally, a Kerberos ticket must be obtained on the server for the principal using `kinit`.
* `java.security.auth.login.config`:
This property defines the path to a JAAS file that contains a service principal and keytab location for a user who is authorized to write to Fusion.
The JAAS configuration file *must* be copied to the same path on every node where a Node Manager is running (i.e., every node where map/reduce tasks are executed). Here is a sample section of a JAAS file:
```bash theme={"dark"}
Client { <1>
com.sun.security.auth.module.Krb5LoginModule required
useKeyTab=true
keyTab="/data/fusion-indexer.keytab" <2>
storeKey=true
useTicketCache=true
debug=true
principal="fusion-indexer@FUSIONSERVER.COM"; <3>
};
```
* `<1>` The name of this section of the JAAS file. This name will be used with the `fusion.jaas.appname` parameter.
* `<2>` The location of the keytab file.
* `<3>` The service principal name. This should be a different principal than the one used for Fusion, but must have access to both Fusion and Pig. This name is used with the `fusion.user` parameter described above.
* `fusion.jaas.appname`:
Used only when indexing to or reading from Fusion when it is secured with Kerberos.
This property provides the name of the section in the JAAS file that includes the correct service principal and keytab path.
### Sample CSV Script
The following Pig script will take a simple CSV file and index it to Solr.
```bash theme={"dark"}
set solr.zkhost '$zkHost';
set solr.collection '$collection'; <1>
A = load '$csv' using PigStorage(',') as (id_s:chararray,city_s:chararray,country_s:chararray,code_s:chararray,code2_s:chararray,latitude_s:chararray,longitude_s:chararray,flag_s:chararray); <2>
--dump A;
B = FOREACH A GENERATE $0 as id, 'city_s', $1, 'country_s', $2, 'code_s', $3, 'code2_s', $4, 'latitude_s', $5, 'longitude_s', $6, 'flag_s', $7; <3>
ok = store B into 'SOLR' using com.lucidworks.hadoop.pig.SolrStoreFunc(); <4>
```
This relatively simple script is doing several things that help to understand how the Solr Pig functions work.
* `<1>` This and the line above define parameters that are needed by `SolrStoreFunc` to know where Solr is. `SolrStoreFunc` needs the properties `solr.zkhost` and `solr.collection`, and these lines are mapping the `zkhost` and `collection` parameters we will pass when invoking Pig to the required properties.
* `<2>` Load the CSV file, the path and name we will pass with the `csv` parameter. We also define the field names for each column in CSV file, and their types.
* `<3>` For each item in the CSV file, generate a document id from the first field (`$0`) and then define each field name and value in `name, value` pairs.
* `<4>` Load the documents into Solr, using the `SolrStoreFunc`. While we don't need to define the location of Solr here, the function will use the `zkhost` and `collection` properties that we will pass when we invoke our Pig script.
When using `SolrStoreFunc`, the document ID *must* be the first field.
When we want to run this script, we invoke Pig and define several parameters we have referenced in the script with the `-p` option, such as in this command:
```bash wrap theme={"dark"}
./bin/pig -Dpig.additional.jars=/path/to/{packageUser}-pig-functions-{connectorVersion}.jar -p csv=/path/to/my/csv/airports.dat -p zkHost=zknode1:2181,zknode2:2181,zknode3:2181/solr -p collection=myCollection ~/myScripts/index-csv.pig
```
The parameters to pass are:
* `csv`:
The path and name of the CSV file we want to process.
* `zkhost`:
The ZooKeeper connection string for a SolrCloud cluster, in the form of `zkhost1:port,zkhost2:port,zkhost3:port/chroot`. In the script, we mapped this to the `solr.zkhost` property, which is required by the `SolrStoreFunc` to know where to send the output documents.
* `collection`:
The Solr collection to index into. In the script, we mapped this to the `solr.collection` property, which is required by the `SolrStoreFunc` to know the Solr collection the documents should be indexed to.
The `zkhost` parameter above is only used if you are indexing to a SolrCloud cluster, which uses ZooKeeper to route indexing and query requests.
If, however, you are not using SolrCloud, you can use the `solrUrl` parameter, which takes the location of a standalone Solr instance, in the form of `http://host:port/solr`.
In the script, you would change the line that maps `solr.zkhost` to the `zkhost` property to map `solr.server.url` to the `solrUrl` property. For example:
`set solr.server.url '$solrUrl';`
It is often possible to get documents into Fusion by configuring a datasource with [the appropriate connector](/docs/5/fusion/getting-data-in/indexing/connectors).
But if there are obstacles to using connectors, it can be simpler to index documents with a REST API call to an index profile or pipeline.
## Push documents to Fusion using index profiles
[Index profiles](/docs/5/fusion/getting-data-in/indexing/index-pipelines/index-profiles) allow you to send documents to a consistent endpoint (the profile alias) and change the backend index pipeline as needed. The profile is also a simple way to use one pipeline for multiple collections without any one collection "owning" the pipeline.
You can send documents directly to an index using the [Index Profiles REST API](/docs/5/fusion/getting-data-in/indexing/index-pipelines/index-profiles). The request path is:
```bash theme={"dark"}
/api/apps/APP_NAME/index/INDEX_PROFILE
```
These requests are sent as a POST request. The request header specifies the format of the contents of the request body. Create an index profile in the Fusion UI.
To send a streaming list of JSON documents, you can send the JSON file that holds these objects to the API listed above with `application/json` as the content type. If your JSON file is a list or array of many items, the endpoint operates in a streaming way and indexes the docs as necessary.
### Send data to an index profile that is part of an app
Accessing an index profile through an app lets a Fusion admin secure and manage all objects on a per-app basis. Security is then determined by whether a user can access an app. This is the recommended way to manage permissions in Fusion.
The syntax for sending documents to an index profile that is part of an app is as follows:
```bash wrap theme={"dark"}
curl -u USERNAME:PASSWORD -X POST -H 'content-type: application/json' https://FUSION_HOST:FUSION_PORT/api/apps/APP_NAME/index/INDEX_PROFILE --data-binary @my-json-data.json
```
Spaces in an app name become underscores. Spaces in an index profile name become hyphens.
To prevent the terminal from displaying all the data and metadata it indexes--useful if you are indexing a large file--you can optionally append `?echo=false` to the URL.
Be sure to set the content type header properly for the content being sent. Some frequently used content types are:
* Text: `application/json`, `application/xml`
* PDF documents: `application/pdf`
* MS Office:
* DOCX: `application/vnd.openxmlformats-officedocument.wordprocessingml.document`
* XLSX: `application/vnd.openxmlformats-officedocument.spreadsheetml.sheet`
* PPTX: `application/vnd.vnd.openxmlformats-officedocument.presentationml.presentation`
* More types: [http://filext.com/faq/office\_mime\_types.php](http://filext.com/faq/office_mime_types.php)
### Example: Send JSON data to an index profile under an app
In `$FUSION_HOME/apps/solr-dist/example/exampledocs` you can find a few sample documents. This example uses one of these, `books.json`.
To push JSON data to an index profile under an app:
1. Create an index profile. In the Fusion UI, click **Indexing > Index Profiles** and follow the prompts.
2. From the directory containing `books.json`, enter the following, substituting your values for username, password, and index profile name:
```bash wrap theme={"dark"}
curl -u USERNAME:PASSWORD -X POST -H 'content-type: application/json' https://FUSION_HOST:FUSION_PORT/api/apps/APP_NAME/index/INDEX_PROFILE?echo=false --data-binary @books.json
```
3. Test that your data has made it into Fusion:
1. Log into the Fusion UI.
2. Navigate to the app where you sent your data.
3. Navigate to the Query Workbench.
4. Search for `*:*`.
5. Select relevant Display Fields, for example `author` and `name`.
### Example: Send JSON data without defining an app
In most cases it is best to delegate permissions on a per-app basis. But if your use case requires it, you can push data to Fusion without defining an app.
To send JSON data without app security, issue the following curl command:
```bash wrap theme={"dark"}
curl -u USERNAME:PASSWORD -X POST -H 'content-type: application/json' https://FUSION_HOST:FUSION_PORT/api/index/INDEX_PROFILE --data-binary @my-json-data.json
```
### Example: Send XML data to an index profile with an app
To send XML data to an app, use the following:
```bash wrap theme={"dark"}
curl -u USERNAME:PASSWORD -X POST -H 'content-type: application/xml' https://FUSION_HOST:FUSION_PORT/api/apps/APP_NAME/index/INDEX_PROFILE --data-binary @my-xml-file.xml
```
In Fusion 5, documents can be created on the fly using the [PipelineDocument](https://javadoc.lucidworks.com/fusion-pipeline-javadocs/5.9/com/lucidworks/apollo/common/pipeline/PipelineDocument.html) JSON notation.
## Remove documents
### Example 1
The following example removes content:
```bash wrap theme={"dark"}
curl -u USERNAME:PASSWORD -X POST -H 'content-type: application/vnd.lucidworks-document' https://FUSION_HOST:FUSION_PORT/api/apps/APP_NAME/index/INDEX_PROFILE --data-binary @del-json-data.json
```
### Example 2
A more specific example removes data from `books.json`. To delete "The Lightning Thief" and "The Sea of Monsters" from the index, use their id values in the JSON file.
The `del-json-data.json` file to delete the two books:
```json wrap theme={"dark"}
[{ "id": "978-0641723445","commands": [{"name": "delete","params": {}}]},{ "id": "978-1423103349","commands": [{"name": "delete","params": {}}, {"name": "commit","params": {}}]}]
```
You can use `?echo=false` to turn off the response to the terminal.
### Example 3
Another example to delete items using the Push API is:
```bash wrap theme={"dark"}
curl -u admin:XXX -X POST 'http://FUSION_HOST:FUSION_PORT/api/apps/APP/index/INDEX' -H 'Content-Type: application/vnd.lucidworks-document' -d '[
{
"id": "1663838589-44",
"commands":
[
{
"name": "delete",
"params":
{}
},
{
"name": "commit",
"params":
{}
}
]
}, ...
]'
```
## Send documents to an index pipeline
Although sending documents to an index profile is recommended, if your use case requires it, you can send documents directly to an index pipeline.
For more information about index pipeline REST API reference documentation, see [Fusion 5.x Index Pipelines API](/api-reference/index-pipelines-api/list-all-index-pipelines).
### Specify a parser
When you push data to a pipeline, you can specify the name of the parser by adding a parserId querystring parameter to the URL.
For example: `https://FUSION_HOST:FUSION_PORT/api/index-pipelines/INDEX_PIPELINE/collections/COLLECTION_NAME/index?parserId=PARSER`.
If you do not specify a parser, and you are indexing outside of an app (`https://FUSION_HOST:FUSION_PORT/api/index-pipelines/...`), then the `_system` parser is used.
If you do not specify a parser, and you are indexing in an app context (`https://FUSION_HOST:FUSION_PORT/api/apps/APP_NAME/index-pipelines/...`), then the parser with the same name as the app is used.
## Indexing CSV Files
In the usual case, to index a CSV or TSV file, the file is split into records, one per row, and each row is indexed as a separate document.
The course for **Ingesting Data** focuses on understanding connectors and how to configure datasources, parsers, and index pipelines.
 4. Click **Choose File** and select the .jar file from your file system.
 5. Click **Upload**.
The new driver’s blob manifest appears.
5. Click **Upload**.
The new driver’s blob manifest appears.
 From this screen you can also delete or replace the driver.
{/* // end::upload[] */}
## How to install a JDBC driver using the API
1. Upload the JAR file to Fusion’s blob store using the [`/blobs/{id}` endpoint](/api-reference/blobs/upload-a-blob).
Specify an arbitrary blob ID, and a `resourceType` value of `plugin:connector`, as in this example:
```bash theme={"dark"}
curl -u USERNAME:PASSWORD -H "content-type:application/java-archive" -H "content-length:707261" -X PUT --data-binary @postgresql-42.0.0.jar http://localhost:8764/api/blobs/mydriver?resourceType=driver:jdbc
```
Success response:
```json theme={"dark"}
{
"name" : "mydriver",
"contentType" : "application/java-archive",
"size" : 707261,
"modifiedTime" : "2017-06-09T19:00:48.919Z",
"version" : 0,
"md5" : "c67163ca764bfe632f28229c142131b5",
"metadata" : {
"subtype" : "driver:jdbc",
"drivers" : "org.postgresql.Driver",
"resourceType" : "driver:jdbc"
}
}
```
Fusion automatically publishes the event to the cluster, and the listeners perform the driver installation process on each node.
From this screen you can also delete or replace the driver.
{/* // end::upload[] */}
## How to install a JDBC driver using the API
1. Upload the JAR file to Fusion’s blob store using the [`/blobs/{id}` endpoint](/api-reference/blobs/upload-a-blob).
Specify an arbitrary blob ID, and a `resourceType` value of `plugin:connector`, as in this example:
```bash theme={"dark"}
curl -u USERNAME:PASSWORD -H "content-type:application/java-archive" -H "content-length:707261" -X PUT --data-binary @postgresql-42.0.0.jar http://localhost:8764/api/blobs/mydriver?resourceType=driver:jdbc
```
Success response:
```json theme={"dark"}
{
"name" : "mydriver",
"contentType" : "application/java-archive",
"size" : 707261,
"modifiedTime" : "2017-06-09T19:00:48.919Z",
"version" : 0,
"md5" : "c67163ca764bfe632f28229c142131b5",
"metadata" : {
"subtype" : "driver:jdbc",
"drivers" : "org.postgresql.Driver",
"resourceType" : "driver:jdbc"
}
}
```
Fusion automatically publishes the event to the cluster, and the listeners perform the driver installation process on each node.