> ## Documentation Index
> Fetch the complete documentation index at: https://doc.lucidworks.com/llms.txt
> Use this file to discover all available pages before exploring further.
# Index Pipelines
export const LwTemplate = ({title = "Key questions to get you started", icon = "sparkles", cta = "Powered by Agent Studio", linkHref = "https://lucidworks.com/demo/?utm_source=docs&utm_medium=referral&utm_campaign=docs_cta_ai"}) => {
const [isLoaded, setIsLoaded] = useState(false);
useEffect(() => {
const timer = setTimeout(() => {
setIsLoaded(true);
}, 500);
return () => clearTimeout(timer);
}, []);
return
{isLoaded && `
}} />}
Powered by Lucidworks Agent Studio
;
};
[localhost link]: http://localhost:3000/docs/5/fusion/getting-data-in/indexing/index-pipelines/overview
[mintlify link]: https://doc.lucidworks.com/docs/5/fusion/getting-data-in/indexing/index-pipelines/overview
[old doc.lw link]: https://doc.lucidworks.com/fusion/5.9/162
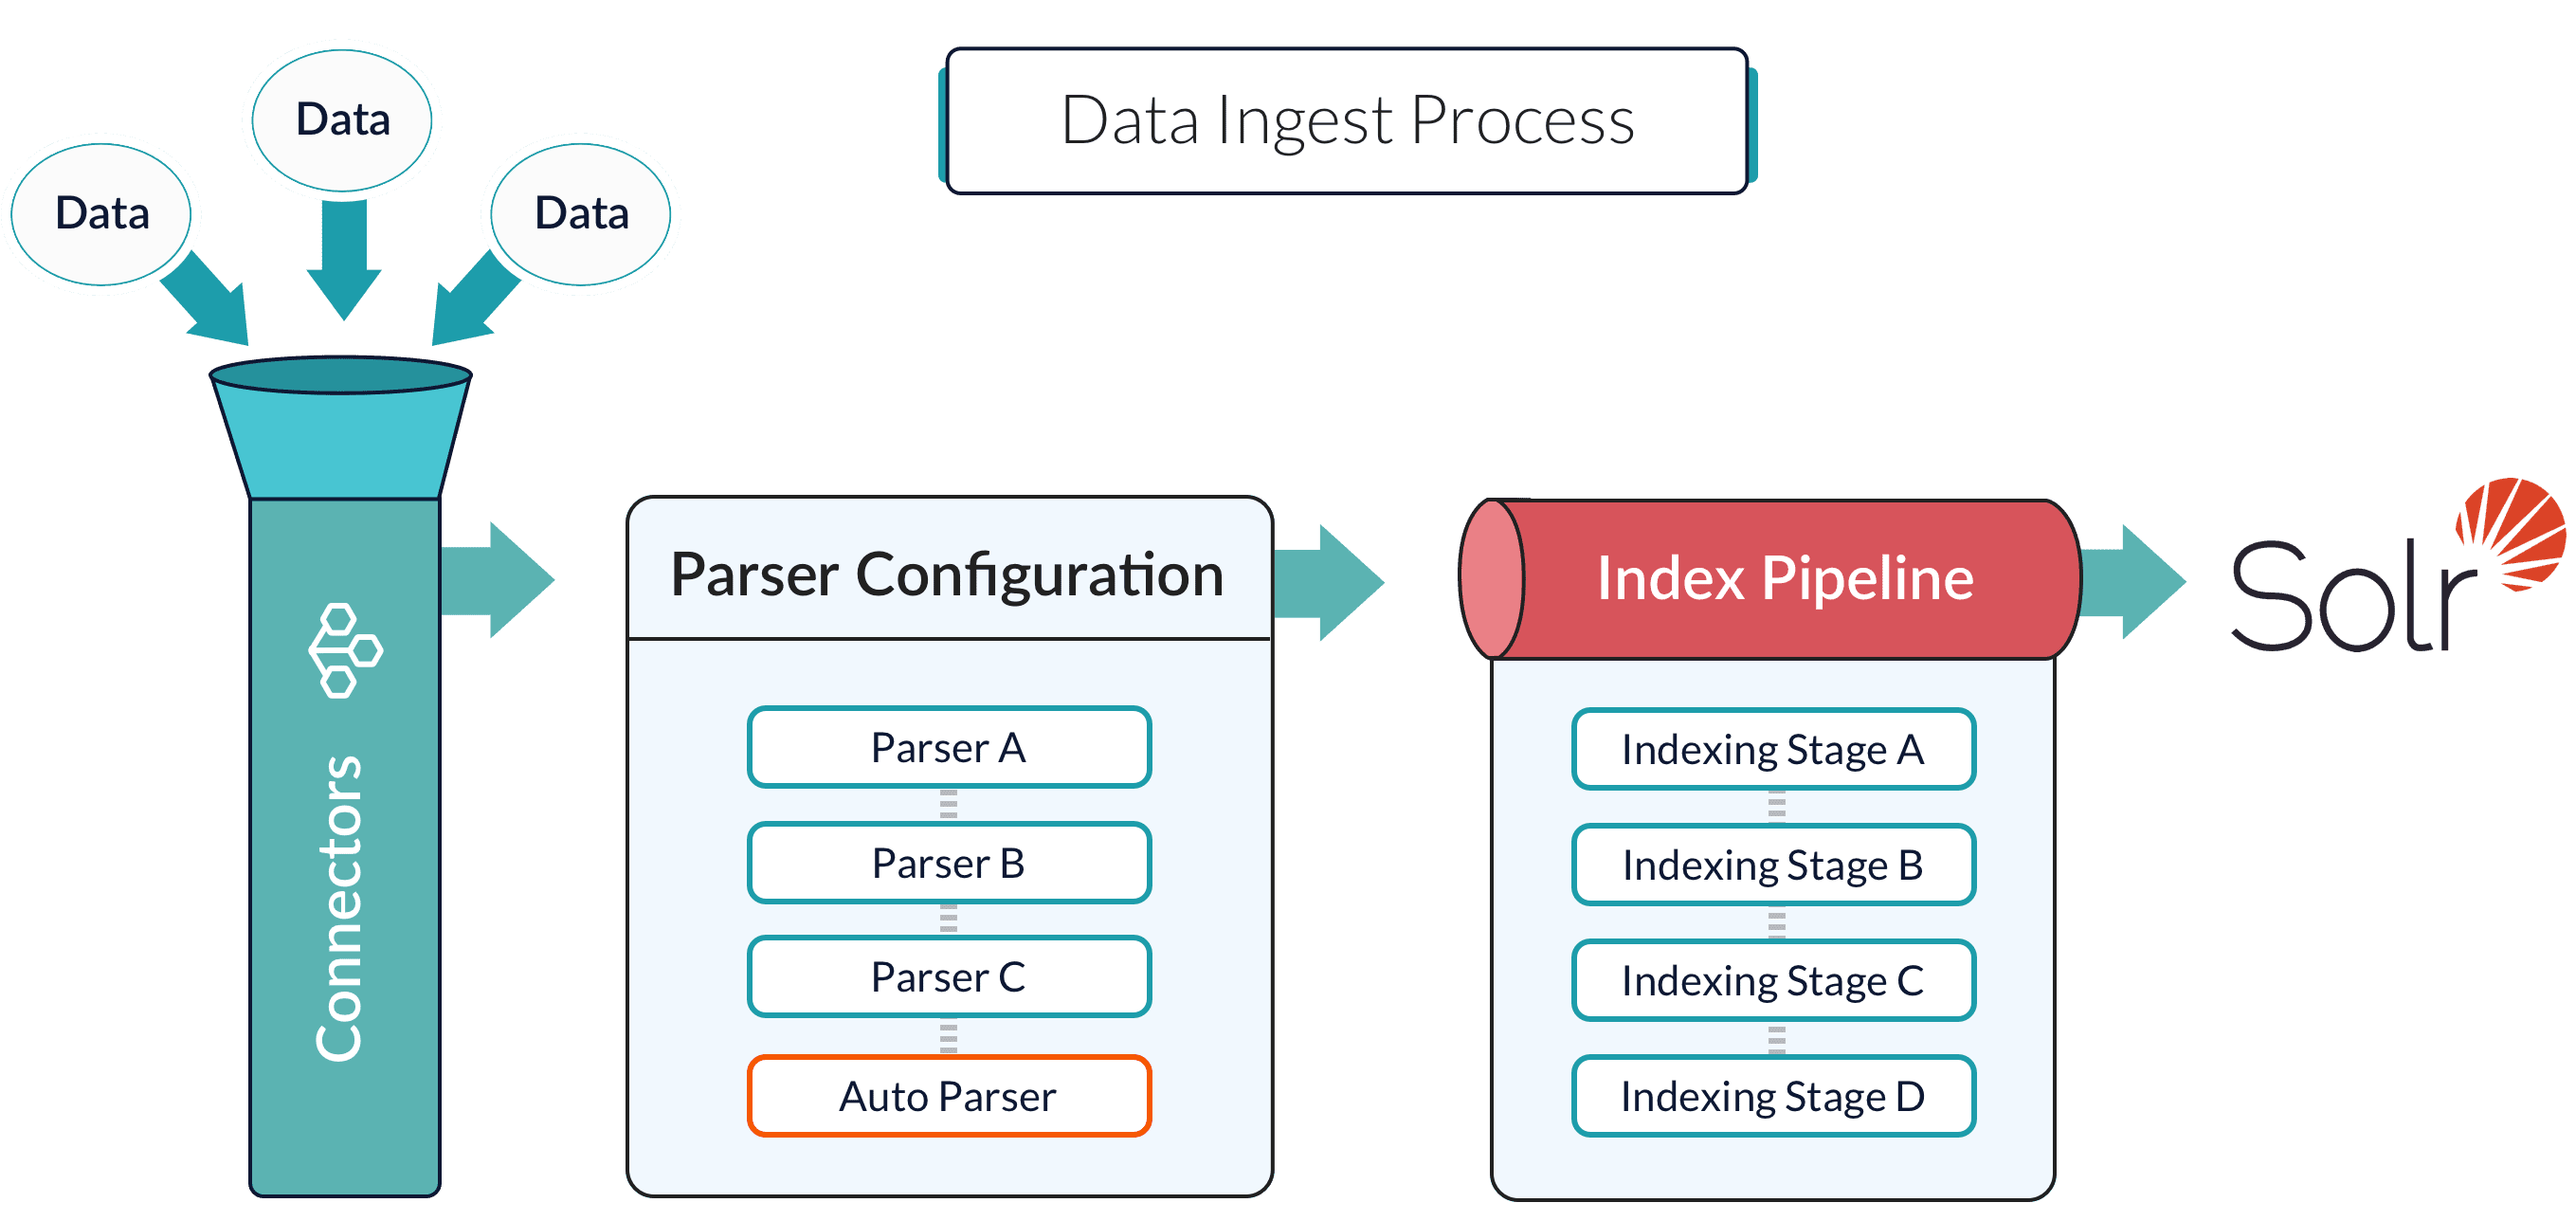
Index pipelines transform incoming data into `PipelineDocument` objects for indexing by Fusion-managed Solr service.
An index pipeline consists of a series of configurable
[index pipeline stages](/docs/5/fusion/getting-data-in/indexing/index-pipelines/index-pipeline-stages),
each performing a different transformation on the data before passing the result to the next stage in the pipeline.
The final stage is the
[Solr Indexer stage](/docs/5/fusion/reference/config-ref/pipeline-stages/index-stages/solr-indexer-stage),
which transforms the PipelineDocument into a Solr document and submits it to Solr for indexing in a specific
[Collection](/docs/5/fusion/getting-data-in/indexing/collections/overview).
Each configured datasource has an associated index pipeline and uses a
[connector](/docs/fusion-connectors/connectors/overview)
to fetch data to parse and then input into the index pipeline.
Alternatively, documents can be submitted directly to an index pipeline or profile with the REST API; see
**Import Data with the REST API**.
It is often possible to get documents into Fusion by configuring a datasource with [the appropriate connector](/docs/5/fusion/getting-data-in/indexing/connectors).
But if there are obstacles to using connectors, it can be simpler to index documents with a REST API call to an index profile or pipeline.
## Push documents to Fusion using index profiles
[Index profiles](/docs/5/fusion/getting-data-in/indexing/index-pipelines/index-profiles) allow you to send documents to a consistent endpoint (the profile alias) and change the backend index pipeline as needed. The profile is also a simple way to use one pipeline for multiple collections without any one collection "owning" the pipeline.
You can send documents directly to an index using the [Index Profiles REST API](/docs/5/fusion/getting-data-in/indexing/index-pipelines/index-profiles). The request path is:
```bash theme={"dark"}
/api/apps/APP_NAME/index/INDEX_PROFILE
```
These requests are sent as a POST request. The request header specifies the format of the contents of the request body. Create an index profile in the Fusion UI.
To send a streaming list of JSON documents, you can send the JSON file that holds these objects to the API listed above with `application/json` as the content type. If your JSON file is a list or array of many items, the endpoint operates in a streaming way and indexes the docs as necessary.
### Send data to an index profile that is part of an app
Accessing an index profile through an app lets a Fusion admin secure and manage all objects on a per-app basis. Security is then determined by whether a user can access an app. This is the recommended way to manage permissions in Fusion.
The syntax for sending documents to an index profile that is part of an app is as follows:
```bash wrap theme={"dark"}
curl -u USERNAME:PASSWORD -X POST -H 'content-type: application/json' https://FUSION_HOST:FUSION_PORT/api/apps/APP_NAME/index/INDEX_PROFILE --data-binary @my-json-data.json
```
Spaces in an app name become underscores. Spaces in an index profile name become hyphens.
To prevent the terminal from displaying all the data and metadata it indexes--useful if you are indexing a large file--you can optionally append `?echo=false` to the URL.
Be sure to set the content type header properly for the content being sent. Some frequently used content types are:
* Text: `application/json`, `application/xml`
* PDF documents: `application/pdf`
* MS Office:
* DOCX: `application/vnd.openxmlformats-officedocument.wordprocessingml.document`
* XLSX: `application/vnd.openxmlformats-officedocument.spreadsheetml.sheet`
* PPTX: `application/vnd.vnd.openxmlformats-officedocument.presentationml.presentation`
* More types: [http://filext.com/faq/office\_mime\_types.php](http://filext.com/faq/office_mime_types.php)
### Example: Send JSON data to an index profile under an app
In `$FUSION_HOME/apps/solr-dist/example/exampledocs` you can find a few sample documents. This example uses one of these, `books.json`.
To push JSON data to an index profile under an app:
1. Create an index profile. In the Fusion UI, click **Indexing > Index Profiles** and follow the prompts.
2. From the directory containing `books.json`, enter the following, substituting your values for username, password, and index profile name:
```bash wrap theme={"dark"}
curl -u USERNAME:PASSWORD -X POST -H 'content-type: application/json' https://FUSION_HOST:FUSION_PORT/api/apps/APP_NAME/index/INDEX_PROFILE?echo=false --data-binary @books.json
```
3. Test that your data has made it into Fusion:
1. Log into the Fusion UI.
2. Navigate to the app where you sent your data.
3. Navigate to the Query Workbench.
4. Search for `*:*`.
5. Select relevant Display Fields, for example `author` and `name`.
### Example: Send JSON data without defining an app
In most cases it is best to delegate permissions on a per-app basis. But if your use case requires it, you can push data to Fusion without defining an app.
To send JSON data without app security, issue the following curl command:
```bash wrap theme={"dark"}
curl -u USERNAME:PASSWORD -X POST -H 'content-type: application/json' https://FUSION_HOST:FUSION_PORT/api/index/INDEX_PROFILE --data-binary @my-json-data.json
```
### Example: Send XML data to an index profile with an app
To send XML data to an app, use the following:
```bash wrap theme={"dark"}
curl -u USERNAME:PASSWORD -X POST -H 'content-type: application/xml' https://FUSION_HOST:FUSION_PORT/api/apps/APP_NAME/index/INDEX_PROFILE --data-binary @my-xml-file.xml
```
In Fusion 5, documents can be created on the fly using the [PipelineDocument](https://javadoc.lucidworks.com/fusion-pipeline-javadocs/5.9/com/lucidworks/apollo/common/pipeline/PipelineDocument.html) JSON notation.
## Remove documents
### Example 1
The following example removes content:
```bash wrap theme={"dark"}
curl -u USERNAME:PASSWORD -X POST -H 'content-type: application/vnd.lucidworks-document' https://FUSION_HOST:FUSION_PORT/api/apps/APP_NAME/index/INDEX_PROFILE --data-binary @del-json-data.json
```
### Example 2
A more specific example removes data from `books.json`. To delete "The Lightning Thief" and "The Sea of Monsters" from the index, use their id values in the JSON file.
The `del-json-data.json` file to delete the two books:
```json wrap theme={"dark"}
[{ "id": "978-0641723445","commands": [{"name": "delete","params": {}}]},{ "id": "978-1423103349","commands": [{"name": "delete","params": {}}, {"name": "commit","params": {}}]}]
```
You can use `?echo=false` to turn off the response to the terminal.
### Example 3
Another example to delete items using the Push API is:
```bash wrap theme={"dark"}
curl -u admin:XXX -X POST 'http://FUSION_HOST:FUSION_PORT/api/apps/APP/index/INDEX' -H 'Content-Type: application/vnd.lucidworks-document' -d '[
{
"id": "1663838589-44",
"commands":
[
{
"name": "delete",
"params":
{}
},
{
"name": "commit",
"params":
{}
}
]
}, ...
]'
```
## Send documents to an index pipeline
Although sending documents to an index profile is recommended, if your use case requires it, you can send documents directly to an index pipeline.
For more information about index pipeline REST API reference documentation, see [Fusion 5.x Index Pipelines API](/api-reference/index-pipelines-api/list-all-index-pipelines).
### Specify a parser
When you push data to a pipeline, you can specify the name of the parser by adding a parserId querystring parameter to the URL.
For example: `https://FUSION_HOST:FUSION_PORT/api/index-pipelines/INDEX_PIPELINE/collections/COLLECTION_NAME/index?parserId=PARSER`.
If you do not specify a parser, and you are indexing outside of an app (`https://FUSION_HOST:FUSION_PORT/api/index-pipelines/...`), then the `_system` parser is used.
If you do not specify a parser, and you are indexing in an app context (`https://FUSION_HOST:FUSION_PORT/api/apps/APP_NAME/index-pipelines/...`), then the parser with the same name as the app is used.
## Indexing CSV Files
In the usual case, to index a CSV or TSV file, the file is split into records, one per row, and each row is indexed as a separate document.
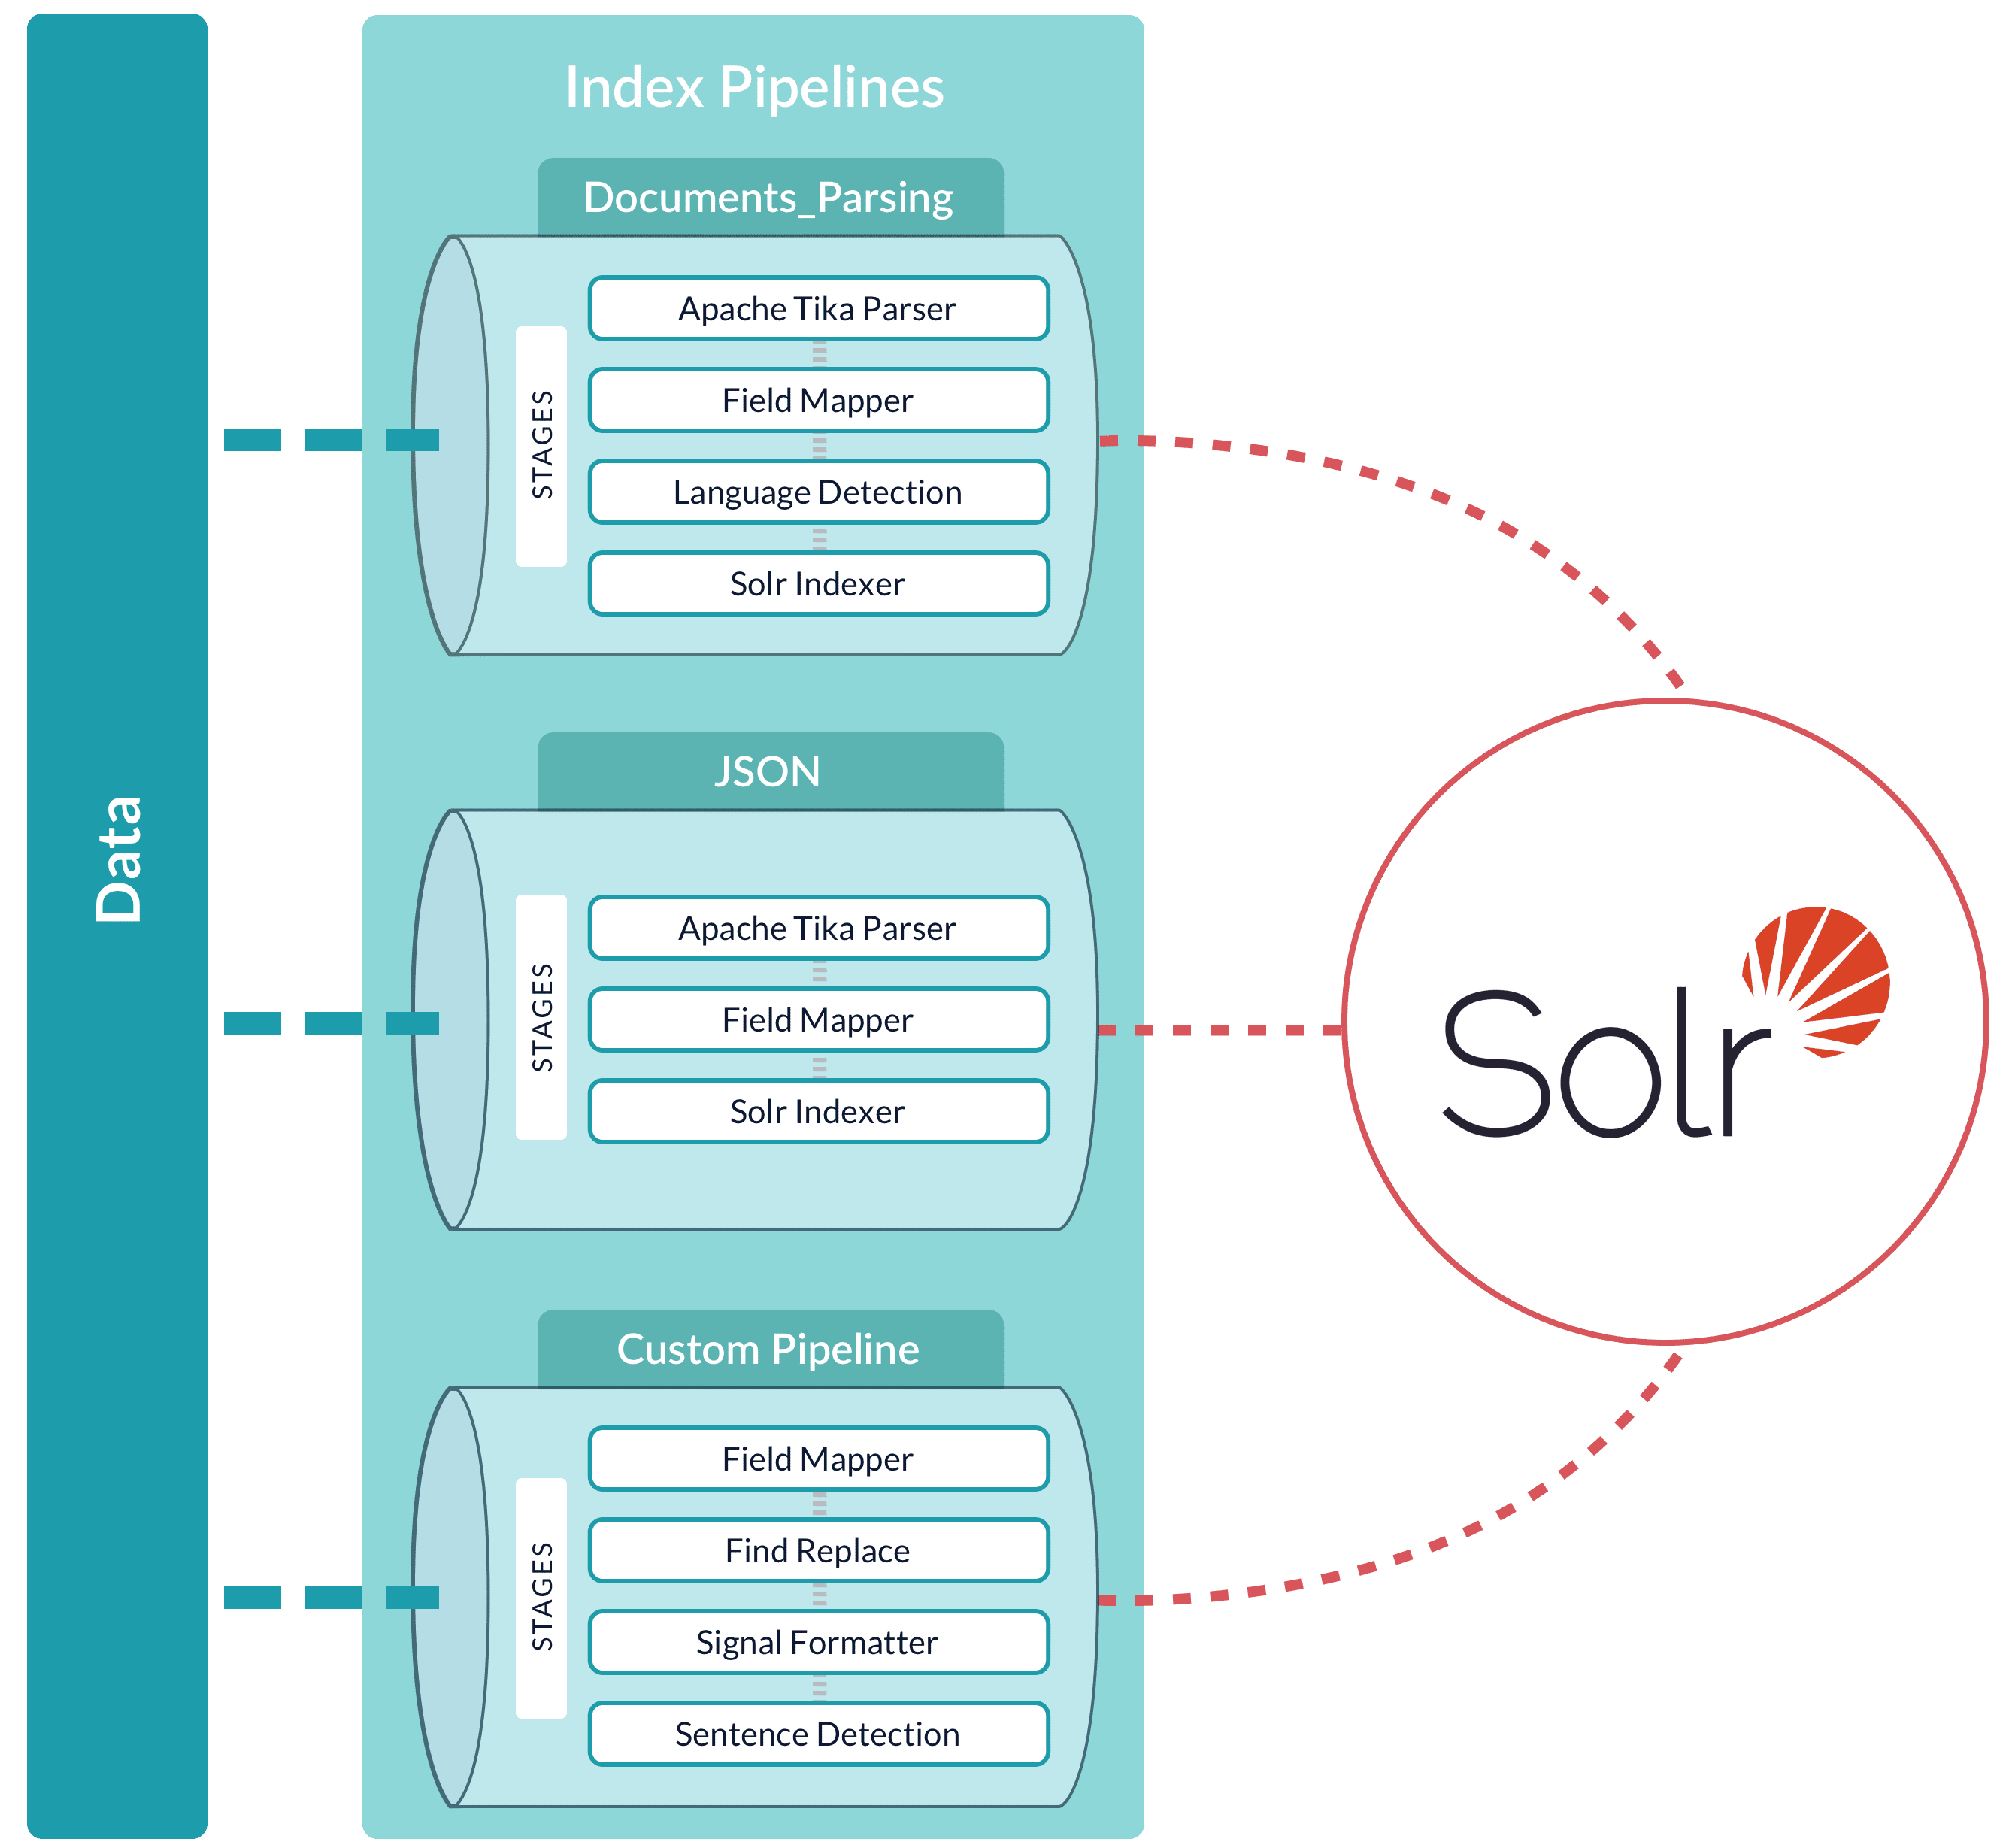
A pipeline can be reused across multiple collections. Fusion provides a set of built-in pipelines. You can use the Index Workbench or the
[REST API](/api-reference/index-pipelines-api/list-all-index-pipelines)
to develop custom index pipelines to suit any datasource or application.
Fusion creates a default index pipeline when you create an app. The index pipeline has the same name as the app. This pipeline consists of a [Field Mapping index stage](/docs/5/fusion/reference/config-ref/pipeline-stages/index-stages/field-mapper-index-stage).
## Debugging
If your pipeline is not producing the desired result, these debugging tips can help you identify the source of the issue and resolve it.
### View parameters
When debugging a pipeline, it helps to see the parameters that are being passed to or from each stage.
There are several ways to exposed those parameters:
Follow these steps to add a Logging stage to your pipeline:
1. In Fusion UI, navigate to **Indexing > Index Pipelines** (for index pipelines) or **Querying > Query Pipelines** (for query pipelines).
2. Click **Add a new pipeline stage**.
3. Select **Logging** from the Troubleshooting section.
4. In the **Label** field, enter a descriptive name (for example, "Debug After Vectorize").
5. Set the **detailed** property to `true` to print the full Request or PipelineDocument object.
6. Place the Logging stage after the stage you want to debug.
7. Click **Save**.
8. Run your pipeline and check the appropriate log file for your pipeline type:
* Query pipelines: `https://FUSION_HOST/var/log/api/api.log`
* Index pipelines: `https://FUSION_HOST/var/log/api/fusion-indexing.log`
Follow these steps to inspect context variables:
1. Add a **JavaScript** stage to your pipeline.
2. Use the `ctx` variable to inspect context data:
```javascript theme={"dark"}
function (request, response, ctx) {
// View all context variables
logger.info("Context: " + JSON.stringify(ctx));
// Check specific variable (for example, vector from LWAI stage)
if(ctx.get('vector') !== null) {
logger.info("Vector: " + ctx.get('vector'));
}
}
```
3. Check logs at `https://FUSION_HOST/var/log/api/api.log`.
Follow these steps to debug using Query Workbench:
1. Navigate to **Querying > Query Workbench**.
2. Enter a test query and click **Search**.
3. Click the **Debug** tab. The debug view displays the following information:
* Request parameters
* Pipeline stage execution details
* Response data including `responseHeader` and `debug.explain`
4. Switch to **View As: JSON** to see the full response structure.
### Enable **Fail on Error**
The **Fail on Error** setting determines whether silent failures can occur in your pipeline.
By enabling **Fail on Error** during development, testing, and troubleshooting, you ensure that configuration issues, authentication problems, or model errors are immediately visible rather than producing incomplete or incorrect data that can be difficult to troubleshoot later.
The **Fail on Error** setting controls whether pipeline execution stops when an LWAI stage encounters an error. Follow these steps to configure this setting:
1. In Fusion UI, navigate to your pipeline (Index or Query).
2. Click the LWAI stage you want to configure (for example, **LWAI Vectorize Field** or **LWAI Vectorize Query**).
3. Locate the **Fail on Error** checkbox at the bottom of the stage configuration.
4. Select the checkbox to enable any of the following behaviors:
* Stop pipeline processing and throw an exception on errors
* Get immediate feedback when LWAI models fail or are misconfigured
* Guarantee data quality by preventing indexing of documents without vectors
In production environments, keep this feature disabled to ensure that service is not interrupted when errors occur.
6. Click **Save**.
During development and testing, enable **Fail on Error** to identify configuration issues early. In production, consider disabling **Fail on Error** if you want resilient pipelines that can handle occasional model failures. For critical vector fields, enable **Fail on Error** to ensure that all documents have required embeddings.
Follow these steps to verify your Fail on Error configuration:
1. Trigger an intentional error (for example, use an invalid model name or account).
2. Verify that the pipeline fails (when Fail on Error is enabled) or continues (when Fail on Error is disabled).
3. Review logs at `https://FUSION_HOST/var/log/api/api.log` for error messages.
 Alternatively, documents can be submitted directly to an index pipeline or profile with the REST API; see
**Import Data with the REST API**.
Alternatively, documents can be submitted directly to an index pipeline or profile with the REST API; see
**Import Data with the REST API**.
 Fusion creates a default index pipeline when you create an app. The index pipeline has the same name as the app. This pipeline consists of a [Field Mapping index stage](/docs/5/fusion/reference/config-ref/pipeline-stages/index-stages/field-mapper-index-stage).
## Debugging
If your pipeline is not producing the desired result, these debugging tips can help you identify the source of the issue and resolve it.
### View parameters
When debugging a pipeline, it helps to see the parameters that are being passed to or from each stage.
There are several ways to exposed those parameters:
Fusion creates a default index pipeline when you create an app. The index pipeline has the same name as the app. This pipeline consists of a [Field Mapping index stage](/docs/5/fusion/reference/config-ref/pipeline-stages/index-stages/field-mapper-index-stage).
## Debugging
If your pipeline is not producing the desired result, these debugging tips can help you identify the source of the issue and resolve it.
### View parameters
When debugging a pipeline, it helps to see the parameters that are being passed to or from each stage.
There are several ways to exposed those parameters: