> ## Documentation Index
> Fetch the complete documentation index at: https://doc.lucidworks.com/llms.txt
> Use this file to discover all available pages before exploring further.
# Machine Learning Model APIs
export const LwTemplate = ({title = "Key questions to get you started", icon = "sparkles", cta = "Powered by Agent Studio", linkHref = "https://lucidworks.com/demo/?utm_source=docs&utm_medium=referral&utm_campaign=docs_cta_ai"}) => {
const [isLoaded, setIsLoaded] = useState(false);
useEffect(() => {
const timer = setTimeout(() => {
setIsLoaded(true);
}, 500);
return () => clearTimeout(timer);
}, []);
return
{isLoaded && `
}} />}
Powered by Lucidworks Agent Studio
;
};
[localhost link]: http://localhost:3000/docs/5/fusion/dev-portal/api/ml-model-service/overview
[mintlify link]: https://doc.lucidworks.com/docs/5/fusion/dev-portal/api/ml-model-service/overview
[old doc.lw link]: https://doc.lucidworks.com/fusion/5.9/fubw40
Use these APIs to deploy machine learning (ML) models and generate predictions.
Fusion’s Machine Learning (ML) Model service stores deployed models and runs prediction jobs.
* [ML Model API](/api-reference/serialized-model-api/deploy-a-model)\
Use this API to deploy ML models and generate predictions.
* [Serialized Model API](/api-reference/serialized-model-api/deploy-a-model)\
The Serialized Model API is for fetching, updating, or deleting deployed models.
For more information, [view the API specification.](/api-reference/model-service-api/list-all-models)
Fusion also provides convenient jobs you can configure to deploy your models via the ML Model service, plus pipelines and pipeline stages for querying them.
See these topics:
* **Develop and Deploy a Machine Learning Model** provides general instructions for using ML models with Fusion, including pre-trained models and your own custom models.\
Lucidworks provides pre-trained models for [sentiment analysis and prediction](/docs/5/fusion/getting-data-out/advanced-query-enhancement/sentiment-analysis) and [Smart Answers](/docs/5/fusion/getting-data-out/advanced-query-enhancement/smart-answers/overview).\
Then you can query your model using the [Machine Learning query pipeline stage](/docs/5/fusion/reference/config-ref/pipeline-stages/query-stages/machine-learning-query-stage).
* **Train a Smart Answers Supervised Model** explains how to configure the [Smart Answers Supervised Training](/docs/5/fusion/reference/config-ref/jobs/smart-answers-supervised-training) job to train a model on an existing body of question/answer data and deploy it for use with your **Configure the Smart Answers Pipelines (5.3 and later)**.
* If your existing question/answer data is sparse or your data is in another format, use the **Train a Smart Answers cold start model** to train and deploy a model you can use to get started.\
Lucidworks also provides **Set Up a Pre-Trained Cold Start Model for Smart Answers** you can use.
This tutorial walks you through deploying your own model to Fusion with Seldon Core.
## Prerequisites
* A Fusion instance with an app and indexed data
* An understanding of Python and the ability to write Python code
* [Docker](https://docs.docker.com/get-docker/) installed locally, plus a private or public Docker repository
* Seldon-core installed locally: `pip install seldon-core`
* Code editor; you can use any editor, but Visual Studio Code is used in the example
* Model: [paraphrase-multilingual-MiniLM-L12-v2 from Hugging Face](https://huggingface.co/sentence-transformers/paraphrase-multilingual-MiniLM-L12-v2)
* Docker image: [example\_sbert\_model](https://hub.docker.com/r/jstrmec/example_sbert_model/)
## Tips
* Always test your Python code locally before uploading to Docker and then Fusion.
This simplifies troubleshooting significantly.
* Once you’ve created your Docker you can also test locally by doing `docker run` with a specified port, like 9000, which you can then `curl` to confirm functionality in Fusion.
See the testing example below.
**LucidAcademy**
Lucidworks offers free training to help you get started.
The **Course** for **Intro to Machine Learning in Fusion** focuses on using machine learning to infer the goals of customers and users in order to deliver a more sophisticated search experience:
Visit the [LucidAcademy](https://academy.lucidworks.com) to see the full training catalog.
## Local testing example
The examples in this section use the following models:
* [multilingual miniLM model](https://colab.research.google.com/drive/1LeCGl57_Evn_PCL25NJAt1MzP6GYH4j2)
* [e5-model](https://colab.research.google.com/drive/15WOHqqMBng5abUsWJYdElxgVLdAoJdn2)
1. Docker command:
```bash theme={"dark"}
docker run -p 127.0.0.1:9000:9000
```
2. Curl to hit Docker:
```bash theme={"dark"}
curl -X POST -H 'Content-Type: application/json' -d '{"data": { "ndarray": ["Sentence to test"], "names":["text"]} }' https://localhost:9000/api/v1.0/predictions
```
3. Curl model in Fusion:
```bash theme={"dark"}
curl -u $FUSION_USER:$FUSION_PASSWORD -X POST -H 'Content-Type: application/json' -d '{"text": "i love fusion"}' https://.lucidworks.com:6764/api/ai/ml-models//prediction
```
4. See all your deployed models:
```bash theme={"dark"}
curl -u USERNAME:PASSWORD http://FUSION_HOST:FUSION_PORT/api/ai/ml-models
```
## Download the model
This tutorial uses the [paraphrase-multilingual-MiniLM-L12-v2](https://huggingface.co/sentence-transformers/paraphrase-multilingual-MiniLM-L12-v2) model from Hugging Face, but any pre-trained model from [https://huggingface.co](https://huggingface.co) will work with this tutorial.
If you want to use your own model instead, you can do so, but your model must have been trained and then saved though a function similar to the PyTorch’s `torch.save(model, PATH)` function.
See [Saving and Loading Models](https://pytorch.org/tutorials/beginner/saving_loading_models.html) in the PyTorch documentation.
## Format a Python class
The next step is to format a Python class which will be invoked by Fusion to get the results from your model.
The skeleton below represents the format that you should follow.
See also [Packaging a Python model for Seldon Core using Docker](https://docs.seldon.io/projects/seldon-core/en/v1.16.0/python/python_wrapping_docker.html) in the Seldon Core documentation.
```python wrap expandable theme={"dark"}
class MyModel(object):
"""
Model template. You can load your model parameters in __init__ from a
location accessible at runtime
"""
def __init__(self):
"""
Add any initialization parameters. These will be passed at runtime
from the graph definition parameters defined in your seldondeployment
kubernetes resource manifest.
"""
print("Initializing")
def predict(self,X,features_names,**kwargs):
"""
Return a prediction.
Parameters
----------
X : array-like
feature_names : array of feature names (optional)
"""
print("Predict called - will run identity function")
return X
def class_names(self):
return ["X_name"]
```
A real instance of this class with the Paraphrase Multilingual MiniLM L12 v2 model is as follows:
```python wrap expandable theme={"dark"}
import logging
import os
from transformers import AutoTokenizer, AutoModel
from torch.nn import functional as F
from typing import Iterable
import numpy as np
import torch
log = logging.getLogger()
class mini():
def __init__(self):
self.tokenizer = AutoTokenizer.from_pretrained('sentence-transformers/paraphrase-multilingual-MiniLM-L12-v2')
self.model= AutoModel.from_pretrained('sentence-transformers/paraphrase-multilingual-MiniLM-L12-v2')
#Mean Pooling
def mean_pooling(self, model_output, attention_mask):
token_embeddings = model_output[0] #First element of model_output contains all token embeddings
input_mask_expanded = attention_mask.unsqueeze(-1).expand(token_embeddings.size()).float()
return torch.sum(token_embeddings * input_mask_expanded, 1) / torch.clamp(input_mask_expanded.sum(1), min=1e-9)
def predict(self, X:np.ndarray, names=None, **kwargs):
# In Fusion there are several variables passed in the numpy array with the Milvus Query stage,
# Encode to Milvus index stage, and Vectorize Seldon index and query stage:
# [pipeline, bool, and text]. Text is what variable will be encoded, so that is what will be set to 'text'
# When using the Machine Learning stage, the input map keys should match what what is in this file.
model_input = dict(zip(names, X))
text = model_input["text"]
with torch.inference_mode(): # Allows torch to run more quickly
# Tokenize sentences
encoded_input = self.tokenizer(text, padding=True, truncation=True, return_tensors='pt')
log.debug('encoded input',str(encoded_input))
model_output = self.model(**encoded_input)
log.debug('model output',str(model_output))
# Perform pooling. In this case, max pooling.
sentence_embeddings = self.mean_pooling(model_output, encoded_input['attention_mask'])
# Normalize embeddings, because Fusion likes it that way.
sentence_embeddings = F.normalize(sentence_embeddings, p=2, dim=-1)
# Fixing the shape of the emebbedings to match (1, 384).
final = [sentence_embeddings.squeeze().cpu().detach().numpy().tolist()]
return final
def class_names(self) -> Iterable[str]:
return ["vector"]
```
In the above code, an additional function has been added in the class; this is completely fine to do.
Logging has also been added for debugging purposes.
Two functions are non-negotiable:
* `init`: The `init` function is where models, tokenizers, vectorizers, and the like should be set to self for invoking.\
It is recommended that you include your model’s trained parameters directly into the Docker container rather than reaching out to external storage inside `init`.
* `predict`: The `predict` function processes the field or query that Fusion passes to the model.\
The `predict` function must be able to handle any text processing needed for the model to accept input invoked in its `model.evaluate()`, `model.predict()`, or equivalent function to get the expected model result.
If the output needs additional manipulation, that should be done before the result is returned.\
For embedding models the return value must have the shape of (1, DIM), where DIM (dimension) is a consistent integer, to enable Fusion to handle the vector encoding into Milvus or Solr.
Use the *exact* name of the class when naming this file.
For the example, above the Python file is named `mini.py` and the class name is `mini()`.
## Create a Dockerfile
The next step is to create a Dockerfile. The Dockerfile should follow this general outline; read the comments for additional details:
```dockerfile wrap expandable theme={"dark"}
#It is important that python version is 3.x-slim for seldon-core
FROM python:3.9-slim
# Whatever directory(folder)the python file for your python class, Dockerfile, and
# requirements.txt is in should be copied then denoted as the work directory.
COPY . /app
WORKDIR /app
# The requirements file for the Docker container
COPY requirements.txt requirements.txt
RUN pip install --no-cache-dir -r requirements.txt
# Copy source code
COPY . .
# GRPC - Allows Fusion to do a Remote Procedure Call
EXPOSE 5000
# Define environment variable for seldon-core
# !!!MODEL_NAME must be the EXACT same as the python file & python class name!!!
ENV MODEL_NAME mini
ENV SERVICE_TYPE MODEL
ENV PERSISTENCE 0
# Changing active directory folder (same one as above on lines 5 & 6) to default user, required for Fusion
RUN chown -R 8888 /app
# Command to wrap python class with seldon-core to allow it to be usable in Fusion
CMD ["sh", "-c", "seldon-core-microservice $MODEL_NAME --service-type $SERVICE_TYPE --persistence $PERSISTENCE"]
# You can use the following if You need shell features like environment variable expansion or
# You need to use shell constructs like pipes, redirects, etc.
# See https://docs.docker.com/reference/dockerfile/#cmd for more details.
# CMD exec seldon-core-microservice $MODEL_NAME --service-type $SERVICE_TYPE --persistence $PERSISTENCE
```
## Create a requirements file
The `requirements.txt` file is a list of installs for the `Dockerfile` to run to ensure the Docker container has the right resources to run the model.\
For the Paraphrase Multilingual MiniLM L12 v2 model, the requirements are as follows:
```text theme={"dark"}
seldon-core
torch
transformers
numpy
```
In general, if an item was used in an `import` statement in your Python file, it should be included in the requirements file.
An easy way to populate the requirements is by using in the following command in the terminal, inside the directory that contains your code:
```bash theme={"dark"}
pip freeze > requirements.txt
```
If you use `pip freeze`, you must manually add `seldon-core` to the requirements file because it is not invoked in the Python file but is required for containerization.
## Build and push the Docker image
After creating the `.py`, `Dockerfile`, and `requirements.txt` files, you need to run a few Docker commands.
Run the commands below in order:
```bash theme={"dark"}
DOCKER_DEFAULT_PLATFORM=linux/amd64 docker build . -t [DOCKERHUB-USERNAME]/[REPOSITORY]:[VERSION-TAG]
```
```bash theme={"dark"}
docker push [DOCKERHUB USERNAME]/[REPOSITORY]:[VERSION-TAG]
```
Using the example model, the terminal commands would be as follows:
```bash theme={"dark"}
DOCKER_DEFAULT_PLATFORM=linux/amd64 docker build . -t jstrmec/example_sbert_model:0.14; docker push jstrmec/example_sbert_model:0.14
```
This repository is public and you can visit it here: [example\_sbert\_model](https://hub.docker.com/r/jstrmec/example_sbert_model/)
## Deploy the model in Fusion
Now you can go to Fusion to deploy your model.
1. In Fusion, navigate to **Collections** > **Jobs**.
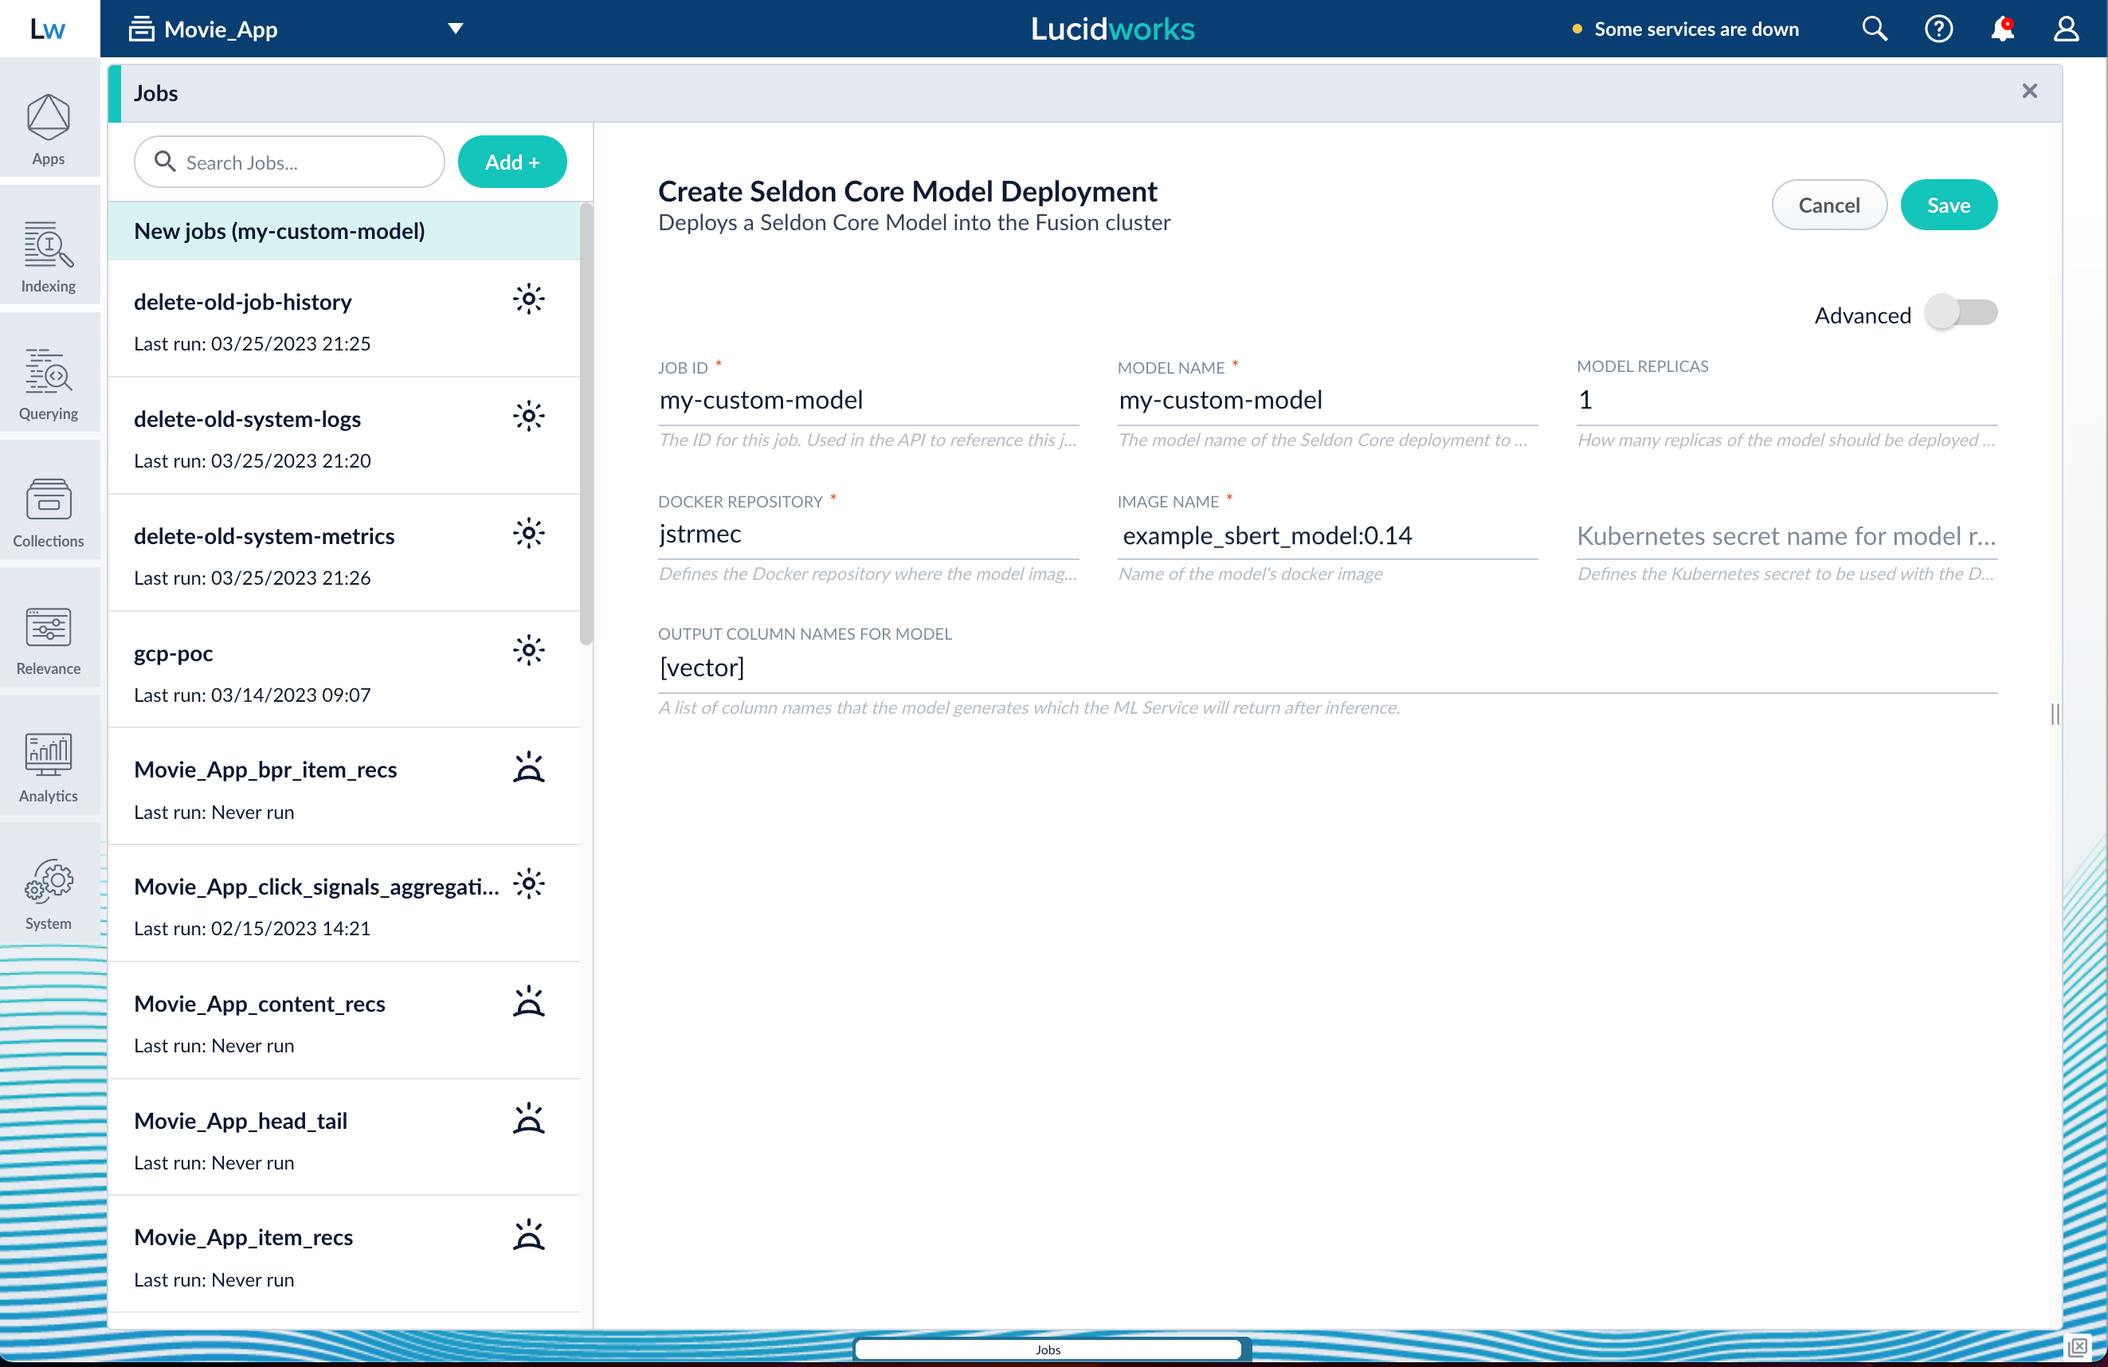
2. Add a job by clicking the **Add+** Button and selecting **Create Seldon Core Model Deployment**.
3. Fill in each of the text fields:
| Parameter | Description |
| ----------------- | ----------------------------------------------------------------------------------------------------------------------------------------------------------------------------------------------- |
| Job ID | A string used by the Fusion API to reference the job after its creation. |
| Model name | A name for the deployed model. This is used to generate the deployment name in Seldon Core. It is also the name that you reference as a `model-id` when making predictions with the ML Service. |
| Model replicas | The number of load-balanced replicas of the model to deploy; specify multiple replicas for a higher-volume intake. |
| Docker Repository | The public or private repository where the Docker image is located. If you’re using Docker Hub, fill in the Docker Hub username here. |
| Image name | The name of the image with an optional tag. If no tag is given, `latest` is used. |
| Kubernetes secret | If you’re using a private repository, supply the name of the Kubernetes secret used for access. |
| Output columns | A list of column names that the model’s `predict` method returns. |
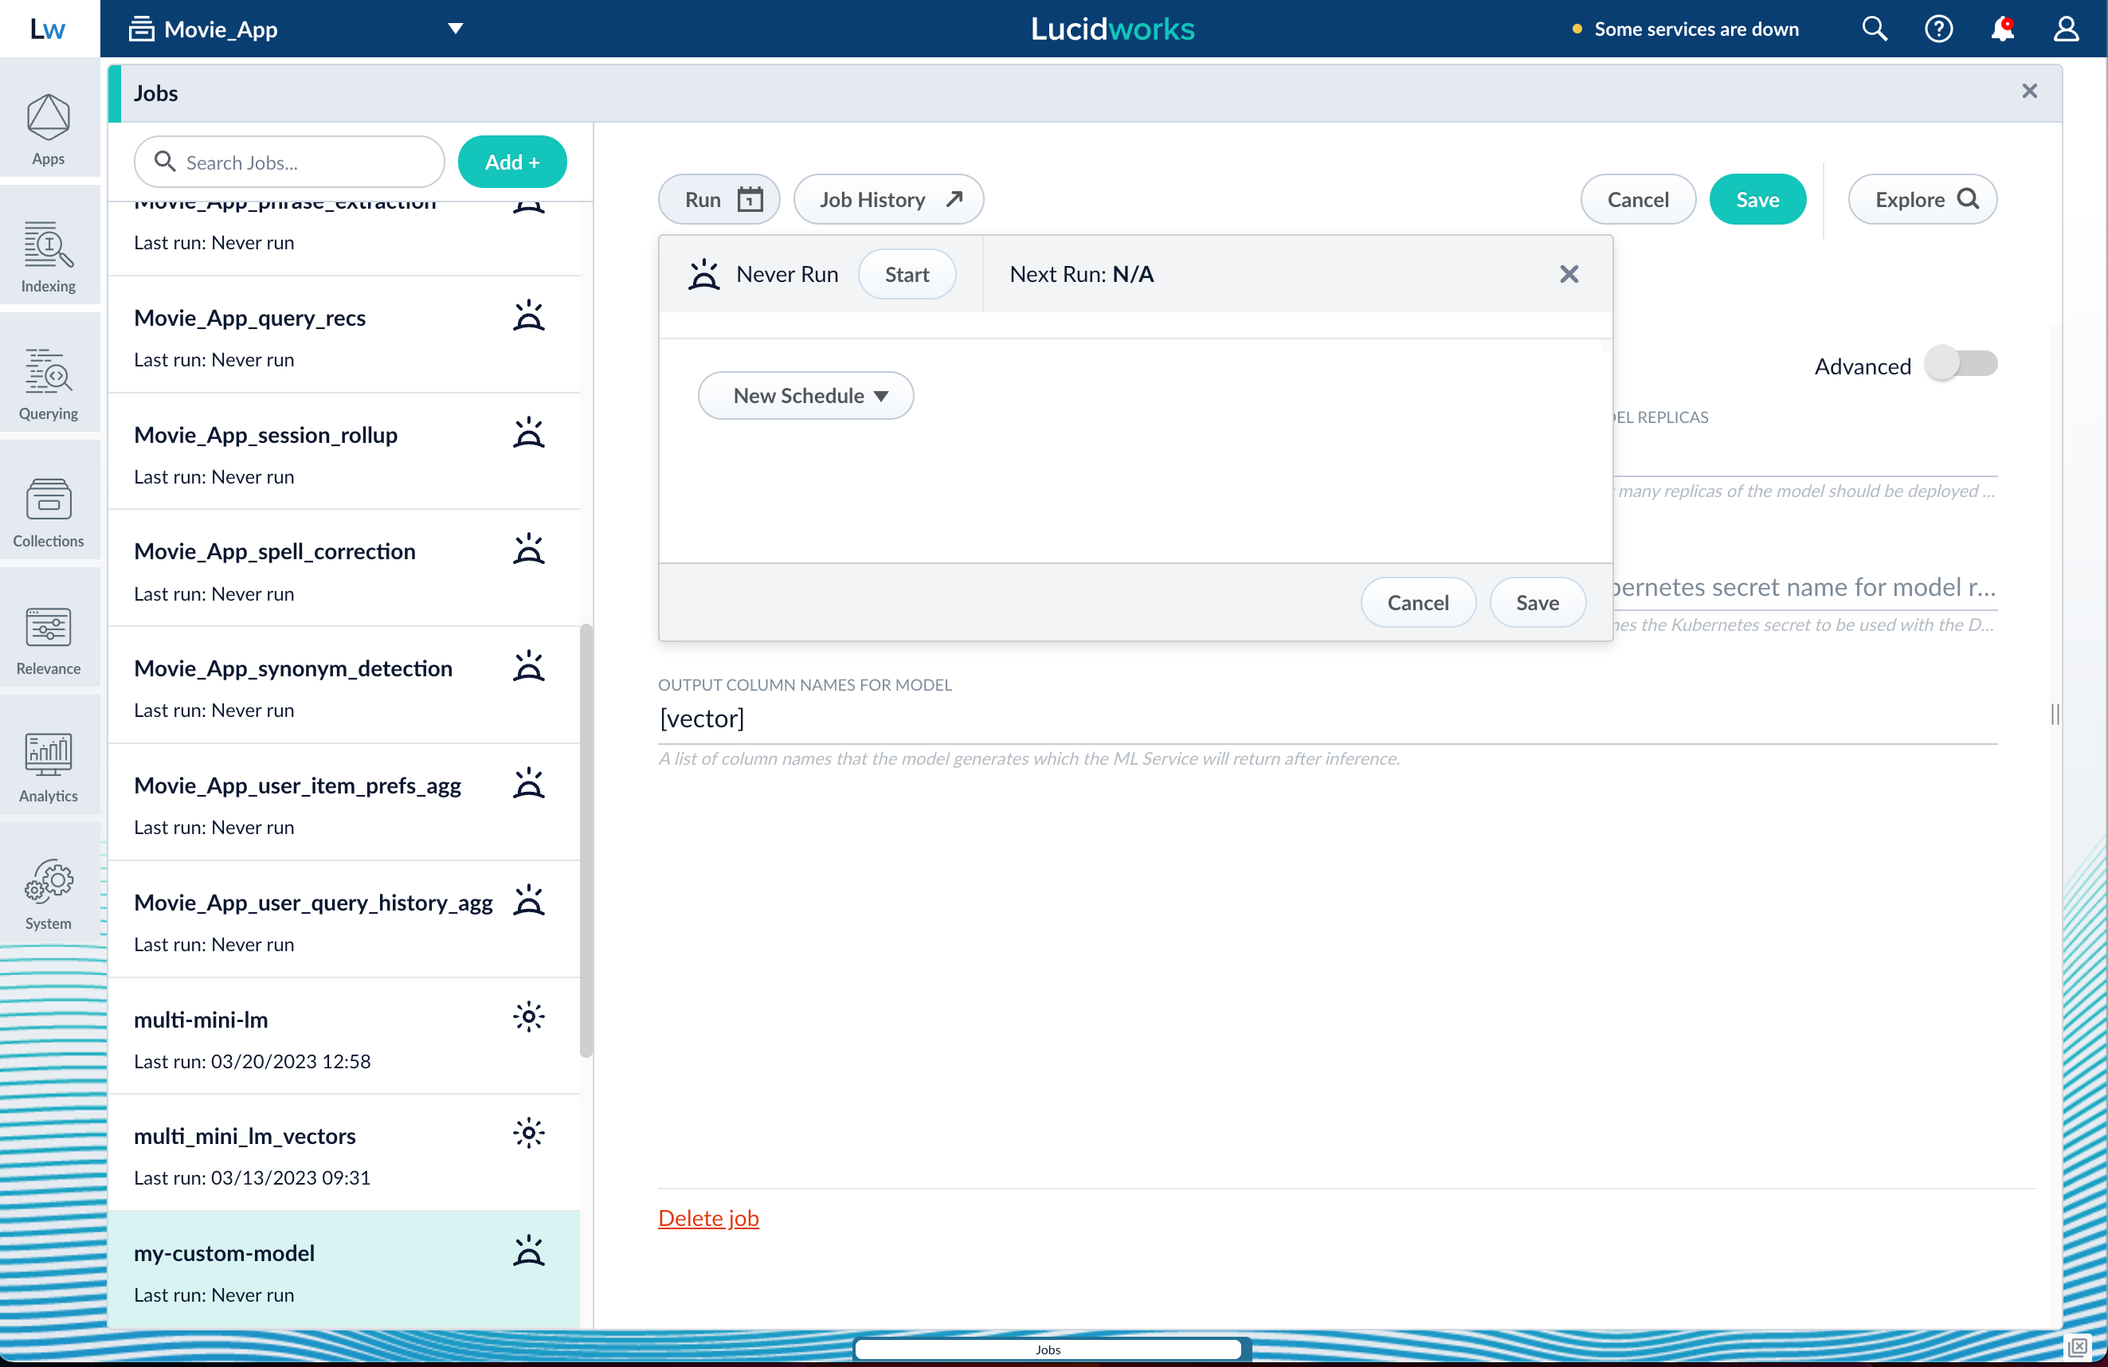
4. Click **Save**, then **Run** and **Start**.
When the job finishes successfully, you can proceed to the next section.
Now that the model is in Fusion, it can be utilized in either index or query pipelines, depending on the model’s purpose.
In this case the model is a word vectorizer or semantic vector search implementation, so both pipelines must invoke the model.
## Apply an API key to the deployment
These steps are only needed if your model utilizes any kind of secret, such as an API key.
If not, skip this section and proceed to the next.
1. Create and modify a `_sdep.yaml` file.\
In the first line, `kubectl get sdep` gets the details for the currently running Seldon Deployment job and saves those details to a YAML file. `kubectl apply -f open_sdep.yaml` adds the key to the Seldon Deployment job the next time it launches.
```yaml theme={"dark"}
kubectl get sdep -o yaml > _sdep.yaml
# Modify _sdep.yaml to add
- env:
- name: API_KEY
value: "your-api-key-here"
kubectl apply -f _sdep.yaml
```
2. Delete `sdep` before redeploying the model. The currently running Seldon Deployment job does not have the key applied to it. Delete it before redeploying and the new job will have the key.
```bash theme={"dark"}
kubectl delete sdep
```
3. Lastly, you can [encode into Milvus](/docs/5/fusion/intro/fusion-stack/milvus).
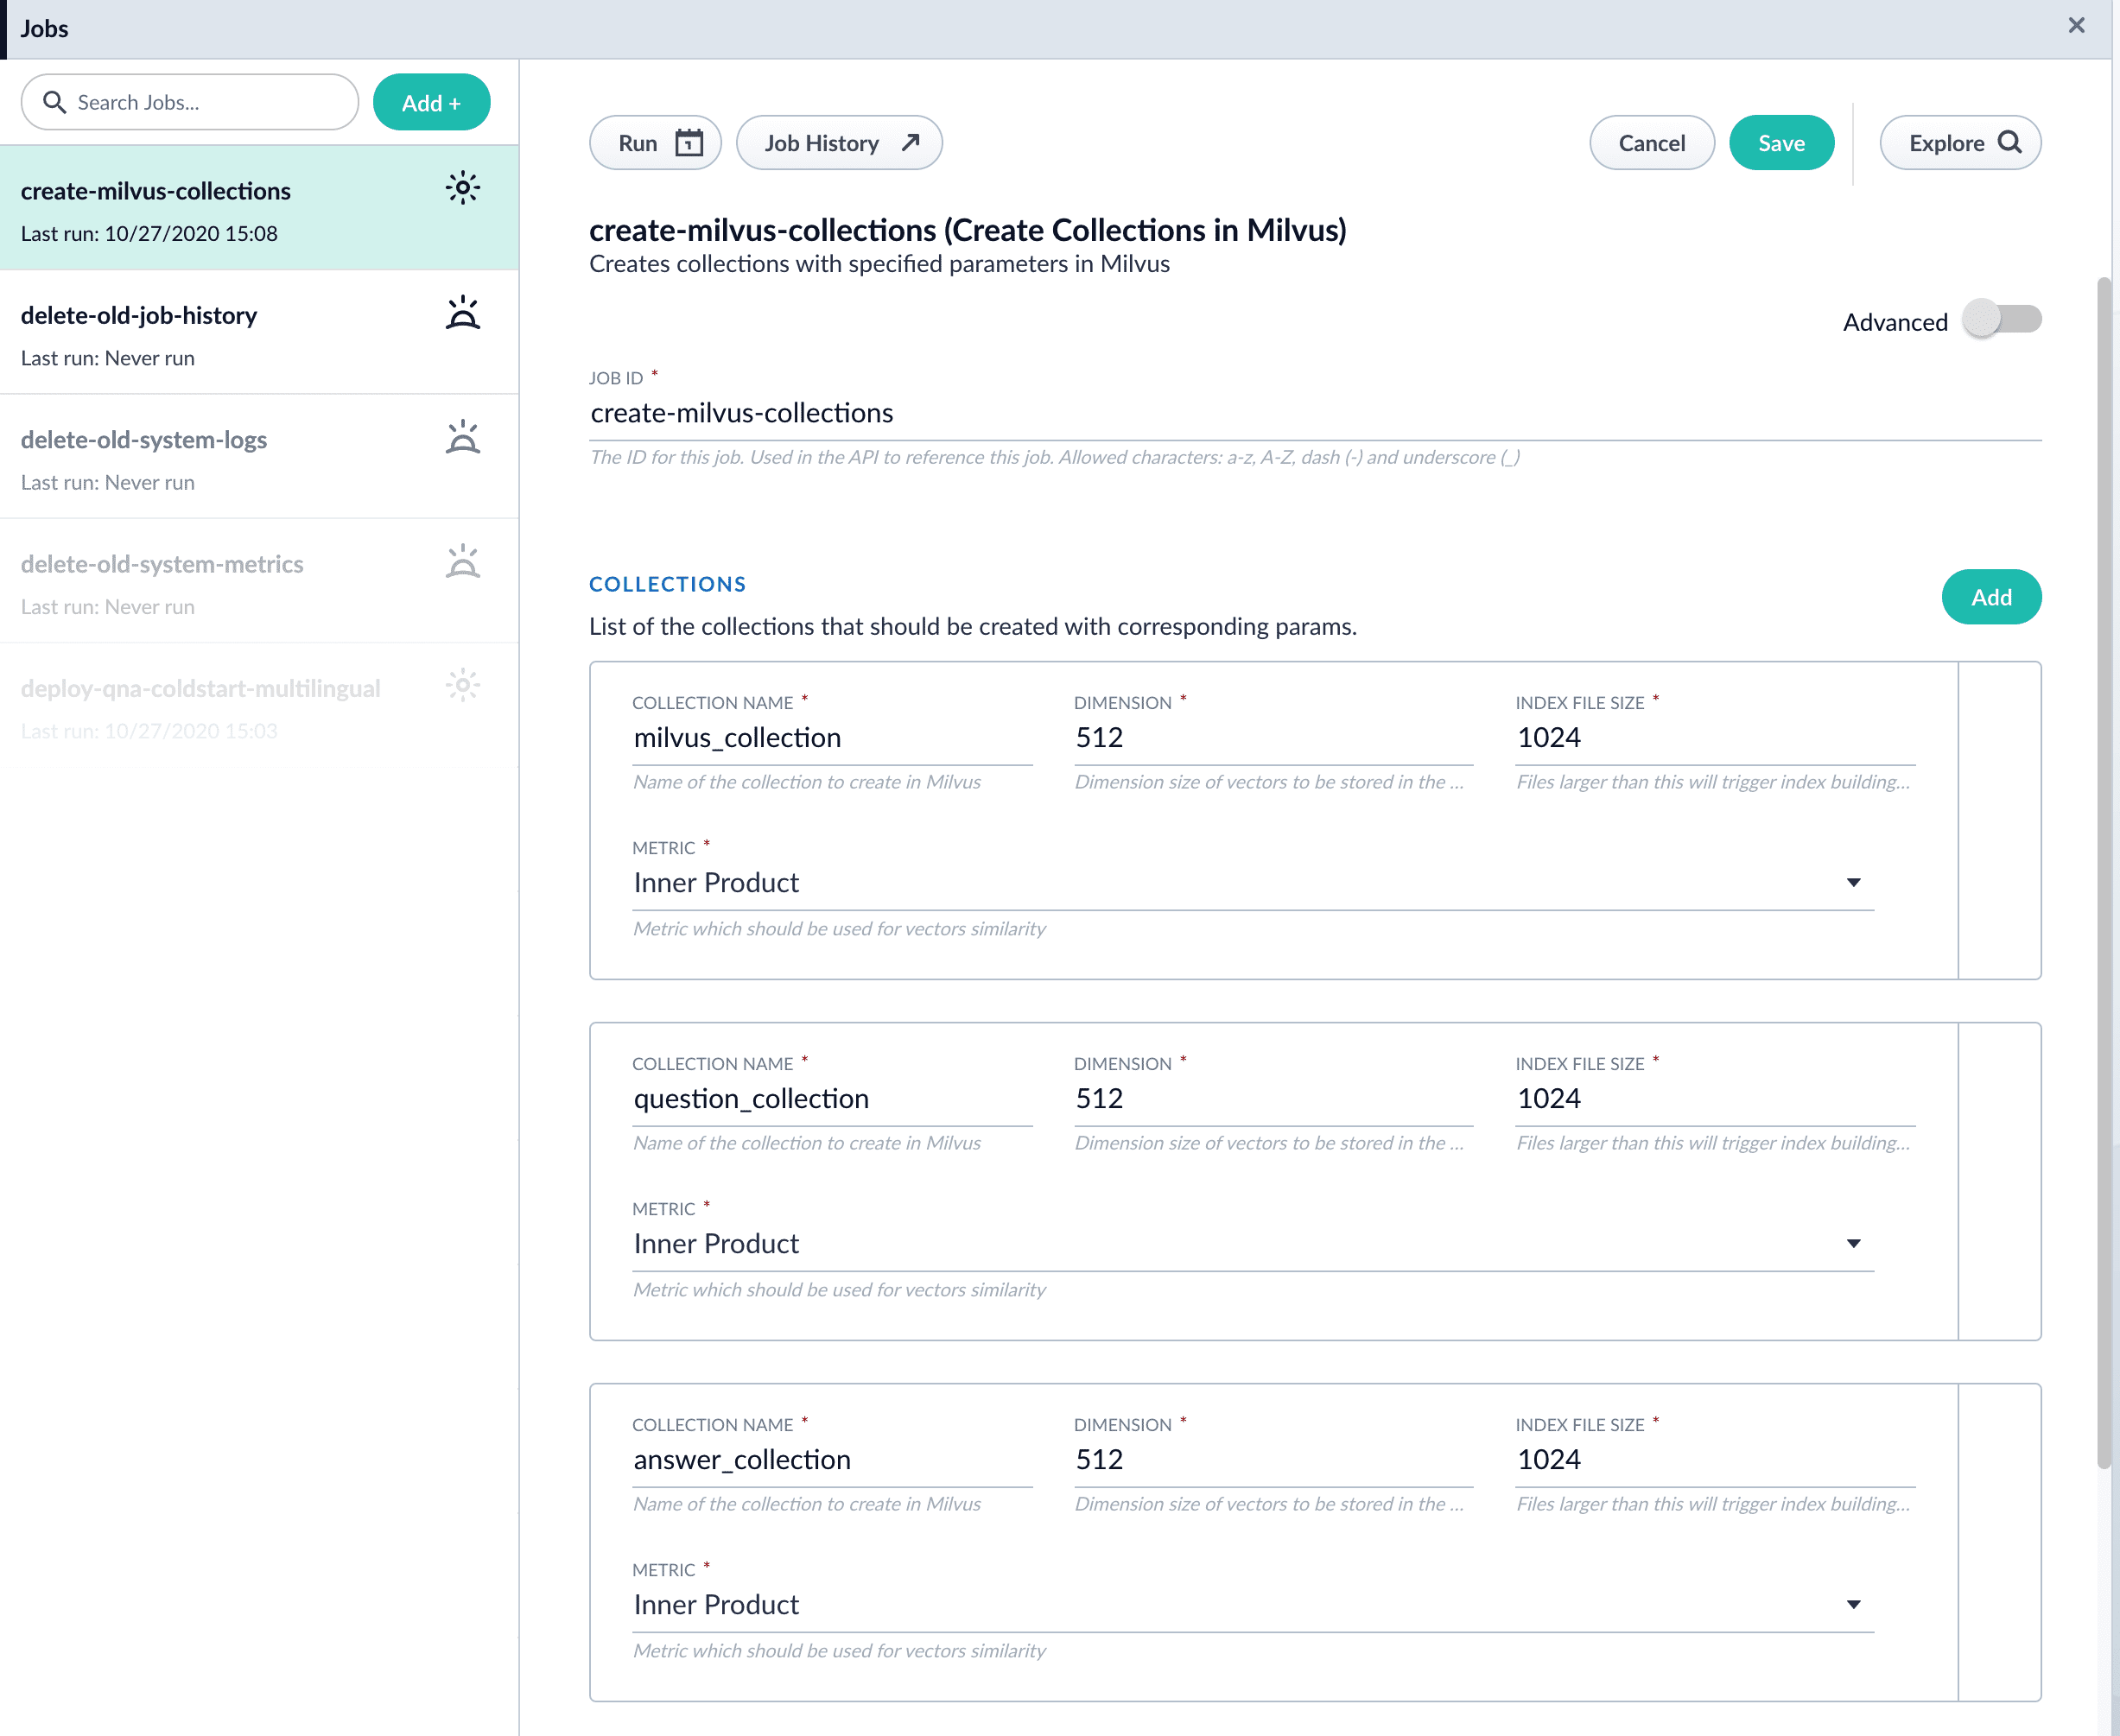
## Create a Milvus collection
1. In Fusion, navigate to **Collections** > **Jobs**.
2. Click the **Add+** Button and select **Create Collections in Milvus**.\
This job creates a collection in Milvus for storing the vectors sent to it.
The job is needed because a collection does not automatically spawn at indexing or query time if it does not already exist.
3. Name the job and the collection.
4. Click **Add** on the right side of the job panel.\
The key to creating the collection is the **Dimension** text field; this must exactly match the shape value your output prediction has.\
In our example the shape is (1,384), so 384 will be in the collections **Dimension** field:
The **Metric** field should typically be left at the default of `Inner Product`, but this also depends on use case and model type.
5. Click **Save**, then **Run** and **Start**.
## Configure the Fusion pipelines
Your real-world pipeline configuration depends on your use case and model, but for our example we will configure the index pipeline and then the query pipeline.
**Configure the index pipeline**
1. Create a new index pipeline or load an existing one for editing.
2. Click **Add a Stage** and then **Encode to Milvus**.
3. In the new stage, fill in these fields:
* The name of your model
* The output name you have for your model job
* The field you’d like to encode
* The collection name
4. Save the stage in the pipeline and index your data with it.
**Configure the query pipeline**
1. Create a new query pipeline or load an existing one for editing.
2. Click **Add a Stage** and then **Milvus Query**.
3. Fill in the configuration fields, then save the stage.
4. Add a **Milvus Ensemble Query** stage.\
This stage is necessary to have the Milvus collection scores taken into account in ranking and to weight multiple collections.
The **Milvus Results Context Key** from the Milvus Query Stage is used in this stage to preform math on the Milvus result scores.
One (1) is a typical multiplier for the Milvus results but any number can be used.
5. Save the stage and then run a query by typing a search term.
6. To verify the Milvus results are correct, use the **Compare+** button to see another pipeline without the model implementation and compare the number of results.
You have now successfully uploaded a Seldon Core model to Fusion and deployed it.
The [Supervised solution for Smart Answers](/docs/lucidworks-search/10-machine-learning/smart-answers/faq-solution) begins with training a model using your existing data and the [Smart Answers Supervised Training job](/docs/lucidworks-search/09-developer-documentation/config-specs/jobs/smart-answers-supervised-training), as explained in this topic. The job includes an auto-tune feature that you can use instead of manually tuning the configuration.
{/* // tag::requirements[] */}
## Training job requirements
**Storage**
150GB plus 2.5 times the total input data size.
**Processor and memory**
The memory requirements depend on whether you choose GPU or CPU processing:
| GPU | CPU |
| -------------------------------------------- | -------------------------------------------- |
|
one core
11GB RAM
|
32 cores
32GB RAM
|
If your training data contains more than 1 million entries, use GPU.
{/* // end::requirements[] */}
## Prepare the input data
1. Format your input data as question/answer pairs, that is, a query and its corresponding response in each row.
You can do this in any format that Lucidworks Search supports.
If there are multiple possible answers for a unique question, then repeat the questions and put the pair into different rows to make sure each row has one question and one answer, as in the example JSON below:
```json theme={"dark"}
[{"question":"How to transfer personal auto lease to business auto lease?","answer":"I would approach the lender that you are getting the lease from..."}
{"question":"How to transfer personal auto lease to business auto lease?","answer":"See what the contract says about transfers or subleases..."}]
```
2. Index the input data in Lucidworks Search.
If you wish to have the training data in Lucidworks Search, index it into a separate collection for training data such as `model_training_input`. Otherwise you can use it directly from the cloud storage.
{/* // tag::steps[] */}
## Configure the training job
1. In Lucidworks Search, navigate to **Collections** > **Jobs**.
2. Select **Add** > **Smart Answers Supervised Training**:
3. In the **Training Collection** field, specify the input data collection that you created when you [prepared the input data](#prepare-the-input-data).
You can also configure this job to read from or write to cloud storage.
4. Enter the names of the **Question Field** and the **Answer Field** in the training collection.
5. Enter a **Model Deployment Name**.
The new machine learning model will be saved in the blob store with this name. You will reference it later when you configure your pipelines.
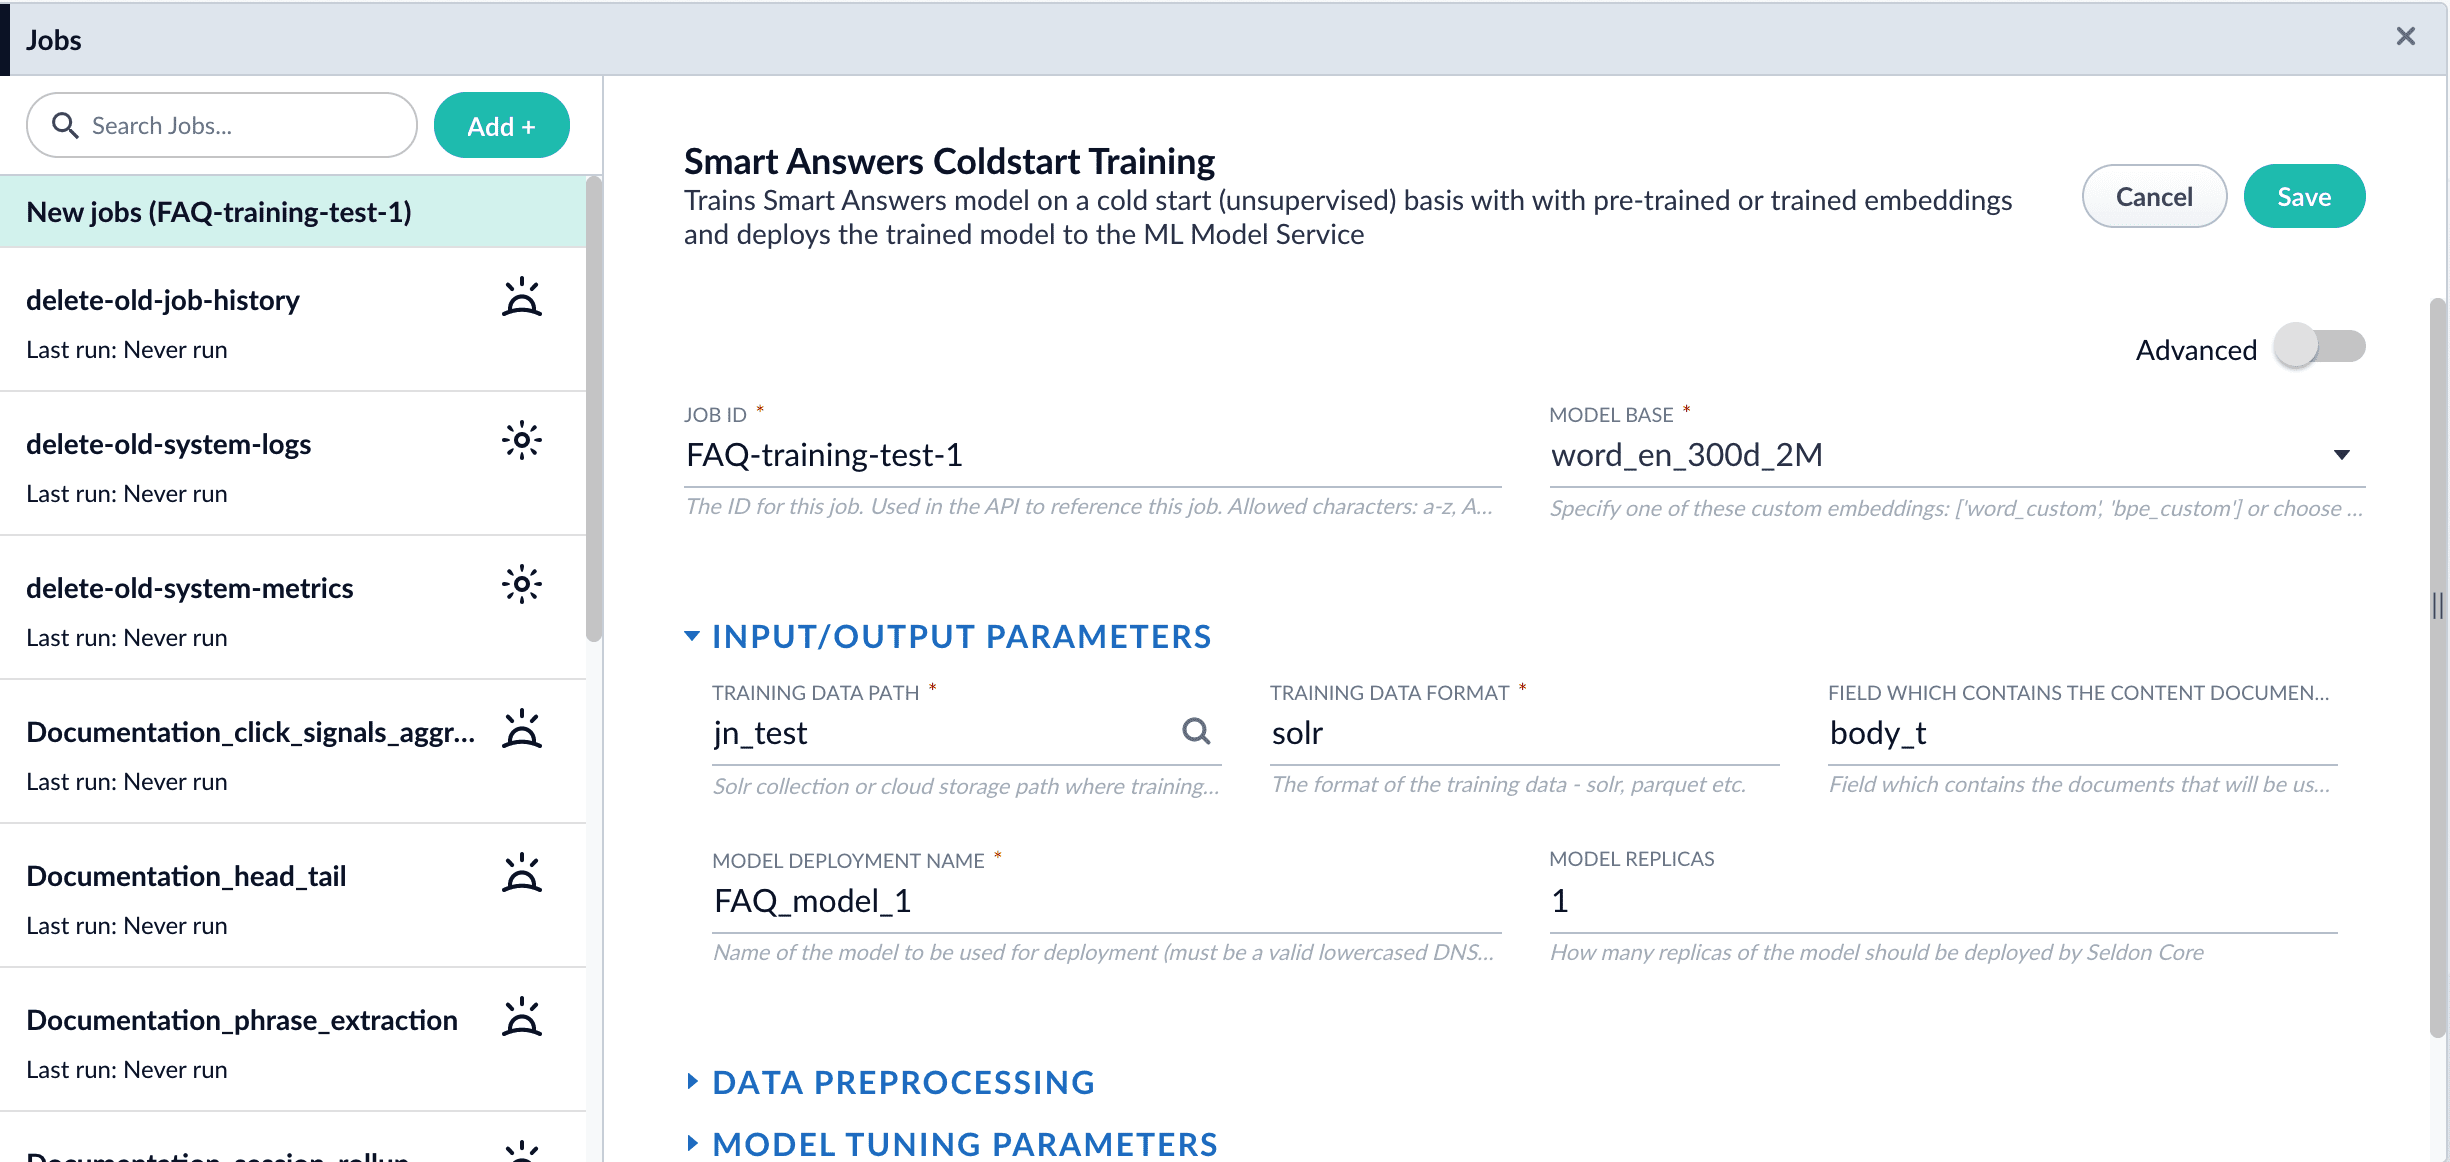
6. Configure the **Model base**.
There are several pre-trained word and [BPE](https://nlp.h-its.org/bpemb) embeddings for different languages, as well as a few pre-trained BERT models.
If you want to train custom embeddings, select `word_custom` or `bpe_custom`. This trains Word2vec on the provided data and specified fields. It might be useful in cases when your content includes unusual or domain-specific vocabulary.
If you have content in addition to the query/response pairs that can be used to train the model, then specify it in the **Texts Data Path**.
When you use the pre-trained embeddings, the log shows the percentage of processed vocabulary words. If this value is high, then try using custom embeddings.
The job trains a few (configurable) RNN layers on top of word embeddings or fine-tunes a BERT model on the provided training data. The result model uses an attention mechanism to average word embeddings to obtain the final single dense vector for the content.
Dimension size of vectors for Transformer-based models is 768. For RNN-based models it is 2 times the number units of the last layer. To find the dimension size: download the model, expand the zip, open the log and search for `Encoder output dim size:` line. You might need this information when creating collections in Milvus.
7. *Optional:* Check **Perform auto hyperparameter tuning** to use auto-tune.
Although training module tries to select the most optimal default parameters based on the training data statistics, auto-tune can extend it by automatically finding even better training configuration through hyper-parameter search.
Although this is a resource-intensive operation, it can be useful to identify the best possible RNN-based configuration. Transformer-based models like BERT are not used during auto hyperparameter tuning as they usually perform better yet they are much more expensive on both training and inference time.
8. Click **Save**.
If using solr as the training data source ensure that the source collection contains the `random_*` dynamic field defined in its `managed-schema.xml`. This field is required for sampling the data. If it is not present, add the following entry to the `managed-schema.xml` alongside other dynamic fields `` and \ alongside other field types.
9. Click **Run** > **Start**.
After training is finished the model is deployed into the cluster and can be used in index and query pipelines.
{/* // where are they saved? */}
{/* // end::steps[] */}
## Next steps
1. See A Smart Answers Supervised Job’s Status and Output
2. Configure The Smart Answers Pipelines
3. Evaluate a Smart Answers Query Pipeline
Before beginning this procedure, train a machine learning model using either the FAQ method or the cold start method.
Regardless of how you set up your model, the deployment procedure is the same:
1. [Create the `Milvus` collection](#create-the-milvus-collection).
2. [Configure the `smart-answers` index pipeline](#configure-the-index-pipeline).
3. [Configure the `smart-answers` query pipeline](#configure-the-query-pipeline).
See also [Best Practices](/docs/5/fusion/getting-data-out/advanced-query-enhancement/smart-answers/best-practices), [Advanced Model Training Configuration for Smart Answers](/docs/5/fusion/getting-data-out/advanced-query-enhancement/smart-answers/smart-answers-advanced-model-config), and Smart Answers Detailed Pipeline Setup.
## Create the Milvus collection
For complete details about job configuration options, see the [Create Collections in Milvus job](/docs/5/fusion/reference/config-ref/jobs/create-collections-in-milvus).
1. Navigate to **Collections** > **Jobs** > **Add +** and select **Create Collections in Milvus**.
2. Configure the job:
1. Enter an ID for this job.
2. Under **Collections**, click **Add**.
3. Enter a collection name.
4. In the **Dimension** field, enter the dimension size of vectors to store in this Milvus collection. The Dimension should match the size of the vectors returned by the encoding model. For example, the `Smart Answers Pre-trained Coldstart` models outputs vectors of 512 dimension size. Dimensionality of encoders trained by `Smart Answers Supervised Training` job depends on the provided parameters and printed in the training job logs.
3. Click **Save**.
The `Create Collections in Milvus` job can be used to create multiple collections at once. In this image, the first collection is used in the [indexing](#configure-the-index-pipeline) and [query](#configure-the-query-pipeline) steps. The other two collections are used in the [example](#pipeline-setup-example).
4. Click **Run** > **Start** to run the job.
## Configure the index pipeline
1. Open the Index Workbench.
2. Load or create your datasource using the default smart-answers index pipeline.
3. Configure the
[Encode into Milvus stage](/docs/5/fusion/reference/config-ref/pipeline-stages/index-stages/encode-into-milvus-index-stage):
1. change the value of **Model ID** to match the model deployment name you chose when you configured the model training job.
2. Change `Field to Encode` to the document field name to be processed and encoded into dense vectors.
3. Ensure the `Encoder Output Vector` matches the output vector from the chosen model.
4. Ensure the `Milvus Collection Name` matches the collection name created via the `Create Milvus Collection` job.
To test out your settings, turn on `Fail on Error` in the `Encode into Milvus` stage and Apply the changes. This will cause an error message to display if any settings need to be changed.
4. Save the datasource.
5. Index your data.
## Configure the query pipeline
1. Open the Query Workbench.
2. Load the default smart-answers query pipeline.
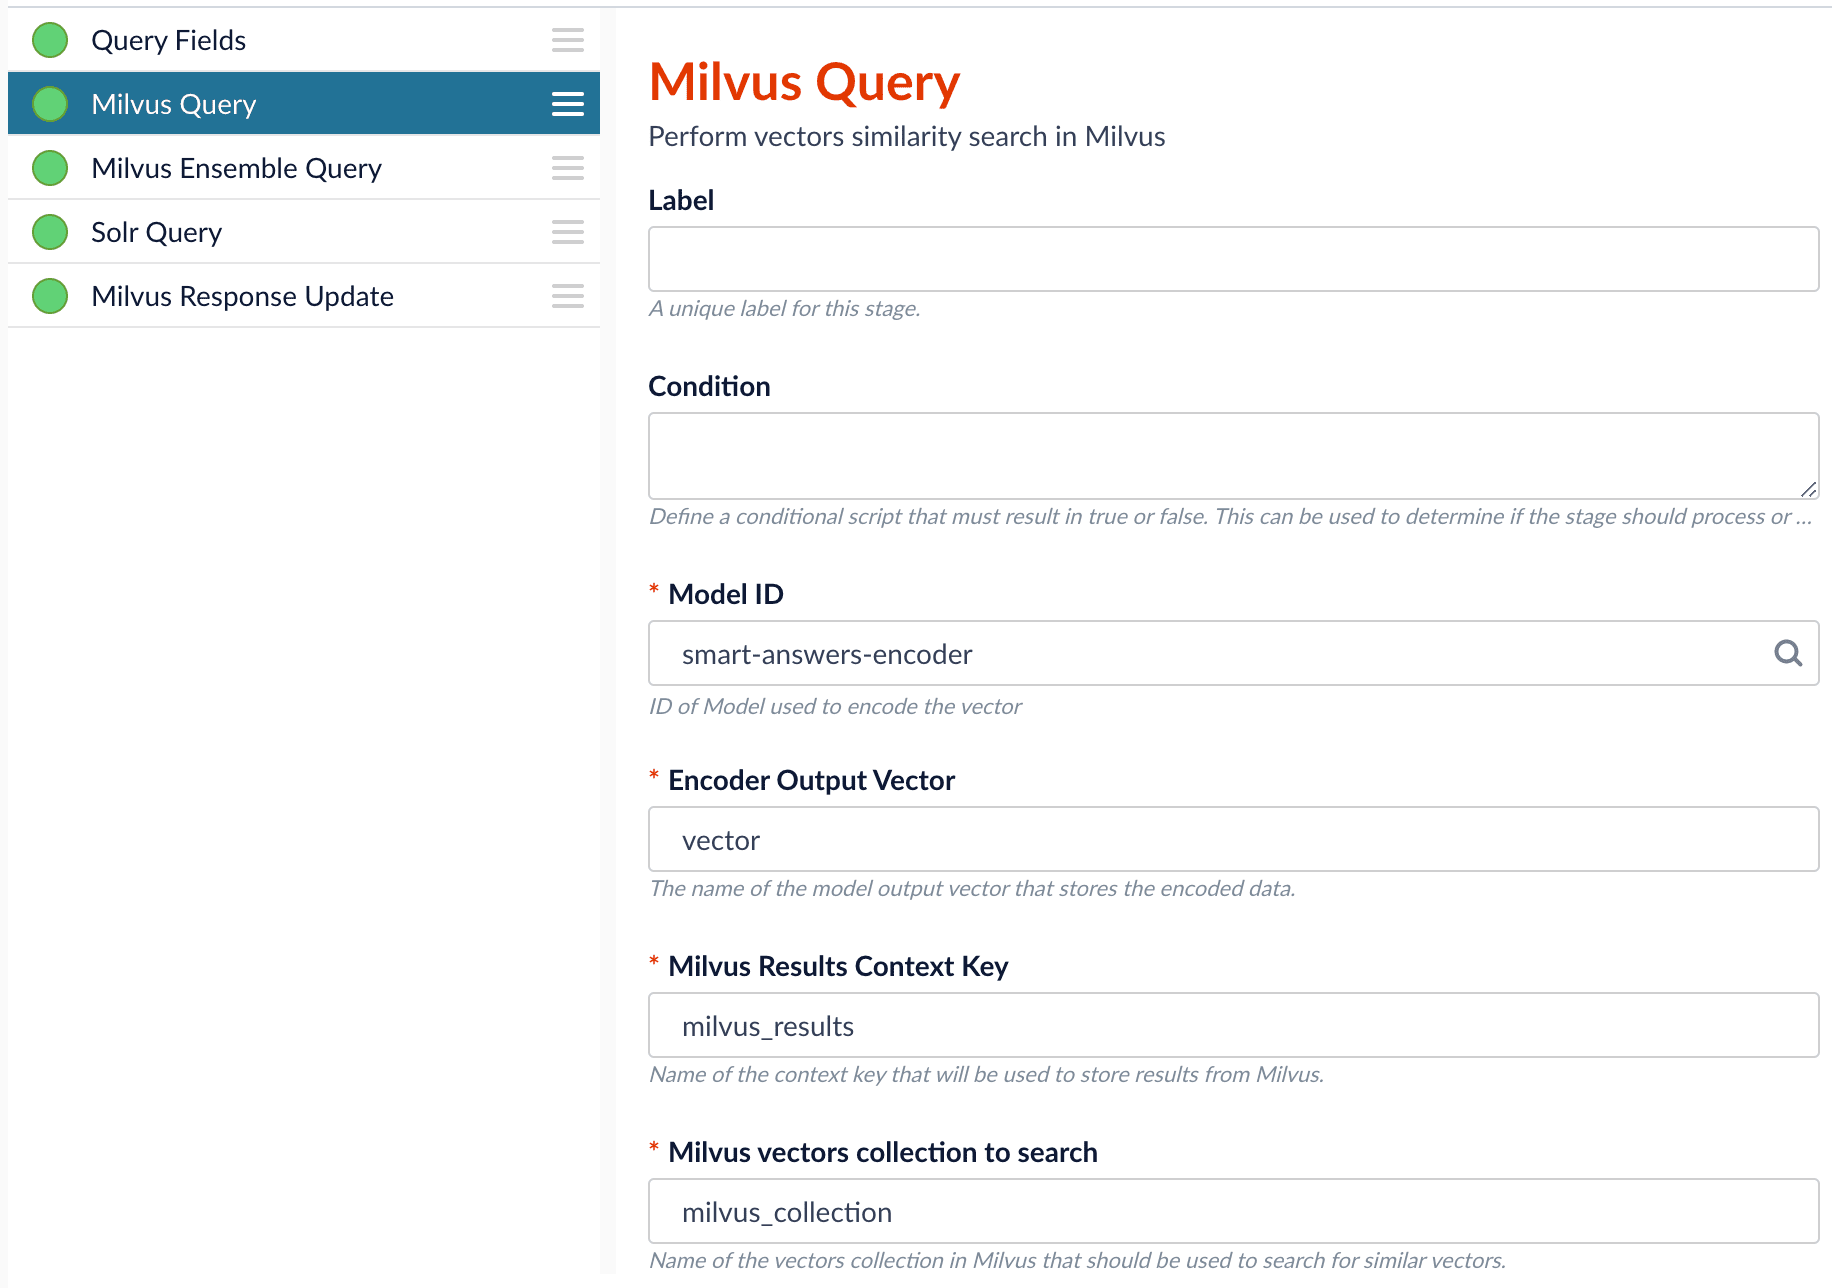
3. Configure the [Milvus Query stage](/docs/5/fusion/reference/config-ref/pipeline-stages/query-stages/milvus-query-stage):
1. Change the **Model ID** value to match the model deployment name you chose when you configured the model training job.
2. Ensure the `Encoder Output Vector` matches the output vector from the chosen model.
3. Ensure the `Milvus Collection Name` matches the collection name created via the `Create Milvus Collection` job.
4. `Milvus Results Context Key` can be changed as needed. It will be used in the Milvus Ensemble Query Stage to calculate the query score.
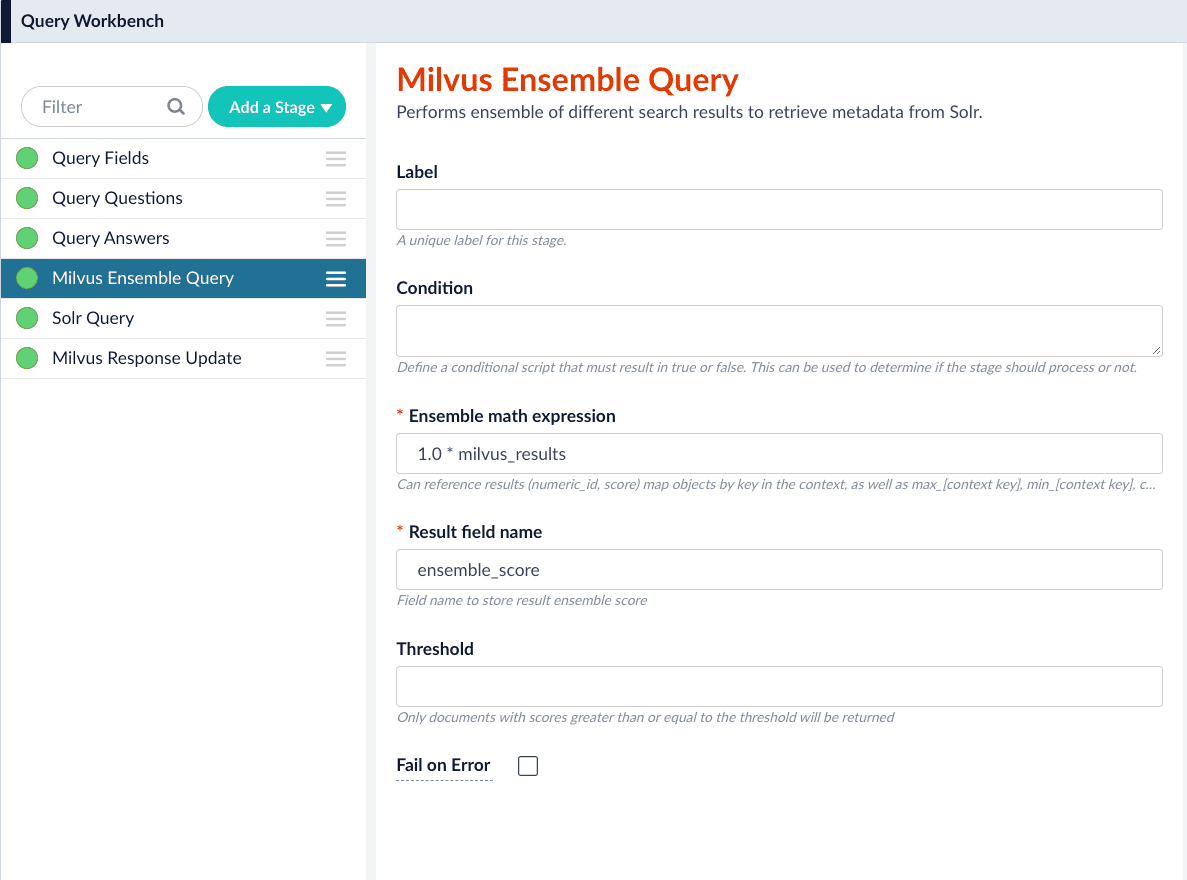
4. In the [Milvus Ensemble Query stage](/docs/5/fusion/reference/config-ref/pipeline-stages/query-stages/milvus-ensemble-query-stage), update the `Ensemble math expression` as needed based on your model and the name used in the prior stage for the storing the Milvus results.
In versions 5.4 and later, you can also set the `Threshold` so that the Milvus Ensemble Query Stage will only return items with a score **greater than** or **equal to** the configured value.
5. Save the query pipeline.
## Pipeline Setup Example
### Index and retrieve the question and answer together
To show question and answer together in one document (that is, treat the question as the title and the answer as the description), you can index them together in the same document. You can still use the default `smart-answers` index and query pipelines with a few additional changes.
Prior to configuring the Smart Answers pipelines, use the `Create Milvus Collection` job to create two collections, `question_collection` and `answer_collection`, to store the encoded "questions" and the encoded "answers", respectively.
#### Index Pipeline
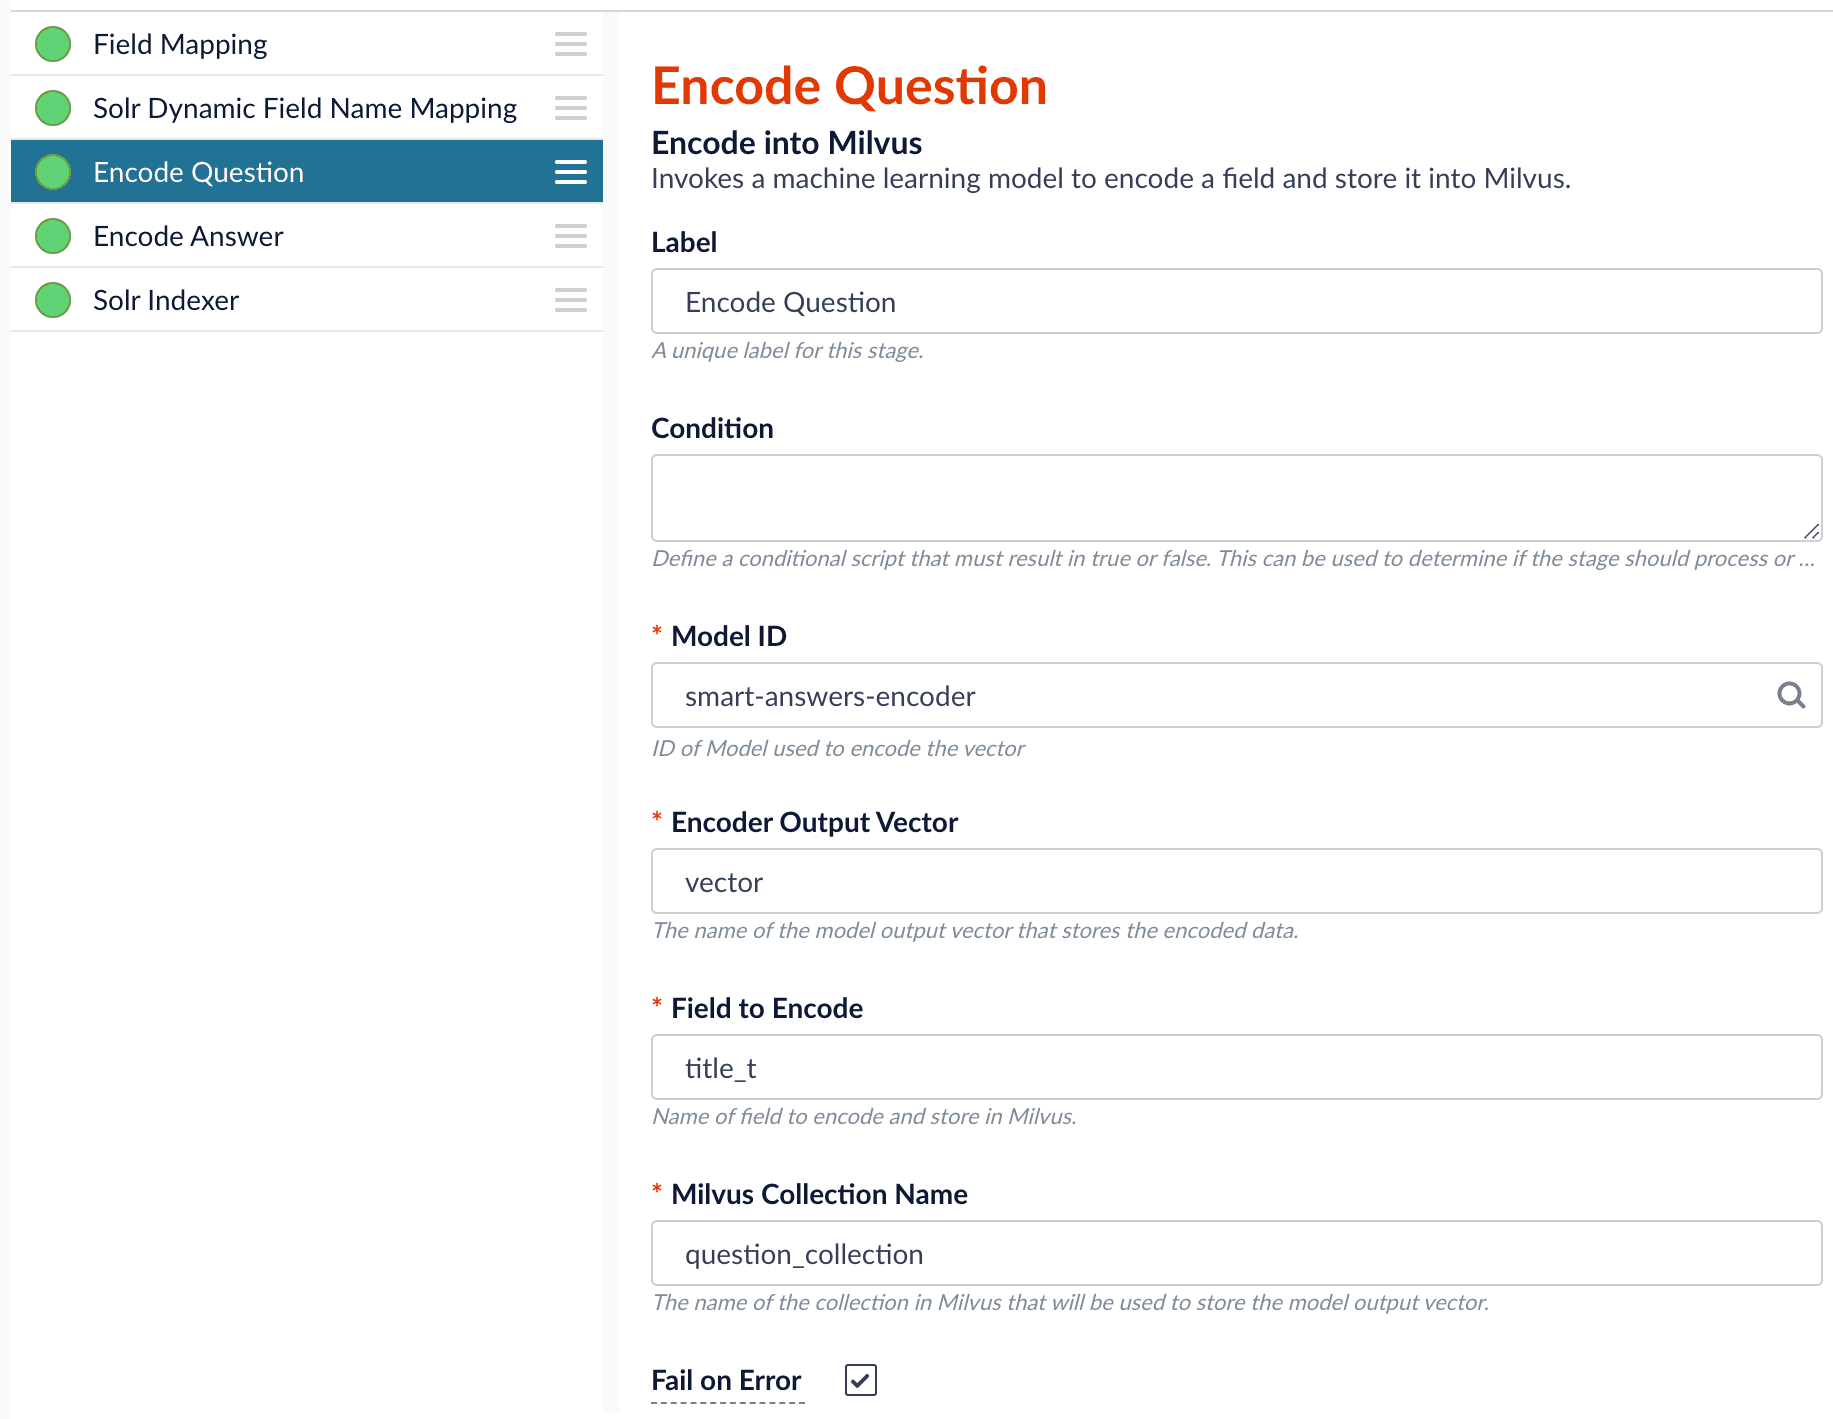
As shown in the pictures below, you will need two Encode into Milvus stages, named Encode Question and Encode Answer respectively.
**Encode Question (Encode Into Milvus) stage**
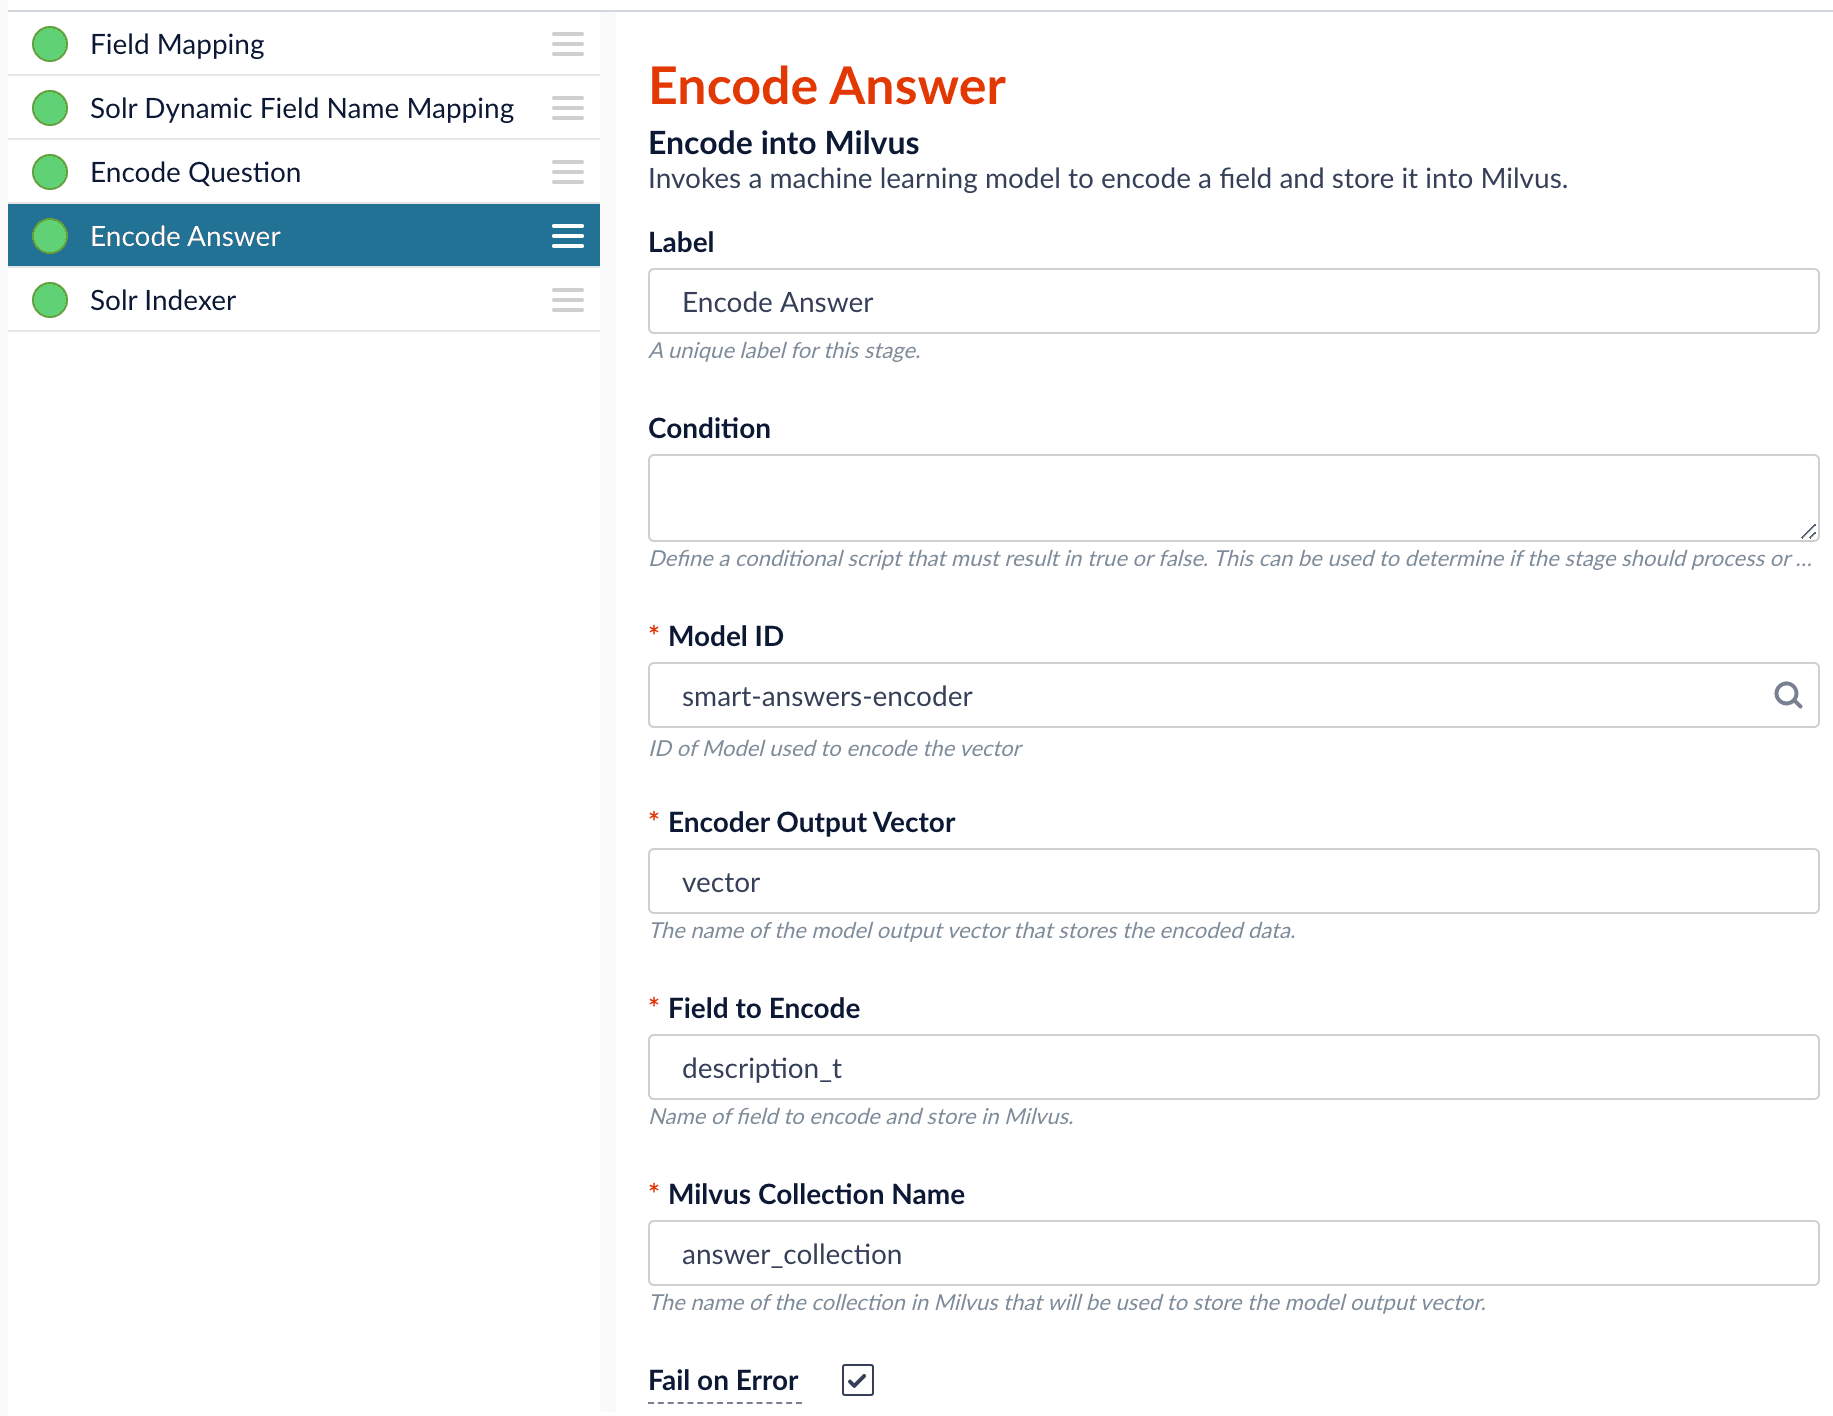
**Encode Answer (Encode Into Milvus) stage**
In the Encode Question stage, specify `Field to Encode` to be `title_t` and change the `Milvus Collection Name` to match the new Milvus collection, `question_collection`.
In the Encode Answer stage, specify `Field to Encode` to be `description_t` and change the `Milvus Collection Name` to match the new Milvus collection, `answer_collection`.
#### Query Pipeline
Since we have two dense vectors generated during indexing, at query time we need to compute both query to question distance and query to answer distance. This can be set up as the pictures shown below with two Milvus Query Stages, one for each of the two Milvus collections.
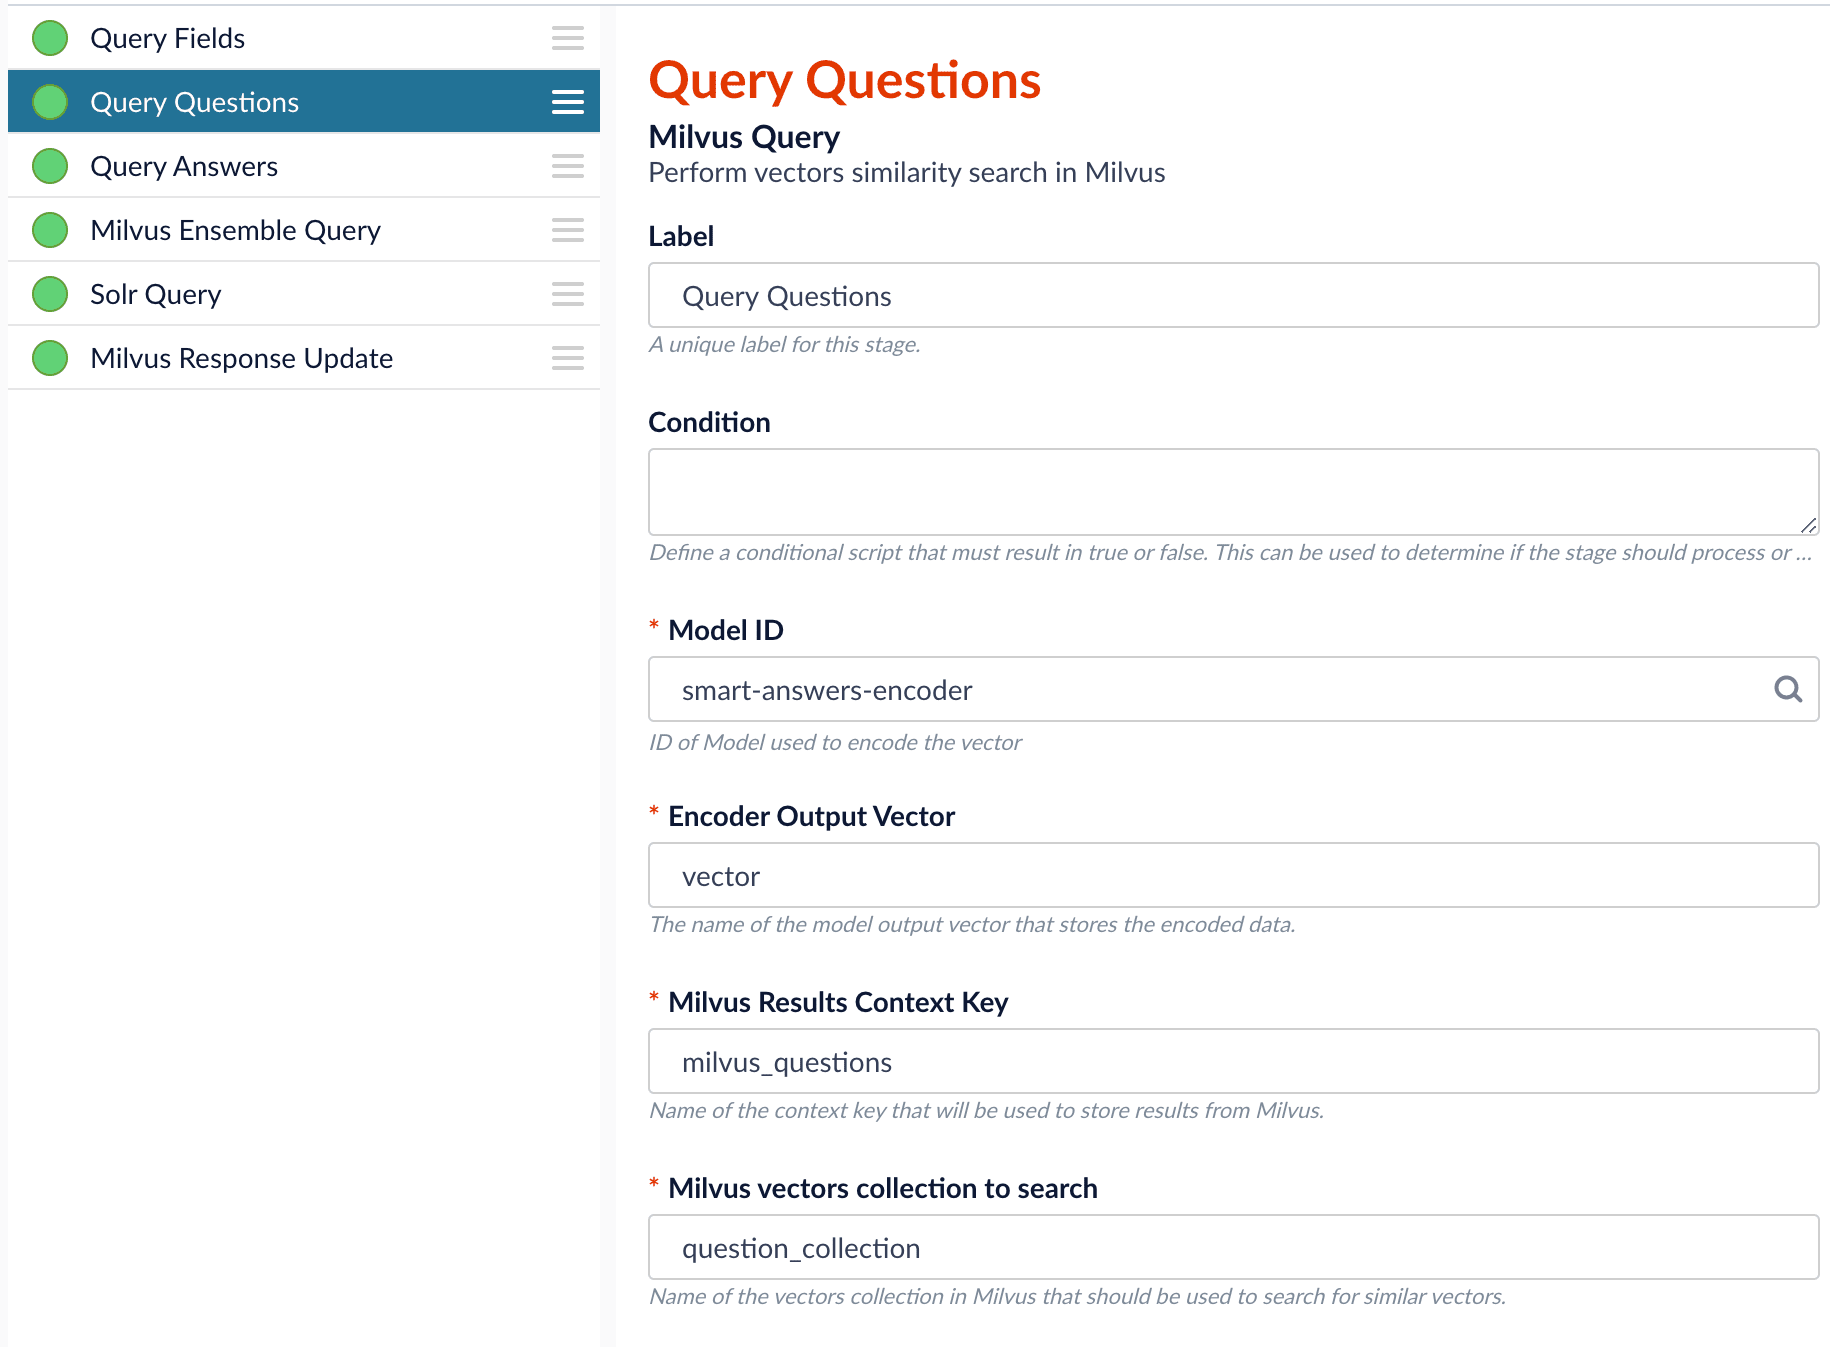
To store those two distances separately, the `Milvus Results Context Key` needs to be different in each of these two stages.
In the Query Questions stage, we set the `Milvus Results Context Key` to `milvus_questions` and the Milvus collection name to `question_collection`.
Query Questions (Milvus Query) stage:
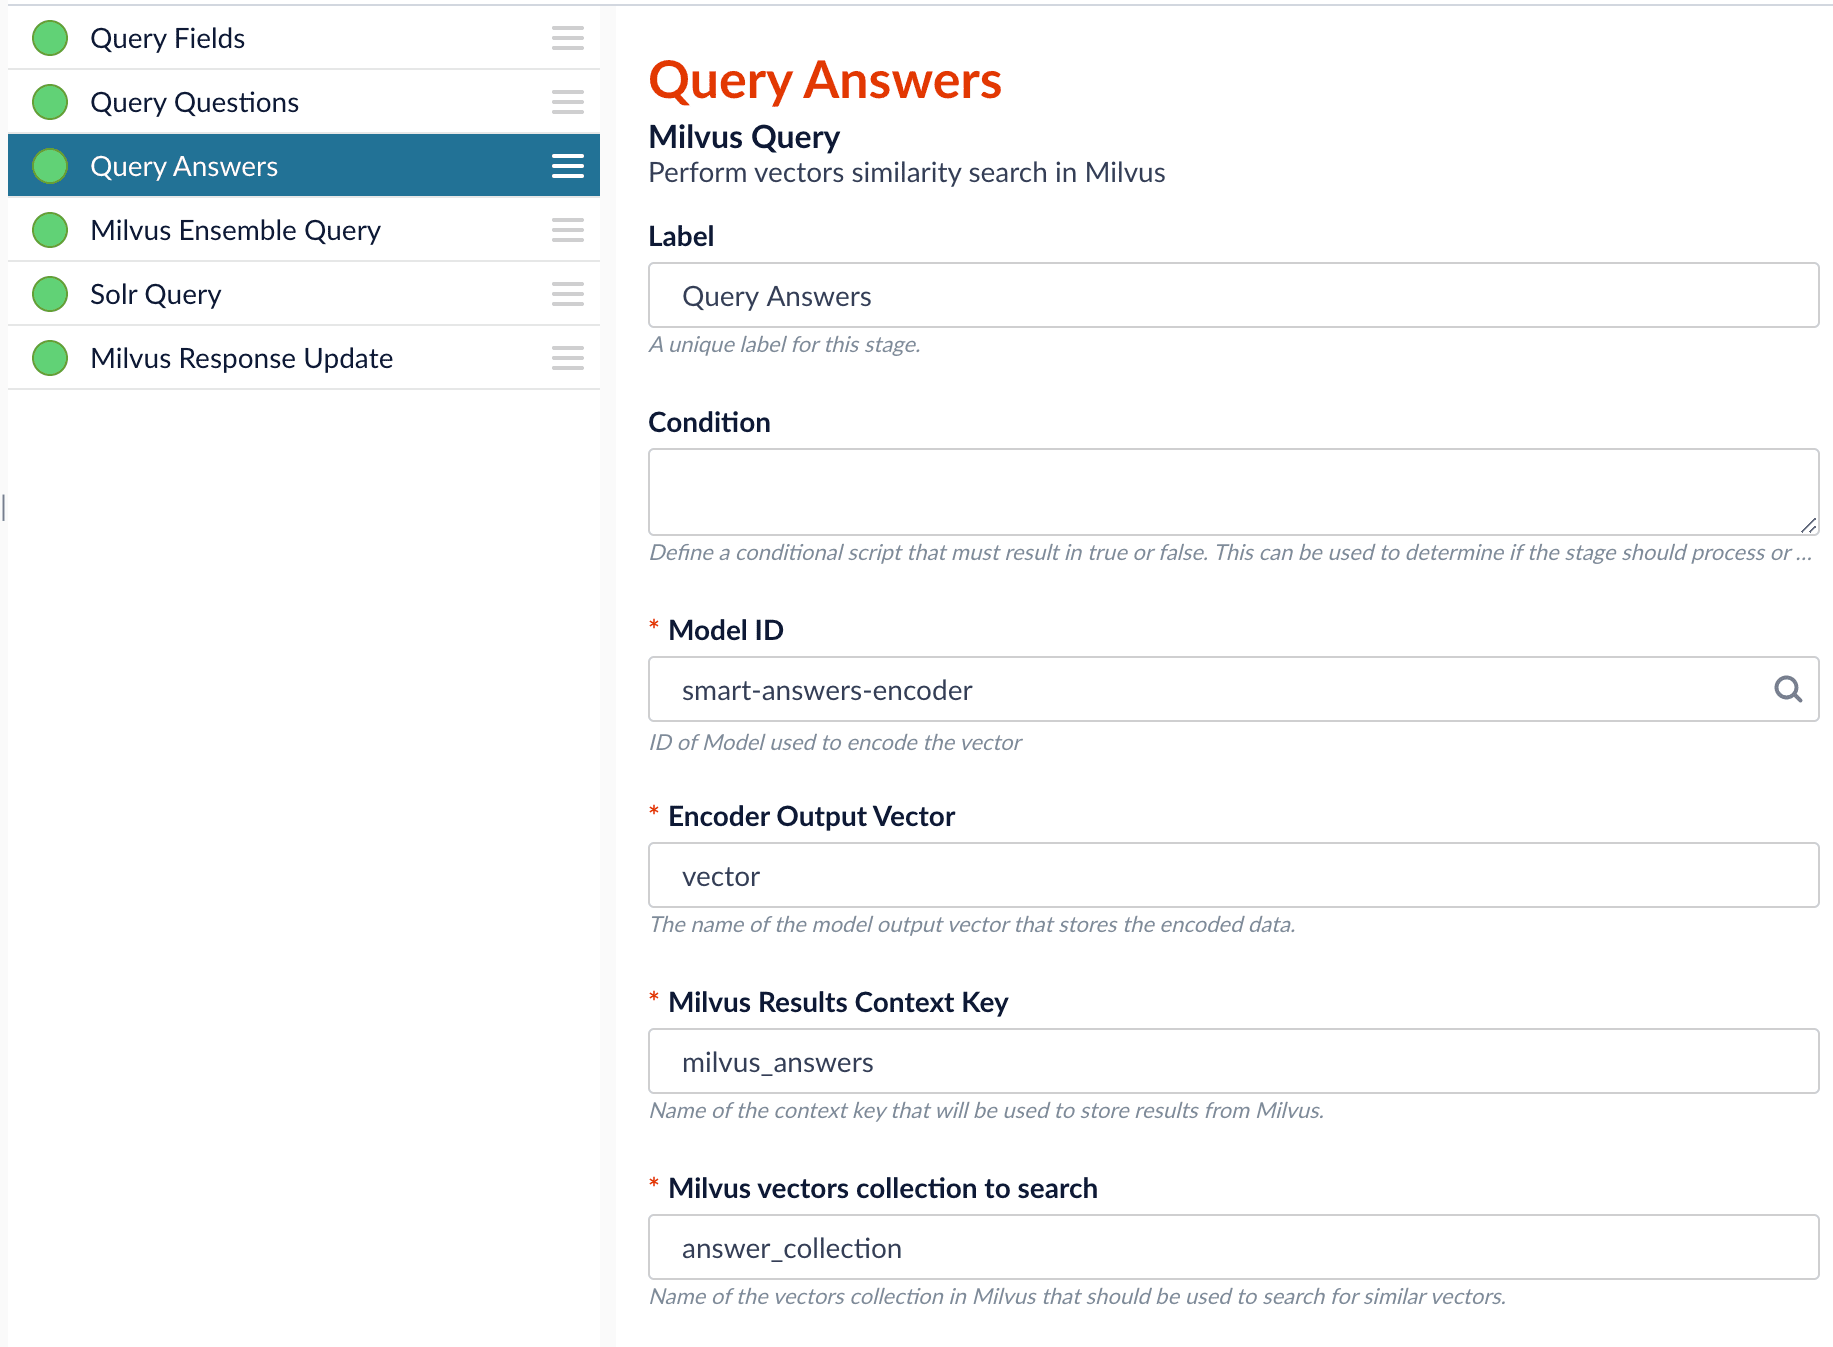
In the Query Answers stage, we set the `Milvus Results Context Key` to `milvus_answers` and the Milvus collection name to `answer_collection`.
Query Answers (Milvus Query) stage:
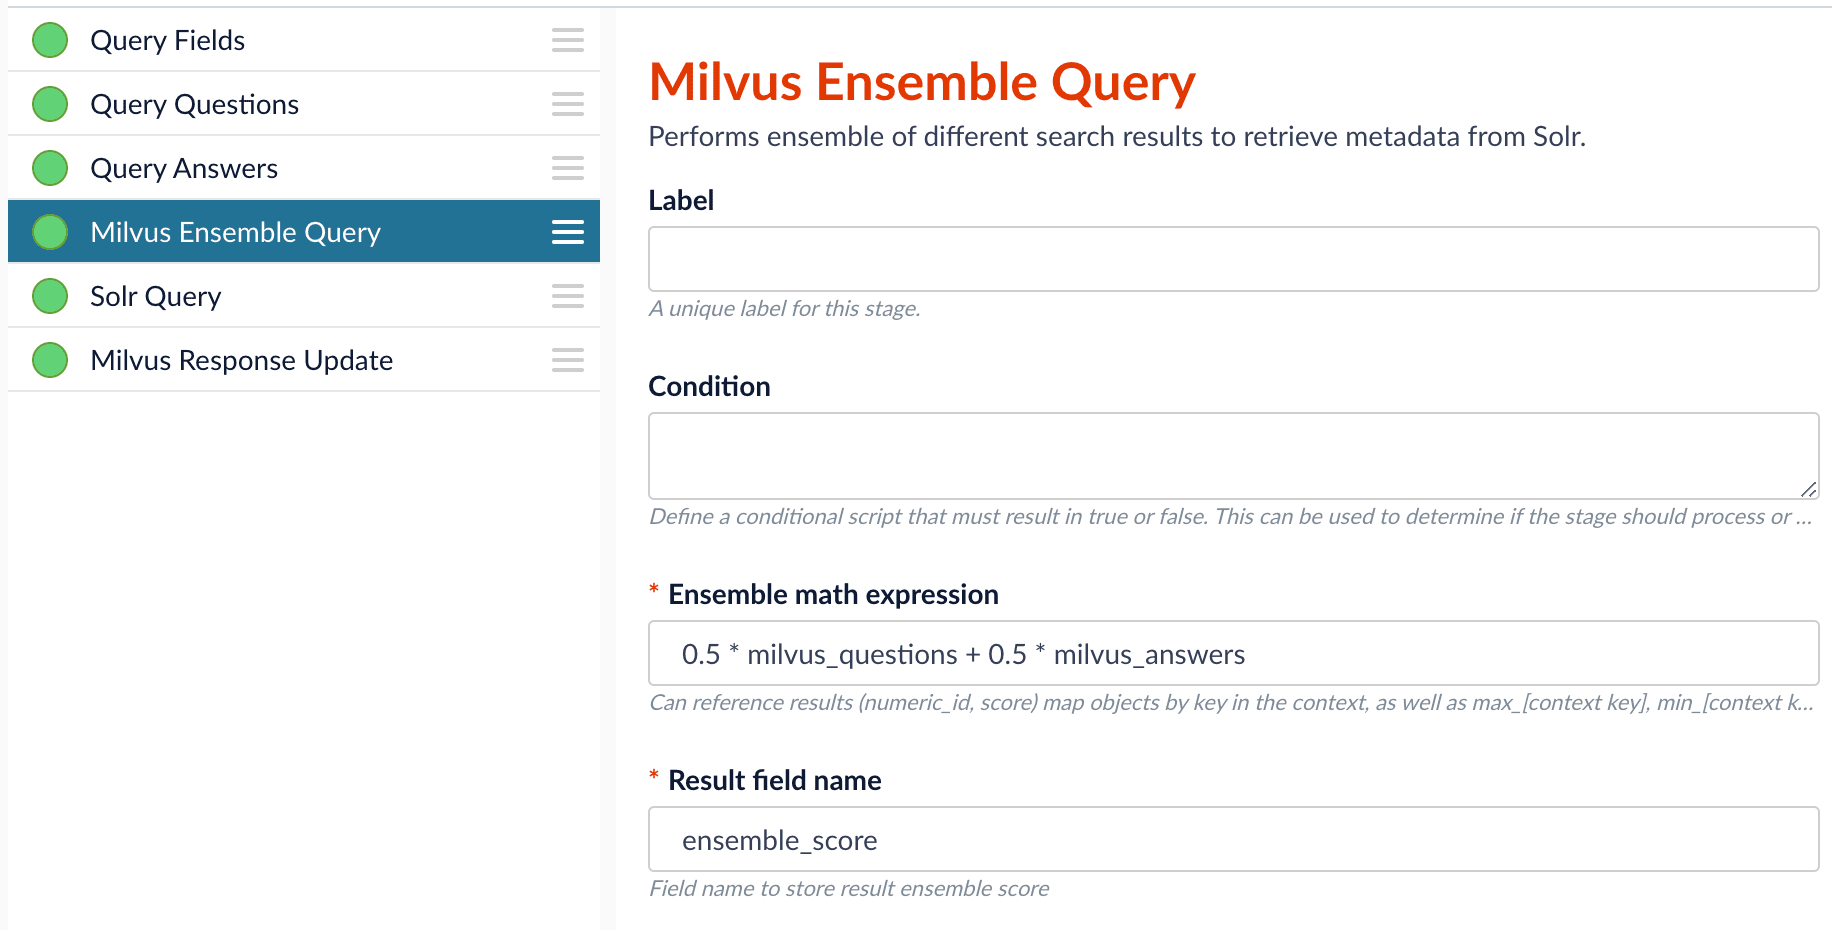
Now we can ensemble them together with the Milvus Ensemble Query Stage with the `Ensemble math expression` combining the results from the two query stages. If we want the question scores and answer scores weighted equally, we would use: `0.5 * milvus_questions + 0.5 * milvus_answers`.
This is recommended especially when you have limited FAQ dataset and want to utilize both question and answer information.
**Milvus Ensemble Query stage**
## Evaluate the query pipeline
The [Evaluate QnA Pipeline job](/docs/5/fusion/reference/config-ref/jobs/smart-answers-evaluate-pipeline) evaluates the rankings of results from any Smart Answers pipeline and finds the best set of weights in the ensemble score.
## Detailed pipeline setup
Typically, you can use the [default pipelines](/docs/5/fusion/getting-data-out/advanced-query-enhancement/smart-answers/overview) included with Fusion AI. These pipelines now utilize Milvus to store encoded vectors and to calculate vector similarity. This topic provides information you can use to customize the Smart Answers pipelines.
| | | |
| ---------------------------------- | ------------------------------------------------------------------------------------------------------------------------------------------------------------------------------------------------------------------------------------------------------------------------------------------------------------------------------------------------------------------------------------------------------------------------------------------------------------------------------------------------------------------------------------------------------------------------------------------------------------------------------------------------------------------------------------------------------------------------------------------------------------------------------------------------------------------------------------------------------------------------------------------------------------------------------------------------------------------------------------------------------------------------------------------------------------------------------------------------------------------------------------------------------------------------------------------------------------------------------------------------------------------------------------------------------------------------------------------------------------------------------------------------------------------------------------------------------------------------------------------------------------------------------------------------------------------------------------------------------------------------------------------ | --------------------------------------------------------------------------------------------------------------------------------------------------------------------------------------------------------------------------------------------------------- |
| **"smart-answers" index pipeline** | | [Encode into Milvus stage](#the-encode-into-milvus-index-stage) |
| **"smart-answers" query pipeline** | |
|
### Create the Milvus collection
Prior to indexing data, the [Create Collections in Milvus job](/docs/5/fusion/reference/config-ref/jobs/create-collections-in-milvus) can be used to create the Milvus collection(s) used by the Smart Answers pipelines (see [Milvus overview](/docs/5/fusion/intro/fusion-stack/milvus)).
* `Job ID`. A unique identifier for the job.
* `Collection Name`. A name for the Milvus collection you are creating. This name is used in both the Smart Answer Index and the Smart Answer Query pipelines.
* `Dimension`. The dimension size of the vectors to store in this Milvus collection. The Dimension should match the size of the vectors returned by the encryption model. For example, if the model was created with either the `Smart Answers Coldstart Training` job or the `Smart Answers Supervised Training` job with the Model Base `word_en_300d_2M`, then the dimension would be 300.
* `Index file size`. Files with more documents than this will cause Milvus to build an index on this collection.
* `Metric`. The type of metric used to calculate vector similarity scores. `Inner Product` is recommended. It produces values between 0 and 1, where a higher value means higher similarity.
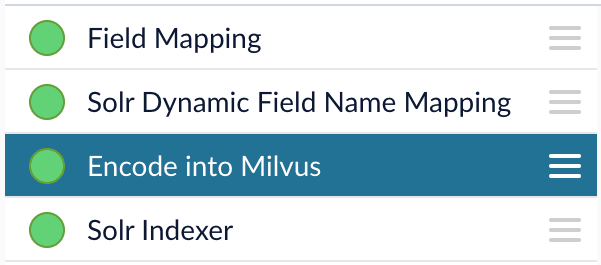
### Index pipeline setup
**Stages in the default "smart-answers" index pipeline**
Only one custom index stage needs to be configured in your index pipeline, the [Encode into Milvus index stage](/docs/5/fusion/reference/config-ref/pipeline-stages/index-stages/encode-into-milvus-index-stage).
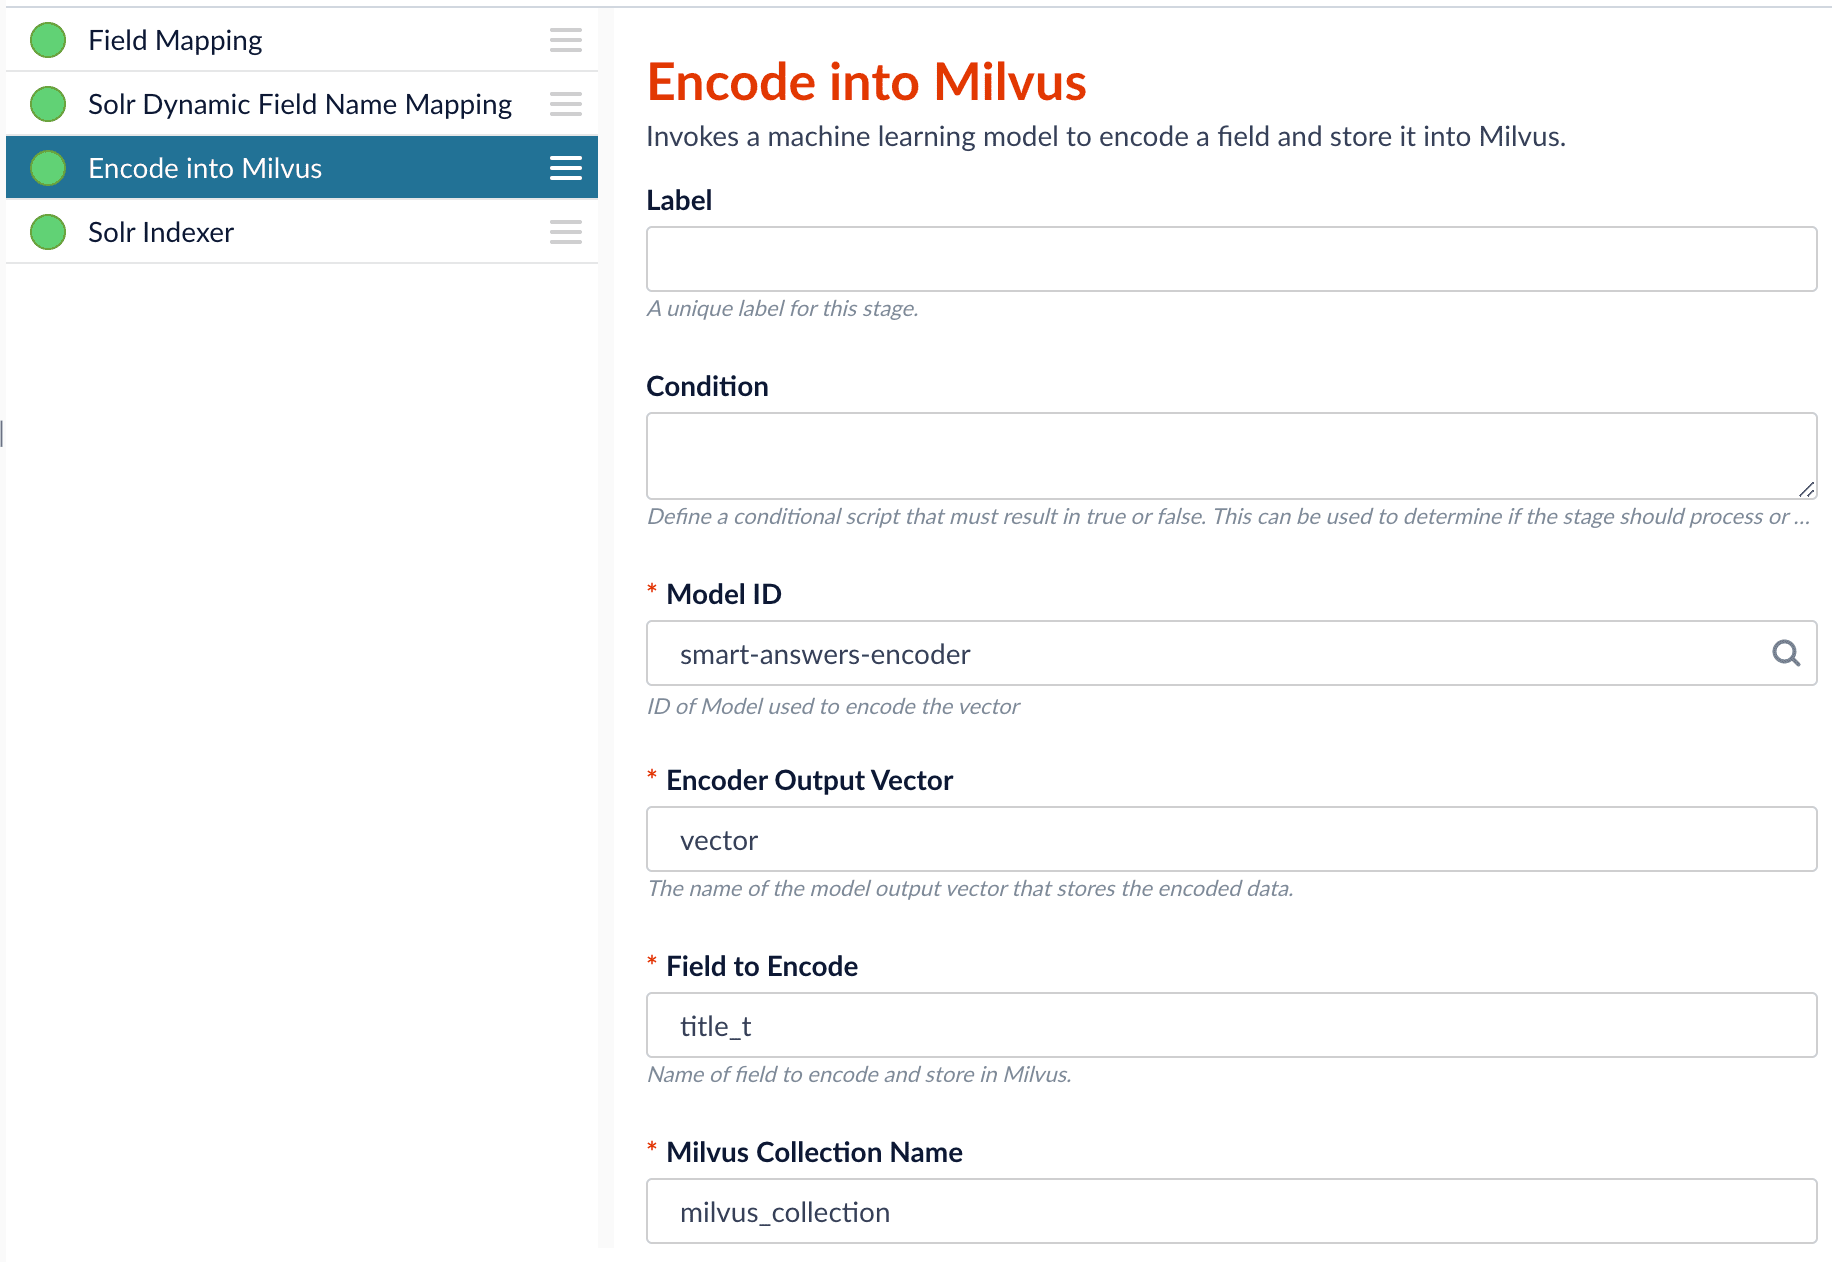
#### The Encode into Milvus Index Stage
If you are using a dynamic schema, make sure this stage is added *after* the [Solr Dynamic Field Name Mapping stage](/docs/5/fusion/reference/config-ref/pipeline-stages/index-stages/solr-dynamic-field-name-mapping-index-stage).
The [Encode into Milvus](/docs/5/fusion/reference/config-ref/pipeline-stages/index-stages/encode-into-milvus-index-stage) index stage uses the specified model to encode the `Field to Encode` and store it in Milvus in the given Milvus collection.
There are several required parameters:
* `Model ID`. The ID of the model.
* `Encoder Output Vector`. The name of the field that stores the compressed dense vectors output from the model. Default value: `vector`.
* `Field to Encode`. The text field to encode into a dense vector, such as `answer_t` or `body_t`.
* `Milvus Collection Name`. The name of the collection you created via the [Create Milvus Collection](/docs/5/fusion/reference/config-ref/jobs/create-collections-in-milvus) job, which will store the dense vectors. When creating the collection you specify the type of **Metric** to use to calculate vector similarity.
This stage can be used multiple times to encode additional fields, each into a different Milvus collection.
### Query pipeline setup
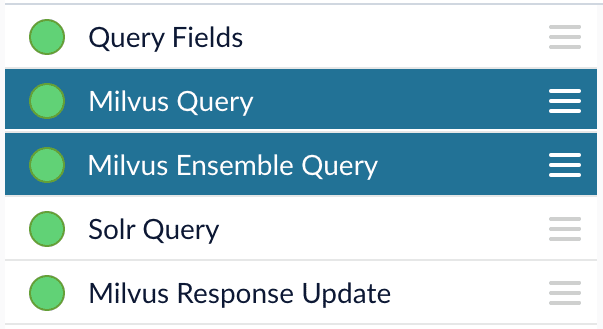
#### The Query Fields stage
The first stage is **Query Fields**. For more information see the [Query Fields stage](/docs/5/fusion/reference/config-ref/pipeline-stages/query-stages/search-fields-query-stage).
#### The Milvus Query stage
The [Milvus Query](/docs/5/fusion/reference/config-ref/pipeline-stages/query-stages/milvus-query-stage) stage encodes the query into a vector using the specified model. It then performs a vector similarity search against the specified Milvus collection and returns a list of the best document matches.
* `Model ID`. The ID of the model used when configuring the model training job.
* `Encoder Output Vector`. The name of the output vector from the specified model, which will contain the query encoded as a vector. Defaults to vector.
* `Milvus Collection Name`. The name of the collection that you used in the `Encode into Milvus` index stage to store the encoded vectors.
* `Milvus Results Context Key`. The name of the variable used to store the vector distances. It can be changed as needed. It will be used in the Milvus Ensemble Query Stage to calculate the query score for the document.
* `Number of Results`. The number of highest scoring results returned from Milvus.
This stage would typically be used the same number of times that the `Encode into Milvus` index stage is used, each with a different Milvus collection and a different `Milvus Results Context Key`.
#### The Milvus Ensemble Query stage
The [Milvus Ensemble Query](/docs/5/fusion/reference/config-ref/pipeline-stages/query-stages/milvus-ensemble-query-stage) takes the results of the Milvus Query stage(s) and calculates the `ensemble score`, which is used to return the best matches.
* `Ensemble math expression`. The mathematical expression used to calculate the `ensemble score`. It should reference the value(s) variable name specified in the `Milvus Results Context Key` parameter in the Milvus Query stage.
* `Result field name`. The name of the field used to store the `ensemble score`. It defaults to `ensemble_score`.
* `Threshold`- A parameter that filters the stage results to remove items that fall below the configured score. Items with a score at, or above, the threshold will be returned.
The **Threshold** feature is only available in Fusion 5.4 and later.
#### The Milvus Response Update Query stage
The [Milvus Response Update Query](/docs/5/fusion/reference/config-ref/pipeline-stages/query-stages/milvus-response-update-stage) stage does not need to be configured and can be skipped if desired. It inserts the Milvus values, including the `ensemble_score`, into each of the returned documents, which is particularly useful when there is more than one `Milvus Query Stage`. This stage needs to come after the `Solr Query` stage.
## Short answer extraction
By default, the question-answering query pipelines return complete documents that answer questions. Optionally, you can extract just a paragraph, a sentence, or a few words that answer the question.
{/* // end::body[] */}
The Smart Answers Cold Start Training job is deprecated in Fusion 5.12.
The [cold start solution for Smart Answers](/docs/lucidworks-search/10-machine-learning/smart-answers/cold-start-solution) begins with training a model using your existing content. To do this, you run the [Smart Answers Coldstart Training](/docs/lucidworks-search/09-developer-documentation/config-specs/jobs/smart-answers-coldstart-training) job. This job uses variety of word embeddings, including custom via Word2Vec training, to learn about the vocabulary that you want to search against.
Smart Answers comes with two pre-trained cold-start models. If your data does not have many domain-specific words, then consider using a pre-trained model.
During a cold start, we suggest capturing user feedback such as document clicks, likes, and downloads on the website. After accumulating feedback data and at least 3,000 query/response pairs, the feedback can be used to train a model using the Supervised method.
{/* // tag::steps[] */}
## Configure the training job
1. In Fusion, navigate to **Collections** > **Jobs**.
2. Select **Add** > **Smart Answer Coldstart Training**.
3. In the **Training Collection** field, specify the collection that contains the content that can be used to answer questions.
4. Enter the name of the **Field which contains the content documents**.
5. Enter a **Model Deployment Name**.
The new machine learning model is saved in the blob store with this name. You will reference it later when you configure your pipelines.
6. Configure the **Model base**.
There are several pre-trained word and [BPE](https://nlp.h-its.org/bpemb) embeddings for different languages, as well as a few pre-trained BERT models.
If you want to train custom embeddings, please select `word_custom` or `bpe_custom`.
This trains Word2vec on the data and fields specified in **Training collection** and **Field which contains the content documents**. It might be useful in cases when your content includes unusual or domain-specific vocabulary.
When you use the pre-trained embeddings, the log shows the percentage of processed vocabulary words. If this value is high, then try using custom embeddings.
During the training job analyzes the content data to select weights for each of the words. The result model performs the weighted average of word embeddings to obtain final single dense vector for the content.
7. Click **Save**.
If using solr as the training data source ensure that the source collection contains the `random_*` dynamic field defined in its `managed-schema.xml`. This field is required for sampling the data. If it is not present, add the following entry to the `managed-schema.xml` alongside other dynamic fields `` and \ alongside other field types.
8. Click **Run** > **Start**.
After training is finished the model is deployed into the cluster and can be used in index and query pipelines.
{/* // end::steps[] */}
## Next steps
1. Configure The Smart Answers Pipelines
2. Evaluate a Smart Answers Query Pipeline
Lucidworks provides these pre-trained cold start models for [Smart Answers](/docs/5/fusion/getting-data-out/advanced-query-enhancement/smart-answers/overview):
* `qna-coldstart-large` - this is a large model trained on variety of corpuses and tasks.
* `qna-coldstart-multilingual` - covers 16 languages. List of supported languages: Arabic, Chinese-simplified, Chinese-traditional, English, French, German, Italian, Japanese, Korean, Dutch, Polish, Portuguese, Spanish, Thai, Turkish, Russian.
When you use these models, you do not need to run the model training job. Instead, you run a job that deploys the model into Fusion. The [Create Seldon Core Model Deployment job](/docs/5/fusion/reference/config-ref/jobs/create-seldon-core-model-deployment) deploys your model as a Docker image in Kubernetes, which you can scale up or down like other Fusion services.
These models are a good basis for a cold start solution if your data does not contain much domain-specific terminology. Otherwise, consider training a model using your existing content.
Dimension size of vectors for both models is **512**. You might need this information when creating collections in Milvus.
## Deploy a pre-trained cold-start model into Fusion
The pre-trained cold-start models are deployed using a Fusion job called [Create Seldon Core Model Deployment](/docs/5/fusion/reference/config-ref/jobs/create-seldon-core-model-deployment). This job downloads the selected pre-trained model and installs it in Fusion.
1. Navigate to **Collections** > **Jobs**.
2. Select **Add** > **Create Seldon Core Model Deployment**.
3. Enter a **Job ID**, such as `deploy-qna-coldstart-multilingual` or `deploy-qna-coldstart-large`.
4. Enter the **Model Name**, one of the following:
* `qna-coldstart-multilingual`
* `qna-coldstart-large`
5. In the **Docker Repository** field, enter `lucidworks`.
6. In the **Image Name** field, enter one of the following:
* `qna-coldstart-multilingual:v1.1`
* `qna-coldstart-large:v1.1`
7. Leave the **Kubernetes Secret Name for Model Repo** field empty.
8. In the **Output Column Names for Model** field, enter one of the following:
* `qna-coldstart-multilingual:[vector]`
* `qna-coldstart-large:[vector, compressed_vector]`
9. Click **Save**.
10. Click **Run** > **Start** to start the deployment job.
## Next steps
1. Configure The Smart Answers Pipelines
2. Evaluate a Smart Answers Query Pipeline


 | Parameter | Description |
| ----------------- | ----------------------------------------------------------------------------------------------------------------------------------------------------------------------------------------------- |
| Job ID | A string used by the Fusion API to reference the job after its creation. |
| Model name | A name for the deployed model. This is used to generate the deployment name in Seldon Core. It is also the name that you reference as a `model-id` when making predictions with the ML Service. |
| Model replicas | The number of load-balanced replicas of the model to deploy; specify multiple replicas for a higher-volume intake. |
| Docker Repository | The public or private repository where the Docker image is located. If you’re using Docker Hub, fill in the Docker Hub username here. |
| Image name | The name of the image with an optional tag. If no tag is given, `latest` is used. |
| Kubernetes secret | If you’re using a private repository, supply the name of the Kubernetes secret used for access. |
| Output columns | A list of column names that the model’s `predict` method returns. |
4. Click **Save**, then **Run** and **Start**.
| Parameter | Description |
| ----------------- | ----------------------------------------------------------------------------------------------------------------------------------------------------------------------------------------------- |
| Job ID | A string used by the Fusion API to reference the job after its creation. |
| Model name | A name for the deployed model. This is used to generate the deployment name in Seldon Core. It is also the name that you reference as a `model-id` when making predictions with the ML Service. |
| Model replicas | The number of load-balanced replicas of the model to deploy; specify multiple replicas for a higher-volume intake. |
| Docker Repository | The public or private repository where the Docker image is located. If you’re using Docker Hub, fill in the Docker Hub username here. |
| Image name | The name of the image with an optional tag. If no tag is given, `latest` is used. |
| Kubernetes secret | If you’re using a private repository, supply the name of the Kubernetes secret used for access. |
| Output columns | A list of column names that the model’s `predict` method returns. |
4. Click **Save**, then **Run** and **Start**.
 When the job finishes successfully, you can proceed to the next section.
Now that the model is in Fusion, it can be utilized in either index or query pipelines, depending on the model’s purpose.
In this case the model is a word vectorizer or semantic vector search implementation, so both pipelines must invoke the model.
## Apply an API key to the deployment
These steps are only needed if your model utilizes any kind of secret, such as an API key.
If not, skip this section and proceed to the next.
1. Create and modify a `
When the job finishes successfully, you can proceed to the next section.
Now that the model is in Fusion, it can be utilized in either index or query pipelines, depending on the model’s purpose.
In this case the model is a word vectorizer or semantic vector search implementation, so both pipelines must invoke the model.
## Apply an API key to the deployment
These steps are only needed if your model utilizes any kind of secret, such as an API key.
If not, skip this section and proceed to the next.
1. Create and modify a `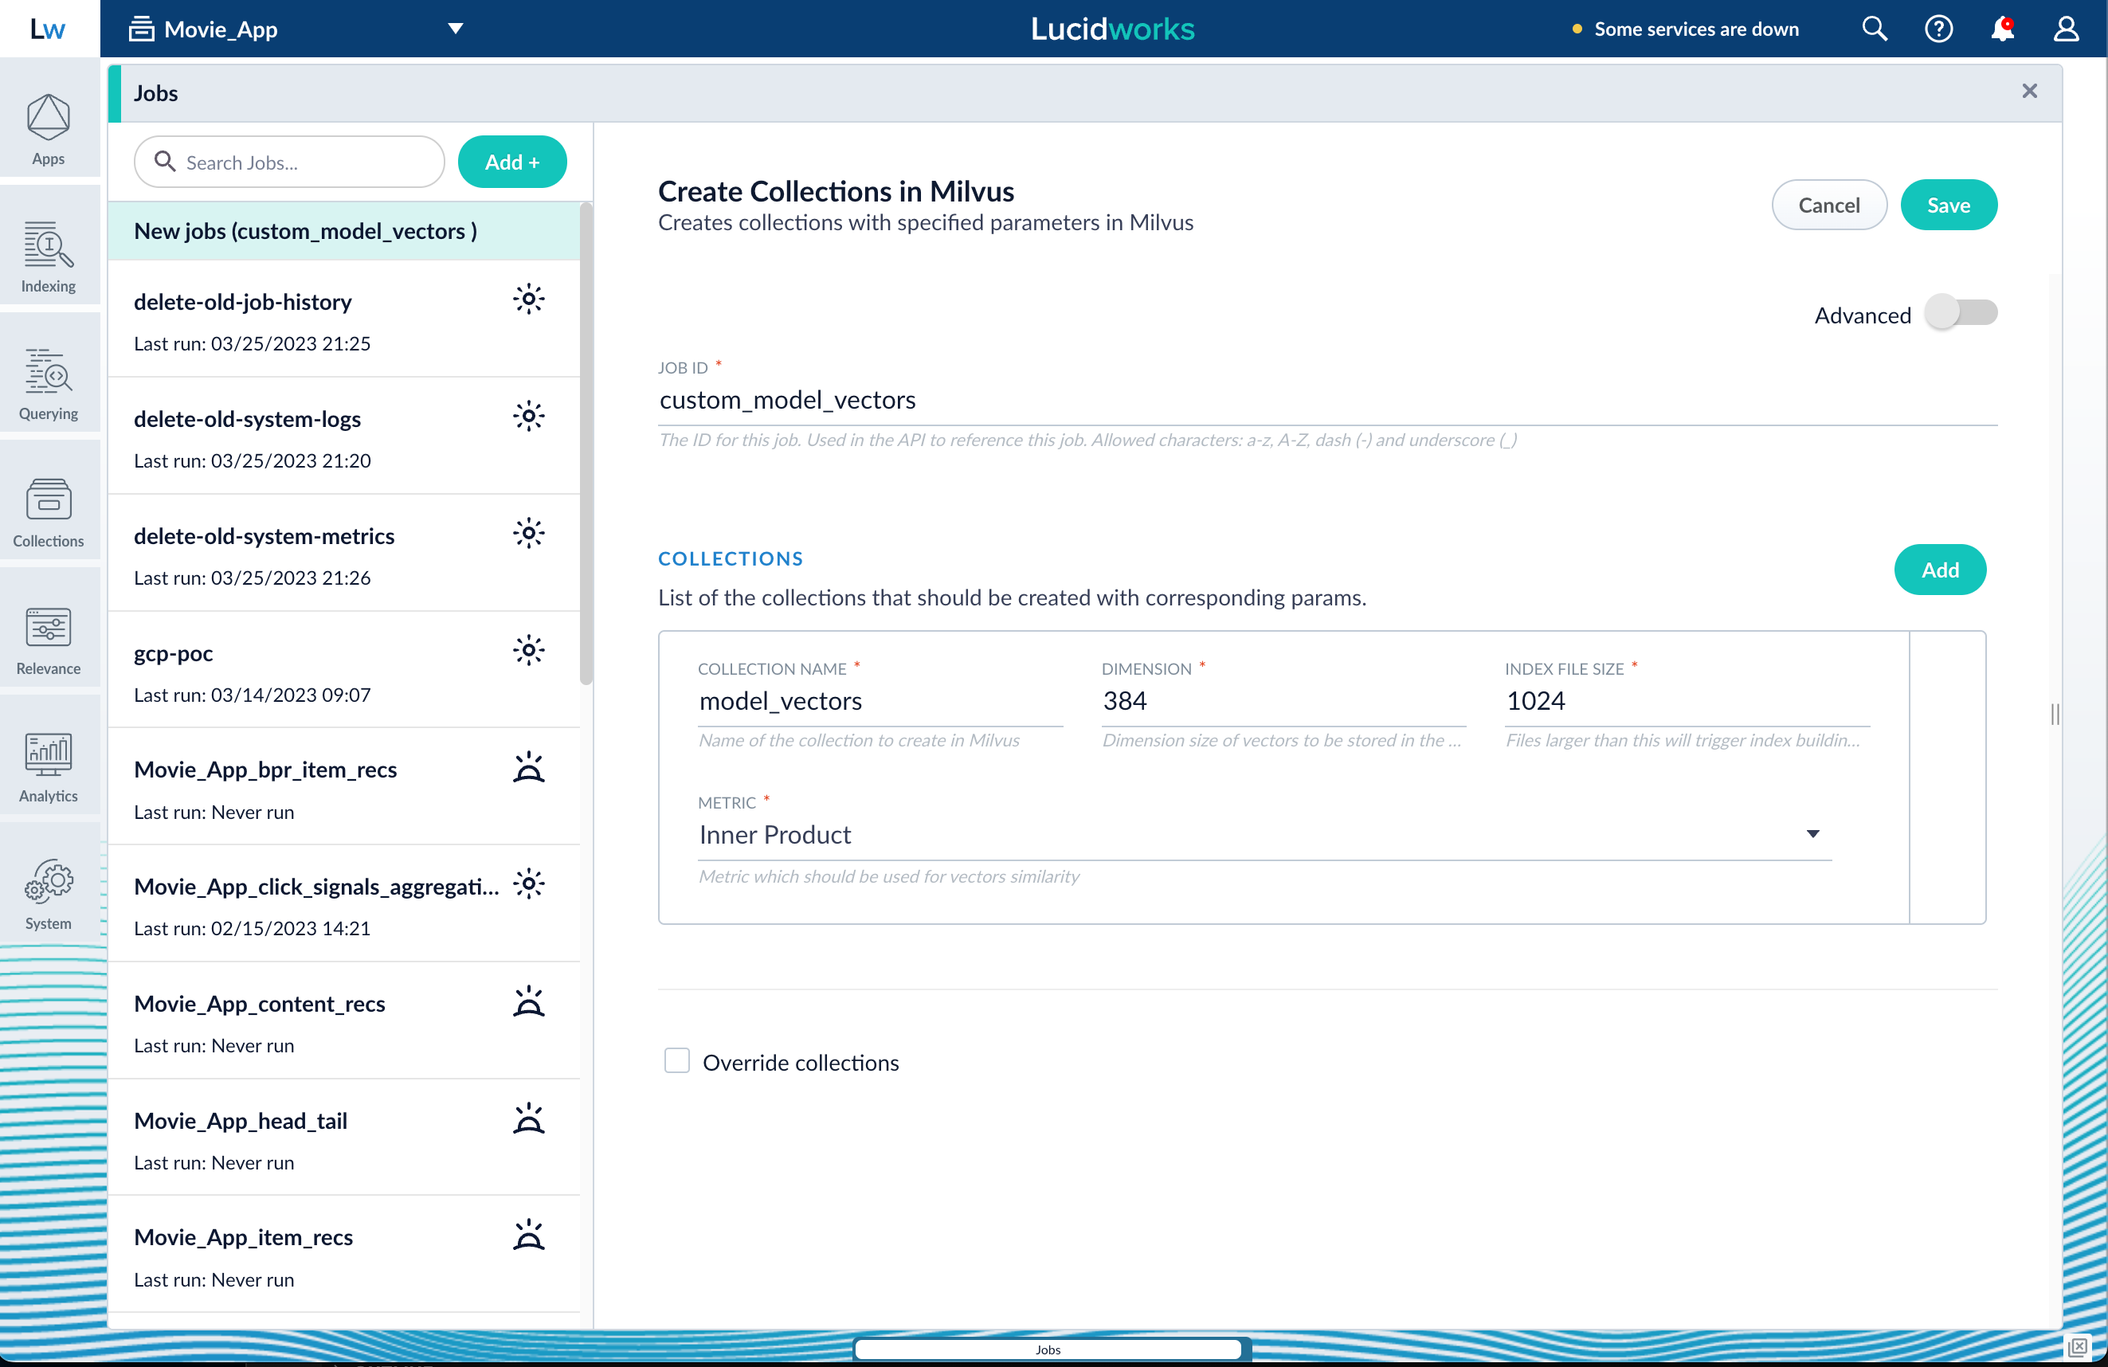 The **Metric** field should typically be left at the default of `Inner Product`, but this also depends on use case and model type.
5. Click **Save**, then **Run** and **Start**.
## Configure the Fusion pipelines
Your real-world pipeline configuration depends on your use case and model, but for our example we will configure the index pipeline and then the query pipeline.
**Configure the index pipeline**
1. Create a new index pipeline or load an existing one for editing.
2. Click **Add a Stage** and then **Encode to Milvus**.
3. In the new stage, fill in these fields:
* The name of your model
* The output name you have for your model job
* The field you’d like to encode
* The collection name
4. Save the stage in the pipeline and index your data with it.
**Configure the query pipeline**
1. Create a new query pipeline or load an existing one for editing.
2. Click **Add a Stage** and then **Milvus Query**.
3. Fill in the configuration fields, then save the stage.
4. Add a **Milvus Ensemble Query** stage.\
This stage is necessary to have the Milvus collection scores taken into account in ranking and to weight multiple collections.
The **Milvus Results Context Key** from the Milvus Query Stage is used in this stage to preform math on the Milvus result scores.
One (1) is a typical multiplier for the Milvus results but any number can be used.
5. Save the stage and then run a query by typing a search term.
6. To verify the Milvus results are correct, use the **Compare+** button to see another pipeline without the model implementation and compare the number of results.
You have now successfully uploaded a Seldon Core model to Fusion and deployed it.
The **Metric** field should typically be left at the default of `Inner Product`, but this also depends on use case and model type.
5. Click **Save**, then **Run** and **Start**.
## Configure the Fusion pipelines
Your real-world pipeline configuration depends on your use case and model, but for our example we will configure the index pipeline and then the query pipeline.
**Configure the index pipeline**
1. Create a new index pipeline or load an existing one for editing.
2. Click **Add a Stage** and then **Encode to Milvus**.
3. In the new stage, fill in these fields:
* The name of your model
* The output name you have for your model job
* The field you’d like to encode
* The collection name
4. Save the stage in the pipeline and index your data with it.
**Configure the query pipeline**
1. Create a new query pipeline or load an existing one for editing.
2. Click **Add a Stage** and then **Milvus Query**.
3. Fill in the configuration fields, then save the stage.
4. Add a **Milvus Ensemble Query** stage.\
This stage is necessary to have the Milvus collection scores taken into account in ranking and to weight multiple collections.
The **Milvus Results Context Key** from the Milvus Query Stage is used in this stage to preform math on the Milvus result scores.
One (1) is a typical multiplier for the Milvus results but any number can be used.
5. Save the stage and then run a query by typing a search term.
6. To verify the Milvus results are correct, use the **Compare+** button to see another pipeline without the model implementation and compare the number of results.
You have now successfully uploaded a Seldon Core model to Fusion and deployed it.
 3. In the **Training Collection** field, specify the input data collection that you created when you [prepared the input data](#prepare-the-input-data).

 4. Click **Run** > **Start** to run the job.
## Configure the index pipeline
1. Open the Index Workbench.
2. Load or create your datasource using the default smart-answers index pipeline.
4. Click **Run** > **Start** to run the job.
## Configure the index pipeline
1. Open the Index Workbench.
2. Load or create your datasource using the default smart-answers index pipeline.
 3. Configure the
[Encode into Milvus stage](/docs/5/fusion/reference/config-ref/pipeline-stages/index-stages/encode-into-milvus-index-stage):
1. change the value of **Model ID** to match the model deployment name you chose when you configured the model training job.
2. Change `Field to Encode` to the document field name to be processed and encoded into dense vectors.
3. Ensure the `Encoder Output Vector` matches the output vector from the chosen model.
4. Ensure the `Milvus Collection Name` matches the collection name created via the `Create Milvus Collection` job.
3. Configure the
[Encode into Milvus stage](/docs/5/fusion/reference/config-ref/pipeline-stages/index-stages/encode-into-milvus-index-stage):
1. change the value of **Model ID** to match the model deployment name you chose when you configured the model training job.
2. Change `Field to Encode` to the document field name to be processed and encoded into dense vectors.
3. Ensure the `Encoder Output Vector` matches the output vector from the chosen model.
4. Ensure the `Milvus Collection Name` matches the collection name created via the `Create Milvus Collection` job.
 4. Save the datasource.
5. Index your data.
## Configure the query pipeline
1. Open the Query Workbench.
2. Load the default smart-answers query pipeline.
4. Save the datasource.
5. Index your data.
## Configure the query pipeline
1. Open the Query Workbench.
2. Load the default smart-answers query pipeline.
 3. Configure the [Milvus Query stage](/docs/5/fusion/reference/config-ref/pipeline-stages/query-stages/milvus-query-stage):
1. Change the **Model ID** value to match the model deployment name you chose when you configured the model training job.
2. Ensure the `Encoder Output Vector` matches the output vector from the chosen model.
3. Ensure the `Milvus Collection Name` matches the collection name created via the `Create Milvus Collection` job.
4. `Milvus Results Context Key` can be changed as needed. It will be used in the Milvus Ensemble Query Stage to calculate the query score.
3. Configure the [Milvus Query stage](/docs/5/fusion/reference/config-ref/pipeline-stages/query-stages/milvus-query-stage):
1. Change the **Model ID** value to match the model deployment name you chose when you configured the model training job.
2. Ensure the `Encoder Output Vector` matches the output vector from the chosen model.
3. Ensure the `Milvus Collection Name` matches the collection name created via the `Create Milvus Collection` job.
4. `Milvus Results Context Key` can be changed as needed. It will be used in the Milvus Ensemble Query Stage to calculate the query score.
 4. In the [Milvus Ensemble Query stage](/docs/5/fusion/reference/config-ref/pipeline-stages/query-stages/milvus-ensemble-query-stage), update the `Ensemble math expression` as needed based on your model and the name used in the prior stage for the storing the Milvus results.
In versions 5.4 and later, you can also set the `Threshold` so that the Milvus Ensemble Query Stage will only return items with a score **greater than** or **equal to** the configured value.
4. In the [Milvus Ensemble Query stage](/docs/5/fusion/reference/config-ref/pipeline-stages/query-stages/milvus-ensemble-query-stage), update the `Ensemble math expression` as needed based on your model and the name used in the prior stage for the storing the Milvus results.
In versions 5.4 and later, you can also set the `Threshold` so that the Milvus Ensemble Query Stage will only return items with a score **greater than** or **equal to** the configured value.
 5. Save the query pipeline.
## Pipeline Setup Example
### Index and retrieve the question and answer together
To show question and answer together in one document (that is, treat the question as the title and the answer as the description), you can index them together in the same document. You can still use the default `smart-answers` index and query pipelines with a few additional changes.
Prior to configuring the Smart Answers pipelines, use the `Create Milvus Collection` job to create two collections, `question_collection` and `answer_collection`, to store the encoded "questions" and the encoded "answers", respectively.
#### Index Pipeline
As shown in the pictures below, you will need two Encode into Milvus stages, named Encode Question and Encode Answer respectively.
**Encode Question (Encode Into Milvus) stage**
5. Save the query pipeline.
## Pipeline Setup Example
### Index and retrieve the question and answer together
To show question and answer together in one document (that is, treat the question as the title and the answer as the description), you can index them together in the same document. You can still use the default `smart-answers` index and query pipelines with a few additional changes.
Prior to configuring the Smart Answers pipelines, use the `Create Milvus Collection` job to create two collections, `question_collection` and `answer_collection`, to store the encoded "questions" and the encoded "answers", respectively.
#### Index Pipeline
As shown in the pictures below, you will need two Encode into Milvus stages, named Encode Question and Encode Answer respectively.
**Encode Question (Encode Into Milvus) stage**
 **Encode Answer (Encode Into Milvus) stage**
 In the Encode Question stage, specify `Field to Encode` to be `title_t` and change the `Milvus Collection Name` to match the new Milvus collection, `question_collection`.
In the Encode Answer stage, specify `Field to Encode` to be `description_t` and change the `Milvus Collection Name` to match the new Milvus collection, `answer_collection`.
#### Query Pipeline
Since we have two dense vectors generated during indexing, at query time we need to compute both query to question distance and query to answer distance. This can be set up as the pictures shown below with two Milvus Query Stages, one for each of the two Milvus collections.
To store those two distances separately, the `Milvus Results Context Key` needs to be different in each of these two stages.
In the Query Questions stage, we set the `Milvus Results Context Key` to `milvus_questions` and the Milvus collection name to `question_collection`.
Query Questions (Milvus Query) stage:
In the Encode Question stage, specify `Field to Encode` to be `title_t` and change the `Milvus Collection Name` to match the new Milvus collection, `question_collection`.
In the Encode Answer stage, specify `Field to Encode` to be `description_t` and change the `Milvus Collection Name` to match the new Milvus collection, `answer_collection`.
#### Query Pipeline
Since we have two dense vectors generated during indexing, at query time we need to compute both query to question distance and query to answer distance. This can be set up as the pictures shown below with two Milvus Query Stages, one for each of the two Milvus collections.
To store those two distances separately, the `Milvus Results Context Key` needs to be different in each of these two stages.
In the Query Questions stage, we set the `Milvus Results Context Key` to `milvus_questions` and the Milvus collection name to `question_collection`.
Query Questions (Milvus Query) stage:
 In the Query Answers stage, we set the `Milvus Results Context Key` to `milvus_answers` and the Milvus collection name to `answer_collection`.
Query Answers (Milvus Query) stage:
In the Query Answers stage, we set the `Milvus Results Context Key` to `milvus_answers` and the Milvus collection name to `answer_collection`.
Query Answers (Milvus Query) stage:
 Now we can ensemble them together with the Milvus Ensemble Query Stage with the `Ensemble math expression` combining the results from the two query stages. If we want the question scores and answer scores weighted equally, we would use: `0.5 * milvus_questions + 0.5 * milvus_answers`.
This is recommended especially when you have limited FAQ dataset and want to utilize both question and answer information.
**Milvus Ensemble Query stage**
Now we can ensemble them together with the Milvus Ensemble Query Stage with the `Ensemble math expression` combining the results from the two query stages. If we want the question scores and answer scores weighted equally, we would use: `0.5 * milvus_questions + 0.5 * milvus_answers`.
This is recommended especially when you have limited FAQ dataset and want to utilize both question and answer information.
**Milvus Ensemble Query stage**
 ## Evaluate the query pipeline
The [Evaluate QnA Pipeline job](/docs/5/fusion/reference/config-ref/jobs/smart-answers-evaluate-pipeline) evaluates the rankings of results from any Smart Answers pipeline and finds the best set of weights in the ensemble score.
## Detailed pipeline setup
Typically, you can use the [default pipelines](/docs/5/fusion/getting-data-out/advanced-query-enhancement/smart-answers/overview) included with Fusion AI. These pipelines now utilize Milvus to store encoded vectors and to calculate vector similarity. This topic provides information you can use to customize the Smart Answers pipelines.
| | | |
| ---------------------------------- | ------------------------------------------------------------------------------------------------------------------------------------------------------------------------------------------------------------------------------------------------------------------------------------------------------------------------------------------------------------------------------------------------------------------------------------------------------------------------------------------------------------------------------------------------------------------------------------------------------------------------------------------------------------------------------------------------------------------------------------------------------------------------------------------------------------------------------------------------------------------------------------------------------------------------------------------------------------------------------------------------------------------------------------------------------------------------------------------------------------------------------------------------------------------------------------------------------------------------------------------------------------------------------------------------------------------------------------------------------------------------------------------------------------------------------------------------------------------------------------------------------------------------------------------------------------------------------------------------------------------------------------------ | --------------------------------------------------------------------------------------------------------------------------------------------------------------------------------------------------------------------------------------------------------- |
| **"smart-answers" index pipeline** |
## Evaluate the query pipeline
The [Evaluate QnA Pipeline job](/docs/5/fusion/reference/config-ref/jobs/smart-answers-evaluate-pipeline) evaluates the rankings of results from any Smart Answers pipeline and finds the best set of weights in the ensemble score.
## Detailed pipeline setup
Typically, you can use the [default pipelines](/docs/5/fusion/getting-data-out/advanced-query-enhancement/smart-answers/overview) included with Fusion AI. These pipelines now utilize Milvus to store encoded vectors and to calculate vector similarity. This topic provides information you can use to customize the Smart Answers pipelines.
| | | |
| ---------------------------------- | ------------------------------------------------------------------------------------------------------------------------------------------------------------------------------------------------------------------------------------------------------------------------------------------------------------------------------------------------------------------------------------------------------------------------------------------------------------------------------------------------------------------------------------------------------------------------------------------------------------------------------------------------------------------------------------------------------------------------------------------------------------------------------------------------------------------------------------------------------------------------------------------------------------------------------------------------------------------------------------------------------------------------------------------------------------------------------------------------------------------------------------------------------------------------------------------------------------------------------------------------------------------------------------------------------------------------------------------------------------------------------------------------------------------------------------------------------------------------------------------------------------------------------------------------------------------------------------------------------------------------------------------ | --------------------------------------------------------------------------------------------------------------------------------------------------------------------------------------------------------------------------------------------------------- |
| **"smart-answers" index pipeline** |