> ## Documentation Index
> Fetch the complete documentation index at: https://doc.lucidworks.com/llms.txt
> Use this file to discover all available pages before exploring further.
# Blob Store API
> Fusion Admin APIs
export const LwTemplate = ({title = "Key questions to get you started", icon = "sparkles", cta = "Powered by Agent Studio", linkHref = "https://lucidworks.com/demo/?utm_source=docs&utm_medium=referral&utm_campaign=docs_cta_ai"}) => {
const [isLoaded, setIsLoaded] = useState(false);
useEffect(() => {
const timer = setTimeout(() => {
setIsLoaded(true);
}, 500);
return () => clearTimeout(timer);
}, []);
return
{isLoaded && `
}} />}
Powered by Lucidworks Agent Studio
;
};
[localhost link]: http://localhost:3000/docs/5/fusion/dev-portal/api/api-swagger/blob-store-api
[mintlify link]: https://doc.lucidworks.com/docs/5/fusion/dev-portal/api/api-swagger/blob-store-api
[old doc.lw link]: https://doc.lucidworks.com/fusion/5.9/305
The Blob Store REST API allows storing binary objects in Solr. The primary use case for this is to store entity extraction models, lookup lists or exclusion lists for use in [index pipelines](/docs/5/fusion/getting-data-in/indexing/index-pipelines/index-pipeline-stages). This may include the entity extraction models and lookup lists included with Fusion in the `{fusion_path}/data/nlp` directory, or files that you have created on your own.
You can also work with blobs in the Fusion UI using the [blob manager](/docs/5/fusion/getting-data-in/blob-storage).
When you upload a blob without specifying an app, the blob is stored in the `system_blobs` collection and you can access it via the **Use the Object Explorer**.
**LucidAcademy**
Lucidworks offers free training to help you get started.
The **Course** for **The Object Explorer** focuses on how to view and manage objects such as collections, datasources, index and query pipelines, index and query profiles, and parsers within apps and share them to other applications:
Visit the [LucidAcademy](https://academy.lucidworks.com) to see the full training catalog.
## Get started
**How to open Object Explorer**
On a PC, press Ctrl+K. On a Mac, press Command ⌘+K. Alternatively, click **System > Object Explorer**.
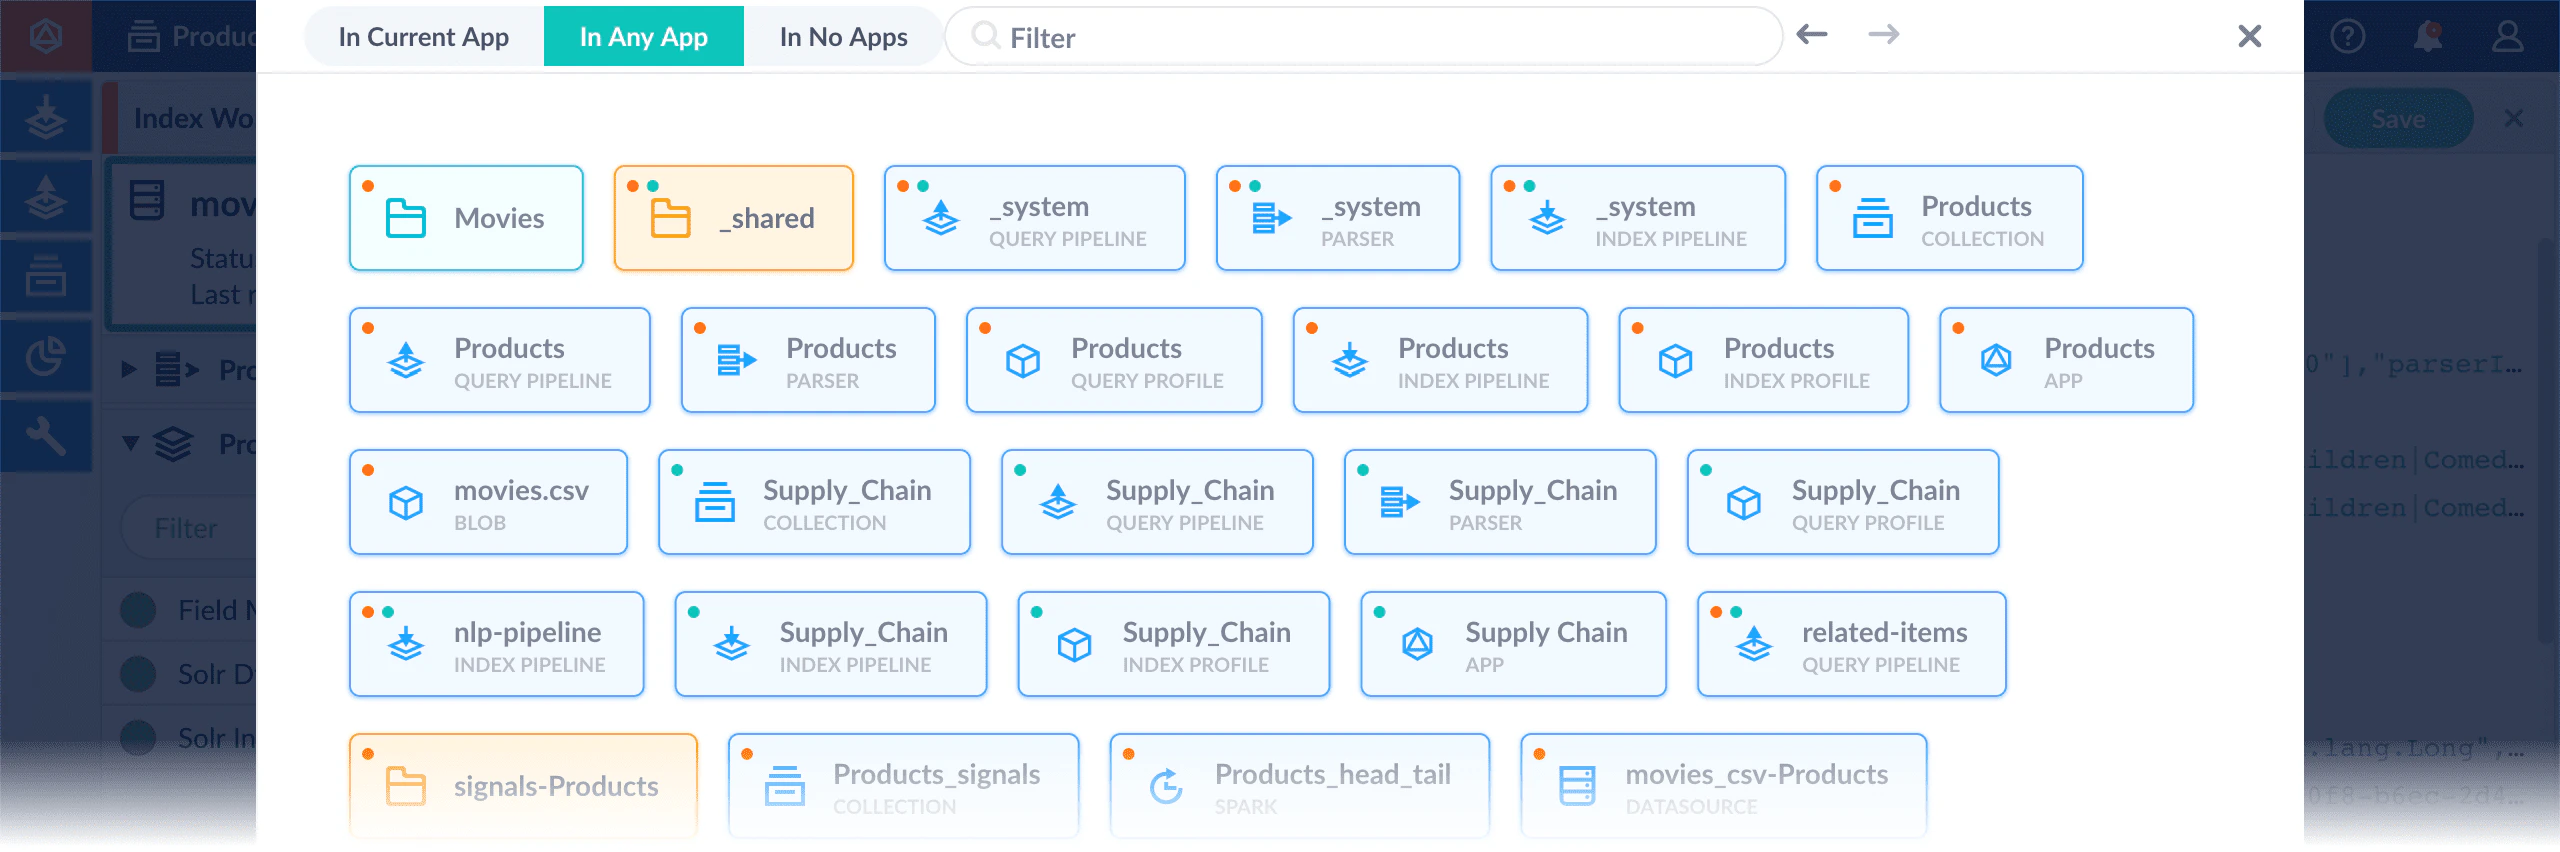
Object Explorer opens and displays either a list of all objects in the current app, or the list of objects that match your most recent search in Object Explorer, whether during this Fusion session or a previous session.
## Search and browse
* **Specify the context** To restrict the scope of searching and browsing, click **In Current App**, **In Any App**, or **In No Apps**.
* **Browse all objects in the context** – Specify the context. Object Explorer displays a list of all objects. If you do not see a list of objects, press Enter in the **Filter** box.
* **Search for objects** – Specify the context. Type any part of an object’s name or type (the gray, uppercase text below the name, for example, `PARSER`) in the **Filter** box. You can enter `group` to search for groups. Enter the search term in any case. Object Explorer displays a list of matching objects.
* **Display related objects** (with a mouse) – With a list of objects present, click an object to select it. Object Explorer centers the object and displays all related objects.
* **Display related objects** (with Tab keys) – With a list of objects present, tab from object to object. With an object highlighted, press Enter to select it. Object Explorer centers the object and displays all related objects.
* **Move backward and forward through a history of results** – You can move backward and forward through a history of results, that is, the objects you have browsed to, searched for, and clicked on. To the right of the **Filter** box, click the arrow keys.
* **Determine which apps an object is in** – Click **In any App**. You will see dots on the objects that represent the apps that the objects are in. To view a list of the apps for an object, hover over the object, and then click the App icon.
## Manage objects
* **Edit an object’s name** – For some objects, for example, Group objects, clicking lets you edit the object’s name.
* **Manage an object** – For most objects that display the icon when you hover over the object, !\[Edit" src="/assets/images/4.0/icons/oe-edit-object.png"/> takes you to the part of the Fusion UI where you can manage the object.
* **Schedule a job or task** – Hover over an object that displays the Schedule icon when you hover. Click Schedule . From the scheduling dialog, you can click **Open Schedule** to open the Scheduler.
## Group objects
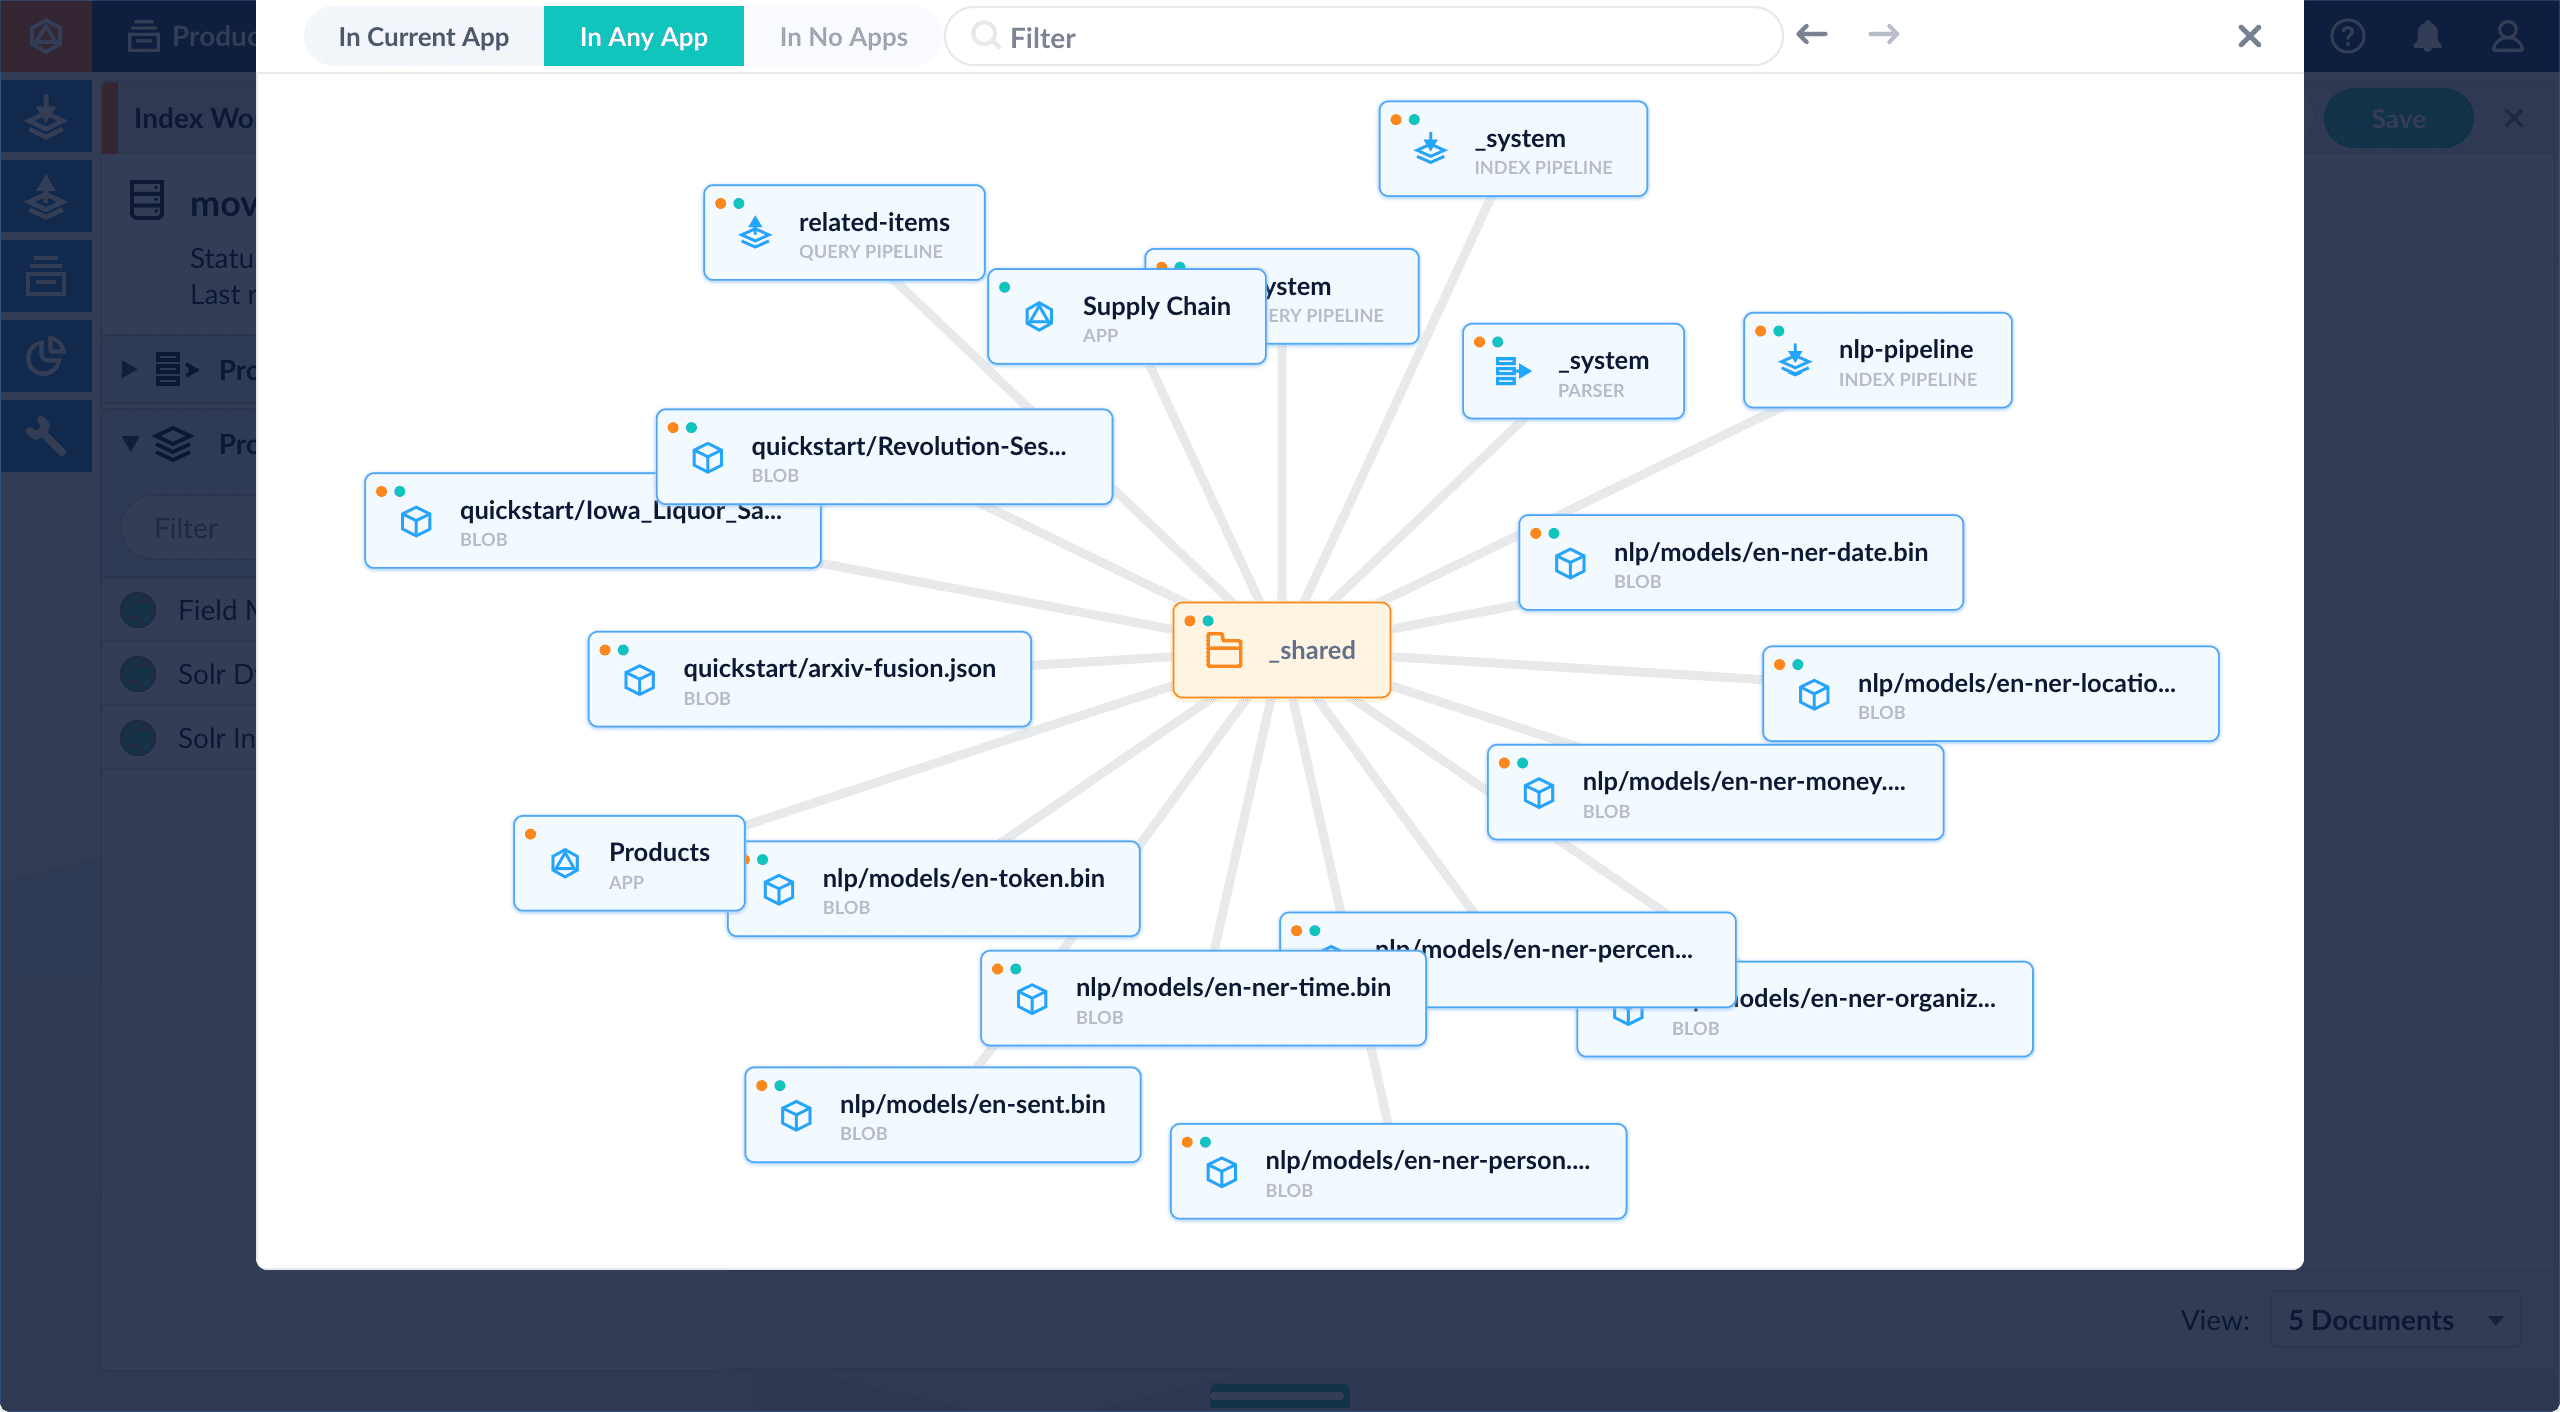
Group objects to easily browse related objects. Fusion groups some objects for you. This is an example of viewing a group, in this case, the `_shared` group:
There are four kinds of groups:
* **System groups** ( ) - Groups created by Fusion to group objects such as signals and items that are shared among apps. You cannot modify the membership of a system group.
* **Recommendations groups** ( ) - Groups related to recommendations. These are a subtype of system groups. You cannot modify the membership of a recommendations group.
* **User-defined groups** ( ) - Groups you create and manage yourself. You can put whatever objects you like in them.
* **Fusion-created groups that are not system groups** ( ) - These look and behave like user-defined groups, but you do not create them. Fusion does. You can put objects in them.
Procedures for managing groups are:
* **View existing groups** – A *group* is a means of tagging objects with a shared, arbitrary identifier.
* **Create a user-defined group** – Hover over an object that you want to add to the group you are creating, and that displays the Add To Group icon when you hover. Click Add To Group . Enter the name of a new group.
A group name can only contain the characters `A-Z`, `a-z`, `0-9`, `-` (hyphen), and `_` (underscore).
* **Add an object to a group** – Hover over an object that displays the Add To Group icon when you hover. Click Add To Group . Choose an existing group, or enter the name of a new group. You cannot add objects to the group `_shared`. Its members are calculated for you.
* **Remove an object from a group** – Select the group from which you want to remove an object. Object Explorer centers the group. Hover over the object you want to remove, and then click Remove From Group .
* **Delete a user-defined group** – When you remove the last object from a user-defined group, the group remains. To delete it, hover over the group, and then click .
## Share objects among apps
Sharing objects among apps lets you configure something once and use it multiple times where needed. When you share an object, the object and any objects that the objects depends on are shared.
Fusion makes intelligent choices regarding what is shared among apps. Exercise caution when adding and removing objects from apps.
* **Add an object to an app** – While in the Fusion workspace for the app to which you want to add an object, open Object Explorer and click **In Any App**. Search for or browse to the object you want to add. Hover over the object, click the App icon, and then click **Add to this app**.
* **Add an object to an app directly** – In cases when an object is linked to an app, but is not linked directly to the app (it is linked via some dependency), you can add the object to an app directly.
While in the Fusion workspace for the app to which you want to add an object directly, open Object Explorer and click **In Any App**. Search for or browse to the object you want to add. Hover over the object, click the App icon, and then click **Add to this app directly**.
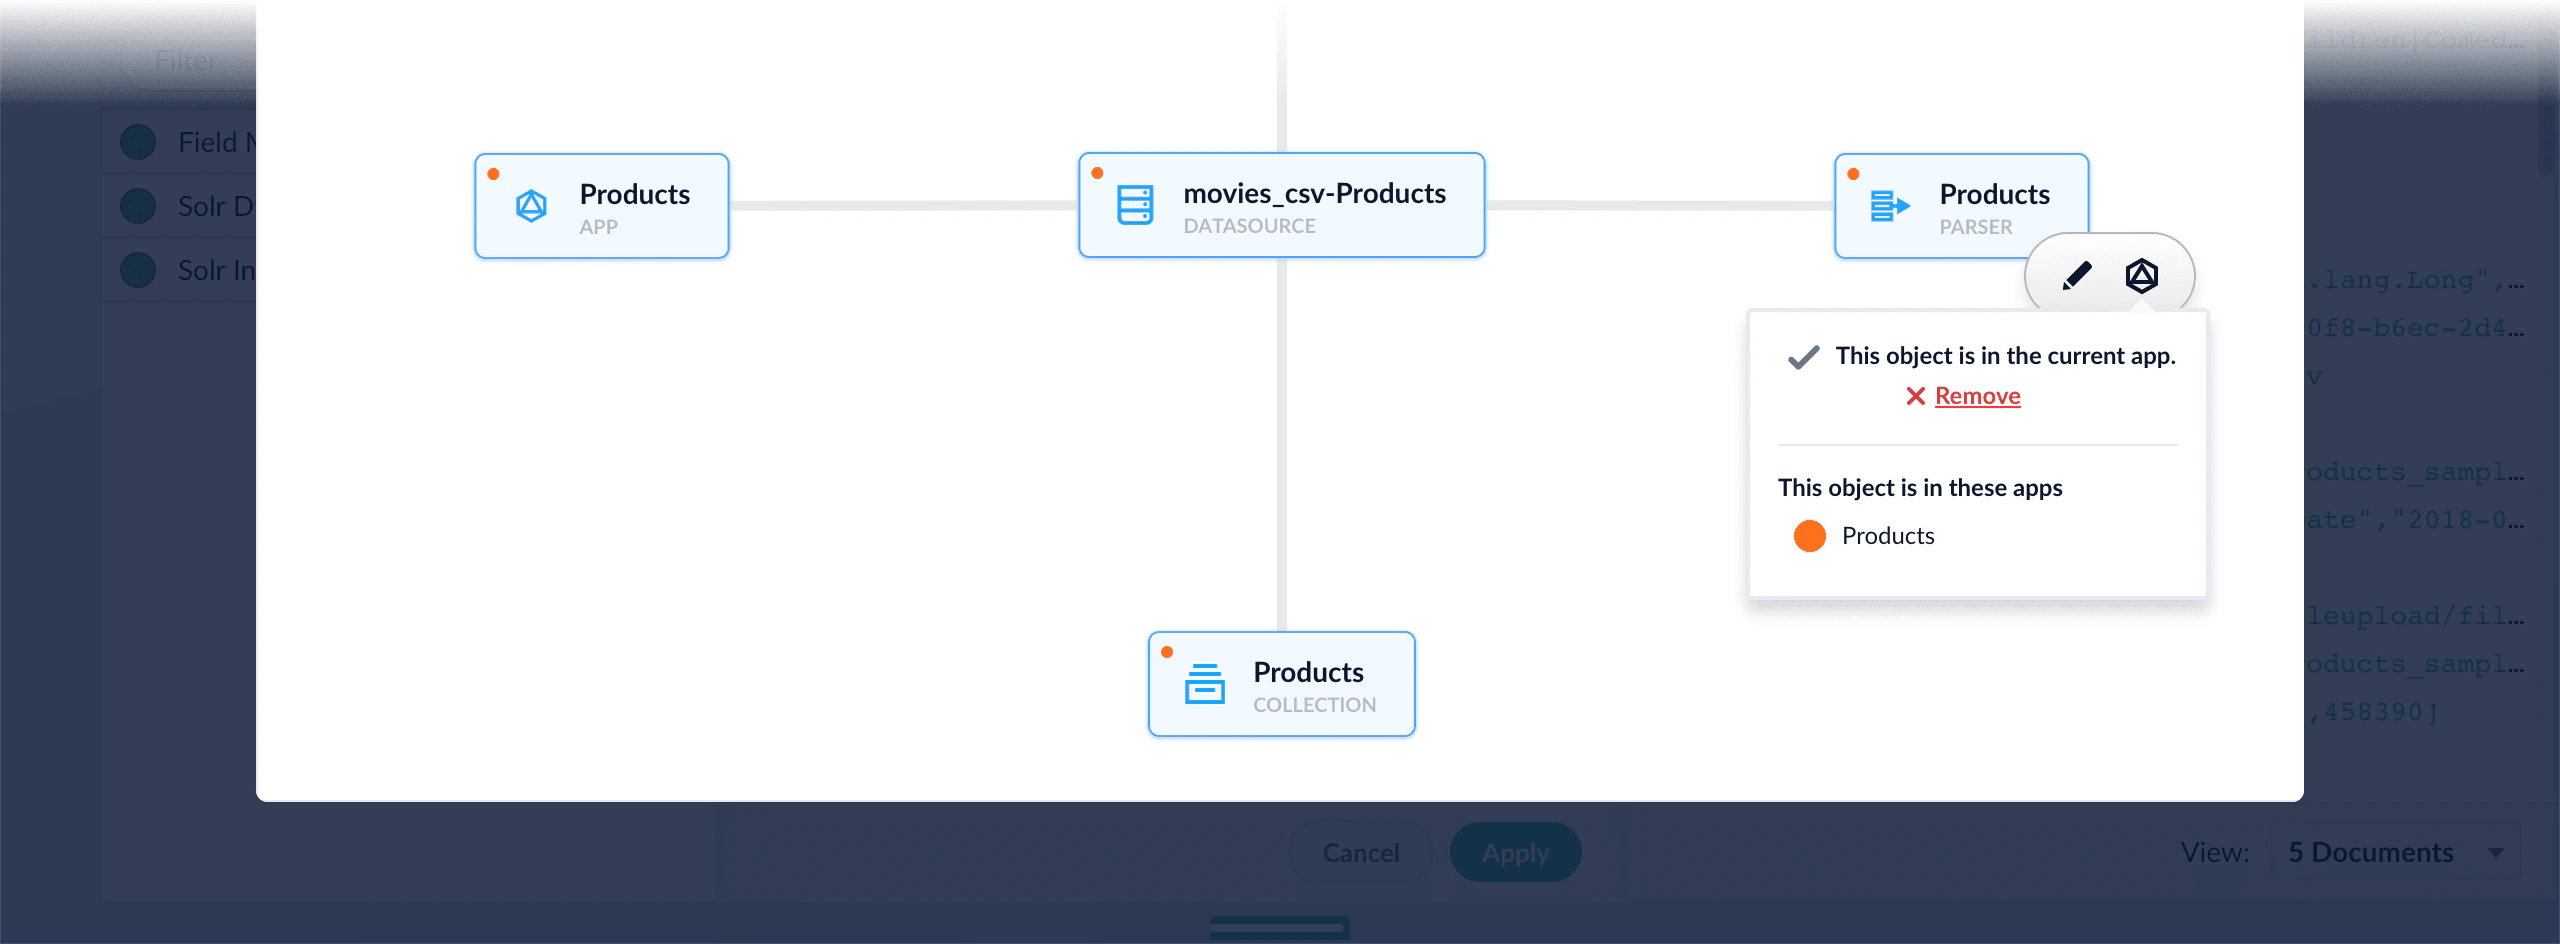
* **Remove an object from an app** – While in the Fusion workspace for the app from which you want to remove an object, open Object Explorer and click **In Any App**. Search for or browse to the object you want to remove. Hover over the object, click the App icon, and then click **Remove**.
## Close Object Explorer
On a PC or Mac, press Esc or click Close . Alternatively on a Mac, you can press Command ⌘+K.
Previously, you could use the Blob Store API to install connectors. Instead, use the **Install or update a connector - 5.2 and later**.
When you create a new datasource that requires an uninstalled connector, Fusion releases 5.2 and later automatically download and install the connector using the [Datasources dropdown](#install-a-connector-using-the-datasources-dropdown). You can also update the connector using the [Blob Store UI](#install-or-update-a-connector-using-the-blob-store-ui) or via the [Connector API](#install-or-update-a-connector-using-the-connector-api).
## Install a connector using the Datasources dropdown
1. In your Fusion app, navigate to **Indexing** > **Datasources**.
2. Click **Add**.
3. In the list of connectors, scroll down to the connectors marked **Not Installed** and select the one you want to install.\
Fusion automatically downloads it and moves it to the list of installed connectors.
After you install a connector, you can Configure a New Datasource.
You can view and download all current and previous V2 connector releases at [Download Connectors](/docs/fusion-connectors/downloads/v2-connectors-downloads).
## Install or update a connector using the Blob Store UI
1. Download the connector zip file from [Download V2 connectors](/docs/fusion-connectors/downloads/v2-connectors-downloads).
Do not expand the archive; Fusion consumes it as-is.
2. In your Fusion app, navigate to **System** > **Blobs**.
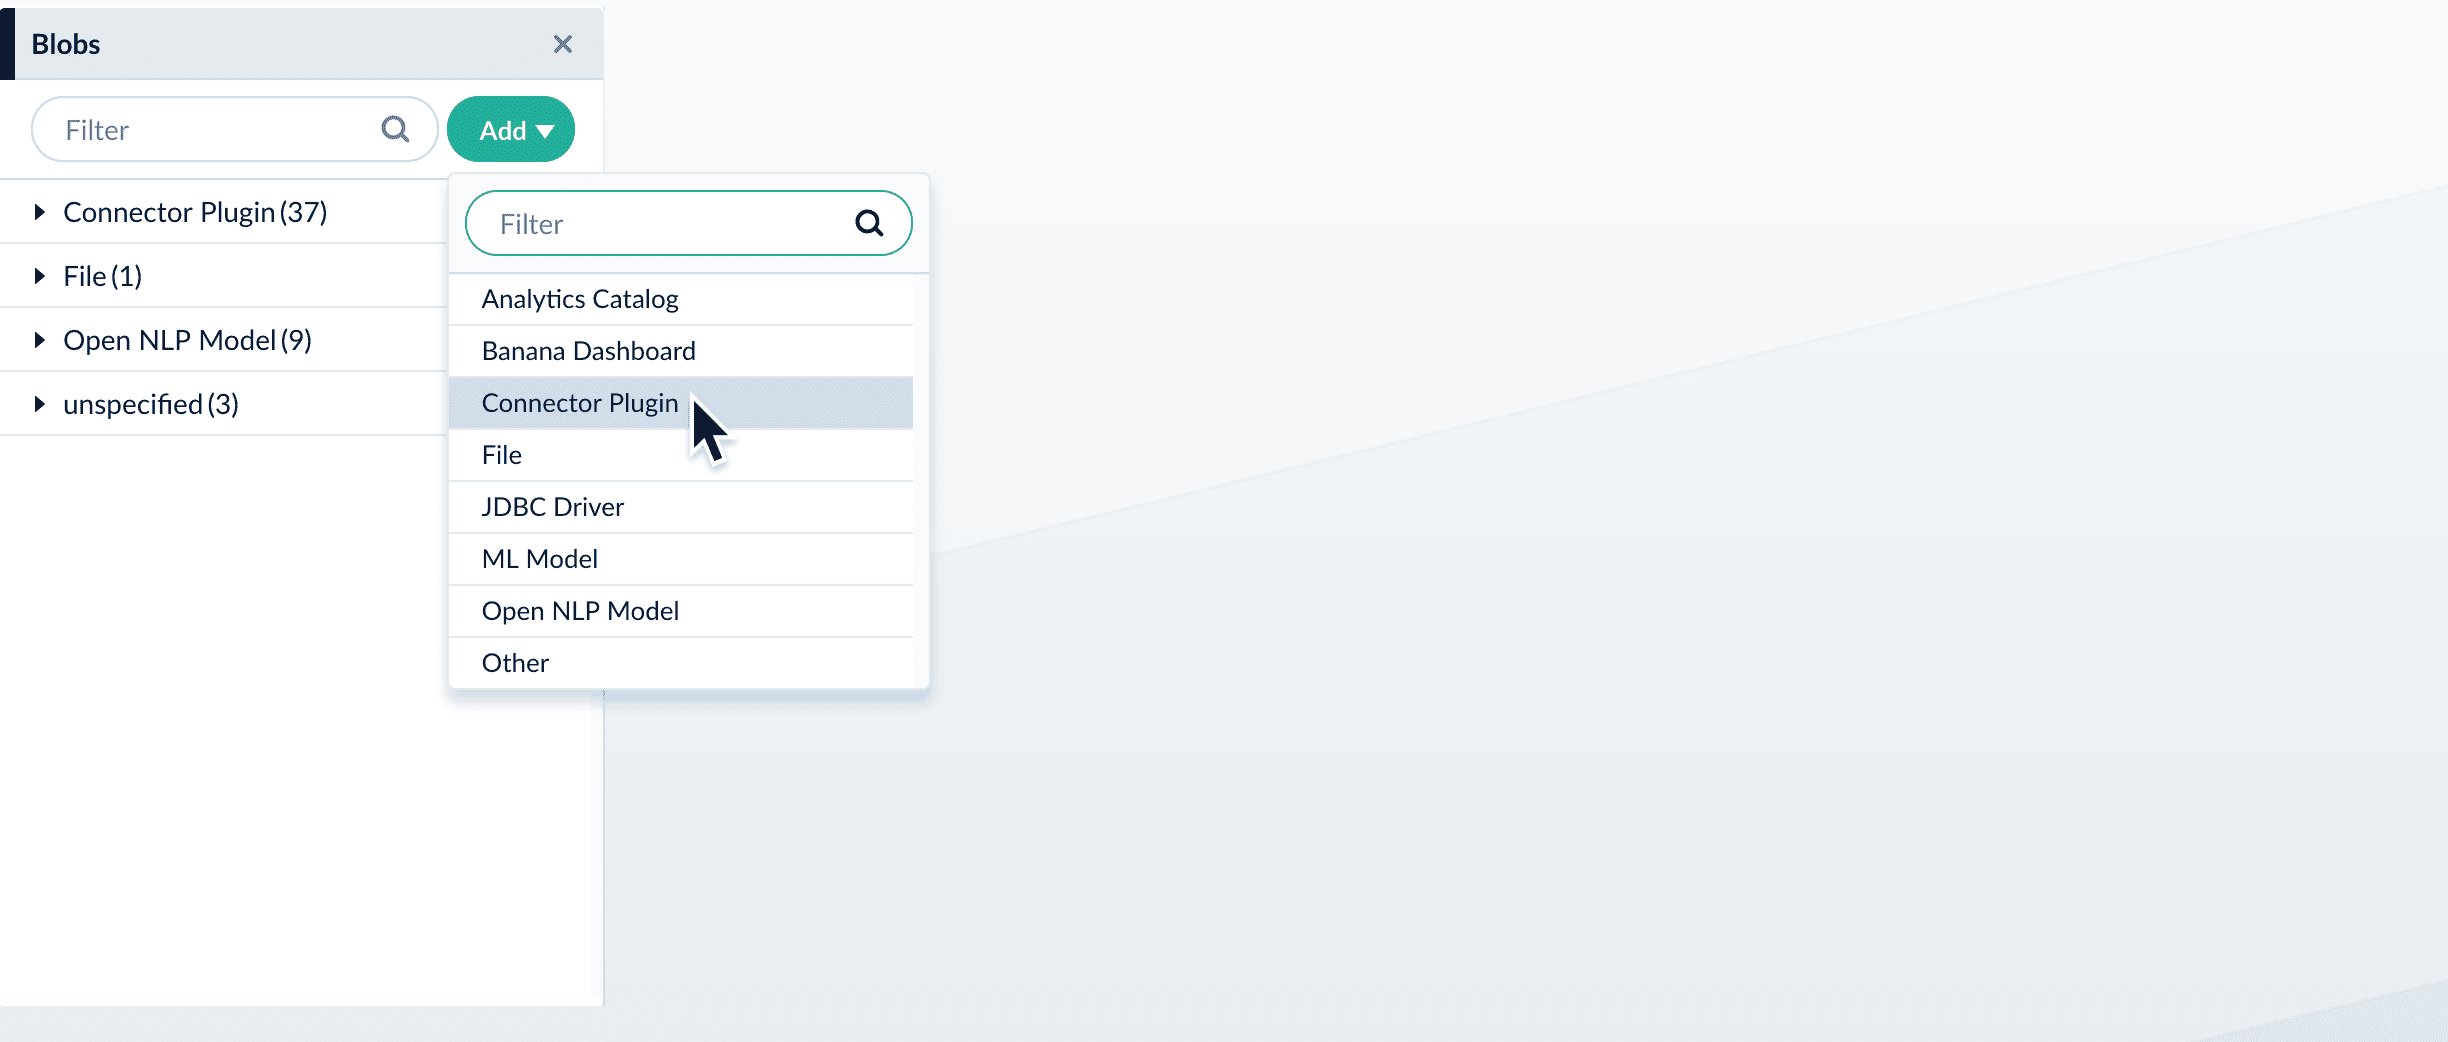
3. Click **Add**.
4. Select **Connector Plugin**.
The "New Connector Plugin Upload" panel appears.
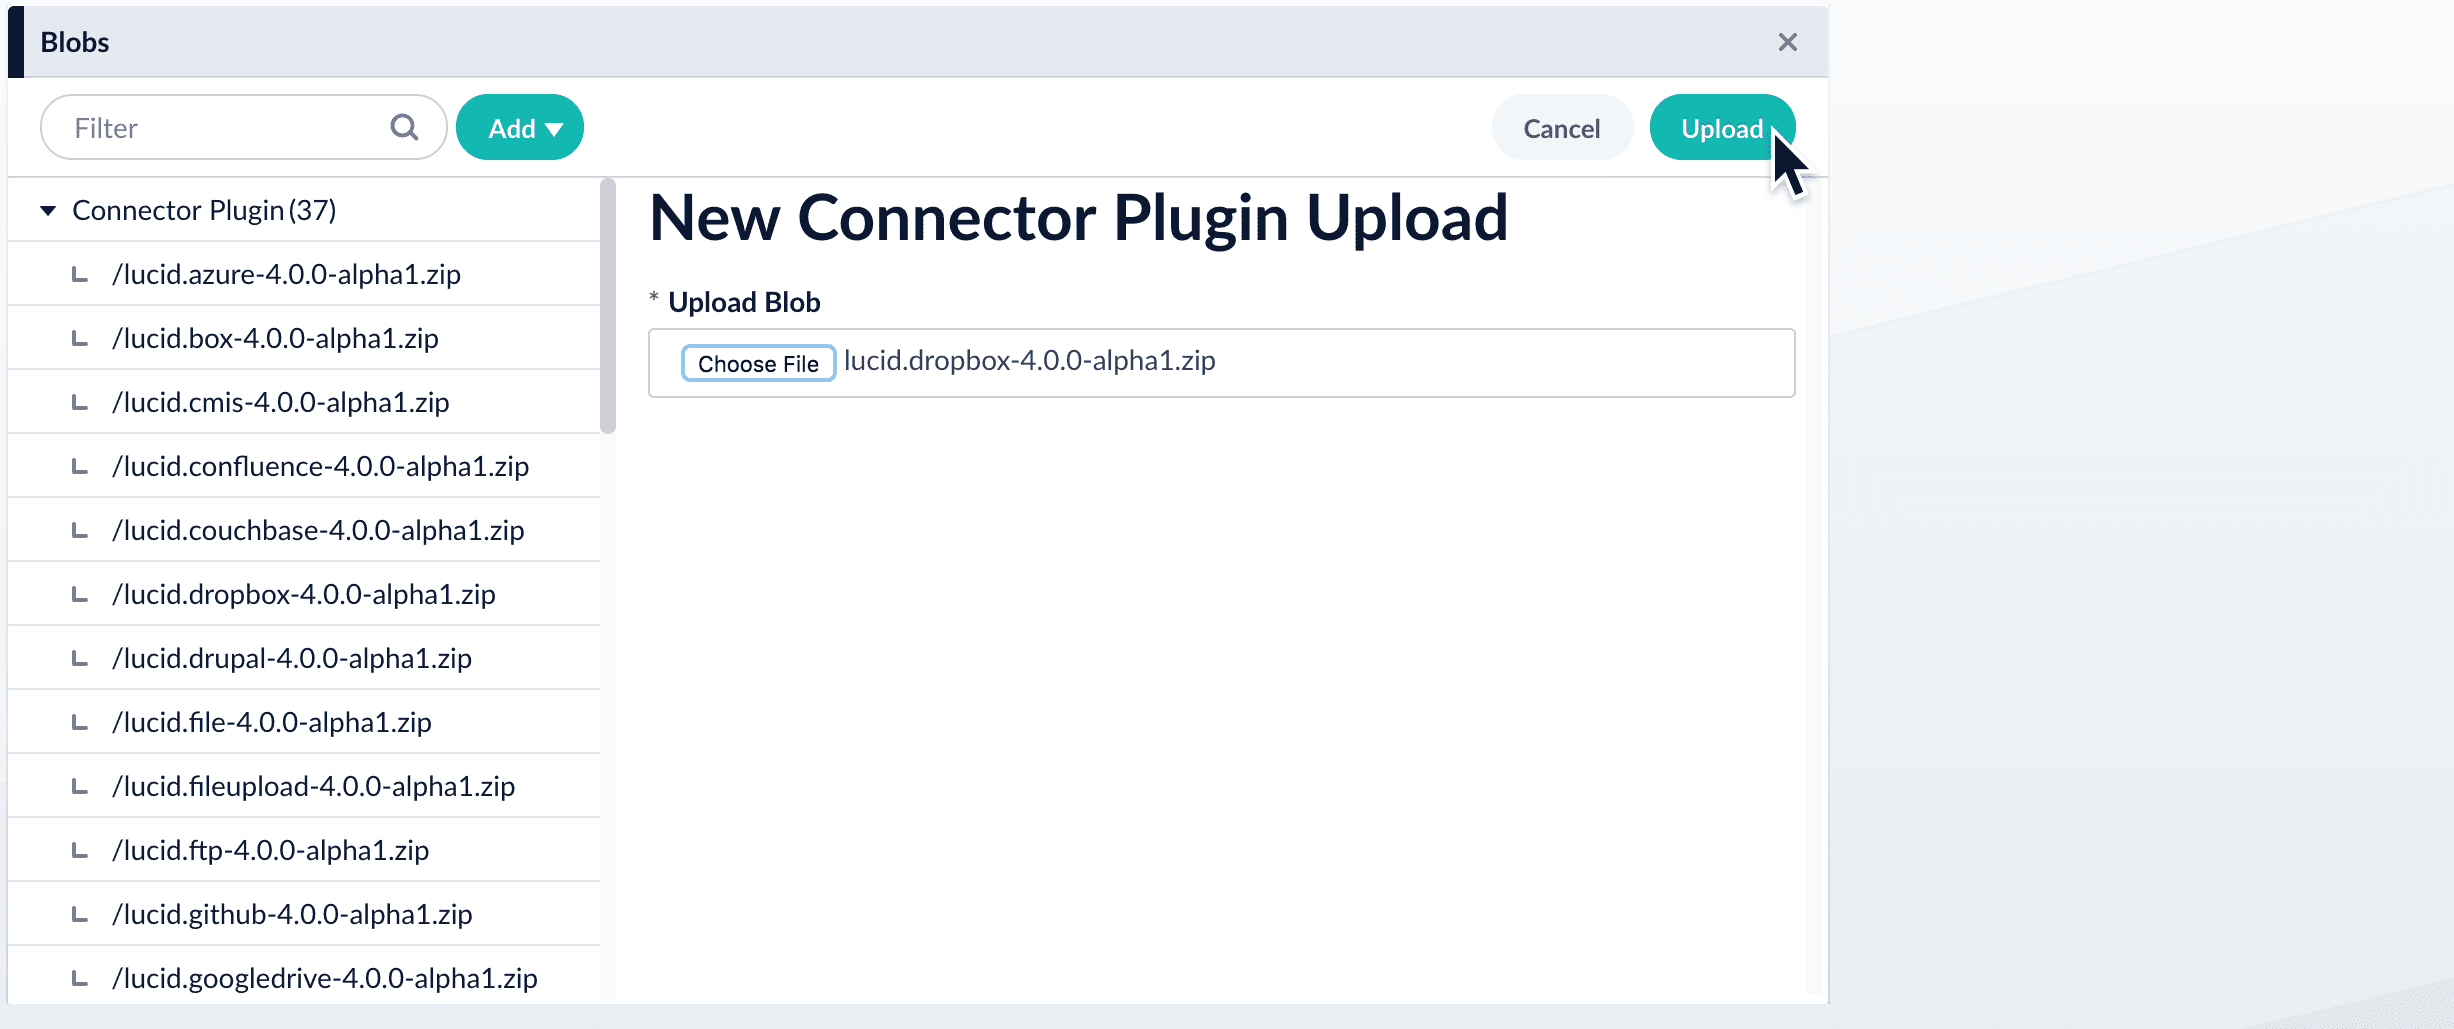
5. Click **Choose File** and select the downloaded zip file from your file system.
6. Click **Upload**.
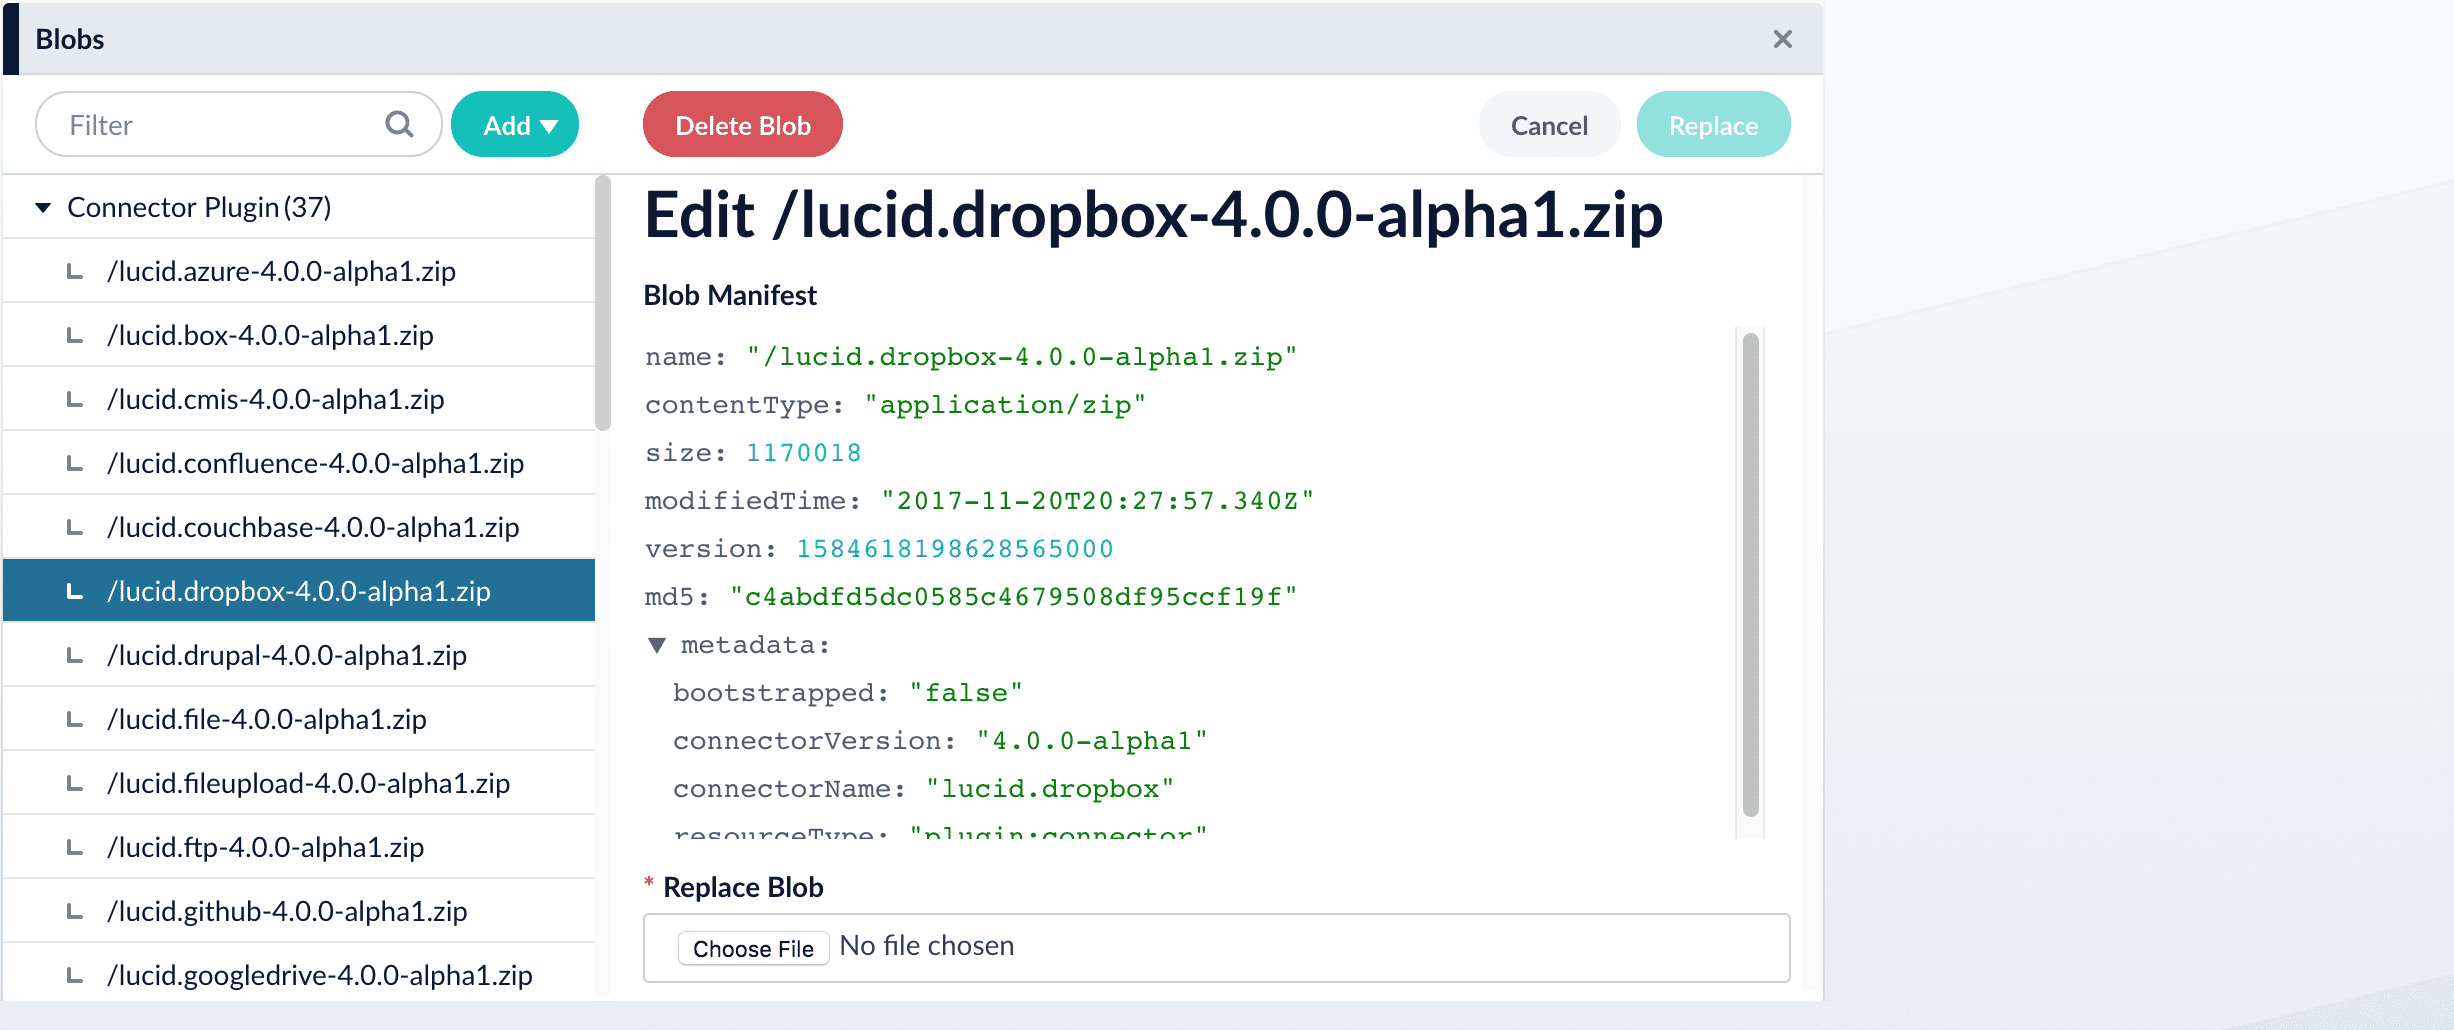
The new connector’s blob manifest appears.
From this screen you can also delete or replace the connector.
Wait several minutes for the connector to finish uploading to the blob store before installing the connector using the [Datasources dropdown](#install-a-connector-using-the-datasources-dropdown).
## Install or update a connector using the Connector API
1. Download the connector zip file from [Download V2 connectors](/docs/fusion-connectors/downloads/v2-connectors-downloads).
Do not expand the archive; Fusion consumes it as-is.
2. Upload the connector zip file to Fusion’s plugins.
Specify a `pluginId` as in this example:
```
curl -H 'content-type:application/zip' -u USERNAME:PASSWORD -X PUT 'https://FUSION_HOST:FUSION_PORT/api/connectors/plugins?id=lucidworks.{pluginId}' --data-binary @{plugin_path}.zip
```
Fusion automatically publishes the event to the cluster, and the listeners perform the connector installation process on each node.
If the `pluginId` is identical to an existing one, the old connector will be uninstalled and the new connector will be installed in its place. To get the list of existing plugin IDs, run: `curl -u USERNAME:PASSWORD https://FUSION_HOST:FUSION_PORT/api/connectors/plugins`
3. Look in `https://FUSION_HOST:FUSION_PORT/apps/connectors/plugins/` to verify the new connector is installed.
## Reinstall a connector
To reinstall a connector for any reason, first delete the connector then use the preceding steps to install it again. This may take a few minutes to complete depending on how quickly the pods are deleted and recreated.
For more information, [view the API specification.](/api-reference/blobs/get-blob-store-service-status)
## Blob Types
A `resourceType` query parameter can be used to specify the blob type. For example, specify `file` when uploading a text or CSV file, like this:
```bash wrap theme={"dark"}
curl -H 'Content-Type: text/csv' -u USERNAME:PASSWORD -X PUT 'https://FUSION_HOST:FUSION_PORT/api/apps/APP_NAME/blobs/quickstart/EXAMPLE.csv?resourceType=file' --data-binary @/path/EXAMPLE.csv
```
The complete list of valid values for `resourceType` is below:
| Type | Description |
| -------------------- | ------------------------------------------------------------------------------------------------------------------------------------------------------------------ |
| `banana` | A Banana [dashboard](/docs/5/fusion/operations/monitoring-and-reporting/banana-dashboards/overview) |
| `catalog` | An [analytics catalog](/docs/4/fusion-server/reference/api/catalog-api) |
| `driver:jdbc` | A **Upload a JDBC Driver to Fusion Server** |
| `file:js-index` | A JavaScript file for use with a [Managed Javascript index stage](/docs/5/fusion/reference/config-ref/pipeline-stages/index-stages/managed-javascript-index-stage) |
| `file:js-query` | A JavaScript file for use with a [Managed Javascript query stage](/docs/5/fusion/reference/config-ref/pipeline-stages/query-stages/managed-javascript-query-stage) |
| `file` | Any uploaded file, such as from the **Quickstart** or the [Index Workbench](/docs/5/fusion/intro/ui-tour/index-workbench) |
| `unspecified` | A blob of unknown type If no `resourceType` is specified on upload, "other" is assigned by default. |
| `plugin:index-stage` | An [index stage plugin](/docs/5/fusion/dev-portal/index-stage-sdk) |
| `plugin:query-stage` | A [query stage plugin](/docs/5/fusion/dev-portal/query-stage-sdk/overview) |
The JDBC V2 connector is supported, and fetches documents from a relational database via SQL queries. Under the hood, this connector implements the Solr [DataImportHandler (DIH)](https://wiki.apache.org/solr/DataImportHandler) plugin.
Fusion stores JDBC drivers in the blob store. You can upload a driver using the Fusion UI or the Blob Store API.
## How to upload a JDBC driver using the Fusion UI
1. In the Fusion UI, navigate to **System** > **Blobs**.
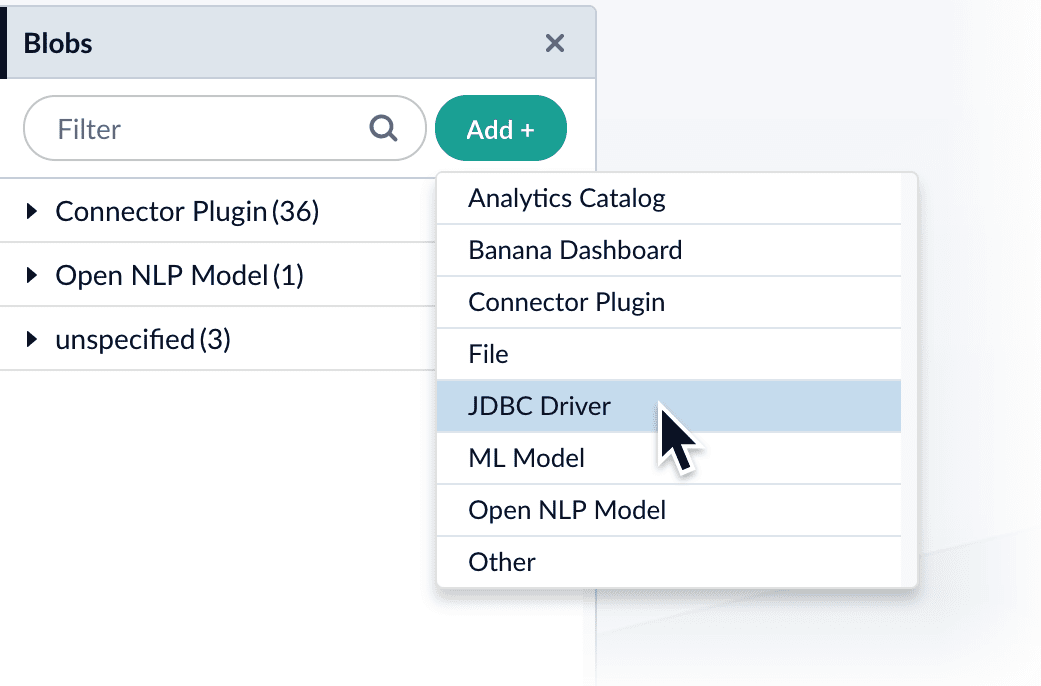
2. Click **Add**.
3. Select **JDBC Driver**.\
The "New 'JDBC Driver' Upload" panel appears.
4. Click **Choose File** and select the .jar file from your file system.
5. Click **Upload**.\
The new driver’s blob manifest appears.
From this screen you can also delete or replace the driver.
## How to install a JDBC driver using the API
1. Upload the JAR file to Fusion’s blob store using the [`/blobs/{id}` endpoint](/docs/5/fusion/dev-portal/api/api-swagger/blob-store-api).
Specify an arbitrary blob ID, and a `resourceType` value of `plugin:connector`, as in this example:
```bash theme={"dark"}
curl -u USERNAME:PASSWORD -H "content-type:application/java-archive" -H "content-length:707261" -X PUT --data-binary @postgresql-42.0.0.jar http://localhost:8764/api/blobs/mydriver?resourceType=driver:jdbc
```
Success response:
```json theme={"dark"}
{
"name" : "mydriver",
"contentType" : "application/java-archive",
"size" : 707261,
"modifiedTime" : "2017-06-09T19:00:48.919Z",
"version" : 0,
"md5" : "c67163ca764bfe632f28229c142131b5",
"metadata" : {
"subtype" : "driver:jdbc",
"drivers" : "org.postgresql.Driver",
"resourceType" : "driver:jdbc"
}
}
```
Fusion automatically publishes the event to the cluster, and the listeners perform the driver installation process on each node.
If the blob ID is identical to an existing one, the old driver will be uninstalled and the new driver will installed in its place. To get the list of existing blob IDs, run: `curl -u USERNAME:PASSWORD https://FUSION_HOST:FUSION_PORT/api/blobs`
2. To verify the uploaded driver, run:
```bash theme={"dark"}
curl -u USERNAME:PASSWORD https://FUSION_HOST:FUSION_PORT/api/blobs/BLOB_ID/manifest
```
Where the `BLOB_ID` is the name specified during upload, such as "mydriver" above. A success response looks like this:
```json theme={"dark"}
{
"name" : "mydriver",
"contentType" : "application/java-archive",
"size" : 707261,
"modifiedTime" : "2017-06-09T19:05:17.897Z",
"version" : 1569755095787110400,
"md5" : "c67163ca764bfe632f28229c142131b5",
"metadata" : {
"subtype" : "driver:jdbc",
"drivers" : "org.postgresql.Driver",
"resourceType" : "driver:jdbc"
}
}
```
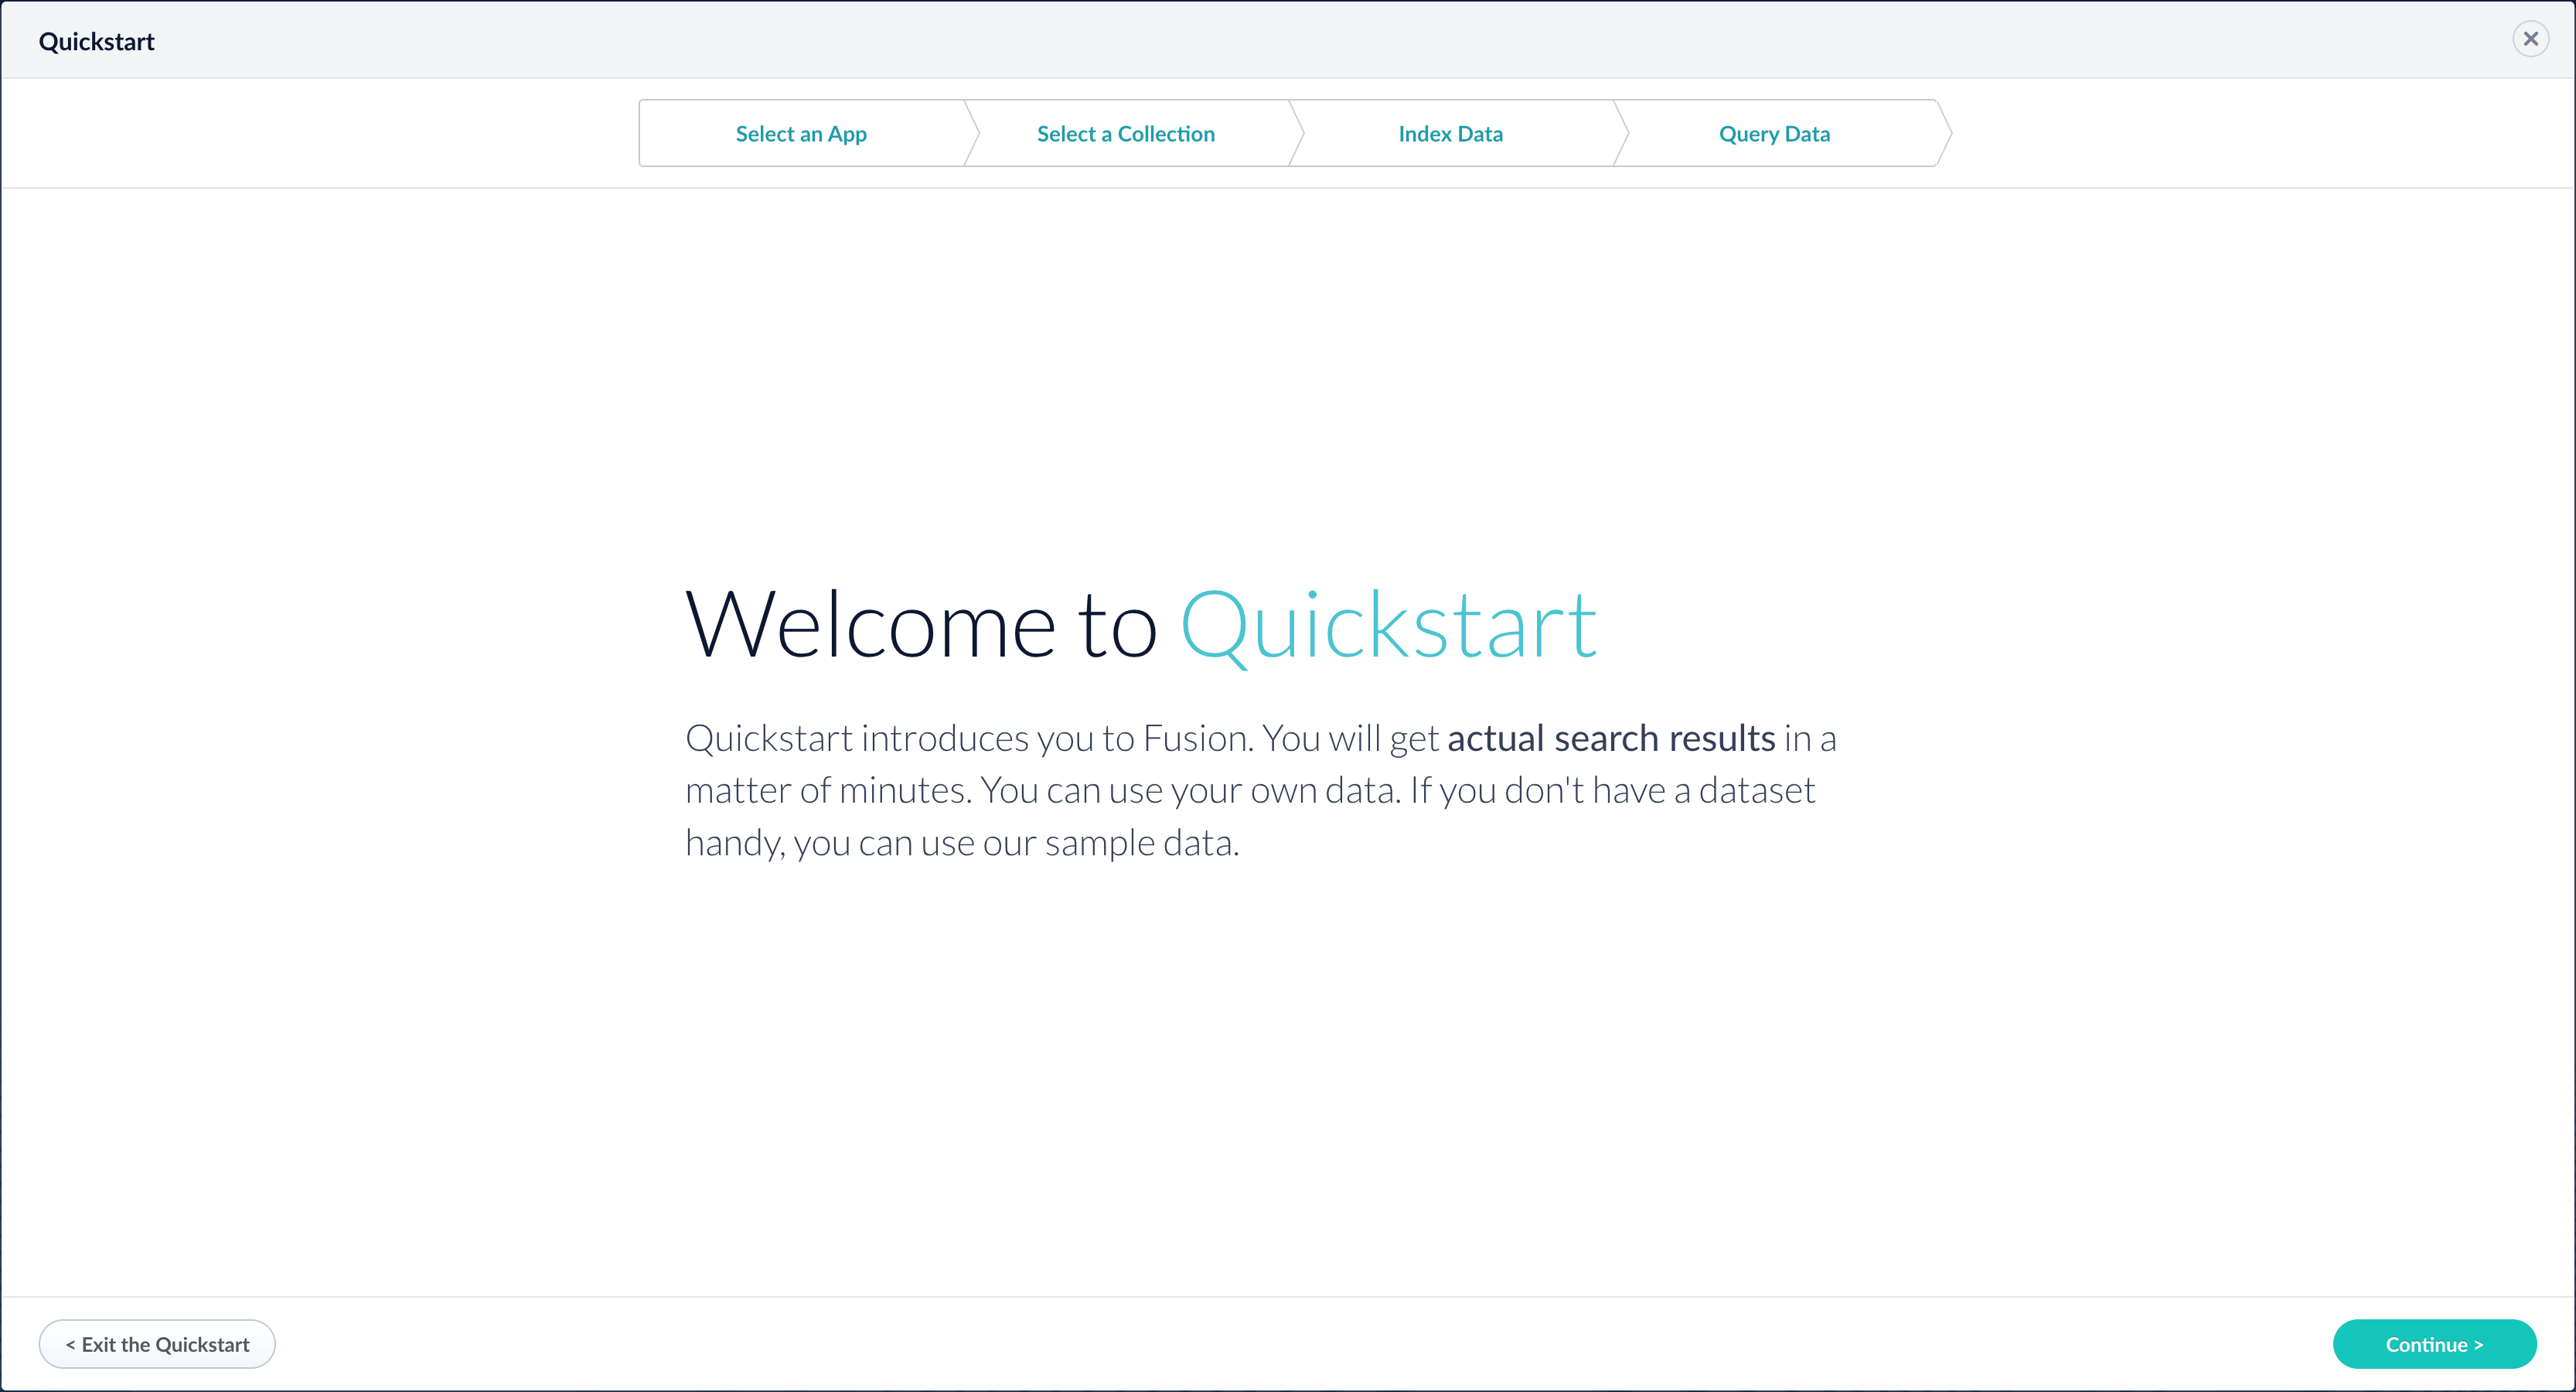
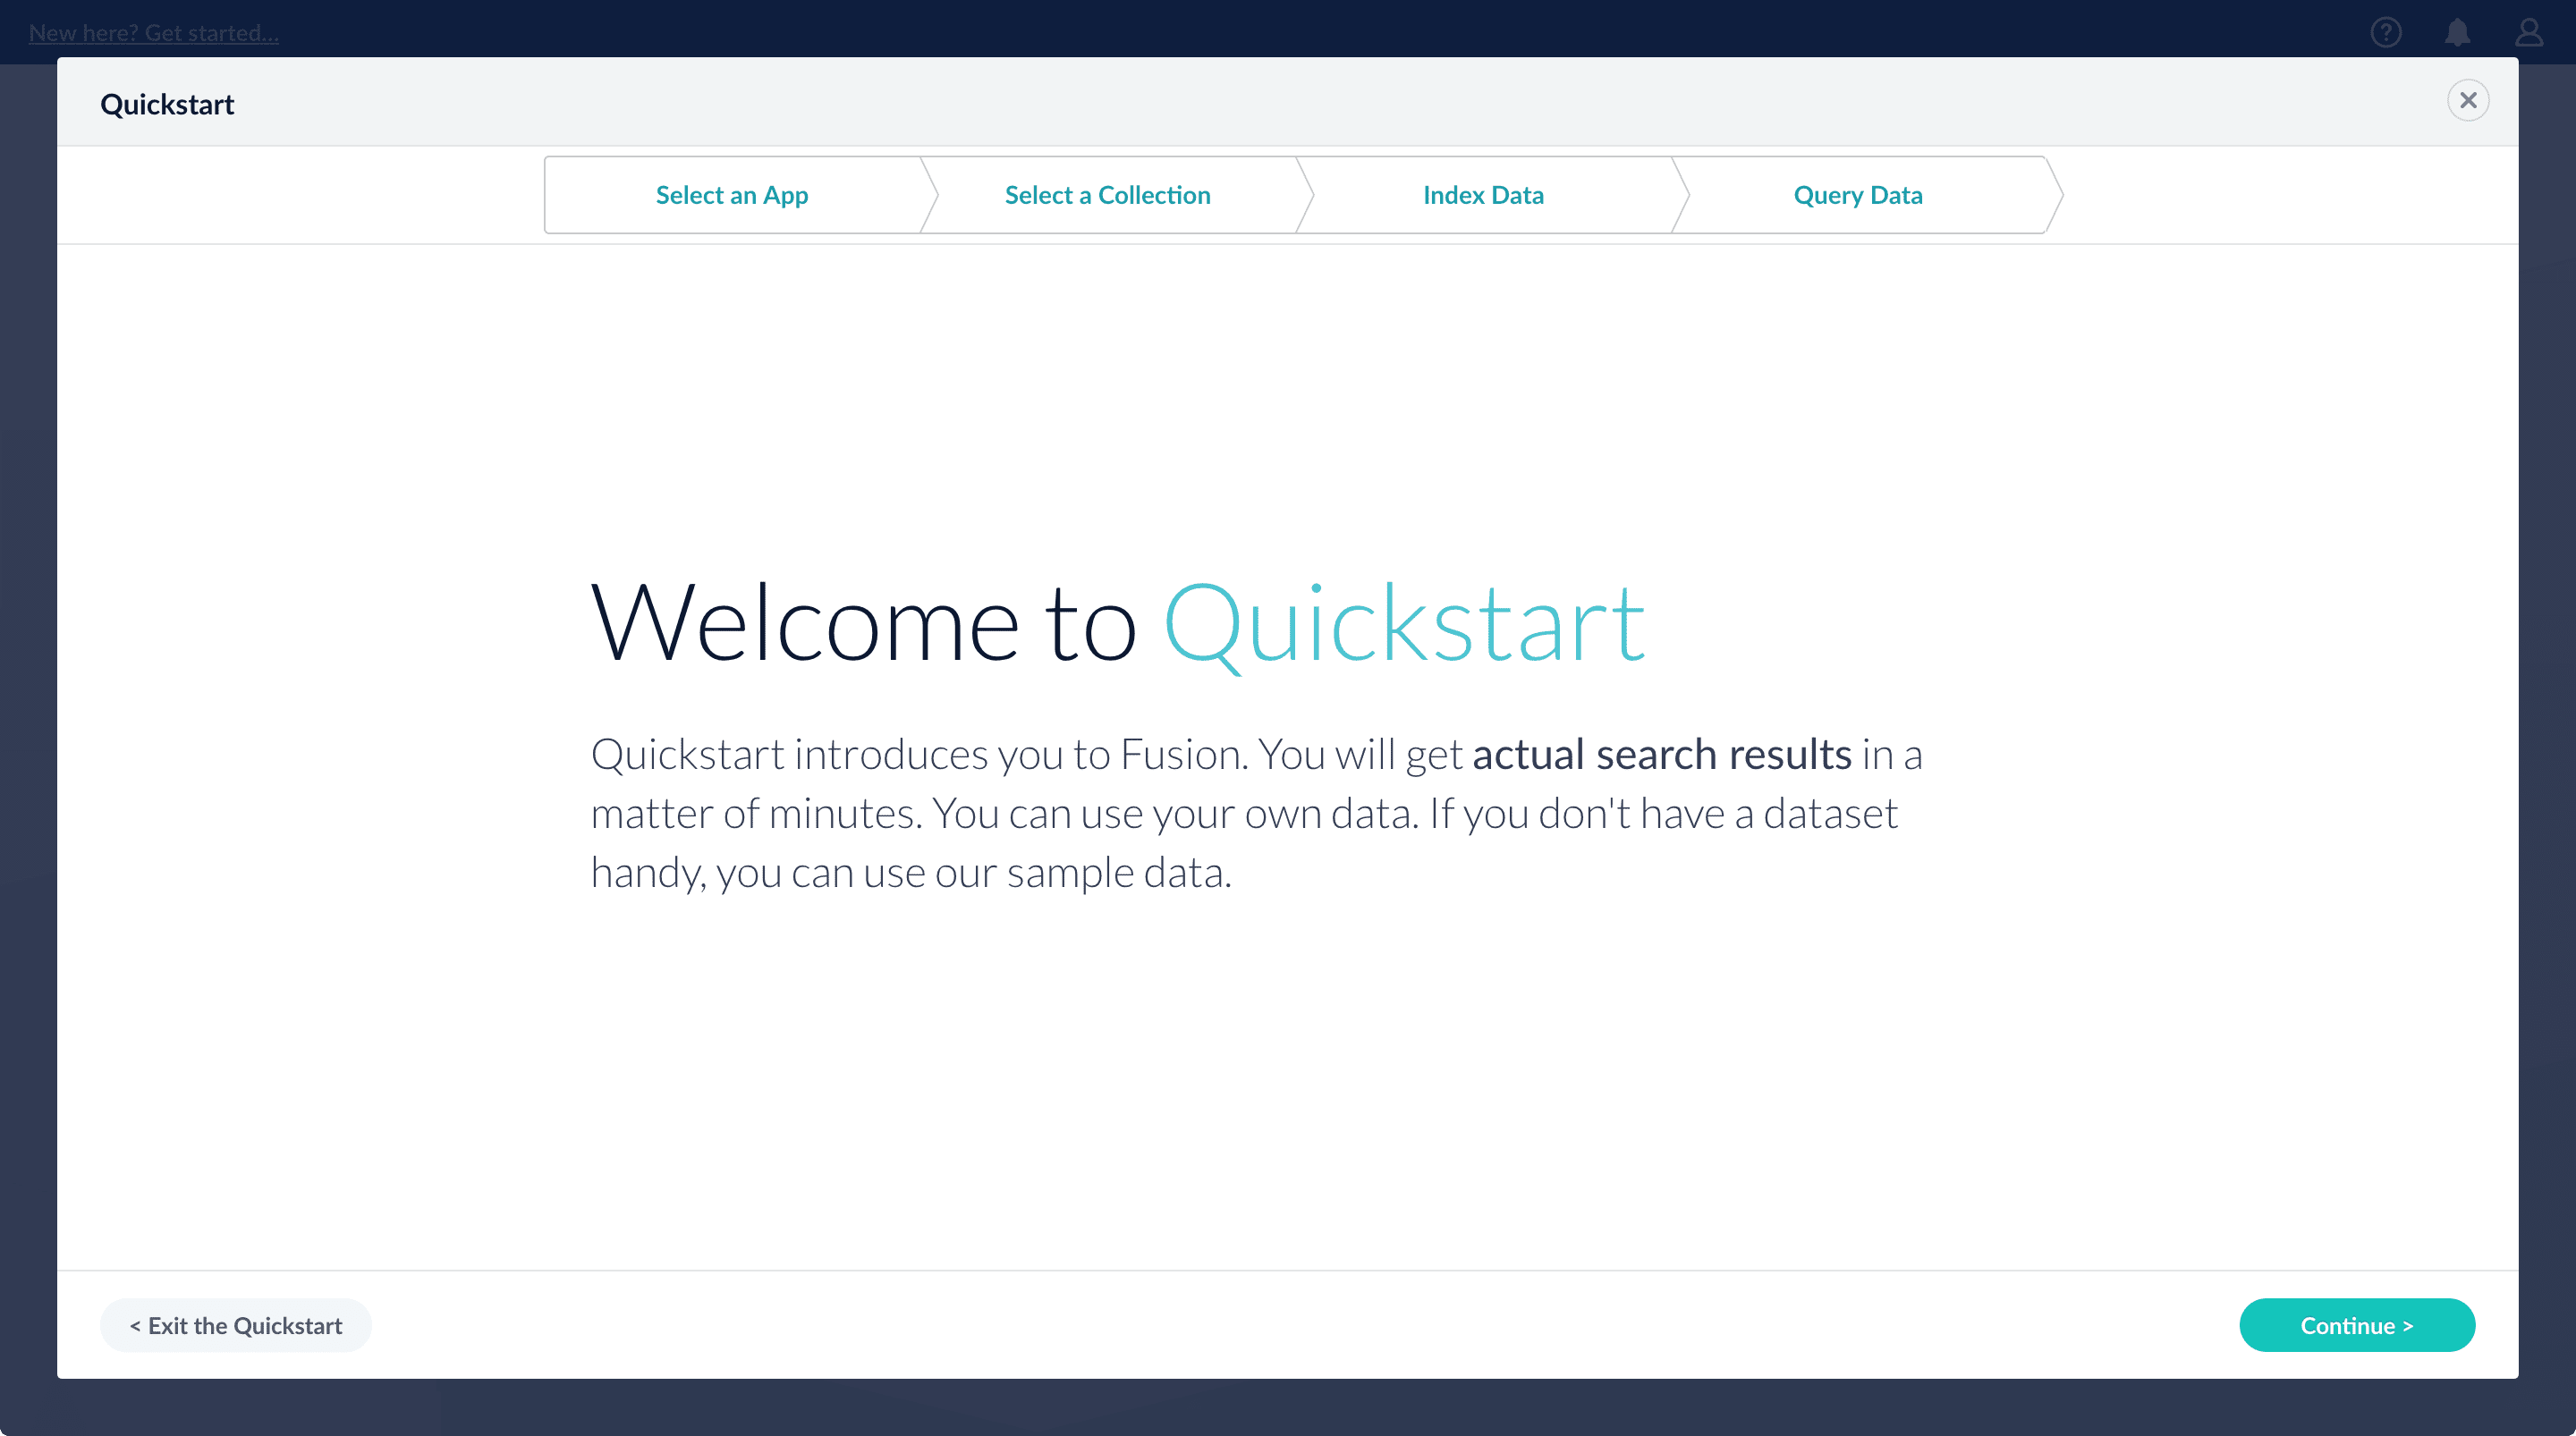
The Quickstart is a wizard that lets you explore some of Fusion’s core capabilities:
* Creating or selecting an app
* Selecting a collection (where data is stored)
* Indexing data
* Searching
**LucidAcademy**
Lucidworks offers free training to help you get started.
The **Course** for **Using The Quickstart Wizard** focuses on using the wizard to practice using the key functions of Fusion:
Visit the [LucidAcademy](https://academy.lucidworks.com) to see the full training catalog.
## Step through the Quickstart wizard
If it is not already open, open the Quickstart wizard. In the Fusion launcher, click **New here? Get started...**.
1. Click **Continue**.
On the **Select an App** screen, you can select or create an [app](/docs/4/fusion-server/concepts/overview) for your quickstart data.
If you click **Create new app**, Fusion prompts you to enter an app name (and optionally a description), then click **Create App** to return to the Quickstart. Your new app is selected by default.
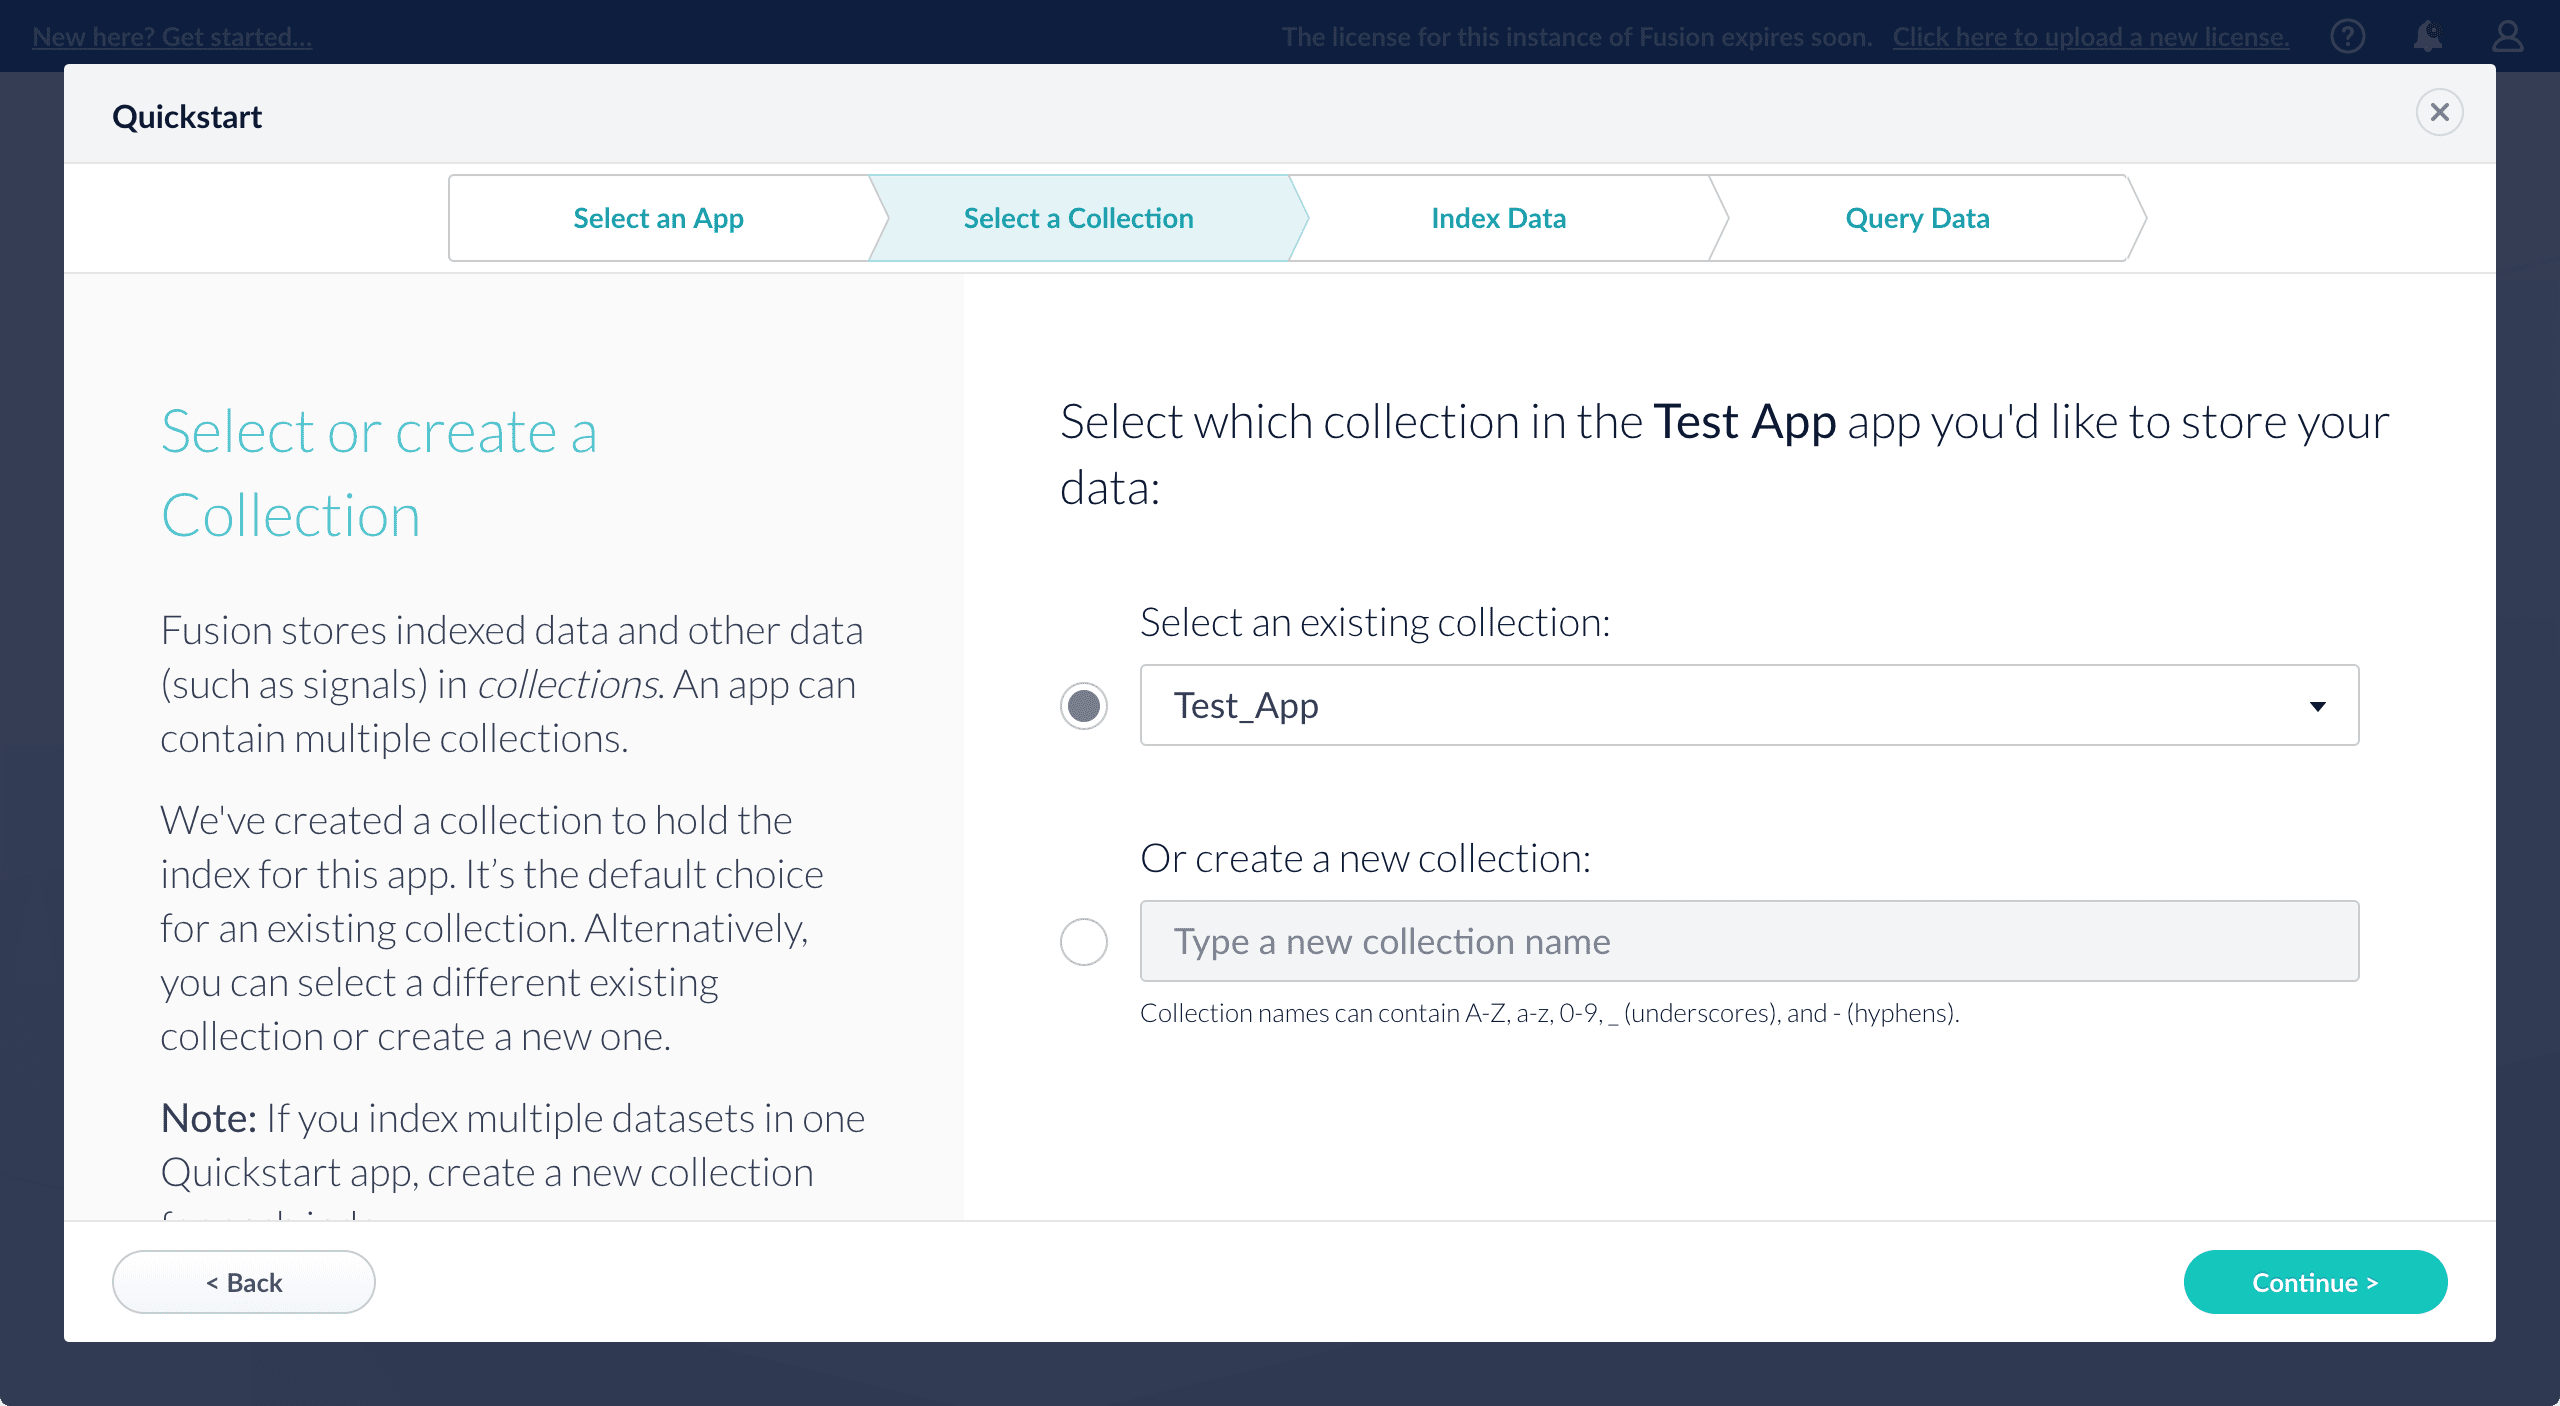
2. After selecting an app, click **Continue**.
On the **Select a Collection** screen, you can select or create a [collection](/docs/4/fusion-server/concepts/overview) for your quickstart data. A collection with the same name as your app is created automatically:
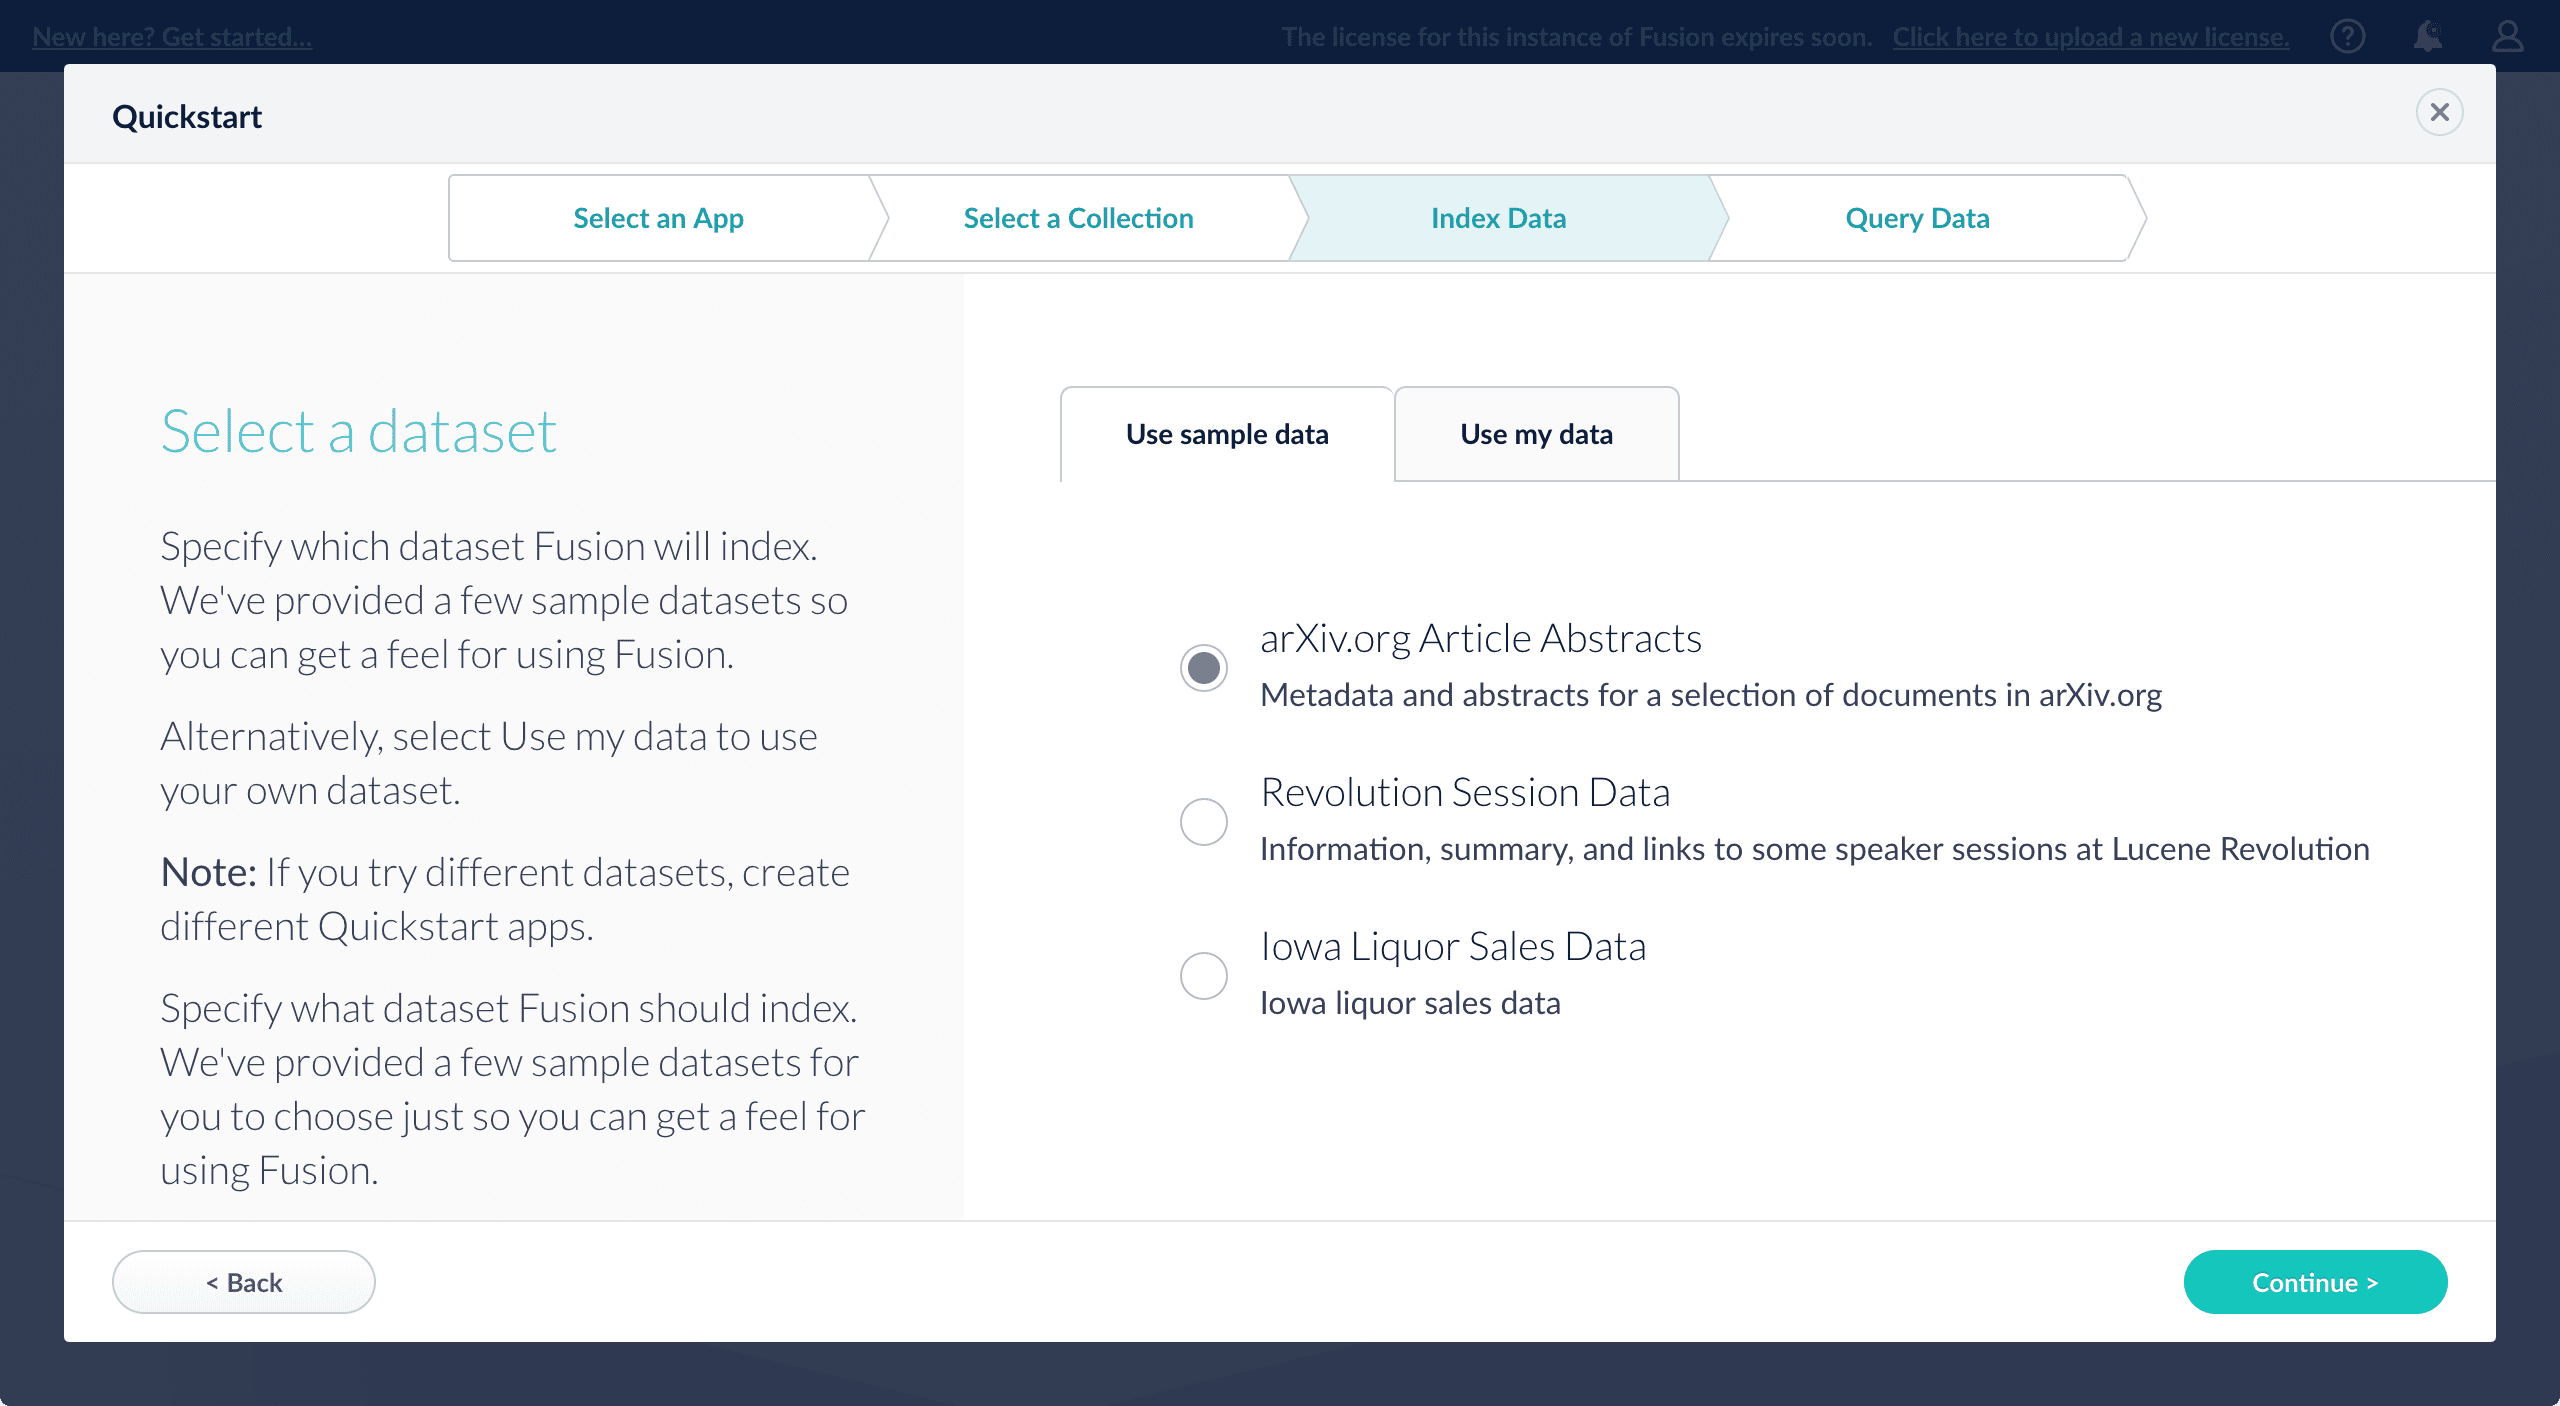
3. Click **Continue**.\
On the **Index Data** screen, you can either select one of the built-in sample datasets or click **Use my data** to upload your own:
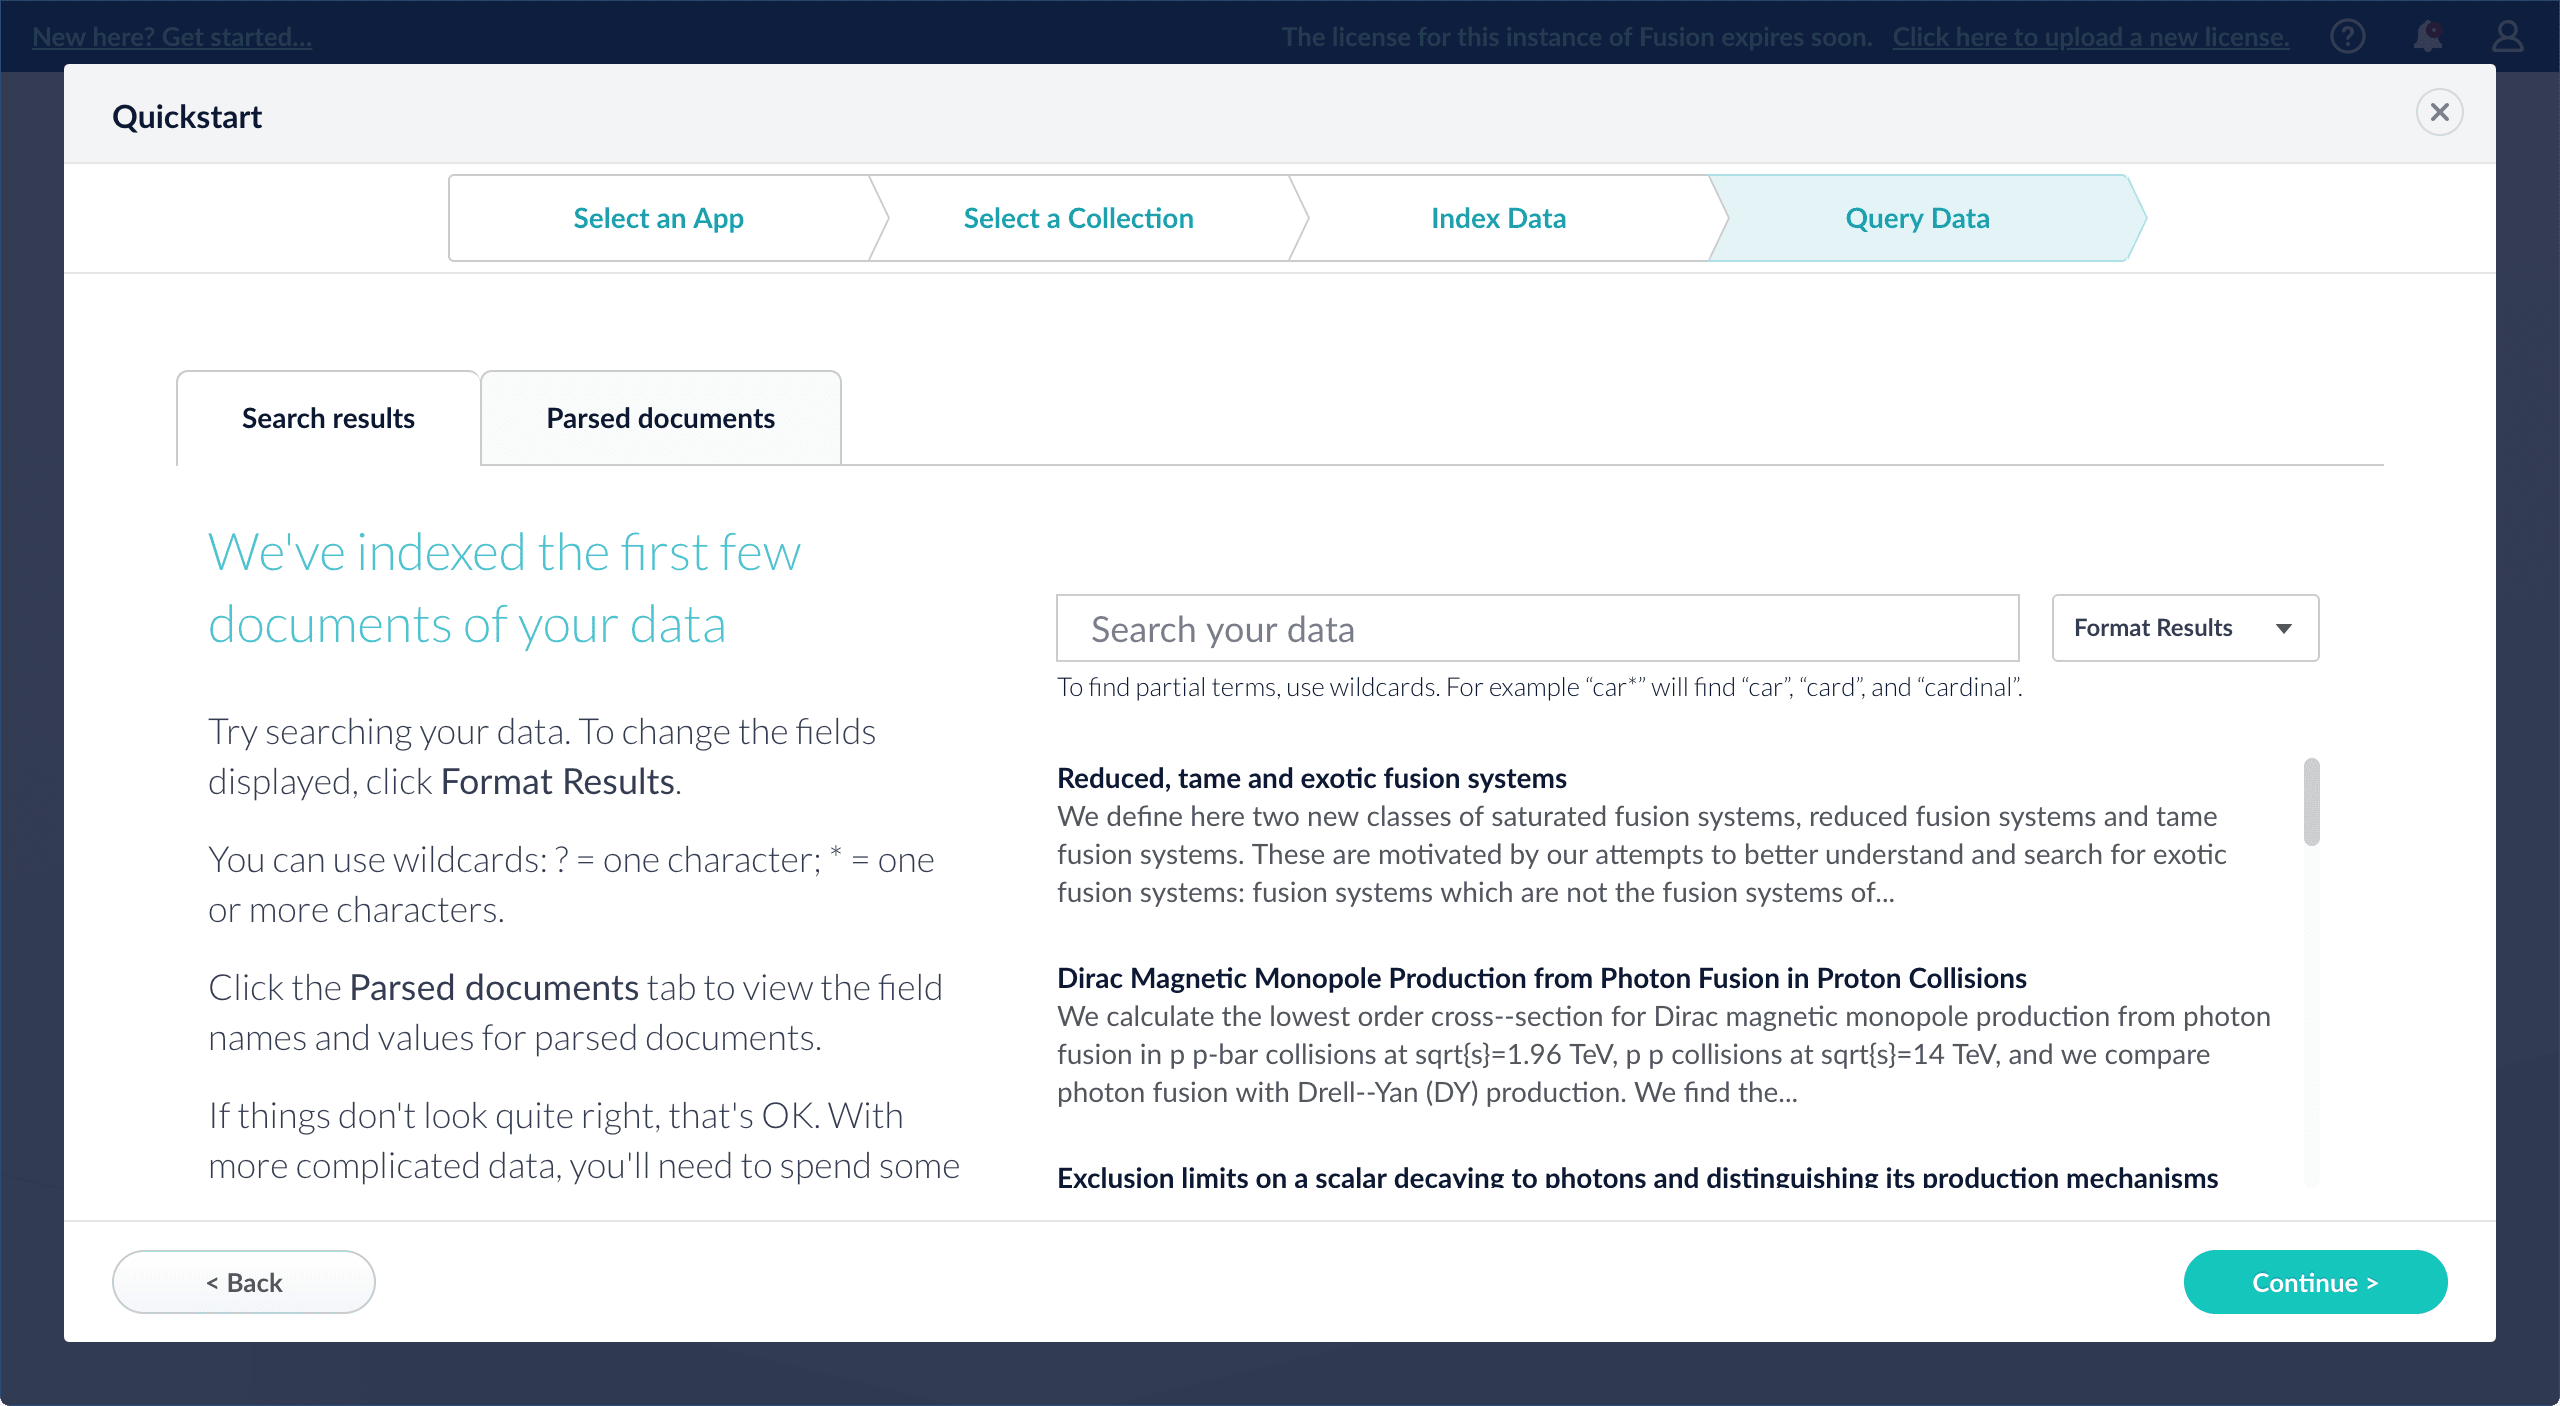
4. Click **Continue**.\
On the **Query Data** screen, you can see all search results and enter your own search queries to test the indexed dataset. You can also select the display fields or view the parsed documents:
5. Click **Continue**.
From here, you can do the following:
* Open the Index Workbench to change the index pipeline.
* [Fusion 4.x Index Workbench](/docs/4/fusion-server/concepts/indexing/datasources/index-workbench)
* [Fusion 5.x Index Workbench](/docs/5/fusion/intro/ui-tour/index-workbench)
* Open the Query Workbench to change the query pipeline.
* [Fusion 4.x Query Workbench](/docs/4/fusion-server/concepts/querying/query-workbench)
* [Fusion 5.x Query Workbench](/docs/5/fusion/getting-data-out/query-basics/query-workbench)
The workbenches are essentials tools in the Fusion workflow.
* Open [App Studio](/docs/4/app-studio/overview) to create a user interface for searching this collection.
App Studio is only available in Fusion 4.1 and 4.2.
## Examples
*Upload a JavaScript file to the blob store:*
**REQUEST**
```bash wrap theme={"dark"}
curl -u USERNAME:PASSWORD -X PUT -H 'Content-Type: text/javascript' --data-binary @query-pipeline-js-stage.js https://FUSION_HOST:FUSION_PORT/api/blobs/query-pipeline-js-stage.js?resourceType=file:js-query
```
The response is empty.
*Verify that the JavaScript blob was uploaded:*
**REQUEST**
```bash wrap theme={"dark"}
curl -u USERNAME:PASSWORD https://FUSION_HOST:FUSION_PORT/api/blobs?resourceType=file:js-query
```
**RESPONSE**
```json wrap theme={"dark"}
[ {
"id" : "query-pipeline-js-stage.js",
"path" : "/query-pipeline-js-stage.js",
"dir" : "/",
"filename" : "query-pipeline-js-stage.js",
"contentType" : "text/javascript",
"size" : 0,
"modifiedTime" : "2018-09-11T16:23:17.743Z",
"version" : 1611328911094841344,
"md5" : "d41d8cd98f00b204e9800998ecf8427e",
"metadata" : {
"resourceType" : "file:js-query"
}
} ]
```
*Upload an OpenNLP sentence model binary file to the blob store:*
**REQUEST**
```bash wrap theme={"dark"}
curl -u USERNAME:PASSWORD -X PUT --data-binary @data/nlp/models/en-sent.bin -H 'Content-type: application/octet-stream' https://FUSION_HOST:FUSION_PORT/api/blobs/sentenceModel.bin
```
In this example, we have changed the name of the blob during upload by giving it a different ID. The file is named 'en-sent.bin' but we have defined the ID of this to 'sentenceModel.bin'. When we use this blob in an index pipeline, we would refer to it by the ID we have given it.
*Get the manifest for a sentence OpenNLP model we have previously saved in the blob store:*
**REQUEST**
```bash wrap theme={"dark"}
curl -u USERNAME:PASSWORD -X HEAD https://FUSION_HOST:FUSION_PORT/api/blobs/sentenceModel.bin
```
**RESPONSE**
```json wrap theme={"dark"}
{
"name" : "sentenceModel.bin",
"contentType" : "application/octet-stream",
"size" : 98533,
"modifiedTime" : "2014-09-08T18:50:07.559Z",
"version" : 1478704189996531712,
"md5" : "3822c5f82cb4ba139284631d2f6b7fde"
}
```
*Upload a JDBC driver, using slashes in the blob name:*
**REQUEST**
```bash wrap theme={"dark"}
curl -u USERNAME:PASSWORD -X PUT --data-binary @en-sent.bin -H 'Content-length: 6' -H 'Content-type: application/octet-stream' https://FUSION_HOST:FUSION_PORT/api/blobs/good/to/go/sentenceModel.bin?resourceType=driver:jdbc
```
**RESPONSE**
```json wrap theme={"dark"}
{
"name" : "good/to/go/sentenceModel.bin",
"contentType" : "application/octet-stream",
"size" : 6,
"modifiedTime" : "2017-04-04T15:58:32.856Z",
"version" : 0,
"md5" : "b1946ac92492d2347c6235b4d2611184",
"metadata" : {
"subtype" : "driver:jdbc",
"resourceType" : "driver:jdbc"
}
}
```
*Get the JDBC driver that was uploaded:*
**REQUEST**
```bash wrap theme={"dark"}
curl -u USERNAME:PASSWORD https://FUSION_HOST:FUSION_PORT/api/blobs?resourceType=driver:jdbc
```
**RESPONSE**
```json wrap theme={"dark"}
[ {
"name" : "good/to/go/sentenceModel.bin",
"contentType" : "application/octet-stream",
"size" : 6,
"modifiedTime" : "2017-04-04T06:21:53.465Z",
"version" : 1563727666574524416,
"md5" : "b1946ac92492d2347c6235b4d2611184",
"metadata" : {
"subtype" : "driver:jdbc",
"resourceType" : "driver:jdbc"
}
} ]
```


 icon.
icon.
 ## Manage objects
* **Edit an object’s name** – For some objects, for example, Group objects, clicking
## Manage objects
* **Edit an object’s name** – For some objects, for example, Group objects, clicking  lets you edit the object’s name.
* **Manage an object** – For most objects that display the
lets you edit the object’s name.
* **Manage an object** – For most objects that display the  icon when you hover. Click Schedule
  There are four kinds of groups:
* **System groups** (
There are four kinds of groups:
* **System groups** (  ) - Groups created by Fusion to group objects such as signals and items that are shared among apps. You cannot modify the membership of a system group.
* **Recommendations groups** (
) - Groups created by Fusion to group objects such as signals and items that are shared among apps. You cannot modify the membership of a system group.
* **Recommendations groups** (  ) - Groups related to recommendations. These are a subtype of system groups. You cannot modify the membership of a recommendations group.
* **User-defined groups** (
) - Groups related to recommendations. These are a subtype of system groups. You cannot modify the membership of a recommendations group.
* **User-defined groups** (  ) - Groups you create and manage yourself. You can put whatever objects you like in them.
* **Fusion-created groups that are not system groups** (
) - Groups you create and manage yourself. You can put whatever objects you like in them.
* **Fusion-created groups that are not system groups** (  icon when you hover. Click Add To Group
  .
* **Delete a user-defined group** – When you remove the last object from a user-defined group, the group remains. To delete it, hover over the group, and then click
.
* **Delete a user-defined group** – When you remove the last object from a user-defined group, the group remains. To delete it, hover over the group, and then click  .
## Share objects among apps
Sharing objects among apps lets you configure something once and use it multiple times where needed. When you share an object, the object and any objects that the objects depends on are shared.
.
## Share objects among apps
Sharing objects among apps lets you configure something once and use it multiple times where needed. When you share an object, the object and any objects that the objects depends on are shared.
 * **Add an object to an app directly** – In cases when an object is linked to an app, but is not linked directly to the app (it is linked via some dependency), you can add the object to an app directly.
While in the Fusion workspace for the app to which you want to add an object directly, open Object Explorer and click **In Any App**. Search for or browse to the object you want to add. Hover over the object, click the App
* **Add an object to an app directly** – In cases when an object is linked to an app, but is not linked directly to the app (it is linked via some dependency), you can add the object to an app directly.
While in the Fusion workspace for the app to which you want to add an object directly, open Object Explorer and click **In Any App**. Search for or browse to the object you want to add. Hover over the object, click the App 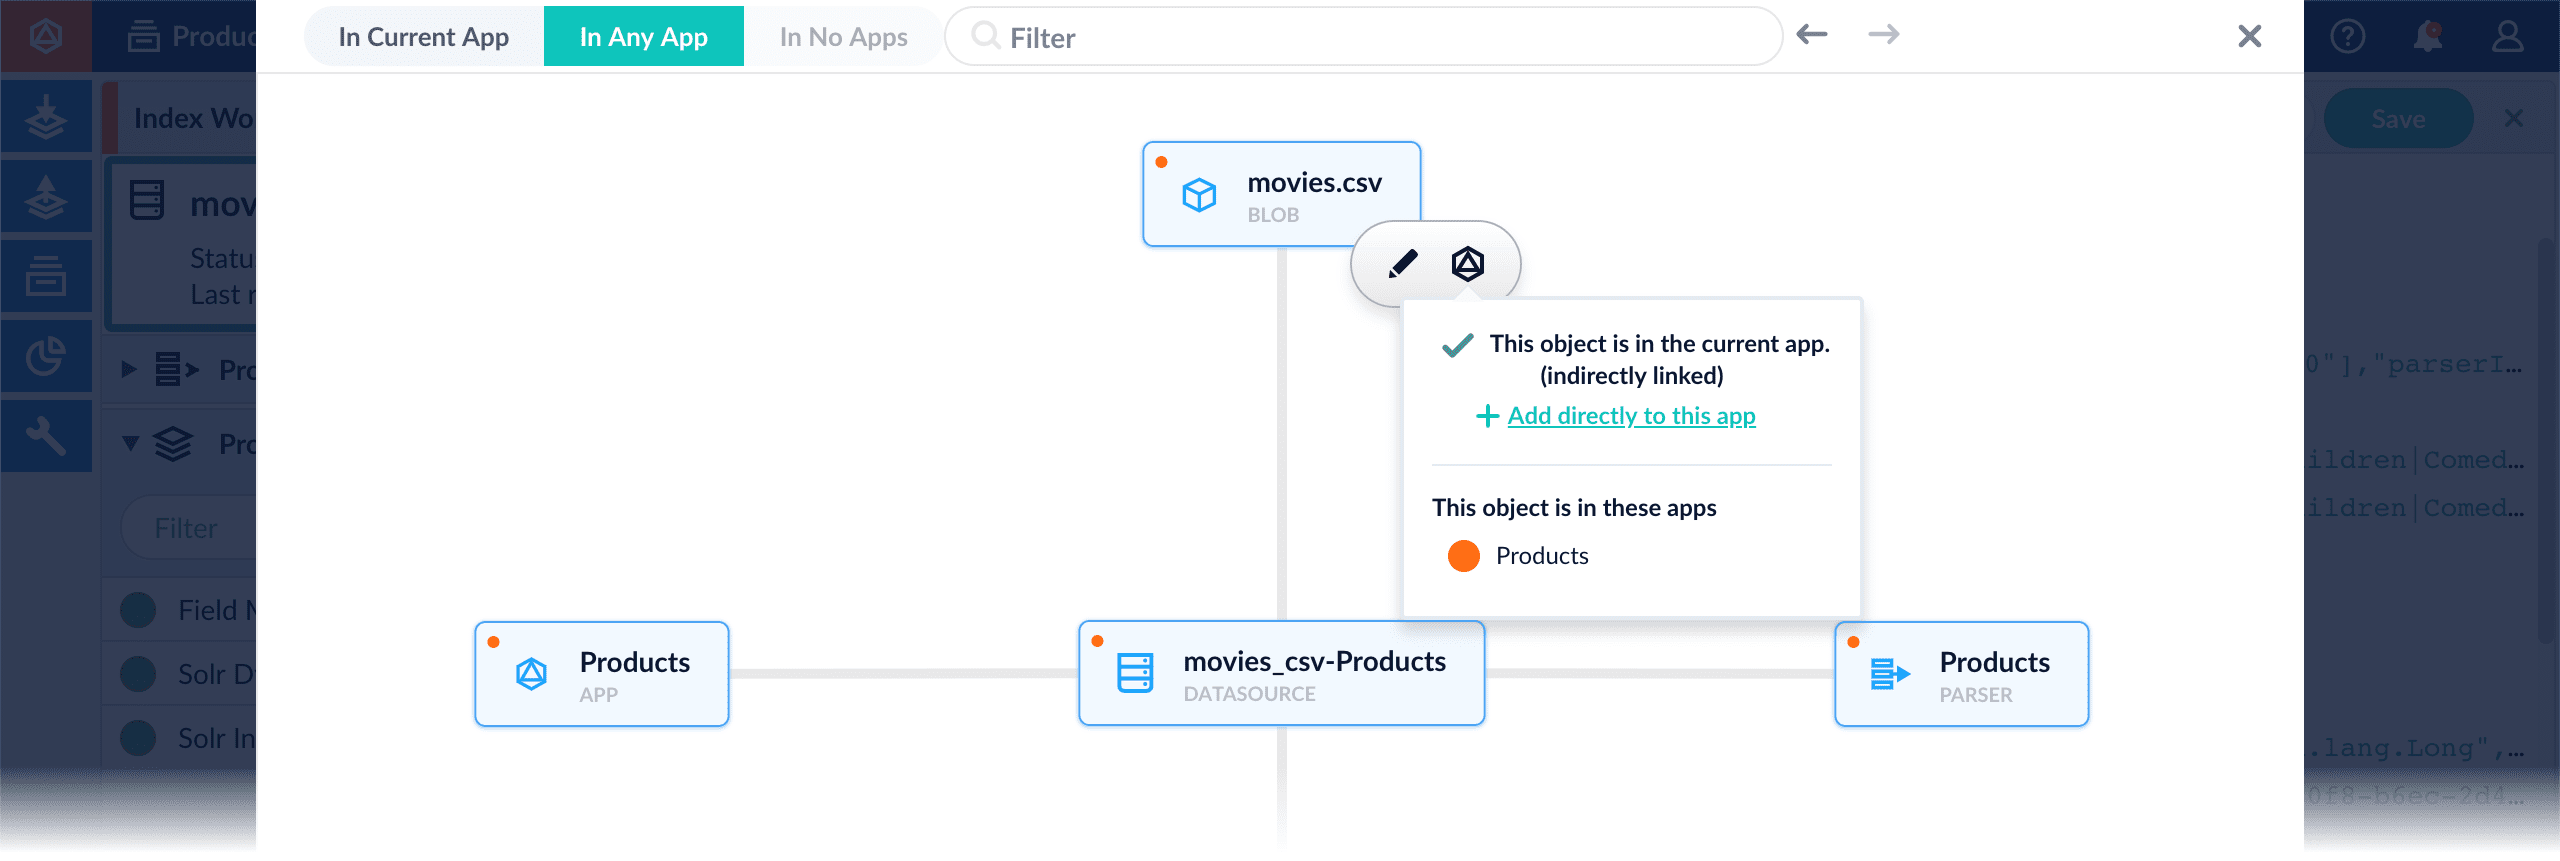 * **Remove an object from an app** – While in the Fusion workspace for the app from which you want to remove an object, open Object Explorer and click **In Any App**. Search for or browse to the object you want to remove. Hover over the object, click the App
  ## Close Object Explorer
On a PC or Mac, press Esc or click Close
## Close Object Explorer
On a PC or Mac, press Esc or click Close  . Alternatively on a Mac, you can press Command ⌘+K.
 The "New Connector Plugin Upload" panel appears.
5. Click **Choose File** and select the downloaded zip file from your file system.
The "New Connector Plugin Upload" panel appears.
5. Click **Choose File** and select the downloaded zip file from your file system.
 6. Click **Upload**.
The new connector’s blob manifest appears.
6. Click **Upload**.
The new connector’s blob manifest appears.
 From this screen you can also delete or replace the connector.
 4. Click **Choose File** and select the .jar file from your file system.
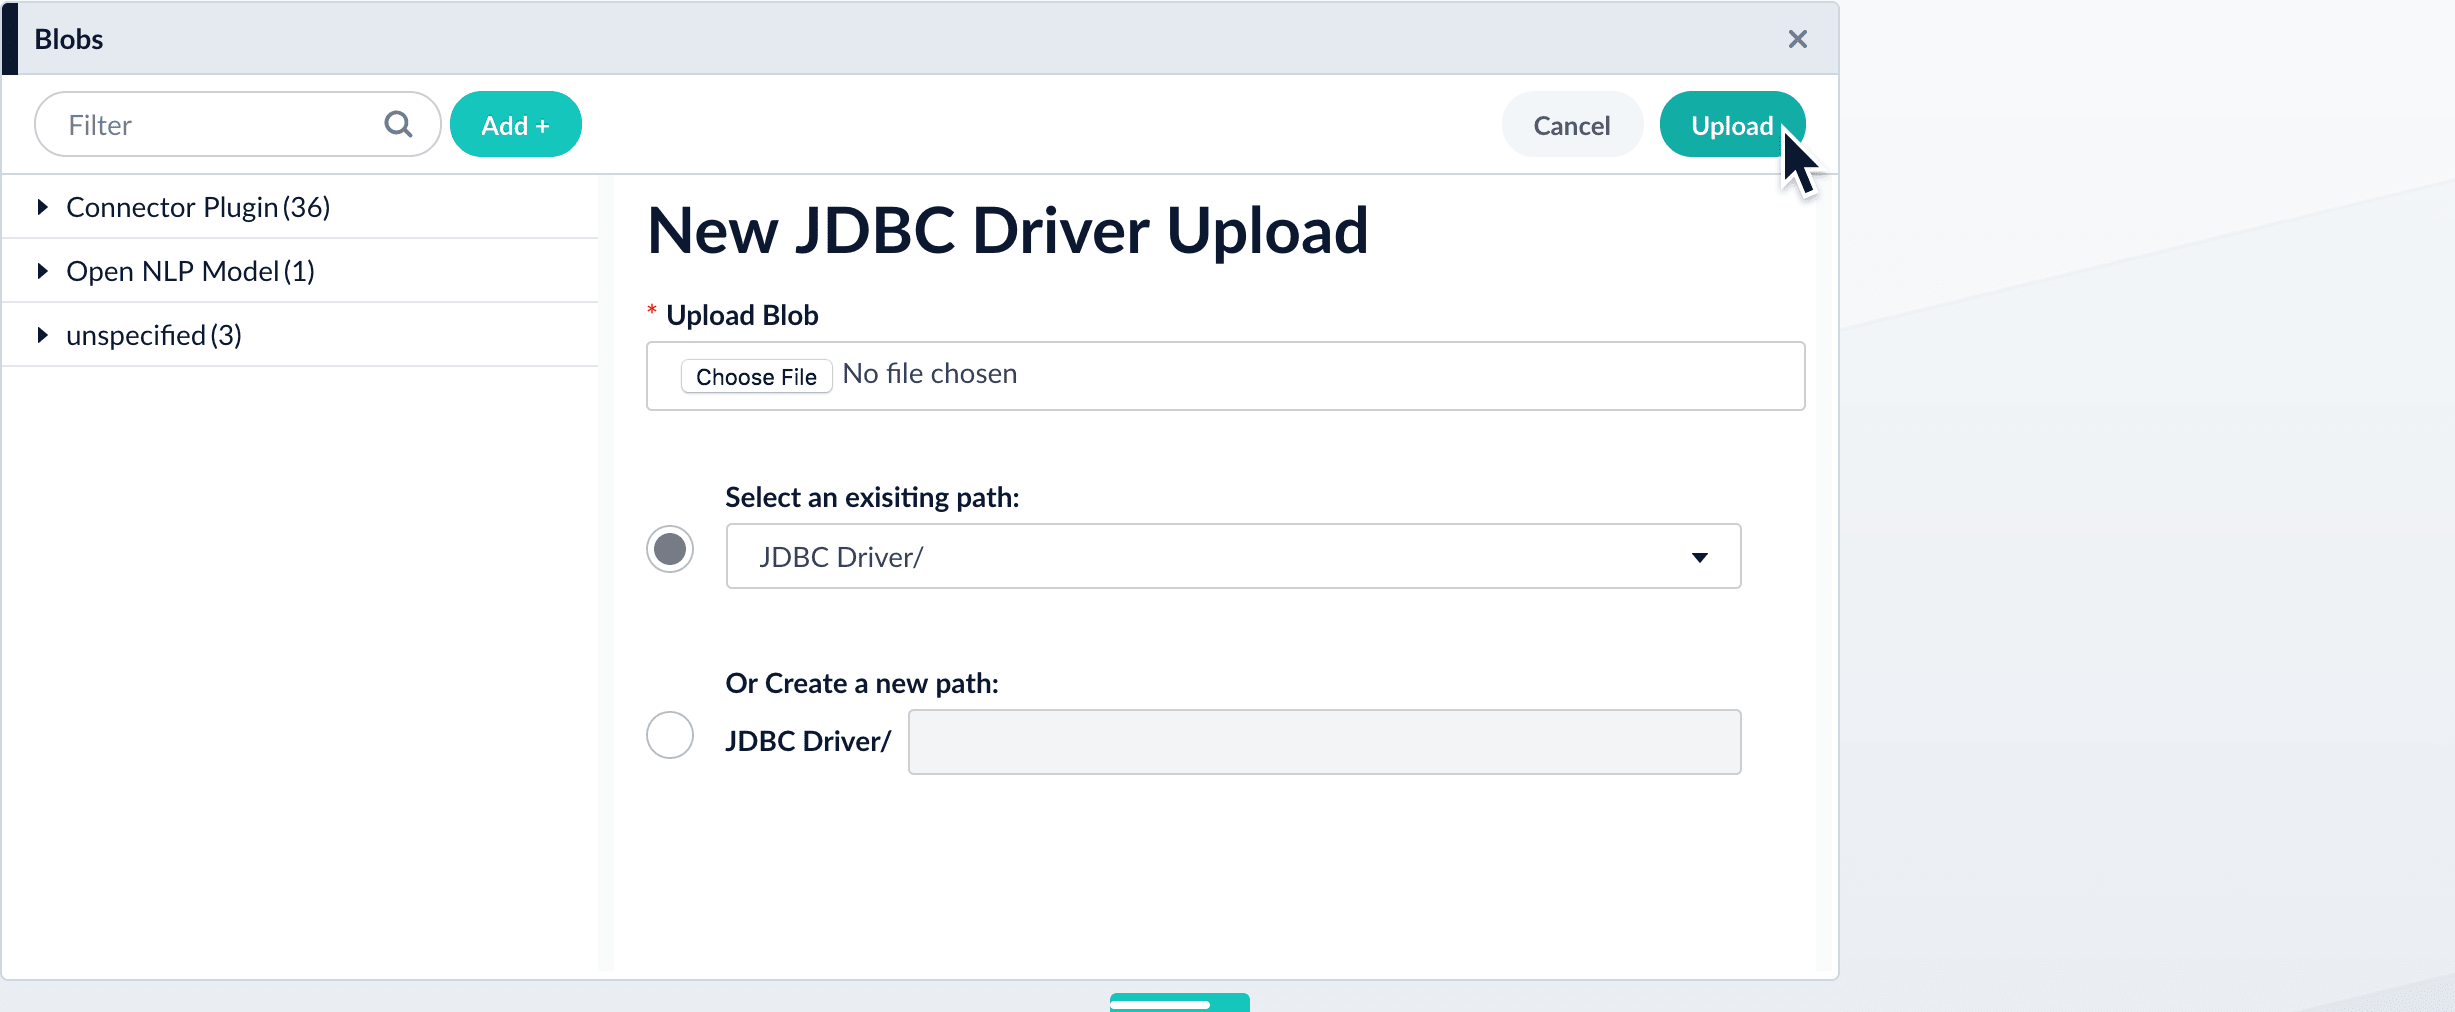 5. Click **Upload**.\
The new driver’s blob manifest appears.
5. Click **Upload**.\
The new driver’s blob manifest appears.
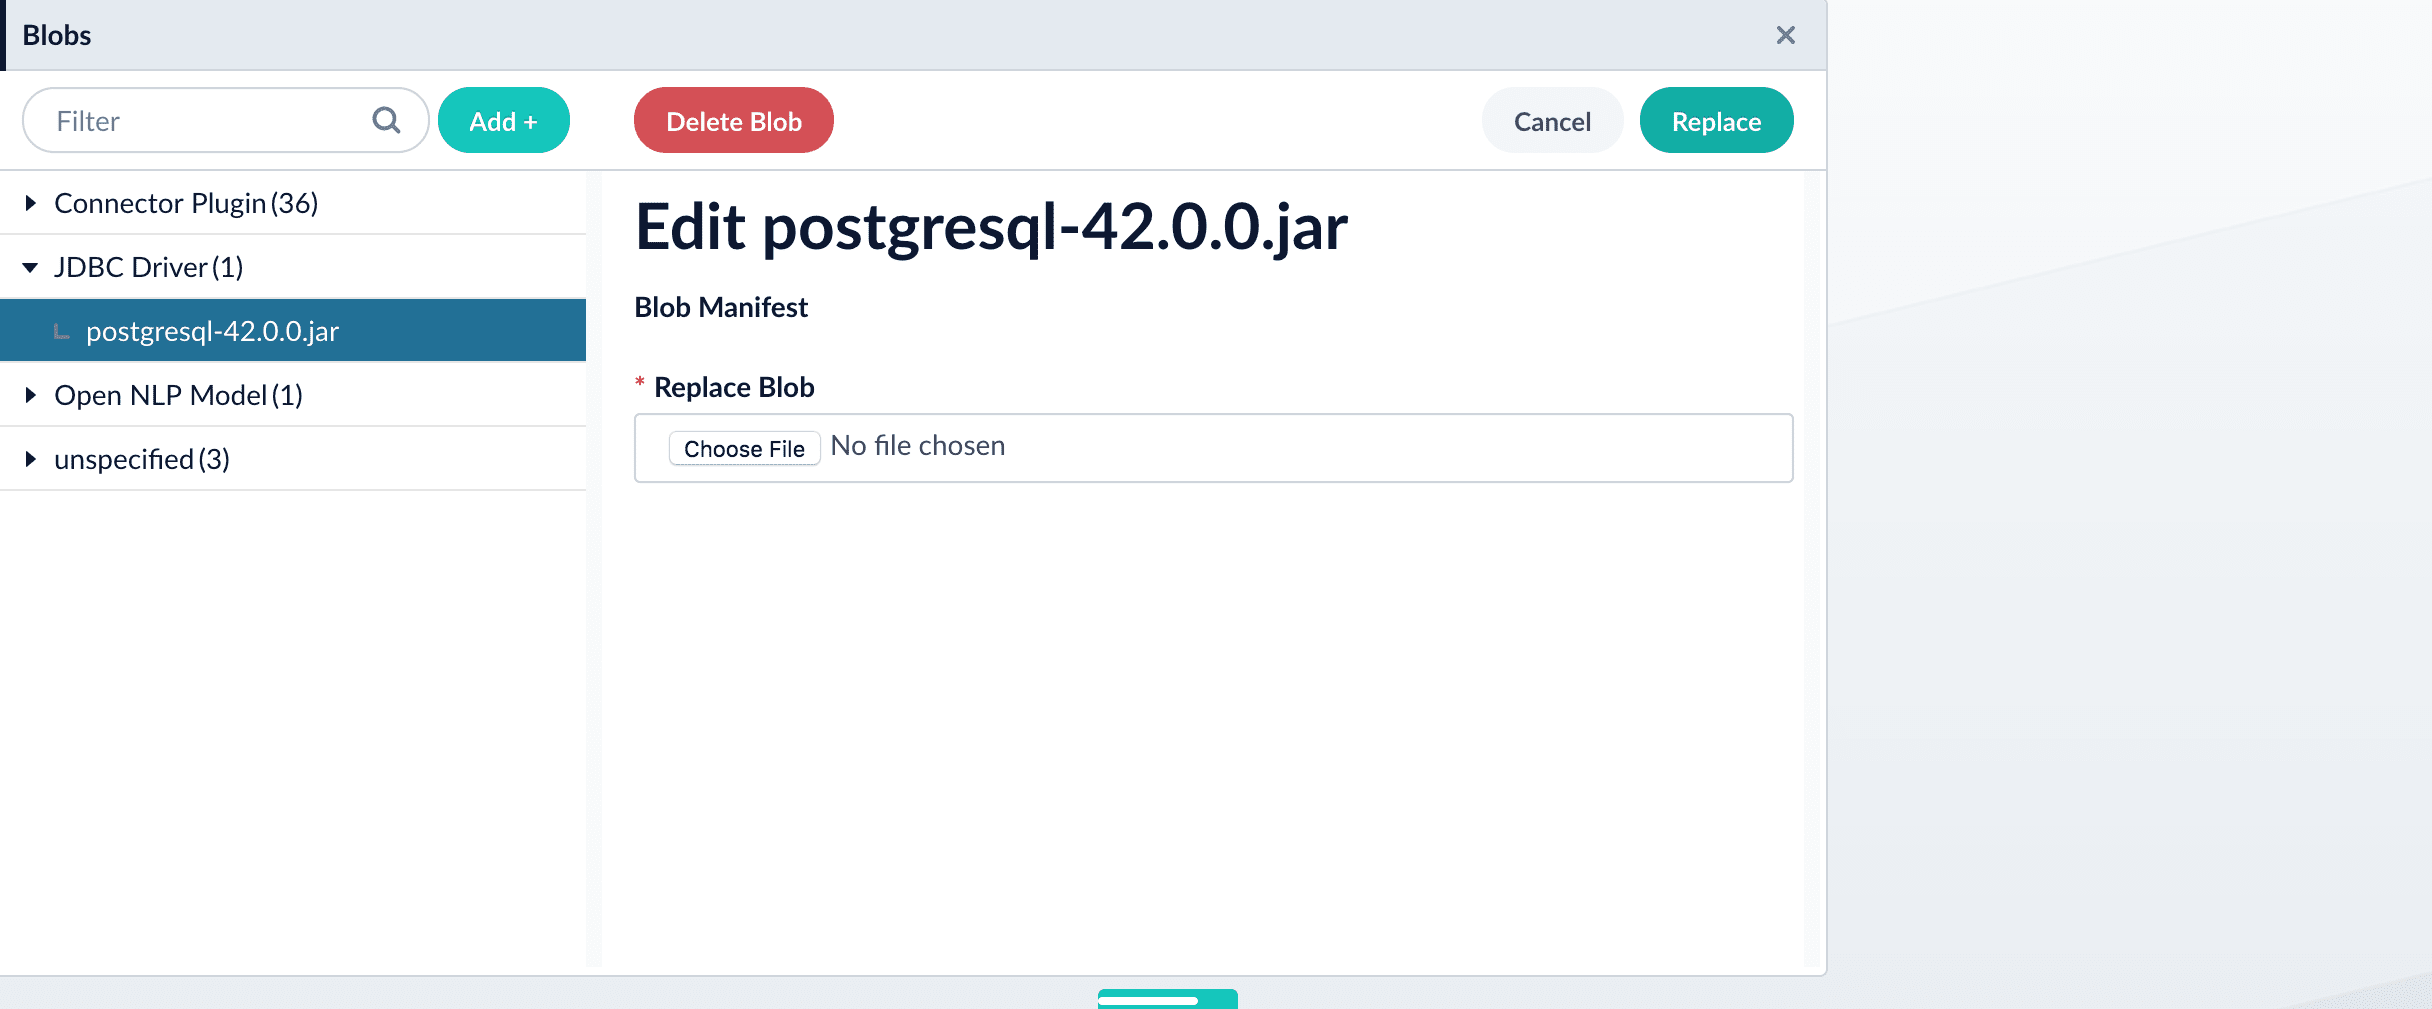 From this screen you can also delete or replace the driver.
## How to install a JDBC driver using the API
1. Upload the JAR file to Fusion’s blob store using the [`/blobs/{id}` endpoint](/docs/5/fusion/dev-portal/api/api-swagger/blob-store-api).
Specify an arbitrary blob ID, and a `resourceType` value of `plugin:connector`, as in this example:
```bash theme={"dark"}
curl -u USERNAME:PASSWORD -H "content-type:application/java-archive" -H "content-length:707261" -X PUT --data-binary @postgresql-42.0.0.jar http://localhost:8764/api/blobs/mydriver?resourceType=driver:jdbc
```
Success response:
```json theme={"dark"}
{
"name" : "mydriver",
"contentType" : "application/java-archive",
"size" : 707261,
"modifiedTime" : "2017-06-09T19:00:48.919Z",
"version" : 0,
"md5" : "c67163ca764bfe632f28229c142131b5",
"metadata" : {
"subtype" : "driver:jdbc",
"drivers" : "org.postgresql.Driver",
"resourceType" : "driver:jdbc"
}
}
```
Fusion automatically publishes the event to the cluster, and the listeners perform the driver installation process on each node.
From this screen you can also delete or replace the driver.
## How to install a JDBC driver using the API
1. Upload the JAR file to Fusion’s blob store using the [`/blobs/{id}` endpoint](/docs/5/fusion/dev-portal/api/api-swagger/blob-store-api).
Specify an arbitrary blob ID, and a `resourceType` value of `plugin:connector`, as in this example:
```bash theme={"dark"}
curl -u USERNAME:PASSWORD -H "content-type:application/java-archive" -H "content-length:707261" -X PUT --data-binary @postgresql-42.0.0.jar http://localhost:8764/api/blobs/mydriver?resourceType=driver:jdbc
```
Success response:
```json theme={"dark"}
{
"name" : "mydriver",
"contentType" : "application/java-archive",
"size" : 707261,
"modifiedTime" : "2017-06-09T19:00:48.919Z",
"version" : 0,
"md5" : "c67163ca764bfe632f28229c142131b5",
"metadata" : {
"subtype" : "driver:jdbc",
"drivers" : "org.postgresql.Driver",
"resourceType" : "driver:jdbc"
}
}
```
Fusion automatically publishes the event to the cluster, and the listeners perform the driver installation process on each node.
 1. Click **Continue**.
On the **Select an App** screen, you can select or create an [app](/docs/4/fusion-server/concepts/overview) for your quickstart data.
1. Click **Continue**.
On the **Select an App** screen, you can select or create an [app](/docs/4/fusion-server/concepts/overview) for your quickstart data.
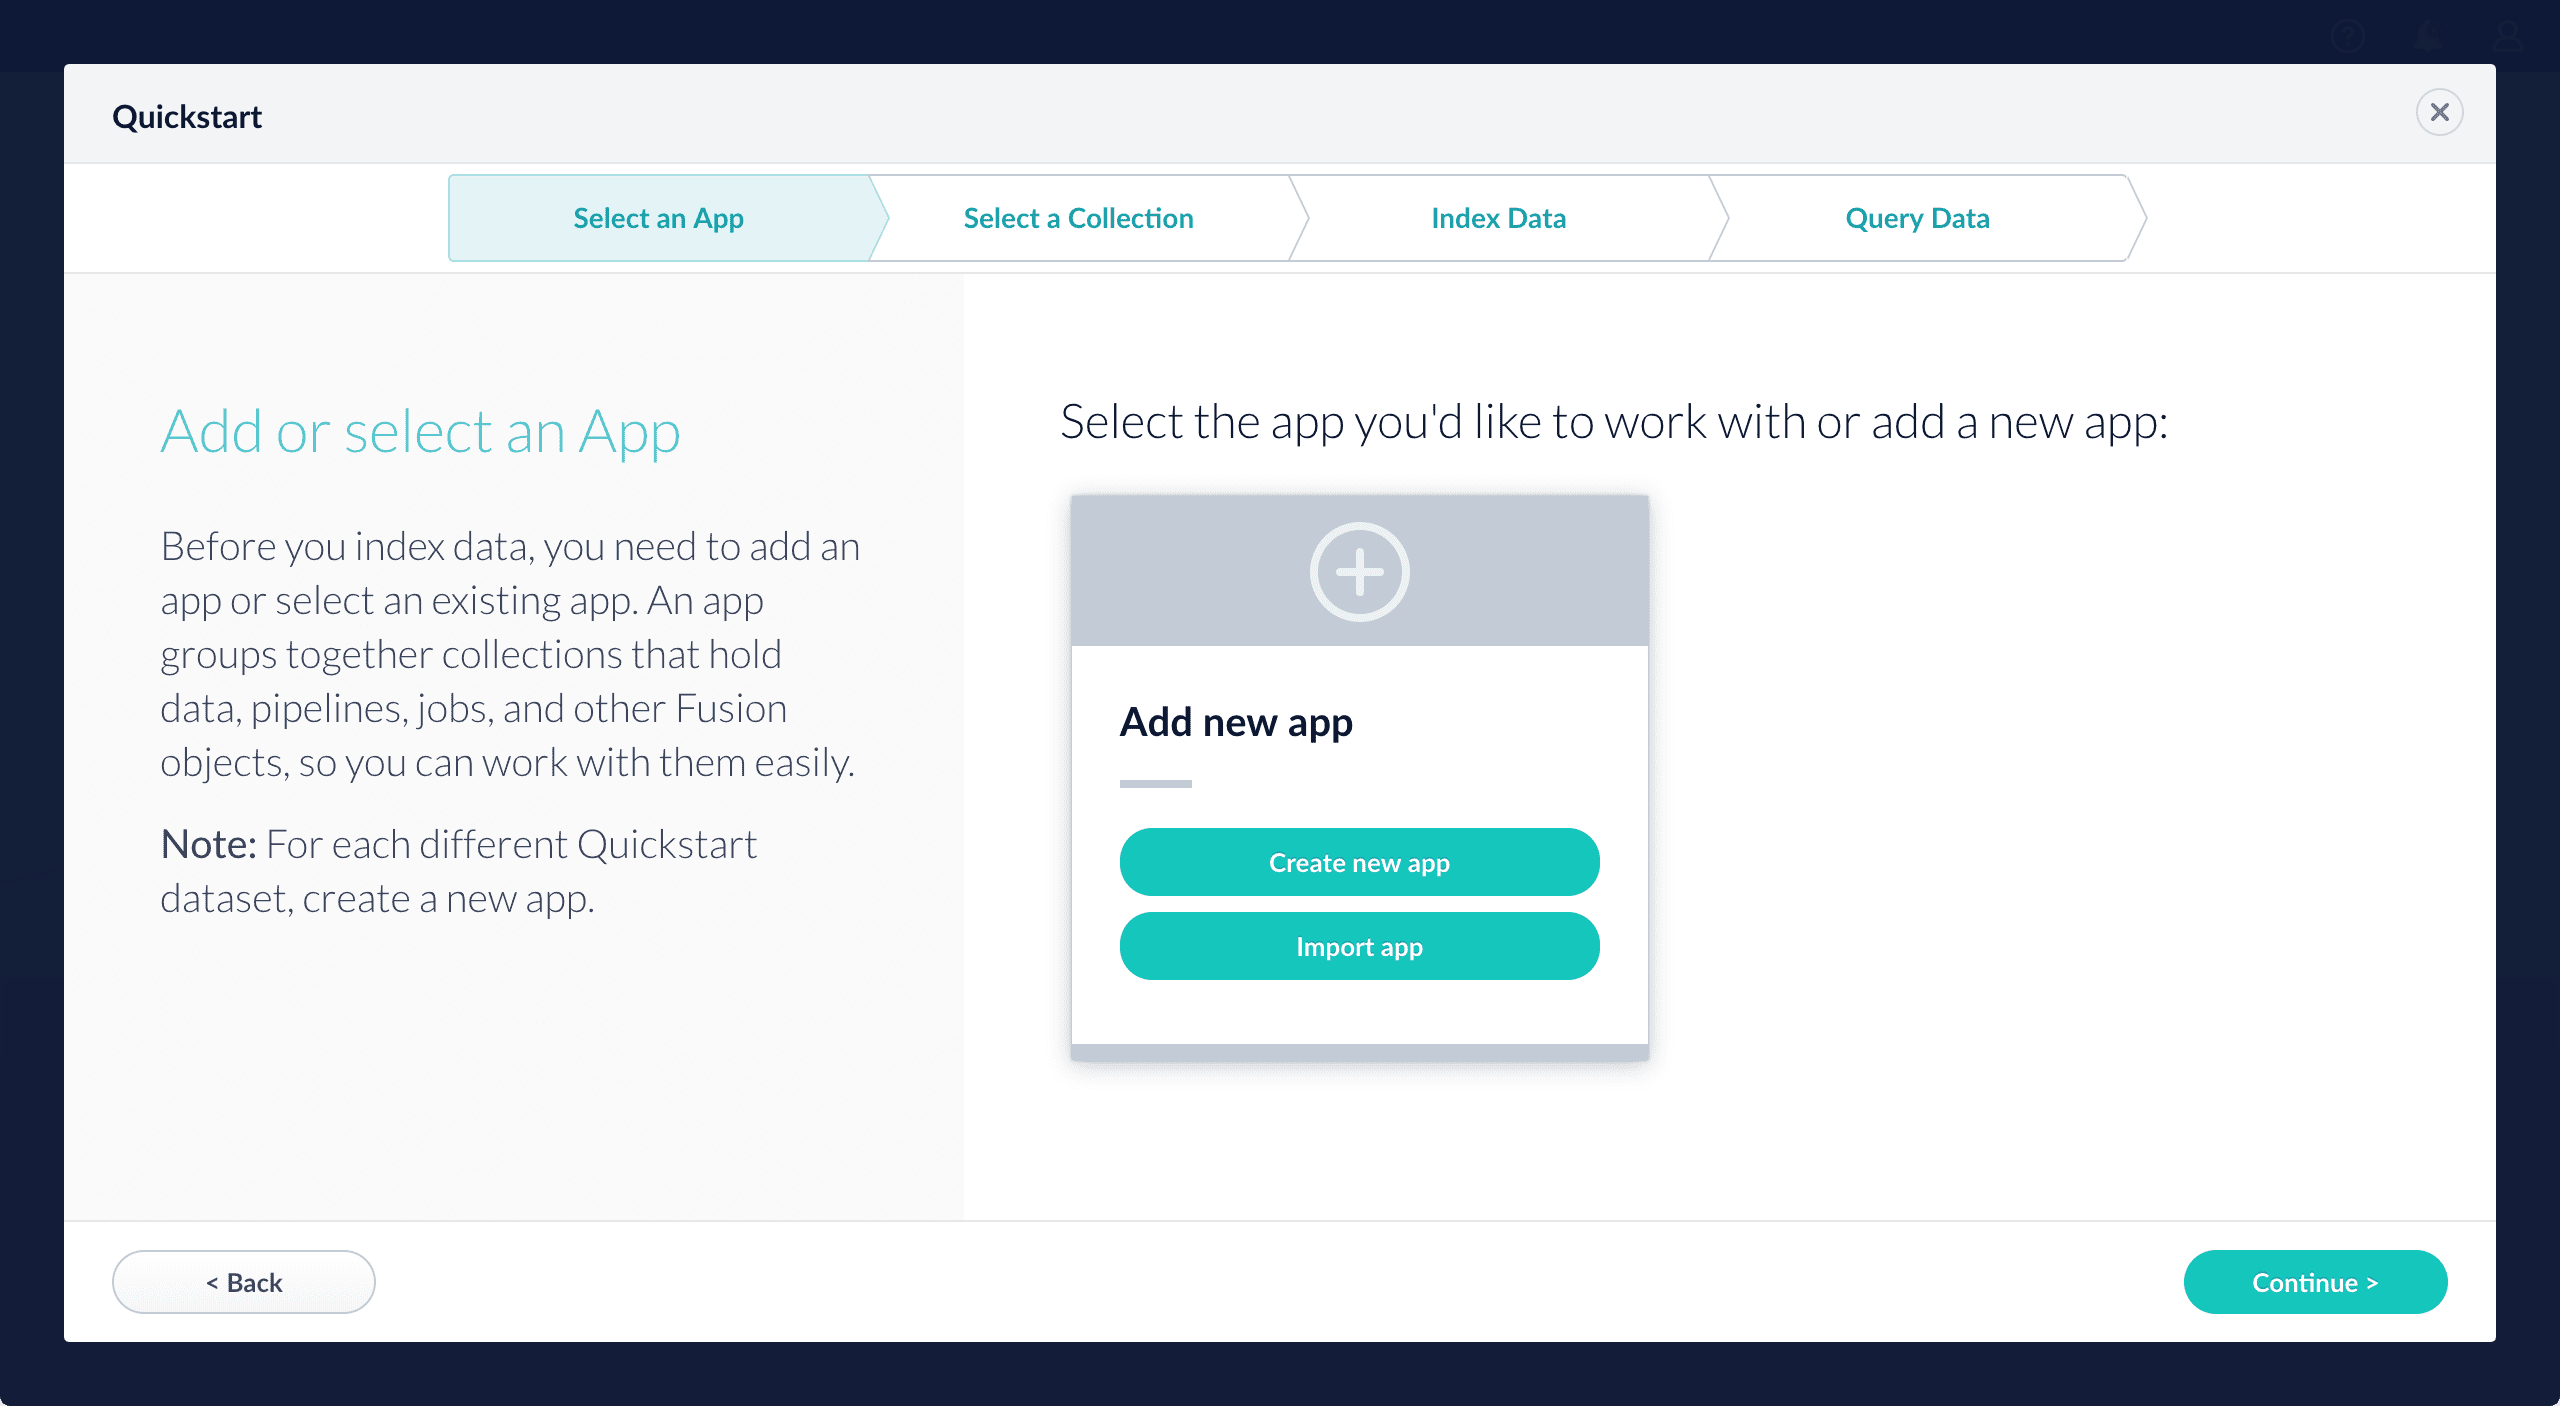 If you click **Create new app**, Fusion prompts you to enter an app name (and optionally a description), then click **Create App** to return to the Quickstart. Your new app is selected by default.
2. After selecting an app, click **Continue**.
On the **Select a Collection** screen, you can select or create a [collection](/docs/4/fusion-server/concepts/overview) for your quickstart data. A collection with the same name as your app is created automatically:
If you click **Create new app**, Fusion prompts you to enter an app name (and optionally a description), then click **Create App** to return to the Quickstart. Your new app is selected by default.
2. After selecting an app, click **Continue**.
On the **Select a Collection** screen, you can select or create a [collection](/docs/4/fusion-server/concepts/overview) for your quickstart data. A collection with the same name as your app is created automatically:
 3. Click **Continue**.\
On the **Index Data** screen, you can either select one of the built-in sample datasets or click **Use my data** to upload your own:
3. Click **Continue**.\
On the **Index Data** screen, you can either select one of the built-in sample datasets or click **Use my data** to upload your own:
 4. Click **Continue**.\
On the **Query Data** screen, you can see all search results and enter your own search queries to test the indexed dataset. You can also select the display fields or view the parsed documents:
4. Click **Continue**.\
On the **Query Data** screen, you can see all search results and enter your own search queries to test the indexed dataset. You can also select the display fields or view the parsed documents:
 5. Click **Continue**.
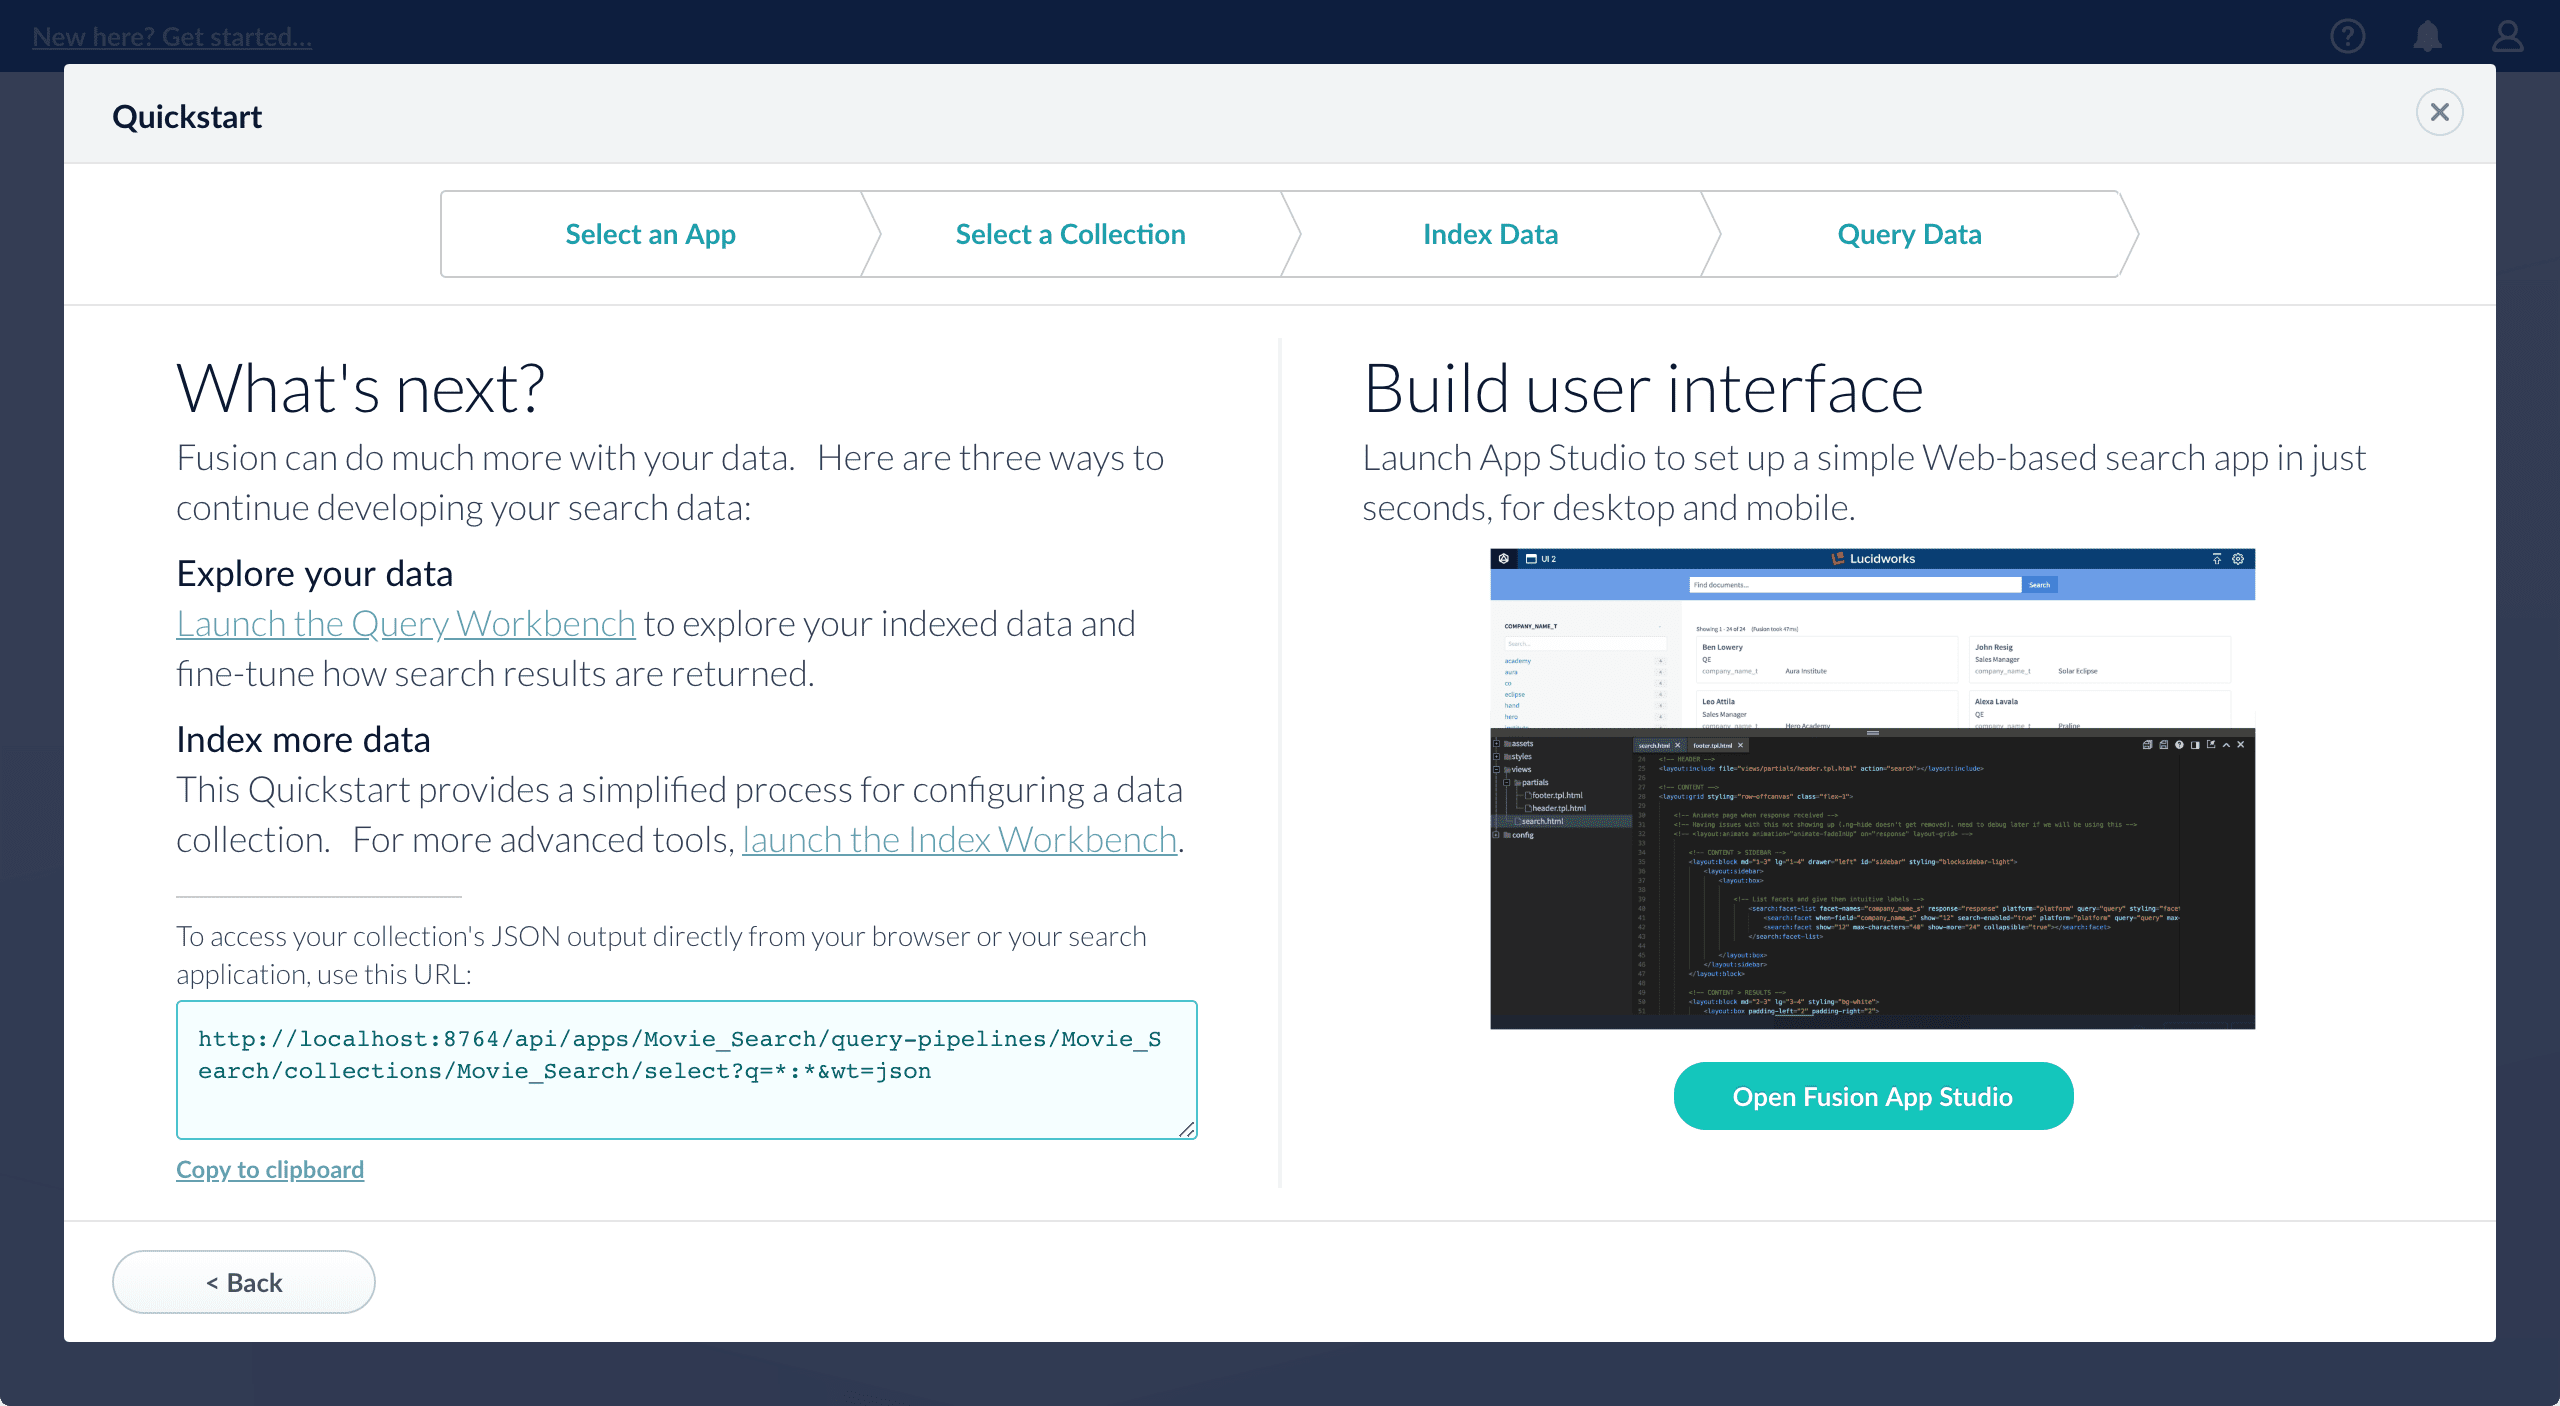 From here, you can do the following:
* Open the Index Workbench to change the index pipeline.
* [Fusion 4.x Index Workbench](/docs/4/fusion-server/concepts/indexing/datasources/index-workbench)
* [Fusion 5.x Index Workbench](/docs/5/fusion/intro/ui-tour/index-workbench)
* Open the Query Workbench to change the query pipeline.
* [Fusion 4.x Query Workbench](/docs/4/fusion-server/concepts/querying/query-workbench)
* [Fusion 5.x Query Workbench](/docs/5/fusion/getting-data-out/query-basics/query-workbench)
The workbenches are essentials tools in the Fusion workflow.
* Open [App Studio](/docs/4/app-studio/overview) to create a user interface for searching this collection.
From here, you can do the following:
* Open the Index Workbench to change the index pipeline.
* [Fusion 4.x Index Workbench](/docs/4/fusion-server/concepts/indexing/datasources/index-workbench)
* [Fusion 5.x Index Workbench](/docs/5/fusion/intro/ui-tour/index-workbench)
* Open the Query Workbench to change the query pipeline.
* [Fusion 4.x Query Workbench](/docs/4/fusion-server/concepts/querying/query-workbench)
* [Fusion 5.x Query Workbench](/docs/5/fusion/getting-data-out/query-basics/query-workbench)
The workbenches are essentials tools in the Fusion workflow.
* Open [App Studio](/docs/4/app-studio/overview) to create a user interface for searching this collection.