> ## Documentation Index
> Fetch the complete documentation index at: https://doc.lucidworks.com/llms.txt
> Use this file to discover all available pages before exploring further.
# Fusion Server
export const LwTemplate = ({title = "Key questions to get you started", icon = "sparkles", cta = "Powered by Agent Studio", linkHref = "https://lucidworks.com/demo/?utm_source=docs&utm_medium=referral&utm_campaign=docs_cta_ai"}) => {
const [isLoaded, setIsLoaded] = useState(false);
useEffect(() => {
const timer = setTimeout(() => {
setIsLoaded(true);
}, 500);
return () => clearTimeout(timer);
}, []);
return
{isLoaded && `
}} />}
Powered by Lucidworks Agent Studio
;
};
[localhost link]: http://localhost:3000/docs/4/fusion-server/overview
[mintlify link]: https://doc.lucidworks.com/docs/4/fusion-server/overview
[old doc.lw link]: https://doc.lucidworks.com/fusion-server/4.2/8764
Fusion Server combines the Apache Solr open source search engine with the distributed power of Apache Spark for artificial intelligence. Highly scalable, Fusion Server indexes and stores data for real-time discovery.
* Index billions of records of any type, from any data source
* Process thousands of queries per second from thousands of concurrent users
* Conduct full-text search using standard SQL capabilities and powerful analytics
To learn about the latest Fusion features and changes, see the [Fusion release notes](/docs/4/fusion-ai/release-notes/overview).
## Key Concepts
Fusion’s ecosystem allows you to manage and access your data in an intuitive fashion.
See [Concepts](/docs/4/fusion-server/concepts/overview) for more information.
### Apache Solr
Solr is the fast open source search platform built on Apache Lucene™ that provides scalable indexing and search, as well as faceting, hit highlighting, and advanced analysis/tokenization capabilities. Solr and Lucene are managed by the [Apache Software Foundation](http://www.apache.org/).
For more information, see the [Solr Reference Guide](/docs/4/fusion-server/reference/solr-reference-guide/overview) for your Fusion release.
### Apache Spark
[Apache Spark](http://spark.apache.org/) is an open source cluster-computing framework that serves as a fast and general execution engine for large-scale data processing jobs that can be decomposed into stepwise tasks, which are distributed across a cluster of networked computers.
Spark improves on previous MapReduce implementations by using resilient distributed datasets (RDDs), a distributed memory abstraction that lets programmers perform in-memory computations on large clusters in a fault-tolerant manner.
See [Apache Spark](/docs/4/fusion-server/concepts/spark/overview) for more information.
### Connectors
Connectors are the out-of-the-box components for pulling your data into Fusion. Lucidworks provides a wide variety of connectors, each specialized for a particular data type. When you add a [datasource](/docs/4/fusion-server/concepts/indexing/datasources/overview) to a
[collection](/docs/4/fusion-server/concepts/indexing/collections/overview), you specify the connector to use for ingesting data.
Connectors are distributed separately from Fusion Server. For complete information, see [Fusion Connectors](/docs/fusion-connectors/overview).
Fusion offers dozens of connectors so you can access your data from a large variety of sources.
To learn more about Fusion connectors, see [connectors concepts](/docs/4/fusion-server/concepts/indexing/connectors/overview) or the [connectors section](/docs/fusion-connectors/overview).
### Pipelines
Pipelines dictate how data flows through Fusion and becomes accessible by a search application. Fusion has two types of pipelines: index pipelines and query pipelines.
[Index pipelines](/docs/4/fusion-server/concepts/indexing/overview) ingest data, indexes it, and stores it in a format that is optimized for searching.
[Query pipelines](/docs/4/fusion-server/concepts/querying/pipelines/query-pipelines) filter, transform, and augment Solr queries and responses in order to return all and only the most relevant search results.
## How-to Information
Want to start right away?
This tutorial takes you from installation to application-ready search data in four easy parts, using a [MovieLens](https://grouplens.org/datasets/movielens/) dataset.
* Part 1: Run Fusion and Create an App
{/* // tag::get-started-1[] */}
Download, install Fusion, and run Fusion, then create a Movie Search app.
{/* // end::get-started-1[] */}
* Part 2: Get Data In
{/* // tag::get-started-2[] */}
Use the Index Workbench to configure an index pipeline, preview the results, and get data into the Movie Search app in a format that is useful for search.
{/* // end::get-started-2[] */}
* Part 3: Get Data Out
{/* // tag::get-started-3[] */}
Use Query Workbench to get data out of the Movie Search app, explore the role of query pipeline stages, configure faceting, and preview search results.
{/* // end::get-started-3[] */}
* Part 4: Improve Relevancy
{/* // tag::get-started-4[] */}
Use signals and boosting to make search results more relevant.
{/* // end::get-started-4[] */}
Looking to upgrade your Fusion instance?
When you have a Fusion-based search application running, at some point it might be necessary to upgrade to a later version of Fusion. We provide a migrator tool to simplify the upgrade process.
See the [release history](/docs/4/fusion-server/release-notes/4.2.0-release-notes) to find out what is new, including which versions of Solr, Spark, and ZooKeeper are bundled with each Fusion release.
The migrator transfers over *most* of the objects that make up your search application, all configurations and customizations for your application, and all data in collections in the application.
In some cases, manual steps are required for objects that the migrator cannot handle automatically. We give you instructions and guidance about what might be required. You should also review the log of the upgrade in `/opt/fusion/x.y.z/var/upgrade/tmp/migrator.log` (on Unix) or `C:\lucidworks\var\fusion\x.y.z\upgrade\tmp\migrator.log` (on Windows). The x.y.z directory is for the Fusion version that you are migrating *from*.
## Key points
Following are some key points about upgrading Fusion:
* **Migration involves down time.** The upgrade process involves multiple starts and stops of Fusion services. Please plan accordingly, especially in terms of disabling external load balancers or monitors that might react adversely to the starts and stops.
* **Current deployment is preserved.** Upgrades preserve the current Fusion deployment, copying information over from the current deployment to the new one. This provides a rapid roll-back option if you encounter problems during the upgrade process.
* **If the upgrade fails.** If an upgrade fails, there is a procedure for dealing with that.
## Supported upgrade sequences
Only specific version-to-version upgrade sequences are supported. Some upgrades require multiple steps.
These upgrade sequences are supported.
### Upgrades to the current version
* **3.1.x to 4.2.y.** From any 3.1.x version to 4.2.6 SP1 (one step, using the migrator)
* **4.0.x to 4.2.y.** From any 4.0.x version to 4.2.6 SP1 (one step, using the migrator)
* **4.1.x to 4.2.y.** From any 4.1.x version to 4.2.6 SP1 (one step, using the migrator)
For links to these procedures, see [Per-version instruction sets](#per-version-instruction-sets).
### Upgrades to prior versions
Using the migrator:
* **3.1.x to 4.0.y.** From 3.1.5 directly to 4.0.2 (one step)
For more information, see Upgrade Fusion 3.1.x to 4.0.y.
* **4.0.x to 4.0.y.** From 4.0.0 or 4.0.1 to 4.0.2 (one step)
For more information, see Upgrade Fusion Server 4.0.x to 4.0.y.
* **3.1.x to 4.1.y.** From any 3.1.x version to 4.1.3 (one step, using the migrator)
For more information, see Upgrade Fusion Server 3.1.x to 4.1.y.
* **4.0.x to 4.1.y.** From 4.0.2 to 4.1.3 (one step, using the migrator)
For more information, see Upgrade Fusion Server 4.0.x to 4.1.y.
* **4.1.x to 4.1.y.** From 4.1.0 to 4.1.3 (one step, using the migrator)
For more information, see Upgrade Fusion Server 4.1.x to 4.1.y.
### Example
For example, to upgrade from Fusion 3.0.1 to Fusion Server 4.2.5, you would perform the following upgrades (both of them using the migrator):
1. Upgrade from Fusion 3.0.1 to Fusion 3.1.5
2. Upgrade from Fusion 3.1.5 to Fusion Server 4.2.5
## Per-version instruction sets
To upgrade to a later version of Fusion from an existing installation requires
transferring over all configurations and data from your existing Fusion installation to the
new version.
**How to upgrade from Fusion 3.1.x to Fusion Server 4.2.y**
Perform the steps in this article:
**Upgrade from Fusion Server 3.1.x to 4.2.y** - Run a migrator to upgrade from Fusion Server 3.1.x to 4.2.y.
**How to upgrade from Fusion 4.0.x to Fusion Server 4.2.y**
Perform the steps in this article:
**Upgrade from Fusion Server 4.0.x to 4.2.y** - Run a migrator to upgrade from Fusion Server 4.0.x to 4.2.y.
**How to upgrade from Fusion 4.1.x to Fusion Server 4.2.y**
Perform the steps in this article:
**Upgrade from Fusion Server 4.1.x to 4.2.y** - Run a migrator to upgrade from Fusion Server 4.1.x to 4.2.y.
**How to upgrade from Fusion 4.2.x to Fusion Server 4.2.y**
Perform the steps in this article:
**Upgrade from Fusion Server 4.2.x to 4.2.y** - Run a migrator to upgrade from Fusion Server 4.2.x to 4.2.y.
## Important Reference Information
Our reference section includes information on [Fusion’s API](/docs/4/fusion-server/reference/api/overview), [index pipelines stages](/docs/4/fusion-server/reference/pipeline-stages/indexing/overview), [query pipelines stages](/docs/4/fusion-server/reference/pipeline-stages/query/overview), [connections](/docs/fusion-connectors/connectors/overview), and more.
See [Reference](/docs/4/fusion-server/reference/overview) for complete reference information.
## Learn more
## Create an app
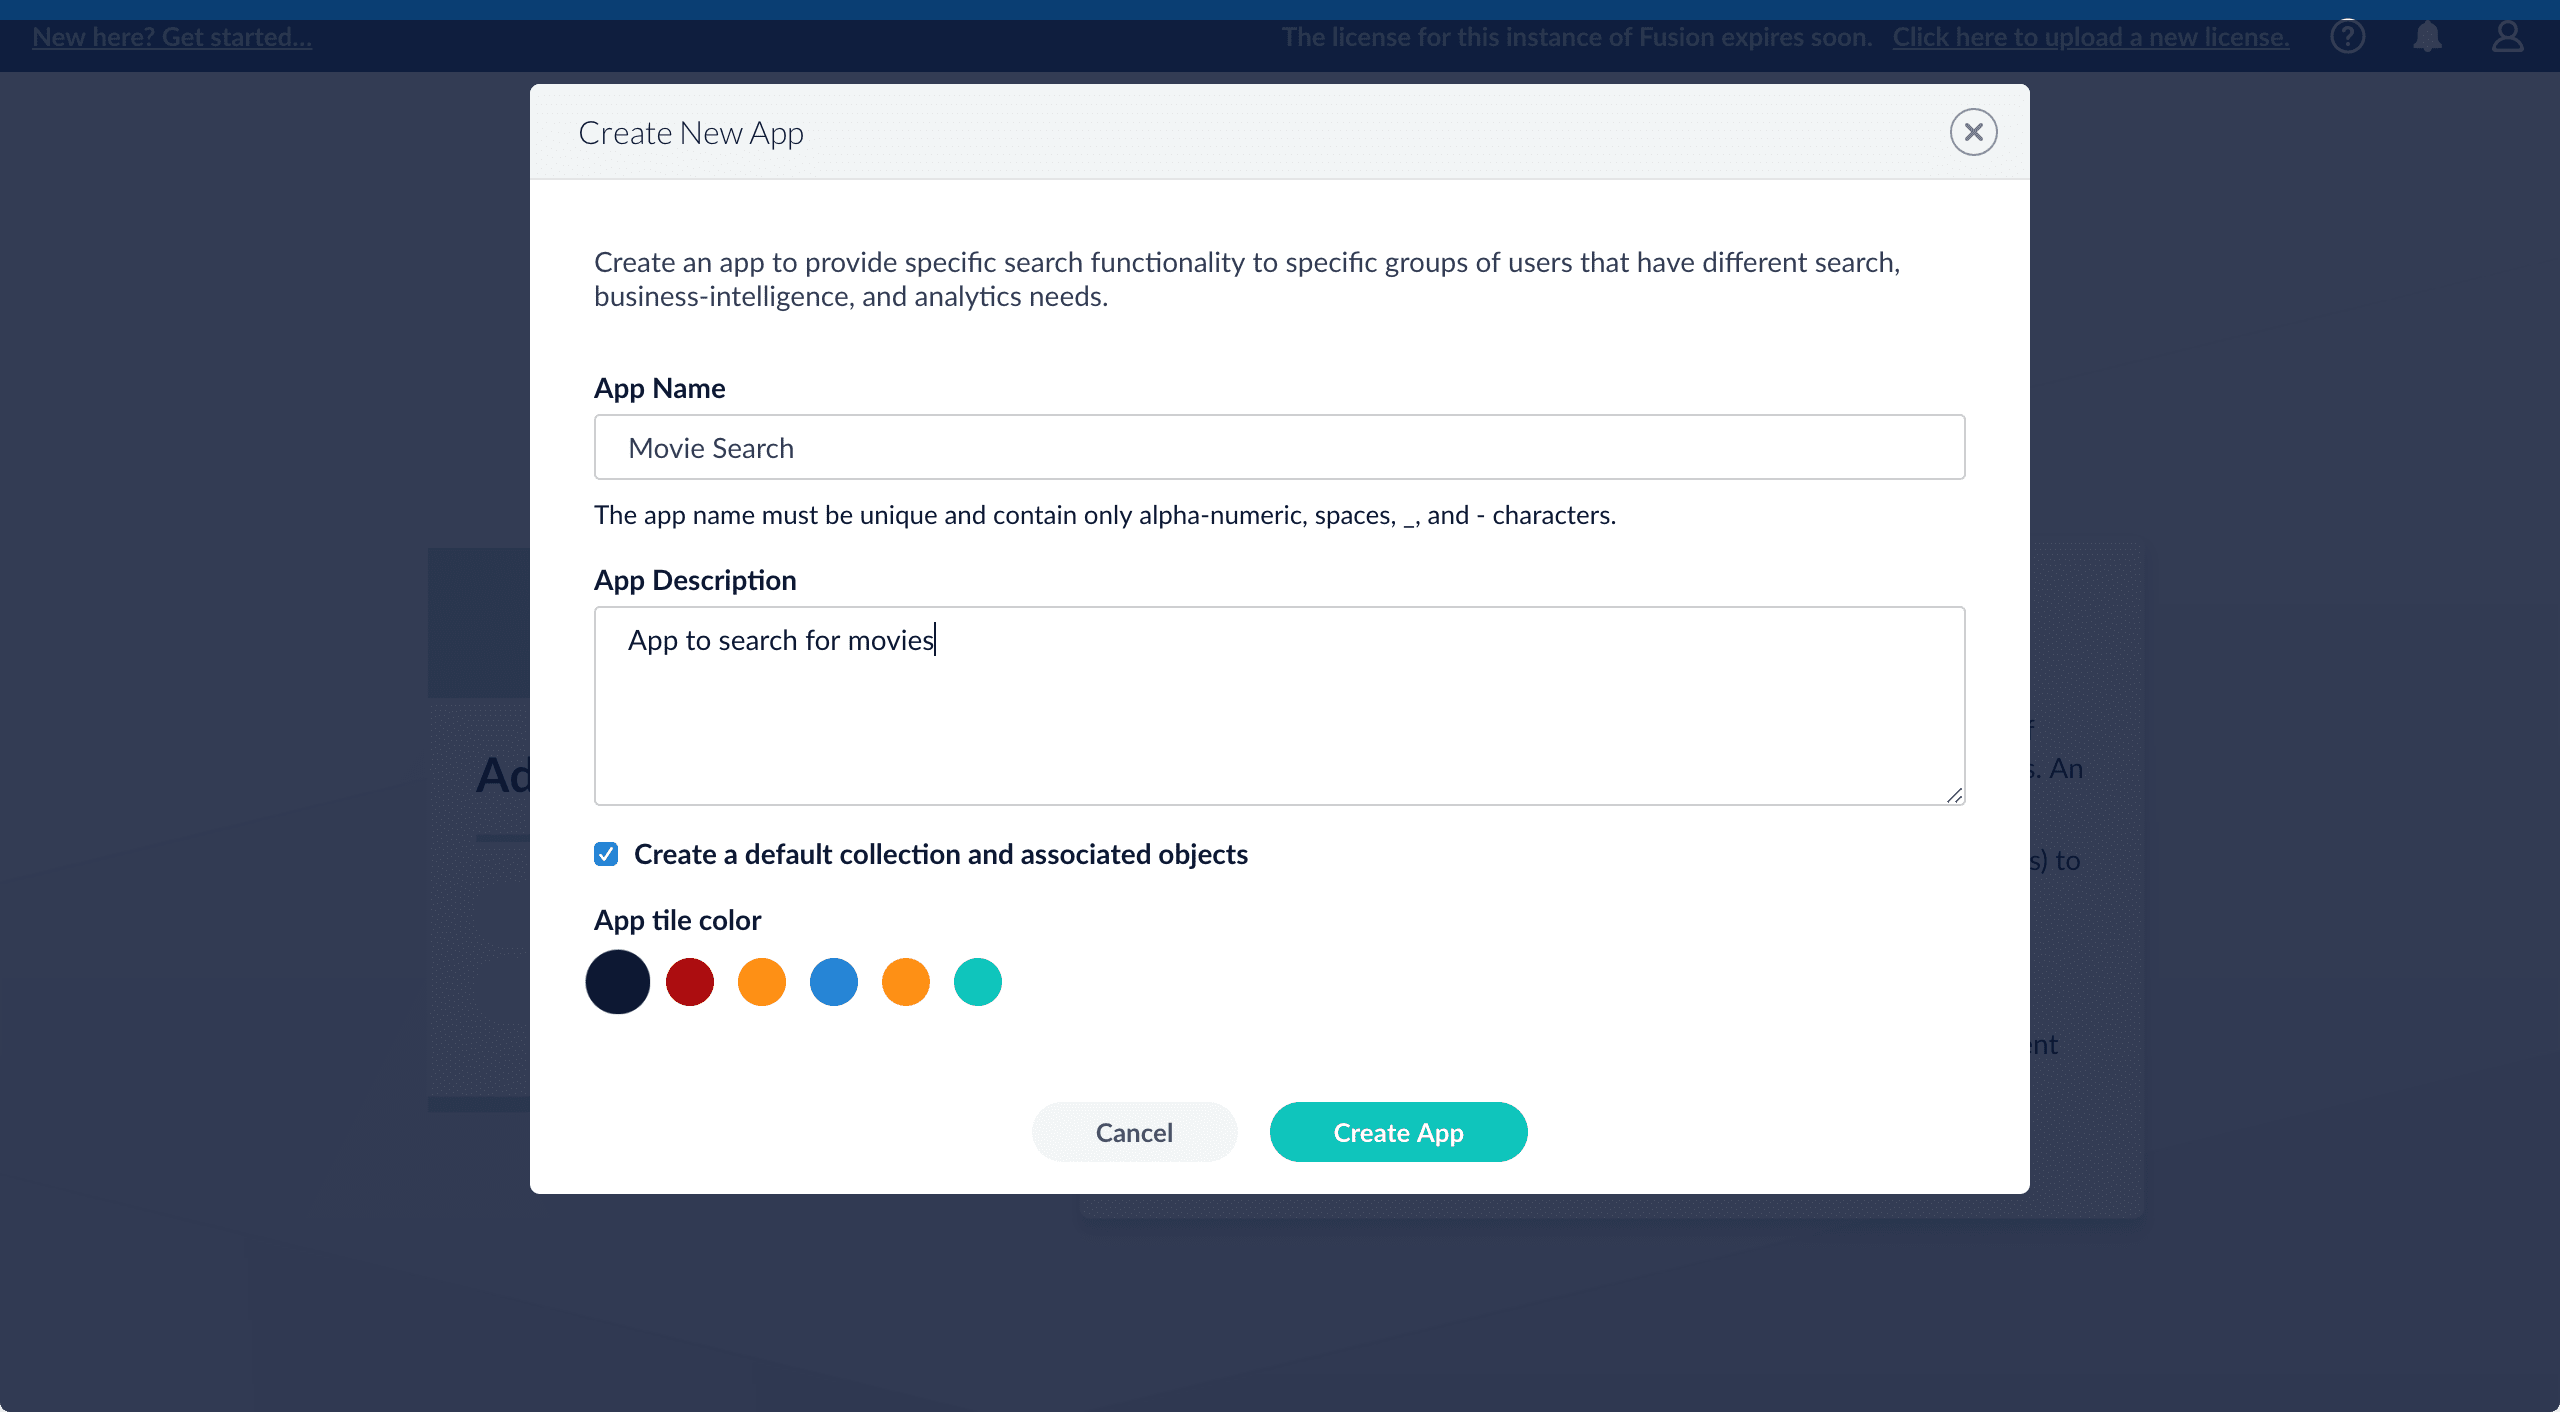
Create a Movie Search app. An app is a set of Fusion objects that performs a specific searching task (such as searching for movies).
1. In the Fusion launcher, click **Create new app**.
2. In the **App Name** field, enter `Movie Search`.
3. In the **App Description** field, enter `App to search for movies`.
4. Click **Create App**.
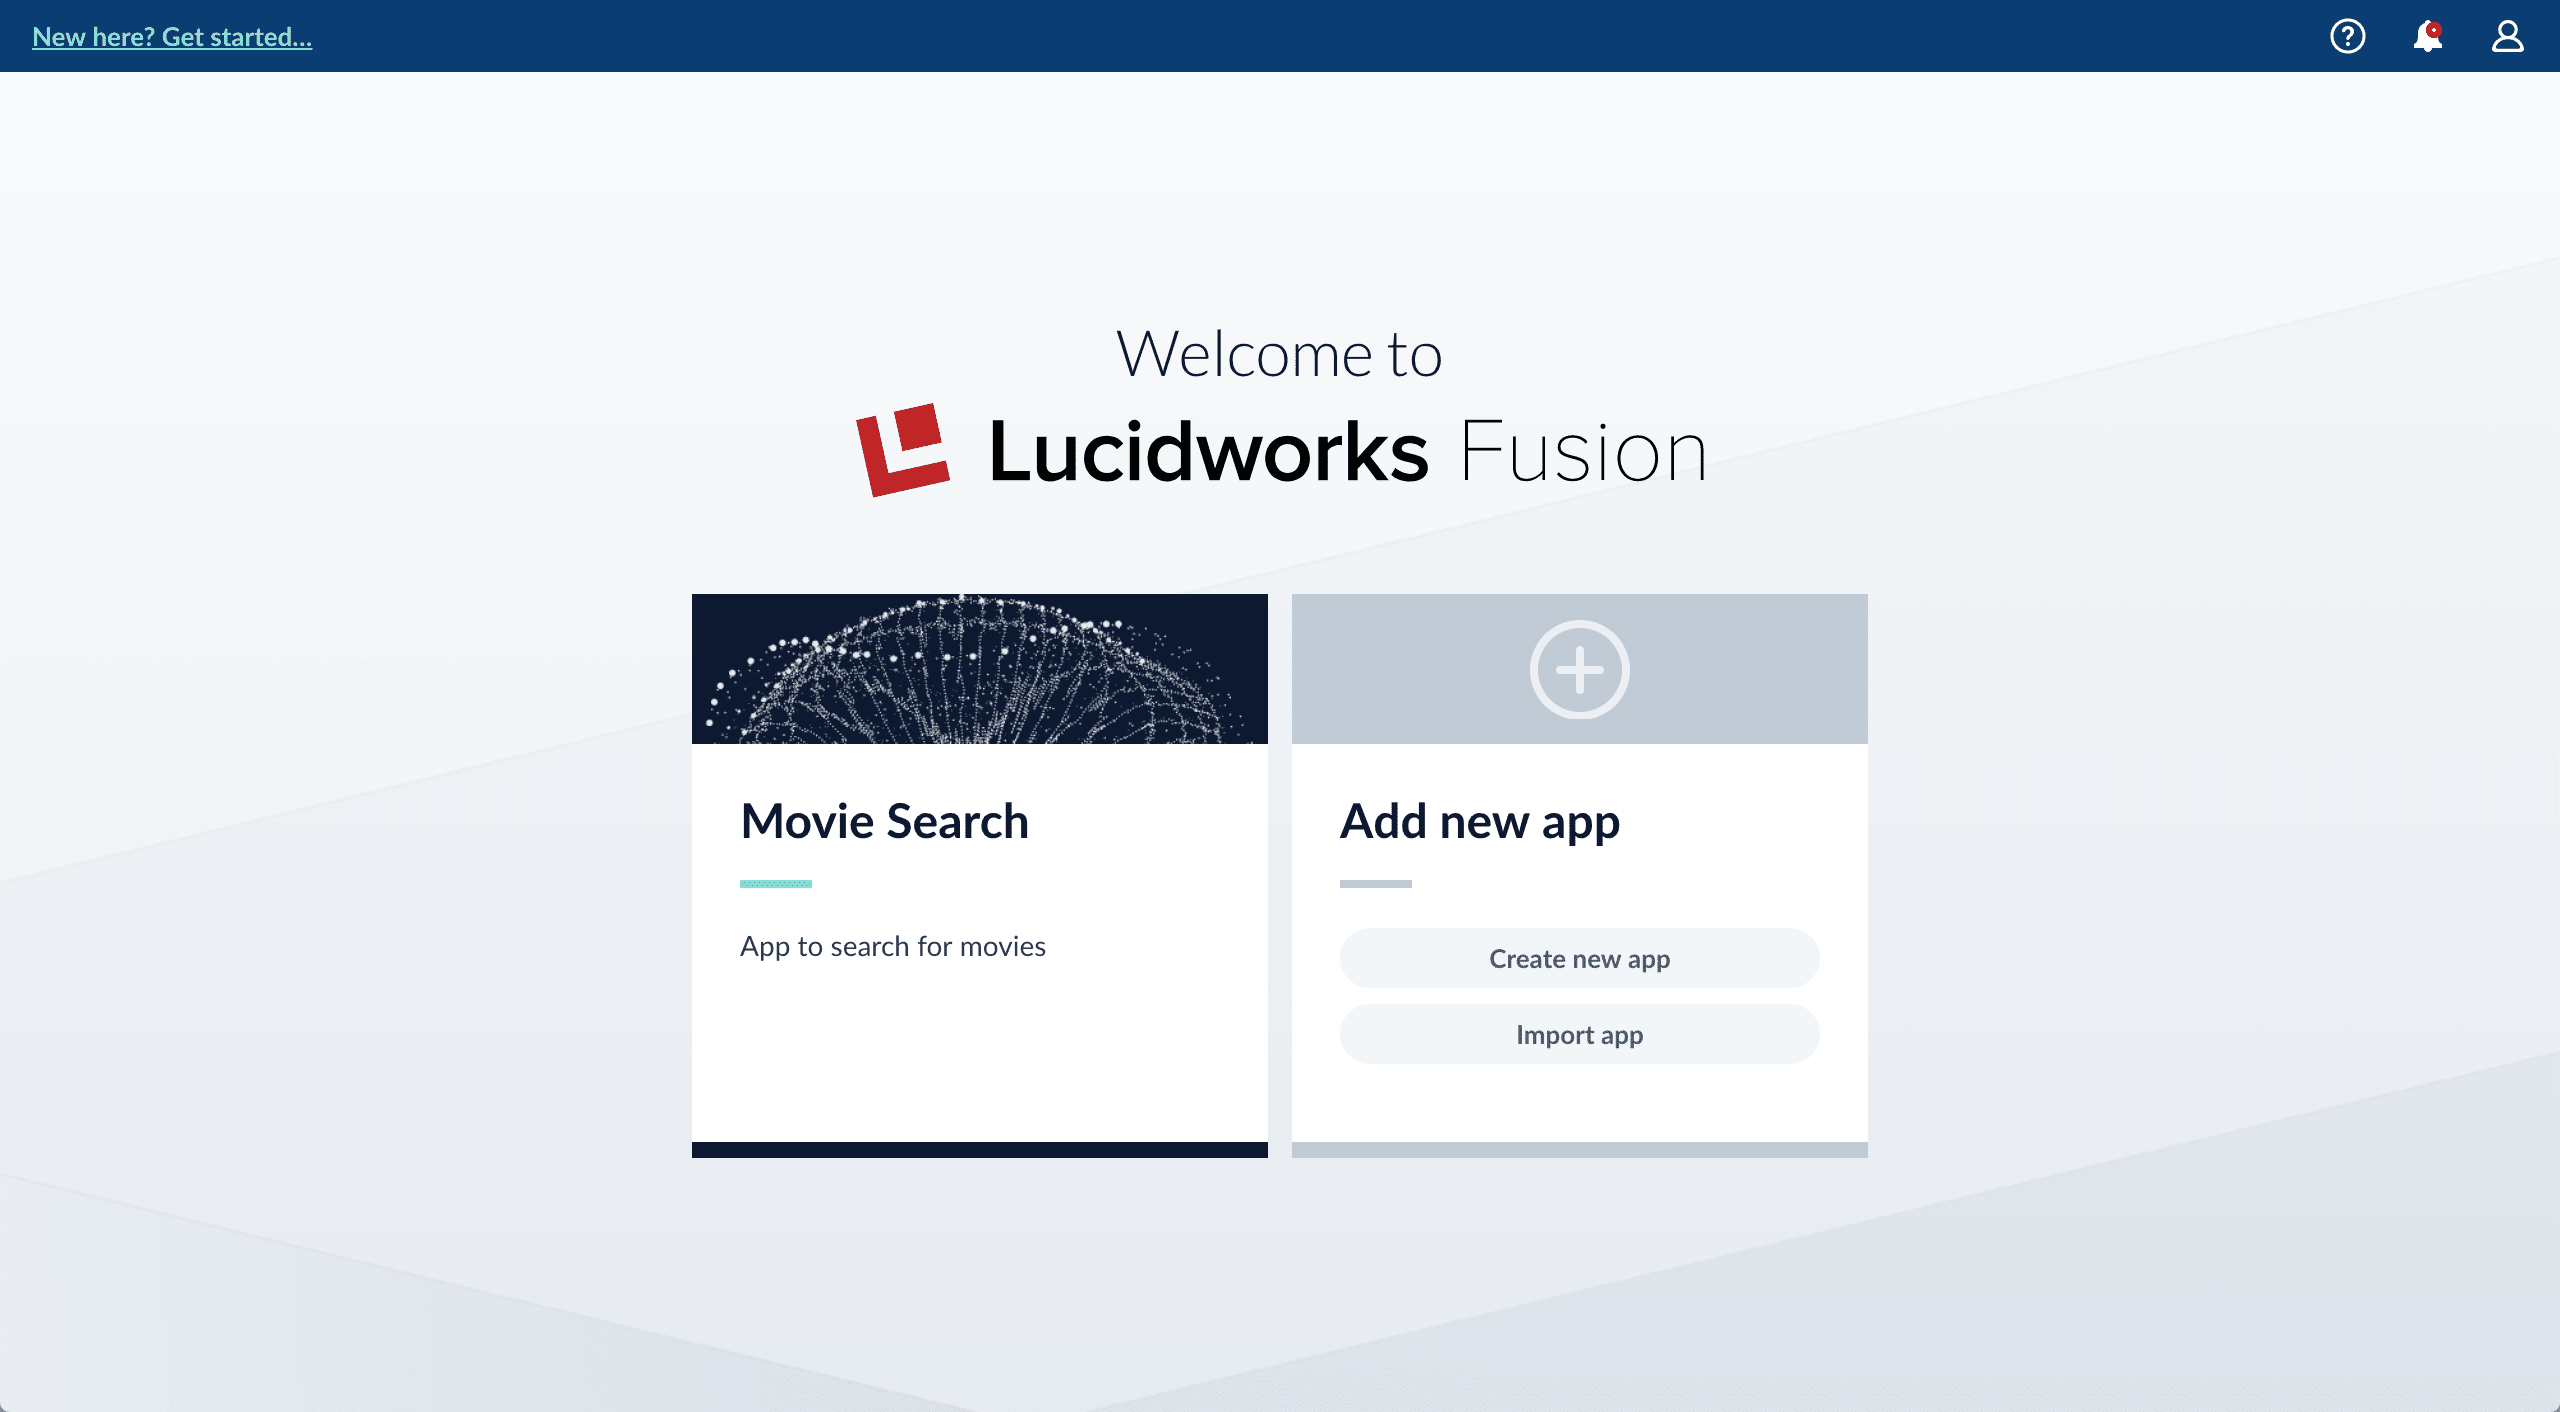
The Movie Search app now appears in the Fusion launcher:
You now have Fusion installed, configured, and running. You also have the MovieLens dataset from which you will use a CSV file that contains data about movies. And you have a Fusion app that you will transform into a movie search app.
You used Index Workbench to get data into Fusion by previewing the dataset, configuring the index pipeline, and then indexing the data.
Now you will explore Query Workbench and learn how to configure Fusion’s output (search results), including faceting. Facets are the ubiquitous, dynamic lists of categories or features offered as filters within a search results page.
## Before you begin
The dataset has three fields that users of your search application might find relevant:
* `genres_ss`. A list of one or more genre labels
* `title_txt`. The name of the movie
* `year_i`. The movie’s year of release
The field suffixes indicate the type of data stored in each field:
* Fields with the suffix `_ss` (multi-valued string fields) contain one or more strings values.
String fields require an exact match between the query string and the
string value stored in that field.
* Fields with the suffix `_txt` (text fields) contain text.
Text fields allow for free text search over the field contents.
For example, because the movie titles are stored in a text field, a search on
the word "Star" will match movies titled "Star", "A Star is Born", all movies in the
Star Wars and Star Trek franchises, as well as "Dark Star", "Lone Star", and "Star Kid".
* Fields with the suffix `_i` (point integer fields) contain integer values.
Numeric fields allow range matches as well as exact matches, and point integer fields allow efficient comparisons between the field’s values and the search criteria.
The different field types allow for different kinds of searches. Configuration of the query pipeline determines how fields are searched.
## Explore search results
Query Workbench lets you interactively configure a query pipeline while previewing the search results it produces. A query pipeline converts a free text query submitted to your search application into a structured query for Solr.
1. Log in to Fusion.
2. Click the **Movie Search** app.
The Fusion workspace appears.
3. Open Query Workbench. Navigate to Querying > **Query Workbench**.
### Perform a search
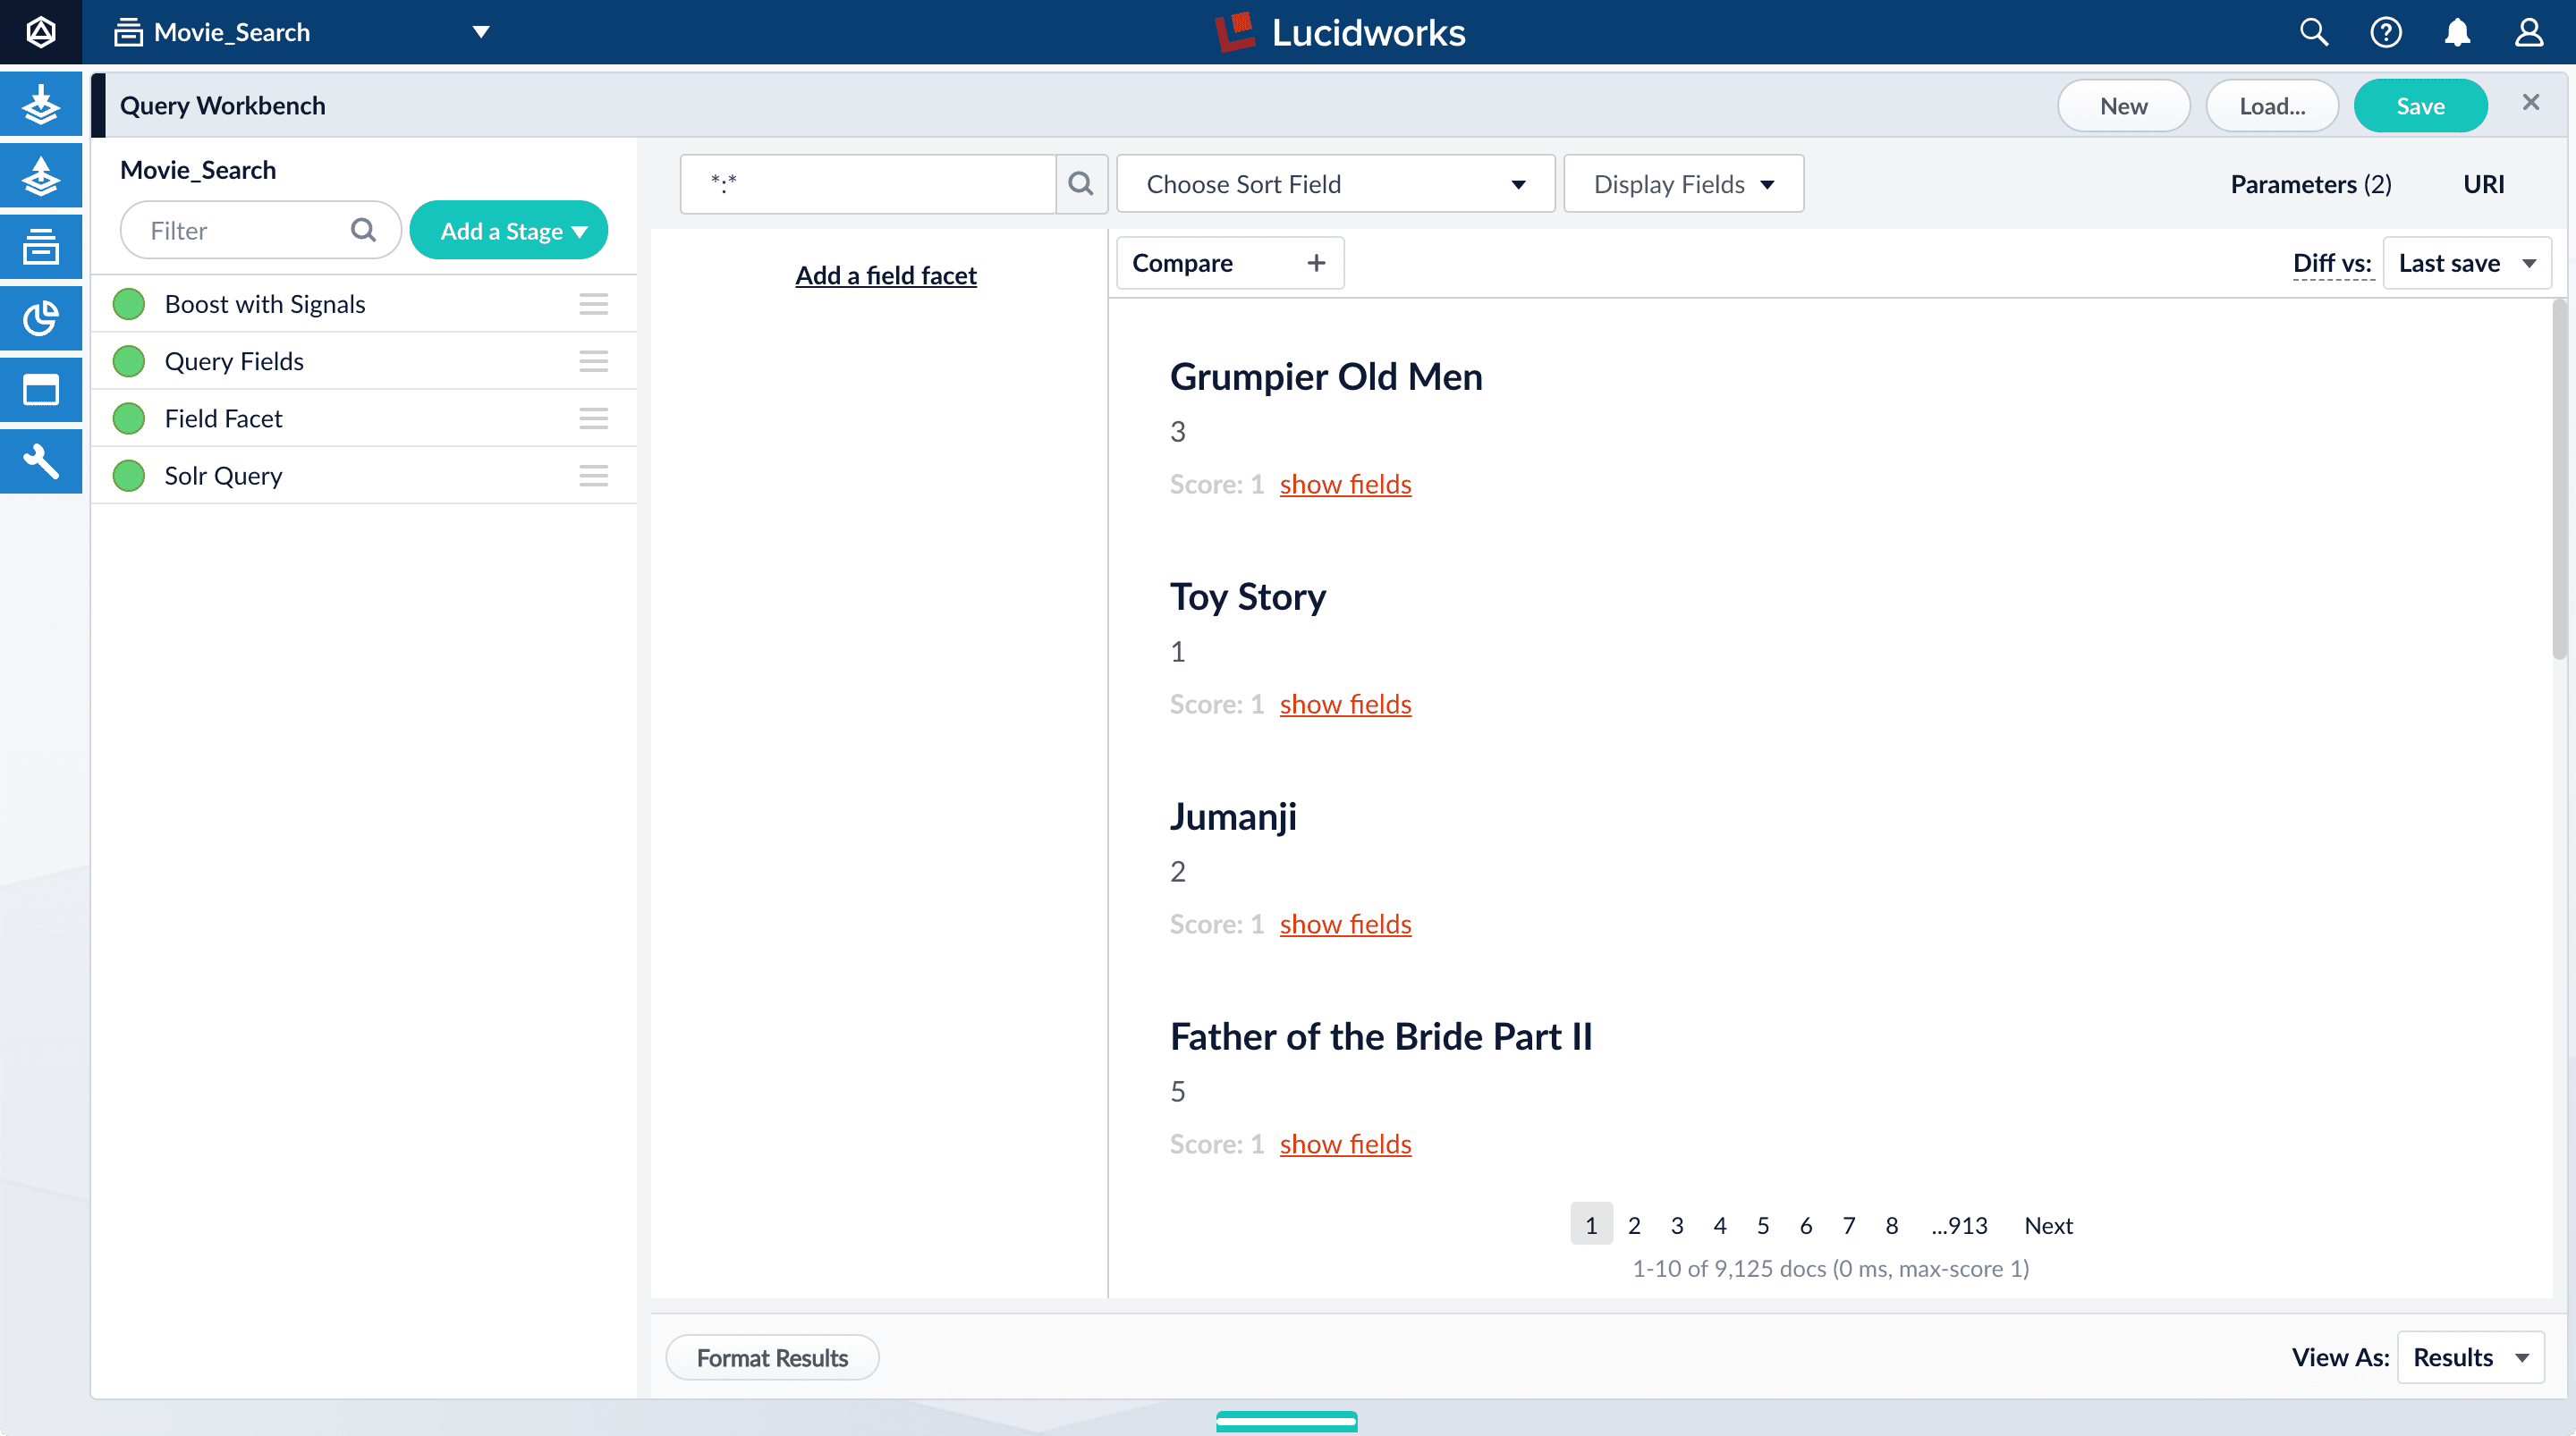
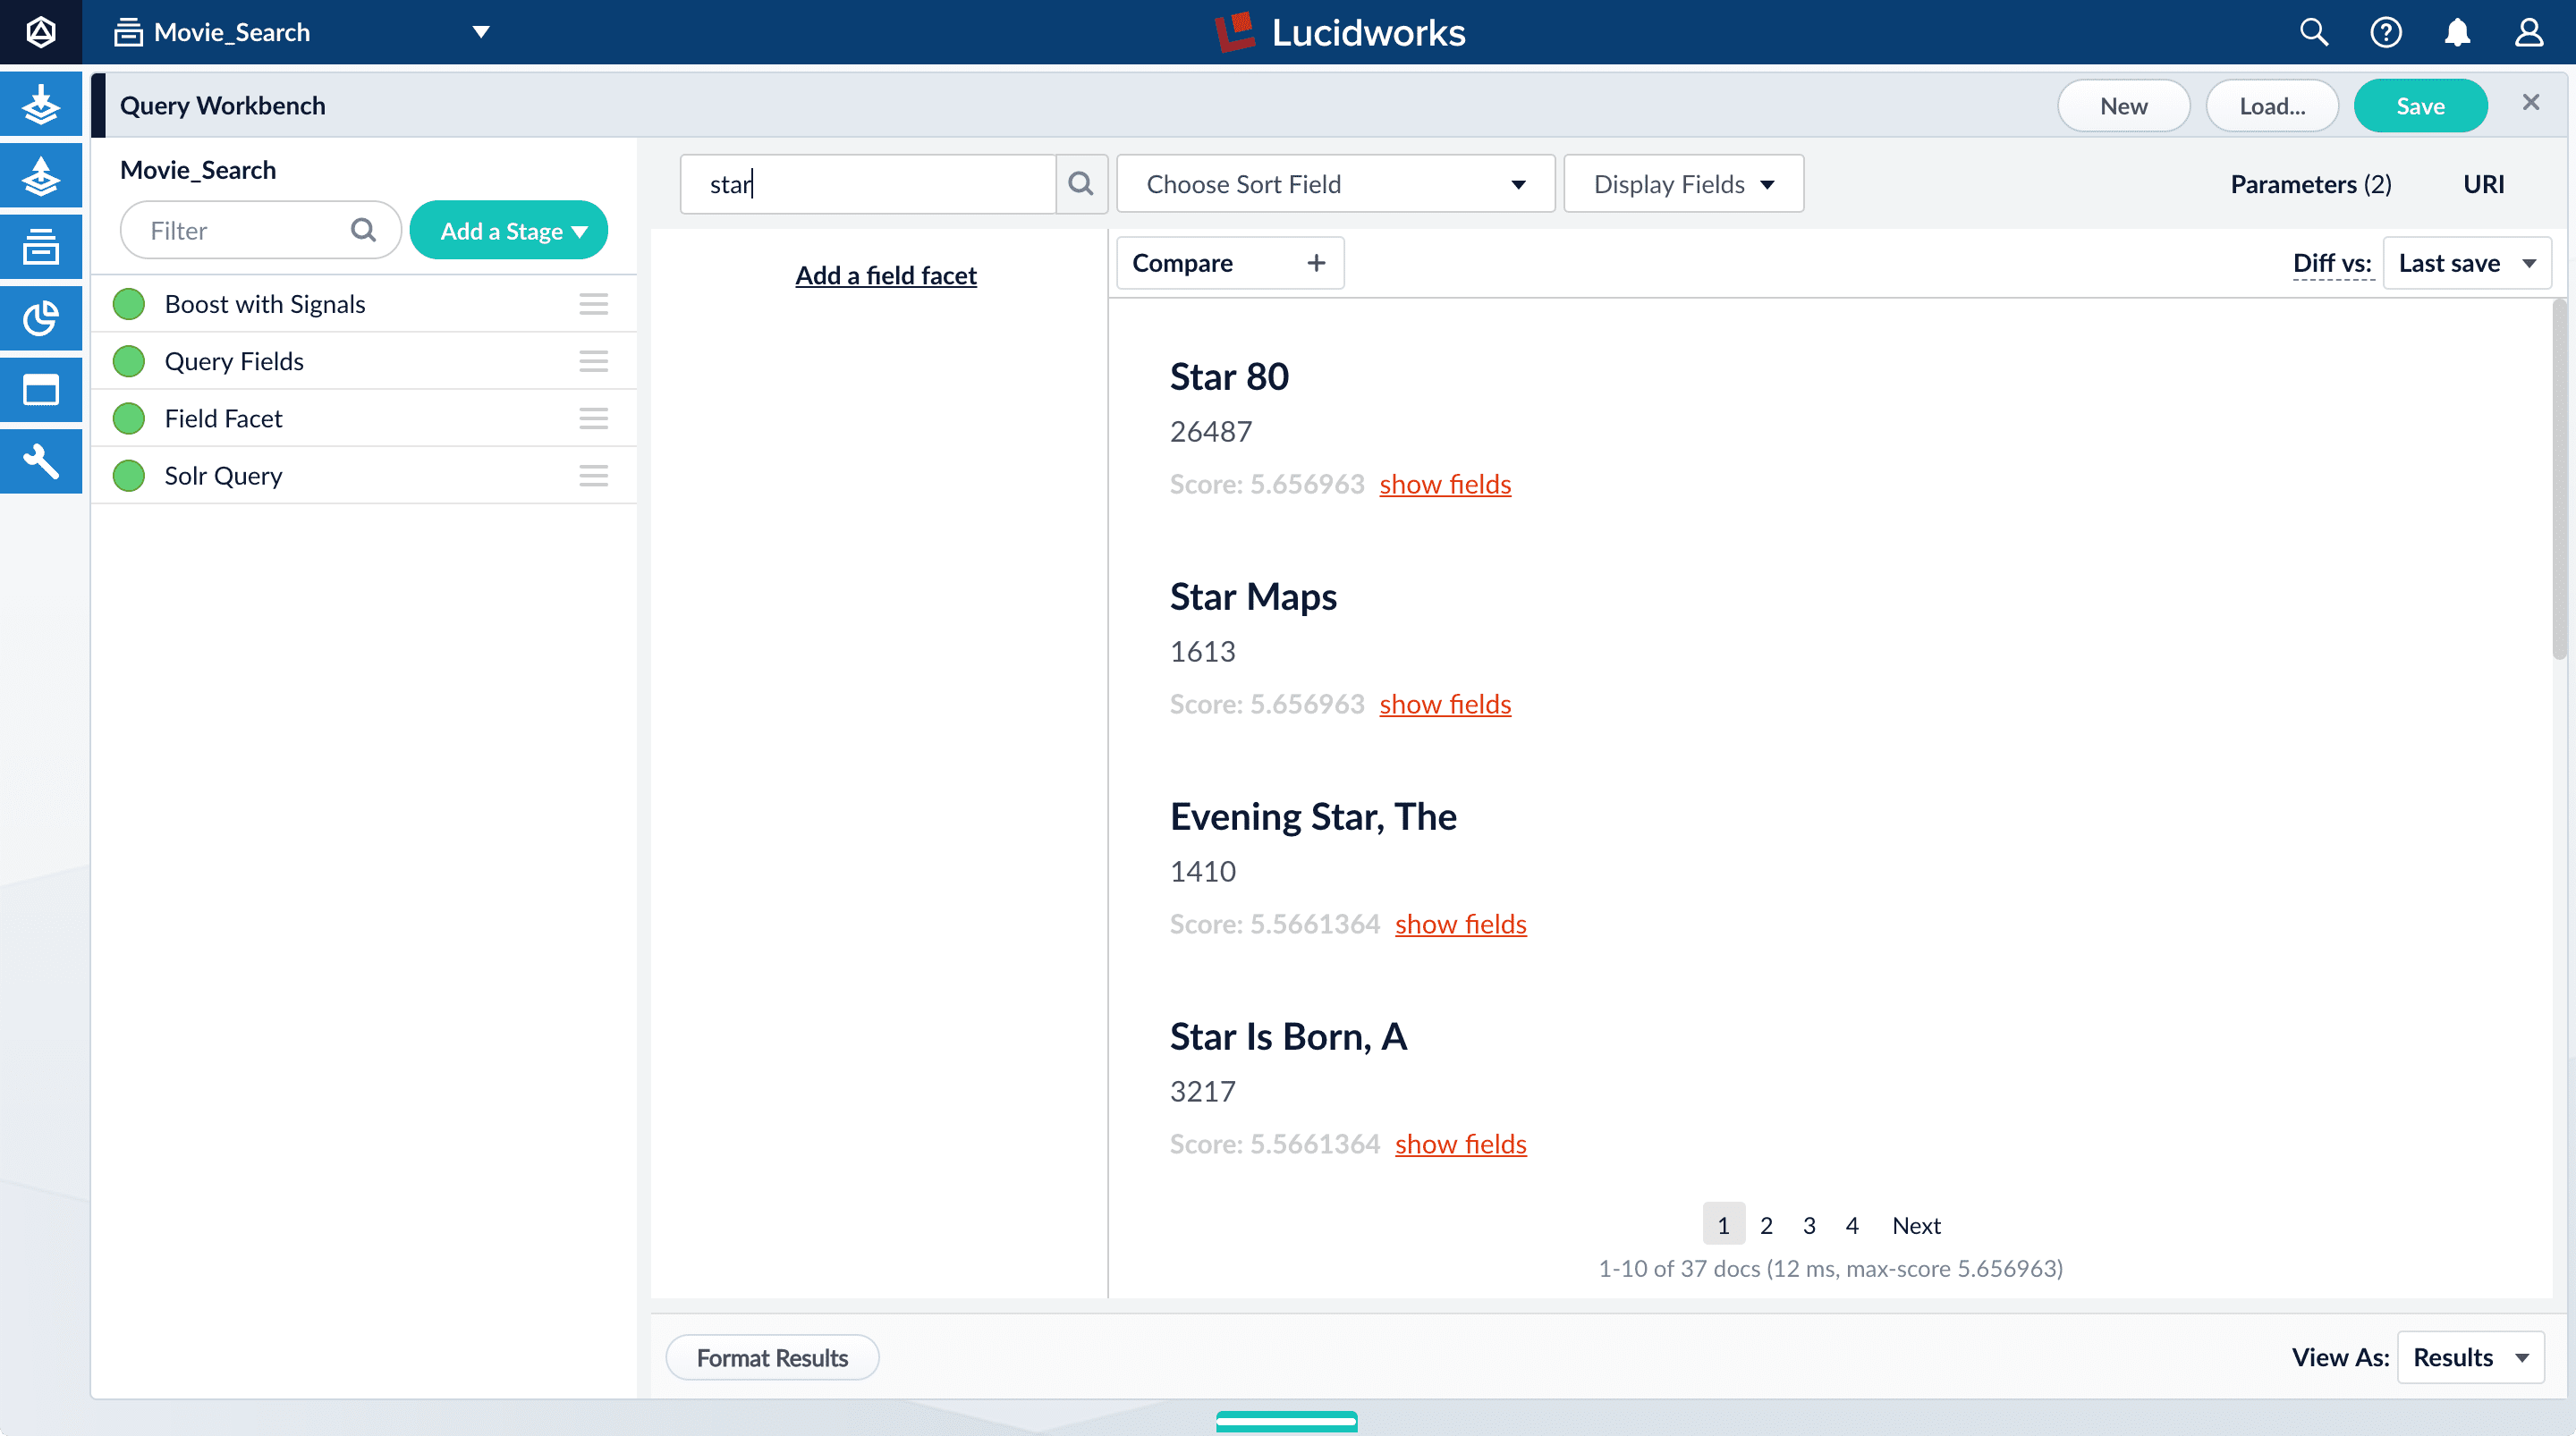
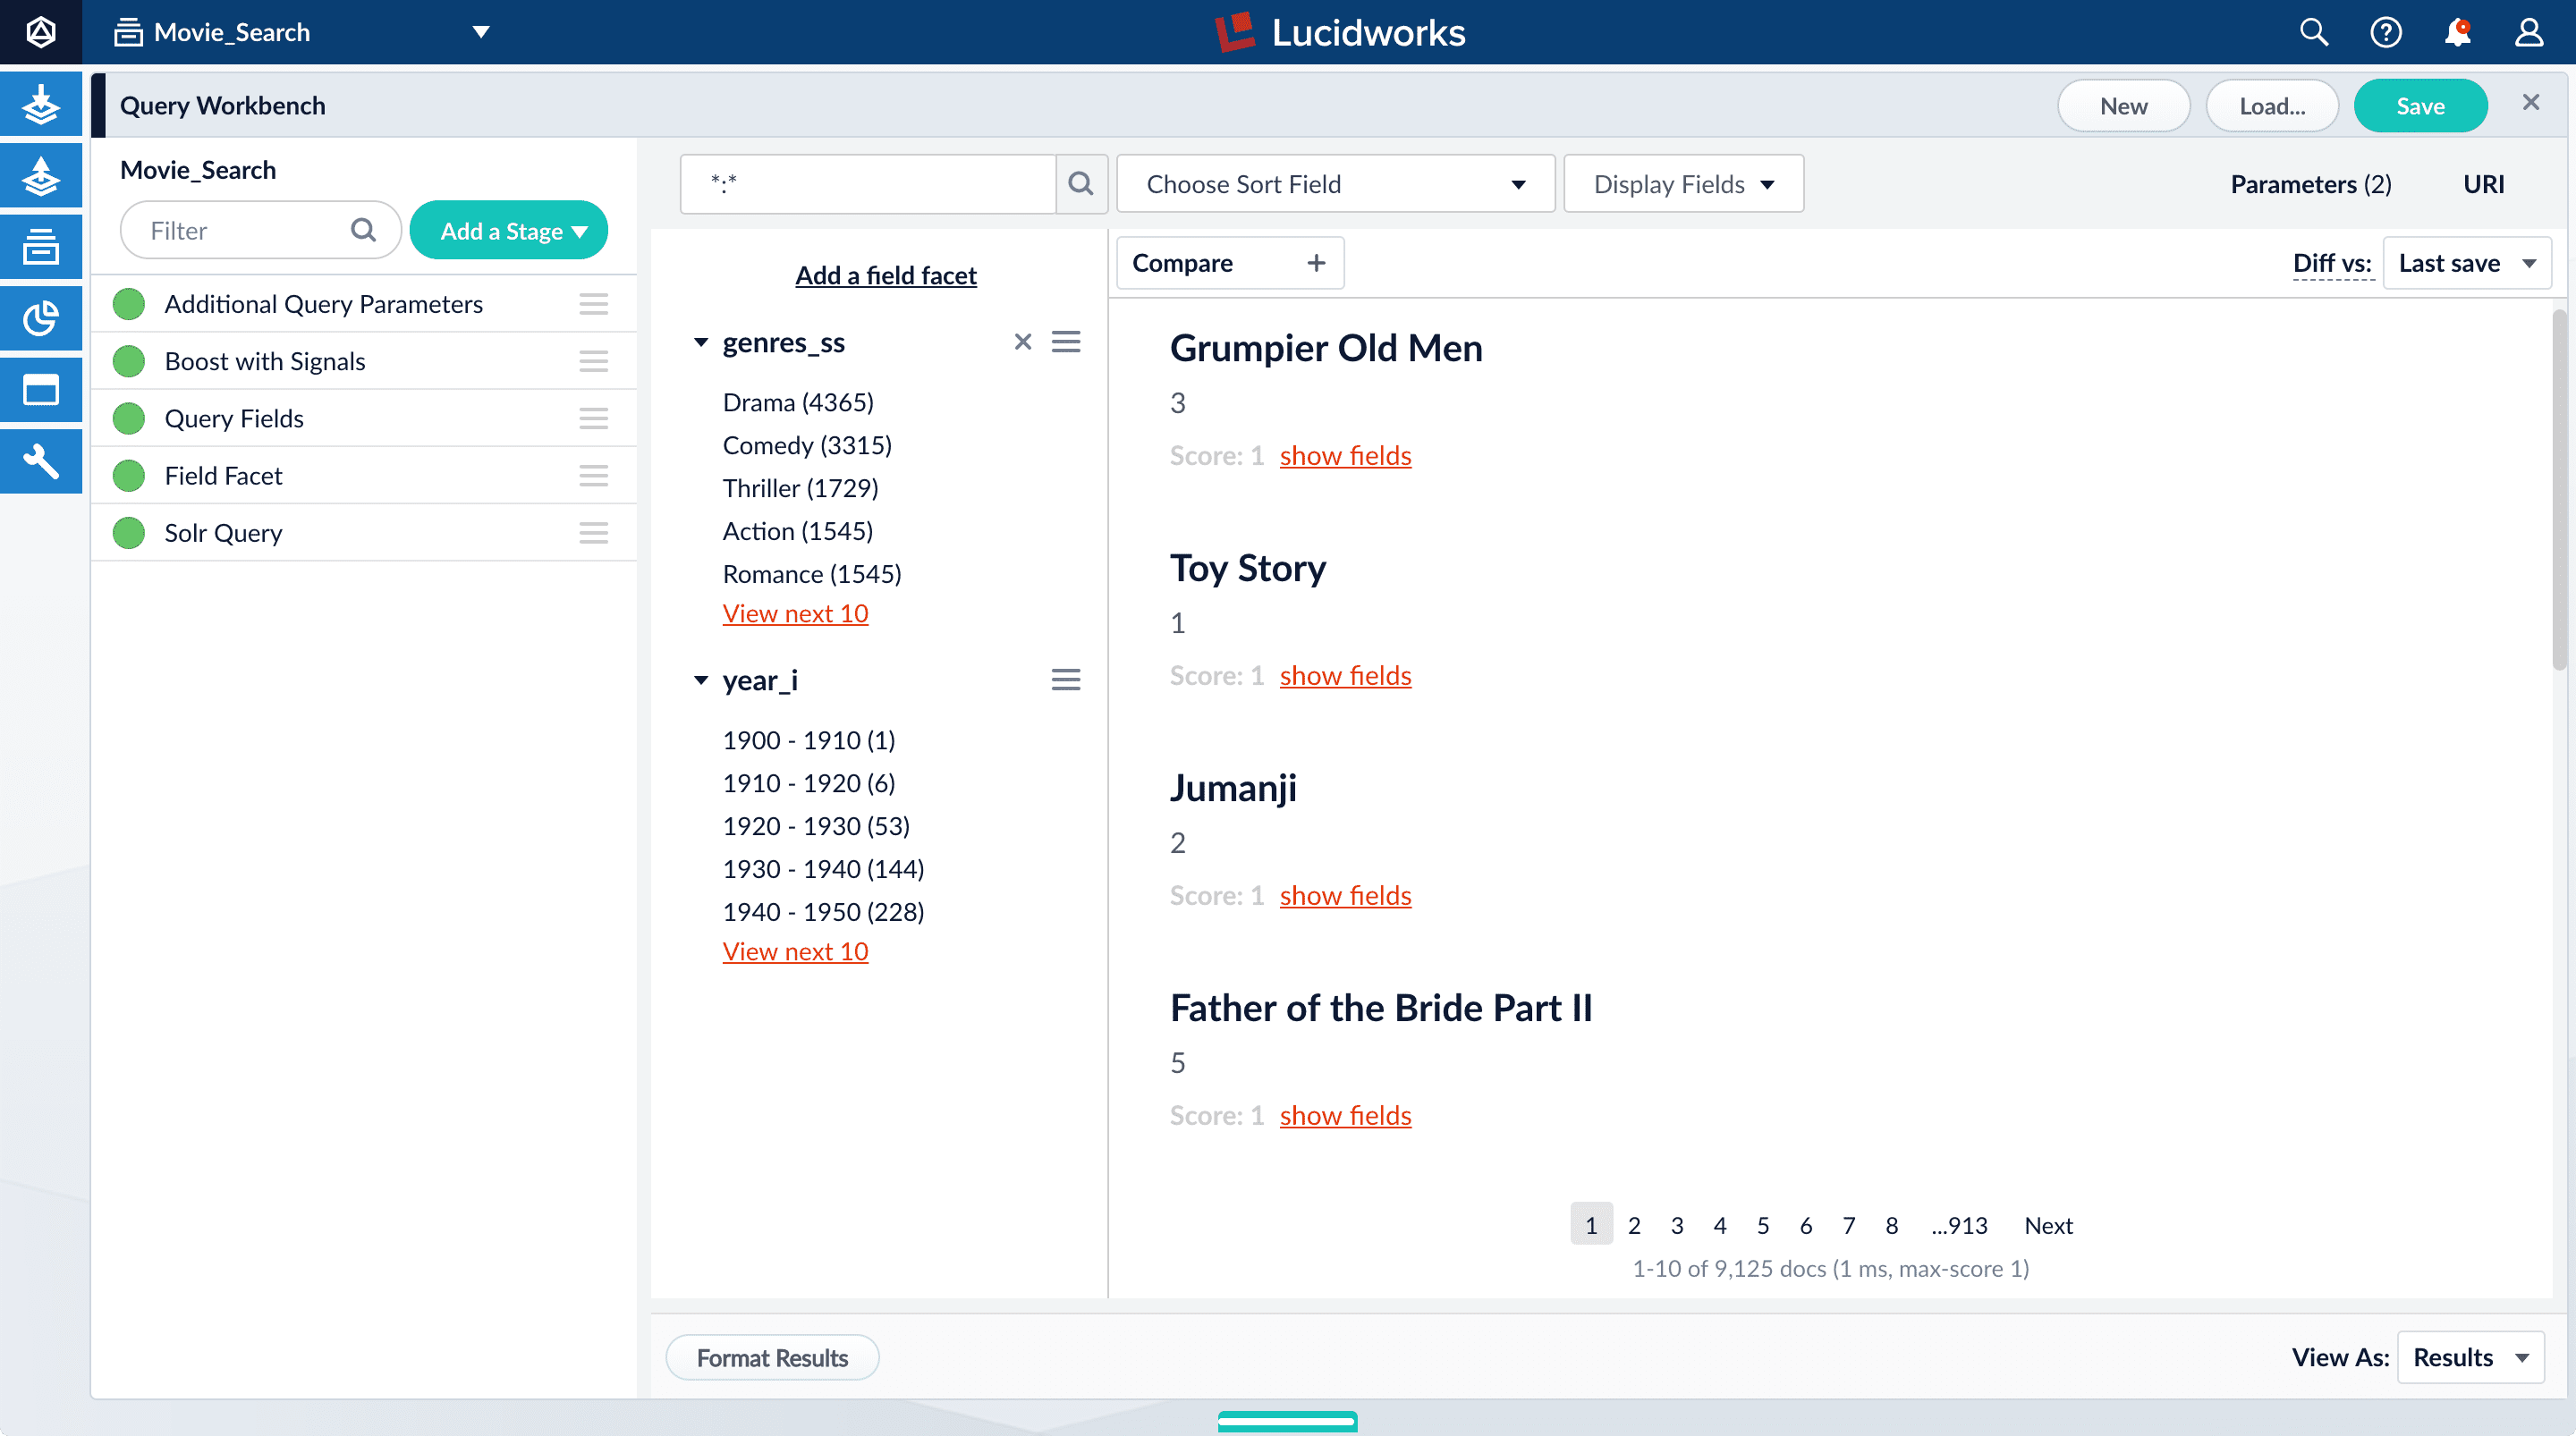
The default search is the wildcard search (`\*:*`), which returns all documents in the collection. You will enter a different search query to get started with facet configuration.
1. In the search box, enter the query string `star`, and then press Enter or click Search .
This search returns all movies that have the word "star" in the title.
The output is configured by the default query pipeline, which has the same name as the collection (4.x) or app (5.x). In this case, the name is `movie-search`.
To see more of the default output, you can perform other searches if you like.
1. In the search box, enter the query string `\*:*` to return all documents, and then press Enter or click Search .
If you wish to refine your results, you can change your index pipeline configuration and reindex your data.
### Explore the role of query pipeline stages
A default query pipeline consists of the stages below.
In Fusion 4.2+, some of these support Fusion AI features for advanced relevancy tuning, which you can read about separately.
In this tutorial, we will configure a couple of the basic stages:
* **Boost with Signals.** Use signals data to boost relevant documents.
* **Query Fields.** Specify the set of fields over which to search.
We will configure this stage later in this tutorial.
* **Field Facet.** Specify the fields to use for faceting.
We will configure this stage, too, for basic faceting and range faceting.
Fusion 4.2+ offers these additional stages:
* **Text Tagger.** Look for known phrases, synonyms, misspellings, and so on, that can be used to improve the query with query rewriting.
* **Apply Rules.** Modify the query using business rules, if any are triggered.
* **Solr Query.** Perform the query and return the results.
This is the only stage that is *always required* to perform a query and receive results.
* **Modify Response with Rules.** Modify Solr’s response using business rules, if any are triggered.
1. Turn off the Solr Query stage by clicking on the green circle on the left. The circle will change to white and Solr Query will dim to indicate the Solr Query stage is off.
All search results disappear from the preview pane because Fusion does not send a query to Solr.
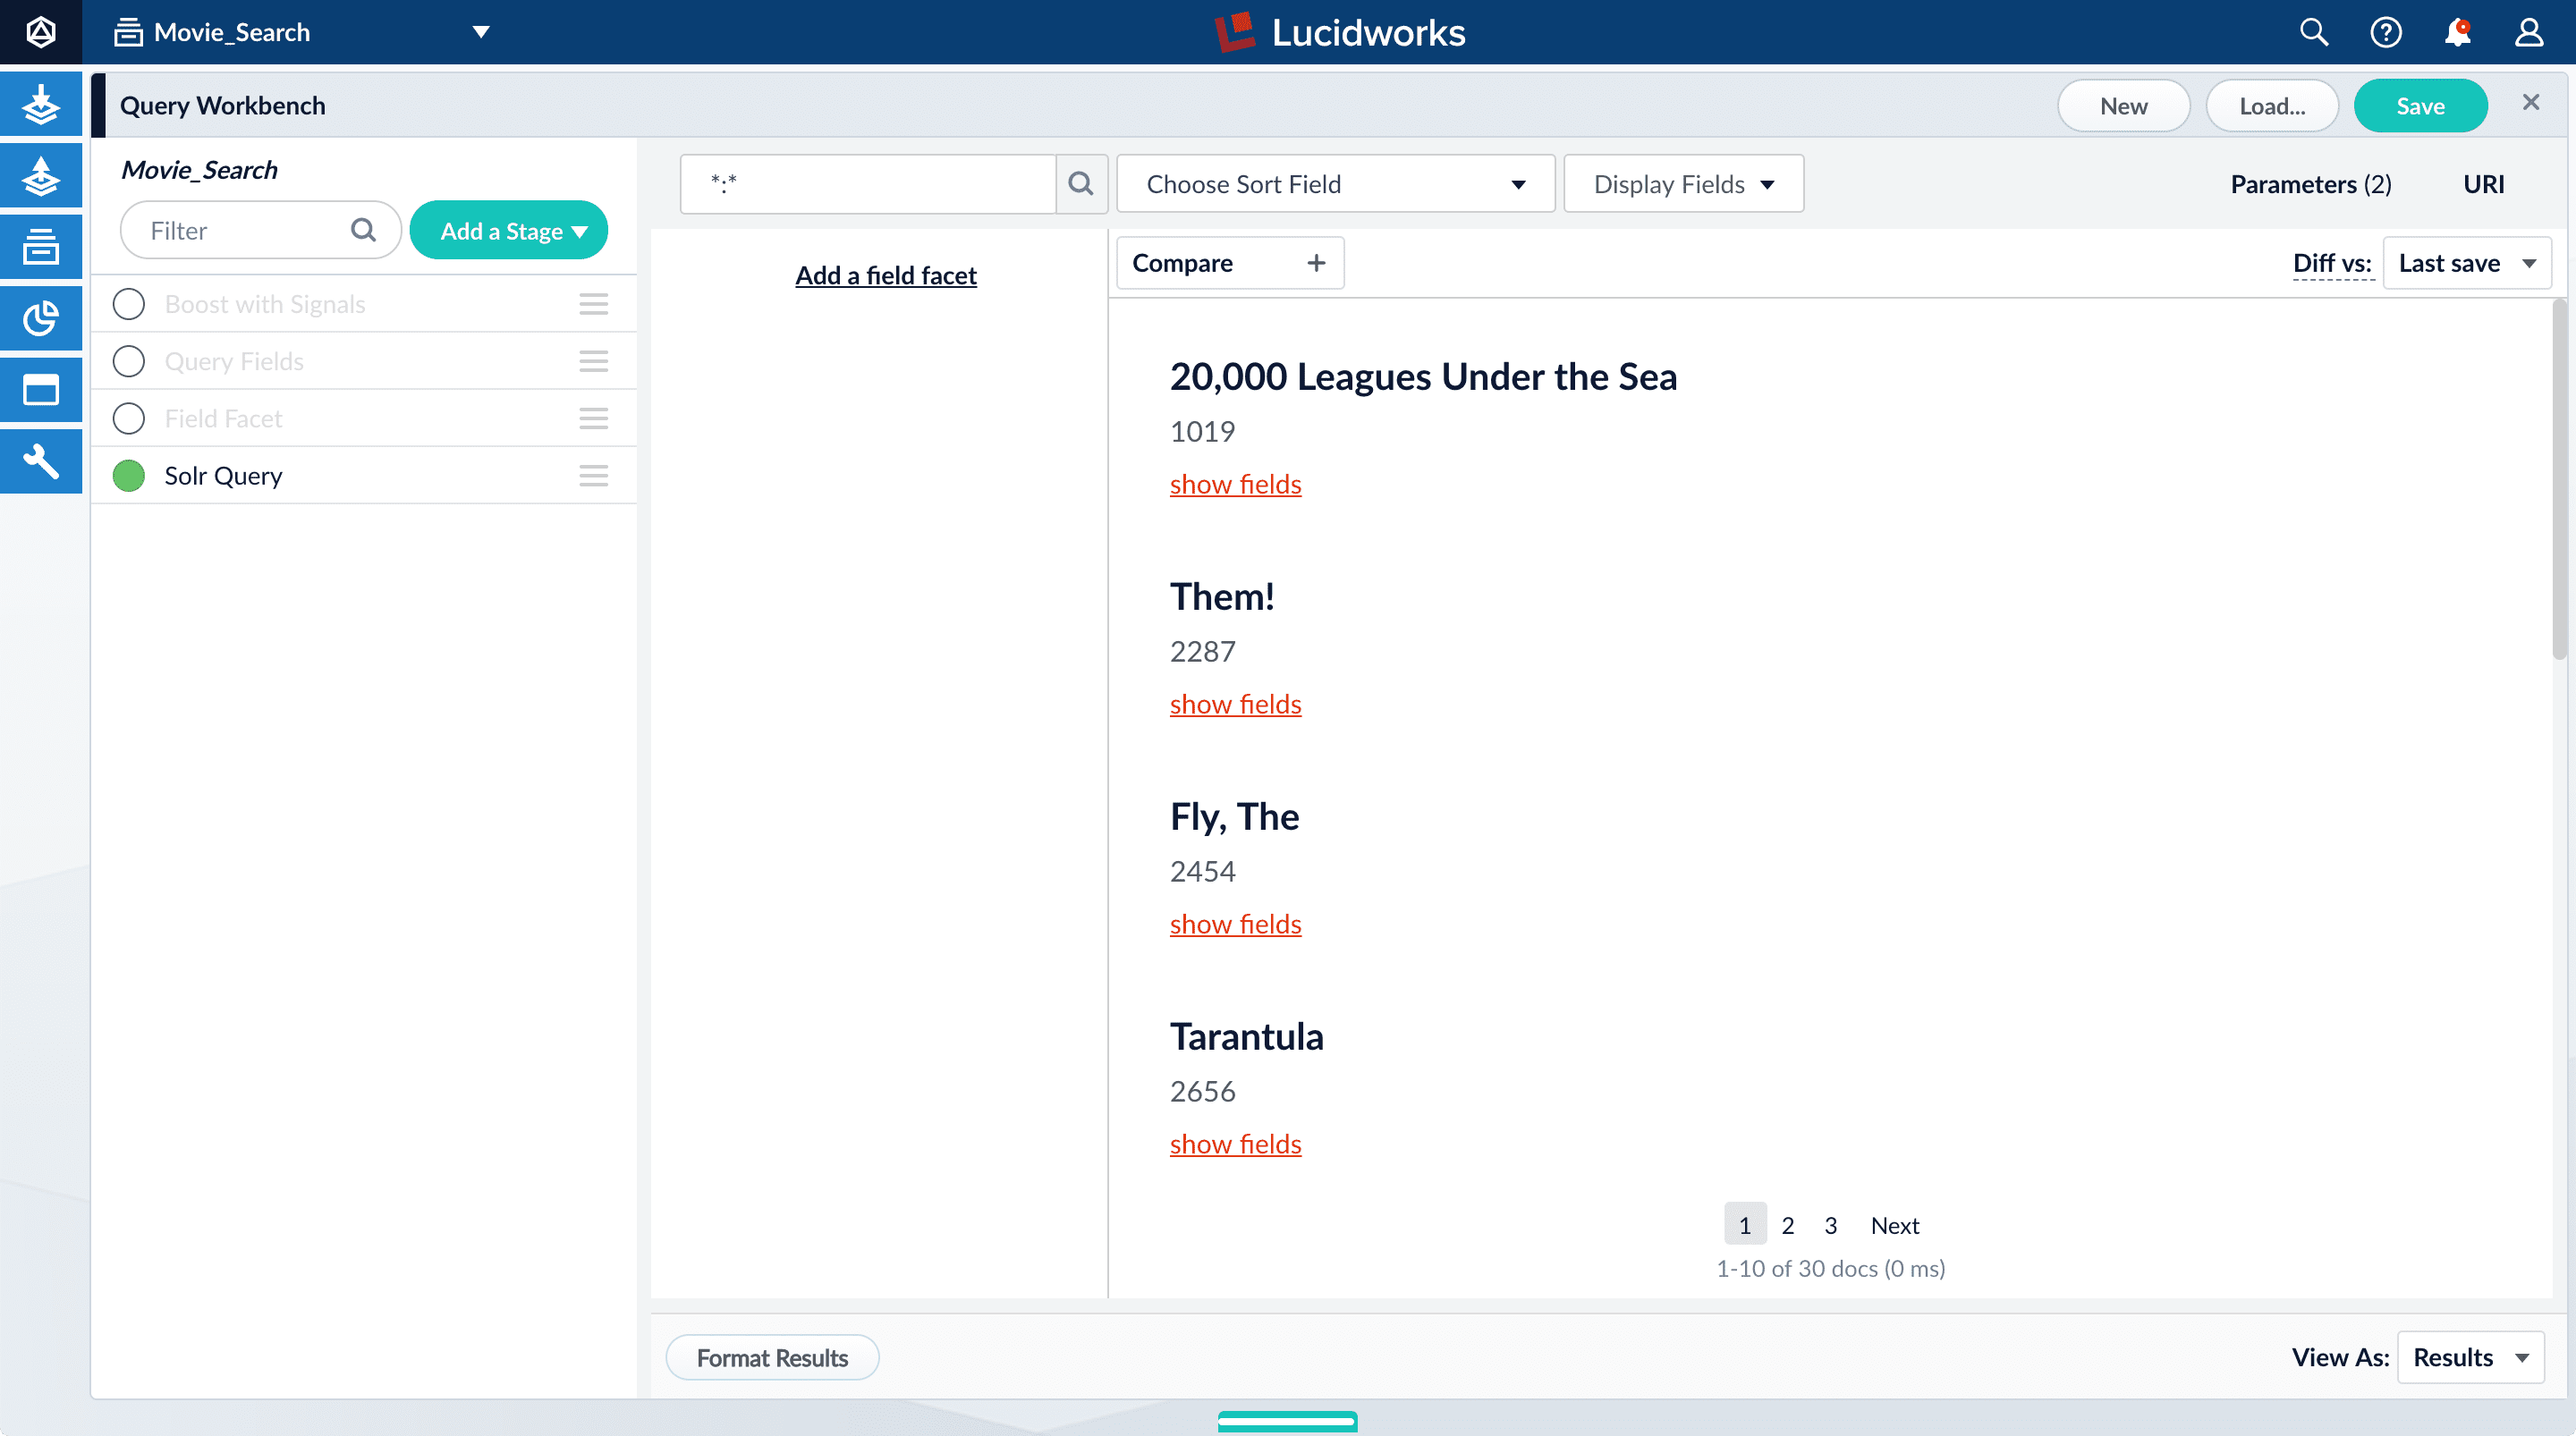
2. Turn on the Solr Query stage and turn all other stages off.
Now the search results look much like they did before. At this point, the disabled stages do not affect the output because they are not yet configured.
3. Turn all stages on.
## Configure faceting
Facets are the ubiquitous, dynamic lists of categories or features offered as filters within a search results page. Facets provide a simple way for users to explore and filter their search results without having to construct complicated queries. You configure facets as a part of configuring a query pipeline.
The data you indexed in Part 1 has two fields that are natural choices for faceting: `genres_ss` and `year_i`. For example, a user could search for science fiction of the 1950s in just a few clicks.
### Configure basic faceting for genres
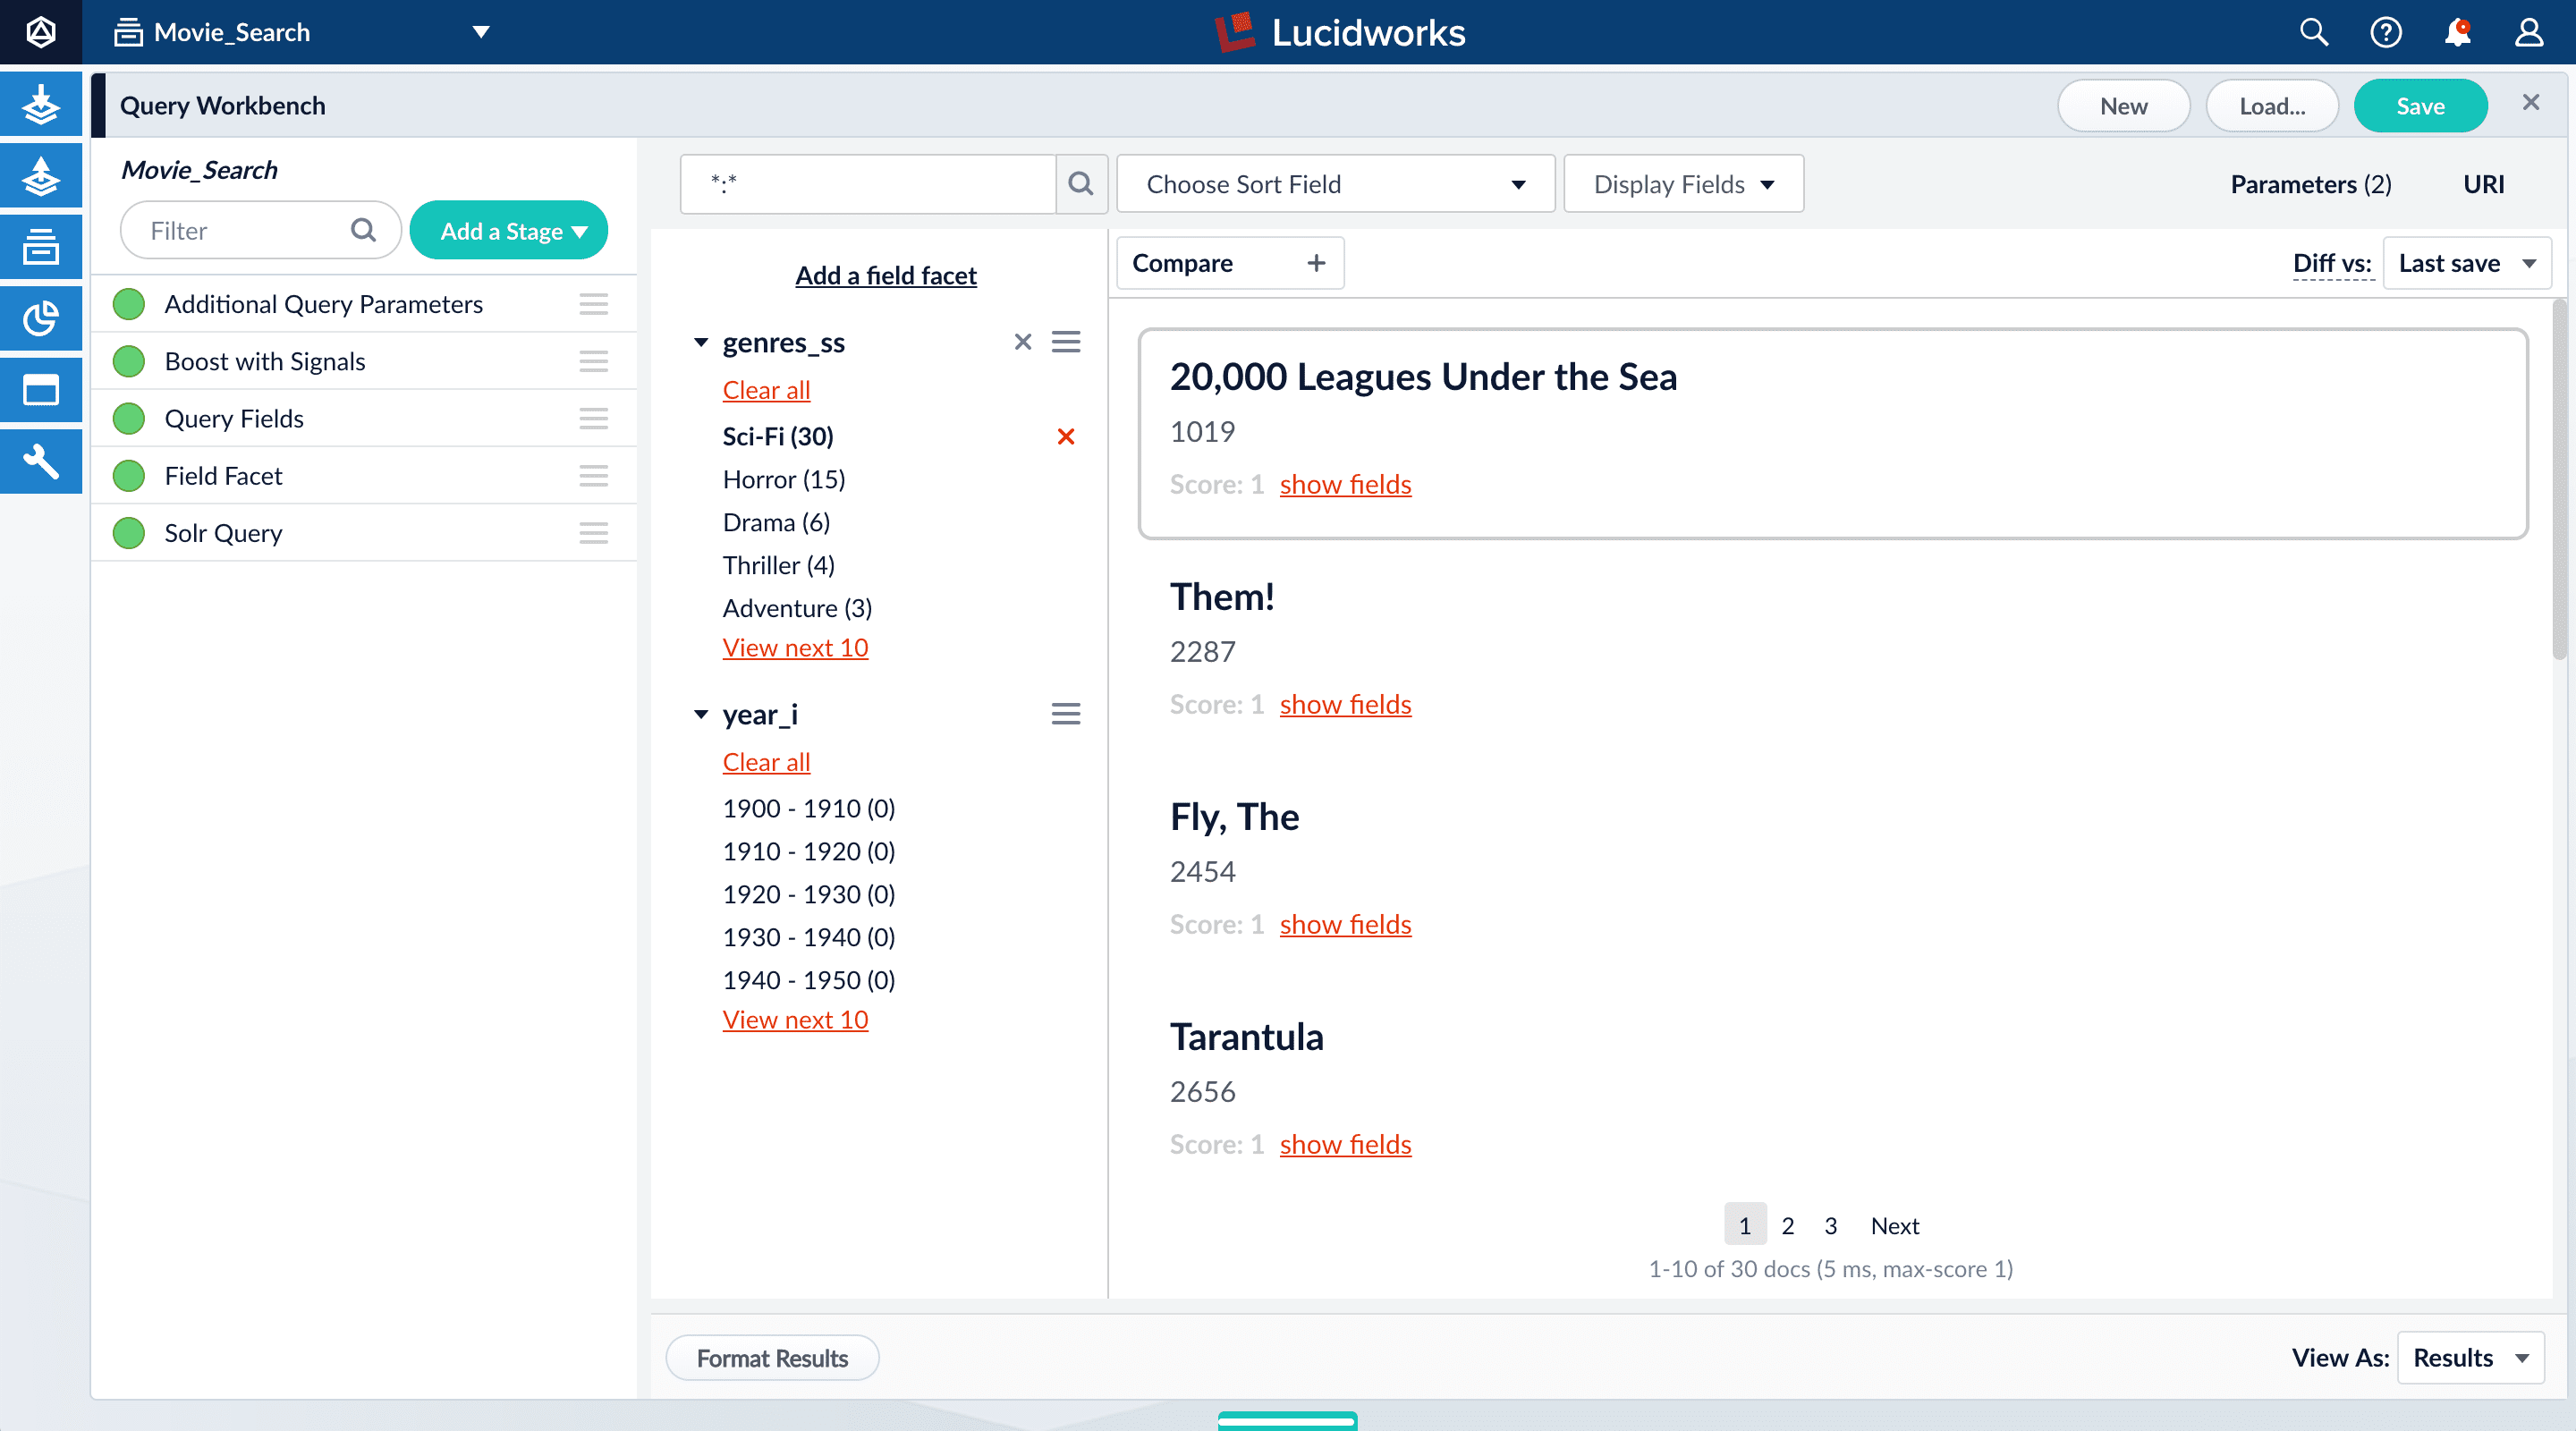
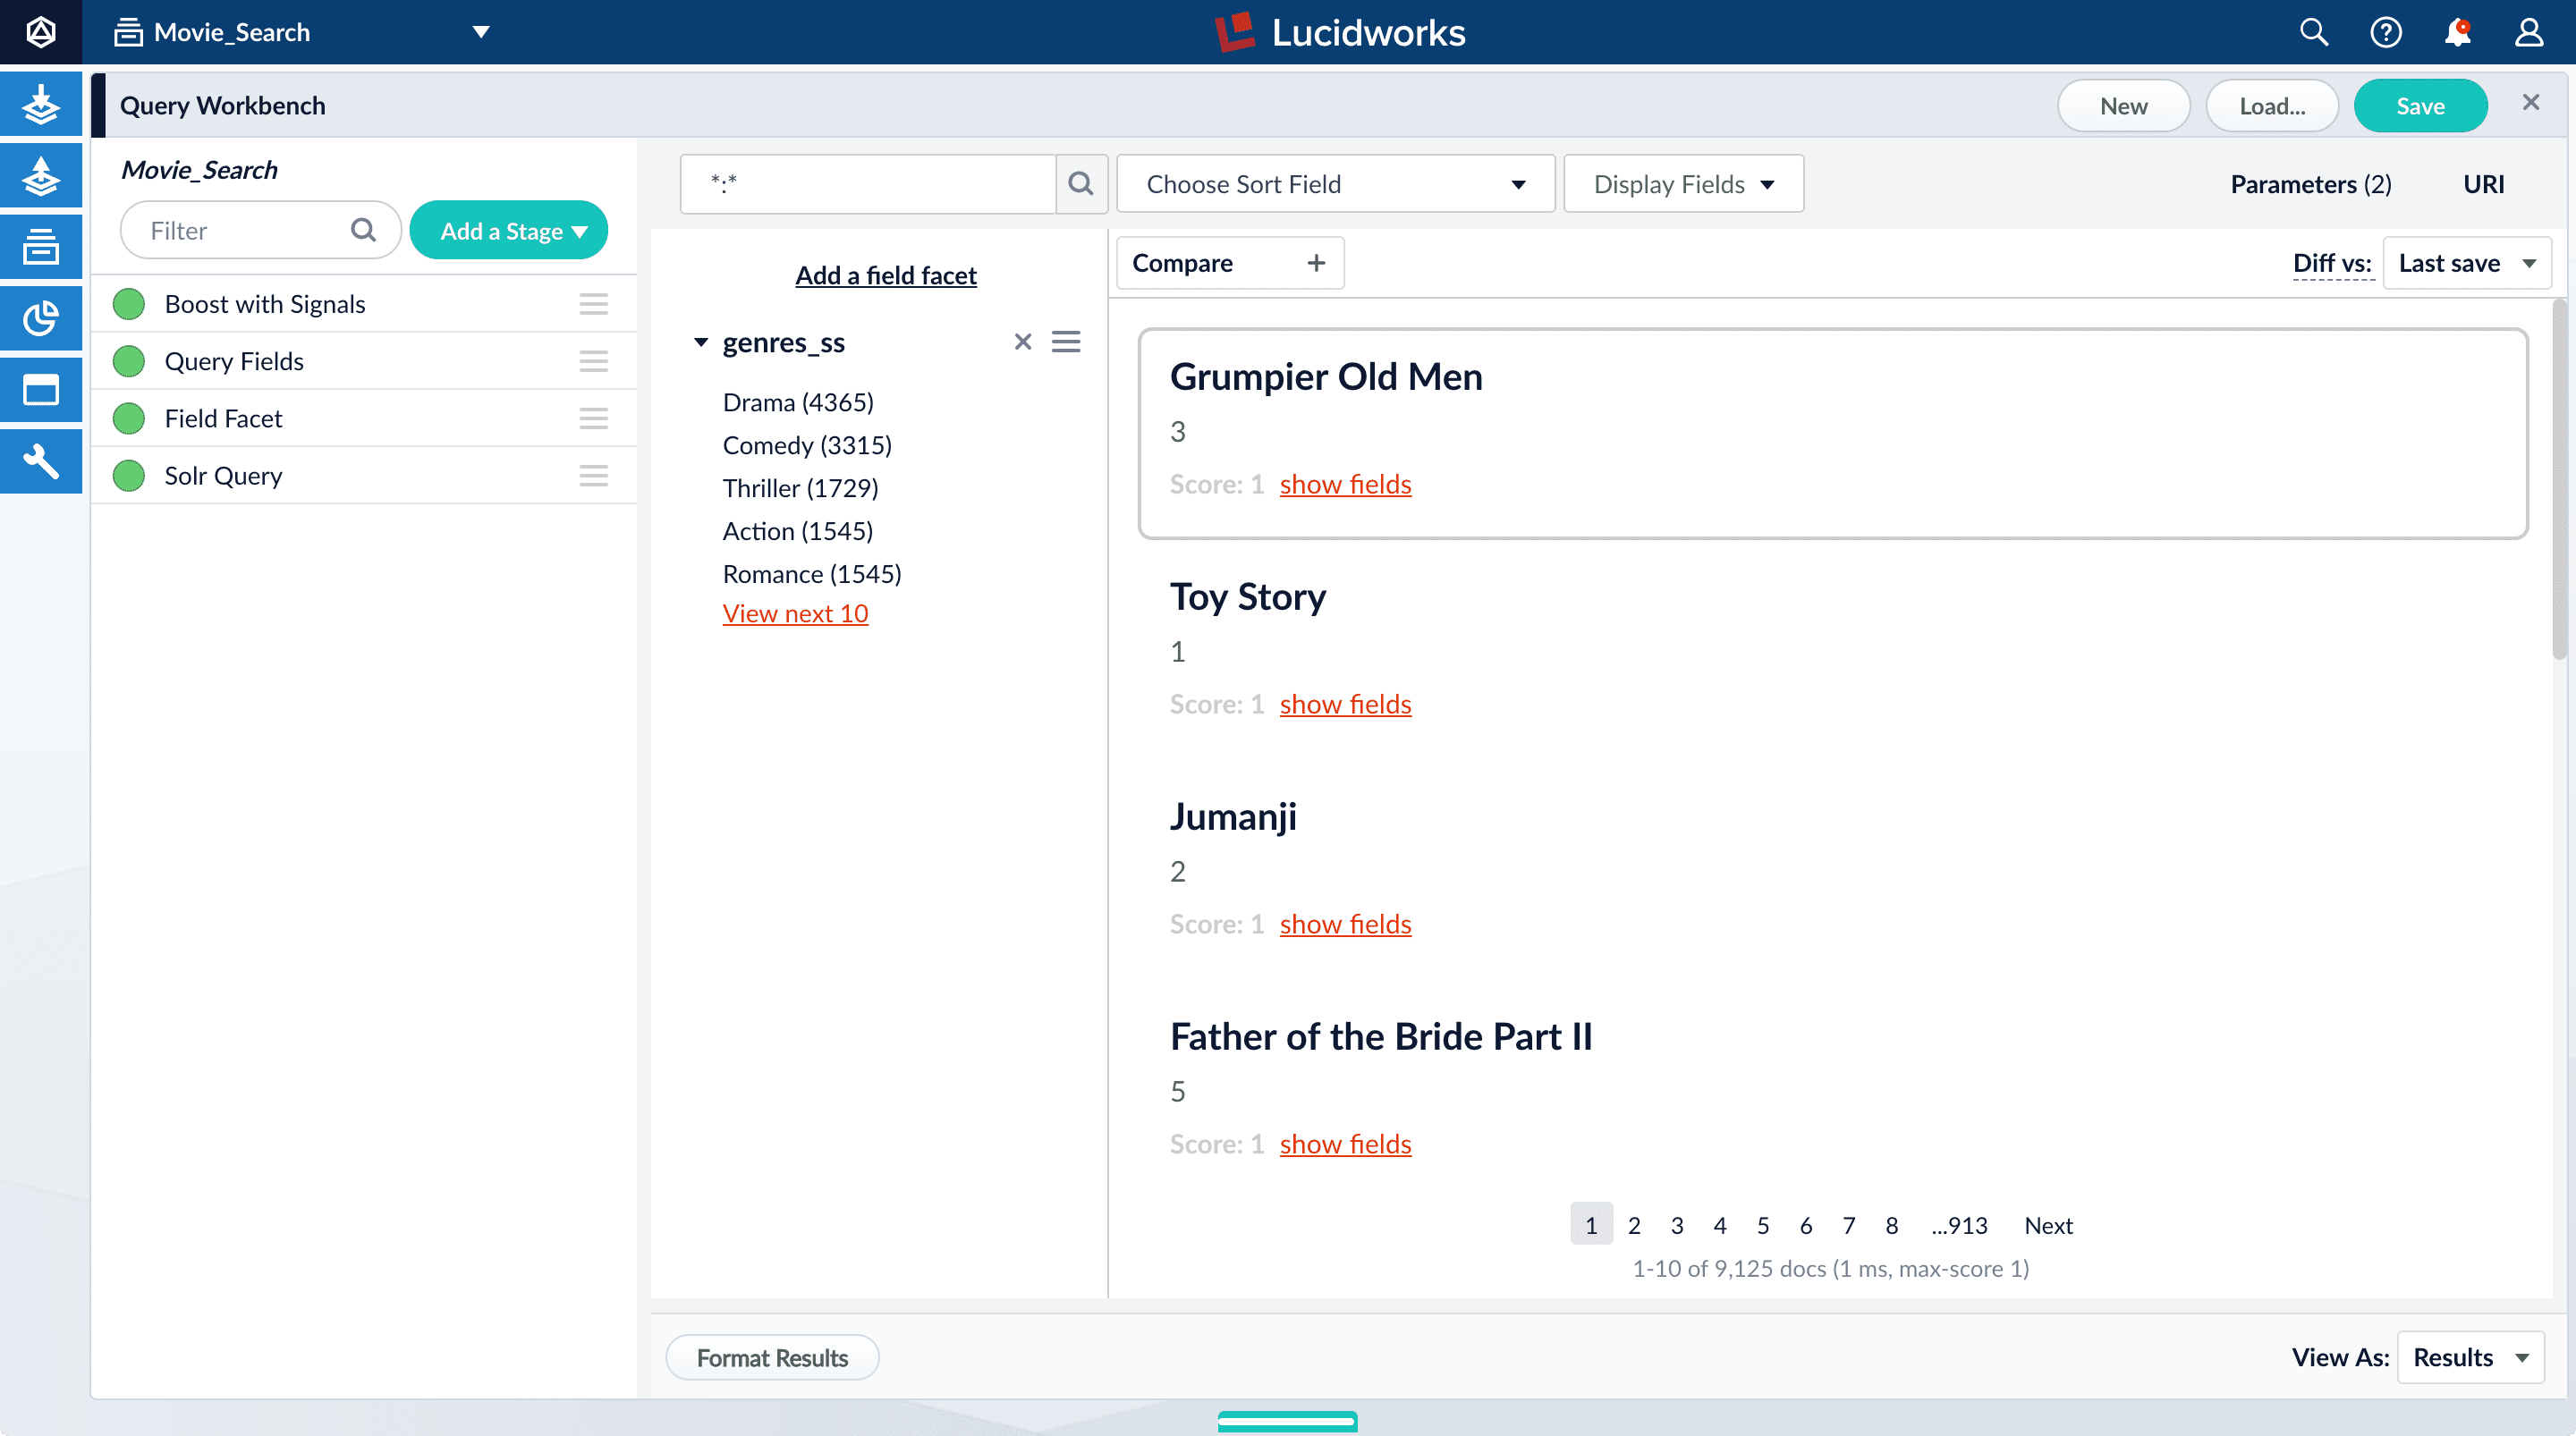
The `genres_ss` field is ready for faceting as-is.
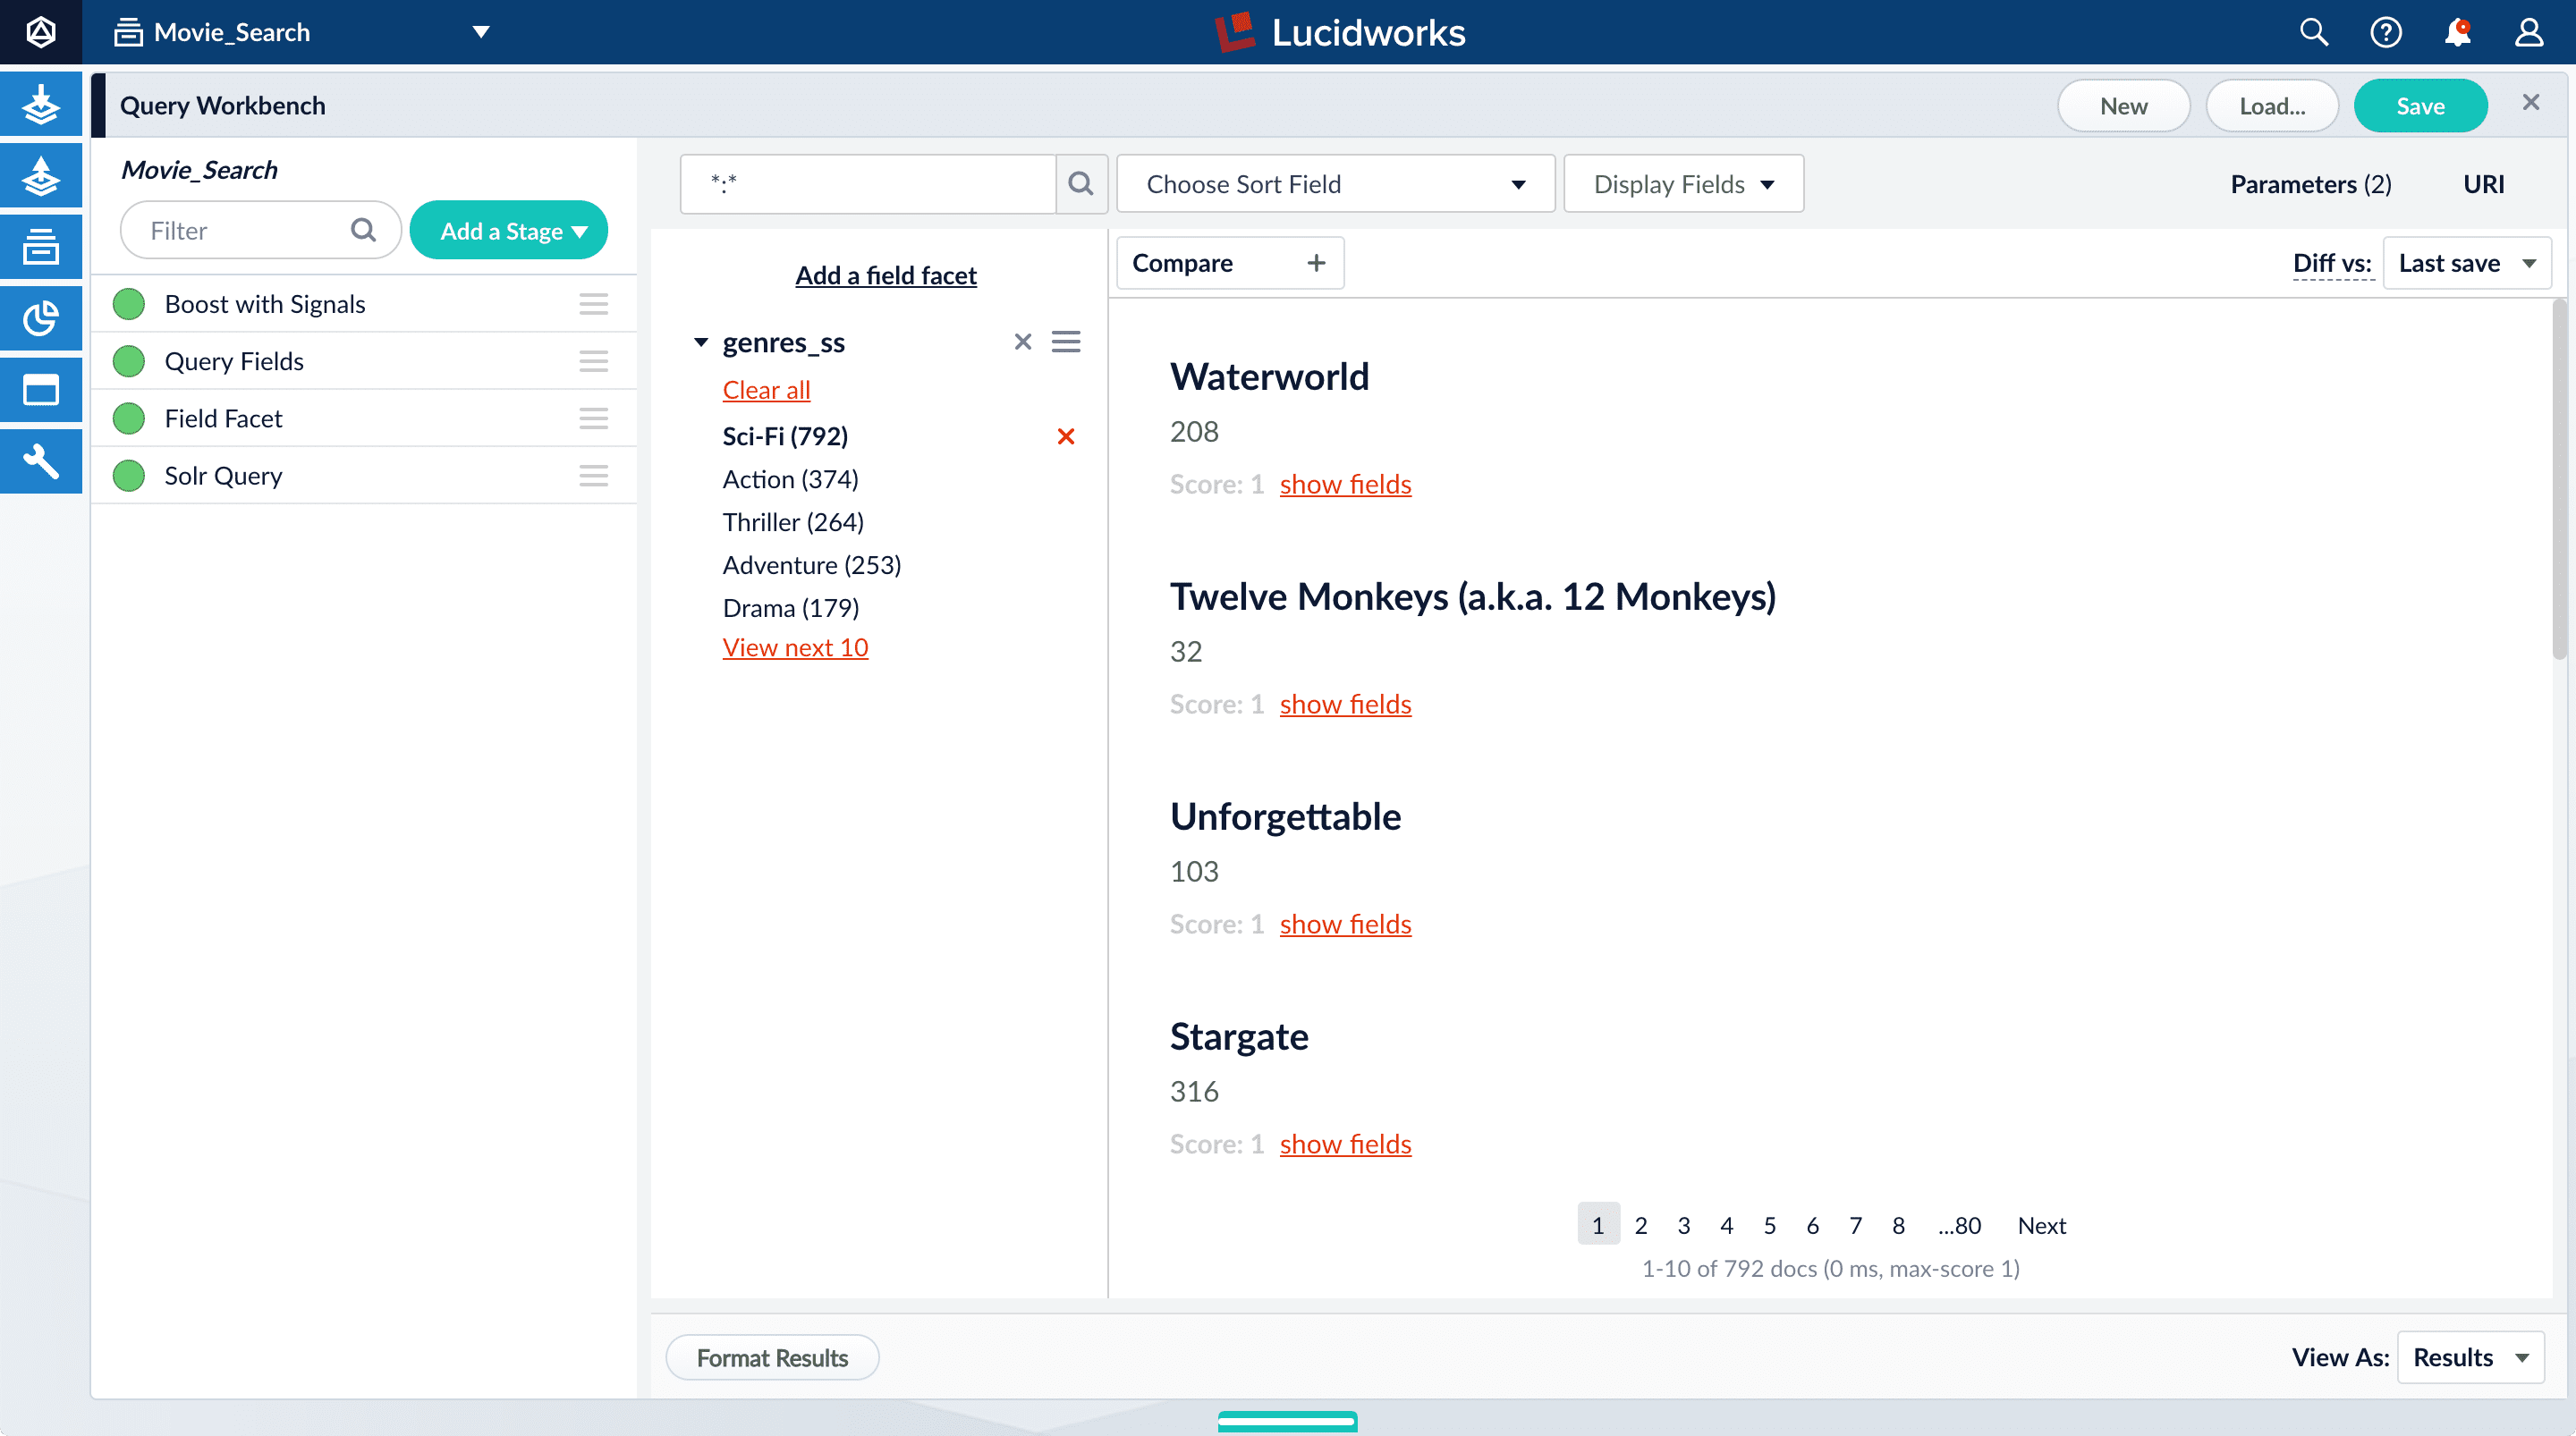
1. Click **Add a field facet** and select the `genres_ss` field.
2. Click **Sci-Fi** to select movies that have the value `Sci-Fi` for `genres_ss`:
Genres are not in any specific order. In configuration for the Field Facet stage, you can choose a value of Sort for the facet field - `index` (alphabetical ascending order) or `count` (number of documents). Or you can add field facets by configuring the Field Facet stage.
3. Under the field facet **genres\_ss**, click **Clear all**.
### Configure range faceting for years
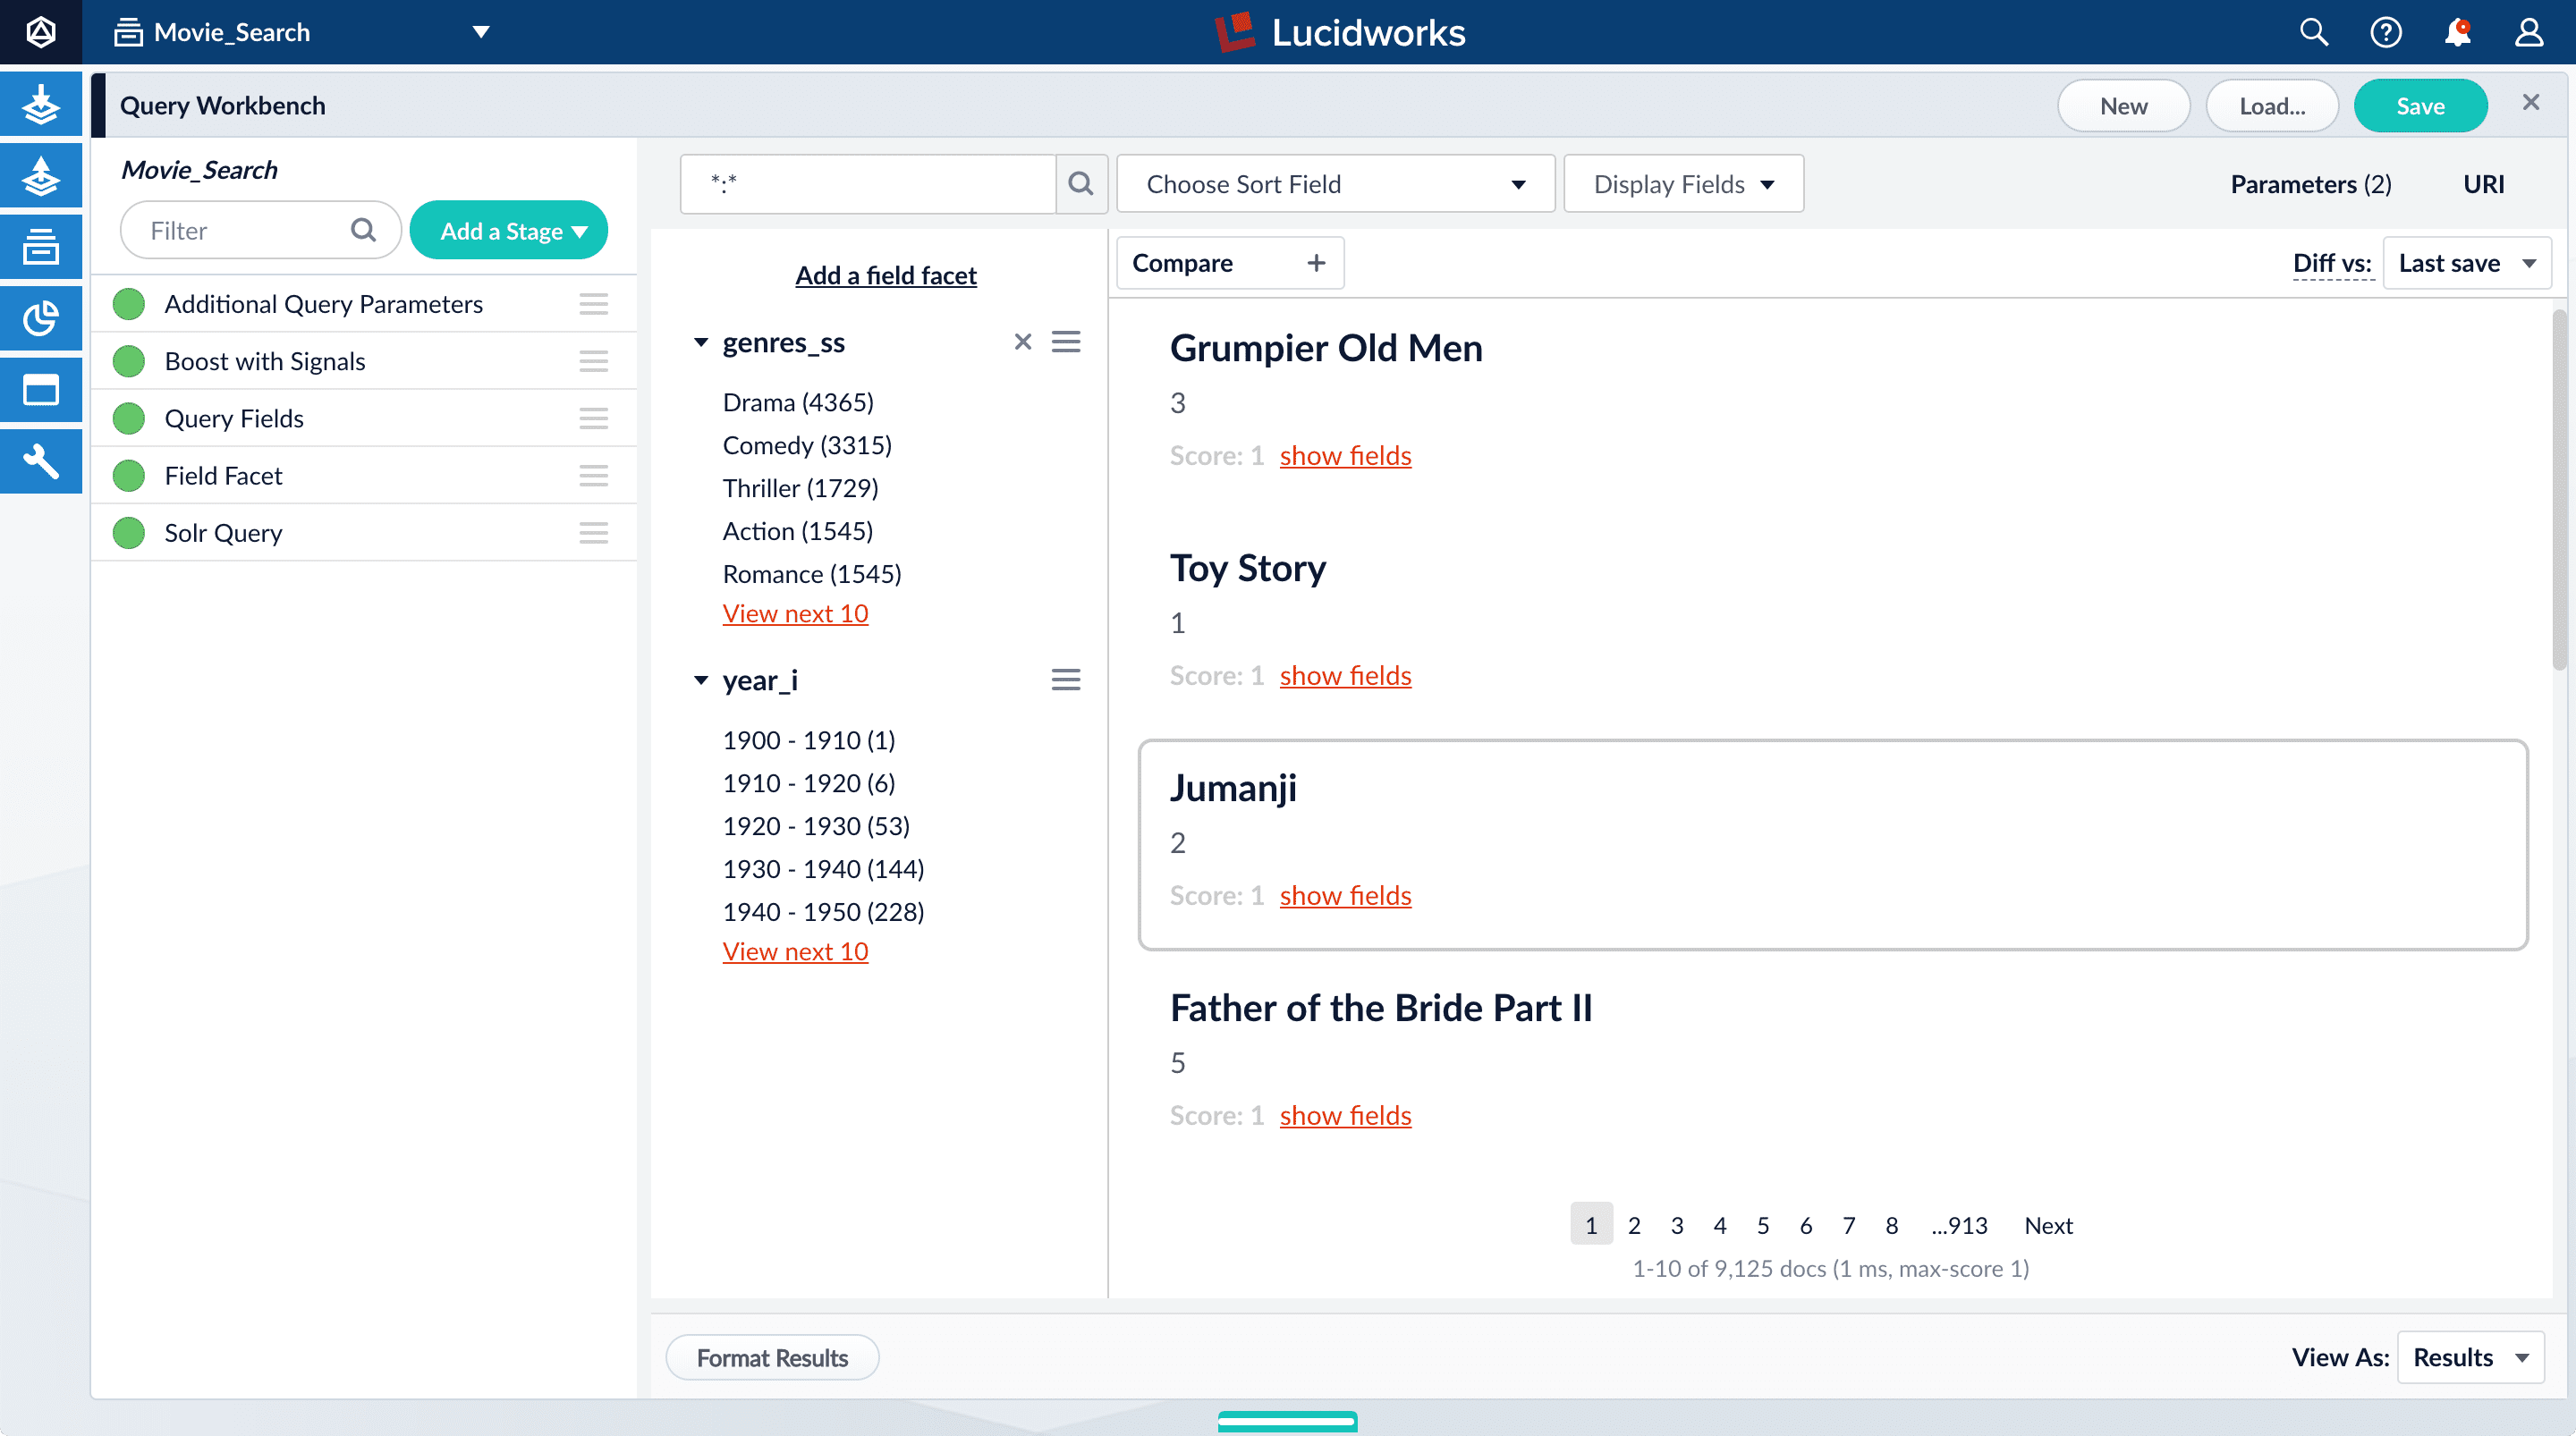
If you were to just configure faceting for the `year_i` field as you did above for the `genres_ss` field, you would get one facet per year, which is not very useful.
But the `year_i` field will be more usable if you configure *range faceting*. Range faceting is a way of grouping values together so that the user can select a value range instead of one specific value. For example, range facets are commonly used with pricing ($50-$100) or ratings (4 stars or higher). Here, we group years by decade.
Range faceting requires sending an additional query parameter to Fusion’s Solr core. You can configure this with the Additional Query Parameters stage. In this case, you will use several of [Solr’s range facet query parameters](https://cwiki.apache.org/confluence/display/solr/Faceting#Faceting-RangeFaceting).
Use the Additional Query Parameters stage to configure range faceting for the `year_i` field:
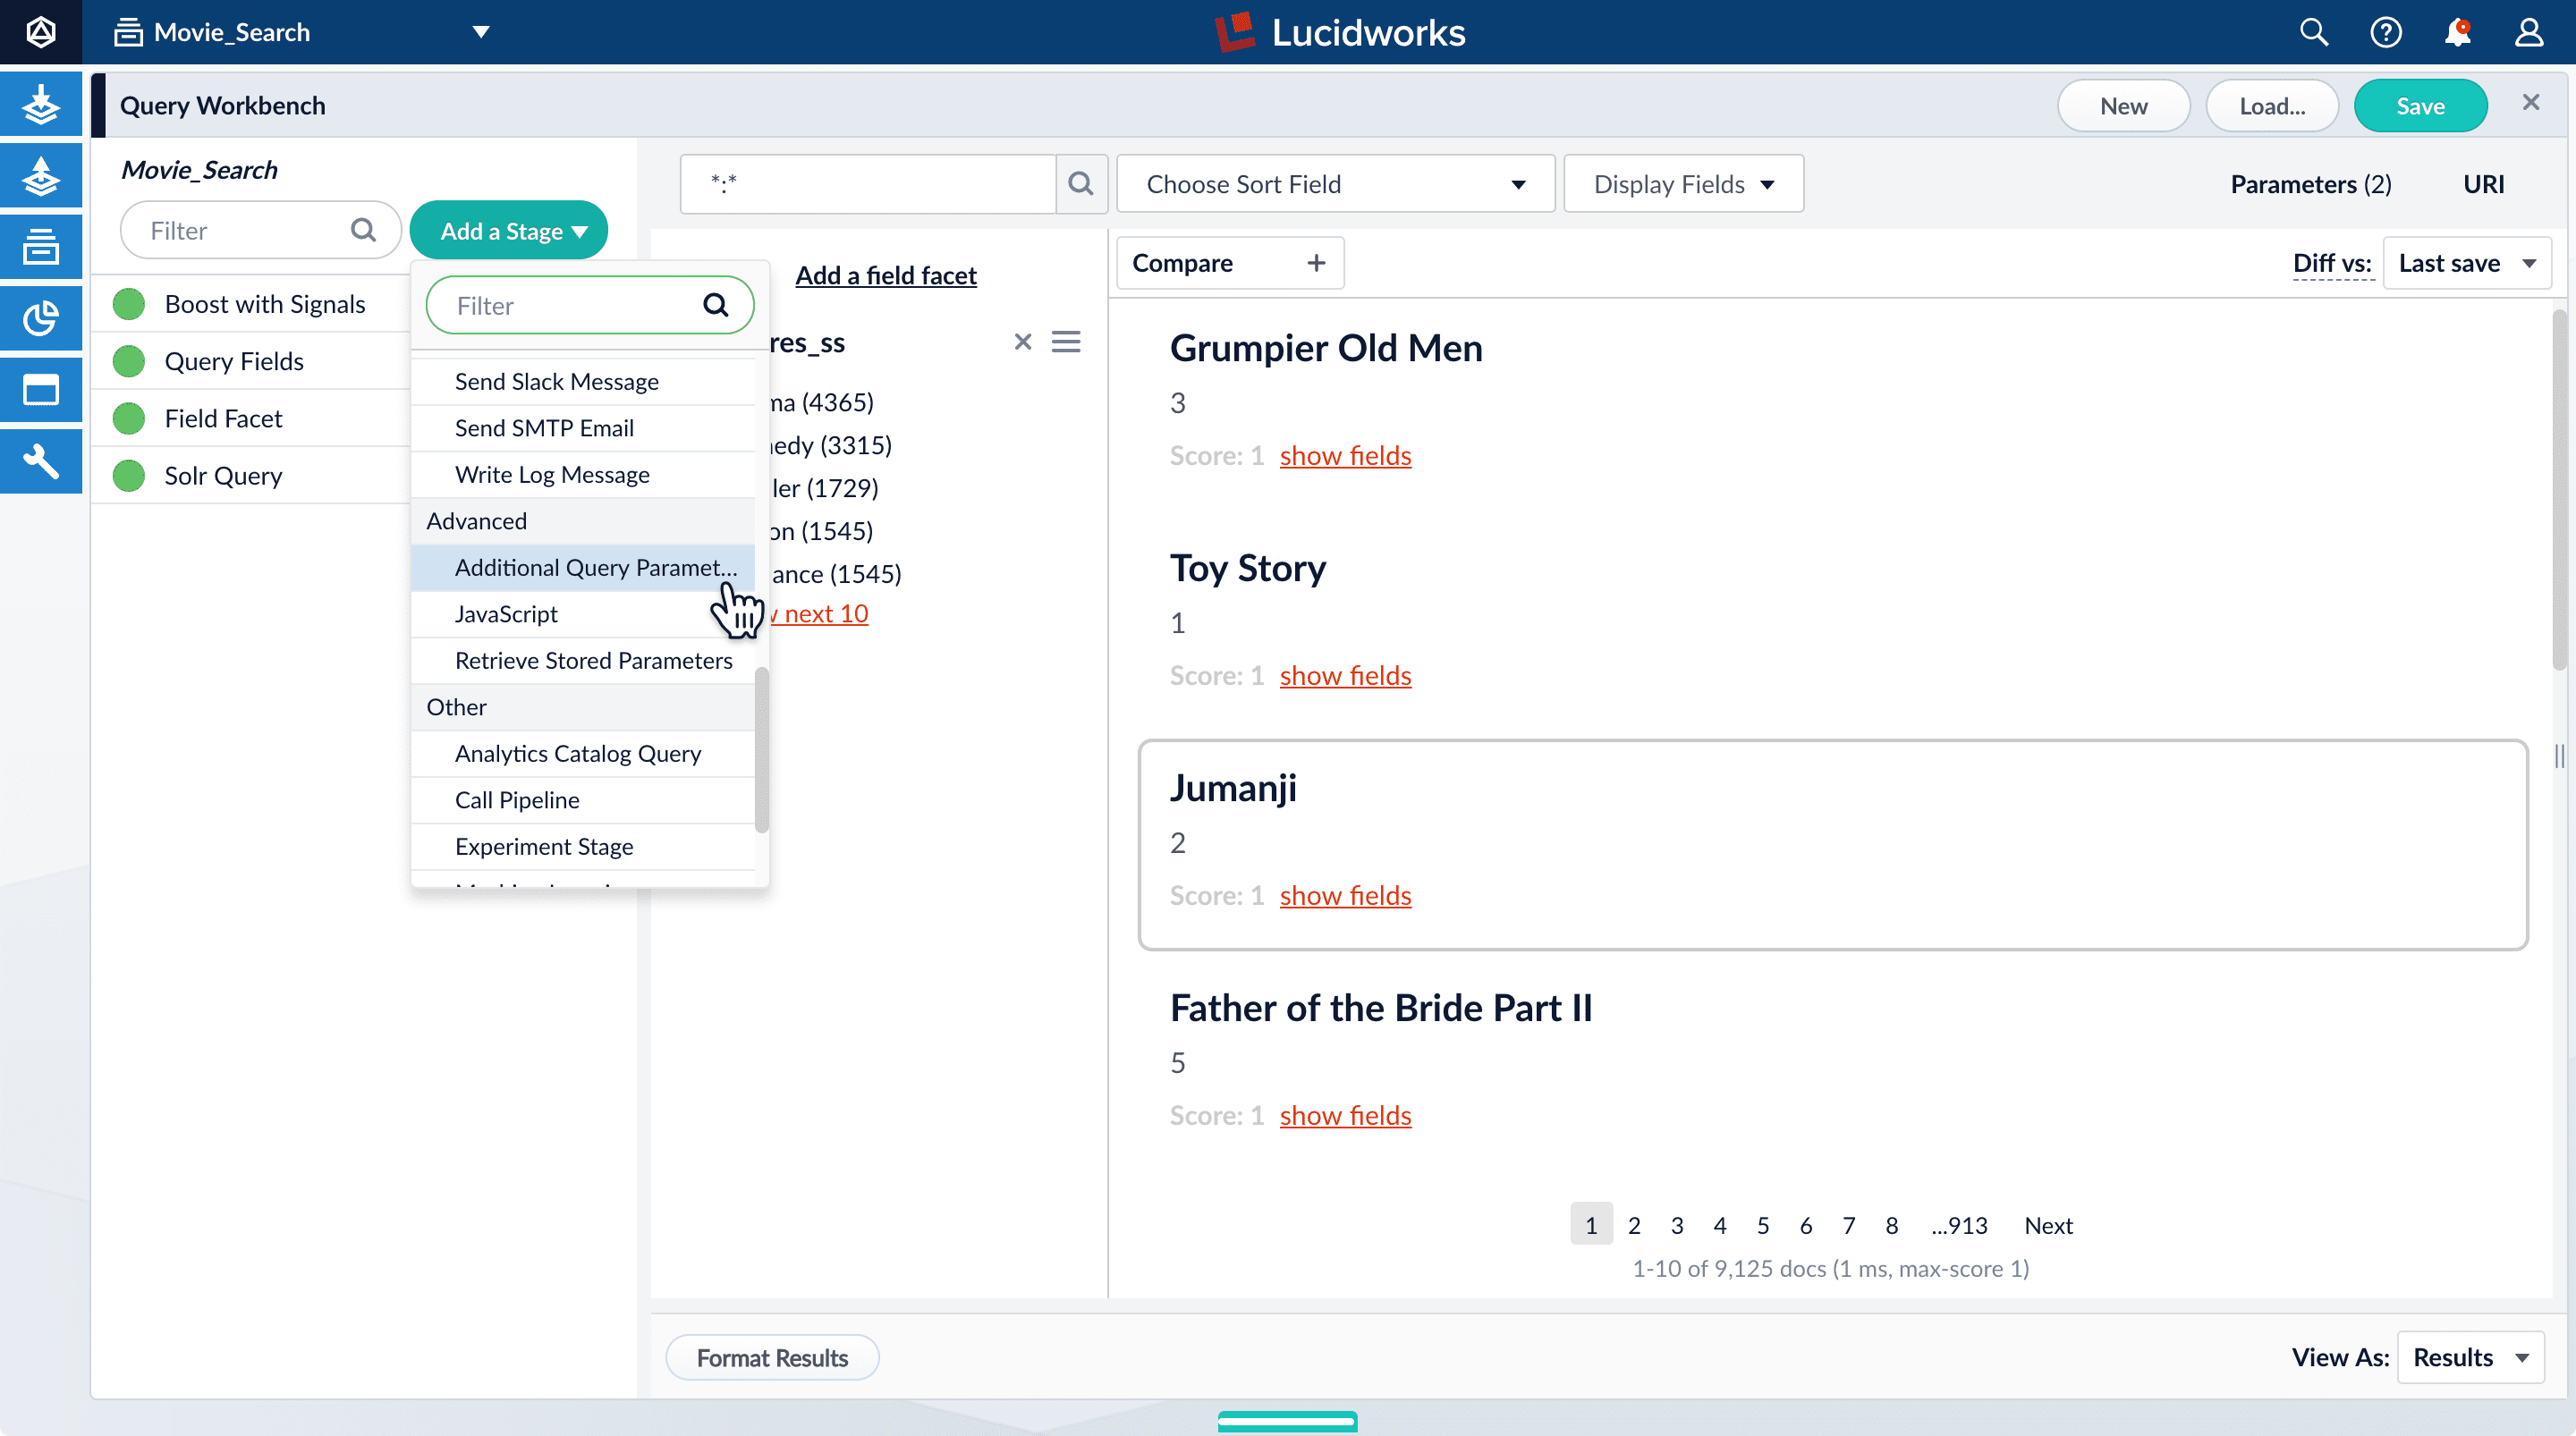
1. Click **Add a stage**.
2. Scroll down under Advanced and select **Additional Query Parameters**.
The Additional Query Parameters configuration panel appears.
3. Under **Parameters and Values**, add the following parameter names and values:
| | |
| --------------------- | --------------- |
| Parameter Name | Parameter Value |
| `facet.range` | `year_i` |
| `facet.range.start` | `1900` |
| `facet.range.end` | `2020` |
| `facet.range.gap` | `10` |
| `facet.range.include` | `outer` |
In this case, you do not need to modify the **Update Policy** field; the default value of `append` is fine.
4. Click **Apply**, and then **Cancel** (which just closes the configuration panel for the Additional Query Parameters stage).
The year facets are now grouped by decade:
Facets are not the only way for users to find items by year. In your user application, you can let users search for specific values in the `year_i` field, for example, by using a text field or dropdown list.
## Configure query fields
In this section, you will see why it is useful to specify which fields Fusion should use to match a query.
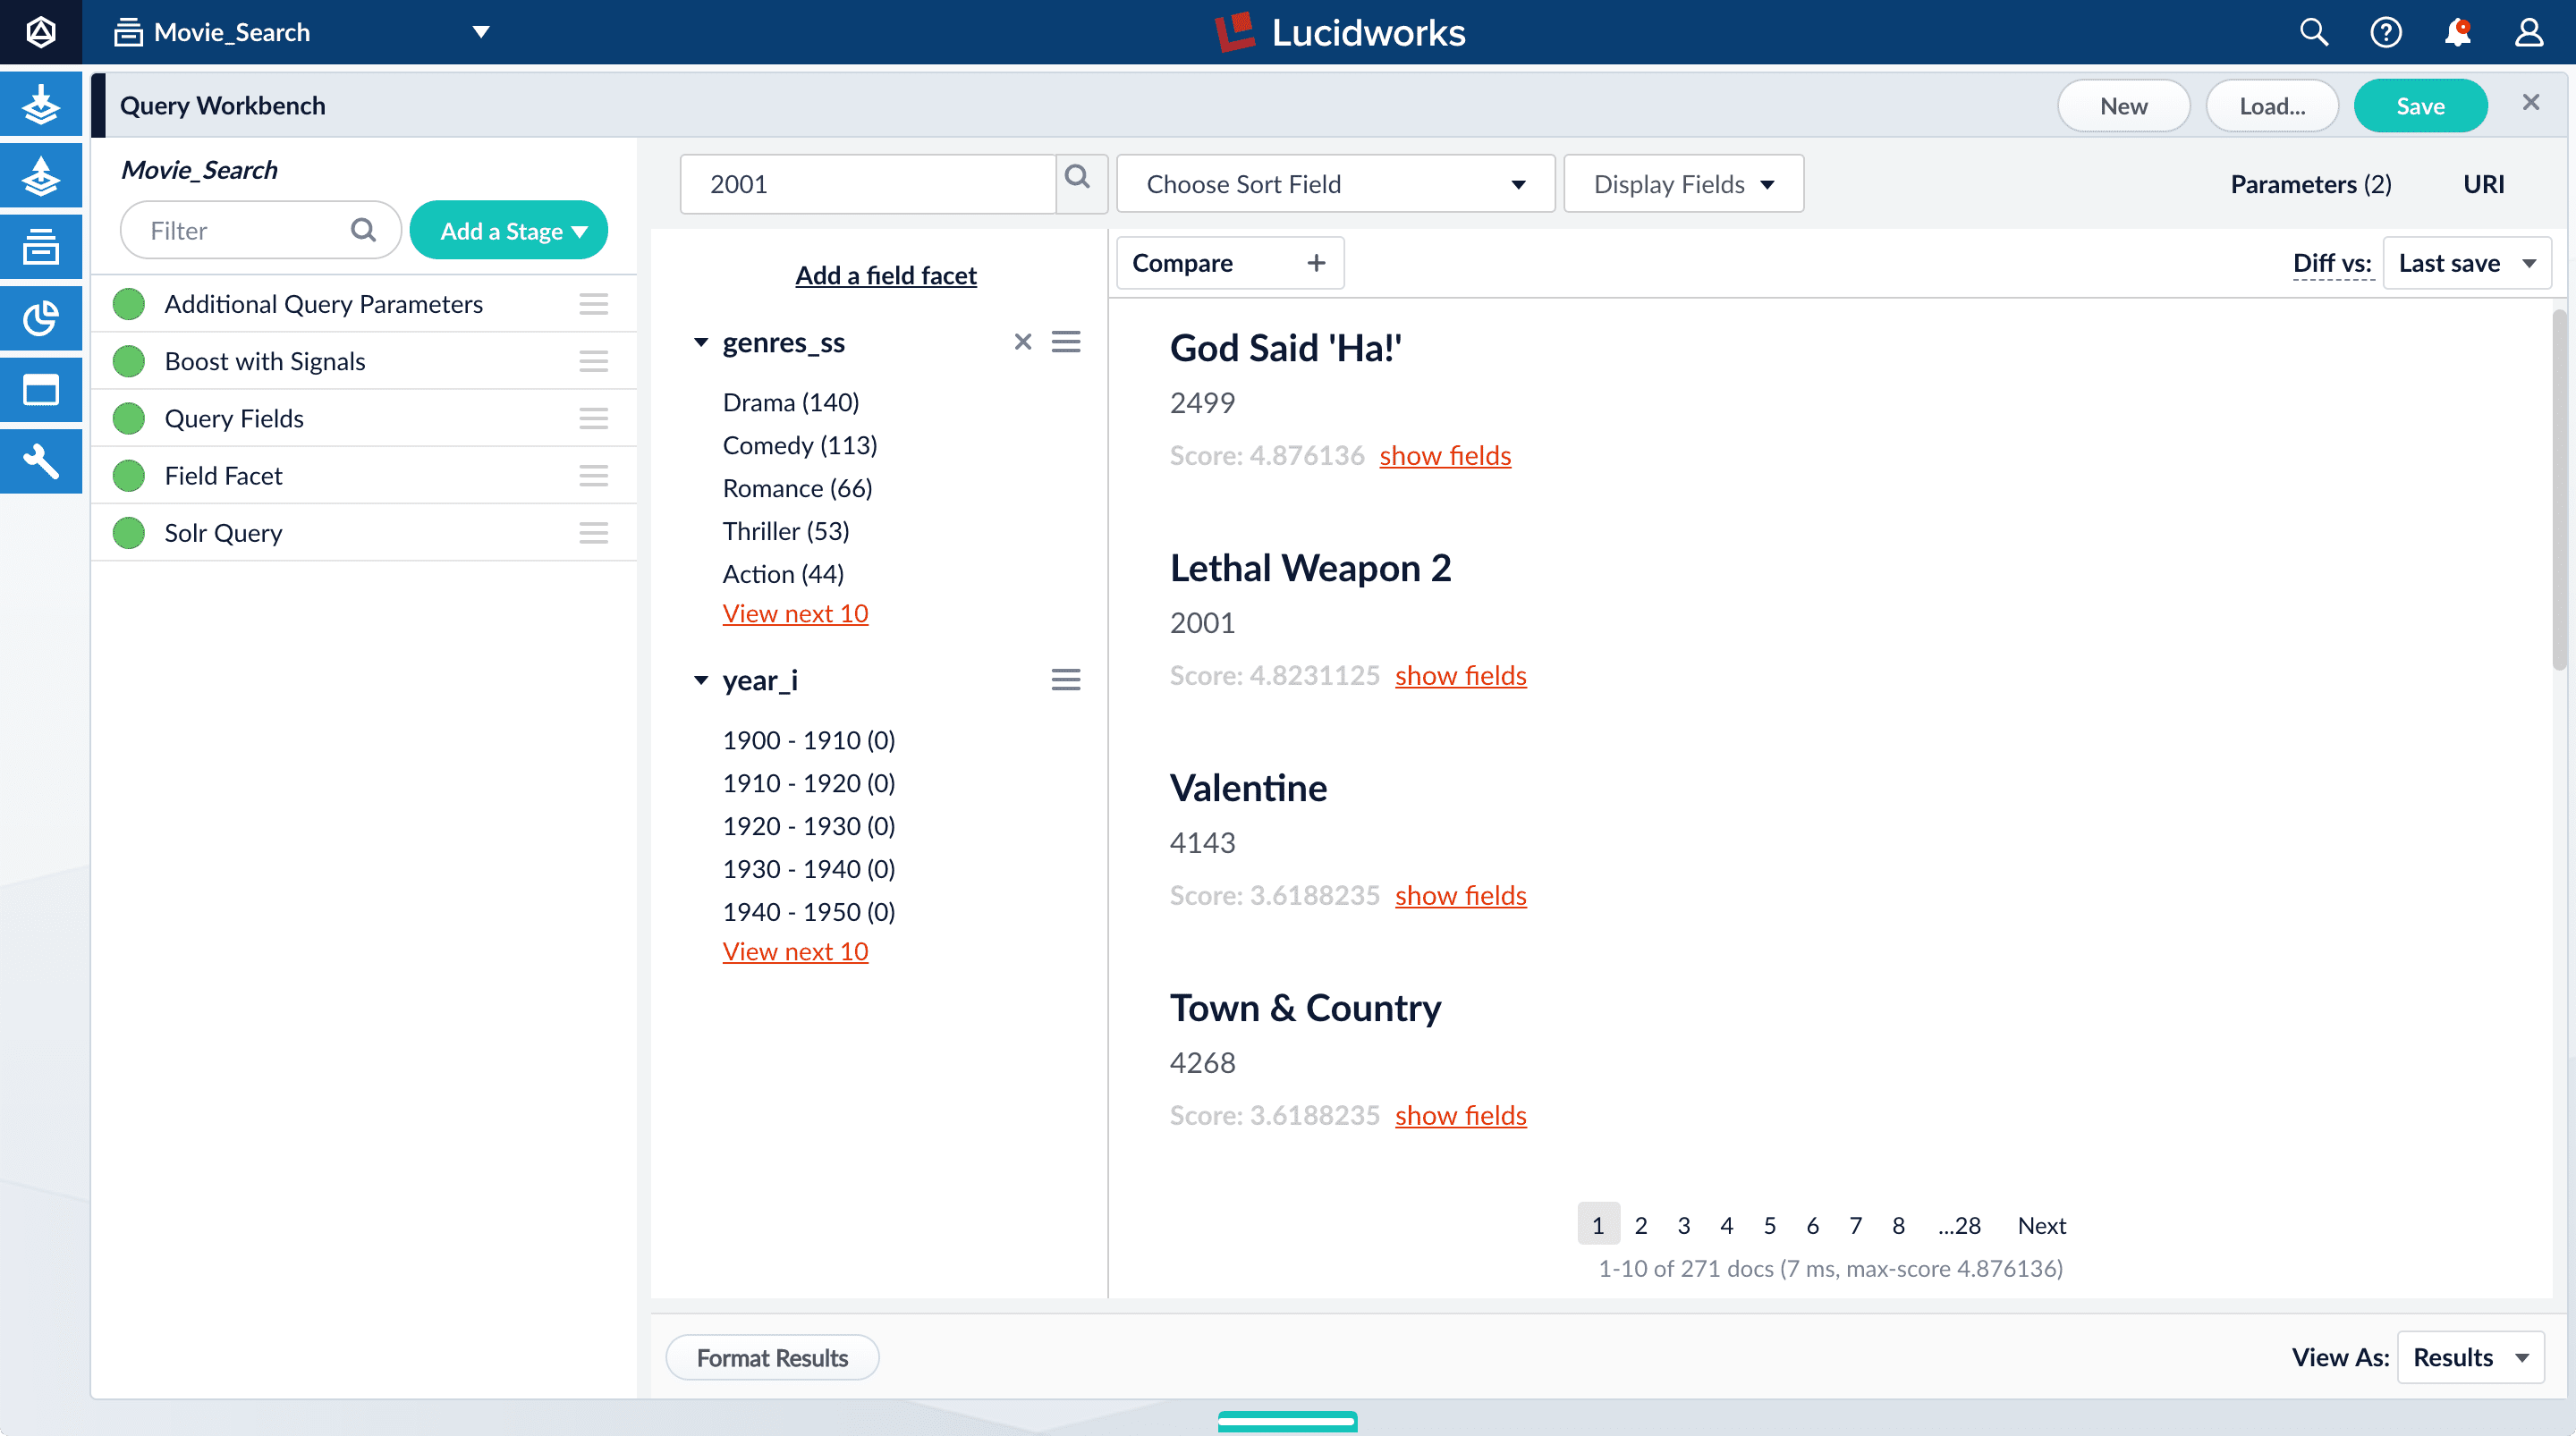
1. Search for "2001".
The results are not what an end user might expect:
"2001: A Space Odyssey" is not the top search result.
2. Under one of the movies listed, click **show fields**.
Here is the reason: your search query matches the `id` field, but users do not care about this field.
You will use the Query Fields stage to specify the fields that users really care about.
3. Below the name for the movie you selected, click **hide fields**.
4. Click the **Query Fields** stage of the query pipeline.
The Query Fields configuration panel appears.
5. Under **Search Fields**, click Add .
6. Enter `title_txt`.
7. Click Add again.
8. Enter `year_i`.
9. Click **Apply**, and then **Cancel** (which just closes the configuration panel for the Query Fields stage).
Now movies with '2001' in their title rise to the top of your search results, followed by films made in the year 2001:
## Save the query pipeline configuration
1. In the upper right, click **Save**.
The **Save Pipeline** window appears. By default, you will overwrite the default query pipeline for this datasource.
2. Click **Save pipeline**.
With just two facet fields combined with keyword search, this prototype is already beginning to feel like a real search application.
Signals are events that can be aggregated and used for automatic boosting or recommendations, which are ways of making search results more relevant.
As an example of boosting, the most popular search results for certain queries can be boosted so that they appear first (or at least nearer the top) when other users make similar queries.
Similarly for recommendations, click events or purchase events can be collected as signals and used to display "Customers who viewed this also viewed" or "Best-selling holiday items".
In a production environment, users' actions generate signals. For the purposes of this tutorial, you will use Query Workbench to generate click signals.
The learning path for **Refining Search Results** focuses on the Fusion features that help you maximize the relevancy of your search results.
## Before you begin
If the Fusion UI is not already open, then open it.
1. In a browser window, open `localhost:8764`.
2. Enter the password for the user `admin`, and then click **Login**.
The Fusion launcher appears.
3. Click the **Movie Search** app.
The Fusion workspace appears.
## Format display fields
To help you understand the continuity in the next steps, first make sure that some relevant fields are displayed.
1. Open Query Workbench.
Navigate to Querying > **Query Workbench**.
2. At the top right of the page, select **Display Fields**.
3. In the **Name** field, click the row to reveal a dropdown of possible values.
4. Select `title_txt`. You can filter the list of possible values to help you.
5. In the **Description** field, select `id`.
6. Close the Display Fields window.
1. Click **Display Fields** to close the Display Fields window.
## Enable synthetic signals
You need some signal data beyond the few signals you generated while completing Part 3. Because this is a prototype app, users are not generating signals. Instead, you will enable synthetic signals in Query Workbench.
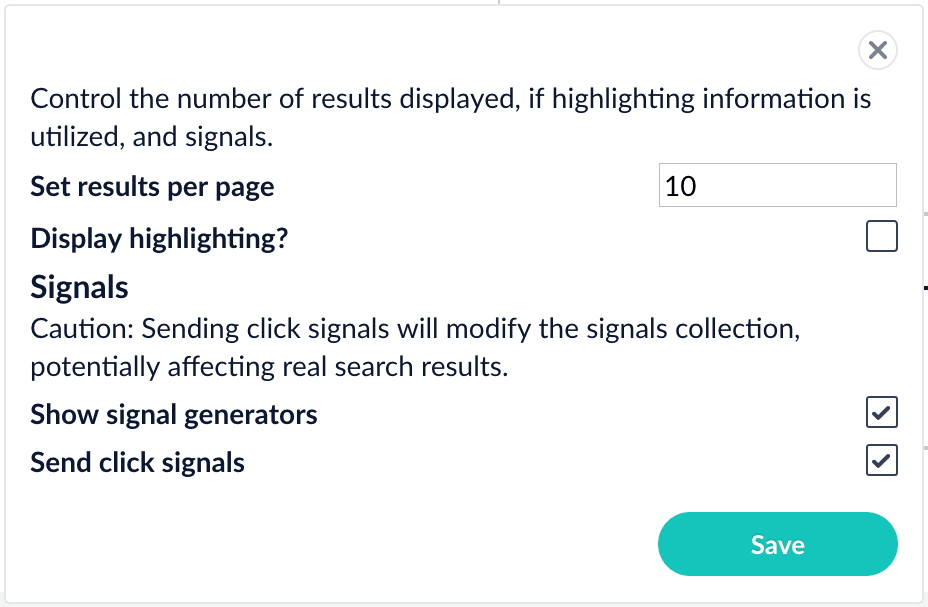
1. At the bottom of the Query Workbench page, click **Format Results**.
2. Select **Show signal generators** *and* **Send click signals**.
3. Click **Save**.
4. Hover over one of the search results.
Now when you hover over a search result, Query Workbench displays controls that include a **Simulate** button next to a field that lets you specify the number of signals to simulate:
## Generate signals
With synthetic signals enabled, you will generate a simple set of signal data that you can use to generate meaningful recommendations.
For this tutorial, you will generate signals that you can use to boost your favorite sci-fi titles so that they appear first.
1. Search for `star wars`.
The top results are not your favorite titles:
2. In **Format Results**, **Set results per page** to 20. This should allow you to scroll for this next part instead of explicitly searching for the titles.
Next you will generate signals that you can use to boost certain titles. Signals are tied to the search query, so your boosted titles will appear first in the search results only when users search for `star wars`.
3. Hover over "Star Wars: Episode IV - A New Hope".
4. Set the number of signals to 4000 and click **Simulate**.
5. Hover over "Star Wars: Episode V - The Empire Strikes Back".
6. Set the number of signals to 3000 and click **Simulate**.
7. Hover over "Star Wars: Episode VI - Return of the Jedi".
8. Set the number of signals to 2000 and click **Simulate**.
With synthetic signals enabled, you can also send a single signal by clicking the underlined movie title.
9. In the upper right, click **Save**.
The **Save Pipeline** window appears. By default, you will overwrite the existing query pipeline for the selected collection (in this case, `Movie_Search_signals`).
10. Click **Save pipeline**.
## Explore the raw signals
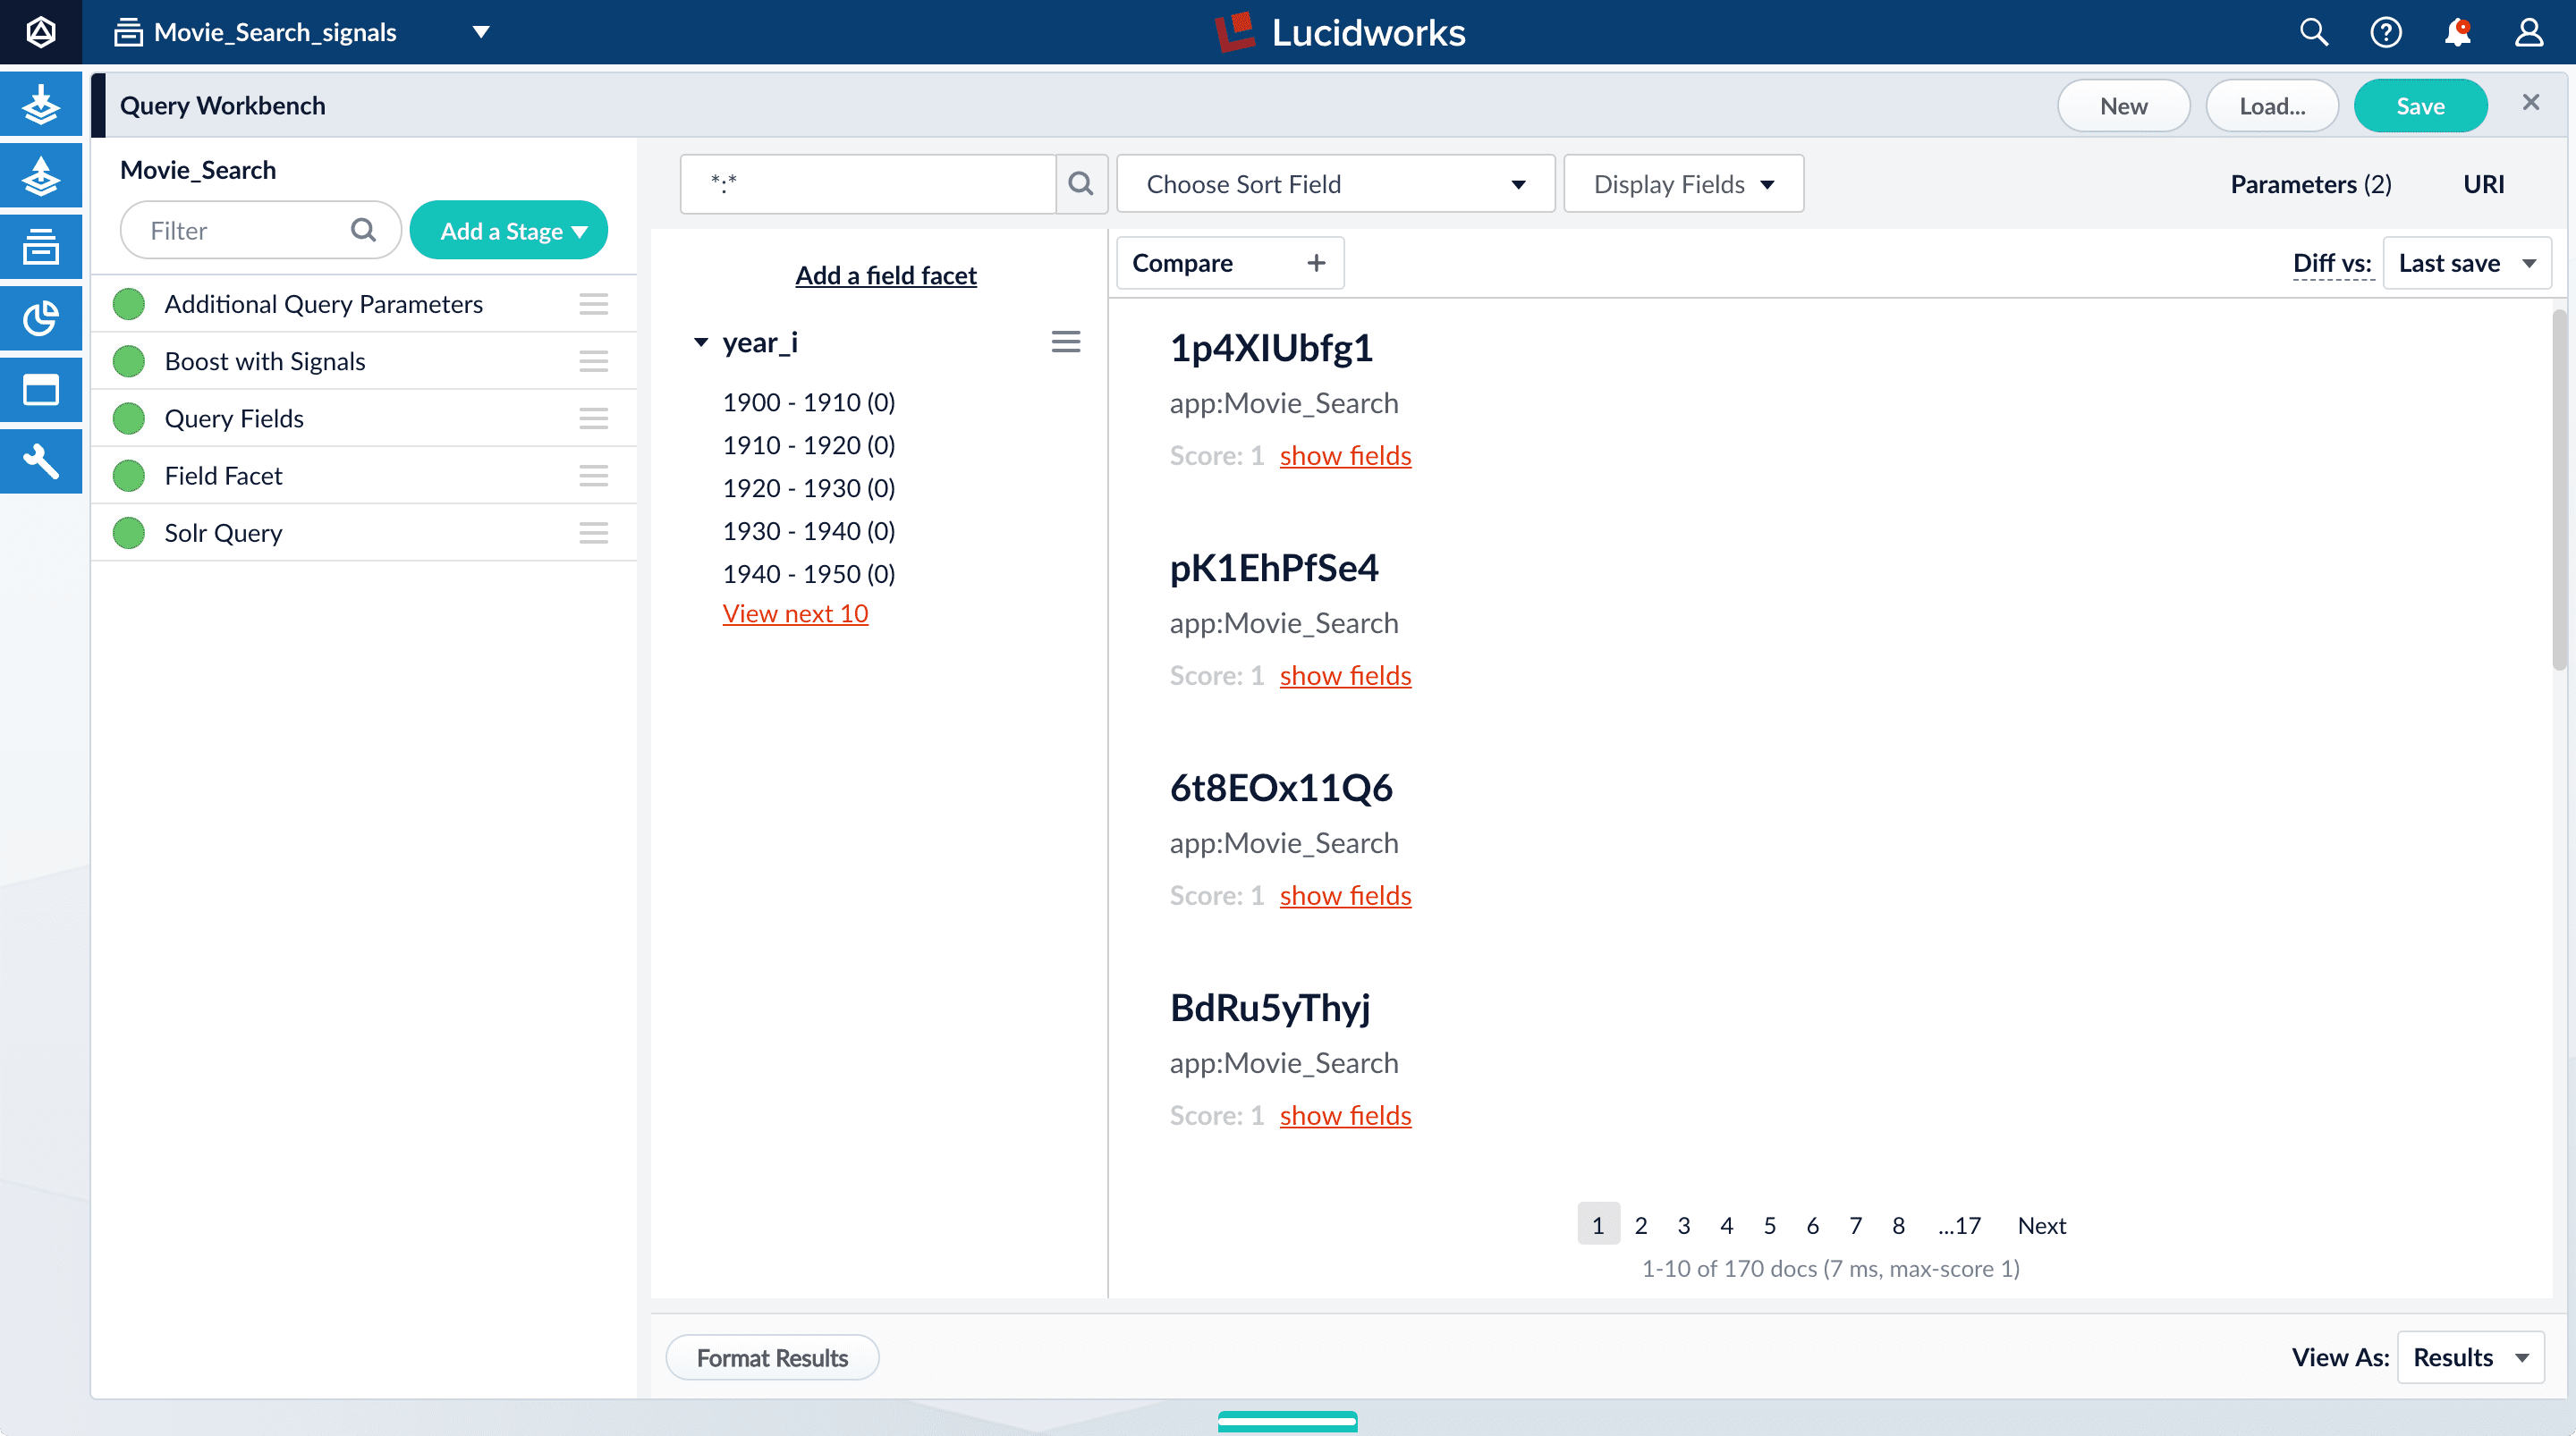
Whenever you create a collection, two corresponding collections are also created automatically: `COLLECTION_NAME_signals` for raw signals and `COLLECTION_NAME_signals_aggr` for aggregated signals (in this case, `Movie_Search_signals` and `Movie_Search_signals_aggr`). Just as you did with your primary collection, you can use Query Workbench to explore the data in the `_signals` collection.
1. In the collection picker in the upper left, select **Movie\_Search\_signals**.
2. Open Query Workbench. Navigate to Querying > **Query Workbench**.
Your signal data appears.
Your signals collection contains several types of signals, such as click signals and search result signals. Let us investigate the click signals.
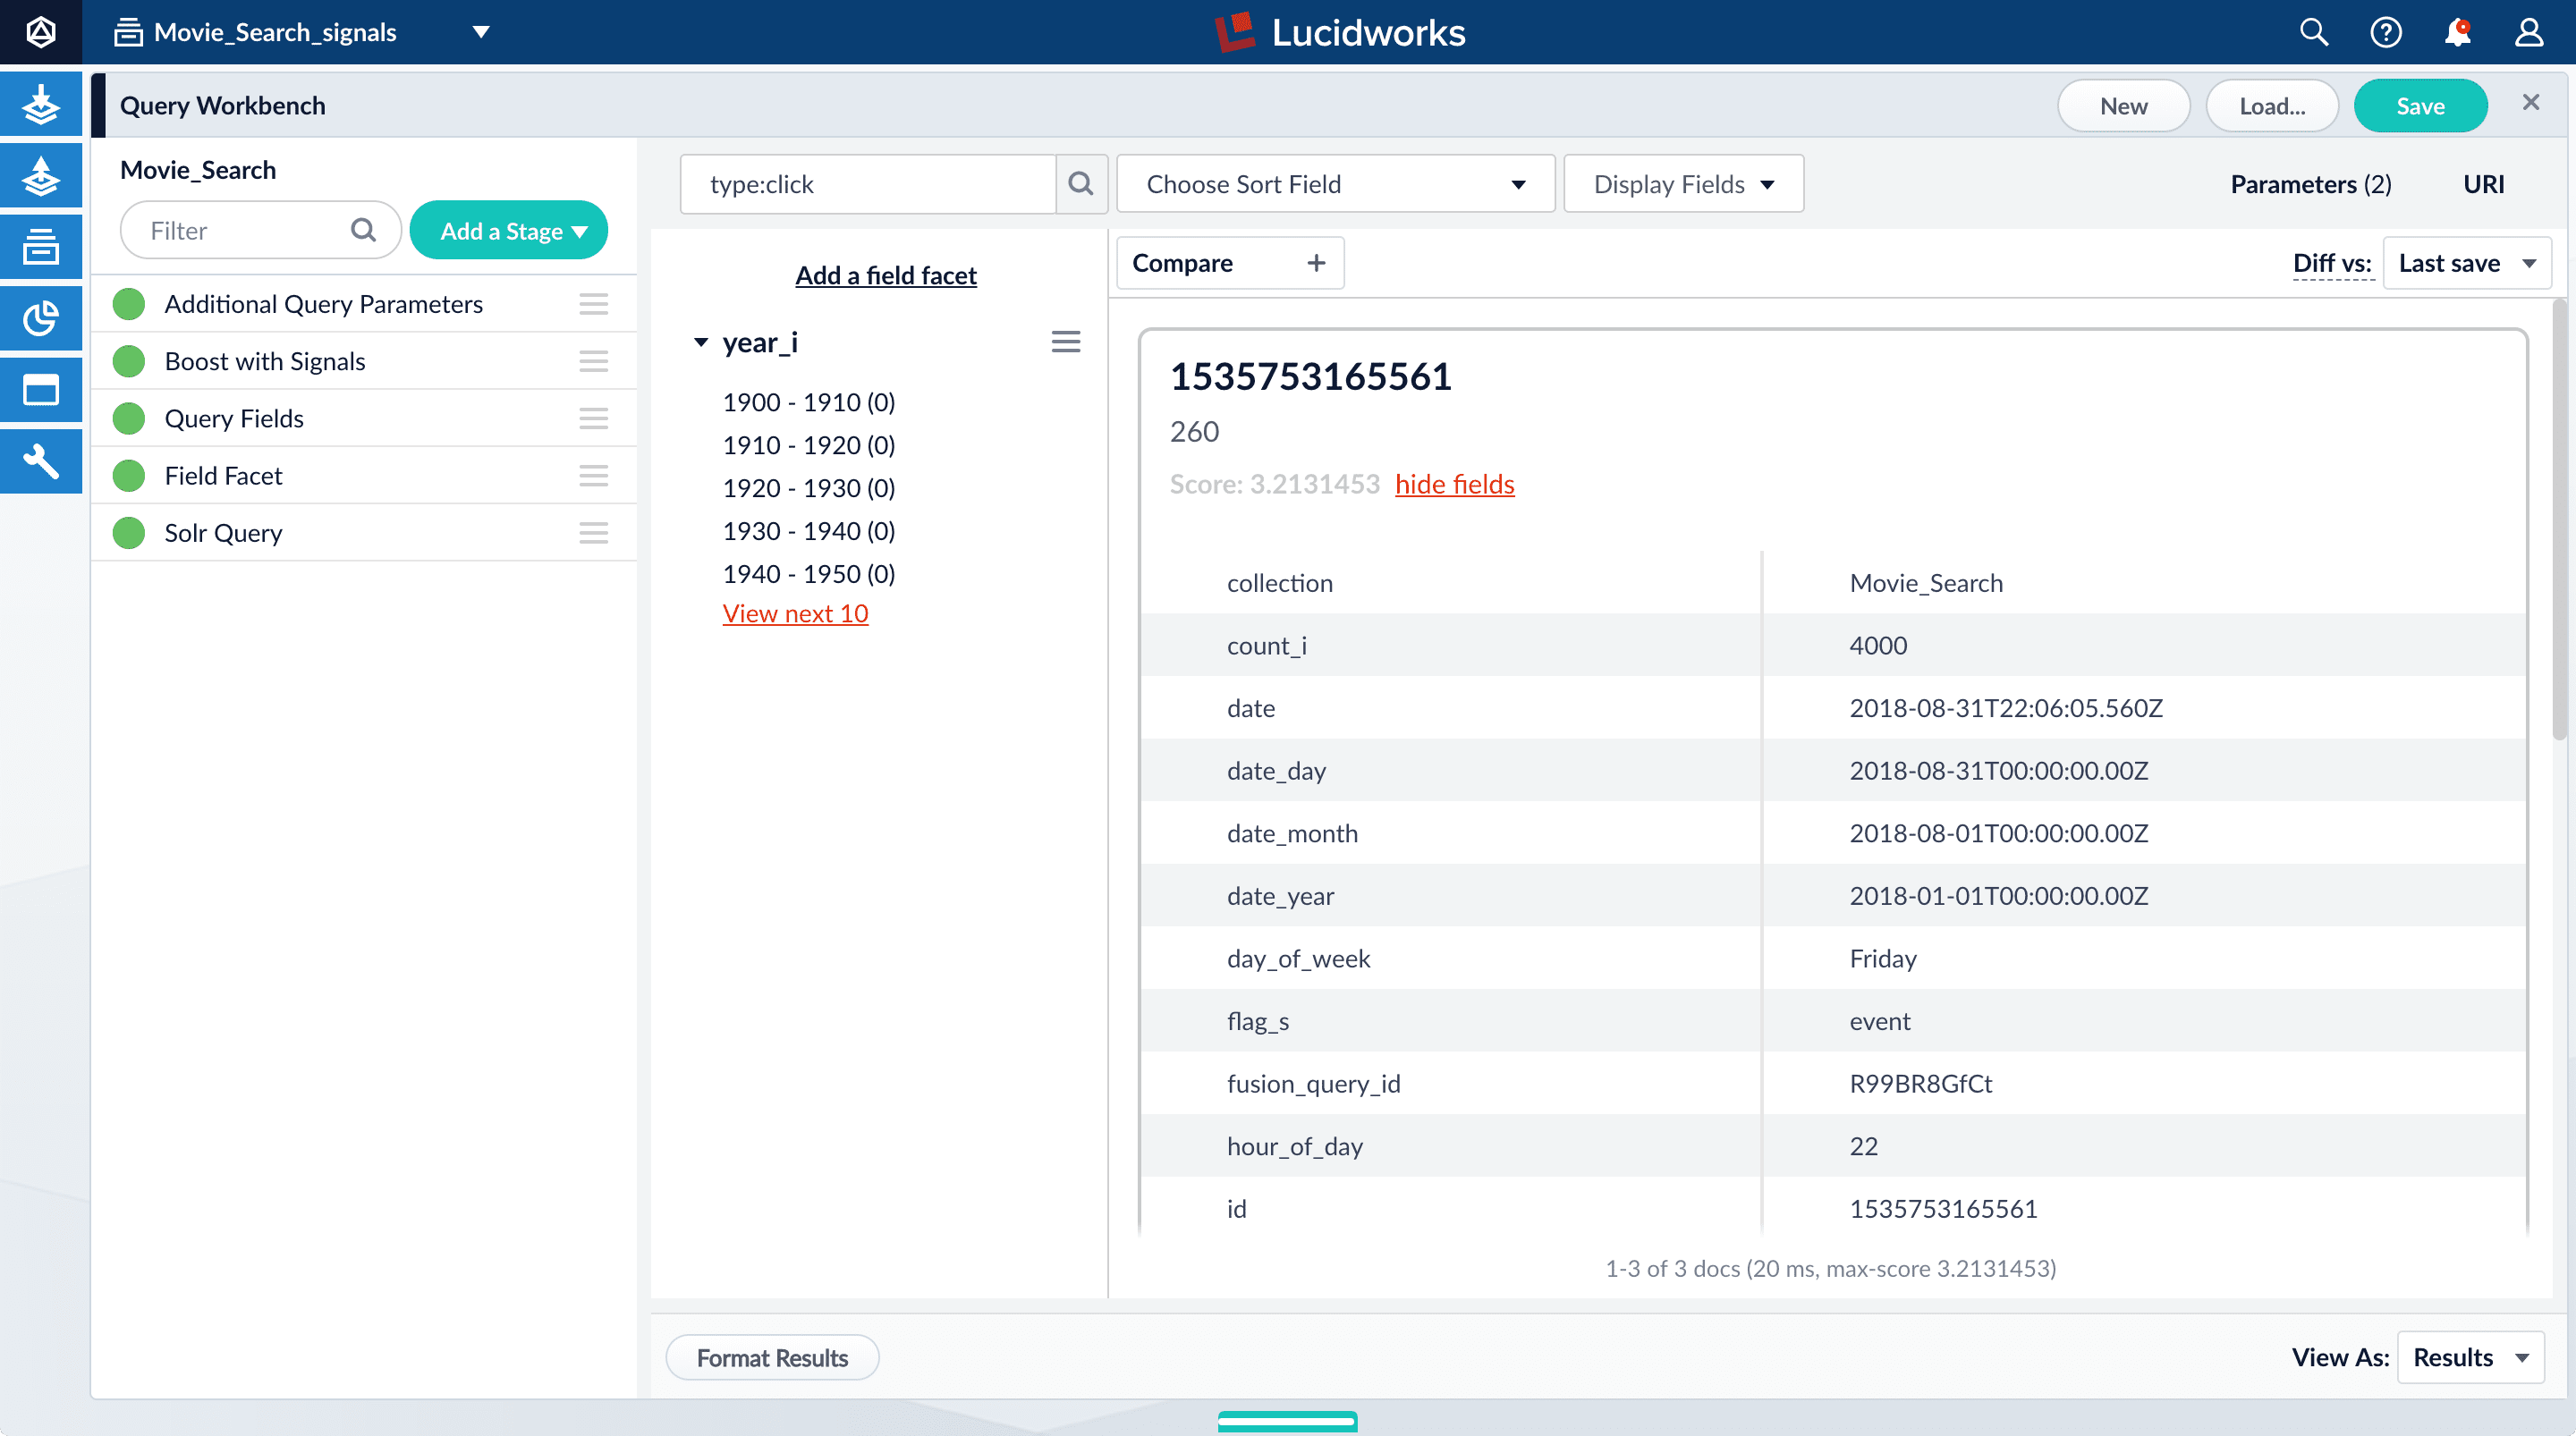
3. Search for `type:click`.
4. For any of the results, click **show fields**.
* The `count_i` field shows the number of click signals you generated for this event. For example, given the corresponding `doc_id` for Star Wars: Episode IV - A New Hope, the `count_i` equals 4000.
In Fusion 4.0:
\*\*\* The contents of the `doc_id_s` field in the `Movie_Search_signals` collection is the same as the contents of the `id` field in your `Movies_Search` collection, that is, the ID of the document that you clicked in Query Workbench, or for which you specified a number of clicks, and then clicked *Simulate*\*.
\*\* The `query_orig_s` field in the `Movie_Search_signals` collection contains the original query string that produced this search result.
5. Click **hide fields**.
### Optional: Format signals fields
You can configure your search view to display fields that are meaningful for your investigation.
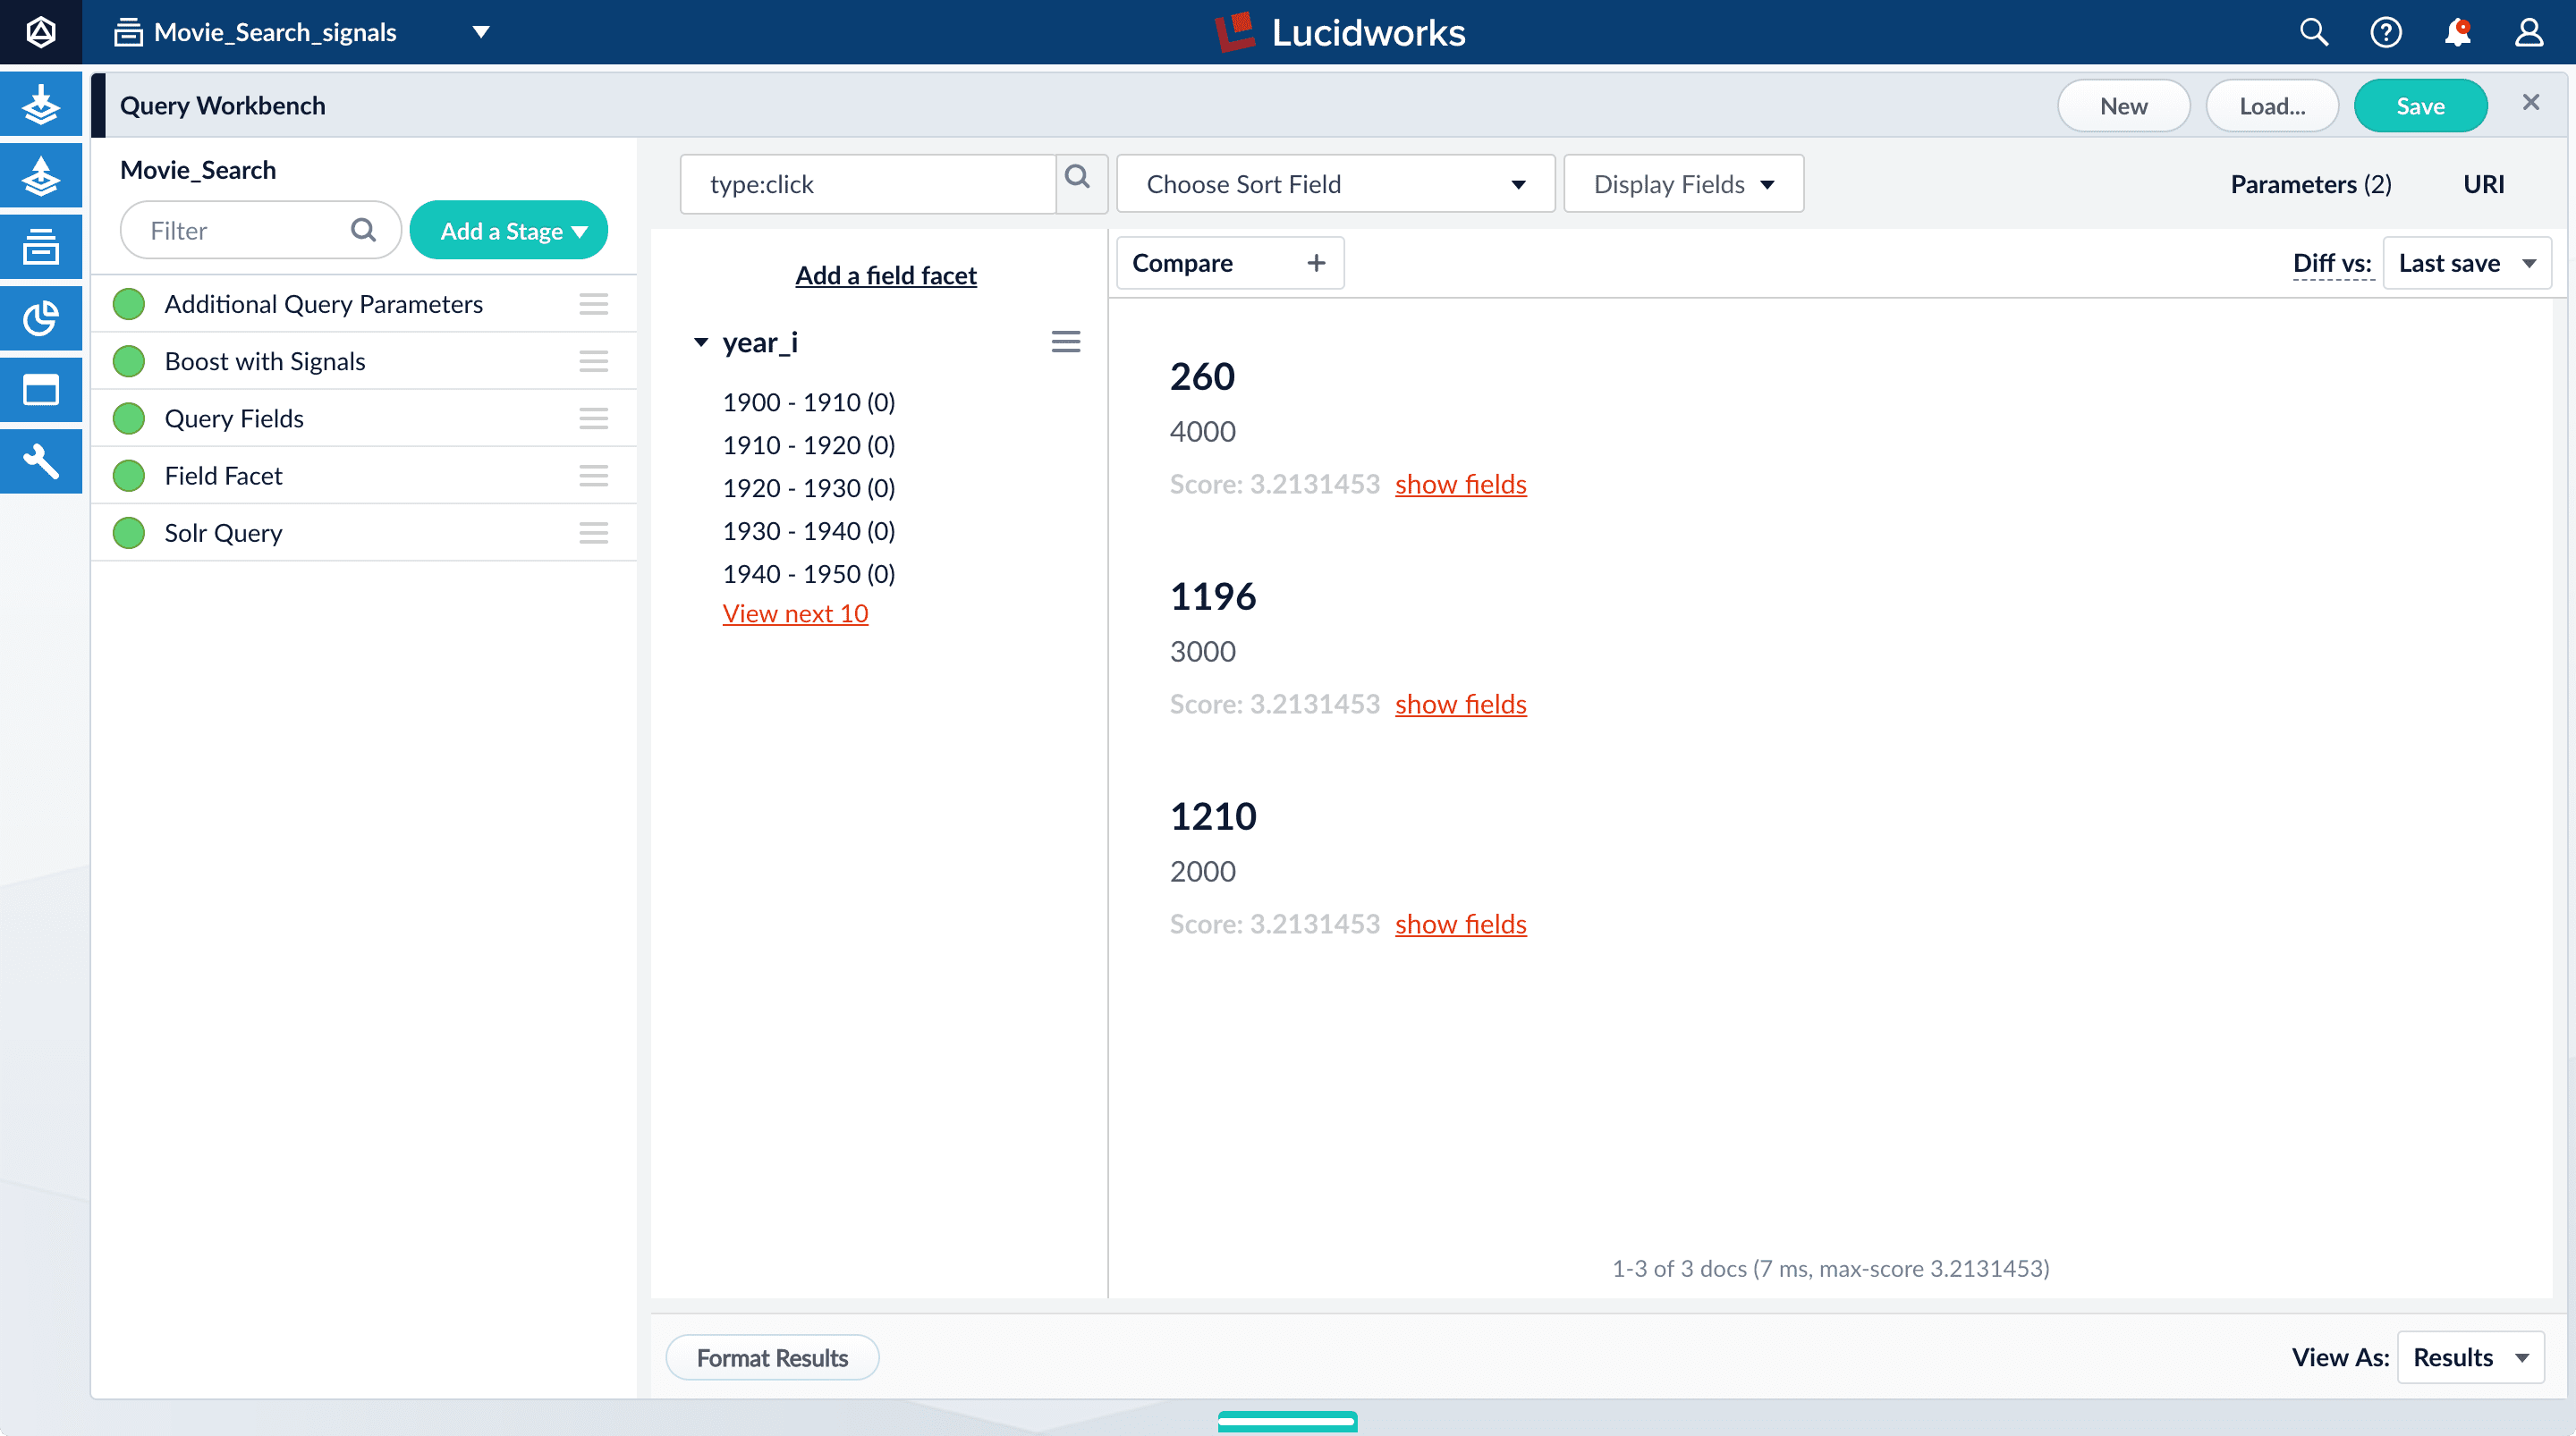
For example, you can display the document ID and the number of click signals.
1. Click **Display Fields**.
2. For the **Name** field, select `doc_id`.
3. For the **Description** field, select `count_i`.
## Explore the aggregated signal data
Aggregation jobs are created automatically when you create an app. However, you need to run the aggregation job manually:
1. Navigate to Collections > **Jobs**.
2. Select `Movie_Search_click_signals_aggregation` from the job list.
3. Click **Run**.
4. Click **Start**.
After you run your job (it might take a minute or two), open the Query Workbench and check whether the aggregated data has arrived in the `Movie_Search_signals_aggr` collection.
1. In the collections picker in the upper left, select **Movie\_Search\_signals\_aggr**.
2. Open Query Workbench. Navigate to Querying > **Query Workbench**.
Your aggregated signal data should appear. If not, wait a minute and then reload your browser, or click Search in Query Workbench.
3. Click **Display Fields**.
4. For the **Name** field, select `doc_id`.
5. For the **Description** field, select `aggr_count_i`.
6. For the result 1210, click **show fields**.
The fields for aggregated signals are very similar to the fields for raw signals, with additional fields to describe the aggregation:
* `aggr_count_i`. Number of signals that have been aggregated (in this case, 3000)
* `aggr_id_s`. Name of the aggregation job
* `aggr_job_id_s`. Job ID
* `aggr_type_s`. Aggregation type
7. In the upper right, click **Save**.
The **Save Pipeline** window appears. By default, you will overwrite the existing query pipeline for the selected collection (in this case, `Movie_Search`).
8. Click **Save pipeline**.
## View the search results with and without default boosting
1. In the collections picker in the upper left, select **Movie\_Search**.
2. Open Query Workbench. Navigate to Querying > **Query Workbench**.
3. Search for `star wars`.
Now, "Star Wars: Episode IV - A New Hope" is the first search result, followed by Episode V and then VI. These search results are automatically boosted by the default configuration of the
Boost with Signals query pipeline stage,
which boosts on the `id` field.
The Boost with Signals stage requires a Fusion AI license. Your Fusion Server trial license enables Fusion AI features.
4. Click **Compare**. Another preview panel opens. Now the working pipeline is on the right and a static snapshot of that same pipeline is on the left.
In this view, you can compare results from one query pipeline side by side with another query pipeline.
In this case, you will compare results for the same pipeline (`Movie_Search`) with and without the Boost with Signals stage enabled.
5. Turn off the Boost with Signals stage.
Now the search results on the right appear as they did before you generated synthetic click signals. Rank-change indicators indicate which results moved up or down as a result of turning off boosting.
6. Turn on the Boost with Signals stage again to restore the boosted results.
7. Close the comparison preview panel by clicking the close icon.
 The Movie Search app now appears in the Fusion launcher:
 You now have Fusion installed, configured, and running. You also have the MovieLens dataset from which you will use a CSV file that contains data about movies. And you have a Fusion app that you will transform into a movie search app.
 > **Query Workbench**.
 ### Perform a search
The default search is the wildcard search (`\*:*`), which returns all documents in the collection. You will enter a different search query to get started with facet configuration.
1. In the search box, enter the query string `star`, and then press Enter or click Search
### Perform a search
The default search is the wildcard search (`\*:*`), which returns all documents in the collection. You will enter a different search query to get started with facet configuration.
1. In the search box, enter the query string `star`, and then press Enter or click Search  .
This search returns all movies that have the word "star" in the title.
.
This search returns all movies that have the word "star" in the title.
 The output is configured by the default query pipeline, which has the same name as the collection (4.x) or app (5.x). In this case, the name is `movie-search`.
To see more of the default output, you can perform other searches if you like.
1. In the search box, enter the query string `\*:*` to return all documents, and then press Enter or click Search
The output is configured by the default query pipeline, which has the same name as the collection (4.x) or app (5.x). In this case, the name is `movie-search`.
To see more of the default output, you can perform other searches if you like.
1. In the search box, enter the query string `\*:*` to return all documents, and then press Enter or click Search 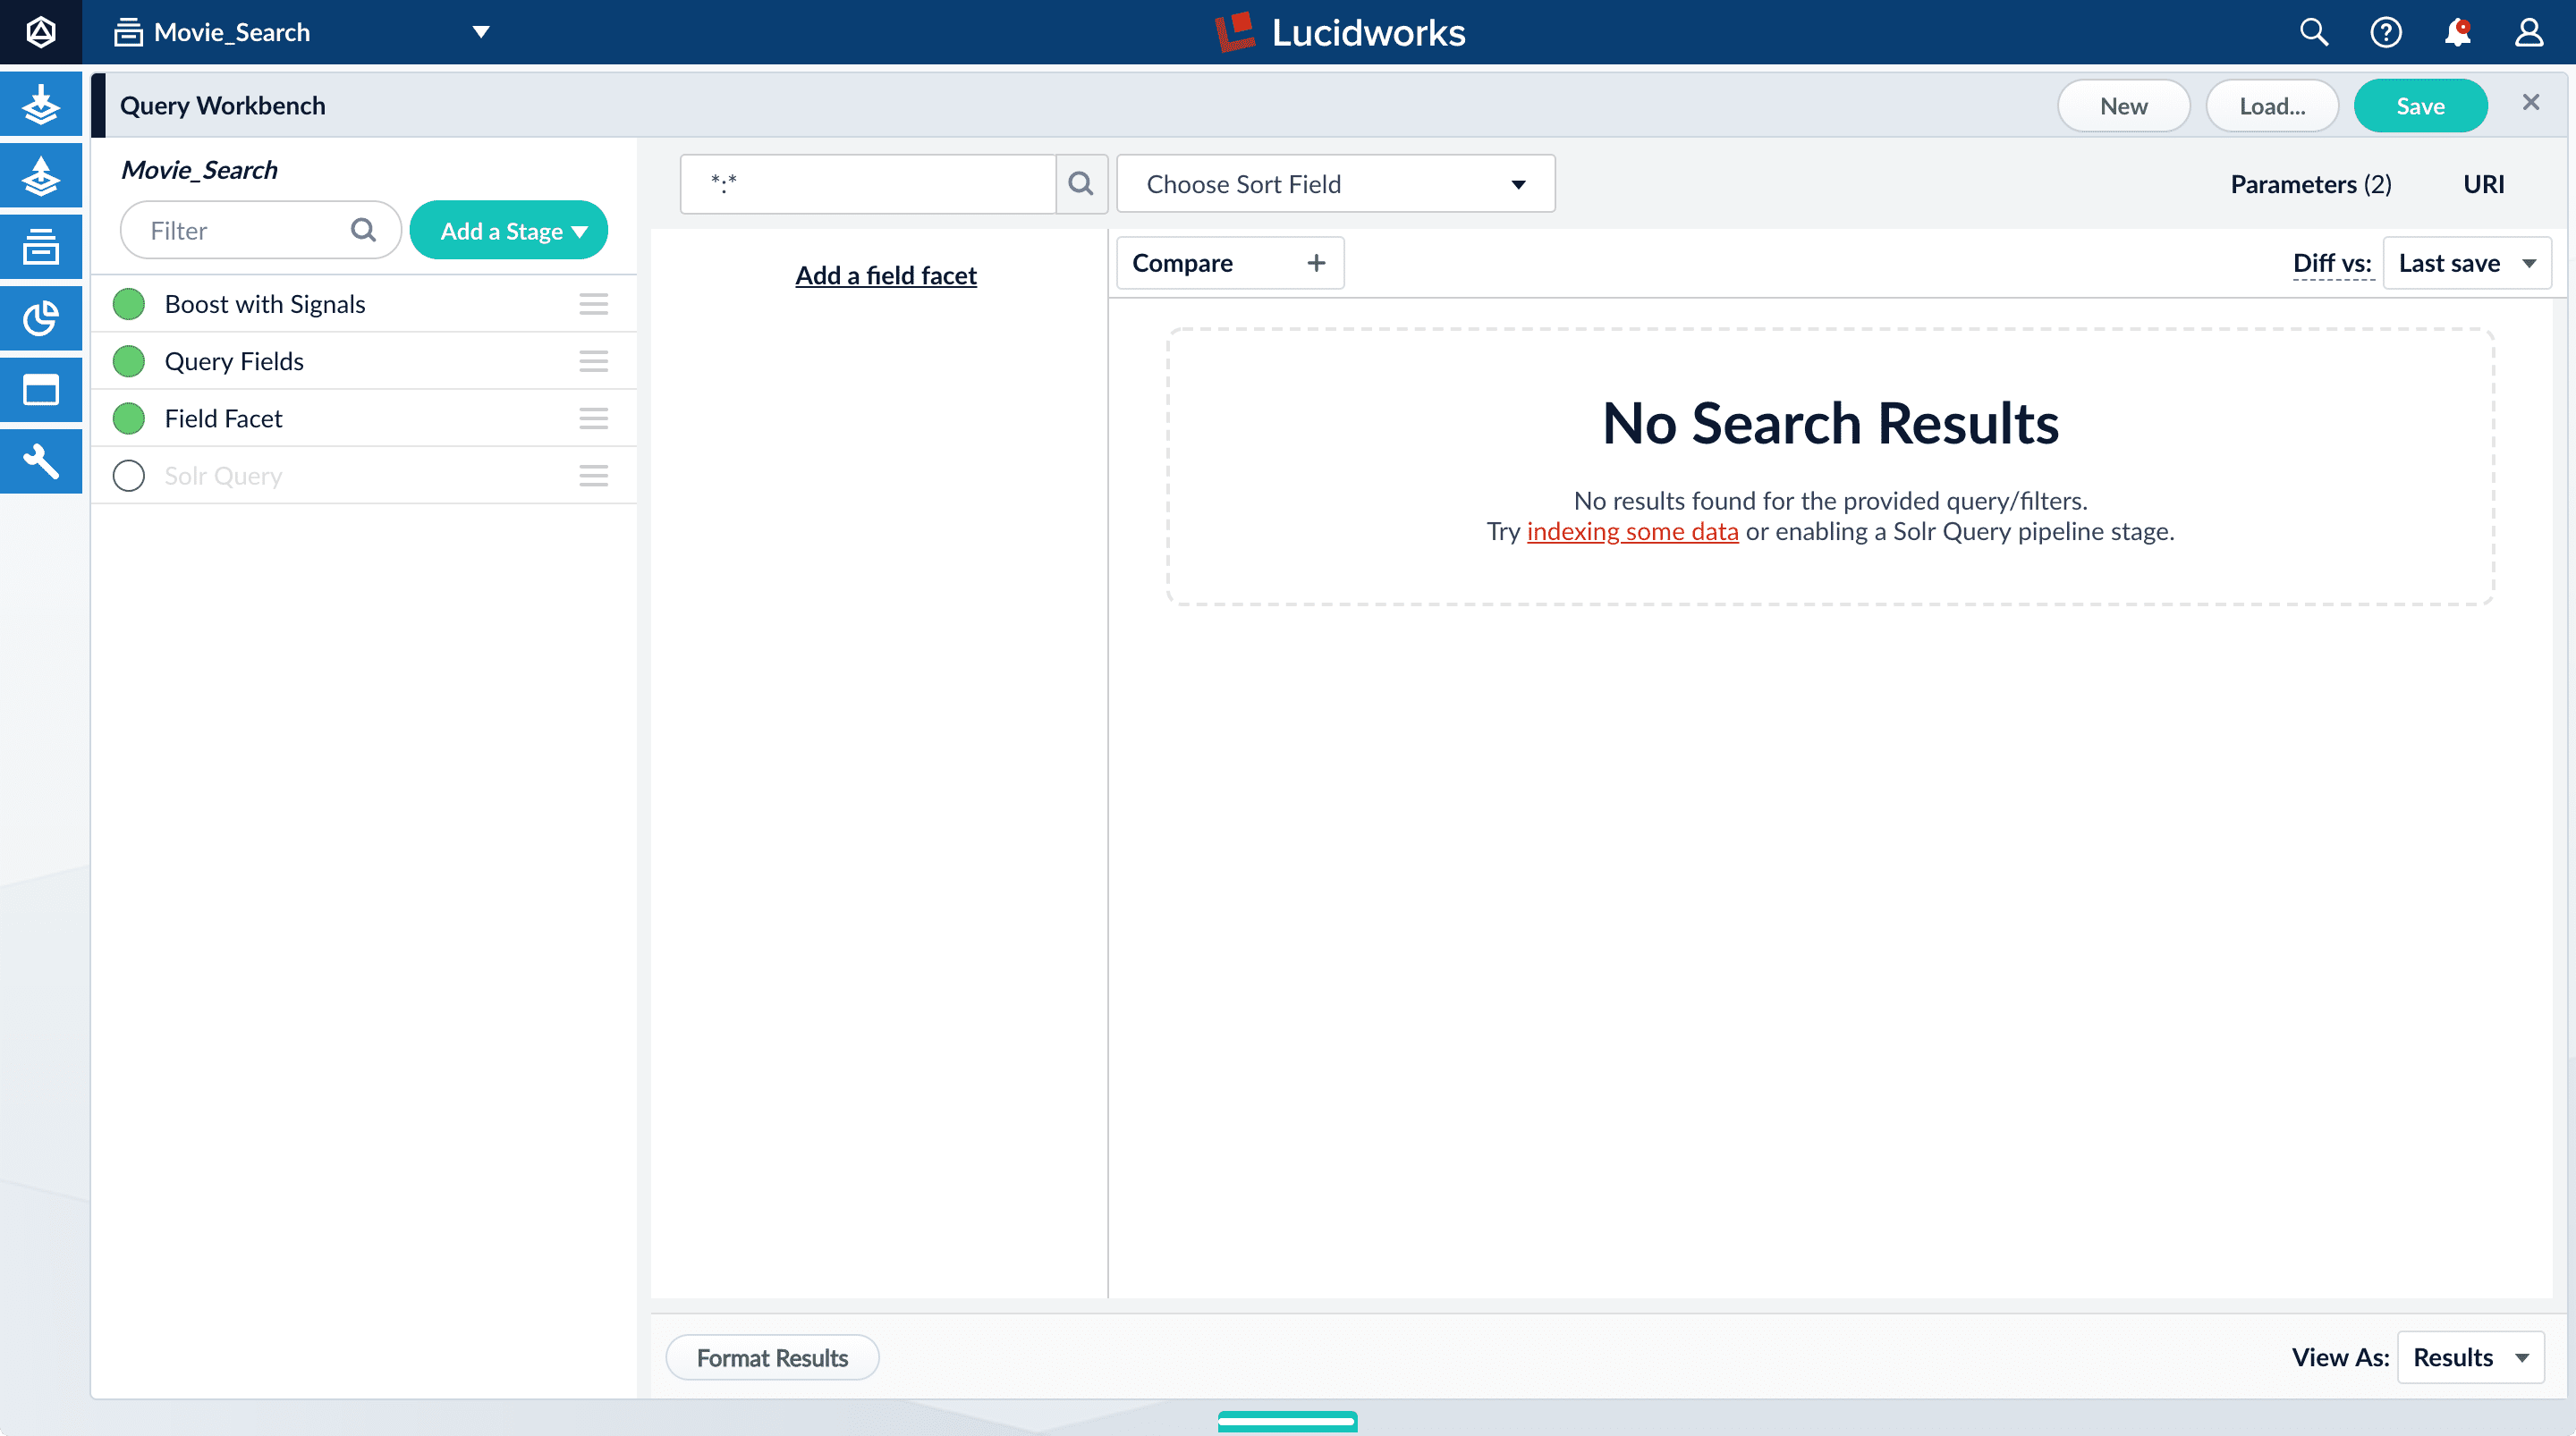 All search results disappear from the preview pane because Fusion does not send a query to Solr.
2. Turn on the Solr Query stage and turn all other stages off.
All search results disappear from the preview pane because Fusion does not send a query to Solr.
2. Turn on the Solr Query stage and turn all other stages off.
 Now the search results look much like they did before. At this point, the disabled stages do not affect the output because they are not yet configured.
3. Turn all stages on.
## Configure faceting
Facets are the ubiquitous, dynamic lists of categories or features offered as filters within a search results page. Facets provide a simple way for users to explore and filter their search results without having to construct complicated queries. You configure facets as a part of configuring a query pipeline.
The data you indexed in Part 1 has two fields that are natural choices for faceting: `genres_ss` and `year_i`. For example, a user could search for science fiction of the 1950s in just a few clicks.
Now the search results look much like they did before. At this point, the disabled stages do not affect the output because they are not yet configured.
3. Turn all stages on.
## Configure faceting
Facets are the ubiquitous, dynamic lists of categories or features offered as filters within a search results page. Facets provide a simple way for users to explore and filter their search results without having to construct complicated queries. You configure facets as a part of configuring a query pipeline.
The data you indexed in Part 1 has two fields that are natural choices for faceting: `genres_ss` and `year_i`. For example, a user could search for science fiction of the 1950s in just a few clicks.
 ### Configure basic faceting for genres
The `genres_ss` field is ready for faceting as-is.
1. Click **Add a field facet** and select the `genres_ss` field.
### Configure basic faceting for genres
The `genres_ss` field is ready for faceting as-is.
1. Click **Add a field facet** and select the `genres_ss` field.
 2. Click **Sci-Fi** to select movies that have the value `Sci-Fi` for `genres_ss`:
 The Additional Query Parameters configuration panel appears.
3. Under **Parameters and Values**, add the following parameter names and values:
| | |
| --------------------- | --------------- |
| Parameter Name | Parameter Value |
| `facet.range` | `year_i` |
| `facet.range.start` | `1900` |
| `facet.range.end` | `2020` |
| `facet.range.gap` | `10` |
| `facet.range.include` | `outer` |
In this case, you do not need to modify the **Update Policy** field; the default value of `append` is fine.
4. Click **Apply**, and then **Cancel** (which just closes the configuration panel for the Additional Query Parameters stage).
The year facets are now grouped by decade:
The Additional Query Parameters configuration panel appears.
3. Under **Parameters and Values**, add the following parameter names and values:
| | |
| --------------------- | --------------- |
| Parameter Name | Parameter Value |
| `facet.range` | `year_i` |
| `facet.range.start` | `1900` |
| `facet.range.end` | `2020` |
| `facet.range.gap` | `10` |
| `facet.range.include` | `outer` |
In this case, you do not need to modify the **Update Policy** field; the default value of `append` is fine.
4. Click **Apply**, and then **Cancel** (which just closes the configuration panel for the Additional Query Parameters stage).
The year facets are now grouped by decade:
 "2001: A Space Odyssey" is not the top search result.
2. Under one of the movies listed, click **show fields**.
"2001: A Space Odyssey" is not the top search result.
2. Under one of the movies listed, click **show fields**.
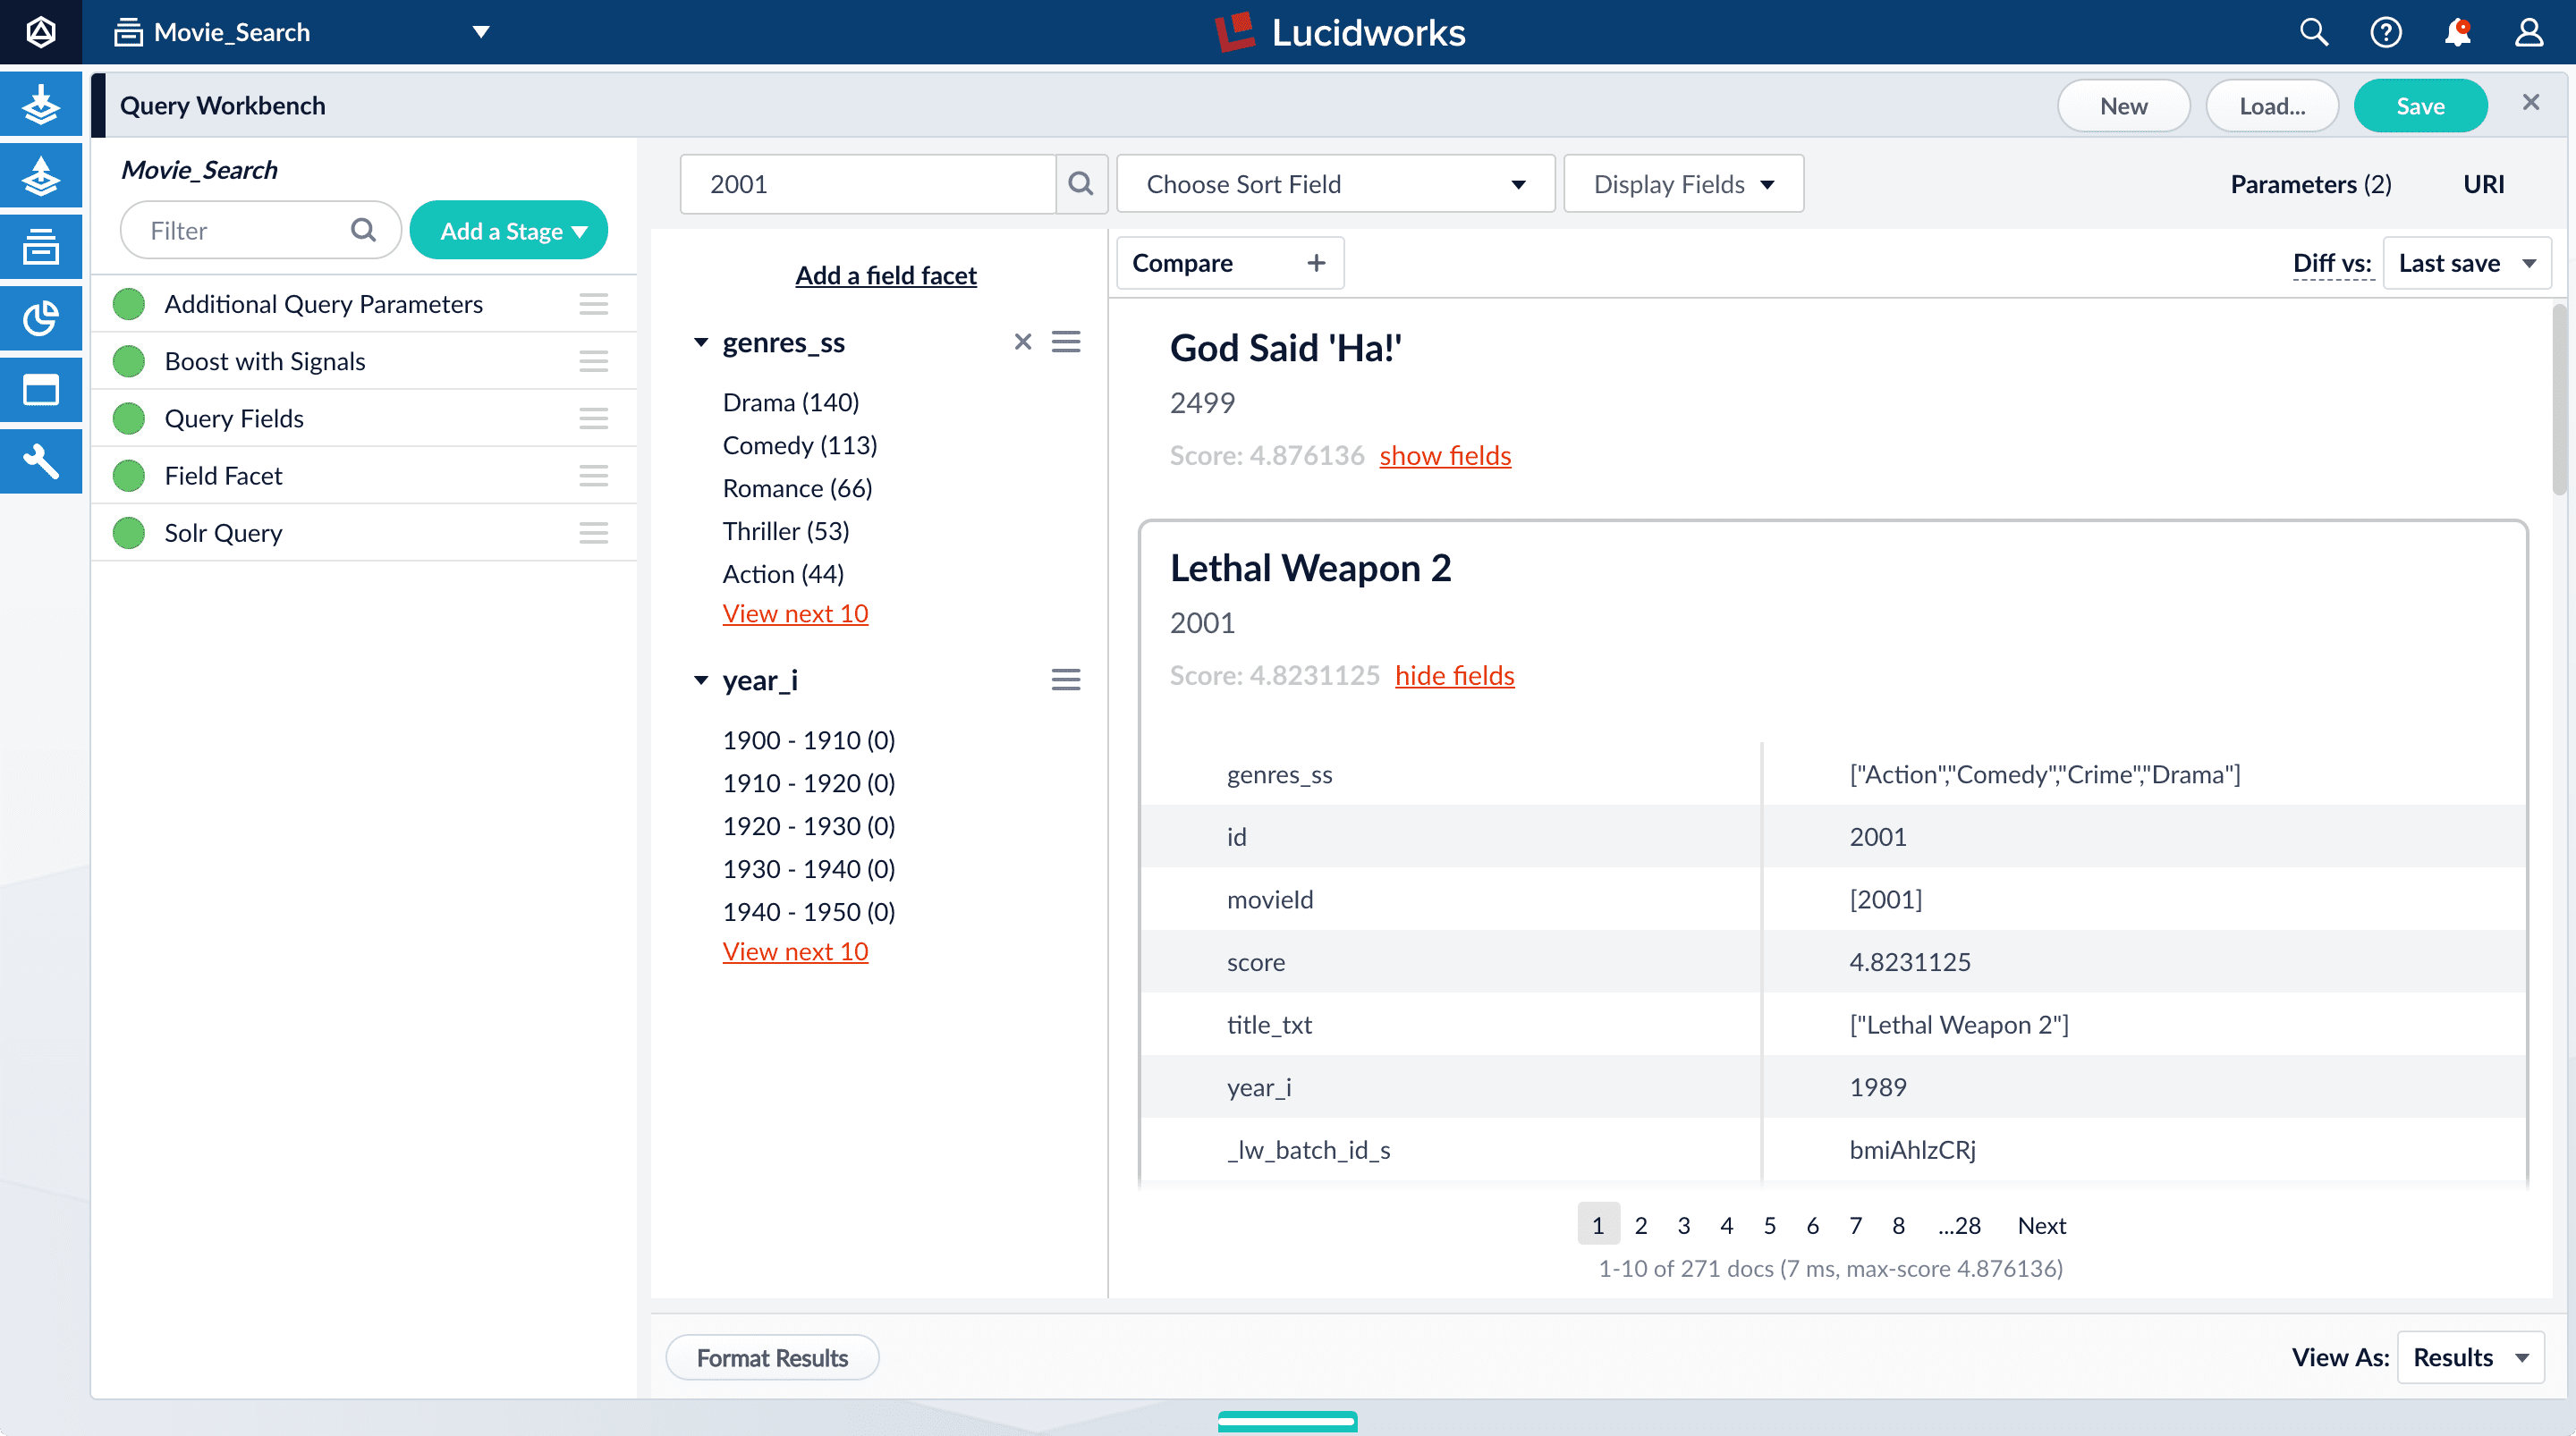 Here is the reason: your search query matches the `id` field, but users do not care about this field.
You will use the Query Fields stage to specify the fields that users really care about.
3. Below the name for the movie you selected, click **hide fields**.
4. Click the **Query Fields** stage of the query pipeline.
The Query Fields configuration panel appears.
5. Under **Search Fields**, click Add
Here is the reason: your search query matches the `id` field, but users do not care about this field.
You will use the Query Fields stage to specify the fields that users really care about.
3. Below the name for the movie you selected, click **hide fields**.
4. Click the **Query Fields** stage of the query pipeline.
The Query Fields configuration panel appears.
5. Under **Search Fields**, click Add  .
6. Enter `title_txt`.
7. Click Add
.
6. Enter `title_txt`.
7. Click Add 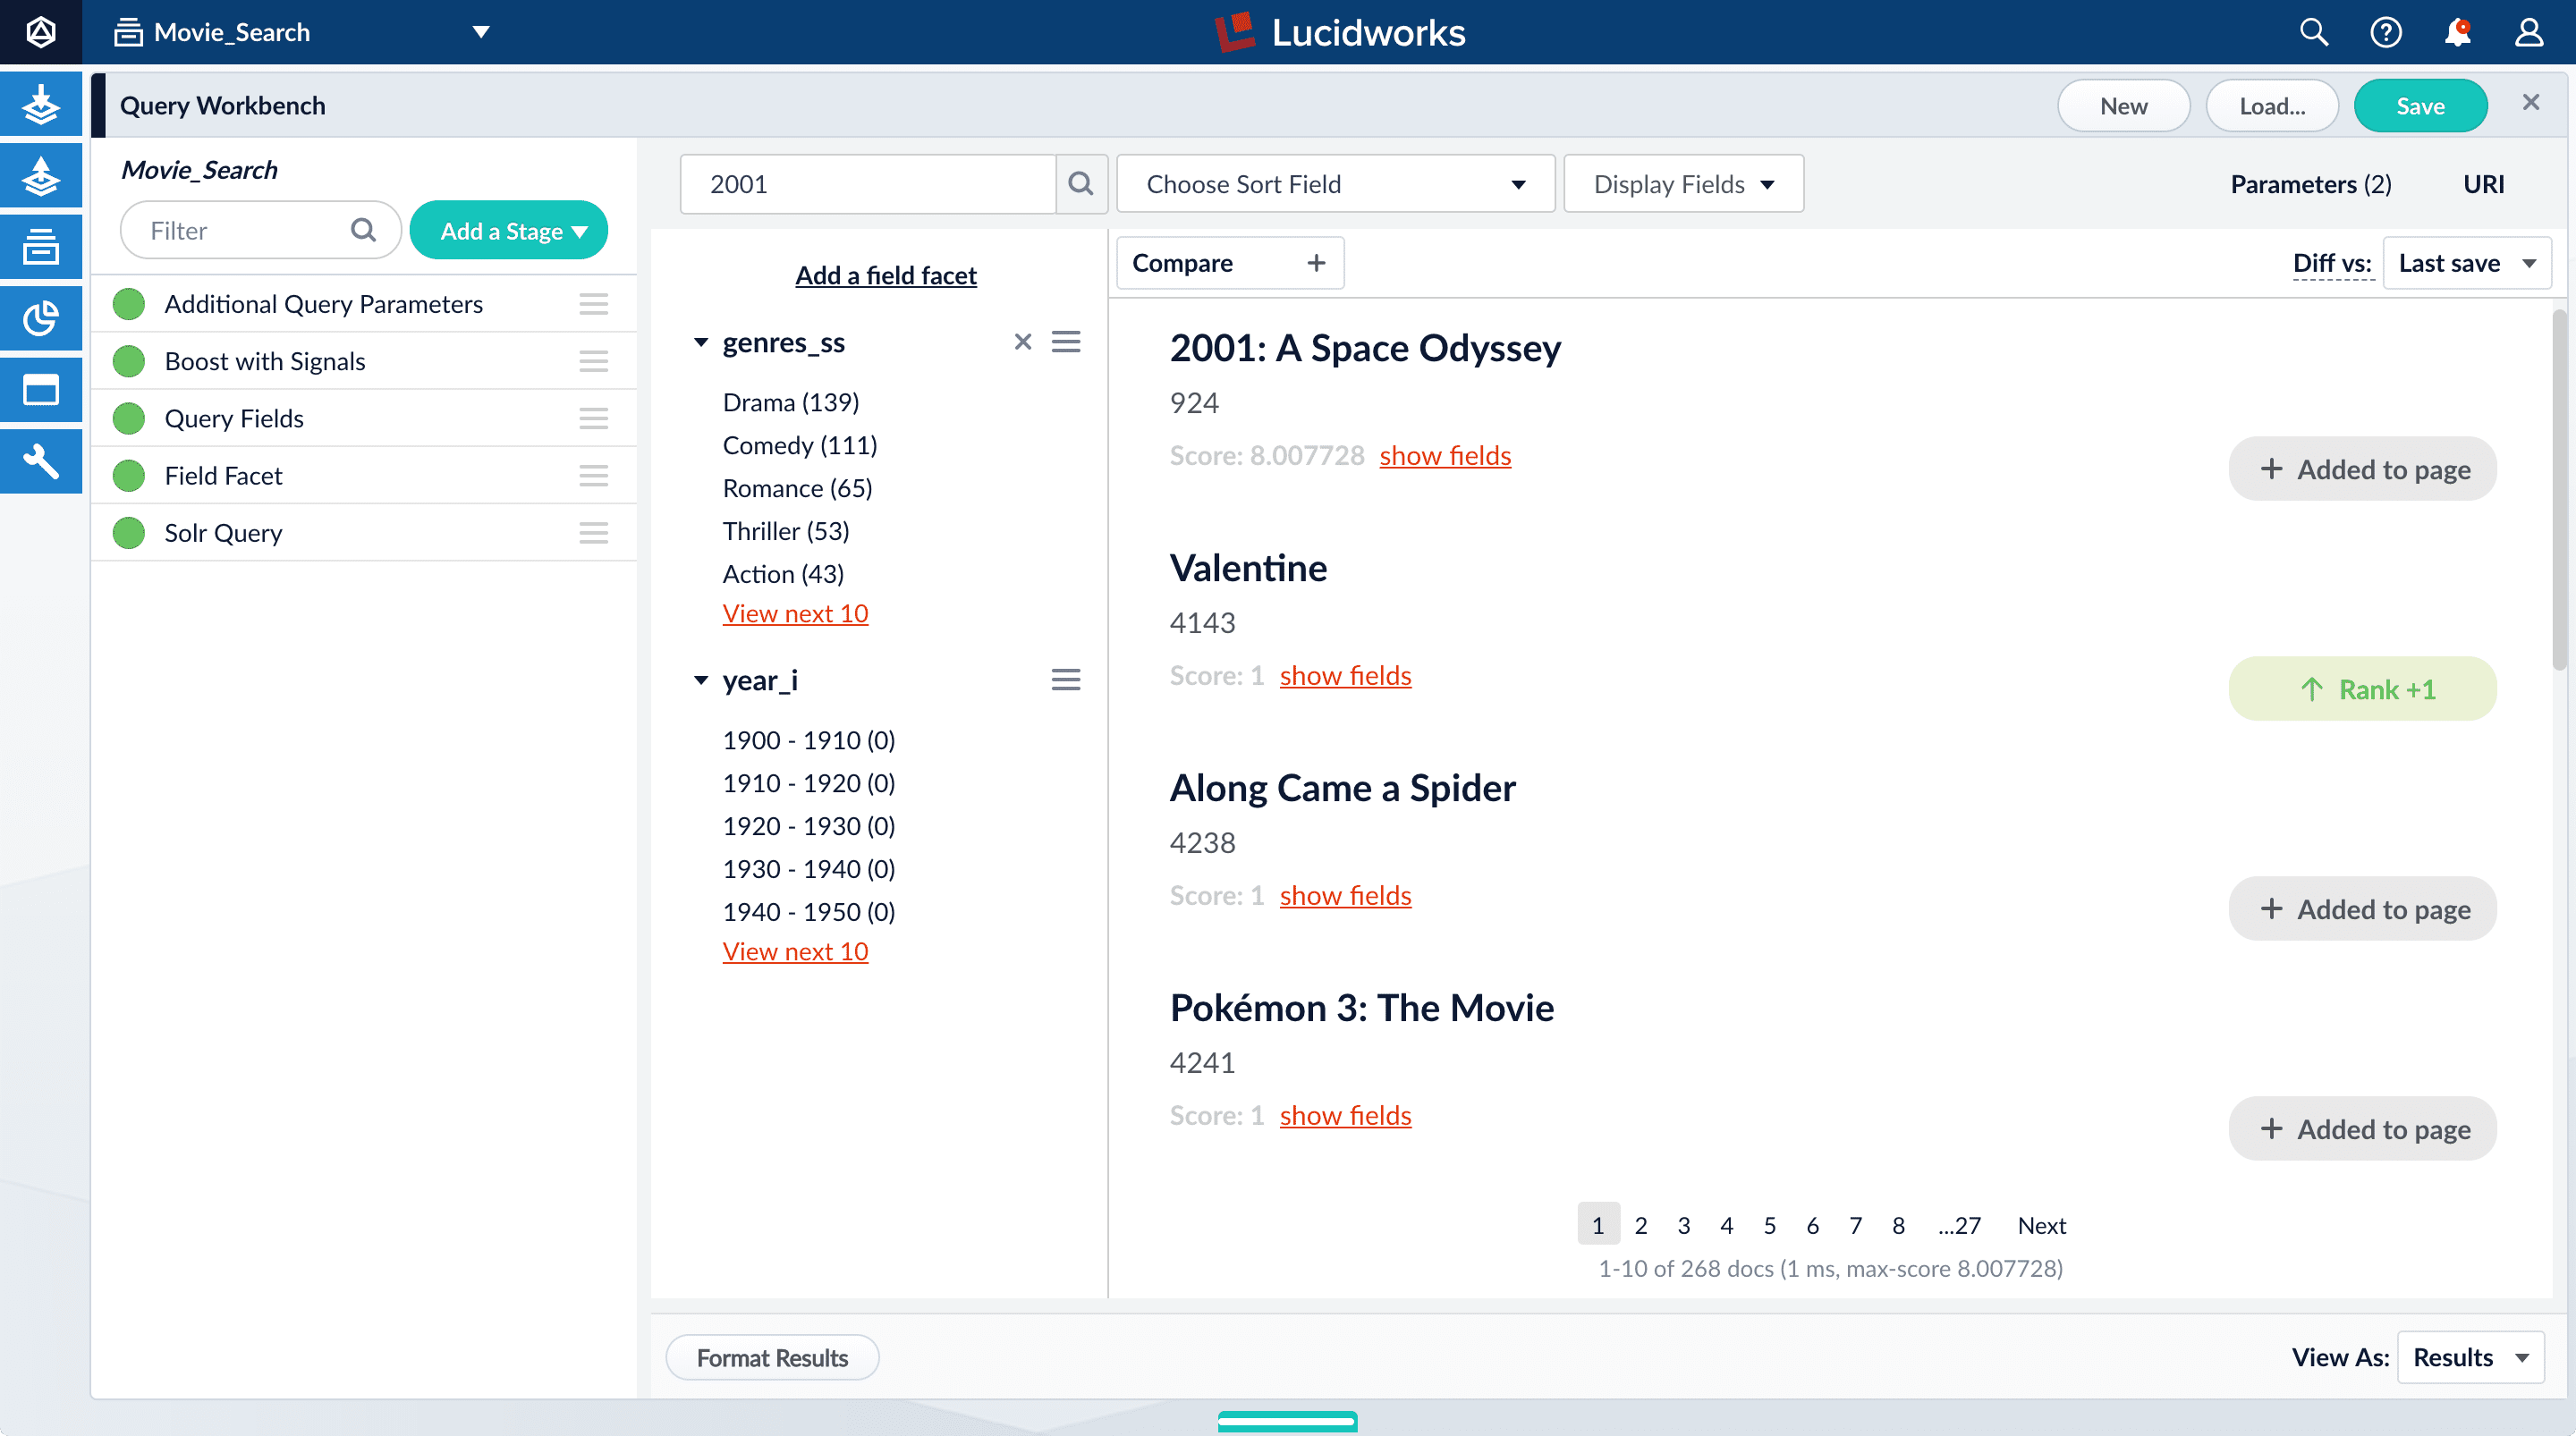 ## Save the query pipeline configuration
1. In the upper right, click **Save**.
The **Save Pipeline** window appears. By default, you will overwrite the default query pipeline for this datasource.
2. Click **Save pipeline**.
With just two facet fields combined with keyword search, this prototype is already beginning to feel like a real search application.
## Save the query pipeline configuration
1. In the upper right, click **Save**.
The **Save Pipeline** window appears. By default, you will overwrite the default query pipeline for this datasource.
2. Click **Save pipeline**.
With just two facet fields combined with keyword search, this prototype is already beginning to feel like a real search application.
 ## Enable synthetic signals
You need some signal data beyond the few signals you generated while completing Part 3. Because this is a prototype app, users are not generating signals. Instead, you will enable synthetic signals in Query Workbench.
1. At the bottom of the Query Workbench page, click **Format Results**.
2. Select **Show signal generators** *and* **Send click signals**.
## Enable synthetic signals
You need some signal data beyond the few signals you generated while completing Part 3. Because this is a prototype app, users are not generating signals. Instead, you will enable synthetic signals in Query Workbench.
1. At the bottom of the Query Workbench page, click **Format Results**.
2. Select **Show signal generators** *and* **Send click signals**.
 3. Click **Save**.
4. Hover over one of the search results.
Now when you hover over a search result, Query Workbench displays controls that include a **Simulate** button next to a field that lets you specify the number of signals to simulate:
3. Click **Save**.
4. Hover over one of the search results.
Now when you hover over a search result, Query Workbench displays controls that include a **Simulate** button next to a field that lets you specify the number of signals to simulate:
 ## Generate signals
With synthetic signals enabled, you will generate a simple set of signal data that you can use to generate meaningful recommendations.
For this tutorial, you will generate signals that you can use to boost your favorite sci-fi titles so that they appear first.
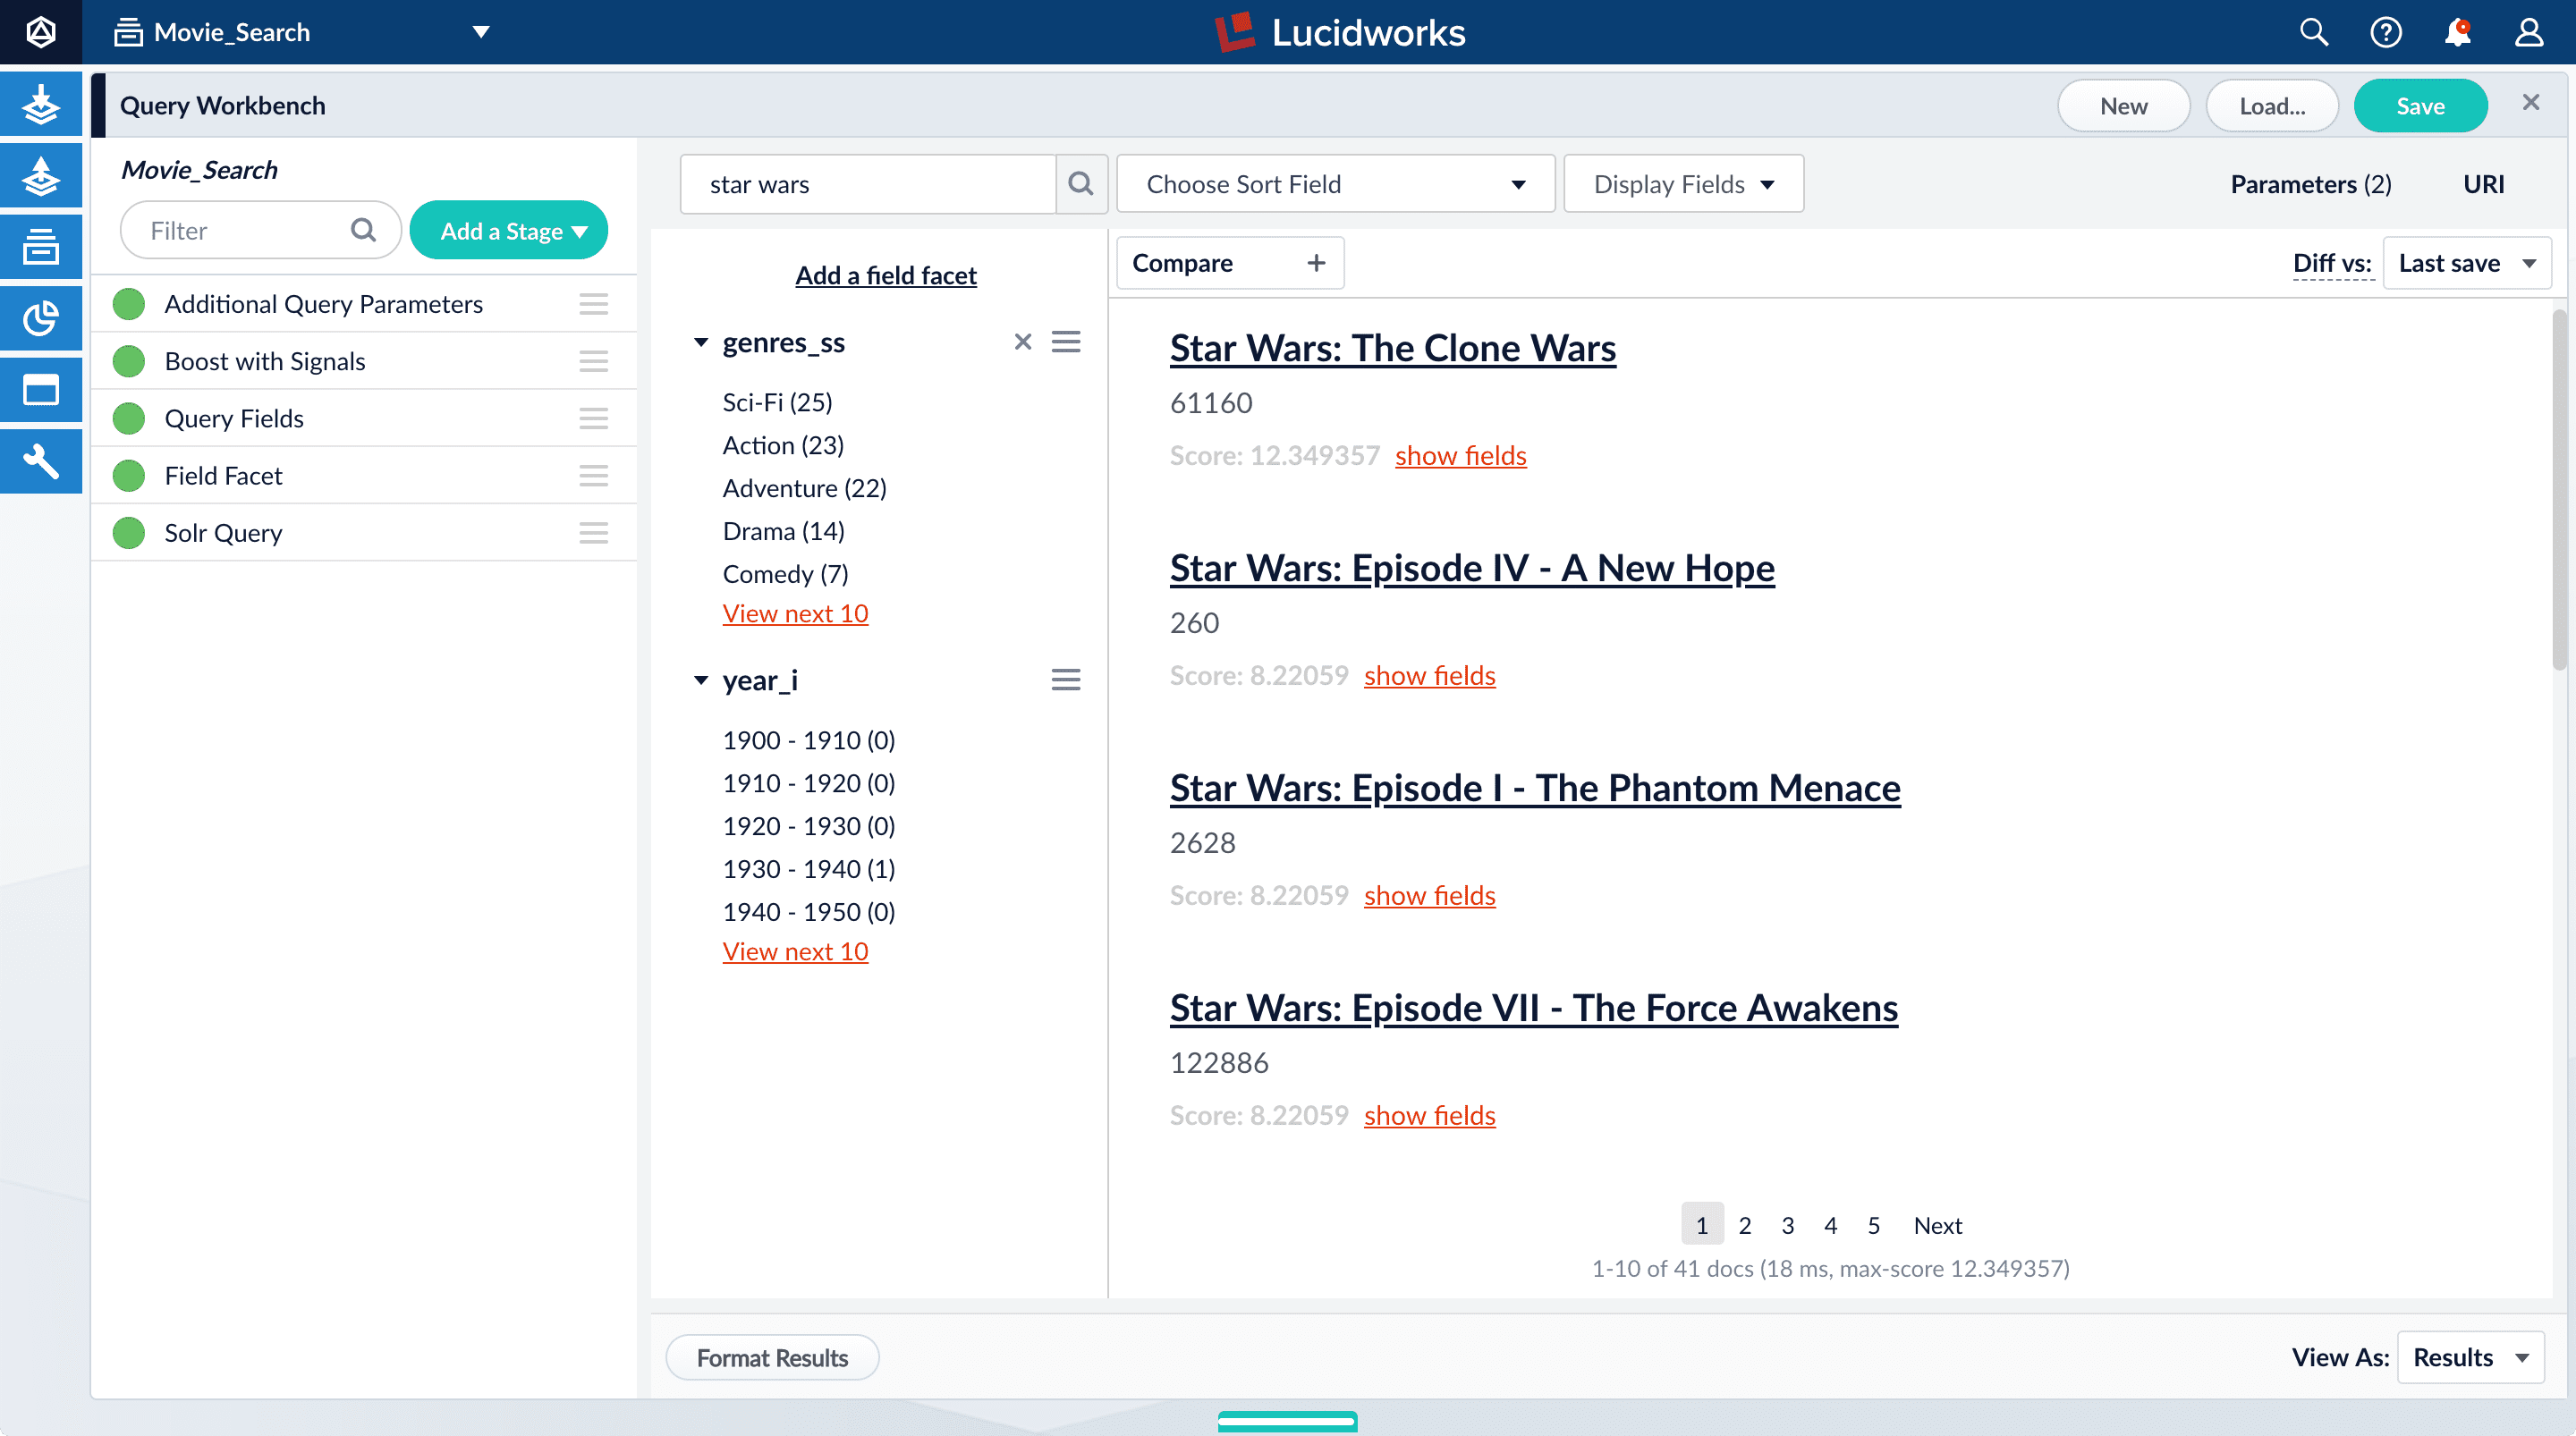
1. Search for `star wars`.
The top results are not your favorite titles:
## Generate signals
With synthetic signals enabled, you will generate a simple set of signal data that you can use to generate meaningful recommendations.
For this tutorial, you will generate signals that you can use to boost your favorite sci-fi titles so that they appear first.
1. Search for `star wars`.
The top results are not your favorite titles:
 2. In **Format Results**, **Set results per page** to 20. This should allow you to scroll for this next part instead of explicitly searching for the titles.
Next you will generate signals that you can use to boost certain titles. Signals are tied to the search query, so your boosted titles will appear first in the search results only when users search for `star wars`.
3. Hover over "Star Wars: Episode IV - A New Hope".
4. Set the number of signals to 4000 and click **Simulate**.
5. Hover over "Star Wars: Episode V - The Empire Strikes Back".
6. Set the number of signals to 3000 and click **Simulate**.
7. Hover over "Star Wars: Episode VI - Return of the Jedi".
8. Set the number of signals to 2000 and click **Simulate**.
2. In **Format Results**, **Set results per page** to 20. This should allow you to scroll for this next part instead of explicitly searching for the titles.
Next you will generate signals that you can use to boost certain titles. Signals are tied to the search query, so your boosted titles will appear first in the search results only when users search for `star wars`.
3. Hover over "Star Wars: Episode IV - A New Hope".
4. Set the number of signals to 4000 and click **Simulate**.
5. Hover over "Star Wars: Episode V - The Empire Strikes Back".
6. Set the number of signals to 3000 and click **Simulate**.
7. Hover over "Star Wars: Episode VI - Return of the Jedi".
8. Set the number of signals to 2000 and click **Simulate**.
 Your signals collection contains several types of signals, such as click signals and search result signals. Let us investigate the click signals.
3. Search for `type:click`.
4. For any of the results, click **show fields**.
* The `count_i` field shows the number of click signals you generated for this event. For example, given the corresponding `doc_id` for Star Wars: Episode IV - A New Hope, the `count_i` equals 4000.
Your signals collection contains several types of signals, such as click signals and search result signals. Let us investigate the click signals.
3. Search for `type:click`.
4. For any of the results, click **show fields**.
* The `count_i` field shows the number of click signals you generated for this event. For example, given the corresponding `doc_id` for Star Wars: Episode IV - A New Hope, the `count_i` equals 4000.
 In Fusion 4.0:
\*\*\* The contents of the `doc_id_s` field in the `Movie_Search_signals` collection is the same as the contents of the `id` field in your `Movies_Search` collection, that is, the ID of the document that you clicked in Query Workbench, or for which you specified a number of clicks, and then clicked *Simulate*\*.
\*\* The `query_orig_s` field in the `Movie_Search_signals` collection contains the original query string that produced this search result.
5. Click **hide fields**.
### Optional: Format signals fields
You can configure your search view to display fields that are meaningful for your investigation.
For example, you can display the document ID and the number of click signals.
1. Click **Display Fields**.
2. For the **Name** field, select `doc_id`.
3. For the **Description** field, select `count_i`.
In Fusion 4.0:
\*\*\* The contents of the `doc_id_s` field in the `Movie_Search_signals` collection is the same as the contents of the `id` field in your `Movies_Search` collection, that is, the ID of the document that you clicked in Query Workbench, or for which you specified a number of clicks, and then clicked *Simulate*\*.
\*\* The `query_orig_s` field in the `Movie_Search_signals` collection contains the original query string that produced this search result.
5. Click **hide fields**.
### Optional: Format signals fields
You can configure your search view to display fields that are meaningful for your investigation.
For example, you can display the document ID and the number of click signals.
1. Click **Display Fields**.
2. For the **Name** field, select `doc_id`.
3. For the **Description** field, select `count_i`.
 ## Explore the aggregated signal data
Aggregation jobs are created automatically when you create an app. However, you need to run the aggregation job manually:
1. Navigate to Collections
## Explore the aggregated signal data
Aggregation jobs are created automatically when you create an app. However, you need to run the aggregation job manually:
1. Navigate to Collections  > **Jobs**.
2. Select `Movie_Search_click_signals_aggregation` from the job list.
3. Click **Run**.
4. Click **Start**.
After you run your job (it might take a minute or two), open the Query Workbench and check whether the aggregated data has arrived in the `Movie_Search_signals_aggr` collection.
1. In the collections picker in the upper left, select **Movie\_Search\_signals\_aggr**.
2. Open Query Workbench. Navigate to Querying
> **Jobs**.
2. Select `Movie_Search_click_signals_aggregation` from the job list.
3. Click **Run**.
4. Click **Start**.
After you run your job (it might take a minute or two), open the Query Workbench and check whether the aggregated data has arrived in the `Movie_Search_signals_aggr` collection.
1. In the collections picker in the upper left, select **Movie\_Search\_signals\_aggr**.
2. Open Query Workbench. Navigate to Querying 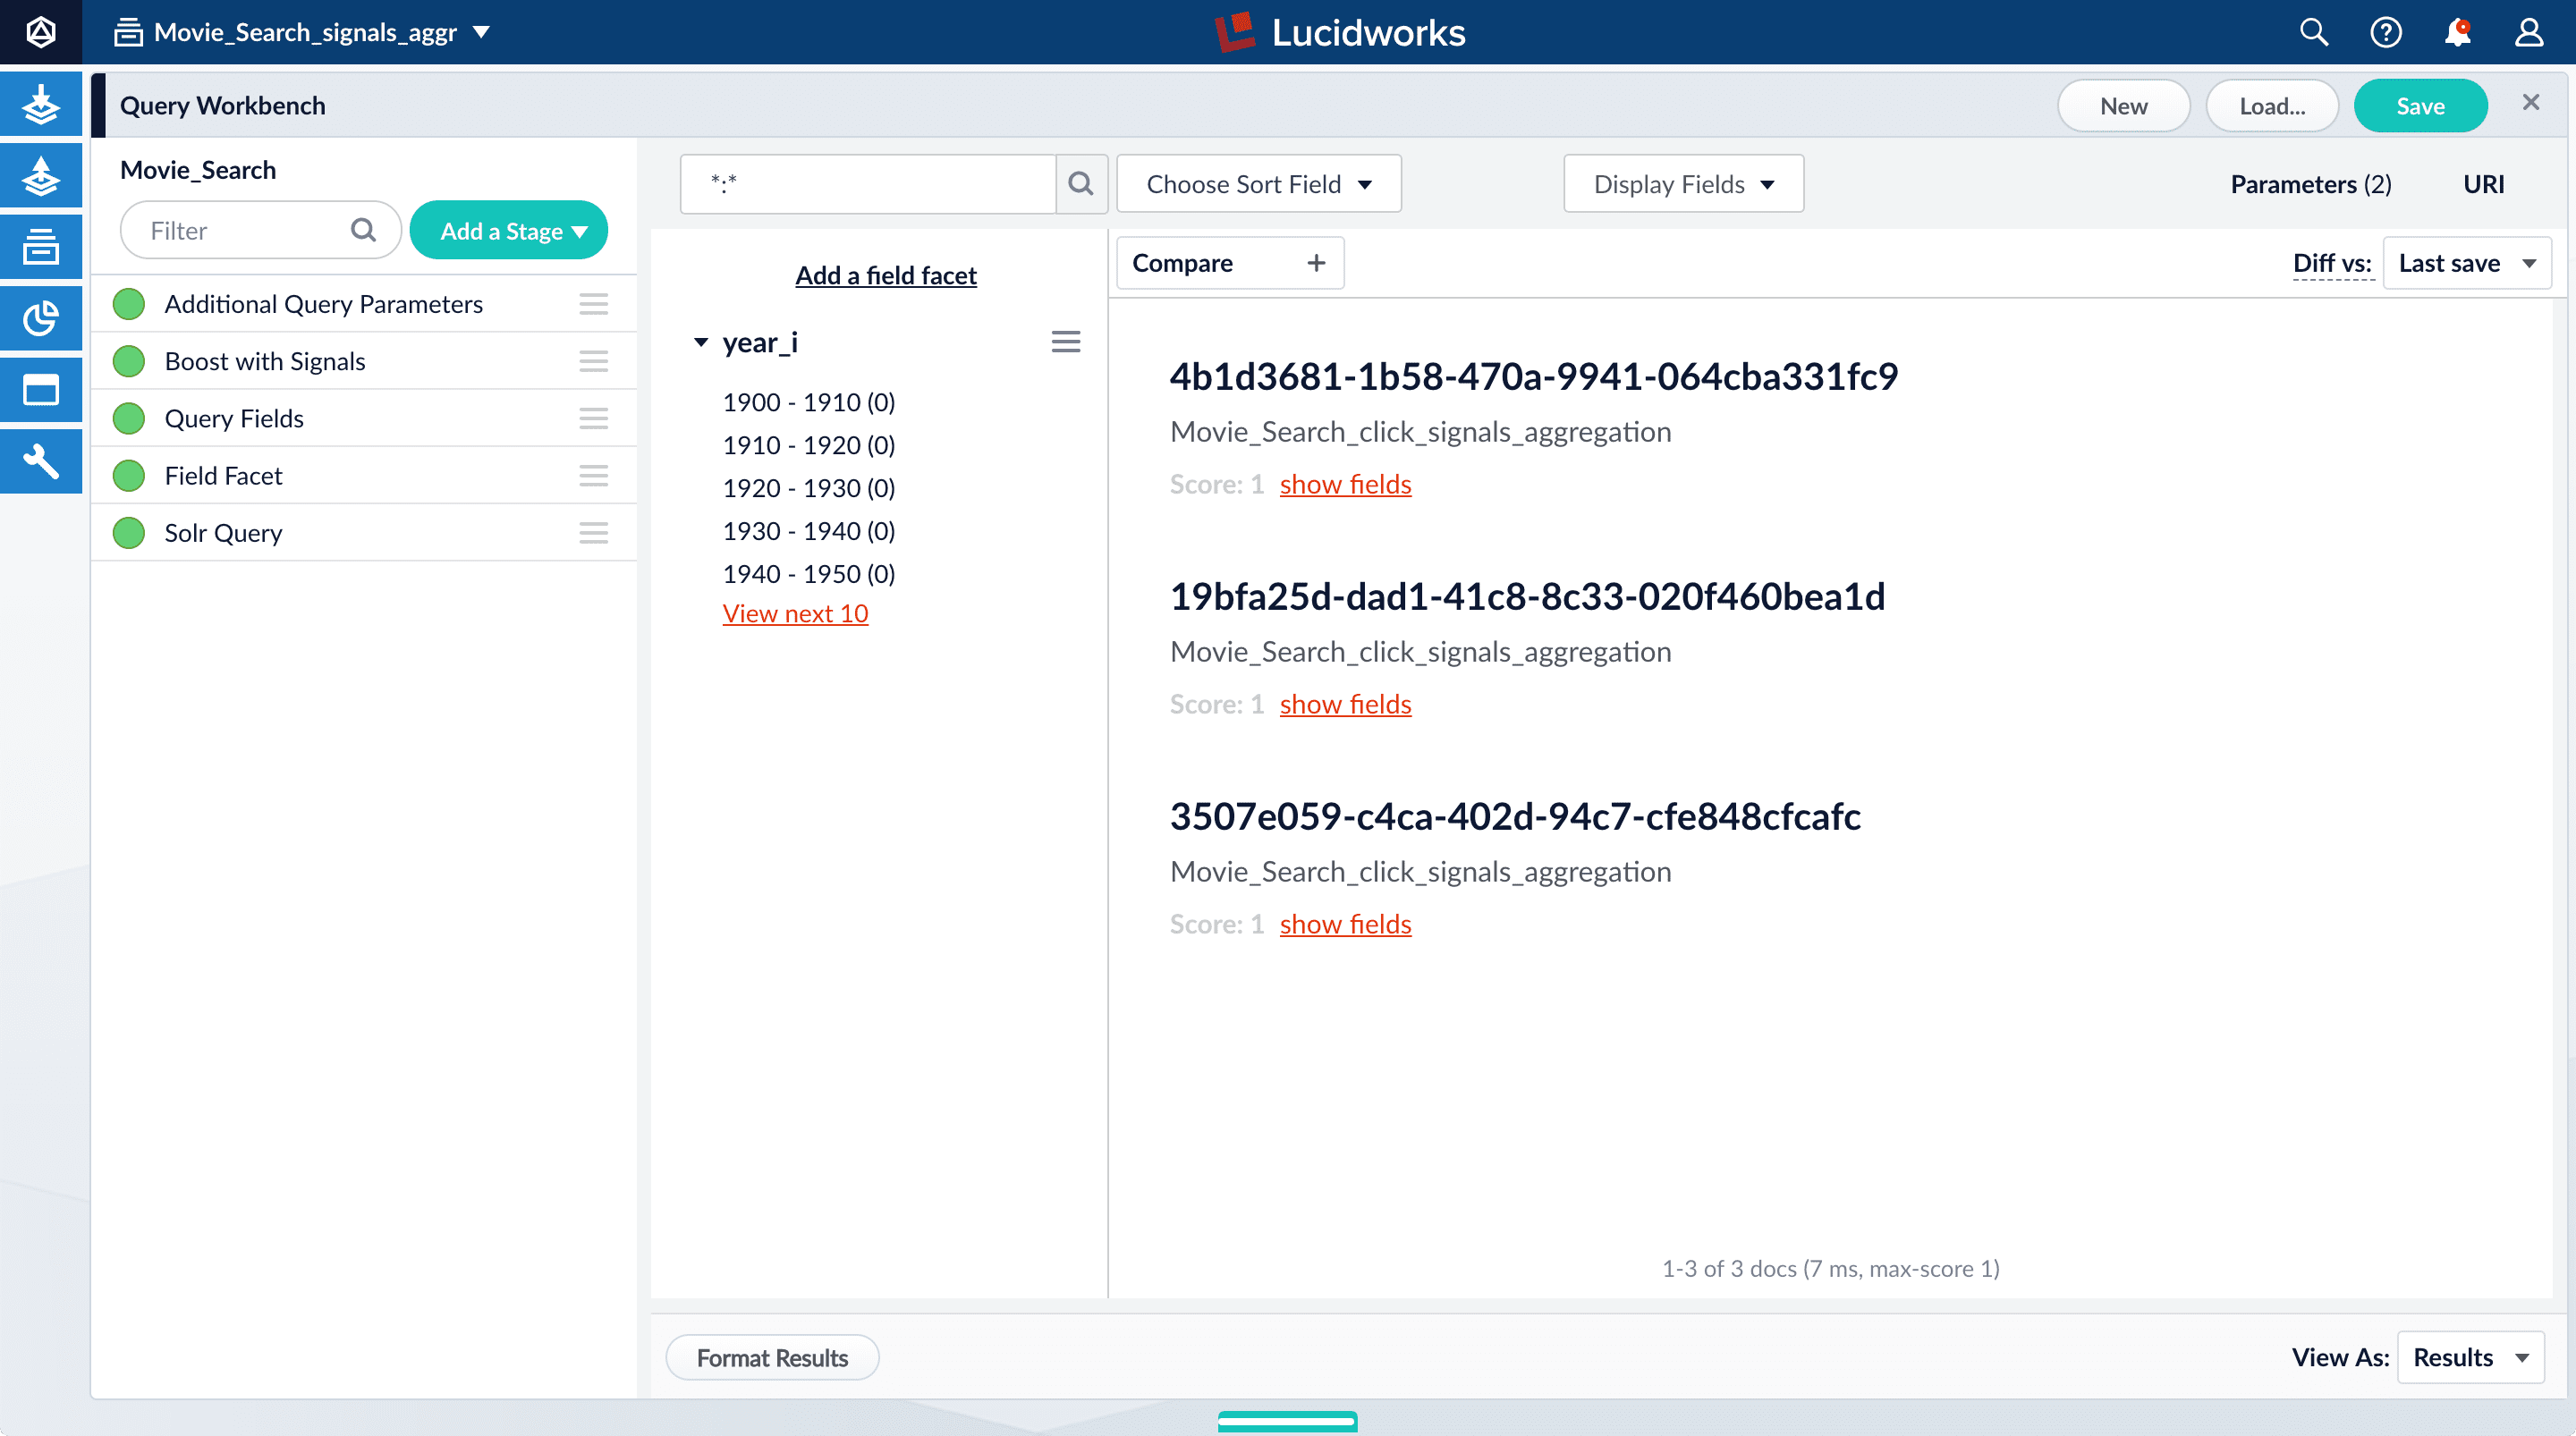 3. Click **Display Fields**.
4. For the **Name** field, select `doc_id`.
5. For the **Description** field, select `aggr_count_i`.
6. For the result 1210, click **show fields**.
3. Click **Display Fields**.
4. For the **Name** field, select `doc_id`.
5. For the **Description** field, select `aggr_count_i`.
6. For the result 1210, click **show fields**.
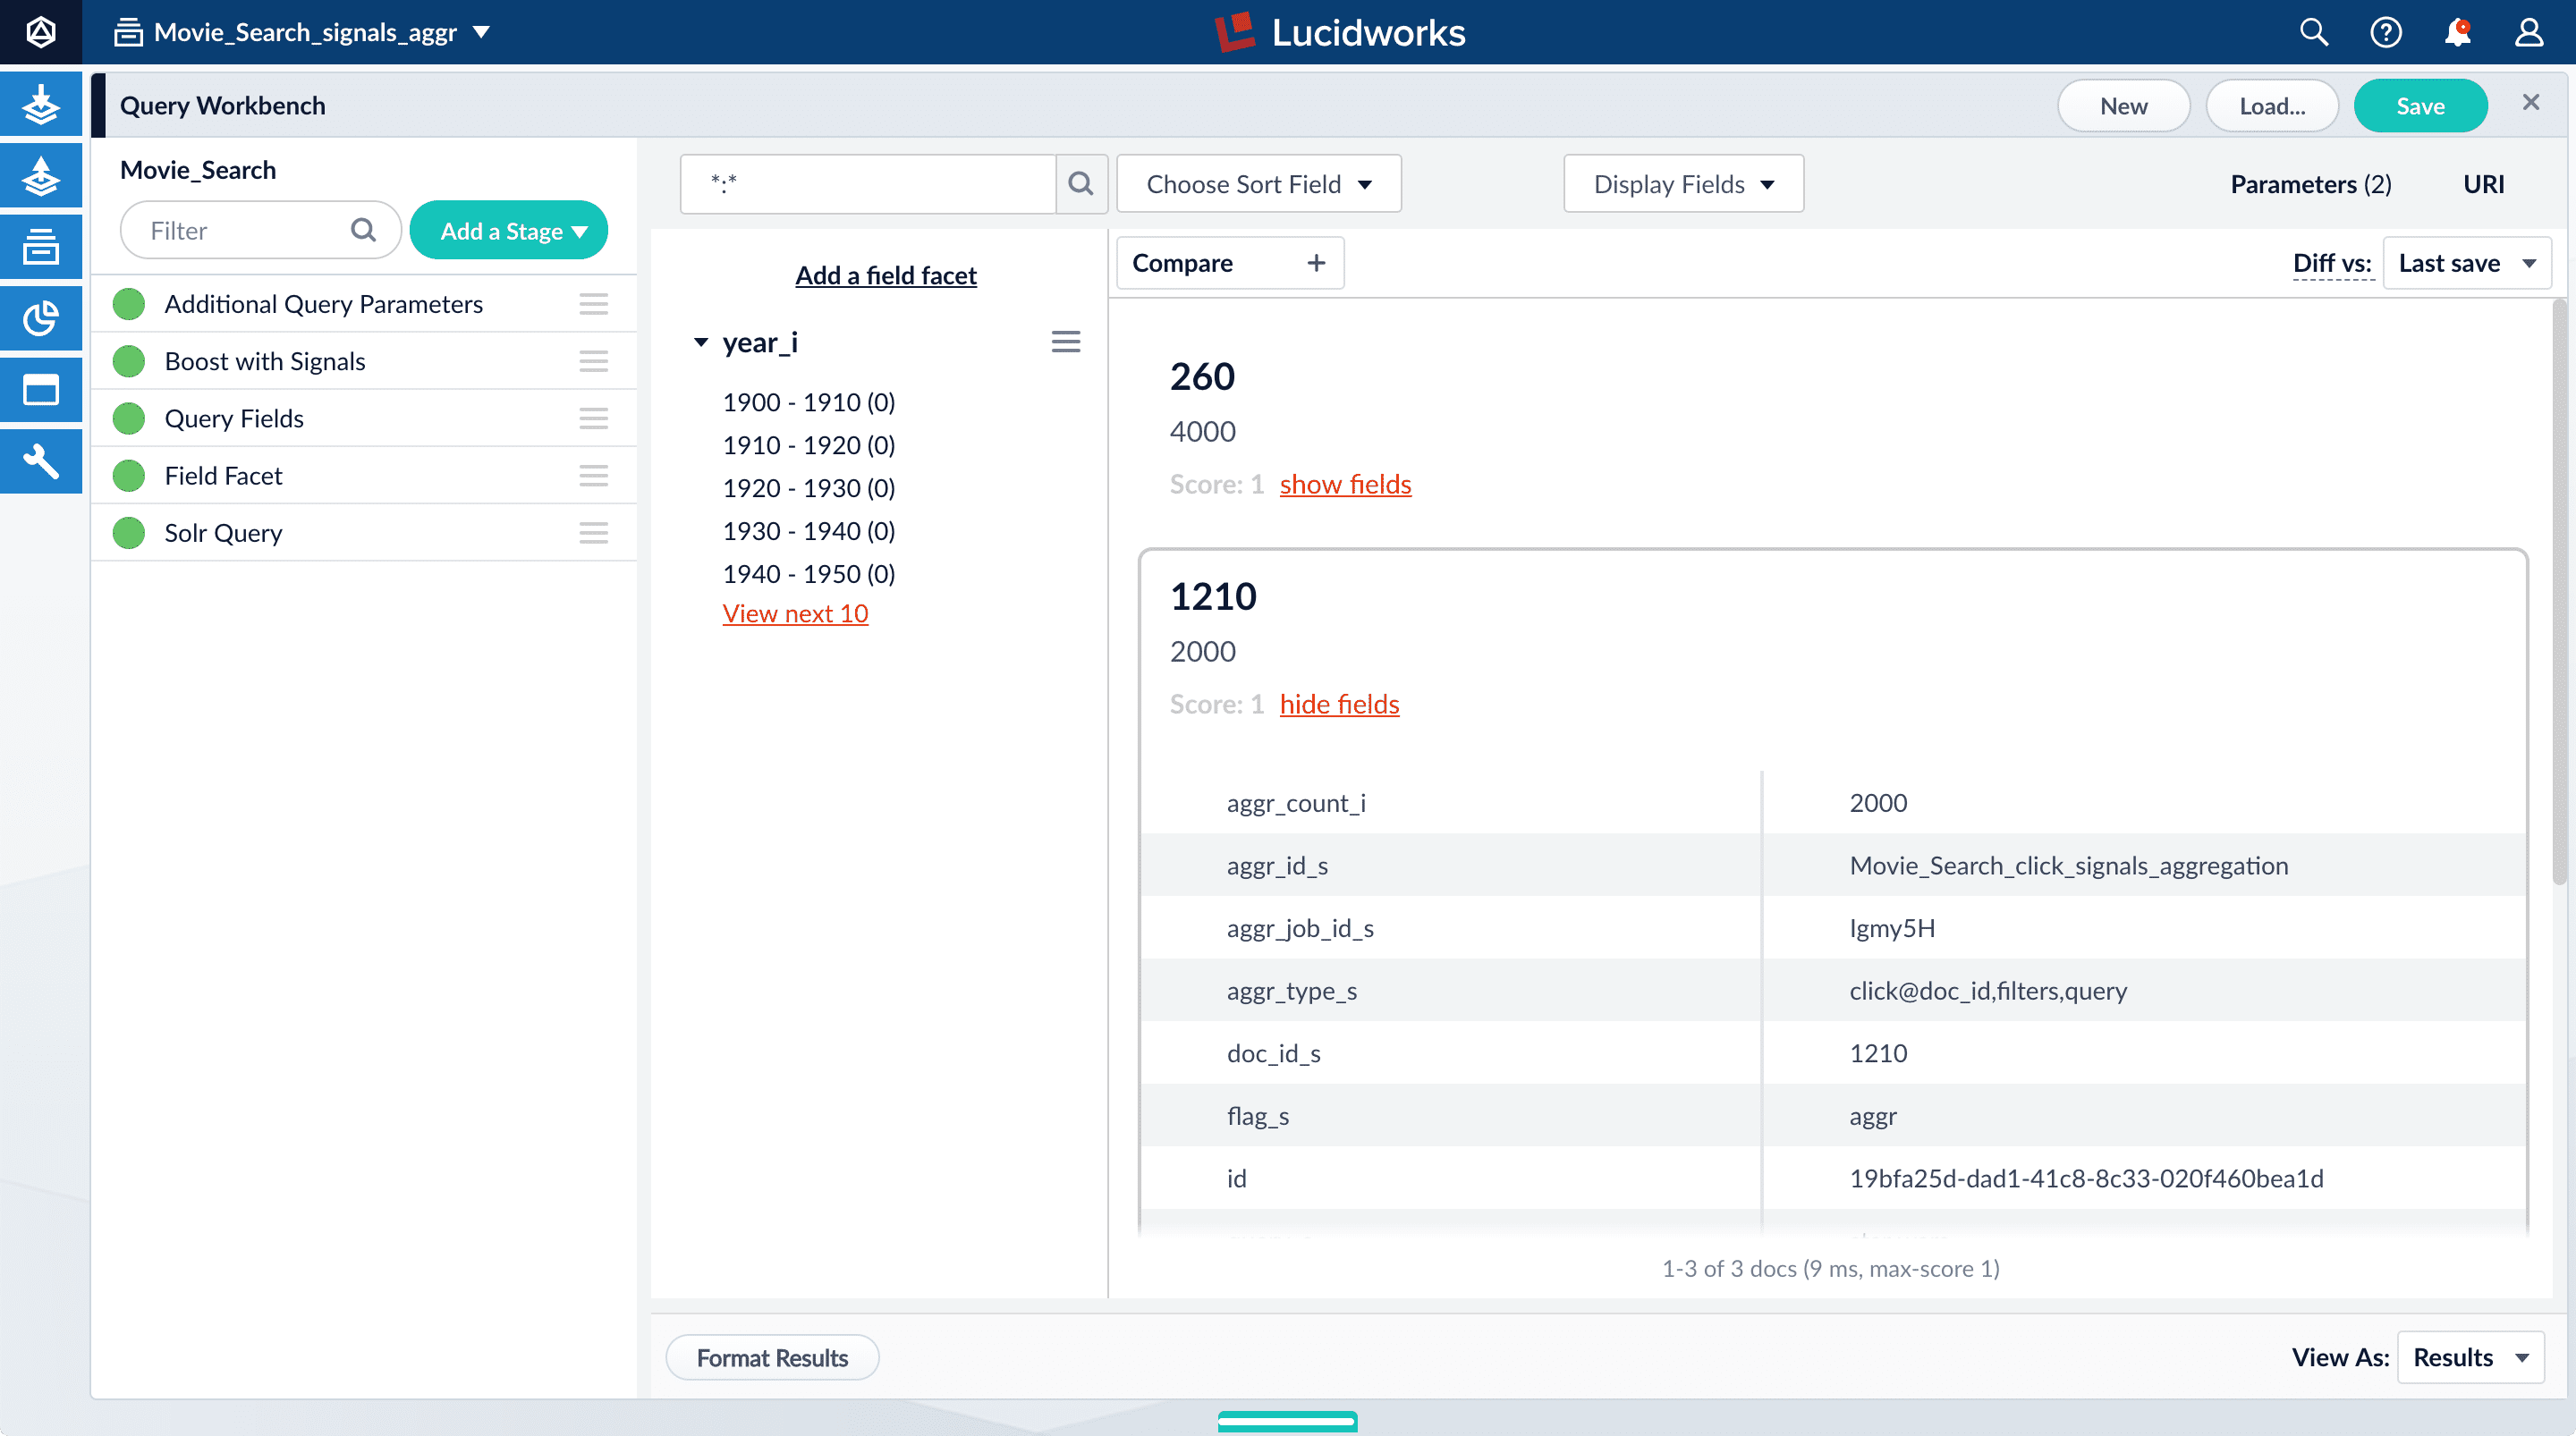 The fields for aggregated signals are very similar to the fields for raw signals, with additional fields to describe the aggregation:
* `aggr_count_i`. Number of signals that have been aggregated (in this case, 3000)
* `aggr_id_s`. Name of the aggregation job
* `aggr_job_id_s`. Job ID
* `aggr_type_s`. Aggregation type
7. In the upper right, click **Save**.
The **Save Pipeline** window appears. By default, you will overwrite the existing query pipeline for the selected collection (in this case, `Movie_Search`).
8. Click **Save pipeline**.
## View the search results with and without default boosting
1. In the collections picker in the upper left, select **Movie\_Search**.
2. Open Query Workbench. Navigate to Querying
The fields for aggregated signals are very similar to the fields for raw signals, with additional fields to describe the aggregation:
* `aggr_count_i`. Number of signals that have been aggregated (in this case, 3000)
* `aggr_id_s`. Name of the aggregation job
* `aggr_job_id_s`. Job ID
* `aggr_type_s`. Aggregation type
7. In the upper right, click **Save**.
The **Save Pipeline** window appears. By default, you will overwrite the existing query pipeline for the selected collection (in this case, `Movie_Search`).
8. Click **Save pipeline**.
## View the search results with and without default boosting
1. In the collections picker in the upper left, select **Movie\_Search**.
2. Open Query Workbench. Navigate to Querying 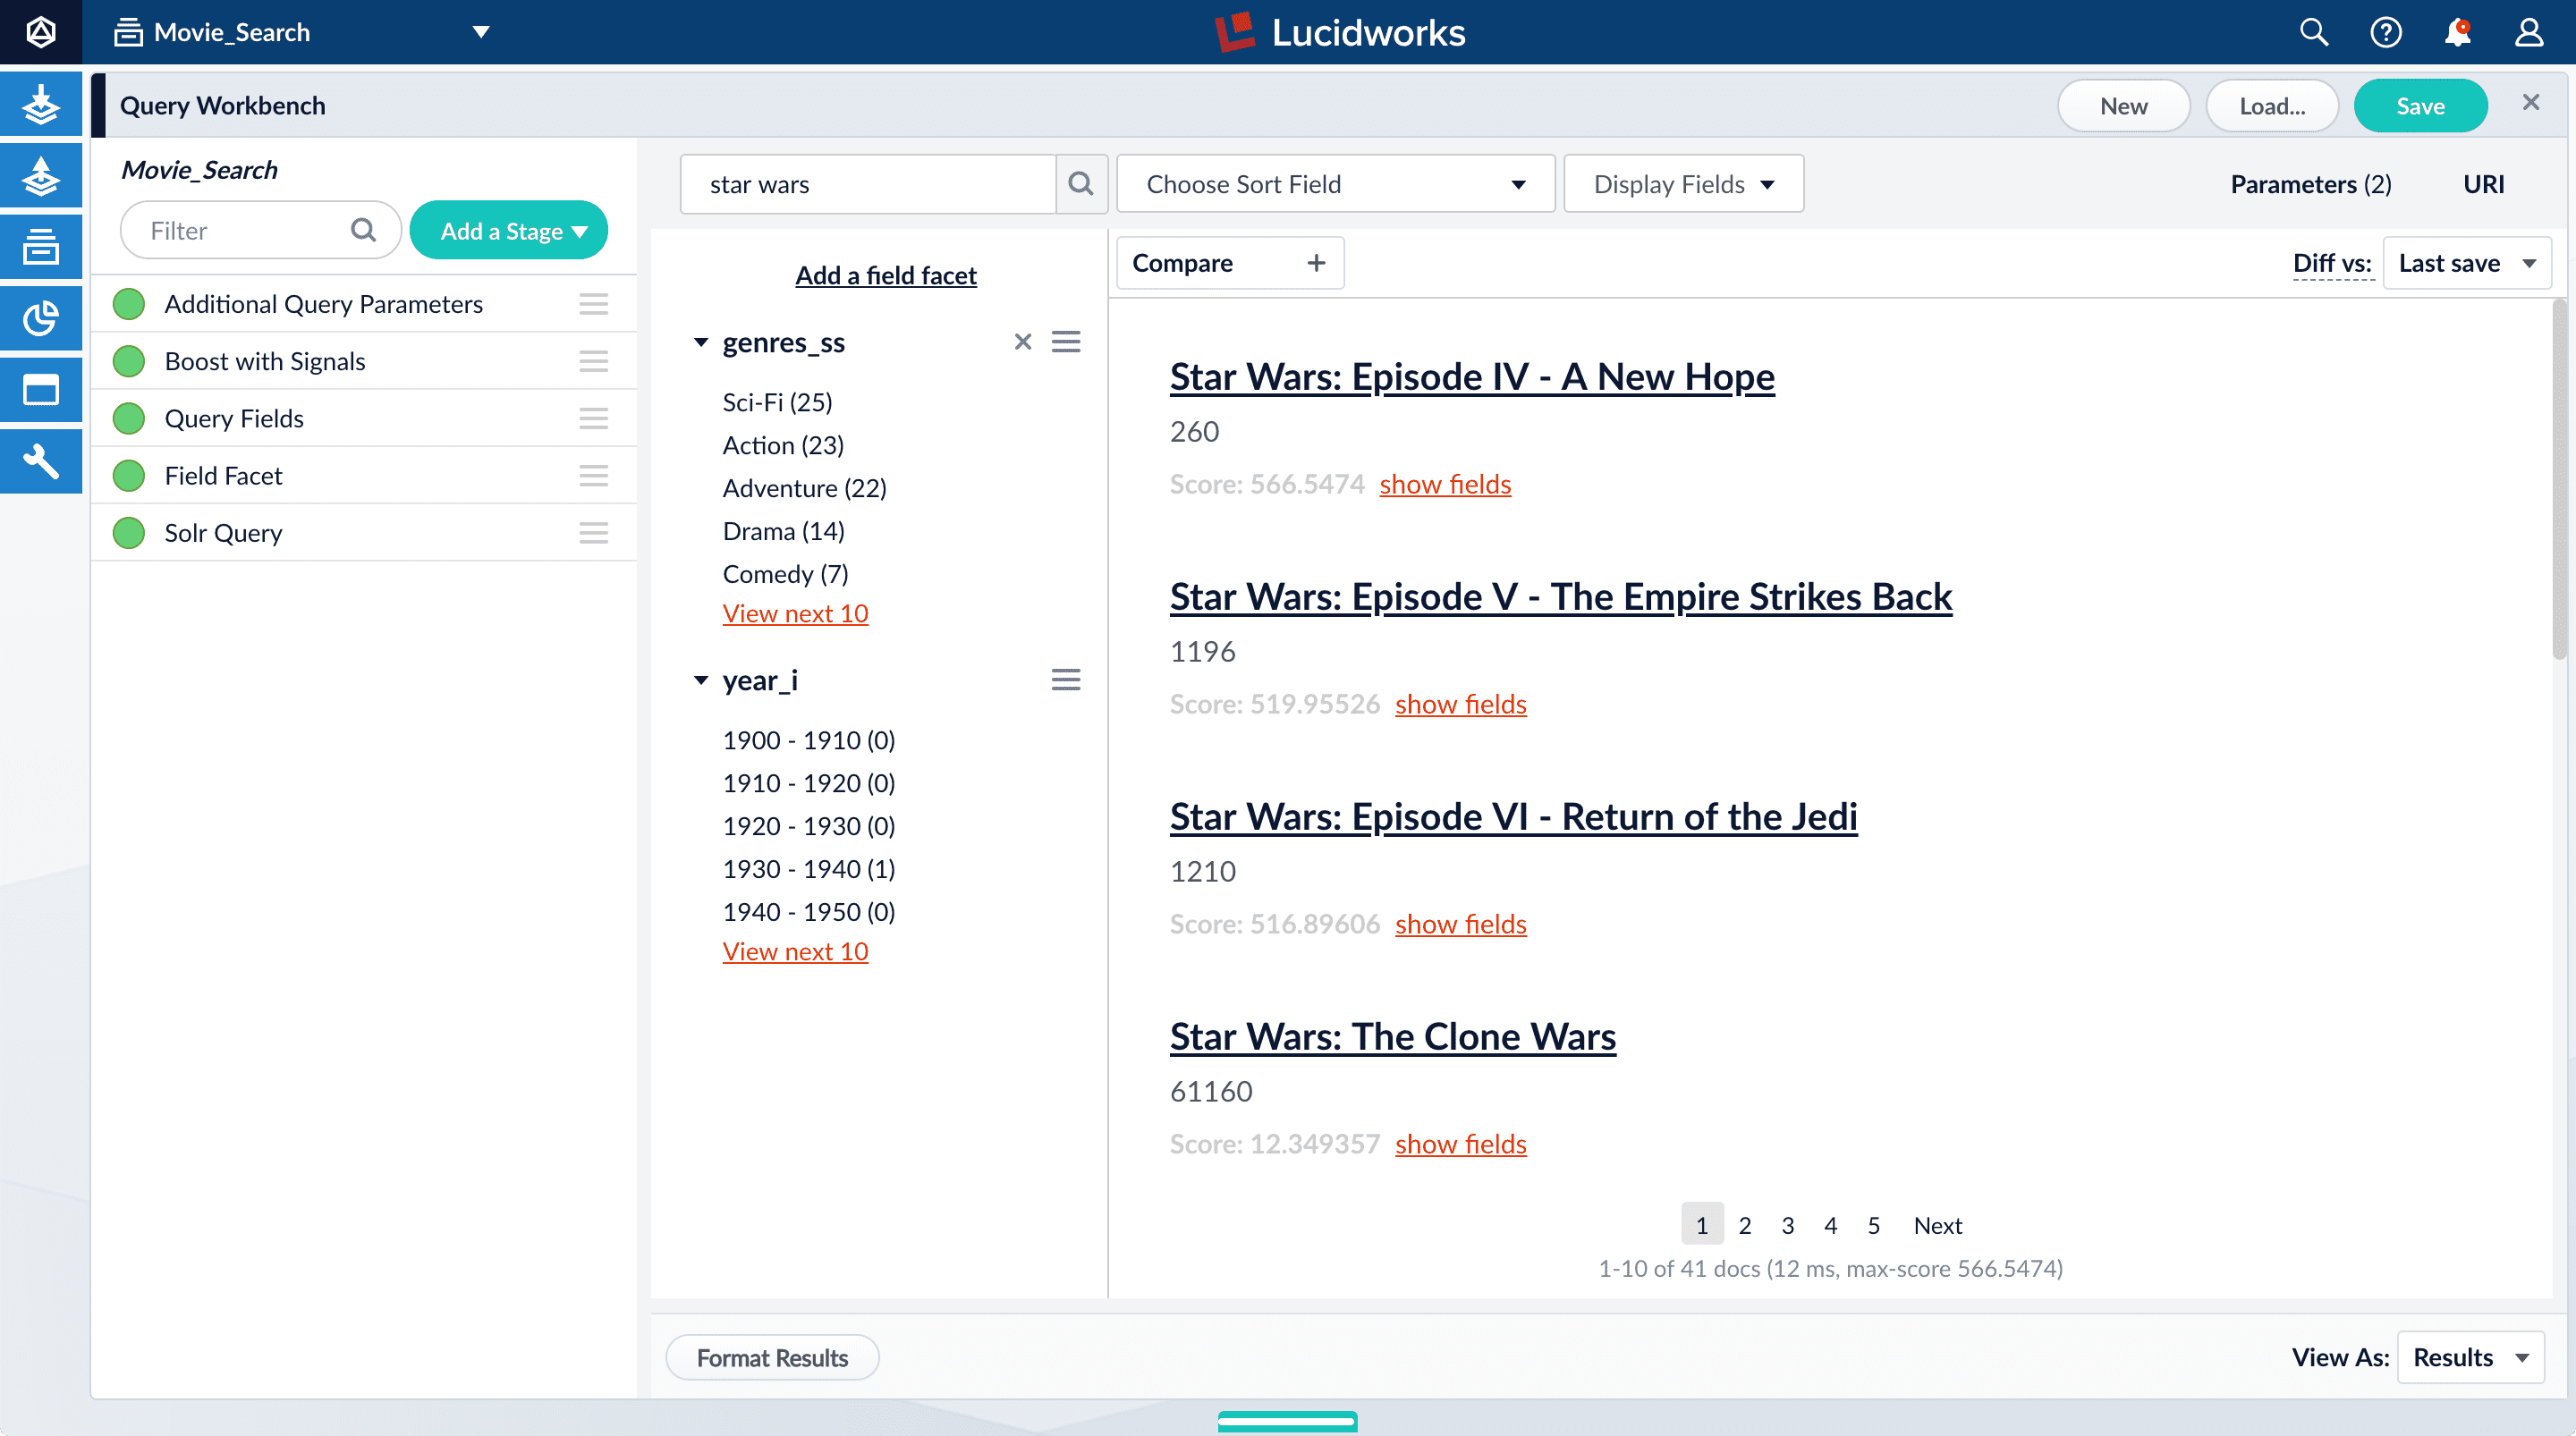
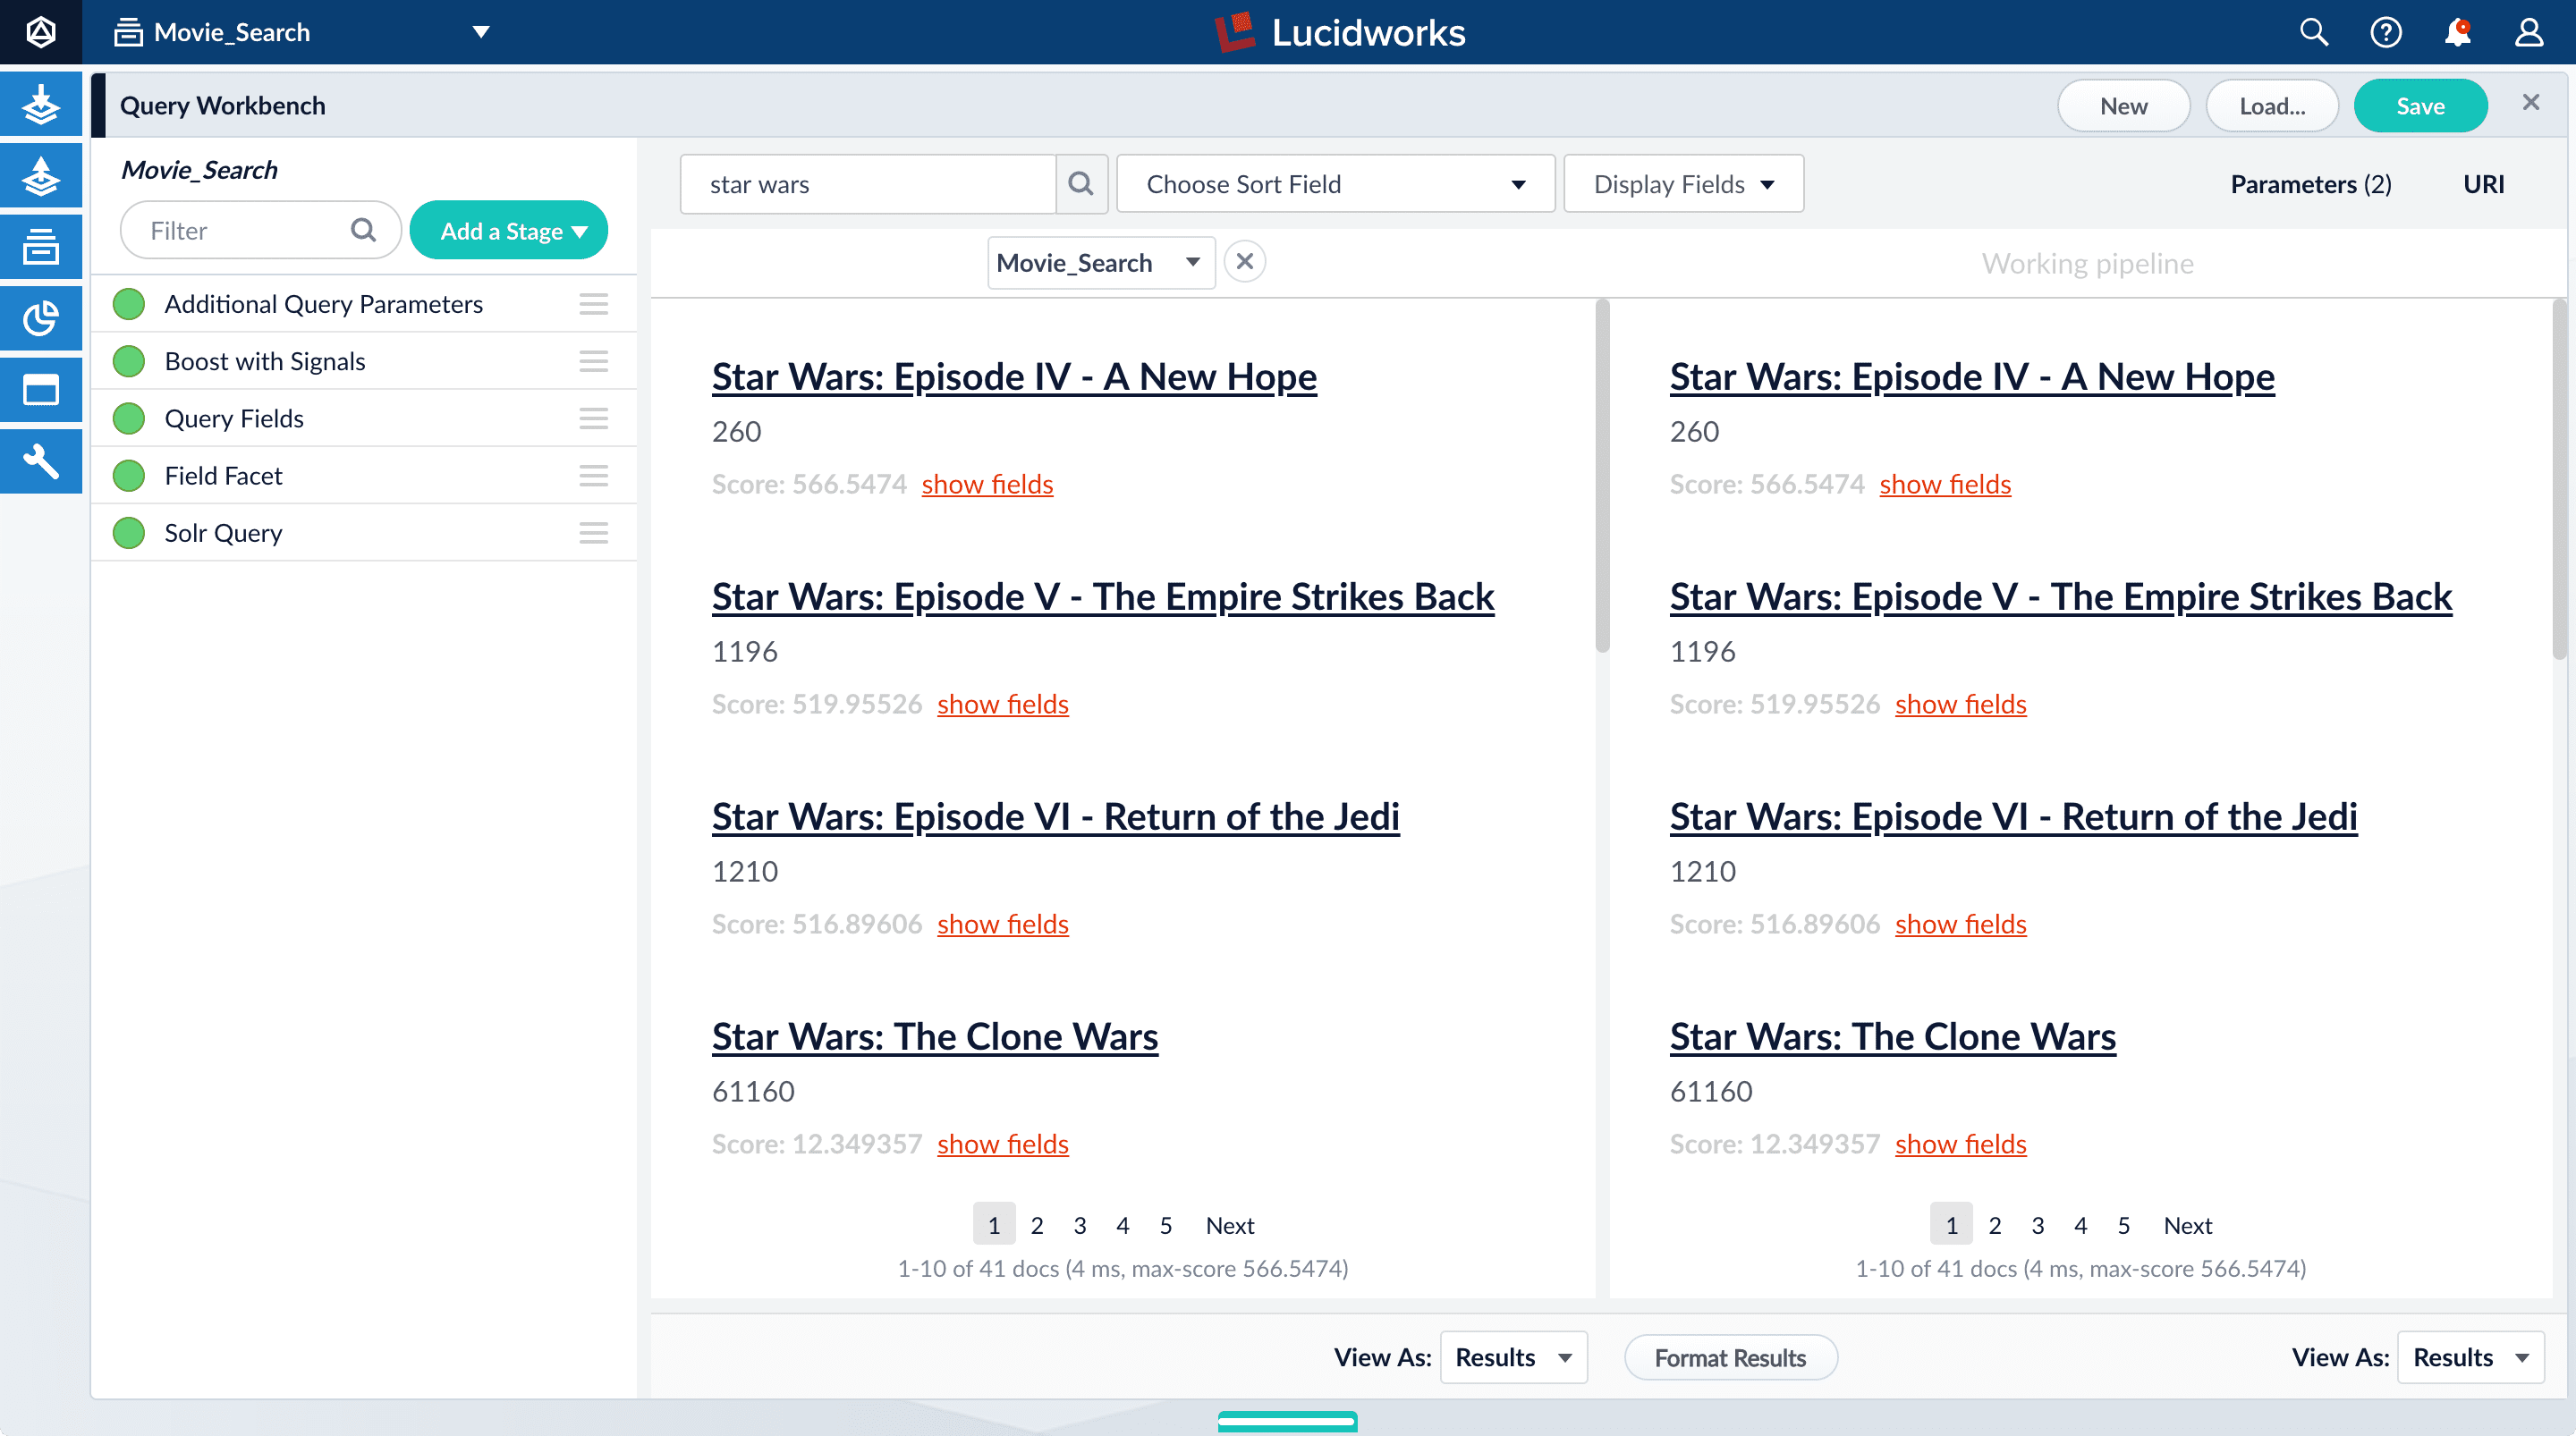 In this view, you can compare results from one query pipeline side by side with another query pipeline.
In this case, you will compare results for the same pipeline (`Movie_Search`) with and without the Boost with Signals stage enabled.
5. Turn off the Boost with Signals stage.
In this view, you can compare results from one query pipeline side by side with another query pipeline.
In this case, you will compare results for the same pipeline (`Movie_Search`) with and without the Boost with Signals stage enabled.
5. Turn off the Boost with Signals stage.
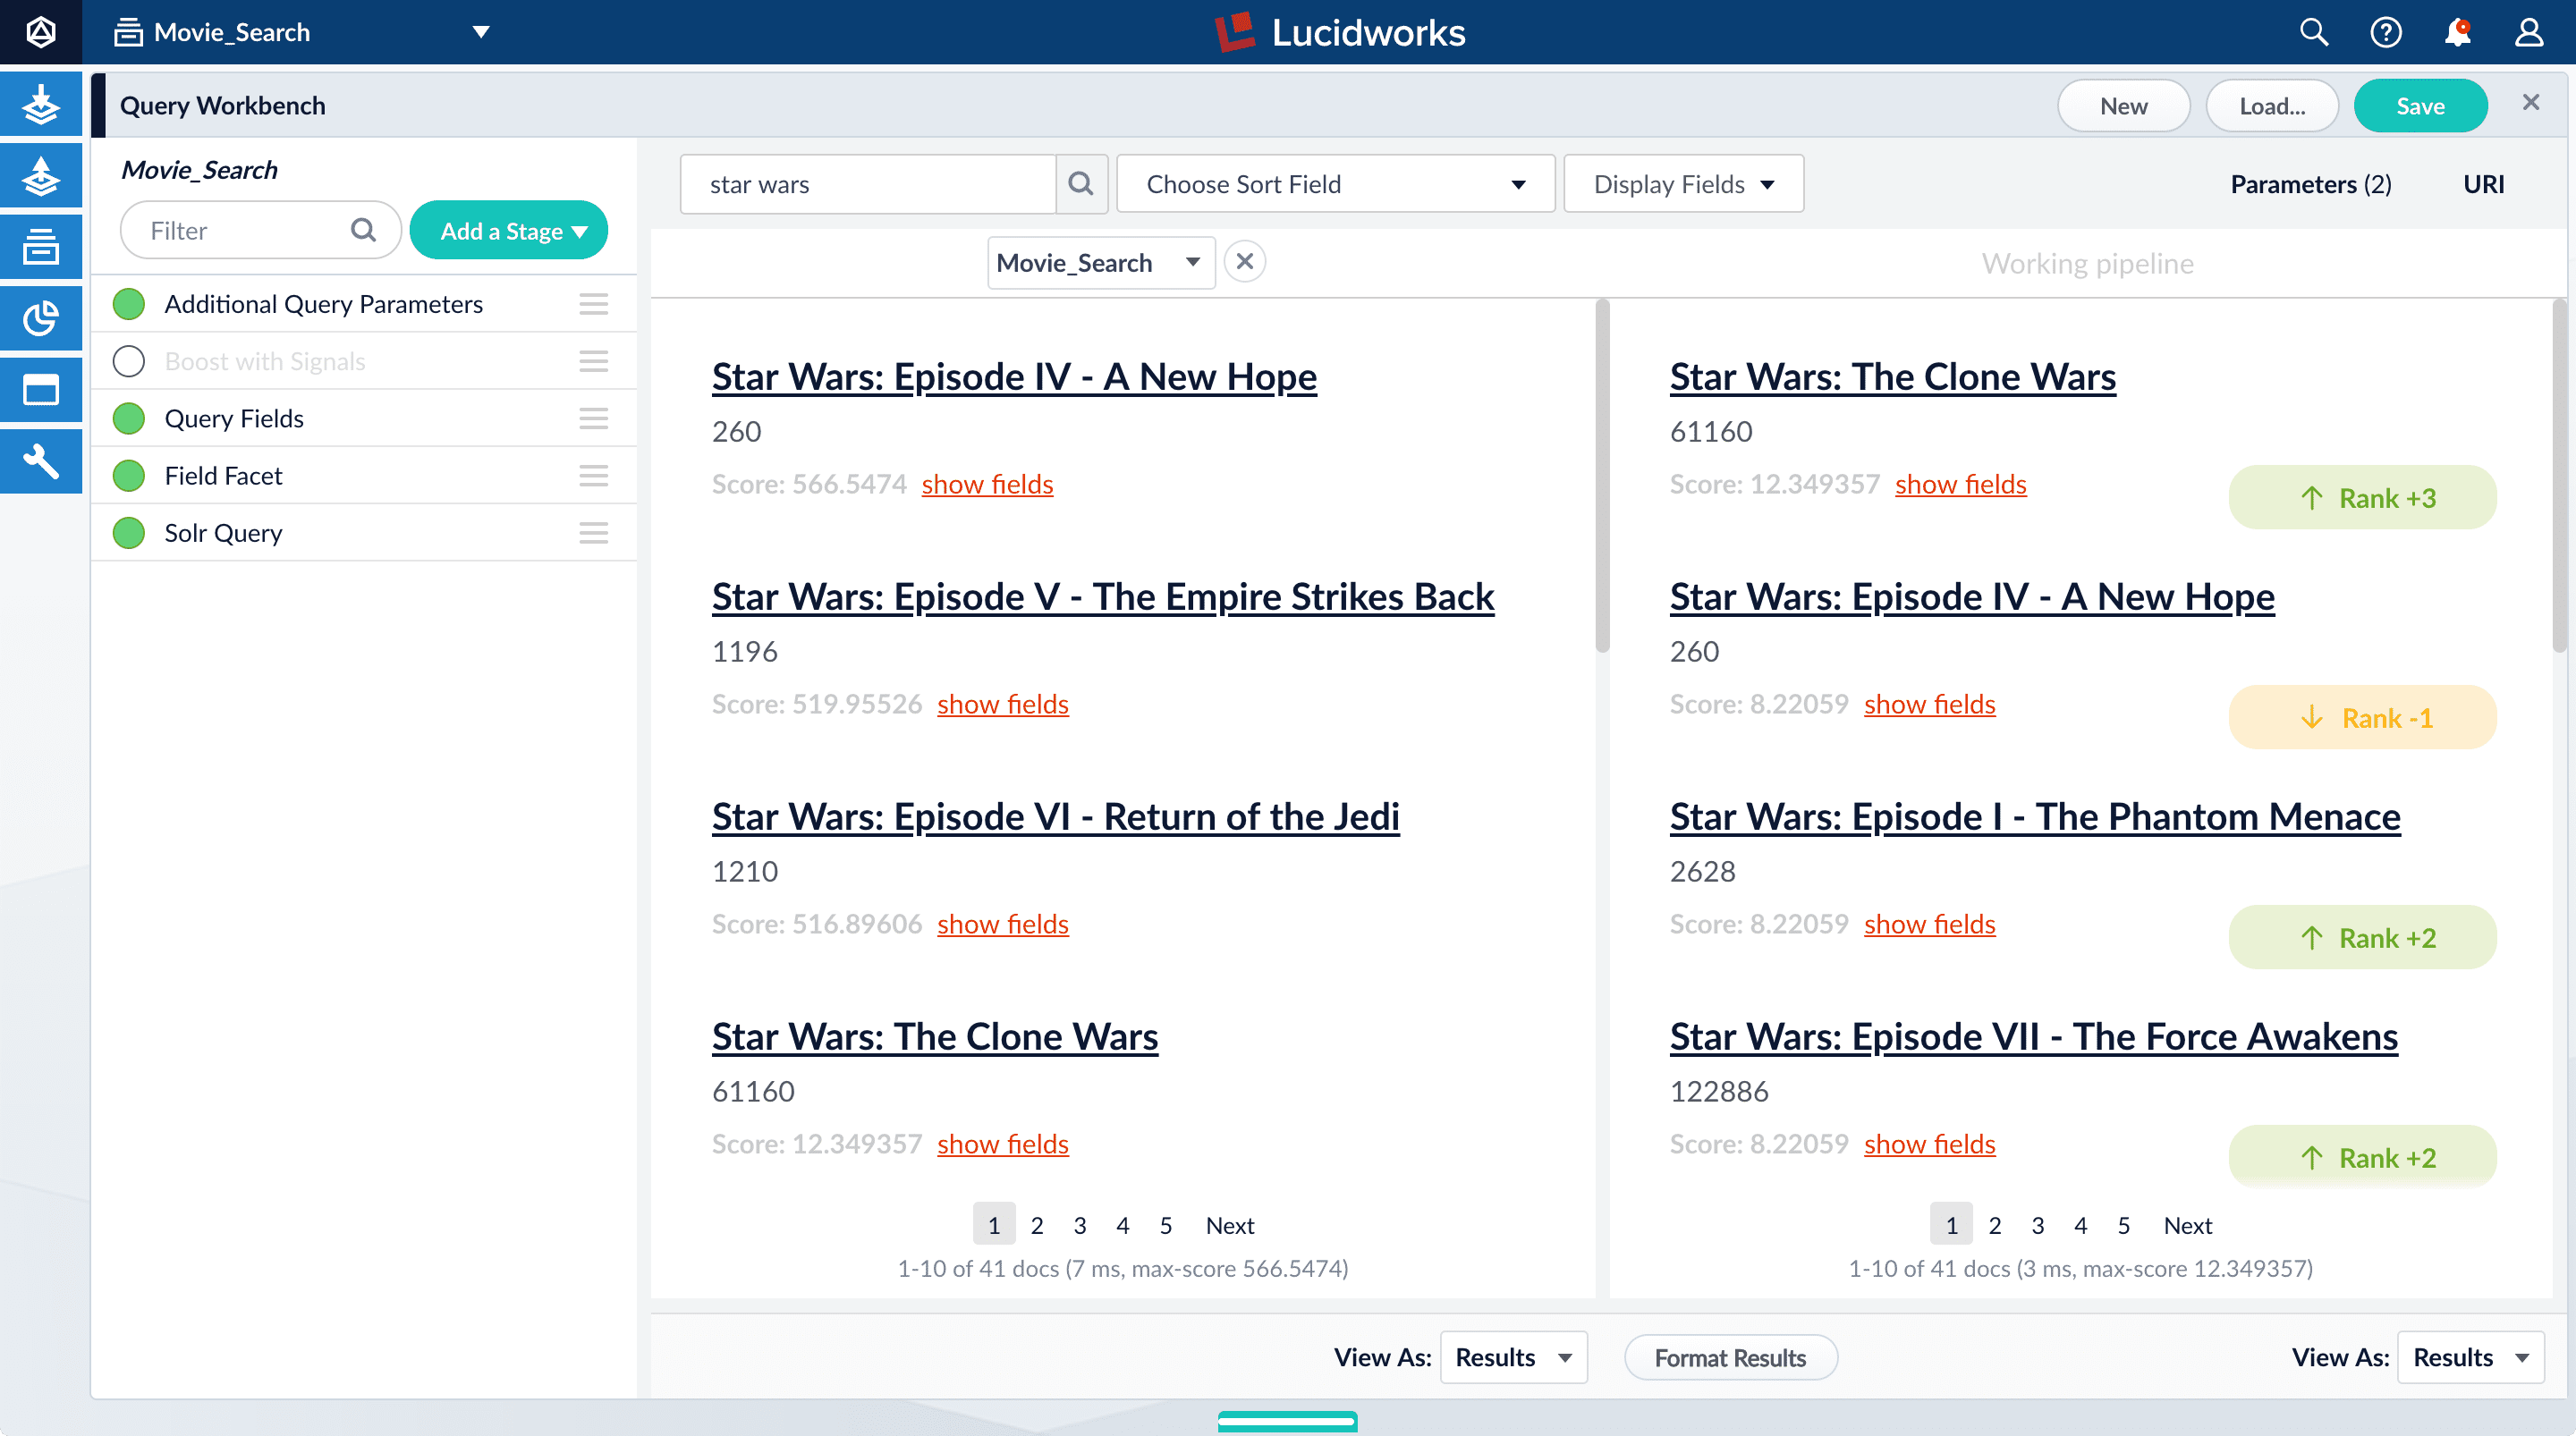 Now the search results on the right appear as they did before you generated synthetic click signals. Rank-change indicators indicate which results moved up or down as a result of turning off boosting.
6. Turn on the Boost with Signals stage again to restore the boosted results.
7. Close the comparison preview panel by clicking the close
Now the search results on the right appear as they did before you generated synthetic click signals. Rank-change indicators indicate which results moved up or down as a result of turning off boosting.
6. Turn on the Boost with Signals stage again to restore the boosted results.
7. Close the comparison preview panel by clicking the close  icon.
icon.