> ## Documentation Index
> Fetch the complete documentation index at: https://doc.lucidworks.com/llms.txt
> Use this file to discover all available pages before exploring further.
# Fusion Concepts and Components
export const LwTemplate = ({title = "Key questions to get you started", icon = "sparkles", cta = "Powered by Agent Studio", linkHref = "https://lucidworks.com/demo/?utm_source=docs&utm_medium=referral&utm_campaign=docs_cta_ai"}) => {
const [isLoaded, setIsLoaded] = useState(false);
useEffect(() => {
const timer = setTimeout(() => {
setIsLoaded(true);
}, 500);
return () => clearTimeout(timer);
}, []);
return
{isLoaded && `
}} />}
Powered by Lucidworks Agent Studio
;
};
[localhost link]: http://localhost:3000/docs/4/fusion-server/concepts/overview
[mintlify link]: https://doc.lucidworks.com/docs/4/fusion-server/concepts/overview
[old doc.lw link]: https://doc.lucidworks.com/fusion-server/4.2/120
Basic Fusion concepts are explained below. Since the core of Fusion Server is Solr, you may also find it useful to familiarize yourself with [Solr terminology](https://lucene.apache.org/solr/guide/solr-glossary.html).
## Apps
*Fusion apps* provide tailored search functionality to specific groups of users.
An app is a named set of linked *objects*, including collections, datasources, index and query pipelines, index and query profiles, parsers, and more. Using roles and security realms, you can define security on a per-app basis.
### Collections
Collections consist of stored data and the datasources that determine how the data is ingested and indexed. Collections are a way to logically group your data sets. Fusion’s concept of collections is the same as Solr collections. See [Collection Management](/docs/4/fusion-server/concepts/indexing/collections/overview).
### Datasources
Datasources are the configurations that determine how data is ingested and indexed. Each datasource includes a connector configuration, a parser configuration, and an index pipeline configuration. See [Datasource Configuration](/docs/4/fusion-server/concepts/indexing/datasources/overview).
#### Connectors
Connectors are the conduit between Fusion and your external data sources. Connectors retrieve your data and import it into Fusion Server.
See the [Connectors Reference Guide](/docs/fusion-connectors/connectors/overview) for a complete list of available connectors.
#### Parsers
Parsers interpret incoming data in order to determine its format and fields. A parser consists of a sequence of parsing stages, each designed to parse a different data format, sometimes recursively. See the [Parser Stages Reference Guide](/docs/4/fusion-server/reference/parser-stages/overview) for complete details about all available parsing stages.
#### Index pipelines
Index pipelines format the incoming raw data into fielded documents that it can be indexed and searched by the Solr core. A pipeline consists of a sequence of stages, and each stage performs a different kind of processing based on user-configured logic. See the [Index Pipeline Stages Reference Guide](/docs/4/fusion-server/reference/pipeline-stages/indexing/overview) for a complete list of available index pipeline stages.
### Query Pipelines
Query pipelines manipulate incoming queries and return an ordered list of matching results from Solr. Individual search results are called documents. See [Query Pipeline Configuration](/docs/4/fusion-server/concepts/querying/pipelines/query-pipelines).
## Fusion Components
### Apache Solr
Solr is the search platform that powers Fusion. There are multiple aspects to Fusion’s use of Solr:
* Fusion components manage Solr search and indexing and provide analytics over these collections. Fusion’s analytics components depend on aggregations over information which is stored in a Solr collection.
* Fusion collections are all Solr collections.
* Application data is stored as one or more Solr collections.
* Fusion’s own logs are stored as Solr collections.
* A few Fusion service APIs use Solr as a backing store, notably Parameter Sets.
#### Solr configuration
Fusion requires that Solr run with
[SolrCloud](https://cwiki.apache.org/confluence/display/solr/SolrCloud)
enabled.
Configuration for Solr’s Web service is in `https://FUSION_HOST:FUSION_PORT/apps/jetty/solr`.
#### Solr logs
Solr log files are in `https://FUSION_HOST:FUSION_PORT/var/log/solr`.
#### Accessing the Solr UI
With Fusion installed out of the box, you can still access the Solr UI at `http://localhost:8983/solr/`.
#### Solr documentation
Solr documentation and additional resources are available at [http://lucene.apache.org/solr/resources.html](http://lucene.apache.org/solr/resources.html).
You can also find plenty of Solr tips and technical discussions in our
[blog](https://lucidworks.com/?s=blogs/s=solr) and
[webinars](https://lucidworks.com/?s=webinars/s=solr).
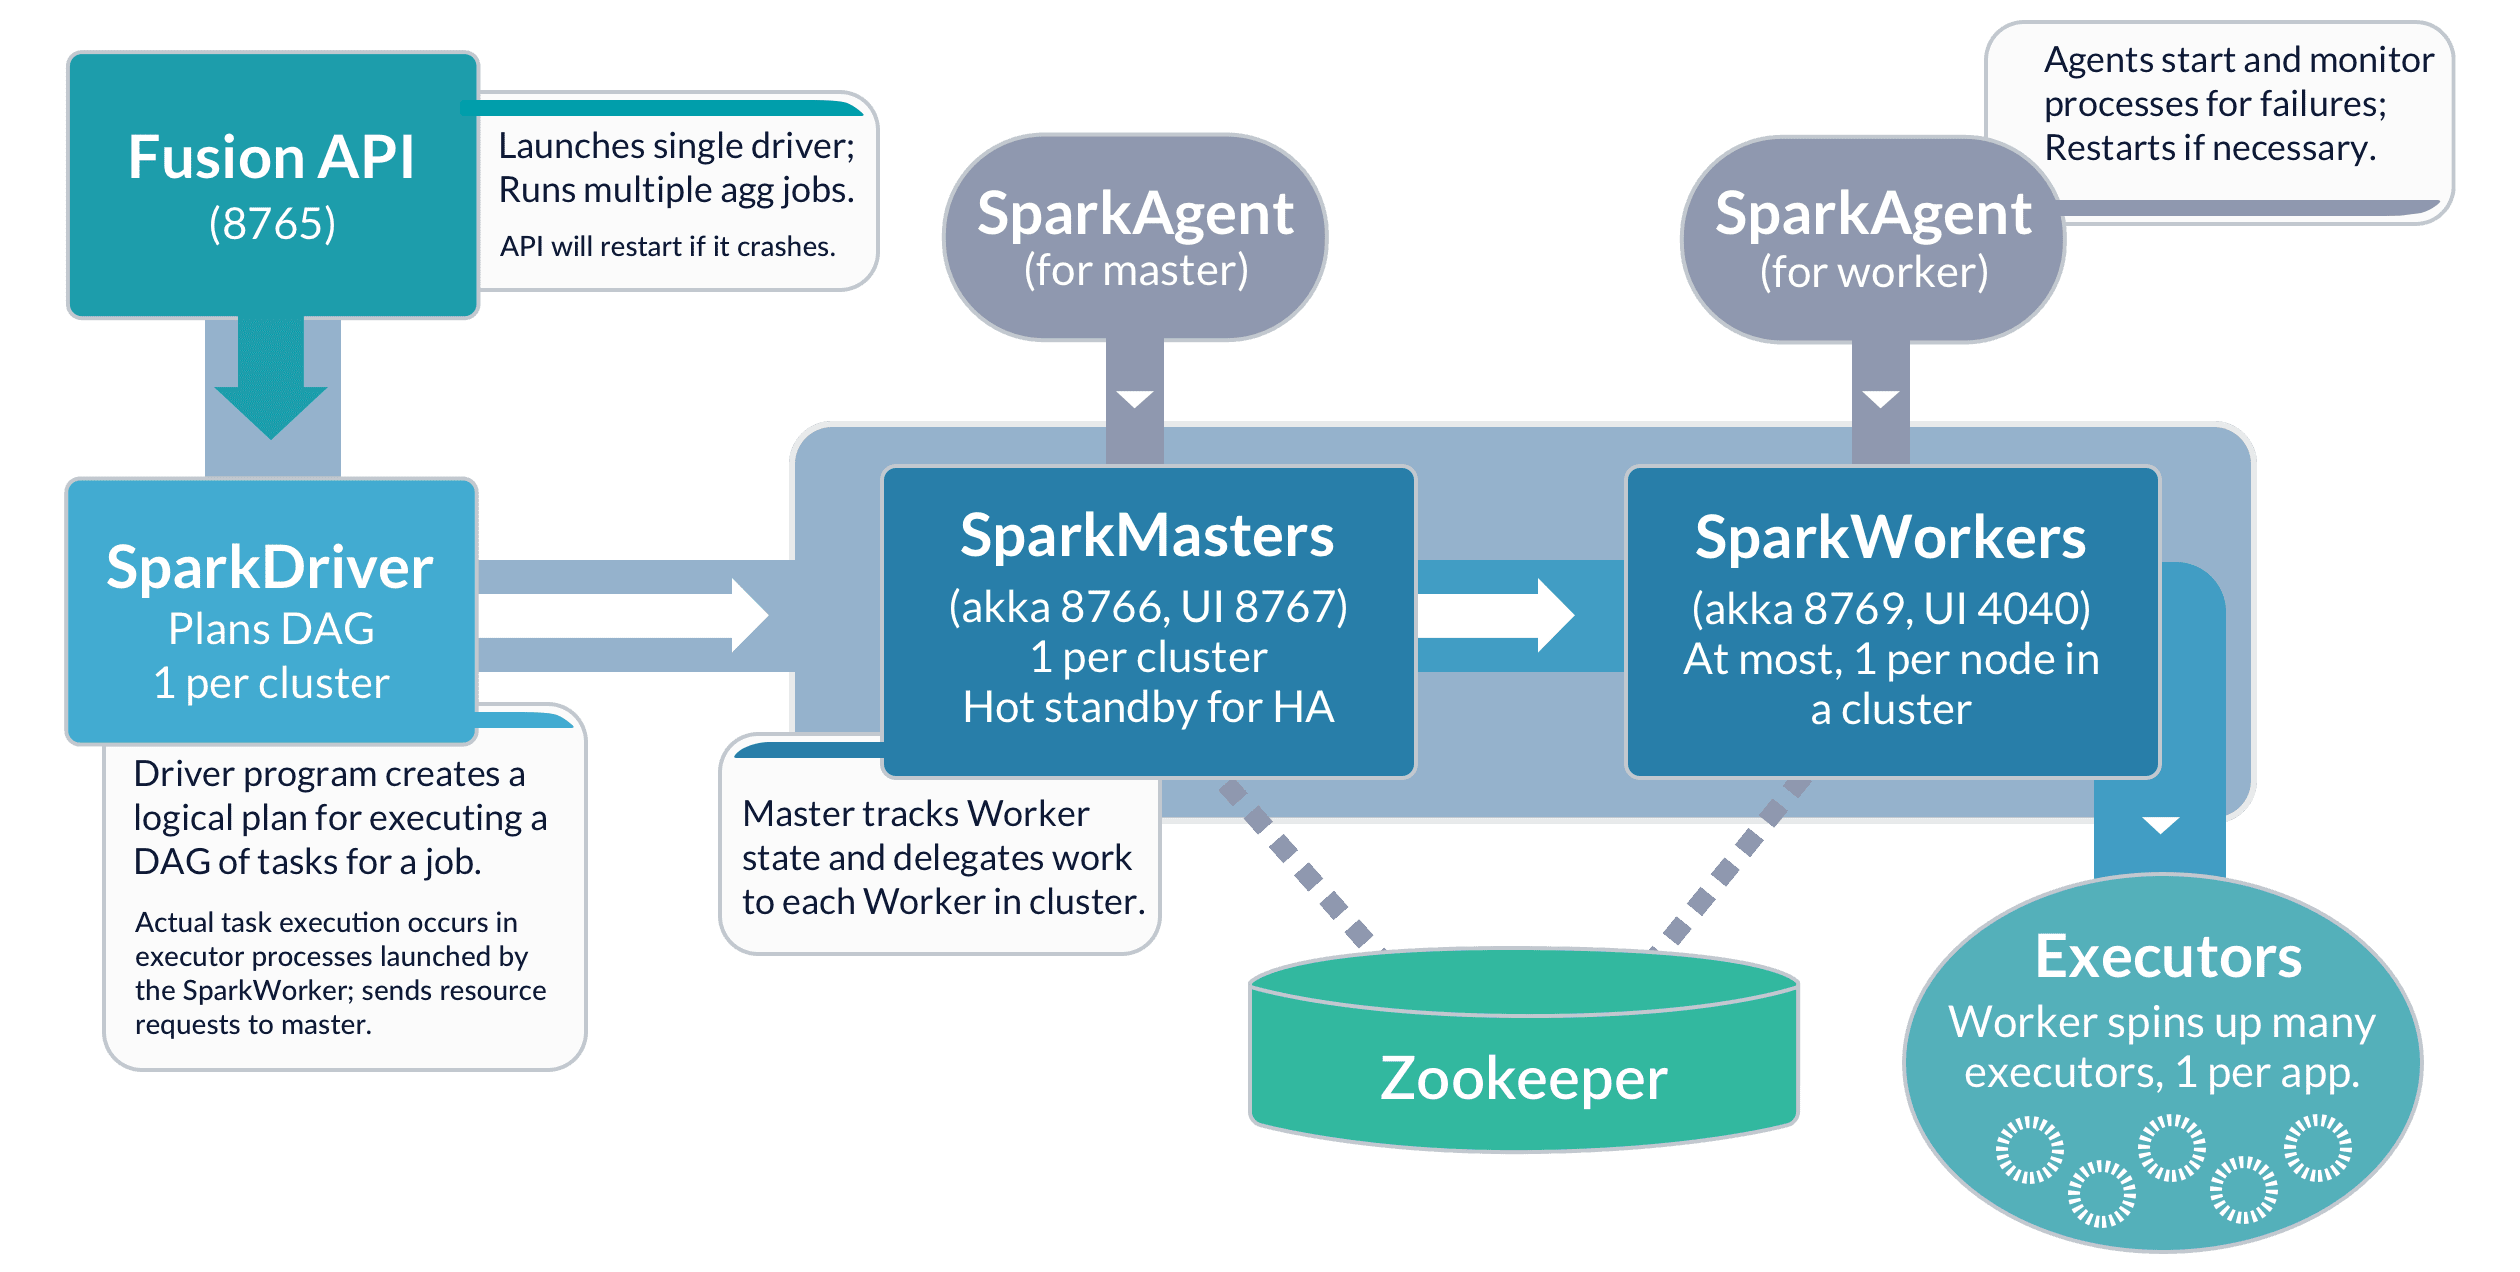
### Apache Spark
[Apache Spark](http://spark.apache.org/) is a fast and general execution engine
for large-scale data processing jobs that can be decomposed into stepwise tasks
which are distributed across a cluster of networked computers.
Spark provides faster processing and better fault-tolerance
than previous MapReduce implementations.
The following schematic shows the Spark components available from Fusion:
See [Spark Administration](/docs/4/fusion-server/concepts/spark/overview) for more information.
### Apache ZooKeeper
[Apache ZooKeeper](http://zookeeper.apache.org/) is a distributed configuration service, synchronization service, and naming registry.
Fusion uses ZooKeeper to configure and manage all Fusion components in a single Fusion deployment,
therefore a ZooKeeper service must always be running as part of the Fusion deployment.
For high availability, this should be an external 3-node ZooKeeper cluster. All Fusion Java components communicate with ZooKeeper using the ZooKeeper API.
For ZooKeeper installation instructions, see the [ZooKeeper documentation](http://zookeeper.apache.org/doc/current/zookeeperAdmin.html#ch_deployment).
You can find ZooKeeper’s logs at `https://FUSION_HOST:FUSION_PORT/var/log/zookeeper`.
#### ZooKeeper Terminology
* **znode.** ZooKeeper data is organized into a hierarchal name space of data nodes called znodes.\
A znode can have data associated with it as well as child znodes.\
The data in a znode is stored in a binary format, but it is possible to import, export, and view this information as JSON data.\
Paths to znodes are always expressed as canonical, absolute, slash-separated paths; there are no relative reference.
* **ephemeral nodes.** An ephemeral node is a znode which exists only for the duration of an active session.\
When the session ends the znode is deleted. An ephemeral znode cannot have children.
* **server.** A ZooKeeper service consists of one or more machines; each machine is a server which runs in its own JVM and listens on its own set of ports.\
For testing, you can run several ZooKeeper servers at once on a single workstation by configuring the ports for each server.
* **quorum.** A quorum is a set of ZooKeeper servers. It must be an odd number. For most deployments, only 3 servers are required.
* **client.** A client is any host or process which uses a ZooKeeper service.
See the official [ZooKeeper documentation](http://zookeeper.apache.org/doc/current/) for details about using and managing a ZooKeeper service.
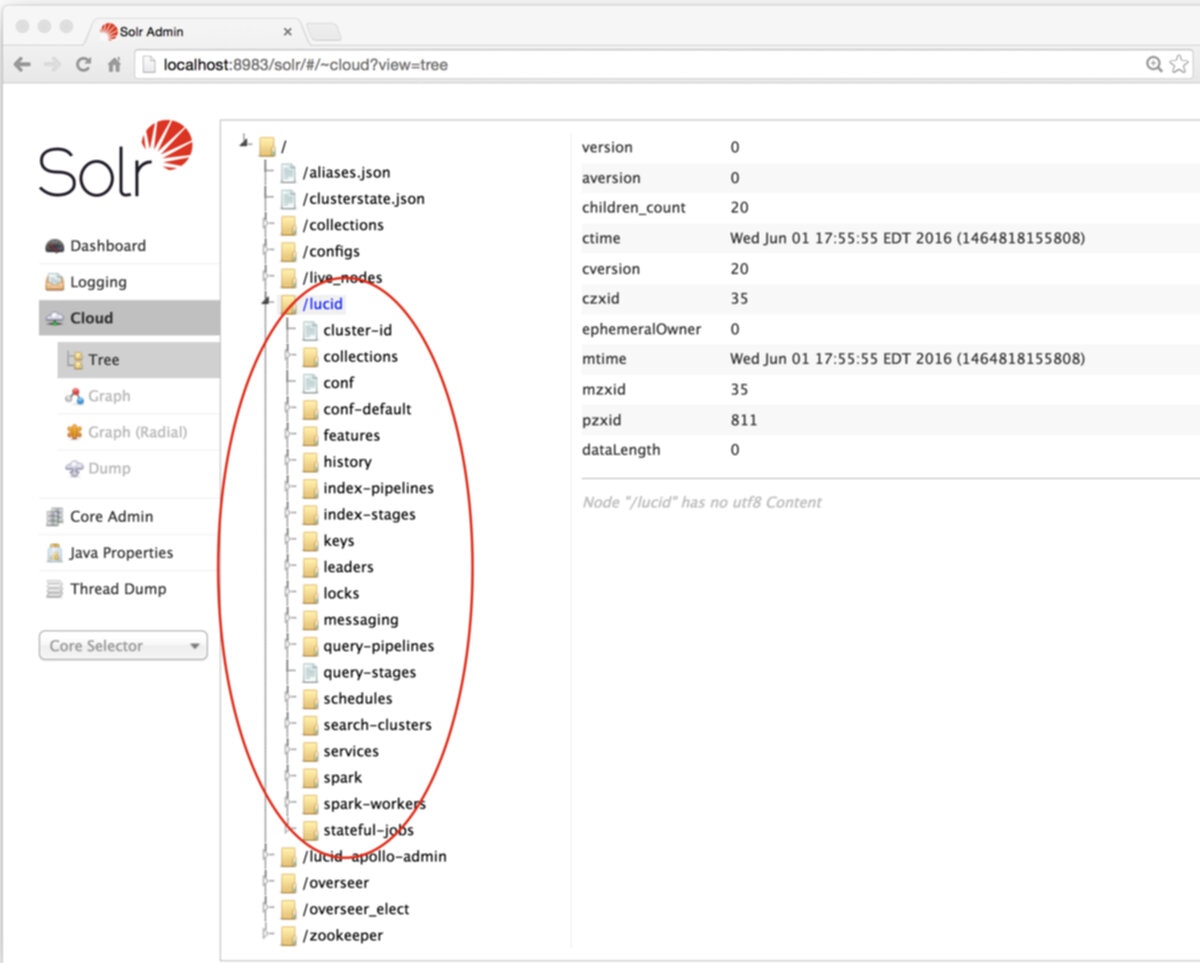
#### Fusion ZooKeeper Nodes
Fusion configuration data is stored in ZooKeeper under two znodes:
* Node `lucid` stores all application-specific configurations, including collection, datasource, pipeline, signals, aggregations, and associated scheduling, jobs, and metrics.
* Node `lucid-apollo-admin` stores all access control information, including all users, groups, roles, and realms.
The Solr Admin tool provides a ZooKeeper node browser tool.
In the case of the Fusion default developer deployment, the Fusion runs scripts are configured to run
the instances of both Solr and ZooKeeper which are included with the Fusion distribution, and therefore
we take a fresh installation of a Fusion developer instance and use the embedded Solr’s Admin tool to
explore how Fusion’s configurations are managed in ZooKeeper.
On initial install, the "lucid" znode contains the set of default configurations used by Fusion’s services:
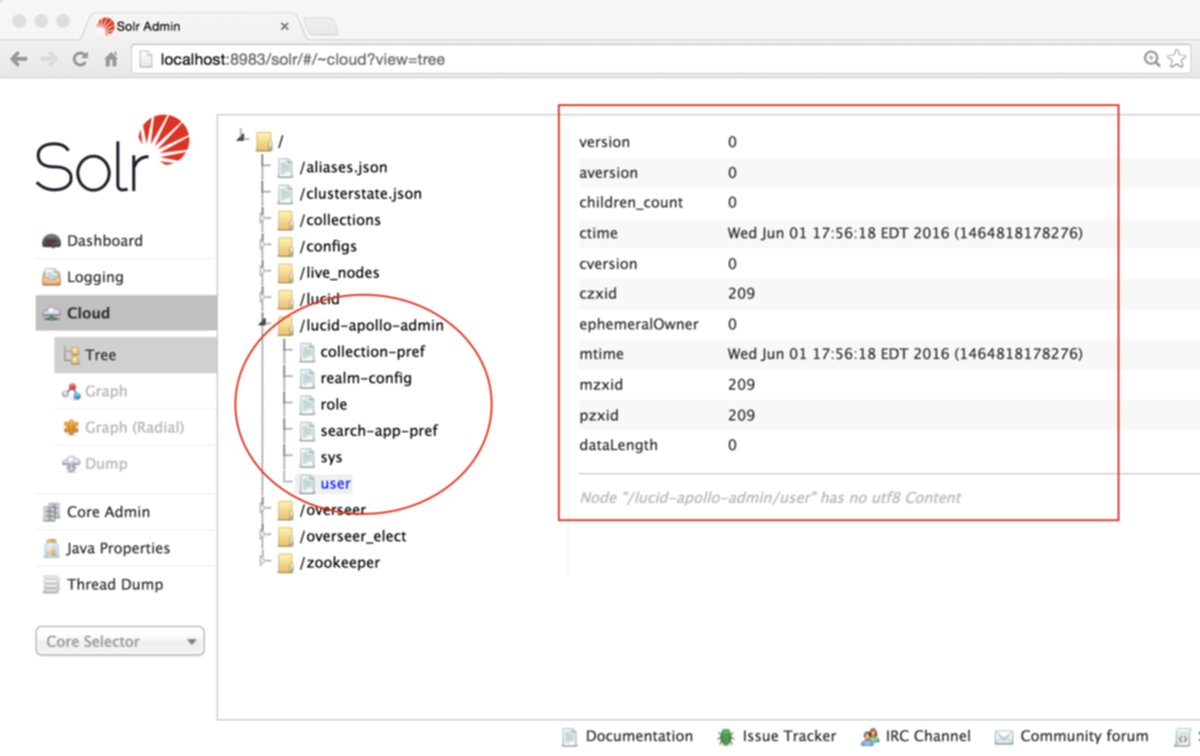
The "lucid-apollo-admin" znode contains the set of nodes used by Fusion’s access control services:
In the above screenshot, the ZooKeeper node browser is browsing the contents of znode "lucid-apollo-admin/users" which is empty.
The Fusion distribution ships without any user accounts.
The initial user added to Fusion is the Fusion native realm "admin" user.
This entry is only created on initial startup via the Fusion UI "set admin password" panel.
Once you submit the admin password, the admin user account is created.
Until Fusion contains as least the admin user account, you cannot use the system, because all Fusion requests
require proper authorization.
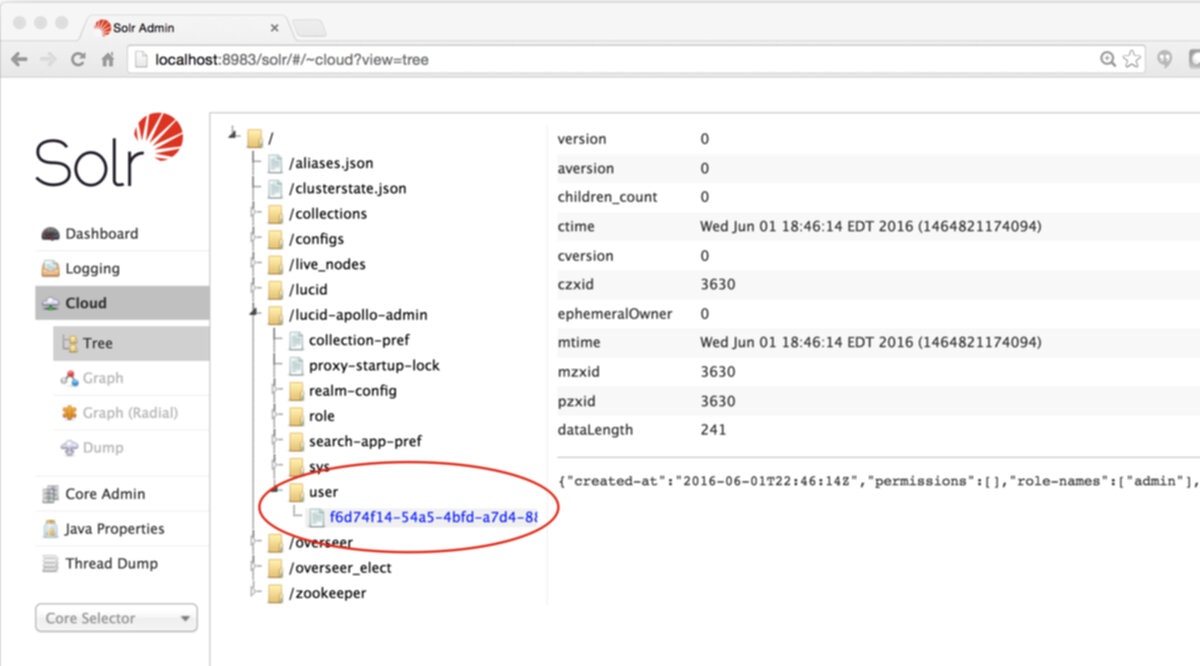
Once the admin password is set, and you have created one or more Fusion collections
and have populated them by running one or more datasources, these collections, datasources,
pipelines, and other application configuration settings are stored under the "lucid" znode:
In the above screenshot, the ZooKeeper node browser is browsing the contents
of znode "lucid/connectors/datasources/ds1". This datasource was used to populate
a Fusion collection with documents retrieved via a webcrawl. Note that in the
initial screenshot for znode "lucid", there is no "connectors" node at all.
The "lucid-apollo-admin" znode now contains one user accounts for user "admin":
### Jetty
[Jetty](https://eclipse.org/jetty) provides Web services for Fusion’s UI, APIs, and Connectors, plus Solr. Each of those components runs inside its own instance of Jetty, using a separate configuration. Configurations for each component are located in `https://FUSION_HOST:FUSION_PORT/apps/jetty`.
Securing Fusion using SSL requires configuring Jetty to use SSL. For example, to secure the UI you need to modify the configuration in `https://FUSION_HOST:FUSION_PORT/apps/jetty/admin-ui`.
Fusion’s UI (which is accessed through the Fusion Proxy service) can run over SSL for secure communication with any HTTP client, using the
[Java Secure Socket Extension (JSSE)](http://docs.oracle.com/javase/8/docs/technotes/guides/security/jsse/JSSERefGuide.html) framework. You configure Fusion for SSL by configuring Fusion’s Proxy and UI services.
Fusion 4.0.2 or later is required to enable SSL security. Version 4.0.2 fixed a bug in the authentication proxy that incorrectly redirected some requests when SSL is enabled.
## Required software
{/* // tag::ssl-software-reqs[] */}
Configuring Fusion for SSL requires the following software:
* **Java Development Kit.** To store certificates, you can use the Java [keytool Key and Certificate Management utility](https://docs.oracle.com/javase/8/docs/technotes/tools/unix/keytool.html) which is a part of the JDK.
The JDK is also [a requirement for Fusion Server](/docs/4/fusion-server/reference/system-requirements).
* [**OpenSSL**](https://www.openssl.org/). You might need the `openssl` command line tool:
* If you have the certificate chain and private key as separate files, then you can use the `openssl` command line tool to create a PKCS #12 file.
* If you have an intermediate CA certificate, then you can use it and `openssl` to generate the certificate chain and private key files.
{/* // end::ssl-software-reqs[] */}
## Load an SSL certificate into a Fusion keystore
The SSL protocol is based on public-key cryptography where encryption keys come in public key/private key pairs. An SSL certificate is used to verify the authenticity of a particular server. It contains the web site name, contact email address, company information and the public key used to encrypt the communication which is shared with the entities that communicate with the owner of the public/private key pair.
The server has a locally-protected private key that is accessible via a
[JSEE keystore](http://docs.oracle.com/javase/8/docs/technotes/guides/security/jsse/JSSERefGuide.html#SSLOverview).
The keystore maintains both the server certificate and the private key, so that when a server authenticates itself to the client, it uses the private key from its keystore for the initial SSL handshake.
Load the certificate into a Fusion keystore. Perform the tasks in the appropriate section:
* [**Self-signed certificate.**](#alternative-1-self-signed-certificate) If Fusion is behind a firewall, you can use a self-signed certificate for SSL communication with other hosts in your internal network. Create a keystore for the Fusion Proxy service and load the keystore with the self-signed PKCS #12 certificate.
* [**Certificate signed by a certificate authority.**](#alternative-2-ca-signed-certificate) In a production environment, SSL certificates typically originate with certificate signing requests (CSRs) and are signed by a trusted third-party [Certificate Authority (CA)](http://en.wikipedia.org/wiki/Certificate_authority). Create a keystore for the Fusion Proxy service and load the keystore with the PKCS #12 certificate from a CA.
### Alternative 1: Self-signed certificate
If you are using a CSR-originated certificate from a trusted certificate authority, proceed to [Alternative 2: CA-signed certificate](#alternative-2-ca-signed-certificate).
If Fusion is behind a firewall, you can use a self-signed certificate for SSL communication with other hosts in your internal network. Create a keystore for the Fusion Proxy service and load the keystore with the self-signed PKCS #12 certificate.
To store certificates, you can use the Java [keytool](https://docs.oracle.com/javase/8/docs/technotes/tools/unix/keytool.html)
Key and Certificate Management utility which is a part of the JDK.
**How to create a keystore and load a self-signed certificate**
1. Set environment variables:
```bash theme={"dark"}
export JAVA_HOME=JavaHomeDirectory
export FUSION_HOME=FusionHomeDirectory
```
For example, in Fusion 4.1:
```bash theme={"dark"}
export JAVA_HOME=/usr/java/jdk1.8.0_171
export FUSION_HOME=/opt/lucidworks/fusion/4.1.2
```
In Fusion 4.0.x:
```bash theme={"dark"}
export JAVA_HOME=/usr/java/jdk1.8.0_171
export FUSION_HOME=/opt/lucidworks/fusion/4.0.2
```
2. Create the Fusion Proxy service keystore, generate the key pair and self-signed certificate, and load them into the keystore:
```bash theme={"dark"}
"$JAVA_HOME/bin/keytool" -genkeypair -keystore "$FUSION_HOME/apps/jetty/proxy/etc/keystore" -dname "CN=CommonName, OU=Unknown, O=Unknown, L=Unknown, ST=Unknown, C=Unknown" -keypass KeyPassword -storepass KeystorePassword -keyalg RSA -alias selfsigned -deststoretype pkcs12 -ext SAN=dns:ServerFqdn,ip:ServerIpAddress
```
You must include the qualified domain name and/or the IP address of the Fusion server in the `-ext SAN` part of the command. Failure to do so results in SSL validation errors.
Example command:
```bash theme={"dark"}
"$JAVA_HOME/bin/keytool" -genkeypair -keystore "$FUSION_HOME/apps/jetty/proxy/etc/keystore" -dname "CN=search.mycorp, OU=Unknown, O=Unknown, L=Unknown, ST=Unknown, C=Unknown" -keypass 59Winter.Is.Long45 -storepass 46I.Prefer.Vanilla24 -keyalg RSA -alias selfsigned -deststoretype pkcs12 -ext SAN=dns:search.mycorp,ip:192.168.1.40,dns:localhost
```
{/* // tag::ssl-hosts[] */}
The resulting certificate enables validated SSL transport to these hosts:
```bash theme={"dark"}
https://search.mycorp:ProxyPort
https://192.168.1.40:ProxyPort
https://localhost:ProxyPort
```
Where `ProxyPort` is the Fusion Proxy port.
{/* // end::ssl-hosts[] */}
### Alternative 2: CA-signed certificate
If Fusion is behind a firewall and you are using a self-signed certificate, skip this section. Perform the tasks in [Alternative 1: Self-signed certificate](#alternative-1-self-signed-certificate).
In a production environment, SSL certificates typically originate with certificate signing requests (CSRs) and are signed by a trusted third-party [Certificate Authority (CA)](http://en.wikipedia.org/wiki/Certificate_authority).
The steps here assume that you are the person who will be obtaining the SSL certificate chain and private key files. If you are not that person, contact your system administrator.
#### Preliminary steps
1. Obtain a domain from a domain registrar.
2. Change the A record of your domain to the public IP address of your web server instance.
#### Generate SSL certificate files
Use an SSL certificate provider to generate the certificate chain and private key files, or a PKCS #12 certificate, from a trusted CA:
* **Certificate chain and private key files.** In this case, you will need to convert these files into a single certificate file in PKCS #12 format.
* **A PKCS #12 certificate.** This must contain both the certificate chain and private key. In this case, no conversion is necessary.
**How to obtain certificate files**
1. In most cases, you will need to temporarily open ports 80 and 443 in your firewall configuration. The SSL certificate provider must be able to make successful HTTP and HTTPS requests to your server through the Domain Name System (DNS).
2. Use an SSL certificate provider to generate the certificate chain (`fullchain.pem`) and private key (`privkey.pem`) files, or the PKCS #12 certificate, from a trusted CA. Steps will vary based on the certificate provider. Contact your certificate provider for details.
3. Close ports 80 and 443 in your firewall configuration.
4. Change the A record of your domain to the public domain-name address of your web server instance.
Proceed to the next sections as follows:
* If you have certificate chain and private key files, perform the steps in [Convert the certificate chain and private key files to a PKCS #12 certificate](#convert-the-certificate-chain-and-private-key-files-to-a-pkcsand-160-12-certificate) and [Import the PKCS #12 certificate into the Fusion Proxy service keystore](#create-the-fusion-proxy-service-keystore-and-import-the-pkcsand-160-12-certificate).
* If you have a PKCS #12 certificate, perform the steps in [Import the PKCS #12 certificate into the Fusion Proxy service keystore](#create-the-fusion-proxy-service-keystore-and-import-the-pkcsand-160-12-certificate).
#### Convert the certificate chain and private key files to a PKCS #12 certificate
If you have a PKCS #12 certificate, skip this section and proceed to the section [Import the PKCS #12 certificate into the Fusion Proxy service keystore](#create-the-fusion-proxy-service-keystore-and-import-the-pkcsand-160-12-certificate).
With the certificate chain and private key as separate files, use the `openssl` command line tool in [OpenSSL](https://www.openssl.org/) to create a PKCS #12 certificate.
```bash theme={"dark"}
openssl pkcs12 -export -out /path/to/keystore.p12 -in /path/to/fullchain.pem -inkey /path/to/privkey.pem
```
Do not enter a blank password.
#### Create the Fusion Proxy service keystore and import the PKCS #12 certificate
Use the Java [keytool](https://docs.oracle.com/javase/8/docs/technotes/tools/unix/keytool.html)
Key and Certificate Management utility to create a keystore for the Fusion Proxy service (`$FUSION_HOME/apps/jetty/proxy/etc/keystore`) and import the PKCS #12 certificate file. Fusion uses this certificate to perform SSL.
1. To create the keystore and import the PKCS #12 certificate:
2. Use the keytool `import` command to create a JSSE keystore.
```bash theme={"dark"}
keytool -importkeystore -srckeystore /path/to/keystore.p12 -srcstoretype PKCS12 -destkeystore "$FUSION_HOME/apps/jetty/proxy/etc/keystore" -deststoretype PKCS12
```
3. (Optional) If desired, delete the PKCS #12 certificate file that resides outside of the Fusion Proxy service keystore (the one you created from the certificate chain and private key files, or obtained from a trusted CA.
```bash theme={"dark"}
rm /path/to/keystore.p12
```
## Enable HTTPS in the Fusion Proxy service
Before beginning these steps, [load an SSL certificate into a Fusion keystore](#alternative-1-self-signed-certificate).
**How to enable HTTPS in the Fusion Proxy service:**
1. (*Only for Fusion Server 4.0.x and 4.1.0*) Prevent the `start.jar` program from downloading a default keystore file, which is not needed. Edit `$FUSION_HOME/apps/jetty/home/modules/ssl.mod`. Comment out the indicated line using `#`. Change:
```bash theme={"dark"}
[files]
https://raw.githubusercontent.com/eclipse/jetty.project/master/jetty-server/src/test/config/etc/keystore?id=${jetty.tag.version}|etc/keystore
```
To:
```bash theme={"dark"}
[files]
# https://raw.githubusercontent.com/eclipse/jetty.project/master/jetty-server/src/test/config/etc/keystore?id=${jetty.tag.version}|etc/keystore
```
2. Set environment variables:
```bash theme={"dark"}
export JAVA_HOME=JavaHomeDirectory
export FUSION_HOME=FusionHomeDirectory
```
For example, in Fusion 4.1:
```bash theme={"dark"}
export JAVA_HOME=/usr/java/jdk1.8.0_171
export FUSION_HOME=/opt/lucidworks/fusion/4.1.2
```
In Fusion 4.0:
```bash theme={"dark"}
export JAVA_HOME=/usr/java/jdk1.8.0_171
export FUSION_HOME=/opt/lucidworks/fusion/4.0.2
```
3. Add HTTPS protocol support to the Jetty TLS (SSL) connector:
```bash theme={"dark"}
cd "$FUSION_HOME/apps/jetty/proxy/"
java -jar "$FUSION_HOME/apps/jetty/home/start.jar" --add-to-start=https
```
Example output:
```bash theme={"dark"}
INFO: ssl initialized (transitively) in ${jetty.base}/start.ini
INFO: https initialized in ${jetty.base}/start.ini
INFO: Base directory was modified
```
4. Get the obfuscated version of your keystore password:
```bash theme={"dark"}
java -cp "$FUSION_HOME/apps/jetty/home/lib/*" org.eclipse.jetty.util.security.Password PASSWORD
```
Replace `PASSWORD` with the password you used for the keystore. If the password contains special characters, [URL encode them](https://www.w3schools.com/tags/ref_urlencode.asp).
Example output:
```bash theme={"dark"}
2018-05-15 12:32:48.988:INFO::main: Logging initialized @133ms
password345XYZ
OBF:1vn21ugu1saj1v9i1v941sar1ugw1vo0
MD5:b91cd1a54781790beaa2baf741fa6789
```
5. Edit the file `$FUSION_HOME/apps/jetty/proxy/start.ini`:
1. Include obfuscated passwords by adding these properties to the end of the file:
```bash theme={"dark"}
* `jetty.sslContext.keyStorePassword`
* `jetty.sslContext.keyManagerPassword`
* `jetty.sslContext.trustStorePassword`
```
2. Use the OBF-encrypted password from step 4 (including the `OBF:` string) as the value for all three of the properties.\
For example:
```bash theme={"dark"}
## Keystore password
jetty.sslContext.keyStorePassword=OBF:2uha1vgt1jg01a4b1a4j1jda1vg11ugg
...
## KeyManager password
jetty.sslContext.keyManagerPassword=OBF:2uha1vgt1jg01a4b1a4j1jda1vg11ugg
## Truststore password
jetty.sslContext.trustStorePassword=OBF:2uha1vgt1jg01a4b1a4j1jda1vg11ugg
```
3. Set the local SSL port by adding the `jetty.ssl.port` property to the end of the file, and providing the port number. For example:
```bash theme={"dark"}
## Connector port to listen on
jetty.ssl.port=8443
```
4. Save the file `$FUSION_HOME/apps/jetty/proxy/start.ini`.
## Restart Fusion and test access through HTTPS
1. Restart all Fusion services:
```bash theme={"dark"}
./bin/fusion restart
```
HTTPS should now be enabled in the Fusion Proxy service.
2. Sign in to the Fusion UI. Specify the HTTPS URL scheme and SSL port, for example, `https://search.mycorp:8443`.
## Disable HTTP access to the Fusion Proxy service
Disable HTTP access. You have a choice. Perform the tasks in the appropriate section:
* [**Disable HTTP access on the firewall or load balancer**](#alternative-1-disable-http-access-on-the-firewall-or-load-balancer) - *This is the preferred approach.*
* [**Disable listening for HTTP requests in the Fusion Proxy service**](#disable-http-access-to-the-fusion-proxy-service)
### Alternative 1: Disable HTTP access on the firewall or load balancer
Disable HTTP access to the Fusion Proxy service on the firewall or load balancer:
1. Disallow all requests for port 8764 from the outside world. Only `localhost` should be able to communicate with Fusion on the non-SSL port 8764. Block all other requestors.
2. If you are using a firewall or load balancer in front of Fusion, use it to redirect all HTTP requests to use HTTPS instead. For example, Apache would [redirect all incoming HTTP traffic to HTTPS](https://httpd.apache.org/docs/2.4/rewrite/avoid.html).
### Alternative 2: Disable listening for HTTP requests in the Fusion Proxy service
Ideally, you should [disable HTTP access using the firewall or load balancer](#alternative-1-disable-http-access-on-the-firewall-or-load-balancer). Follow the steps in this section *only* if disabling HTTP access on the firewall or load balancer is not feasible.
You can only use this alternative if your SSL certificate covers a hostname that can be accessed from the local host. For example, if your certificate only covers `https://fusion.com`, then your local machine must be able to access Fusion from that exact host. If necessary, change the `hosts` file so that this can work.
**How to disable HTTP**
1. Edit `/opt/lucidworks/fusion/latest.x/apps/jetty/proxy/start.d/http.ini`.
1. Change this line:
```bash theme={"dark"}
--module=http
```
To:
```bash theme={"dark"}
#--module=http
```
2. Save the file.
2. Edit the Fusion configuration file, `/opt/lucidworks/fusion/latest.x/conf/fusion.cors` (`fusion.properties` in Fusion 4.x).
1. Ensure that the Agent JVM uses the Fusion Proxy service’s keystore by adding this to the end of the file:
```bash theme={"dark"}
agent.jvmOptions=-Djavax.net.ssl.trustStore="${FUSION_HOME}/apps/jetty/proxy/etc/keystore" -Djavax.net.ssl.trustStorePassword=PASSWORD -Djavax.net.ssl.keyStore="${FUSION_HOME}/apps/jetty/proxy/etc/keystore" -Djavax.net.ssl.keyStorePassword=PASSWORD
```
Replace `PASSWORD` with your Fusion keystore password.
2. Uncomment the `default.address` and change it to the hostname of the server that is validated by your SSL certificate.\
If the hostname saved in `default.address` is not validated by your SSL certificate, then the Fusion Proxy service will not start, because the agent’s liveness detector will not be able to access the HTTPS port to determine whether Fusion is running.
If you self-signed the certificate, then the `default.address` must match the hostname you specified while signing the certificate. Failure to do this will result in the Fusion Proxy service not starting after you have disabled HTTP.
For example, if your SSL certificate’s validated hostname is `search.mycorp`, then change:
```bash theme={"dark"}
#default.address = 127.0.0.1
```
To:
```bash theme={"dark"}
default.address = search.mycorp
```
3. Change the `proxy.port` to the SSL port you chose.
4. Uncomment `proxy.ssl` and change its value to `true`. Change:
```bash theme={"dark"}
# proxy.ssl=false
```
To:
```bash theme={"dark"}
proxy.ssl=true
```
Stopping and starting Fusion is needed for these changes to take effect. But there is a bit more to do concerning the Fusion Agent before restarting Fusion.
## References and tutorials
* [Transport Layer Security](http://en.wikipedia.org/wiki/Transport_Layer_Security) (Wikipedia)
* [Public Key Certificate](http://en.wikipedia.org/wiki/Public_key_certificate) (Wikipedia)
* [OpenSSL Cookbook](https://www.feistyduck.com/library/openssl-cookbook/online/) (free ebook)
* [OpenSSL Command Line Utilities](https://wiki.openssl.org/index.php/Command_Line_Utilities) (OpenSSL wiki)
* [Java Tutorials: Generating and Verifying Certificates](https://docs.oracle.com/javase/tutorial/security/apisign/index.html)
* [IBM developerWorks: What is the JSSE all about?](http://www.ibm.com/developerworks/websphere/techjournal/0502_benantar/0502_benantar.html)
Fusion’s UI (which is accessed through the Fusion Proxy service) can run over SSL for secure communication with any HTTP client, using the
[Java Secure Socket Extension (JSSE)](http://docs.oracle.com/javase/8/docs/technotes/guides/security/jsse/JSSERefGuide.html) framework. You configure Fusion for SSL by configuring Fusion’s Proxy and UI services.
Fusion 4.0.2 or later is required to enable SSL security. Version 4.0.2 fixed a bug in the authentication proxy that incorrectly redirected some requests when SSL is enabled.
## Required software
Configuring Fusion for SSL requires the following software:
* **Java Development Kit.** To store certificates, you can use the Java [keytool Key and Certificate Management utility](https://docs.oracle.com/javase/8/docs/technotes/tools/unix/keytool.html) which is a part of the JDK.
The JDK is also [a requirement for Fusion Server](/docs/4/fusion-server/reference/system-requirements).
* [**OpenSSL**](https://www.openssl.org/). You might need the `openssl` command line tool:
* If you have the certificate chain and private key as separate files, then you can use the `openssl` command line tool to create a PKCS #12 file.
* If you have an intermediate CA certificate, then you can use it and `openssl` to generate the certificate chain and private key files.
## Overview of procedure
**How to configure Fusion for SSL:**
1. [Load an SSL certificate into a Fusion keystore](#alternative-1-self-signed-certificate).
2. [Enable SSL in the Fusion Proxy service](#generate-ssl-certificate-files).
3. [Restart Fusion and test access through HTTPS](#restart-fusion-and-test-access-through-https).
4. [Disable HTTP access to the Fusion Proxy service](#disable-http-access-to-the-fusion-proxy-service).
## Load an SSL certificate into a Fusion keystore
The SSL protocol is based on public-key cryptography where encryption keys come in public key/private key pairs. An SSL certificate is used to verify the authenticity of a particular server. It contains the web site name, contact email address, company information and the public key used to encrypt the communication which is shared with the entities that communicate with the owner of the public/private key pair.
The server has a locally-protected private key that is accessible via a
[JSEE keystore](http://docs.oracle.com/javase/8/docs/technotes/guides/security/jsse/JSSERefGuide.html#SSLOverview).
The keystore maintains both the server certificate and the private key, so that when a server authenticates itself to the client, it uses the private key from its keystore for the initial SSL handshake.
Load the certificate into a Fusion keystore. Perform the tasks in the appropriate section:
* [**Self-signed certificate.**](#alternative-1-self-signed-certificate) If Fusion is behind a firewall, you can use a self-signed certificate for SSL communication with other hosts in your internal network. Create a keystore for the Fusion Proxy service and load the keystore with the self-signed PKCS #12 certificate.
* [**Certificate signed by a certificate authority.**](#alternative-2-ca-signed-certificate) In a production environment, SSL certificates typically originate with certificate signing requests (CSRs) and are signed by a trusted third-party [Certificate Authority (CA)](http://en.wikipedia.org/wiki/Certificate_authority). Create a keystore for the Fusion Proxy service and load the keystore with the PKCS #12 certificate from a CA.
### Alternative 1: Self-signed certificate
If you are using a CSR-originated certificate from a trusted certificate authority, proceed to [Alternative 2: CA-signed certificate](#alternative-2-ca-signed-certificate).
If Fusion is behind a firewall, you can use a self-signed certificate for SSL communication with other hosts in your internal network. Create a keystore for the Fusion Proxy service and load the keystore with the self-signed PKCS #12 certificate.
To store certificates, you can use the Java [keytool](https://docs.oracle.com/javase/8/docs/technotes/tools/windows/keytool.html)
Key and Certificate Management utility which is a part of the JDK.
**How to create a keystore and load a self-signed certificate**
1. Set environment variables:
```bash theme={"dark"}
set JAVA_HOME=JavaHomeDirectory
set FUSION_HOME=FusionHomeDirectory
```
2. Create the Fusion Proxy service keystore, generate the key pair and self-signed certificate, and load them into the keystore:
```bash theme={"dark"}
"%JAVA_HOME%\bin\keytool.exe" -genkeypair -keystore "%FUSION_HOME%\apps\jetty\proxy\etc\keystore" -dname "CN=CommonName, OU=Unknown, O=Unknown, L=Unknown, ST=Unknown, C=Unknown" -keypass KeyPassword -storepass KeystorePassword -keyalg RSA -alias selfsigned -deststoretype pkcs12 -ext SAN=dns:ServerFqdn,ip:ServerIpAddress
```
You must include the qualified domain name and/or the IP address of the Fusion server in the `-ext SAN` part of the command. Failure to do so results in SSL validation errors.
Example command:
```bash theme={"dark"}
"%JAVA_HOME%\bin\keytool.exe" -genkeypair -keystore "%FUSION_HOME%\apps\jetty\proxy\etc\keystore" -dname "CN=CommonName, OU=Unknown, O=Unknown, L=Unknown, ST=Unknown, C=Unknown" -keypass 59Winter.Is.Long45 -storepass 46I.Prefer.Vanilla24 -keyalg RSA -alias selfsigned -deststoretype pkcs12 -ext SAN=dns:search.mycorp,ip:192.168.1.40,dns:localhost
```
The resulting certificate enables validated SSL transport to these hosts:
```bash theme={"dark"}
https://search.mycorp:ProxyPort
https://192.168.1.40:ProxyPort
https://localhost:ProxyPort
```
Where `ProxyPort` is the Fusion Proxy port.
### Alternative 2: CA-signed certificate
If Fusion is behind a firewall and you are using a self-signed certificate, skip this section. Perform the tasks in [Alternative 1: Self-signed certificate](#alternative-1-self-signed-certificate).
In a production environment, SSL certificates typically originate with certificate signing requests (CSRs) and are signed by a trusted third-party [Certificate Authority (CA)](http://en.wikipedia.org/wiki/Certificate_authority).
The steps here assume that you are the person who will be obtaining the SSL certificate chain and private key files. If you are not that person, contact your system administrator.
#### Preliminary steps
1. Obtain a domain from a domain registrar.
2. Change the A record of your domain to the public IP address of your web server instance.
#### Generate SSL certificate files
Use an SSL certificate provider to generate the certificate chain and private key files, or a PKCS #12 certificate, from a trusted CA:
* **Certificate chain and private key files.** In this case, you will need to convert these files into a single certificate file in PKCS #12 format.
* **A PKCS #12 certificate that contains both the certificate chain and private key.** In this case, no conversion is necessary.
**How to obtain certificate files**
1. In most cases, you will need to temporarily open ports 80 and 443 in your firewall configuration. The SSL certificate provider must be able to make successful HTTP and HTTPS requests to your server through the Domain Name System (DNS).
2. Use an SSL certificate provider to generate the certificate chain (`fullchain.pem`) and private key (`privkey.pem`) files, or the PKCS #12 certificate, from a trusted CA. Steps will vary based on the certificate provider. Contact your certificate provider for details.
3. Close ports 80 and 443 in your firewall configuration.
4. Change the A record of your domain to the public domain-name address of your web server instance.
Proceed to the next sections as follows:
* If you have certificate chain and private key files, perform the steps in [Convert the certificate chain and private key files to a PKCS #12 certificate](#convert-the-certificate-chain-and-private-key-files-to-a-pkcsand-160-12-certificate) and [Import the PKCS #12 certificate into the Fusion Proxy service keystore](#create-the-fusion-proxy-service-keystore-and-import-the-pkcsand-160-12-certificate).
* If you have a PKCS #12 certificate, perform the steps in [Import the PKCS #12 certificate into the Fusion Proxy service keystore](#create-the-fusion-proxy-service-keystore-and-import-the-pkcsand-160-12-certificate).
#### Convert the certificate chain and private key files to a PKCS #12 certificate
If you have a PKCS #12 certificate, skip this section and proceed to the section [Import the PKCS #12 certificate into the Fusion Proxy service keystore](#create-the-fusion-proxy-service-keystore-and-import-the-pkcsand-160-12-certificate).
**How to create a PKCS #12 certificate**
With the certificate chain and private key as separate files, use the `openssl` command line tool in [OpenSSL](https://www.openssl.org/) to create a PKCS #12 certificate.
```bash theme={"dark"}
openssl pkcs12 -export -out \path\to\keystore.p12 -in \path\to\fullchain.pem -inkey \path\to\privkey.pem
```
Do not enter a blank password.
#### Create the Fusion Proxy service keystore and import the PKCS #12 certificate
Use the Java [keytool](https://docs.oracle.com/javase/8/docs/technotes/tools/windows/keytool.html)
Key and Certificate Management utility to create a keystore for the Fusion Proxy service (`%FUSION_HOME%\apps\jetty\proxy\etc\keystore`) and import the PKCS #12 certificate file. Fusion uses this certificate to perform SSL.
If you are starting with a certificate file in PFX format (file extension `.pfx`), that format is now identical to PKCS #12 format.
1. To create the keystore and import the PKCS #12 certificate:
```bash theme={"dark"}
"%JAVA_HOME%\bin\keytool.exe" -genkeypair -alias mykeystore -keyalg RSA -keysize 2048 -keystore keystore.jks
"%JAVA_HOME%\bin\keytool.exe" -importkeystore -srckeystore mycertificate.p12 -srcstoretype PKCS12 -destkeystore keystore.jks
```
2. Use the keytool `import` command to create a JSSE keystore.
```bash theme={"dark"}
keytool -importkeystore -srckeystore \path\to\keystore.p12 -srcstoretype PKCS12 -destkeystore "%FUSION_HOME%\apps\jetty\proxy\etc\keystore" -deststoretype PKCS12
```
3. (Optional) If desired, delete the PKCS #12 certificate file that resides outside of the Fusion Proxy service keystore (the one you created from the certificate chain and private key files, or obtained from a trusted CA.
```bash theme={"dark"}
del \path\to\keystore.p12
```
## Enable HTTPS in the Fusion Proxy service
Before beginning these steps, [load an SSL certificate into a Fusion keystore](#alternative-1-self-signed-certificate).
**How to enable HTTPS in the Fusion Proxy service:**
1. Set environment variables:
```bash theme={"dark"}
set JAVA_HOME=JavaHomeDirectory
set FUSION_HOME=FusionHomeDirectory
```
2. Add HTTPS protocol support to the Jetty TLS (SSL) connector:
```bash theme={"dark"}
cd "%FUSION_HOME%\apps\jetty\proxy\"
java -jar "%FUSION_HOME%\apps\jetty\home\start.jar" --add-to-start=https
```
Example output:
```log theme={"dark"}
INFO: ssl initialized (transitively) in ${jetty.base}/start.ini
INFO: https initialized in ${jetty.base}/start.ini
INFO: Base directory was modified
```
3. Get the obfuscated version of your keystore password:
```bash theme={"dark"}
java -cp "$FUSION_HOME/apps/jetty/home/lib/*" org.eclipse.jetty.util.security.Password PASSWORD
```
Replace `PASSWORD` with the password you used for the keystore. If the password contains special characters, [URL encode them](https://www.w3schools.com/tags/ref_urlencode.asp).
Example output:
```log theme={"dark"}
2018-05-15 12:32:48.988:INFO::main: Logging initialized @133ms
password345XYZ
OBF:1vn21ugu1saj1v9i1v941sar1ugw1vo0
MD5:b91cd1a54781790beaa2baf741fa6789
```
4. Edit the file `%FUSION_HOME%\apps\jetty\proxy\start.ini`:
1. Include obfuscated passwords by adding these properties to the end of the file:
* `jetty.sslContext.keyStorePassword`
* `jetty.sslContext.keyManagerPassword`
* `jetty.sslContext.trustStorePassword`
2. Use the OBF-encrypted password from step 4 (including the `OBF:` string) as the value for all three of the properties.\
For example:
```ini theme={"dark"}
## Keystore password
jetty.sslContext.keyStorePassword=OBF:2uha1vgt1jg01a4b1a4j1jda1vg11ugg
...
## KeyManager password
jetty.sslContext.keyManagerPassword=OBF:2uha1vgt1jg01a4b1a4j1jda1vg11ugg
## Truststore password
jetty.sslContext.trustStorePassword=OBF:2uha1vgt1jg01a4b1a4j1jda1vg11ugg
```
3. Set the local SSL port by adding the `jetty.ssl.port` property to the end of the file, and providing the port number. For example:
```ini theme={"dark"}
## Connector port to listen on
jetty.ssl.port=8443
```
4. Save the file `%FUSION_HOME%\apps\jetty\proxy\start.ini`.
## Restart Fusion and test access through HTTPS
1. Restart all Fusion services:
```bash theme={"dark"}
bin\fusion.cmd restart
```
HTTPS should now be enabled in the Fusion Proxy service.
2. Sign in to the Fusion UI. Specify the HTTPS URL scheme and SSL port, for example, `https://search.mycorp:8443`.
## Disable HTTP access to the Fusion Proxy service
Disable HTTP access. You have a choice. Perform the tasks in the appropriate section:
* [**Disable HTTP access on the firewall or load balancer**](#alternative-1-disable-http-access-on-the-firewall-or-load-balancer) - *This is the preferred approach.*
* [**Disable listening for HTTP requests in the Fusion Proxy service**](#disable-http-access-to-the-fusion-proxy-service)
### Alternative 1: Disable HTTP access on the firewall or load balancer
Disable HTTP access to the Fusion Proxy service on the firewall or load balancer:
1. Disallow all requests for port 8764 from the outside world. Only `localhost` should be able to communicate with Fusion on the non-SSL port 8764. Block all other requestors.
2. If you are using a firewall or load balancer in front of Fusion, use it to redirect all HTTP requests to use HTTPS instead. For example, Apache would [redirect all incoming HTTP traffic to HTTPS](https://httpd.apache.org/docs/2.4/rewrite/avoid.html).
### Alternative 2: Disable listening for HTTP requests in the Fusion Proxy service
Ideally, you should [disable HTTP access using the firewall or load balancer](#alternative-1-disable-http-access-on-the-firewall-or-load-balancer). Follow the steps in this section *only* if disabling HTTP access on the firewall or load balancer is not feasible.
You can only use this alternative if your SSL certificate covers a hostname that can be accessed from the local host. For example, if your certificate only covers `https://fusion.com`, then your local machine must be able to access Fusion from that exact host. If necessary, change the `hosts` file so that this can work.
**How to disable HTTP**
1. Edit `\lucidworks\fusion{backslash}latest.x\apps\jetty\proxy\start.d\http.ini`.
1. Change this line:
```
--module=http
```
To:
```
#--module=http
```
2. Save the file.
2. Edit the Fusion configuration file, `\lucidworks\fusion{backslash}latest.x\conf\fusion.cors` (`fusion.properties` in Fusion 4.x).
1. Ensure that the Agent JVM uses the Fusion Proxy service’s keystore by adding this to the end of the file:
```properties theme={"dark"}
agent.jvmOptions=-Djavax.net.ssl.trustStore="%{FUSION_HOME}%\\apps\\jetty\\proxy\\etc\\keystore" -Djavax.net.ssl.trustStorePassword=PASSWORD -Djavax.net.ssl.keyStore="%{FUSION_HOME}%\\apps\\jetty\\proxy\\etc\\keystore" -Djavax.net.ssl.keyStorePassword=PASSWORD
```
Replace `PASSWORD` with your Fusion keystore password.
2. Uncomment the `default.address` and change it to the hostname of the server that is validated by your SSL certificate.\
If the hostname saved in `default.address` is not validated by your SSL certificate, then the Fusion Proxy service will not start, because the agent’s liveness detector will not be able to access the HTTPS port to determine whether Fusion is running.
If you self-signed the certificate, then the `default.address` must match the hostname you specified while signing the certificate. Failure to do this will result in the Fusion Proxy service not starting after you have disabled HTTP.
For example, if your SSL certificate’s validated hostname is `search.mycorp`, then change:
```
#default.address = 127.0.0.1
```
To:
```
default.address = search.mycorp
```
3. Change the `proxy.port` to the SSL port you chose. For example, change:
```
proxy.port = 8764
```
To:
```
proxy.port = 8443
```
4. Uncomment `proxy.ssl` and change its value to `true`. Change:
```
# proxy.ssl=false
```
To:
```
proxy.ssl=true
```
Stop and start Fusion for these changes to take effect.
## References and tutorials
* [Transport Layer Security](http://en.wikipedia.org/wiki/Transport_Layer_Security) (Wikipedia)
* [Public Key Certificate](http://en.wikipedia.org/wiki/Public_key_certificate) (Wikipedia)
* [OpenSSL Cookbook](https://www.feistyduck.com/library/openssl-cookbook/online/) (free ebook)
* [OpenSSL Command Line Utilities](https://wiki.openssl.org/index.php/Command_Line_Utilities) (OpenSSL wiki)
* [Java Tutorials: Generating and Verifying Certificates](https://docs.oracle.com/javase/tutorial/security/apisign/index.html)
* [IBM developerWorks: What is the JSSE all about?](http://www.ibm.com/developerworks/websphere/techjournal/0502_benantar/0502_benantar.html)
Log messages about Jetty are written to the log files for the components that use it:
* `https://FUSION_HOST:FUSION_PORT/var/log/ui`
* `https://FUSION_HOST:FUSION_PORT/var/log/api`
* `https://FUSION_HOST:FUSION_PORT/var/log/connectors`
* `https://FUSION_HOST:FUSION_PORT/var/log/solr`
## Learn more
When you need personalized, expert assistance, the Lucidworks technical support team is available 24/7.
Before you open a support case, see the instructions below to learn how to gather data that the technical support team can use to evaluate your issue and provide a solution.
Once you have obtained the relevant data from Fusion, [Submit a request](https://support.lucidworks.com/hc/en-us/requests/new).
The course for **Support Portal Overview** focuses on how to navigate the support portal, open a support ticket, identify the severity of your issue, and escalate issues as needed.
### Exporting log files from the DevOps Center
This section only applies to Fusion 4.2 through 5.5.
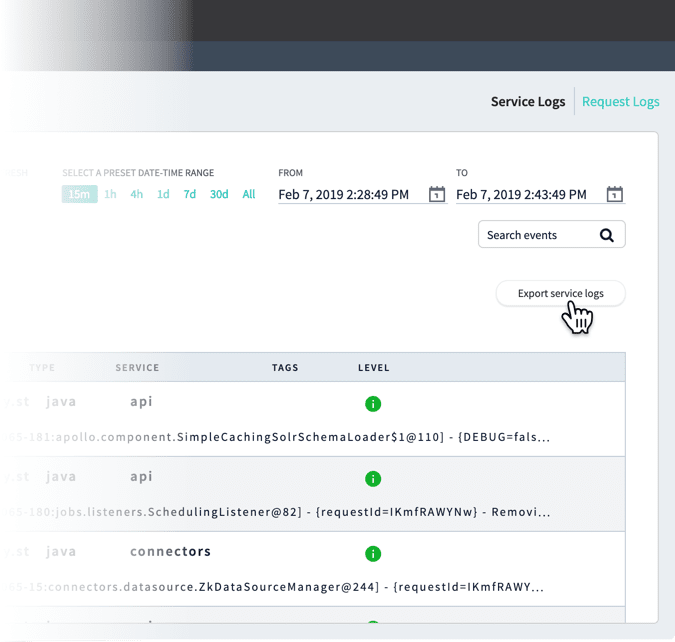
The DevOps Center provides an easy way to export logs for the timeframe that pertains to your issue.
**How to export data from the DevOps Center**
1. In the Fusion UI, navigate to **System** > **DevOps Center** > **Log Viewer**.
2. Select the time period that is relevant to the incident you are interested in.\
Log files will be exported according to the tab you are viewing.\\
Click **Export service logs** in the Service Logs tab or **Export request logs** in the Request Logs tab to download a `.csv` file containing the logs (shown here with example timestamps):
* `serviceLogs[2019-02-07T22:28:49.000Z-2019-02-07T22:43:49.695Z].csv`
* `requestLogs[2019-02-07T22:28:49.000Z-2019-02-07T22:43:49.695Z].csv`
### Finding log files in the filesystem
Log files are located in the `https://FUSION_HOST:FUSION_PORT/var/log` directory. Generally, the log files below are the most useful in diagnosing an issue:
* API logs
`https://FUSION_HOST:FUSION_PORT/var/log/api/api.log` and `https://FUSION_HOST:FUSION_PORT/var/log/api/gc_.log.0.current`
* Connectors logs
`https://FUSION_HOST:FUSION_PORT/var/log/connectors-classic/connectors-classic.log` and `https://FUSION_HOST:FUSION_PORT/var/log/connectors-rpc/connectors-rpc.log`
If it is apparent that additional components are involved, collect their logs and associated `gc` logs from the `https://FUSION_HOST:FUSION_PORT/var/log` directory.
### Opening a support case
Lucidworks provides technical support to customers 24 hours a day, 7 days a week, with unlimited incidents. Once you have obtained the relevant data from Fusion as described above, you can open a support case.
For detailed information about submitting a support case, see [Lucidworks Customer Center Training](https://support.lucidworks.com/hc/en-us/articles/360049594894-Lucidworks-Customer-Center-Training).
To open a support case, complete the following:
1. Access the [Lucidworks Submit a request page](https://support.lucidworks.com/hc/en-us/requests/new).\
You can also select **Contact Support** from any page on the Lucidworks support site.
2. Enter information in the following fields:
* **Your email address**
* **Subject**
* **Description**
3. In the **Severity** field, select the appropriate severity value for your issue according to the guidelines below.
| Severity | Time | Definition | Example |
| -------- | -------- | -------------------------------------------------------------------------------------------------------------------------- | ---------------------------------------------- |
| S1 | 1 Hour | Severe commercial impact on Customer 's business which either makes the system inoperable or prevents content discovery. | Production search is down. |
| S2 | 12 Hours | Significant commercial impact on Customer 's business which makes one or more critical areas of functionality inoperable. | Search performance has slowed down to a crawl. |
| S3 | 24 Hours | Moderate commercial impact on Customer 's business which makes one or more non-critical areas of functionality inoperable. | Slight increase in query time. |
| S4 | 48 Hours | No commercial impact on Customer 's business. | How to implement a certain search feature. |
4. Select values in the following fields:
* **Product Line**
* **Fusion Version** (optional)
* **Solr Version** (optional)
5. In the **Environment** field, select one of the following:
* **Dev/Sandbox/POC**
* **Performance**
* **Production**
* **QA/UAT**
* **Staging**
6. In the **Attachments** field, drag files or click to add [log files](#solr-logs).
You can attach only one file. Upload all of your files as one `.tar` or `.zip` archive.
7. When you have attached all pertinent data, click **Submit**.
You will receive an email message containing your case number. A Lucidworks support engineer will contact you within the time period corresponding to your issue’s severity level.
 See [Spark Administration](/docs/4/fusion-server/concepts/spark/overview) for more information.
### Apache ZooKeeper
[Apache ZooKeeper](http://zookeeper.apache.org/) is a distributed configuration service, synchronization service, and naming registry.
Fusion uses ZooKeeper to configure and manage all Fusion components in a single Fusion deployment,
therefore a ZooKeeper service must always be running as part of the Fusion deployment.
For high availability, this should be an external 3-node ZooKeeper cluster. All Fusion Java components communicate with ZooKeeper using the ZooKeeper API.
For ZooKeeper installation instructions, see the [ZooKeeper documentation](http://zookeeper.apache.org/doc/current/zookeeperAdmin.html#ch_deployment).
You can find ZooKeeper’s logs at `https://FUSION_HOST:FUSION_PORT/var/log/zookeeper`.
#### ZooKeeper Terminology
* **znode.** ZooKeeper data is organized into a hierarchal name space of data nodes called znodes.\
A znode can have data associated with it as well as child znodes.\
The data in a znode is stored in a binary format, but it is possible to import, export, and view this information as JSON data.\
Paths to znodes are always expressed as canonical, absolute, slash-separated paths; there are no relative reference.
* **ephemeral nodes.** An ephemeral node is a znode which exists only for the duration of an active session.\
When the session ends the znode is deleted. An ephemeral znode cannot have children.
* **server.** A ZooKeeper service consists of one or more machines; each machine is a server which runs in its own JVM and listens on its own set of ports.\
For testing, you can run several ZooKeeper servers at once on a single workstation by configuring the ports for each server.
* **quorum.** A quorum is a set of ZooKeeper servers. It must be an odd number. For most deployments, only 3 servers are required.
* **client.** A client is any host or process which uses a ZooKeeper service.
See the official [ZooKeeper documentation](http://zookeeper.apache.org/doc/current/) for details about using and managing a ZooKeeper service.
#### Fusion ZooKeeper Nodes
Fusion configuration data is stored in ZooKeeper under two znodes:
* Node `lucid` stores all application-specific configurations, including collection, datasource, pipeline, signals, aggregations, and associated scheduling, jobs, and metrics.
* Node `lucid-apollo-admin` stores all access control information, including all users, groups, roles, and realms.
The Solr Admin tool provides a ZooKeeper node browser tool.
In the case of the Fusion default developer deployment, the Fusion runs scripts are configured to run
the instances of both Solr and ZooKeeper which are included with the Fusion distribution, and therefore
we take a fresh installation of a Fusion developer instance and use the embedded Solr’s Admin tool to
explore how Fusion’s configurations are managed in ZooKeeper.
On initial install, the "lucid" znode contains the set of default configurations used by Fusion’s services:
See [Spark Administration](/docs/4/fusion-server/concepts/spark/overview) for more information.
### Apache ZooKeeper
[Apache ZooKeeper](http://zookeeper.apache.org/) is a distributed configuration service, synchronization service, and naming registry.
Fusion uses ZooKeeper to configure and manage all Fusion components in a single Fusion deployment,
therefore a ZooKeeper service must always be running as part of the Fusion deployment.
For high availability, this should be an external 3-node ZooKeeper cluster. All Fusion Java components communicate with ZooKeeper using the ZooKeeper API.
For ZooKeeper installation instructions, see the [ZooKeeper documentation](http://zookeeper.apache.org/doc/current/zookeeperAdmin.html#ch_deployment).
You can find ZooKeeper’s logs at `https://FUSION_HOST:FUSION_PORT/var/log/zookeeper`.
#### ZooKeeper Terminology
* **znode.** ZooKeeper data is organized into a hierarchal name space of data nodes called znodes.\
A znode can have data associated with it as well as child znodes.\
The data in a znode is stored in a binary format, but it is possible to import, export, and view this information as JSON data.\
Paths to znodes are always expressed as canonical, absolute, slash-separated paths; there are no relative reference.
* **ephemeral nodes.** An ephemeral node is a znode which exists only for the duration of an active session.\
When the session ends the znode is deleted. An ephemeral znode cannot have children.
* **server.** A ZooKeeper service consists of one or more machines; each machine is a server which runs in its own JVM and listens on its own set of ports.\
For testing, you can run several ZooKeeper servers at once on a single workstation by configuring the ports for each server.
* **quorum.** A quorum is a set of ZooKeeper servers. It must be an odd number. For most deployments, only 3 servers are required.
* **client.** A client is any host or process which uses a ZooKeeper service.
See the official [ZooKeeper documentation](http://zookeeper.apache.org/doc/current/) for details about using and managing a ZooKeeper service.
#### Fusion ZooKeeper Nodes
Fusion configuration data is stored in ZooKeeper under two znodes:
* Node `lucid` stores all application-specific configurations, including collection, datasource, pipeline, signals, aggregations, and associated scheduling, jobs, and metrics.
* Node `lucid-apollo-admin` stores all access control information, including all users, groups, roles, and realms.
The Solr Admin tool provides a ZooKeeper node browser tool.
In the case of the Fusion default developer deployment, the Fusion runs scripts are configured to run
the instances of both Solr and ZooKeeper which are included with the Fusion distribution, and therefore
we take a fresh installation of a Fusion developer instance and use the embedded Solr’s Admin tool to
explore how Fusion’s configurations are managed in ZooKeeper.
On initial install, the "lucid" znode contains the set of default configurations used by Fusion’s services:
 The "lucid-apollo-admin" znode contains the set of nodes used by Fusion’s access control services:
 In the above screenshot, the ZooKeeper node browser is browsing the contents of znode "lucid-apollo-admin/users" which is empty.
The Fusion distribution ships without any user accounts.
The initial user added to Fusion is the Fusion native realm "admin" user.
This entry is only created on initial startup via the Fusion UI "set admin password" panel.
Once you submit the admin password, the admin user account is created.
Until Fusion contains as least the admin user account, you cannot use the system, because all Fusion requests
require proper authorization.
Once the admin password is set, and you have created one or more Fusion collections
and have populated them by running one or more datasources, these collections, datasources,
pipelines, and other application configuration settings are stored under the "lucid" znode:
In the above screenshot, the ZooKeeper node browser is browsing the contents of znode "lucid-apollo-admin/users" which is empty.
The Fusion distribution ships without any user accounts.
The initial user added to Fusion is the Fusion native realm "admin" user.
This entry is only created on initial startup via the Fusion UI "set admin password" panel.
Once you submit the admin password, the admin user account is created.
Until Fusion contains as least the admin user account, you cannot use the system, because all Fusion requests
require proper authorization.
Once the admin password is set, and you have created one or more Fusion collections
and have populated them by running one or more datasources, these collections, datasources,
pipelines, and other application configuration settings are stored under the "lucid" znode:
 In the above screenshot, the ZooKeeper node browser is browsing the contents
of znode "lucid/connectors/datasources/ds1". This datasource was used to populate
a Fusion collection with documents retrieved via a webcrawl. Note that in the
initial screenshot for znode "lucid", there is no "connectors" node at all.
The "lucid-apollo-admin" znode now contains one user accounts for user "admin":
In the above screenshot, the ZooKeeper node browser is browsing the contents
of znode "lucid/connectors/datasources/ds1". This datasource was used to populate
a Fusion collection with documents retrieved via a webcrawl. Note that in the
initial screenshot for znode "lucid", there is no "connectors" node at all.
The "lucid-apollo-admin" znode now contains one user accounts for user "admin":
 ### Jetty
[Jetty](https://eclipse.org/jetty) provides Web services for Fusion’s UI, APIs, and Connectors, plus Solr. Each of those components runs inside its own instance of Jetty, using a separate configuration. Configurations for each component are located in `https://FUSION_HOST:FUSION_PORT/apps/jetty`.
Securing Fusion using SSL requires configuring Jetty to use SSL. For example, to secure the UI you need to modify the configuration in `https://FUSION_HOST:FUSION_PORT/apps/jetty/admin-ui`.
### Jetty
[Jetty](https://eclipse.org/jetty) provides Web services for Fusion’s UI, APIs, and Connectors, plus Solr. Each of those components runs inside its own instance of Jetty, using a separate configuration. Configurations for each component are located in `https://FUSION_HOST:FUSION_PORT/apps/jetty`.
Securing Fusion using SSL requires configuring Jetty to use SSL. For example, to secure the UI you need to modify the configuration in `https://FUSION_HOST:FUSION_PORT/apps/jetty/admin-ui`.
 Click **Export service logs** in the Service Logs tab or **Export request logs** in the Request Logs tab to download a `.csv` file containing the logs (shown here with example timestamps):
* `serviceLogs[2019-02-07T22:28:49.000Z-2019-02-07T22:43:49.695Z].csv`
* `requestLogs[2019-02-07T22:28:49.000Z-2019-02-07T22:43:49.695Z].csv`
### Finding log files in the filesystem
Log files are located in the `https://FUSION_HOST:FUSION_PORT/var/log` directory. Generally, the log files below are the most useful in diagnosing an issue:
* API logs
`https://FUSION_HOST:FUSION_PORT/var/log/api/api.log` and `https://FUSION_HOST:FUSION_PORT/var/log/api/gc_
Click **Export service logs** in the Service Logs tab or **Export request logs** in the Request Logs tab to download a `.csv` file containing the logs (shown here with example timestamps):
* `serviceLogs[2019-02-07T22:28:49.000Z-2019-02-07T22:43:49.695Z].csv`
* `requestLogs[2019-02-07T22:28:49.000Z-2019-02-07T22:43:49.695Z].csv`
### Finding log files in the filesystem
Log files are located in the `https://FUSION_HOST:FUSION_PORT/var/log` directory. Generally, the log files below are the most useful in diagnosing an issue:
* API logs
`https://FUSION_HOST:FUSION_PORT/var/log/api/api.log` and `https://FUSION_HOST:FUSION_PORT/var/log/api/gc_