> ## Documentation Index
> Fetch the complete documentation index at: https://doc.lucidworks.com/llms.txt
> Use this file to discover all available pages before exploring further.
# Cold Start Solution
export const LwTemplate = ({title = "Key questions to get you started", icon = "sparkles", cta = "Powered by Agent Studio", linkHref = "https://lucidworks.com/demo/?utm_source=docs&utm_medium=referral&utm_campaign=docs_cta_ai"}) => {
const [isLoaded, setIsLoaded] = useState(false);
useEffect(() => {
const timer = setTimeout(() => {
setIsLoaded(true);
}, 500);
return () => clearTimeout(timer);
}, []);
return
{isLoaded && `
}} />}
Powered by Lucidworks Agent Studio
;
};
[localhost link]: http://localhost:3000/docs/4/fusion-ai/concepts/smart-answers/cold-start
[mintlify link]: https://doc.lucidworks.com/docs/4/fusion-ai/concepts/smart-answers/cold-start
[old doc.lw link]: https://doc.lucidworks.com/fusion/5.9/463
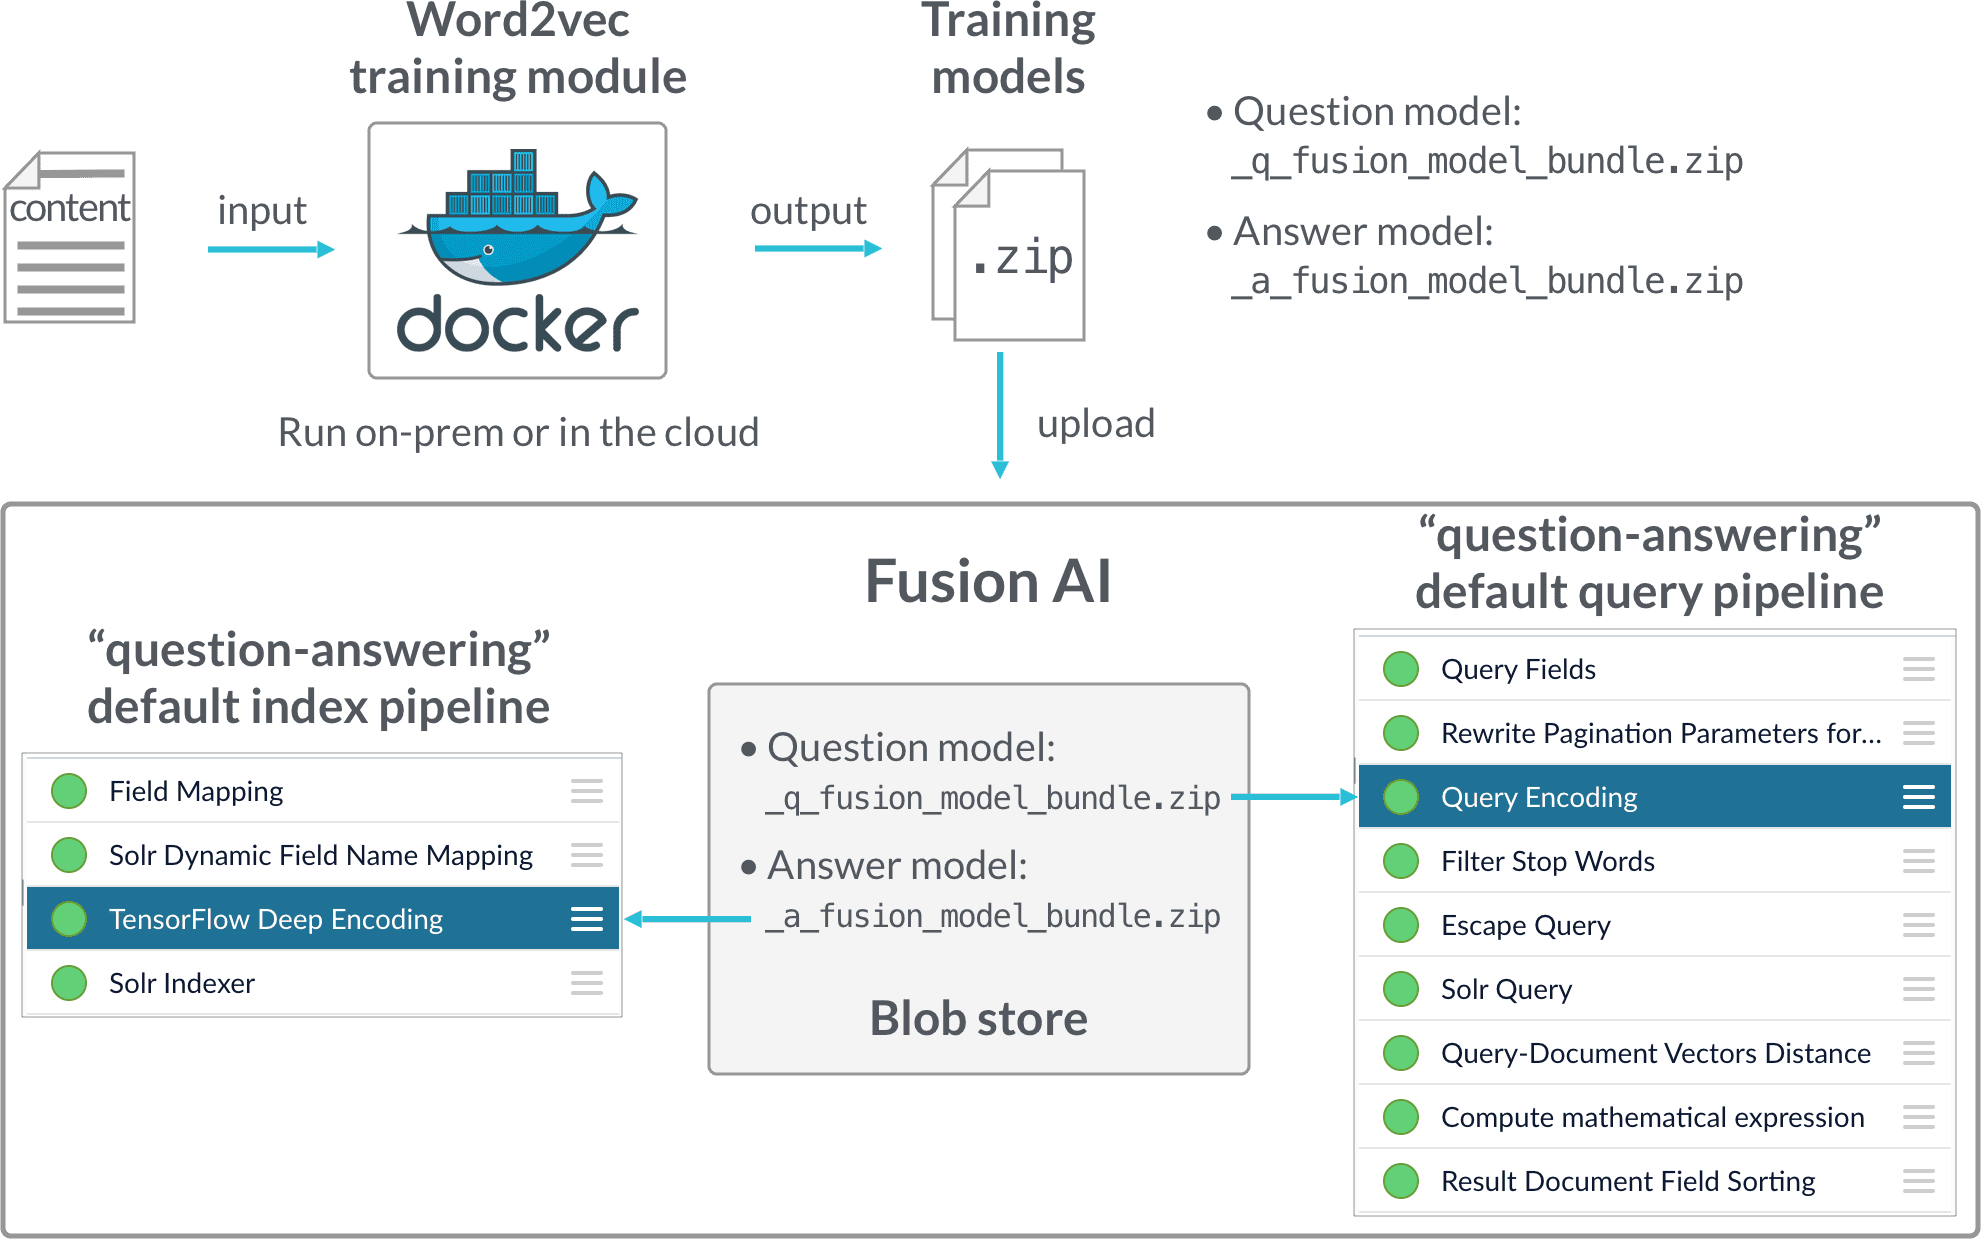
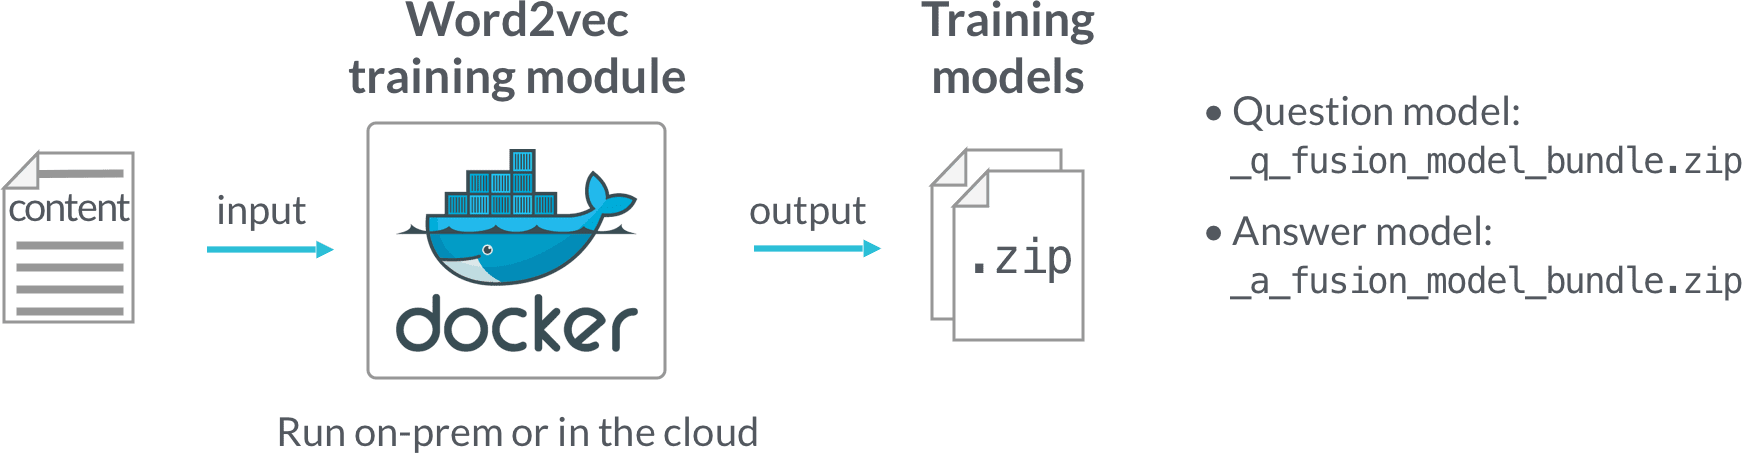
When no FAQ exists for training, the cold start solution uses our word vector (Word2vec) training module in the Docker image to learn about the vocabulary in the search results. Then it uses our provided query pipeline to combine Solr and document vector similarity scores at query time.
We suggest capturing [signals](/docs/4/fusion-ai/concepts/signals-and-aggregations/signals/overview) from document clicks, likes, and downloads. These signals form Q\&A pairs. After cumulating at least 3,000 Q\&A pairs, that feedback can be used as training data for the [FAQ solution](/docs/4/fusion-ai/concepts/smart-answers/faq-solution).
Like the FAQ solution, the cold start solution has two parts:
1. **Cold Start Part 1**\
Model training is performed in a Docker image, which can be downloaded from the Lucidworks Docker hub. The deep learning/word vector training modules and configuration UI are installed in the Docker image, and it can be used on-prem or in the cloud.\
After training is finished, a `.zip` file is generated which includes the model and associated files. The model transforms documents into digital vectors which can be used to measure similarities.
2. **Smart Answers Cold Start Part 2**\
Deployment is performed in Fusion. To deploy, you just upload the generated zip file to Fusion and use our provided query pipeline to conduct run-time neural search.
The [cold start solution for Smart Answers](/docs/4/fusion-ai/concepts/smart-answers/cold-start) in Fusion 4.2 begins with training a model using your existing content and the Word2vec training module in the Docker container. Once you have trained a model, you can deploy it using the information in the Smart Answers Cold Start Part 2 topic.
See also [Advanced Model Training Configuration for Smart Answers](/docs/4/fusion-ai/concepts/smart-answers/smart-answers-advanced-model-config).
Begin collecting [signals](/docs/4/fusion-ai/concepts/signals-and-aggregations/signals/overview) after your cold-start model is deployed. Once you have accumulated a sufficient number of signals, you can train a model more accurately, using the information in the Train a Smart Answers Supervised Model topic.
## Prerequisites
You need a [Docker Hub](https://hub.docker.com/) account with access to the `lucidworks/ai-lab` repository. Contact Lucidworks AI Labs with your Docker Hub account name to gain access to this repository.
## Hardware requirements and instance setup
The Docker training module can run on either a CPU or a GPU.
CPU is sufficient for most use cases.
GPU is 2-8 times faster. GPU is recommended if want to try our model auto-tune feature on a large dataset (e.g. over 20k QA pairs) or if the training data size is over 1 million entries for any of the training scenarios.
You can run the Docker image either on-prem or in the cloud. We recommend a minimum of 32GB RAM and 32 cores for a CPU server or a cloud instance. If you choose a GPU machine, one GPU with 11GB memory is sufficient for most training use cases.
Below are examples of the AWS instance types that we recommend:
**CPU:**
* AMI: Ubuntu Server 18.04 LTS (HVM), SSD Volume Type
* Instance Type: c5.9xlarge (36 vCPUs, 72 GB RAM)
* Recommended storage volume: Suggested 150GB plus 2.5 times the total input data size
* Networking
* Allow inbound port 4440
* Allow inbound port 5550
**GPU:**
* AMI: Deep Learning AMI (Ubuntu) Version 22.0
* Instance Type: p2.xlarge (11.75 ECUs, 4 vCPUs, 61 GB RAM, EBS only)
* Recommended storage volume: Suggested 150GB plus 2.5 times of total input data size.
* Networking
* Allow inbound port 4440
* Allow inbound port 5550
Below are examples of the Azure GPU instance type that we recommend:
* Deep Learning Virtual Machine
* Linux OS
* VM Size: 1x Standard NC6 (6 vcpus, 56 GB memory)
* Recommended OS Disk Size: Suggested 150GB plus 2.5 times the total input data size
* Networking
* Allow inbound port 4440
* Allow inbound port 5550
{/* // Link is dead. cannot find the doc. Preserving for later. Dustin 01/13/20. */}
{/* // Follow the [instance setup](instance-setup.html) steps or contact Lucidworks AI Labs to inquire about AWS AMI images with Docker pre-installed. */}
## Docker image setup
1. Determine the instance’s external hostname.
Refer to your cloud provider’s documentation for instructions on how to do this.
2. Create a directory, such as `/opt/faq_training`, and ensure it meets [disk space requirements](#hardware-requirements-and-instance-setup). Also ensure that it is writable by the `docker` Linux user account.
The training Docker container requires this directory to read input files, write temporary files, and write the output (deep learning models).
3. Run `docker login` and enter your account credentials.
4. Pull the `lucidworks/ai-lab:latest` image:
```bash theme={"dark"}
docker pull lucidworks/ai_lab:latest
```
5. Run the Docker image:\
For GPU instance:
```bash theme={"dark"}
docker run -d --rm \
-e "RD_HOSTNAME=" \
-e "ENABLE_GPU=1" \
--name deep_faq \
-v :/src/DL/working_dir \
--net=host \
--runtime=nvidia \
lucidworks/ai_lab:latest
```
For CPU-only instance:
```bash theme={"dark"}
docker run -d --rm \
-e "RD_HOSTNAME=" \
--name deep_faq \
-v :/src/DL/working_dir \
--net=host \
lucidworks/ai_lab:latest
```
This starts the Docker container in the background.
6. Wait about one minute for the container to initialize.
In your working directory, you should see these directories:
```bash theme={"dark"}
conf data input models output rundeck
```
* The `input` directory is where all training data and input files should be placed.
* The `output` directory contains the models that result from the training.
* All other directories are used by the model training container to save persistent files or temporary files.
You can clear the `data` folder periodically to save disk space.
7. Point your browser to `http://:4440`.
This redirects you to a Rundeck login screen.
8. Log in with your username and password.
## Running Jobs
We use [https://www.rundeck.com/open](https://www.rundeck.com/open) source\[Rundeck^] to control job runs.
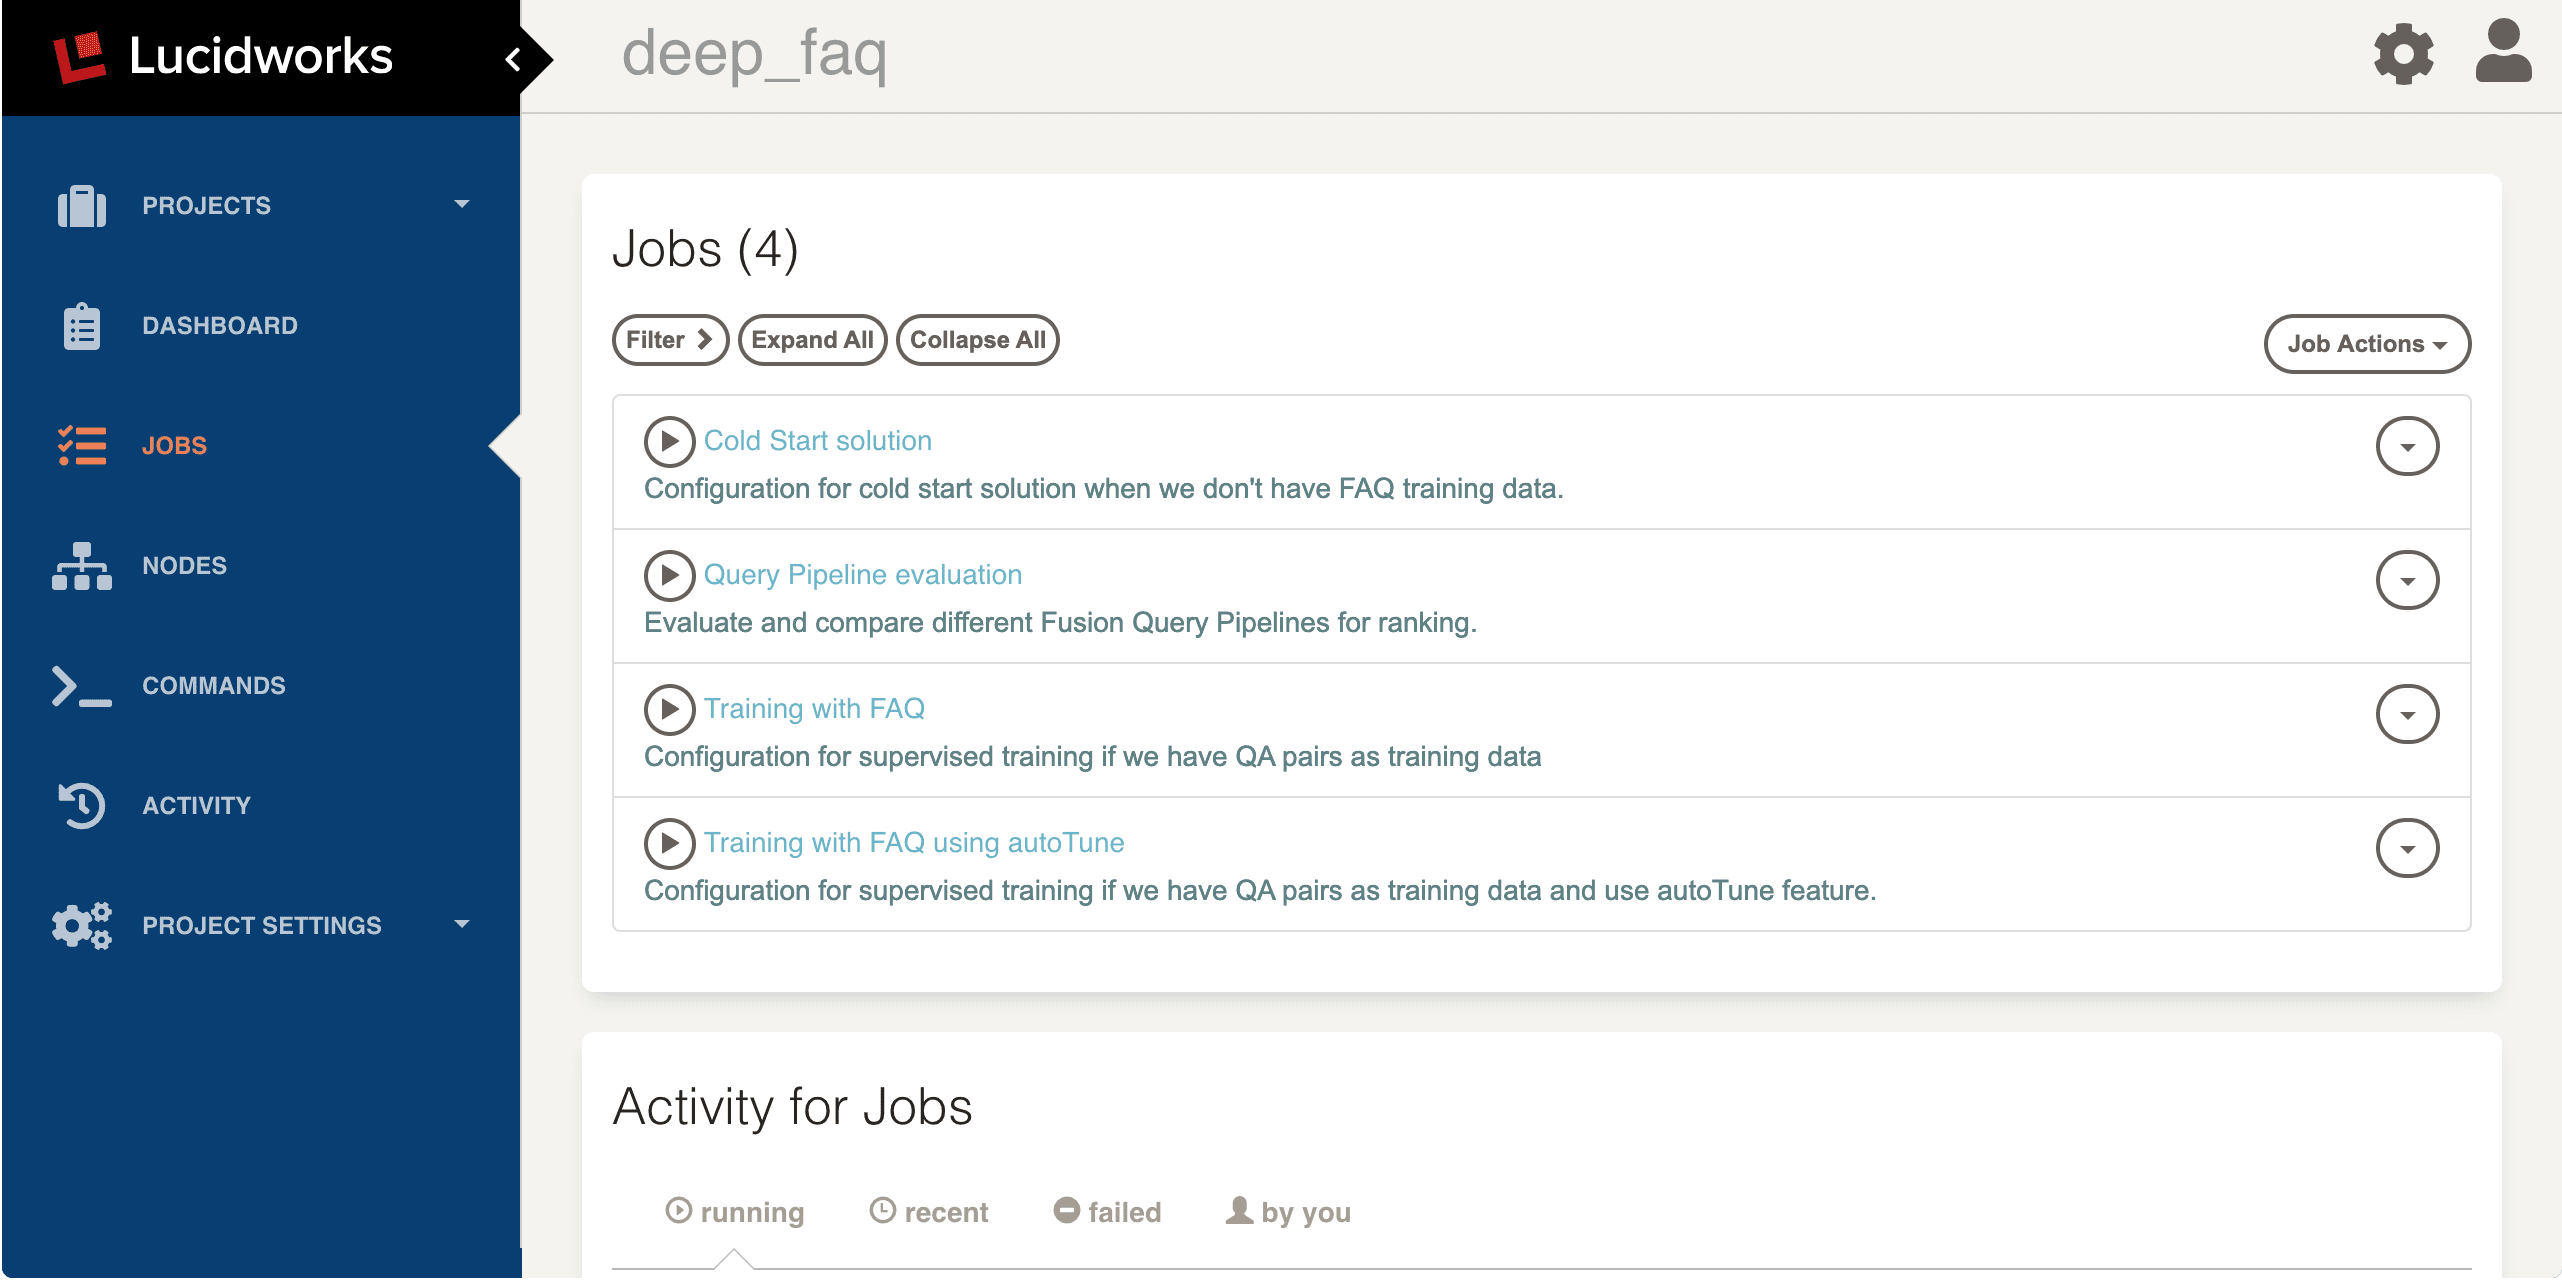
1. When Rundeck has started, click on the `deep_faq` project.
This opens the **JOBS** panel, where you will see three jobs for different training scenarios and one job for query pipeline evaluation.
* Click on a job to configure job parameters.
* Click **Run Job Now** to start the job.
* You can monitor the progress of a job by clicking on the **running** button under the **Activity for Jobs** section as shown in the screenshot below.
If similar jobs have run before, then Rundeck estimates the total run time and displays a progress bar.
You can click on the running job to enter the activity control page, where you can kill the job or watch the log output.
{/* //Figure – Rundeck Activity Page */}
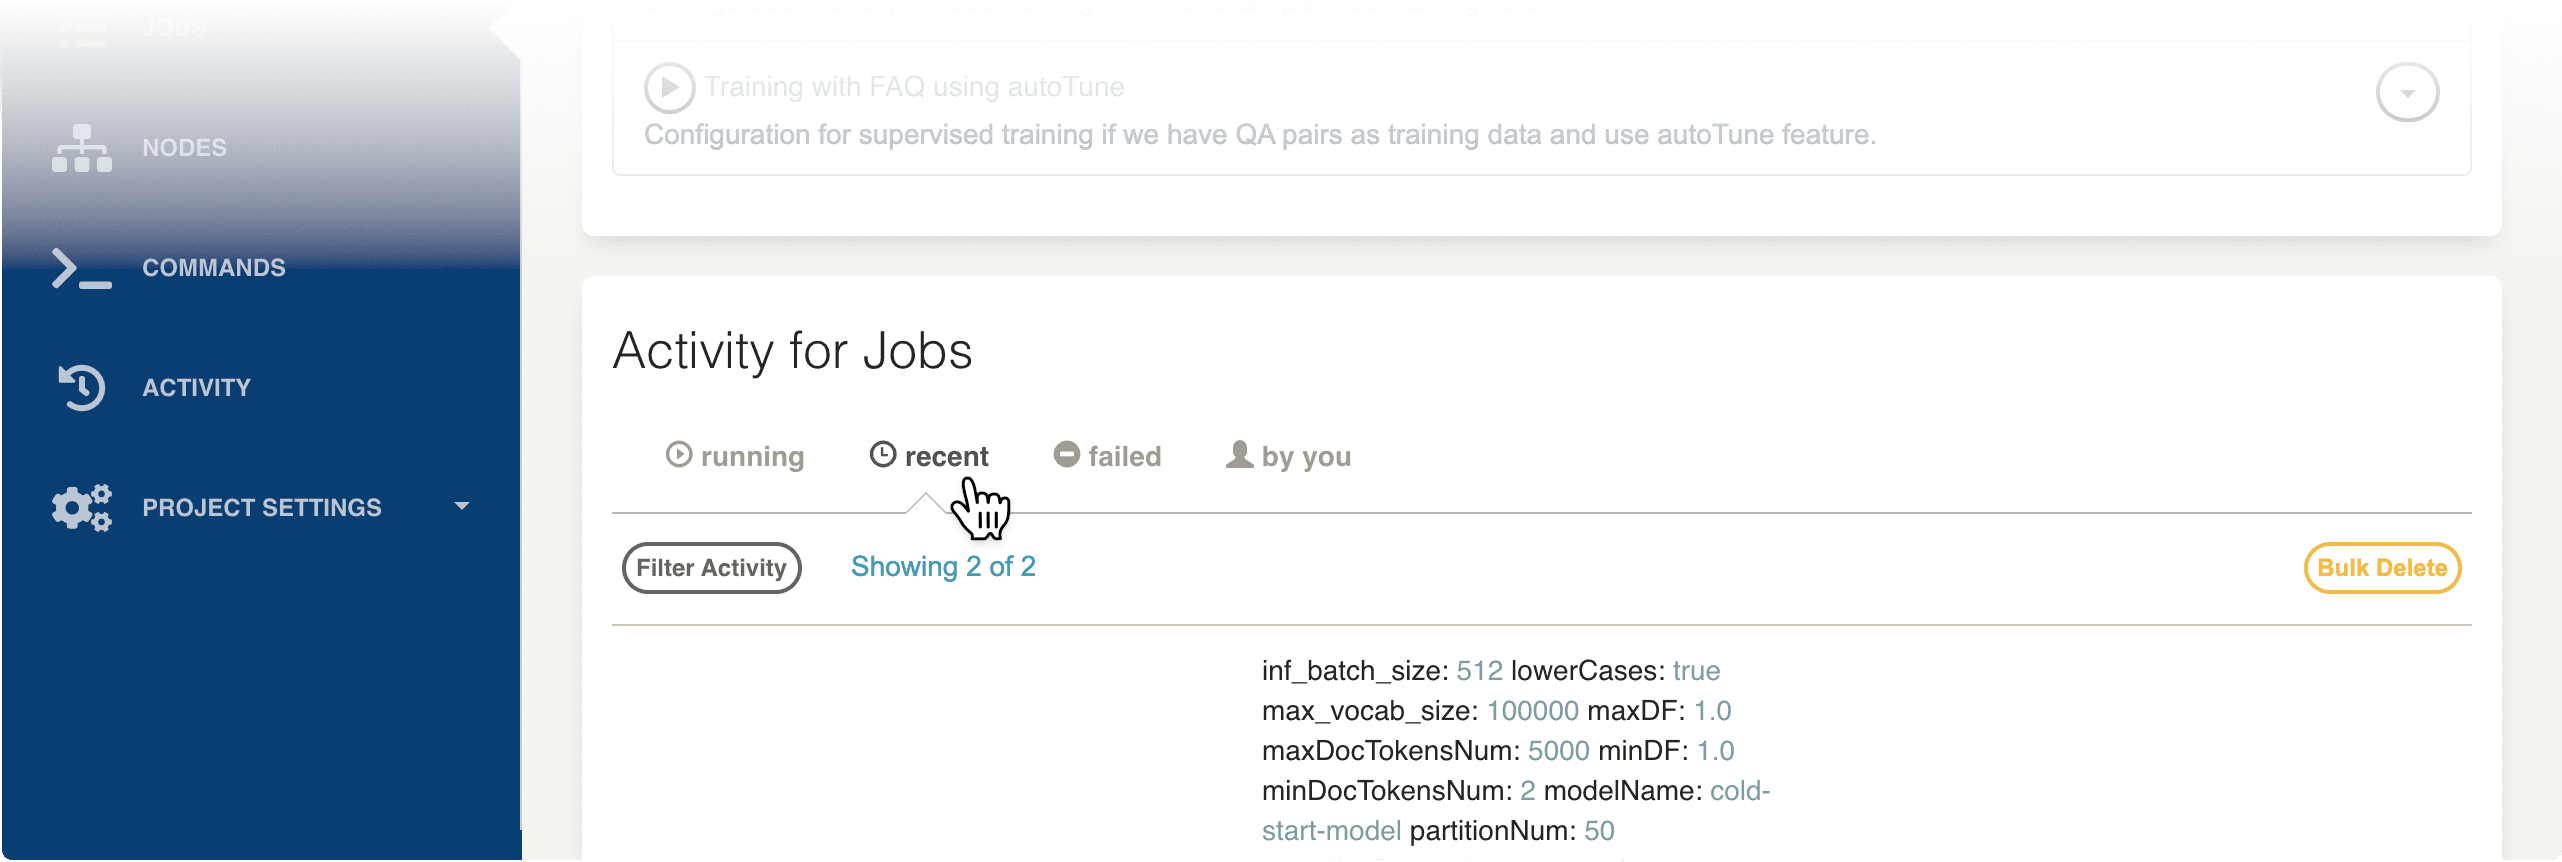
If you want to reuse the previously-configured job, click the **recent** button under **Activity for Jobs**.
Select a recent job configuration that you want to modify, then click the button to enter the configuration page with previously-entered values.
{/* //image? */}
For more details about Rundeck job control, refer to the [Rundeck documentation](https://docs.rundeck.com/docs/manual/04-jobs.html).
### Training scenarios and configuration
Click on the **Cold Start solution** job.
This job can learn about the vocabulary that you want to search against through Word2vec. And we can combine Solr with Word2vec at query time using our query pipeline.
### Input data parameters
For cold start solution input, these parameters are required:
* Content documents file name
* Field which contains the content documents
There are two vocabulary learning options:
* You can use the pre-trained word embeddings included with our training module.
In cold start mode, it gets the Word2vec vectors from the pre-trained file directly. The pre-trained word embeddings are built on a large corpus from the Internet, covering common words we use daily.
* If there are many domain-specific words or special tokens in your documents, we recommend training Word2vec using your own data.
Set the **Generate customized embeddings** parameter to "true" to train from your own data. This uses the data and field specified in **Content documents file name** and **Field which contains the content documents** to train Word2vec vectors.
When you use the pre-trained embeddings, the log shows the percentage of covered vocabulary words (search for vocab coverage by embeddings in the log). If the number of covered vocabulary words is less than 80%, then you should train Word2vec from your own data.You must provide a **Model name** for model tracking and version control purposes. If you use the same model name across different runs, the new model will replace the old model with the same name.
See also the [Advanced Model Training Configuration for Smart Answers](/docs/4/fusion-ai/concepts/smart-answers/smart-answers-advanced-model-config).
### Result models
Track the running steps in the log, which provides information on data pre-processing, training steps, evaluations, and model generation in the end.
After training is finished, the final models and their associated files are saved in zip file format, which can be downloaded from `http://:5550/{modelName}`.
{/* //Figure – Downloading model zip file */}
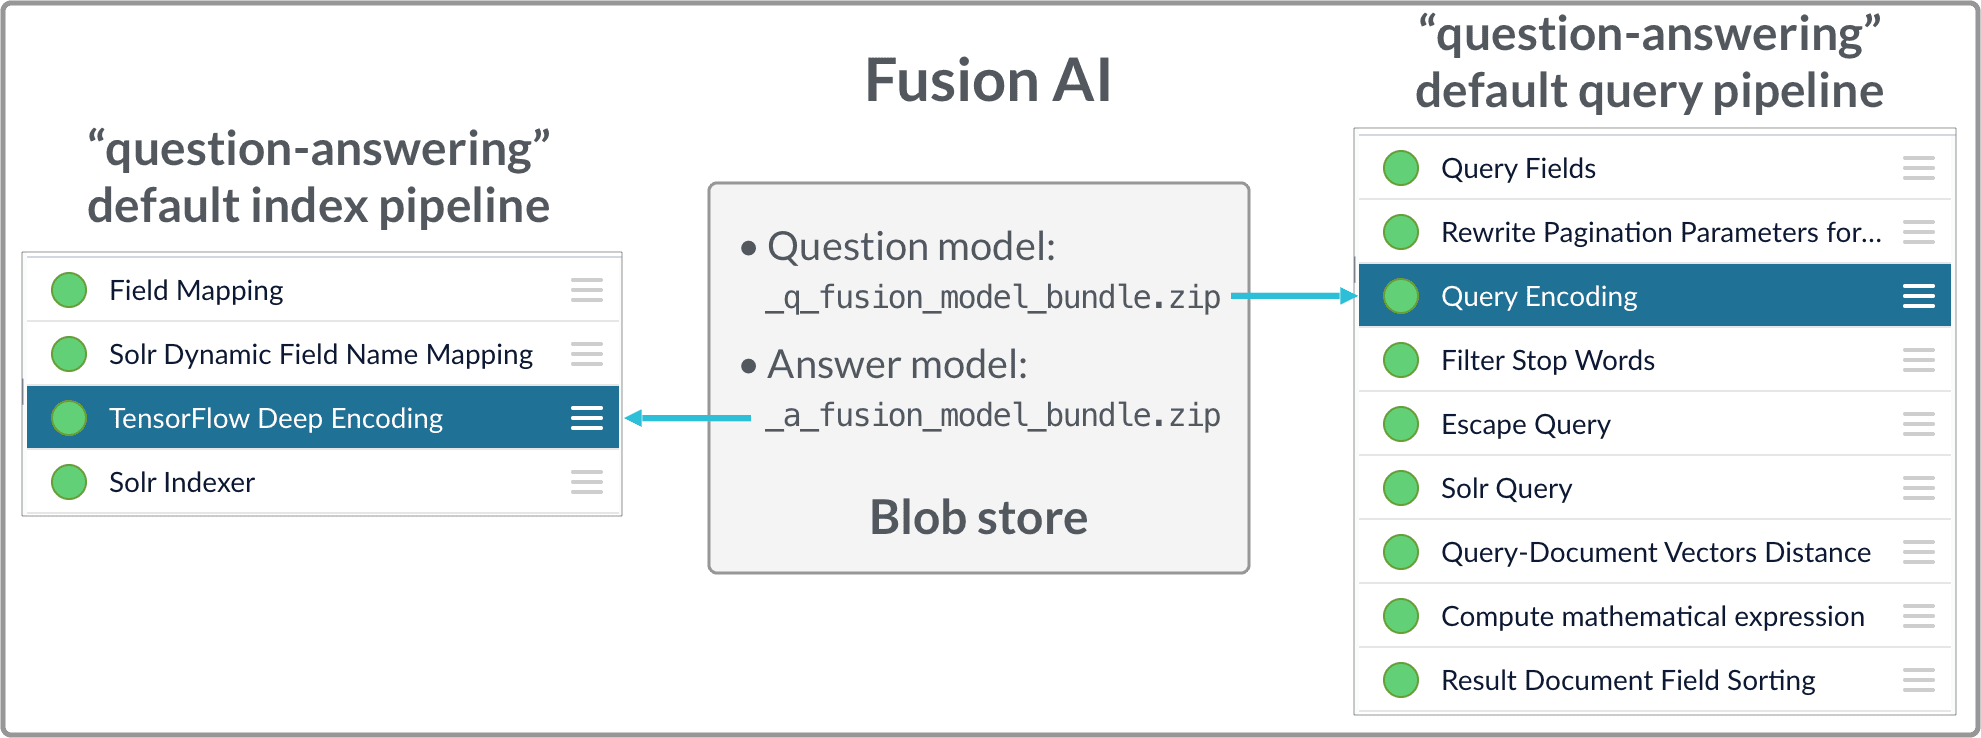
Download the two zipfiles ending with `_a_fusion_model_bundle.zip` and `_q_fusion_model_bundle.zip` to be used in the Smart Answers Cold Start Part 2 phase.
The Smart Answers deployment procedure for the FAQ solution and the cold start solution is the same:
1. [Upload the question and answer models](#how-to-upload-the-models-to-the-blob-store) to the blob store.
2. [Configure the `question-answering` index pipeline](#configure-the-index-pipeline) so that it uses the answer model.
3. [Configure the `question-answering` query pipeline](#configure-the-query-pipeline) so that it uses the question model.
See also [Best Practices](/docs/4/fusion-ai/concepts/smart-answers/best-practices).
## How to upload the models to the blob store
Two model files are generated by the FAQ Solution Part 1 Docker job:
* `x_a_fusion_model_bundle.zip` - The answer model.
* `x_q_fusion_model_bundle.zip` - The question model.
Both files must be deployed to the Fusion [blob store](/docs/4/fusion-server/concepts/indexing/blob-storage).
**How to upload the deep-learning models to the blob store**
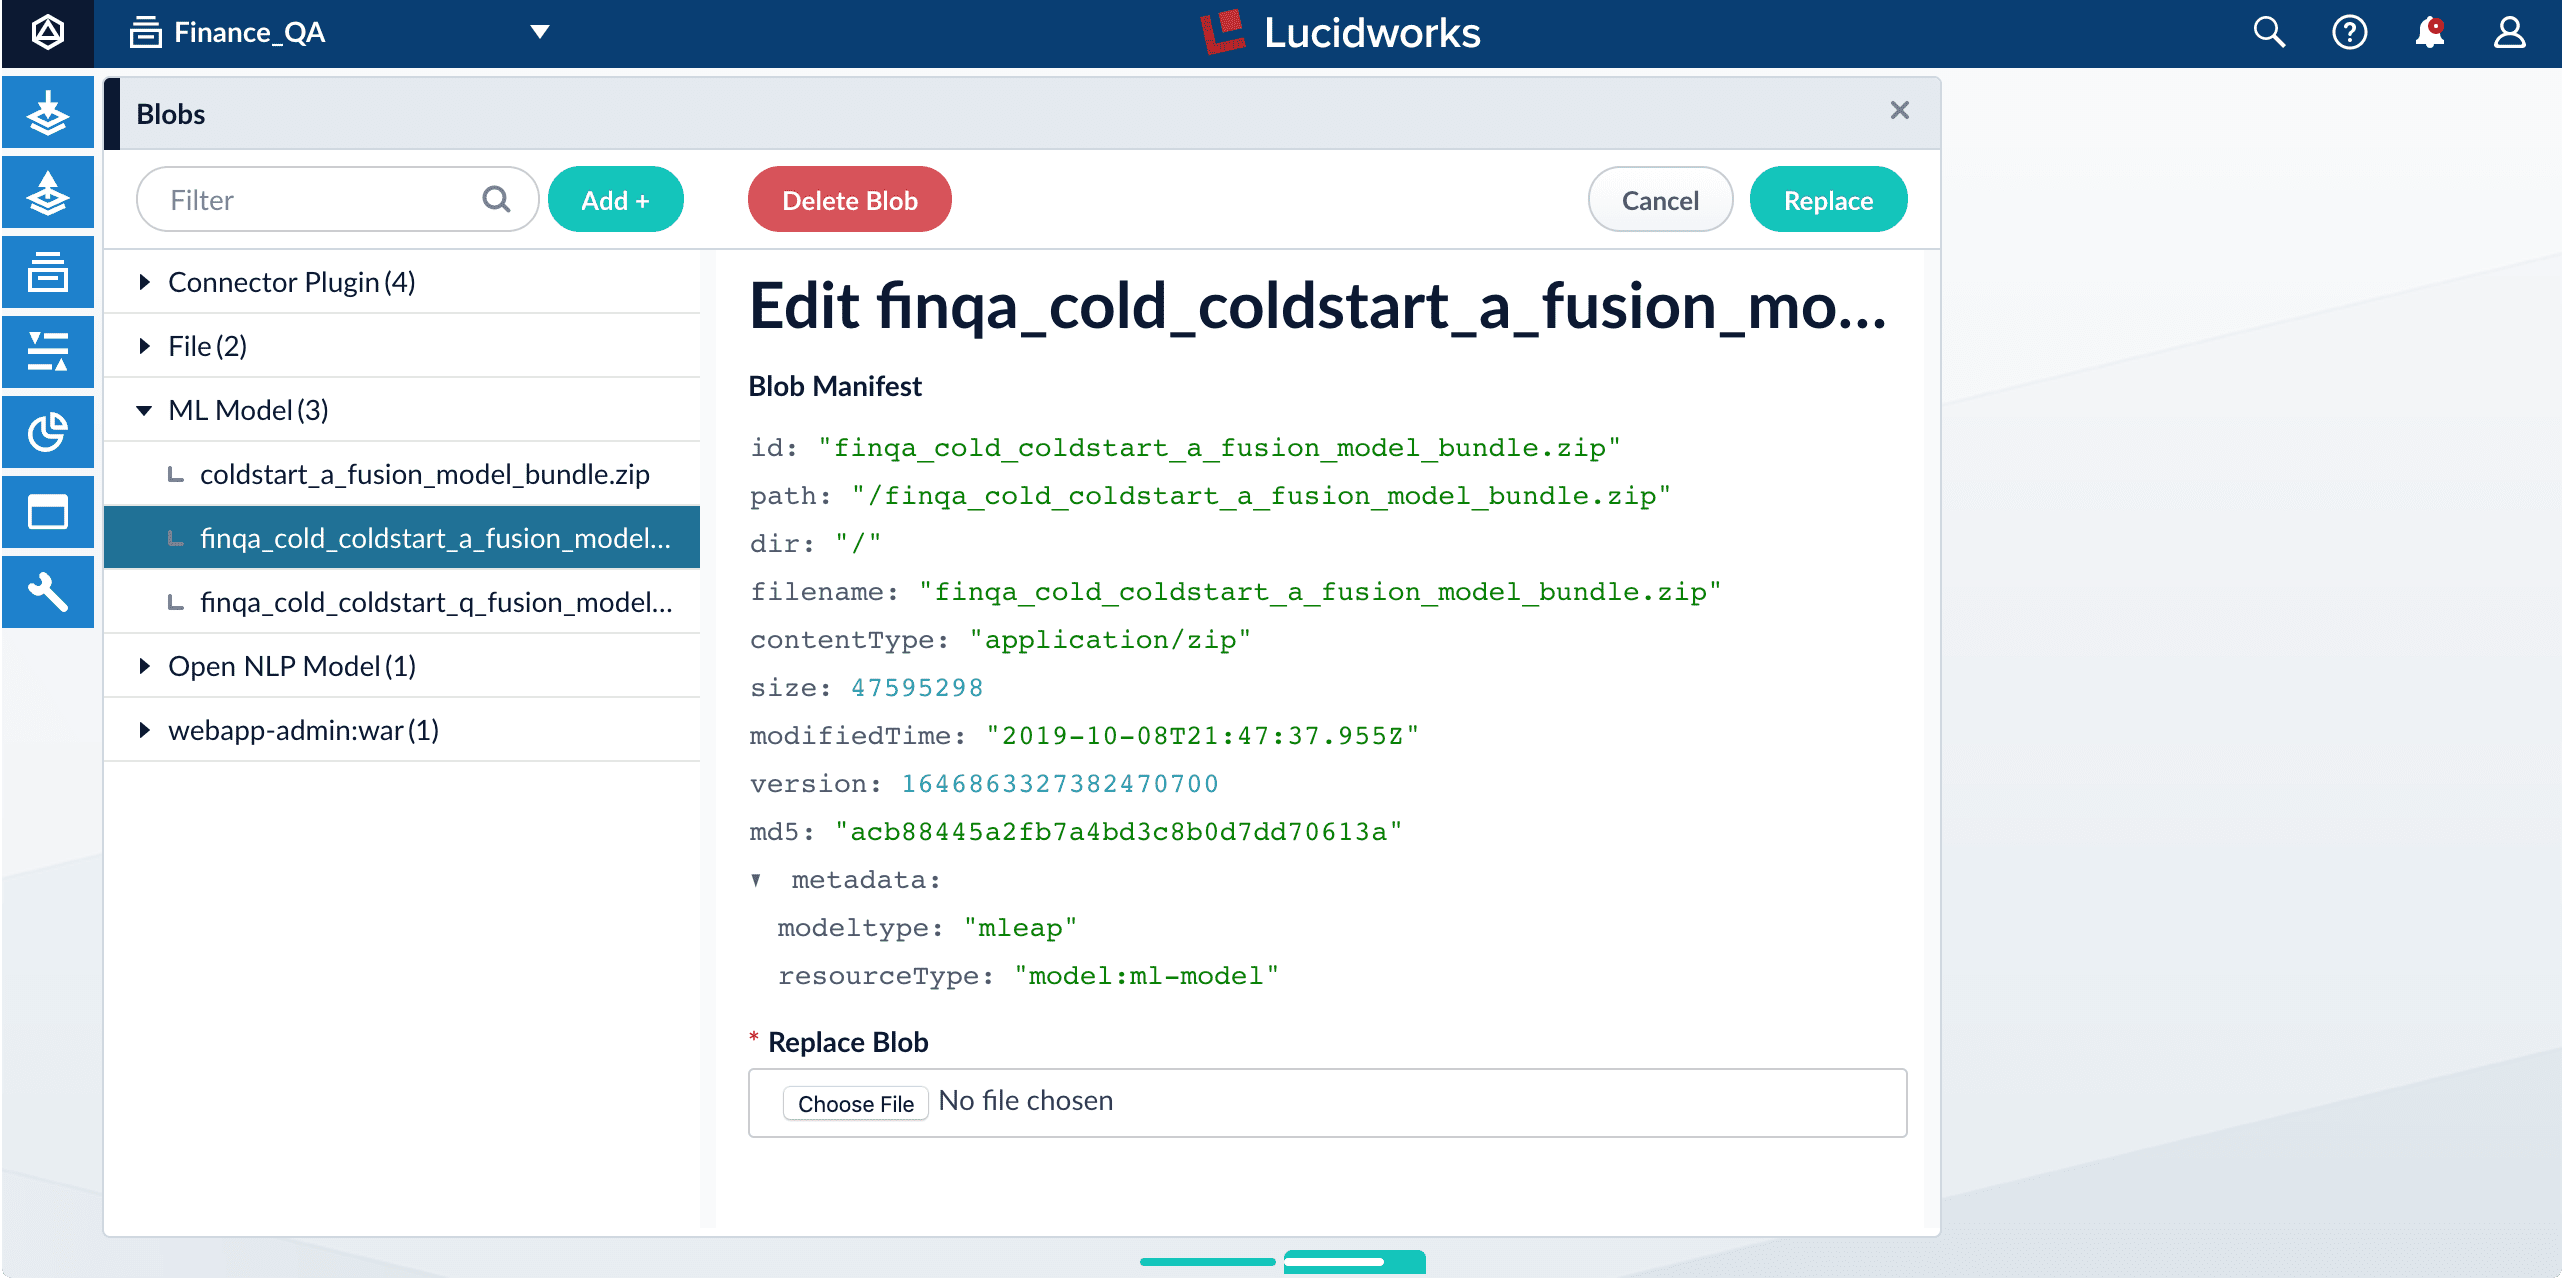
1. In the Fusion UI, navigate to **System** > **Blobs**.
2. Click **Add** > **ML Model**.
3. Click **Choose File** and select one of the model files.
4. Make sure the **Is Mleap?** checkbox is selected.
5. Click **Upload**.
6. Repeat steps 2-5 for the other model file.
## Fusion configuration overview
* Fusion index pipeline
The index pipeline uses the trained model in `x_a_fusion_model_bundle.zip` to generate dense vectors for the documents to be indexed.
* Fusion query pipeline
The query pipeline uses the trained model in `x_q_fusion_model_bundle.zip` to generate dense vectors for incoming questions on the fly, then compare those with the indexed dense vectors for answers to find answers, or with the indexed dense vectors for historical questions to find similar questions.
Another option is to have two separate index stages, one for questions and another for answers. Then, at query time, two query stages compute query-to-question distance and query-to-answer distance. Both scores are ensembled into a final similarity score. The two options are illustrated in [Pipeline setup examples](#pipeline-setup-examples).
## How to configure the default pipelines
If you have an AI license, then the following default index and query pipelines are included in any newly-created Fusion app:
**Default index pipelines**
| Default pipeline | Notes |
| -------------------------------- | ----------------------------------------------------------------- |
| `question-answering` | For encoding one field. |
| `question-answering-dual-fields` | For encoding two fields (question and answer pairs, for example). |
See [Configure the index pipeline](#configure-the-index-pipeline) below.
**Default query pipelines**
| Default pipeline | Notes |
| -------------------------------- | --------------------------------------------------------------------------------------------------------------------------------------------------------------------------------------------------------- |
| `question-answering` | Calculates vectors distances between an encoded query and one document vector field. Should be used together with `question-answering` index pipeline. |
| `question-answering-dual-fields` | Calculates vectors distances between an encoded query and two document vector fields. After that, scores are ensembled. Should be used together with the `question-answering-dual-fields` index pipeline. |
See [Configure the query pipeline](#configure-the-query-pipeline) below.
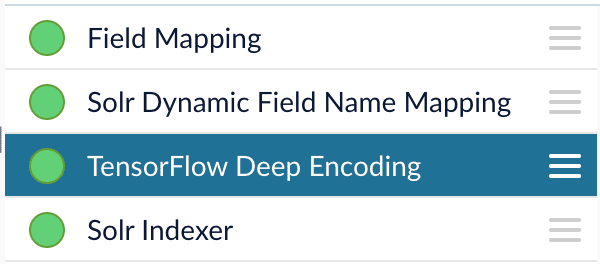
### Configure the index pipeline
1. Open the Index Workbench.
2. Load or create your datasource using the default question-answering index pipeline.
3. In the [TensorFlow Deep Encoding stage](/docs/4/fusion-ai/reference/index-pipeline-stages/tensorflow-deep-encoding-index-stage), change the value of **TensorFlow Deep Learning Encoder Model ID** to the model ID of the `x_a_fusion_model_bundle.zip` model that was uploaded to the blob store.
The `_a_` (answer) model allows you to encode longer text.
4. Change **Document Feature Field** to the document field name to be processed and encoded into dense vectors.
5. Save the datasource.
6. Index your data.
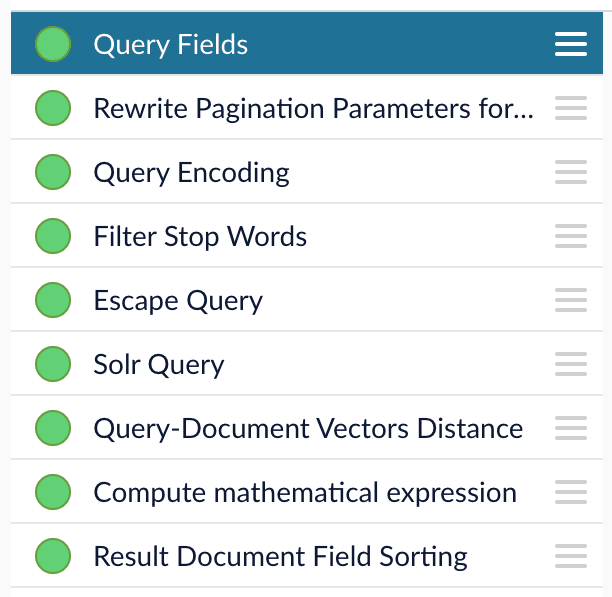
### Configure the query pipeline
1. Open the Query Workbench.
2. Load or create your datasource using one of the default question-answering query pipelines.
3. In the [Query Fields stage](/docs/4/fusion-server/reference/pipeline-stages/query/search-fields-query-stage), update **Return Fields** to return additional fields that should be displayed with each answer, such as fields corresponding to title, text, or ID.
It is recommended that you remove the asterisk (`*`) field and specify each individual field you want to return, as returning too many fields will affect runtime performance.
Do not remove `compressed_document_vector_s`, `document_clusters_ss`, and `score` as these fields are necessary for later stages
4. In the [TensorFlow Deep Encoding stage](/docs/4/fusion-ai/reference/query-pipeline-stages/tensorflow-deep-encoding-query-stage), change **TensorFlow Deep Learning Encoder Model ID** value to the model ID of the `x_q_fusion_model_bundle.zip` model that was uploaded to the blob store.
The (`_q_`) (question) model is slightly more efficient for short natural-language questions.
5. Save the query pipeline.
{/* // This link is dead, and I cannot find the page it is referring to. Saving for future. Dustin 01/13/20. */}
{/* // See [Detailed Pipeline Setup](pipeline-setup.html) for more detailed descriptions and usage instructions for customizing and fine-tuning the stages. */}
## Pipeline Setup Examples
* [Example 1 - Index and retrieve question and answer separately](#example-1-index-and-retrieve-question-and-answer-separately)
* [Example 2 - Index and retrieve question and answer together](#example-2-index-and-retrieve-question-and-answer-together)
### Example 1 - Index and retrieve question and answer separately
Based on your search Web page design, you can put best-matched questions and answers in separate sections, or if you only want to retrieve answers and serve to chatbot app, please index them separately in different documents.
For example, in the picture below, we construct the input file for the index pipeline such that the text part of the question/answer is stored in `text_t`, and we add an additional field `type_s` whose value is "question" or "answer" to separate the two types.
In the TensorFlow Deep Encoding stage, we specify **Document Feature Field** as `text_t` so that `compressed_document_vector_s` is generated based on this field.
At search time, we can apply a filter query on the `type_s` field to return either a question or an answer.
You can achieve a similar result by using the default `question-answering` index and query pipelines.
{/* //Figure – Index pipeline setup for Example 1. */}
### Example 2 - Index and retrieve question and answer together
If you prefer to show question and answer together in one document (that is, treat the question as the title and the answer as the description), you can index them together in the same document. It’s similar to the `question-answering-dual-fields` index and query pipelines default setup.
For example, in the picture below, we added two TensorFlow Deep Encoding stages and named them Answers Encoding and Questions Encoding respectively. In the Questions Encoding stage, we specify **Document Feature Field** to be question\_t, and changed the default values for **Vector Field**, **Clusters Field** and **Distances Field** to question\_vector\_ds, question\_clusters\_ss and question\_distances\_ds respectively. In the Answers Encoding stage, we specify **Document Feature Field** to be answer\_t, and changed the default values for **Vector Field**, **Clusters Field** and **Distances Field** to answer\_vector\_ds, answer\_clusters\_ss and answer\_distances\_ds respectively. (Detailed information of the above field setup please refer to the “Appendix C: Detailed Pipeline Setup” section.)
{/* //Figure – Index pipeline setup for Example 2. */}
{/* //The indexed document is shown in the picture below. */}
{/* //Figure – Indexed document for Example 2. */}
Since we have two dense vectors generated in the index (compressed\_question\_vector\_s and compressed\_answer\_vector\_s), at query time, we need to compute query to question distance and query to answer distance. This can be setup as the picture shown below. We added two **Vectors distance per Query/Document** stages and named them QQ Distance and QA Distance respectively. In the QQ Distance stage, we changed the default values for **Document Vector Field** and **Document Vectors** **Distance Field** to compressed\_question\_vector\_s and qq\_distance respectively. In the QA Distance stage, we changed the default values for **Document Vector Field** and **Document Vectors** **Distance Field** to compressed\_answer\_vector\_s and qa\_distance respectively. (Detailed information of the above field setup please refer to the “Appendix C: Detailed Pipeline Setup” section.)
{/* //Figure – Query pipeline setup for Example 2. */}
Now we have two distances (query to question distance and query to answer distance), we can ensemble them together with Solr score to get a final ranking score. This is recommended especially when you have limited FAQ dataset and want to utilize both question and answer information. This ensemble can be done in the **Compute mathematical expression** stage as shown below.
{/* //Figure – Compute mathematical expression stage setup for Example 2. */}
## Query pipeline evaluation
Stages and configurations of the query pipeline will impact ranking results. For example, we may need to make decisions about whether to use clustering option in the [TensorFlow Deep Encoding stage](/docs/4/fusion-ai/reference/query-pipeline-stages/tensorflow-deep-encoding-query-stage), what should be the weights of each ranking score in the **Compute mathematical expression** stage, whether adding other Fusion stages (such as text tagger, ML stage) would help. Comparing two different query pipelines with different models and setups may be needed as well.
The **Query Pipeline evaluation** job in the training docker image can help evaluate the rankings of Fusion returned results from different pipeline setups, additionally help search for the best set of weights in the ensemble score.
In order to evaluate the rankings, we need to know the ground truth answers for some testing questions. For example, user can provide around 200 testing questions, and for each question, we need to know which indexed answers are the correct answers in Fusion, so that we can compute positions of correct answers in the current ranking. User needs to provide a file in CSV format which contains the testing questions (**Testing query field** parameter in the job) and correct answer text or id (**Ground truth field** parameter in the job), put this file in the mapped input folder where we put other training data files, then specify the file name in the **Evaluation file name** parameter. NOTE: if there are multiple matching answers for a question, please put question and answer pairs in different rows. In Fusion, there should be a returned field which contains values that match the answer text or id, please specify this field in the **Answer or id field in Fusion** parameter. NOTE: if use answer text, please make sure the formatting of answer text in the evaluation file is the same as the answer text in Fusion so that we can find matches. Several Fusion access parameters are also needed in order to grab results from Fusion in batch, such as login username, password, host ip, app name, collection and pipeline name.
The job will provide a variety of metrics (controlled by \*\*Metrics list *parameter) at different positions (controlled by *Metrics\@k list** parameter) in the logs for the chosen final ranking score (specified in **Ranking score** parameter). For example, if choose **Ranking score** as “ensemble\_score”, the program will rank results by the ensemble score returned in **Compute mathematical expression** stage. If choose **Ranking score** as “score” (default field name for Solr score in Fusion), then the ranking evaluation will be based only on Solr score. In addition to the metrics in logs, a CSV results evaluation file will be generated. It will provide correct answer positions for each testing question as well as top returned results for each field specified in **Return fields** parameter. User can specify the file name for this results file in the **Ranking results file name** parameter, then download the file from `http://:5550/evaluation`.
Another function of this job is to help choose weights for different ranking scores such as Solr score, query to question distance, query to answer distance in **Compute mathematical expression** stage. If interested in performing this weights selection, please choose \*\*Whether perform weights selection *parameter to true, list the set of score names in *List of ranking scores for ensemble** parameter. Since we can use different scaling methods for Solr score in the stage, please choose which Solr scale function you used in the stage in **Solr scale function** parameter. **Target metric to use for weight selection** parameter allows to specify metric that should be optimized during weights selection, for example `recall@3`. Metric values at different positions for different weights combinations will be shown in the log, sorted descendingly based on metric specified above. NOTE: Weights selection can take a while to run for big evaluation datasets, thus if only interested in comparing pipelines, please turn this function off by specifying **Whether perform weights selection** parameter to false.
There are a few additional advanced parameters that might be useful but not required to provide. **Additional query parameters** allows to provide extra query parameters like `rowsFromSolrToRerank` in a dictionary format. **Sampling proportion** and **Sampling seed** provides a possibility to run evaluation job only on a sample of data.
Tip: Please make sure the Ranking score, answer text or id, and list of ranking scores for ensemble (if perform weights selection) are returned by Fusion by checking the fields returned in the Query Workbench. User can setup the returned fields in Return Fields section of Query Fields stage.
 Like the FAQ solution, the cold start solution has two parts:
1. **Cold Start Part 1**\
Model training is performed in a Docker image, which can be downloaded from the Lucidworks Docker hub. The deep learning/word vector training modules and configuration UI are installed in the Docker image, and it can be used on-prem or in the cloud.\
After training is finished, a `.zip` file is generated which includes the model and associated files. The model transforms documents into digital vectors which can be used to measure similarities.
2. **Smart Answers Cold Start Part 2**\
Deployment is performed in Fusion. To deploy, you just upload the generated zip file to Fusion and use our provided query pipeline to conduct run-time neural search.
Like the FAQ solution, the cold start solution has two parts:
1. **Cold Start Part 1**\
Model training is performed in a Docker image, which can be downloaded from the Lucidworks Docker hub. The deep learning/word vector training modules and configuration UI are installed in the Docker image, and it can be used on-prem or in the cloud.\
After training is finished, a `.zip` file is generated which includes the model and associated files. The model transforms documents into digital vectors which can be used to measure similarities.
2. **Smart Answers Cold Start Part 2**\
Deployment is performed in Fusion. To deploy, you just upload the generated zip file to Fusion and use our provided query pipeline to conduct run-time neural search.
 See also [Advanced Model Training Configuration for Smart Answers](/docs/4/fusion-ai/concepts/smart-answers/smart-answers-advanced-model-config).
 You can click on the running job to enter the activity control page, where you can kill the job or watch the log output.
{/* //Figure – Rundeck Activity Page */}
If you want to reuse the previously-configured job, click the **recent** button under **Activity for Jobs**.
You can click on the running job to enter the activity control page, where you can kill the job or watch the log output.
{/* //Figure – Rundeck Activity Page */}
If you want to reuse the previously-configured job, click the **recent** button under **Activity for Jobs**.
 Select a recent job configuration that you want to modify, then click the button to enter the configuration page with previously-entered values.
{/* //image? */}
For more details about Rundeck job control, refer to the [Rundeck documentation](https://docs.rundeck.com/docs/manual/04-jobs.html).
### Training scenarios and configuration
Click on the **Cold Start solution** job.
This job can learn about the vocabulary that you want to search against through Word2vec. And we can combine Solr with Word2vec at query time using our query pipeline.
### Input data parameters
For cold start solution input, these parameters are required:
* Content documents file name
* Field which contains the content documents
There are two vocabulary learning options:
* You can use the pre-trained word embeddings included with our training module.
In cold start mode, it gets the Word2vec vectors from the pre-trained file directly. The pre-trained word embeddings are built on a large corpus from the Internet, covering common words we use daily.
* If there are many domain-specific words or special tokens in your documents, we recommend training Word2vec using your own data.
Set the **Generate customized embeddings** parameter to "true" to train from your own data. This uses the data and field specified in **Content documents file name** and **Field which contains the content documents** to train Word2vec vectors.
Select a recent job configuration that you want to modify, then click the button to enter the configuration page with previously-entered values.
{/* //image? */}
For more details about Rundeck job control, refer to the [Rundeck documentation](https://docs.rundeck.com/docs/manual/04-jobs.html).
### Training scenarios and configuration
Click on the **Cold Start solution** job.
This job can learn about the vocabulary that you want to search against through Word2vec. And we can combine Solr with Word2vec at query time using our query pipeline.
### Input data parameters
For cold start solution input, these parameters are required:
* Content documents file name
* Field which contains the content documents
There are two vocabulary learning options:
* You can use the pre-trained word embeddings included with our training module.
In cold start mode, it gets the Word2vec vectors from the pre-trained file directly. The pre-trained word embeddings are built on a large corpus from the Internet, covering common words we use daily.
* If there are many domain-specific words or special tokens in your documents, we recommend training Word2vec using your own data.
Set the **Generate customized embeddings** parameter to "true" to train from your own data. This uses the data and field specified in **Content documents file name** and **Field which contains the content documents** to train Word2vec vectors.
 See also [Best Practices](/docs/4/fusion-ai/concepts/smart-answers/best-practices).
## How to upload the models to the blob store
Two model files are generated by the FAQ Solution Part 1 Docker job:
* `x_a_fusion_model_bundle.zip` - The answer model.
* `x_q_fusion_model_bundle.zip` - The question model.
Both files must be deployed to the Fusion [blob store](/docs/4/fusion-server/concepts/indexing/blob-storage).
**How to upload the deep-learning models to the blob store**
1. In the Fusion UI, navigate to **System** > **Blobs**.
2. Click **Add** > **ML Model**.
3. Click **Choose File** and select one of the model files.
4. Make sure the **Is Mleap?** checkbox is selected.
See also [Best Practices](/docs/4/fusion-ai/concepts/smart-answers/best-practices).
## How to upload the models to the blob store
Two model files are generated by the FAQ Solution Part 1 Docker job:
* `x_a_fusion_model_bundle.zip` - The answer model.
* `x_q_fusion_model_bundle.zip` - The question model.
Both files must be deployed to the Fusion [blob store](/docs/4/fusion-server/concepts/indexing/blob-storage).
**How to upload the deep-learning models to the blob store**
1. In the Fusion UI, navigate to **System** > **Blobs**.
2. Click **Add** > **ML Model**.
3. Click **Choose File** and select one of the model files.
4. Make sure the **Is Mleap?** checkbox is selected.
 5. Click **Upload**.
 6. Repeat steps 2-5 for the other model file.
## Fusion configuration overview
* Fusion index pipeline
The index pipeline uses the trained model in `x_a_fusion_model_bundle.zip` to generate dense vectors for the documents to be indexed.
* Fusion query pipeline
The query pipeline uses the trained model in `x_q_fusion_model_bundle.zip` to generate dense vectors for incoming questions on the fly, then compare those with the indexed dense vectors for answers to find answers, or with the indexed dense vectors for historical questions to find similar questions.
Another option is to have two separate index stages, one for questions and another for answers. Then, at query time, two query stages compute query-to-question distance and query-to-answer distance. Both scores are ensembled into a final similarity score. The two options are illustrated in [Pipeline setup examples](#pipeline-setup-examples).
## How to configure the default pipelines
If you have an AI license, then the following default index and query pipelines are included in any newly-created Fusion app:
**Default index pipelines**
| Default pipeline | Notes |
| -------------------------------- | ----------------------------------------------------------------- |
| `question-answering` | For encoding one field. |
| `question-answering-dual-fields` | For encoding two fields (question and answer pairs, for example). |
See [Configure the index pipeline](#configure-the-index-pipeline) below.
**Default query pipelines**
| Default pipeline | Notes |
| -------------------------------- | --------------------------------------------------------------------------------------------------------------------------------------------------------------------------------------------------------- |
| `question-answering` | Calculates vectors distances between an encoded query and one document vector field. Should be used together with `question-answering` index pipeline. |
| `question-answering-dual-fields` | Calculates vectors distances between an encoded query and two document vector fields. After that, scores are ensembled. Should be used together with the `question-answering-dual-fields` index pipeline. |
See [Configure the query pipeline](#configure-the-query-pipeline) below.
### Configure the index pipeline
6. Repeat steps 2-5 for the other model file.
## Fusion configuration overview
* Fusion index pipeline
The index pipeline uses the trained model in `x_a_fusion_model_bundle.zip` to generate dense vectors for the documents to be indexed.
* Fusion query pipeline
The query pipeline uses the trained model in `x_q_fusion_model_bundle.zip` to generate dense vectors for incoming questions on the fly, then compare those with the indexed dense vectors for answers to find answers, or with the indexed dense vectors for historical questions to find similar questions.
Another option is to have two separate index stages, one for questions and another for answers. Then, at query time, two query stages compute query-to-question distance and query-to-answer distance. Both scores are ensembled into a final similarity score. The two options are illustrated in [Pipeline setup examples](#pipeline-setup-examples).
## How to configure the default pipelines
If you have an AI license, then the following default index and query pipelines are included in any newly-created Fusion app:
**Default index pipelines**
| Default pipeline | Notes |
| -------------------------------- | ----------------------------------------------------------------- |
| `question-answering` | For encoding one field. |
| `question-answering-dual-fields` | For encoding two fields (question and answer pairs, for example). |
See [Configure the index pipeline](#configure-the-index-pipeline) below.
**Default query pipelines**
| Default pipeline | Notes |
| -------------------------------- | --------------------------------------------------------------------------------------------------------------------------------------------------------------------------------------------------------- |
| `question-answering` | Calculates vectors distances between an encoded query and one document vector field. Should be used together with `question-answering` index pipeline. |
| `question-answering-dual-fields` | Calculates vectors distances between an encoded query and two document vector fields. After that, scores are ensembled. Should be used together with the `question-answering-dual-fields` index pipeline. |
See [Configure the query pipeline](#configure-the-query-pipeline) below.
### Configure the index pipeline
 1. Open the Index Workbench.
2. Load or create your datasource using the default question-answering index pipeline.
3. In the [TensorFlow Deep Encoding stage](/docs/4/fusion-ai/reference/index-pipeline-stages/tensorflow-deep-encoding-index-stage), change the value of **TensorFlow Deep Learning Encoder Model ID** to the model ID of the `x_a_fusion_model_bundle.zip` model that was uploaded to the blob store.
1. Open the Index Workbench.
2. Load or create your datasource using the default question-answering index pipeline.
3. In the [TensorFlow Deep Encoding stage](/docs/4/fusion-ai/reference/index-pipeline-stages/tensorflow-deep-encoding-index-stage), change the value of **TensorFlow Deep Learning Encoder Model ID** to the model ID of the `x_a_fusion_model_bundle.zip` model that was uploaded to the blob store.
 1. Open the Query Workbench.
2. Load or create your datasource using one of the default question-answering query pipelines.
3. In the [Query Fields stage](/docs/4/fusion-server/reference/pipeline-stages/query/search-fields-query-stage), update **Return Fields** to return additional fields that should be displayed with each answer, such as fields corresponding to title, text, or ID.
It is recommended that you remove the asterisk (`*`) field and specify each individual field you want to return, as returning too many fields will affect runtime performance.
Do not remove `compressed_document_vector_s`, `document_clusters_ss`, and `score` as these fields are necessary for later stages
4. In the [TensorFlow Deep Encoding stage](/docs/4/fusion-ai/reference/query-pipeline-stages/tensorflow-deep-encoding-query-stage), change **TensorFlow Deep Learning Encoder Model ID** value to the model ID of the `x_q_fusion_model_bundle.zip` model that was uploaded to the blob store.
1. Open the Query Workbench.
2. Load or create your datasource using one of the default question-answering query pipelines.
3. In the [Query Fields stage](/docs/4/fusion-server/reference/pipeline-stages/query/search-fields-query-stage), update **Return Fields** to return additional fields that should be displayed with each answer, such as fields corresponding to title, text, or ID.
It is recommended that you remove the asterisk (`*`) field and specify each individual field you want to return, as returning too many fields will affect runtime performance.
Do not remove `compressed_document_vector_s`, `document_clusters_ss`, and `score` as these fields are necessary for later stages
4. In the [TensorFlow Deep Encoding stage](/docs/4/fusion-ai/reference/query-pipeline-stages/tensorflow-deep-encoding-query-stage), change **TensorFlow Deep Learning Encoder Model ID** value to the model ID of the `x_q_fusion_model_bundle.zip` model that was uploaded to the blob store.