Crawl an Authenticated Website with the Web Connector
This article explains how to use the Web V1 connector to crawl a website that is protected by SSO, SAML, or OAuth.
Overview
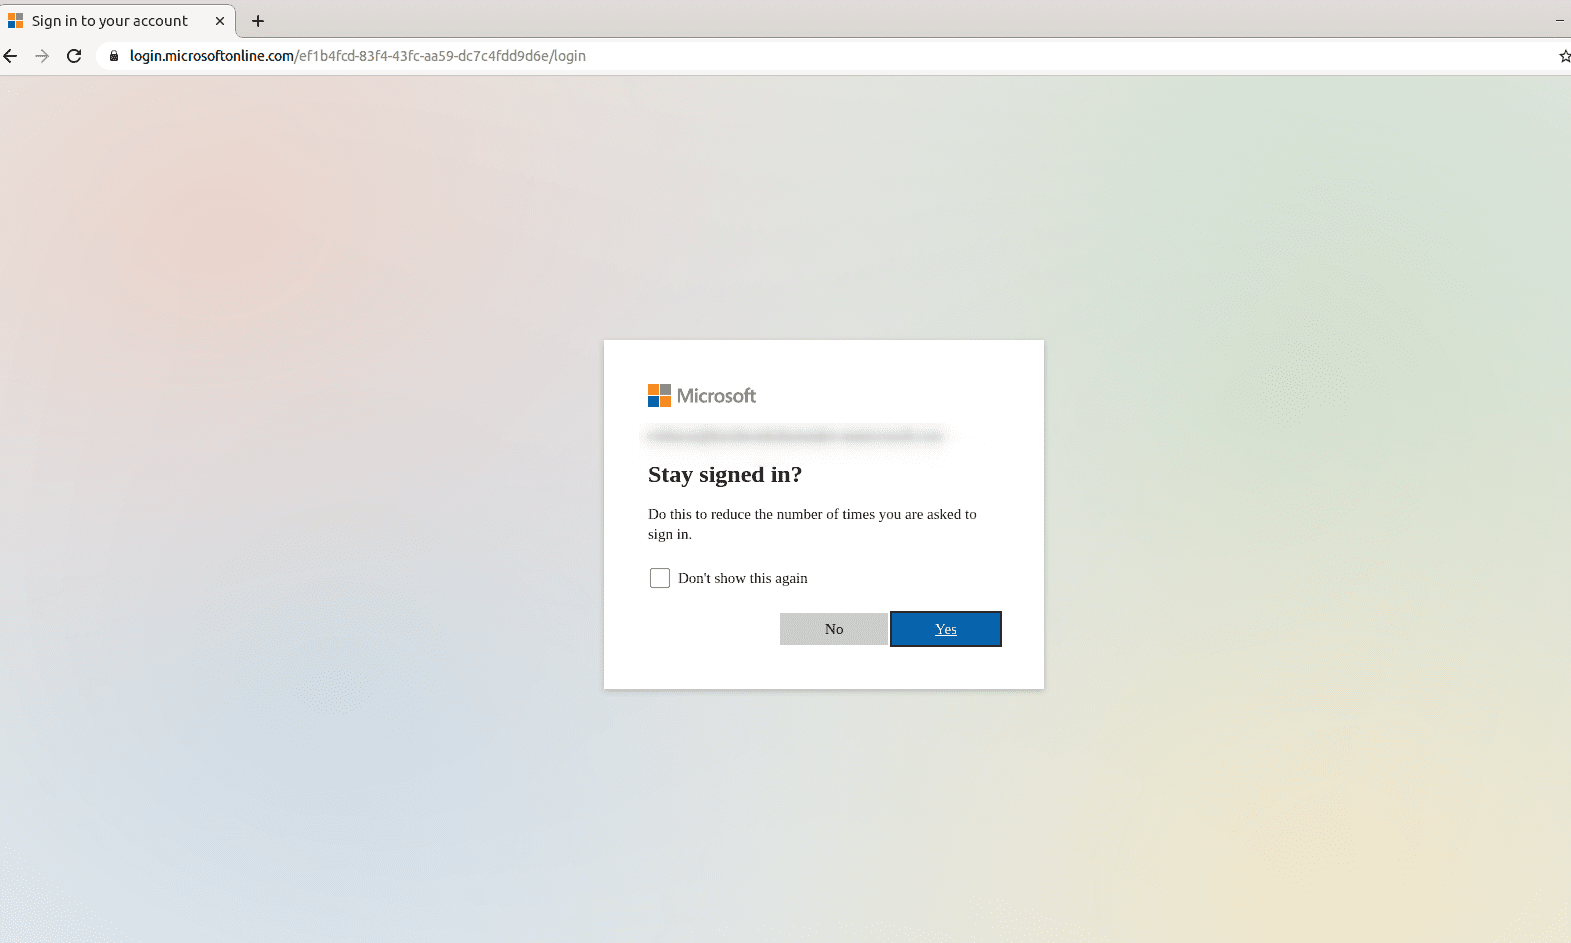
This example uses SharePoint Online, a website that uses the Microsoft identity platform.
To crawl a website behind a login, configure the Web connector to authenticate with valid login credentials. In this example, there is also a final prompt to stay signed in. Configure the connector to use the SAML/Smart Form authentication method.
The Microsoft identity platform also requires JavaScript to authenticate, which means you must also configure the connector to use JavaScript Evaluation.
Prerequisites
Before you can configure the Web connector, you must locate and copy the login parameters from the website you’re trying to crawl.
-
Open a private or incognito window in your internet browser. This example uses Google Chrome.
-
Navigate to the site that you want to crawl with authentication.
-
Identify the URL for the login page.
For example, from
http://some-website-with-auth.com, navigate to the page that displays the login form, then copy the page URL, such ashttp://some-website-with-auth.com/sso/login.Use this URL as the value of the
loginUrlparameter (URL in the Fusion UI) explained in Complex form-based authentication. -
On the login page, identify the fields used for inputting the username and password.
You can do this by right-clicking on the form fields and selecting Inspect element to open the developer tools, where the corresponding HTML element is highlighted.
In most cases it is an
<input>element that has anameattribute and you can specify the field as this name value. For example:<input id="resolving_input" name="login" class="signin-textfield" autocorrect="off" autocapitalize="off" type="text"> -
Add the username field as a parameter to the authentication section of the Web connector. The Property Name is
loginand the Property Value is the username the connector will use to log in. -
Add the password field name as the
passwordParamName(Password Parameter in the Fusion UI). -
On the site login page, right-click Submit (or equivalent) and select Inspect element.
-
If the button is an
<input type="submit"/>, then the SmartForm login picks it up automatically. -
If the button is another element (such as
<button>,<a>,<div>, and so on) then you must add a parameter with the special prefix::submitButtonXPath::, then add an XPath expression that points to the submit button. For example:::submitButtonXPath:://button[@name='loginButton']
-
-
If there is no
nameattribute on the<input>elements, then you must specify a parameter to tell the Web connector how to find the input element. You can use any of these special selector formats for the parameter name:;;BY_XPATH;;//input[@id='someId'] ;;BY_ID;;someid ;;BY_NAME;;somename ;;BY_CLASS_NAME;;someCssClassName ;;BY_CSS_SELECTOR;;.div#selector
Sometimes your web page asks you a random question, such as What is the name of your first dog?
In this case add another special parameter:
::WhenXPath::XPath of element to check against::Either @attributeToCheckAgainst or text to check against the text of the element::Value To Match::Field selector to set the value of only if the conditional check matchedHere is an example of three different parameters where your site might ask one of three questions randomly:
::WhenXPath:://div[@tag='Your question']::text::What is the name of your first dog?::;;BY_ID;;answer
::WhenXPath:://div[@tag='Your question']::text::In what city were you born?::;;BY_ID;;answer
::WhenXPath:://input[@id='Your question']::@value::In what city were you born?::;;BY_ID;;answer
Configure Web connector
Configure the connector to use login credentials and JavaScript to successfully authenticate through your website.
-
In Fusion, navigate to Indexing > Datasources.
-
Click Add, then select Web (v1) (in Fusion 5.12, select Web (Deprecated)) from the dropdown.
-
Configure the datasource and fill in required fields.
-
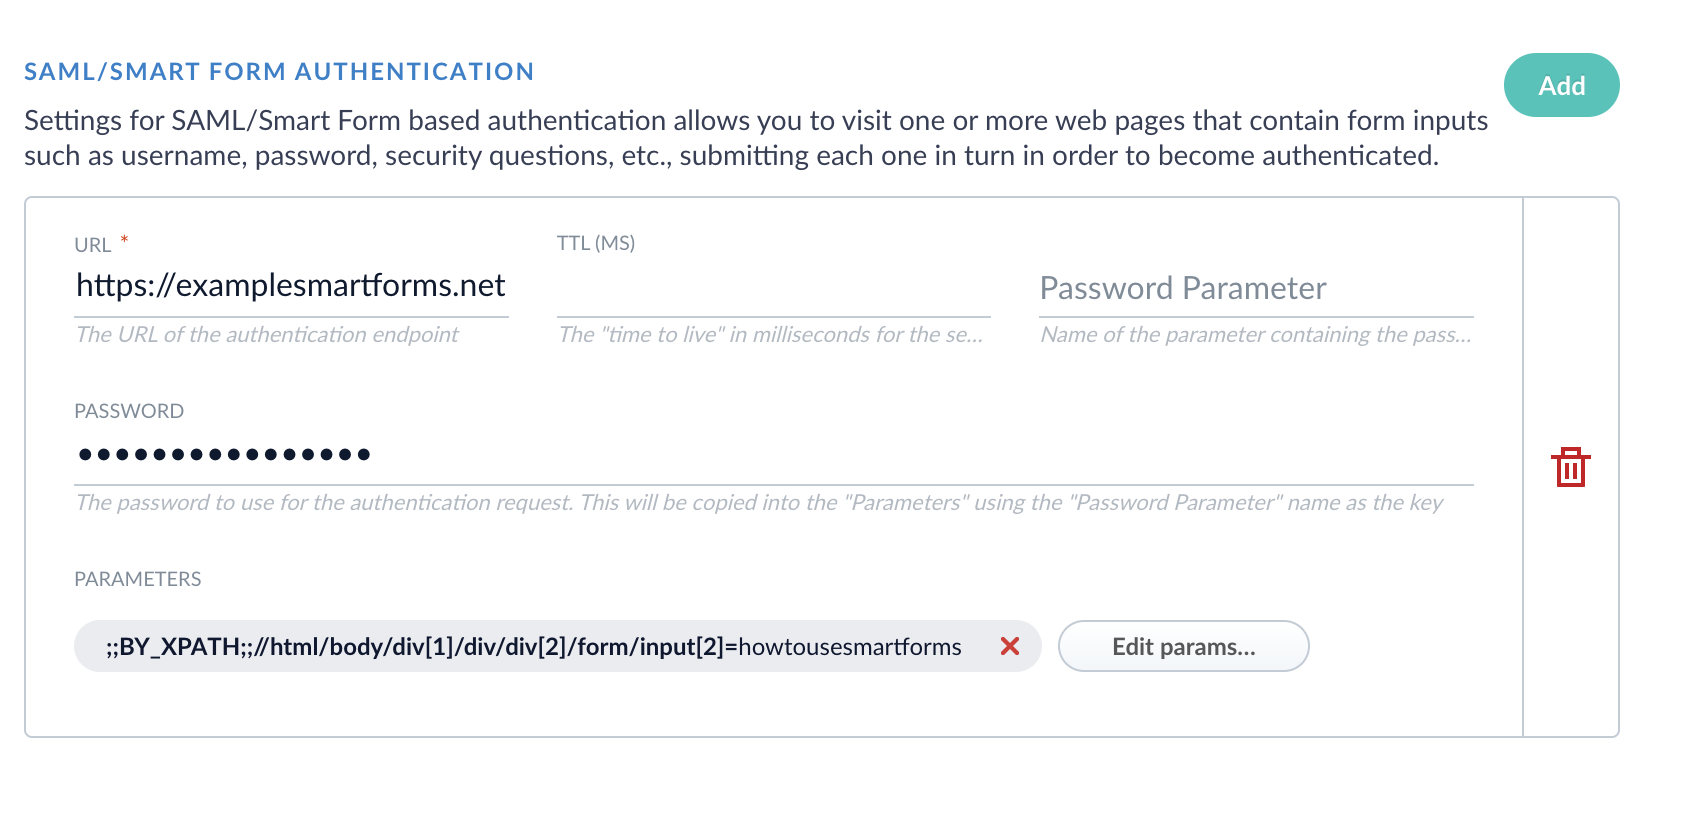
Expand Crawl Authorization, scroll down to SAML/Smart Form Authentication, then click Add.
-
Enter the URL of the website that requires authentication.
-
Enter the password to use for the authentication request.
-
Set the TTL (ms) so there is enough time to load the form pieces on the page before Fusion attempts to run the Smart Form step.
-
Add Parameters as needed. For example, if the login page requires you to enter your name in addition to a password, add a parameter, specifying the Property Name and Property Value. Add a parameter for every required field on the login page.
-
If applicable, create a SAML/Smart Form Authentication for every subsequent login page. These steps trigger from top to bottom.
-
-
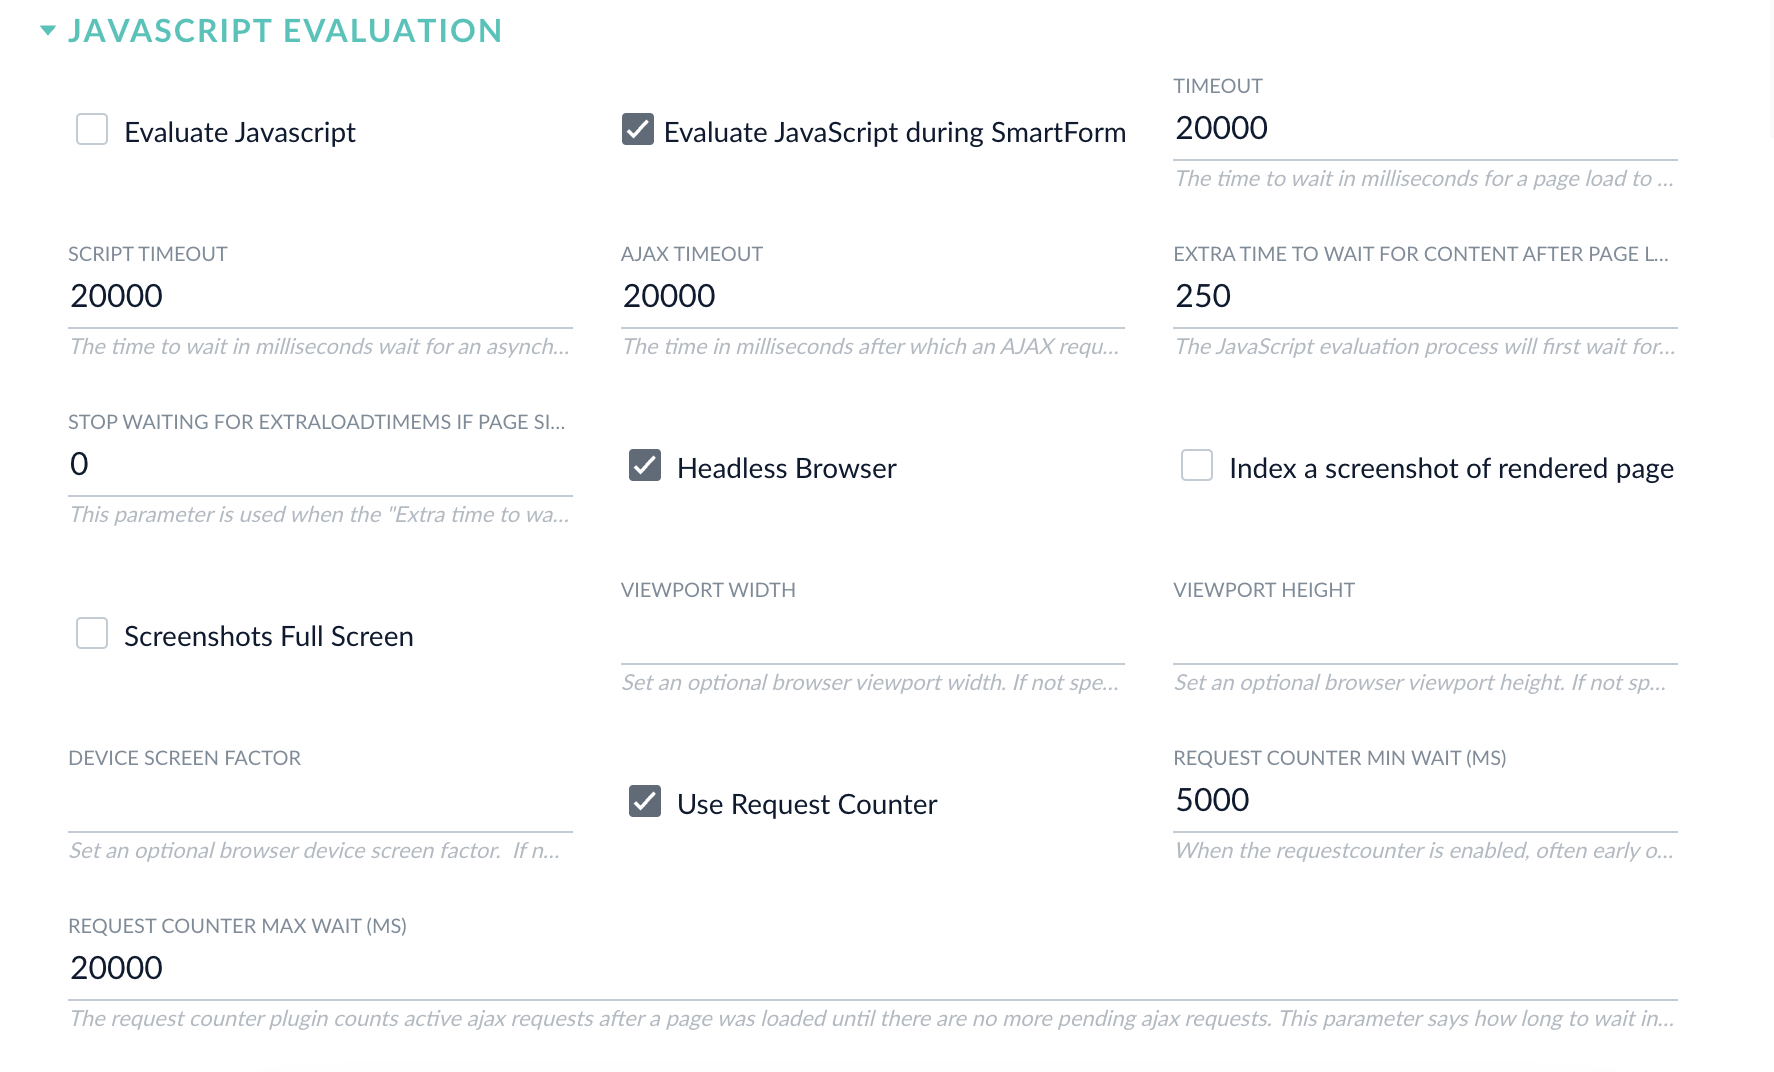
Expand the JavaScript Evaluation section and enable Evaluate JavaScript during SmartForm Authentication. Enable Evaluate Javascript if you would like to use a JavaScript evaluation engine for all requests, not just the authentication.
| You can find the Property Name and Property Value for any given step on the login page. Use your browser’s Developer Tools to inspect the input field, then copy the XPath. |
Install Chromium dependencies (Fusion 4.x only)
| This section only applies to 4.x.x releases. For 5.x.x releases, Chrome dependencies are already installed in the Docker container. |
To enable high-performance JavaScript evaluation, you must install some dependencies, then set f.crawlJS/"Evaluate JavaScript" and f.useHighPerfJsEval/"High Performance Mode" to "true".
-
Install the dependencies, using one of the scripts packaged with Fusion:
-
Windows:
https://FUSION_HOST:FUSION_PORT/bin/install-high-perf-web-deps.ps1 -
Linux and OSX:
https://FUSION_HOST:FUSION_PORT/bin/install-high-perf-web-deps.sh
When the script finishes a confirmation message displays:
Successfully installed high-performance JS eval mode dependencies for Lucidworks Fusion web connector. -
-
In the Fusion UI, configure your Web data source:
-
Set Evaluate Javascript to "true".
-
Set High Performance Mode to "true".
An additional
f.headlessBrowserparameter can be set to "false" to display the browser windows during processing. It is "true" by default. Non-headless mode is available only using the "High-performance" mode. -
-
Save the datasource configuration.
If Fusion is running on Docker, you must either mount an shm directory using the argument -v /dev/shm:/dev/shm or use the flag --shm-size=2g to use the host’s shared memory. The default shm size 64m will result in failing crawls with logs showing error messages like org.openqa.selenium.WebDriverException: Failed to decode response from marionette. See Geckodriver issue 1193 for more details.
|
Test the configuration
-
In Fusion, navigate to Indexing > Datasources.
-
Click on the web connector you configured.
-
Set your Fetch Threads and Emit Threads. It simplifies testing when only one thread is trying to authenticate at a time.
-
Expand Crawl Performance.
-
Set Fetch Threads and Emit Threads to
1.
-
-
Enable Diagnostic logging. Diagnostic mode will allow the HTML contents to print out in the logs for each step of the log on process, so you can use that to see what the browser doing. This can be useful because you can see where the browser was when/if you got into a bad state.
-
Toggle Advanced to view advanced settings.
-
Enable Diagnostic mode.
-
-
Headless mode (Fusion 4.x only). If you are on a Windows Server or have the ability to install Fusion somewhere an active desktop environment is available, such as Mac or Linux with Desktop, you can use
headless mode = falseto test with an actual web browser.-
Expand JavaScript Evaluation.
-
Disable Headless Browser.
-
When you run the crawl, a browser window opens and performs the log in process.
-
-
Click Run to start the datasource job. Review results in the Query Workbench.